


G
Front Surround System Système Surround Frontal
Фронтальная система окружающего звучания
Owner’s Manual |
Manual de instrucciones |
Mode d’emploi |
Manual do Proprietário |
Bedienungsanleitung |
Gebruikershandleiding |
Bruksanvisning |
Руководство пользователя |
Manuale di istruzioni |
|
|
EN FR DE SV IT ES |
|
PT NL RU ZH-CN |
English
Français
Deutsch
Svenska
Italiano
Español
Português
Nederlands
Русский

CONTENTS |
|
|
PRECAUTIONS |
4 |
|
NOTICE AND INFORMATION |
8 |
|
BEFORE USING THE UNIT |
12 |
|
Features......................................................................... |
12 |
|
Accessories.................................................................... |
14 |
|
Using the remote control.............................................. |
14 |
|
Part names and functions............................................. |
16 |
|
PREPARATION |
20 |
|
1 |
Installation............................................................... |
20 |
|
Installing the unit on a TV stand, etc................................................................................ |
20 |
2 |
Connecting a TV...................................................... |
21 |
|
Connecting a TV that supports Audio Return Channel (ARC)................................. |
21 |
|
Connecting a TV that does not support Audio Return Channel (ARC)................. |
22 |
3 |
Connecting playback devices................................. |
23 |
|
HDMI connection with a playback device...................................................................... |
23 |
|
Analog connection with a playback device................................................................... |
23 |
4 |
Connecting an external subwoofer....................... |
24 |
|
Connecting an external subwoofer.................................................................................. |
24 |
5 Connecting the power cord.................................... |
24 |
Connecting the power cord................................................................................................. |
24 |
PLAYBACK |
25 |
Basic operations............................................................ |
25 |
Basic procedure for playback.............................................................................................. |
25 |
Enjoying your favorite sound....................................... |
27 |
Playback with 3D surround sound.................................................................................... |
27 |
Playback with surround sound........................................................................................... |
27 |
Playback with 2-channel stereo sound............................................................................ |
27 |
Playback of human voices clearly (clear voice)............................................................. |
28 |
Enjoying enhanced bass sound (bass extension)........................................................ |
28 |
Use of a Bluetooth® device........................................... |
29 |
Listening to music stored on a Bluetooth® device...................................................... |
29 |
Connecting the unit to two Bluetooth devices simultaneously (multipoint |
|
connection)................................................................................................................................ |
31 |
Useful features for playback........................................ |
32 |
Using a TV’s remote control to operate the unit (HDMI control)........................... |
32 |
Showing audio information with playback.................................................................... |
33 |
Operating the unit with the HOME THEATER CONTROLLER app........................... |
34 |
2 En

CONFIGURATIONS |
35 |
Configuring various functions..................................... |
35 |
Changing the brightness of the indicators (DIMMER)................................................ |
35 |
Configuring the HDMI control function.......................................................................... |
35 |
Configuring HDMI audio output........................................................................................ |
36 |
Setting the auto power standby function...................................................................... |
36 |
Enabling/disabling touch panel control (child lock function)................................. |
37 |
Configuring the Bluetooth standby function................................................................ |
37 |
Initializing the unit.................................................................................................................. |
38 |
APPENDIX |
39 |
When any problem appears (General)........................ |
39 |
When any problem appears (Power and system |
|
function)......................................................................... |
39 |
When any problem appears (Audio)............................ |
42 |
When any problem appears (Bluetooth®)................... |
44 |
Specifications................................................................ |
46 |
Specifications............................................................................................................................ |
46 |
Supported HDMI audio and video formats.................................................................... |
47 |
Supported digital audio formats........................................................................................ |
48 |
Information for qualified contractors or dealers........ |
49 |
Mounting the unit on a wall................................................................................................ |
49 |
3 En

PRECAUTIONS
PLEASE READ CAREFULLY BEFORE USE. BE SURE TO FOLLOW THESE INSTRUCTIONS.
The precautions listed below are to prevent risk of harm to the user and others, as well as to prevent property damage, and to help the user use this unit properly and safely. Be sure to follow these instructions.
After reading this manual, be sure to keep it in a safe place where it can be referenced at any time.
•Be sure to request inspections or repairs from the dealer where you purchased the unit or from qualified Yamaha service personnel.
•Yamaha cannot be held responsible for injury to you or damage of the products caused by improper use or modifications to the unit.
•This product is for ordinary homes. Do not use for applications requiring high reliability, such as managing lives, health care or high-value assets.
 WARNING
This content indicates “risk of serious injury or death.”
If you notice any abnormality
▪If any of the following abnormalities occur, immediately turn off the power and disconnect the power plug. If you are using batteries, remove the batteries from this unit.
–The power cord/plug is damaged.
–An unusual smell, unusual sound or smoke is emitted from the unit.
–Foreign material or water gets into the interior of the unit.
–There is a loss of sound during use.
–There is a crack or damage in the unit.
Continued use could cause electric shocks, a fire, or malfunctions. Immediately request an inspection or repair from the dealer where you purchased the unit or from qualified Yamaha service personnel.
Power supply
▪Do not do anything that could damage the power cord.
–Do not place it near a heater.
–Do not bend it excessively or alter it.
–Do not scratch it.
–Do not place it under a heavy object.
Using the power cord with the core of the cord exposed could cause electric shocks or a fire.
▪Do not touch the power plug or cord if there is a chance of lightning. Failure to observe this may cause electric shocks.
▪Use this unit with the power supply voltage printed on it.
Failure to connect to an appropriate AC outlet may cause a fire, electric shocks, or malfunctions.
4 En

▪Be sure to use the supplied power cord. Also, do not use the supplied power cord for other units.
Failure to observe the above may cause a fire, burns, or malfunctions.
▪Check the electric plug periodically and remove any dirt or dust which may have accumulated on it.
Failure to observe this may cause a fire or electric shocks.
▪When setting up the unit, make sure that the AC outlet you are using is easily accessible.
If some trouble or malfunction occurs, immediately turn off the power switch and disconnect the plug from the AC outlet. Even when the power switch is turned off, as long as the power cord is not unplugged from the wall AC outlet, the unit will not be disconnected from the power source.
▪If you hear thunder or suspect approaching lightning, quickly turn off the power switch and pull the power plug from the AC outlet.
Failure to observe this may cause a fire or malfunctions.
▪If not using the unit for long periods of time, be sure to pull the power plug from the AC outlet.
Failure to observe this may cause a fire or malfunctions.
Installation
▪Install in the manner instructed in the manual. Falling or toppling may result in injury or damage.
▪Confirm that the finished installation is safe and secure. Also, carry out safety inspections periodically.
Failure to observe this may cause devices to fall and result in injury.
Do not disassemble
▪Do not disassemble or modify this unit.
Failure to observe this may cause a fire, electric shocks, injury, or malfunctions.
Water warning
▪Do not expose the unit to rain, use it near water or in damp or wet conditions, or place on it any containers (such as vases, bottles or glasses) containing liquids which might spill into any openings or places where water may drop. A liquid such as water getting into the unit may cause a fire, electric shocks, or malfunctions.
▪Never insert or remove an electric plug with wet hands. Do not handle this unit with wet hands.
Failure to observe this may cause electric shocks or malfunctions.
Fire warning
▪Do not place any burning items or open flames near the unit, since they may cause a fire.
Maintenance and care
▪Do not use aerosols or spray-type chemicals that contain combustible gas for cleaning or lubrication.
The combustible gas will remain inside the unit, which may cause explosion or fire.
Handling caution
▪Be careful not to drop or apply strong impact to this unit.
Failure to observe this may cause electric shocks, a fire, or malfunctions.
Battery use
▪DO NOT INGEST BATTERY, CHEMICAL BURN HAZARD
The remote control supplied with this product contains a coin/button cell battery. If the coin/button cell battery is swallowed, it can cause severe internal burns in just 2 hours and can lead to death.
Keep new and used batteries away from children. If the battery compartment does not close securely, stop using the product and keep it away from children.
If you think batteries might have been swallowed or placed inside any part of the body, seek immediate medical attention.
5 En

▪Do not disassemble a battery.
If the contents of the battery get on your hands or in your eyes, it can cause blindness or chemical burns.
▪Do not dispose of a battery in fire.
Do not expose a battery to high temperatures, such as direct sunlight or a fire.
Doing so may result in the battery bursting, causing a fire or injury.
▪Do not attempt to recharge batteries that are not intended to be charged. Charging could cause the battery to burst or leak, which can cause blindness, chemical burns, or injury.
▪If the batteries do leak, avoid contact with the leaked fluid.
Battery fluid is corrosive and may possibly cause loss of sight or chemical burns. If the batteries do leak, avoid contact with the leaked fluid. If the battery fluid should come in contact with your eyes, mouth, or skin, wash immediately with water and consult a doctor.
Wireless unit
▪Do not use this unit near medical devices or inside medical facilities. Radio waves from this unit may affect electro-medical devices.
▪Do not use this unit within 15 cm (6 in) of persons with a heart pacemaker implant or a defibrillator implant.
Radio waves from this unit may affect electro-medical devices, such as a heart pacemaker implant or defibrillator implant.
 CAUTION
This content indicates “risk of injury.”
Power supply
▪Do not use an AC outlet where the power plug fits loosely when inserted. Failure to observe this may cause a fire, electric shocks, or burns.
▪When disconnecting the power plug, always hold the plug itself and not the cord.
Pulling by the cord can damage it and cause electric shocks or a fire.
▪Insert the power plug firmly all the way into the AC outlet.
Using the unit when it is not plugged in sufficiently can cause dust to accumulate on the plug, causing a fire or burns.
Installation
▪Do not place the unit in an unstable position where it might accidentally drop or fall over and cause injuries.
▪When installing this unit, do not obstruct heat dissipation.
–Do not cover it with any cloth.
–Do not install it on a carpet or rug.
–Do not block this unit's ventilation holes (cooling slits).
–Do not install the unit in other ways than indicated.
–Do not use the device in a confined, poorly-ventilated location.
Failure to observe the above may trap heat inside the unit, causing a fire or malfunctions. Ensure that there is adequate space around the unit: at least 10 cm (4 in) on top, 10 cm (4 in) on the sides, and 10 cm (4 in) on the rear.
▪Do not install the unit in other ways than indicated.
Failure to observe this may cause malfunctions or for the unit to fall and cause injury.
▪Do not install the unit in places where it may come into contact with corrosive gases or salt air or places that have excessive smoke or steam. Doing so may result in malfunction.
▪Avoid being near the unit during a disaster, such as an earthquake. Since the unit may turn over or fall and cause injury, quickly move away from the unit and go to a safe place.
▪Before moving this unit, be sure to turn off the power switch and disconnect all connection cables.
Failure to observe this may damage the cables or cause you or someone else to trip and fall.
▪For proper mounting the unit on a wall, make sure to have it done by the dealer from where you purchased the unit or by qualified service personnel.
Failure to observe this may cause the installation to fall and result in injury. Installation requires special skills and experience.
6 En

Hearing loss
▪Do not use the unit for a long period of time at a high or uncomfortable volume level, since this can cause permanent hearing loss. If you experience any hearing loss or ringing in the ears, consult a physician.
▪Before connecting the unit to other devices, turn off the power for all devices.
Failing to do so may result in hearing loss, electric shock, or device damage.
Maintenance and care
▪Remove the power plug from the AC outlet before cleaning the unit. Failure to observe this may cause electric shocks.
Handling caution
▪Do not insert foreign materials such as metal or paper into the openings of this unit.
Failure to observe this may cause a fire, electric shocks, or malfunctions.
▪Keep small parts out of the reach of infants. Your children may accidentally swallow them.
▪Do not do the following:
–stand on or sit on the equipment.
–put heavy items on top of the equipment.
–place the equipment in a stack.
–apply unreasonable force to buttons, switches, input/output terminals, etc.
–hang on the equipment.
–lean against the equipment.
Failure to observe this may cause injuries or damage to the equipment.
▪Avoid pulling the connected cables to prevent injuries or damage to the unit by causing it to fall.
Battery use
▪Do not use batteries other than specified batteries.
Doing so cause fire, burns, or inflammation due to leakage.
▪Keep batteries away from children.
A child could accidentally swallow a battery. Failure to observe this may also cause inflammation due to battery fluid leaks.
▪Do not put in a pocket or bag, carry, or store batteries together with pieces of metal.
The battery could short, burst, or leak, causing a fire or injury.
▪Always make sure all batteries are inserted in conformity with the +/- polarity markings.
Failure to do so might result in a fire, burns, or inflammation due to fluid leaks.
▪When the batteries run out, or if the unit is not to be used for a long time, remove the batteries from the remote control to prevent possible leakage of the battery fluid.
▪When storing or discarding batteries, insulate the terminal area by applying tape, or some other protection.
Mixing them with other batteries or metal objects can cause a fire, burns, or inflammation due to fluid.
7 En

NOTICE AND INFORMATION
Notice
Indicates points that you must observe in order to prevent product failure, damage or malfunction and data loss.
Power supply
•If not using the unit for a long period of time, be sure to pull the power plug from the outlet. Even if this unit is turned off by [z] (Standby/On), a minute current is still flowing.
Installation
•Do not use this unit in the vicinity of other electronic equipment, such as a TV, radio, or mobile phone. Failure to observe this may cause this unit or the TV or radio to produce noise.
•Do not use this unit in a location that is exposed to direct sunlight that becomes extremely hot, such as near a heater, or extremely cold, or that is subject to excessive dust or vibration. Failure to observe this may cause the unit's panel to become deformed, the internal components to malfunction, or for operation to become unstable.
•If using a wireless function, avoid installing this unit near metal walls or desks, microwave ovens, or other wireless network devices.
Obstructions could shorten the transmission distance.
Connections
•If connecting external units, be sure to thoroughly read the manual for each unit and connect them in accordance with the instructions.
Failure to properly handle a unit in accordance with the instructions could cause malfunctions.
•Do not connect this unit to industrial units.
Digital audio interface standards for consumer use and industrial use are different. This unit has been designed to connect to a consumer-use digital audio interface. Connections to an industrial-use digital audio interface could not only cause this unit to malfunction, but could also damage the speakers.
Handling
•Do not place vinyl, plastic, or rubber products on this unit. Failure to observe this may cause discoloration or deformation in the panel of this unit.
•If the ambient temperature changes drastically (such as during unit transportation or under rapid heating or cooling) and there is a chance condensation may have formed in the unit, leave the unit for several hours without turning on the power until it is completely dry before use. Using the unit while there is condensation can cause malfunctions.
8 En
Maintenance and care
•When cleaning the unit, use a dry, soft cloth. Using chemicals such as benzine or thinner, cleaning agents, or chemical scrubbing cloths can cause discoloration or deformation.
Speakers
•Do not touch the speaker units. Failure to observe this may damage the speaker units.
About disposal
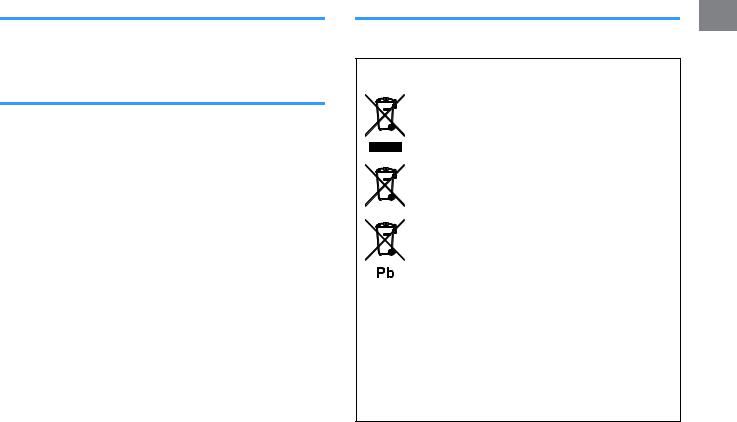
•Be sure to discard used batteries in accordance with local regulations.
Information for users on collection and disposal of old equipment and used batteries:
These symbols on the products, packaging, and/or accompanying documents mean that used electrical and electronic products and
batteries should not be mixed with general household waste. For proper treatment, recovery and recycling of old products and
used batteries, please take them to applicable collection points, in accordance with your national legislation.
By disposing of these products and batteries correctly, you will help to save valuable resources and prevent any potential negative effects on human health and the environment which could otherwise arise from inappropriate waste handling.
For more information about collection and recycling of old products and batteries, please contact your local municipality, your waste disposal service or the point of sale where you purchased the items.
For business users in the European Union:
If you wish to discard electrical and electronic equipment, please contact your dealer or supplier for further information.
Information on Disposal in other Countries outside the European Union:
These symbols are only valid in the European Union. If you wish to discard these items, please contact your local authorities or dealer and ask for the correct method of disposal.
Note for the battery symbol (bottom two symbol examples):
This symbol might be used in combination with a chemical symbol. In this case it complies with the requirement set by the EU Battery Directive for the chemical involved.
(weee_battery_eu_en_02)
9 En

Information
Indicates notes on instructions, restrictions on functions, and additional information that may be helpful.
About the name plate of the unit
The model number, serial number, power requirements, etc., may be found on or near the name plate, which is at the bottom of the unit.
You should note this serial number in the space provided below and retain this manual as a permanent record of your purchase to aid identification in the event of theft.
MODEL NO.
SERIAL NO.
(bottom_en_01)
Trademarks
Manufactured under license from Dolby Laboratories. Dolby, Dolby Audio, Pro Logic, and the double-D symbol are trademarks of Dolby Laboratories.
For DTS patents, see http://patents.dts.com.
Manufactured under license from DTS, Inc. DTS, the Symbol, DTS and the Symbol together, DTS Digital Surround, and DTS Virtual:X are registered trademarks or trademarks of DTS, Inc. in the United States and/or other countries.
© DTS, Inc. All Rights Reserved.
App StoreSM
App Store is a service mark of Apple Inc.
The terms HDMI, the HDMI Logo, and High-Definition Multimedia Interface are trademarks or registered trademarks of HDMI Licensing LLC in the United States and other countries.
x.v.Color™
“x.v.Color” is a trademark of Sony Corporation.
The Bluetooth® word mark and logos are registered trademarks owned by Bluetooth SIG, Inc. and any use of such marks by Yamaha Corporation is under license.
Blu-ray™
“Blu-ray Disc™”, “Blu-ray™”, and the logos are trademarks of the Blue-ray Disc Association.
10 En
About content in this manual
•This manual is for the following readers:
–the users of the unit
–the constructor, builder and dealer that mount the unit on the wall
•This manual uses the following signal words for the important information:
–  WARNING
This content indicates “risk of serious injury or death.”
–  CAUTION
This content indicates “risk of injury.”
–NOTICE
Indicates points that you must observe in order to prevent product failure, damage or malfunction and data loss, as well as to protect the environment.
–NOTE
Indicates notes on instructions, restrictions on functions, and additional information that may be helpful.
•The illustrations and screens in this manual are for instructional purposes only.
•The company names and product names in this manual are the trademarks or registered trademarks of their respective companies.
•Software may be revised and updated without prior notice.
11 En
BEFORE USING THE UNIT
Features
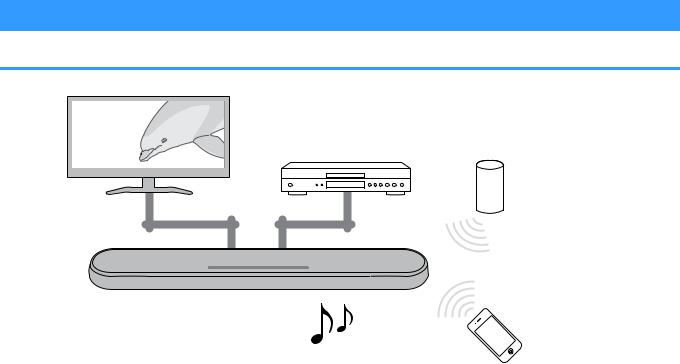
Introduction
This front surround system with its built-in subwoofers allows for the enjoyment of dynamic sound with video played on a TV.
Playback device |
Bluetooth device |
(BD/DVD player) |
(Smart speaker) |
TV
The unit
• Play audio from a TV or BD/DVD player in surround sound.
• Play audio from a Bluetooth device with excellent quality.
Bluetooth device (Smartphone)
12 En

3D surround playback
Surround sound can be heard not only from horizontal directions, but also from varying heights when DTS Virtual:X is used. For details, see the following:
• “Playback with 3D surround sound” (p.27)
Transmission of 4K high dynamic range (HDR) video
Enjoy high-resolution video from a cable or satellite set top box, or a BD/DVD player. When a TV that supports Audio Return Channel (ARC) is used, this ARC-compatible unit can be connected to the TV via a single HDMI cable. For details, see the following:
•“Connecting a TV that supports Audio Return Channel (ARC)” (p.21)
•“Supported HDMI audio and video formats” (p.47)
HDMI control function
Link functions of a TV and the unit are available using the TV’s remote control. For details, see the following:
•“Using a TV’s remote control to operate the unit (HDMI control)” (p.32)
Support for multipoint connection of Bluetooth devices
Easily play content from a Bluetooth-compatible smartphone, tablet, or PC. In addition, the unit supports multipoint connection and can switch between two Bluetooth devices for playback. Our exclusive
Compressed Music Enhancer technology improves sound quality and characteristics, and can be used to enjoy realistic and impressive sound. For details, see the following:
•“Connecting the unit to two Bluetooth devices simultaneously (multipoint connection)” (p.31)
HOME THEATER CONTROLLER app
HOME THEATER CONTROLLER, a free app for smartphones, allows you to easily operate the unit using a smartphone. For details, see the following:
•“Operating the unit with the HOME THEATER CONTROLLER app” (p.34)
Bass extension
The bass extension function boosts low bass levels to enjoy more powerful sound. For details, see the following:
• “Enjoying enhanced bass sound (bass extension)” (p.28)
Clear voice
The clear voice function makes speech, such as dialog and narration, clearer. For details, see the following:
• “Playback of human voices clearly (clear voice)” (p.28)
13 En

Accessories
Checking the accessories
Make sure you have received all of the following accessories.
The unit
Remote control |
Power cord |
Optical digital audio |
* A CR2025 Lithium |
|
cable |
battery has already |
|
|
been inserted into the |
|
|
remote control. |
|
|
Mounting template
* Use when mounting the unit on awall.
Using the remote control
Preparing the remote control
Remove the battery’s insulating strip before attempting to use the remote control.
Battery’s insulating strip
Spacers (x 2/sheet) |
Owner’s Manual |
* Use when mounting |
|
the unit on a wall. |
(this booklet) |
14 En
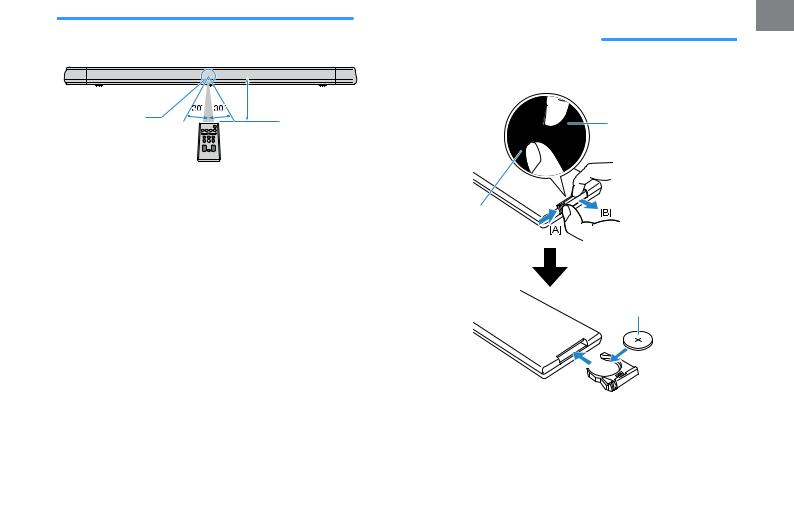
Operating range of the remote control |
Replacing the battery in the remote |
Operate the remote control within the range shown in the following |
control |
figure. |
Press and hold the release tab firmly in the direction indicated by |
|
|
|
[A], and slowly slide the battery holder out in the direction indicated |
|
by [B]. |
Within 6 m (20 ft) |
|
Remote control |
Battery holder |
sensor |
NOTE |
Release tab |
|
When the unit is mounted on a wall, point the remote control at the remote control sensor on the top panel. For details, see the following:
▪“Part names and functions of the front/top panel” (p.16)
▪“Mounting the unit on a wall” (p.49)
CR2025 Lithium battery
15 En

Part names and functions
Part names and functions of the front/top panel
The part names and functions of the front and top panels are as follows.
A B C D E
F G
1Indicators
The indicators on the top panel flash or glow, to show the operation and setting status. In this manual, indicators status, such as off, glowing, and flashing, are shown as the illustrations below.
Off
Glows


 Flashes
H
G F
NOTE
The brightness of the indicators can be changed using DIMMER on the remote control. For details, see the following:
▪“Changing the brightness of the indicators
(DIMMER)” (p.35)
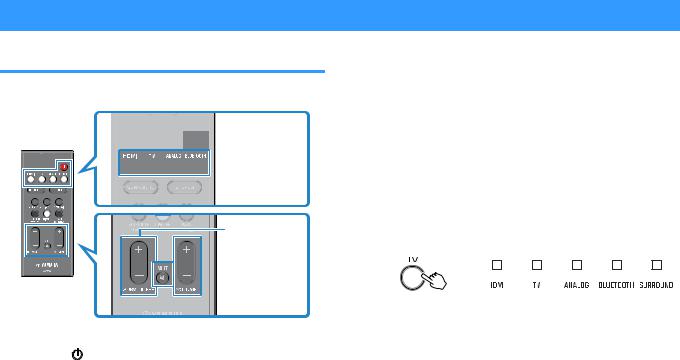
2y(input)
Select an input source to be played back (p.25).
3|(mute)
Mute the audio output (p.25). Touch again to unmute.
4}/ {(volume +/-)
Adjust the volume (p.25).
5z(power)
Turn on or off the unit.
NOTE
The unit may automatically turn off when the auto power standby function is enabled (p.36).
6Speakers
7Dual built-in subwoofers
The built-in subwoofers are located in the top part of the unit.
16 En

8Remote control sensors
Receive infrared signals from the remote control of the unit (p.15).
NOTE
▪2, 3, 4 and 5 are touch sensors. Touch icons with your finger to control functions.
▪Do not place any objects on the touch panel as doing so may result in unintended operations.
▪When touch panel control is disabled, no operations can be performed using the unit’s touch panel. This prevents accidental operation of the unit. For details, refer to the following:
–“Enabling/disabling touch panel control (child lock function)” (p.37)
17 En
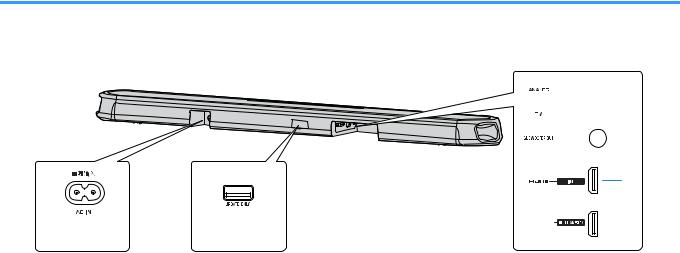
Part names and functions of the rear panel
The part names and functions of the rear panel are as follows.
The illustrations in this manual include labels next to the jacks on the bottom of the unit for easy identification.

 C
C

 D
D

 E
E
Inside the cover
F


 G A B
G A B
1AC IN jack
Connect the power cord of this unit (p.24).
2UPDATE ONLY jack
Use to update this unit’s firmware. The jack is located inside the cover.
Refer to the instructions supplied with the firmware for details.
3ANALOG input jack
For connecting to an external device with a 3.5 mm stereo mini plug cable and inputting audio signals (p.23).
4TV input jack
For connecting to a TV with an optical digital audio cable and inputting audio signals (p.22).
5SUBWOOFER OUT jack
For connecting to an external subwoofer with an RCA mono cable (p.24).
6HDMI IN jack
For connecting to an HDMI-compatible playback device, such as a BD/DVD player, a satellite and cable TV tuner, and a game console, and inputting video/audio signals (p.23).
7HDMI OUT (ARC) jack
For connecting to an HDMI-compatible TV and outputting video/audio signals (p.21). When a TV that supports Audio Return Channel (ARC) is used, TV audio signal can also be input through this jack.
18 En
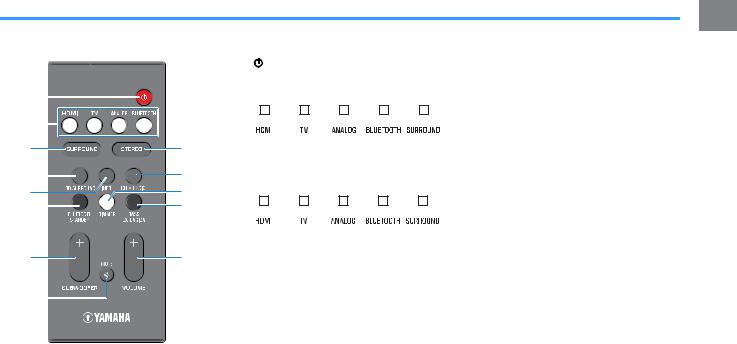
Part names and functions of the remote control
The part names and functions of the supplied remote control are as follows.
|
|
|
|
|
|
|
|
|
1 z(power) button |
|||
|
|
|
|
|
|
|
|
|
Turn on/off the unit. |
|||
A |
|
|
|
|
|
|
|
|
Turned on |
|||
|
|
|
|
|
|
|
|
|
|
|
|
|
B |
|
|
|
|
|
|
|
|
|
|
|
|
|
|
|
|
|
|
|
|
|
|
|
|
|
|
|
|
|
|
|
|
|
|
|
|
|
|
|
|
|
|
|
|
|
|
|
|
|
|
|
C |
|
|
|
|
|
|
|
I |
The indicator for the last input source selected |
|||
|
|
|
|
|
|
|
glows. |
|||||
D |
|
|
|
|
|
|
|
J |
Turned off (Bluetooth standby function |
|||
|
|
|
|
|
|
|
enabled) p.37 |
|||||
|
|
|
|
|
|
|
|
|
||||
E |
|
|
|
|
|
|
|
K |
|
|
|
|
F |
|
|
|
|
|
|
|
L |
|
|
|
|
|
|
|
|
|
|
|
|
|
|
|||
|
|
|
|
|
|
|
|
|
|
|
||
|
|
|
|
|
|
|
|
|
2 Input buttons |
|||
G |
|
|
|
|
|
|
|
M |
Select an input source to be played back. |
|||
|
|
|
|
|
|
|
|
|
|
|
||
|
|
|
|
|
|
|
|
|
• HDMI : Sound from a device connected to |
|||
|
|
|
|
|
|
|
|
|
||||
|
|
|
|
|
|
|
|
|
|
the HDMI IN jack (p.23) |
||
H |
|
|
|
|
|
|
|
|
• TV : TV audio (p.21) |
|||
|
|
|
|
|
|
|
|
|
• ANALOG : Sound from a device |
|||
|
|
|
|
|
|
|
|
|
|
connected to the ANALOG input jack |
||
|
|
|
|
|
|
|
|
|
|
(p.23) |
||
|
|
|
|
|
|
|
|
|
• BLUETOOTH : Sound from a Bluetooth |
|||
|
|
|
|
|
|
|
|
|
|
device (p.31) |
||
|
|
|
|
|
|
|
|
|
3 SURROUND button |
|||
|
|
|
|
|
|
|
|
|
Switch to surround playback (p.27). |
|||
|
|
|
|
|
|
|
|
|
4 3D SURROUND button |
|||
|
|
|
|
|
|
|
|
|
Switch to 3D surround playback (p.27). |
|||
5INFO button
Indicate audio signal information of the input source being played or bass extension setting (p.33).
6BLUETOOTH STANDBY button
Hold down the key for more than 3 seconds to enable/disable the Bluetooth standby function (p.37).
7SUBWOOFER (+/-) button
Adjust the volume of the subwoofer (p.25).
8MUTE button
Mute the audio output (p.25). Press the key again to unmute.
9STEREO button
Switch to stereo (2-channel) playback (p.27).
:CLEAR VOICE button
Enable/disable the clear voice function (p.28).
ADIMMER button
Change the brightness of the indicators (p.35).
BBASS EXTENSION button
Enable/disable the bass extension function (p.28).
CVOLUME (+/-) button
Adjust the volume of the unit (p.25).
19 En

PREPARATION
1 Installation
Installing the unit on a TV stand, etc.
Position the unit with the touch panel facing up on a TV stand, etc.
|
|
|
|
|
|
|
|
|
|
|
|
|
|
|
|
|
|
|
|
|
|
|
|
|
|
|
|
|
|
|
|
|
|
|
|
|
|
|
|
|
|
Remote control |
Touch panel |
||||
sensor |
|
|
|||
NOTICE
▪Do not stack the unit and a BD/DVD player or other device directly on each other. Doing so may cause a malfunction due to vibrations.
▪Avoid touching, and never place any weight or pressure on the speakers (portion covered with fabric) on the top of the unit. Doing so may damage the speakers.
▪The unit contains non-magnetic shielding speakers. Do not place magnetically sensitive items (hard disk drive, etc.) near the unit.
NOTE
The unit can also be mounted on a wall. Some knowledge of building construction is required for safe installation. Please have a qualified contractor or dealer install the unit on a wall. For details, refer to the following:
▪ “Information for qualified contractors or dealers” (p.49)
20 En
2 Connecting a TV
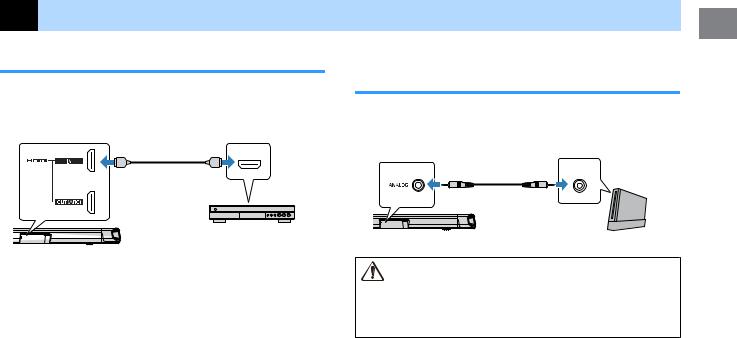
Connecting a TV that supports Audio Return Channel (ARC)
Connect the TV, which supports Audio Return Channel (ARC), to the unit with an HDMI cable (sold separately).
HDMI OUT jack
HDMI input jack
HDMI (ARC)
HDMI
 HDMI
HDMI
The unit (rear) |
TV |
What is Audio Return Channel (ARC)?
In order for the unit to play audio from a TV, the TV must usually be connected to the unit via an audio cable as well as an HDMI cable. If, however, the TV supports Audio Return Channel (ARC), TV audio signals can be input to the unit via the HDMI cable that outputs video signals from the unit to the TV.
NOTE
▪Connect an HDMI cable to the audio return channel supported jack (the jack with
“ARC” indicated) on TV.
▪Enable the HDMI control function of the unit to activate the Audio Return Channel
(ARC). For details, see the following:
–“Configuring the HDMI control function” (p.35)
▪Use a 19-pin HDMI cable with the HDMI logo printed on it. A cable with a maximum length of 5 m (16 ft) is recommended to prevent degradation of signal quality.
▪Use a premium high-speed HDMI cable for playback of 3D and 4K video content.
▪The unit supports HDCP version 2.2, a copy protection technology. For playback of 4K video, connect the unit to the HDMI input jack (one compatible with HDCP 2.2) on an HDCP 2.2-compliant TV.
▪The TV input jack cannot be used when a TV that supports the Audio Return
Channel is connected to the unit.
21 En
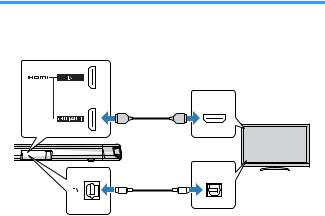
Connecting a TV that does not support Audio Return Channel (ARC)
Connect the TV to the unit with an HDMI cable (sold separately) and an optical digital audio cable (supplied).
HDMI OUT jack
|
|
HDMI input jack |
|
|
|
HDMI |
|
|
HDMI |
HDMI |
|
The unit |
|
OPTICAL |
TV |
|
|
||
(rear) |
O |
O |
|
|
TV jack |
Audio output jack |
|
|
(digital optical) |
|
NOTE
▪Use a 19-pin HDMI cable with the HDMI logo printed on it. A cable with a maximum length of 5 m (16 ft) is recommended to prevent degradation of signal quality.
▪Use a premium high-speed HDMI cable for playback of 3D and 4K video content.
▪The unit supports HDCP version 2.2, a copy protection technology. For playback of 4K video, connect the unit to the HDMI input jack (one compatible with HDCP 2.2) on an HDCP 2.2-compliant TV.
▪When connecting the supplied optical digital audio cable, be sure to remove the cap and check the plug’s orientation before connecting it.
▪If the TV has no optical jack, connect the audio output jack on the TV to the ANALOG input jacks on the unit. For details, see the following:
–“Analog connection with a playback device” (p.23)
22 En
3 Connecting playback devices
HDMI connection with a playback device
Connect a playback device such as a BD/DVD player to the unit with an HDMI cable (sold separately). Use the HDMI cable to best connect a playback device equipped with the HDMI output jack.
HDMI IN jack |
HDMI output jack |
|
HDMI |
HDMI |
HDMI |
Playback device (BD/DVD player)
The unit (rear)
NOTE
▪Once the HDMI control function has been activated, video and audio contents from playback devices can be output from the TV even when the unit is turned off (HDMI signal pass-through). For details, see the following:
–“Configuring the HDMI control function” (p.35)
▪Use a 19-pin HDMI cable with the HDMI logo printed on it. A cable with a maximum length of 5 m (16 ft) is recommended to prevent degradation of signal quality.
▪Use a premium high-speed HDMI cable for playback of 3D and 4K video content.
▪The unit supports HDCP version 2.2, a copy protection technology. For playback of 4K video, connect the unit to the HDMI output jack on a HDCP 2.2-compliant BD/DVD player.
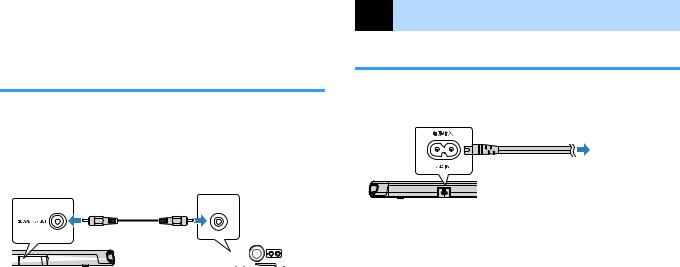
Analog connection with a playback device
Connect a playback device, such as a game console or a TV that does not have an optical digital audio output, to the unit via a 3.5 mm stereo mini plug cable (sold separately).
ANALOG input jack |
Audio output jack |
|
|
|
OUTPUT |
The unit (rear) |
Playback device (game console) |
CAUTION
▪If volume can be adjusted on the device connected to the unit’s ANALOG input jack, set that device’s volume to the same level as that of other devices connected to the unit’s HDMI IN jack to prevent volume from being louder than expected.
NOTE
When connecting the video device, connect the video device’s video output to the TV’s video input directly.
23 En
4 |
Connecting an external |
subwoofer |
|
|
|
Connecting an external subwoofer
The unit has dual built-in subwoofers; however you can connect a subwoofer equipped with built-in amplifier when you want to enhance low frequency sound.
Connect an external subwoofer to the unit via an RCA mono cable (sold separately).
SUBWOOFER |
Input jack |
|
OUT jack |
||
|
||
|
MONO IN |
|
|
|
|
|
|
|
|
|
|
|
|
|
|
|
|
|
|
|
|
|
|
|
|
|
|
|
|
|
|
|
|
|
|
The unit (rear) |
|
Subwoofer quipped with |
||||||||||||||
|
|
|
|
|
|
|
|
|
|
|
built-in amplifier. |
|||||
NOTE
Sound is output from both the built-in subwoofers and external subwoofer.
5 Connecting the power cord
Connecting the power cord
After all connections are complete, connect the supplied power cord to the AC IN jack on the unit and plug the power cord into an AC wall outlet.
To an AC wall outlet
The unit (rear)
24 En
PLAYBACK
Basic operations
Basic procedure for playback
Basic procedure for playing back music is as follows.
 z
z


 Input buttons
SUBWOOFER (+/-)
 VOLUME (+/-)
 MUTE
MUTE
1 |
Press zto turn on the unit. |
2 |
Turn on the external devices (such as a TV or |
|
BD/DVD player, game console) connected to the |
unit.
3 |
Use the input buttons to select an input source to |
|
|||
|
|||||
|
be played back. |
|
|||
|
HDMI: Sound from a device connected to the HDMI IN |
|
|||
|
jack |
|
|||
|
TV: TV audio |
|
|||
|
ANALOG: Sound from a device connected to the |
|
|||
|
ANALOG input jack |
|
|||
|
BLUETOOTH: Sound from a Bluetooth device |
|
|||
|
The indicator for the selected input source glows. |
|
|||
|
Example |
|
|||
|
When TV is selected |
|
|||
|
|
|
|
|
|
|
|
|
|
|
|
|
|
Glows |
|
||
|
|
|
|||
|
|
|
|||
4 |
Start playback on the external device selected in |
|
|||
|
step 3. |
|
|||
25 En
5 Press VOLUME (+/-) to adjust the volume.
Volume down (-) Volume up (+)
When audio is output from both TV speaker and the unit, mute the TV sound.
6 |
Adjust sound settings to suit individual |
|
preferences. |
NOTE
▪For details on adjusting sound settings, see the following:
–“Playback with 3D surround sound” (p.27)
–“Playback with surround sound” (p.27)
–“Playback with 2-channel stereo sound” (p.27)
–“Playback of human voices clearly (clear voice)” (p.28)
–“Enjoying enhanced bass sound (bass extension)” (p.28)
▪For details on playback music files stored on a Bluetooth device, see the following:
–“Listening to music stored on a Bluetooth® device” (p.29)
▪To mute the sound, press MUTE. Press MUTE again to unmute.
Flash (on mute)
▪When sound input to the HDMI IN jack is output from the TV, the volume level does not change even if you press VOLUME (+/-) or MUTE.
▪To adjust the subwoofer volume, press SUBWOOFER (+/-). The subwoofer volume can be adjusted separately from the whole volume.
Volume down (-)  Volume up (+)
▪When playing audio/video from a device connected to the TV, select TV as the unit’s input source, and select the playback device with the input selector on the TV.
26 En
Enjoying your favorite sound
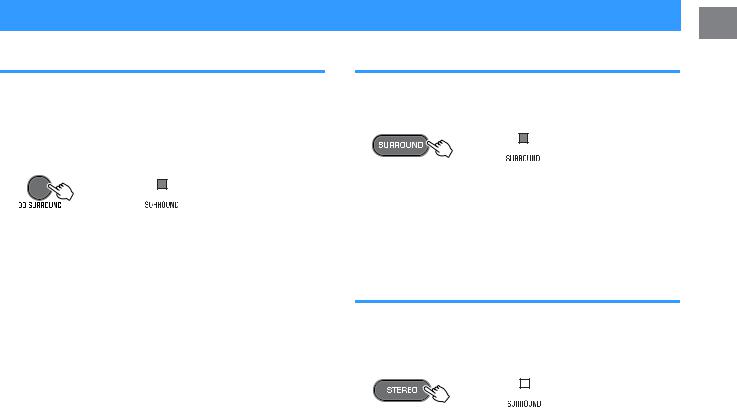
Playback with 3D surround sound
Press 3D SURROUND to switch to 3D surround playback according to the input source or your individual preference.
When 3D surround playback is selected, DTS Virtual:X makes it possible to hear sound not only from horizontal directions, but also from varying heights.
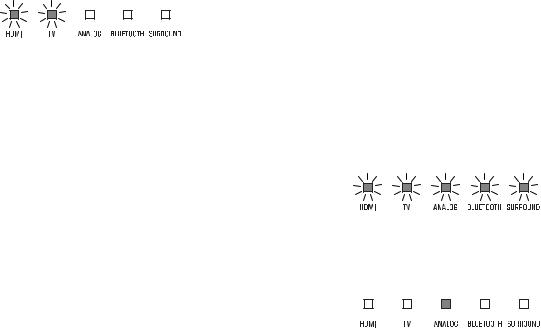
The SURROUND indicator glows blue.
Glows (blue)
NOTE
The TV Program, Movie, Music, Sports, or Game surround mode can be selected using the HOME THEATER CONTROLLER app installed on a smartphone that supports the Bluetooth function. For details, see the following:
▪ “Operating the unit with the HOME THEATER CONTROLLER app” (p.34)
Playback with surround sound
Press SURROUND to switch to surround playback according to the input source or your individual preference.
The SURROUND indicator glows white.
Glows (white)
NOTE
The TV Program, Movie, Music, Sports, or Game surround mode can be selected using the HOME THEATER CONTROLLER app installed on a smartphone that supports the Bluetooth function. For details, see the following:
▪ “Operating the unit with the HOME THEATER CONTROLLER app” (p.34)
Playback with 2-channel stereo sound
Press STEREO to switch to 2-channel stereo playback. You can enjoy playback sources with your favorite sound mode.
When stereo playback is enabled, the SURROUND indicator goes out.
Off
27 En

Playback of human voices clearly (clear voice)
Press CLEAR VOICE to turn on the clear voice function. Human voices such as lines in movies and TV shows, or news and sport commentary, are played clearly.
Press the button again to disable the function.
Flash three times (enabled)
Flash once (disabled)
NOTE
Press INFO to confirm whether the clear voice function is enabled or disabled. For details, refer to the following:
▪ “Showing audio information with playback” (p.33)
Enjoying enhanced bass sound (bass extension)
Press BASS EXTENSION to turn on the bass extension function. You can enjoy enhanced bass sound and more powerful sound.
Press the button again to disable the function.
Flash three times (enabled)
Flash once (disabled)
NOTE
Press INFO to confirm whether the bass extension function is enabled or disabled. For details, refer to the following:
▪ “Showing audio information with playback” (p.33)
28 En
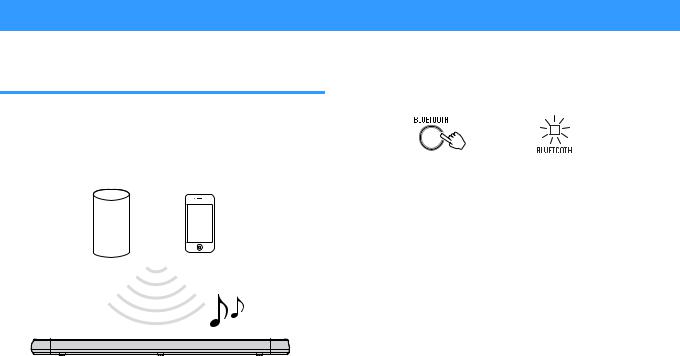
Use of a Bluetooth® device
Listening to music stored on a Bluetooth® device
Music files stored on a Bluetooth device, such as a smartphone, smart speaker, or digital music player, can be played back on the unit over a wireless connection.
The unit can be connected to two Bluetooth devices simultaneously (Music cannot be played from both devices simultaneously).
Bluetooth device
NOTE
The Bluetooth standby function is enabled by default. When a Bluetooth device is connected to this unit while the unit is off, the unit will be turned on and will be immediately ready to play sound from the Bluetooth device. For details, refer to the following:
▪ “Configuring the Bluetooth standby function” (p.37)
1 |
Press BLUETOOTH to select “Bluetooth” as the |
|
|
||
|
input source. |
|
The BLUETOOTH indicator on the unit flashes.
|
|
|
|
|
Flashes |
||
|
NOTE |
||
|
If Bluetooth devices have been connected before, the unit will connect to |
||
|
the last played device when BLUETOOTH is pressed. |
||
2 |
On the Bluetooth device, enable the Bluetooth |
||
|
function. |
||
The Bluetooth device list appears on the Bluetooth device.
29 En
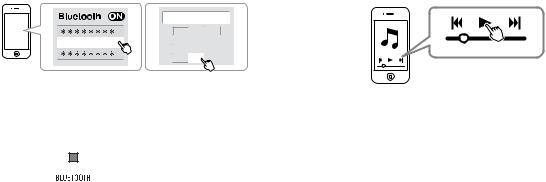
3 |
Select “YAS-108 Yamaha” (or “YamahaAV”) in the |
|
list. |
If a passkey (PIN) is required, enter the number “0000”.
|
PIN |
0 0 0 0 |
|
|
1 |
2 |
3 |
YAS-108 YAMAHA |
4 |
5 |
6 |
|
|
|
|
|
7 |
8 |
9 |
|
|
0 |
|
When the connection between the Bluetooth device and the unit is established, a completion message is displayed on the Bluetooth device, and the BLUETOOTH indicator on the unit glows.
Glows
4 Play back a song on the Bluetooth device.
The unit will begin playing audio from the Bluetooth device.
NOTE
▪To terminate the Bluetooth connection, perform one of the following operations.
–Turn off the Bluetooth function on the Bluetooth device.
–Hold down BLUETOOTH for more than 3 seconds.
–Select an input source other than Bluetooth using the input buttons on the unit.
–Turn off the unit.
▪If the Bluetooth connection is terminated when the unit’s input is BLUETOOTH, the BLUETOOTH indicator flashes and the unit enters the connection wait status.
▪Adjust the volume level of the Bluetooth device as required.
▪Perform Bluetooth connection with the Bluetooth device and unit within 10 m (33 ft) of each other.
▪See documentation supplied with your Bluetooth device for more information.
30 En
 Loading...