


 Loading...
WD TV™ Mini Media Player
User Manual
WD Service and Support
Should you encounter any problem, please give us an opportunity to address it before returning this product. Most technical support questions can be answered through our knowledge base or e-mail support service at support.wdc.com. If the answer is not available or, if you prefer, please contact WD at the best telephone number shown below.
Your product includes 30 days of free telephone support during the warranty period. This 30-day period starts on the date of your first telephone contact with WD technical support. E-mail support is free for the entire warranty period and our extensive knowledge base is available 24/7. To help us keep you informed of new features and services, remember to register your product online at https://www.wdc.com/register.
Accessing Online Support
Visit our product support website at support.wdc.com and choose from these topics:
•Downloads - Download drivers, software, and updates for your WD product.
•Registration - Register your WD product to get the latest updates and special offers.
•Warranty & RMA Services - Get Warranty, Product Replacement (RMA), RMA Status, and Data Recovery Information.
•Knowledge Base - Search by keyword, phrase, or answer ID.
•Installation - Get online installation help for your WD product or software.
Contacting WD Technical Support
When contacting WD for support, have your WD product serial number, system hardware, and system software versions available.
North America |
|
Asia Pacific |
|
|
|
English |
800.ASK.4WDC |
Australia |
1 800 42 9861 |
||
|
(800.275.4932) |
China |
800 820 6682/+65 62430496 |
||
Spanish |
800.832.4778 |
Hong Kong |
+800 |
6008 |
6008 |
|
|
India |
1 800 11 9393 (MNTL)/1 800 200 5789 (Reliance) |
||
|
|
|
011 26384700 (Pilot Line) |
||
Europe (toll free)* |
00800 ASK4 WDEU |
Indonesia |
+803 |
852 9439 |
|
|
(00800 27549338) |
Japan |
00 531 650442 |
||
|
|
Korea |
02 719-3240 |
||
Europe |
+31 880062100 |
Malaysia |
+800 |
6008 |
6008/1 800 88 1908/+65 62430496 |
Middle East |
+31 880062100 |
Philippines |
1 800 1441 0159 |
||
Africa |
+31 880062100 |
Singapore |
+800 |
6008 |
6008/+800 608 6008/+65 62430496 |
|
|
Taiwan |
+800 |
6008 |
6008/+65 62430496 |
*Toll free number available in the following countries: Austria, Belgium, Denmark, France, Germany, Ireland, Italy, Netherlands, Norway, Spain, Sweden, Switzerland, United Kingdom.

Table of Contents
1 Important User Information. . . . . . . . . . . . . . . . . . . . .1
Important Safety Instructions . . . . . . . . . . . . . . . . . . . . . . . . . . . . . . . . . 1 Recording your WD Product Information . . . . . . . . . . . . . . . . . . . . . . . 2 Registering your WD Product . . . . . . . . . . . . . . . . . . . . . . . . . . . . . . . . 2 Accessories . . . . . . . . . . . . . . . . . . . . . . . . . . . . . . . . . . . . . . . . . . . . . . 2
2 Product Overview . . . . . . . . . . . . . . . . . . . . . . . . . . . . .3
3 Features and Functions . . . . . . . . . . . . . . . . . . . . . . .4
Features . . . . . . . . . . . . . . . . . . . . . . . . . . . . . . . . . . . . . . . . . . . . . . . . . . 4
Connections . . . . . . . . . . . . . . . . . . . . . . . . . . . . . . . . . . . . . . . . . . . . . . 5
LED Indicators . . . . . . . . . . . . . . . . . . . . . . . . . . . . . . . . . . . . . . . . . . . . . 6
Remote Control . . . . . . . . . . . . . . . . . . . . . . . . . . . . . . . . . . . . . . . . . . . . 7
4 Getting Started . . . . . . . . . . . . . . . . . . . . . . . . . . . . . . .8
Package Contents . . . . . . . . . . . . . . . . . . . . . . . . . . . . . . . . . . . . . . . . . 8
Installation Requirements . . . . . . . . . . . . . . . . . . . . . . . . . . . . . . . . . . . . 8
Installation Procedure . . . . . . . . . . . . . . . . . . . . . . . . . . . . . . . . . . . . . . . 8
5 Operating the WD TV Mini Media Player. . . . . . . . .17
Using the Remote Control . . . . . . . . . . . . . . . . . . . . . . . . . . . . . . . . . . 17 Powering on the WD TV Mini Media Player . . . . . . . . . . . . . . . . . . . . 18 Using the WD TV Mini Media Player Menu. . . . . . . . . . . . . . . . . . . . . 19 File Management . . . . . . . . . . . . . . . . . . . . . . . . . . . . . . . . . . . . . . . . . . 20 Auto Play . . . . . . . . . . . . . . . . . . . . . . . . . . . . . . . . . . . . . . . . . . . . . . . . 23
6 Watching Video . . . . . . . . . . . . . . . . . . . . . . . . . . . . . .24
Video Playback . . . . . . . . . . . . . . . . . . . . . . . . . . . . . . . . . . . . . . . . . . . 24
Video Playback Controls. . . . . . . . . . . . . . . . . . . . . . . . . . . . . . . . . . . . 26
Video Playback Options . . . . . . . . . . . . . . . . . . . . . . . . . . . . . . . . . . . . 26
7 Playing Music . . . . . . . . . . . . . . . . . . . . . . . . . . . . . . .30
Music Playback . . . . . . . . . . . . . . . . . . . . . . . . . . . . . . . . . . . . . . . . . . . 30
Music Playback Controls . . . . . . . . . . . . . . . . . . . . . . . . . . . . . . . . . . . 33
TABLE OF CONTENTS – i

8 Viewing Photos . . . . . . . . . . . . . . . . . . . . . . . . . . . . . .36
Photo Display. . . . . . . . . . . . . . . . . . . . . . . . . . . . . . . . . . . . . . . . . . . . . 36
Photo Display Options . . . . . . . . . . . . . . . . . . . . . . . . . . . . . . . . . . . . . 37
Photo Slideshow . . . . . . . . . . . . . . . . . . . . . . . . . . . . . . . . . . . . . . . . . . 39
9 Settings and Advanced Features . . . . . . . . . . . . . . .41
Settings Navigation Buttons . . . . . . . . . . . . . . . . . . . . . . . . . . . . . . . . 42
Available Settings . . . . . . . . . . . . . . . . . . . . . . . . . . . . . . . . . . . . . . . . . 43
Locating Media Content . . . . . . . . . . . . . . . . . . . . . . . . . . . . . . . . . . . . 46
10 System Maintenance . . . . . . . . . . . . . . . . . . . . . . . . .49
System Firmware Upgrade . . . . . . . . . . . . . . . . . . . . . . . . . . . . . . . . . . 49
Troubleshooting . . . . . . . . . . . . . . . . . . . . . . . . . . . . . . . . . . . . . . . . . . 50
Common Error Messages . . . . . . . . . . . . . . . . . . . . . . . . . . . . . . . . . . 52
Frequently Asked Questions . . . . . . . . . . . . . . . . . . . . . . . . . . . . . . . . 52
11 Appendix. . . . . . . . . . . . . . . . . . . . . . . . . . . . . . . . . . . .54
Media File Formats - Video. . . . . . . . . . . . . . . . . . . . . . . . . . . . . . . . . . 54
Media File Formats - Audio and Photo . . . . . . . . . . . . . . . . . . . . . . . . 55
Regulatory Compliance . . . . . . . . . . . . . . . . . . . . . . . . . . . . . . . . . . . . 56
Warranty Information . . . . . . . . . . . . . . . . . . . . . . . . . . . . . . . . . . . . . . 58
TABLE OF CONTENTS – ii

WD TV Mini Media Player
User Manual
1 Important User Information
Important Safety Instructions
This device is designed and manufactured to assure personal safety. Improper use can result in electric shock or fire hazard. The safeguards incorporated into this unit will protect you if you observe the following procedures for installation, use, and servicing.
•Read these instructions.
•Keep these instructions.
•Heed all warnings.
•Follow all instructions.
•Do not use this apparatus near water.
•Clean only with dry cloth.
•Do not block any ventilation openings. Install in accordance with the manufacturer’s instructions.
•Do not install near any heat sources such as radiators, heat registers, stoves, or other apparatus (including amplifiers) that produce heat.
•Do not defeat the safety purpose of the polarized or grounding-type plug. A polarized plug has two blades with one wider than the other. A grounding type plug has two blades and a third grounding prong. The wide blade or the third prong are provided for your safety. If the provided plug does not fit into your outlet, consult an electrician for replacement of the obsolete outlet.
•Protect the power cord from being walked on or pinched particularly at plugs, convenience receptacles, and the point where they exit from the apparatus.
•Only use attachments/accessories specified by the manufacturer.
•Unplug this apparatus during lightning storms or when unused for long periods of time.
•Refer all servicing to qualified service personnel. Servicing is required when the apparatus has been damaged in any way, such as power-supply cord or plug is damaged, liquid has been spilled or objects have fallen into the apparatus, the apparatus has been exposed to rain or moisture, does not operate normally, or has been dropped.
•Carefully read and follow the Quick Install Guide and User Manual.
•Do not operate this device outside the temperature range of 5°C–35°C (41°F–95°F).
•Do not drop or shake the device.
•Do not move the device when it is powered on.
•Power supply cords should be routed so that they are not likely to be walked on or pinched by items placed upon them or against them.
•Do not overload wall outlets.
For additional safety information, refer to www.wdc.com.
IMPORTANT USER INFORMATION – 1

WD TV Mini Media Player
User Manual
Recording your WD Product Information
In the following table, write the serial and model numbers of your new WD product. You can find this information on the label on the bottom of the device. You should also note the date of purchase. This information may be required when requesting technical support.
Serial Number:
Model Number:
Purchase Date:
System and Software Notes:
Registering your WD Product
Your WD product includes 30 days of free technical support during the applicable warranty period for your product. The 30-day period commences on the date of your first telephone contact with WD technical support. Register your WD product online at register.wdc.com.
Accessories
For U.S. residents, visit shopwd.com to view additional accessories available for your WD TV Mini Media Player. For users outside the U.S., visit support.wdc.com.
IMPORTANT USER INFORMATION – 2

WD TV Mini Media Player
User Manual
2 Product Overview
Thank you for purchasing the WD TV Mini Media Player. This user manual provides step-by-step instructions for installing and using your new media player. For the latest WD product information and news, visit our website at www.westerndigital.com.
WD TV™ Mini media player is an easy, affordable way to watch digital media on your TV. Simply plug in WD’s My Passport portable hard drive or similar USB drive and play movies, music, and photos in a wide variety of file formats, including Real Media (RMVB) format. There’s no limit to the size of your media collection; just add more drives for more movies. Supports DVD-quality video playback. Also works with most popular USB drives, digital cameras, and camcorders.
The USB port is used to connect USB mass storage devices, such as the My Passport portable drive and My Book external drive. The included remote control lets you quickly browse through your media and configure settings.
Advanced Navigation Options Include:
•Thumbnail and list views – browse your content by filename or by thumbnails of photos, album covers, and movie preview
•Search – search by filename and partial filename
Photo Viewing:
•Create custom slide shows with a variety of transitions
•Zoom, pan, repeat, shuffle, and rotate
Movie Viewing:
•Fast forward, rewind, previous, next, pause, repeat, shuffle, and zoom
•View subtitles
•View video menu (if supported by the file format)
•Video preview (if supported by the file format)
Music Playback:
•Fast forward, rewind, pause, shuffle, and repeat
•View album art
File Management:
•View all files together
•Copy or delete files directly from the TV
Additional Features:
•Real Media (RMVB) playback
•480 decode DVD quality and upscales up to 1080i
•Plug-and-play convenience
•Popular media format support
•Metadata support
•Thumbnail support
•Aggregated music/photo/video view
•Composite and component video outputs
•Toslink (optical) audio output
•Supported USB device file systems: FAT32, NTFS, HFS+ (no journaling)
PRODUCT OVERVIEW – 3

WD TV Mini Media Player
User Manual
3 Features and Functions
Features
Audio/Video Interface
•Composite interface (RCA yellow/white/red to mini jack) for analog AV connection
•Component video connection (YPbPr to mini jack) for analog video connection.
•Toslink (optical) audio for high-fidelity digital audio
•Video output resolution includes 480i and 576i (composite and component interface), or 480p, 576p, 720p, and 1080i (component interface)
•Stereo or multi-channel digital surround (pass through only) audio output
Content Playback
The WD TV Mini Media Player is capable of playing several different types of multiformat files. For a detailed list of supported formats, go to “Media File Formats - Video” on page 54.
Plug-n-Play USB 2.0 Support
•USB storage device with a USB connector
•Portable media players with USB connector
•Digital cameras with USB connector
For a list of tested, compatible USB devices, see Article #2581 in our knowledge base at support.wdc.com.
USB Storage File System Support
•NTFS
•FAT/FAT32
•HFS+
For instructions on how to disable Journaling, see Article #2615 in our knowledge base at support.wdc.com.
FEATURES AND FUNCTIONS – 4

WD TV Mini Media Player
User Manual
Connections
|
|
|
|
|
4 |
5 |
|
|
|
|
|
|
|
||
|
1 |
2 |
3 |
6 |
|||
|
|
|
|
|
|
|
|
Item |
Component |
Description |
|
|
|
|
|
|
|
|
|
|
|||
|
|
|
|
|
|||
1 |
USB port |
Supports connection of removable storage devices, portable |
|||||
|
|
media players, and digital cameras with USB connectors |
|||||
|
|
|
|
|
|||
2 |
Composite analog video |
Connect to your TV’s analog video and audio jacks. Use the |
|||||
|
and audio |
mini-plug to composite jack adapter included with the device. |
|||||
|
|
|
|
|
|||
3 |
YPbPr analog |
Connect to your TV’s YPbPr analog video jacks. Use the mini- |
|||||
|
Component video |
plug to YPbPR jack adapter included with the device. |
|||||
|
|
Note: This is for video connection only. Audio connection must |
|||||
|
|
be supplied through either the Toslink (optical) port; or use the |
|||||
|
|
audio jacks (red and white color) of the Composite connection. |
|||||
|
|
|
|
|
|||
4 |
Toslink (optical) audio |
Connects to your AV receiver (Toslink cable sold separately) |
|||||
|
port |
|
|
|
|
|
|
|
|
|
|
|
|||
5 |
Reset switch |
Reset the media player to factory settings (using a fine-tipped |
|||||
|
|
stylus or the unfolded end of a paperclip) |
|
|
|||
|
|
|
|
|
|
|
|
6 |
Power jack |
Connects the power cable |
|
|
|
|
|
|
|
|
|
|
|
|
|
FEATURES AND FUNCTIONS – 5
WD TV Mini Media Player
User Manual
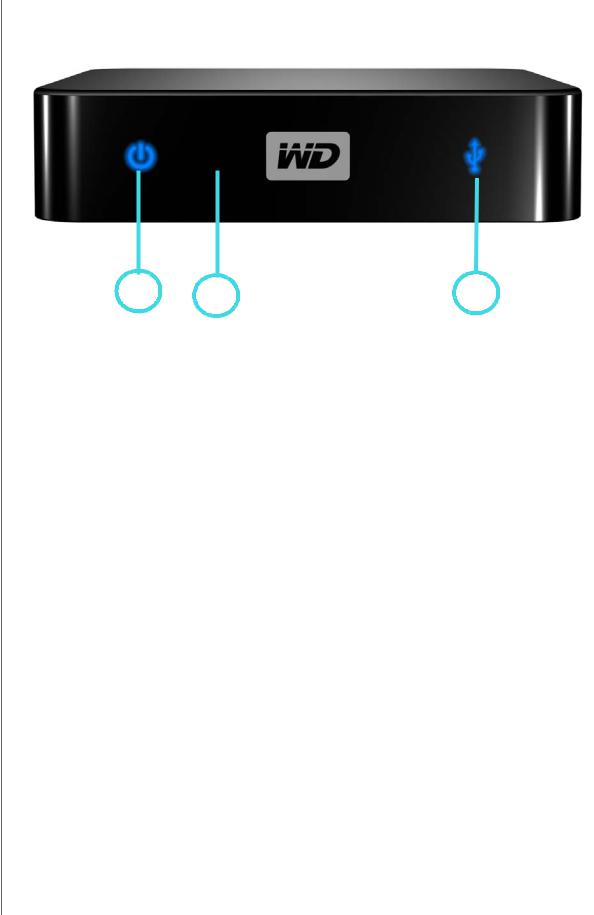
LED Indicators
|
1 |
2 |
3 |
|
|
|
|
Item |
Component |
Description |
|
|
|
|
|
|
|
|
|
1 |
Power LED |
• On (Blue)—The power cable is connected and the power is on. |
|
|
|
• Off—The media player is in standby mode or the power cable is |
|
|
|
disconnected. |
|
|
|
|
|
2 |
Infrared |
• Receives signals from the remote control. Point the tip of the |
|
|
receiver |
remote control to the infrared receiver and ensure that the path |
|
|
|
between the two is unobstructed. |
|
|
|
|
|
3 |
Status LED |
• On (Blue) —A USB device is being accessed and the media |
|
|
|
player is in idle mode. |
|
|
|
• Off—No USB device is connected. |
|
|
|
• Blinking—Scans for media from the USB storage. |
|
|
|
|
|
FEATURES AND FUNCTIONS – 6
WD TV Mini Media Player
User Manual
Remote Control
1.Infrared transmitter
2.HOME
3.POWER
4.Navigation buttons
5.ENTER
6.STOP
7.BACK
8.REV (rewind)
9.PREV (previous track)
10.SEARCH
11.OPTION
12.PAUSE/PLAY
13.FF (fast forward)
14.NEXT (next track)
15.EJECT (safe removal of attached storage)
1
2
3
4
5 
6
 11
11
7 
12
8 
 13
13
9 
 14
14
10 |
15 |
Note: For additional information, see “Using the Remote Control” on page 17.
FEATURES AND FUNCTIONS – 7

WD TV Mini Media Player
User Manual
4 Getting Started
Package Contents
WD TV Mini Media Player
Composite AV cables |
Component (YPbPr) cables |
Remote control and |
|
|
Two AAA batteries |
Quick Install Guide |
Documentation and |
|
software CD |
||
AC power adapter |
||
|
Installation Requirements
•Standard or HD TV with a component or composite audio/video input
•USB storage device with a USB 2.0 connector
Optional: Stereo or AV receiver with a digital optical (Toslink) cable.
Installation Procedure
The media player installation procedure is outlined below:
1.Transfer content from your computer to the USB storage media.
2.Connect the media player to your TV or entertainment unit through the desired interface option.
3.Connect the power cable.
4.Insert the batteries into the remote control.
5.Connect the USB device containing your media content.
GETTING STARTED – 8
WD TV Mini Media Player
User Manual
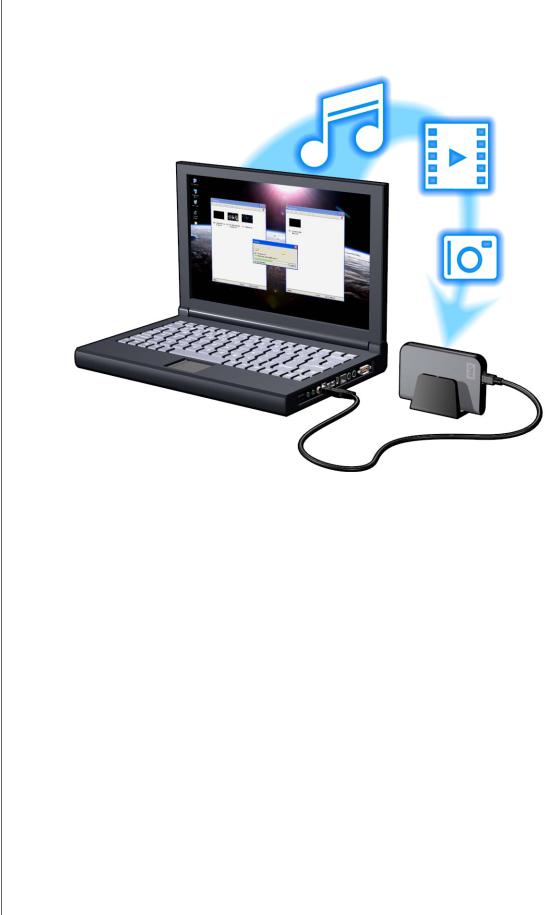
Step 1 - Loading Content onto your USB Drive
Transfer your favorite content from your computer to your external USB drive, such as My Passport™ or My Book® (external USB drives and stand not included).
GETTING STARTED – 9

WD TV Mini Media Player
User Manual
Step 2 - Connecting the Power Cable
1.Connect the power clip to the power cable plug.
The AC power adapter will vary, depending on your location. Some locations do not require a power plug clip. Units sold in those locations will have a fixed power plug. Refer to the illustration below.
US/JA/TW EU/KO
US/JA/TW EU/KO
Installing |
Removing |
Installing |
Removing |
2.Connect the power cable to the media player’s DC connector, and then plug the opposite end into an AC power outlet. The media player powers up automatically.
GETTING STARTED – 10

WD TV Mini Media Player
User Manual
Step 3 - Connecting the WD TV Mini Media Player
The following figures illustrate the cable connections supported by the media player. The standard connection uses the included composite-to-mini AV cables.
Note: Toslink (optical) cables are sold separately.
Choosing the Best Connection
The quality of the picture produced by your TV depends on the quality of your TV and its connection to the media player.
Connection |
Quality |
Connectors |
|
|
|
|
|
|
|
|
|
Component |
Best |
• |
Green = Y |
|
(up to 1080i) |
• |
Blue = Pb |
|
|
||
|
|
• |
Red = Pr |
|
|
|
|
Composite |
Good (480i/ |
• |
Yellow = video |
|
576i) |
• Red = right audio |
|
|
|
||
|
|
• White = left audio |
|
|
|
|
|
Composite (Standard Definition) |
|
Component (High Definition) |
|
GETTING STARTED – 11

WD TV Mini Media Player
User Manual
Composite AV Connection (Standard Definition)
To use a composite connection:
1.Plug the mini-connector into the composite port on the media player.
2.Plug the opposite ends into the composite input ports on your TV, yellow to yellow, red to red, and white to white.
3.Select the appropriate TV input source.
Wait a few seconds for your TV to detect the media player. If the media player is not detected, you may need to change the input source on your TV to component or composite, depending on your connection. Check the user documentation of your TV for more information.
Once the media player is detected, the splash screen displays to indicate system bootup, then the home screen of the user interface opens.
If powering on the device for the first time, the following screen will appear:
GETTING STARTED – 12
WD TV Mini Media Player
User Manual
4.Use the UP/DOWN navigation buttons on the remote control to select Composite AV (CVBS)
Note: This screen will switch between Component and Composite every 10 seconds until you make a selection.
5.Press the ENTER button to confirm the video output setting.
After selecting your video resolution output option, see “Using the WD TV Mini Media Player Menu” on page 19.
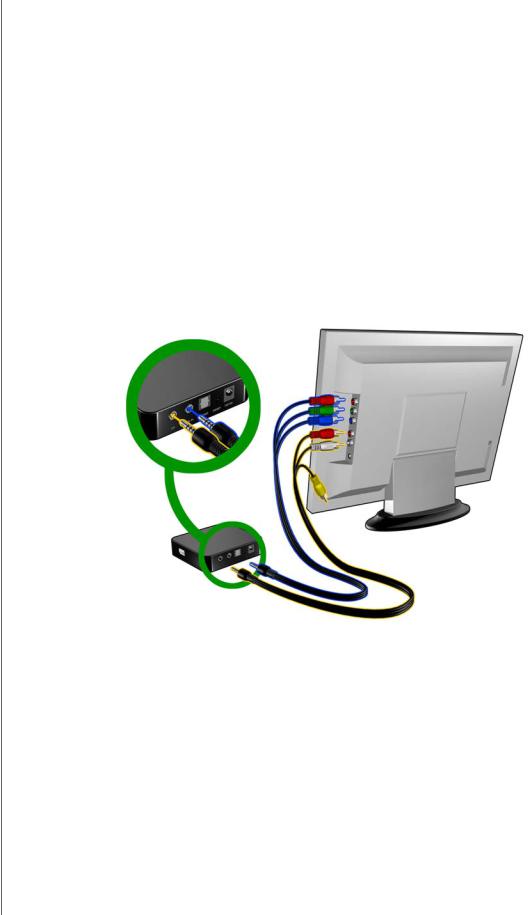
Component Video and Audio (High Definition)
The component connection only provides video signals. You will also need to connect the composite audio cables to provide sound. This interface provides video quality resolution of up to 1080i.
To connect your media player using a component-to-mini cable:
1.Plug mini cable into the component connector on the media player.
2.Plug the opposite ends into the component ports on your TV or audio/video system (if available), red to red, green to green, and blue to blue.
3.For audio, plug the composite-to-mini connector into the composite port on the media player.
4.Plug the audio connectors on the opposite end of the cable into the composite audio input ports on your TV, red to red and white to white.
Wait a few seconds for your TV to detect the media player. If the media player is not detected, you may need to change the input source on your TV to component or composite, depending on your connection. Check the user documentation of your TV for more information.
Once the media player is detected, the splash screen displays to indicate system bootup, then the home screen of the user interface opens.
GETTING STARTED – 13

WD TV Mini Media Player
User Manual
If powering on the device for the first time, the following screen will appear:
5.Use the UP/DOWN navigation buttons on the remote control to select Component (YPbPr).
Note: This screen will switch between Component and Composite every 10 seconds until you make a selection.
6.Press the ENTER button to confirm the video output setting.
After selecting your video resolution output option, see “Using the WD TV Mini Media Player Menu” on page 19.
Toslink (optical) Digital Audio
Toslink (optical) digital can send digital audio to a receiver capable of decoding multichannel audio through an AV receiver.
1.Complete the composite or component video connection as described on page 13.
2.Plug a Toslink (optical) cable into the S/PDIF digital optical port on your media player.
3.Plug the other end of the Toslink (optical) cable into the digital optical port on your AV receiver.
GETTING STARTED – 14

WD TV Mini Media Player
User Manual
4. Select the appropriate audio source on your AV receiver.
Note: Toslink cable sold separately.
Step 4 - Connecting a USB Device
The media player has one USB port that supports playback from a WD USB external drive.*
* For a list of supported WD external drives, see article #2581 in or knowledge base at support.wdc.com.
Certain USB hubs have been tested to ensure compatibility. For a list of supported USB devices, see Article #2581 in our knowledge base at support.wdc.com.
To connect the USB device:
1. Connect the USB device to the media player’s USB port.
My Book external drive (sold separately)
OR |
My Passport portable drive |
(sold separately) |
2.Wait for a few moments while the media player scans the USB device for media files. (Scanning is enabled by default).
GETTING STARTED – 15

WD TV Mini Media Player
User Manual
This may take several minutes, depending on the storage capacity of the USB device and the number of available media files. When the USB device is detected, the status LED turns on. “Please insert a USB storage device” appears on the screen.
For Apple Users
For HFS+, Journaling must be disabled on the storage device connected to the media player. For information on disabling Journaling, see page 4.
Removing a USB Device
To prevent data loss, it is highly recommended that you first press the EJECT button on the remote control before removing a USB device.
To remove a USB device:
1.Press the EJECT button on the remote.
2.Highlight the checkmark on the eject prompt, then press ENTER.
3.Disconnect the USB device from the media player.
GETTING STARTED – 16
Loading...