


My Net™
N600, N750, and N900 Routers
User Manual
WD® Service and Support
Should you encounter a problem, please give us an opportunity to address it before returning this product. Most technical support questions can be answered through our knowledge base or e-mail support service at http://support.wdc.com. If the answer is not available or, if you prefer, please contact WD at the best telephone number shown below.
Your product includes 30 days of free telephone support during the warranty period. This 30-day period starts on the date of your first telephone contact with WD technical support. E-mail support is free for the entire warranty period and our extensive knowledge base is available 24/7. To help us keep you informed of new features and services, remember to register your product online at http://register.wdc.com.
Accessing Online Support
Visit our product support website at http://support.wdc.com and choose from these topics:
Downloads - Download drivers, software, and updates for your WD product.
Registration - Register your WD product to get the latest updates and special offers.
Warranty & RMA Services - Get Warranty, Product Replacement (RMA), RMA Status, and Data Recovery Information.
Knowledge Base - Search by keyword, phrase, or answer ID.
Installation - Get online installation help for your WD product or software.
WD Community – Share your thoughts and connect with other users.
Contacting WD Technical Support
When contacting WD for support, have your WD product serial number, system hardware, and system software versions available.
North America |
|
Asia Pacific |
|
|
|
|
English |
855-842-5370 |
Australia |
1 800 42 9861 |
|
||
|
|
China |
800 820 6682/+65 62430496 |
|||
Spanish |
800.832.4778 |
Hong Kong |
+800 |
6008 |
6008 |
|
|
|
India |
1 800 11 9393 |
(MNTL)/1 800 200 5789 (Reliance) |
||
|
|
|
011 26384700 |
(Pilot Line) |
||
Europe (toll free)* |
00800 ASK4 WDEU |
Indonesia |
+803 |
852 9439 |
||
|
(00800 27549338) |
Japan |
00 531 650442 |
|
||
|
|
Korea |
02 703 6550 |
|
||
Europe |
+31 880062100 |
Malaysia |
+800 |
6008 |
6008/1 800 88 1908/+65 62430496 |
|
Middle East |
+31 880062100 |
Philippines |
1 800 1441 0159 |
|||
Africa |
+31 880062100 |
Singapore |
+800 |
6008 |
6008/+800 608 6008/+65 62430496 |
|
|
|
Taiwan |
+800 |
6008 |
6008/+65 62430496 |
|
* Toll free number available in the following countries: Austria, Belgium, Denmark, France, Germany, Ireland, Italy, Netherlands, Norway, Spain, Sweden, Switzerland, United Kingdom.

Table of Contents
WD® Service and Support . . . . . . . . . . . . . . . . . . . . . . . . . . . . . . . . 2
1 Important User Information . . . . . . . . . . . . . . . . . . . . 1
Important Safety Instructions . . . . . . . . . . . . . . . . . . . . . . . . . . . . . . 1
Recording Your WD Product Information . . . . . . . . . . . . . . . . . . . . . 2
Registering Your WD Product . . . . . . . . . . . . . . . . . . . . . . . . . . . . . 2
2 Product Overview . . . . . . . . . . . . . . . . . . . . . . . . . . . . 3
Features. . . . . . . . . . . . . . . . . . . . . . . . . . . . . . . . . . . . . . . . . . . . . . 3
Package Contents . . . . . . . . . . . . . . . . . . . . . . . . . . . . . . . . . . . . . . 5
Components . . . . . . . . . . . . . . . . . . . . . . . . . . . . . . . . . . . . . . . . . . 6
3 Getting Started . . . . . . . . . . . . . . . . . . . . . . . . . . . . . 10
Installing the Router on the Network . . . . . . . . . . . . . . . . . . . . . . . 10 Using the Setup CD . . . . . . . . . . . . . . . . . . . . . . . . . . . . . . . . . . . . 10 Using a Browser for Setup (Windows or Mac) . . . . . . . . . . . . . . . . 13 Installing WD Software from the CD (Optional) . . . . . . . . . . . . . . . . 18
4 Basic Settings and Tasks . . . . . . . . . . . . . . . . . . . . . 20
Opening My Dashboard After Setup. . . . . . . . . . . . . . . . . . . . . . . . 20 Understanding My Dashboard . . . . . . . . . . . . . . . . . . . . . . . . . . . . 21 Connecting to the Internet . . . . . . . . . . . . . . . . . . . . . . . . . . . . . . . 23 Configuring Wireless Settings . . . . . . . . . . . . . . . . . . . . . . . . . . . . 24 Setting Up External Storage . . . . . . . . . . . . . . . . . . . . . . . . . . . . . 25 Adding a Device . . . . . . . . . . . . . . . . . . . . . . . . . . . . . . . . . . . . . . 27
5 Advanced Settings . . . . . . . . . . . . . . . . . . . . . . . . . . 30
Typical Advanced Settings Screen . . . . . . . . . . . . . . . . . . . . . . . . . 30
Advanced WAN (Internet) Category . . . . . . . . . . . . . . . . . . . . . . . . 31
Advanced Wireless Category . . . . . . . . . . . . . . . . . . . . . . . . . . . . 36
TABLE OF CONTENTS – i

|
Advanced LAN Category . . . . . . . . . . . . . . . . . . . . . . . . . . . . . . . |
38 |
|
Security Settings Category . . . . . . . . . . . . . . . . . . . . . . . . . . . . . . |
42 |
|
Additional Features Category . . . . . . . . . . . . . . . . . . . . . . . . . . . . |
45 |
|
Admin Category . . . . . . . . . . . . . . . . . . . . . . . . . . . . . . . . . . . . . |
50 |
6 |
Performing Advanced Tasks . . . . . . . . . . . . . . . . . . |
55 |
|
Enabling Guest Access . . . . . . . . . . . . . . . . . . . . . . . . . . . . . . . . |
55 |
|
Setting Up Parental Controls . . . . . . . . . . . . . . . . . . . . . . . . . . . . |
56 |
|
Changing the Administrator's Password . . . . . . . . . . . . . . . . . . . |
62 |
|
Accessing Files Stored on an Attached USB Drive . . . . . . . . . . . . |
62 |
|
Updating the Router’s Firmware . . . . . . . . . . . . . . . . . . . . . . . . . |
66 |
|
Restoring the Router to Factory Defaults . . . . . . . . . . . . . . . . . . . |
67 |
|
Rebooting the Router . . . . . . . . . . . . . . . . . . . . . . . . . . . . . . . . . |
67 |
|
Using the Router as an Access Point . . . . . . . . . . . . . . . . . . . . . . |
68 |
|
Configuring UPnP . . . . . . . . . . . . . . . . . . . . . . . . . . . . . . . . . . . . |
71 |
|
Enabling Port Forwarding . . . . . . . . . . . . . . . . . . . . . . . . . . . . . . |
71 |
|
Accessing My Net View . . . . . . . . . . . . . . . . . . . . . . . . . . . . . . . . |
73 |
7 |
Installing and Using WD Print Share . . . . . . . . . . . . |
74 |
|
Installing WD Print Share (Windows) . . . . . . . . . . . . . . . . . . . . . . . |
74 |
|
Using WD Print Share. . . . . . . . . . . . . . . . . . . . . . . . . . . . . . . . . . |
75 |
8 |
Troubleshooting. . . . . . . . . . . . . . . . . . . . . . . . . . . . . |
76 |
9 |
Regulatory and Warranty Information . . . . . . . . . . . |
77 |
|
Regulatory Compliance . . . . . . . . . . . . . . . . . . . . . . . . . . . . . . . . |
77 |
|
Warranty Information (All Regions Except Australia/New Zealand). 82 |
|
|
Warranty Information (Australia/New Zealand only) . . . . . . . . . . . . |
82 |
|
GNU General Public License (“GPL”) . . . . . . . . . . . . . . . . . . . . . . |
84 |
Appendix: Technical Specifications. . . . . . . . . . . . .85
My Net N600/N750 . . . . . . . . . . . . . . . . . . . . . . . . . . . . . . . . . . . 85
My Net N900 . . . . . . . . . . . . . . . . . . . . . . . . . . . . . . . . . . . . . . . . 86
Index . . . . . . . . . . . . . . . . . . . . . . . . . . . . . . . . . . . . . .87
TABLE OF CONTENTS – ii

IMPORTANT USER INFORMATION
1 Important User Information
Important Safety Instructions
This device is designed and manufactured to assure personal safety. Improper use can result in electric shock or fire hazard. The safeguards incorporated into this unit will protect you if you observe the following instructions for installation, use, and servicing.
Read these instructions.
Keep these instructions.
Heed all warnings.
Follow all instructions.
Do not use this apparatus near water.
Clean only with dry cloth.
Do not block any ventilation openings. Install in accordance with the manufacturer’s instructions.
Do not install near any heat sources such as radiators, heat registers, stoves, or other apparatus (including amplifiers) that produce heat.
Protect the power cord from being walked on or pinched particularly at plugs, convenience receptacles, and the point where they exit from the apparatus.
Only use attachments/accessories specified by the manufacturer.
Unplug this apparatus during lightning storms or when unused for long periods of time.
Refer all servicing to qualified service personnel. Servicing is required when the apparatus has been damaged in any way, such as power-supply cord or plug is damaged, liquid has been spilled or objects have fallen into the apparatus, the apparatus has been exposed to rain or moisture, does not operate normally, or has been dropped.
Carefully read and follow the Quick Install Guide and User Manual.
Do not operate this device outside the temperature range of 5°C–35°C (41°F–95°F).
Do not drop or shake the device.
Do not move the device when it is powered on.
Power supply cords should be routed so that they are not likely to be walked on or pinched by items placed upon them or against them.
Do not overload wall outlets.
For additional safety information, refer to www.wdc.com.
MY NET ROUTERS |
1 |
USER MANUAL |
|

IMPORTANT USER INFORMATION
Recording Your WD Product Information
In the following table, write the serial and model numbers of your new WD product. You can find this information on the label on the bottom of the device. You should also note the date of purchase. This information may be required when requesting technical support.
Serial Number:
Model Number:
Purchase Date:
System and Software Notes:
Registering Your WD Product
Your WD product includes 30 days of free technical support during the applicable warranty period for your product. The 30-day period commences on the date of your first telephone contact with WD technical support. Register your WD product online at http://register.wdc.com.
MY NET ROUTERS |
2 |
USER MANUAL |
|

PRODUCT OVERVIEW
2 Product Overview
Thank you for purchasing the My Net™ router. This user manual provides
step-by-step instructions for installing and using your new router. For the latest WD product information and news, visit our website at www.wdc.com.
This chapter contains the following topics:
Features
Package Contents
Components
Getting Started
Features
The WD My Net dual band routers (My Net N600, N750, and N900 Pro) look similar, their user interfaces are similar, and they work in much the same way. The table below summarizes the features that are different are different.
Feature |
My Net N600 |
My Net N750 |
My Net N900 |
|
|
|
|
|
|
|
|
Wireless speed1 |
300 Mbps + |
300 Mbps + |
450 Mbps + |
|
300 Mbps |
450 Mbps |
450 Mbps |
|
|
|
|
Wired speed |
10/100 Fast Ethernet |
10/100/1000 Gigabit |
10/100/1000 Gigabit |
|
|
Ethernet |
Ethernet |
|
|
|
|
USB ports |
(1) USB 2.0 |
(2) USB 2.0 |
(2) USB 2.0 |
|
|
|
|
Ethernet ports |
(4) RJ45 |
(4) RJ45 |
(7) RJ45 |
|
|
|
|
WMM QoS |
3 |
3 |
3 |
|
|
|
|
FasTrack™ |
3 |
3 |
X |
|
|
|
|
FasTrack Plus |
X |
X |
3 |
|
|
|
|
Note: For detailed technical specifications, see “Appendix: Technical
Specifications” on page 85.
The following features are common to all of the routers unless specified otherwise.
Easy Setup (for Windows Computers) – Installation software that connects your router and sets up Wi-Fi security, creating a secure wireless home network.
Simultaneous dual band speed1 – Enables you to enjoy smooth, uninterrupted video streaming and online gaming.
Wired speed – For My Net N600 and N750 routers, connect up to four Ethernet-enabled devices for fast wired speed within your network. For My Net N900 routers, connect up to seven such devices.
1.Maximum wireless performance rate derived from IEEE standard 802.11 specifications. Actual data throughput and wireless coverage may vary based on wireless network capacity, data throughput rate, range and coverage. Performance depends on factors including distance from the access point, volume of network traffic, building materials and construction, operating system used, configuration of wireless products used, interference and other adverse conditions.
MY NET ROUTERS |
3 |
USER MANUAL |
|

PRODUCT OVERVIEW
Exclusive FasTrack™ and FasTrack Plus technology – Instantly detect entertainment traffic and deliver smart real-time prioritization for smooth HD streaming to your smart TV, tablet, smartphone, computers, and other Wi-Fi connected devices.
Plug USB storage and printers into your router – Gives you the flexibility to add storage and share files as well as to connect a printer and print from any computer within your network.
DLNA/UPnP media server – An external hard drive connected to a USB port on the My Net router can be used to stream photos, video, and music to any media client on the network.
Internet Security and Parental Controls – Use this feature to block web sites or content based on your preferences.
Guest access – Set up guest access to allow others to use your Internet connection without joining your personal network. While guests will have access to the Internet, they will not have access to your personal files or local resources such as printers.
WPS (Wi-Fi Protected Setup™) security – Use the one-touch WPS button on your router to establish a secure connection between the My Net router and other WPS-enabled Wi-Fi devices such as tablets and notebook computers.
Keep your network up and running – The included network diagnostics tool monitors your network for you. It shows how many devices are on your network, continually analyzes common network connectivity issues and helps correct them when they occur so you are back up and running quickly.
Advanced settings – Users who want to customize and have control over their router can use the Advanced Settings module on the router’s internal My Dashboard user interface.
Additional software – The product CD provides additional software:
WD Quick View runs in the background on your computer and notifies you of important warnings or events on the network. For example, it opens the
My Dashboard interface, shows network attached storage status, and opens the public share of an attached USB storage device.
WD Print Share enables users to share a printer connected to a USB port on the My Net router.
My Net View diagnoses and detects any issue within the network and recommends ways to address the issue. WD Customer Service also uses this software to get necessary information to support customers with network issues.
MY NET ROUTERS |
4 |
USER MANUAL |
|
PRODUCT OVERVIEW
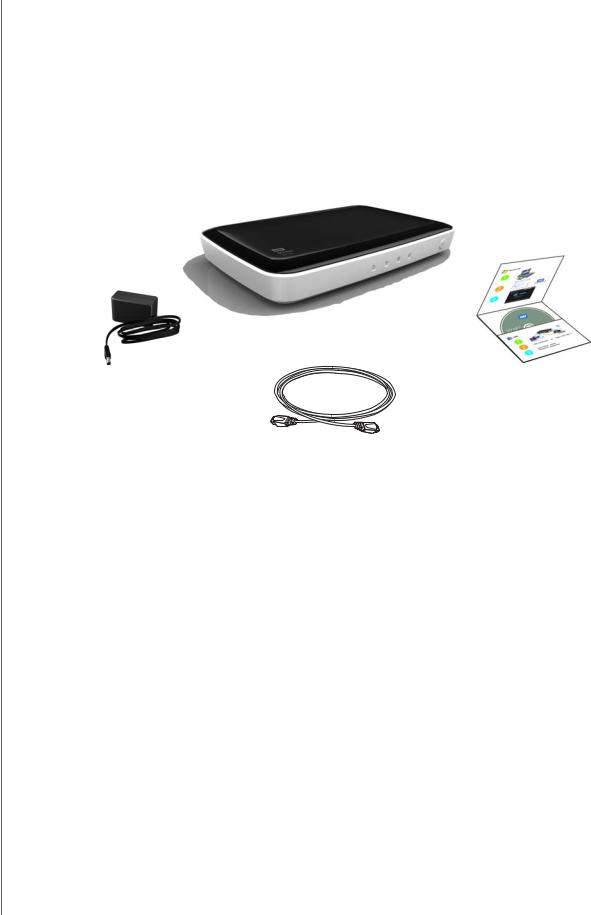
Package Contents
In addition to your router, the package contains:
Network (Ethernet) cable
AC Power adapter
Setup CD containing setup software, additional software, and product documentation
Quick Install Guide on the CD cover
Quick Install Guide
My Net Router
Setup CD
AC power adapter
Ethernet cable
Accessories
For U.S. residents, visit www.shopwd.com to view additional accessories available for your My Net router. For users outside the U.S., visit http://support.wdc.com.
MY NET ROUTERS |
5 |
USER MANUAL |
|
PRODUCT OVERVIEW
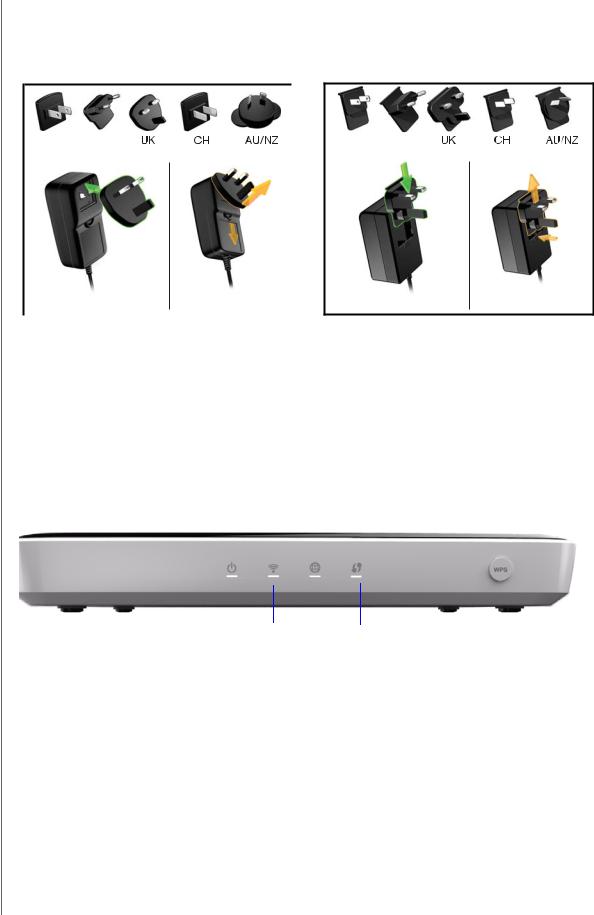
AC Power Adapters
The AC power adapter varies, depending on your location. Some locations do not require a power plug clip. Units sold in those locations will have a fixed power plug. Refer to the illustrations below.
US/JA/TW EU/KO
US/JA/TW EU/KO
Installing |
Removing |
Installing |
Removing |
Components
Front Panel
The front panels of the My Net N600, My Net N750, and My Net N900 routers are identical.
Power LED Internet LED |
Wi-Fi Protected Setup |
||||
(WPS) button |
|||||
|
|
|
|||
|
|
|
|||
|
|
|
|
|
|
|
|
|
|
|
|
|
|
|
|
|
|
Wireless LED Wi-Fi Protected Setup LED
MY NET ROUTERS |
6 |
USER MANUAL |
|
|
|
PRODUCT OVERVIEW |
|
Front panel LED indicators |
|||
|
|
|
|
|
LED |
Description |
|
|
|
|
|
|
|
|
|
|
Power |
Steady when the router is powered on and operational; flashes slowly |
|
|
|
during bootup, firmware upgrades, and system self-tests. |
|
|
|
|
|
|
Wireless |
Lit when wireless connection is active. |
|
|
|
|
|
|
Internet |
Lit when Internet connection is active. |
|
|
|
|
|
|
Wi-Fi Protected |
When connecting the router and a wireless device (e.g., a printer) that |
|
|
Setup (WPS) |
you want to add to the network, the LED indicates the status of |
|
|
|
WPS: |
|
|
|
• When WPS is connecting a network device, the light blinks slowly. |
|
|
|
• If an error occurs during setup, the light blinks quickly. |
|
|
|
• After setup, light is solid when WPS is active. |
|
|
|
|
|
Front button |
|
|
|
|
|
|
|
|
Button |
Description |
|
|
|
|
|
|
WPS (Wi-Fi |
Enables you to configure Wi-Fi security on WPS-enabled devices. |
|
|
Protected |
|
|
|
Setup) button |
|
|
|
|
|
|
Back Panel
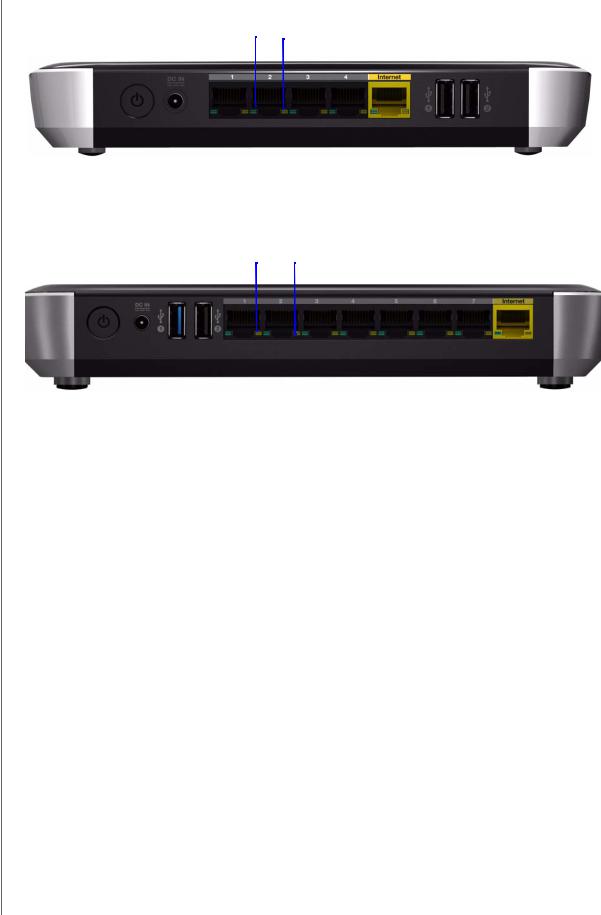
The back panels of the three My Net router models are similar except for the number of USB and Ethernet ports.
My Net N600 router
Link LED (Green)
|
|
|
|
|
|
|
|
|
|
|
|
|
|
|
|
|
|
|
|
|
|
|
|
|
|
|
|
|
|
|
|
|
|
|
|
|
|
|
|
|
|
|
|
Power button |
|
|
Ethernet ports |
|
|
|
USB 2.0 port |
|||
|
|
|||||||||
|
|
Power port |
Internet port |
|||||||
|
|
|
|
|
|
|
||||
MY NET ROUTERS |
7 |
USER MANUAL |
|
PRODUCT OVERVIEW
My Net N750 router
Link LED (Green) Activity LED (Yellow)
|
|
|
|
|
|
|
|
|
|
|
|
|
|
|
|
|
|
|
|
|
|
|
|
|
|
|
|
|
|
|
|
|
|
|
|
|
|
|
|
|
|
|
|
|
|
|
|
|
|
|
|
|
|
|
Power button |
|
|
Ethernet ports |
Internet port |
USB 2.0 ports |
|||||
|
Power port |
|
|
|
||||||
|
|
|
|
|
|
|
||||
My Net N900 router
Link LED (Green) Activity LED (Yellow)
|
|
|
|
|
|
|
|
|
|
|
|
|
|
|
|
|
|
|
|
|
|
|
|
|
|
|
|
|
|
|
|
|
|
|
|
|
|
|
|
|
|
|
|
Power button |
USB 2.0 ports |
Ethernet ports |
Internet port |
|||||||
|
|
|
|
|
|
|||||
|
|
|
|
|
|
|
|
|
|
|
Power port
Component |
How to use |
|
|
|
|
Internet (WAN) port (yellow) |
Use an Ethernet (network) cable to connect this port to a modem. |
|
|
Ethernet (LAN) ports |
Use Ethernet (network) cables to connect wired network devices |
|
to these ports. |
|
|
Power port |
Use the included AC power adapter to connect this port to the |
|
power source. |
|
|
Power button |
Press to turn on the router. Press again to turn off the router. |
|
|
USB 2.0 port(s) |
Connect storage devices such as the WD Passport or a printer to |
|
your network so you can share files and resources. |
|
|
MY NET ROUTERS |
8 |
USER MANUAL |
|

|
|
|
|
PRODUCT OVERVIEW |
|
Port LEDS |
|
|
|
|
|
|
|
|
|
|
|
|
Component |
|
LED |
Description |
|
|
|
|
|
|
|
|
Ethernet ports |
|
Link LED (Green) |
Steady on when a cable connects the |
|
|
|
|
|
port to a network device’s Ethernet port. |
|
|
|
|
|
|
|
|
|
|
Activity LED (Yellow) |
Blinks to indicate network activity on |
|
|
|
|
|
that Ethernet port. |
|
|
|
|
|
|
|
|
Internet port |
|
Link LED (Green) |
On when a cable connects the port to |
|
|
|
|
|
the modem. |
|
|
|
|
|
|
|
|
|
|
Activity LED (Yellow) |
Blinks to indicate network activity on |
|
|
|
|
|
that port. |
|
|
|
|
|
|
|
Bottom (not shown) |
|
|
|
|
|
|
|
|
|
|
|
|
Component |
|
Description |
|
|
|
|
|
|
|
|
|
|
|
|
|
|
|
Reset button |
|
To reset your My Net router to factory defaults, press and hold the |
||
|
|
|
Reset button for at least 10 seconds. When the reset starts, the |
||
|
|
|
Power LED blinks. |
|
|
|
|
|
|
|
|
MY NET ROUTERS |
9 |
USER MANUAL |
|
GETTING STARTED
3 Getting Started
This chapter contains the following topics:
Installing the Router on the Network
Using the Setup CD
Using a Browser for Setup (Windows or Mac)
Installing WD Software from the CD (Optional)
Installing the Router on the Network
Two methods install the My Net router on your network:
Setup CD – The Easy Setup utility for Windows discovers and installs the router on the network. Use the utility to configure the Internet connection, wireless network, and install additional WD software.
Browser – Mac users must use a web browser to set up the router. Windows users may also use a web browser to set up the router.
Using the Setup CD
Starting Easy Setup (Windows)
Windows XP
1.Insert the Setup CD into your computer’s CD/DVD drive.
If AutoRun (AutoPlay) is enabled, the Choose your setup option screen displays.
If AutoRun (AutoPlay) is disabled, click Start > My Computer and locate the My Net router CD drive under Devices with Removable Storage. Double-click the CD, and then double-click EasySetup.exe to display the Choose your setup option screen.
2.Continue to “Setting up a New Router” on page 11.
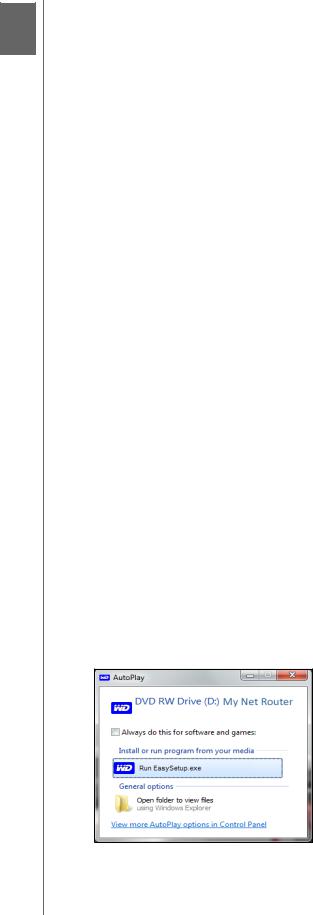
Windows Vista/Windows 7
1.Insert the Setup CD into your computer’s CD/DVD drive.
2.If a dialog box displays, click Run EasySetup.exe:
3.If a dialog box does not display, click Start or  > Computer and locate the My Net router CD drive under Devices with Removable Storage.
MY NET ROUTERS |
10 |
USER MANUAL |
|
GETTING STARTED
4.Double-click the CD, and then double-click EasySetup.exe to display the Choose your setup option screen.
5.Continue to “Setting up a New Router” below.
Setting up a New Router
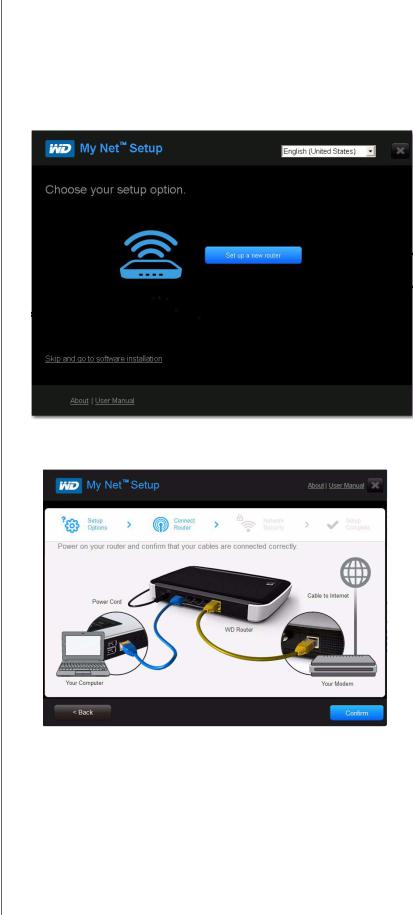
1.On the Choose your setup option screen, click Set up a new router. A screen showing a connected router appears:
MY NET ROUTERS |
11 |
USER MANUAL |
|
GETTING STARTED
2. Make sure that your router is connected properly and click Confirm.
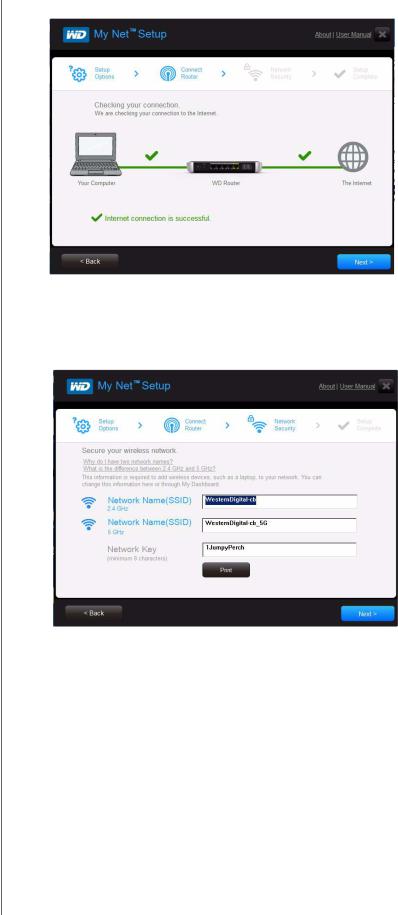
3.The utility checks your connection to the router and the Internet. When both connections are confirmed, click Next.
4.Follow the instructions in the Easy Setup wizard for configuring the router’s wireless settings:
5. Click Print to make a hard copy of the Wireless network settings.
MY NET ROUTERS |
12 |
USER MANUAL |
|
GETTING STARTED
6. Click Next to complete the router's wireless settings.
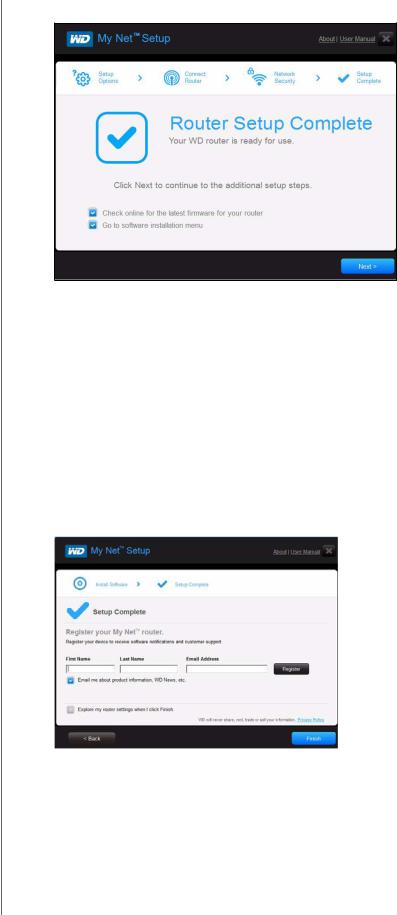
7.On the Setup Complete screen, do one of the following:
a.Check online for the latest firmware for your router or go to the software installation menu and select the appropriate check box(es).
Note: For more information on these processes, see “Updating the Router’s Firmware” on page 66 and “Installing WD Software from the CD (Optional)” on page 18.
b.To use or configure the router without selecting the other options, clear the check boxes and click Next.
Note: You can install the software from the Setup CD and update the firmware from the My Dashboard user interface at any time.
8.Register your router to receive software notifications and customer support. Enter your name, email address, and click Register:
9.To configure additional router settings, continue with “Basic Settings and Tasks” on page 20.
MY NET ROUTERS |
13 |
USER MANUAL |
|
GETTING STARTED
Using a Browser for Setup (Windows or Mac)
To connect a Mac computer to a My Net router you must use a browser.
Note: Windows users can set up the router using a browser instead of Easy Setup.
The initial physical connection may be wired, as described in “Connecting the Router Physically” below, or wireless, as described in “Connecting to the Router Wirelessly (WD SSID)” on page 15.
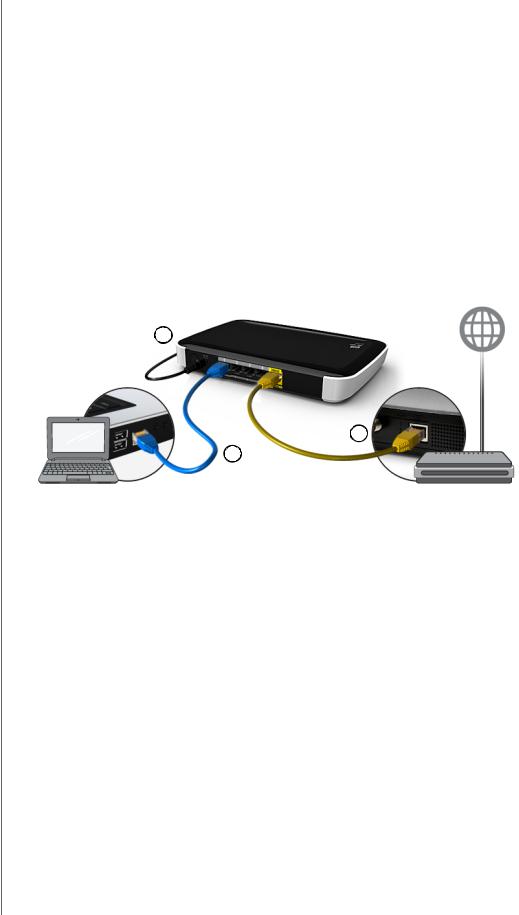
Connecting the Router Physically
While the installation wizards for the router lead you through the steps for physically connecting the router, this section is for users who want more specific information and for those who simply want to connect the router and start using it.
1
2
3
1.Connect the power cable to the router’s DC connector and into an AC power outlet. Press the On/Off button on the back of the router once to turn it on. The four LEDs on the front panel of the router light up one by one as it boots up.
2.Connect the included yellow Internet (Ethernet) cable to the router’s Internet port and the the modem.
Note: One Ethernet (network) cable is included in the product package. You can purchase additional cables from the WD Store or another source.
3.Using Ethernet cables, connect network devices or computers to the router’s unused Ethernet ports.
4.Continue to “Configuring a New Router” on page 15.
MY NET ROUTERS |
14 |
USER MANUAL |
|
GETTING STARTED
Connecting to the Router Wirelessly (WD SSID)
If you are using a desktop computer with a wireless card or a laptop computer with wireless capability, you can connect wirelessly to the router immediately. The same is true of mobile wireless devices with Wi-Fi enabled.
1.Make sure your computer's Wi-Fi is turned on.
2.Select the network WesternDigital from the list of wireless networks on the computer’s or device’s screen, and connect. By default there is no password. Continue to Configuring a New Router, below.
Configuring a New Router
1.Open a browser. (See requirements in “Appendix: Technical Specifications” on page 85.)
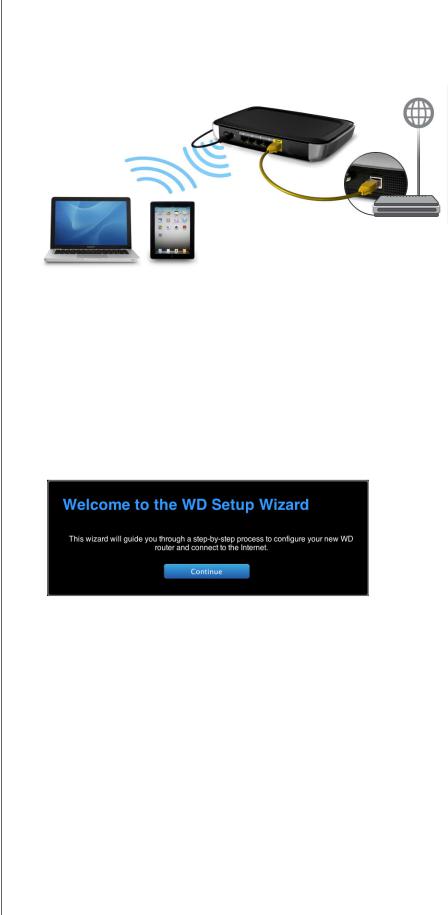
2.In the address field, type http://wdrouter or http://192.168.1.1. The Welcome screen displays:
3. Click Continue to display the first Connect to Internet screen.
MY NET ROUTERS |
15 |
USER MANUAL |
|
GETTING STARTED
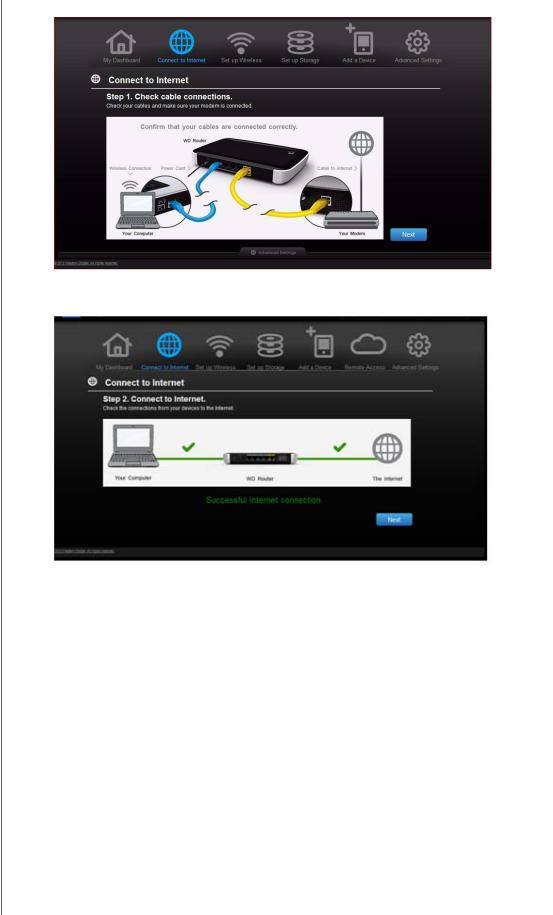
4. Make sure that your router is connected properly and click Confirm.
5.When both connections are confirmed, click Next.
6.Follow the installation wizard’s instructions.
MY NET ROUTERS |
16 |
USER MANUAL |
|

GETTING STARTED
7.When the Set up Wireless screen displays, you can change the Network Name (SSID) and Security Mode for more protection. (See “Configuring Wireless Settings” on page 24 for more information.)
Note: If you do so, you will have to connect your computer or wireless device to the new SSID.
8.Click Save.
9.Complete the installation wizard, including installing WD Software (optional). For more information, see “Installing WD Software from the CD (Optional)” on page 18.
10.Click Finish. The My Dashboard home screen displays.
Note: To configure your router, continue with “Basic Settings and Tasks” on page 20.
MY NET ROUTERS |
17 |
USER MANUAL |
|
GETTING STARTED
Installing WD Software from the CD (Optional)
Easy Setup (Windows)
Use Easy Setup to install additional WD software on a Windows computer at any time.
1.Start Easy Setup as described in “Using the Setup CD” on page 10.
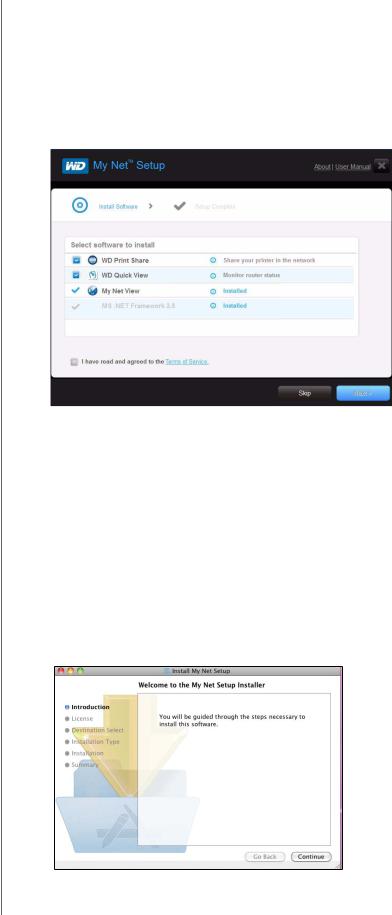
2.On the Choose your setup option screen, click Skip and go to software installation. A list of available software applications displays:
3. Click the check boxes for the software you want to install and click Next.
Note: For information about WD Quick View, see “Using WD Quick View (Windows or Mac)” on page 63. For information about WD Print Share, see “Installing and Using WD Print Share” on page 74. For information about My Net View, see “Accessing My Net View” on page 73.
4. Complete the wizards to install the software, and then click Finish.
My Net Software (Mac)
Use My Net Setup on the Setup CD to install WD Printshare and WD Quick View on a Mac computer.
1.Insert the Setup CD into the CD drive of your Mac computer to display the Welcome to the My Net Setup Installer screen.
Note: As you follow the steps in the wizard, they appear in bold letters in the list on the left
MY NET ROUTERS |
18 |
USER MANUAL |
|
GETTING STARTED
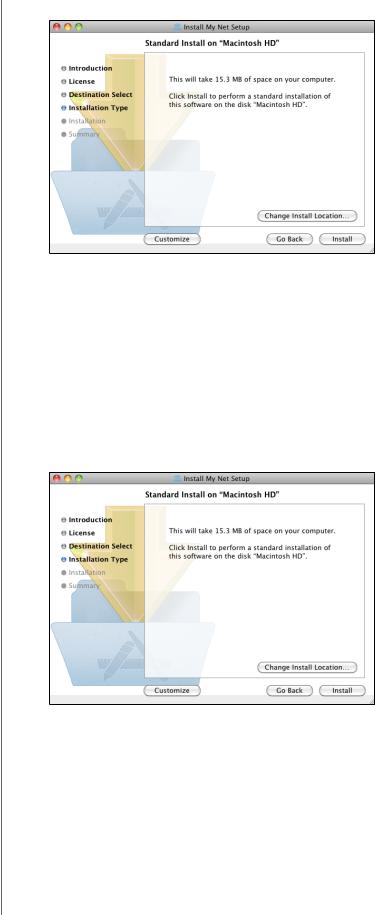
2.Click Continue to display the Standard Install on “Macintosh HD” screen, which provides several options:
To change the where the applications should be installed, click Change Install Location.
To customize the installation, click Customize and select the applications you want to install.
To perform a standard installation of WD Quick View and WD Print Share, click
Install.
Note: For information about WD Quick View, see “Using WD Quick View (Windows or Mac)” on page 63. For information about WD Print Share, see “Installing and Using WD Print Share” on page 74.
MY NET ROUTERS |
19 |
USER MANUAL |
|
BASIC SETTINGS AND TASKS
4 Basic Settings and Tasks
This chapter contains the following topics:
Opening My Dashboard After Setup
Understanding My Dashboard
Opening My Dashboard After Setup
Connecting to the Internet
Configuring Wireless Settings
Setting Up External Storage
Adding a Device
Opening My Dashboard After Setup
To open the My Net router dashboard after initial configuration:
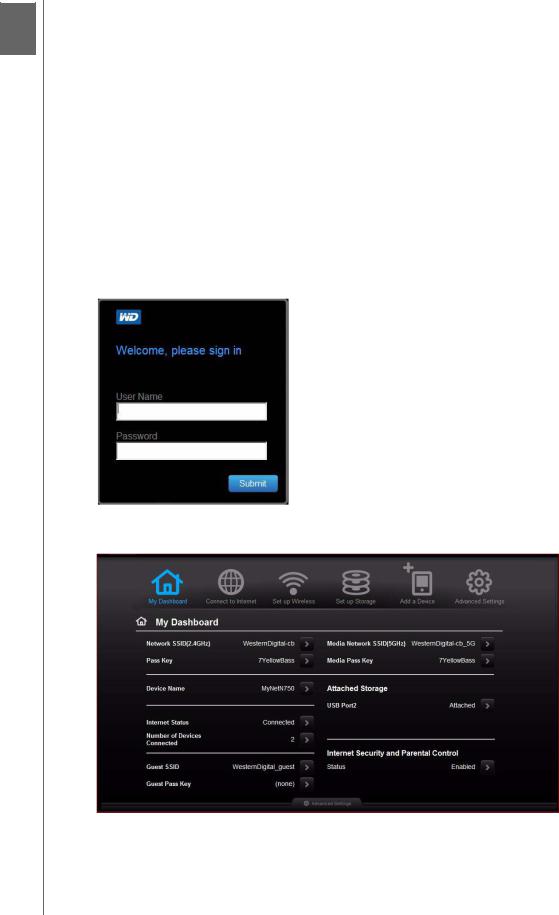
1.Enter http://wdrouter or http://192.168.1.1 in the address field of your browser. The Welcome screen displays.
2.Enter the router’s username (default value is admin) and password (default value is lowercase password) and click Submit. The My Dashboard home screen displays:
MY NET ROUTERS |
20 |
USER MANUAL |
|

BASIC SETTINGS AND TASKS
Understanding My Dashboard
Basic Dashboard Icons
The icons at the top of the screen open modules and wizards for performing important tasks. The red Alert icon at the upper right of the screen displays notices concerning the router.
Icon |
Name |
Actions |
See ... |
|
|
|
|
|
My Dashboard |
Review and change current settings. |
“Basic Settings and |
|
|
|
Tasks” on page 20 |
|
|
|
|
|
Connect to |
Connect the router to the Internet and |
“Connecting to the |
|
Internet |
follow the wizard through the process |
Internet” on page 23 |
|
|
of setting up the Internet connection. |
|
|
|
|
|
|
Set up Wireless |
Configure wireless settings such as |
“Configuring Wireless |
|
|
network name and security. |
Settings” on page 24 |
|
|
|
|
|
Set up Storage |
Follow the wizard guiding you through |
“Setting Up External |
|
|
setting up a storage device connected |
Storage” on page 25 |
|
|
to the USB port of the router. |
|
|
|
|
|
|
Add a Device |
Add a wireless device and configure its |
“Adding a Device” on |
|
|
security settings. |
page 27 |
|
|
|
|
|
Advanced |
Configure advanced settings for |
“Advanced Settings” on |
|
Settings |
Internet connections, wireless |
page 30 |
|
|
connections, storage, devices, system |
|
|
|
administration, security, and the local |
|
|
|
network (LAN) settings. |
|
|
|
|
|
|
Alert |
Click to display recent alerts about |
|
|
|
new firmware and network issues and |
|
|
|
shortcuts to important settings. |
|
|
|
|
|
MY NET ROUTERS |
21 |
USER MANUAL |
|
BASIC SETTINGS AND TASKS
Reviewing Current Settings 
The My Dashboard’s home screen is a simple snapshot of the router’s configuration with the most essential information in one screen. It includes summary information for wireless
settings, Internet status, guest network, parental control, and attached hard drive(s).
1.Review the following settings on the My Dashboard home page. If you used
Easy Setup, you may have changed the settings from the defaults already. If not, you can change them here.
Setting |
Description |
|
|
|
|
Network SSID (2.4 GHz) |
Unique identifier of the 2.4 GHz network. |
|
|
Pass Key |
Password for accessing the 2.4 GHz network. |
|
|
Device Name |
Name assigned to the router. |
|
|
Internet Status |
Router is Connected to or Disconnected from |
|
the Internet. |
|
|
Number of Devices Connected |
Number of devices connected to the router. |
|
|
Guest SSID |
To provide guests with limited access to the |
|
Internet, you can create a guest network. The |
|
guest network is disabled by default. |
|
|
Guest Pass Key |
Password for accessing the guest network. |
|
|
Media Network SSID (5 GHz) |
Unique identifier of the 5 GHz network. This |
|
network is generally used for media and smart |
|
devices because it minimizes interference that |
|
might interrupt media streaming. |
|
|
Media Pass Key |
Password for accessing the 5 GHz network. |
|
|
MY NET ROUTERS |
22 |
USER MANUAL |
|
|
BASIC SETTINGS AND TASKS |
||
|
|
|
|
Setting |
Description |
|
|
|
|
|
|
Attached Storage |
Status of a storage device connected to the |
|
|
|
router’s USB port. |
|
|
|
|
|
|
Internet Security and Parental Control |
If status is Enabled, this feature controls access |
||
status |
to the Internet by restricting dangerous or |
||
|
undesirable web access. Disabled by default. |
||
|
See “Setting Up Parental Controls” on page 56. |
||
|
|
|
|
2.To change a setting, click the arrow to the right of the setting to display another screen or a list of options.
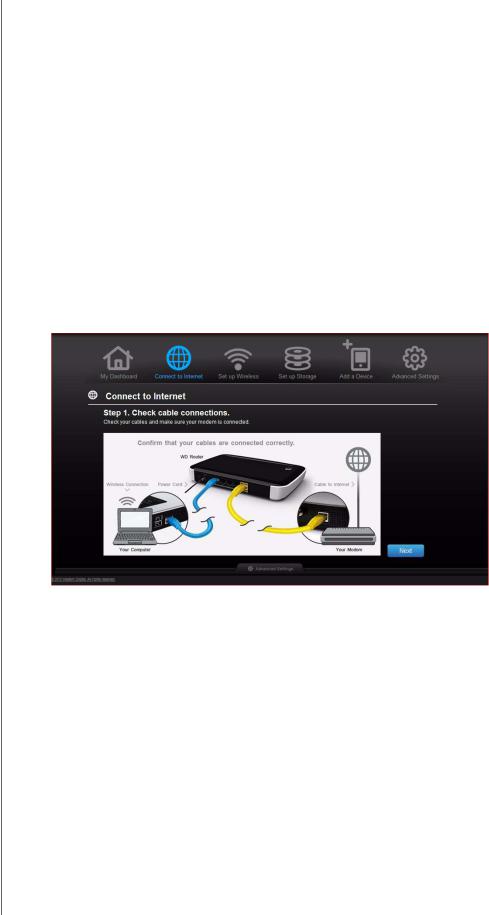
Connecting to the Internet 
To check or troubleshoot your Internet connection:
1.Click the Connect to Internet icon to display a diagram showing you how to connect the router cables.
2.Click Next. A screen displays the status of the connections: from the computer to the router and from the router to the Internet.
3.When a connection succeeds, a check mark displays above it.
a.Click Next to display the Congratulations screen.
b.Click Finished to display the My Dashboard home page again.
4.If the connection to the Internet fails:
a.Click Next and enter your Internet service provider account PPPoE Username and
Password.
b.Click Next to display the My Dashboard home page again.
MY NET ROUTERS |
23 |
USER MANUAL |
|
BASIC SETTINGS AND TASKS
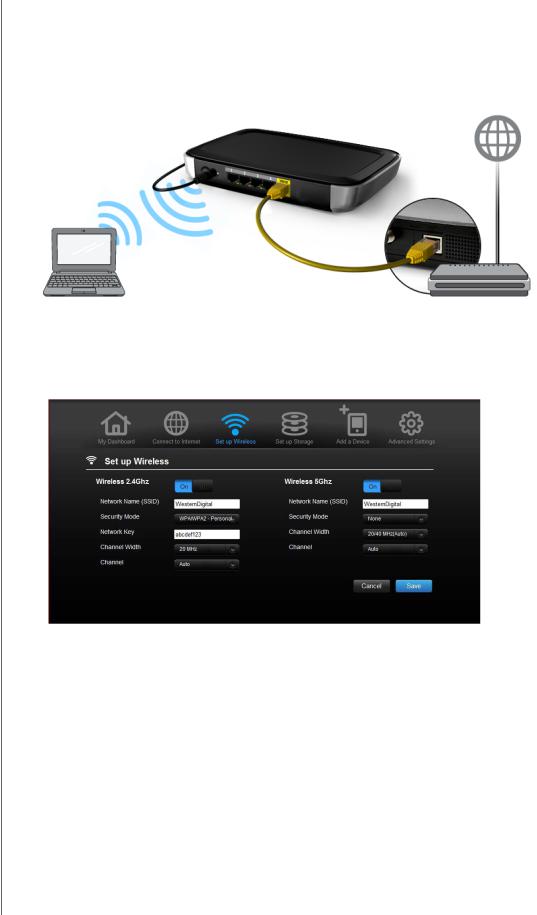
Configuring Wireless Settings 
Once you configure wireless settings on the router, you can easily connect wireless devices such as notebooks, laptops, tablets, PDAs, or smart phones to the Internet and to other devices on the network.
To configure basic wireless settings:
1.Click the Set Up Wireless icon at the top of the page. The Set Up Wireless screen displays.
2.View or modify the required wireless settings for the 2.4 GHz network and the 5 GHz network.
Note: You can change some settings on this screen. See “Advanced Wireless Category” on page 36 for additional wireless settings.
Setting |
Description |
|
|
On/Off |
Wireless service is enabled by default. To disable, toggle to the |
|
Off setting. |
|
|
Network Name |
Name given to the wireless network. |
(SSID) |
|
|
|
MY NET ROUTERS |
24 |
USER MANUAL |
|
 Loading...