


My Book World Edition II
Table of contents
 Loading...
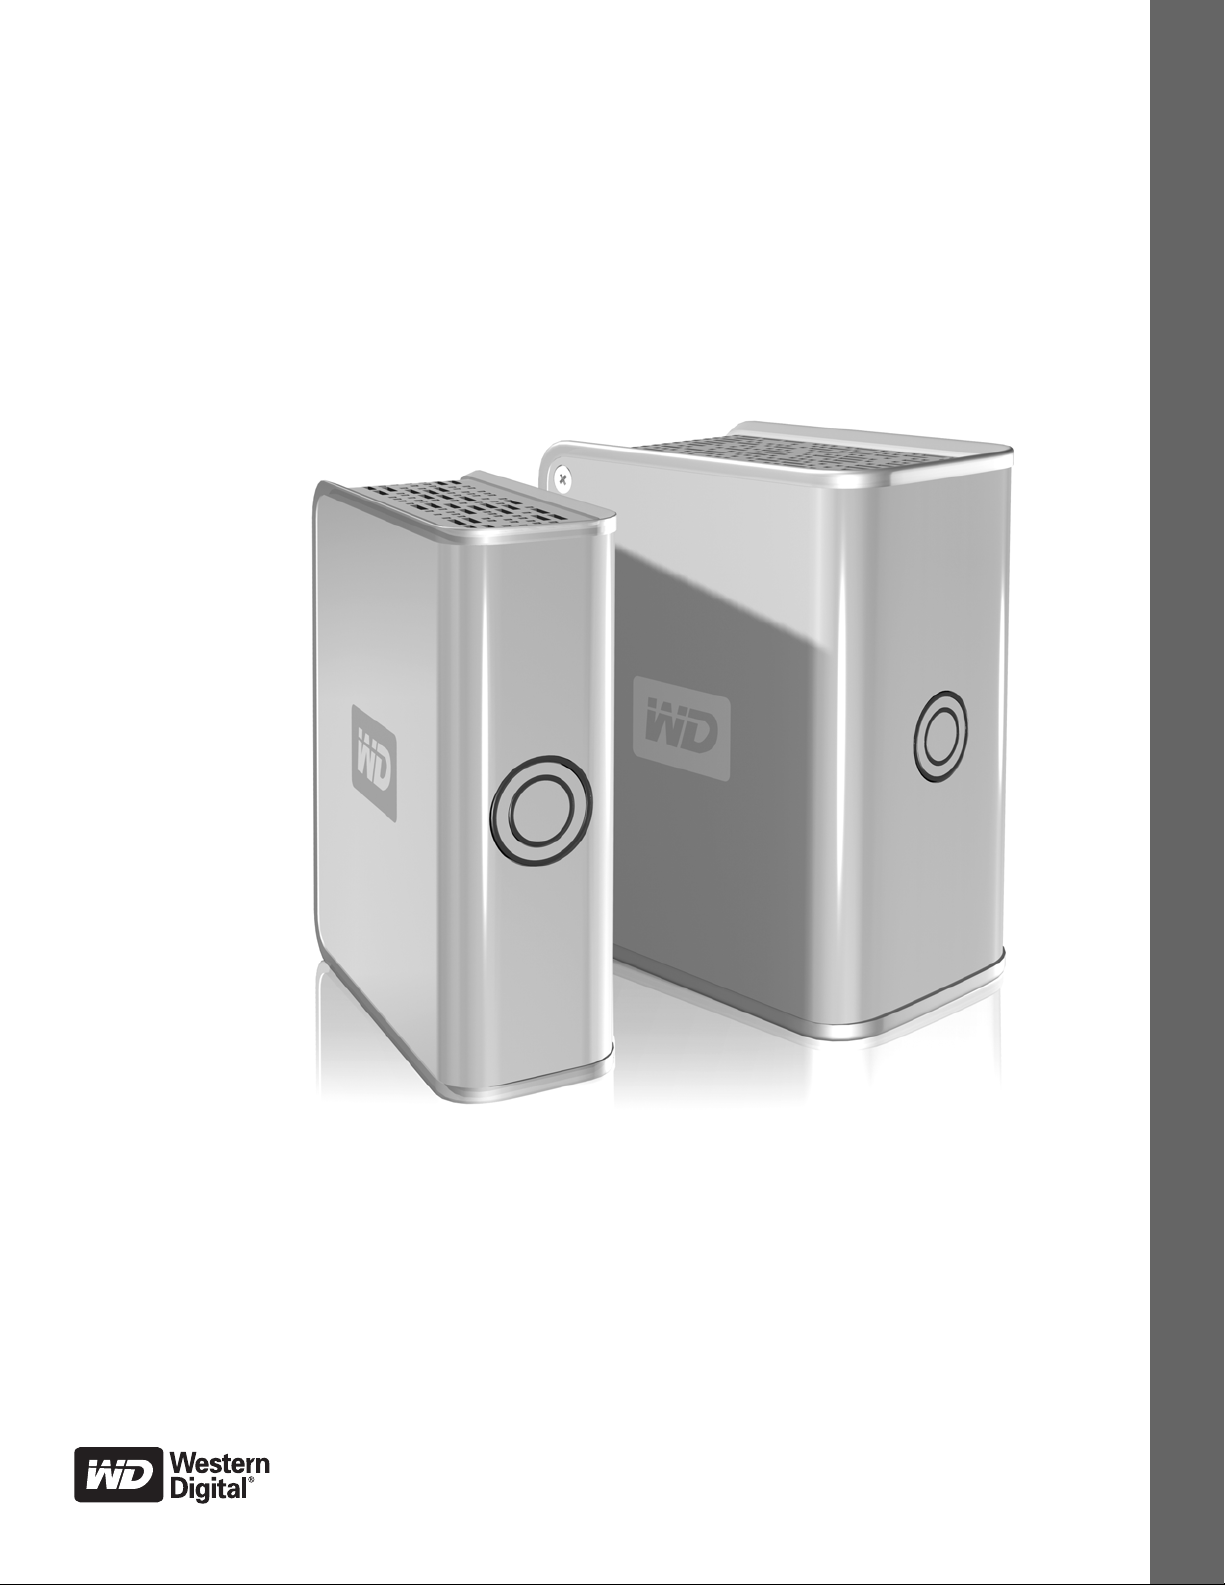
My Book
World Edition
User Manual
Single and Dual-drive Remote Access Storage Systems
™
™

Table of Contents
1 Introduction . . . . . . . . . . . . . . . . . . . . . . . . . . . . . . . . . .1
My Book World Edition in Your Network—The Basics . . . . . . . . . . . . 1
2 About Your WD Product . . . . . . . . . . . . . . . . . . . . . . .2
Kit Contents . . . . . . . . . . . . . . . . . . . . . . . . . . . . . . . . . . . . . . . . . . . . . . . 2
Optional Accessories . . . . . . . . . . . . . . . . . . . . . . . . . . . . . . . . . . . . . . . 2
System Requirements . . . . . . . . . . . . . . . . . . . . . . . . . . . . . . . . . . . . . . . 2
Updating Your Operating System . . . . . . . . . . . . . . . . . . . . . . . . . . . . . 3
Recording Your WD Product Information . . . . . . . . . . . . . . . . . . . . . . . 3
Registering Your Product . . . . . . . . . . . . . . . . . . . . . . . . . . . . . . . . . . . . 3
Free Technical Support. . . . . . . . . . . . . . . . . . . . . . . . . . . . . . . . . . . . . . 3
Handling Precautions . . . . . . . . . . . . . . . . . . . . . . . . . . . . . . . . . . . . . . . 3
3 Getting Started . . . . . . . . . . . . . . . . . . . . . . . . . . . . . . .4
Format and Configuration . . . . . . . . . . . . . . . . . . . . . . . . . . . . . . . . . . . . 4
My Book World Edition Front and Rear View . . . . . . . . . . . . . . . . . . . . 4
Power Button . . . . . . . . . . . . . . . . . . . . . . . . . . . . . . . . . . . . . . . . . . . . . . 4
LED Indicators . . . . . . . . . . . . . . . . . . . . . . . . . . . . . . . . . . . . . . . . . . . . . 4
Power/Activity LED . . . . . . . . . . . . . . . . . . . . . . . . . . . . . . . . . . . . . . . . . 5
Capacity Gauge. . . . . . . . . . . . . . . . . . . . . . . . . . . . . . . . . . . . . . . . . . . . 5
Rear View Ports . . . . . . . . . . . . . . . . . . . . . . . . . . . . . . . . . . . . . . . . . . . . 5
4 Hardware Setup. . . . . . . . . . . . . . . . . . . . . . . . . . . . . . .6
5 WD Anywhere Access Setup . . . . . . . . . . . . . . . . . . . .7
6 Using WD Anywhere Access . . . . . . . . . . . . . . . . . . .12
Signing In . . . . . . . . . . . . . . . . . . . . . . . . . . . . . . . . . . . . . . . . . . . . . . . . 12
Remote Access . . . . . . . . . . . . . . . . . . . . . . . . . . . . . . . . . . . . . . . . . . . 13
Inviting Others to Share . . . . . . . . . . . . . . . . . . . . . . . . . . . . . . . . . . . . 16
TABLE OF CONTENTS – i

7 Replacing a Drive . . . . . . . . . . . . . . . . . . . . . . . . . . . .18
8 Troubleshooting . . . . . . . . . . . . . . . . . . . . . . . . . . . . .21
9 Appendix A - Shared Storage Manager. . . . . . . . . .24
Accessing Shared Storage Manager. . . . . . . . . . . . . . . . . . . . . . . . . . 24
Shared Storage Manager Setup . . . . . . . . . . . . . . . . . . . . . . . . . . . . . 25
General Setup . . . . . . . . . . . . . . . . . . . . . . . . . . . . . . . . . . . . . . . . . . . . 27
File Sharing . . . . . . . . . . . . . . . . . . . . . . . . . . . . . . . . . . . . . . . . . . . . . . 34
Drive Management. . . . . . . . . . . . . . . . . . . . . . . . . . . . . . . . . . . . . . . . . 41
10 Appendix B - Regulatory and Warranty . . . . . . . . . .43
Regulatory Compliance. . . . . . . . . . . . . . . . . . . . . . . . . . . . . . . . . . . . . 43
Warranty Information. . . . . . . . . . . . . . . . . . . . . . . . . . . . . . . . . . . . . . . 44
GNU General Public License (“GPL”). . . . . . . . . . . . . . . . . . . . . . . . . 45
WD Service and Support . . . . . . . . . . . . . . . . . . . . . . . . . . . . . . . . . . . 46
Index . . . . . . . . . . . . . . . . . . . . . . . . . . . . . . . . . . . . . . .47
TABLE OF CONTENTS – ii

1
MY BOOK WORLD EDITION
USER MANUAL
Introduction
My Book World Edition in Your Network—The Basics
Congratulations on purchasing a My Book World Edition remote access storage
system. Designed for home users, creative professionals, workgroups, small offices,
and anyone looking for shared storage, WD’s My Book World Edition offers a
surprisingly simple and secure way to access and share data, photos, and music at
home, in the office, and anywhere in the world—even when your local computer is
turned off.
Follow the steps in this manual to set up centralized storage and make it available to
local and remote computers.
*
Connect My Book
1 2 3
World Edition to your
hub or router.
Locate My Book World
Edition on your
computer using
WD Anywhere Access
powered by MioNet.
Act as administrator to
assign security
™
settings and set up,
create, and manage
shared folders
accessible from
anywhere in the world.
Note: The dual-drive My Book World Edition II is preformatted for maximum capacity
as a large, spanned single volume. To change the format to RAID 1 for additional
protection, see “Drive Management” on page 42. If WD Anywhere Access is not
currently installed, you must first run the Initial Setup wizard (see “Appendix A Shared Storage Manager” on page 25) before you can access Drive Management.
Once configuration is complete, you can start saving files to the device, or return to
the beginning of this manual for instructions on setting up the device with
™
WD Anywhere Access
for remote file sharing and management.
* Some file formats may be copy protected and cannot be shared by WD Anywhere Access. For a list of these file types, search
for knowledge base article 1495 at support.wdc.com.
INTRODUCTION – 1
2
MY BOOK WORLD EDITION
USER MANUAL
About Your WD Product
This user manual provides step-by-step installation instructions and other important
information regarding your WD product. For the latest WD product information and
news, visit our website at www.westerndigital.com.
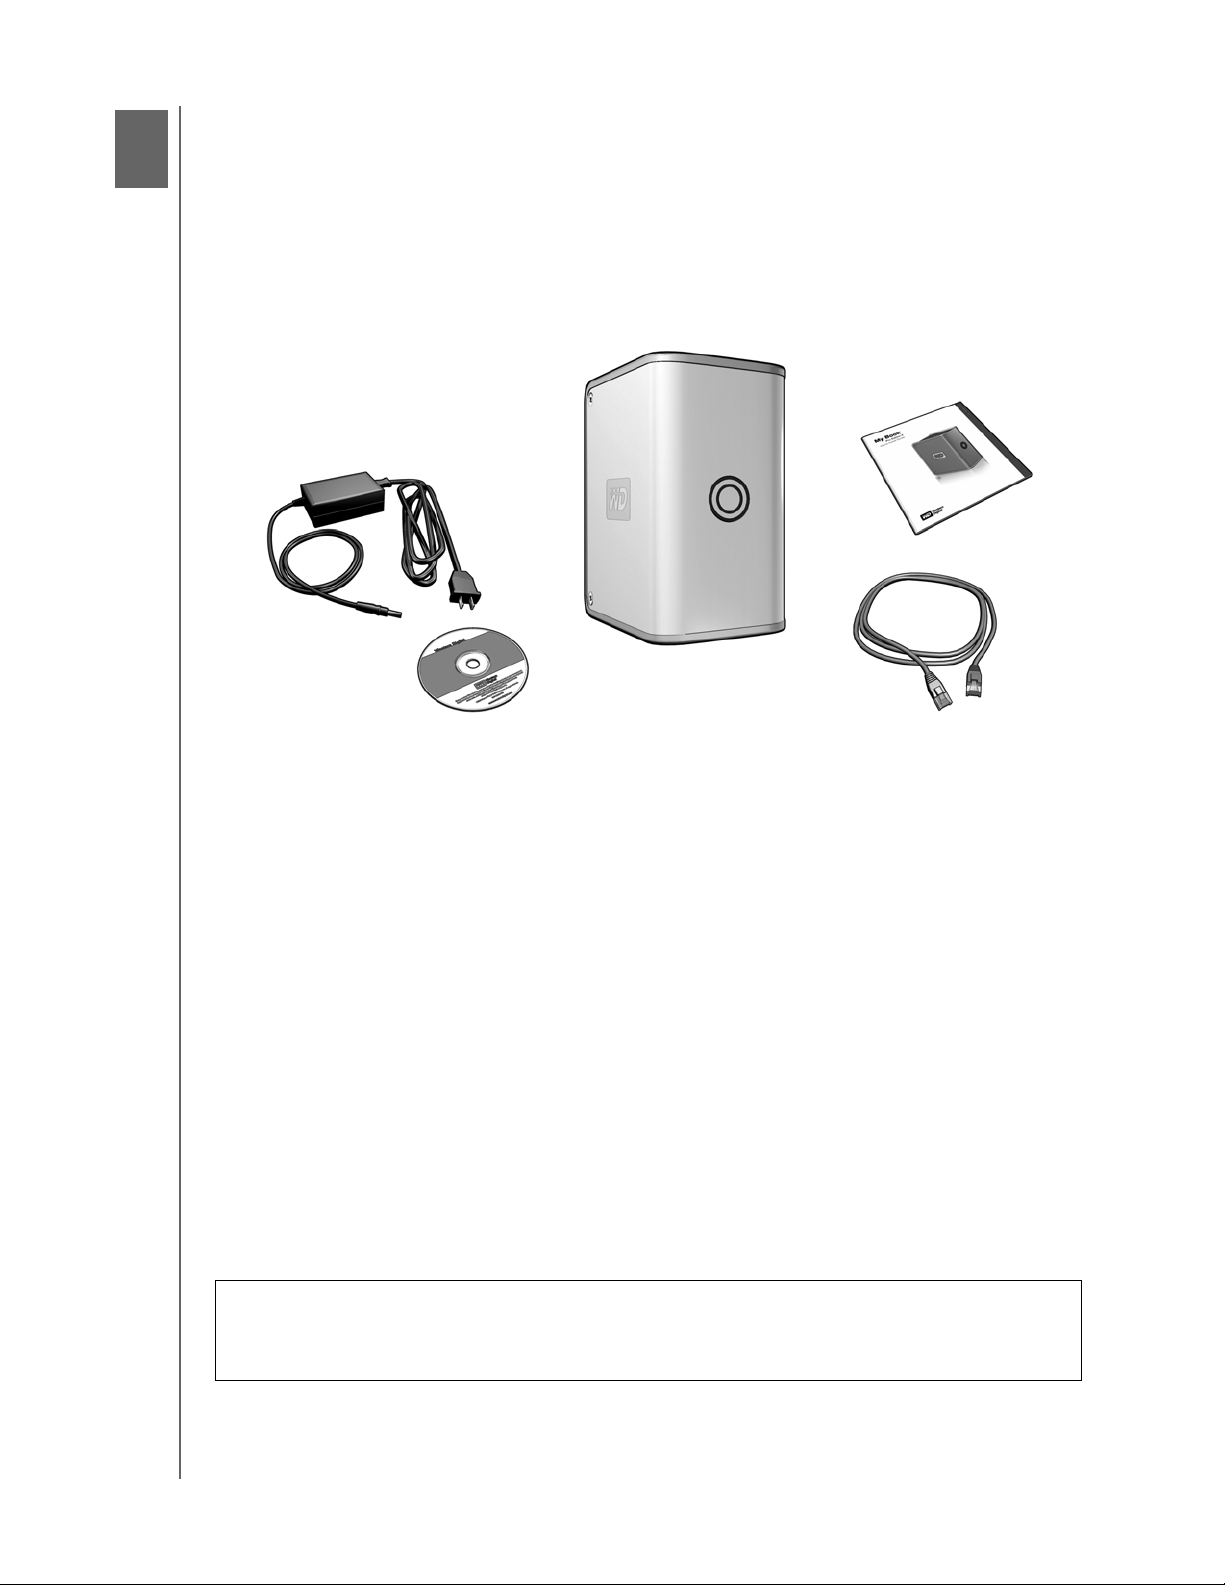
Kit Contents
Remote Access Storage System
AC Adapter
Software CD
Ethernet Cable
Quick Install Guide
Optional Accessories
For more information on optional accessories for this product, visit store.wdc.com
(U.S. only). Outside the U.S., visit support.wdc.com.
System Requirements
• Available 10/100/1000Base-T Ethernet connection (network adapter, router,
switch, or hub port)
• 500 MB of available local hard drive space
• CD-ROM or DVD-ROM drive
• 512 MB of RAM
®
• Pentium
III class, 500 MHz or newer
• Windows® 2000/XP/Vista
• Web browser (Mozilla
™
Firefox™1.0.3, Internet Explorer 6.0 or later)
• Broadband internet connection
Note: Compatibility may vary depending on user’s hardware configuration and
operating system.
Important: For highest performance and reliability, it is recommended that you
install the latest updates and service pack (SP). Go to the Start menu and select
Windows Update.
ABOUT YOUR WD PRODUCT – 2

MY BOOK WORLD EDITION
USER MANUAL
Updating Your Operating System
Go to the Start menu and click Windows Update. For more information regarding
updating your system, visit windowsupdate.microsoft.com.
Recording Your WD Product Information
In the following table, write the serial number and model number of your new WD
product found on the large label on the back panel of the device. This information is
necessary for setup and technical support. Also, record the account information you
used when setting up WD Anywhere Access.
Serial Number:
Model Number:
Purchase Date:
System and Software Notes:
WD Anywhere Access account info:
User name:
Password:
E-mail:
Storage device name:
Registering Your Product
Registering your My Book device enables access to WD services such as news
about your product, tips, and updates. Registration is quick and easy. Go to
register.wdc.com and follow the instructions as prompted.
Free Technical Support
Your WD product includes 30 days of free technical support during the applicable
warranty period for your product. The 30-day period commences on the date of your
first telephone contact with WD technical support.
Handling Precautions
WD products are precision instruments and must be handled with care during
unpacking and installation. Drives may be damaged by rough handling, shock, or
vibration. Be aware of the following precautions when unpacking and installing your
external storage product:
• Do not drop or jolt the device.
• Do not move the device during activity.
• Do not use My Book as a portable device.
• Do not block air slots on the underside, top, or rear of the enclosure.
• Do not stack any objects on top of the device.
ABOUT YOUR WD PRODUCT – 3
3
MY BOOK WORLD EDITION
USER MANUAL
Getting Started
Format and Configuration
My Book World Edition is preformatted as a Linux file system. The dual-drive model
My Book World Edition II is pre-configured for maximum capacity as a large single
spanned volume. For more information, see “Drive Management” on page 42.
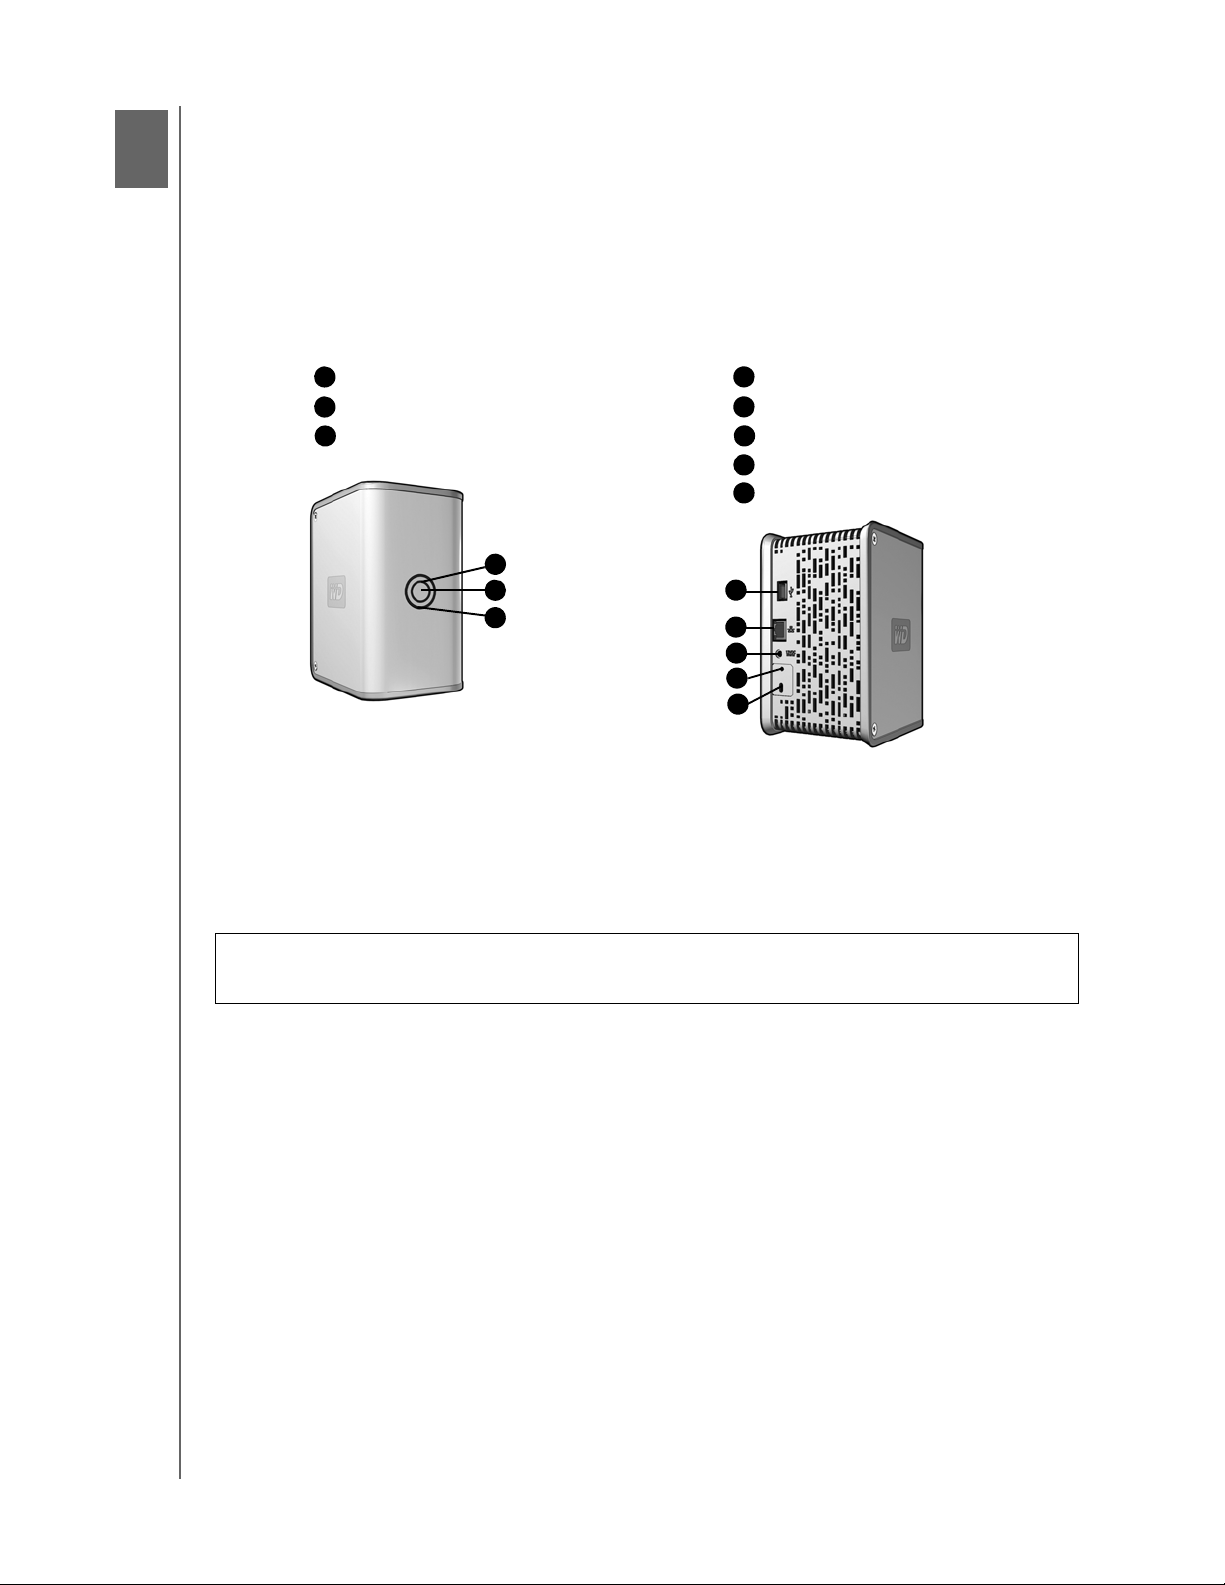
My Book World Edition Front and Rear View
A
Capacity Gauge LED (inner ring)
B
Power Button
C
Power/Activity LED (outer ring)
A
B
B
C
D
USB Port (for drive expansion only)
E
Ethernet Port
F
Power Port
G
Recovery Button
H
Kensington Security Slot
D
E
F
G
H
Power Button
The power button turns the device on or off. To turn on the device, press the power
button and hold down until the LED flashes once, then release. The LEDs will remain
off (up to 30 seconds) as the device powers up. Holding the button down for four
seconds powers off the device.
Important: The device powers on automatically upon initial connection to power,
which may take up to three minutes.
LED Indicators
The Power/Activity and Capacity Gauge LEDs are two concentric rings on the front
panel of the drive. The outer ring is the Power/Activity LED and the inner ring is the
Capacity Gauge LED.
GETTING STARTED – 4

MY BOOK WORLD EDITION
USER MANUAL
Power/Activity LED
Appearance Description
Steady Power-on state or
power-save mode
Outer LED ring rotating clockwise Device in use
Alternate flashing between inner and outer LED rings RAID degraded mode.
See section 7 for drive
replacement instructions.
Rotating inner LED ring which increments as the
RAID rebuild mode
rebuild percentage increases
Simultaneous flashing of both inner and outer LED
rings
Device is overheating.
Shut down the My Book
device.
Capacity Gauge
The Capacity Gauge (inner LED) consists of six sections which illuminate in a
clockwise direction to indicate space used on the drive. Each section represents
approximately 1/6 (one sixth) of disk space. Because this drive is preformatted and
contains software and utilities, the first section is illuminated upon installation.
Rear View Ports
• Ethernet port—Connects to an open router, hub, or network switch port using an
Ethernet cable.
• USB 2.0 port—Connects an external USB hard drive.
• Power port—Connects to the supplied power adapter and cable.
Recovery Button
Pressing the recovery button while powering up the device resets the admin user
name and password to default without erasing shared folders or volumes. The
recovery button also resets network configuration to DHCP (obtain an IP address
automatically). Follow the instructions below to reset the device using the recovery
button.
1. Turn off the device and disconnect all cables from the unit.
2. Insert a paperclip or narrow tipped pen into the recovery slot on the back of the
unit. Press and hold down the recovery button.
3. While continuing to hold down the recovery button, connect the power cable to
the back of the unit.
4. Hold the recovery button down until 10 seconds after the power/activity LED
lights on the front of the device, then release the button. The unit may take up to
three minutes to boot up completely.
Note: The default user name is
admin and the default password is 123456.
GETTING STARTED – 5

MY BOOK WORLD EDITION
USER MANUAL
Kensington®Security Slot
For drive security, this My Book device is equipped with a Kensington Security Slot,
which supports a standard Kensington security cable (sold separately). For more
information on the Kensington Security Slot and available products, visit
www.kensington.com.
GETTING STARTED – 6
4
MY BOOK WORLD EDITION
USER MANUAL
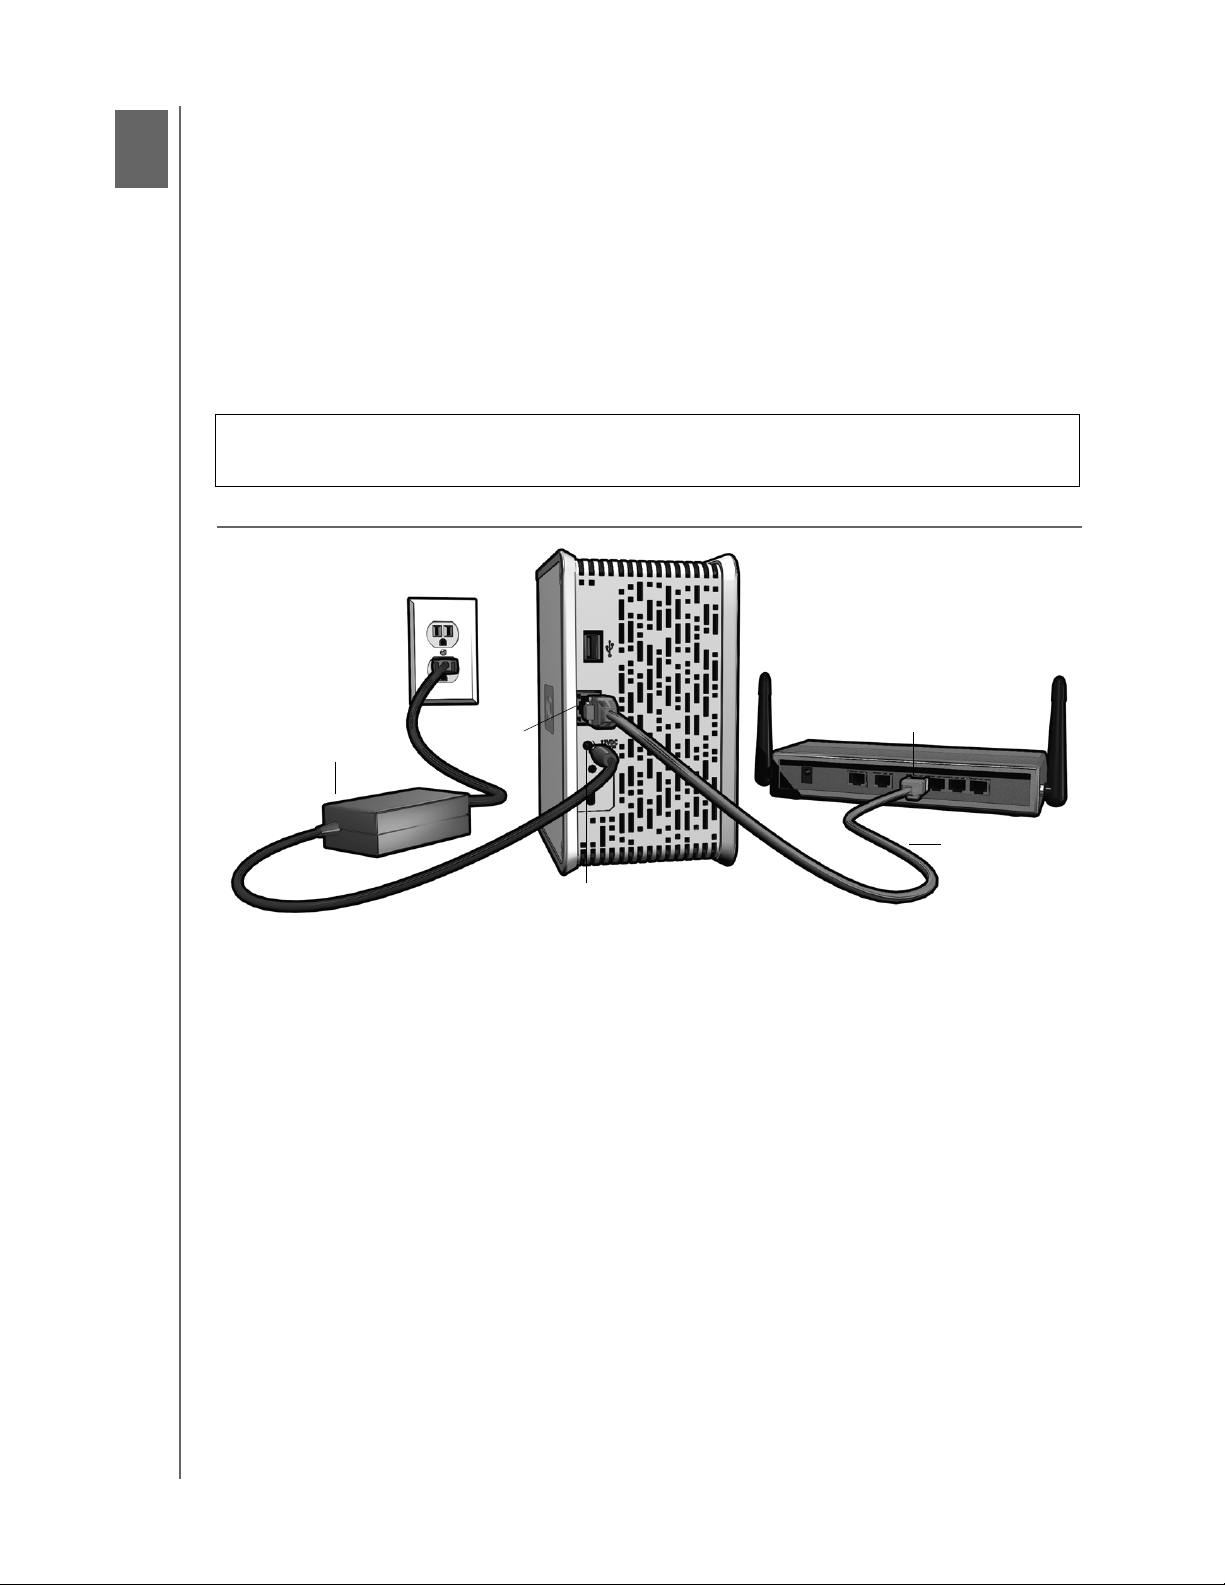
Hardware Setup
1. Connect one end of the Ethernet cable into the Ethernet port located on the back
of the unit.
2. Connect the other end of the Ethernet cable directly into a router or network
switch port.
3. Plug the AC adapter into an electrical outlet.
4. Connect the other end of the adapter into the DC power supply socket located on
the back of the unit. The unit powers up automatically after approximately 30
seconds indicated by an LED illuminated on the outer ring.
Important: Wait for the drive to finish powering up (approximately three minutes)
before installing WD Anywhere Access.
AC adapter
Ethernet port
Router Port
Ethernet Cable
Power Port
HARDWARE SETUP – 7
5
MY BOOK WORLD EDITION
USER MANUAL
WD Anywhere Access Setup
This section contains instructions to get your My Book World Edition quickly set up
and running. To use My Book World Edition, installing WD Anywhere Access is
required.
Note: WD Anywhere Access is a custom version of MioNet. If the regular version of
MioNet is already installed in your system, you must uninstall it before installing
WD Anywhere Access. A software license key is not needed to install WD Anywhere
Access.
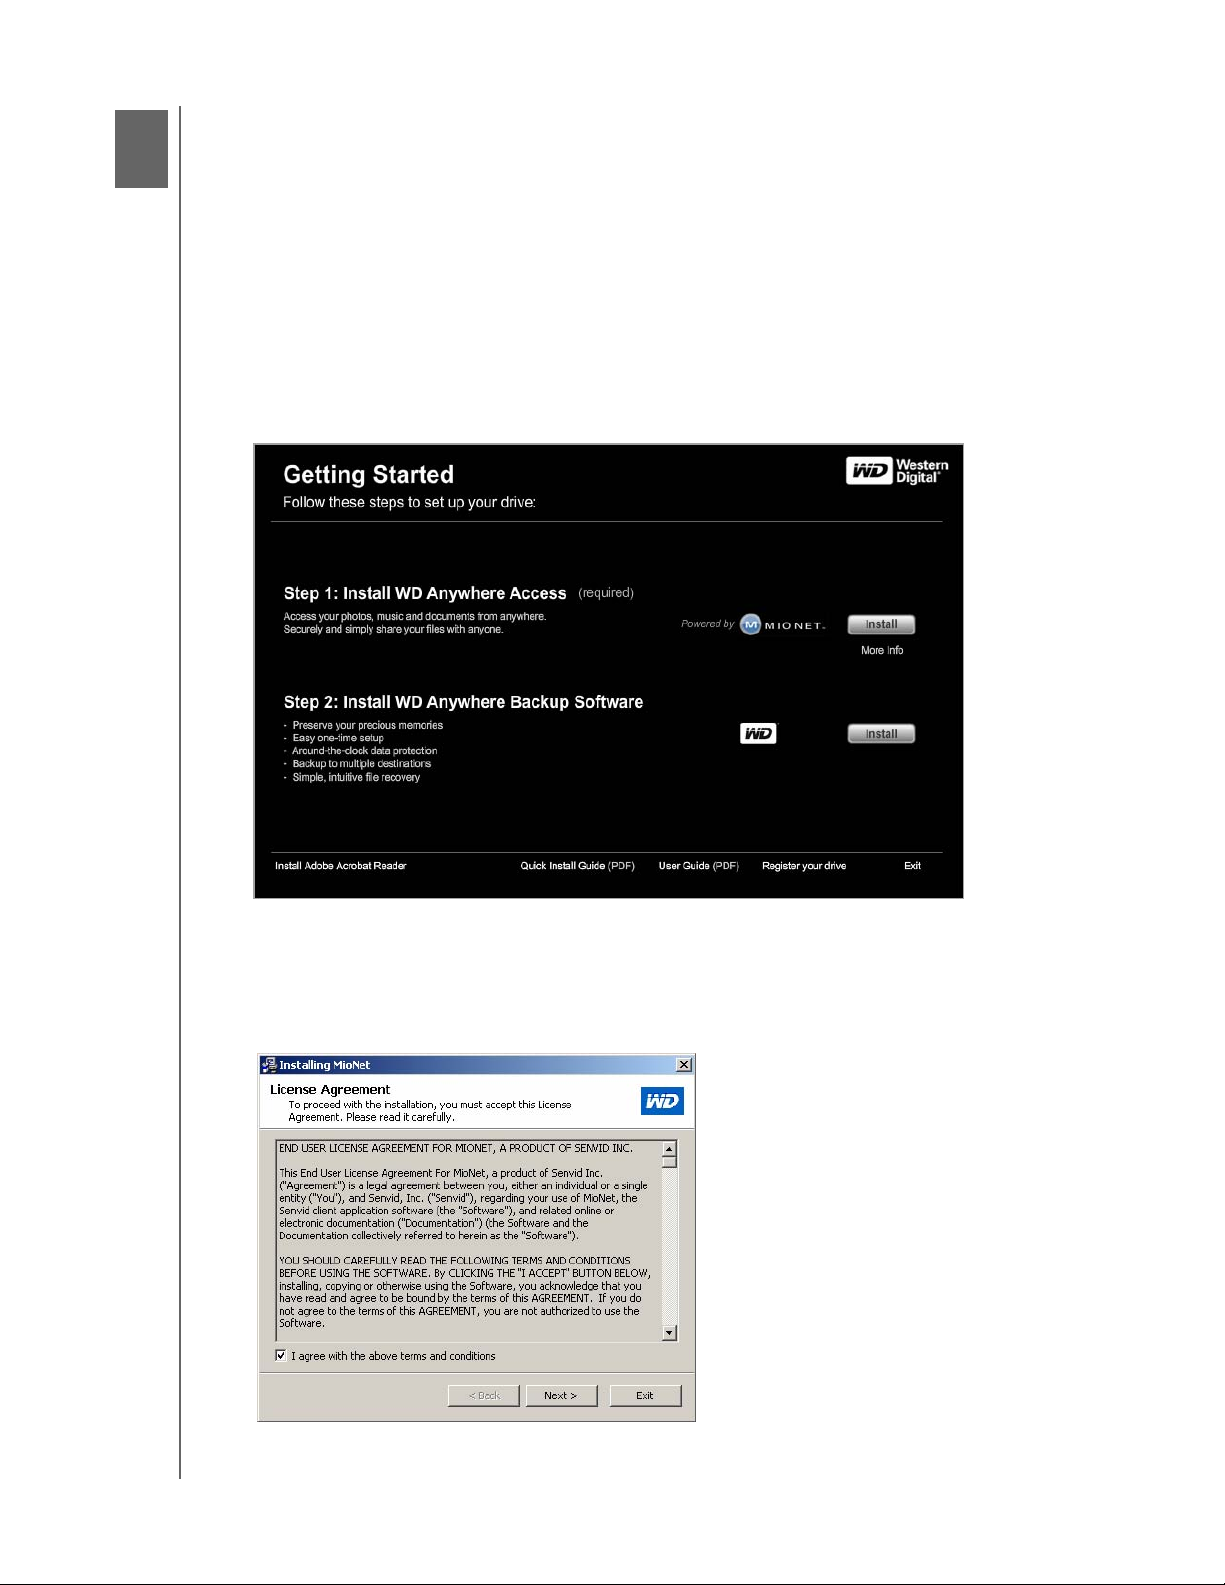
1. Insert the software CD into your CD-ROM drive. The program autoruns and
displays the My Book World Edition main menu. In Step 1, click Install.
If AutoPlay is disabled on your computer, you must install utilities manually. Click
the Start button and point to My Computer. Double-click the WD Installer icon,
the WDAnywhereAccess folder, and Setup.exe.
2. Read the license agreement. Click the
conditions
check box, then click Next.
I agree with the above terms and
WD ANYWHERE ACCESS SETUP – 8

MY BOOK WORLD EDITION
USER MANUAL
3. Click Finish. WD Anywhere Access (powered by MioNet) is initialized.
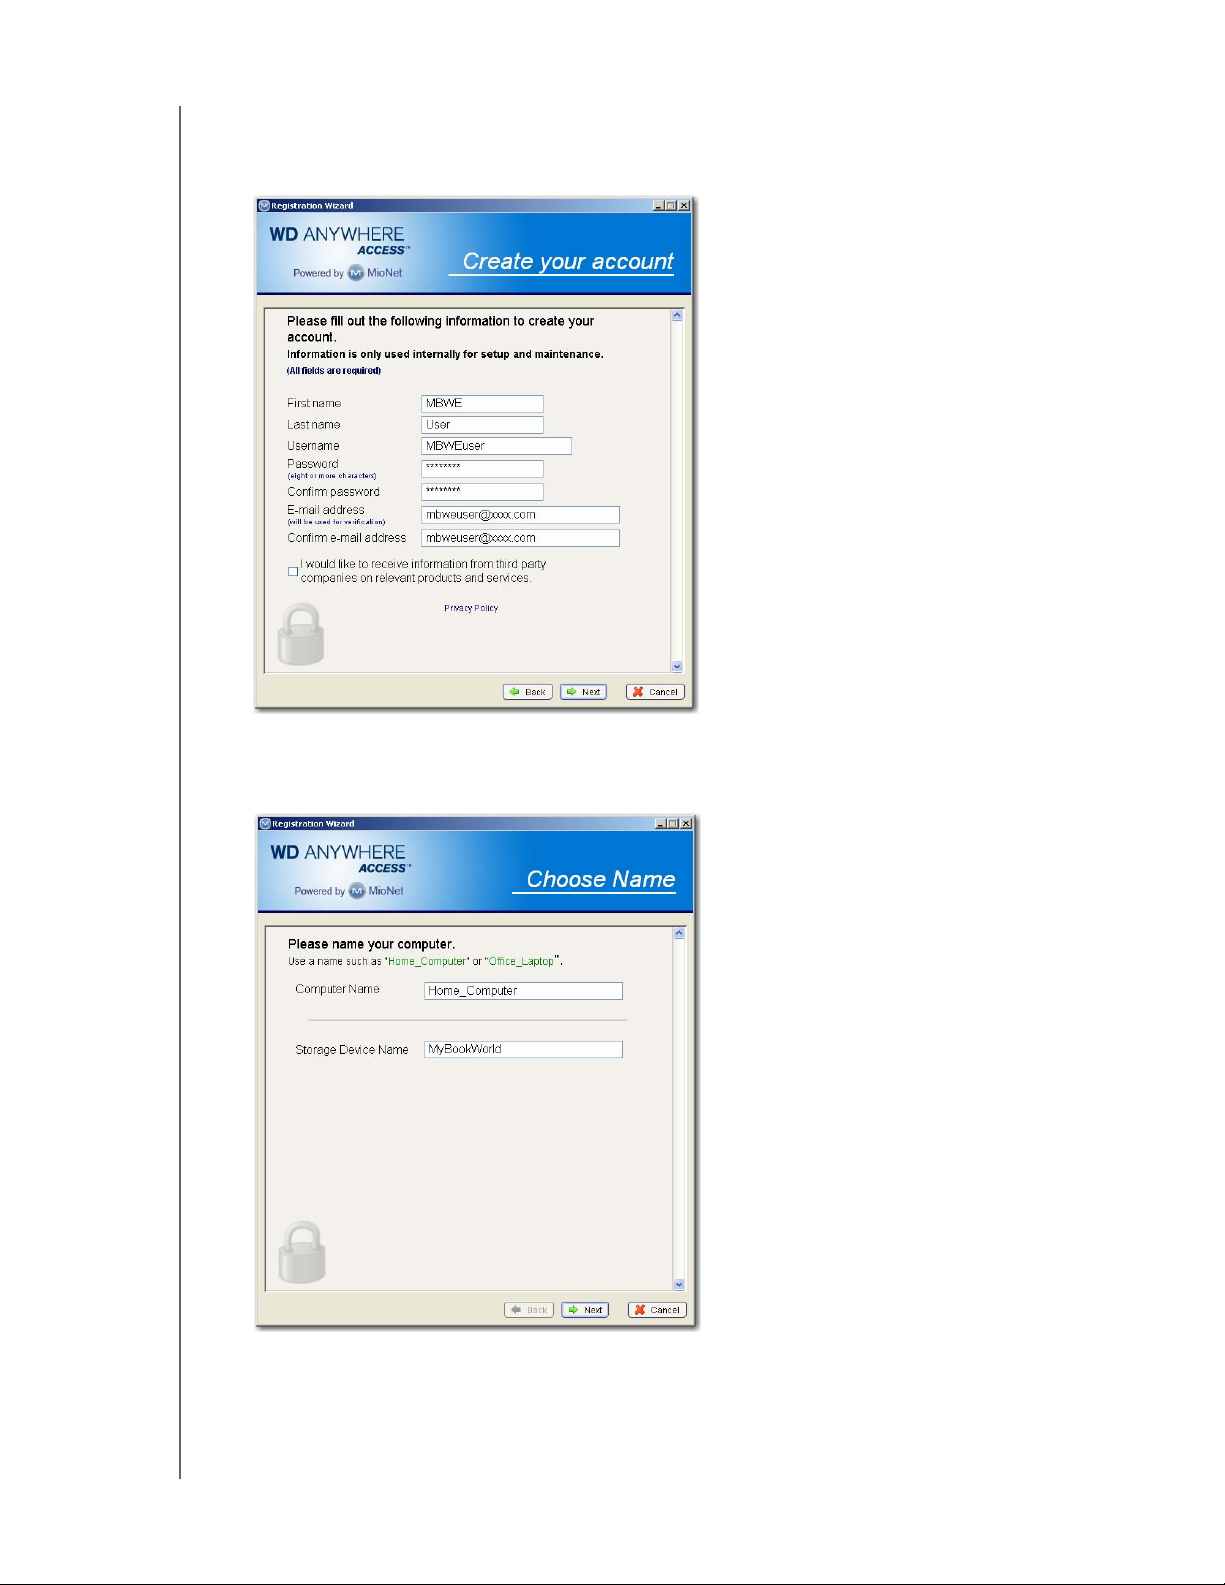
4. The WD Anywhere Access Registration Wizard starts. Click I am creating my
new WD Anywhere Access account
the computer to your existing account, click
existing WD Anywhere Access account
if new to MioNet, then click Next. If adding
I am adding this computer to my
, enter your user name and password in
the next screen, click Next, and proceed to step 6.
WD ANYWHERE ACCESS SETUP – 9
MY BOOK WORLD EDITION
USER MANUAL
5. If creating a new account, fill out all fields then click Next.
Note: The user name and password you enter here changes the admin user name
and password of the My Book World Edition device.
6. Enter easy-to-remember names in the Computer Name (name by which
WD Anywhere Access references your computer) and Storage Device Name
(name of the My Book World Edition device) fields, then click Next.
Note: The Storage Device Name field is prepopulated with ‘MyBookWorld’ as the
recommended default name. If you need to change this field, note that the
Storage Device Name is limited to 15 alphanumeric characters. Spaces and
special characters are not supported.
WD ANYWHERE ACCESS SETUP – 10
MY BOOK WORLD EDITION
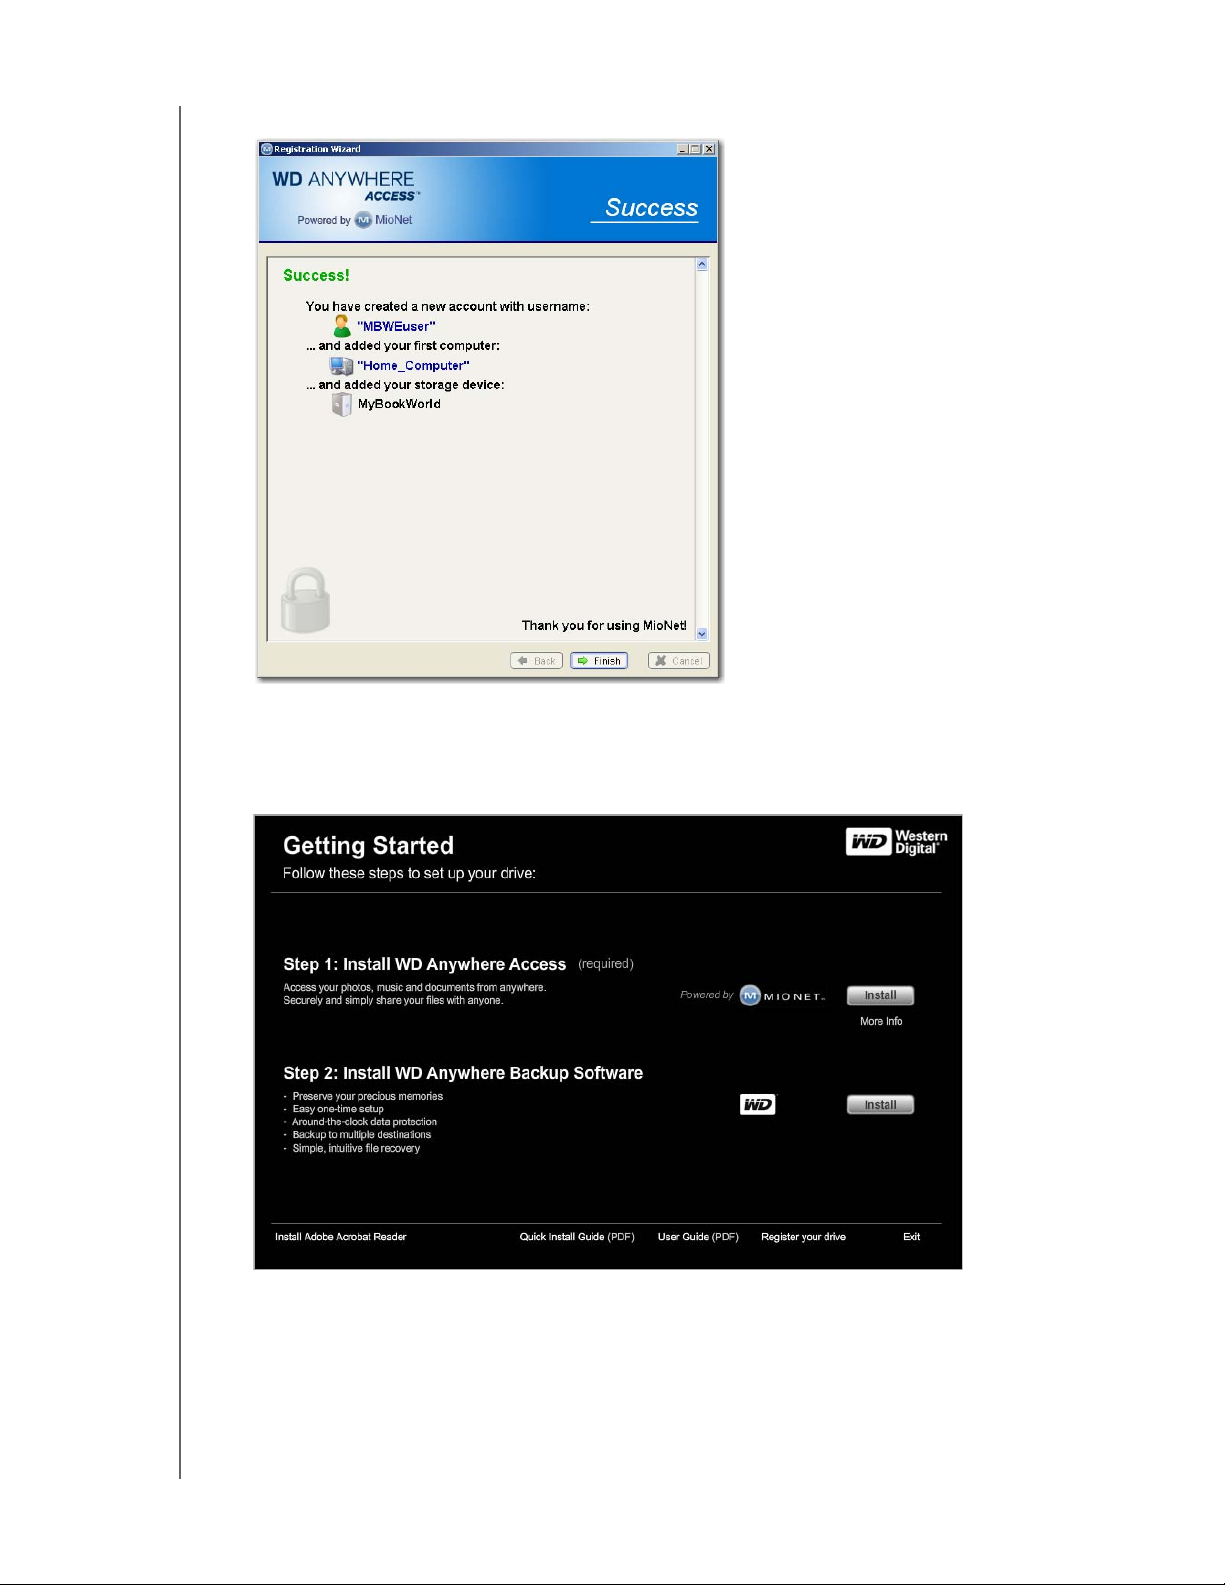
7. WD Anywhere Access account setup is complete. Click Finish.
USER MANUAL
8. You may now install WD Anywhere Backup Software from the WD Installer
screen (click More info under the bottom Install button for further details about
this software). Click Install next to the WD logo in Step 2.
For more information on WD Anywhere Backup, visit support.wdc.com.
9. Return to the WD Installer screen and click
Exit in the lower right corner.
WD ANYWHERE ACCESS SETUP – 11

MY BOOK WORLD EDITION
USER MANUAL
10.Click Restart Now.
Congratulations! My Book World Edition is now installed and mapped as a drive
letter on your system. Continue to section 6 to install remote access and share
My Book World Edition.
WD ANYWHERE ACCESS SETUP – 12
6
MY BOOK WORLD EDITION
USER MANUAL
Using WD Anywhere Access
Signing In
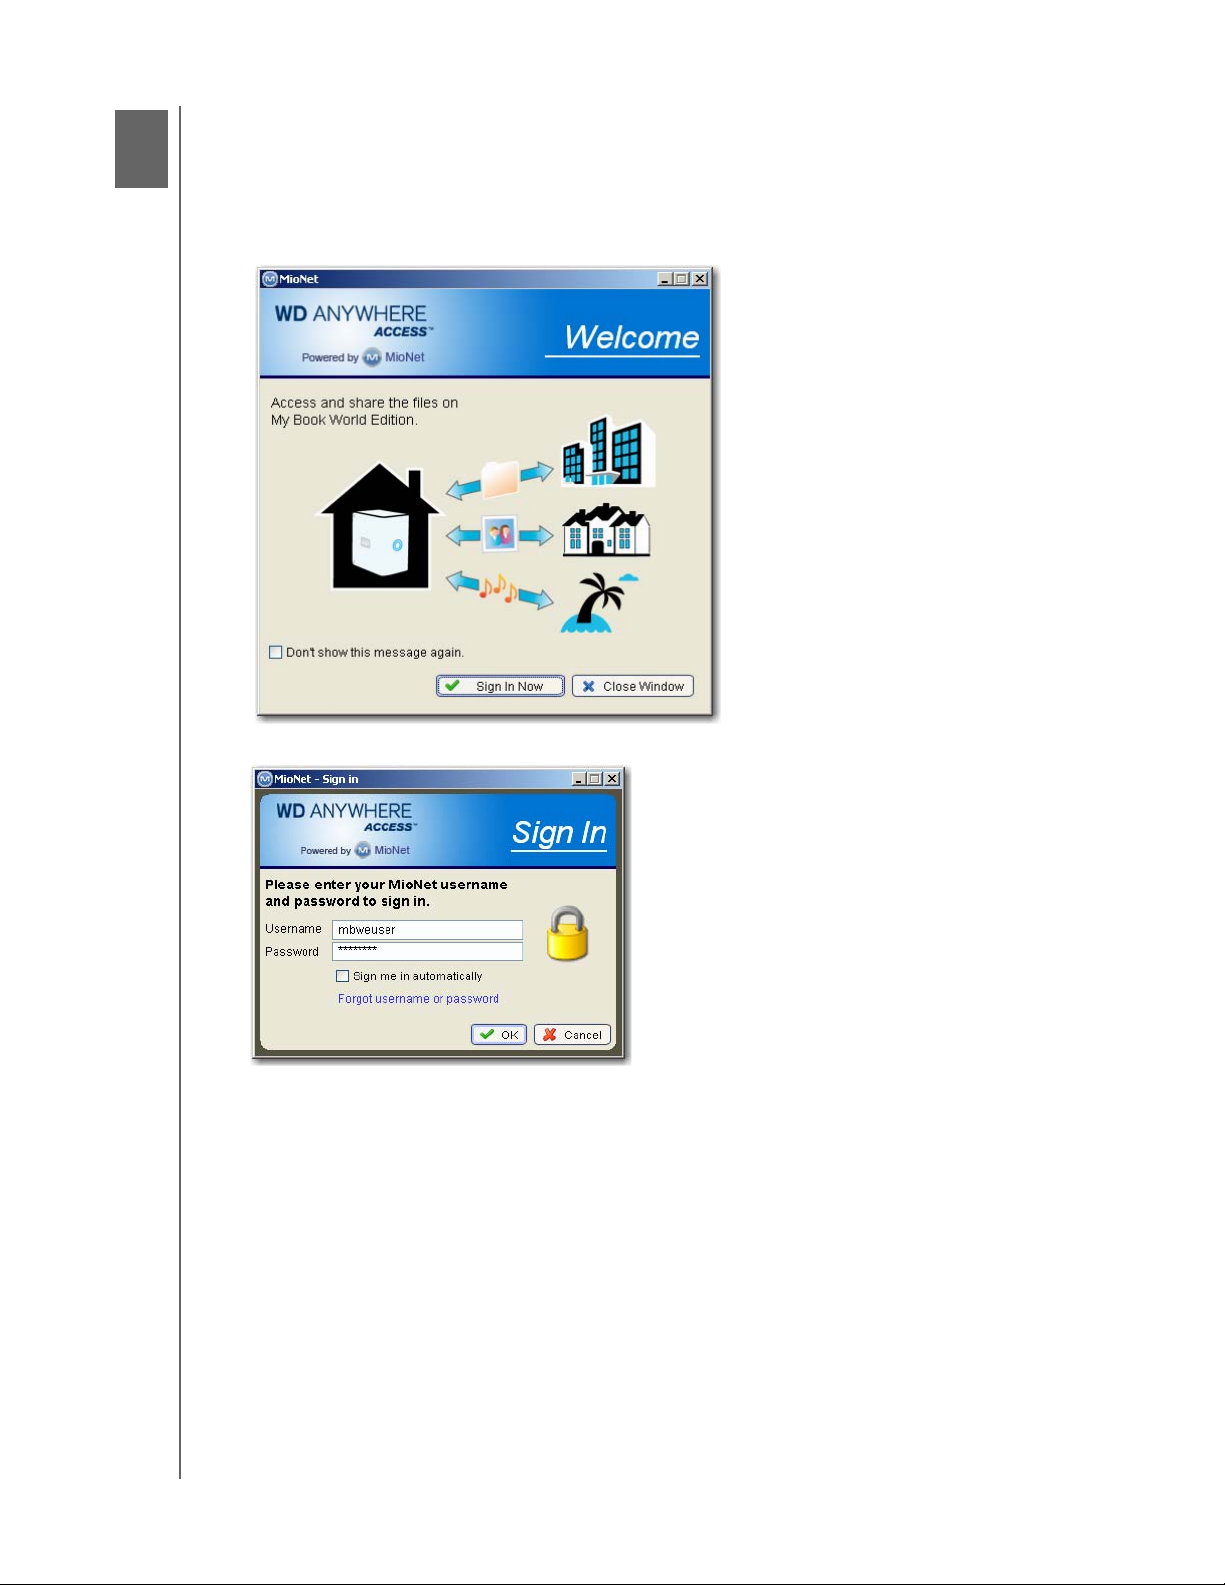
1. After restarting or when starting up your computer, the WD Anywhere Access
welcome screen displays. Click Sign In Now.
2. Enter the WD Anywhere Access password you created in section 5 and click OK.
3. Click
OK to the e-mail verification request.
USING WD ANYWHERE ACCESS – 13
Loading...