


Bedienungsanleitung
Copyright UNOLD AG | www.unold.de
Instructions for use | Notice d´utilisation
Gebruiksaanwijzing
Instrucciones de uso
Руководство по эксплуатации
Modell 48360
| Istruzioni per l’uso
| Instrukcja obsługi
WAFFELAUTOMAT ZAUBERNUSS

INHALTSVERZEICHNIS
Copyright UNOLD AG | www.unold.de
Bedienungsanleitung Modell 48360
Technische Daten ................................... 4
Symbolerklärung ..................................... 4
Sicherheitshinweise ................................ 4
In Betrieb nehmen .................................. 7
Zaubernüsse zubereiten ........................... 8
Reinigen und Pflegen .............................. 9
Zaubernuss-Rezept ................................. 10
Garantiebestimmungen ........................... 12
Entsorgung / Umweltschutz ..................... 12
Informationen für den Fachhandel ............ 12
Service-Adressen .................................... 13
Instructions for use Model 48360
Technical Specifications .......................... 14
Explanation of symbols ............................ 14
Important Safeguards .............................. 14
Preparing the appliance for operation ....... 17
Preparing oreshki .................................... 17
Cleaning and care ................................... 19
Recipes ................................................. 19
Guarantee Conditions .............................. 21
Waste Disposal/Environmental Protection .. 21
Service .................................................. 13
Notice d’utilisation modèle 48360
Spécification technique .......................... 22
Explication des symboles ......................... 22
Consignes de sécurité ............................. 22
Mise en service....................................... 25
Préparer des oreshkis .............................. 26
Nettoyage et entretien ............................. 27
Recette des oreshkis ............................... 27
Conditions de Garantie ............................ 29
Traitement des déchets /
Protection de l’environnement .................. 29
Service .................................................. 13
Gebruiksaanwijzing model 48360
Technische gegevens .............................. 30
Verklaring van de symbolen ...................... 30
Veiligheidsvoorschriften ........................... 30
Ingebruikneming .................................... 33
Tovernoten toebereiden ........................... 33
Reiniging en onderhoud .......................... 34
Tovernootrecepten ................................... 35
Garantievoorwaarden ............................... 37
Verwijderen van afval/Milieubescherming .. 37
Service .................................................. 13
Istruzioni per l’uso modello 48360
Dati tecnici ........................................... 38
Significato dei simboli ............................ 38
Avvertenze di sicurezza ........................... 38
Messa in funzione ................................... 41
Preparazione delle „noci magiche“ ........... 41
Pulizia ................................................... 43
Ricetta delle „noci magiche“ ................... 43
Norme die garanzia ................................. 45
Smaltimento / Tutela dell’ambiente .......... 45
Service .................................................. 13
Manual de Instrucciones modelo 48360
Datos técnicos ....................................... 46
Explicación de los símbolos ..................... 46
Indicaciones de seguridad ....................... 46
Puesta en servicio ................................... 49
Preparación de oreshki ............................ 50
Limpieza y cuidado ................................. 51
Recetas de oreshki .................................. 51
Condiciones de Garantia .......................... 53
Disposición/Protección del
medio ambiente ..................................... 53
Service .................................................. 13

INHALTSVERZEICHNIS
Copyright UNOLD AG | www.unold.de
Instrukcja obsługi modelu 48360
Dane techniczne .................................... 54
Objaśnienie symboli ................................ 54
Zasady bezpieczeństwa ........................... 54
Uruchomienie......................................... 57
Pieczenie orzeszków ................................ 57
Czyszczenie i pielęgnacja ........................ 59
Przepisy na orzeszki ................................ 59
Warunki gwarancji................................... 61
Utylizacja / ochrona środowiska ................ 61
Service .................................................. 13
Руководство по эксплуатации model 48360
Технические данные ................................ 62
Символы ................................................... 62
Для Вашей безопасности ........................ 62
Ввод в эксплуатацию ............................... 65
Приготовление „волшебных орешков“ ... 66
Чистка и уход ........................................... 67
Рецепты „волшебных орешков“ .............. 68
ГАРАНТИЯ ................................................ 70
Утилизация /
охране окружающей среды ..................... 70
Service....................................................... 13
SERVICE-HOTLINE
Bei Fragen zu den Rezepten und zum Gebrauch des Gerätes können Sie sich direkt an unsere
Beraterin Frau Blum wenden:
Montag und Dienstag von 8 bis 12 Uhr und 13 bis 17 Uhr
Rufnummer: 0 18 05/94 18 99*
*derzeit 0,14 EUR/Minute aus dem Festnetz der Deutschen Telekom.
Bei Anrufen aus Mobilfunknetzen und aus dem Ausland (+49 18 05/94 18 99) können abweichende
Kosten anfallen. Ab 1.3.2010 Mobilfunkpreis maximal 0,42 EUR/Minute.
Kunden aus Österreich wählen bitte die Nummer (0) 1/8 10 20 39
BEDIENUNGSANLEITUNG MODELL 48360
Copyright UNOLD AG | www.unold.de
TECHNISCHE DATEN
Leistung: 1.400 Watt, 230 V~, 50 Hz
Platten: Druckguss-Aluminium, antihaftbeschichtet
Abmessungen: ca. 25,5 x 32,0 x 10,3 cm (L/B/H)
Gewicht: ca. 2,2 kg
Zuleitung: ca. 80 cm
Ausstattung: zur Herstellung russischer Zaubernüsse (Oreschki) mit süßer
Zubehör: Bedienungsanleitung
Änderungen und Irrtümer in Ausstattungsmerkmalen, Technik, Farben und Design
vorbehalten
SYMBOLERKLÄRUNG
Dieses Symbol kennzeichnet eventuelle Gefahren, die Verletzungen
nach sich ziehen können oder zu Schäden am Gerät führen.
Dieses Symbol weist Sie auf eine eventuelle Verbrennungsgefahr hin.
Gehen Sie hier immer besonders achtsam vor.
SICHERHEITSHINWEISE
oder herzhafter Füllung, antihaftbeschichtete Backplatten,
Funktionskontrollleuchte, Verschlussclip
Bitte lesen Sie die folgenden Anweisungen und bewahren
Sie diese auf.
1. Dieses Gerät kann von Kindern ab 8 Jahren sowie von Personen mit reduzierten physischen, sensorischen oder mentalen
Fähigkeiten oder
werden, wenn sie beaufsichtigt oder bezüglich des sicheren
Gebrauchs des Geräts unterwiesen wurden und die daraus resul
tierenden Gefahren verstanden haben.
2.
Kinder dürfen nicht mit dem Gerät spielen.
Mangel an Erfahrung und/oder Wissen benutzt
-
4

3. Reinigung und benutzerseitige Wartung dürfen nicht von Kindern
Copyright UNOLD AG | www.unold.de
durchgeführt werden, es sei denn, sie sind älter als 8 Jahre und
werden beaufsichtigt.
4. Bewahren Sie das Gerät und das Kabel außerhalb der Reichweite
von Kindern unter 8 Jahren auf.
5. VORSICHT - Teile dieses Produkts können sehr heiß werden und
Verbrennungen verursachen! In Anwesenheit von Kindern und
gefährdeten Personen ist besondere Vorsicht geboten.
6. Gerät nur an Wechselstrom mit Spannung gemäß Typenschild
anschließen.
7. Dieses Gerät darf nicht mit einer externen Zeitschaltuhr oder
einem Fernbedienungssystem betrieben werden.
8. Verwenden Sie aus Sicherheitsgründen nach Möglichkeit kein
Verlängerungskabel und keine Mehrfachsteckdose, um das Gerät
ans Stromnetz anzuschließen.
9. Tauchen Sie das Gerät keinesfalls in Wasser oder andere Flüs
-
sigkeiten ein.
10.
Das Gerät darf nicht in der Spülmaschine gereinigt werden.
11. Lassen Sie das Gerät während des Betriebs nicht unbeaufsichtigt
und halten Sie es außerhalb der Reichweite von Kindern.
12. Nach Gebrauch, vor der Reinigung oder bei evtl. Störungen wäh
-
rend des Betriebs ist der Netzstecker zu ziehen.
13.
Stellen Sie das Gerät auf eine freie, ebene Fläche. Gerät und
Zuleitung nie auf oder in der Nähe von heißen Oberflächen
abstellen oder betreiben.
14. Das Gerät bzw. die Zuleitung niemals mit nassen Händen berüh
-
ren.
15.
Das Gerät ist ausschließlich für den Haushaltsgebrauch oder
ähnliche Verwendungszwecke bestimmt, z. B.
Teeküchen in Geschäften, Büros oder sonstigen Arbeitsstätten,
in landwirtschaftlichen Betrieben,
zur Verwendung durch Gäste in Hotels, Motels oder sonstigen
Beherbergungsbetrieben,
in Privatpensionen oder Ferienhäusern.
16. Verwenden Sie das Gerät nur in Innenräumen.
5

17. Die Zuleitung vor Gebrauch vollständig abwickeln. Das Kabel
Copyright UNOLD AG | www.unold.de
darf nicht über die Kante der Arbeitsfläche herunterhängen,
damit z. B. Kleinkinder das Gerät nicht versehentlich von der
Arbeitsplatte ziehen können.
18. Wickeln Sie die Zuleitung nie um das Gerät.
19. Ziehen Sie die Zuleitung immer nur am Anschlussstecker aus der
Steckdose, nie am Anschlusskabel.
20. Achten Sie darauf, dass die Zuleitung nicht am heißen Gerät
anliegt.
21. Betreiben Sie das Gerät nicht in der Nähe von hitzeempfindli
-
chen Materialen wie Spiritus – Brandgefahr!
22.
Das Gerät wird im Betrieb heiß, benutzen Sie deshalb die Griffe
bzw. Topflappen, wenn Sie das Gerät bewegen.
23. Solange das Gerät heiß ist, nicht unbeaufsichtigt lassen –
Verbrennungsgefahr!
24. Überhitzen Sie Ihr Koch-, Brat- und Backgeschirr nicht, um
Rauchentwicklung zu vermeiden, die für kleine Tiere (z. B. Vögel)
mit einem besonders empfindlichen Atmungssystem gefährlich
sein kann. Wir empfehlen Ihnen, Vögel nicht in der Küche zu
halten.
25. Beim Einfüllen von Teig oder Entnehmen der Waffel den Deckel
unbedingt ganz öffnen, da dieser sonst zufallen kann: Verbren
-
nungs- und Verletzungsgefahr!
26.
Decken Sie aus Sicherheitsgründen das Gerät sowie die
Backflächen nie mit Papier, Folien oder anderen Fremdkörpern
ab. Es besteht sonst Brandgefahr!
27. Berühren Sie nie während des Betriebs und kurz danach die
Backflächen mit Körperteilen oder hitzeempfindlichen Gegen
-
ständen.
28.
Nicht in heißem Zustand zur Aufbewahrung wegstellen.
29. Verarbeiten Sie nur Lebensmittel in diesem Gerät.
30. Prüfen Sie regelmäßig Stecker und Zuleitung auf Verschleiß oder
Beschädigungen. Bei Beschädigung der Zuleitung oder anderer
Teile senden Sie das Gerät bitte zur Überprüfung und Reparatur
an unseren Kundendienst. Unsachgemäße Reparaturen können
zu erheblichen Gefahren für den Benutzer und zum Ausschluss
der Garantie führen.
6
31. Wenn die Anschlussleitung dieses Gerätes beschädigt wird, muss
Copyright UNOLD AG | www.unold.de
sie durch den Hersteller oder seinen Kundendienst oder eine
ähnlich qualifizierte Person ersetzt werden, um Gefährdungen
zu vermeiden.
VORSICHT:
Das Gerät wird während des Betriebs sehr heiß!
Öffnen Sie auf keinen Fall das Gehäuse des Gerätes. Es besteht
die Gefahr eines Stromschlages.
Der Hersteller übernimmt keine Haftung bei fehlerhafter Montage, bei unsachgemäßer oder fehlerhafter
Verwendung oder nach Durchführung von Reparaturen durch nicht autorisierte Dritte.
IN BETRIEB NEHMEN
1. Entfernen Sie alle Verpackungsmaterialien und ggf. Transportsicherungen.
Halten Sie Verpackungsmaterial von Kindern fern - Erstickungsgefahr!
2. Vor dem ersten Benutzen empfehlen wir Ihnen, die beiden antihaftbeschichteten Backflächen mit einem feuchten Tuch abzuwischen.
3. Öffnen Sie während der nun folgenden Einbrennphase das Fenster.
4. Gerät schließen, Stecker in eine Steckdose (230 V~, 50 Hz) stecken. Die
rote Betriebskontrollleuchte leuchtet auf und zeigt an, dass die Heizung in
Betrieb ist.
5. Sobald die Vorheizphase beendet ist, erlischt die Kontrollleuchte.
6. Heizen Sie das Gerät für ca. 10 Minuten auf.
7. Nach dem Einbrennen sind am Gerät eventuell schon Gebrauchsspuren zu
sehen, diese beeinträchtigen jedoch nicht die Funktion des Gerätes und sind
kein Reklamationsgrund.
8. Fetten Sie vor dem ersten Benutzen beide Backflächen mit einem Pinsel
leicht mit einem hitzebeständigen Fett, z. B. Margarine ein. Da die Backflächen des Gerätes antihaftbeschichtet sind, müssen Sie diese nur vor der
ersten Nutzung einfetten, danach nicht mehr.
9. Sollte beim ersten Anheizen Ihres neuen Gerätes ein leichter Geruch entstehen, so ist dies völlig unbedenklich.
Achtung: Wir raten grundsätzlich, die allerersten im Gerät zubereiteten
Lebensmittel nicht zu verzehren sondern zu entsorgen. Bei jedem weiteren
Benutzen des Gerätes ist dies natürlich nicht mehr erforderlich!
7
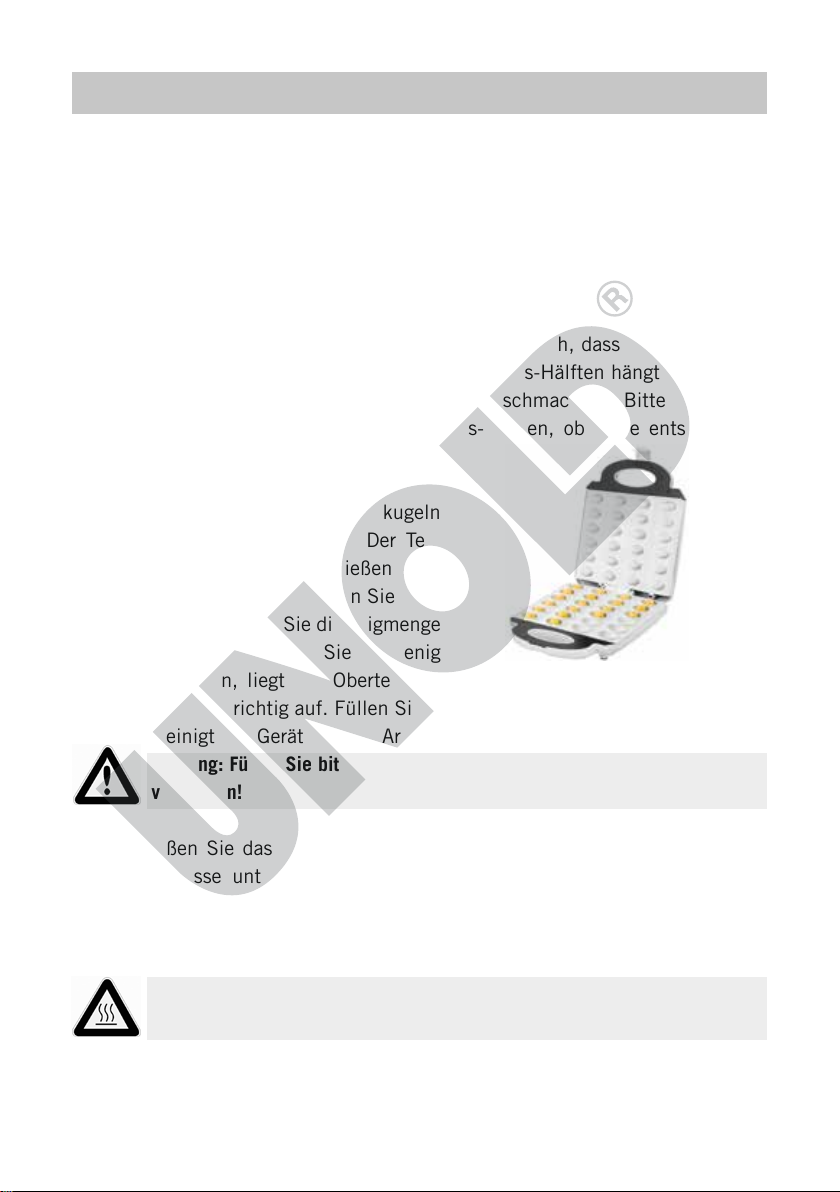
ZAUBERNÜSSE ZUBEREITEN
Copyright UNOLD AG | www.unold.de
1. Bereiten Sie zunächst den Zaubernuss-Teig zu, wie im Kapitel „Rezepte“
beschrieben.
2. Gerät schließen, Stecker in eine Steckdose (230 V~, 50 Hz) stecken. Die
rote Betriebskontrollleuchte leuchtet auf und zeigt an, dass die Heizung in
Betrieb ist.
3. Warten Sie, bis die Kontrollleuchte erlischt. Dies dauert ca. 3 bis 8 Minuten.
Hinweis zur Backampel: Wenn die Leuchte ausgeht, bedeutet dies, dass die
richtige Temperatur wieder erreicht ist, nicht jedoch, dass die ZaubernussHälften fertig sind. Die Backzeit der Zaubernuss-Hälften hängt vom jeweils
verwendeten Teig und dem persönlichen Geschmack ab. Bitte prüfen Sie
daher vor der Entnahme der Zaubernuss-Hälften, ob diese entsprechend
Ihren Wünschen gelungen sind.
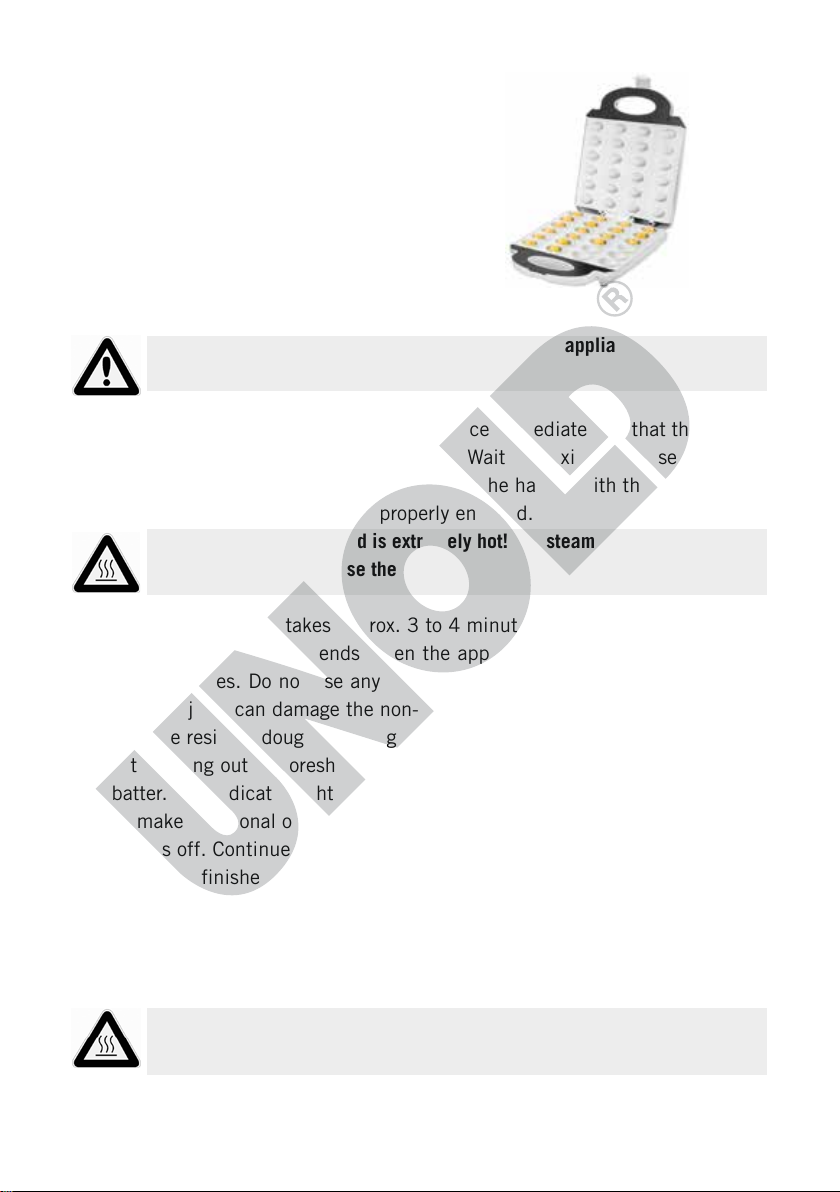
4. Öffnen Sie das Gerät.
5. Legen Sie nun die kleinen Teigkugeln
in die unteren Teigmulden. Der Teig
verteilt sich beim Schließen des
Gerätes gleichmäßig. Achten Sie bitte
immer darauf, dass Sie die Teigmenge
richtig dosieren. Wenn Sie zu wenig
Teig einfüllen, liegt das Oberteil des
Gerätes nicht richtig auf. Füllen Sie zu viel Teig ein, läuft der Teig über und
verunreinigt das Gerät und die Arbeitsfläche.
Achtung: Füllen Sie bitte immer alle Teigmulden, um Schäden am Gerät zu
vermeiden!
6. Schließen Sie das Gerät sofort nach dem Einfüllen des Teiges, damit die
Zaubernüsse unten und oben gleichmäßig braun werden. Warten Sie 5
Sekunden, drücken Sie den Deckel nochmals fest und verschließen Sie den
Griff mit dem Verschlussclip.
7. Achten Sie darauf, dass der Verschlussclip richtig eingerastet ist.
Achtung: Der Gerätedeckel ist sehr heiß! Aus dem Gerät kann heißer Dampf
austreten, wenn Sie den Deckel schließen.
8

8. Der Backvorgang dauert ca. 3 bis 4 Minuten.
Copyright UNOLD AG | www.unold.de
9. Wenn der Backvorgang beendet ist, öffnen Sie das Gerät und entnehmen Sie
die Zaubernüsse vorsichtig. Verwenden Sie hierfür nach Möglichkeit keine
metallischen Gegenstände wie z. B. eine Gabel, da dadurch die Antihaftbeschichtung beschädigt werden kann.
10. Im Gerät anhaftende Teigreste mit einem Teigschaber entfernen.
11. Nach dem Herausnehmen der Zaubernüsse kann das Gerät sofort wieder mit
Teig gefüllt werden.
12. Um weitere Zaubernüsse herzustellen, schließen Sie das Gerät und warten
Sie, bis die Kontrollleuchte erlischt. Fahren Sie mit den Schritten 1 bis
12 fort, bis der Teig aufgebraucht ist.
13. Lassen Sie die fertigen Zaubernüsse abkühlen, bevor Sie diese weiterverarbeiten. Die Zaubernüsse werden wie gewünscht gefüllt, die Ränder werden
ebenfalls mit der Füllung bestrichen. Anschließend werden jeweils zwei
Zaubernuss-Hälften zusammengesetzt.
14. Nach dem Backen Netzstecker ziehen. Erst dann ist das Gerät abgeschaltet.
Achtung: Auch nach dem Gebrauch ist das Gerät noch längere Zeit sehr
heiß! Verbrennungsgefahr!
REINIGEN UND PFLEGEN
Vor dem Reinigen stets das Gerät ausschalten, indem Sie den
Stecker aus der Steckdose ziehen.
Lassen Sie das Gerät abkühlen, bevor Sie es reinigen.
1. Das Gerät darf nicht in Wasser oder eine andere Flüssigkeit eingetaucht
werden.
2. Wischen Sie die noch warmen Backflächen mit einem feuchten Tuch ab oder
verwenden Sie eine weiche Bürste zum Reinigen der Vertiefungen.
3. Verwenden Sie niemals spitze oder harte Gegenstände. Sie würden die Antihaftbeschichtung zerkratzen.
4. Verwenden Sie außerdem keine scharfen Scheuermittel, Stahlwolle, metallischen Gegenstände, heißen Reinigungsmittel oder Desinfektionsmittel, da
diese zu Beschädigungen führen können.
5. Vor der erneuten Benutzung muss das Gerät vollkommen trocken sein.
6. Zur platzsparenden Aufbewahrung kann das Gerät hochkant abgestellt werden.
9

ZAUBERNUSS-REZEPT
Copyright UNOLD AG | www.unold.de
Süße Zaubernüsse
Grundrezept
250 g Butter, 2 Eier, 1 Päckchen Vanillezucker, 100 g Zucker, 400 g Mehl
Type 405, 50 g Stärkemehl, 2 Messerspitzen Backpulver
Nuss- oder Mandel-Zaubernüsse
250 g Butter, 2 Eier, 1 Päckchen Vanillezucker, 100 g Zucker, 100 g fein
gemahlene Nüsse oder Mandeln (wahlweise), 1 Fläschchen Bittermandelaroma, 400 g Mehl Type 405, 2 Messerspitzen Backpulver
Orangen-Zaubernüsse
250 g Butter, 2 Eier, 1 Päckchen Vanillezucker, 100 g Zucker, 50 g gerie-
bene Orangenschale, 1 Fläschchen
Backaroma Orange, 400 g Mehl Type
405, 2 Messerspitzen Backpulver
Vollkorn-Zaubernüsse
250 g Butter, 2 Eier, 1 Eigelb, Mark einer Vanilleschote, 120 g Honig, 1 Prise Salz, 400 g Dinkelvollkornmehl, 1
gestr. TL Backpulver
Herzhafte Zaubernüsse
Tomaten-Zaubernüsse
250 g Butter, 2 Eier, 1 Päckchen Tomatensauce (Pulver), ¼ TL Chilipulver, 2 EL Bruschettagewürz, ½ TL
Salz, 450 g Mehl Type 405, 2 Messerspitzen Backpulver
Herzhafte Zaubernüsse
250 g Butter, 2 Eier, 2 ½ EL gekörnte
Gemüsebrühe, 450 g Mehl Type 405,
2 Messerspitzen Backpulver
Kräuter- Zaubernüsse
250 g Butter, 2 Eier, 1 EL getrockneter Bärlauch, 1 Glas Basilikumpesto
(190 g), 500 g Weizenvollkornmehl,
2 Messerspitzen Backpulver
Zubereitung
Stellen Sie aus den Zutaten einen
Knetteig her. Stellen Sie den Teig ca.
1 Std. kalt. Formen Sie kleine Kugeln
(ca. 1,5-2 cm Durchmesser). Hierzu können Sie z. B. auch einen Kugelausstecher verwenden. Am Anfang
sind eventuell einige Versuche notwendig, um die exakt richtige Kugelgröße zu finden.
Legen Sie die Kugeln in das Gerät,
schließen Sie das Gerät und backen
die Zaubernüsse ca. 3 Minuten bis zur
gewünschten Bräune.
Wenn die Nüsse fertig gebacken sind,
fassen Sie das Gerät an beiden Griffen
an, öffnen es und schütten die Nüsse
auf ein Backblech.
Am Anfang den überschüssigen Teig
nach dem Erkalten von der gebackenen Nuss abschneiden.
Die Nüsse können Sie auch auf Vorrat
backen. Sie lassen sich in einer luftdicht verschlossenen Dose einige Zeit
10

lagern. Bitte verwenden Sie keine fri-
Copyright UNOLD AG | www.unold.de
schen Kräuter, da diese zu viel Feuchtigkeit enthalten und die Nüsse wieder
aufweichen und verderben könnten.
Süße Füllungen für Zaubernüsse
Für die Füllungen die jeweils angegebenen Zutaten miteinander verrühren.
Bitte füllen Sie die Zaubernüsse erst
unmittelbar vor dem Servieren, damit
die Schale knusprig bleibt.
Nougatfüllung
200 g Nussnougatcreme, 200 gFrischkäse
Eierlikörfüllung
100 ml Eierlikör, 1 Päckchen Vanille-
zucker, 100 ml süße Sahne, 1 Päckchen Paradiescreme Vanille
Himbeerfüllung
100 ml süße Sahne, 1 EL Zucker,
1 Päckchen Sahnesteif
Sahne steif schlagen und dann 200 g
frische Himbeeren unter die Sahne
ziehen.
Herzhafte Füllungen für Zaubernüsse
Für die Füllungen die jeweils angegebenen Zutaten gut miteinander verrühren. Sie können die Zaubernüsse
auch mit fertigen Salaten füllen, z.B.
Fleischsalat, Geflügelsalat, Pusztasalat oder Eiersalat.
Räucherlachsfüllung
100 g Räucherlachs, 200 g Frischkäse, 1 TL Sahnemeerrettich
Alle Zutaten zerkleinern und mixen,
z. B. mit dem ESGE-Zauberstab® oder
der ESGE-Zauberette®. Statt Räucherlachs können Sie auch geräucherte
Forellenfilets oder Thunfisch in Öl verwenden.
Käsefüllung
100 g fein zerkleinerter Emmentaler
Käse, 150 g Kräuterfrischkäse, 1 EL
Kirschwasser (Alternative: 150 g
neutraler Frischkäse und 10 Cocktailkirschen)
Schinkenfüllung
100 g geräucherter roher Schinken,
200 g Kräuterfrischkäse, 1 TL Sahnemeerrettich
Camembertfüllung
2 EL Preiselbeermarmelade, 100 g
weicher Camembert, 200 g Frischkäse
Die Rezepte in dieser Bedienungsanleitung wurden von den Autoren und von der UNOLD AG sorgfältig erwogen und geprüft, dennoch kann keine Garantie übernommen werden. Eine Haftung der
Autoren bzw. der UNOLD AG und ihrer Beauftragten für Personen-, Sach- und Vermögensschäden
ist ausgeschlossen.
11

GARANTIEBESTIMMUNGEN
Copyright UNOLD AG | www.unold.de
Wir gewähren auf unsere Geräte eine Garantie von 24 Monaten, bei gewerblichem Gebrauch 12 Monate, ab dem Kaufdatum für Schäden, die bei bestimmungsgemäßem Gebrauch nachweislich auf
Werksfehler zurückzuführen sind. Innerhalb der Garantiezeit beheben wir Material- und Herstellungsfehler nach unserem Ermessen durch Reparatur oder Umtausch. Unsere Garantieleistungen
gelten ausschließlich für in Deutschland und Österreich verkaufte Geräte. Bei anderen Ländern wenden Sie sich bitte an den zuständigen Importeur. Geräte, für die eine Mängelbeseitigung beansprucht
wird, senden Sie bitte zusammen mit einer Kopie des maschinell erstellten Kauf belegs, aus dem das
Kaufdatum ersichtlich sein muss, sowie einer Fehlerbeschreibung gut verpackt und freigemacht
an unseren Kundendienst. Im Garantiefall werden dem Kunden in Deutschland und Österreich entstandene Versandkosten zurückerstattet. Von der Garantie ausgeschlossen sind Schäden durch Verschleiß, unsachgemäße Handhabung und Nichteinhaltung der Wartungs- und Pflegeanweisungen.
Der Garantieanspruch erlischt, wenn Reparaturen oder Eingriffe am Gerät von dritter Stelle vorgenommen werden. Eventuelle Ansprüche des Endverbrauchers gegenüber dem Verkäufer oder Händler
werden durch diese Garantie nicht eingeschränkt.
ENTSORGUNG / UMWELTSCHUTZ
Unsere Geräte werden auf hohem Qualitätsniveau für eine lange Nutzungsdauer herge stellt. Regelmäßige Wartung und fachge rechte Reparaturen durch unseren Kundendienst können die Nutzungsdauer des Gerätes verlängern. Wenn ein Gerät defekt und
nicht mehr zu reparieren ist, beachten Sie bitte: Dieses Produkt darf nicht zusammen
mit dem normalen Hausmüll entsorgt werden. Sie müssen dieses Produkt an einer ausgewiesenen Sammelstelle zum Recycling von elektrischen oder elektronischen Geräten
ab liefern. Durch das separate Sammeln und Recyceln von Abfallprodukten helfen Sie
mit, die natürlichen Ressourcen zu schonen und stellen sicher, dass das Produkt in
gesundheits- und umweltverträglicher Weise entsorgt wird.
INFORMATIONEN FÜR DEN FACHHANDEL
Hiermit erklärt die UNOLD AG, dass sich der Waffelautomat 48360 in Übereinstimmung mit den
grundlegenden Anforderungen der europäischen Richtlinie für elektromagnetische Verträglichkeit
(2014/30/EU) und der Niederspannungsrichtlinie (2014/35/EC) bendet.
Hiermit bestätigt die UNOLD AG, dass sowohl das Produkt als auch die eingesetzten Rohstoffe den
Vorschriften des LFBG 2005, § 30+31 in ihrer jeweils aktuellen Fassung entspricht. Die gesetzlichen
Grenzwerte werden eingehalten.
Die Übereinstimmung mit den Regularien bezieht sich auf den Tag der Erstellung dieser Erklärung.
Hockenheim, 5.11.2017 UNOLD AG, Mannheimer Straße 4, 68766 Hockenheim
12

SERVICE-ADRESSEN
Copyright UNOLD AG | www.unold.de
DEUTSCHLAND
Kundendienst
Telefon +49 (0) 62 05/94 18-27
Mannheimer Straße 4
68766 Hockenheim
Sie möchten innerhalb der Garantiezeit ein Gerät zur Reparatur einsenden? Auf unserer
Internetseite www.unold.de/ruecksendung können Sie sich einen Rücksendeschein ausdrucken,
um damit das Paket kostenlos bei der Post abzugeben (nur für Einsendungen aus Deutschland
und Österreich).
SCHWEIZ ÖSTERREICH
Telefax +49 (0) 62 05/94 18-22
E-Mail service@unold.de
Internet www.unold.de
MENAGROS AG
Hauptstr. 23
CH 9517 Mettlen
Telefon +41 (0) 71 6346015
Telefax +41 (0) 71 6346011
E-Mail info@bamix.ch
Internet www.bamix.ch
DEC
Digital Electronic Center Service GmbH
Kelsenstraße 2
A-1030 Wien
Telefon +43 (0) 1/9616633-0
Telefax +43 (0) 1/9616633-22
E-Mail office@decservice.at
Internet www.decservice.at
POLEN
Quadra-Net
Dziadoszanska 10
61-248 Poznań
Internet www.quadra-net.pl
Diese Anleitung kann im Internet unter www.unold.de als pdf-Datei heruntergeladen werden.
13
INSTRUCTIONS FOR USE MODEL 48360
Copyright UNOLD AG | www.unold.de
TECHNICAL SPECIFICATIONS
Power: 1,400 watt, 230 V~, 50 Hz
Plates: Die-cast aluminium, non-stick coating
Dimensions: approx. 25.5 x 32.0 x 10.3 cm (L/W/H)
Weight: approx. 2.2 kg
Power cord: approx. 80 cm
Features: For making Russian „oreshki“ (walnut-shaped cookies)
Accessories: Operating instructions
Equipment features, technology, colours and design are subject to change without
notice. Errors and omissions excepted.
EXPLANATION OF SYMBOLS
This symbol denotes a possible hazard which could cause injury or
damage to the appliance.
This symbol indicates a potential burning hazard. Please be especially
careful at all times here.
IMPORTANT SAFEGUARDS
with sweet or savoury filling, baking plates with non-stick
coating, indicator light, closure clip
Please read the following instructions and keep them on
hand for later reference.
1. This appliance can be used by children 8 years and older, as
well as by persons with reduced physical, sensory or mental
abilities or with lack of experience and/or knowledge, if they are
supervised or if they have been instructed with regard to safe use
of the appliance and have understood the dangers that can result
from use of the appliance.
2. Children must not play with the appliance.
3. Children are not allowed to perform cleaning and user maintenance,
unless they are 8 years of age or older and are supervised.
14

4. Keep the appliance and the power cord out of the reach of
Copyright UNOLD AG | www.unold.de
children under 8 years of age.
5. CAUTION – parts of this product can become very hot and
cause burn injuries! Particular caution is required if children or
persons at risk are present.
6. Children should be supervised to ensure that they do not play
with the appliance.
7. Only connect the appliance to an AC power supply with voltage
corresponding to the voltage specified on the rating plate.
8. This appliance must not be operated with an external timer or a
remote control system.
9. For safety reasons, if possible do not use an extension cord, and
do not use a multiple socket unit to connect the appliance to the
mains supply.
10. Never immerse the appliance in water or other liquids.
11. Do not clean the appliance in a dishwasher.
12. Never leave the appliance unattended during operation and keep
it out of the reach of children.
13. After use, before cleaning or if there are faults during operation,
the mains plug must always be unplugged.
14. Place the appliance on a free, level surface. Never place or oper
-
ate the appliance on or in the vicinity of hot surfaces.
15.
Never touch the appliance or power cord with wet hands.
16. The appliance is intended for household use only, or for similar
areas of use, such as,
kitchenettes in businesses, offices or other workplaces,
in agricultural enterprises,
for use by guests in hotels, motels or other lodgings,
in private guest houses or holiday homes.
17. Only use the appliance indoors.
18. Carefully and completely unwind the power cord before use. The
power cord must not hang down over the edge of the work sur
face; so that small children cannot unintentionally pull the appliance down from the work surface.
19.
Never wrap the power cord around the appliance.
20. To unplug the appliance, always pull on the plug, never on the
power cord.
15

21. Ensure that the power cord does not rest on the hot appliance.
Copyright UNOLD AG | www.unold.de
22. Do not operate the appliance in the vicinity of heat-sensitive
material, such as methylated spirit – fire hazard!
23. The appliance becomes hot during operation; therefore, always
use the handles or pot holders to move the appliance.
24. Do not leave the appliance unattended as long as it is hot - risk
of fire!
25. To prevent smoke, do not overheat your cooking, frying, or bak
ing utensils; the smoke can be hazardous for small animals (e.g.
birds) with a particularly sensitive respiratory system. W
e recom-
mend that you not keep birds in the kitchen.
26.
When placing dough into the appliance or removing the oreshki,
always open the lid all the way, otherwise it can fall shut: Danger
of burns and danger of injury!
27. For safety reasons, never cover the appliance or the baking sur
faces with paper, foil or other foreign objects. Otherwise there is
a fire hazard!
28.
Never touch the baking surfaces with parts of your body or heat-
sensitive objects during operation or immediately thereafter.
29. Do not put the appliance away for storage when it is still hot.
30. Only use this appliance to prepare food.
31. Check the plug and the power cord regularly for wear or damage.
In case of damage to the power cord or other parts, please send
the appliance for inspection and repair to our customer service
department. Unauthorised repairs can result in serious risks to
the user and will void the warranty. If the power cord of this appli
ance is damaged, it must be replaced by the manufacturer or by
the manufacturer’s customer service organisation, or by a person
with similar qualifications, to prevent hazards.
CAUTION:
The appliance becomes very hot during operation!
Never open the housing of the appliance. This can result in
electric shock.
The manufacturer will not be liable in the event of incorrect assembly, improper or incorrect use or if
repairs are carried out by unauthorized third parties.
16
PREPARING THE APPLIANCE FOR OPERATION
Copyright UNOLD AG | www.unold.de
1. Before using the appliance for the first time, we recommend that you wipe
off the two non-stick baking surfaces with a damp cloth.
2. Open the window during the burn-in phase that now follows.
3. Close the appliance, plug the mains plug of the appliance into an electrical
outlet (230 V~, 50 Hz). The red operating indicator light is illuminated and
shows that the heating circuit is in operation.
4. Heat up the appliance for approx. 10 minutes.
5. After pre-heating the appliance there may already be visible traces of use;
however, these do not affect the function of the appliance and do not constitute grounds for a complaint.
6. Before using the oreshki maker for the first time, lightly grease both baking
surfaces with a brush with a heat-resistant shortening, such as margarine.
Because the baking surfaces of the appliance have a non-stick coating, they
must only be greased prior to making the first oreshki, thereafter greasing is
no longer required.
7. If a mild odour becomes perceptible after heating up your new appliance for
the first time, it is completely harmless.
Caution: We always recommend that you not eat the very first oreshki
prepared in the appliance; dispose of them. For each subsequent use of the
appliance, naturally this is no longer necessary!
PREPARING ORESHKI
1. First prepare the oreshki dough as described in the „Recipes“ section.
2. Close the appliance, plug the mains plug of the appliance into an electrical
outlet (230 V~, 50 Hz). The red operating indicator light is illuminated and
shows that the heating circuit is in operation.
3. Wait until the indicator light is off. This takes approx. 3 to 8 minutes. Note
concerning the baking signal light: When the light is off, this means that the
proper temperature has again been reached, however it does not mean that
the oreshki halves are ready. The bake time of the oreshki depends on the
dough used and your personal taste. Consequently, before removing the
oreshki, please ensure that they are done the way you want them.
4. Open the appliance.
17
5. Now place the small dough balls in the
Copyright UNOLD AG | www.unold.de
lower dough recesses. When closing
the appliance the dough is distributed
uniformly. Always ensure that you correctly dose the amount of dough. If
you use too little dough the upper part
of the appliance will not sit correctly.
If you use too much dough the excess
dough will overflow and adhere on the appliance and the countertop.
Caution: Always fill all dough recesses to prevent appliance damage!
6. After adding the dough, close the appliance immediately so that the oreshki
brown uniformly on the top and bottom. Wait approximately 5 seconds and
firmly press the lid down again, and close the handle with the closure clip.
7. Ensure that the closure clip is properly engaged.
Caution: The appliance lid is extremely hot! Hot steam can escape from the
appliance when you close the lid.
8. The baking process takes approx. 3 to 4 minutes.
9. When the baking cycle ends, open the appliance and carefully remove the
oreshki halves. Do not use any metallic objects, such as a fork, to do this,
metal objects can damage the non-stick coating.
10. Remove residual dough adhering in the appliance with a spatula.
11. After taking out the oreshki the appliance can immediately be refilled with
batter. The indicator light will again go out.
12. To make additional oreshki, close the appliance and wait until the indicator
light is off. Continue with steps 1 to 12 until the dough is used up.
13. Allow the finished oreshki to cool slightly before proceeding to the subsequent steps. The oreshki are filled as desired, the edges are also coated with
filling. Then two oreshki halves are joined together to form one oreshki.
14. After baking, unplug the mains plug. The appliance is not switched off until
it is unplugged.
Caution: After use, the appliance still remains extremely hot for a longer period of time! Danger of burn injuries!
18

CLEANING AND CARE
Copyright UNOLD AG | www.unold.de
Before cleaning, always turn off the appliance and unplug it from
the electrical outlet.
Allow the appliance to cool before cleaning it.
1. Do not immerse the appliance in water or other liquids.
2. Wipe off the baking surfaces with a damp cloth while they are still warm, and
use a soft brush to clean the recesses.
3. Never use hard or sharp objects. Hard or sharp objects would scratch the
non-stick coating.
4. Moreover, do not use any abrasive scouring agents, steel wool, metal objects,
hot cleaning agents or disinfectants, since they can damage the appliance.
5. Prior to first use the appliance must be completely dry.
6. The appliance can be set on its edge for place-saving storage.
RECIPES
Walnut-shaped cookies, also known as oreshki, are a Russian specialty. They can
be filled with a sweet or savoury filling. The oreshki are baked in the oreshki maker, then filled and two halves are joined together to make one oreshki. Naturally
there are no limits to your creativity in this regard, you will also find a few modifications in recipe books and on the Internet. Moreover you can also make the
basic dough cited above suitable for savoury oreshki by adding salt. In this case
do not use any vanilla sugar. These oreshki can be filled with a cheese cream,
for example.
Sweet oreshki
Basic recipe
250 g butter, 2 eggs, 1 envelope vanilla sugar,
100 g sugar, 400 g white flour, type 405, 50 g
corn starch, large pinches of baking power
Nut or almond oreshki
250 g butter, 2 eggs, 1 envelope vanilla sugar,
100 g sugar, 100 g finely ground nuts or almonds (optional), 1 vial (1/2 tsp) bitter almond
flavouring, 400 g white flour, type 405, 2 large
pinches baking power
Orange oreshki
250 g butter, 2 eggs, 1 envelope vanilla sugar,
100 g sugar, 50 g grated orange peel, 1 vial orange extract (1/2 tsp), 400 g white flour, type
405, 2 large pinches of baking power
Wholemeal oreshki
250 g butter, 2 eggs, 1 egg yolk, 1 vanilla pod
120 g honey, 1 pinch salt, 400 g wholemeal
spelt flour, 1 level tsp baking power
19

Savoury oreshki
Copyright UNOLD AG | www.unold.de
Tomato oreshki
250 g butter, 2 eggs, 1 envelope tomato sauce
(powder, ¼ tsp chili powder, 2 TBSP bruschetta
seasoning, 450 g white flour, type 405, 2 large
pinches baking powder
Savoury oreshki
250 g butter, 2 eggs, 2 ½ TBSP granulated vegetable broth, 450 g white flour, type 405, 2
large pinches baking powder
Herb oreshki
250 g butter, 2 eggs, 1 TBSP dried wild garlic, 1 jar basil pesto (190 g), 500 g wholemeal
wheat flour, 2 large pinches baking powder
Preparation
Make a kneaded dough from the ingredients.
Refrigerate the dough for approx. 1 hour. Form
small balls (approx. 1.5 - 2 cm diameter). You
can also use a melon baller to do this. Initially
several attempts may be necessary to find the
ball size that is just right. Place the balls in the
appliance, close the appliance and bake the
oreshki approx. 3 minutes until the desired level of browning. When the oreshki have finished
baking, grasp both handles of the appliance,
open the appliance and shake the oreshki onto
a baking sheet. At the beginning, after cooling,
cut off the excess dough from the baked oreshki.
You can also bake the oreshki and store them for
use later on. They can be stored for some time
is a sealed, air-tight container. Please do not use
fresh herbs, as they contain too much moisture
and the oreshki could soften and spoil.
Sweet fillings for oreshki
For the fillings, blend together the respective
specified ingredients. Please fill the oreshki
just before serving them so that the shell remains crispy.
Nougat filling
200 g nut nougat spread, 200 g cream cheese
Egg liqueur filling
100 ml egg liqueur, 1 envelope vanilla sugar,
100 ml sweet cream 1 envelope Paradiescreme
Vanille (cream dessert with vanilla flavour)
Raspberry filling
100 ml sweet cream, 1 TBSP sugar, 1 envelope
whipped cream stabiliser
Whip the cream until stiff, and then fold 200 g
fresh raspberries into the cream.
Savoury fillings for oreshki
For the fillings, thoroughly blend together the respective specified ingredients. You can also fill
the oreshki with ready-made salads, e.g. meat
salad, poultry salad, puszta salad or egg salad.
Smoked salmon filling
100 g smoked salmon, 200 g cream cheese, 1
tsp creamed horseradish
Chop and mix all ingredients, for example,
with the ESGE-Zauberstab
®
or the ESGEZauberette®. Instead of smoked salmon, you can
also use smoked trout filets or tuna fish in oil.
Cheese filling
100 g finely chopped Emmentaler cheese,
150 g herb cream cheese, 1 TBSP cherry brandy (alternative: 150 g neutral cream cheese and
10 cocktail cherries)
20
Ham filling
Copyright UNOLD AG | www.unold.de
100 g smoked raw ham, 200 g herb cream
cheese, 1 tsp creamed horseradish
The authors have thoroughly considered and tested the recipes included in these operating instructions. Nevertheless, a guarantee cannot be accepted. The authors, respectively UNOLD AG and their
assignees shall not be liable for personal injuries, material damages and financial loss.
Camembert filling
2 TBSP lingonberry jam, 100 g soft camembert,
200 g cream cheese
GUARANTEE CONDITIONS
We grant a 24 months guarantee, and in case of commercial use a 12 months guarantee, starting from the
date of purchase for any damage demonstrably due to manufacturing defects and when the appliance has been
used according to its intended use. Within the warranty period we will remedy defective materials or workmanship through repair or replacement, at our option. Our warranty terms apply only to appliances sold in Germany
and Austria. For other countries, please contact the responsible importer. In the event of a claim for remedy of
defects, please send the appliance to our after sales service, properly packaged and postage paid, together with
a copy of the automatically generated sales receipt, which must show the date of purchase, and a description
of the defect. If the defect is covered by the warranty, the customer will be reimbursed for the shipping costs
only in Germany and Austria. The warranty does not cover damage from normal wear, improper handling and
failure to comply with the maintenance and care instructions. The warranty is void if repairs or modifications
are made to the appliance by third parties. Any claims of the end consumer vis-à-vis the retailer are not limited
by this warranty.
WASTE DISPOSAL / ENVIRONMENTAL PROTECTION
Our appliances are produced on a high quality level for a long lifetime. Regular maintenance
and expert repairs by our after-sales service can extend the useful life of the appliance. If an
appliance is defective and repair is not possible we ask you to follow the following instructions
for disposal. Do not dispose this appliance together with your standard household waste. Please
bring this product to an approved collection point for recycling of electric and electronic products. By separate collection and disposal of waste products you help to protect natural resources
and ensure, that the product is disposed in an adequate way to protect health and environment.
The instruction booklet is also available for download: www.unold.de
21
NOTICE D’UTILISATION MODÈLE 48360
Copyright UNOLD AG | www.unold.de
SPÉCIFICATION TECHNIQUE
Puissance : 1400 Watts, 230 V~, 50 Hz
Plaques : aluminium coulé sous pression, revêtement anti-adhérent
Dimensions : env. 25,5 x 32,0 x 10,3 cm (L / l / h)
Poids : env. 2,17 kg
Cordon
d’alimentation : env. 80 cm
Équipement : pour la fabrication de biscuits russes en forme de noix (oreshkis) avec un
Accessoires : mode d‘emploi
Sous réserve de modifications et d‘erreurs concernant les caractéristiques d‘équipement, la technique,
les couleurs et le design.
EXPLICATION DES SYMBOLES
Ce symbole indique les dangers susceptibles de provoquer des blessures ou des endommagements de l’appareil.
Ce symbole indique le risque d’être brûlé. Soyez prudent en utilisant l’appareil.
fourrage sucré ou relevé, plaques de cuisson avec revêtement antiadhésif,
voyant de contrôle, clip de fermeture
CONSIGNES DE SÉCURITÉ
Veuillez lire les instructions suivantes et les conserver.
1. Cet appareil peut être utilisé par des enfants de plus de 8 ans
et par des personnes dont les capacités physiques, sensorielles
ou intellectuelles sont limitées ou dont l’expérience et/ou les
connaissances sont insuffisantes, si ceux-ci sont surveillés ou
s’ils ont été formés à une utilisation sûre de l’appareil et aux
dangers pouvant en résulter.
2. Les enfants ne doivent pas jouer avec l’appareil.
3. Le nettoyage et la maintenance incombant à l’utilisateur ne
doivent pas être effectués par des enfants, à moins qu’ils soient
âgés de plus de 8 ans et qu’ils soient surveillés.
22

4. Conserver l’appareil ainsi que le câble hors de portée des enfants
Copyright UNOLD AG | www.unold.de
de moins de 8 ans.
5. ATTENTION : certaines parties de ce produit peuvent devenir très
chaudes et occasionner des brûlures ! Une prudence particulière
est requise en présence d’enfants et de personnes menacées.
6. Les enfants doivent être surveillés afin de s’assurer qu’ils ne
jouent pas avec l’appareil.
7. Raccorder exclusivement l’appareil au courant alternatif à la ten
-
sion se conformant au panneau signalétique.
8.
Cet appareil ne doit pas être utilisé avec un minuteur externe ou
un système de commande à distance.
9. Pour des raisons de sécurité, n‘utilisez pas de rallonge, dans la
mesure du possible, ni de prise multiple pour raccorder l‘appa
-
reil au secteur.
10.
Ne plongez en aucun cas l’appareil dans de l’eau ou un autre
liquide.
11. L’appareil ne doit pas être lavé dans le lave-vaisselle.
12. Ne laissez pas l‘appareil sans surveillance pendant le fonction
-
nement et maintenez-le hors de portée des enfants.
13.
Après utilisation, avant le nettoyage ou en cas d‘éventuels dys-
fonctionnements durant le fonctionnement, veuillez débrancher
la prise.
14.
Poser l’appareil sur une surface plane et dégagée. Ne jamais
déposer ou faire fonctionner l‘appareil et le cordon d‘alimenta
-
tion sur ou près de surfaces chaudes.
15.
Ne jamais toucher l’appareil ou son cordon d’alimentation avec
les mains mouillées.
16. L‘appareil est exclusivement destiné à un usage ménager ou à
des fins similaires, par ex.
une kitchenette dans des boutiques, des bureaux ou d‘autres
lieux de travail,
des exploitations agricoles,
à l‘usage des clients dans des hôtels, motels ou autres lieux
d‘hébergement,
dans des pensions privées ou des résidences de vacances.
17. Utiliser l‘appareil exclusivement à l‘intérieur.
23

18. Dérouler intégralement le cordon avant utilisation. Le câble ne
Copyright UNOLD AG | www.unold.de
doit jamais pendre par dessus le bord du plan de travail, afin que
par exemple, de petits enfants ne puissent pas tirer l‘appareil par
mégarde du plan de travail.
19. N‘enroulez jamais le câble d‘alimentation autour de l‘appareil.
20. Débranchez le cordon d’alimentation de la prise de courant uni
-
quement au niveau de la prise mâle, ne jamais tirer sur le câble.
21.
Veillez à ce que le cordon ne soit pas plaqué contre l‘appareil
chaud.
22. N‘utilisez pas l‘appareil à proximité de matériaux sensibles à la
chaleur, comme de l‘alcool : risque d‘incendie !
23. En fonctionnement, l‘appareil chauffe. Par conséquent, utilisez
les poignées et des maniques pour déplacer l‘appareil.
24. Ne pas laisser l‘appareil sans surveillance tant qu‘il est chaud :
risque de brûlure !
25. Afin d‘éviter le développement de fumées, ne faites pas sur
chauffer vos plats de cuisson et gamelles ; la fumée peut être
dangereuse pour les petits animaux (par ex. oiseaux) ayant un
système de respiration particulièrement
sensible. Nous vous
recommandons de ne pas installer d‘oiseaux dans votre cuisine.
26. Lors du remplissage de pâte ou du retrait des demi-coques finies,
ouvrir impérativement le couvercle en entier sans quoi celui-ci
pourrait retomber : risque de brûlure et de lésions !
27. Pour des raisons de sécurité, ne jamais couvrir l‘appareil et les
surfaces de cuisson de papier, de film ou d‘autres corps étran
-
gers. Risque d‘incendie !
Ne touchez jamais les surfaces de cuisson avec des parties du
28.
corps ou d‘autres objets sensibles à la chaleur, pendant et juste
après le fonctionnement.
29. Ne pas ranger l‘appareil lorsqu‘il est encore chaud.
30. Ne placez que des aliments dans cet appareil.
31. Vérifier régulièrement que la prise mâle et le cordon d‘alimenta
tion ne sont pas usés ni abîmés. Si le cordon ou d’autres pièces
sont abîmés,
envoyer l’appareil pour contrôle et réparation à
notre service après-vente.
32. Toute réparation irrégulière peut provoquer d’importants dangers
pour l’utilisateur et entraîner l’extinction de la garantie. Si le
24

câble d‘alimentation de cet appareil est endommagé, il doit être
Copyright UNOLD AG | www.unold.de
remplacé par le fabricant, son service clientèle ou une personne
qualifiée similaire, afin d‘éviter tout danger.
Prudence :
L’appareil est très chaud pendant son fonctionnement !
N’ouvrez en aucun cas la coque de l’appareil. Risque
d‘électrocution.
Le fabricant n’est nullement responsable en cas de montage non conforme, d‘utilisation irrégulière ou non
conforme ou suite à l’exécution de réparations par des tiers non autorisés.
MISE EN SERVICE
1. Avant la première utilisation, nous vous recommandons d‘essuyer les deux surfaces de cuisson
dotées d‘un revêtement anti-adhérent avec un chiffon humide.
2. Ouvrir la fenêtre durant la phase de cuisson qui suit.
3. Fermer l‘appareil et brancher le cordon dans une prise de courant (230 V~, 50 Hz). Le voyant de
contrôle de fonctionnement rouge s‘allume et indique que le chauffage est en fonctionnement.
4. Faites chauffer l‘appareil pendant 10 minutes environ.
5. Après la cuisson à vide, l‘appareil peut déjà présenter d‘éventuelles traces d‘utilisation. Celles-ci
ne portent toutefois pas atteinte au fonctionnement de l‘appareil et ne constituent pas un motif
de réclamation.
6. Avant la première utilisation, graissez légèrement les deux surfaces de cuisson avec un pinceau
à l‘aide d‘une matière grasse résistant à la chaleur, par ex. de la margarine. Les surfaces de cuisson de l‘appareil étant dotées d‘un revêtement anti-adhésif, vous devez uniquement les graisser
avant la première utilisation, mais plus du tout par la suite.
7. Si une légère odeur se dégage lors de la première mise en température de votre nouvel appareil,
celle-ci est totalement inoffensive.
Attention : nous conseillons en principe de ne pas consommer les toutes premières demicoques préparées dans l‘appareil, et de les jeter. Cela n‘est naturellement plus nécessaire
pour les utilisations suivantes de l‘appareil !
25

PRÉPARER DES ORESHKIS
Copyright UNOLD AG | www.unold.de
1. Commencer par préparer la pâte à oreshkis, comme décrit au chapitre « Recettes ».
2. Fermer l‘appareil et brancher le cordon dans une prise de courant (230 V~, 50 Hz). Le voyant de
contrôle de fonctionnement rouge s‘allume et indique que le chauffage est en fonctionnement.
3. Attendez jusqu’à ce que le voyant est éteint. Cela dure environ 3 à 8 minutes. Remarque concer-
nant le témoin de cuisson : lorsque le lampe est éteint, cela signifie que la température appropriée
est à nouveau atteinte, mais pas que les demi-coques de noix sont prêtes. La durée de cuisson des demi-coques de noix dépend de la pâte utilisée et du goût de chacun. Par conséquent,
avant de retirer les demi-coques de noix, veuillez vérifier si elles sont conformes à vos attentes.
4. Ouvrez l‘appareil.
5. Placez maintenant de petites boules de pâte
dans les moules inférieurs. Lors de la fermeture
de l‘appareil, la pâte se répartit régulièrement.
Veiller à toujours doser correctement la quantité
de pâte. Si vous versez trop peu de pâte, la partie
supérieure de l‘appareil ne repose pas correcte-
ment. Si vous versez trop de pâte, elle débordera
et salira l‘appareil et la surface de travail.
Attention : remplissez toujours tous les moules afin d‘éviter d‘endommager l‘appareil !
6. Fermez l‘appareil immédiatement après avoir versé la pâte afin que les oreshkis soient aussi
bruns en dessous qu‘au-dessus. Patientez 5 secondes, pressez à nouveau fermement le couvercle et fermez la poignée avec le clip de fermeture.
7. Veillez à ce que le clip de fermeture soit correctement enclenché.
Attention : le couvercle de l‘appareil est très chaud ! De la vapeur chaude peut s‘échapper de
l‘appareil lorsque vous fermez le couvercle.
8. La cuisson dure environ 3 à 4 minutes.
9. Si la cuisson est terminée, ouvrez l‘appareil et retirez délicatement les oreshkis. Pour cela, n‘uti-
lisez pas d‘objets métalliques (par ex. une fourchette) dans la mesure du possible, car cela pourrait endommager le revêtement antiadhésif.
10. Retirer les résidus de pâte adhérant à l‘appareil à l‘aide d‘une spatule.
11. Une fois les oreshkis retirés, l‘appareil peut être à nouveau rempli de pâte immédiatement. Le
voyant de contrôle s‘éteint à nouveau.
12. Pour fabriquer d‘autres oreshkis, fermer l‘appareil et attendre jusqu‘à ce que le voyant de
contrôle est éteint. Poursuivre avec les étapes 1 à 12 jusqu‘à ce que toute la pâte soit utilisée.
26

13. Laissez les oreshkis terminés refroidir un peu avant de les utiliser. Les oreshkis sont fourrés
Copyright UNOLD AG | www.unold.de
comme souhaité, les bords sont également enduits avec la garniture. Ensuite, les deux demicoques de noix sont assemblées.
14. Après la cuisson, débrancher la prise. Ce n‘est qu‘alors que l‘appareil sera éteint.
Attention : l‘appareil reste très chaud pendant une longue période, même après utilisation !
Risque de brûlure !
NETTOYAGE ET ENTRETIEN
Avant le nettoyage, éteindre systématiquement l’appareil en débranchant la prise.
Laisser l’appareil refroidir avant de le nettoyer.
1. L’appareil ne doit pas être plongé dans l‘eau ni dans aucun autre liquide.
2. Essuyer les surfaces de cuisson encore chaudes avec un chiffon humide ou utiliser une brosse
douce pour nettoyer les creux.
3. Ne jamais utiliser d‘objets durs ou pointus. Cela rayerait le revêtement anti-adhésif.
4. En outre, vous ne devez pas utiliser d‘abrasif puissant, de laine d‘acier, d’objets métalliques, de
détergent chaud ou de désinfectant, car ils pourraient détériorer l‘appareil.
5. L‘appareil doit être totalement sec avant d‘être réutilisé.
6. L‘appareil peut être rangé sur la tranche afin de prendre moins de place.
RECETTE DES ORESHKIS
Les oreshkis sont des biscuits en forme de noix originaires de Russie. Ils peuvent au choix être fourrés d‘une garniture sucrée ou relevée. Les oreshkis sont cuits dans un moule à biscuits spécial, puis
fourrés et les deux moitiés sont ensuite réunies. Vos désirs ne connaissent aucune limite pour leur
préparation, et vous trouverez aussi certaines variations dans des livres de recettes ou sur Internet.
Oreshkis sucrés
Recette de base
250 g de beurre, 2 œufs, 1 sachet de sucre vanillé, 100 g de sucre, 400 g de farine type 405,
50 g d’amidon, 2 pointes de couteau de levure
Oreshkis aux noisettes ou aux amandes
250 g de beurre, 2 œufs, 1 sachet de sucre vanillé, 100 g de sucre, 100 g de noisettes ou
d’amandes finement moulues (au choix), 1
flasque d’arôme d’amande amère, 400 g de farine type 405, 2 pointes de couteau de levure
Oreshkis à l’orange
250 g de beurre, 2 œufs, 1 sachet de sucre vanillé, 100 g de sucre, 50 g d’écorce d’orange râpée, 1 flasque d’arôme orange, 400 g de farine
type 405, 2 pointes de couteau de levure
Oreshkis à la farine complète
250 g de beurre, 2 œufs, 1 jaune d’œuf, la
pulpe d’une gousse de vanille, 120 g de miel, 1
pincée de sel, 400 g de farine d’épeautre complète, 1 cc rase de levure
27

Oreshkis salés
Copyright UNOLD AG | www.unold.de
Oreshkis à la tomate
250 g de beurre, 2 œufs, 1 sachet de sauce tomate (en poudre), ¼ cc de piment en poudre, 2
cs d’épices pour bruschetta, ½ cc de sel, 450 g
de farine type 405, 2 pointes de couteau de levure
Oreshkis épicés
250 g de beurre, 2 œufs, 2 ½ cs de bouillon de
légumes en grains, 450 g de farine type 405, 2
pointes de couteau de levure
Oreshkis aux herbes
250 g de beurre, 2 œufs, 1 cs d’ail des ours,
1 verre de pesto au basilic (190 g), 500 g de
farine de blé complète, 2 pointes de coureau
de levure
Préparation
Réalisez une pâte avec les ingrédients.
Réservez la pâte au frais pendant 1 heure envi-
ron. Formez de petites billes (env. 1,5-2 cm de
diamètre). Pour ce faire, vous pouvez également
utiliser, par ex., une cuillère parisienne. Au dé-
but, certains essais peuvent s’avérer nécessaires
pour obtenir la taille de billes qui convient. Placez les billes dans l’appareil, fermez-le et cuisez
les oreshkis pendant 3 minutes env. jusqu’à ce
qu’ils aient la couleur brune souhaitée. Lorsque
les biscuits sont cuits, saisissez l’appareil par
les deux poignées, ouvrez-le et déposez les biscuits sur une plaque de cuisson. Commencez
par découper la pâte en excédent des biscuits
cuits une fois ces derniers refroidis.
Vous pouvez également cuire les biscuits à
l’avance. Ils peuvent être conservés pendant un
certain temps dans une boîte hermétique fer-
mée. N’utilisez pas d’herbes fraîches car elles
renferment trop d’humidité, ce qui pourrait provoquer un ramollissement des biscuits et leur
altération.
Farces sucrées pour oreshkis
Pour réaliser les farces, mélanger ensemble les
ingrédients indiqués. Ne farcissez les oreshkis qu’au moment de servir afin que leur coque
reste croustillante.
Farce au nougat
200 g de crème au nougat, 200 g de fromage
frais
Farce à la liqueur aux œufs
100 ml de liqueur aux œufs, 1 sachet de sucre
vanillé, 100 ml de crème sucrée, 1 sachet de
préparation pour crème dessert à la vanille
Farce à la framboise
100 ml de crème sucrée, 1 cs de sucre, 1 sachet de fixe-chantilly
Fouetter le fixe-chantilly, puis incorporer 200 g
de framboises fraîches à la crème.
Farces salées pour oreshkis
Pour réaliser les farces, mélanger vigoureusement ensemble les ingrédients indiqués.
Vous pouvez aussi farcir les oreshkis avec des
salades toutes prêtes, par ex. du cervelas rémoulade, de la salade à la volaille, de la salade
des Balkans ou des œufs en salade.
Farce au saumon fumé
100 g de saumon fumé, 200 g de fromage frais,
1 cs de raifort à la crème
Couper tous les ingrédients en morceaux et les
mixer, par ex. avec la baguette magique ESGE
®
28

ou le hachoir universel ESGE®. Vous pouvez éga-
Copyright UNOLD AG | www.unold.de
lement utiliser des filets de truite fumée ou du
thon à l’huile pour remplacer le saumon fumé.
Farce au jambon
100 g de jambon cru fumé, 200 g de fromage
frais aux herbes, 1 cs de raifort à la crème
Farce au fromage
100 g d’emmental coupé en petits morceaux,
150 de fromage frais aux herbes, 1 cs d’eau de
vie à la cerise (alternative : 150 g de fromage
frais neutre et 10 cerises cocktail)
Les recettes disponibles dans ce mode d’emploi ont été soigneusement examinées et contrôlées par
leurs auteurs respectifs et par la société UNOLD AG. Notre responsabilité n’est toutefois en aucun
cas engagée. Les auteurs et la société UNOLD AG ainsi que ses représentants déclinent toute responsabilité en cas de dommages corporels, matériels et pécuniaires.
Farce au camembert
2 cs de marmelade aux airelles, 100 g de camembert mou, 200 g de fromage frais
CONDITIONS DE GARANTIE
En cas d’utilisation conforme et lors de dégâts manifestement dus à des défauts de fabrication, nos appareils
sont garantis 24 mois, lors d’utilisation professionnelles 12 mois, à dater de l’achat. Notre garantie n’est
valide que pour les appareils vendus en Allemagne et en Autriche. Dans tout autre pays veuillez contacter
l’importateur. Veuillez envoyer à notre adresse les appareils, pour lesquels vous réclamez une suppression de
défauts, avec le bon d’achat montrant la date d’achat, port payé et proprement emballé. Les coûts de transport
seront remboursés en cas de garantie en Allemagne et en Autriche. Les défauts causés par usure, utilisation
incorrecte ou non-respect des instructions de maintenance sont exclus. Notre obligation de garantie cesse, si
de réparations ou des interventions sont accomplies par des tiers. Cette garantie n’affecte pas les droits du
consommateur contre le commerçant.
TRAITEMENT DES DÉCHETS / PROTECTION DE L’ENVIRONNEMENT
Nos appareils sont produits selon un standard élevé de qualité pour une longue durée d’utilisation. Un entretien régulier et des réparations compétentes par notre service après-vente
prolongent cette durée d’utilisation. Si néanmoins l’appareil est endommagé et ne peut plus être
réparé, veuillez suivre les instructions suivantes. Ne jamais disposer ce produit avec les dégâts
de ménage. Apportez ce produit à une station de collection pour récupération de produits électriques et électroniques. Par la collection séparée vous aidez à protéger les ressources naturelles
et prenez soin, que le produit est démonté sans risque pour la santé et l’environnement.
29

GEBRUIKSAANWIJZING MODEL 48360
Copyright UNOLD AG | www.unold.de
TECHNISCHE GEGEVENS
Vermogen: 1400 Watt, 230 V~, 50 Hz
Platen: Aluminium spuitgietwerk, met antiaanbakcoating
Afmetingen: ca. 25,5 x 32,0 x 10,3 cm (l/b/h)
Gewicht: ca. 2,2 kg
Snoer: ca. 80 cm
Uitvoering: Om Russische tovernoten (oreschki) met zoete of hartige vulling te maken,
bakplaten met antiaanbakcoating, controlelamp, sluitclip
Toebehoren: Gebruiksaanwijzing
Wijzigingen en vergissingen in de uitrustingskenmerken, techniek, kleuren en design voorbehouden.
VERKLARING VAN DE SYMBOLEN
Dit symbool wijst op eventuele gevaren die letsel tot gevolg kunnen hebben of tot schade
aan het apparaat leiden.
Dit symbool wijst op een eventueel verbrandingsgevaar. Ga hier altijd zeer voorzichtig te
werk.
VEILIGHEIDSVOORSCHRIFTEN
Lees de volgende aanwijzingen a.u.b. door en bewaar ze
goed.
1. Dit apparaat kan door kinderen vanaf 8 jaar worden gebruikt en
door personen die over gebrekkige fysieke, sensorische of geestelijke vaardigheden of gebrek aan ervaring en/of kennis beschikken, mits zij onder toezicht staan of instructies hebben gekregen aangaande het veilige gebruik van dit apparaat en de hieruit
resulterende gevaren begrepen hebben.
2.
Kinderen mogen niet met het apparaat spelen.
3. Reiniging en onderhoud door de gebruiker mogen niet door kin
deren worden uitgevoerd, tenzij deze ouder dan 8 jaar zijn en
onder toezicht staan.
4.
Berg het apparaat en de kabel op buiten bereik van kinderen
onder de 8 jaar.
30
-

5. VOORZICHTIG - delen van dit product kunnen zeer heet worden
Copyright UNOLD AG | www.unold.de
en brandwonden veroorzaken! Wees in aanwezigheid van kinderen en kwetsbare personen bijzonder voorzichtig.
6.
Kinderen moeten onder toezicht staan om te waarborgen dat zij
niet met het apparaat spelen.
7. Het apparaat uitsluitend op wisselstroom met spanning conform
typeplaatje aansluiten.
8. Dit apparaat mag niet worden gebruikt met een externe tijdscha
-
kelklok of afstandsbesturing.
9.
Gebruik om veiligheidsredenen zo mogelijk geen verlengkabel en
geen aftakcontactdoos om het apparaat op het stroomnet aan te
sluiten.
10. Dompel het apparaat in geen geval in water of andere vloeistof
-
fen.
11.
Het apparaat mag niet in de afwasmachine worden gereinigd.
12. Laat het apparaat tijdens het gebruik niet zonder toezicht en
houd het buiten het bereik van kinderen.
13. Na het gebruik, voor de reiniging of bij evtl. storingen tijdens de
werking moet de netstekker worden uitgetrokken.
14. Zet het apparaat op een vrij, egaal vlak. Apparaat en snoer nooit
op of in de buurt van hete oppervlakken neerzetten of gebruiken.
15. Het apparaat c.q. het snoer nooit met natte handen aanraken.
16. Het apparaat is uitsluitend bestemd voor huishoudelijk gebruik
of soortgelijke gebruiksdoelen, b v.
theekeukens in bedrijven, kantoren of overige werklocaties,
in agrarische bedrijven,
voor gebruik door gasten in hotels, motels of overige logiesbe
-
drijven,
in particuliere pensions of vakantiehuizen.
17. Gebruik het apparaat uitsluitend binnen.
18. Het snoer vóór gebruik volledig afwikkelen. De kabel mag niet
over de rand van het werkvlak naar beneden hangen, opdat b v.
kleine kinderen het apparaat niet per ongeluk van de werkplaat
kunnen trekken.
19. Wikkel het snoer nooit om het apparaat.
20. Trek het snoer altijd uitsluitend aan de aansluitstekker uit het
stopcontact, nooit aan de aansluitkabel.
31

21. Let op dat het snoer niet tegen het hete apparaat ligt.
Copyright UNOLD AG | www.unold.de
22. Gebruik het apparaat niet in de buurt van hittegevoelige materialen zoals spiritus – gevaar voor brand!
23.
Het apparaat wordt tijdens het gebruik heet; gebruik daarom de
grepen c.q. pannenlappen als u het apparaat beweegt.
24. Het apparaat zolang het heet is niet zonder toezicht laten –
gevaar voor verbranding!
25. Oververhit uw kook-, braad- en bakgerei niet om rookontwikkeling
te voorkomen die voor kleine dieren (bv. vogels) met een bijzon
der gevoelig ademhalingsstelsel gevaarlijk kan zijn. Wij adviseren
u om geen vogels in de keuken te houden.
26.
Bij het vullen met deeg of het uitnemen van de kant-en-klare
helften het deksel absoluut geheel openen, omdat dit anders kan
dichtvallen: kans op verbranding en verwonding!
27. Dek om veiligheidsredenen het apparaat en de bakvlakken nooit
met papier, folies of andere n vreemde voorwerpen af. Er bestaat
anders gevaar voor brand!
28. Raak tijdens het gebruik en vlak daarna de bakvlakken nooit aan
met lichaamsdelen of hittegevoelige voorwerpen.
29. Niet in hete staat wegzetten voor opslag.
30. Verwerk uitsluitend levensmiddelen in dit apparaat.
31. Controleer de stekker en het snoer regelmatig op slijtage of
beschadigingen. Stuur bij beschadiging van het snoer of van
andere onderdelen het apparaat voor controle en reparatie naar
onze klantenservice a.u.b. Onvakkundige reparaties kunnen lei
den tot aanzienlijke gevaren voor de gebruiker en tot uitsluiting
van de garantie. Als de aansluitkabel van dit apparaat wordt
beschadigd, moet deze, om risico te voorkomen, door de fabri
kant of de klantenservice van de fabrikant of door iemand met
dezelfde competentie worden vervangen.
LET OP:
Het apparaat wordt tijdens de werking heel heet!
Open de behuizing van het apparaat in geen geval. Er bestaat
gevaar voor een elektrische schok.
32

De fabrikant aanvaardt geen aansprakelijkheid bij foutieve montage, bij ondeskundig of foutief gebruik of
Copyright UNOLD AG | www.unold.de
als reparaties door niet geautoriseerde personen worden uitgevoerd.
INGEBRUIKNEMING
1. Wij adviseren u om de twee bakvlakken met antiaanbakcoating met een vochtige doek af te vegen
voordat zij voor de eerste keer worden gebruikt.
2. Open tijdens de nu volgende inbrandingsfase het raam.
3. Apparaat sluiten, de stekker in een stopcontact (230 V~, 50 Hz) steken. De rode controlelamp
voor bedrijf gaat branden en geeft aan dat de verwarming in bedrijf is.
4. Warm het apparaat ca. 10 minuten op.
5. Na het inbranden zijn bij het apparaat eventueel al sporen van gebruik te zien, maar deze schaden de functie van het apparaat niet en zijn geen reden voor reclamatie.
6. Vet vóór het eerste gebruik beide bakvlakken met een kwast licht in met een hittebestendig vet,
bv. margarine. Omdat de bakvlakken van het apparaat een antiaanbakcoating bezitten, hoeven
deze uitsluitend vóór het eerste gebruik te worden ingevet, daarna niet meer.
7. Mocht bij de eerste opwarming van uw nieuwe apparaat een lichte geur ontstaan, dan kan dit
geen enkel kwaad.
Attentie: Wij raden in beginsel aan om de allereerste in het apparaat bereide helften niet te
consumeren, maar af te voeren. Bij elk volgend gebruik van het apparaat is dit natuurlijk niet
meer nodig!
TOVERNOTEN TOEBEREIDEN
1. Bereid eerst de tovernootdeeg toe, zoals beschreven in het hoofdstuk „Recepten“.
2. Apparaat sluiten, de stekker in een stopcontact (230 V~, 50 Hz) steken. De rode controlelamp
voor bedrijf gaat branden en geeft aan dat de verwarming in bedrijf is.
3. Wacht tot het lampje uitgaat. Dit duurt ca. 3 tot 8 minuten. Aanwijzing m.b.t. het bakstoplicht: Als
de lamp gaat uit, betekent dit dat de juiste temperatuur weer bereikt is, maar niet , dat de tovernoothelften gereed zijn. De baktijd van de tovernoothelften hangt af van het telkens gebruikte
deeg en de persoonlijke smaak. Controleer daarom a.u.b. voordat u de tovernoothelften eruit pakt
of deze naar uw wensen gelukt zijn.
4. Open het apparaat.
5. Leg nu de kleine deegbollen in de onderste deegholten. Bij het sluiten van het apparaat wordt het
deeg gelijkmatig verdeeld. Let er a.u.b. altijd op dat u het deegvolume juist doseert. Als u met
te weinig deeg vult, ligt het bovenstuk van het apparaat er niet juist op. Als u met te veel deeg
vult, loopt het deeg over en verontreinigt het apparaat en het werkblad.
33

Attentie: Vul a.u.b. altijd alle deegholten om
Copyright UNOLD AG | www.unold.de
schade aan het apparaat te voorkomen.
6. Sluit het apparaat onmiddellijk na het vullen met
het deeg, zodat de tovernoten van onderen en
boven gelijkmatig bruin worden. Wacht 5 seconden, druk het deksel nogmaals vast en sluit de
greep met de sluitclip.
7. Let op dat de sluitclip op de juiste wijze vastgeklikt is.
Attentie: Het deksel van het apparaat is zeer heet! Er kan hete stoom uit het apparaat stromen
als u het deksel sluit.
8. Het bakproces duurt ca. 3 tot 4 minuten.
9. Als het bakproces afgelopen is, opent u het apparaat en neemt u de tovernoten voorzichtig eruit.
Gebruik hiervoor zo mogelijk geen metalen voorwerpen zoals bv. een vork, omdat daardoor de
antiaanbakcoating kan worden beschadigd.
10. In het apparaat plakkende deegresten met een deegschraper verwijderen.
11. Nadat de tovernoten eruit gepakt zijn, kan het apparaat onmiddellijk weer met deeg worden
gevuld. De controlelamp dooft weer.
12. Om nog meer tovernoten te maken sluit u het apparaat en wacht u totdat de controlelamp gaat
uit. Ga door met stap 1 tot 12 tot het deeg op is.
13. Laat de kant-en-klare tovernoten afkoelen, voordat u deze verder verwerkt. De tovernoten worden
naar wens gevuld; de randen worden eveneens met de vulling bestreken. Vervolgens worden telkens twee helften van de tovernoten bij elkaar gezet.
14. Na het bakken netstekker uittrekken. Dan pas is het apparaat uitgeschakeld.
Attentie: Ook na gebruik is het apparaat nog vrij lang zeer heet! Gevaar voor verbranding!
REINIGING EN ONDERHOUD
Vóór het reinigen altijd het apparaat uitschakelen door de stekker uit de stekkerdoos te trekken.
Laat het toestel afkoelen voordat u het reinigt.
1. Het apparaat mag niet in water of een andere vloeistof worden gedompeld.
2. Veeg de nog warme bakvlakken met een vochtige doek af of gebruik een zachte borstel om de
diepe plekken te reinigen.
3. Gebruik nooit spitse of harde voorwerpen. Zij zouden krassen maken op de antiaanbakcoating.
34

4. Gebruik bovendien geen scherpe schuurmiddelen, staalwol, metalen voorwerpen, hete schoon-
Copyright UNOLD AG | www.unold.de
maakmiddelen of desinfecterende middelen, omdat deze het apparaat kunnen beschadigen.
5. Het apparaat moet volkomen droog zijn, voordat u het opnieuw gebruikt.
6. Het apparaat kan voor plaatsbesparende opslag op de smalle kant worden weggezet.
TOVERNOOTRECEPTEN
Tovernoten, ook bekend als oreshki, zijn een Russische specialiteit. Zij kunnen optioneel zoet of hartig worden gevuld. De tovernoten worden gebakken in de Tovernoot-Maker, vervolgens gevuld en met
telkens twee helften bij elkaar gezet. Er zijn in beginsel natuurlijk geen grenzen gesteld aan uw fantasie; ook in receptboeken en op het Internet zult u nog enkele variaties vinden.
Zoete oreshki
Basisrecept
250 g boter, 2 eieren, 1 zakje vanillesuiker,
100 g suiker, 400 g bloem type 405, 50 g zet-
meel, 2 mespunten bakpoeder
Noten- of amandel-oreshki
250 g boter, 2 eieren, 1 zakje vanillesuiker,
100 g suiker, 100 g fijn gemalen noten of
amandelen (naar keuze), 1 flesje bitter-aman-
delaroma, 400 g bloem type 405, 2 mespunten bakpoeder
Sinaasappel-oreshki
250 g boter, 2 eieren, 1 zakje vanillesuiker,
100 g suiker, 50 g geraspte sinaasappelschil, 1
flesje bakaroma sinaasappel , 400 g bloem type
405, 2 mespunten bakpoeder
Volkoren oreshki
250 g boter, 2 eieren, 1 eidooier, merg van een
vanillescheut, 120 g honing, 1 snufje zout,
400 g volkorenspeltmeel, 1 afgestreken theelepel bakpoeder
Hartige oreshki
Tomaten-oreshki
250 g boter, 2 eieren, 1 pakje tomatensaus
(poeder), ¼ tl chilipoeder, 2 el bruschettakruiden, ½ tl zout, 450 g bloem type 405, 2 mespunten bakpoeder
Hartige oreshki
250 g boter, 2 eieren, 2½ el groentebouillonkorrels, 450 g bloem type 405, 2 mespunten
bakpoeder
Kruiden-oreshki
250 g boter, 2 eieren, 1 el gedroogde daslook, 1
glas basilicumpesto (190 g), 500 g volkorentarwemeel, 2 mespunten bakpoeder
Bereiding
Maak van de ingrediënten een kneeddeeg. Zet
het deeg ca. 1 uur in de koelkast. Vorm kleine
bolletjes (diameter ca. 1,5-2 cm). Hiervoor kunt
u bv. ook een bolletjessteker gebruiken. Aan het
begin zijn misschien meerdere pogingen nodig
om de juiste bolletjesmaat te vinden.
35

Leg de bolletjes in het apparaat, sluit het appa-
Copyright UNOLD AG | www.unold.de
raat en bak de oreshki ca. 3 minuten tot ze mooi
bruin zijn. Als de oreshki klaar zijn, pakt u het
apparaat aan de beide handgrepen vast, opent
het en schud u de oreshki op een bakplaat. Aan
het begin het overtollige deeg na het afkoelen
van de gebakken oreshki afsnijden. U kunt de
oreshki ook op voorraad bakken. Ze kunnen in
een luchtdicht afgesloten doosje goed een tijdje bewaard worden. Gebruik geen verse kruiden,
omdat deze te veel vocht bevatten en de oreshki
weer zacht maken en kunnen laten bederven.
Zoete vullingen voor de oreshki
Voor de vullingen de telkens aangegeven ingrediënten door elkaar roeren. Vul de oreshki pas
kort vóór het serveren, zodat de schaal knappe-
rig blijft.
Nogavulling
200 g chocoladepasta , 200 g kwark
Eierlikeurvulling
100 ml eierlikeur, 1 zakje vanillesuiker, 100 ml
slagroom, 1 zakje Paradiescreme vanille
Frambozenvulling
100 ml slagroom, 1 el suiker, 1 zakje slagroomversteviger (Klop-Fix)
Slagroom stijf kloppen en dan 200 g verse frambozen voorzichtig door de slagroom mengen.
Hartige vullingen voor de oreshki
Voor de vullingen de telkens aangegeven ingrediënten goed door elkaar roeren.
U kunt de oreshki ook met kant-en-klare salades vullen, bv. vleessalade, kipsalade, koolsla of
eiersalade.
Zalmvulling
100 g gerookte zalm, 200 g kwark, 1 tl mierikswortel
Alle ingrediënten klein maken en mixen, bv. met
een staafmixer of een hakmolen. In plaats van
gerookte zalm kunt u ook gerookte forelfilets of
tonijn in olie gebruiken.
Kaasvulling
100 g Emmentaler-kaas in hele kleine stukjes,
150 g kruidenkwark, 1 el kirschwasser (alternatief: 150 g neutrale kwark en 10 cocktailkersen)
Hamvulling
100 g gerookte rauwe ham, 200 g kruidenkwark, 1 tl mierikswortel
Camembertvulling
2 el rode bosbessenjam, 100 g zachte camembert, 200 g kwark
De recepten in deze gebruiksaanwijzing zijn door de auteurs en door UNOLD AG zorgvuldig ontwikkeld en getest. Een garantie kan er echter niet worden aanvaard. De auteurs en/of UNOLD AG en
haar gemachtigden kunnen in geen geval aansprakelijk worden gesteld voor letsel, materiële schade
en financiële schade.
36

GARANTIEVOORWAARDEN
Copyright UNOLD AG | www.unold.de
Wij geven op onze apparaten een garantietermijn van 24 maanden (12 maanden bij commerciële gebruik), gerekend vanaf de dag van aanschaf. Deze garantie geldt voor schade, die bij correct gebruik aantoonbaar is veroorzaakt door een fout in de productie. Binnen de garantietermijn verhelpen wij materiaal- en productiefouten
door herstelling of vervanging naar onze keuze. Onze garantie is slechts geldig voor in Duitsland en Oostenrijk
verkopte apparaten. In andere landen a.u.b. de importeur aanspreken. Apparaaten, waarvoor garantie in aanspraak wordt genomen, moeten ons samen met een kopie van de machineel gegenereerde kassabon waaruit de
koopdatum duidelijk wordt, alsmede een beschrijving van de fout goed verpakt aan onze klantenservice worden
toegezonden, porto betaald. Als er sprake van garantie is, worden de verzendingskosten in Duitsland en Oostenrijk aan de klant vergoed. De garantie dekt geen schade veroorzaakt door slijtage, onbehoorlijk gebruik/foutieve
handelingen en niet-naleving van de onderhouds- en reinigingsaanwijzingen. Het recht op garantie vervalt,
wanneer reparaties of manipulaties aan het apparaat door derden worden doorgevoerd. Eventuele rechten van
de eindgebruiker t.o.v. de verkoper of distributeur worden door deze garantie niet aangetast.
VERWIJDEREN VAN AFVAL / MILIEUBESCHERMING
Onze apparaten zijn geproduceerd met een hoge qualiteit voor een lange gebruik. Regelmatige
onderhoud en vakkundig reparaties door onze klantenservice verlengt de gebruiksduur. Wanneer
het apparat defekt is en kan niet meer gerepareerd worden, let op de volgende instructies. Dit
product mag niet samen met het normale huishoudelijke afval worden afgevoerd. U dient dit
product bij een voor het recycleren van elektrische of elektronische apparaten aangewezen verzamelplaats in te leveren. Door het separaat inzamelen en recycleren van afvalproducten helpt u
mee bij het zuinig omgaan met de natuurlijke hulpbronnen en zorgt u ervoor dat het product op
een gezondheids- en milieuvriendelijke manier afgevoerd wordt.
37

ISTRUZIONI PER L’USO MODELLO 48360
Copyright UNOLD AG | www.unold.de
DATI TECNICI
Potenza: 1400 Watt, 230 V~, 50 Hz
Piastre: Alluminio pressofuso, con rivestimento antiaderente
Misure: circa 25,5 x 32,0 x 10,3 cm (lung./largh./alt.)
Peso: circa 2,2 kg
Cavo di alimentazione: circa 80 cm
Dotazioni: Per la preparazione di „noci magiche“ russe (oreshki) con farcitura
dolce o salata, piastre con rivestimento antiaderenti, spie di controllo,
fermo di chiusura
Accessori: Istruzioni per l‘uso con ricettario
Con riserva di modifiche ed errori relativi a caratteristiche delle dotazioni, tecnica, colore e design
SIGNIFICATO DEI SIMBOLI
Questo simbolo segnala possibili pericoli in grado di provocare lesioni a persone o danni all‘apparecchio.
Questo simbolo indica un possibile pericolo di ustioni. In presenza di questo simbolo agire sempre con la massima cautela.
AVVERTENZE DI SICUREZZA
Si raccomanda di leggere e conservare le presenti istruzioni.
1. Questo apparecchio può essere utilizzato da bambini a partire
dagli 8 anni di età e da persone che presentano ridotte capa
cità fisiche, sensoriali o mentali o che difettano della necessaria
esperienza e/o conoscenze solo se adeguatamente sorvegliati o
addestrati sull’uso in sicurezza dell’apparecchio e se a cono
scenza dei rischi correlati.
2.
I bambini non devono giocare con l’apparecchio.
3. La pulizia e la manutenzione dell’utente non devono essere ese
guite da bambini, a meno che non abbiano più di 8 anni e non
vengano sorvegliati.
4.
Conservare l’apparecchio e il cavo fuori dalla portata dei bambini
di età inferiore agli 8 anni.
38
-
-
-

5. CAUTELA - Parti di questo prodotto possono essere molto calde
Copyright UNOLD AG | www.unold.de
e causare ustioni! In presenza di bambini e persone a rischio
usare la massima cautela.
6. I bambini vanno sorvegliati per assicurarsi che non giochino con
l‘apparecchio.
7. Collegare l’apparecchio soltanto a corrente alternata con la ten
-
sione indicata sulla targhetta.
8.
Questo apparecchio non deve essere comandato tramite timer
esterni o sistemi di telecomando.
9. Per ragioni di sicurezza, per collegare l‘apparecchio alla rete elet
trica non usare, per quanto possibile, cavi di prolunga e prese
multiple.
10.
Non immergere mai l‘apparecchio in acqua o altri liquidi.
11. Non è idoneo per il lavaggio in lavastoviglie.
12. Durante l‘esercizio non lasciare l‘apparecchio incustodito e
tenerlo fuori dalla portata dei bambini.
13. Dopo l‘uso, prima della pulizia o in caso di anomalie durante l‘e
-
sercizio staccare la spina dalla presa elettrica.
14.
Appoggiare l’apparecchio su una superficie piana sgombra. Non
riporre o far funzionare mai l‘apparecchio e il cavo di alimenta
-
zione su o nei pressi di superfici calde.
15.
Non toccare mai né l‘apparecchio né il cavo di alimentazione a
mani bagnate.
16. L’apparecchio è progettato esclusivamente per l’uso domestico o
per impieghi similari, ad es.
in aree cucina di negozi, uffici o altri luoghi di lavoro,
aziende agrituristiche,
per l‘uso da parte degli ospiti di hotel, motel o altre strutture
ricettive,
in pensioni private o case di vacanza.
17. Usare l‘apparecchio solo in interni.
18. Prima dell‘uso srotolare completamente il cavo di alimentazione.
Il cavo non deve pendere oltre lo spigolo della superficie di lavoro
affinché ad es. bambini piccoli non possano strattonarlo invo
-
lontariamente facendo cadere l‘apparecchio dal piano di lavoro.
19.
Non avvolgere mai il cavo di alimentazione attorno all‘apparec-
chio.
39

20. Staccare il cavo di alimentazione dalla presa elettrica sempre
Copyright UNOLD AG | www.unold.de
mediante la spina, mai tramite il cavo.
21. Assicurarsi che il cavo di alimentazione non venga a contatto con
l‘apparecchio caldo.
22. Non usare l‘apparecchio nelle vicinanze di materiali sensibili al
calore come l‘alcol – pericolo d‘incendio!
23. Durante l‘utilizzo l‘apparecchio diventa caldo, pertanto per spo
-
starlo usare sempre le maniglie o delle presine.
24.
Finché l‘apparecchio è caldo non lasciarlo incustodito – pericolo
di ustioni!
25. Per evitare lo sviluppo di fumi, non surriscaldare le stoviglie
usate per la cottura; il fumo può essere pericoloso per i piccoli
animali (ad es. uccellini) dal sistema respiratorio particolar
-
mente delicato. Consigliamo di non tenere uccellini in cucina.
26.
Nel versare l‘impasto o nello sformare i mezzi gusci pronti aprire
sempre completamente il coperchio, in quanto altrimenti può
ricadere in posizione chiusa: Pericolo di ustioni e ferite!
27. Per ragioni di sicurezza non coprire mai l‘apparecchio e le super
fici di cottura con carta, pellicola o altri corpi estranei. Altrimenti
sussiste pericolo di incendi!
28.
Durante il funzionamento e immediatamente dopo non toccare
le superfici di cottura con parti del corpo o oggetti sensibili al
calore.
29. Non riporre l‘apparecchio, ai fini della conservazione, quando è
ancora caldo.
30. Con questo apparecchio lavorare solamente alimenti.
31. Controllare regolarmente la spina e il cavo di alimentazione per
verificare che non presentino tracce di usura o danni. Nel caso
il cavo di alimentazione o altri componenti siano danneggiati
inviare l‘apparecchio alla nostra assistenza clienti per la veri
fica e la riparazione. Riparazioni inadeguate possono comportare notevoli pericoli per l‘utente e comportare l‘esclusione dalla
garanzia. Se il cavo di collegamento di questo apparecchio è danneggiato, al fine di evitare pericolosità, deve essere sostituito dal
produttore, dal servizio clienti o da una persona analogamente
qualificata.
40

ATTENZIONE:
Copyright UNOLD AG | www.unold.de
Durante il funzionamento l‘apparecchio diventa molto caldo!
Non aprire mai la scocca dell‘apparecchio. Pericolo di scossa
elettrica.
Il produttore non si assume alcuna responsabilità per un montaggio scorretto, un utilizzo inappropriato o
errato oppure in seguito a riparazioni effettuate da officine o persone non autorizzate.
MESSA IN FUNZIONE
1. Prima del primo utilizzo consigliamo di strofinare le due piastre di cottura con rivestimento antiaderente con un panno umido.
2. Durante la successiva fase di riscaldamento iniziale si consiglia di aprire le finestre.
3. Chiudere l‘apparecchio e inserire la spina in una presa elettrica (230 V~, 50 Hz). La spia di controllo del funzionamento rossa si illumina segnalando che il riscaldamento è in funzione.
4. Far riscaldare la piastra per circa 10 minuti.
5. Dopo il riscaldamento iniziale è possibile che sulla piastra siano già visibili delle tracce d‘uso,
che tuttavia non ne pregiudicano in alcun modo il funzionamento e quindi non possono costituire motivo di reclamo.
6. Prima del primo utilizzo spennellare leggermente le due piastre di cottura con grasso resistente
al calore, ad es. margarina. Dato che le piastre di cottura dell‘apparecchio sono dotate di un
rivestimento antiaderente devono essere unte soltanto prima del primo utilizzo, dopo non più.
7. Qualora al primo riscaldamento la piastra emanasse un leggero odore, ciò è assolutamente normale.
Attenzione: Consigliamo di non mangiare, ma di buttare, i primi mezzi gusci di noce preparati
con la piastra. Ciò non è naturalmente necessario per i successivi utilizzi!
PREPARAZIONE DELLE „NOCI MAGICHE“
1. Preparare innanzitutto l‘impasto per le noci magiche come illustrato nel capitolo „Ricette“.
2. Chiudere la piastra e inserire la spina in una presa elettrica (230 V~, 50 Hz). La spia di controllo
del funzionamento rossa si illumina segnalando che il riscaldamento è in funzione.
3. Attendere che la spia si spegne. Ciò richiede all‘incirca 3 - 8 minuti. Avvertenza sulle spie di cot-
tura: Quando entrambe la spia si spegne significa che è stata nuovamente raggiunta la temperatura richiesta, non che i mezzi gusci di noce sono pronti. Il tempo di cottura dei mezzi gusci
di noce dipende dall‘impasto di volta in volta utilizzato e dai gusti personali. Pertanto prima di
estrarre i mezzi gusci di noce controllare che siano riusciti come li si voleva.
4. Aprire l’apparecchio.
41

5. Quindi mettere le palline di pasta nelle vaschette inferiori.
Copyright UNOLD AG | www.unold.de
Chiudendo la piastra l‘impasto si distribuisce in maniera
uniforme. Prestare attenzione a dosare sempre correttamente la quantità di impasto. Se si mette troppo poco
impasto la parte superiore dell‘apparecchio non chiude correttamente. Se invece si mette troppo impasto, questo tracima sporcando la piastra e il piano di lavoro.
Attenzione: Per evitare di danneggiare la piastra riempire sempre tutte le vaschette!
6. Chiudere la piastra immediatamente dopo aver versato l‘impasto di modo che la doratura della
noci magiche sia uguale sopra e sotto. Attendere 5 secondi, riabbassare il coperchio e chiudere
il manico con il fermo di chiusura.
7. Controllare che il fermo di chiusura sia saldamente fissato in posizione.
Attenzione: Il coperchio della piastra è molto caldo! Dalla piastra può fuoriuscire vapore caldo
quando si chiude il coperchio.
8. Il processo di cottura dura circa 3 - 4 minuti.
9. A cottura terminata, aprire la piastra ed estrarre le noci magiche con delicatezza. Se possibile,
per estrarle non usare oggetti metallici, come ad es. forchette, che potrebbero danneggiare il
rivestimento antiaderente.
10. Rimuovere gli eventuali residui di impasto aderenti alla piastra con un raschino.
11. Dopo la sformatura delle noci magiche la piastra può essere immediatamente riempita con altro
impasto. La spia di controllo si rispegne.
12. Per preparare altre noci magiche chiudere la piastra e attendere che la spia di controllo si spegne. Proseguire con i punti 1 - 12 fino all‘esaurimento dell‘impasto.
13. Lasciar raffreddare leggermente le noci magiche prima di continuare con la lavorazione. Farcire
le noci magiche come si preferisce, spennellando con la farcitura anche i bordi. Infine congiungere i due mezzi gusci di noce.
14. Dopo la cottura staccare la spina dalla rete elettrica. La piastra è effettivamente spenta soltanto
dopo tale operazione.
Attenzione: Dopo l‘uso la piastra rimane calda per tempi anche molto lunghi! Pericolo di
ustioni!
42

PULIZIA
Copyright UNOLD AG | www.unold.de
Prima di procedere alla pulizia spegnere sempre l’apparecchio staccando la
spina dalla presa elettrica.
Lasciar raffreddare l‘apparecchio prima di pulirlo.
1. Non immergere l‘apparecchio in acqua o altri liquidi.
2. Strofinare le piastre di cottura ancora calde con un panno umido oppure usare una spazzola
morbida per pulire i solchi.
3. Non usare mai oggetti duri o appuntiti. Graffierebbero il rivestimento antiaderente.
4. Inoltre non usare prodotti abrasivi, lana d’acciaio, oggetti metallici, detergenti caldi o disinfettanti
in quanto possono provocare danni.
5. Prima del riutilizzo l‘apparecchio deve essere completamente asciutto.
6. Per la conservazione salvaspazio l‘apparecchio può essere riposto di taglio.
RICETTA DELLE „NOCI MAGICHE“
Le noci magiche, chiamate anche oreshki, sono una specialità russa. Possono essere farcite, a piacere, con ripieni dolci o salati. Le noci magiche vanno preparate nell‘apposita piastra, poi devono essere farcite e i due mezzi gusci congiunti. In linea di principio non vi sono limiti alla fantasia, altre
variazioni sono certamente reperibili nei ricettari e in Internet.
Noci magiche dolci
Ricetta base
250 g di burro, 2 uova, 1 bustina di zucchero
vanigliato, 100 g di zucchero, 400 g di farina
tipo 405, 50 g di fecola, 2 punte di coltello di
lievito in polvere
Noci magiche alle noci o mandorle
250 g di burro, 2 uova, 1 bustina di zucchero vanigliato, 100 g di zucchero, 100 g noci o
mandorle (a scelta) grattugiate fini, 1 fialetta
di aroma di mandorle amare, 400 g farina tipo
405, 2 punte di coltello di lievito in polvere
Noci magiche all’arancio
250 g di burro, 2 uova, 1 bustina di zucchero
vanigliato, 100 g di zucchero, 50 g di buccia
d’arancio grattugiata, 1 fialetta di aroma d’aran-
cio, 400 g di farina tipo 405, 2 punte di coltello
di lievito in polvere
Noci magiche con farina integrale
250 g di burro, 2 uova, 1 tuorlo, polpa di una
bacca di vaniglia, 120 g di miele, 1 presa di
sale, 400 g di farina integrale di farro, 1 cucchiaino raso di lievito in polvere
Noci magiche salate
Noci magiche al pomodoro
250 g di burro, 2 uova, 1 bustina di salsa di pomodoro (in polvere), ¼ di cucchiaino di chili in
polvere, 2 cucchiai di spezie per bruschette, ½
cucchiaino di sale, 450 g di farina tipo 405, 2
punte di coltello di lievito in polvere
43

Noci magiche salate
Copyright UNOLD AG | www.unold.de
250 g di burro, 2 uova, 2 ½ cucchiai di dado
granulare da verdure essiccate, 450 g di farina
tipo 405, 2 punte di coltello di lievito in polvere
Noci magiche alle erbe aromatiche
250 g di burro, 2 uova, 1 cucchiaio di aglio orsino essiccato, 1 barattolino di pesto al basilico
(190 g), 500 g di farina di frumento integrale, 2
punte di coltello di lievito in polvere
Preparazione
Con gli ingredienti preparare un impasto. Lasciarlo riposare al fresco per circa un’ora. Formare delle palline (di circa 1,5-2 cm di diametro) utilizzando ad es. uno scavino. All’inizio
possono essere necessari diversi tentativi pri-
ma di individuare l’esatta grandezza delle noci.
Mettere le palline nella macchina, chiuderla e
cuocere le noci magiche per circa 3 minuti fino
a ottenere il grado di doratura desiderato. Quan-
do le noci hanno finito di cuocere afferrare la
macchina per entrambe le maniglie, aprirla e riversare le noci su una placca da forno. Quindi
eliminare l’impasto in eccesso dalle noci dopo
che queste si sono raffreddate. Le noci possono
essere preparate anche in gran numero, in modo
da tenerle di scorta. Riposte in un barattolo ermeticamente chiuso si conservano abbastanza
a lungo. Non usare erbe aromatiche fresche in
quanto contengono troppa umidità, che renderebbe le noci molli e le farebbe marcire.
Farciture dolci per noci magiche
Per le farciture mescolare assieme gli ingredienti indicati. Si raccomanda di farcire le noci magiche poco prima di servirle affinché la cialda
rimanga croccante.
Farcitura alla crema nougat
200 g di crema nougat alle noci, 200 g di formaggio fresco
Farcitura di liquore all’uovo
100 ml di liquore all’uovo, 1 bustina di zucchero vanigliato, 100 ml di panna zuccherata, 1 busta di crema paradiso alla vaniglia
Farcitura ai lamponi
100 ml di panna zuccherata, 1 cucchiaio di
zucchero, 1 bustina di fissante per panna
Montare la panna finché risulta ben salda e
quindi incorporarvi 200 g di lamponi freschi.
Farciture salate per noci magiche
Per le farciture mescolare assieme gli ingredienti indicati. Le noci magiche possono essere farcite anche con insalate pronte, ad es. insalata di carne, di pollo, insalata Puszta o insalata
di uova.
Farcitura al salmone affumicato
100 g di salmone affumicato, 200 g di formaggio fresco, 1 cucchiaino di salsa di rafano alla
panna
Sminuzzare tutti gli ingredienti e frullarli, ad
esempio con l’ESGE-Zauberstab
®
o l’ESGE-Zauberette®. Invece del salmone affumicato si possono usare anche filetti di trota affumicata o
tonno sott’olio.
Farcitura al formaggio
100 g di formaggio Emmental a pezzettini,
150 g formaggio fresco alle erbe, 1 cucchiaio
di kirsch (alternativa: 150 g di formaggio fresco
neutro e 10 ciliegine da cocktail)
44

Farcitura al prosciutto
Copyright UNOLD AG | www.unold.de
100 g di prosciutto crudo affumicato, 200 g di
formaggio fresco alle erbe, 1 cucchiaino di salsa
di rafano alla panna
Le ricette di queste istruzioni per l’uso sono state ideate e verificate dagli autori e da UNOLD AG.
Tuttavia non può essere emessa alcuna garanzia. È esclusa la responsabilità degli autori, di
UNOLD AG e dei rispettivi incaricati per danni provocati a persone, cose o materiali.
Farcitura al camembert
2 cucchiai di marmellata di mirtilli rossi, 100 g
di camembert morbido, 200 g di formaggio fresco
NORME DIE GARANZIA
I nostri prodotti sono garantiti per 24 mesi, 12 mesi in caso di uso professionale, dalla data di acquisto per i
guasti manifestatisi durante un utilizzo conforme alle disposizioni e attribuibili in modo dimostrabile a difetti
di fabbricazione. Nel periodo di garanzia porremo rimedio ai difetti materiali e di produzione secondo la nostra
valutazione, procedendo alla riparazione o alla sostituzione dell’apparecchio. Le nostre prestazioni di garanzia
valgono esclusivamente per gli apparecchi venduti in Germania e Austria. In tutti gli altri casi rivolgersi all‘importatore. Gli apparecchi per i quali si richiede la riparazione di guasti ci devono essere inviati con spedizione
affrancata e debitamente imballati, unitamente a una copia del documento di acquisto redatto a macchina dal
quale risulti la data di vendita, nonché la descrizione del guasto. In caso di garanzia al cliente verranno rimborsati i costi di spedizione sostenuti in Germania e Austria. Sono esclusi dalla garanzia i guasti dovuti all’usura,
all’uso inappropriato o al mancato rispetto delle regole di manutenzione. Il diritto di garanzia decade qualora
siano state effettuate riparazioni o interventi da parte di terzi. Eventuali diritti del consumatore finale verso il
venditore o negoziante non vengono limitati dalla presente garanzia.
SMALTIMENTO / TUTELA DELL’AMBIENTE
I nostri apparecchi vengono prodotti rispettando un elevato standard qualitativo per una lunga
durata di utilizzo. Una corretta manutenzione e riparazioni adeguate a cura dal nostro servizio
clienti possono prolungare la durata di utilizzo del prodotto. Se un apparecchio è difettoso e non
più riparabile, per il suo smaltimento si presti attenzione ai punti che seguono. Questo prodotto
non deve essere smaltito unitamente ai comuni rifiuti domestici. Consegnare il prodotto a un
centro di raccolta per il riciclaggio dei rifiuti elettrici o elettronici. Con la raccolta differenziata
dei rifiuti e dei prodotti riciclabili è possibile contribuire alla tutela delle risorse naturali e far
smaltire il prodotto nel rispetto dell’ambiente e della salute.
45

MANUAL DE INSTRUCCIONES MODELO 48360
Copyright UNOLD AG | www.unold.de
DATOS TÉCNICOS
Potencia: 1400 vatios, 230 V~, 50 Hz
Placas: aluminio fundido bajo presión, con revestimiento antiadherente
Dimensiones: aprox. 25,5 x 32,0 x 10,3 cm (L/An/Al)
Peso: aprox. 2,2 kg
Cable de
alimentación: aprox. 80 cm
Equipamiento: para hacer galletas rusas en forma de nueces („oreshki“) con relleno dulce o
salado, placas de cocción antiadherentes, piloto de control y clip de cierre
Accesorios: instrucciones de uso con recetas
Salvo modificaciones y errores a nivel de las características de equipamiento, la tecnología, los
colores y el diseño
EXPLICACIÓN DE LOS SÍMBOLOS
Este símbolo advierte de posibles riesgos que pueden traer consigo lesiones personales
o daños al aparato.
Este símbolo hace referencia a un eventual riesgo de quemaduras. Proceda siempre con
especial cuidado.
INDICACIONES DE SEGURIDAD
Por favor lea y guarde las siguientes instrucciones.
1. Este aparato puede ser usado por niños a partir de 8 años, así
como por personas con una capacidad física, mental o sensorial
reducida o carentes de experiencia y/o conocimientos siempre
que estén supervisados o hayan sido correspondientemente ins
truidos en el manejo seguro de dicho aparato y comprendan los
peligros que conlleva.
2.
El aparato no es un juguete.
3. No está permitido que los niños lleven a cabo la limpieza o el
mantenimiento del usuario a no ser que tengan más de 8 años y
estén supervisados.
46
-

4. Guarde el aparato y el cable fuera del alcance de niños menores
Copyright UNOLD AG | www.unold.de
de 8 años.
5. PRECAUCIÓN: ¡Algunas de las piezas de este producto pueden
llegar a calentarse demasiado y causar quemaduras! Tener espe
cial cuidado si hay niños o personas que puedan estar en peligro
presentes.
6.
Los niños deben ser supervisados para asegurar que no jueguen
con el aparato.
7. Conecte el aparato solo a corriente alterna con una tensión de
acuerdo con la placa de características.
8. Este aparato no debe utilizarse con un reloj programador externo
ni con un sistema de mando a distancia.
9. Por razones de seguridad y de ser posible, no utilice ningún cable
de prolongación ni enchufe múltiple para conectar el aparato a
la red de corriente.
10. No sumerja nunca el aparato en agua o en otros líquidos.
11. El aparato no se debe lavar en el lavavajillas.
12. No deje el aparato sin vigilancia durante su funcionamiento y
manténgalo fuera del alcance de los niños.
13. Desenchufar el aparato después de usarlo, antes de limpiarlo o
si se produce algún fallo durante el funcionamiento.
14. Coloque el aparato sobre una superficie plana despejada. Nunca
coloque ni ponga en marcha el aparato sobre o cerca de super
-
ficies calientes.
15.
No toque nunca el aparato o el cable de alimentación con las
manos húmedas.
16. El aparato está destinado exclusivamente al uso doméstico o a
fines de uso similares, por ejemplo,
cocinas tipo office en comercios, oficinas u otros lugares de tra
-
bajo,
en explotaciones agrícolas,
para el uso por parte de clientes en hoteles, moteles u otros
establecimientos de alojamiento colectivo,
en pensiones privadas o en casas vacacionales.
17. Utilice el aparato solo en espacios interiores.
18. Desenrollar completamente el cable de alimentación antes del
uso. El cable no debe quedar colgando por el borde de la super
-
47

ficie de trabajo para que, p. ej., los niños no puedan tirar el apa-
Copyright UNOLD AG | www.unold.de
rato accidentalmente de la encimera.
19.
Nunca enrolle el cable de alimentación alrededor del aparato.
20. Extraiga el cable de alimentación de la toma de corriente tirando
siempre solo de la clavija de conexión, nunca del cable de cone
-
xión.
21.
Asegúrese de que el cable de alimentación no se apoye en el
aparato caliente.
22. No opere el aparato cerca de materiales sensibles al calor, como
alcohol. ¡Peligro de incendio!
23. El aparato se calienta durante el funcionamiento. Por ello, siem
pre que desee moverlo hágalo tomándolo siempre por las asas o
los agarradores.
24.
No deje el aparato sin supervisión mientras esté caliente. ¡Peli
gro de quemaduras!
25.
No sobrecaliente su vajilla de cocinar, asar y hornear para evi-
tar la formación de humo que puede ser peligroso para animales pequeños (p. ej., pájaros) con un sistema respiratorio especialmente sensible. Recomendamos no tener a los pájaros en la
cocina.
26.
Durante el vertido de la masa o al retirar las mitades prepara
das es imprescindible abrir totalmente la tapa, dado que podría
cerrarse de golpe: ¡Peligro de quemaduras y de lesiones!
27.
Por razones de seguridad, nunca tape el aparato y las placas de
cocinado con papel, láminas u otros cuerpos extraños. ¡De lo
contrario, existe peligro de incendio!
28. No toque nunca las placas de cocción con partes del cuerpo u
objetos sensibles al calor durante el funcionamiento y poco des
-
pués.
29.
No guardar el aparato mientras siga caliente.
30. Procese solo alimentos en este aparato.
31. Compruebe periódicamente si el enchufe y el cable de alimen
tación están desgastados o deteriorados. En caso de daños en
el cable de alimentación o en otras piezas envíe el aparato para
su verificación y reparación a nuestro servicio de atención al
cliente. Las reparaciones inadecuadas pueden ocasionar consi
derables peligros para el usuario y tienen como consecuencia la
48

exclusión de la garantía. En caso de que la línea de alimentación
Copyright UNOLD AG | www.unold.de
del aparato esté dañada, para evitar peligros la deberá cambiar
el fabricante, su Servicio Postventa u otra persona igualmente
cualificada.
PRECAUCIÓN:
el aparato se calienta mucho durante el funcionamiento.
De ninguna manera abra la carcasa del aparato. Existe peligro
de una descarga eléctrica.
El fabricante no asume ninguna responsabilidad en caso de montaje defectuoso, uso inapropiado o incorrecto o después de reparaciones realizadas por terceros no autorizados.
PUESTA EN SERVICIO
1. Antes del primer uso, recomendamos limpiar con un paño húmedo las dos placas de cocinado
con revestimiento antiadherente.
2. Abra la ventana durante la fase de encendido que sigue a continuación.
3. Cerrar el aparato, enchufar la clavija en una toma de corriente (230 V~, 50 Hz). El piloto de
control de funcionamiento rojo se ilumina e indica que la calefacción está en funcionamiento.
4. Caliente el aparato durante aprox. 10 minutos.
5. Después del encendido pueden verse ya signos de uso en el aparato. Sin embargo, estos no perjudican el funcionamiento del mismo y no son motivos de reclamación.
6. Antes del primer uso, engrase con un pincel las dos placas de cocinado ligeramente con una
grasa resistente al calor, p. ej., margarina. Dado que las placas de cocinado del aparato tienen
revestimiento antiadherente, solo es necesario engrasarlas antes del primer uso. Posteriormente
ya no volverá a ser necesario.
7. Si al calentar su aparato nuevo por primera vez detectase un ligero olor, esto no supondría ningún inconveniente.
Atención: Recomendamos encarecidamente no consumir las primeras mitades preparadas en
el aparato, sino desecharlas. ¡Por supuesto, esto ya no será necesario en usos posteriores!
49

PREPARACIÓN DE ORESHKI
Copyright UNOLD AG | www.unold.de
1. En primer lugar, prepare la masa de las oreshki como se indica en el capítulo „Recetas“.
2. Cerrar el aparato, enchufar la clavija en una toma de corriente (230 V~, 50 Hz). El piloto de
control de funcionamiento rojo se ilumina e indica que la calefacción está en funcionamiento.
3. Espere hasta que el piloto de control se apaga. Esto tarda aprox. de 3 a 8 minutos. Nota sobre el
piloto: Si el piloto de control se apaga quiere decir que se ha vuelto a alcanzar la temperatura, no
que las dos mitades de oreshki estén ya listas. El tiempo de horneado de las mitades de oreshki
depende de la masa utilizada y del sabor personalizado que se desee. Antes de sacar las mitades
de oreshki, compruebe que han alcanzado el punto deseado.
4. Abra el aparato.
5. Ahora, introduzca las bolas pequeñas de masa en los moldes inferiores. La masa se distribuye uniformemente al cerrar el aparato. Asegú-
rese siempre de dosificar la cantidad de masa correcta. Si pone poca
cantidad de masa, la parte superior del aparato no se apoyará correctamente. Si pone demasiada cantidad de masa, esta se derramará
ensuciando el aparato y la superficie de trabajo.
Atención: ¡Llene siempre todos los moldes para evitar daños en el aparato!
6. Cierre el aparato inmediatamente después de verter la masa para que las oreshki se tuesten uniformemente por el lado superior e inferior. Espere durante 5 segundos, presione de nuevo firmemente la tapa y cierre la empuñadura con el clip de cierre.
7. Preste atención a que la palanca de cierre haya encajado correctamente.
Atención: ¡La tapa del aparato está muy caliente! Puede salir vapor caliente del aparato si
cierre la tapa.
8. El proceso de horneado dura aprox. de 3 a 4 minutos.
9. Cuando haya finalizado el proceso de horneado, abra el aparato y retire las nueces con cuidado.
Para ello, si puede evitarlo no utilice objetos metálicos como, p. ej., un tenedor, dado que esto
podría deteriorar el revestimiento antiadherente.
10. Retirar los restos de masa del aparato con una rasqueta de panadero.
11. Después de retirar las oreshki se puede llenar nuevamente el aparato con la masa. El piloto de
control se apaga de nuevo.
12. Para preparar más oreshki, cierre el aparato y espere hasta que se apaga el piloto de control.
Continúe con los pasos 1 a 12 hasta agotar la masa.
50

13. Deje enfriar un poco las oreshki preparadas antes de utilizarlas. Las oreshki se llenan como se
Copyright UNOLD AG | www.unold.de
desea y los bordes también se untan con el relleno. A continuación, se unen de dos en dos para
formar las „nueces“.
14. Después del horneado, retire el enchufe. Solo entonces estará desconectado el aparato.
Atención: ¡El aparato permanece caliente durante un tiempo prolongado aún después de su
uso! ¡Peligro de quemaduras!
LIMPIEZA Y CUIDADO
Antes de proceder con su limpieza, desconecte siempre el aparato retirando el
enchufe de la toma de corriente.
Deje enfriar el aparato antes de limpiarlo.
1. El aparato no se debe sumergir en agua o en otro líquido.
2. Limpie las placas de cocinado aún calientes con un paño húmedo o utilice un cepillo blando
para limpiar las cavidades. No utilice nunca objetos duros o puntiagudos. Podrían dañar el
revestimiento antiadherente.
3. Además, no utilice productos de limpieza agresivos, lana o estopa de acero, objetos metálicos,
productos de limpieza calientes ni desinfectantes, ya que pueden producir daños.
4. Antes de cada nuevo uso, el aparato debe estar completamente seco.
5. Para guardar el aparato en un mínimo espacio, puede colocarse en posición vertical.
RECETAS DE ORESHKI
Las oreshki son galletas rellenas en forma de nueces, típicas de Rusia. El relleno puede ser dulce
o salado. Las oreshki se hornean en una plancha eléctrica especial, se rellenan a continuación y se
unen de dos en dos para formar las „nueces“. Naturalmente, la elaboración de las oreshki depende de la fantasía del cocinero, que también podrá encontrar otras variantes en libros de cocina o en
Internet.
Oreshki dulces
Receta básica
250 g de mantequilla, 2 huevos, 1 sobrecito de
azúcar de vainilla, 100 g de azúcar, 400 g de
harina tipo 405, 50 g de maicena, 2 pizcas de
levadura
Oreshki de nueces o almendras
250 g de mantequilla, 2 huevos, 1 sobrecito de
azúcar de vainilla, 100 g de azúcar, 100 g de
nueces o almendras (opcional) finamente moli-
das, 1 frasco de aroma de almendras amargas,
400 g de harina tipo 405, 2 pizcas de levadura
Oreshki de naranja
250 g de mantequilla, 2 huevos, 1 sobrecito de
azúcar de vainilla, 100 g de azúcar, 50 g de ralladura de naranja, 1 frasco de aroma de naranja, 400 g de harina tipo 405, 2 pizcas de
levadura
51

Oreshki de harina integral
Copyright UNOLD AG | www.unold.de
250 g de mantequilla, 2 huevos, 1 yema, una
rama de vainilla, 120 g de miel, 1 pizca de sal,
400 g de harina integral de espelta, 1 cucharadita rasa de levadura
Oreshki sabrosas
Oreshki de tomates
250 g de mantequilla, 2 huevos, 1 sobrecito
de salsa de tomate (en polvo), ¼ cucharadita
de chile en polvo, 2 cucharadas de especias de
bruschetta, ½ cucharadita de sal, 450 g de harina tipo 405, 2 pizcas de levadura
Oreshki sabrosas
250 g de mantequilla, 2 huevos, 2 ½ cuchara-
das de caldo de verdura en grano, 450 g de ha-
rina tipo 405, 2 pizcas de levadura
Oreshki de hierbas
250 g de mantequilla, 2 huevos, 1 cucharada
de ajo silvestre seco, 1 vaso de pesto de albaha-
ca (190 g), 500 g de harina integral de trigo, 2
pizcas de levadura
Preparación
Elabore una masa con los ingredientes. Ponga la
masa en la nevera durante aprox. 1 hora. Forme
pequeñas bolas (aprox. 1,5-2 cm de diámetro).
Para hacerlo puede utilizar, por ejemplo, un sacabolas. Es posible que al principio necesite varios intentos para encontrar el tamaño de bola
correcto. Ponga las bolas en el aparato, ciérrelo
y hornee las oreshki durante aprox. 3 minutos
hasta obtener el tueste deseado. Cuando haya
terminado de hornear las oreshki, agarre el aparato por las dos asas, ábralo y vierta las oreshki
sobre una bandeja de horno. Cortar al principio
la masa sobrante de la nuez horneada después
de enfriarla. Puede también hornear las oreshki
en grandes cantidades para tenerlas almacenadas. Se pueden guardar durante algún tiempo
en un tarro herméticamente cerrado. No utilice
hierbas frescas dado que contienen demasiada
humedad y las oreshki podrían ablandarse y estropearse.
Rellenos dulces para oreshki
Para los rellenos, mezclar los ingredientes indicados en cada caso. Rellene las oreshki justo
antes de servirlas para que se mantengan crujientes.
Relleno de turrón
200 g de crema de turrón y nueces, 200 g de
queso crema
Relleno de ponche de huevo
100 ml de ponche de huevo, 1 sobrecito de azúcar de vainilla, 100 ml de nata dulce, 1 sobrecito de crema de vainilla
Relleno de frambuesas
100 ml de nata dulce, 1 cucharada de azúcar, 1
sobrecito de estabilizante para nata
Montar la nata y, después, añadir 200 g de
frambuesas frescas a la nata.
Rellenos sabroso para oreshki
Para los rellenos, mezclar bien los ingredientes
indicados en cada caso. También puede rellenar
las oreshki con ensaladas preparadas como, p.
ej., ensalada de taquitos de embutido, ensalada de carne de ave, ensalada puszta o ensalada de huevo.
52

Relleno de salmón ahumado
Copyright UNOLD AG | www.unold.de
100 g de salmón ahumado, 200 g de queso crema, 1 cucharadita de salsa de rábano picante
Triturar y mezclar todos los ingredientes, p. ej.,
con la “varita mágica” ESGE Zauberstab® o con
la picadora ESGE-Zauberette®. En lugar de salmón ahumado también puede utilizar filetes de
trucha ahumada o atún en aceite.
Relleno de queso
100 g de queso emmental finamente troceado,
150 g de queso crema con hierbas, 1 cucharada
de licor de cereza (alternativa: 150 g de queso
crema neutro y 10 guindas)
Relleno de jamón
100 g de jamón crudo ahumado, 200 g de queso crema con hierbas, 1 cucharadita de salsa de
rábano picante
Relleno de queso Camembert
2 cucharadas de mermelada de arándanos rojos, 100 g de Camembert blando, 200 g de queso crema
Las recetas del presente manual de instrucciones han sido cuidadosamente seleccionadas y probadas tanto por sus autores como por UNOLD AG quienes, no obstante, no asumen garantía alguna.
Queda explícitamente excluida cualquier responsabilidad de los autores y UNOLD AG o sus delegados por daños personales, materiales o financieros.
CONDICIONES DE GARANTIA
La garantía para nuestros equipos es de 24 meses, y de 12 meses en el caso de uso comercial, a partir de la fecha de compra, cubriendo
los daños que con un uso acorde a lo prescrito pueden atribuirse fehacientemente a defectos de fabricación. Dentro del período de garantía,
solucionamos errores de material y de fabricación a consideración nuestra mediante reparación o cambio. Nuestros servicios de garantía son
válidos únicamente para los aparatos que han sido vendidos en Alemania y Austria. Para todos los demás casos diríjase por favor al importador
correspondiente. Aquellos aparatos que se presentan para eliminar errores, por favor enviarlos junto a una copia del comprobante de compra
extendido a máquina, del cual debe desprenderse la fecha de compra, así como una breve descripción de las deficiencias, apropiadamente
embalado y con los sellos correspondientes a nuestro servicio al cliente. En caso de garantía, los gastos de envío serán restituidos al cliente
solamente en Alemania y Austria. Aquellos daños causados por desgaste están excluidos de la garantía, así como manipulación incorrecta, e
incumplimiento de las condiciones de mantenimiento y cuidado. El derecho a garantía expira si las reparaciones o mantenimiento son realiza-
das por terceros. Todo reclamo del consumidor final ante el vendedor, comerciante no se ve afectado por esta garantía.
DISPOSICIÓN/PROTECCIÓN DEL MEDIO AMBIENTE
Nuestros aparatos se fabrican con un alto nivel de calidad por un largo período de uso. El mantenimiento regular y las
reparaciones de tipo técnico a través de nuestro servicio al cliente pueden prolongar la duración del aparato. Cuando un
aparato está defectuoso y ya no puede repararse, por favor considere en la disposición final los siguientes puntos: Este
producto no puede ser eliminado junto a la basura domiciliaria. Usted debe entregar este producto a un lugar oficial para el
reciclaje de aparatos eléctricos o electrónicos. Mediante la clasificación por separado y el reciclaje de productos residuales,
Usted contribuye a proteger los recursos naturales y asegura que el producto sea eliminado de forma salubre y acorde con
el medio ambiente.
53

INSTRUKCJA OBSŁUGI MODELU 48360
Copyright UNOLD AG | www.unold.de
DANE TECHNICZNE
Moc: 1400 W, 230 V~, 50 Hz
Płytki: Odlew ciśnieniowy z aluminium z powłoką antyadhezyjną
Wymiary: ok. 25,5 x 32,0 x 10,3 cm (dł./szer./wys.)
Ciężar: ok. 2,2 kg
Przewód zasilający: ok. 80 cm
Wyposażenie: Do pieczenia ciastek w kształcie orzechów włoskich ze słodkim lub
Akcesoria: Instrukcja obsługi z przepisami
Zastrzegamy sobie prawo do zmian technicznych.
OBJAŚNIENIE SYMBOLI
Symbol ten oznacza ewentualne niebezpieczeństwa, które mogą prowadzić do obrażeń
lub uszkodzenia urządzenia.
Symbol ten wskazuje na ewentualne niebezpieczeństwo poparzenia. Zawsze postępować
tutaj ze szczególną ostrożnością.
pikantnym nadzieniem, płytki opiekające z nieprzywierającą powłoką,
lampki kontrolne, zamknięcie
ZASADY BEZPIECZEŃSTWA
Prosimy przeczytać poniższe instrukcje i zachować je.
1. Urządzenie może być używane przez dzieci w wieku powyżej 8
lat oraz osoby o ograniczonej sprawności fizycznej, sensorycznej czy umysłowej lub osoby nie posiadające doświadczenia i/
lub wiedzy, jeśli są one nadzorowane
zakresie
tego zagrożenia.
2. Nie wolno dzieciom bawić się urządzeniem.
3. Czyszczenia i konserwacji, które powinien wykonać użytkownik,
nie mogą wykonywać dzieci poniżej 8 lat. Dzieci w wieku powyżej
8 lat mogą robić to pod nadzorem.
4. Urządzenie z przewodem przechowywać w miejscu niedostępnym
dla dzieci w wieku poniżej 8 lat.
54
bezpiecznego użytkowania i zrozumiały wynikającego z
lub zostały przeszkolone w

5. OSTROŻNIE! Niektóre części tego produktu mogą być bardzo
Copyright UNOLD AG | www.unold.de
gorące i powodować oparzenia! Zachować szczególną ostrożność
w obecności dzieci i osób zagrożonych.
6. Pilnować, aby dzieci nie bawiły się urządzeniem.
7. Urządzenie należy podłączać wyłącznie do prądu przemiennego
o napięciu podanym na tabliczce znamionowej.
8. Urządzenie nie może pracować z zewnętrznym regulatorem cza
sowym lub systemem zdalnego sterowania.
9.
Ze względów bezpieczeństwa nie używać w miarę możliwości
przedłużaczy ani wielokrotnych gniazd wtykowych do podłącze
nia urządzenia do prądu.
10.
W żadnym wypadku nie wolno urządzenia zanurzać w wodzie lub
w innych cieczach.
11. Urządzenia nie wolno myć w zmywarce.
12. Podczas pracy nie pozostawiać urządzenia bez nadzoru i trzymać
z dala od dzieci.
13. Po użyciu, przed czyszczeniem lub w razie ewentualnych zakłó
ceń podczas pracy prosimy zawsze wyciągnąć wtyczkę sieciową.
14.
Urządzenie należy stawiać na wolnej i równej powierzchni.
Nigdy nie stawiać i nie używać urządzenia ani kabla na gorących
powierzchniach lub w ich pobliżu.
15. Nigdy nie dotykać urządzenia ani kabla mokrymi dłońmi.
16. Urządzenie przeznaczone jest wyłącznie do użycia w gospodar
stwie domowym lub w podobnych zastosowaniach, np.
aneksach kuchennych w sklepach, biurach lub innych zakła-
dach,
zakładach rolnych,
do użycia przez gości w hotelach, motelach lub innych nocle
gowniach,
w prywatnych pensjonatach lub domach letniskowych.
17. Używać urządzenie wyłącznie wewnątrz pomieszczeń.
18. Przed użyciem kabel całkowicie rozwinąć. Kabel nie może zwi
sać z krawędzi powierzchni roboczej, aby nie było możliwe np.
przypadkowe
ściągnięcie
urządzenia z płyty roboczej przez małe
dzieci.
19. Nigdy nie owijać przewodu wokół urządzenia.
-
-
-
-
-
-
55

20. Przewód wyjmować z gniazda ciągnąc za wtyczkę, nigdy nie za
Copyright UNOLD AG | www.unold.de
kabel.
21. Zwrócić uwagę na to, aby przewód nie dotykał gorącego urządze
nia.
22.
Nie używać urządzenia w pobliżu materiałów wrażliwych na
wysoką temperaturę, jak spirytus – niebezpieczeństwo pożaru!
23. Urządzenie nagrzewa się podczas pracy, dlatego do jego przesu
wania należy używać uchwytów lub łapek do garnków.
24.
Gdy urządzenie jest gorące, nie wolno zostawiać go bez nadzoru
– niebezpieczeństwo poparzenia!
25. Aby uniknąć powstawania dymu, nie przegrzewać naczyń do
gotowania, smażenia i pieczenia; dym może być niebezpieczny
dla małych zwierząt (np. ptaków) o szczególnie wrażliwym ukła
dzie oddechowym. Zalecamy nie trzymać ptaków w kuchni.
26.
Podczas wlewania ciasta lub wyjmowania upieczonych połówek
orzeszków należy koniecznie całkowicie otworzyć pokrywę, gdyż
może ona się zamknąć – niebezpieczeństwo poparzenia i obra
żeń!
27.
Ze względów bezpieczeństwa nigdy nie przykrywać urządzenia
i powierzchni opiekających papierem, folią lub innymi materia
łami. Istnieje niebezpieczeństwo pożaru!
28.
Podczas pracy i na krótko po zakończeniu pracy nigdy nie doty-
kać powierzchni opiekających częściami ciała ani przedmiotami
wrażliwymi na wysoką temperaturę.
29.
Nie odstawiać gorącego urządzenia do przechowania.
30. Urządzenie jest przeznaczone wyłącznie do obróbki żywności.
31. Regularnie sprawdzać wtyczkę i kabel pod kątem zużycia lub
uszkodzenia. Gdy uszkodzony jest kabel lub inne części, pro
simy odesłać urządzenie do sprawdzenia i naprawy do naszego
serwisu
klienta.
Nieprawidłowo przeprowadzone naprawy mogą
prowadzić do powstania znacznych zagrożeń dla użytkownika i
prowadzą do utraty gwarancji. Gdy przewód przyłączeniowy urzą
dzenia jest uszkodzony, musi go wymienić producent, serwis producenta lub odpowiednio wykwalifikowana osoba, aby uniknąć
niebezpieczeństw
.
-
-
-
-
-
-
-
56

OSTROŻNIE:
Copyright UNOLD AG | www.unold.de
Urządzenie podczas pracy jest bardzo gorące!
W żadnym wypadku nie otwierać obudowy urządzenia.
Istnieje niebezpieczeństwo porażenia prądem.
Producent nie przejmuje odpowiedzialności za nieodpowiednie bądź wadliwe użytkowanie lub po
przeprowadzonych naprawach przez nieautoryzowane zakłady bądź niekompetentne osoby.
URUCHOMIENIE
1. Przed pierwszym użyciem zalecamy obydwie powierzchnie opiekające pokryte nieprzywierającą
powłoką przetrzeć wilgotną ściereczką.
2. Podczas fazy wypalania urządzenia otworzyć okno.
3. Zamknąć urządzenie, włożyć wtyczkę do gniazda (230 V~, 50 Hz). Zapala się czerwona lampka
kontrolna sygnalizująca włączone nagrzewanie.
4. Nagrzewać puste urządzenie przez ok. 10 minut.
5. Po wypaleniu na urządzeniu mogą być widoczne ślady użytkowania, które nie wpływają na dzia-
łanie urządzenia i nie stanowią podstawy do reklamacji.
6. Przed pierwszym użyciem lekko posmarować obydwie powierzchnie opiekające pędzlem zwilżonym tłuszczem odpornym na wysokie temperatury, np. margaryną. Powierzchnie opiekające urzą-
dzenia pokryte są nieprzywierającą powłoką i muszą zostać nasmarowane tylko przed pierwszym
użyciem, potem nie jest to już konieczne.
7. Jeśli przy pierwszym nagrzaniu urządzenia wydzieli się lekki zapach, jest on całkowicie nieszkod-
liwy.
Uwaga: Zalecamy nie spożywać pierwszych połówek orzeszków upieczonych w urządzeniu,
lecz je wyrzucić. Przy kolejnym używaniu urządzenia nie jest to już konieczne!
PIECZENIE ORZESZKÓW
1. Przygotować ciasto na orzeszki w sposób opisany w rozdziale „Przepisy“.
2. Zamknąć urządzenie, włożyć wtyczkę do gniazda (230 V~, 50 Hz). Zapala się czerwona lampka
kontrolna sygnalizująca włączone nagrzewanie.
3. Zaczekać, aż lampka kontrolna zgaśnie. Trwa to ok. 3-8 minut. Uwaga dotycząca sygnalizacji pie-
czenia: Jeżeli lampka kontrolna zgaśnie, że ponownie została osiągnięta odpowiednia tempera-
tura, nie oznacza to jednak, że połówki orzeszków są gotowe do wyjęcia. Czas pieczenia orzesz-
ków zależy od użytego ciasta i osobistego smaku. Przed wyjęciem połówek orzeszków należy
sprawdzić, czy odpowiadają one oczekiwaniom.
57

4. Otworzyć urządzenie.
Copyright UNOLD AG | www.unold.de
5. Włożyć małe kulki z ciasta do dolnych form na
ciasto. Ciasto rozlewa się równomiernie w formie
po zamknięciu urządzenia. Zwrócić uwagę na pra-
widłowe dozowanie ilości ciasta. Gdy wleje się za
mało ciasta, górna część urządzenia nie przylega
prawidłowo. Jeżeli wleje się za dużo ciasta, ciasto przeleje się i zabrudzi urządzenie i powierzch-
nię roboczą.
Uwaga: Zawsze napełniać ciastem wszystkie formy na ciasto, aby uniknąć uszkodzenia urządzenia!
6. Zamknąć urządzenie natychmiast po nalaniu ciasta, aby orzeszki zarumieniły się równomiernie
na dole i u góry. Zaczekać 5 sekund, docisnąć jeszcze raz pokrywę i zamknąć uchwyt zamknię-
ciem.
7. Zwrócić uwagę na to, aby zamknięcie poprawnie zatrzasnęło się.
Uwaga: Pokrywa urządzenia jest bardzo gorąca! Podczas zamykania urządzenia może z niego
uchodzić gorąca para.
8. Pieczenie trwa ok. 3-4 minut.
9. Po zakończeniu pieczenia otworzyć urządzenie i ostrożnie wyjąć orzeszki. Nie używać do tego
celu w miarę możliwości żadnych metalowych przedmiotów, takich jak widelca, gdyż mogą one
uszkodzić powłokę antyadhezyjną.
10. Resztki ciasta można usunąć z urządzenia za pomocą szpatułki do ciasta.
11. Po wyjęciu orzeszków urządzenie można od razu ponownie napełnić ciastem. Lampka kontrolna
ponownie gaśnie.
12. Aby upiec następne orzeszki, zamknąć urządzenie i zaczekać, aż lampka kontrolna zgaśnie.
Powtarzać kroki od 1 do 12, aż zużyte zostanie całe ciasto.
13. Zaczekać chwilę, aż gotowe orzeszki nieco ostygną, zanim będzie można ich użyć. Napełnić
orzeszki nadzieniem, smarując masą również krawędzie orzeszków. Następnie połączyć dwie
połówki orzeszka w jedną całość.
14. Po zakończeniu pieczenia wyciągnąć wtyczkę sieciową. Dopiero wtedy urządzenie jest wyłączone.
Uwaga: Przez dłuższy czas po użyciu urządzenie jest bardzo gorące! Niebezpieczeństwo
poparzenia!
58

CZYSZCZENIE I PIELĘGNACJA
Copyright UNOLD AG | www.unold.de
Przed czyszczeniem należy zawsze wyłączyć urządzenie i wyciągnąć wtyczkę z
gniazda.
Przed czyszczeniem zaczekać, aż urządzenie ochłodzi się.
1. Nie wolno zanurzać urządzenia w wodzie lub innej cieczy.
2. Ciepłe jeszcze powierzchnie pieczenia należy wytrzeć wilgotną ściereczką lub użyć miękkiej
szczoteczki, aby wyczyścić je w zagłębieniach.
3. Nigdy nie używać ostrych lub twardych przedmiotów. Te przedmioty powodują zadrapanie warstwy
antyadhezyjnej.
4. Nie używać ostrych środków szorujących, wełny stalowej, metalowych przedmiotów, gorących
środków czyszczących lub środków dezynfekujących, gdyż mogą spowodować uszkodzenia.
5. Przed ponownym użyciem urządzenie musi być całkowicie suche.
6. Aby przechowywane urządzenie nie zajmowało dużo miejsca, można je ustawić wyższą krawędzią
w pionie.
PRZEPISY NA ORZESZKI
Kruche ciasteczka w formie orzechów włoskich to rosyjski przysmak. Można je przyrządzić do wyboru
ze słodkim lub pikantnym nadzieniem. Ciasteczka piecze się w opiekaczu do orzeszków, po czym wypełnia masą i łączy dwie połówki w jedno ciasteczko. Wyobraźnia nie ma tu granic, również w książ-
kach kucharskich i Internecie można znaleźć wiele różnych wersji ciasteczek.
Słodkie orzeszki
Przepis podstawowy
250 g masła, 2 jajka, 1 opakowanie cukru wa-
niliowego, 100 g cukru, 400 g mąki tortowej,
50 g mąki skrobiowej, 2 szczypty proszku do
pieczenia
Orzeszki orzechowe lub migdałowe
250 g masła, 2 jajka, 1 opakowanie cukru waniliowego, 100 g cukru, 100 g drobno mielonych
orzechów lub migdałów (do wyboru), 1 butelecz-
ka aromatu migdałowego, 400 g mąki tortowej,
2 szczypty proszku do pieczenia
Orzeszki pomarańczowe
250 g masła, 2 jajka, 1 opakowanie cukru waniliowego, 100 g cukru, 50 g startej skórki z po-
marańczy, 1 buteleczka aromatu pomarańczo-
wego, 400 g mąki tortowej, 2 szczypty proszku
do pieczenia
Orzeszki razowe
250 g masła, 2 jajka, 1 żółtko, miąższ z jednej laski wanilii, 120 g miodu, 1 szczypta soli,
400 g mąki orkiszowej pełnoziarnistej, 1 płaska
łyżeczka proszku do pieczenia
59

Pikantne orzeszki
Copyright UNOLD AG | www.unold.de
Orzeszki pomidorowe
250 g masła, 2 jajka, 1 opakowanie sosu pomidorowego w proszku, ¼ łyżeczka chili w prosz-
ku, 2 łyżki przyprawy do bruschetty, ½ łyżeczki
soli, 450 g mąki tortowej, 2 szczypty proszku
do pieczenia
Pikantne orzeszki
250 g masła, 2 jajka, 2 ½ łyżki wywaru warzyw-
nego, 450 g mąki tortowej, 2 szczypty proszku
do pieczenia
Orzeszki ziołowe
250 g masła, 2 jajka, 1 łyżka suszonego czosn-
ku niedźwiedziego, 1 słoiczek pesto bazyliowego
(190 g), 500 g mąki pszennej pełnoziarnistej, 2
szczypty proszku do pieczenia
Przyrządzenie
Przyrządzić ze składników kruche ciasto. Odsta-
wić ciasto na ok. 1 godzinę do lodówki. Formo-
wać małe kulki (o średnicy ok. 1,5 - 2 cm). Do
tego celu można użyć np. łyżki do drążenia owo-
ców. Na początku może trochę potrwać, zanim
uda się uformować kulki prawidłowej wielkości.
Włożyć kulki do urządzenia, zamknąć urządzenie i piec orzeszki przez ok. 3 minuty aż zbrązowieją zgodnie z życzeniem. Gdy orzeszki są upie-
czone, schwycić urządzenie za obydwa uchwyty,
otworzyć je i wytrząsnąć orzeszki na blachę do
pieczenia. Ewentualnie odciąć nadmiar cia-
sta z ciepłych jeszcze, upieczonych orzeszków.
Orzeszki można piec na zapas. W szczelnie za-
mykanym pojemniku można je przechowywać
przez jakiś czas. Nie używać świeżych ziół, gdyż
zawierają one za dużo wilgoci, orzeszki znów zro-
bią się miękkie i mogą się zepsuć.
Słodkie nadzienia do orzeszków
Aby uzyskać nadzienie, zmieszać ze sobą poda-
ne składniki. Nadziewać orzeszki bezpośrednio
przed podaniem, aby ich skorupka była chrupią-
ca.
Nadzienie nugatowe
200 g kremu orzechowo-nugatowego, 200 g
świeżego serka
Nadzienie z likierem jajecznym
100 ml likieru jajecznego, 1 opakowanie cukru
waniliowego, 100 ml słodkiej śmietanki, 1 opakowanie kremu do tortów (Dr. Oetker Paradiescreme o smaku waniliowym)
Nadzienie malinowe
100 ml słodkiej śmietanki, 1 łyżka cukru, 1 opa-
kowanie fixu do ubijania śmietany
Ubić śmietanę na sztywną pianę, dodać
200 świeżych malin.
Pikantne nadzienia do orzeszków
Aby uzyskać nadzienie, dobrze zmieszać ze sobą
podane składniki. Orzeszki można nadziewać
również gotowymi sałatkami, np. sałatką mięs-
ną, sałatką drobiową, sałatką z marynowanych
warzyw lub sałatką jajeczną.
Nadzienie z wędzonego łososia
100 g wędzonego łososia, 200 g świeżego serka,
1 łyżeczka chrzanu ze śmietaną
Wszystkie składniki pokroić i zmiksować, np.
przy użyciu ESGE-Zauberstab
®
lub ESGE-
Zauberette®. Zamiast wędzonego łososia można
użyć również filetów z wędzonego pstrąga lub
tuńczyka w oleju.
60

Nadzienie serowe
Copyright UNOLD AG | www.unold.de
100 g drobno pokrojonego sera ementaler, 150
g świeżego serka z ziołami, 1 łyżka wiśniówki (al-
ternatywnie: 150 g świeżego serka naturalnego i
10 wisienek koktajlowych)
Nadzienie z szynką
100 g surowej szynki wędzonej, 200 g świeżego
serka z ziołami, 1 łyżeczka chrzanu ze śmietaną
Przepisy podane w tej instrukcji obsługi zostały starannie opracowane i sprawdzone przez autorów
i przedsiębiorstwo UNOLD AG, ale bez gwarancji. Wyklucza się odpowiedzialność autorów lub
przedsiębiorstwa UNOLD AG i ich pełnomocników za szkody osobowe, rzeczowe i majątkowe.
Nadzienie z serem camembert
2 łyżki marmolady żurawinowej, 100 g miękkie-
go sera camembert, 200 g świeżego serka
WARUNKI GWARANCJI
Udzielamy na nasze produkty 24 miesięcznej gwarancji od daty zakupu (warunkiem jest zachowanie faktury
zakupu lub paragonu) na szkody, które przy użytkowaniu zgodnym z przeznaczeniem wskazują na wadę fabrycz-
ną. W czasie trwania gwarancji usuniemy wady materiałowe bądź fabryczne zgodnie z naszym osądem poprzez
naprawę lub wymianę. Gwarancja udzielana jest na produkty sprzedawane na terenie Niemiec i Austrii. W innych
krajach proszę zwrócić się do właściwego Importera. Urządzenia, w których wymagane jest usunięcie wady,
proszę przesłać razem z kopią faktury zakupu, na której musi być widoczna data zakupu, z załączonym opisem
wady, w oryginalnym pudełku, dobrze zapakowane i na własny koszt na adres serwisu. Gwarancja nie obejmuje
szkód wynikających ze zużycia, użytkowania niezgodnie z przeznaczeniem i nieprzestrzegania wskazówek doty-
czących konserwacji i pielęgnacji. Roszczenie gwarancji wygasa, jeżeli naprawa bądź otwarcie przedmiotu będą
przeprowadzone przez stronę trzecią. Ewentualne roszczenia użytkownika końcowego wobec sprzedawcy/dealera
nie są ograniczone tą gwarancją.
UTYLIZACJA / OCHRONA ŚRODOWISKA
Nasze urządzenia wyprodukowane zostały na wysokim poziomie do długiego użytkowania. Regu-
larna konserwacja i fachowe naprawy poprzez nasz serwis mogą wydłużyć pracę urządzenia. W
razie kiedy urządzenie jest uszkodzone i nie nadaje się do naprawy, proszę przestrzegać zaleceń:
Ten produkt nie może być zutylizowany razem z normalnymi odpadami domowymi. Muszą Pań-
stwo dostarczyć ten produkt do zbiorczego punktu recyklingowego dla urządzeń elektrycznych i
elektronicznych. Poprzez oddzielne zbieranie i recykling odpadów pomagają Państwo chronić na-
turalne zasoby i sprawiają, że ten produkt będzie zutylizowany w sposób bezpieczny dla zdrowia
i środowiska naturalnego.
61

Руководство по эксплуатации MODEL 48360
Copyright UNOLD AG | www.unold.de
ТЕХНИЧЕСКИЕ ДАННЫЕ
Мощность: 1400 ватт, 230 ~В, 50 Гц
Материал форм
для выпечки: литой алюминий с антипригарным покрытием
Габариты: ок. 25,5 x 32,0 x 10,3 см (Д/Ш/В)
Масса: ок. 2,2 кг
Провод питания: ок. 80 см
Оснащение: для приготовления русских „волшебных орешков“ (орешки) со
сладкой или пикантной начинкой, антипригарные формы для выпечки,
контрольные лампы, закрывающая клипса
Принадлежности: руководство по эксплуатации по эксплуатации с рецептами
Сохраняется право на внесение изменений, касающихся техники, расцветки и
дизайна, а также на погрешности в характеристиках оснащения
СИМВОЛЫ
Этот символ указывает на возможные опасности, которые могут привести к травме
или повреждению устройства.přístroje.
Этот символ указывает на возможный риск ожога. Иди сюда, прежде чем всегда
особенно бдительными.opatrně.
ДЛЯ ВАШЕЙ БЕЗОПАСНОСТИ
Пожалуйста, прочтите следующие инструкции и сохраните их.
1.
Прибор может эксплуатироваться детьми от 8 лет и лицами
с ограниченными физическими, сенсорными или умствен
ными способностями, либо с дефицитом опыта и/или знаний, если они осуществляют эксплуатацию под надзором
или
рошли инструктаж по безопасному использованию
п
прибора и осознали опасности, связанные с ним. Данный
прибор не является игрушкой. Выполнение чистки и техоб
служивания прибора детьми разрешается только под контролем взрослых.
62
-
-

2. Дети в возрасте до 3 лет должны держаться подальше от
Copyright UNOLD AG | www.unold.de
прибора или находиться под беспрестанным контролем со
стороны взрослых.
3. Детям в возрасте от 3 до 8 лет разрешается включать и
выключать прибор лишь в том случае, если он находится
в нормальном состоянии, предусмотренном для обслу
живания, за ними осуществляется контроль или проведен
инстр
таж на тему безопасного обращения и они осознали
ук
опасности, связанные с ним. Детям в возрасте от 3 до 8 лет
не разрешается осуществлять подключение, обслужива
ние, чистку или техобслуживание прибора.
4.
ОПАСНО - Детали этого прибора могут очень сильно нагре-
ваться и стать причиной ожогов! В присутствии детей и лиц,
к
торым угрожает опасность, будьте предельно осторожны.
о
5. Необходимо следить за детьми, чтобы убедиться, что они
не играют с прибором.
6. Подключать прибор только к источнику переменного тока с
напряжением, соответствующим указанному на заводской
табличке.
7. Не разрешается эксплуатировать данный прибор с внеш
ним таймером или с системой дистанционного управления.
8.
Из соображений безопасности по возможности не исполь-
зуйте удлинитель и тройник для подключения прибора к
э
ктросети.
ле
9. Ни в коем случае не погружайте прибор в воду или другие
жидкости.
10. Не разрешается мыть прибор в посудомоечной машине.
11. Не оставляйте прибор без надзора во время эксплуатации и
держите его вне пределов досягаемости детей.
12. После использования, перед чисткой или при возникнове
нии неисправностей во время эксплуатации следует извлечь
вилк
тевого кабеля.
у се
13. Установите прибор на свободную, ровную поверхность.
Никогда не размещать и не эксплуатировать прибор и про
вод питания на горячей поверхности или вблизи нее.
14.
Никогда не прикасаться к прибору или проводу питания
мокрыми руками.
-
-
-
-
-
63

15. Прибор предназначен исключительно для бытового и ему
Copyright UNOLD AG | www.unold.de
подобного использования, нап-р.,
чайные в магазинах, офисах и прочих местах работы,
на сельскохозяйственных предприятиях,
для использования гостями в отелях, мотелях и на других
предприятиях, предоставляющих услуги временного прожи
вания,
в частных пансионатах или домах отдыха.
16. Используйте прибор только внутри помещений.
17. Перед использованием следует полностью размотать про
вод питания. Провод не должен провисать через кромку
рабо
поверхности стола, чтобы, напр-р., маленькие дети
чей
не могли нечаянно стянуть прибор с рабочей поверхности.
18. Никогда не наматывайте провод питания вокруг прибора.
19. Всегда извлекайте провод из розетки только за штепсель
ную вилку, никогда не тяните за провод.
20.
Следите за тем, чтобы провод не прилегал к нагретому при-
бору.
21.
Не эксплуатируйте прибор вблизи термочувствительных
веществ, таких как спирт – существует опасность возникно
вения пожара!
22.
Во время работы прибор нагревается, поэтому для переме-
щения прибора используйте прихватки.
23.
Не оставляйте прибор без присмотра пока он горячий –
существует опасность получения ожога!
24. Во избежание образования дыма не допускайте перегрева
Вашей посуды для варки, жарки и выпечки, это может быть
опасно для мелких животных с особо чувствительной дыха
тельной системой (напр-р, птицы). Мы не рекомендуем Вам
де
ть птиц на кухне.
ржа
25. При заполнении формы тестом или извлечении вафель
обязательно полностью открывайте крышку, потому что в
противном случае она может закрыться: опасность ожога и
получения травмы!
26. Из соображений безопасности никогда не накрывайте при
бор и поверхность формы для выпекания бумагой, пленкой
-
-
-
-
-
-
64

или другими посторонними предметами. В противном слу-
Copyright UNOLD AG | www.unold.de
чае существует опасность возникновения пожара!
27.
Никогда во время эксплуатации и некоторое время после
нее не прикасайтесь к формам для выпекания частями тела
или термочувствительными предметами.
28. Не убирайте на хранение в горячем состоянии.
29. Используйте этом приборе только пищевые продукты.
30. Регулярно проверяйте штепсельную вилку и провод на
предмет износа или наличия повреждений. При поврежде
нии провода или других деталей, пожалуйста, отправьте
п
бор в нашу сервисную службу с целью проведения про-
ри
верки и ремонта. Некомпетентное осуществление ремонта
м
жет привести к возникновению серьезной опасности для
о
пользователя и к аннулированию гарантии. Если поврежден
провод этого прибора, то во избежание опасности он дол
жен быть заменен производителем или специалистами его
сервисной
жбы, либо специалистом с аналогичной ква-
слу
лификацией.
Внимание: Даже после отключения прибор длительное
время остается горячим! Опасность получения ожога!
Никогда не снимайте корпус этого устройства. Сущест
вует риск поражения электрическим током.
-
-
-
Изготовитель не несет никакой ответственности за неправильной установки, в случае
ненадлежащего или неправильного использования или для проведения ремонтных работ от
несанкционированного доступа третьих лиц.
ВВОД В ЭКСПЛУАТАЦИЮ
1. Перед первичным использованием мы рекомендуем Вам протереть влажной тканью обе
антипригарные поверхности форм для выпечки.
2. Откройте окно на время последующей фазы нагревания.
3. Закройте прибор, вставьте штепсельную вилку в розетку (230 ~В, 50 Гц). Красная лампа
контроля эксплуатации загорается и показывает, что производится нагрев.
4. Как только будет завершена фаза предварительного нагрева, загорится контрольная
лампа.
5. Прогрейте прибор в течение примерно 10 минут.
65

6. После нагревания на приборе возможно уже будут видны следы эксплуатации, однако,
Copyright UNOLD AG | www.unold.de
они не оказывают отрицательного воздействия на функционирование прибора и не явля-
ются поводом для рекламации.
7. Перед первым использованием слегка смажьте кисточкой обе формы для выпечки термо-
стойким жиром, напр-р, маргарином. Поскольку формы для выпечки имеют антипригар-
ное покрытие, смазывать их нужно только перед первым изготовлением вафель, после
этого необходимость в смазывании отсутствует.
8. Если при первичном нагревании Вашего нового прибора возникает легкий запах, то это не
должно вызывать никаких опасений.
Внимание: Мы принципиально рекомендуем утилизировать самую первую
приготовленную вафлю, а не использовать ее в пищу. При последующем
использовании прибора этого, конечно, больше не потребуется.
ПРИГОТОВЛЕНИЕ „ВОЛШЕБНЫХ ОРЕШКОВ“
1. Прежде всего, приготовьте тесто для орешков так, как описано в главе „Рецепты“.
2. Закройте прибор, вставьте штепсельную вилку в розетку (230 ~В, 50 Гц). Красная лампа
контроля эксплуатации загорается и показывает, что производится нагрев.
3. Подождите, пока индикатор не погаснет. Это может занять от 3 до 8 минут. Указание по
индикатору выпечки Если сигнальная лампа гаснет, это значит, что правильная тем-
пература снова достигнута, но не то, что вафельные половинки орешков готовы. Время
выпечки вафельных половинок орешков зависит от используемого теста и личных вку-
совых предпочтений. Поэтому, пожалуйста, перед извлечением вафельных половинок
орешков проверьте, получились ли они в соответствии с Вашими ожиданиями.
4. Откройте прибор.
5. Теперь выложите небольшие шарики из теста
в нижние желоба для теста. Тесто равно-
мерно распределяется при закрытии прибора.
Пожалуйста, всегда следите за правильной
дозировкой теста. Если теста слишком мало,
то верхняя часть прибора будет прилегать
неправильно. Если теста слишком много, то
оно вытечет и запачкает прибор вместе с рабочей поверхностью стола.
Внимание: Пожалуйста, всегда заполняйте все желоба для теста, чтобы избежать повреждения прибора!
66

6. Сразу после заполнения прибора тестом закрывайте его, чтобы орешки равномерно
Copyright UNOLD AG | www.unold.de
зарумянились сверху и снизу. Подождите 5 секунд, еще раз прочно прижмите крышку и
зафиксируйте рукоятку при помощи закрывающей клипсы.
7. Следите за тем, чтобы закрывающая клипса правильно зашла в паз.
Внимание: Крышка прибора очень горячая! Из прибора может выступить
горячий пар, когда Вы закрываете крышку.
8. Процесс выпекания занимает от 3 до 4 минут.
9. Когда процесс выпекания будет завершен, откройте прибор и осторожно извлеките
орешки. По возможности не используйте для этого металлические приборы, такие как,
напр-р, вилка, поскольку из-за этого может быть повреждено антипригарное покрытие.
10. Остатки теста, запекшегося на приборе удалите при помощи скребка для теста.
11. После извлечения орешков прибор можно снова заполнять тестом. Контрольная лампа
опять погаснет.
12. Чтобы изготовить следующую порцию орешков, закройте прибор и ждите, когда погас-
нет контрольная лампа. Повторяйте действия с 1 по 12 пока не израсходуете все тесто.
13. Остудите готовые орешки, прежде чем продолжить их приготовление. Орешки заполня-
ются начинкой по желанию, а края их половинок также смазываются начинкой. В завер-
шении две половинки соединяются, образуя один орешек.
14. После выпечки извлечь сетевой штекер. Прибор отключается только после этого.
Внимание: Даже после отключения прибор длительное время остается горячим! Опасность получения ожога!
ЧИСТКА И УХОД
Перед чисткой следует всегда выключать прибор, извлекая штекер из розетки.
Прежде чем начинать чистку, дайте прибору остыть.
1. Нельзя погружать прибор в воду или другую жидкость.
2. Еще теплые поверхности форм для выпечки протрите влажной тканью или используйте
мягкую щетку для очистки углублений.
3. Никогда не используйте острые или твердые предметы. В противном случае Вы
поцарапаете антипригарное покрытие.
4. Кроме того, не используйте острые и абразивные вещества, стальное волокно,
металлические предметы, горячие чистящие средства или средства для дезинфекции,
поскольку это может привести к повреждениям.
5. Прибор должен полностью просохнуть прежде чем использоваться повторно.
6. Для компактного хранения прибор можно поставить вертикально.
67

РЕЦЕПТЫ „ВОЛШЕБНЫХ ОРЕШКОВ“
Copyright UNOLD AG | www.unold.de
Волшебные орешки, также известные как орешки – это русское лакомство. Они могут быть
приготовлены как со сладкой, так и с пикантной начинкой. Половинки орешков выпекаются в
орешнице, затем начиняются и соединяются, образуя целый орешек. При этом варианты при-
готовления ограничены только пределами Вашей фантазии, к тому же как в изданиях с рецеп-
тами, так и в интернете Вы найдете массу вариаций.
Сладкие орешки
Базовый рецепт
250 г сливочного масла, 2 яйца, 1 упаковка
ванильного сахара, 100 г сахара, 400 г муки
типа 405, 50 г крахмала, 2 щепотки разрых-
лителя (на кончике ножа)
Ореховые или миндальные волшебные
орешки
250 г сливочного масла, 2 яйца, 1 упаковка
ванильного сахара, 100 г сахара, 100 г из-
мельченных орехов или миндаля (на выбор),
1 бутылочка пекарного ароматизатора „горь-
кий миндаль”, 400 г муки типа 405, 2 щепотки
разрыхлителя (на кончике ножа)
Апельсиновые волшебные орешки
250 г сливочного масла, 2 яйца, 1 упаков-
ка ванильного сахара, 100 г сахара, 50 г на-
тертой апельсиновой цедры, 1 бутылочка
пекарного ароматизатора „апельсин”, 400 г
муки типа 405, 2 щепотки разрыхлителя (на
кончике ножа)
Цельнозерновые волшебные орешки
250 г сливочного масла, 2 яйца, 1 яичный бе-
лок, сердцевина стручка ванили, 120 г меда,
1 щепотка соли, 400 г цельнозерновой спель-
ты, 1 ч. л. разрыхлителя (без горки)
Пикантные волшебные орешки
Томатные волшебные орешки
250 г сливочного масла, 2 яйца, 1 упаковка
томатной пасты (в виде порошка), ¼ ч. л. по-
рошка чили, 2 ст. л. приправы для брускетты,
½ ч. л. соли, 450 г муки типа 405, 2 щепотки
разрыхлителя (на кончике ножа)
Пикантные волшебные орешки
250 г сливочного масла, 2 яйца, 2 ½ ст. л.
сухого овощного бульона в гранулах, 450 г
муки типа 405, 50 г крахмала, 2 щепотки раз-
рыхлителя (на кончике ножа)
Волшебные орешки с зеленью
250 г сливочного масла, 2 яйца, 1 ст. л. су-
шеной черемши, 1 стакан соуса песто с ба-
зиликом (190 г), 500 г пшеничной цельно-
зерновой муки, 2 щепотки разрыхлителя (на
кончике ножа)
Приготовление
Из указанных ингредиентов заместите тесто.
Поставьте тесто на холод примерно на 1 час.
Сформируйте маленькие шарики (прибл.
1,5-2 см в диаметре). Для этого вы так же
можете использовать нож для фруктовых
шариков. Возможно, в начале потребует-
ся сделать несколько попыток, чтобы точ-
но определить правильный размер шарика.
Положите шарики в прибор, закройте его и
68

выпекайте волшебные орешки примерно 3
Copyright UNOLD AG | www.unold.de
минуты до получения нужной степени под-
румянивания. Когда орешки испекутся, возь-
мите прибор за обе рукоятки, откройте и
вытряхните орешки на противень. После ох-
лаждения испеченных орешков следует об-
резать излишки теста, образовавшиеся вна-
чале. Вы также можете напечь орешков про
запас. Их можно хранить некоторое время в
герметично закрытом контейнере.
Пожалуйста, не используйте свежую зелень,
поскольку в ней содержится слишком много
влаги, что может привести к размягчению и
порче орешков.
Сладкие начинки для волшебных ореш-
ков
Для приготовления начинки смешайте ука-
занные ингредиенты друг с другом.
Чтобы корзиночка оставалась хрустящей,
пожалуйста, заполняйте ее начинкой непо-
средственно перед подачей.
Начинка из нуги
200 г крема из ореховой нуги, 200 г сливоч-
ного сыра
Пикантные начинки для волшебных
орешков
Для приготовления начинки хорошо смешай-
те указанные ингредиенты друг с другом.
Вы можете начинить орешки готовыми са-
латами, напр., мясным салатом, салатом из
курицы, венгерским салатом Puszta или яич-
ным салатом.
Начинка из копченого лосося
100 г копченого лосося, 200 г сливочного
сыра, 1 ч. л. сметаны с хреном
Измельчить и перемешать все ингредиенты,
напр., при помощи блендера „волшебная
палочка” ESGE-Zauberstab
®
или
измельчителя-терки ESGE-Zauberette®.
Вместо копченого лосося можно так же
использовать копченое филе форели или
тунец в масле.
Сырная начинка
100 г тонко измельченного эмментальско-
го сыра, 150 г сливочного сыра с зеленью, 1
ст. л. вишневой наливки (альтернатива: 150
г сливочного сыра без добавок и 10 коктей-
льных вишен)
Начинка из яичного ликера
100 мл яичного ликера, 1 упаковка ваниль-
ного сахара, 100 мл сладких сливок, 1 упа-
ковка ванильного крема Paradies Vanille
Начинка из малины
100 мл сладких сливок, 1 ст. л. сахара, 1 упа-
ковка закрепителя для сливок
Взбить сливки в густую пену и аккуратно
вмешать 200 г свежей малины.
Начинка из ветчины
100 г сырокопченой ветчины, 200 г сливочно-
го сыра с зеленью, 1 ч. л. сметаны с хреном
Начинка из камамбера
2 ст. л. брусничного джема, 100 г мягкого ка-
мамбера, 200 г сливочного сыра
69

Рецепты в данном руководстве, были тщательно взвешены и рассмотрены авторами и
Copyright UNOLD AG | www.unold.de
UNOLD AG, но нет никакой гарантии, могут быть взяты. Ответственность авторов или UNOLD
AG и его агентов для личных, имущественных и финансовых убытков.
ГАРАНТИЯ
Мы предоставляем на наших устройствах в течение 24 месяцев, с учетом активного профессионального использования 12 месяцев с даты покупки о возмещении ущерба может быть доказана для использования по назначению на заводской
дефект. В течение гарантийного срока мы ремонтируем материала и производственные дефекты, по нашему усмотрению путем ремонта или замены. Наша гарантия распространяется только на продукты, продаваемые в Германии и Австрии
устройств. Для других стран, пожалуйста, свяжитесь с ответственным импортером.
Устройства, для которых исправительные утверждал, отправить вместе с копией
машинного производства доказательством покупки даты покупки должны быть четкими и описанием ошибки хорошо упакованы и освободила нашу службу. В случае
гарантии клиент в Германии и Австрии в результате чего транспортные расходы
возмещены. Гарантия не распространяется на повреждения вследствие износа,
неправильного обращения и несоблюдения инструкции по техническому обслуживанию и уходу. Истекает гарантийный срок, если необходимо предпринять ремонт
или вмешательства со стороны третьих лиц. Любые претензии потребителя против
продавца или дилера не будет зависеть от этой гарантии.
УТИЛИЗАЦИЯ / ОХРАНЕ ОКРУЖАЮЩЕЙ СРЕДЫ
Наши приборы производятся на высоком уровне качества в течение
длительного периода эксплуатации. Регулярное техническое обслуживание и ремонт экспертов по нашим обслуживанием клиента может
продлить срок службы устройства. Если устройство неисправен и не
подлежит ремонту, обратите внимание: этот продукт нельзя утилизировать вместе с обычными бытовыми отходами. Вы должны доставить
этот продукт в назначенный пункт сбора для утилизации электрического и электронного оборудования. Раздельный сбор и переработка отходов вы помочь сохранить природные ресурсы и гарантировать, что
продукт в области здравоохранения и экологически безопасным образом утилизируется.
70

Weitere Informationen zu unserem Sortiment erhalten Sie unter www.unold.de
Copyright UNOLD AG | www.unold.de
71

Copyright UNOLD AG | www.unold.de
Impressum:
Bedienungsanleitung Modell 48360
Stand: April 2018 /nr
Copyright ©
Mannheimer Straße 4
68766 Hockenheim
Telefon +49 (0) 62 05/94 18-0
Telefax +49 (0) 62 05/94 18-12
E-Mail info@unold.de
Internet www.unold.de
Aus dem Hause
 Loading...