

Page 1
Bedienungsanleitung
Instructions for use | Notice d´utilisation
Gebruiksaanwijzing | Istruzioni per l’uso
Instrucciones de uso | Návod k obsluze
Instrukcja obsługi
Modell 38650
DAMPFGARER MINI ALLROUND
Copyright UNOLD AG | www.unold.de
Page 2

Impressum:
Copyright UNOLD AG | www.unold.de
Bedienungsanleitung Modell 38650
Stand: August 2016 /nr
Copyright ©
Mannheimer Straße 4
68766 Hockenheim
Telefon +49 (0) 62 05/94 18-0
Telefax +49 (0) 62 05/94 18-12
E-Mail info@unold.de
Internet www.unold.de
Page 3

Copyright UNOLD AG | www.unold.de
Page 4

INHALTSVERZEICHNIS
Copyright UNOLD AG | www.unold.de
Bedienungsanleitung Modell 38650
Technische Daten ................................... 10
Symbolerklärung ..................................... 10
Sicherheitshinweise ................................ 10
Vor dem ersten Gebrauch......................... 14
Eier garen .............................................. 14
Eierstich herstellen ................................. 16
Dampfgaren ........................................... 17
Reinigen und Pflegen .............................. 19
Rezepte ................................................. 20
Garantiebestimmungen ........................... 23
Entsorgung / Umweltschutz ..................... 23
Informationen für den Fachhandel ............ 23
Service-Adressen .................................... 24
Instructions for use Model 38650
Technical Specifications .......................... 25
Explanation of symbols ............................ 25
Important Safeguards .............................. 25
Before using the appliance for the
first time................................................ 29
Cooking eggs .......................................... 29
Making custard royale ............................ 30
Steam cooking........................................ 31
Cleaning and care ................................... 33
Recipes ................................................. 33
Guarantee Conditions .............................. 36
Waste Disposal / Environmental Protection 36
Service .................................................. 24
Notice d’utilisation modèle 38650
Spécification technique .......................... 37
Explication des symboles ......................... 37
Consignes de sécurité ............................. 37
Avant la première utilisation .................... 41
Cuire des œufs ....................................... 41
Préparer des œufs à la royale ................... 42
Cuisson vapeur ....................................... 43
Nettoyage et entretien ............................. 45
Recettes ................................................ 46
Conditions de Garantie ............................ 48
Traitement des déchets /
Protection de l’environnement .................. 48
Service .................................................. 24
Gebruiksaanwijzing model 38650
Technische gegevens .............................. 49
Verklaring van de symbolen ...................... 49
Veiligheidsvoorschriften ........................... 49
Vóór het eerste gebruik ............................ 53
Eieren gaar maken .................................. 53
Bouillon met ei maken ............................ 54
Stoomgaren ............................................ 55
Reinigen en onderhouden ........................ 56
Recepten ............................................... 57
Garantievoorwaarden ............................... 59
Verwijderen van afval /
Milieubescherming ................................. 59
Service .................................................. 24
Page 5
INHALTSVERZEICHNIS
Copyright UNOLD AG | www.unold.de
Istruzioni per l’uso modello 38650
Dati tecnici ........................................... 60
Significato dei simboli ............................ 60
Avvertenze di sicurezza ........................... 60
Prima del primo utilizzo .......................... 64
Cottura di uova ....................................... 64
Preparazione della royale ......................... 65
Cottura a vapore ..................................... 66
Pulizia e cura ......................................... 68
Ricette .................................................. 68
Norme die garanzia ................................. 70
Smaltimento / Tutela dell’ambiente .......... 70
Service .................................................. 24
Manual de Instrucciones modelo 38650
Datos técnicos ....................................... 71
Explicación de los símbolos ..................... 71
Indicaciones de seguridad ....................... 71
Antes del primer uso ............................... 75
Cocer huevos .......................................... 75
Preparar „Eierstich“ ............................... 76
Cocción al vapor ..................................... 77
Limpieza y cuidado ................................. 79
Recetas ................................................. 79
Condiciones de Garantia .......................... 81
Disposición/Protección del
medio ambiente ..................................... 81
Service .................................................. 24
Návod k obsluze model 38650
Technické údaje .................................... 82
Vysvětlení symbolů .................................. 82
Bezpečnostní pokyny ............................... 82
Před prvním použitím .............................. 85
Vaření vajec ........................................... 86
Příprava vaječného svítku ........................ 87
Dušení ................................................... 87
Čištění a péče ........................................ 89
Recepty ................................................. 89
Záruční podmínky ................................... 91
Likvidace / Ochrana životného prostředí ... 91
Service .................................................. 24
Instrukcja obsługi Model 38650
Dane techniczne ..................................... 92
Objaśnienie symboli ................................ 92
Zasady bezpieczeństwa ........................... 92
Przed pierwszym użyciem ........................ 96
Gotowanie jajek ...................................... 96
Przyrządzanie jajka lanego ....................... 97
Gotowanie na parze ................................. 98
Czyszczenie i pielęgnacja ........................ 99
Przepisy ................................................. 100
Warunki gwarancji................................... 102
Utylizacja / ochrona środowiska ................ 102
Service .................................................. 24
Page 6
EINZELTEILE
Copyright UNOLD AG | www.unold.de
1
2
3
4
8
6
5
6
10
9
7
Page 7

EINZELTEILE
Copyright UNOLD AG | www.unold.de
D Ab Seite 10
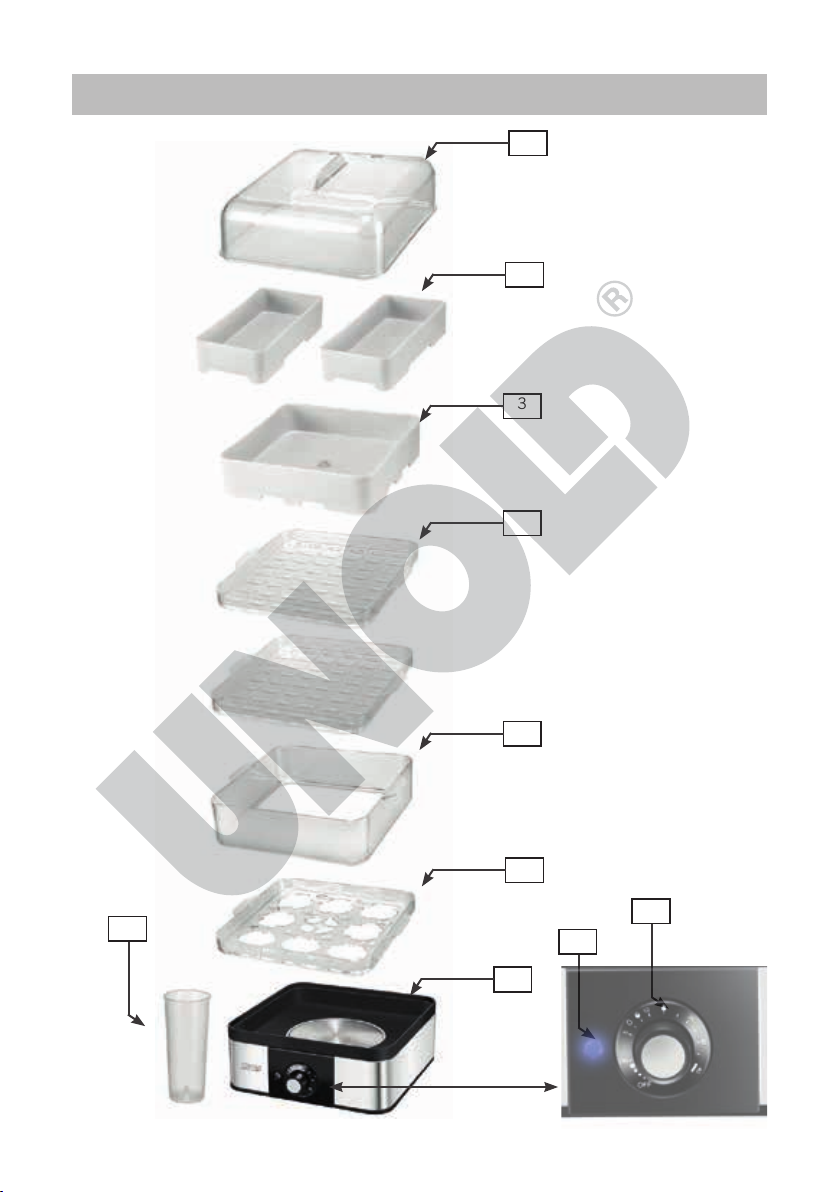
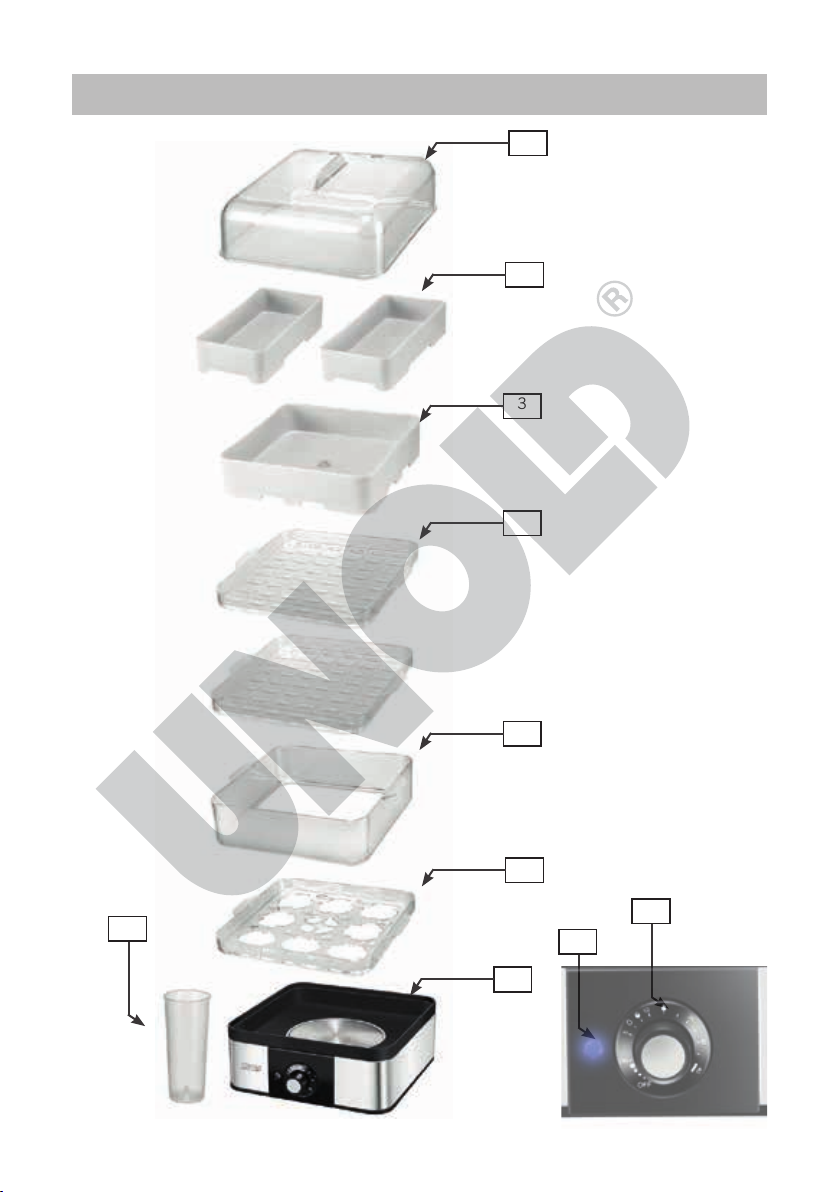
1 Deckel
2 2 kleine Garschalen
3 Garschale
4 Gareinsatz 2 x
5 Rahmen
6 Eiereinsatz
7 Sockel mit Kochschale und
Heizplatte
8 Messbecher
9 Kontrollleuchte
10 Drehregler
GB Page 25
1 Lid
2 2 small cooking trays
3 Tray
4 Cooking insert 2 x
5 Frame
6 Egg insert
7 Base with cooking tray and
heating plate
8 Measuring cup
9 Indicator light
10 Control dial
F Page 37
1 Couvercle
2 2 petites coupelles de cuisson
3 Coupelle à riz
4 Panier vapeur 2 x
5 Châssis
6 Cuit-œufs
7 Socle avec bac de cuisson et
plaque chauffante
8 Verre doseur
9 Voyant de contrôle
10 Bouton de réglage rotatif
NL Pagina 49
1 Deksel
2 2 kleine gaarschalen
3 Rijstschaal
4 Gaarinzetelement 2 x
5 Frame
6 Ei-inzetelement
7 Sokkel met kookschaal en
verwarmingsplaat
8 Maatbeker
9 Controlelamp
10 Draaiknop
7
Page 8
EINZELTEILE
Copyright UNOLD AG | www.unold.de
1
2
3
4
8
8
5
6
10
9
7
Page 9
EINZELTEILE
Copyright UNOLD AG | www.unold.de
I Pagina 60
1 Coperchio
2 2 vaschette di cottura piccole
3 Vaschetta per riso
4 Inserto di cottura 2 x
5 Telaietto
6 Portauova
7 Base con vaschetta di cottura e
piastra riscaldante
8 Misurino
9 Spia di controllo
10 Selettore rotante
E Página 71
1 Tapa
2 2 cuencos pequeños para
cocción
3 Cuenco para arroz
4 Cestillo 2 x
5 Marco
6 Accesorio para huevos
7 Base con cuenco para cocción y
placa calentadora
8 Vaso medidor
9 Piloto luminoso
10 Regulador giratorio
CZ Strany 82
1 Kryt
2 2 malé varné misky
3 Miska na rýži
4 Varná vložka 2 x
5 Rám
6 Vložka na vejce
7 Podstavec s varnou miskou a
topnou deskou
8 Odměřovací nádoba
9 Kontrolka
10 Otočný regulátor
PL Strony 92
1 Pokrywa
2 2 małe pojemniki do gotowania
na parze
3 Pojemnik na ryż
4 Wkład do gotowania na parze 2 x
5 Ramka
6 Wkład na jajka
7 Podstawa z pojemnikiem na wodę
i płytą grzejną
8 Kubek z miarką
9 Lampka kontrolna
10 Regulator obrotowy
9
Page 10
BEDIENUNGSANLEITUNG MODELL 38650
Copyright UNOLD AG | www.unold.de
TECHNISCHE DATEN
Leistung: 400 W, 220–240 V~, 50/60 Hz
Gehäuse: Kunststoff
Deckel: Kunststoff
Abmessungen: Ca. 19,0 x 19,0 x 24,5 cm (L/T/H)
Zuleitung: Ca. 60 cm
Gewicht: Ca. 1,1 kg
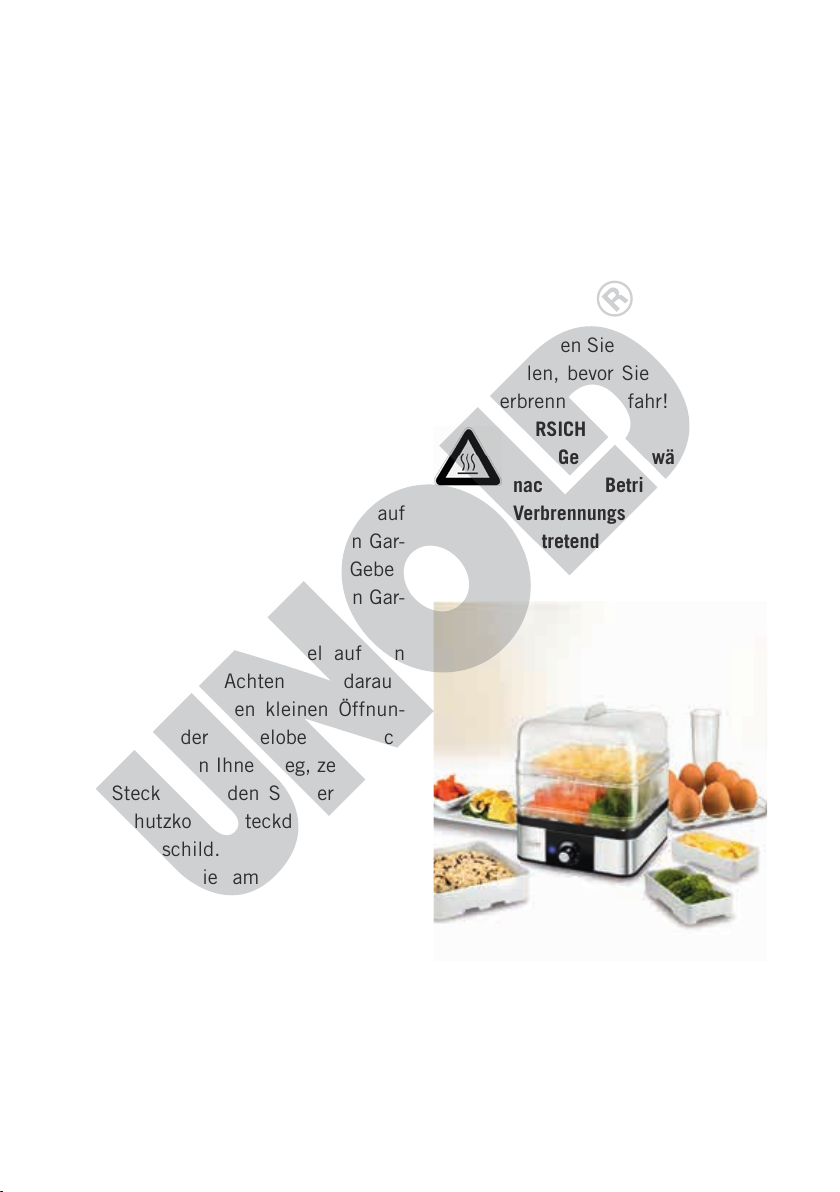
Ausstattung . Wahlweise für das Garen von bis zu 8 Eiern oder als Dampfgarer
für Fisch, Gemüse usw. einsetzbar, Überhitzungsschutz,
Kochstopp mit Abschaltautomatik, Kontrollleuchte, maximales
Fassungsvermögen 350 ml Wasser
Zubehör: 2 Gareinsätze, Eiereinsatz, Messbecher mit Eierstecher,
Garschale, 2 kleine Garschalen, Bedienungsanleitung
Änderungen und Irrtümer in Ausstattungsmerkmalen, Technik, Farben und Design
vorbehalten
SYMBOLERKLÄRUNG
Dieses Symbol kennzeichnet eventuelle Gefahren, die Verletzungen
nach sich ziehen können oder zu Schäden am Gerät führen.
Dieses Symbol weist Sie auf eine eventuelle Verbrennungsgefahr hin.
Gehen Sie hier immer besonders achtsam vor.
SICHERHEITSHINWEISE
Bitte lesen Sie die folgenden
Anweisungen und bewahren Sie
diese auf.
Allgemeine Sicherheitshinweise
1. Das Gerät kann von Kindern
ab 8 Jahren und von Per
sonen mit verringerten physischen, sensorischen oder
10
mentalen Fähigkeiten oder
Mangel an Erfahrung und/
oder W
issen benutzt wer
den, wenn sie beaufsichtigt werden oder bezüglich
-
des sicheren Gebrauchs des
Gerätes unterwiesen wurden
und die daraus resultieren
-
Page 11
den Gefahren verstanden
Copyright UNOLD AG | www.unold.de
haben. Das Gerät ist kein
Spielzeug. Das Säubern und
die Wartung des Geräts dür
fen von Kindern nur unter
Aufsicht durchgeführt werden.
2.
Kinder unter 3 Jahren sollten
dem Gerät fernbleiben oder
durchgehend beaufsichtigt
werden.
3. Kinder zwischen 3 und 8
Jahren sollten das Gerät nur
dann ein- und ausschalten,
wenn es sich in seiner vor
gesehenen normalen Bedie-
nungsposition befindet, sie
beaufsichtigt werden oder
bezüglich des sicheren
Gebrauchs unterwiesen wur
-
den und die daraus resultie-
renden Gefahren verstanden
haben. Kinder zwischen 3
und 8 Jahren sollten das
Gerät weder anschließen
noch bedienen, säubern oder
warten.
4.
VORSICHT - Teile dieses
Produkts können sehr heiß
werden und Verbrennungen
verursachen! Seien Sie bei
Anwesenheit von Kindern
und gefährdeten Personen
besonders vorsichtig.
5. Kinder sollten beaufsichtigt
werden, um sicherzustellen,
dass sie nicht mit dem Gerät
spielen.
6. Das Gerät an einem für Kin
der unzugänglichen Ort aufbewahren.
7.
Das Gerät ist ausschließlich
für den Haushaltsgebrauch
oder ähnliche Verwendungs
zwecke bestimmt, z. B.
Teeküchen in Geschäf-
ten, Büros oder sonstigen
Arbeitsstätten,
landwirtschaftliche Betriebe,
zur Verwendung durch Gäste
in Hotels, Motels oder sons
tigen Beherbergungsbetrieben,
in Privatpensionen oder
Ferienhäusern.
8. Öffnen Sie auf keinen Fall
das Gehäuse des Gerätes. Es
besteht Gefahr durch Strom
-
schlag.
9.
Prüfen Sie regelmäßig
das Gerät, den Stecker
und die Zuleitung auf Ver
schleiß oder Beschädigungen. Bei Beschädigung des
Anschlusskabels oder anderer Teile senden Sie das Gerät
oder den Sockel bitte zur
Überprüfung und Reparatur
an unseren Kundendienst.
Unsachgemäße Reparatu
ren können zu erheblichen
Gefahren
für den Benut-
11
Page 12

zer führen und haben den
Copyright UNOLD AG | www.unold.de
Ausschluss der Garantie zur
Folge.
10. Wenn die Anschlussleitung
dieses Gerätes beschädigt
wird, muss sie durch den
Hersteller oder seinen Kun
dendienst oder eine ähnlich
qualifizierte Person ersetzt
werden, um Gefährdungen
zu vermeiden.
Sicherheitshinweise zum sicheren
Aufstellen und Betrieb des Gerätes
11.
Aus hygienischen Gründen
müssen Eier, die mit dem
Eierstecher angestochen
werden, sofort gekocht wer
-
den. Wenn Sie diese Eier
nicht sofort verwenden kön-
nen, entsorgen Sie die Eier
bitte.
12.
Gerät nur an Wechselstrom
mit Spannung gemäß Typen
-
schild anschließen.
13.
Dieses Gerät darf nicht mit
einer externen Zeitschaltuhr
oder einem Fernbedienungs
system betrieben werden.
14.
Tauchen Sie das Gerät oder
die Zuleitung keinesfalls in
Wasser oder andere Flüssig
keiten ein.
15.
Der Sockel darf nicht mit
Wasser oder anderen Flüs
sigkeiten in Kontakt kommen. Falls dies doch einmal
geschehen
sollte, muss er
erneuter Benutzung voll
vor
-
kommen trocken sein.
16.
Der Sockel darf nicht in der
Spülmaschine gereinigt wer
-
den.
17.
Das Gerät bzw. die Zuleitung
niemals mit nassen Händen
berühren.
18. Stellen Sie das Gerät aus
Sicherheitsgründen niemals
auf heiße Oberflächen, ein
Metalltablett oder auf einen
nassen Untergrund.
19. Das Gerät oder die Zuleitung
dürfen nicht in der Nähe von
Flammen betrieben werden.
20. Verwenden Sie bitte zum
elektrischen Anschluss des
Gerätes keine Mehrfach
steckdosen – Brandgefahr.
W
enn Sie ein Verlängerungs-
kabel
verwenden, prüfen Sie,
ob dieses intakt ist und für
die entsprechende Leistung
geeignet ist, da es sonst zu
Überhitzung kommen kann.
21.
Verwenden Sie das Gerät
nicht an einer Steckdose
ohne Schutzleiter. Las
sen Sie im Zweifelsfall die
elektrische Hausinstallation
durch einen Fachmann prü
fen.
22.
Benutzen Sie das Gerät stets
auf einer freien, ebenen und
hitzebeständigen Oberflä
che.
12
Page 13
23. Achten Sie darauf, dass
Copyright UNOLD AG | www.unold.de
die Zuleitung nicht über
den Rand der Arbeitsflä
che hängt, da dies zu Unfällen führen kann, wenn z. B.
Kleinkinder daran ziehen.
24.
Die Zuleitung muss so verlegt
sein, dass ein Ziehen oder
Stolpern verhindert wird.
25. Wickeln Sie die Zuleitung nie
um das Gerät, sondern um
die dafür vorgesehene Kabe
laufbewahrung am Boden
des Sockels.
26.
Ziehen Sie die Zuleitung
immer nur am Anschluss-
stecker aus der Steckdose,
nie am Anschlusskabel.
27. Tragen Sie den Sockel nicht
am Anschlusskabel.
28. Verwenden Sie das Gerät nur
in Innenräumen.
29. Benutzen Sie das Gerät nie in
der Nähe brennbarer Materi
alien wie z. B. Vorhänge,
außerdem nicht im Backofen
oder der Mikrowelle.
30.
Stellen Sie sicher, dass der
Deckel des Gerätes stets fest
geschlossen ist, um Verlet
zungen durch heiße Wasserspritzer zu vermeiden.
31.
Vermeiden Sie eine Überfül-
lung des Behälters.
32.
Verwenden Sie die Dämpf-
Funktion nur zum Dämpfen
von Lebensmitteln.
33. Betreiben Sie das Gerät
nie, ohne ausreichend Was
ser eingefüllt zu haben, um
Schäden am Gerät zu vermeiden.
34.
Stellen Sie sicher, dass
allen Benutzern, insbeson
dere Kindern, die Gefahr
durch aus-tretenden Dampf
oder heiße Wasserspritzer
bekannt ist – Verbrennungs
gefahr!
35.
Die Oberfläche des Deckels
wird während des Betriebes
heiß. Benutzen Sie daher
ggf. Topflappen.
36. Verschieben Sie das Gerät
nicht, solange es in Betrieb
ist, um Verbrühungen durch
herausspritzendes Wasser zu
vermeiden.
37. Das Gerät darf nicht mit
Zubehör anderer Hersteller
oder Marken benutzt wer
den, um Schäden zu vermeiden.
38.
Nach Gebrauch sowie vor
dem Reinigen den Netzste
cker aus der Steckdose ziehen. Das Gerät niemals unbeaufsichtigt lassen, wenn der
Netzstecker eingesteckt ist.
39.
Lassen Sie das Gerät vor
dem Reinigen abkühlen.
13
Page 14
VORSICHT:
Copyright UNOLD AG | www.unold.de
Das Gerät wird während des Betriebs sehr heiß!
Verbrennungsgefahr durch austretenden Dampf!
Öffnen Sie auf keinen Fall das Gehäuse des Gerätes. Es besteht
die Gefahr eines Stromschlages.
Der Hersteller übernimmt keine Haftung bei fehlerhafter Montage, bei unsachgemäßer oder fehlerhafter
Verwendung oder nach Durchführung von Reparaturen durch nicht autorisierte Dritte.
VOR DEM ERSTEN GEBRAUCH
1. Entfernen Sie alle Verpackungsmaterialien und ggf. Transportsicherungen. Halten Sie Verpackungsmaterialien von Kindern
fern – Erstickungsgefahr!
2. Reinigen Sie alle Teile mit einem
feuchten Tuch, wie im Kapitel
EIER GAREN
1. Stellen Sie sicher, dass das Gerät
ausgeschaltet ist und auf einer
ebenen, festen Oberfläche steht.
2. Den beiliegenden Messbecher mit
kaltem Wasser füllen und den
Inhalt in die Kochschale geben.
Achtung: Überfüllen Sie die Kochschale nicht, da sonst während
des Betriebs kochendes Wasser
herausspritzen kann – Verbrennungsgefahr! Es müssen mindestens 80 ml Wasser eingefüllt werden, maximal können 350 ml
Wasser eingefüllt werden.
„Reinigen und Pflegen“ beschrieben.
3. Prüfen Sie, ob das Gerät stabil
steht.
3. Hinweis: Das Gerät arbeitet mit
einer zeitlichen Steuerung des
Kochvorgangs, so dass das Wasser nicht pro Ei abgemessen werden muss.
4. Die Eier an der stumpfen Seite
einstechen, damit diese beim
Kochen nicht aufplatzen.
Achtung: Gefahr von Verletzungen durch den Eierstecher
5. Die Eier mit der stumpfen Seite
nach oben in den Eiereinsatz setzen.
14
Page 15
6. Den Eiereinsatz mit den Eiern
Copyright UNOLD AG | www.unold.de
auf die Kochschale stellen und
den Deckel aufsetzen. Achten Sie
darauf, dass die beiden kleinen
Öffnungen an der Deckeloberseite
nach hinten, von Ihnen weg, zeigen.
7. Stecken Sie den Stecker in eine
Schutzkontaktsteckdose gemäß
Typenschild.
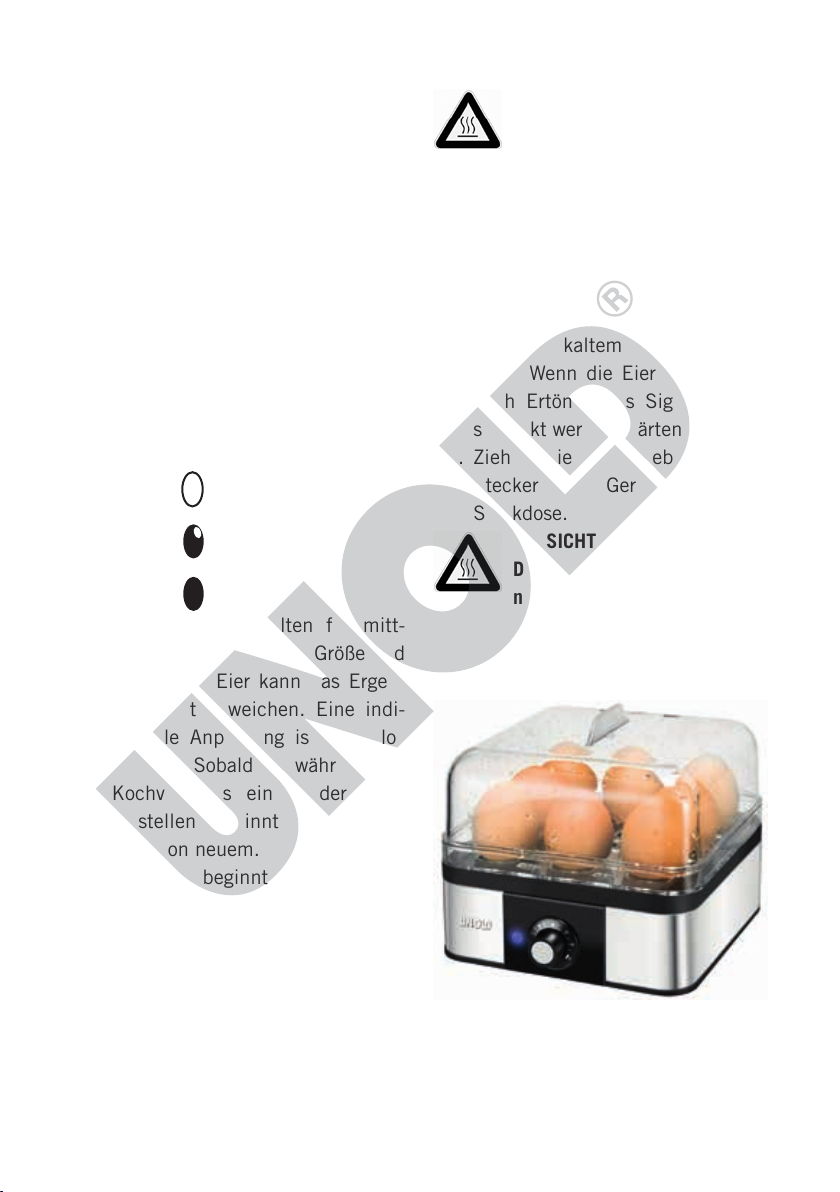
8. Den gewünschten Härtegrad am
Drehregler einstellen:
9. Die Symbole zeigen den jeweiligen Härtegrad an.
Weich
Mittel
Hart
10. Diese Angaben gelten für mitt-
lere Eigrößen. Je nach Größe und
Anzahl der Eier kann das Ergebnis leicht abweichen. Eine indi-
viduelle Anpassung ist stufenlos
möglich. Sobald Sie während des
Kochvorgangs eine andere Zeit
einstellen, beginnt der Kochvorgang von neuem.
11. Das Gerät beginnt zu heizen.
12. Sobald der Kochvorgang beendet
ist, ertönen mehrere Signaltone
und das Gerät schaltet sich aus.
13. Vergewissern Sie sich, dass der
Regler auf „OFF“ steht und heben
Sie den Deckel vorsichtig ab.
Vorsicht:
Achten Sie auf austretenden
Dampf!
14. Da der Deckel sehr heiß ist, bitte
nur an den Griffen anfassen und
nur auf hitzebeständige Oberflächen legen!
15. Den Eiereinsatz mit den Eiern von
der Kochschale nehmen und die
Eier unter kaltem Wasser abschrecken. Wenn die Eier nicht sofort
nach Ertönen des Signals abgeschreckt werden, härten sie nach.
16. Ziehen Sie nach Gebrauch den
Stecker des Gerätes aus der
Steckdose.
VORSICHT:
Das Gerät ist während und
nach dem Betrieb sehr heiß!
Verbrennungsgefahr durch
austretenden Dampf!
15
Page 16
EIERSTICH HERSTELLEN
Copyright UNOLD AG | www.unold.de
1. Sie können mit dem Gerät unter
anderem Eierstich herstellen.
2. Bereiten Sie die gewünschte Eierstichmasse vor.
3. Den beiliegenden Messbecher mit
kaltem Wasser füllen und den
Inhalt in die Kochschale geben.
Achtung: Überfüllen Sie die Kochschale nicht, da sonst während
des Betriebs kochendes Wasser
herausspritzen kann – Verbrennungsgefahr! Es müssen mindestens 80 ml Wasser eingefüllt werden, maximal können 350 ml
Wasser eingefüllt werden.
4. Setzen Sie den Eiereinsatz auf die
Kochschale.
5. Fetten Sie die beiden kleinen Gar-
schalen oder die große Reisschale
gut ein und geben Sie die Eimasse
hinein.
6. Setzen Sie die Garschalen auf den
Eiereinsatz und verschließen Sie
das Gerät mit dem Deckel. Achten Sie darauf, dass die beiden
kleinen Öffnungen an der Deckeloberseite nach hinten, von Ihnen
weg, zeigen.
7. Stecken Sie den Stecker in eine
Schutzkontaktsteckdose gemäß
Typenschild.
8. Wählen Sie die gewünschte Garzeit am Drehregler aus.
9. Wenn die Garzeit beendet ist,
ertönen mehrere Signaltöne und
das Gerät schaltet sich aus.
10. Vergewissern Sie sich, dass der
Regler auf „OFF“ steht und heben
Sie den Deckel vorsichtig ab.
Vorsicht:
Achten Sie auf austretenden
Dampf!
11. Da der Deckel sehr heiß ist, bitte
nur an den Griffen anfassen und
nur auf hitzebeständige Oberflächen legen!
12. Entnehmen Sie die Garschalen.
VORSICHT:
Das Gerät ist während und
nach dem Betriebs sehr heiß!
Verbrennungsgefahr durch
austretenden Dampf!
16
Page 17
DAMPFGAREN
Copyright UNOLD AG | www.unold.de
Tipp: Wenn Sie mehrere Gemüsesorten gleichzeitig zubereiten, stellen Sie die
Garzeit immer zunächst abgestimmt auf das Gemüse ein, welches schneller gar
ist. Entnehmen Sie dann das fertige Gemüse und stellen Sie die Garzeit auf das
verbliebene Gemüse ein.
1. Stellen Sie sicher, dass das Gerät
ausgeschaltet ist und auf einer
ebenen, festen Oberfläche steht.
2. Den beiliegenden Messbecher
komplett mit kaltem Wasser füllen
und den Inhalt in die Kochschale
geben. Achtung: Überfüllen Sie
die Kochschale nicht, da sonst
während des Betriebs kochendes
Wasser herausspritzen kann – Ver-
brennungsgefahr! Es müssen mindestens 80 ml Wasser eingefüllt
werden, maximal können 350 ml
Wasser eingefüllt werden.
3. Hinweis: Verwenden Sie zum
Dämpfen ausschließlich kaltes
Wasser. Die Verwendung anderer
Flüssigkeiten kann das Heizelement des Gerätes beschädigen.
4. Bereiten Sie die gewünschten
Lebensmittel vor und legen Sie
die Lebensmittel in den Gareinsatz.
5. Setzen Sie nun entweder den
Eieinsatz und den Rahmen ein
und platzieren Sie dann darauf
den Gareinsatz.
6. Je nach Zubereitung können Sie
aber auch die Lebensmittel in
die weißen Garschalen geben und
diese auf den Gareinsatz stellen.
Bitte hierbei immer erst die große
Garschale einsetzen und anschließend die beiden kleineren Schalen in die große Garschale einsetzen.
7. Setzen Sie den Deckel auf den
Gareinsatz. Achten Sie darauf,
dass die beiden kleinen Öffnungen an der Deckeloberseite nach
hinten, von Ihnen weg, zeigen.
8. Stecken Sie den Stecker in eine
Schutzkontaktsteckdose gemäß
Typenschild.
9. Wählen Sie am Drehregler die
gewünschte Garzeit aus. Es können maximal 40 Minuten eingestellt werden.
10. Nach Ablauf der gewählten Zeit
ertönt erneut ein Signalton und
das Gerät wird automatisch ausgeschaltet. Die Kontrollleuchte
erlischt.
11. Vergewissern Sie sich, dass der
Regler auf „OFF“ steht und heben
Sie den Deckel vorsichtig ab. Achten Sie auf austretenden heißen
Dampf – Verbrennungsgefahr!
12. Entnehmen Sie den Gareinsatz.
17
Page 18
13. Ziehen Sie nach dem Gebrauch
Copyright UNOLD AG | www.unold.de
des Gerätes den Netzstecker aus
der Steckdose.
14. Tipp: Lassen Sie das Gargut etwas
abkühlen, bevor Sie es verzehren
– Verbrennungsgefahr!
Oder: Garen auf zwei Ebenen
15. Bereiten Sie die gewünschten
Lebensmittel vor.
16. Geben Sie die eine Portion der
gewünschten Lebensmittel in die
beiden weißen Garschalen und
setzen Sie diese auf den Eiereinsatz im Gerät.
17. Stellen Sie den Rahmen darauf
und platzieren Sie dann den Gar-
einsatz auf dem Rahmen. Geben
Sie die zweite Portion in den Gar-
einsatz.
18. Setzen Sie den Deckel auf den
Gareinsatz. Achten Sie darauf,
dass die beiden kleinen Öffnun-
gen an der Deckeloberseite nach
hinten, von Ihnen weg, zeigen.
19. Stecken Sie den Stecker in eine
Schutzkontaktsteckdose gemäß
Typenschild.
20. Wählen Sie am Drehregler die
gewünschte Garzeit aus. Es können maximal 40 Minuten eingestellt werden.
21. Nach Ablauf der gewählten Zeit
ertönt erneut ein Signalton und
das Gerät wird automatisch ausgeschaltet. Die Kontrollleuchte
erlischt.
22. Vergewissern Sie sich, dass der
Regler auf „OFF“ steht und heben
Sie den Deckel vorsichtig ab. Achten Sie auf austretenden heißen
Dampf – Verbrennungsgefahr!
23. Entnehmen Sie den Gareinsatz.
24. Ziehen Sie nach dem Gebrauch
des Gerätes den Netzstecker aus
der Steckdose.
25. Tipp: Lassen Sie das Gargut etwas
abkühlen, bevor Sie es verzehren
– Verbrennungsgefahr!
VORSICHT:
Das Gerät ist während und
nach dem Betriebs sehr heiß!
Verbrennungsgefahr durch
austretenden Dampf!
18
Page 19

REINIGEN UND PFLEGEN
Copyright UNOLD AG | www.unold.de
Vor dem Reinigen Gerät
ausschalten und den Netzstecker ziehen.
Das Gerät abkühlen lassen
und Restwasser aus der Kochschale entleeren.
1. Das Gerät niemals in Wasser oder
andere Flüssigkeiten eintauchen.
2. Verwenden Sie keine scharfen
Scheuermittel, Stahlwolle, metallischen Gegenstände, heißen
Reinigungsmittel oder Desinfektionsmittel, da diese zu Beschädi-
gungen führen können.
3. Wischen Sie das Gehäuse sowie
die Kochschale mit einem feuch-
ten Tuch mit etwas mildem Reini-
gungsmittel ab und trocknen Sie
es mit einem weichen Tuch nach.
4. Reinigungsmittel nie direkt auf
das Gerät, sondern immer auf das
Tuch geben.
5. Deckel, Messbecher, Eiereinsatz,
Rahmen und Gareinsatz können
gespült und mit einem weichen
Tuch abgetrocknet werden. Diese
Teile können auch in der Spülmaschine gereinigt werden (oberer Korb bei schonendem Reinigungsprogramm).
6. Kalkrückstände in der Kochschale
können mit handelsüblichem Entkalker nach Herstelleranweisung
gelöst werden.
19
Page 20

REZEPTE
Copyright UNOLD AG | www.unold.de
Eierstich
3 Eier, 50 ml Milch, 50 ml Sahne,
nach Geschmack: Salz, Pfeffer,
geriebene Muskatnuss
Alle Zutaten mit einer Gabel oder einem
Schneebesen gut vermengen. Wir
raten dazu, hierfür kein elektrisches
Handrührgerät zu verwenden, um
Porenbildung zu vermeiden.
Die Masse, wie im Kapitel „Eierstich
herstellen“ beschrieben, im Gerät
zubereiten. Tipp: Geben Sie statt Salz
etwas Kräutersalz oder geriebenen
Parmesan in die Masse.
Gemüse dämpfen
Sie können frisches oder tiefgefrorenes
Gemüse verwenden. Tiefgefrorenes
Gemüse nicht auftauen, sondern
gefroren in den Garschale legen
und die Garzeit um ca. 5 Minuten
verlängern. Bei Gemüse mit festem
Strunk z.B. Brokkoli oder Rosenkohl
bitte den Strunk kreuzweise
einschneiden. Je nach Frische, Anbau,
Zuschnitt und Lagerung des Gemüses
und nach persönlichem Geschmack
(knackig oder weich) kann die Garzeit
kürzer oder länger sein. Beim Garen
von Gemüse auf keinen Fall Wein,
Zitronensaft, Essig o. Ä. zugeben.
Verfeinern Sie das Gemüse bitte erst
nach dem Dünsten.
Tipp für eine leichte Grundsauce zu
Gemüse
1 EL Butter, 1 kleine Zwiebel,
125 ml trockener Weißwein, 125 ml
Gemüsebrühe, 3 EL Crème fraîche,
Salz, weißer Pfeffer
Zwiebel putzen und fein würfeln, in
Butter anschwitzen und mit Wein
und Brühe ablöschen. 5-7 Minuten
einkochen lassen. Crème fraîche
einrühren. Besonders luftig wird
die Sauce, wenn Sie diese mit dem
ESGE Zauberstab
®
mit Quirlscheibe
aufschäumen. Mit Salz und Pfeffer
abschmecken und sofort servieren.
Fleisch
Tipp: Sie können im Dampfgarer auch
problemlos Würstchen, Fleischwurst
oder vorgekochtes Fleisch wie
Kassler (in Scheiben von 1 cm Dicke)
aufwärmen.
Gedämpftes Kalbsfilet mit Gemüserahmsauce
250 g Kalbsfilet (Scheiben von
1-1,5 cm Stärke), einige Zweige
Estragon, Salz, Pfeffer, 50 g
Möhren, 50 g Sellerie, 50 g Lauch,
50 g Zucchini, 50 g festkochende
Kartoffeln, 15 g Butter, 15 g Mehl,
25 ml trockener Weißwein, 60 ml
Kalbsfonds, 100 ml Sahne, Salz,
Pfeffer
20
Page 21

Wasser in das Gerät füllen, Rahmen
Copyright UNOLD AG | www.unold.de
aufsetzen. Die Filetscheiben
bestreuen und mit Salzkartoffeln
servieren.
zusammen mit dem Estragon auf den
Gareinsatz setzen und im Gerät ca. 15
Minuten garen. Nach dem Garzeitende
warm halten.
In der Zwischenzeit das Gemüse
putzen und in sehr kleine Würfelchen
schneiden. Die Butter in einem Topf auf
dem Herd zerlassen und das Gemüse
darin anschwitzen. Das Gemüse mit
Mehl bestäuben und den Kalbsfonds
zusammen mit dem Weißwein und der
Sahne unter Rühren angießen. Einige
Minuten reduzieren lassen und mit
Das oben genannte Fischrezept ist nur
eine Anregung aus Neptuns Reich.
Gedämpfter Fisch lässt sich mit feinen
Saucen immer wieder anders servieren.
Neben den im Handel erhältlichen
Fertigsaucen kann man jedoch viele
Saucen schnell und frisch zubereiten.
Die nachfolgenden Rezepte basieren
alle auf einer hellen Grundsauce. Bitte
bereiten Sie diese Saucen in einem
Topf auf dem Herd zu, auf keinen Fall
im Dampfgarer.
Salz und Pfeffer abschmecken.
Kalbsfilet mit der Gemüsesauce
anrichten. Dazu schmecken frischer
Stangenspargel und junge Kartoffeln.
Helle Grundsauce
30 g Butter (2 EL), 30 g Mehl (2 EL),
125 ml Gemüsebrühe, 125 ml Milch,
Salz, Pfeffer, Muskat
Seelachs mit Gemüsegarnitur
1 Seelachsfilets à 150 g, 1 mittelgroße
Möhre, 1/2 kleine Zucchini, 1/2
kleiner Kohlrabi, 1/4 Zitrone, Pfeffer,
Salz, Muskat, gehackte Petersilie
Möhren und Kohlrabi waschen und
schälen, Zucchini waschen. Gemüse
in ca. 3 mm dicke Streifen hobeln
Butter in einem kleinen Topf auf
dem Herd zerlassen, Mehl zugeben
und verrühren. Hitze reduzieren.
Nach und nach unter ständigem
Rühren mit kalter Brühe und kalter
Milch aufgießen, 3 Minuten köcheln
lassen. Mit Salz, Pfeffer und Muskat
abschmecken.
(z.B. mit dem ESGE-Zauberstab®
und der ESGE Zauberette®). Gemüse
mischen und in den Gareinsatz legen.
Fischfilet waschen, trocken tupfen,
salzen und pfeffern, mit Zitronensaft
beträufeln. Etwas Muskat darüber
Zitronensauce
Eine helle Sauce zubereiten und
mit 2 EL Zitronensaft und evtl. 1 TL
fein abgeriebener Zitronenschale
abschmecken.
streuen. Fischfilet auf das Gemüse
setzen. Deckel schließen ca. 10
Minuten garen. Mit frischer Petersilie
Saucen zu gedämpftem Fisch
21
Page 22

Currysauce
Copyright UNOLD AG | www.unold.de
Eine helle Sauce zubereiten, dabei
jedoch die Milch durch Kokosmilch
ersetzen und 1 EL Currypulver sowie 2
EL Ananassaft zugeben.
Weinsauce
Eine helle Sauce zubereiten, dabei
jedoch die Milch durch trockenen
Weißwein ersetzen.
Die Rezepte in dieser Bedienungsanleitung wurden von den Autoren und von
der UNOLD AG sorgfältig erwogen und geprüft, dennoch kann keine Garantie
übernommen werden. Eine Haftung der Autoren bzw. der UNOLD AG und ihrer
Beauftragten für Personen-, Sach- und Vermögensschäden ist ausgeschlossen.
22
Page 23
GARANTIEBESTIMMUNGEN
Copyright UNOLD AG | www.unold.de
Wir gewähren auf unsere Geräte eine Garantie von 24 Monaten, bei gewerblichem Gebrauch 12 Monate, ab dem Kaufda-
tum für Schäden, die bei bestimmungsgemäßem Gebrauch nachweislich auf Werksfehler zurückzuführen sind. Innerhalb
der Garantiezeit beheben wir Material- und Herstellungsfehler nach unserem Ermessen durch Reparatur oder Umtausch.
Unsere Garantieleistungen gelten ausschließlich für in Deutschland und Österreich verkaufte Geräte. Bei anderen Ländern
wenden Sie sich bitte an den zuständigen Importeur. Geräte, für die eine Mängelbeseitigung beansprucht wird, senden Sie
bitte zusammen mit einer Kopie des maschinell erstellten Kauf belegs, aus dem das Kaufdatum ersichtlich sein muss, sowie
einer Fehlerbeschreibung gut verpackt und freigemacht an unseren Kundendienst. Im Garantiefall werden dem Kunden in
Deutschland und Österreich entstandene Versandkosten zurückerstattet. Von der Garantie ausgeschlossen sind Schäden
durch Verschleiß, unsachgemäße Handhabung und Nichteinhaltung der Wartungs- und Pflegeanweisungen. Der Garantiean-
spruch erlischt, wenn Reparaturen oder Eingriffe am Gerät von dritter Stelle vorgenommen werden. Eventuelle Ansprüche des
Endverbrauchers gegenüber dem Verkäufer oder Händler werden durch diese Garantie nicht eingeschränkt.
ENTSORGUNG / UMWELTSCHUTZ
Unsere Geräte werden auf hohem Qualitätsniveau für eine lange Nutzungsdauer her ge stellt. Regelmäßige
Wartung und fachge rechte Reparaturen durch unseren Kunden dienst können die Nutzungsdauer des Gerätes
verlängern. Wenn ein Gerät defekt und nicht mehr zu reparieren ist, beachten Sie bitte: Dieses Produkt darf
nicht zusammen mit dem normalen Hausmüll entsorgt werden. Sie müssen dieses Produkt an einer aus-
gewiesenen Sammelstelle zum Recycling von elektrischen oder elektronischen Geräten ab liefern. Durch das
separate Sammeln und Recyceln von Abfallprodukten helfen Sie mit, die natürlichen Ressourcen zu schonen
und stellen sicher, dass das Produkt in gesundheits- und umweltverträglicher Weise entsorgt wird.
INFORMATIONEN FÜR DEN FACHHANDEL
Hiermit erklärt die UNOLD AG, dass sich der Eierkocher 38650 in Übereinstimmung mit den
grundlegenden Anforderungen der europäischen Richtlinie für elektromagnetische Verträglichkeit
und der Niederspannungsrichtlinie bendet.
Die Übereinstimmung mit den Regularien bezieht sich auf den Tag der Erstellung dieser Erklärung.
Hockenheim, 4.8.2016
UNOLD AG, Mannheimer Straße 4, 68766 Hockenheim
Diese Anleitung kann im Internet unter www.unold.de als pdf-Datei heruntergeladen werden.
23
Page 24

SERVICE-ADRESSEN
Copyright UNOLD AG | www.unold.de
DEUTSCHLAND
Kundendienst
Telefon +49 (0) 62 05/94 18-27
Mannheimer Straße 4
68766 Hockenheim
Sie möchten innerhalb der Garantiezeit ein Gerät zur Reparatur einsenden? Auf unserer
Internetseite www.unold.de/ruecksendung können Sie sich einen Rücksendeschein ausdrucken,
um damit das Paket kostenlos bei der Post abzugeben (nur für Einsendungen aus Deutschland
und Österreich).
SCHWEIZ
MENAGROS AG
Hauptstr. 23
CH 9517 Mettlen
Telefon +41 (0) 71 6346015
Telefax +41 (0) 71 6346011
E-Mail info@bamix.ch
Internet www.bamix.ch
Telefax +49 (0) 62 05/94 18-22
E-Mail service@unold.de
Internet www.unold.de
POLEN TSCHECHIEN
Quadra-Net
Dziadoszanska 10
61-248 Poznań
Internet www.quadra-net.pl
24
befree.cz s.r.o.
Škroupova 150
537 01 Chrudim
Telefon +42 0 46 46 01 881
E-Mail obchod@befree.cz
Page 25
INSTRUCTIONS FOR USE MODEL 38650
Copyright UNOLD AG | www.unold.de
TECHNICAL SPECIFICATIONS
Power: 400 W, 220–240 V~, 50/60 Hz
Housing: Plastic
Lid: Plastic
Dimensions: approx. 19.0 x 19.0 x 24.5 cm (L/W/H)
Power cord: approx. 60 cm
Weight: approx. 1.1 kg
Features: Either for cooking up to 8 eggs or can be used as a steam cooker
for fish, vegetables, etc. overheating protection circuit, boildry protection with automatic shut-off, indicator light, maximum
capacity 350 ml water
Accessories: 1 cooking insert, egg insert, measuring cup with egg piercer, rice
tray, 2 small cooking trays, operating instructions
Equipment features, technology, colours and design are subject to change without
notice. Errors and omissions excepted
EXPLANATION OF SYMBOLS
This symbol denotes a possible hazard which could cause injury or damage to the appliance.
This symbol indicates a potential burning hazard. Please be especially
careful at all times here.
IMPORTANT SAFEGUARDS
Please read the following
instructions and keep them on
hand for later reference.
1. The appliance can be used
by children 8 years and older
and by persons with limited
physical, sensory or mental
abilities or with lack of expe
rience or limited knowledge,
if they are supervised by a
person who is responsible for
their safety or they have been
instructed with regard to safe
use of the appliance and
have understood the dangers
-
that can result from use of
25
Page 26

the appliance. The appliance
Copyright UNOLD AG | www.unold.de
is not a toy. Children should
only clean and maintain the
appliance under supervision.
2. Children under the age of 3
should stay away from the
appliance or they must be
under constant supervision.
3. Children between the ages of
3 and 8 should only switch
the appliance on and off
when it is in its normal
intended operating position,
they are supervised or have
been instructed relative to
safe use of the appliance
and have understood the
hazards that can result from
using the product. Children
between 3 and 8 years of
age should neither connect
or operate the appliance, nor
should they clean or main
-
tain the appliance.
4.
CAUTION – parts of this
product can become very hot
and cause burn injuries! Be
particularly careful if chil
dren or persons at risk are
present.
5.
Children should be super
vised to ensure that they do
not play with the appliance.
6.
Keep the appliance out of
the reach of children.
7. The appliance is intended
for household use only, or for
similar areas of use, such as,
kitchenettes in businesses,
offices or other workplaces,
agricultural enterprises,
for use by guests in hotels,
motels or other lodgings,
in private guest houses or
holiday homes.
8. Never open the housing of
the appliance. There is dan
-
ger due to electric shock.
9.
Check the appliance, the
plug and the power cord
regularly for wear or damage.
If there is damage to the
power cord or other parts,
please send the appliance or
the base for inspection and
repair to our customer service
organisation. Unauthorised
repairs can result in serious
hazards for the user and void
the warranty.
10. If the power cord of this
appliance is damaged, it
must be replaced by the
manufacturer or by the man
ufacturer’s customer service
organisation, or by a person
with similar qualifications,
to prevent hazards.
26
Page 27
Instructions for safe set-up and
Copyright UNOLD AG | www.unold.de
operation of the appliance
11. For hygienic reasons, eggs
that are pierced with the
egg piercer must be cooked
immediately. If you cannot
use these eggs immediately,
dispose of the eggs immedi
-
ately.
12.
Only connect the appliance
to an AC power supply with
voltage corresponding to the
voltage specified on the rat
-
ing plate.
13.
This appliance must not be
operated with an external
timer or a remote control
system.
14. Never immerse the appliance
or the power cord in water or
other liquids.
15. The base should never come
into contact with water or
other liquids. If this should
occur, the base must be
completely dry before oper
-
ating the appliance again.
16.
Do not clean the base in a
dishwasher.
17. Never touch the appliance or
power cord with wet hands.
18. For safety reasons, never
place the appliance on hot
surfaces, a metal tray or a
wet surface.
19. Do not place the appliance or
power cord near open flames
during operation.
20. Do not use any multiple
socket outlet for the electri
cal connection of the appliance – fire hazard. If you use
an extension cord, make sure
that it is intact and suitable
for the power draw of the
appliance; otherwise, there
is a possibility of overheat
ing.
21.
Do not use the appliance on
an electrical outlet without
circuit breaker. If in doubt,
have a specialist check the
household electrical connec
tion.
22.
Always use the appliance
on a level, uncluttered and
heat-resistant surface.
23. Ensure that the power cord
does not hang over the edge
of the counter top or table,
since this can cause acci
dents, for example if small
children pull on the cord.
24.
Route the power cord so that
there is no possibility of the
cord being pulled or tripped
over.
25. To unplug the appliance,
always pull on the plug,
never on the power cord.
27
Page 28
26. Never use the power cord to
Copyright UNOLD AG | www.unold.de
carry the base.
27. Only use the appliance
indoors.
28. Never use the appliance
in the vicinity of flamma
ble materials, such as Curtains, moreover do not use
the appliance in the oven or
the microwave.
29.
Make sure that the lid of
the appliance is always com
pletely closed, to prevent
injuries from hot splashing
water.
30.
Avoid overfilling the con
-
tainer.
31.
Only use the steam function
to steam food.
32. To prevent damage never
operate the appliance with
-
out having filled it with sufficient water.
33.
Make sure that all users,
especially children, are
aware of the danger of injury
from emerging steam or hot
splashing water – danger of
burns!
34. The surface of the lid
becomes hot during opera
tion. Consequently, use pot
holders if necessary.
Do not move the appliance
35.
as long as it is in opera
tion, to prevent burns from
splashing water
To avoid damage, do not use
36.
the appliance with accesso
.
ries of other manufacturers
or brands.
37.
Unplug the mains plug from
the electrical outlet after use
and before cleaning. Never
leave the appliance unat
tended when the mains plug
is plugged in.
38.
Allow the appliance to cool
before cleaning it.
CAUTION:
The appliance becomes extremely hot during operation! Danger
of burns due to escaping steam!
Never open the housing of the appliance. This can result in
electric shock.
The manufacturer will not be liable in the event of incorrect assembly, improper or incorrect use or if
repairs are carried out by unauthorized third parties.
28
Page 29
BEFORE USING THE APPLIANCE FOR THE FIRST TIME
Copyright UNOLD AG | www.unold.de
1. Remove all packaging materials
and any transport safeguards.
Keep packaging materials away
from children – danger of suffocation!
COOKING EGGS
1. Ensure that the appliance is
switched off and is standing on a
level, firm surface.
2. Fill the provided measuring cup
with cold water and pour the water
into the cooking tray. Caution:
Do not overfill the cooking tray,
otherwise boiling water can spray
out during operation – danger of
burns! At least 80 ml of water
must be poured in, the appliance
can hold a maximum of 350 ml
water.
3. Note: The appliance operates with
time control of the cooking, so
that the water per egg does not
need to be measured.
4. Pierce the eggs on the big end so
that they do not burst open during
cooking process.
Caution: Danger of injury due
to the egg piercer
5. Place the eggs in the egg insert
with the big end down.
6. Place the egg insert with the eggs
on the cooking tray and fit on the
2. Clean all parts with a damp
cloth, as described in the section
„Cleaning and care“.
3. Check to make sure that the appliance is stable.
lid. Ensure that the two small
openings on the top of the lid
are pointing to the rear, i.e. away
from you.
7. Plug the power cord into a
grounded electrical outlet as
specified on the rating plate.
8. Adjust the desired degree of hardness on the control dial:
9. The symbols indicate the respective degrees of hardness.
Soft
Medium
Hard
10. This information applies for
medium-size eggs. The result can
deviate slightly depending on the
size and number of eggs. Individual, variable adjustment is possible. As soon as you set a different
time during the cooking process,
the cooking process starts all over
again.
11. The appliance starts to heat.
12. As soon as the cooking process is
concluded, multiple signal tones
29
Page 30
are sounded and the appliance
Copyright UNOLD AG | www.unold.de
switches itself off.
13. Switch off the appliance completely via the rotary switch.
14. Take off the lid.
Caution:
Pay attention to the escaping
steam!
15. Because the lid is extremely hot,
only touch the lid on the handles
and only place it on heat-resistant
surfaces!
16. Take the egg insert with the eggs
off the cooking tray and hold
them under cold water. If the
eggs are not placed under cold
MAKING CUSTARD ROYALE
water immediately after the signal sounds, they will continue to
harden.
17. After use, unplug the mains plug
of the appliance from the electrical outlet.
CAUTION:
The appliance is very hot during and after operation! Danger of burns due to escaping
steam!
1. Among other things you can also
make custard royale with the appli-
ance (custard cut into shapes and
used as a garnish in soups).
2. Prepare the desired custard royale
mixture.
3. Fill the provided measuring cup
with cold water and pour the water
into the cooking tray. Caution:
Do not overfill the cooking tray,
otherwise boiling water can spray
out during operation – danger of
burns! At least 80 ml of water
must be poured in, the appliance
can hold a maximum of 350 ml
water.
4. Place the egg insert on the cooking tray.
30
5. Grease the two small cooking trays
or the large rice tray and place the
egg mixture in the trays or tray.
6. Place the cooking shells and close
the appliance with the lid. Ensure
that the two small openings on the
top of the lid are pointing to the
rear, i.e. away from you.
7. Plug the power cord into a grounded electrical outlet as specified
on the rating plate.
8. Select the desired cooking time
on the rotary switch.
9. As soon as the cooking time has
elapsed, multiple signal tones are
sounded and the appliance switches itself off.
Page 31

10. Switch off the appliance comple-
Copyright UNOLD AG | www.unold.de
tely via the rotary switch.
11. Take off the lid.
Caution: Pay attention to the
escaping steam!
CAUTION:
The appliance is very hot during and after operation! Danger of burns due to escaping
steam!
12. Because the lid is extremely hot,
only touch the lid on the handles
and only place it on heat-resistant
surfaces!
13. Take-out the cooking trays.
STEAM COOKING
Tip: If you are preparing several different vegetables at the same time, always
set the cooking time for the vegetable that cooks faster, first. Then take out the
finished vegetables and adjust the cooking time for the remaining vegetables.
1. Ensure that the appliance is swit-
ched off and is standing on a
level, firm surface.
2. Completely fill the provided
measuring cup with cold water
and pour the water into the cooking tray. Caution: Do not overfill
the cooking tray, otherwise boiling
water can spray out during operation – danger of burns! At least
80 ml of water must be poured
in, the appliance can hold a maximum of 350 ml water.
3. Note: Only use cold water for steaming. Use of any other liquids can
damage the heating element of
the appliance.
4. Prepare the desired foods and
place them in them in the cooking insert.
5. Now insert the egg insert and
frame and then place the cooking
insert on top.
6. However you can also place the
food in the white cooking trays
place these on the cooking insert.
In this case always insert the large
cooking tray first and then insert
the two smaller trays in the cooking tray.
7. Place the lid on the cooking
insert. Ensure that the two small
openings on the top of the lid are
31
Page 32

pointing to the rear, i.e. away from
Copyright UNOLD AG | www.unold.de
you.
8. Plug the power cord into a grounded electrical outlet as specified
on the rating plate. .
9. Select the desired cooking time on
the control dial. A maximum time
of 40 minutes can be set.
10. After the selected baking time has
elapsed the signal tone sounds
again and the appliance is automatically switched off. The indicator light will go out.
11. Ensure that the switch is on the
„OFF“ position and carefully lift
off the lid. Pay attention to esca-
ping steam – danger of burns!
12. Remove the cooking insert.
13. After using the appliance unplug
the mains plug from the electri-
cal outlet.
14. Tip: Allow the cooked food to cool
for a short time before eating it –
danger of burns!
Or: Cooking on two levels
15. Prepare the desired food.
16. Place one portion of the desired
food in the two white cooking trays
and place the white cooking trays
on the egg insert in the appliance.
17. Place the frame on top and then
place the cooking insert on the
frame. Place the second portion
in the cooking insert.
18. Place the lid on the cooking
insert. Ensure that the two small
openings on the top of the lid are
pointing to the rear, i.e. away from
you.
19. Plug the power cord into a grounded electrical outlet as specified
on the rating plate.
20. Select the desired cooking time on
the control dial. A maximum time
of 40 minutes can be set.
21. After the selected baking time has
elapsed the signal tone sounds
again and the appliance is automatically switched off. The indicator light will go out.
22. Ensure that the switch is on the
„OFF“ position and carefully lift
off the lid. Pay attention to escaping steam – danger of burns!
23. Remove the cooking insert.
24. After using the appliance unplug
the mains plug from the electrical outlet.
25. Tip: Allow the cooked food to cool
for a short time before eating it –
danger of burns!
CAUTION:
The appliance is very hot during and after operation! Danger of burns due to escaping
steam!
32
Page 33

CLEANING AND CARE
Copyright UNOLD AG | www.unold.de
Before cleaning, unplug the
appliance from the electrical
outlet.
Let the appliance cool and
empty any residual water from
the cooking tray.
1. Never immerse the appliance in
water or other liquids.
2. Do not use any abrasive scouring
agents, steel wool, metal objects,
hot cleaning agents or disinfectants, since these items can
damage the appliance.
3. Wipe off the housing and the coo-
king tray with a damp cloth and a
little mild dish-washing liquid and
dry it with a soft cloth.
RECIPES
4. Never place cleaning agents
directly on the appliance; always
put cleaning agents on the cloth.
5. The lid, measuring cup, egg insert,
frame and cooking insert can be
rinsed out and dried off with a
soft cloth. The attachments can
also be cleaned in the dishwasher
(top basket, gentle dish-washing
program).
6. Lime-scale residues in the cooking tray can be dissolved with offthe-shelf descalers in accordance
with the manufacturer‘s instructions.
Custard royale
3 eggs, 50 ml milk, 50 ml cream, the
following to taste: Salt, pepper, ground
nutmeg
Thoroughly mix all ingredients with a
fork or a wire whisk. In this regard, we
recommend that you not use a hand
mixer to do this, in order to prevent
porosity.
Prepare the mixture in the appliance
as described in the section „Preparing
custard royale“. Tip: Instead of salt
add a little herbal salt or grated
parmesan to the mixture.
Steaming vegetables
You can use fresh or frozen vegetables.
Do not thaw frozen vegetables, place
them in the cooking tray in their frozen
state, and extend the cooking time by
approx. 5 minutes. For vegetables
with a firm stalk, such as broccoli or
Brussels sprouts, make transverse
cuts in the stalk. The cooking time
can be shorter or longer depending
on freshness, type of cultivation, cut,
and storage of the vegetables, and
according to personal taste (firm or
soft). When cooking vegetables do not
33
Page 34

– under any circumstances – add wine,
Copyright UNOLD AG | www.unold.de
lemon juice, vinegar, or similar liquids,
only add such liquids after steaming.
Tip for a light basic sauce for vegetables
1 TBSP butter, 1 small onion, 125 ml
dry white wine, 125 ml vegetable
broth, 3 TBSP Crème fraîche, salt,
white pepper
Clean and finely dice onion, sauté in
butter; add wine and vegetable broth.
Simmer to thicken 5-7 minutes. Stir
in crème fraîche. The sauce becomes
particularly airy if you foam it with the
ESGE Zauberstab® with emulsifying
blade. Season with salt and pepper
and serve immediately.
Meat
Tip: In the steam cooker you can easily
heat up sausage or pre-cooked meat
such as Kassler, a salted, slightly
smoked cut of pork (in slices 1 cm
thick).
Steamed veal fillet with vegetable cream
sauce
Pour water into the appliance, fit on the
frame. Place the fillet slices together
with the tarragon on the cooking insert
and cook in the appliance for approx.
15 minutes. Keep warm after the
cooking time.
In the meantime, cook the vegetables
and dice them finely. Melt the butter
in a pan on the stove, and sauté the
vegetables in the melted butter. Dust
the vegetables with flour and while
stirring pour in the veal stock together
with the white wine and the cream.
Simmer for a few minutes to thicken
the sauce season with salt and pepper.
Serve the veal fillet with the vegetable
sauce. Goes well with fresh whole
asparagus and new potatoes.
Fish
Salmon with vegetables
1 salmon fillet 150 g, 1 medium-sized
carrot, 1/2 small zucchini, 1/2 small
kohlrabi, 1/4 lemon, pepper, salt,
nutmeg, chopped parsley
Wash and peel carrot and kohlrabi,
wash zucchini. Grate vegetables in
strips approx. 3 mm thick (e.g. with
the ESGE-Zauberstab® and der ESGE
Zauberette®). Mix vegetables and
place them in the cooking insert. Wash
fish fillet, pat dry, salt and pepper,
drizzle with lemon juice. Sprinkle fillet
with a little nutmeg. Place fish fillet
on the vegetables. Close lid, cook for
approx. 10 minutes. Sprinkle with
fresh parsley and serve with boiled
potatoes.
Sauces for steamed fish
The fish recipe above is just one
suggestion from Neptune‘s kingdom.
Steamed fish can always be served
in different ways with fine sauces.
However, in addition to the ready-touse sauces available in stores, you
can also quickly prepare many fresh
34
Page 35

sauces. The following recipes are all
Copyright UNOLD AG | www.unold.de
based on a light basic sauce. Prepare
these sauces in a pan on the oven, not
under any circumstances in the steam
cooker.
Light basic sauce
30 g butter (2 TBSP), 30 g flour (2
TBSP), 125 ml vegetable broth, 125
ml milk, salt, pepper, nutmeg
Melt butter in a small pan on the
oven, add flour and stir. Reduce heat.
Stirring constantly, a little at a time
add cold broth and cold milk, let
simmer for 3 minutes. Season with
salt, pepper and nutmeg.
Lemon sauce
Prepare a light sauce, season with
2 TBSP lemon juice and possibly 1 tsp
finely grated lemon peel.
Curry sauce
Prepare a light sauce, however replace
the milk with coconut milk and
1 TBSP curry powder, and add 2 TPSP
pineapple juice.
Wine sauce
Prepare a light sauce, however replace
the milk with dry white wine.
The authors have thoroughly considered and tested the recipes included in
these operating instructions. Nevertheless, a guarantee cannot be accepted.
The authors, respectively UNOLD AG and their assignees shall not be liable for
personal injuries, material damages and financial loss.
35
Page 36

GUARANTEE CONDITIONS
Copyright UNOLD AG | www.unold.de
We grant a 24 months guarantee, and in case of commercial use a 12 months guarantee, starting from the date of purchase
for any damage demonstrably due to manufacturing defects and when the appliance has been used according to its intended
use. Within the warranty period we will remedy defective materials or workmanship through repair or replacement, at our
option. Our warranty terms apply only to appliances sold in Germany and Austria. For other countries, please contact the re-
sponsible importer. In the event of a claim for remedy of defects, please send the appliance to our after sales service, properly
packaged and postage paid, together with a copy of the automatically generated sales receipt, which must show the date of
purchase, and a description of the defect. If the defect is covered by the warranty, the customer will be reimbursed for the
shipping costs only in Germany and Austria. The warranty does not cover damage from normal wear, improper handling and
failure to comply with the maintenance and care instructions. The warranty is void if repairs or modifications are made to the
appliance by third parties. Any claims of the end consumer vis-à-vis the retailer are not limited by this warranty.
WASTE DISPOSAL / ENVIRONMENTAL PROTECTION
Our appliances are produced on a high quality level for a long lifetime. Regular maintenance and expert
repairs by our after-sales service can extend the useful life of the appliance. If an appliance is defective
and repair is not possible we ask you to follow the following instructions for disposal. Do not dispose this
appliance together with your standard household waste. Please bring this product to an approved collection
point for recycling of electric and electronic products. By separate collection and disposal of waste products
you help to protect natural resources and ensure, that the product is disposed in an adequate way to protect
health and environment.
The instruction booklet is also available for download: www.unold.de
36
Page 37

NOTICE D’UTILISATION MODÈLE 38650
Copyright UNOLD AG | www.unold.de
SPÉCIFICATION TECHNIQUE
Puissance : 400 W, 220–240 V~, 50/60 Hz
Boîtier : plastique
Couvercle : plastique
Dimensions : env. 19,0 x 19,0 x 24,5 cm (l/p/h)
Câble d’alimentation : env. 60 cm
Poids : env. 1,1 kg
Équipement : à utiliser au choix pour la cuisson de 8 œufs au maximum ou comme cuiseur
vapeur pour du poisson, des légumes, etc., protection contre la surchauffe,
arrêt de cuisson avec fonction de coupure automatique, voyant de contrôle,
contenance maximale de 350 ml d‘eau
Accessoires : 1 panier vapeur, cuit-œufs, verre doseur avec pique-œuf, coupelle à riz, 2
petites coupelles de cuisson, mode d‘emploi
Modifications et erreurs des caractéristiques de l‘équipement, de la technique, des couleurs et du design
réservées
EXPLICATION DES SYMBOLES
Ce symbole indique les dangers susceptibles de provoquer des blessures ou des
endommagements de l’appareil.
Ce symbole indique le risque d’être brûlé. Soyez prudent en utilisant l’appareil.
CONSIGNES DE SÉCURITÉ
Veuillez lire les instructions
suivantes et les conserver.
1. L‘appareil peut être utilisé
par des enfants de plus de
8 ans et par des personnes
dont les capacités phy
siques, sensorielles ou intellectuelles sont limitées ou
dont l‘expérience et/ou les
connaissances sont insuffi
santes, si ceux-ci sont surveillés ou s‘ils ont été formés
à une utilisation sûre de l‘appareil et aux dangers pou-
-
vant en résulter. L‘appareil
n‘est
pas un jouet. Le
nettoyage et la maintenance de
l‘appareil
peuvent être exé-
37
Page 38

cutés par des clients, exclu-
Copyright UNOLD AG | www.unold.de
sivement sous surveillance.
2.
Les enfants de moins de 3
ans doivent se tenir loin de
l‘appareil ou être surveillés
en permanence.
3. Les enfants de 3 à 8 ans ne
doivent allumer et éteindre
l‘appareil que s‘il se trouve
dans sa position d‘utilisa
tion normale prévue, s‘ils
sont surveillés ou s‘ils ont
été informés concernant
la sécurité d‘utilisation et
qu‘ils ont compris les risques
potentiels en résultant. Les
enfants âgés de 3 à 8 ans ne
doivent ni brancher
, ni utili
ser, ni nettoyer ou entretenir
l‘appareil.
4.
ATTENTION : certaines par
-
ties de ce produit peuvent
devenir très chaudes et occa-
sionner des brûlures ! En
présence d‘enfants et de personnes fragiles, soyez particulièrement vigilant.
5.
Les enfants doivent être sur-
veillés afin de s’assurer qu’ils
ne jouent pas avec l’appareil.
6.
Conserver l’appareil hors de
portée des enfants.
7. L‘appareil est exclusivement
destiné à un usage ménager
ou à des fins similaires, par
ex.
une kitchenette dans des
boutiques, des bureaux ou
d‘autres lieux de travail,
des exploitations agricoles,
à l‘usage des clients dans
des hôtels, motels ou autres
lieux d‘hébergement,
dans des pensions privées
ou des résidences de vacan
ces.
8.
Ne pas ouvrir le boîtier de
l‘appareil. Il existe un risque
d’électrocution.
9. Vérifier régulièrement l’usure
et la détérioration de l’appa
reil, de la prise et du câble.
Si le câble de raccordement
ou d’autres pièces sont abî
més, envoyez l’appareil ou le
socle pour contrôle et réparation à notre service aprèsvente. T
oute réparation nonconforme peut provoquer des
risques importants pour l’uti
lisateur et entraîner l’exclusion de la garantie.
10.
Si le câble d‘alimentation de
cet appareil est endommagé,
il doit être remplacé par le
fabricant, son service clien
tèle ou une personne qualifiée similaire, afin d‘éviter
tout danger
.
-
-
-
-
-
38
Page 39

Remarques de sécurité relatives à
Copyright UNOLD AG | www.unold.de
l‘installation et au fonctionnement
sécurisés de l‘appareil
19.
11. Pour des raisons d‘hygiène,
les œufs percés avec le
pique-œuf doivent être cuits
20. N‘utilisez pas de prise mul
immédiatement. Si vous ne
pouvez pas utiliser ces œufs
immédiatement, veuillez les
jeter.
12. Raccorder exclusivement
l’appareil au courant alterna
tif à la tension se conformant
au panneau signalétique.
13.
Cet appareil ne doit pas être
21.
utilisé avec un minuteur
externe ou un système de
commande à distance.
14. Ne plonger en aucun cas
l’appareil ou le câble d‘ali
mentation dans de l’eau ou
-
22. Utilisez toujours l‘appareil
un autre liquide.
15.
Le socle ne doit pas entrer
en contact avec de l‘eau ou
avec d‘autres liquides. Si
23.
toutefois cela arrive, il faut
le laisser sécher complète
ment avant une nouvelle utilisation.
16.
Le socle ne doit pas être lavé
au lave-vaisselle.
24.
17. Ne jamais toucher l’appareil
ou son cordon d’alimentation
avec les mains mouillées.
18. Pour des raisons de sécu
25. N’enroulez jamais le câble
rité, l’appareil ne doit jamais
être placé sur des surfaces
chaudes, une tablette métal
-
lique ou un support humide.
L’appareil ou le câble ne
doivent pas être utilisés à
proximité de flammes.
tiple pour le branchement
électrique de l‘appareil :
risque d‘incendie. Si vous
utilisez
une rallonge, assu
rez-vous qu‘elle est intacte
et
qu‘elle convient à la puissance utilisée, sans quoi une
surchauffe peut se produire.
N‘utilisez pas l‘appareil sur
une prise de courant sans
conducteur de protection. En
cas de doute, faites contrôler
votre installation électrique
par un professionnel.
sur une surface dégagée,
plane et résistante à la cha
-
leur.
Veiller à ce que le câble ne
pende pas par-dessus le bord
du plan de travail, cela pou
vant provoquer des accidents
si un enfant tire dessus, par
exemple.
Le câble d‘alimentation doit
être disposé de façon à ce
qu‘il soit impossible de tirer
dessus ou de trébucher.
autour de l’appareil, mais
autour du range-cordon
39
Page 40

prévu à cet effet, situé sur le
Copyright UNOLD AG | www.unold.de
corps du socle.
26. Débranchez le cordon d’ali
mentation de la prise de courant uniquement au niveau
de la prise mâle, ne jamais
tirer sur le câble.
27.
Ne portez pas l’appareil par
le câble de raccordement.
28. Utilisez exclusivement l‘ap
pareil à l‘intérieur.
29.
N’utilisez jamais l’appareil
à proximité de matériaux
inflammables, comme par
ex. des rideaux. Ne le placez
pas au four traditionnel ou
au four à micro-ondes.
30. Assurez-vous que le cou
vercle de l’appareil est tou-
jours correctement fermé,
afin d‘éviter des blessures
en raison
des éclaboussures
d‘eau chaude.
Évitez de trop remplir le
31.
réservoir.
32. Utilisez exclusivement la
fonction Vapeur pour la cuis
son vapeur de denrées alimentaires.
33.
Ne faites jamais fonctionner
l‘appareil sans avoir versé
suffisamment d‘eau, afin
d‘éviter de l‘endommager.
34. Assurez-vous que tous les
utilisateurs, notamment les
enfants, ont connaissance
des risques que comportent
la vapeur formée ou les écla
boussures d’eau chaude :
risque de brûlures !
35.
La surface du couvercle
chauffe fortement durant le
fonctionnement. Par consé
quent, utilisez des maniques,
en cas de besoin.
36.
Ne déplacez jamais l’appa
reil tant qu’il est en fonctionnement afin d’éviter des
brûlures provoquées par des
éclaboussures d’eau.
37.
L‘appareil ne doit pas être
utilisé avec des accessoires
d‘un autre fabricant ou d‘une
autre marque pour ne pas
risquer de l‘abîmer.
38. Débrancher l’appareil du
secteur après utilisation
et avant le nettoyage. Ne
jamais laisser l’appareil sans
surveillance lorsque la prise
est branchée.
39. Laissez refroidir l’appareil
avant de le nettoyer.
40
Page 41

ATTENTION :
Copyright UNOLD AG | www.unold.de
L’appareil est très chaud pendant son fonctionnement ! Risque
de brûlures occasionnées par la vapeur dégagée !
Ne pas ouvrir le boîtier de l‘appareil. Risque d‘électrocution.
Le fabricant n’est nullement responsable en cas de montage non conforme, d‘utilisation irrégulière ou non
conforme ou suite à l’exécution de réparations par des tiers non autorisés.
AVANT LA PREMIÈRE UTILISATION
1. Retirer tous les matériaux d‘emballage et,
le cas échéant, les sécurités de transport.
Tenir le matériel d‘emballage hors de portée
des enfants : risque d‘asphyxie !
CUIRE DES ŒUFS
1. Assurez-vous que l‘appareil est éteint et
qu‘il est posé sur une surface plane et
stable.
2. Remplissez le verre doseur fourni avec de
l‘eau froide et versez le contenu dans le
bac de cuisson. Attention : ne remplissez
pas trop le bac de cuisson sans quoi des
éclaboussures d‘eau bouillante pourraient
survenir durant le fonctionnement : risque
de brûlures ! Le réservoir doit contenir au
moins 80 ml d‘eau et 350 ml au maximum.
2. Nettoyer toutes les pièces à l’aide d’un
chiffon humide, comme décrit dans le
chapitre « Nettoyage et Entretien ».
3. Vérifiez que l’appareil est stable.
3. Remarque : l‘appareil travaille avec une
commande temporelle de la cuisson, ce qui
signifie que l‘eau ne peut pas être mesurée
individuellement pour chaque œuf.
4. Piquer les œufs du côté rond afin qu‘ils
n‘éclatent pas durant la cuisson.
Attention : risque de blessures avec le
pique-œuf
5. Placez les œufs avec le côté rond vers le
haut dans le cuit-œufs.
41
Page 42

6. Posez le cuit-œufs avec les œufs sur le
Copyright UNOLD AG | www.unold.de
bac de cuisson, puis installez le couvercle.
Veillez à ce que les deux petits orifices sur
le dessus du couvercle soient tournés vers
l‘arrière, loin de vous.
7. Branchez la prise dans une prise de courant
avec contact de protection conforme à la
plaque signalétique.
8. Réglez le degré de dureté souhaité à l‘aide
du bouton de réglage rotatif :
9. Les symboles indiquent le degré de dureté
correspondant.
Mou
Moyen
Dur
10. Ces indications s‘appliquent à des œufs
de taille moyenne. Selon la grosseur et le
nombre d‘œufs, le résultat peut différer
légèrement. Un ajustement individuel est
possible en continu. Dès que vous réglez
une durée différente pendant la cuisson, le
processus de cuisson redémarre.
11. L‘appareil commence à chauffer.
12. Dès que le processus de cuisson est terminé,
plusieurs signaux sonores retentissent et
l‘appareil s‘éteint.
13. Arrêtez complètement l‘appareil avec le
bouton de réglage rotatif.
14. Retirez le couvercle.
Attention :
prenez garde à la vapeur qui
s‘échappe !
15. Le couvercle étant extrêmement chaud,
veuillez le tenir uniquement par les poignées
et le poser exclusivement sur des surfaces
résistant à la chaleur !
16. Retirez le cuit-œufs contenant les œufs du
bac de cuisson et refroidissez les œufs sous
l‘eau froide. Si les œufs ne sont pas refroidis
immédiatement après l‘émission du signal
sonore, ils continuent à durcir.
17. Débranchez l‘appareil du secteur après
utilisation.
ATTENTION :
l‘appareil est très chaud pendant et
après le fonctionnement ! Risque de
brûlures occasionnées par la vapeur
dégagée !
PRÉPARER DES ŒUFS À LA ROYALE
1. Vous pouvez, entre autres, préparer des
œufs à la royale avec l‘appareil.
2. Préparez la quantité d‘œufs à la royale
souhaitée.
3. Remplissez le verre doseur fourni avec de
l‘eau froide et versez le contenu dans le
42
bac de cuisson. Attention : ne remplissez
pas trop le bac de cuisson sans quoi des
éclaboussures d‘eau bouillante pourraient
survenir durant le fonctionnement : risque
de brûlures ! Le réservoir doit contenir au
moins 80 ml d‘eau et 350 ml au maximum.
Page 43

4. Placez le cuit-œufs sur le bac de cuisson.
Copyright UNOLD AG | www.unold.de
5. Graissez abondamment les deux petites
coupelles de cuisson ou la grande coupelle à
riz, et versez-y la préparation à base d‘œufs.
6. Positionnez les coupelles de cuisson sur
le cuit-œufs et fermez l‘appareil avec le
couvercle. Veillez à ce que les deux petits
orifices sur le dessus du couvercle soient
tournés vers l‘arrière, loin de vous.
7. Branchez la prise dans une prise de courant
avec contact de protection conforme à la
plaque signalétique.
8. Sélectionnez le temps de cuisson souhaité
avec le bouton de réglage.
9. Une fois le temps de cuisson écoulé,
plusieurs signaux sonores sont émis et
l‘appareil s‘éteint.
10. Arrêtez complètement l‘appareil avec le
bouton de réglage rotatif.
11. Retirez le couvercle.
Attention :
prenez garde à la vapeur qui
s‘échappe !
12. Le couvercle étant extrêmement chaud,
veuillez le tenir uniquement par les poignées
et le poser exclusivement sur des surfaces
résistant à la chaleur !
13. Retirez les coupelles de cuisson.
ATTENTION :
l‘appareil est très chaud pendant et
après le fonctionnement ! Risque de
brûlures occasionnées par la vapeur
dégagée !
CUISSON VAPEUR
Conseil : si vous préparez plusieurs variétés de légumes en même temps, réglez toujours en premier
le temps de cuisson qui convient pour les légumes qui cuisent le plus vite. Retirez ensuite les
légumes qui sont cuits, puis réglez le temps de cuisson pour les légumes restants.
1. Assurez-vous que l‘appareil est éteint et
qu‘il est posé sur une surface plane et
stable.
2. Remplissez complètement le verre doseur
fourni avec de l‘eau froide et versez le
contenu dans le bac de cuisson. Attention :
ne remplissez pas trop le bac de cuisson
sans quoi des éclaboussures d‘eau
bouillante pourraient survenir durant le
fonctionnement : risque de brûlures ! Le
réservoir doit contenir au moins 80 ml d‘eau
et 350 ml au maximum.
3. Remarque : pour cuire à la vapeur, utilisez
exclusivement de l‘eau froide. L‘utilisation
d‘autres liquides peut endommager
l‘élément chauffant de l‘appareil.
4. Préparez les aliments souhaités et placezles dans le panier vapeur.
43
Page 44

5. Installez maintenant le cuit-œufs et le
Copyright UNOLD AG | www.unold.de
châssis, puis placez ensuite le panier
vapeur au-dessus.
6. Selon la préparation, vous pouvez également
placer les aliments dans les coupelles
de cuisson blanches et les installer sur
le panier vapeur. Ce faisant, positionnez
toujours la grande coupelle de cuisson en
premier, puis placez les deux plus petites
coupelles à l‘intérieur.
7. Placez le couvercle sur le panier vapeur.
Veillez à ce que les deux petits orifices sur
le dessus du couvercle soient tournés vers
l‘arrière, loin de vous.
8. Branchez la prise dans une prise de courant
avec contact de protection conforme à la
plaque signalétique.
9. Sélectionnez le temps de cuisson souhaité
avec le bouton de réglage. Il est possible de
régler 40 minutes au maximum.
10. Une fois la durée choisie écoulée, un signal
sonore retentit à nouveau et l‘appareil
s‘éteint automatiquement. Le voyant de
contrôle s‘éteint.
11. Assurez-vous que l‘interrupteur est placé
sur « OFF » et soulevez le couvercle avec
précaution. Prenez garde à la vapeur chaude
qui s‘échappe : risque de brûlures !
12. Retirez le panier vapeur.
13. Débranchez l’appareil du secteur après
utilisation.
14. Conseil : laissez un peu les aliments cuits
refroidir avant de les consommer - Risque
de brûlures !
Ou : cuisson sur deux étages
15. Préparez les aliments souhaités.
16. Placez une portion des aliments souhaités
dans les deux coupelles de cuisson
blanches et placez-les sur le cuit-œufs dans
l‘appareil.
17. Positionnez le châssis par dessus et placez
ensuite le panier vapeur sur le châssis.
Placez la seconde portion dans le panier
vapeur.
18. Placez le couvercle sur le panier vapeur.
Veillez à ce que les deux petits orifices sur
le dessus du couvercle soient tournés vers
l‘arrière, loin de vous.
19. Branchez la prise dans une prise de courant
avec contact de protection conforme à la
plaque signalétique.
20. Sélectionnez le temps de cuisson souhaité
avec le bouton de réglage. Il est possible de
régler 40 minutes au maximum.
21. Une fois la durée choisie écoulée, un signal
sonore retentit à nouveau et l‘appareil
s‘éteint automatiquement. Le voyant de
contrôle s‘éteint.
22. Assurez-vous que l‘interrupteur est placé
sur « OFF » et soulevez le couvercle avec
précaution. Prenez garde à la vapeur chaude
qui s‘échappe : risque de brûlures !
23. Retirez le panier vapeur.
24. Débranchez l’appareil du secteur après
utilisation.
25. Conseil : laissez un peu les aliments cuits
refroidir avant de les consommer - Risque
de brûlures !
44
Page 45

ATTENTION :
Copyright UNOLD AG | www.unold.de
l‘appareil est très chaud pendant et
après le fonctionnement ! Risque de
brûlures occasionnées par la vapeur
dégagée !
NETTOYAGE ET ENTRETIEN
Avant de procéder au nettoyage,
débranchez la prise.
Laissez l‘appareil refroidir et videz
l‘eau restant dans le bac de cuisson.
1. L’appareil ne doit jamais être plongé dans
l’eau ou un autre liquide.
2. N’utilisez aucun produit à récurer agressif,
ni de laine de verre, d’objets métalliques,
de détergent chaud ou de désinfectant,
lesquels pourraient détériorer l‘appareil.
3. Essuyez le boîtier ainsi que le bac de
cuisson avec un chiffon humide et un peu
de produit nettoyant doux, et séchez-le à
l‘aide d‘un chiffon doux.
4. Ne jamais appliquer de produit nettoyant
directement sur l‘appareil, mais toujours le
verser sur le chiffon.
5. Le couvercle, le verre doseur, le cuit-œufs,
le châssis et le panier vapeur peuvent être
rincés et séchés avec un chiffon doux.
Ces éléments peuvent également être
nettoyés au lave-vaisselle (panier du haut
en programme de lavage pour vaisselle
délicate).
6. Les résidus de calcaire dans le bac de
cuisson peuvent être dissous avec un
produit anti-calcaire courant, en respectant
les consignes du fabricant.
45
Page 46

RECETTES
Copyright UNOLD AG | www.unold.de
Royale
3 œufs, 50 ml de lait, 50 ml de crème, selon les
goûts : sel, poivre, noix de muscade râpée
Bien mélanger tous les ingrédients avec
une fourchette ou un fouet. Pour cela, nous
vous conseillons de ne pas utiliser de batteur
électrique afin d’éviter la formation de bulles.
Préparer l’appareil comme décrit au chapitre
« Préparer des œufs à la royale ». Conseil : au
lieu du sel, mettre un peu de sel aux herbes ou
de parmesan râpé dans l’appareil.
Cuire des légumes à la vapeur
Vous pouvez utiliser des légumes frais ou
surgelés. Ne pas décongeler les légumes
surgelés, mais les placer congelés dans le panier
de cuisson et prolonger le temps de cuisson de
5 minutes env. Dans le cas de légumes avec
un trognon dur, comme par ex. les brocolis ou
le chou-fleur, veuillez entailler le trognon en
croix. Selon la fraîcheur, la culture, la découpe
et le stockage des légumes, et en fonction
des goûts personnels (croquants ou mous), le
temps de cuisson peut être plus court ou plus
long. N’ajoutez en aucun cas de vin, de jus de
citron, de vinaigre ou autres pour la cuisson des
légumes. N’assaisonnez les légumes qu’après la
cuisson vapeur.
Conseil pour une sauce de base légère pour
accompagner des légumes
1 cs de beurre, 1 petit oignon, 125 ml de vin
blanc sec, 125 ml de bouillon de légumes, 3 cs
de crème fraîche, sel, poivre blanc
Nettoyer l’oignon et le couper en petits dés,
le faire suer dans du beurre et mouiller avec
du vin et du bouillon. Laisser réduire 5 à 7
minutes. Incorporer la crème fraîche. La sauce
sera particulièrement aérée si vous la faites
mousser avec le mixeur plongeant ESGE équipé
du disque mélangeur. Assaisonner de sel et de
poivre et servir immédiatement.
Viande
Conseil : vous pouvez également parfaitement
réchauffer des chipolatas, des saucisses de
volaille ou de la viande précuite, comme des
côtes de porc salées et fumées (en tranches de
1 cm d’épaisseur).
Filet de veau à la vapeur avec sauce à la crème et
aux légumes
250 g de filet de veau (tranches de 1 à 1,5 cm
d’épaisseur), quelques branches d’estragon, sel,
poivre, 50 g de carottes, 50 g de céleri, 50 g de
poireau, 50 g de courgettes, 50 g de pommes
de terre à chair ferme, 15 g de beurre, 15 g de
farine, 25 ml de vin blanc sec, 60 ml de fond de
veau, 100 ml de crème, sel, poivre
Mettre de l’eau dans l’appareil et installer
le châssis. Placer les tranches de filet avec
l’estragon sur le panier vapeur et cuire env. 15
minutes dans l’appareil. Maintenir au chaud à
l’issue du temps de cuisson.
Pendant ce temps, laver les légumes et les
découper en très petits dés. Faire fondre le
beurre dans une casserole sur la cuisinière et y
faire suer les légumes. Saupoudrer les légumes
46
Page 47

de farine et verser le vin blanc et la crème
Copyright UNOLD AG | www.unold.de
tout en mélangeant. Laisser réduire quelques
minutes et assaisonner avec du sel et du poivre.
Dresser le filet de veau avec la sauce aux
légumes. Accompagner d’asperges fraîches et
de pommes de terre nouvelles.
Poisson
Lieu noir et garniture de légumes
1 filet de lieu noir (env. 150 g), 1 carotte de
taille moyenne, 1/2 courgette de petite taille,
1/2 chou-rave de petite taille, 1/4 de citron,
poivre, sel, muscade, persil haché
Laver et peler la carotte et le chou-rave, laver
la courgette. Émincer les légumes en lanières
de 3 mm d’épaisseur environ (par ex. avec le
mixeur plongeant ESGE et le hachoir universel
ESGE). Mélanger les légumes et les placer dans
le panier vapeur. Laver le filet de poisson, le
sécher en tamponnant, saler et poivrer, puis
arroser de jus de citron. Parsemer d’un peu
de muscade. Placer le filet de poisson sur
les légumes. Fermer le couvercle et cuire 10
minutes environ. Parsemer de persil frais et
servir avec des pommes de terre à l’eau.
sur la cuisinière, mais en aucun cas dans le
cuiseur vapeur.
Fond de sauce clair
30 g de beurre (2 cs), 30 g de farine (2 cs),
125 ml de bouillon de légumes, 125 ml de lait,
sel, poivre, muscade
Faire fondre le beurre dans une petite casserole,
ajouter la farine et mélanger. Baisser le feu.
Tout en mélangeant en permanence, arroser de
temps en temps de bouillon froid et de lait froid,
laisser frémir 3 minutes. Assaisonner avec du
sel, du poivre et de la muscade.
Sauce citronnée
Préparer une sauce claire et assaisonner
avec 2 cuillères à soupe de jus de citron et,
éventuellement, 1 cuillère à café de zeste de
citron finement râpé.
Sauce curry
Préparer une sauce claire et, ce faisant,
remplacer le lait par du lait de coco, puis
ajouter 1 cuillère à soupe de curry en poudre et
2 cuillères à soupe de jus d’ananas.
Sauces pour poisson à la vapeur
La recette de poisson susmentionnée est
juste une suggestion inspirée par le royaume
de Neptune. Le poisson à la vapeur peut être
servi en variant à chaque fois avec des sauces
délicates. Outre les sauces toutes prêtes
vendues dans le commerce, il est également
possible de préparer une multitude de sauces
fraîches très rapidement. Les recettes ci-après
se basent toutes sur un fond de sauce clair.
Veuillez préparer ces sauces dans une casserole
Sauce au vin
Préparer une sauce claire, et ce faisant
remplacer le lait par du vin blanc sec.
47
Page 48

CONDITIONS DE GARANTIE
Copyright UNOLD AG | www.unold.de
En cas d’utilisation conforme et lors de dégâts manifestement dus à des défauts de fabrication, nos appareils sont garantis
24 mois, lors d’utilisation professionnelles 12 mois, à dater de l’achat. Notre garantie n’est valide que pour les appareils
vendus en Allemagne et en Autriche. Dans tout autre pays veuillez contacter l’importateur. Veuillez envoyer à notre adresse
les appareils, pour lesquels vous réclamez une suppression de défauts, avec le bon d’achat montrant la date d’achat, port
payé et proprement emballé. Les coûts de transport seront remboursés en cas de garantie en Allemagne et en Autriche. Les
défauts causés par usure, utilisation incorrecte ou non-respect des instructions de maintenance sont exclus. Notre obligation
de garantie cesse, si de réparations ou des interventions sont accomplies par des tiers. Cette garantie n’affecte pas les droits
du consommateur contre le commerçant.
TRAITEMENT DES DÉCHETS / PROTECTION DE L’ENVIRONNEMENT
Nos appareils sont produits selon un standard élevé de qualité pour une longue durée d’utilisation. Un
entretien régulier et des réparations compétentes par notre service après-vente prolongent cette durée
d’utilisation. Si néanmoins l’appareil est endommagé et ne peut plus être réparé, veuillez suivre les in-
structions suivantes. Ne jamais disposer ce produit avec les dégâts de ménage. Apportez ce produit à une
station de collection pour récupération de produits électriques et électroniques. Par la collection séparée
vous aidez à protéger les ressources naturelles et prenez soin, que le produit est démonté sans risque pour
la santé et l’environnement.
Les recettes disponibles dans ce mode d’emploi ont été soigneusement examinées et contrôlées
par leurs auteurs respectifs et par la société UNOLD AG. Notre responsabilité n’est toutefois en
aucun cas engagée. Les auteurs et la société UNOLD AG ainsi que ses représentants déclinent toute
responsabilité en cas de dommages corporels, matériels et pécuniaires.
48
Page 49

GEBRUIKSAANWIJZING MODEL 38650
Copyright UNOLD AG | www.unold.de
TECHNISCHE GEGEVENS
Vermogen: 400 W, 220–240 V~, 50/60 Hz
Behuizing: Kunststof
Deksel: Kunststof
Afmetingen: ca. 19,0 x 19,0 x 24,5 cm (b/d/h)
Snoer: ca. 60 cm
Gewicht: ca. 1,1 kg
Uitvoering: Optioneel om maximaal 8 eieren gaar te laten worden of als stoomgaarder voor vis,
groente enz. inzetbaar, oververhittingsbeveiliging, kookstop met uitschakelautomaat,
controlelamp, akoestisch signaal, maximaal volume 350 ml water
Toebehoren: 1 gaarinzetelement, ei-inzetelement, maatbeker met eiprikker, rijstschaal, 2 kleine
gaarschalen, gebruiksaanwijzing
Wijzigingen en vergissingen in de uitrustingskenmerken, techniek, kleuren en design voorbehouden
VERKLARING VAN DE SYMBOLEN
Dit symbool wijst op eventuele gevaren die letsel tot gevolg kunnen hebben of tot schade
aan het apparaat leiden.
Dit symbool wijst op een eventueel verbrandingsgevaar. Ga hier altijd zeer voorzichtig te
werk.
VEILIGHEIDSVOORSCHRIFTEN
Lees de volgende aanwijzingen
a.u.b. door en bewaar ze goed.
1. Het apparaat kan door kin
deren worden gebruikt die 8
jaar zijn of door personen die
over gebrekkige fysieke, sen
sorische of geestelijke vaardigheden of gebrek aan ervaring en/of kennis
mits zij onder toezicht staan
of
instructies hebben gekre
beschikken,
gen aangaande het veilige
gebruik van dit apparaat en
-
de hieruit resulterende geva
ren
begrepen hebben. Het
apparaat is geen speelgoed.
-
Schoonmaak en onderhoud
van het apparaat mogen uit
sluitend onder toezicht worden uitgevoerd.
2.
Kinderen onder 3 jaar moe-
-
ten uit de buurt van het
-
-
49
Page 50

apparaat blijven of voortdu-
Copyright UNOLD AG | www.unold.de
rend onder toezicht staan.
3.
Kinderen tussen 3 en 8 jaar
moeten het apparaat uit
sluitend in- en uitschakelen
als het zich op zijn beoogde
normale bedieningspositie
bevindt, als zij onder toe
zicht staan of instructies
hebben gekregen aangaande
het veilige gebruik en de
daaruit resulterende gevaren
begrepen hebben. Kinderen
tussen 3 en 8 jaar moeten
het apparaat noch aanslui
ten, noch bedienen, schoon-
maken of onderhouden.
4.
VOORZICHTIG - delen van
dit product kunnen zeer heet
worden en brandwonden
veroorzaken! Wees in aan
wezigheid van kinderen en
personen die gevaar lopen,
bijzonder voorzichtig.
5.
Kinderen moeten onder toe
zicht staan om te waarborgen
dat zij niet met het apparaat
spelen.
6.
Het apparaat op een voor kin
deren ontoegankelijke plaats
opslaan.
7.
Het apparaat is uitsluitend
bestemd voor huishoude
lijk gebruik of soortgelijke
gebruiksdoelen, b v
.
theekeukens in bedrijven,
kantoren of overige werklo
caties,
-
agrarische bedrijven,
voor gebruik door gasten
in hotels, motels of overige
logiesbedrijven,
-
in particuliere pensions of
vakantiehuizen.
8. Open in geen geval de behui
zing van het apparaat. Er
bestaat gevaar door stroomstoot.
9.
Controleer het apparaat, de
-
stekker en het snoer regel
matig op slijtage of beschadigingen. Bij beschadiging
van de aansluitkabel of van
andere
onderdelen stuurt u
het apparaat of de sokkel
-
voor controle en reparatie
naar onze klantenservice.
Onvakkundige reparaties
kunnen leiden tot aanzien
-
lijke gevaren voor de gebrui
ker en hebben tot gevolg dat
de garantie vervalt.
10.
Als de aansluitkabel van dit
-
apparaat wordt beschadigd,
moet deze, om risico te voor
komen, door de fabrikant
of de klantenservice van de
-
fabrikant of door iemand met
dezelfde competentie wor
den vervangen.
-
-
-
-
-
-
-
50
Page 51

Veiligheidsinstructies om het ap-
Copyright UNOLD AG | www.unold.de
paraat veilig op te stellen en te
gebruiken
11.
Om hygiënische redenen
moeten eieren waarin een
gaatje wordt geprikt met de
eiprikker, onmiddellijk wor
den gekookt. Als u deze eieren niet onmiddellijk kunt
gebruiken, dient u de eieren
tot afval te verwerken.
12.
Het apparaat uitsluitend op
wisselstroom met spanning
conform typeplaatje aanslui
ten.
13.
Dit apparaat mag niet wor-
den gebruikt met een externe
tijdschakelklok of afstandsbesturing.
14.
Dompel het apparaat of het
snoer in geen geval in water
of andere vloeistoffen.
15. De sokkel mag niet in con
-
tact komen met water of
andere vloeistoffen. Als dit
toch eens gebeurt, moet hij
volkomen droog zijn vóór het
volgende gebruik.
16.
De sokkel mag niet in de
afwasmachine worden gerei
nigd.
17.
Het apparaat c.q. het snoer
nooit met natte handen aan
raken.
18.
Plaats het apparaat om veilig-
heidsredenen nooit op hete
oppervlakken, een metalen
dienblad of op een natte
ondergrond.
19.
Het apparaat of het snoer
mogen niet in de buurt van
vlammen worden gebruikt.
20. Gebruik voor aansluiting van
het apparaat op de elektri
citeit geen aftakcontactdozen a.u.b. – gevaar voor
brand. Als u een verlengkabel gebruikt, controleer dan
of deze intact is en geschikt
is voor het desbetreffende
vermogen,
omdat er anders
oververhitting kan optreden.
Gebruik het apparaat niet
21.
op een stopcontact zonder
aardleiding. Laat ingeval van
twijfel de elektrische huisin
stallatie controleren door een
vakman.
Gebruik het apparaat altijd
22.
op een vrij, egaal en hittebe
-
stendig oppervlak.
23.
Let erop dat het snoer niet
over de rand van het werk
vlak heen hangt, omdat dit
tot ongevallen kan leiden,
als bv. kleine kinderen eraan
trekken.
24.
Het snoer moet zodanig
gelegd zijn dat trekken of
struikelen wordt voorkomen.
25. Trek het snoer altijd uitslui
tend aan de aansluitstekker
uit het stopcontact, nooit
aan de aansluitkabel.
51
Page 52

26. Draag de sokkel niet aan de
Copyright UNOLD AG | www.unold.de
aansluitkabel.
27. Gebruik het apparaat uitslui
-
tend binnen.
28.
Gebruik het apparaat nooit
in de buurt van brandbare
materialen zoals b v. gordij
nen, maar niet in de bakoven
of de magnetron.
29.
Zorg ervoor dat het deksel
van het apparaat altijd goed
gesloten is om verwondingen
door hete waterspetters te
voorkomen.
30. Voorkom dat het reservoir
overvol wordt.
31. Gebruik de stoomfunctie uit
-
sluitend om levensmiddelen
te stomen.
32.
Gebruik het apparaat nooit
zonder het met voldoende
water te hebben gevuld, om
schade aan het apparaat te
voorkomen.
33. Zorg ervoor dat alle gebrui
kers, met name kinderen,
het gevaar van naar bui-
ten komende stoom of hete
waterspetters kennen –
gevaar voor verbranding!
34.
Het oppervlak van het dek
sel wordt tijdens het gebruik
heet. Gebruik daarom evtl.
pannenlappen.
35.
Verschuif het apparaat niet
zolang het in bedrijf is, om
verbrandingen door naar bui
ten spattend water te voorkomen.
36.
Om schade te voorkomen
mag het apparaat niet met
toebehoren van andere fabri
kanten of merken worden
gebruikt.
37.
Na gebruik en vóór het reini
gen van het apparaat de netstekker uit de stekkerdoos
trekken. Het apparaat nooit
zonder toezicht laten als de
netstekker ingestoken is.
38.
Laat het apparaat vóór het
reinigen afkoelen.
-
-
-
-
VOORZICHTIG:
Het apparaat wordt tijdens het gebruik zeer heet! Gevaar voor
verbranding door naar buiten komende stoom!
Open in geen geval de behuizing van het apparaat. Er bestaat
gevaar van een stroomstoot.
De fabrikant aanvaardt geen aansprakelijkheid bij foutieve montage, bij ondeskundig of foutief gebruik of
als reparaties door niet geautoriseerde personen worden uitgevoerd.
52
Page 53

VÓÓR HET EERSTE GEBRUIK
Copyright UNOLD AG | www.unold.de
1. Verwijder alle verpakkingsmaterialen
en evtl. transportbeveiligingen. Houd
verpakkingsmaterialen uit de buurt van
kinderen - gevaar voor verstikking!
EIEREN GAAR MAKEN
1. Zorg ervoor dat het apparaat uitgeschakeld
is en op een egaal, vast oppervlak staat.
2. De bijgevoegde maatbeker met koud water
vullen en de inhoud in de kookschaal doen.
Attentie: Maak de kookschaal niet te vol,
omdat anders tijdens het gebruik kokend
water naar buiten kan spatten – gevaar voor
verbranding! Er moet met minimaal 80 ml
water worden gevuld; maximaal kan met
350 ml water worden gevuld.
3. Aanwijzing: Het apparaat werkt met een
tijdsregeling van het kookproces, zodat het
water niet per ei hoeft te worden afgemeten.
4. De eieren inprikken aan de stompe kant,
zodat deze bij het koken niet openspringen.
Attentie: Gevaar van verwondingen
door de eiprikker
5. De eieren met de stompe kant naar boven
toe in het ei-inzetelement plaatsen.
6. Het ei-inzetelement met de eieren op
de kookschaal plaatsen en het deksel
aanbrengen. Let op dat de twee kleine
openingen in de bovenkant van het deksel
aan de achterkant, van u vandaan, zitten.
7. Steek de stekker in een veiligheidswandcontactdoos conform typeplaatje.
2. Reinig alle onderdelen met een vochtige
doek, zoals beschreven staat in het
hoofdstuk „Reinigen en onderhouden“.
3. Controleer of het apparaat stabiel staat.
8. De gewenste hardheidsgraad instellen met
de draaiknop:
9. De symbolen geven de desbetreffende
hardheidsgraad aan.
Zacht
Gemiddeld
Hard
10. Deze gegevens gelden voor middelgrote
eimaten. Het resultaat kan afhankelijk van
maat en aantal eieren licht afwijken. Een
individuele aanpassing is traploos mogelijk.
Zodra u tijdens het kookproces een andere
tijd instelt, begint het kookproces opnieuw.
11. Het apparaat begint te verwarmen.
12. Zodra het kookproces beëindigd is, klinken
er meerdere akoestisch signalen en wordt
het apparaat uitgeschakeld.
13. Schakel het apparaat met de draaiknop
volledig uit.
14. Neem het deksel eraf.
Voorzichtig:
Let op naar buiten komende stoom!
15. Omdat het deksel zeer heet is, dit uitsluitend
aan de grepen vastpakken en uitsluitend op
hittebestendige oppervlakken leggen!
53
Page 54

16. Het ei-inzetelement met de eieren van de
Copyright UNOLD AG | www.unold.de
kookschaal pakken en de eieren onder koud
water afschrikken. Als de eieren nicht direct
worden afgeschrikt nadat het signaal heeft
geklonken, worden zij harder.
17. Trek na gebruik de stekker van het apparaat
uit het stopcontact.
BOUILLON MET EI MAKEN
VOORZICHTIG:
Het apparaat is tijdens en na het
gebruik zeer heet! Gevaar voor
verbranding door naar buiten komende
stoom!
1. U kunt met het apparaat onder andere
bouillon met ei maken.
2. Bereid de gewenste massa bouillon met ei
voor.
3. De bijgevoegde maatbeker met koud water
vullen en de inhoud in de kookschaal doen.
Attentie: Maak de kookschaal niet te vol,
omdat anders tijdens het gebruik kokend
water naar buiten kan spatten – gevaar voor
verbranding! Er moet met minimaal 80 ml
water worden gevuld; maximaal kan met
350 ml water worden gevuld.
4. Plaats het ei-inzetelement op de kookschaal.
5. Vet de twee kleine gaarschalen of de grote
rijstschaal goed in en doe de eimassa erin.
6. Zet de gaarschalen op het ei-inzetelement
en sluit het apparaat met het deksel. Let
op dat de twee kleine openingen in de
bovenkant van het deksel aan de achterkant,
van u vandaan, zitten.
7. Steek de stekker in een veiligheidswandcontactdoos conform typeplaatje.
8. Kies de gewenste gaartijd uit met de
draaiknop.
9. Als de gaartijd beëindigd is, klinken er
meerdere akoestisch signalen en wordt het
apparaat uitgeschakeld.
10. Schakel het apparaat met de draaiknop
volledig uit.
11. Neem het deksel eraf.
Voorzichtig:
Let op naar buiten komende stoom!
12. Omdat het deksel zeer heet is, dit uitsluitend
aan de grepen vastpakken en uitsluitend op
hittebestendige oppervlakken leggen!
13. Neem de gaarschalen eruit.
VOORZICHTIG:
Het apparaat is tijdens en na het
gebruik zeer heet! Gevaar voor
verbranding door naar buiten komende
stoom!
54
Page 55

STOOMGAREN
Copyright UNOLD AG | www.unold.de
Tip: Als u verschillende groentesoorten tegelijkertijd bereidt, stelt u de gaartijd altijd eerst op de
groente af die het snelst gaar is. Neem dan de kant-en-klare groente eruit en stel de gaartijd af op
de resterende groente.
1. Zorg ervoor dat het apparaat uitgeschakeld
is en op een egaal, vast oppervlak staat.
2. De bijgevoegde maatbeker compleet
met koud water vullen en de inhoud in
de kookschaal doen. Attentie: Maak de
kookschaal niet te vol, omdat anders tijdens
het gebruik kokend water naar buiten kan
spatten – gevaar voor verbranding! Er moet
met minimaal 80 ml water worden gevuld;
maximaal kan met 350 ml water worden
gevuld.
3. Aanwijzing: Gebruik uitsluitend koud water
om te stomen. Het gebruik van andere
vloeistoffen kan het verwarmingselement
van het apparaat beschadigen.
4. Bereid de gewenste levensmiddelen
voor en leg de levensmiddelen in het
gaarinzetelement.
5. Plaats nu het ei-inzetelement en het frame
en plaats het gaarinzetelement dan daarop.
6. Afhankelijk van de toebereiding kunt
u echter ook de levensmiddelen in de
witte gaarschalen doen en deze op het
gaarinzetelement zetten. Plaats hierbij
a.u.b. altijd eerst de grote gaarschaal en
vervolgens de twee kleinste gaarschalen in
de grote gaarschaal zetten.
7. Zet het deksel op het gaarinzetelement.
Let op dat de twee kleine openingen in de
bovenkant van het deksel aan de achterkant,
van u vandaan, zitten.
8. Steek de stekker in een veiligheidswandcontactdoos conform typeplaatje.
9. Selecteer met de draaiknop de gewenste
gaartijd. Er kan maximaal 40 minuten
worden ingesteld. Het apparaat begint te
verwarmen.
10. Na afloop van de gekozen tijd klinkt
opnieuw een akoestisch signaal en wordt
het apparaat automatisch uitgeschakeld. De
controlelamp dooft.
11. Controleer of de schakelaar op „OFF“ staat
en til het deksel voorzichtig eraf. Let op
naar buiten komende stoom - gevaar voor
verbranding!
12. Neem het gaarinzetelement eruit.
13. Trek na gebruik van het apparaat de
netstekker uit het stopcontact.
14. Tip: Laat het gaarmateriaal een beetje
afkoelen, voordat u het consumeert – gevaar
voor verbranding!
Of: Garen op twee niveaus
15. Bereid de gewenste levensmiddelen voor.
16. Doe een portie van de gewenste
levensmiddelen in de twee witte gaarschalen
en zet deze op het ei-inzetelement in het
apparaat.
17. Zet het frame daarop en plaats dan het
gaarinzetelement op het frame. Doe de
tweede portie in het gaarinzetelement.
55
Page 56

18. Zet het deksel op het gaarinzetelement.
Copyright UNOLD AG | www.unold.de
Let op dat de twee kleine openingen in de
bovenkant van het deksel aan de achterkant,
van u vandaan, zitten.
19. Steek de stekker in een veiligheidswandcontactdoos conform typeplaatje.
20. Selecteer met de draaiknop de gewenste
gaartijd. Er kan maximaal 40 minuten
worden ingesteld. Het apparaat begint te
verwarmen.
21. Na afloop van de gekozen tijd klinkt
opnieuw een akoestisch signaal en wordt
het apparaat automatisch uitgeschakeld. De
controlelamp dooft.
22. Controleer of de schakelaar op „OFF“ staat
en til het deksel voorzichtig eraf. Let op
REINIGEN EN ONDERHOUDEN
naar buiten komende stoom - gevaar voor
verbranding!
23. Neem het gaarinzetelement eruit.
24. Trek na gebruik van het apparaat de
netstekker uit het stopcontact.
25. Tip: Laat het gaarmateriaal een beetje
afkoelen, voordat u het consumeert – gevaar
voor verbranding!
VOORZICHTIG:
Het apparaat is tijdens en na het
gebruik zeer heet! Gevaar voor
verbranding door naar buiten komende
stoom!
Vóór het reinigen de netstekker
uittrekken.
Het apparaat laten afkoelen en
resterend water uit de kookschaal
doen.
1. Het apparaat nooit in water of andere
vloeistoffen dompelen.
2. Gebruik geen scherpe schuurmiddelen,
staalwol, metalen voorwerpen, hete
schoonmaakmiddelen of desinfecterende
middelen, omdat deze het apparaat kunnen
beschadigen.
3. Veeg de behuizing en de kookschaal met
een vochtige doek met een beetje mild
56
reinigingsmiddel af en veeg ze droog met
een zachte doek.
4. Reinigingsmiddel nooit direct op het
apparaat, maar altijd op de doek doen.
5. Deksel, maatbeker, ei-inzetelement, frame
en gaarinzetelement kunnen worden
afgewassen en met een zachte doek
worden afgedroogd. Deze onderdelen
kunnen ook in de afwasmachine worden
gereinigd (bovenste korf bij behoedzaam
reinigingsprogramma).
6. Kalkresten in de kookschaal kunnen met in
de handel verkrijgbare ontkalker conform
fabrieksinstructie worden opgelost.
Page 57

RECEPTEN
Copyright UNOLD AG | www.unold.de
Bouillon met ei
3 eieren, 50 ml melk, 50 ml slagroom, volgens
smaak: zout, peper, geraspte muskaatnoot
Alle ingrediënten met een vork of een garde
goed door elkaar mengen. Wij adviseren hierbij
om geen elektrische handmixer te gebruiken om
de vorming van poriën te voorkomen.
De massa zoals beschreven in hoofdstuk
„Bouillon met ei maken“, in het apparaat
toebereiden. Tip: Doe i.p.v. zout een beetje
kruidenzout of geraspte parmezaan in de massa.
Groente stomen
U kunt verse of diepvriesgroente gebruiken.
Diepvriesgroente niet laten ontdooien, maar
bevroren in de gaarschaal leggen en de gaartijd
met ca. 5 minuten verlengen. Bij groente met
een vaste stronk bv. broccoli of bloemkool de
stronk a.u.b. kruiselings insnijden. Afhankelijk
van de versheid, cultivatie, gesneden materiaal
en persoonlijke smaak (knapperig of zacht) kan
de gaartijd korter of langer zijn. Bij het garen
van groente in geen geval wijn, citroensap, azijn
e.d. toevoegen. Verfijn de groente pas na het
stoven a.u.b.
Tip voor een lichte basissaus bij groente
1 eetlepel boter, 1 kleine ui, 125 ml droge witte
wijn, 125 ml groentebouillon, 3 eetlepels crème
fraîche, zout, witte peper
Ui schoonmaken en in fijne blokjes snijden, in
boter lichtjes bruineren en met wijn en bouillon
afblussen. 5-7 minuten laten inkoken. Crème
fraîche doorroeren. De saus wordt bijzonder
luchtig als u deze opschuimt met de ESGE
Zauberstab® (Toverstaaf) met roerschijf. Met
zout en peper op smaak brengen en direct
serveren.
Vlees
Tip: U kunt in de stoomgaarder ook probleemloos
worstjes, vleesworst of voorgekookt vlees zoals
casselerrib (in schijven met een dikte van 1 cm)
opwarmen.
Gestoomde kalfsfilet met groenteroomsaus
250 g kalfsfilet (schijven van 1-1,5 cm dikte),
enkele takjes dragon, zout, peper, 50 g wortelen,
50 g selderie, 50 g prei, 50 g zucchini, 50 g
vastkokende aardappelen, 15 g boter, 15 g
meel, 25 ml droge witte wijn, 60 ml kalfsfond,
100 ml slagroom, zout, peper
Water in het apparaat doen, frame opzetten.
De filetschijven samen met de dragon op het
gaarinzetelement zetten en in het apparaat
ca. 15 minuten laten garen. Na afloop van de
gaartijd warmhouden.
In de tussentijd de groente schoonmaken en
in zeer kleine blokjes snijden. De boter in een
pan op het fornuis laten smelten en de groente
daarin lichtjes bruineren. De groente met meel
bestuiven en de kalfsfond samen met de witte
wijn en de room al roerend opgieten. Enkele
minuten laten reduceren en op smaak brengen
met zout en peper.
Kalfsfilet met de groentesaus klaarmaken. Daar
smaken verse asperges en jonge aardappels bij.
57
Page 58

Vis
Copyright UNOLD AG | www.unold.de
Zeezalm met groentegarnituur
1 zeezalmfilet (ca. 150 g), 1 middelgrote
wortel, 1/2 kleine zucchini, 1/2 kleiner koolrabi,
1/4 citroen, peper, zout, muskaat, gehakte
peterselie
Wortelen en koolrabi wassen en schillen, zucchini
wassen. Groente in ca. 3 mm dikke strepen
schaven (bv. met de ESGE-Zauberstab
®
en de
ESGE Zauberette®). Groente mengen een in het
gaarinzetelement leggen. Visfilet wassen, droog
betten, zout en peper toevoegen, met citroensap
besprenkelen. Een beetje muskaat eroverheen
strooien. Visfilet op de groente leggen. Deksel
sluiten ca. 10 minuten laten garen. Met verste
peterselie bestrooien en serveren met gekookte
aardappelen.
Sausen bij gestoomde vis
Het bovengenoemde visrecept is slechts een
suggestie uit het rijk van Neptunus. Gestoomde
vis kan met fijne sauzen steeds anders worden
geserveerd. Naast de in de handel verkrijgbare
kant-en-klare sauzen kan men veel sauzen snel
en vers toebereiden. De volgende recepten zijn
gebaseerd op een lichte basissaus. Bereid deze
sauzen a.u.b. in een pan op het fornuis, in geen
geval in de stoomgaarder.
minuten laten koken. Op smaak brengen met
zout, peper en muskaat.
Citroensaus
Een lichte saus toebereiden en op smaak
brengen met 2 EL citroensap en evtl. 1 theelepel
fijn geraspte citroenschil.
Currysaus
Een lichte saus toebereiden, hierbij echter
de melk vervangen door kokosmelk en 1 EL
currypoeder en 2 EL ananassap toevoegen.
Wijnsaus
Een lichte saus toebereiden, hierbij echter de
melk vervangen door droge witte wijn.
Lichte basissaus
30 g boter (2 EL), 30 g meel (2 EL), 125 ml
groentebouillon, 125 ml melk, zout, peper,
muskaat
Boter in een kleine pan op het fornuis laten
smelten, meel toevoegen een door elkaar roeren.
Hitte reduceren. Geleidelijk constant roerend
met koude bouillon en koude melk opgieten, 3
58
Page 59

GARANTIEVOORWAARDEN
Copyright UNOLD AG | www.unold.de
Wij geven op onze apparaten een garantietermijn van 24 maanden (12 maanden bij commerciële gebruik), gerekend vanaf de
dag van aanschaf. Deze garantie geldt voor schade, die bij correct gebruik aantoonbaar is veroorzaakt door een fout in de pro-
ductie. Binnen de garantietermijn verhelpen wij materiaal- en productiefouten door herstelling of vervanging naar onze keuze.
Onze garantie is slechts geldig voor in Duitsland en Oostenrijk verkopte apparaten. In andere landen a.u.b. de importeur
aanspreken. Apparaaten, waarvoor garantie in aanspraak wordt genomen, moeten ons samen met een kopie van de machineel
gegenereerde kassabon waaruit de koopdatum duidelijk wordt, alsmede een beschrijving van de fout goed verpakt aan onze
klantenservice worden toegezonden, porto betaald. Als er sprake van garantie is, worden de verzendingskosten in Duitsland
en Oostenrijk aan de klant vergoed. De garantie dekt geen schade veroorzaakt door slijtage, onbehoorlijk gebruik/foutieve han-
delingen en nietnaleving van de onderhouds- en reinigingsaanwijzingen. Het recht op garantie vervalt, wanneer reparaties of
manipulaties aan het apparaat door derden worden doorgevoerd. Eventuele rechten van de eindgebruiker t.o.v. de verkoper of
distributeur worden door deze garantie niet aangetast.
VERWIJDEREN VAN AFVAL / MILIEUBESCHERMING
Onze apparaten zijn geproduceerd met een hoge qualiteit voor een lange gebruik. Regelmatige onderhoud
en vakkundig reparaties door onze klantenservice verlengt de gebruiksduur. Wanneer het apparat defekt is
en kan niet meer gerepareerd worden, let op de volgende instructies. Dit product mag niet samen met het
normale huishoudelijke afval worden afgevoerd. U dient dit product bij een voor het recycleren van elek-
trische of elektronische apparaten aangewezen verzamelplaats in te leveren. Door het separaat inzamelen
en recycleren van afvalproducten helpt u mee bij het zuinig omgaan met de natuurlijke hulpbronnen en zorgt
u ervoor dat het product op een gezondheids- en milieuvriendelijke manier afgevoerd wordt.
De recepten in deze gebruiksaanwijzing zijn door de auteurs en door UNOLD AG zorgvuldig ontwikkeld
en getest. Een garantie kan er echter niet worden aanvaard. De auteurs en/of UNOLD AG en haar
gemachtigden kunnen in geen geval aansprakelijk worden gesteld voor letsel, materiële schade en
financiële schade.
59
Page 60

ISTRUZIONI PER L’USO MODELLO 38650
Copyright UNOLD AG | www.unold.de
DATI TECNICI
Potenza: 400 W, 220–240 V~, 50/60 Hz
Scocca: Plastica
Coperchio: Plastica
Misure: circa 19,0 x 19,0 x 24,5 cm (L/P/A)
Cavo di alimentazione: circa 60 cm
Peso: circa 1,1 kg
Dotazioni: Utilizzabile, a scelta, per cuocere massimo 8 uova o quale cuocivapore per
pesce, verdure ecc., protezione dai surriscaldamenti, arresto cottura con
dispositivo di disattivazione automatica, spia di controllo, capacità massima
350 ml d‘acqua
Accessori: 1 inserto di cottura, portauova, misurino con pungiuova, vaschetta per riso,
2 vaschette di cottura piccole, istruzioni per l‘uso
Con riserva di modifiche ed errori relativi a caratteristiche delle dotazioni, tecnica, colore e design
SIGNIFICATO DEI SIMBOLI
Questo simbolo segnala possibili pericoli in grado di provocare lesioni a persone o danni
all‘apparecchio.
Questo simbolo indica un possibile pericolo di ustioni. In presenza di questo simbolo
agire sempre con la massima cautela.
AVVERTENZE DI SICUREZZA
Si raccomanda di leggere e conservare le presenti istruzioni.
1.
L‘apparecchio può essere
utilizzato da bambini a par
tire dagli 8 anni di età e
da persone che presentano
ridotte capacità fisiche, sen
soriali o mentali o che difettano della necessaria espe-
60
rienza e/o conoscenze solo
se adeguatamente sorvegliati
o addestrati sull‘uso in sicu
-
rezza
dell‘apparecchio e se
-
a conoscenza dei rischi correlati. L‘apparecchio non è
-
un giocattolo. La pulizia e la
manutenzione dell‘apparec
-
chio possono essere effet-
Page 61

tuate da bambini soltanto
Copyright UNOLD AG | www.unold.de
sotto sorveglianza.
2. L‘apparecchio deve essere
tenuto fuori dalla portata dei
bambini di età inferiore a 3
anni oppure questi devono
essere costantemente sorve
-
gliati.
3.
I bambini di età compresa tra
3 e 8 anni dovrebbero accen
dere e spegnere l‘apparecchio soltanto quando questo
si trova nella posizione di
comando normalmente pre
vista, se sono sorvegliati o se
sono stati istruiti in relazione
all‘uso sicuro e hanno com
-
preso i pericoli risultanti. I
bambini di età compresa tra
3 e 8 anni non dovrebbero
collegare, comandare, pulire
o sottoporre a manutenzione
l‘apparecchio.
4.
CAUTELA - Parti di que
sto prodotto possono essere
molto calde e causare
ustioni! In presenza di bam
bini e persone a rischio usare
la massima cautela.
5.
I bambini vanno sorvegliati
per assicurarsi che non gio
chino con l‘apparecchio.
6.
Conservare l‘apparecchio
fuori dalla portata dei bam
bini.
7.
L’apparecchio è progettato
esclusivamente per l’uso
domestico o per impieghi
similari, ad es.
in aree cucina di negozi,
uffici o altri luoghi di lavoro,
aziende agricole,
per l‘uso da parte degli
ospiti di hotel, motel o altre
strutture ricettive,
in pensioni private o case di
vacanza.
8. Non aprire mai la scocca
dell‘apparecchio. Sussiste il
pericolo di scosse elettriche.
9. Controllare regolarmente
l’apparecchio, la spina e il
cavo di alimentazione, per
vedere se vi sono tracce di
usura o danni. In caso di
danni al cavo di collega
mento o ad altre parti, inviare
l’apparecchio o la base alla
nostra assistenza clienti per
la verifica o la riparazione.
Riparazioni non idonee pos
sono infatti causare notevoli pericoli per l‘utente e
comportano il decadere della
garanzia.
10.
Se il cavo di collegamento di
questo apparecchio è dan
neggiato, al fine di evitare
pericolosità, deve essere
sostituito dal produttore, dal
servizio clienti o da una per
sona analogamente qualificata.
61
Page 62

Avvertenze per l‘installazione e il
Copyright UNOLD AG | www.unold.de
funzionamento sicuro dell‘apparecchio
11.
Per ragioni igieniche le
uova forate con il pungiuova
devono venir cotte immedia
tamente. Se le uova non vengono cotte immediatamente
devono venir buttate.
12.
Collegare l’apparecchio sol
tanto a corrente alternata
con la tensione indicata sulla
targhetta.
13.
Questo apparecchio non
deve essere comandato tra
mite timer esterni o sistemi
di telecomando.
14.
Non immergere mai l‘appa
recchio o il cavo di alimenta-
zione in acqua o altri liquidi.
15.
La base non deve entrare in
contatto con acqua o altri
liquidi. Se ciò dovesse acca
-
dere, prima del riutilizzo
deve comunque essere completamente asciutta.
16.
La base non deve essere
lavata in lavastoviglie.
17. Non toccare mai né l‘appa
recchio né il cavo di alimentazione a mani bagnate.
18.
Per motivi di sicurezza non
posizionare mai l‘apparec
chio su superfici calde, vassoi metallici o basi umide.
19.
L‘apparecchio e il cavo di
alimentazione non devono
essere impiegati nei pressi
di fiamme.
20. Non usare prese multiple
per collegare l‘apparecchio –
pericolo di incendi. Se si usa
un cavo di prolunga, control
lare che sia integro e idoneo
per la rispettiva potenza, in
quanto altrimenti può surri
scaldarsi.
21.
Non alimentare l‘apparec-
chio tramite prese senza conduttore di protezione. Nei
casi dubbi far verificare l‘impianto elettrico domestico da
un tecnico.
22.
Utilizzare sempre l‘appa
recchio su una superficie
piana, sgombra e resistente
al calore.
23.
Assicurarsi che il cavo di ali
mentazione non penda dal
piano di lavoro, in quanto ciò
potrebbe causare infortuni,
ad es. se un bambino piccolo
dovesse strattonarlo.
24.
Il cavo di alimentazione deve
essere posato in modo che
non possa essere strattonato
o non ci si possa inciampare
sopra.
25. Non avvolgere mai il cavo di
alimentazione attorno all‘ap
parecchio, bensì attorno
all‘apposito avvolgicavo sulla
base dell‘apparecchio.
62
Page 63

26. Staccare il cavo di alimen-
Copyright UNOLD AG | www.unold.de
tazione dalla presa elettrica
sempre mediante la spina,
mai tramite il cavo.
27.
Non trasportare la base per
il cavo.
28. Usare l‘apparecchio solo in
interni.
29. Non usare mai l‘apparec
chio nei pressi di materiali
infiammabili come ad es.
tende e nemmeno in forno o
nel microonde.
30.
Assicurarsi che il coperchio
dell‘apparecchio sia sem
pre saldamente chiuso, in
modo da evitare di ferirsi con
spruzzi d‘acqua calda.
31.
Evitare di riempire eccessi
-
vamente il contenitore.
32.
Utilizzare la funzione vapore
soltanto per cuocere a vapore
alimenti.
33. Per prevenire danni all‘ap
parecchio non metterlo mai
in funzione senza averlo
riempito con una sufficiente
quantità d‘acqua.
34.
Accertarsi che i pericoli da
vapore fuoriuscente o da
schizzi d‘acqua calda siano
noti a tutti gli utenti, in par
ticolare ai bambini – pericolo
di ustioni!
35.
Durante l‘uso la superficie
del coperchio diventa calda.
Pertanto eventualmente uti
lizzare delle presine.
36.
Non spostare l‘apparecchio
finché è in funzione, in modo
da evitare ustioni causate da
spruzzi d‘acqua.
37. Per evitare danni, non usare
l’apparecchio con accessori
di altri marchi o produttori.
38. Dopo l’utilizzo e prima della
pulizia, staccare la spina
dalla presa elettrica. Non
lasciare mai l’apparecchio
incustodito quando la spina
è inserita.
39. Prima della pulizia far raf
-
freddare l‘apparecchio.
63
Page 64

ATTENZIONE:
Copyright UNOLD AG | www.unold.de
Durante il funzionamento l‘apparecchio diventa molto caldo!
Non aprire mai la scocca dell‘apparecchio. Pericolo di scossa
elettrica.
Il produttore non si assume alcuna responsabilità per un montaggio scorretto, un utilizzo inappropriato o
errato oppure in seguito a riparazioni effettuate da officine o persone non autorizzate.
PRIMA DEL PRIMO UTILIZZO
1. Rimuovere tutti i materiali da imballo e le
eventuali protezioni da trasporto. Tenere il
materiale da imballo fuori dalla portata dei
bambini – pericolo di soffocamento!
2. Pulire tutte le parti con un panno umido,
come descritto nel capitolo „Pulizia e
manutenzione“.
COTTURA DI UOVA
1. Accertarsi che l’apparecchio sia spento e
appoggiato su una superficie piana e solida.
2. Riempire il misurino fornito in dotazione
con acqua fredda e versarne il contenuto
nella vaschetta di cottura. Attenzione: Non
riempire eccessivamente la vaschetta, in
quanto altrimenti durante il funzionamento
l’acqua bollente può schizzare fuori –
pericolo di ustioni! La vaschetta deve essere
riempita con minimo 80 ml e massimo
350 ml d’acqua.
3. Avvertenza: L’apparecchio lavora con
comando temporale della cottura e quindi
l’acqua non deve essere misurata in base al
numero di uova.
3. Controllare che l‘apparecchio sia
stabilmente posizionato.
4. Forare le uova sull’estremità più grossa e
arrotondata di modo che durante la cottura
non scoppino.
Attenzione: Pericolo di ferirsi con il
pungiuova
5. Posizionare le uova nel portauova con
l’estremità più grossa e arrotondata rivolta
verso l’alto.
6. Mettere il portauova con le uova nella
vaschetta di cottura e chiuderla con il
coperchio. Accertarsi che le due piccole
aperture sul lato superiore del coperchio si
trovino dietro, sulla parte opposta rispetto
all’utilizzatore.
64
Page 65

7. Inserire la spina in una presa con contatti di
Copyright UNOLD AG | www.unold.de
protezione secondo la targhetta.
8. Con il selettore impostare il grado di durezza
desiderato:
9. I simboli indicano il relativo grado di
durezza.
Molle
Medio
Sodo
10. Queste indicazioni valgono per uova di
media grandezza. Il risultato può variare
leggermente a seconda del numero e delle
dimensioni della uova. E’ possibile un
adattamento personalizzato continuo. Se
durante la cottura si imposta un tempo
differente il processo ricomincia.
11. L’apparecchio inizia a scaldare.
12. Non appena il processo di cottura è
terminato, vengono inviati diversi segnali
acustici e l’apparecchio si spegne.
13. Spegnere completamente l’apparecchio
tramite l’ selettore
14. Rimuovere il coperchio.
Cautela:
Attenzione al vapore fuoriuscente!
15. Dato che il coperchio è molto caldo,
afferrarlo soltanto per i manici e appoggiarlo
solamente su superfici resistenti al calore!
16. Estrarre il portauova con le uova dalla
vaschetta di cottura e raffreddare le uova
in acqua fredda. Se le uova non vengono
raffreddate in acqua fredda subito dopo il
segnale acustico, continuano a rassodarsi.
17. Dopo l’utilizzo staccare la spina
dell’apparecchio dalla presa elettrica.
ATTENZIONE:
Durante e dopo l’utilizzo l’apparecchio
è molto caldo! Pericolo di ustioni da
vapore fuoriuscente!
PREPARAZIONE DELLA ROYALE
1. Con l‘apparecchio è possibile preparare tra
l‘altro anche la royale.
2. Preparare il composto di uova desiderato.
3. Riempire il misurino fornito in dotazione
con acqua fredda e versarne il contenuto
nella vaschetta di cottura. Attenzione: Non
riempire eccessivamente la vaschetta, in
quanto altrimenti durante il funzionamento
l‘acqua bollente può schizzare fuori –
pericolo di ustioni! La vaschetta deve essere
riempita con minimo 80 ml e massimo
350 ml d‘acqua.
4. Mettere il portauova sulla vaschetta di
cottura.
65
Page 66

5. Ungere abbondantemente le due vaschette
Copyright UNOLD AG | www.unold.de
di cottura piccole o quella grande per il riso
e versarvi il composto di uova.
6. Posizionare le vaschette di cottura sul
portauova e chiudere l‘apparecchio con il
coperchio. Accertarsi che le due piccole
aperture sul lato superiore del coperchio si
trovino dietro, sulla parte opposta rispetto
all‘utilizzatore.
7. Inserire la spina in una presa con contatti di
protezione secondo la targhetta.
8. Con il selettore selezionare il tempo di
cottura desiderato.
9. Quando il tempo di cottura è terminato,
vengono inviati diversi segnali acustici e
l‘apparecchio si spegne.
10. Spegnere completamente l’apparecchio
tramite l’ selettore.
COTTURA A VAPORE
11. Rimuovere il coperchio.
Cautela:
Attenzione al vapore fuoriuscente!
12. Dato che il coperchio è molto caldo,
afferrarlo soltanto per i manici e appoggiarlo
solamente su superfici resistenti al calore!
13. Estrarre le vaschette di cottura.
Durante e dopo l’utilizzo l’apparecchio
è molto caldo! Pericolo di ustioni da
vapore fuoriuscente!
Consiglio: Se si cuociono contemporaneamente diverse varietà di verdura, impostare sempre il tempo
di cottura prima in base alla verdura che cuoce più rapidamente. Quindi estrarre le verdure pronte e
impostare il tempo di cottura per quelle rimanenti.
1. Accertarsi che l‘apparecchio sia spento e
appoggiato su una superficie piana e solida.
2. Riempire completamente il misurino fornito
in dotazione con acqua fredda e versarne
il contenuto nella vaschetta di cottura.
Attenzione: Non riempire eccessivamente
la vaschetta, in quanto altrimenti durante
il funzionamento l‘acqua bollente può
schizzare fuori – pericolo di ustioni! La
vaschetta deve essere riempita con minimo
80 ml e massimo 350 ml d‘acqua.
66
3. Avvertenza: Per cuocere a vapore usare
esclusivamente acqua fredda. L‘uso di
liquidi diversi può danneggiare l‘elemento
riscaldatore dell‘apparecchio.
4. Preparare gli alimenti desiderati e metterli
nell‘inserto di cottura.
5. Quindi inserire il portauova e il telaietto e
metterci sopra l‘inserto di cottura.
6. Tuttavia, a seconda della preparazione, si
possono mettere gli alimenti anche nelle
vaschette di cottura bianche e quindi
Page 67

mettere tali vaschette sull‘inserto di cottura.
Copyright UNOLD AG | www.unold.de
Inserire per prima sempre la vaschetta
di cottura grande e poi mettere le due
vaschette piccole in quella grande.
7. Chiudere l‘inserto di cottura con il
coperchio. Accertarsi che le due piccole
aperture sul lato superiore del coperchio si
trovino dietro, sulla parte opposta rispetto
all‘utilizzatore.
8. Inserire la spina in una presa con contatti di
protezione secondo la targhetta.
9. Con il selettore selezionare la temperatura
desiderata. Si possono impostare massimo
40 minuti. L‘apparecchio inizia a scaldare.
10. Una volta trascorso il tempo selezionato è
nuovamente inviato un segnale acustico e
l‘apparecchio si spegne automaticamente.
La spia di controllo si spegne.
11. Accertarsi che l‘interruttore sia in posizione
„OFF“ e alzare cautamente il coperchio.
Prestare attenzione al vapore fuoriuscente –
pericolo di ustioni!
12. Rimuovere l‘inserto di cottura.
13. Quando si è finito di usare l‘apparecchio
staccare la spina dalla presa elettrica.
14. Consiglio: Lasciar raffreddare un pochino i
cibi prima di mangiarli – pericolo di ustioni!
Oppure: Cottura su due livelli
15. Approntare gli alimenti desiderati.
16. Mettere una porzione del cibo desiderato
nelle due vaschette di cottura bianche
e poi mettere le vaschette sul portauova
nell‘apparecchio.
17. Metterci sopra il telaietto e quindi
posizionare sul telaietto l‘inserto di cottura.
Mettere nell‘inserto di cottura la seconda
porzione.
18. Chiudere l‘inserto di cottura con il
coperchio. Accertarsi che le due piccole
aperture sul lato superiore del coperchio si
trovino dietro, sulla parte opposta rispetto
all‘utilizzatore.
19. Inserire la spina in una presa con contatti di
protezione secondo la targhetta. Accendere
l‘apparecchio tramite l‘interruttore
20. Con il selettore selezionare la temperatura
desiderata. Si possono impostare massimo
40 minuti. L‘apparecchio inizia a scaldare.
21. Una volta trascorso il tempo selezionato è
nuovamente inviato un segnale acustico e
l‘apparecchio si spegne automaticamente.
La spia di controllo si spegne.
22. Accertarsi che l‘interruttore sia in posizione
„OFF“ e alzare cautamente il coperchio.
Prestare attenzione al vapore fuoriuscente –
pericolo di ustioni!
23. Rimuovere l‘inserto di cottura.
24. Quando si è finito di usare l‘apparecchio
staccare la spina dalla presa elettrica.
25. Consiglio: Lasciar raffreddare un pochino i
cibi prima di mangiarli – pericolo di ustioni!
Durante e dopo l’utilizzo l’apparecchio
è molto caldo! Pericolo di ustioni da
vapore fuoriuscente!
67
Page 68

PULIZIA E CURA
Copyright UNOLD AG | www.unold.de
Prima di procedere alla pulizia
staccare la spina.
Lasciar raffreddare l‘apparecchio
e eventualmente svuotare l‘acqua
residua dalla vaschetta di cottura.
1. Non immergere mai l‘apparecchio in acqua
o altri liquidi.
2. Non usare prodotti abrasivi, lana d’acciaio,
oggetti metallici, detergenti caldi o
disinfettanti in quanto possono causare
danni.
3. Strofinare la scocca e la vaschetta di cottura
con un panno umido e un po‘ di detersivo
RICETTE
Royale
3 uova, 50 ml di latte, 50 ml di panna, secondo
i gusti personali: sale, pepe, noce moscata
macinata
Sbattere accuratamente tutti gli ingredienti con
una forchetta o una frusta. Consigliamo di non
usare sbattitori elettrici, al fine di evitare la
formazione di pori.
Preparare il composto nell’apparecchio, come
illustrato nel capitolo «Preparazione della
royale». Consiglio: Invece del sale aggiungere
al composto sale alle erbe o parmigiano
grattugiato.
Cottura al vapore di verdure
Si possono utilizzare verdure fresche o
surgelate. Non scongelare le verdure congelate,
bensì metterle nella vaschetta di cottura ancora
delicato e quindi asciugarli con un panno
morbido.
4. Non mettere mai il detersivo direttamente
sull‘apparecchio, bensì sul panno.
5. Il coperchio, il misurino, il portauova, il
telaietto e l‘inserto di cottura possono essere
lavati e asciugati con un panno morbido.
Queste parti possono essere lavate anche
in lavastoviglie (nel cestello superiore e con
programma di lavaggio delicato).
6. I residui di calcare nella vaschetta di cottura
possono venir eliminati con un comune
decalcificante seguendo le istruzioni del
produttore.
congelate e aumentare il tempo di cottura di
circa 5 minuti. Per le verdure con gambo duro,
come ad es. broccoli o cavolfiore, tagliare il
gambo a croce. Il tempo di cottura può essere
più corto o più lungo a seconda della freschezza,
del tipo di coltivazione, del taglio e della
conservazione della verdura nonché a seconda
dei gusti personali (croccante o tenera). Durante
la cottura delle verdure non aggiungere mai
vino, succo di limone, aceto o simili. Condire le
verdure solo dopo la cottura.
Consiglio per una salsa base leggera per verdure
1 cucchiaio di burro, 1 cipolla piccola, 125 ml
di vino bianco secco, 125 ml di brodo di verdure,
3 cucchiai di crème fraîche, sale, pepe bianco
Mondare la cipolla e tagliarla a cubetti piccoli,
rosolarla nel burro e stemperarla con vino e
68
Page 69

brodo. Lasciar restringere per 5-7 minuti.
Copyright UNOLD AG | www.unold.de
Amalgamare la crème fraîche. La salsa riesce
particolarmente ariosa se la si lavora con l’ESGE
Zauberstab
®
con disco frullino. Insaporire con
sale e pepe e servire immediatamente.
Carne
Consiglio: Nel cuocivapore è anche possibile
riscaldare senza problemi salsicce, wurstel
o carne precotta (tagliata a fette di 1 cm di
spessore).
Filetto di vitello al vapore con salsa alla panna e
verdure
250 g di filetto di vitello (fette di 1-1,5 cm
di spessore), alcuni rametti di dragoncello,
sale, pepe, 50 g di carote, 50 g di sedano, 50
g di porro, 50 g di zucchine, 50 g patate che
tengano bene la cottura, 15 g di burro, 15 g
di farina, 25 ml di vino bianco secco, 60 ml di
fondo di vitello, 100 ml di panna, sale, pepe
Versare l’acqua nell’apparecchio, posizionare
il telaietto. Mettere le fette di filetto con il
dragoncello nell’inserto di cottura e farle cuocere
nell’apparecchio per 15 minuti. Terminata la
cottura tenerle in caldo.
Nel frattempo mondare le verdure e tagliarle
a cubetti piccolissimi. Far fondere il burro
in una pentola e rosolarvi dentro le verdure.
Cospargere le verdure con farina e, mescolando
continuamente, aggiungere il fondo di vitello
assieme al vino bianco e alla panna. Lasciare
restringere per alcuni minuti e aggiustare di sale
e pepe.
Servire il filetto di vitello con la salsa alle
verdure. Si abbina bene con asparagi freschi e
patate novelle.
Pesce
Merlano nero con contorno di verdure
1 filetto di merlano nero (circa 150 g), 1
carota media, 1/2 zucchina piccola, 1/2 cavolo
rapa piccolo, 1/4 di limone, pepe, sale, noce
moscata, prezzemolo tritato
Lavare e sbucciare la carota e il cavolo rapa,
lavare la zucchina. Tagliare le verdure a
strisce spesse circa 3 mm (ad es. con l’ESGEZauberstab® e l’ESGE Zauberette®). Mescolare
le verdure e metterle nell’inserto di cottura.
Lavare il filetto di pesce, asciugarlo con carta da
cucina, salarlo e peparlo, irrorarlo con succo di
limone. Cospargerci sopra della noce moscata.
Mettere il filetto di pesce sulle verdure. Chiudere
il coperchio e cuocere per circa 10 minuti.
Cospargere con prezzemolo fresco e servire con
patate al sale.
Salse per pesce al vapore
La ricetta di pesce su illustrata è solo un
suggerimento dal regno di Nettuno. Abbinato a
salse raffinate, il pesce al vapore assume sapori
sempre nuovi. Oltre alle salse pronte reperibili
nei negozi, è possibile preparare rapidamente
tante salse buone e fresche. Le seguenti ricette
si basano tutte su una salsa base chiara. Queste
salse vanno preparate in una pentola sui fornelli,
non si possono fare nel cuocivapore.
Salsa base chiara
30 g di burro (2 cucchiai), 30 g di farina (2
cucchiai), 125 ml di brodo di verdure, 125 ml
di latte, sale, pepe, noce moscata
Far fondere il burro in un pentolino sul fornello,
aggiungere la farina e mescolare. Abbassare il
calore. Aggiungere gradualmente il brodo freddo
e il latte freddo mescolando continuamente,
69
Page 70

lasciar sobbollire per 3 minuti. Insaporire con
Copyright UNOLD AG | www.unold.de
sale, pepe e noce moscata.
Salsa al limone
Preparare una salsa chiara e insaporirla con 2
cucchiai di succo di limone ed eventualmente 1
cucchiaino di buccia di limone grattugiata fine.
Salsa al curry
Preparare una salsa chiara, sostituendo però
il latte con latte di cocco e aggiungendo 1
cucchiaio di polvere di curry e 2 cucchiai di
succo d’ananas.
Salsa al vino
Preparare una salsa chiara, sostituendo però il
latte con vino bianco secco.
NORME DIE GARANZIA
I nostri prodotti sono garantiti per 24 mesi, 12 mesi in caso di uso professionale, dalla data di acquisto per i guasti manife-
statisi durante un utilizzo conforme alle disposizioni e attribuibili in modo dimostrabile a difetti di fabbricazione. Nel periodo
di garanzia porremo rimedio ai difetti materiali e di produzione secondo la nostra valutazione, procedendo alla riparazione
o alla sostituzione dell’apparecchio. Le nostre prestazioni di garanzia valgono esclusivamente per gli apparecchi venduti
in Germania e Austria. In tutti gli altri casi rivolgersi all‘importatore. Gli apparecchi per i quali si richiede la riparazione di
guasti ci devono essere inviati con spedizione affrancata e debitamente imballati, unitamente a una copia del documento
di acquisto redatto a macchina dal quale risulti la data di vendita, nonché la descrizione del guasto. In caso di garanzia al
cliente verranno rimborsati i costi di spedizione sostenuti in Germania e Austria. Sono esclusi dalla garanzia i guasti dovuti
all’usura, all’uso inappropriato o al mancato rispetto delle regole di manutenzione. Il diritto di garanzia decade qualora siano
state effettuate riparazioni o interventi da parte di terzi. Eventuali diritti del consumatore finale verso il venditore o negoziante
non vengono limitati dalla presente garanzia.
SMALTIMENTO / TUTELA DELL’AMBIENTE
I nostri apparecchi vengono prodotti rispettando un elevato standard qualitativo per una lunga durata
di utilizzo. Una corretta manutenzione e riparazioni adeguate a cura dal nostro servizio clienti possono
prolungare la durata di utilizzo del prodotto. Se un apparecchio è difettoso e non più riparabile, per il suo
smaltimento si presti attenzione ai punti che seguono. Questo prodotto non deve essere smaltito unitamente
ai comuni rifiuti domestici. Consegnare il prodotto a un centro di raccolta per il riciclaggio dei rifiuti elettrici
o elettronici. Con la raccolta differenziata dei rifiuti e dei prodotti riciclabili è possibile contribuire alla tutela delle risorse
naturali e far smaltire il prodotto nel rispetto dell’ambiente e della salute.
Le ricette di queste istruzioni per l’uso sono state ideate e verificate dagli autori e da UNOLD AG.
Tuttavia non può essere emessa alcuna garanzia. È esclusa la responsabilità degli autori, di UNOLD
AG e dei rispettivi incaricati per danni provocati a persone, cose o materiali.
70
Page 71

MANUAL DE INSTRUCCIONES MODELO 38650
Copyright UNOLD AG | www.unold.de
DATOS TÉCNICOS
Potencia: 400 W, 200–240 V~, 50/60 Hz
Carcasa: plástico
Tapa: plástico
Dimensiones: aprox. 19,0 x 19,0 x 24,5 cm (An/Pr/Al)
Cable de alimentación: aprox. 60 cm
Peso: aprox. 01,1 kg
Equipamiento opcionalmente para la cocción de hasta 8 huevos o como vaporera para
pescado, verdura, etc., protección de sobrecalentamiento, parada de cocción
con sistema automático de desconexión, piloto de control, capacidad
máxima de 350 ml de agua
Accesorios: 1 cestillo, accesorio para huevos, vaso medidor con perforador de
huevos, cuenco para arroz, 2 cuencos pequeños para cocción, manual de
instrucciones
Reservado el derecho de modificaciones y errores en características de equipamiento, técnica, colores
y diseño
EXPLICACIÓN DE LOS SÍMBOLOS
Este símbolo advierte de posibles riesgos que pueden traer consigo lesiones personales
o daños al aparato.
Este símbolo hace referencia a un eventual riesgo de quemaduras. Proceda siempre con
especial cuidado.
INDICACIONES DE SEGURIDAD
Por favor lea y guarde las
siguientes instrucciones.
1. Este aparato puede ser
manejado por niños a partir
de 8 años y por personas con
una capacidad física, mental
o sensorial reducida o caren
tes de experiencia y/o cono-
cimientos siempre que estén
supervisados o hayan sido
correspondientemente ins
truidos en el manejo seguro
de dicho aparato y comprendan los peligros que con-
-
lleva. Este aparato no es ningún juguete. Los niños solo
71
Page 72

pueden llevar a cabo la lim-
Copyright UNOLD AG | www.unold.de
pieza y el mantenimiento del
mismo si están supervisados
por un adulto.
2.
Mantener vigilados o aleja
dos del aparato a los niños
menores de 3 años.
3.
Los niños de entre 3 y 8
años solo deben conectar
y desconectar el aparato si
se encuentra en su posición
de manejo normal previsto,
si son supervisados o han
sido instruidos en el manejo
seguro del aparato y han
comprendido los peligros
resultantes del mismo. Los
niños de entre 3 y 8 años no
deberán conectar, manejar,
limpiar ni realizar el mante
-
nimiento del aparato.
4.
PRECAUCIÓN - ¡Algunas de
las piezas de este producto
pueden llegar a calentarse
demasiado y causar quema
duras! Tenga especial cuidado siempre que haya niños
o personas más vulnerables
presentes.
5.
Los niños deben ser supervi
sados para asegurar que no
jueguen con el aparato.
6.
Guarde el aparato fuera del
alcance de los niños.
7. El aparato está destinado
exclusivamente al uso
doméstico o a fines de uso
similares, por ejemplo,
cocinas tipo office en comer
cios, oficinas u otros lugares
de trabajo,
empresas agrícolas,
para el uso por parte de
clientes en hoteles, moteles
u otros establecimientos de
alojamiento colectivo,
en pensiones privadas o en
casas vacacionales.
8. No abra la carcasa del apa
rato en ningún caso. Existe
peligro de descarga eléctrica.
9.
Revise periódicamente si el
aparato, el enchufe y el cable
de alimentación presentan
desgaste o daños. En caso
de daños en el cable de ali
mentación o en otras piezas,
envíe el aparato o el zócalo
para su verificación y repa
ración a nuestro servicio de
atención al cliente. Las reparaciones inadecuadas pueden ocasionar considerables
peligros
para el usuario y
tienen como consecuencia la
exclusión de la garantía.
10.
En caso de que la línea
de alimentación del aparato
esté dañada, para evitar peli
gros la deberá cambiar el
fabricante, su Servicio Pos-
-
-
-
-
-
72
Page 73

tventa u otra persona igual-
Copyright UNOLD AG | www.unold.de
mente cualificada
Indicaciones de seguridad para la
colocación segura y el funcionamiento del aparato
11.
Por razones higiénicas, los
huevos perforados con el per
forador de huevos se deben
cocer inmediatamente. Si no
puede utilizar los huevos de
inmediato, deséchalos.
12.
Conecte el aparato solo a
corriente alterna con una
tensión de acuerdo con la
placa de características.
13. Este aparato no debe utili
-
zarse con un reloj programador externo ni con un sis-
tema de mando a distancia.
14.
No sumerja nunca el aparato
o el cable de alimentación en
agua o en otros líquidos.
15. La base no debe entrar en
contacto con agua u otros
líquidos. Si a pesar de ello,
esto ocurriese alguna vez,
deberá estar completamente
seca antes de un nuevo uso.
16. La base no se debe lavar en
el lavavajillas.
17. No toque nunca el aparato o
el cable de alimentación con
las manos húmedas.
18. Por razones de seguridad
jamás coloque el aparato
sobre superficies calientes,
sobre una bandeja metálica
o sobre una base mojada.
19. El aparato o el cable de ali
mentación no deben utilizarse cerca de llamas.
20.
No utilice enchufes múlti-
ples para la conexión eléctrica del aparato. Peligro de
incendio. Si usa un cable de
prolongación, compruebe si
está intacto y si es adecuado
para
la potencia correspon
diente porque de lo contrario
puede producirse un sobrecalentamiento.
21.
No utilice el aparato en una
toma de corriente sin con
ductor protector. En caso de
dudas, encargue la revisión
de la instalación doméstica
eléctrica a un profesional.
22.
Use siempre el aparato sobre
una superficie libre, plana y
resistente al calor.
23. Preste atención a que el
cable de alimentación no
cuelgue sobre el borde de la
superficie de trabajo, dado
que ello puede conducir a
accidentes, si p. ej. niños
pequeños tiran de él.
24. El cable de alimentación se
debe colocar de tal manera
de no sea posible tirar de él
ni provocar un tropiezo .
25. Nunca enrolle el cable de
alimentación alrededor del
73
Page 74

aparato, sino alrededor del
Copyright UNOLD AG | www.unold.de
alojamiento de cables previsto para ello en la parte
inferior de la base.
26.
Extraiga el cable de ali
mentación del enchufe de
conexión sujetándolo por el
conector. No tire nunca del
cable de conexión.
27.
No transporte la base del
cable de conexión.
28. Utilice el aparato solo en
espacios interiores.
29. No utilice nunca el aparato
cerca de materiales inflama
bles como, p. ej., cortinas, ni
en el horno o en el microon-
das.
30.
Asegúrese de que la tapa del
aparato esté siempre cerrada
para evitar lesiones por sal
-
picaduras de agua caliente.
31.
Evite llenar el recipiente en
exceso.
32. Utilice la función de vapor
solo para cocinar alimentos
al vapor.
33. No opere nunca el aparato
sin haber vertido el agua
suficiente para evitar daños
en el mismo.
34. Asegúrese de que todos los
usuarios, especialmente los
niños, conozcan el peligro
por la salida de vapor o sal
picaduras de agua caliente.
¡Peligro de quemaduras!
35.
La superficie de la tapa se
calienta durante el funcio
namiento. Por ello, en caso
necesario, utilice agarraderas.
36.
No desplace el aparato mien-
tras esté en funcionamiento
para evitar escaldaduras por
salpicaduras de agua.
37.
Para evitar daños, no use
el equipo con accesorios de
otros fabricantes o marcas.
38. Después del uso, así como
antes de la limpieza, des
enchufe el aparato. No deje
nunca el aparato sin vigilancia cuando esté enchufado.
39.
Deje enfriar el aparato antes
de la limpieza.
PRECAUCIÓN:
el aparato se calienta mucho durante el funcionamiento.
¡Peligro de quemaduras por salida de vapor!
No abra la carcasa del aparato en ningún caso. Existe peligro
de descarga eléctrica.
El fabricante no asume ninguna responsabilidad en caso de montaje defectuoso, uso inapropiado o
incorrecto o después de reparaciones realizadas por terceros no autorizados.
74
Page 75

ANTES DEL PRIMER USO
Copyright UNOLD AG | www.unold.de
1. Retire todos los materiales de embalaje y,
dado el caso, los seguros de transporte.
Mantenga los materiales de embalaje
alejados de los niños. ¡Peligro de asfixia!
2. Limpie todas las piezas con un paño húmedo
como se describe en el capítulo “Limpieza
y cuidado”.
COCER HUEVOS
1. Asegúrese de que el aparato esté
desconectado y colocado sobre una
superficie plana y estable.
2. Llenar el vaso medidor adjunto con agua
fría y verter el contenido en el cuenco de
cocción. Atención: No llene en exceso el
cuenco de cocción dado que, de lo contrario,
podría salpicar agua hirviendo durante el
funcionamiento. ¡Peligro de quemaduras!
Se deben llenar como mínimo 80 ml de
agua y como máximo 350 ml de agua.
3. Indicación: El aparato funciona con un
control de tiempo del proceso de cocción,
de modo que no se debe mediar el agua por
cada huevo.
4. Perforar los huevos por el extremo más
plano para que no estallen cuando se están
cocinando.
Atención: Peligro de lesiones por el
perforador de huevos
5. Colocar los huevos con el extremo más plano
hacia arriba en el accesorio para huevos.
6. Colocar el accesorio para huevos con los
huevos sobre el cuenco de cocción y poner
3. Compruebe si el aparato está colocado de
forma estable.
la tapa. Asegúrese de que los dos orificios
pequeños del lado superior de la tapa
señalen hacia atrás, alejados de usted.
7. Enchufe la clavija en una caja de enchufe
con contacto de tierra según la placa de
características.
8. Ajustar el grado de dureza deseado en el
regulador giratorio:
9. Los símbolos indican el grado de dureza
correspondiente.
Pasado por agua
Medio cocido
Duro
10. Estas indicaciones son válidas para huevos
de tamaño mediano. El resultado puede
diferir ligeramente según el tamaño y la
cantidad de huevos. Se puede ajustar
individualmente de forma continua. Si
ajusta otro tiempo durante el proceso de
cocción, este proceso se inicia de nuevo.
11. El aparato empieza a calentar.
12. En cuanto haya finalizado el proceso de
cocción, se emiten varias señales acústicas
y el aparato se desconecta.
75
Page 76

13. Desconecte completamente el aparato en el
Copyright UNOLD AG | www.unold.de
regulador giratorio.
14. Quite la tapa.
Precaución:
¡Tenga cuidado con la salida de vapor!
15. ¡Dado que la tapa se calienta mucho, agarre
el aparato solo de las asas y colóquelo
únicamente sobre superficies resistentes a
calor!
16. Retirar el accesorio para huevos con los
huevos del cuenco de cocción y pasarlos
por agua fría. Si después de escuchar la
señal acústica no se pasan los huevos
directamente por agua fría, estos se
endurecerán.
PREPARAR „EIERSTICH“
17. Para mantenerlos calientes, volver a
colocar el accesorio con los huevos sobre el
cuenco de cocción, poner la tapa y ajustar
el regulador giratorio en “Keep warm”
(mantener caliente).
18. Después del uso, retire la clavija del aparato
de la caja de enchufe.
PRECAUCIÓN:
El aparato está muy caliente durante
y después del funcionamiento. ¡Peligro
de quemaduras por salida de vapor!
1. Cuajada de huevo alemana como guarnición
de sopa:
2. Entre otras recetas, con este aparato puede
preparar una cuajada de huevo alemana
servida como guarnición en la sopa.
3. Prepare la masa para la guarnición deseada.
4. Llenar el vaso medidor adjunto con agua
fría y verter el contenido en el cuenco de
cocción. Atención: No llene en exceso el
cuenco de cocción dado que, de lo contrario,
podría salpicar agua hirviendo durante el
funcionamiento. ¡Peligro de quemaduras!
Se deben llenar como mínimo 80 ml de
agua y como máximo 350 ml de agua.
5. Coloque el accesorio sobre el cuenco de
cocción.
76
6. Engrase bien los dos cuencos de cocción o
el cuenco de arroz grande y añada la masa
de huevos.
7. Coloque los cuencos de cocción sobre el
accesorio para huevos y cierre el aparato
con la tapa. Asegúrese de que los dos
orificios pequeños del lado superior de la
tapa señalen hacia atrás, alejados de usted.
8. Enchufe la clavija en una caja de enchufe
con contacto de tierra según la placa de
características.
9. Elija el tiempo de cocción deseado con el
regulador giratorio.
10. Cuando haya finalizado el tiempo de
cocción, se emiten varias señales acústicas
y el aparato se desconecta.
Page 77

11. Desconecte completamente el aparato en el
Copyright UNOLD AG | www.unold.de
regulador giratorio.
12. Quite la tapa.
Precaución:
¡Tenga cuidado con la salida de vapor!
13. Dado que la tapa se calienta mucho, agarre
el aparato solo de las asas y colóquelo
únicamente sobre superficies resistentes a
calor!
14. Retire los cuencos de cocción.
PRECAUCIÓN:
El aparato está muy caliente durante
y después del funcionamiento. ¡Peligro
de quemaduras por salida de vapor!
COCCIÓN AL VAPOR
Consejo: Si prepara varias clases de verdura al mismo tiempo, ajuste el tiempo de cocción primero
siempre a la verdura que se cuece más rápido. Después, retire la verdura cocinada y ajuste el tiempo
de cocción a las demás verduras.
1. Asegúrese de que el aparato esté
desconectado y colocado sobre una
superficie plana y estable.
2. Llenar el vaso medidor adjunto
completamente con agua fría y añadir el
contenido al cuenco de cocción. Atención:
No llene en exceso el cuenco de cocción
dado que, de lo contrario, podría salpicar
agua hirviendo durante el funcionamiento.
¡Peligro de quemaduras! Se deben llenar
como mínimo 80 ml de agua y como máximo
350 ml de agua.
3. Indicación: Para cocinar al vapor utilice
solo agua fría. El uso de otros líquidos
puede deteriorar el elemento calefactor del
aparato.
4. Prepare los alimentos deseados y póngalos
en el cestillo.
5. Ahora, inserte el accesorio para huevos y el
marco y después coloque encima el cestillo.
6. Según la preparación también puede
añadir alimentos en los cuencos de cocción
blancos y colocarlos sobre el cestillo. Al
hacerlo, inserte siempre primero el cuenco
de cocción más grande y, después, los dos
cuencos más pequeños en el cuenco de
cocción grande.
7. Coloque la tapa sobre el cestillo. Asegúrese
de que los dos orificios pequeños del lado
superior de la tapa señalen hacia atrás,
alejados de usted.
8. Enchufe la clavija en una caja de enchufe
con contacto de tierra según la placa de
características.
9. Seleccione el tiempo de cocción deseado
en el regulador giratorio. Puede ajustar 40
77
Page 78

minutos como máximo. El aparato empieza
Copyright UNOLD AG | www.unold.de
a calentar.
10. Después de finalizar el tiempo ajustado,
se emite de nuevo una señal acústica y el
aparato se desconecta automáticamente. El
piloto de control se apaga.
11. Asegúrese de que el interruptor esté en
„OFF“ y levante la tapa con cuidado. Preste
atención a la salida de vapor caliente.
¡Peligro de quemaduras!
12. Extraiga el cestillo.
13. Después del uso, retire la clavija de la caja
del enchufe.
14. Consejo: Deje enfriar un poco la comida antes
de consumirla. ¡Peligro de quemaduras!
O: Cocer en dos niveles
15. Prepare los alimentos deseados.
16. Añada una ración de los alimentos deseados
en los dos cuencos de cocción blancos y
colóquelos sobre el accesorio para huevos
en el aparato.
17. Coloque el marco por encima y posicione el
cestillo sobre el marco. Añada la segunda
ración en el cestillo.
18. Coloque la tapa sobre el cestillo. Asegúrese
de que los dos orificios pequeños del lado
superior de la tapa señalen hacia atrás,
alejados de usted.
19. Enchufe la clavija en una caja de enchufe
con contacto de tierra según la placa de
características. Encienda el aparato en el
interruptor de conexión/desconexión.
20. Seleccione el tiempo de cocción deseado
en el regulador giratorio. Puede ajustar 40
minutos como máximo. El aparato empieza
a calentar.
21. Después de finalizar el tiempo ajustado,
se emite de nuevo una señal acústica y el
aparato se desconecta automáticamente. El
piloto de control se apaga.
22. Asegúrese de que el interruptor esté en
“OFF” y levante la tapa con cuidado. Preste
atención a la salida de vapor caliente.
¡Peligro de quemaduras!
23. Extraiga el cestillo.
24. Después del uso, retire la clavija de la caja
del enchufe.
25. Consejo: Deje enfriar un poco la comida antes
de consumirla. ¡Peligro de quemaduras!
PRECAUCIÓN:
El aparato está muy caliente durante
y después del funcionamiento. ¡Peligro
de quemaduras por salida de vapor!
78
Page 79

LIMPIEZA Y CUIDADO
Copyright UNOLD AG | www.unold.de
Desenchufe el aparato antes de la
limpieza.
Deje enfriar el aparato y vacíe el agua
restante del cuenco de cocción.
1. Nunca sumerja el aparato en agua o en otros
líquidos.
2. No utilice productos de limpieza agresivos,
lana o estopa de acero, objetos metálicos,
productos de limpieza calientes ni
desinfectantes, ya que pueden producir
daños.
3. Limpie la carcasa y el cuenco de cocción con
un paño húmero y un poco de detergente y
séquelos con un paño suave.
RECETAS
Eierstich (cuajada de huevo)
3 huevos, 50 ml de leche, 50 ml de nata, al
gusto: sal, pimienta y nuez moscada molida
Mezclar bien todos los ingredientes con un
tenedor o un batidor. Desaconsejamos el uso de
una batidora amasadora para evitar la porosidad.
Preparar la masa en el aparato como se indica en
el capítulo «Preparación de ‘Eierstich’ (cuajada
de huevo)». Consejo: En lugar de sal común,
añada a la masa un poco de sal de hierbas o de
parmesano rallado.
Verduras al vapor
Puede utilizar verduras frescas o congeladas. No
descongele las verduras: échelas directamente
congeladas en el cestillo y prolongue el tiempo
de cocción unos 5 minutos. En el caso de las
verduras que tienen un troncho fuerte, por
4. No ponga los detergentes nunca
directamente sobre el aparato, sino siempre
sobre un paño.
5. La tapa, el vaso medidor, el accesorio para
huevos, el marco y el cestillo se pueden
lavar y secar con un paño suave. Estas
piezas también se pueden lavar en el
lavavajillas (cesta superior, programa de
lavado delicado).
6. Los residuos de cal en el cuenco de cocción
se pueden eliminar con un descalcificador
comercial según las instrucciones del
fabricante.
ejemplo, el brécol o las coles de Bruselas, se
debe hacer un corte en forma de cruz en dicha
parte. El tiempo de cocción variará según la
frescura, el cultivo, el corte y el almacenamiento
de la verdura, así como el gusto del consumidor
(crujiente o muy hecha). A la hora de cocer
verduras, no añadir nunca vino, zumo de limón,
vinagre ni otros productos similares. Aderece la
verdura después de cocerla al vapor.
Consejo para preparar una salsa básica ligera para
verduras
1 cucharada de mantequilla, 1 cebolla pequeña,
125 ml de vino blanco seco, 125 ml de caldo
de verduras, 3 cucharadas de nata fresca, sal y
pimienta blanca
Limpiar la cebolla y cortarla en cuadraditos;
rehogar en mantequilla y rociar con vino y caldo
79
Page 80

de verduras. Cocinar durante 5-7 minutos.
Copyright UNOLD AG | www.unold.de
Agregar la nata fresca. La salsa quedará
especialmente fina si utiliza ESGE Zauberstab
®
con disco batidor. Salpimentar al gusto y servir
de inmediato.
Carne
Consejo: La vaporera también sirve para calentar
salchichas, embutidos o carne precocinada (en
filetes de 1 cm de grosor).
Solomillo de ternera al vapor con nata y verduras
250 g de solomillo de ternera (filetes de 1-1,5
cm de grosor), unas ramitas de estragón, sal,
pimienta, 50 g de zanahorias, 50 g de apio,
50 g de puerro, 50 g de calabacines, 50 g de
patatas para cocer, 15 g de mantequilla, 15 g
de harina, 25 ml de vino blanco seco, 60 ml de
caldo de ternera, 100 ml de nata, sal y pimienta
Llenar el aparato de agua y colocar el marco.
Colocar los filetes en el cestillo junto con el
estragón y cocer durante 15 minutos aprox. en el
aparato. Mantener caliente una vez transcurrido
el tiempo de cocción.
Mientras tanto, limpiar las verduras y cortarlas
en cuadraditos muy pequeños. Derretir la
mantequilla en una olla al fuego y rehogar en
ella las verduras. Espolvorear las verduras con
harina y verter el caldo de ternera junto con el
vino blanco y la nata removiendo continuamente.
Dejar que se espese durante algunos minutos
y salpimentar al gusto. Servir el solomillo de
ternera con la salsa de verduras. Este plato
está muy rico con espárragos frescos y patatas
pequeñas.
Pescado
Abadejo con guarnición de verduras
1 filete de abadejo de 150 g, 1 zanahoria
mediana, 1/2 calabacín pequeño, 1/2 colinabo
pequeño, 1/4 de limón, pimienta, sal, nuez
moscada y perejil picado
Lavar y pelar la zanahoria y el colinabo; lavar el
calabacín. Cortar las verduras en tiras de 3 mm
de grosor aprox. (p. ej., con ESGE Zauberstab®
y ESGE Zauberette®). Mezclar las verduras
y colocarlas en el cestillo. Lavar el filete de
pescado, secarlo, salpimentar y rociar con zumo
de limón. Espolvorear un poco de nuez moscada
por encima. Colocar el filete de pescado sobre
la verdura. Cerrar la tapa y cocinar durante 10
minutos aprox. Espolvorear con perejil fresco y
servir con patatas cocidas sin piel.
Salsas para pescado al vapor
La receta de pescado anterior solo es una
pequeña propuesta de lo que podemos encontrar
en el reino de Neptuno. El pescado al vapor se
acompaña muy bien de salsas variadas. Además
de las salsas preparadas disponibles en el
mercado, se pueden elaborar salsas frescas de
forma rápida y sencilla. Las recetas siguientes
parten de una salsa blanca básica. Las salsas
deben prepararse en una olla al fuego: no utilice
la vaporera.
Salsa blanca básica
30 g de mantequilla (2 cucharadas), 30 g de
harina (2 cucharadas), 125 ml de caldo de
verduras, 125 ml de leche, sal, pimienta y nuez
moscada
Derretir la mantequilla en un cazo al fuego,
añadir la harina y remover. Reducir el fuego.
Removiendo poco a poco constantemente, verter
el caldo frío y la leche fría y cocer a fuego lento
durante 3 minutos. Sazonar con sal, pimienta y
nuez moscada.
80
Page 81

Salsa de limón
Copyright UNOLD AG | www.unold.de
Preparar una salsa blanca y aderezar con 2
cucharadas de zumo de limón y, si lo desea, con
1 cucharadita de ralladura fina de limón.
Salsa de curri
Preparar una salsa blanca, pero sustituyendo
la leche por leche de coco y añadiendo 1
cucharada de curri en polvo y 2 cucharadas de
zumo de piña.
Salsa de vino blanco
Preparar una salsa blanca, pero sustituyendo la
leche por vino blanco seco.
CONDICIONES DE GARANTIA
La garantía para nuestros equipos es de 24 meses, y de 12 meses en el caso de uso comercial, a partir de la fecha de compra,
cubriendo los daños que con un uso acorde a lo prescrito pueden atribuirse fehacientemente a defectos de fabricación. Dentro
del período de garantía, solucionamos errores de material y de fabricación a consideración nuestra mediante reparación o
cambio. Nuestros servicios de garantía son válidos únicamente para los aparatos que han sido vendidos en Alemania y
Austria. Para todos los demás casos diríjase por favor al importador correspondiente. Aquellos aparatos que se presentan
para eliminar errores, por favor enviarlos junto a una copia del comprobante de compra extendido a máquina, del cual debe
desprenderse la fecha de compra, así como una breve descripción de las deficiencias, apropiadamente embalado y con los
sellos correspondientes a nuestro servicio al cliente. En caso de garantía, los gastos de envío serán restituidos al cliente
solamente en Alemania y Austria. Aquellos daños causados por desgaste están excluidos de la garantía, así como mani-
pulación incorrecta, e incumplimiento de las condiciones de mantenimiento y cuidado. El derecho a garantía expira si las
reparaciones o mantenimiento son realizadas por terceros. Todo reclamo del consumidor final ante el vendedor, comerciante
no se ve afectado por esta garantía.
DISPOSICIÓN/PROTECCIÓN DEL MEDIO AMBIENTE
Nuestros aparatos se fabrican con un alto nivel de calidad por un largo período de uso. El mantenimiento
regular y las reparaciones de tipo técnico a través de nuestro servicio al cliente pueden prolongar la du-
ración del aparato. Cuando un aparato está defectuoso y ya no puede repararse, por favor considere en la
disposición final los siguientes puntos: Este producto no puede ser eliminado junto a la basura domiciliaria.
Usted debe entregar este producto a un lugar oficial para el reciclaje de aparatos eléctricos o electrónicos.
Mediante la clasificación por separado y el reciclaje de productos residuales, Usted contribuye a proteger
los recursos naturales y asegura que el producto sea eliminado de forma salubre y acorde con el medio
ambiente.
Las recetas del presente manual de instrucciones han sido cuidadosamente seleccionadas y probadas tanto
por sus autores como por UNOLD AG quienes, no obstante, no asumen garantía alguna. Queda explícitamente
excluida cualquier responsabilidad de los autores y UNOLD AG o sus delegados por daños personales, materiales
o financieros.
81
Page 82

NÁVOD K OBSLUZE MODEL 38650
Copyright UNOLD AG | www.unold.de
TECHNICKÉ ÚDAJE
Výkon: 400 W, 220–240 V~, 50/60 Hz
Těleso: plast
Kryt: plast
Rozměry: cca 19,0 x 19,0 x 24,5 cm (Š/H/V)
Přívod: cca 60 cm
Hmotnost: cca 1,1kg
Vybavení: volitelně použitelný pro vaření až 8 vajec nebo jako parní hrnec na ryby, zeleninu
atd., ochrana proti přehřátí, automatické vypínání při varu, kontrolka, objem na
maximálně 350 ml vody
Příslušenství: 1 varná vložka, vložka na vejce, odměřovací nádoba s propichovačem vajec, miska
na rýži, 2 malé varné misky, návod k obsluze
Je vyhrazeno právo na omyly a změny vybavení, techniky, barev a designu
VYSVĚTLENÍ SYMBOLŮ
Tento symbol označuje případná ohrožení, která mohou způsobit poranění nebo
poškození přístroje.
Tento symbol poukazuje na eventuální nebezpečí popálení. Postupujte tu vždy zvláště
opatrně.
BEZPEČNOSTNÍ POKYNY
Následující pokyny si přečtěte a
uložte.
1. Přístroj může být používán
dětmi od 8 let a osobami se
sníženými fyzickými, smyslo
vými nebo duševními schopnostmi nebo s nedostatkem
zkušeností a/nebo nedostatkem znalostí, pokud jsou pod
dohledem nebo pokud byly
82
poučeny
o bezpečném
žívání přístroje a porozuměly
z
něj vyplývajícím
Přístroj není hračka. Čištění
-
a údržbu přístroje smí pro
vádět děti pouze pod dohle-
dem.
2.
Děti do 3 let by se neměly k
přístroji přibližovat nebo být
pod trvalým dohledem.
pou-
rizikům.
-
Page 83

3. Děti mezi 3 a 8 roky by
Copyright UNOLD AG | www.unold.de
měly zapínat a vypínat přístroj pouze tehdy, když se
nachází
ve své
určené nor-
mální pozici ovládání a když
jsou
pokud
pod dohledem nebo
byly poučeny o bez
pečném používání přístroje
a porozuměly z
něj vyplývajícím rizikům. Děti mezi 3 a
8
roky by
neměly přístroj ani
připojovat ani ovládat, čistit
nebo provádět údržbu.
4. POZOR - části tohoto výrobku
se mohou silně ohřát a způ
sobit popálení! Při přítom-
nosti dětí a ohrožených osob
buďte zvláště opatrní.
5.
Je potřeba dohlížet na děti,
aby bylo zajištěno, že si s pří
strojem nehrají.
6.
Uchovávejte přístroj na místě
nepřístupném dětem.
7. Přístroj je určen výhradně
pro domácí použití nebo
podobné účely, např.
pro kuchyňky v obchodech,
kancelářích nebo podob
ných pracovištích,
zemědělské provozy,
pro použití hosty v hotelu,
motelu nebo jiných ubytova
cích zařízeních,
v soukromých penziónech
nebo rekreačních objektech.
8. V žádném případě těleso pří
stroje neotevírejte. Je nebez-
pečí úderu elektrickým proudem.
9.
Pravidelně kontrolujte pří-
stroj, zástrčku a přívodní
kabel,
zda nejsou
opotřebeny
nebo poškozeny. Při poško
-
zení přívodního kabelu nebo
jiných dílů pošlete
nebo základnu na kontrolu
a opravu do našeho servisu.
Neodborné opravy mohou
vést k značnému nebezpečí
pro uživatele a mají za násle
dek ztrátu záruky.
10.
-
Je-li přívodní vedení tohoto
přístroje poškozeno, musí
být vyměněno výrobcem,
jeho servisem nebo podobně
kvalifikovanou osobou, aby
-
se předešlo ohrožení.
Bezpečnostní pokyny k bezpečné
mu postavení a provozu přístroje
Z hygienických důvodů musí
11.
být vejce, která se propích
nou propichovačem vajec,
ihned uvařena. Když
-
vejce nepoužijete hned, zlik
vidujte je.
12.
Přístroj připojujte pouze na
střídavý proud s napětím
-
podle typového štítku.
13. Tento přístroj nesmí být pou
žíván s externími časovými
spínacími hodinami nebo se
-
systémem pro dálkové ovlá
dání.
-
přístroj
-
-
-
tato
-
-
-
83
Page 84

14. V žádném případě přístroj
Copyright UNOLD AG | www.unold.de
nebo jeho přívod neponořujte
do vody nebo do jiné kapa
liny.
15.
Patice se nesmí dostat do
kontaktu s vodou nebo jinými
tekutinami. Pokud by k tomu
přesto došlo, musí být před
novým použitím zcela suché.
16. Podstavec nesmí být čištěn
v myčce.
17. Nikdy se přístroje popř. jeho
přívodu nedotýkejte mok
rýma rukama.
18.
Z bezpečnostních důvodů
přístroj nikdy nestavte na
horké povrchy, kovový pod
nos nebo mokrý podklad.
19.
Přístroj ani přívodní kabel
nesmí být používány v blíz
kosti plamenů.
20.
Pro elektrické připojení
nepoužívejte vícenásobné
zásuvky – nebezpečí požáru.
Když používáte prodlužovací
kabel, zkontrolujte, zda je
v pořádku a dimenzovaný
na příslušný výkon, protože
jinak může dojít k jeho pře
hřátí.
Nepoužívejte přístroj se
21.
zásuvkou bez ochranného
vodiče. V případě pochyb
nechte elektrickou domovní
instalaci zkontrolovat odbor
níkem.
22.
Přístroj vždy používejte na
volném, rovném a tepelně
-
odolném podkladu.
23. Dbejte na to, aby přívodní
kabel nevisel přes okraj pra
covní plochy, protože to může
vést
k nehodám,
např. za něj
mohou zatáhnout malé děti.
24. Přívod musí být položen tak,
aby bylo vyloučeno zatažení
za něj nebo zakopnutí.
25. Přívod vždy vytahujte ze
-
zásuvky za zástrčku, nikdy
za kabel.
26. Nenoste podstavec za pří
vodní kabel.
27.
-
Používejte přístroj pouze ve
vnitřních prostorech.
28. Nikdy přístroj nepoužívejte v
-
blízkosti hořlavých předmětů
jako např. závěsů, kromě
toho ne v troubě nebo mikro
vlnné troubě.
29.
Zajistěte, aby byl kryt pevně
uzavřen, aby se předešlo zra
nění v důsledku vystříknutí
horké vody.
30.
Zamezte přeplnění nádoby.
31. Parní funkci používejte pouze
k dušení potravin.
32. Nikdy přístroj nepoužívejte,
aniž byste naplnili dostatek
vody, abyste předešli poško
zení přístroje.
33.
-
Zajistěte, aby všem uživa-
telům, zvláště dětem, bylo
-
-
-
-
-
84
Page 85

36.
Copyright UNOLD AG | www.unold.de
známo nebezpečí v důsledku
unikající páry nebo vystříknutí horké vody – nebezpečí
opaření!
34.
Povrch krytu je během pro
vozu horký. Proto případně
použijte kuchyňské chňapky.
35.
Dokud je přístroj v provozu,
neposunujte jej, abyste pře
dešli opaření vystřikující
vodou.
-
-
Přístroj nesmí být použí-
ván s příslušenstvím jiných
výrobců nebo značek,
aby se
předešlo poškození.
37. Po použití i před čištěním
vyndejte síťovou zástrčku ze
zásuvky. Nikdy nenechávejte
přístroj bez dozoru, když je
připojen do sítě.
38. Nechte přístroj před čiště
ním vychladnout.
POZOR:
Přístroj je během provozu velmi horký! Nebezpečí opaření
unikající párou!
V žádném případě těleso přístroje neotevírejte. Je nebezpečí
úderu elektrickým proudem.
Výrobce nepřebírá záruku v případě chybné montáže, neodborného a chybného používání nebo po
provedení opravy ze strany neoprávněné třetí osoby.
-
PŘED PRVNÍM POUŽITÍM
1. Odstraňte všechny části balení a případné
transportní pojistky. Materiály balení
udržujte mimo dosah dětí – nebezpečí
udušení!
2. Všechny díly vyčistěte vlhkou utěrkou, jak je
popsáno v kapitole „Čištění a péče“.
3. Zkontrolujte, zda přístroj stabilně stojí.
85
Page 86

VAŘENÍ VAJEC
Copyright UNOLD AG | www.unold.de
1. Ujistěte se, že přístroj je vypnutý a stojí na
rovném, pevném povrchu.
2. Přiloženou odměřovací nádobu naplňte
studenou vodou a obsah vylijte do varné
misky. Pozor: Nepřeplňujte varnou misku,
protože jinak může během provozu vařící
voda vystříknout – nebezpečí opaření!
Musí být naplněno minimálně 80 ml vody,
maximálně může být naplněno 350 ml vody.
3. Upozornění: Přístroj má časové řízení
průběhu vaření, takže není nutné odměřovat
vodu na každé vejce.
4. Vejce na tupé straně propíchněte, aby při
vaření nepraskla.
Pozor: Nebezpečí zranění propichova-
čem vajec
5. Vejce vložte tupou stranou nahoru do vložky
na vejce.
6. Vložku s vejci položte na varnou misku a
nasaďte kryt. Dbejte na to, aby oba malé
otvory v horní straně krytu směřovaly
dozadu, směrem od Vás.
7. Zastrčte zástrčku do zásuvky s ochranným
kontaktem podle typového štítku.
8. Na otočném regulátoru nastavte stupeň
uvaření.
9. Symboly ukazují daný stupeň uvaření.
Naměkko
může výsledek mírně lišit. Individuální
přizpůsobení je plynule možné. Jakmile
během vaření nastavíte jiný čas, začne
průběh vaření znovu.
11. Přístroj začne ohřívat.
12. Jakmile je průběh vaření dokončen, zazní
několik signálních tónů a přístroj se vypne.
13. Kompletně vypněte přístroj spínačem ZAP/
VYP.
14. Sundejte kryt.
Opatrně:
Pozor na unikající páru!
15. Protože kryt je velmi horký, dotýkejte se
ho pouze za držadla a pokládejte jej jen na
tepelně odolné povrchy!
16. Vložku s vejci sundejte z varné misky a vejce
opláchněte pod studenou vodou. Pokud
vejce nejsou opláchnutím zchlazena hned
po zaznění signálu, tak ztvrdnou.
17. Po použití vytáhněte zástrčku přístroje ze
zásuvky.
POZOR:
Přístroj je během provozu a po něm
velmi horký! Nebezpečí opaření
unikající párou!
Nahniličko
Natvrdo
10. Tyto údaje platí pro středně velká
vejce. Podle velikosti a počtu vajec se
86
Page 87

PŘÍPRAVA VAJEČNÉHO SVÍTKU
Copyright UNOLD AG | www.unold.de
1. S přístrojem můžete mimo jiné připravit
vaječný svítek.
2. Připravte si potřebnou hmotu na vaječný
svítek.
3. Přiloženou odměřovací nádobu naplňte
studenou vodou a obsah vylijte do varné
misky. Pozor: Nepřeplňujte varnou misku,
protože jinak může během provozu vařící
voda vystříknout – nebezpečí opaření!
Musí být naplněno minimálně 80 ml vody,
maximálně může být naplněno 350 ml vody.
4. Nasaďte vložku na vejce na varnou misku.
5. Obě malé varné misky nebo velkou misku na
rýži vymažte tukem a dejte do ní vaječnou
hmotu.
6. Nasaďte varné misky na vložku na vejce
a uzavřete přístroj krytem. Dbejte na to,
aby oba malé otvory v horní straně krytu
směřovaly dozadu, směrem od Vás.
7. Zastrčte zástrčku do zásuvky s ochranným
kontaktem podle typového štítku.
8. Zvolte požadovanou dobu vaření na otočném
regulátoru.
9. Když je vaření dokončeno, zazní několik
signálních tónů a přístroj se vypne.
10. Kompletně vypněte přístroj spínačem ZAP/
VYP.
11. Sundejte kryt.
Opatrně:
Pozor na unikající páru!
12. Protože kryt je velmi horký, dotýkejte se
ho pouze za držadla a pokládejte jej jen na
tepelně odolné povrchy!
13. Vyjměte varné misky.
POZOR:
Přístroj je během provozu a po něm
velmi horký! Nebezpečí opaření
unikající párou!
DUŠENÍ
Tip: Když chcete připravovat více druhů zeleniny současně, nastavte dobu tepelné úpravy vždy
nejprve podle té zeleniny, která je připravena rychleji. Potom hotovou zeleninu vyjměte a nastavte
dobu tepelné úpravy podle zbývající zeleniny.
1. Ujistěte se, že přístroj je vypnutý a stojí na
rovném, pevném povrchu.
2. Přiloženou odměřovací nádobu kompletně
naplňte studenou vodou a obsah vylijte do
varné misky. Pozor: Nepřeplňujte varnou
misku, protože jinak může během provozu
vařící voda vystříknout – nebezpečí opaření!
Musí být naplněno minimálně 80 ml vody,
maximálně může být naplněno 350 ml vody.
3. Upozornění: Pro dušení používejte výhradně
studenou vodu. Použití jiných tekutin může
poškodit topný prvek přístroje.
87
Page 88

4. Připravte požadované potraviny a vložte je
Copyright UNOLD AG | www.unold.de
do varné vložky.
5. Nyní vložte vložku na vejce a rám a umístěte
na ně varnou vložku.
6. Podle způsobu přípravy ale také můžete
vložit potraviny do bílých varných misek
a ty položit na varnou vložku. Přitom vždy
nejprve vložte velkou varnou misku a potom
obě menší misky do velké varné misky.
7. Nasaďte kryt na varnou vložku. Dbejte na
to, aby oba malé otvory v horní straně krytu
směřovaly dozadu, směrem od Vás.
8. Zastrčte zástrčku do zásuvky s ochranným
kontaktem podle typového štítku.
9. Otočným regulátorem zvolte požadovanou
dobu tepelné úpravy. Maximálně lze nastavit
40 minut. Zazní signální tón a přístroj začne
ohřívat.
10. Po uplynutí zvolené doby znovu zazní
signální tón a přístroj se automaticky vypne.
Kontrolka zhasne.
11. Ujistěte se, že spínač je v poloze „OFF“, a
opatrně zvedněte kryt. Pozor na unikající
páru – nebezpečí opaření!
12. Vyjměte varnou vložku.
13. Po použití přístroje vytáhněte zástrčku ze
zásuvky.
14. Tip: Před konzumací nechte pokrm trochu
vychladnout – nebezpečí opaření!
17. Na ně položte rám a na něj pak umístěte
varnou vložku. Druhou porci dejte do varné
vložky.
18. Nasaďte kryt na varnou vložku. Dbejte na
to, aby oba malé otvory v horní straně krytu
směřovaly dozadu, směrem od Vás.
19. Zastrčte zástrčku do zásuvky s ochranným
kontaktem podle typového štítku.
20. Otočným regulátorem zvolte požadovanou
dobu tepelné úpravy. Maximálně lze nastavit
40 minut. Zazní signální tón a přístroj začne
ohřívat.
21. Po uplynutí zvolené doby znovu zazní
signální tón a přístroj se automaticky vypne.
Kontrolka zhasne.
22. Ujistěte se, že spínač je v poloze „OFF“, a
opatrně zvedněte kryt. Pozor na unikající
páru – nebezpečí opaření!
23. Vyjměte varnou vložku.
24. Po použití přístroje vytáhněte zástrčku ze
zásuvky.
25. Tip: Před konzumací nechte pokrm trochu
vychladnout – nebezpečí opaření!
POZOR:
Přístroj je během provozu a po něm
velmi horký! Nebezpečí opaření
unikající párou!
Nebo: Vaření na dvou úrovních
15. Připravte si požadované potraviny.
16. Jednu porci požadovaných potravin dejte do
obou bílých varných misek a ty položte na
vložku na vejce v přístroji.
88
Page 89

ČIŠTĚNÍ A PÉČE
Copyright UNOLD AG | www.unold.de
Před čištěním vytáhněte síťovou
zástrčku.
Nechte přístroj vychladnout a z varné
misky vylijte zbylou vodu.
1. Nikdy přístroj neponořujte do vody ani jiné
tekutiny.
2. Nepoužívejte abrazivní čisticí prostředky,
drátěnku, kovové předměty, horké čisticí
prostředky ani dezinfekční prostředky,
protože mohou způsobit poškození.
3. Těleso i varnou misku vyčistěte vlhkou
utěrkou s trochou jemného čisticího
prostředku a osušte suchou utěrkou.
RECEPTY
Svítek
3 vejce, 50 ml mléka, 50 ml smetany, podle
chuti: sůl, pepř, nastrouhaný muškátový oříšek
Všechny přísady dobře promíchejte vidličkou
nebo šlehací metlou. Doporučujeme k tomu
nepoužívat elektrický ponorný mixér, aby se
předešlo vzniku pórů.
Hmotu připravte v přístroji podle popisu v
kapitole „Příprava vaječného svítku“. Tip: Místo
soli přidejte do hmoty trochu bylinkové soli nebo
strouhaného parmazánu.
Dušení zeleniny
Můžete použít čerstvou nebo mraženou zeleninu.
Mraženou zeleninu nerozmrazujte, nýbrž ji
zmrzlou vložte do varné misky a dobu tepelné
úpravy prodlužte o cca 5 minut. U zeleniny
4. Čisticí prostředek nikdy nedávejte přímo na
přístroj nýbrž vždy na utěrku.
5. Kryt, odměřovací nádoba, vložka na vejce,
rám a varná vložka mohou být opláchnuty
a osušeny měkkou utěrkou. Tyto díly mohou
být čištěny také v myčce (horní koš a šetrný
program mytí).
6. Vápenné usazeniny ve varné misce mohou
být uvolněny přípravkem pro odstranění
vápníku podle pokynů od jeho výrobce.
s pevným košťálem, např. brokolice nebo
růžičkové kapusty, košťál do kříže nařízněte.
Podle čerstvosti, rozkrájení a skladování zeleniny
a podle osobní chuti (křupavá nebo měkká)
může být doba tepelné úpravy kratší nebo delší.
Při tepelné úpravě zeleniny v žádném případě
nepřidávejte víno, citrónovou šťávu, ocet apod.
Zeleninu zjemněte až po dušení.
Tip pro lehkou základní omáčku k zelenině
1 polévková lžíce másla, 1 malá cibule, 125 ml
suchého bílého vína, 125 ml zeleninového
vývaru, 3 polévkové lžíce Crème fraîche, sůl,
bílý pepř
Cibuli očistěte a nakrájejte na malé kostičky,
zpěňte v másle a zalijte vínem a vývarem.
Nechte povařit 5-7 minut. Vmíchejte Crème
89
Page 90

fraîche. Mimořádně lehká bude omáčka, když ji
Copyright UNOLD AG | www.unold.de
zpěníte ponorným mixérem ESGE Zauberstab
®
s
míchacím kotoučem. Dochuťte solí a pepřem a
ihned podávejte.
Maso
Tip: V parním hrnci můžete bezproblémově
ohřívat také vuřty, klobásy nebo předvařené
maso jako nakládané uzené (v plátcích s
tloušťkou 1 cm).
Dušený jehněčí filet se smetanovou zeleninovou
omáčkou
250 g jehněčího filetu (plátky s tloušťkou
1-1,5 cm), několik oddenků estragonu, sůl,
pepř, 50 g mrkve, 50 g celeru, 50 g pórku, 50 g
cukety, 50 g vařených brambor, 15 g másla,
15 g mouky, 25 ml suchého bílého vína, 60 ml
telecích fondů, 100 ml smetany, sůl, pepř
Naplňte přístroj vodou, nasaďte rám. Plátky
filetu společně s estragonem položte na varnou
vložku a nechte v přístroji připravovat cca 15
minut. Po konci tepelné úpravy udržujte teplotu.
Mezitím očistěte zeleninu a rozkrájejte ji na
velmi malé kostičky. V hrnci na sporáku rozpusťte
máslo a nechte v něm zpěnit zeleninu. Zeleninu
poprašte moukou a telecí fondy společně s bílým
vínem a smetanou přidejte za stálého míchání.
Několik minut nechte redukovat a dochuťte solí
a pepřem.
Jehněčí filet podávejte se zeleninovou omáčkou.
K tomu chutná čerstvý chřest a mladé brambory.
Ryba
Mořský losos se zeleninovou oblohou
1 filet z mořského lososa (cca 150 g), 1
středně velká mrkev, 1/2 malé cukety, 1/2
malé kedlubny, 1/4 citrónu, pepř, sůl, muškát,
nasekaná petrželka
Mrkev a kedlubnu omyjte a oloupejte,
cuketu omyjte. Zeleninu nakrájejte na cca 3
mm silné plátky (např. ponorným mixérem
ESGE-Zauberstab® s příslušenstvím ESGE
Zauberette®). Zeleninu promíchejte a vložte do
varné vložky. Rybí filet omyjte a osušte, osolte a
opepřete, pokapejte citrónovou šťávou. Posypte
trochou muškátu. Rybí filet dejte na zeleninu.
Zavřete kryt a připravujte cca 10 minut. Posypte
čerstvou petrželkou a podávejte se slanými
bramborami.
Omáčky k dušené rybě
Výše uvedený rybí recept je pouze podnětem
z Neptunovy říše. Dušenou rybu je možné s
jemnými omáčkami servírovat pokaždé jinak.
Kromě prodávaných hotových omáček je však
možné rychle připravit mnoho čerstvých omáček.
Všechny následující recepty vycházejí ze světlé
základní omáčky. Tyto omáčky připravujte v
hrnci na sporáku, v žádném případě v parním
hrnci.
Světlá základní omáčka
30 g másla (2 polévkové lžíce), 30 g mouky (2
polévkové lžíce), 125 ml zeleninového vývaru,
125 ml mléka, sůl, pepř, muškát
V hrnci na sporáku rozpusťte máslo, přidejte
mouku a rozmíchejte. Ztlumte ohřev. Postupně
při stálém míchání přidávejte studený vývar a
studené mléko, nechte vařit 3 minuty. Dochuťte
solí, pepřem a muškátem.
90
Page 91

Citrónová omáčka
Copyright UNOLD AG | www.unold.de
Připravte světlou omáčku a dochuťte 2
polévkovými lžícemi citrónové šťávy a případně
1 lžičkou jemně nastrouhané citrónové kůry.
Kari omáčka
Připravte světlou omáčku, mléko však nahraďte
kokosovým mlékem a přidejte 1 polévkovou lžíci
kari v prášku a 2 polévkové lžíce ananasové
šťávy.
Vinná omáčka
Připravte světlou omáčku, mléko však nahraďte
suchým bílým vínem.
ZÁRUČNÍ PODMÍNKY
Na naše přístroje poskytujeme záruku v trvání 24 měsíců (u průmyslového využití 12 měsíců) od data koupě výrobku, záruka
se vztahuje na poškození, která prokazatelne vznikla při správném použití v důsledku výrobních vad. Po dobu záruky budeme
odstraňovat materiální i výrobní vady opravou nebo výměnou podle našeho uvážení. Poskytnutí záruky výhradně platí pro
zařízení prodány v Německu i Rakousku. V jiných zemích se obrat’te prosím na kompetentní dovozce. Přístroje, na které
bylo uplatňováno odstranění vad, zašlete prosím smechanicky vyhotovenou kopií nákupního dokladu, ze kterého musí být
bezpodmínečně patrný datum nákupu i s popisem vad, přístroj musí být bezpečně zabalen a nafrankován na náš záruční
servis. V připadě opravněné záruky jsou kupujícím vraceny poštovní poplatky v Německu i Rakousku. Tato záruka se nevztahuje
na poškození způsobená opotřebením, nesprávným zacházením a nedodržováním návodů kúdržbě a obsluze. Záruční doba
zaniká, když opravy nebo manipulace s přístrojem byly provedeny třetí osobou. Eventuální nároky zákazníka vůči prodejci/
obchodníku nejsou touhle zárukou omezeny.
LIKVIDACE / OCHRANA ŽIVOTNÉHO PROSTŘEDÍ
Naše vyrobené přístroje mají vysoce kvalitní standard pro zajišt’ění jejich dlouhé životnosti. Pravidel-
né údržby i opravy odborně provedeny naším prodejním servisem mohou mít vliv na prodloužení provozní
životnosti přístroje. Když je přístroj vadný a už ho nelze opravit, neopomeňte prosím: Toto zařízení nepatří
do běžného domovního odpadku, ale musí být předáno do autorizované sběrny pro recyklování elektrických
nebo elektronických zařízení. Separátní sběr a recyklování odpadních produktů umožňuje šetření přírodních
zdrojů a zajišt’uje, aby byly odpady likvidovány způsobem, který je pro zdraví a kologii přijatelný.
Recepty v tomto návodu k použití byly pečlivě zváženy a odzkoušeny autory z firmy UNOLD AG, přesto
není možno za tyto převzít záruku. Poskytnutí záruky na poškození zdraví, věcné a majetkové škody
prostřednictvím autorů popř. firmou UNOLD AG a jí pověřenými osobami je vyloučeno.
91
Page 92

INSTRUKCJA OBSŁUGI MODEL 38650
Copyright UNOLD AG | www.unold.de
DANE TECHNICZNE
Moc: 400 W, 220–240 V~, 50/60 Hz
Obudowa: Tworzywo sztuczne
Pokrywa: Tworzywo sztuczne
Wymiary: ok. 19,0 x 19,0 x 24,5 cm (szer./głęb./wys.)
Przewód zasilający: ok. 60 cm
Ciężar: ok. 1,1 kg
Wyposażenie: Do wyboru do gotowania maks. 8 jajek lub do gotowania na parze ryb, warzyw
itd., zabezpieczenie przed przegrzaniem, automatyczne wyłączanie, lampka
kontrolna, maksymalna pojemność 350 ml wody
Akcesoria: 1 wkład do gotowania na parze, wkład na jajka, kubek z miarką ze szpikulcem
do nakłuwania jajek, pojemnik na ryż, 2 małe pojemniki do gotowania na parze,
instrukcja obsługi
Zmiany i błędy w opisie wyposażenia, technice, kolorach i konstrukcji są zastrzeżone
OBJAŚNIENIE SYMBOLI
Symbol ten oznacza ewentualne niebezpieczeństwa, które mogą prowadzić do obrażeń
lub uszkodzenia urządzenia.
Symbol ten wskazuje na ewentualne niebezpieczeństwo poparzenia. Zawsze postępować
tutaj ze szczególną ostrożnością.
ZASADY BEZPIECZEŃSTWA
Prosimy przeczytać poniższe instrukcje i zachować je.
1.
Urządzenie może być uży-
wane przez dzieci w wieku
powyżej
8 lat
ograniczonej sprawności
fizycznej, sensorycznej lub
umysłowej lub też nie posia
dające doświadczenia i/lub
92
oraz osoby o
wiedzy, jeśli są
one nad-
zorowane lub zostały poin-
struowane w zakresie bez-
piecznego użytkowania i
zrozumiały
tego
zagrożenia. Urządze
wynikającego z
-
nie nie jest zabawką. Dzieci
-
mogą czyścić i
konserwować
Page 93

urządzenie tylko pod nadzo-
Copyright UNOLD AG | www.unold.de
rem.
2.
Nie dopuszczać do urządze-
nia dzieci w wieku poniżej 3
lat
lub nadzorować
je przez
cały czas.
3. Dzieci w wieku od 3 do 8
lat mogą włączać i wyłączać
urządzenie tylko wtedy, gdy
znajduje się ono w swojej
normalnej pozycji obsługi,
gdy dzieci są nadzorowane
lub zostały poinstruowane w
zakresie bezpiecznego użyt
-
kowania i zrozumiały wynikającego z tego zagrożenia.
Dzieci w wieku od 3 do 8 lat
nie
powinny urządzenia
pod
-
łączać, obsługiwać, czyścić
ani konserwować.
4.
OSTROŻNIE! Niektóre czę
-
ści tego produktu mogą być
bardzo gorące i
oparzenia! Zachować szcze
powodować
-
gólną ostrożność w obecności dzieci i zagrożonych osób.
5.
Pilnować, aby dzieci nie
bawiły się urządzeniem.
6. Urządzenie należy przecho
wywać w miejscu niedostępnym dla dzieci.
7.
Urządzenie przeznaczone
jest wyłącznie do użycia w
gospodarstwie domowym
lub w podobnych zastosowa
niach, np.
aneksach kuchennych
w sklepach, biurach lub
innych zakładach,
zakładach rolnych,
do użycia przez gości w hote
lach, motelach lub innych
noclegowniach,
w prywatnych pensjonatach
lub domach letniskowych.
8. W żadnym wypadku nie wolno
otwierać obudowy urządze
nia. Istnieje niebezpieczeństwo porażenia prądem elek-
trycznym.
9.
Regularnie sprawdzać urzą-
dzenie, wtyczkę i kabel zasilający pod kątem śladów
zużycia
lub uszkodzenia.
W przypadku uszkodzenia
kabla
lub innych części pro
simy odesłać urządzenie lub
podstawę
do sprawdzenia
naprawy do naszego serwisu.
Nieprawidłowo wykonane
naprawy mogą powodować
znaczne niebezpieczeństwo
dla użytkownika i prowadzą
do unieważnienia gwarancji.
10. Uszkodzony kabel urządze
nia musi ze względów bezpieczeństwa wymienić pro-
ducent, serwis klienta lub
osoba
o podobnych kwalifi-
kacjach.
-
-
-
i
-
93
Page 94

Wskazówki bezpieczeństwa doty-
Copyright UNOLD AG | www.unold.de
czące bezpiecznego ustawienia i
obsługi urządzenia
11.
Ze względów higienicznych
jajka nakłute szpikulcem
muszą zostać natychmiast
ugotowane. Jajka, które nie
zostaną natychmiast użyte,
należy wyrzucić.
12. Urządzenie należy podłączać
wyłącznie do prądu prze
miennego o napięciu poda-
nym na tabliczce znamionowej.
13.
Urządzenie nie może praco-
wać z zewnętrznym regulato-
rem czasowym lub systemem
zdalnego sterowania.
14.
W żadnym wypadku nie zanu
rzać urządzenia lub prze-
wodu w wodzie lub w innych
cieczach.
15.
Podstawa nie może mieć
kontaktu z wodą ani z innymi
cieczami. Jeśli doszło do
kontaktu, to przed ponow
nym użyciem wszystkie części należy całkowicie wysuszyć.
16.
Podstawy urządzenia nie
wolno myć w zmywarce.
17. Nigdy nie dotykać urządzenia
ani kabla mokrymi dłońmi.
18. Ze względów bezpieczeń
stwa nie należy nigdy stawiać urządzenia na gorących
powierzchniach, metalowym
blacie lub
wilgotnym pod
łożu.
19.
Nie wolno używać urządzenia
ani kabla w pobliżu płomieni.
20. Nie używać wielokrotnych
gniazd wtykowych do podłą
czenia urządzenia do prądu
– niebezpieczeństwo pożaru.
Jeśli
używa się przewodu
przedłużającego, spraw
-
dzić, czy jest nieuszkodzony
i
nadaje się
na odpowiednią moc, gdyż w przeciwnym
wypadku
może dojść
grzania.
21.
Nie podłączać urządzenia
do gniazda bez przewodu
ochronnego. W razie wąt
-
pliwości zlecić sprawdzenie
domowej instalacji elektrycz-
nej przez specjalistę.
22.
Urządzenie należy używać
zawsze na wolnej, równej i
żaroodpornej powierzchni.
23. Zwrócić uwagę na to, aby
-
przewód nie zwisał z brzegu
powierzchni roboczej, gdyż
może to prowadzić do wypad
ków, gdy np. pociągną za
niego małe dzieci.
24.
Przewód zasilający musi być
tak ułożony, aby niemożliwe
było jego pociągnięcie lub
-
potknięcie się o niego.
25. Przewód wyjmować z gniazda
ciągnąc za wtyczkę, nigdy
nie za kabel.
-
-
-
do prze-
-
-
94
Page 95

26. Nie nosić podstawy trzyma-
Copyright UNOLD AG | www.unold.de
jąc za kabel instalacyjny.
27.
Używać urządzenie wyłącz-
nie wewnątrz pomieszczeń.
28.
Nigdy nie używać urządze-
nia w pobliżu palnych materiałów, jak np. zasłony, nie
wolno
go również
używać
w piekarniku lub kuchence
mikrofalowej.
29. Zawsze upewnić się, czy
pokrywa urządzenia jest
dobrze zamknięta, aby unik
nąć obrażeń przez rozpryski
gorącej wody.
30.
Unikać przepełniania pojem
nika.
31.
Używać funkcji gotowania
na parze tylko do gotowania
żywności.
32. Nigdy nie używać urządzenia
nie napełnionego w wystar
czającym stopniu wodą, aby
uniknąć jego uszkodzenia.
33.
Zapewnić, aby wszyscy użyt
kownicy, a zwłaszcza dzieci,
znali niebezpieczeństwo spo
wodowane przez wydostającą
się parę lub
rozpryski gorą-
cej wody – niebezpieczeń-
stwo poparzenia!
34.
Powierzchnia pokrywy jest
podczas pracy gorąca. Użyć
w razie potrzeby łapek do
garnków.
35. Nie przesuwać urządzenia
podczas pracy, aby unik
nąć oparzeń przez rozpryski
-
wody.
36.
Urządzenia nie wolno używać
z akcesoriami innych produ
-
centów lub marek, aby unik-
nąć szkód.
37.
Po użyciu urządzenia i
przed czyszczeniem urzą
dzenia wyciągnąć wtyczkę
z gniazda. Nigdy nie pozo-
-
stawiać urządzenia bez nadzoru, gdy wtyczka włożona
jest do gniazda.
38.
-
Przed czyszczeniem ochło
dzić urządzenie.
-
-
-
-
-
OSTROŻNIE:
Urządzenie jest podczas pracy bardzo gorące! Niebezpieczeństwo
poparzenia uchodzącą parą!
W żadnym wypadku nie wolno otwierać obudowy urządzenia.
Istnieje niebezpieczeństwo porażenia prądem elektrycznym.
Producent nie przejmuje odpowiedzialności za nieodpowiednie bądź wadliwe użytkowanie lub po
przeprowadzonych naprawach przez nieautoryzowane zakłady bądź niekompetentne osoby.
95
Page 96

PRZED PIERWSZYM UŻYCIEM
Copyright UNOLD AG | www.unold.de
1. Usunąć cały materiał opakowaniowy i
ewentualne zabezpieczenia transportowe.
Przechowywać opakowania poza zasięgiem
dzieci – niebezpieczeństwo uduszenia!
2. Oczyścić wszystkie części wilgotną ścierką
zgodnie z opisem podanym w rozdziale
„Czyszczenie i pielęgnacja“.
GOTOWANIE JAJEK
1. Upewnić się, że urządzenie jest wyłączone i
ustawione na równej, twardej powierzchni.
2. Dostarczony kubek z miarką napełnić
zimną wodą, po czym wlać jego zawartość
do pojemnika na wodę. Uwaga: Nie
przepełniać pojemnika na wodę, aby
uniknąć podczas gotowania rozpryskiwania
wody – niebezpieczeństwo poparzenia! Wlać
do pojemnika na wodę minimum 80 ml
wody, maksimum 350 ml.
3. Wskazówka: Urządzenie pracuje ze
sterowaniem czasowym, nie jest więc
konieczne odmierzenie ilości wody
odpowiednio do ilości jajek.
4. Nakłuć jajka od szerszej strony, aby nie
pękły podczas gotowania.
Uwaga: Niebezpieczeństwo obrażeń
ciała szpikulcem do nakłuwania jajek
5. Włożyć jajka do wkładu na jajka szerszą
stroną skierowaną do góry.
6. Postawić wkład z jajkami na pojemniku na
wodę i przykryć pokrywą. Zwrócić uwagę na
to, aby obydwa małe otwory w górnej części
3. Sprawdzić, czy urządzenie jest ustawione
stabilnie.
pokrywy były skierowane do tyłu, z dala od
użytkownika.
7. Włożyć wtyczkę do gniazda wtykowego z
zestykiem ochronnym zgodnie z danymi na
tabliczce znamionowej.
8. Włączyć urządzenie przyciskiem WŁ./WYŁ.
9. Ustawić pokrętłem obrotowym żądany
stopień twardości jajek:
10. Symbole wskazują dany stopień twardości.
Miękkie
Średnio twarde
Twarde
11. Te dane obowiązują dla jajek o średniej
wielkości. Zależnie od wielkości i ilości
jajek wynik może być nieco inny. Istnieje
możliwość indywidualnego, bezstopniowego
dopasowania. Gdy podczas gotowania
ustawiony zostanie inny czas, gotowanie
rozpoczyna się ponownie od nowa.
12. Urządzenie rozpoczyna gotowanie.
96
Page 97

13. Gdy gotowanie jest zakończone, rozbrzmiewa
Copyright UNOLD AG | www.unold.de
kilka sygnałów dźwiękowych i urządzenie
wyłącza się.
14. Wyłączyć urządzenie przyciskiem WŁ./WYŁ.
15. Zdjąć pokrywę.
Ostrożnie:
Zwrócić uwagę na uchodzącą parę!
16. Zdjąć wkład z jajkami z pojemnika na wodę
i opłukać krótko zimną wodą. Jeżeli jajka
nie zostaną opłukane zimną wodą zaraz
PRZYRZĄDZANIE JAJKA LANEGO
po usłyszeniu sygnału, zrobią się bardziej
twarde.
17. Po użyciu wyciągnąć wtyczkę urządzenia z
gniazda.
OSTROŻNIE:
Podczas używania i po zakończeniu
gotowania urządzenie jest bardzo
gorące! Niebezpieczeństwo poparzenia uchodzącą parą!
1. Przygotować masę jajeczną.
2. Dostarczony kubek z miarką napełnić
zimną wodą, po czym wlać jego zawartość
do pojemnika na wodę. Uwaga: Nie
przepełniać pojemnika na wodę, aby
uniknąć podczas gotowania rozpryskiwania
wody – niebezpieczeństwo poparzenia! Wlać
do pojemnika na wodę minimum 80 ml
wody, maksimum 350 ml.
3. Położyć wkład na jajka na pojemniku na
wodę.
4. Nasmarować tłuszczem obydwie małe
pojemniki do gotowania na parze lub
pojemnik na ryż i wlać do środka masę
jajeczną.
5. Postawić małe pojemniki do gotowania
na parze na wkładzie na jajka i zamknąć
urządzenie pokrywą. Zwrócić uwagę na to,
aby obydwa małe otwory w górnej części
pokrywy były skierowane do tyłu, z dala od
użytkownika.
6. Włożyć wtyczkę do gniazda wtykowego z
zestykiem ochronnym zgodnie z danymi na
tabliczce znamionowej.
7. Ustawić regulatorem obrotowym żądany
czas gotowania.
8. Gdy gotowanie jest zakończone, rozbrzmiewa
kilka sygnałów dźwiękowych i urządzenie
wyłącza się.
9. Wyłączyć urządzenie przyciskiem WŁ./WYŁ.
10. Zdjąć pokrywę.
Ostrożnie:
Zwrócić uwagę na uchodzącą parę!
11. Ponieważ pokrywa jest bardzo gorąca,
chwytać ją tylko za uchwyty i odkładać na
żaroodpornych powierzchniach!
12. Wyjąć pojemniki do gotowania na parze.
OSTROŻNIE: Podczas używania i po
zakończeniu gotowania urządzenie
jest bardzo gorące! Niebezpieczeństwo
poparzenia uchodzącą parą!
97
Page 98

GOTOWANIE NA PARZE
Copyright UNOLD AG | www.unold.de
Porada: Jeżeli gotuje się na parze kilka rodzajów warzyw, należy dostosować czas gotowania do
warzyw, które gotuje się najkrócej. Wyjąć ugotowane warzywa i ustawić pozostały czas gotowania dla
pozostałych warzyw.
1. Upewnić się, że urządzenie jest wyłączone i
ustawione na równej, twardej powierzchni.
2. Dostarczony kubek z miarką napełnić w
całości zimną wodą, po czym wlać jego
zawartość do pojemnika na wodę. Uwaga:
Nie przepełniać pojemnika na wodę, aby
uniknąć podczas gotowania rozpryskiwania
wody – niebezpieczeństwo poparzenia! Wlać
do pojemnika na wodę minimum 80 ml
wody, maksimum 350 ml.
3. Wskazówka: Do gotowania na parze
należy używać wyłącznie zimnej wody.
Użycie innych cieczy może prowadzić do
uszkodzenia elementu grzejnego urządzenia.
4. Przygotować żywność w pożądany sposób i
włożyć do wkładu do gotowania na parze.
5. Włożyć wkład na jajka i ramkę, po czym
postawić na nich wkład do gotowania na
parze.
6. Zależnie od sposobu przyrządzania
żywność można włożyć również do białych
pojemników do gotowania na parze, po czym
postawić je na wkładzie do gotowania na
parze. Należy zawsze wkładać najpierw duży
pojemnik do gotowania na parze, a dopiero
potem włożyć do niego obydwa mniejsze
pojemniki.
7. Położyć pokrywę na wkładzie do gotowania
na parze. Zwrócić uwagę na to, aby obydwa
małe otwory w górnej części pokrywy były
skierowane do tyłu, z dala od użytkownika.
8. Włożyć wtyczkę do gniazda wtykowego z
zestykiem ochronnym zgodnie z danymi na
tabliczce znamionowej.
9. Ustawić regulatorem obrotowym żądany czas
gotowania. Można ustawić maksymalnie 40
minut. Urządzenie rozpoczyna gotowanie.
10. Po upływie wybranego czasu ponownie
rozbrzmiewa sygnał dźwiękowy i urządzenie
automatycznie wyłącza się. Lampka
kontrolna gaśnie.
11. Upewnić się, że wyłącznik jest ustawiony
w pozycji „OFF“ i ostrożnie zdjąć pokrywę.
Zwrócić uwagę na uchodzącą parę –
niebezpieczeństwo poparzenia!
12. Wyjąć wkład do gotowania na parze.
13. Po użyciu urządzenia wyciągnąć wtyczkę z
gniazda.
14. Porada: Zaczekać przed spożyciem,
aż żywność trochę ochłodzi się –
niebezpieczeństwo poparzenia!
Lub: Gotowanie na parze na dwóch poziomach
15. Przygotować żywność.
16. Włożyć jedną porcję żywności do obydwóch
białych pojemników do gotowania na parze
i położyć je na wkładzie do gotowania na
parze w urządzeniu.
17. Postawić na nie ramkę i ustawić na ramce
wkład do gotowania na parze. Położyć na
wkładzie do gotowania na parze drugą
porcję.
98
Page 99

18. Położyć pokrywę na wkładzie do gotowania
Copyright UNOLD AG | www.unold.de
na parze. Zwrócić uwagę na to, aby obydwa
małe otwory w górnej części pokrywy były
skierowane do tyłu, z dala od użytkownika.
19. Włożyć wtyczkę do gniazda wtykowego z
zestykiem ochronnym zgodnie z danymi na
tabliczce znamionowej. Włączyć urządzenie
przyciskiem WŁ./WYŁ.
20. Ustawić regulatorem obrotowym żądany czas
gotowania. Można ustawić maksymalnie 40
minut. Urządzenie rozpoczyna gotowanie.
21. Po upływie wybranego czasu ponownie
rozbrzmiewa sygnał dźwiękowy i urządzenie
automatycznie wyłącza się. Lampka
kontrolna gaśnie.
22. Upewnić się, że wyłącznik jest ustawiony
w pozycji „OFF“ i ostrożnie zdjąć pokrywę.
CZYSZCZENIE I PIELĘGNACJA
Zwrócić uwagę na uchodzącą parę –
niebezpieczeństwo poparzenia!
23. Wyjąć wkład do gotowania na parze.
24. Po użyciu urządzenia wyciągnąć wtyczkę z
gniazda.
25. Porada: Zaczekać przed spożyciem,
aż żywność trochę ochłodzi się –
niebezpieczeństwo poparzenia!
OSTROŻNIE:
Podczas używania i po zakończeniu
gotowania urządzenie jest bardzo
gorące! Niebezpieczeństwo poparzenia uchodzącą parą!
Przed czyszczeniem wyciągnąć
wtyczkę z gniazda.
Zaczekać do ochłodzenia się
urządzenia i wylać z pojemnika na
wodę resztki wody.
1. Nie wolno zanurzać urządzenia w wodzie lub
innej cieczy.
2. Nie używać ostrych środków szorujących,
wełny stalowej, przedmiotów metalowych,
gorących środków czyszczących ani
środków dezynfekujących, ponieważ mogą
spowodować uszkodzenia.
3. Wytrzeć obudowę i pojemnik na wodę
wilgotną ściereczką zwilżoną łagodnym
środkiem do czyszczenia i wysuszyć miękką
ściereczką.
4. Środka czyszczącego nie nanosić nigdy
bezpośrednio na urządzenie, tylko zawsze
na ściereczkę.
5. Pokrywę, kubek z miarką, wkład na jajka,
ramkę i wkład do gotowania na parze można
umyć i wysuszyć miękką ścierką. Te części
można również myć w zmywarce (górny kosz
i program delikatny).
6. Osady wapnia w pojemniku na wodę można
usunąć przy użyciu dostępnego w sklepach
odkamieniacza postępując według instrukcji
producenta.
99
Page 100

PRZEPISY
Copyright UNOLD AG | www.unold.de
Jajko lane
3 jajka, 50 ml mleka, 50 ml śmietany, do
smaku: sól, pieprz, starta gałka muszkatołowa
Wszystkie składniki dobrze zmieszać widelcem
lub trzepaczką. Zalecamy nie używać do tego
celu miksera, aby uniknąć powstawania porów
w masie.
Gotować masę w urządzenia w sposób opisany w
rozdziale „Przyrządzanie jajka lanego“. Porada:
Dodać do masy zamiast zwykłej soli szczyptę soli
ziołowej lub startego parmezanu.
Gotowanie warzyw na parze
Do gotowania na parze można użyć świeżych
lub mrożonych warzyw. Mrożonych warzyw nie
należy wcześniej rozmrażać, lecz włożyć je w
zamrożonym stanie do pojemnika do gotowania
na parze i wydłużyć czas gotowania na parze
o ok. 5 minut. W przypadku warzyw z twardą
łodygą, takich jak brokuły lub brukselki, naciąć
łodygę na krzyż. Zależnie od świeżości, rodzaju
uprawy, przycięcia i składowania warzyw i
osobistego smaku (chrupiące lub miękkie)
czas gotowania może być krótszy lub dłuższy.
Podczas gotowania warzyw nie dodawać wina,
soku z cytryny, octu itp. Przyprawiać warzywa
dopiero po ugotowaniu.
Lekki sos podstawowy do warzyw
1 łyżka masła, 1 mała cebula, 125 ml wytrawnego
białego wina, 125 ml bulionu warzywnego, 3
łyżki crème fraîche, sól, biały pieprz
Cebulę obrać z łupiny, pokroić w drobną kostkę,
krótko przysmażyć na maśle i zalać winem i
bulionem. Gotować przez 5-7 minut. Dodać
crème fraîche. Sos będzie szczególnie puszysty,
gdy się go ubije blenderem ESGE Zauberstab®
z nasadką do roztrzepywania. Przyprawić do
smaku solą i pieprzem i od razu podawać.
Mięso
Porada: W urządzeniu do gotowania na parze
można również bez problemu podgrzewać
kiełbaski, kiełbasę parówkową lub gotowane
mięso, np. schab peklowany (plastry o grubości
1 cm).
Filet z cielęciny gotowany na parze w sosie
warzywno-śmietankowym
250 g fileta z cielęciny (plastry o grubości
1-1,5 cm), kilka gałązek estragonu, sól,
pieprz, 50 g marchwi, 50 g selera, 50 g poru,
50 g cukinii, 50 g ziemniaków gotujących
się na twardo, 15 g masła, 15 g mąki, 25 ml
wytrawnego białego wina, 60 ml wywaru z
cielęciny, 100 ml śmietany, sól i pieprz
Wlać wodę do urządzenia, nałożyć ramkę.
Plastry filetu położyć razem z estragonem na
wkładzie do gotowania na parze i gotować
na parze przez ok. 15 minut. Po zakończeniu
gotowania utrzymywać w ciepłym stanie.
W międzyczasie oczyścić warzywa i pokroić w
bardzo małe kosteczki. Roztopić masło w garnku
na kuchence i krótko przysmażyć w nim warzywa.
Oprószyć warzywa mąką i zalać wywarem
cielęcym, białym winem i śmietaną, cały czas
mieszając. Po kilku minutach zmniejszyć ogień i
doprawić do smaku solą i pieprzem.
100
 Loading...