


 Loading...
Trane TWE061D-E***A, TWE090D-E**BA, TWE120D-E**BA, TWE150E**BA, TWE180E**BA Installation and Maintenance Manual
...Installation, Operation,
and Maintenance
Split System Air Conditioners
Odyssey™ |
™ |
||
Air Handler — 5 to 25 Tons |
|||
Model (60 Hz) |
Model (50 Hz) |
||
TWE061D/E***A |
TWE051D***A |
||
TWE090D/E**BA |
TWE076D/E***A |
|
|
|
|||
TWE120D/E**BA |
TWE101D/E***A |
|
|
|
|
||
TWE150E**BA |
TWE126E***A |
|
|
TWE180E**BA |
TWE156E***A |
|
|
TWE240E**BA |
TWE201E***A |
|
|
TWE300E**BA |
TWE251E***A |
|
|
|
|
|
|
|
|
|
|
 SAFETY WARNING
Only qualified personnel should install and service the equipment. The installation, starting up, and servicing of heating, ventilating, and air-conditioning equipment can be hazardous and requires specific knowledge and training. Improperly installed, adjusted or altered equipment by an unqualified person could result in death or serious injury. When working on the equipment, observe all precautions in the literature and on the tags, stickers, and labels that are attached to the equipment.
March 2015 |
SSA-SVX06E-EN |
Introduction
Read this manual thoroughly before operating or servicing this unit.
Warnings, Cautions, and Notices
Safety advisories appear throughout this manual as required. Your personal safety and the proper operation of this machine depend upon the strict observance of these precautions.
The three types of advisories are defined as follows:
Indicates a potentially hazardous situation which, if not avoided, could result in death or serious injury.
Indicates a potentially hazardous situation which, if not avoided, could result in minor or moderate injury. It could also be used to alert against unsafe practices.
Indicates a situation that could result in equipment or property-damage only accidents.
Important Environmental Concerns
Scientific research has shown that certain man-made chemicals can affect the earth’s naturally occurring stratospheric ozone layer when released to the atmosphere. In particular, several of the identified chemicals that may affect the ozone layer are refrigerants that contain Chlorine, Fluorine and Carbon (CFCs) and those containing Hydrogen, Chlorine, Fluorine and Carbon (HCFCs). Not all refrigerants containing these compounds have the same potential impact to the environment. Trane advocates the responsible handling of all refrigerants-including industry replacements for CFCs such as HCFCs and HFCs.
Important Responsible Refrigerant
Practices
Trane believes that responsible refrigerant practices are important to the environment, our customers, and the air conditioning industry. All technicians who handle refrigerants must be certified. The Federal Clean Air Act (Section 608) sets forth the requirements for handling, reclaiming, recovering and recycling of certain refrigerants and the equipment that is used in these service procedures. In addition, some states or municipalities may have additional requirements that must also be adhered to for responsible management of refrigerants. Know the applicable laws and follow them.
 WARNING
Proper Field Wiring and Grounding Required!
All field wiring MUST be performed by qualified personnel. Improperly installed and grounded field wiring poses FIRE and ELECTROCUTION hazards. To avoid these hazards, you MUST follow requirements for field wiring installation and grounding as described in NEC and your local/ state electrical codes.
 WARNING
Personal Protective Equipment (PPE) Required!
Technicians, in order to protect themselves from potential electrical, mechanical, and chemical hazards, MUST follow precautions in this manual and on the tags, stickers, and labels, as well as the instructions below:
•Before installing/servicing this unit, technicians MUST put on all PPE required for the work being undertaken (Examples; cut resistant gloves/sleeves, butyl gloves, safety glasses, hard hat/bump cap, fall protection, electrical PPE and arc flash clothing). ALWAYS refer to appropriate Material Safety Data Sheets (MSDS)/Safety Data Sheets (SDS) and OSHA guidelines for proper PPE.
•When working with or around hazardous chemicals, ALWAYS refer to the appropriate MSDS/SDS and OSHA/GHS (Global Harmonized System of Classification and Labelling of Chemicals) guidelines for information on allowable personal exposure levels, proper respiratory protection and handling instructions.
•If there is a risk of energized electrical contact, arc, or flash, technicians MUST put on all PPE in accordance with OSHA, NFPA 70E, or other country-specific requirements for arc flash protection, PRIOR to servicing the unit. NEVER PERFORM ANY SWITCHING, DISCONNECTING, OR VOLTAGE TESTING WITHOUT PROPER ELECTRICAL PPE AND ARC FLASH CLOTHING. ENSURE ELECTRICAL METERS AND EQUIPMENT ARE PROPERLY RATED FOR INTENDED VOLTAGE.
©2015 Trane All rights reserved |
SSA-SVX06E-EN |

 WARNING
Refrigerant under High Pressure!
System contains oil and refrigerant under high pressure. Recover refrigerant to relieve pressure before opening the system. See unit nameplate for refrigerant type. Do not use non-approved refrigerants, refrigerant substitutes, or refrigerant additives.
 WARNING
R-410A Refrigerant under Higher Pressure than R-22!
The units described in this manual use R-410A refrigerant which operates at higher pressures than R-22. Use ONLY R-410A rated service equipment or components with these units. For specific handling concerns with R-410A, please contact your local Trane representative.
Copyright
This document and the information in it are the property of Trane, and may not be used or reproduced
Introduction
in whole or in part without written permission. Trane reserves the right to revise this publication at any time, and to make changes to its content without obligation to notify any person of such revision or change.
Trademarks
All trademarks referenced in this document are the trademarks of their respective owners.
Revision History
•With the change to Microchannel, the Odyssey split system now offers a 50Hz, 6.25 standard air handler (TWE076E) and a 60Hz, 7.5 ton standard/SZVAV/2- Speed VFD air handler (TWE090E). See performance data for additional details on this new split system.
•Odyssey air handlers now have the ability to convert from Single Zone VAV to 2–Speed Fan control in order to comply with certain sections of California Title 24 and ASHRAE 90.1. See “Installation, 2-Speed VFD Units,” p. 25 for configuration details.
SSA-SVX06E-EN |
3 |
Table of Contents
Model Number Description . . . . . . . . . . . . . . . . . 5
Air Handler. . . . . . . . . . . . . . . . . . . . . . . . . . . . . . . 5
General Information . . . . . . . . . . . . . . . . . . . . . . . . 6
Unit Description . . . . . . . . . . . . . . . . . . . . . . . . . . 6
Pre-Installation . . . . . . . . . . . . . . . . . . . . . . . . . . . . . 7
Unit Inspection . . . . . . . . . . . . . . . . . . . . . . . . . . . 7
Inspection Checklist . . . . . . . . . . . . . . . . . . . 7
Testing for Leaks. . . . . . . . . . . . . . . . . . . . . . . . . . 7
Lifting Recommendations . . . . . . . . . . . . . . . . . 7
Repositioning Drain Pan. . . . . . . . . . . . . . . . . . . 7
Field Conversion to 460 Volt . . . . . . . . . . . . . . . 9 Converting Motor to 460 Volt . . . . . . . . . . . 9
Refrigerant Piping . . . . . . . . . . . . . . . . . . . . . . . . 9 Reorienting Evaporator Coil
(TWE126/150 and 156/180) . . . . . . . . . . . . . 9 Preparation for Refrigerant
Piping. . . . . . . . . . . . . . . . . . . . . . . . . . . . . . . 10
Installations, Limitations and
Recommendations. . . . . . . . . . . . . . . . . . . . . . . 10
Dimensional Data . . . . . . . . . . . . . . . . . . . . . . . . . 11
Weights . . . . . . . . . . . . . . . . . . . . . . . . . . . . . . . . . . . 20
Air Handler. . . . . . . . . . . . . . . . . . . . . . . . . . . . . . 20
Installation . . . . . . . . . . . . . . . . . . . . . . . . . . . . . . . . 22
Horizontal Suspension . . . . . . . . . . . . . . . . . . . 22
Leveling. . . . . . . . . . . . . . . . . . . . . . . . . . . . . 22
Auxiliary Drain Pan. . . . . . . . . . . . . . . . . . . 22
Refrigerant Piping . . . . . . . . . . . . . . . . . . . . . . . 22
Condensate Piping. . . . . . . . . . . . . . . . . . . . . . . 23
Filter Replacement . . . . . . . . . . . . . . . . . . . . . . . 23
Duct Connections. . . . . . . . . . . . . . . . . . . . . . . . 24
Air Flow Settings . . . . . . . . . . . . . . . . . . . . . . . . 24
Standard Units. . . . . . . . . . . . . . . . . . . . . . . 24
SZVAV Units . . . . . . . . . . . . . . . . . . . . . . . . . 24
2-Speed VFD Units . . . . . . . . . . . . . . . . . . . 25
Minimum Supply Fan Output . . . . . . . . . 25
Electrical Connections . . . . . . . . . . . . . . . . . . . 26
Setpoints . . . . . . . . . . . . . . . . . . . . . . . . . . . . . . . 26
EDC Switch Wiring . . . . . . . . . . . . . . . . . . . 27
Heating and Cooling Setpoint
Arbitration . . . . . . . . . . . . . . . . . . . . . . . . . . 27
Checkout Procedure . . . . . . . . . . . . . . . . . . . . . 28
Installation Checklist . . . . . . . . . . . . . . . . . . . . . 28
Thermostat and Control
Connections. . . . . . . . . . . . . . . . . . . . . . . . . . . . . 29
Electromechanical Controls . . . . . . . . . . . 29
ReliaTel Controls . . . . . . . . . . . . . . . . . . . . . 29
Electrical Data . . . . . . . . . . . . . . . . . . . . . . . . . . . . . 31
60 Hz Models . . . . . . . . . . . . . . . . . . . . . . . . . . . . 31
50 Hz Models . . . . . . . . . . . . . . . . . . . . . . . . . . . . 40
Start-Up . . . . . . . . . . . . . . . . . . . . . . . . . . . . . . . . . . . 42
Sequence of Operation. . . . . . . . . . . . . . . . . . . 42 Variable Air Volume Applications
(SZVAV) . . . . . . . . . . . . . . . . . . . . . . . . . . . . . 42 2–Speed VFD Applications . . . . . . . . . . . . 43
Maintenance . . . . . . . . . . . . . . . . . . . . . . . . . . . . . . 44
Fan Belt Adjustment . . . . . . . . . . . . . . . . . . . . . 44
Monthly . . . . . . . . . . . . . . . . . . . . . . . . . . . . . . . . 44
Annually (Cooling Season) . . . . . . . . . . . . . . . 45
Coil Cleaning . . . . . . . . . . . . . . . . . . . . . . . . . . . . 45
Maintenance Log . . . . . . . . . . . . . . . . . . . . . . . . 46
Wiring Diagram Matrix . . . . . . . . . . . . . . . . . . . . 47
4 |
SSA-SVX06E-EN |

Model Number Description
Air Handler
T WE |
2 40 |
E |
D |
1 2 3 |
4 5 6 |
7 |
8 |
T WE |
201 |
E |
D |
1 2 3 |
4 5 6 |
7 |
8 |
Note: When ordering replacement parts or requesting service, be sure to refer to the specific model number, serial number, and DL number (if applicable) stamped on the unit nameplate.
DIGITS 1 - 3: Product Type
TWE = Split System Heat Pump/Cooling Air Handler
DIGITS 4 - 6: Nominal Gross Cooling Capacity (MBh)
061 = 5 Tons (60 Hz)
090 = 7.5 Tons (60 Hz)
120 = 10 Tons (60 Hz)
150 = 12.5 Tons (60 Hz)
180 = 15 Tons (60 Hz)
240 = 20 Tons (60 Hz)
300 = 25 Tons (60 Hz)
051 = 4.6 Tons (50 Hz)
076 = 6.25 Tons (50 Hz)
101 = 8.33 Tons (50 Hz)
126 = 10.4 Tons (50 Hz)
156 = 13.0 Tons (50 Hz)
201 = 16.7 Tons (50 Hz)
251 = 20.9 Tons (50 Hz)
DIGIT 7: Major Development Sequence
1. * = sequential alpha character
0 0 |
* |
* |
9 10 |
11 |
12 |
0 0 |
* |
* |
9 10 |
11 |
12 |
D = Single Refrigeration Circuit
E = Dual Refrigeration Circuit
DIGIT 8: Electrical Characteristics
3 = 208–230/60/3
4 = 460/60/3 W = 575/60/3
D = 380-415/50/3 K = 380/60/3
DIGITS 9 - 10: Factory Installed Options
00 = Packed Stock (Standard)
03 = 2-Speed Variable Frequency Drive (VFD) standard motor (electromechanical condenser only)
04 = 2-Speed Variable Frequency Drive (VFD) oversized motor (electromechanical condenser only)
R3 = Single Zone Variable Air Volume (VFD) standard motor - (ReliaTel condenser only)
R4 = Single Zone Variable Air Volume (VFD) oversized motor - (ReliaTel condenser only)
DIGITS 11: Minor Design Sequence
* = Current Design Sequence1
DIGITS 12: Service Digit
* = Current Design Sequence1
SSA-SVX06E-EN |
5 |
General Information
This manual describes proper installation, operation, and maintenance procedures for air cooled systems. By carefully reviewing the information within this manual and following the instructions, the risk of improper operation and/or component damage will be minimized. It is important that periodic maintenance be performed to help assure trouble free operation. Should equipment failure occur, contact a qualified service organization with qualified, experienced HVAC technicians to properly diagnose and repair this equipment.
Important: All phases of this installation must comply with the NATIONAL, STATE & LOCAL CODES. In addition to local codes, the installation must conform with National Electric Code -ANSI/NFPA NO. 70 LATEST REVISION.
Any individual installing, maintaining, or servicing this equipment must be properly trained, licensed and qualified.
Important: Do not remove the VFD without first contacting technical support! For performance-related questions and diagnostic support in North America call 1- 877-872-6363. Any return requires a claim number FIRST. Removal of the VFD prior to this step will void the unit’s warranties.
Installation procedures should be performed in the sequence that they appear in this manual. Do not destroy or remove the manual from the unit. The
manual should remain weather-protected with the unit until all installation procedures are complete.
Note: It is not the intention of this manual to cover all possible variations in systems that may occur or to provide comprehensive information concerning every possible contingency that may be encountered during an installation. If additional information is required or if specific problems arise that are not fully discussed in this manual, contact your local sales office.
Use the installation checklist provided In this manual to verify that all necessary installation procedures have been completed. Do not use the checklist as a substitute for reading the information contained in the manual. Read the entire manual before beginning installation procedures.
Unit Description
These air handler models incorporate a single slab coil assembly, improved application flexibility, servicing, maintenance accessibility and an improved accessory line. They are fully convertible, (vertical to horizontal discharge) without field removal of the coil assembly. They are shipped ready for horizontal installation.
All units have one drain pan that can be installed in any one of four positions. This allows for vertical or horizontal applications and right or left exit.
Important: All dual circuit (digit 7 = E) have an intertwined coil, except for the 25 ton, TWE251 and TWE300 units.
6 |
SSA-SVX06E-EN |

Pre-Installation
The final position for the air handler must be dictated by required service access to it, weight distribution over structural supports, and by the locations of electrical, refrigerant and condensate drainage connections. After this is determined, the following preparations should be made.
Unit Inspection
Inspect material carefully for any shipping damage. If damaged, it must be reported to, and claims made against the transportation company. Compare the information that appears on the unit nameplate with ordering and submittal data to ensure the proper unit was shipped. Available power supply must be compatible with electrical characteristics specified on component nameplates. Replace damaged parts with authorized parts only.
Inspection Checklist
To protect against loss due to damage incurred in transit, complete the following checklist upon receipt of the unit.
Inspect individual pieces of the shipment before accepting the unit. Check for obvious damage to the unit or packing material.
Inspect the unit for concealed damage before it is stored and as soon as possible after delivery. Concealed damage must be reported within 15 days. If concealed damage is discovered, stop unpacking the shipment. Do not remove damaged material from the receiving location. Take photos of the damage if possible. The owner must provide reasonable evidence that the damage did not occur after delivery.
Notify the carrier’s terminal of damage immediately by phone and by mail. Request an immediate joint inspection of the damage by the carrier and the consignee.
Notify the sales representative and arrange for repair. Do not repair the unit until the damage is inspected by the carrier’s representative.
Testing for Leaks
All TWE units are shipped with a holding charge of nitrogen in each circuit and should be leak tested before installation.
1.Remove the access panel.
2.Locate the liquid line or suction line access valve for each circuit.
3.Install gauges to determine if the circuits are still pressurized. If not, the charge has escaped and should be repaired as required to obtain a leak-free circuit.
Lifting Recommendations
 WARNING
Improper Unit Lift!
Test lift unit approximately 24 inches to verify proper center of gravity lift point. To avoid dropping of unit, reposition lifting point if unit is not level.
NOTICE
Equipment Damage!
Use spreader bars to prevent straps from damaging the unit. Install the bars between lifting straps, both underneath the unit and above the unit to prevent the straps from crushing the unit cabinet or damaging the finish.
Before preparing the unit for lifting, estimate the approximate center of gravity for lifting safety. Because of placement of internal components, the unit weight may be unevenly distributed. See “Weights,” p. 20 for approximate unit weights.
The crated unit can be moved using a forklift of suitable capacity. For lifting the unit into an elevated mounting position, run lifting straps or slings under the unit and attach securely to the lifting device.
Repositioning Drain Pan
Air handlers come with one drain pan that can be installed in any one of four positions; this allows for vertical or horizontal application and right or left condensate line connection.
Note: Important! All air handlers are shipped with the drain pan installed in the horizontal position and the connection on the left side (as shown in Figure 1, p. 8 If an alternate. position is required, the drain pan should be repositioned before setting the air handler.
1.Remove the access plate at the opposite end of the drain connection. This plate secures and lifts the back end of the drain pan for sloping. It must be removed before the drain pan can be removed. This is done as follows:
a.Remove the screw
b.Lift the access plate up
c.Pull the plate out. If the drain pan is to be moved to the vertical position also remove the other two access plates.
2.Remove the screw securing the drain pan.
a.Lift the pan up
b.Slide the pan out
3.Install the drain pan into the new position.
SSA-SVX06E-EN |
7 |
Pre-Installation
a. Slide the drain pan into the opening |
Figure 2. Drain pan relocation |
b. Lift the drain pan up
c. Push it in all the way
d.Drop it down over the lip of the opening, secure with screw
4.Install the access plate on the opposite end of the
drain pain.
a.Slide the edge of the access plate under the drain pan
b. Lift the access plate and drain pan up
c.Push the access plate in
d.Drop the access plate down over the lip of the opening, secure with screw
Note: If the drain pan is being moved to the vertical position, install the other access plates over the horizontal position opening
Figure 1. Drain pan location
NOTICE
System Component Damage!
These air handlers are shipped with a dry nitrogen holding charge in the coil. Depress or remove the access valve cone to bleed off the nitrogen prior to brazing. Temporarily cap off tubes if the refrigerant line connections are to be made later.
8 |
SSA-SVX06E-EN |

Field Conversion to 460 Volt
 WARNING
Hazardous Voltage w/Capacitors!
Disconnect all electric power, including remote disconnects and discharge all motor start/run capacitors before servicing. Follow proper lockout/ tagout procedures to ensure the power cannot be inadvertently energized. For variable frequency drives or other energy storing components provided by Trane or others, refer to the appropriate manufacturer’s literature for allowable waiting periods for discharge of capacitors. Verify with an appropriate voltmeter that all capacitors have discharged.
For additional information regarding the safe discharge of capacitors, see PROD-SVB06A-EN.
 WARNING
Proper Field Wiring and Grounding Required!
All field wiring MUST be performed by qualified personnel. Improperly installed and grounded field wiring poses FIRE and ELECTROCUTION hazards. To avoid these hazards, you MUST follow requirements for field wiring installation and grounding as described in NEC and your local/ state electrical codes.
•Available power supply must agree with electrical data on component nameplate.
•Some standard air handlers are shipped wired for 208-230 volt applications and can be converted for 460 volt by rewiring the blower motor. (This includes models TWE090D3, TWE090E3, TWE120D3, TWE120E3, TWE150E3 and TWE180E3).
Converting Motor to 460 Volt
1.Ensure power is disconnected to unit by following the warning above.
2.Remove unit access panels closest to motor.
3.Open terminal cover on lead end of motor.
4.Pull voltage selector plug from low voltage
selection (see Figure 3, p. 9 |
). |
5.Shift the plug (or rotate 180°) to align plug for high voltage selection and re-insert plug.
Important: When re-inserting voltage selection plug, ensure it is fully seated.
6.Replace terminal cover on lead end of motor.
7.Replace unit access panels.
Pre-Installation
Figure 3. Voltage change plug
Refrigerant Piping
Reorienting Evaporator Coil (TWE126/ 150 and 156/180)
Important: Applies to TWE126/150 and 156/180 when positioned for vertical upflow. Unit is shipped in the horizontal position. If installing in the vertical position, the coil must be reoriented by rotating the coil 4 degrees (control box side) from the shipped position.
1.Remove screws from top evaporator coil bracket (bracket that attaches coil to cabinet and runs the length of the unit).
2.Rotate evaporator coil approximately 4 degrees clockwise - looking from the control box end. When the evaporator coil is rotated, the lower set of evaporator coil bracket holes will align with the support bracket (from which it was originally fastened).
3.Reinsert screws in evaporator coil bracket.
SSA-SVX06E-EN |
9 |
Pre-Installation
Figure 4. Evaporator coil reorientation for TWE126, 150, 156, 180
Preparation for Refrigerant Piping
NOTICE
Equipment Damage!
Do not apply heat to remove seal caps until the gauge port cores have been removed. If seal caps are intact, application of heat may generate excessive pressure in the unit and result in damage to the coil or expansion valve.
The air handler is designed so that refrigerant piping can enter from either the right or left hand side. It is shipped with the intent that the refrigerant lines will enter from the left hand side. To convert to right hand entry, unbraze the elbow on the suction line and rotate 180° and rebraze.
Important: Access to refrigerant lines is limited in all horizontal and some vertical applications. Therefore, refrigerant lines should be stubbed out and temporarily capped prior to setting the air handler. Protect adjacent surfaces from heat damage when brazing in and around the air handler.
Installations, Limitations and Recommendations
NOTICE
System Component Damage!
Properly insulate all refrigerant gas piping to prevent possible water damage due to condensation and to prevent capacity loss and possible compressor damage.
The general location of the air handler is normally selected by the architect, contractor and/or buyer. For proper installation, the following items must be considered:
•Available power supply must agree with electrical data on component nameplate.
•If external accessories are installed on the unit, additional clearances must be provided.
•All duct work should be properly insulated to prevent condensation and heat loss.
•Refrigerant gas piping must be insulated.
It is recommended that the outline drawings in the Dimensional Data section be studied and dimensions properly noted and checked against the selected installation site. By noting in advance which features are to be used, proper clearance allowances can be made for installation and possible future service.
Important: When installing these units “free standing” with discharge grills and isolators, a top support with isolator should be added to prevent tipping. Support and isolator can be attached to a wall or other appropriate structure.
If adding external accessories to the unit, additional clearances must be considered for the overall space needed.
For installation of accessories available for this air handler, follow the installation instructions that are shipped with each accessory.
10 |
SSA-SVX06E-EN |
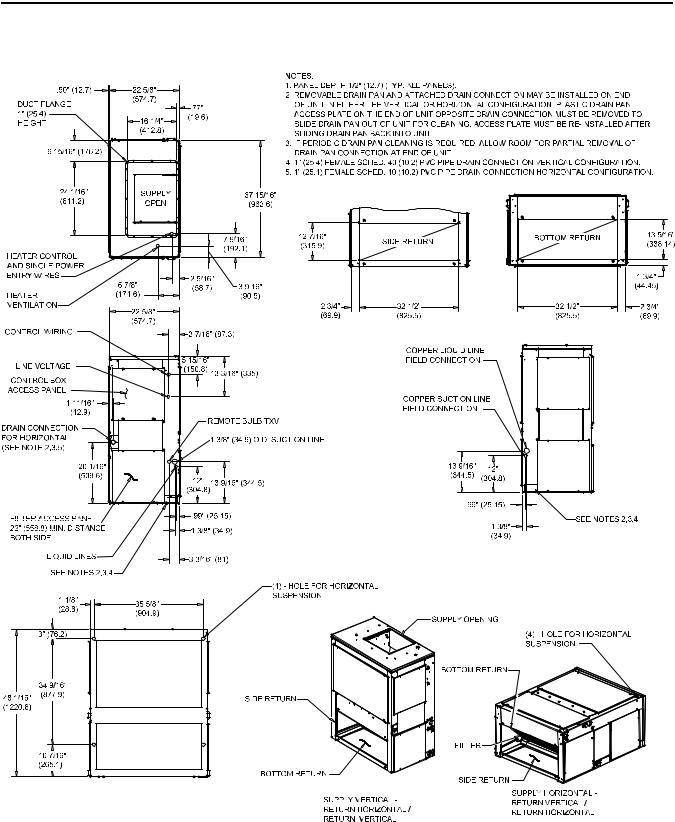
Dimensional Data
Figure 5. Height, width and depth measurements
Model Number |
H - in. (mm) |
W - in. (mm) |
D - in. (mm) |
|
TWE051, |
061 |
48-1/8 (1222.4) |
39-5/8 (1006.5) |
23-5/8 (600.0) |
TWE076, |
090 |
54-1/8 (1374.8) |
49-1/8 (1247.8) |
26-1/2 (673.1) |
TWE101, |
120 |
54-1/8 (1374.8) |
65-1/8 (1654.2) |
26-1/2 (673.1) |
TWE126, 150, |
156, 180 |
69-1/8 (1756.0) |
81-1/4 (2063.7) |
30 (762.0) |
TWE201, 240, |
251, 300 |
71-7/8 (1806.6) |
94-1/4 (2394.0) |
32-1/8 (816.0) |
Note: Full dimensional data is available on the following pages.
SSA-SVX06E-EN |
11 |
Dimensional Data
Figure 6. 4.6, 5 ton air handler, single circuit
12 |
SSA-SVX06E-EN |

Dimensional Data
Figure 7. 5 ton air handler, dual circuit
SSA-SVX06E-EN |
13 |

Dimensional Data
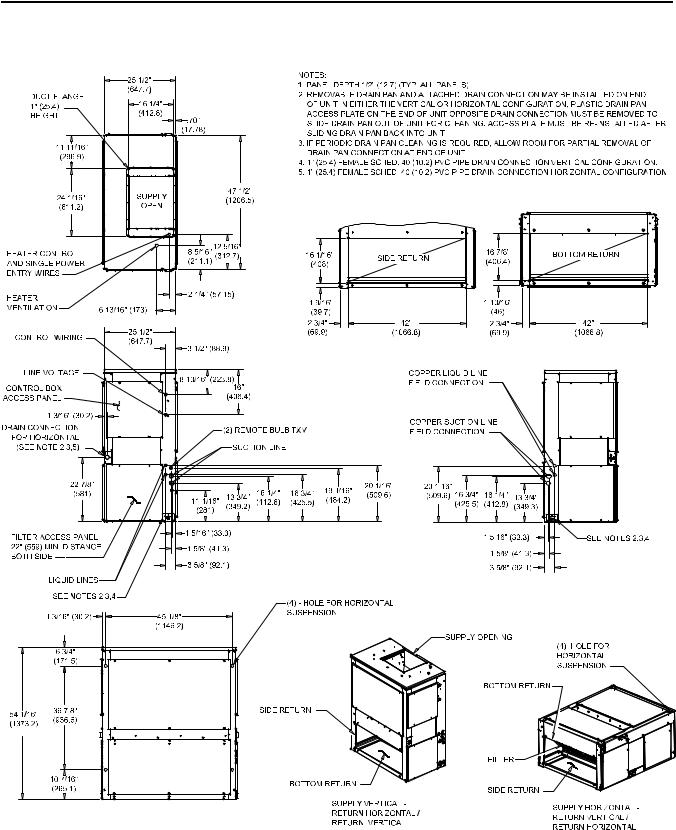
Figure 8. 6.25, 7.5 ton air handler, single circuit
14 |
SSA-SVX06E-EN |
Dimensional Data
Figure 9. 6.25, 7.5 ton air handler, dual circuit
SSA-SVX06E-EN |
15 |
Loading...