


 Loading...
TomTom 4FB40, 4FA50, 4FA60, 4FL50, 4FL60 Manual
...TomTom GO
User Manual
16.1
Contents
Welcome to navigation with TomTom |
6 |
|
|
What's new |
7 |
|
|
New in this release ................................................................................................ |
7 |
TomTom videos .................................................................................................... |
7 |
Get going |
9 |
|
|
Installing in your car .............................................................................................. |
9 |
Positioning the device ............................................................................................ |
9 |
Switching on and off .............................................................................................. |
9 |
Setting up ......................................................................................................... |
10 |
GPS reception .................................................................................................... |
10 |
Sending information to TomTom .............................................................................. |
10 |
Memory card slot ................................................................................................ |
11 |
Device not starting .............................................................................................. |
11 |
Charging your device ............................................................................................ |
11 |
Caring for your GO............................................................................................... |
11 |
Connecting to TomTom services |
12 |
|
|
About TomTom services ........................................................................................ |
12 |
TomTom MyDrive App for iOS or Android .................................................................... |
12 |
Connect to TomTom services using your smartphone ..................................................... |
13 |
Reconnect to TomTom services using your smartphone .................................................. |
13 |
Connect to TomTom services using a different smartphone ............................................. |
14 |
Deleting phones .................................................................................................. |
14 |
Unable to get a connection .................................................................................... |
14 |
What's on the screen |
16 |
|
|
The map view..................................................................................................... |
16 |
The guidance view............................................................................................... |
18 |
The route bar ..................................................................................................... |
19 |
Distances and the route bar ............................................................................... |
20 |
The quick menu .................................................................................................. |
21 |
Navigation buttons............................................................................................... |
21 |
Main Menu smaller buttons and symbols..................................................................... |
23 |
Volume control ................................................................................................... |
25 |
Using gestures .................................................................................................... |
25 |
Changing the text and button size............................................................................ |
26 |
Reordering the Main Menu buttons ........................................................................... |
26 |
Traffic |
27 |
|
|
About TomTom Traffic.......................................................................................... |
27 |
The route bar ..................................................................................................... |
27 |
Looking at traffic on the map ................................................................................. |
28 |
Looking at traffic on your route............................................................................... |
29 |
Traffic incidents ................................................................................................. |
30 |
Approaching a traffic jam warning ........................................................................... |
31 |
Avoiding a traffic jam on your route ......................................................................... |
31 |
2 |
|
Advanced Lane Guidance ....................................................................................... |
32 |
Time-dependent speed limits ................................................................................. |
32 |
Syncing using TomTom MyDrive |
33 |
|
|
About TomTom MyDrive ........................................................................................ |
33 |
Logging into MyDrive ............................................................................................ |
33 |
Setting a destination using MyDrive .......................................................................... |
33 |
Planning a route with stops using MyDrive .................................................................. |
34 |
Showing a planned destination in MyDrive .................................................................. |
35 |
Clearing a MyDrive destination ................................................................................ |
35 |
Deleting a MyDrive destination from My Places ............................................................ |
35 |
Set a phone contact as your destination using the MyDrive app ........................................ |
35 |
Finding and syncing locations using MyDrive ................................................................ |
35 |
Syncing My Places locations with MyDrive ................................................................... |
36 |
Importing a community POI list ............................................................................... |
36 |
Deleting a community POI list ................................................................................. |
36 |
Importing a track GPX file...................................................................................... |
37 |
Deleting a track GPX file ....................................................................................... |
37 |
Saving and restoring your personal navigation information .............................................. |
37 |
Using Quick Search |
39 |
|
|
About search...................................................................................................... |
39 |
Planning a route to a POI using search....................................................................... |
39 |
Planning a route to a POI using online search .............................................................. |
41 |
Entering search terms........................................................................................... |
43 |
Working with search results ................................................................................... |
44 |
About ZIP codes .................................................................................................. |
46 |
About mapcodes ................................................................................................. |
46 |
List of POI type icons............................................................................................ |
46 |
Planning a route |
51 |
|
|
Using suggested destinations .................................................................................. |
51 |
Planning a route to an address using search ................................................................ |
51 |
Planning a route to a city center ............................................................................. |
53 |
Planning a route to a POI using search....................................................................... |
55 |
Planning a route to a POI using online search .............................................................. |
57 |
Planning a route using the map ............................................................................... |
59 |
Planning a route using My Places ............................................................................. |
60 |
Planning a route using coordinates ........................................................................... |
61 |
Planning a route using a mapcode ............................................................................ |
62 |
Finding an alternative route ................................................................................... |
63 |
Planning a route in advance ................................................................................... |
64 |
Finding a parking lot ............................................................................................ |
66 |
Finding a gas station ............................................................................................ |
68 |
Changing your route |
70 |
|
|
The Current Route menu ....................................................................................... |
70 |
Avoiding a blocked road ........................................................................................ |
72 |
Avoiding part of a route ........................................................................................ |
72 |
Types of route .................................................................................................... |
73 |
Route features ................................................................................................... |
73 |
Avoiding a route feature on your route ...................................................................... |
74 |
Adding a stop to your route from the current route menu ............................................... |
74 |
Adding a stop to your route using the map ................................................................. |
74 |
3 |
|
Deleting a stop from your route............................................................................... |
75 |
Skipping the next stop on your route ........................................................................ |
75 |
Reordering stops on a route ................................................................................... |
75 |
My Routes |
76 |
|
|
About My Routes ................................................................................................. |
76 |
About GPX and ITN files ........................................................................................ |
76 |
Saving a route .................................................................................................... |
77 |
Navigating using a saved route ................................................................................ |
78 |
Navigating to a stop on a saved route ....................................................................... |
78 |
Adding a stop to a saved route using the map.............................................................. |
80 |
Recording a track ................................................................................................ |
81 |
Deleting a route or a track from My Routes................................................................. |
81 |
Navigating using a track ........................................................................................ |
81 |
Exporting tracks to a memory card ........................................................................... |
82 |
Importing routes and tracks from a memory card ......................................................... |
83 |
Voice control (Speak & Go) |
84 |
|
|
About voice control.............................................................................................. |
84 |
Starting voice control ........................................................................................... |
84 |
Making your own wake-up phrase............................................................................. |
84 |
The voice control screen ....................................................................................... |
85 |
Some tips for using voice control ............................................................................. |
86 |
What you can use voice control for........................................................................... |
86 |
Saying commands in different ways .......................................................................... |
87 |
Entering an address using voice control ..................................................................... |
87 |
Going home using voice control ............................................................................... |
88 |
Going to a POI using voice control ............................................................................ |
88 |
Changing a setting using voice control....................................................................... |
88 |
Map Share |
90 |
|
|
About Map Share ................................................................................................. |
90 |
Creating a map change report................................................................................. |
90 |
Creating a map change report from a marked location................................................... |
91 |
Types of map change............................................................................................ |
92 |
Safety Cameras |
94 |
|
|
About Safety Cameras .......................................................................................... |
94 |
Safety camera warnings ........................................................................................ |
94 |
Changing the way you are warned ............................................................................ |
95 |
Reporting a new safety camera ............................................................................... |
96 |
Confirm or remove a speed trap .............................................................................. |
96 |
Updating locations for cameras and hazards ............................................................... |
97 |
My Places |
98 |
|
|
About My Places.................................................................................................. |
98 |
Setting your home and work locations ....................................................................... |
98 |
Changing your home location .................................................................................. |
99 |
Adding a location from My Places............................................................................ |
100 |
Add a location to My Places from the map ................................................................. |
100 |
Adding a location to My Places using search ............................................................... |
101 |
Adding a location to My Places by marking ................................................................ |
101 |
|
4 |

Deleting a recent destination from My Places ............................................................. |
101 |
Deleting a location from My Places .......................................................................... |
101 |
Settings |
102 |
Appearance ...................................................................................................... |
102 |
Display ........................................................................................................ |
102 |
Route Bar..................................................................................................... |
103 |
Guidance view ............................................................................................... |
104 |
Automatic Zoom............................................................................................. |
105 |
Voices ............................................................................................................. |
105 |
Voice Control .................................................................................................... |
106 |
Maps............................................................................................................... |
106 |
Route Planning .................................................................................................. |
107 |
Sounds and Warnings ........................................................................................... |
108 |
Warning type ................................................................................................ |
108 |
Safety camera warnings ................................................................................... |
108 |
Cameras ...................................................................................................... |
108 |
Hazards ....................................................................................................... |
109 |
Screen touch sounds........................................................................................ |
109 |
Language and Units............................................................................................. |
109 |
System ............................................................................................................ |
110 |
Help ............................................................................................................... |
111 |
Getting Help |
112 |
Help ............................................................................................................... |
112 |
Product certification |
113 |
Finding product certification information on your device............................................... |
113 |
Updating using MyDrive Connect |
114 |
About MyDrive Connect ........................................................................................ |
114 |
TomTom account ............................................................................................... |
114 |
Setting up MyDrive Connect................................................................................... |
114 |
Addendum |
116 |
Copyright notices |
121 |
5

Welcome to navigation with TomTom
This Reference Guide explains all you need to know about your new TomTom GO.
To learn about getting started with your device and installing it in your vehicle, we recommend that you read the Get going chapter.
After that, you will probably want to connect to TomTom services, which you can read all about in the Connecting to TomTom services chapter. To help avoid traffic delays and get you to your destination quicker, you can even use TomTom services on the routes you drive every day.
After that, you will probably want to learn about Quick Search and you can read all about that in the Using Quick Search chapter.
For information about what you see on the device itself, go to What's on the screen. To plan your first route, go to Planning a route.
Tip: There are also frequently asked questions (FAQs) at tomtom.com/support. Select your product model from the list or enter a search term.
We hope you enjoy reading about and, most importantly, using your new GO!
6

What's new
New in this release
Version 16.1
GO 40, GO 50, GO 51, GO 60, GO 61, GO 400, GO 500, GO 510, GO 600, GO 610, GO 5000, GO 5100, GO 6000, GO 6100
START 40, START 50, START 60
Record and export tracks, and import tracks and routes
You can now record a track while you drive, with or without a route planned. The track is saved in My Routes.
You can export tracks as GPX files and save them on a memory card for sharing with other users. You can import track GPX and route ITN files from a memory card and save them in My Routes. To learn more go to My Routes in this guide.
Search for specific POI names using voice control (GO only)
You can now use voice control to search for a specific POI using the POI brand name. For example, when voice control is on, you can say "Find Starbucks."
To learn more go to Voice Control in this guide.
Other bug fixes and improvements
Various performance improvements and bug fixes have been implemented.
TomTom videos
You can find many videos on our YouTube channel to help you learn about your new TomTom GO and other TomTom products. Visit www.youtube.com/user/TomTomOfficial/videos to find out more!
Here are links to some videos that you might find interesting:
Tip: Look on the TomTom YouTube Channel for videos in your own language.
TomTom GO (English only)
Learn more about the GO here: https://tomtom.dist.sdlmedia.com/Distributions/?o=5197E8C4-1943-40F0-A4E8-98A562AFAFCE
The all new TomTom GO - Guided Tour (English only) https://www.youtube.com/watch?v=sSBSeYtGpuY
Using MyDrive |
|
UK English: |
https://www.youtube.com/watch?v=PIs5tGFhQIA |
|
7 |
French (France): |
https://www.youtube.com/watch?v=lYpPDxxXSwk |
Spanish (Spain): |
https://www.youtube.com/watch?v=HkZqdD5MkHI |
German: |
https://www.youtube.com/watch?v=Skg6PWMbRxI |
Italian: |
https://www.youtube.com/watch?v=AybGRzpgu1s |
USA ONLY - Getting traffic on a smartphone-connected device https://us.support.tomtom.com/app/content/name/Connect/page/3
New products
TomTom Bandit (English): https://www.youtube.com/watch?v=U2DXXwRcWyI
8

Get going
Installing in your car
Use the supplied mount to install your TomTom GO in your vehicle. Read the instructions about positioning your device before you install your GO.
To install your GO, do the following:
1.Connect the supplied USB cable to the mount. If the mount is integrated into your GO, connect the USB cable to the device.
Note: Use ONLY the USB cable supplied with your GO. Other USB cables may not work.
2.Connect the USB cable to the USB car charger and plug this into the power supply on your dashboard.
3.Choose the best smooth location, on your windshield or side window, to mount your TomTom GO.
Tip: If the mount is integrated into your GO, you can easily change the rotation of your device. Push the button on the back of the device to release the mount, then slide the mount out. Insert it back into the other side of the device.
4.Make sure that both the suction cup on the mount and your windshield are clean and dry.
5.Press the suction cup of the mount firmly against your windshield.
6.Turn the rubber grip near the base of the mount in a clockwise direction until you feel it lock.
7.If your mount is not integrated into your GO, place your GO in the mount, making sure that it clicks into place.
Dashboard adhesive disks are available as part of a range of accessories for your GO. For more information, go to tomtom.com/accessories.
Positioning the device
Be careful where you install your GO. The GO shouldn't block or interfere with any of the following:
Your view of the road.
The controls in your vehicle.
Your rearview mirrors.
The airbags.
You should be able to reach your GO easily without leaning or stretching. In a car, you can attach your GO to the windshield or side window or you can use a Dashboard Mount Disk to attach the mount to your dashboard.
Switching on and off
Switching your device on
Press the On/Off button until your device starts. If the device was off you see the map view. If your device was sleeping you see the last screen you were looking at.
Putting your device to sleep
To put your navigation device to sleep, press the On/Off button and then release it.
9

You can also press the On/Off button for more than 2 seconds until you see the Sleep and Turn Off buttons. Select Sleep to make the device sleep.
Tip: To send your navigation device to sleep when the USB cable is unplugged or whenever it is removed from the mount, go to Battery settings in the Settings menu.
Switching your device off completely
To switch off your navigation device completely, you can do one of the following:
Press and hold the On/Off button for more than 2 seconds until you see the Sleep and Turn Off buttons. Select Turn Off to switch off the device. Select the "back" button if you don't want to switch your device off.
Press and hold the On/Off button for more than 5 seconds until the device switches off.
Setting up
Note: The language you choose will be used for all text on the screen. You can always change the language later in Language and Units in the Settings menu.
When you first switch on your TomTom GO, you have to answer a few questions to set it up. Answer the questions by touching the screen.
GPS reception
When you first start your TomTom GO, it may need a few minutes to determine your position. In the future, your position will be found much faster.
To ensure good satellite reception, use your GO outdoors and keep it upright. Large objects such as tall buildings can sometimes interfere with reception.
Important: QuickGPSFix contains information about satellite positions which helps your GO find your position faster. QuickGPSFix information is sent to Always Connected devices in real time and to Smartphone Connected devices when connected to TomTom services using your smartphone. You can also update QuickGPSFix using MyDrive.
Sending information to TomTom
When you first start navigating or you have reset your GO, your GO asks for permission to collect some information about your use of the navigation device. The information is stored on your GO until we retrieve it. We use it anonymously to improve our products and services. If you use our services, we will also use your location information to deliver the services to you.
You can change whether you send this information to us at any time by doing the following:
1.In the Main Menu, select the Settings button.
2.Select System.
3.Select Your information.
4.Select the button to turn sending of information on or off.
Note: If you choose not to send location information to us, you will no longer receive our services. This is because services need to send the location of your device to TomTom in order to receive the traffic information related to where you are. The end date of your subscription remains the same, even if you do not send this information to us.
Additional information
If you think that your information is not being used for the purpose for which you have provided it to TomTom, contact us at tomtom.com/support.
10
You can find current and more detailed information at tomtom.com/privacy.
Memory card slot
Some TomTom navigation devices have a memory card slot that is located on the side or bottom of the device.
Before you use the memory card slot, make sure that you have the latest version of the application installed on your navigation device by connecting to MyDrive using a computer.
When your GO is up to date, you can use a memory card as extra storage space to add extra maps, tracks or routes to your device. Maps can be purchased from tomtom.com.
Device not starting
In rare cases, your TomTom GO may not start correctly or may stop responding to your taps.
First, check that the battery is charged. To charge the battery, connect your GO to the car charger. It can take 3 - 5 hours to fully charge the battery, depending on the type of device.
If this does not solve the problem, you can perform a reset. To do this, press and hold the On/Off button until your GO begins to restart.
Charging your device
The battery in your TomTom GO charges when you connect it to the car charger, to your computer or to a USB Home Charger.
You are warned when the battery level is low or critical. You lose your connection to some TomTom services when the battery level is low or critical. When the battery is empty, your GO goes into sleep mode.
Note: Use ONLY the USB cable supplied with your GO. Other USB cables may not work.
Caring for your GO
It is important to take care of your device:
Do not open the casing of your device under any circumstances. Doing so may be dangerous and will void the warranty.
Wipe or dry the screen of your device using a soft cloth. Do not use any liquid cleaners.
11

Connecting to TomTom services
About TomTom services
TomTom services give you real-time information about traffic and safety cameras on your route. To get TomTom services on your GO you need the following items:
Any GO.
A smartphone with a data plan from a mobile services provider.
The TomTom MyDrive app for iOS or Android installed on your smartphone.
A TomTom account.
Using TomTom services means that data is sent and received by your phone using your mobile services provider.
Important: You might have additional costs when you use the internet on your phone, especially if you are outside the area covered by your data plan. Check with your mobile services provider for more information.
Note: TomTom services are not available on all GO devices.
Note: TomTom services are not available in all countries or regions, and not all services are available in all countries or regions. For more information on available services in each region, go to tomtom.com/services.
TomTom MyDrive App for iOS or Android
The TomTom MyDrive app connects your GO to the internet using Bluetooth (not tethering) on your smartphone.
You can download and install the app on your smartphone from the Apple iTunes store or Google Play store.
Note: The language used for buttons and menus in the TomTom MyDrive app is the same as the language you selected in your smartphone settings. If you change the language you must restart the TomTom MyDrive app to see the new language.
Starting the app
On your smartphone tap the MyDrive icon to start the app. To use TomTom services, you must create a TomTom account or you can log in using an existing TomTom account. When the app is started you can do one of the following:
Connect to TomTom services using your smartphone
Reconnect to TomTom services using your smartphone
Sharing your information
When you use a TomTom service we ask you to share information about you and your device. The first time you use a TomTom service please read the details about how each service uses your information. On your GO, tap Yes to allow your information to be shared. If you don't agree to share your information the service will not work.
12

Notifications
Your smartphone displays a notification when the TomTom MyDrive app is connected to your GO.
Main Menu
Tap the app Main Menu button to show the app Main Menu. The menu has the following items:
Status - shows the status screen where you can see the status of the connection.
Traffic - shows a map of your location with traffic incidents.
TomTom Account - lets you log into your TomTom account.
Settings - lets you change the app settings.
About - Displays information about the TomTom MyDrive app.
Connect to TomTom services using your smartphone
To connect your GO to your phone, do the following:
1.Select TomTom Services in the Main Menu.
2.Select Network status.
3.If you are prompted, select Yes to agree to send information to TomTom.
Note: You cannot use TomTom services unless you agree to send information to TomTom.
4.Turn on Bluetooth on your phone, and make sure your phone is discoverable (iOS) or visible (Android).
5.Start the TomTom MyDrive app on your phone.
6.Select the next screen arrow on your navigation device. Your device searches for your phone.
Tip: If your device cannot find your phone, make sure your phone is still discoverable (iOS) or visible (Android) for other Bluetooth devices. Select Search to search for your phone again.
7.Select your phone from the list on your navigation device.
Your navigation device connects to the internet using your phone's internet connection.
8.On the TomTom MyDrive app, log into your existing TomTom account or create a new TomTom account.
Tip: If you already own a TomTom navigation device, we recommend that you open a new TomTom account for your GO using a different email address.
9.Return to the map view on your navigation device.
TomTom services are now active.
Tip: You can also connect to services by selecting Connected Services in the Main Menu, followed by Traffic & Safety Cameras.
Reconnect to TomTom services using your smartphone
To reconnect your GO to TomTom services, on your phone make sure that Bluetooth is on and that the TomTom MyDrive app is started.
Your GO will remember your phone and will find it automatically when you are in range of your navigation device. If you have a valid TomTom services subscription, the service will start automatically.
The Bluetooth icon at the top of the Main Menu screen on your GO shows the status of the Bluetooth connection:
13

Bluetooth not connected.
Bluetooth connecting. Your device is trying to automatically connect to your phone.
Bluetooth connected. Your device is connected to your phone.
You can also connect using another phone.
Connect to TomTom services using a different smartphone
1.Turn on Bluetooth on your phone, and make sure that your phone is discoverable (iOS) or visible (Android).
2.Start the TomTom MyDrive app on your phone.
3.Select Connected Services in the Main Menu.
4.Select Traffic & Safety Cameras.
5.Select the pop-up menu button then select Search for Phones. Your navigation device searches for your smartphone.
Tip: If your device cannot find your smartphone, make sure your smartphone is still discoverable (iOS) or visible (Android) for other Bluetooth devices.
6.Select your smartphone from the list of smartphones on your device.
Your navigation device connects to TomTom services using your smartphone internet connection.
7.On the TomTom MyDrive app, log in to your existing MyTomTom account.
8.Return to the map view on your navigation device.
TomTom services are now active.
Deleting phones
1.Select Connected Services in the Main Menu.
2.Select Traffic & Safety Cameras.
3.Select Manage Phones.
4.Select the pop-up menu button then select Delete Phones.
5.Select the phone you want to delete.
6.Select Delete.
Your phone is deleted.
Tip: If you delete all your connected phones, you will no longer be able to use TomTom services.
Unable to get a connection
To check your connection status to the internet, select Connected Services in the Main Menu. If your connection status is shown as offline, select Offline and follow the instructions.
If your GO cannot connect to your phone, or you have no internet connection, also check the following:
Your phone is shown on your TomTom navigation device.
14
Your phone's Bluetooth is turned on.
The TomTom MyDrive app is started on your phone.
Your data plan with your mobile services provider is active, and you can access the internet on your phone.
15

What's on the screen
The map view
The map view is shown when you have no planned route. Your actual location is shown as soon as your GO has found your GPS location.
You can use map view in the same way as you might look at a traditional paper map. You can move around the map using gestures, and zoom using the zoom buttons.
Important: Everything on the map is interactive, including the route and the map symbols - try selecting something and see what it does!
Tip: To open a pop-up menu for an item on the map, for example a route or a POI, select the item to open the menu. To select a location on the map, select and hold the location until the pop-up menu opens.
The map shows your current location and many other locations such as your My Places locations. If you have not planned a route, the map is zoomed out to show the area around your location.
If you have planned a route, your complete route is shown on the map. You can add stops to your route directly from the map. When you start to drive, the guidance view is shown.
16

1.Back button. This button returns the map to an overview of your whole route or, if no route is planned, moves the map to put your current location at the center.
2.Switch view button. Select the switch view button to change between the map view and the guidance view.
When in map view, if you are driving, the small arrow rotates to indicate your direction of travel relative to north, with north being up.
Tip: The compass direction you are driving is shown in the switch view button below the small compass arrow, for example, NE for North East. These compass directions automatically appear when driving in North America and disappear if you leave North America.
3.Zoom buttons. Select the zoom buttons to zoom in and out.
4.Current location. This symbol shows your current location. Select it to add it to My Places or search near your current location.
Note: If your GO cannot find your location the symbol appears gray.
5.Selected location. Press and hold to select a location on the map. Select the pop-up menu button to show options for the location, or select the Drive/Ride button to plan a route to the location.
6.Main Menu button. Select the button to open the Main Menu.
7.Map symbols. Symbols are used on the map to show your destination and your saved places:
Your destination.
Your home location. You can set your home location in My Places.
Your work location. You can set your work location in My Places.
A stop on your route.
A location saved in My Places.
When a search for POIs near destination is done and the results are shown on the map, less important POIs are shown as black pins with white crosses.
Select a map symbol to open the pop-up menu, then select the menu button to see a list of actions you can take.
8.Traffic information. Select the traffic incident to display information about the traffic delay.
9.Your route, if you have planned a route. Select the route to clear it, change the route type, add a stop or save changes to your route.
10.Safety cameras on your route. Select a safety camera to display information about that camera.
11.Route bar. The route bar is shown when you have planned a route.
17

The guidance view
The guidance view is used to guide you along the route to your destination. The guidance view is shown when you start driving. You see your current location and details along your route, including 3D buildings in some cities.
Note: 3D buildings in guidance view are not available on all devices.
The guidance view is normally in 3D. To show a 2D map with the map moving in your direction of travel, change the 2D and 3D default settings.
Tip: When you have planned a route and the 3D guidance view is shown, select the switch view button to change to the map view and use the interactive features.
When your GO starts after sleeping and you have a route planned, you are shown the guidance view with your current location.
1.Switch view button. Select the switch view button to change between the map view and the guidance view.
When in guidance view, if you are driving, the small arrow rotates to indicate your direction of travel relative to north, with north being up.
Tip: The compass direction you are driving is shown in the switch view button below the small compass arrow, for example, NE for North East. These compass directions automatically appear when driving in North America and disappear if you leave North America.
2.Zoom buttons. Select the zoom buttons to zoom in and out.
Tip: On some devices you can also pinch to zoom in and out.
18

3.Instruction panel. This panel shows the following information:
The direction of your next turn.
The distance to your next turn.
The name of the next road on your route.
Lane guidance at some intersections.
Note: Select the instruction panel to see a list of turn-by-turn text instructions for your planned route.
4.Route symbols. Symbols are used on your route to show your starting location, your stops, and your destination.
5.Main Menu button. Select the button to show the Main Menu.
6.Speed panel. This panel shows the following information:
The speed limit at your location.
Your current speed. If you drive more than 3 mph (5 km/h) over the speed limit the speed panel turns red. If you drive less than 3 mph (5 km/h) over the speed limit the speed panel turns orange.
The name of the street you are driving on.
7.Current location. This symbol shows your current location. Select the symbol or the speed panel to open the quick menu.
Note: If your GO cannot find your location the symbol appears gray.
8.Route bar. The route bar is shown when you have planned a route.
Important: To see a wider route bar showing additional route information, change the setting for Route Information.
The route bar
The route bar is shown when you have planned a route. It has an arrival information panel at the top, and a bar with symbols underneath.
Important: To see a wider route bar showing additional route information, change the setting for Route Information.
Note: The distance ahead shown by the route bar depends on the overall length of your route.
19

The arrival information panel shows the following information:
The estimated time that you will arrive at your destination.
The length of time to drive to the destination from your current location.
A parking button is shown near the destination flag when parking is available near your destination.
Tip: If your destination is in a different time zone, you see a plus
(+) or a minus (-) sign and the time difference in hours and half hours in the arrival information panel. The estimated time of arrival is the local time at your destination.
If you have stops on your route, select this panel to change between information about the next stop and your final destination.
You can choose the information you see on the arrival information panel.
Traffic status - if your GO isn't receiving any traffic information, a symbol showing traffic with a cross appears underneath the arrival information panel.
The bar uses symbols to show the following information:
The next two stops on your route.
Tip: To quickly remove a stop, select it in the route bar and use the menu.
Gas stations that are directly on your route.
TomTom Traffic including heavy rain or snow.
TomTom Safety Cameras and Danger Zones.
Rest stops directly on your route.
You can choose the information you see on your route.
The symbols are in the order that they occur on your route. For traffic incidents, the symbol for each incident alternates between showing the type of incident and the delay in minutes. Select a symbol to see more information about a stop, an incident or a safety camera. If a symbol is shown on top of another symbol, selecting the symbols zooms in on the route bar to show each symbol separately. You can then select a symbol.
The total time delay due to traffic jams, weather, and other incidents on your route, including information provided by IQ Routes, is shown above the symbols.
For a complete list of incident types, see Traffic incidents.
The bottom of the route bar represents your current location and shows the distance to the next incident on your route. In addition, you can choose to see the current time if you turn the setting on.
Note: To make the route bar more readable some incidents may not be shown. These incidents will always be of minor importance and only cause short delays.
The route bar also shows status messages, for example Finding fastest route or Playing route preview.
Distances and the route bar
The distance ahead shown on the route bar depends on the length of your route, or the distance remaining on your route.
For remaining distances longer than 31 miles (50 km), only the next 31 miles (50 km) is shown. The destination icon is not shown.
20
Tip: You can scroll the route bar to see your whole route.
For remaining distances between 6 miles (10 km) and 31 miles (50 km), the complete distance is shown. The destination icon is shown fixed at the top of the route bar.
For remaining distances of less than 6 miles (10 km) the complete distance is shown. The destination icon moves down toward the chevron symbol as you get closer to your destination.
The top half of the route bar shows twice the distance of the bottom half, as shown in the following examples:
A remaining distance of 31 miles (50 km) on the route bar is split into 21 miles (34 km) at the top and 9 miles (16 km) on the bottom.
A remaining distance of 6 miles (10 km) on the route bar is split into 4 miles (6.6 km) at the top and 2 miles (3.3 km) on the bottom.
The route bar is constantly updated as you drive.
The quick menu
To open the quick menu, select the current location symbol or the speed panel in the guidance view.
You can then do any of the following:
Mark a location
Report a new safety camera
Change a speed limit
Avoid a blocked road
See your current location or your latitude/longitude if not on a named road.
Navigation buttons
On the map view or guidance view, select the Main Menu button to open the Main Menu.
The following navigation buttons are available in the Main Menu screen, in addition to other buttons and symbols:
Note: Not all features are supported on all devices.
Search |
Select this button to search for an address, a place or a Point of Interest, |
|
then plan a route to that location. |
||
|
Drive Home |
Select this button to drive to your home location. If this button is not |
|
included in your Main Menu, go to My Places to set up your home location. |
||
|
21

Drive to Work |
Select this button to drive to your work location. If this button is not |
|
included in your Main Menu, go to My Places to set up your work location. |
||
|
Recent Destination |
Select this button to open the list of your recent destinations. Select a |
|
recent destination to plan a route to that destination. |
||
|
Current Route / |
Select this button to clear or change your planned route or track. |
|
|
Current Track |
|
Report Safety |
Select this button to report a safety camera. |
|
|
Camera |
|
My Places |
Select this button to show your saved places. |
|
My Routes |
Select this button to show your saved routes. |
|
22

Parking |
Select this button to find parking lots/garages. |
|
Gas Station Select this button to find gas stations.
Voice Recognition |
Select this button to start voice recognition. |
|
|
|
Tip: You can also say the wake-up phrase to start voice recognition. |
TomTom Services |
Select this button to see the status of your connection to the internet. |
|
Main Menu smaller buttons and symbols
On the map view or guidance view, select the Main Menu button to open the Main Menu.
The following buttons and symbols are available in the Main Menu screen, in addition to the navigation buttons:
Select this button to open the Settings Menu.
Select this button to open the Help Menu. The Help Menu contains help about using your GO, together with other information about your device, for example, map version, device serial number and legal information.
Select this button to reorder the buttons in the Main Menu.
Select this button to return to the previous screen.
23

Select this button to return to the map view or guidance view.
This symbol shows the status of the Bluetooth connection when you use a smartphone to connect to TomTom services.
This symbol shows the power level of the battery in your GO.
This symbol shows that your GO is connected to TomTom services.
This symbol shows that your GO is not connected to TomTom services.
This symbol shows that GO is connected to your MyDrive.
This symbol shows that GO is not connected to your MyDrive.
This button shows that you will hear voice instructions. Select the button to switch off voice instructions. You will no longer hear spoken route instructions but you will still hear information such as traffic information and warning sounds.
Tip: You can select the types of instructions you want to hear. Select Voices in the Settings Menu and select the instructions you want to hear.
This button shows that you will not hear voice instructions. Select this button to switch on voice instructions.
This button shows that the display is using day colors. Select the button to reduce the brightness of the screen and display the map in darker colors.
When driving at night or when driving through a dark tunnel, it is easier to view the screen and less distracting for the driver if the brightness of the screen is dimmed.
Tip: Your device automatically switches between day and night colours depending on the time of day. To switch off this feature, select Appearance, then Display in the Settings menu and switch off Switch to night colors when dark.
This button shows that the display is using night colors. Select the button to increase the brightness of the screen and display the map in brighter colors.
24

Select this button to refresh your screen.
Volume control
On the map or guidance view, select the Main Menu button to open the Main Menu.
Select and slide the volume control to change the volume of voice instructions and warnings. If the voice instructions are turned off, the volume control will still change the volume of the warnings.
Using gestures
You use gestures to control your GO.
This Reference Guide explains which gestures to use throughout the guide but here is a complete list of all the gestures you can use.
Double tap Touch one finger on the screen twice in rapid succession. Example of when to use this: Zooming in on the map.
Drag |
Put one finger on the screen and move it across the screen. |
|
Example of when to use this: Scrolling around in the map. |
Flick |
Flick the tip of a single finger across the screen. |
|
Example of when to use this: Scrolling a long distance on the map. |
|
|
|
Tip: Flick isn't available on all devices. |
|
|
|
|
Press and hold |
Put one finger on the screen for more than one half second. |
|
Example of when to use this: Opening the pop-up menu for a place on the |
|
map. |
Pinch to zoom Touch the screen with your thumb and a finger. Move them apart to zoom in or move them together to zoom out.
Example of when to use this: Zooming in and out on the map.
Tip: Pinch to zoom isn't available on all devices. If pinch to zoom isn't available on your GO, use the zoom buttons to zoom in and out.
25

Tap or select Tap a single finger on the screen.
Example of when to use this: Selecting an item in the Main Menu.
Tip: To open a pop-up menu for an item on the map, select and hold the item until the menu opens.
Changing the text and button size
You can change the size of the text and the buttons you see on the screen, for example to make the text easier to read and the buttons easier to use.
Note: This feature is only available on devices with a 6 inch / 15 cm or larger screen.
To change the size of the text and the buttons, select the Settings button in the Main Menu, then select Appearance, then select Size of text and buttons. Your device must restart to apply the change.
Reordering the Main Menu buttons
To reorder the buttons in the Main Menu to suit your preference, do the following:
1.Select the Main Menu button to open the Main Menu.
2.Press and hold the button you want to move for two seconds.
Tip: Alternatively, select the Edit button at the far right of the Main Menu.
The menu button is shown with left and right arrows.
3.Press the left or right arrow on the menu button to move the button to a new position in the menu.
4.Select and move other buttons to the order you want.
5.Select Done.
26

Traffic
About TomTom Traffic
TomTom Traffic is a TomTom service providing real-time traffic information.
In combination with IQ Routes, TomTom Traffic helps you plan the optimum route to your destination taking into account the current local traffic conditions and the weather.
Your TomTom GO regularly receives information about the changing traffic conditions. If traffic jams, heavy rain, snow or other incidents are found on your current route, your GO will offer to replan your route to try and avoid any delays.
Important: When you approach a faster alternative route, you get a warning in the route bar and you can see the alternative route in both the guidance view and the map view. To accept a faster route, just steer towards the alternative route as you approach it and your device will select it.
To get TomTom services on your GO, you must be connected to TomTom services and logged into a TomTom account.
Note: TomTom services are not available on all devices.
Note: Some TomTom services might not be available in your current location.
The route bar
The route bar is shown when you have planned a route. It has an arrival information panel at the top, and a bar with symbols underneath.
Important: To see a wider route bar showing additional route information, change the setting for Route Information.
Note: The distance ahead shown by the route bar depends on the overall length of your route.
The arrival information panel shows the following information:
The estimated time that you will arrive at your destination.
The length of time to drive to the destination from your current location.
A parking button is shown near the destination flag when parking is available near your destination.
Tip: If your destination is in a different time zone, you see a plus
(+) or a minus (-) sign and the time difference in hours and half hours in the arrival information panel. The estimated time of arrival is the local time at your destination.
If you have stops on your route, select this panel to change between information about the next stop and your final destination.
You can choose the information you see on the arrival information panel.
Traffic status - if your GO isn't receiving any traffic information, a symbol showing traffic with a cross appears underneath the arrival information panel.
The bar uses symbols to show the following information:
The next two stops on your route.
27

Tip: To quickly remove a stop, select it in the route bar and use the menu.
Gas stations that are directly on your route.
TomTom Traffic including heavy rain or snow.
TomTom Safety Cameras and Danger Zones.
Rest stops directly on your route.
You can choose the information you see on your route.
The symbols are in the order that they occur on your route. For traffic incidents, the symbol for each incident alternates between showing the type of incident and the delay in minutes. Select a symbol to see more information about a stop, an incident or a safety camera. If a symbol is shown on top of another symbol, selecting the symbols zooms in on the route bar to show each symbol separately. You can then select a symbol.
The total time delay due to traffic jams, weather, and other incidents on your route, including information provided by IQ Routes, is shown above the symbols.
For a complete list of incident types, see Traffic incidents.
The bottom of the route bar represents your current location and shows the distance to the next incident on your route. In addition, you can choose to see the current time if you turn the setting on.
Note: To make the route bar more readable some incidents may not be shown. These incidents will always be of minor importance and only cause short delays.
The route bar also shows status messages, for example Finding fastest route or Playing route preview.
Looking at traffic on the map
Traffic incidents are shown on the map. If several traffic incidents overlap, the highest priority incident is shown. For example, a road closure is higher priority than road work or a closed lane.
28
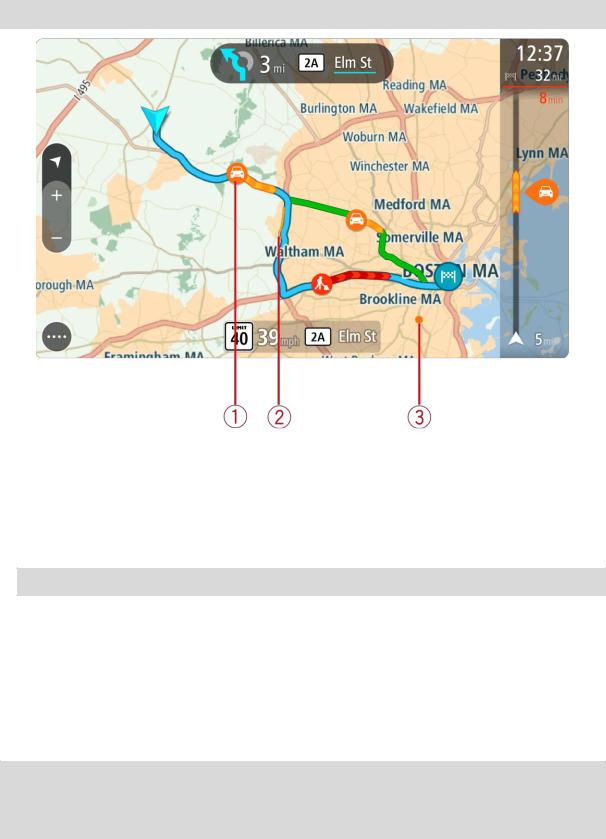
Tip: Select an incident on the map to see more detailed information.
1.Traffic incident that affects your route in your direction of travel.
A symbol or number at the start of the incident shows the type of incident or the delay in minutes, for example 5 minutes.
The color of the incident indicates the speed of traffic relative to the maximum allowed speed at that location, with red being the slowest. The stripes on the traffic jam are also animated to show the speed of the traffic, where appropriate.
For a complete list of incident types, see Traffic incidents.
Tip: You see weather symbols on the map if there is bad weather such as heavy rain or snow.
2.Traffic incident on your route but in the opposite direction of travel.
3.Traffic incidents on roads that are not visible at your current zoom level.
Looking at traffic on your route
Information about traffic incidents on your route is shown in the route bar on the right-hand side of the map.
The route bar tells you about traffic delays while you are driving, using symbols to show you where each traffic incident is located on your route.
Note: If your GO isn't receiving any traffic information, a symbol showing traffic with a cross appears underneath the arrival information panel.
Note: To make the route bar more readable some incidents may not be shown. These incidents will always be of minor importance and only cause short delays.
29

To get more information about an incident, select an incident in the route bar. The map opens zoomed in on the incident and an information panel opens showing detailed information about the traffic incident.
The information shown includes:
The type of traffic incident – general, accident, roadwork, lane closure or weather such as heavy rain or snow.
The severity of the incident - slow traffic, traffic lining up or stationary traffic.
The delay time.
The length of the incident.
For a complete list of incident types, see Traffic incidents.
Select the back button to go back to the guidance view.
Traffic incidents
Traffic incidents and weather warnings are shown in the map view and in the route bar. Traffic incident symbols:
Stationary traffic
Traffic lining up
Slow traffic
Unknown accident
Unknown incident
Road work
Lane closure
Roadblock
30
Loading...