


 Loading...

NAVIGATION SYSTEM
Before starting . . . . . . . . . . . . . . . . . . . . . . . . . . . . . . . . . . . . . . 5
Navigation . . . . . . . . . . . . . . . . . . . . . . . . . . . . . . . . . . . . . . . . . . 13
Audio and Visual . . . . . . . . . . . . . . . . . . . . . . . . . . . . . . . . . . 89
Others. . . . . . . . . . . . . . . . . . . . . . . . . . . . . . . . . . . . . . . . . . . . . . 125
Addendum. . . . . . . . . . . . . . . . . . . . . . . . . . . . . . . . . . . . . . . . . 143
Customer contact and personal information will be held in the strictest confidence by TomTom Live Services in accordance with information privacy policy in the EU.
For the purpose of protection of your private information, please delete your personal data by "Reset factory settings".

Contents |
|
Before starting ........................................................................................... |
5 |
Kit contents........................................................................................................................................ |
6 |
Safety ................................................................................................................................................ |
8 |
Starting ............................................................................................................................................ |
10 |
Changing the map data ................................................................................................................... |
11 |
Navigation................................................................................................... |
13 |
Before you start............................................................................................................................... |
14 |
Names and Functions ..................................................................................................................... |
16 |
Making your first journey ................................................................................................................. |
17 |
Driving View .................................................................................................................................... |
28 |
Advanced Lane Guidance ............................................................................................................... |
30 |
Finding alternative routes ................................................................................................................ |
31 |
Browse Map .................................................................................................................................... |
33 |
TomTom Map Share™ (Correcting the map).................................................................................. |
35 |
Sounds and voices .......................................................................................................................... |
42 |
Preferences ..................................................................................................................................... |
44 |
Points of Interest (POIs) .................................................................................................................. |
57 |
Itinerary Planning ............................................................................................................................ |
62 |
Help me ........................................................................................................................................... |
65 |
Favourites........................................................................................................................................ |
67 |
TomTom HD Traffic......................................................................................................................... |
70 |
TomTom Safety Alerts..................................................................................................................... |
78 |
TomTom Weather ........................................................................................................................... |
84 |
Introducing TomTom HOME ........................................................................................................... |
86 |
Audio and Visual..................................................................................... |
89 |
How to Use Audio and Visual Systems ........................................................................................... |
90 |
Basic audio and visual system operation ........................................................................................ |
94 |
FM ................................................................................................................................................... |
97 |
AM ................................................................................................................................................. |
102 |
USB ............................................................................................................................................... |
105 |
CD (MP3 included) ........................................................................................................................ |
109 |
iPod ............................................................................................................................................... |
116 |
AUX ............................................................................................................................................... |
122 |
Audio control switch ...................................................................................................................... |
123 |
2

Others.......................................................................................................... |
125 |
Hands-free ..................................................................................................................................... |
126 |
Voice recognition ........................................................................................................................... |
131 |
Rear view camera (option)............................................................................................................. |
136 |
LIVE Services ................................................................................................................................ |
137 |
Software version............................................................................................................................ |
141 |
Addendum................................................................................................ |
143 |
Addendum (Navigation) ................................................................................................................. |
144 |
Addendum (Audio and visual)........................................................................................................ |
148 |
Addendum (Others) ....................................................................................................................... |
152 |
License .......................................................................................................................................... |
153 |
Copyright notices ........................................................................................................................... |
154 |
3
Memo
4

Before starting |
|
Kit contents ........................................................................................................................................ |
6 |
Safety................................................................................................................................................. |
8 |
Starting ............................................................................................................................................ |
10 |
Changing the map data ................................................................................................................... |
11 |
5
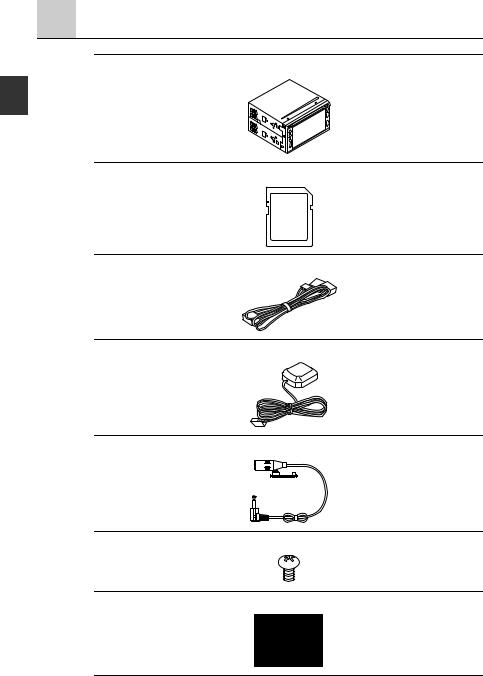
Kit contents
Navigation device
SD card (including EU map)
EUROPE
Power supply harness
GPS Aerial
Microphone
Screw (M5×8)
Connector
6
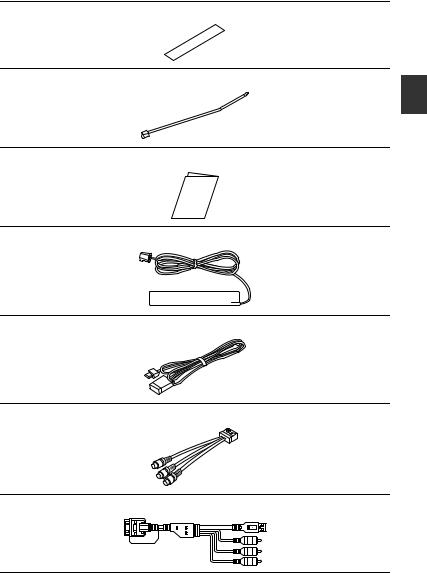
Tape for securing leads
Wire band
Owner’s manual
External GPRS aerial
USB lead
RCA lead
iPod lead (option)
7

Safety
Safety preferences
Read this owner’s manual for your Navigation System carefully before using the system. It contains instructions about how to use the system in a safe and effective manner.
The dealer where you purchased the product assumes no responsibility for any problems resulting from failure to observe the instructions given in this manual.
This manual uses pictographs to show you how to use the product safely and to alert you to potential dangers resulting from improper connections and operation. The meanings of the pictographs are explained below. It is important that you fully understand the pictographs and explanations in order to use this manual and the system properly.
 WARNING
The presence of this Warning symbol in the text is intended to alert you to the importance of heeding the operation instructions. Failure to heed the instructions may result in severe injury or death.
 WARNING
Do not keep your eyes fixed on the monitor screen or operate the system while driving.
Do not change the settings and destination locations while driving. Minimize the time spent on viewing the monitor screen and listening to the voice guidance while driving. Operating the system will distract the driver from looking ahead of the vehicle and can cause accidents. Always stop the vehicle in a safe location and use the parking brake before operating the system.
Always obey local traffic regulations.
Your guided route may include roads that are not open to vehicles or are closed due to traffic regulations. Comply with the local traffic regulations and take another route.
Do not use the navigation device when it is out of order.
If the navigation device is out of order (no image, no sound) or in an abnormal state (has foreign matter in it, is exposed to water, is smoking, or smells), then turn it off immediately and consult with an Expert dealer, we recommend the dealer where you purchased the product. Using the navigation device in an out-of-order condition may lead to accidents, fires, or electric shocks.
Use the proper power supply.
This product is designed for operation with a negative grounded 12 V DC battery system.
Do not disassemble.
Do not disassemble the product or attempt to repair it yourself. If the product needs to be repaired, take it to the dealer where you purchased the product, we recommend the dealer where you purchased the product.
8

 WARNING
Your navigation device contains a GSM/GPRS module which can interfere with electrical devices such as cardiac pacemakers and hearing aids. Interference from these devices may endanger the health or life of others. *GSM: Global System for Mobile Communications
*GPRS: General Packet Radio Service
 WARNING
If GPS and GPRS aerial is installed within the instrument panel, do not place any objects, cell phones and portable radios above the installation location. The reception sensitivity can be lower and no signals can be received.
 CAUTION
The presence of this Caution symbol in the text is intended to alert you to the importance of heeding the operation instructions. Failure to heed the instructions may result in injury or material damage.
 CAUTION
Do not use the product where it is exposed to water, moisture, or dust.
Exposure to water, moisture, or dust may lead to smoke, fire, or other damage to the navigation device. Make especially sure that the navigation device does not get wet in car washes or on rainy days.
Keep the voice guidance volume at an appropriate level.
Keep the volume level low enough to be aware of road and traffic conditions while driving.
Protect the Deck Mechanism.
Do not insert any foreign objects into the slot of this navigation device.
This navigation system is designed exclusively for use in automobiles.
This navigation system should only be installed in an automobile. Do not install it in a ship, aircraft, or any other vehicles except an automobile. Do not use it detached from the vehicle.
Do not insert or allow your hand or fingers to be caught in the navigation device.
To prevent injury, do not get your hand or fingers caught in moving parts or in the disc slot. Especially watch out for infants.
Operation is subject to the following two conditions; (1)this device may not cause interference, and (2)this device must accept any interference,
including interference that may cause undesired operation of the device.
 CAUTION
This product is a class  laser product.
However this product uses a visible/invisible laser beam which could cause hazardous radiation exposure if directed.
Be sure to operate this product correctly as instructed.
Use of controls or adjustments or performance of procedures other than those specified herein may result in hazardous radiation exposure. Do not open covers and do not repair yourself. Refer servicing to qualified personnel.
9
Starting
Opening
When the ignition is switched to ACC or ON, the display transitions to the start-up screen. The first time you switch on your device, it may take a short time to start.
In rare cases, your navigation device may not start correctly or may stop responding to your touches. You can reset the device. If you press and continue to hold the power button for 20 seconds with the ignition switched ON, your device will restart. When your device begins to restart, release the power button. After resetting, re-do the radio settings.
Power button
Live Services
TomTom HD Traffic, TomTom Safety alerts, TomTom weather, and Google local search can be used by connecting to Live services.
For details on how to connect to Live services, refer to the “Activate LIVE Services” (page 137). For more information, go to tomtom.com/service.
10

Changing the map data
Changing the map data
The map information can be updated by accessing TomTom HOME from your computer.
1.Access TomTom HOME from your computer.
2.Download the required data.
3.Insert the SD card into your computer and download the data to the SD card.
4.Pull out the SD card from your computer and insert it into the navigation device.
Latest map guarantee
The map can be updated for free within 60 days after purchasing the navigation device.
NOTE
The map updating is available only once within 60 days. Refer to the following website for details.
-tomtom.com/latestmap
SD card removal
 CAUTION
•A SD card may generate heat due to your prolonged use but this is not a failure.
•A SD card has limited product life. Prolonged use may not enable you to write or delete data.
NOTE
If you leave the SD card in the slot for a long time, it may generate heat but this does not indicate a malfunction.
11
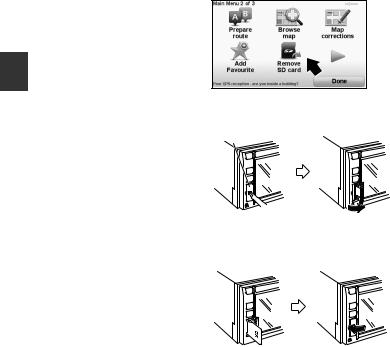
1. Touch  .
.
2.Touch  .
.
3.Open the SD card cover and push the SD card once to eject it.
SD card cover
4.Insert the SD card into the slot and close the SD card cover until you hear it “clicks”.
•Keep the label side of the SD card on the left side, and insert the card into the direction of an arrow until you hear it “clicks”.
Label mark SD card
12

Navigation |
|
Before you start ............................................................................................................................... |
14 |
Names and Functions...................................................................................................................... |
16 |
Making your first journey.................................................................................................................. |
17 |
Driving View..................................................................................................................................... |
28 |
Advanced Lane Guidance ............................................................................................................... |
30 |
Finding alternative routes ................................................................................................................ |
31 |
Browse Map..................................................................................................................................... |
33 |
TomTom Map Share™ (Correcting the map) .................................................................................. |
35 |
Sounds and voices .......................................................................................................................... |
42 |
Preferences ..................................................................................................................................... |
44 |
Points of Interest (POIs) .................................................................................................................. |
57 |
Itinerary Planning............................................................................................................................. |
62 |
Help me ........................................................................................................................................... |
65 |
Favourites ........................................................................................................................................ |
67 |
TomTom HD Traffic ......................................................................................................................... |
70 |
TomTom Safety Alerts ..................................................................................................................... |
78 |
TomTom Weather............................................................................................................................ |
84 |
Introducing TomTom HOME............................................................................................................ |
86 |
13
Before you start
Switching on and off
When the ignition is switched to ACC or ON, the display transitions to the start-up screen. The first time you switch on your device, it may take a short time to start.
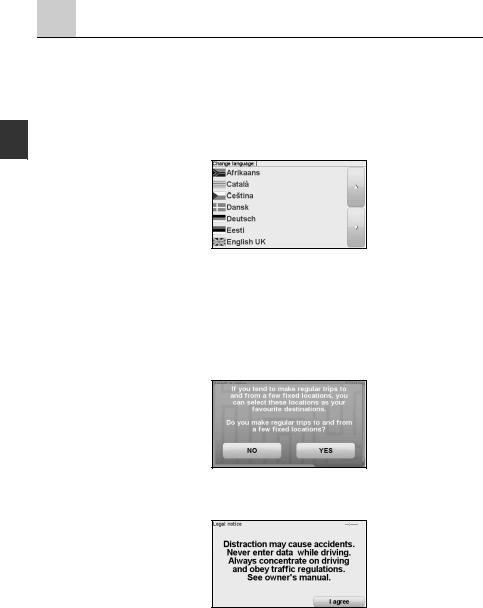
Setting up
When you first switch on your device, you have to answer a few questions as indicated below to set up the device.
• Change language
•Distance units
•Clock display
•Please set the correct time
•Select a voice
•Your “Home” address
•Join Map Share TM
•Regular trips
•Legal notice
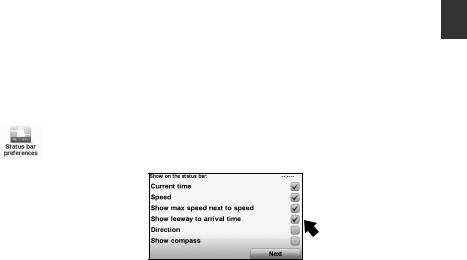
You are asked whether you make regular trips to the same locations. If you touch  , you can enter these destinations as your favourite destinations.
Every time you switch on your device, you can immediately select one of these locations as your destination.
To use, touch  on the “Legal notice” screen which is displayed at the end.
14
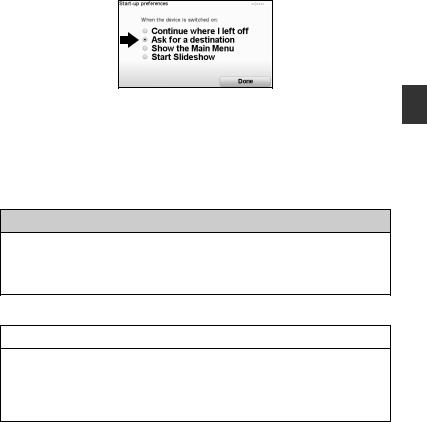
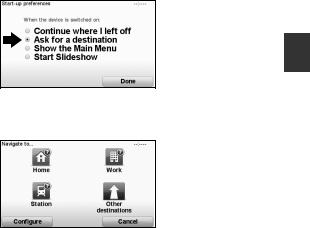
To change these destinations or select a new destination, touch  in the Change preferences, then select
  . Refer to the “Start-up preferences” (page 54).
GPS reception
When you first start your navigation device, it may need a few minutes to determine your GPS position and show your current position on the map. In the future, your position will be found much faster, usually within a few seconds.
Large objects such as tall buildings can sometimes interfere with reception.
The navigation device includes Enhanced Positioning Technology or EPT. EPT automatically estimates your position when the GPS signal is lost while you are driving, such as when you are in a tunnel. When EPT is in use, the EPT symbol is shown in the Driving View.
*EPT: Enhanced Positioning Technology
 WARNING
Your navigation device contains a GSM/GPRS module which can interfere with electrical devices such as cardiac pacemakers and hearing aids.
Interference from these devices may endanger the health or life of others. *GSM: Global System for Mobile Communications
*GPRS: General Packet Radio Service
Take care of your device
 CAUTION
It is important to take care of your device.
•Your device is not designed for use in extreme temperatures and any such exposure may cause permanent damage.
•Do not open the casing of your device under any circumstances. Doing so may be dangerous and will invalidate the warranty.
•Wipe or dry the screen of your device using a soft cloth. Do not use any liquid cleaners.
15
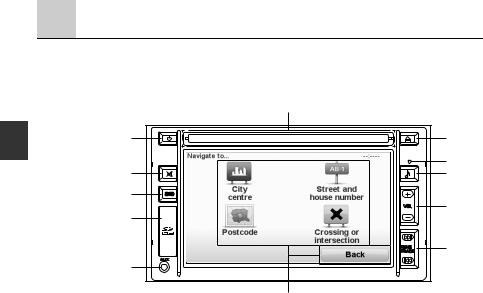
Names and Functions
Names and Functions
The navigation device can be operated by pressing a button on the panel (panel button) or touching a button displayed on the screen (on-screen button).
|
F |
A |
H |
|
I |
B |
J |
C |
|
|
K |
D |
|
|
L |
E |
|
|
G |
A |
Power button - |
Power on/off. When the navigation device’s power is off, the clock is |
|
|
displayed in the centre of the screen. |
B |
Mute button - |
Navigation and audio sound is muted. |
C |
Source button - |
Audio mode source change. |
D |
SD card slot - |
Installing and removing SD cards which contain map data. |
E |
Auxiliary jack - |
External device input. |
F |
CD slot - |
CD insertion. |
G On-screen button -You can operate the navigation and audio & visual functions by touching
|
|
the screen of the navigation device. |
H |
CD eject button - |
CD ejection. |
I |
Light sensor - |
To change to night and day colours automatically, tab Brightness |
|
|
preferences in the Preferences menu. Then select “Light sensor switches |
|
|
day/night mode”. |
JSound button - Sound setting screen is displayed.
KVolume button - Press + to increase the volume of the sound. Press – to decrease the
volume of the sound.
L Seek tuning/ Track up/ Track down button - Seek tuning is available (AM/FM mode). Long-press the  to fast-forward. Long-press the
  to reverse. (CD/MP3/USB/iPod mode)
Press the  to track up. Press the
  to track down. (CD/MP3/USB/iPod mode)
16
Making your first journey
Planning a route with your navigation device is easy. To plan a route, follow the steps below.
 WARNING
Do not keep your eyes fixed on the monitor screen or operate the system while driving.
Do not change the settings and destination locations while driving. Minimize the time spent on viewing the monitor screen and listening to the voice guidance while driving. Operating the system will distract the driver from looking ahead of the vehicle and can cause accidents. Always stop the vehicle in a safe location and use the parking brake before operating the system.
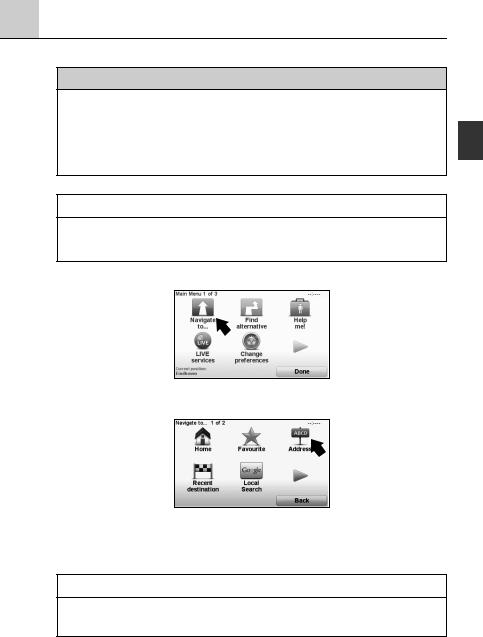
1. Touch the screen to bring up the Main Menu.
NOTE
The buttons on your navigation device are shown in full colour unless a button is currently unavailable. For example, the button named  in the Main Menu is not available until you have planned a route.
2. Touch  .
.
3.Touch  .
.
For other navigation option functions, refer to “Other navigation options” (page 24).
When you enter an address, you can choose from the following options:
• - touch this button to set your destination as the centre of a city or town.
• - touch this button to set an exact address as your destination.
• - touch this button to enter a postcode as your destination.
NOTE
You can enter a postcode for any country. In some countries, postcodes are detailed enough to identify a house on their own. In other countries you can enter a postcode to identify a town or area. You will then have to enter a street and house number.
•  - touch this button to set your destination as the point where two streets meet.
17
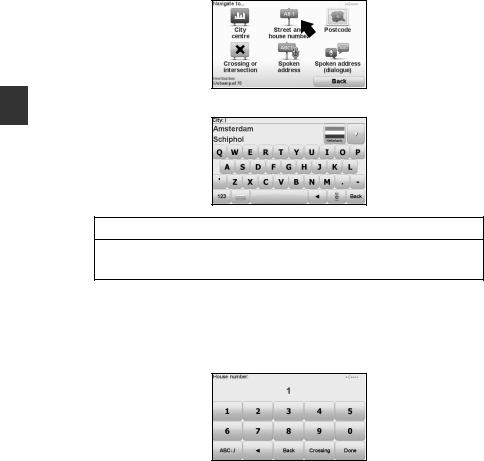
In this example, we will enter an address. 4. Touch  .
.
5. Start to type the name of the town where you want to go.
NOTE
When planning a trip for the first time your navigation device asks you to choose a state or country. Your choice is saved and used for all routes you plan.
You can change this setting at any time by touching the flag.
6.As you type, the names of the towns that match what you have typed are shown. When your destination appears in the list, touch the name of the town to set the destination.
7.Start to type the street name. Touch the name when it is shown in the list.
As with the name of the town, the names of the streets that match what you have typed are shown. When your destination appears in the list, touch the name of the street to set the destination.
8.Enter the house number and then touch  .
.
18

9.Your navigation device asks if you need to arrive at a particular time. For this exercise, touch
 .
.
The route is calculated by your device using IQ Routes™.
IQ Routes™ is used to plan the best possible route using information about the average speeds measured on the roads.
When the route has been calculated, touch  .
.
Your navigation device warns you about any traffic delays and begins to guide you to your destination. Refer to the “Planning preferences” (page 54)
Route summary
After planning a route, you see a summary of your route.
The route summary shows an overview map of your route and the total journey time including delays caused by both incidents and busy roads.
You can see the route summary at any time by touching the right side of the status bar.
19
LIVE snapshot
LIVE snapshot shows an overview of the information provided by LIVE services for your planned route. To explore LIVE snapshot, open the LIVE tab on the route summary screen, then touch each panel for more detailed information.
NOTE
Not all services are available in all countries or regions. Go to tomtom.com/services to check which services are available where you live.
Touch on the panels in the LIVE tab to see, for example, information on the following. Not all information is available in all countries:
• |
- touch this section to see details of any delays caused by incidents and busy |
|
roads. |
•  - touch this section to see the Safety Camera menu. You can then report a safety camera or change the warning preferences.
NOTE
As well as using LIVE services in your own country, you may also be able to use LIVE services when travelling abroad. Not all LIVE services are available in all countries. For more information on available services, go to tomtom.com/services.
Using your voice to plan a route
Instead of touching the screen to plan a route, you can use your voice to plan a route.
For information about the different ways you can plan a route using your voice, Refer to the “Voice recognition” (page 131).
20
Frequent destinations
If you often make trips to the same destinations, you can set your device to ask if you want to plan a route to one of these locations every time the device launches. This is faster than planning a route in the normal way.
1.To select a new destination, touch  in the Change preferences then select
  .
.
2.Touch  .
.
3.You are asked if you want to select a new destination and you then need to answer a few questions about the location.
21

Show my list of frequent destinations every time my navigation device launches
You can set your navigation device to ask if you want to plan a route to one of your frequently visited destinations every time the device launches.
To change this setting, do the following:
1. Touch  in the Change preferences and then select
  .
.
2.Touch  , then touch
  again to begin entering information about the destination.
3.Select a symbol for the destination and touch  to set the symbol, then touch
 .
.
NOTE
If you want to choose a title of your own, select a numbered symbol.
4.Touch  and if required enter a new name, then touch
  .
.
5.Enter the address details in the same way you enter an address when planning a route, then touch  .
.
6.If you want to set more destinations, repeat the steps above. Otherwise, touch  . You are asked if you want to change the start-up image.
7.If you want to change the image, follow the instructions shown on the screen. Otherwise, touch  .
.
Every time your navigation device launches, you are asked if you want to plan a route. If you touch Cancel, you are shown the Main Menu.
22
Arrival times
When you plan a route, your navigation device asks you if you need to arrive at a particular time.
Touch  to enter a preferred arrival time.
Your navigation device calculates your arrival time and shows you whether you will arrive on time.
You can also use this information to work out when you need to leave. If your navigation device shows that you will arrive 30 minutes early, you can wait and leave in 30 minutes time, rather than arrive early.
Your arrival time is constantly recalculated during your journey. The status bar shows whether you will arrive on time or if you are going to be late, as shown below:
 - You will arrive 55 minutes before the arrival time you entered.
If the estimated arrival time is more than five minutes before the time you entered, it is shown in green.
 - You will arrive 3 minutes before the arrival time you entered.
If the estimated arrival time is less than 5 minutes before the time you entered, it is shown in yellow.
 - You will arrive 19 minutes late.
If the estimated arrival time is later than the time you entered, it is shown in red.
Touch  in the Change preferences, to enable or disable arrival time notifications. Select the required options on the first menu screen and then touch
  .
.
To enable arrival time notifications, select  .
.
23
Other navigation options
When you touch |
, you can set your destination in many ways, not just by entering the |
address. The other options are listed below:
Touch this button to navigate to your Home location.
You will probably use this button more than any other.
Touch this button to select a Favourite as your destination.
Refer to the “Favourites” (page 67).
Touch this button to enter an address as your destination.
Touch this button to select your destination from a list of places you have recently used as destinations.
A maximum of 24 locations can be registered to Recent destination.
Touch this button to use Local Search with Google search to help you find shops and businesses in and around your current location.
You can choose to search for shops and businesses near you, near your destination, near any other destination or in a city.
For example, if you are looking for a swimming pool near your current location, enter ‘swimming pool’ and choose the best search result.
Touch this button to navigate to a POI.
Refer to the “Points of Interest (POIs)” (page 57).
Touch this button to register your current location.
Touch this button to select a point on the map as your destination using the map browser.
Touch this button to enter a destination using latitude and longitude values.
Touch this button to select your last recorded position, as your destination.
24
Planning a route in advance
You can use your navigation device to plan a route in advance, selecting your starting point and your destination.
Here are some more reasons to plan a route in advance:
•Find out how long a journey is going to take before you start.
You can also compare journey times for the same route at different times of the day or on different days of the week. Your navigation device uses IQ Routes™ when planning a route. IQ Routes™ calculates routes based on the real average speeds measured on roads.
•Study the route of a journey you are planning.
•Check a route for someone who is coming to visit you and then explain the route to them in
detail.
To plan a route in advance, follow these steps:
1.Touch the screen to bring up the main menu.
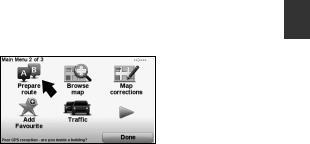
2.Touch the arrow button to move to the next menu screen and touch  .
.
3.Select the starting point for your journey in the same way that you would select your destination.
4.Set the destination for your journey.
25

5.Choose the type of route that should be planned.
• - the route which takes the least time.
• - the most fuel-efficient route for your journey.
•- the shortest distance between the locations you set. This may not be the
quickest route, especially if the shortest route is through a town or city.
• - a route which avoids motorways.
•- a route for a vehicle which can only be driven at a limited speed. You have to
specify the maximum speed.
6.Choose when you will make the journey you are planning. There are three options:
If you select either  or
or  , your navigation device uses IQ Routes™ to work out the best possible route at that time, using the real average speeds measured on roads. In this way you can compare how long a journey takes at different times of day, or on different days of the week.
7. Your navigation device plans the route between the two locations you selected.
26

More information about a route
There are two methods for obtaining detailed route information.
You can access these options for the route you last planned by touching the  button on the route summary screen.
1. Touch  in the Main Menu. 2.Touch
  .
.
You can then select from the following options:
Touch this button for a list of all the turn instructions on the route.
This is very useful if you need to explain a route to someone else.
Touch this button to see each turn in the journey. Touch the right and left arrows to move forwards and backwards through the journey.
Touch the screen to turn off the 3D display and view the map from above.
Touch this button to see an overview of the route using the map browser.
Touch this button to watch a demo of the journey. You can interrupt the demo at any time by touching the screen.
Touch this button to open the route summary screen.
27
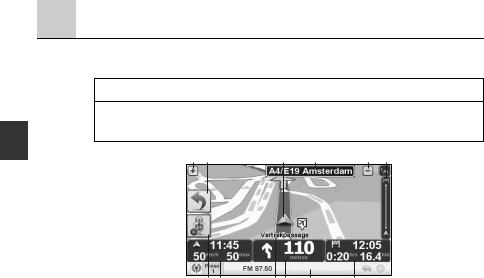
Driving View
When your navigation device launches, you are shown the Driving View along with detailed information about your current position.
NOTE
•The Driving View is shown in black and white until your device locates your current position.
•Touch the centre of the screen at any time to open the Main Menu.
A B C D A E
F G H I K J
AZoom in and out.
BYou can enable the quick menu in the Change preferences. Refer to the “Quick menu preferences” (page 52).
CYour current position.
DRoad sign information or the next street name.
ETraffic sidebar. Refer to the “TomTom HD Traffic” (page 70).
FMicrophone button for voice command and control. Refer to the “Command and control” (page 52).
GThe time, your current speed and the speed limit, if known. Touch the status bar to repeat the last voice guidance message.
HThe name of the street you are on.
INavigation instruction for the road ahead.
Touch this part of the status bar to change between 2D and 3D views of the Driving View. Refer to the “Status bar preferences” (page 50).
JThe remaining journey time, the remaining distance and your estimated arrival time. Touch this part of the status bar to open the route summary screen.
KAudio function information is displayed.
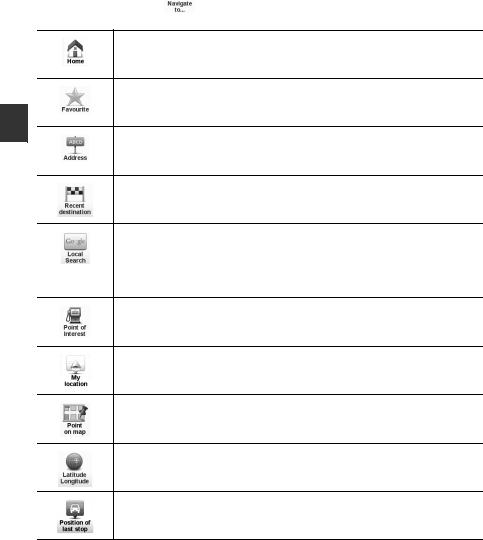
To change the information shown in the status bar, touch  in the Change preferences. Refer to the “Status bar preferences” (page 50).
28

Driving View symbols
The following symbols are shown in the Driving View:
EPT - this symbol is shown when your device is using EPT to estimate your current location. EPT is only used when you have no GPS reception.
NOTE
EPT is not supported on all devices.
*EPT: Enhanced Positioning Technology
Mobile phone not connected - this symbol is shown when the selected mobile phone is not connected to your device. You must have already established a connection to this phone.
Sound off - this symbol is shown when the sound is switched off.
To switch on the sound, open the Change preferences and touch  .
.
Compass - the compass is shown when the compass is enabled.
To enable or disable the compass, adjust the setting in the status bar preferences.
Arrival - this symbol is shown when you arrive at your destination.
29
Loading...