


 Loading...
TomTom XL

1. Getting started
Mounting your navigation device
1. Push the EasyPort™ Mount on your TomTom XL against the windshield in your car.
1
2. Adjust the angle of your device.
2
3. Lock the EasyPort Mount by twisting the base.
3
4.Insert the Car Charger into your device.
4
2
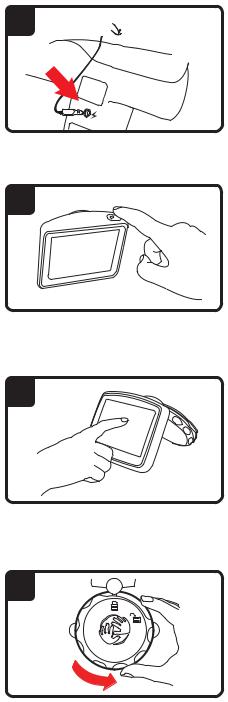
5. Insert the Car Charger into the cigarette lighter in your car.
5

6.Switch your device on by pressing the On/Off button on the top of your device.
6
7.You now have to answer some questions to set up your device. Tap the screen to answer the questions.
7
8.To remove the Mount from your windshield, first unlock the EasyPort Mount, then gently pull one of the tabs. The Mount comes off of the windshield.
8
GPS reception
When you first start your TomTom XL navigation device, the device may need a few minutes to determine your GPS position and show your current position on the map. In the future, your position will be found much faster, usually within a few seconds.
To ensure good GPS reception, you should use your device outdoors. Large objects such as tall buildings can sometimes interfere with reception.
Troubleshooting
In rare cases, your TomTom XL navigation device may not start correctly or may stop responding to your taps.
3

First, check that the battery is properly charged. To charge the battery, connect your device to the car charger. It can take up to 2 hours to fully charge the battery.
If this does not solve the problem, you can reset the device. First turn your device off and wait for at least 10 seconds. Then use a straightened paper clip, or something similar, to push the reset button. The reset button is on the bottom of your device.
4
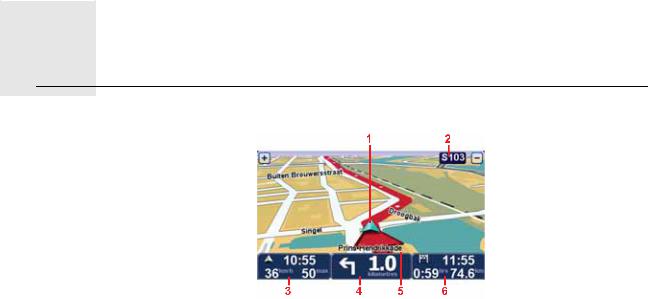
2. Driving View
1.Your current position.
2.The name of the next street or street sign information.
3.Your speed and the speed limit, if known.
Tap this area to repeat the last spoken instruction and to change the volume.
4.Navigation instruction for the road ahead.
Tap this panel on the status bar to switch between 2D and 3D views of the Driving View.
5.The name of the street you are on.
6.Information about your trip: trip time, remaining distance and arrival time. Tap this panel on the status bar to see a route summary.
5
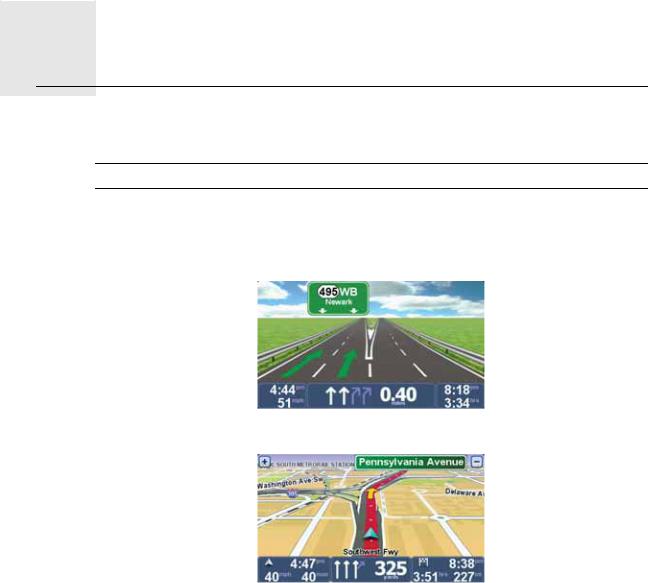
3. Advanced Lane Guidance
Advanced Lane Guidance
Note: Lane guidance is not available for all junctions or in all countries.
Your TomTom XL helps you prepare for highway exits and junctions by showing the correct driving lane for your planned route.
As you approach an exit or junction, the lane you need is shown on the screen.
For some exits and junctions, the lane you need is shown in the status bar.
6
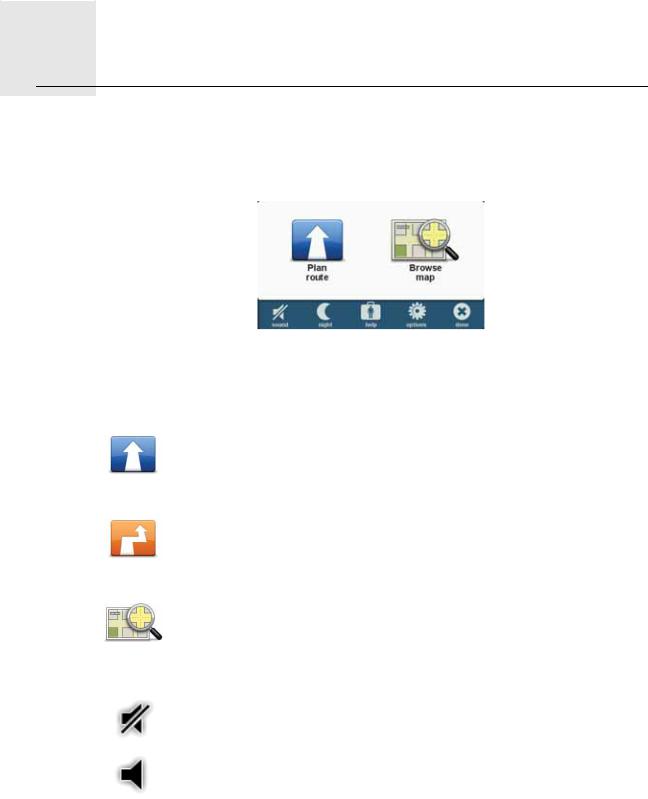
4. Main Menu
The Main Menu is the starting point for planning a route, looking at a map or changing your device settings.
To open the Main Menu from the Driving View, tap the center of the screen.
To return to the Driving View from the Main Menu, tap done.
Main Menu buttons
The following buttons are shown on the Main Menu.
Plan route
Tap this button to plan a new route.
This button is shown when you have not planned a route.
Change route
Tap this button to change the existing route or to plan a new route. This button is shown when you have planned a route.
Browse map
Tap this button to look at the map.
Sound
sound
Tap this button to turn the sound off. sound
Tap this button to turn the sound on.
7

Night /Day
night
Tap this button to set the night color scheme, which reduces the brightness of the screen and shows the map using dark colors.
This is useful when driving at night or in dark environments such as long tunnels. day
Tap this button to set the day color scheme, which increases the brightness of the screen and shows the map using bright colors.
Options
options
Tap this button to adjust the settings for your device. For more information, see the chapter Options.
Help
help
Tap this button to see contact details for local emergency services and other specialized services, such as hospitals and veterinary clinics. You can then plan a route to your chosen service center.
For more information, see the chapter Help.
8
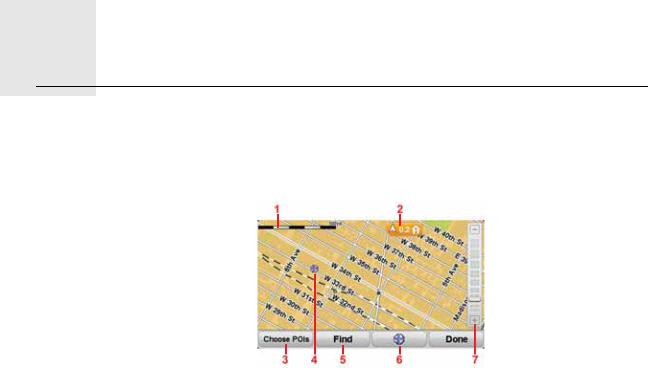
5. Browse map
To look at the map in the same way as you might look at a traditional paper map, tap Browse map in the Main Menu.
You can move the map by touching the screen and sliding your finger across the screen.
1.Scale bar
2.Marker
Markers point to your current location, your home location and your destination. The marker shows the distance to the location.
Tap a marker to center the map on the location pointed to by the marker.
3.POI button
Tap this button to select which POIs are shown.
4.Cursor
5.Find button
Tap this button to find specific addresses.
6.Cursor button
Tap this button to plan a route to the cursor position, create a Favorite at the cursor position or find a Point of Interest near to the cursor position.
7.Zoom bar
Zoom in and out by moving the slider.
9
6.Planning a route
1.Tap the screen to open the Main Menu.
2.Tap Plan route.
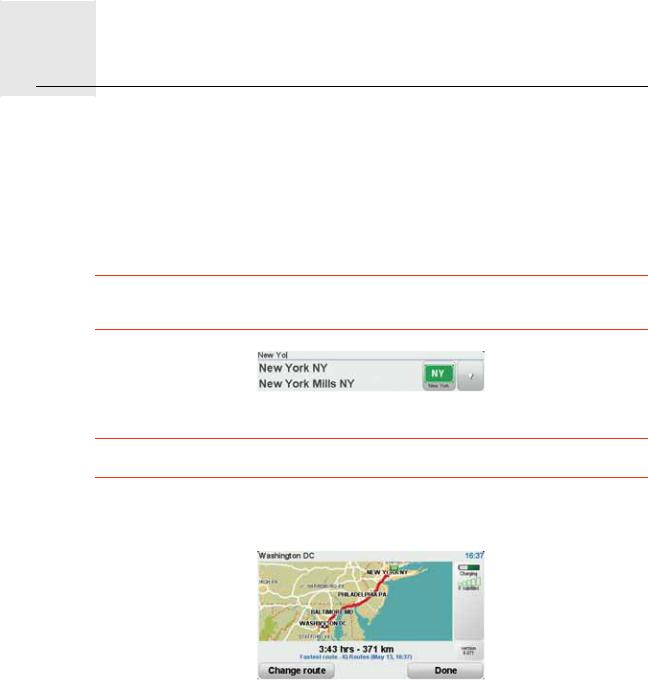
You can enter an address in various ways, but we will enter the full address.
3.Tap Address.
4.Start to type the name of the town where your trip will begin and tap on the name when it appears in the list.
Tip: When you plan a route for the first time you are asked to select the country or state. Your choice is saved and used for all future routes. You can change this setting by tapping on the flag and selecting a new country or state.
5. Enter the street name and the house number, then tap Done.
Tip: Before you start to enter a street name, City center is shown at the top of the list. This is useful if you do not have an address and only need general directions.
6.Tap Done.
The route is planned and a summary of the route is shown.
7.Tap Done.
Your navigation device is ready to guide you to your destination.
Planning a route with a new starting point
To plan a route in advance of traveling or to use a starting point that isn’t your current location, do the following:
1.Tap the screen to open the Main Menu.
2.Tap Plan route.
10
3.Tap Depart from.
You can enter an address in various ways, but we will enter the full address.
4.Tap Address.
Start to type the name of the town where your trip will begin and tap on the name when it appears in the list.
Tip: When you plan a route for the first time you are asked to select the country or state. Your choice is saved and used for all future routes. You can change this setting by tapping on the flag and selecting a new country or state.
5. Enter the street name and the house number, then tap Done.
Tip: Before you start to enter a street name, City center is shown at the top of the list. This is useful if you do not have an address and only need general directions.
6.Enter the destination address, then select Now when asked for the departure time and then tap Done.
The route is planned and a summary of the route is shown.
7.Tap Done.
Your navigation device is ready to guide you to your destination.
11
7. Finding alternative routes
Once you have planned a route, you may want to change something about the route, without changing your destination.
Reasons for changing a route
Maybe for one of these reasons:
•You can see a roadblock or a line of traffic ahead.
•You want to travel via a particular location, to pick someone up, stop for lunch or fill up with gas.
•You want to avoid a difficult intersection or a road you don’t like.
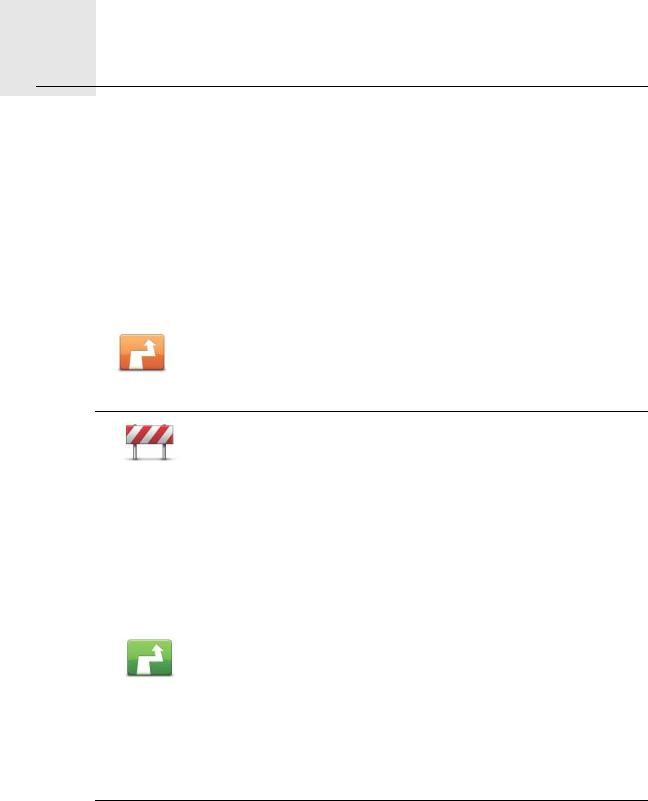
Tap this button in the Main Menu to change the currently planned route.
Change route
Tap this button if you can see a roadblock or a line of traffic ahead. You then have to choose how much of the route ahead you want to avoid.
Avoid roadblock |
Choose from the different options. Your XL recalculates your route |
|
|
|
avoiding the section of the route for the distance you selected. |
|
Don’t forget that once a new route is calculated, you may have to |
|
turn off the road you are on very soon. |
|
If the roadblock disappears while you are traveling, you can tap |
|
Recalculate original to recalculate your original route. After you tap |
|
Calculate alternative, the button name changes to Recalculate origi- |
|
nal. |
|
|
|
Tap this button to calculate an alternative to the route already plan- |
|
ned. Your XL calculates another route, starting from your current |
|
location. |
Calculate alternative
After you tap Calculate alternative, the button name changes to Recalculate original. If you later decide you want to travel along the original route, tap Recalculate original.
Apart from the roads near your position and near your destination, the new route uses totally different roads to reach your destination. This is an easy way of calculating a totally different route.
12
Loading...