


 Loading...
DraftTomTom RIDER
Re erence Guide
Contents
What's in the box |
7 |
||||||||||
|
|
|
|
|
|
|
|
|
|||
|
What's in the box |
................................................................................................................................ |
|
|
|
|
|
7 |
|||
Read me first |
8 |
||||||||||
|
|
|
|
|
|
|
|
|
|||
|
|
|
|
|
|
|
|
||||
|
Mounting your navigation device |
...................................................................................................... |
8 |
||||||||
|
Using a headset |
.................................................................................................................................. |
|
|
|
|
|
8 |
|||
Switching on....................................................................................................................................... |
9 |
||||||||||
|
|
Draft |
|
||||||||
Setting up.......................................................................................................................................... |
10 |
||||||||||
GPS receeption................................................................................................................................. |
10 |
||||||||||
|
Using the anti-theft solution |
............................................................................................................. |
|
|
10 |
||||||
Safety |
|
|
|
|
|
|
|
|
|
11 |
|
|
Safety messages |
.............................................................................................................................. |
|
|
|
11 |
|||||
The Driving View |
12 |
||||||||||
About the Driving View .................................................................................................................... |
12 |
||||||||||
The Driving View .............................................................................................................................. |
12 |
||||||||||
Main Menu |
14 |
||||||||||
About the Main Menu ...................................................................................................................... |
14 |
||||||||||
|
Main Menu buttons |
.......................................................................................................................... |
|
|
14 |
||||||
Quick Menu |
16 |
||||||||||
|
|
|
|
||||||||
About the Quick Menu ..................................................................................................................... |
16 |
||||||||||
Setting up the Quick Menu .............................................................................................................. |
16 |
||||||||||
Using the Quick Menu...................................................................................................................... |
16 |
||||||||||
Planning a route |
17 |
||||||||||
|
|
|
|
||||||||
Planning a route with winding roads............................................................................................... |
17 |
||||||||||
Planning a route with a new starting point ..................................................................................... |
18 |
||||||||||
Planning a route................................................................................................................................ |
19 |
||||||||||
Winding routes |
22 |
||||||||||
|
|
|
|
||||||||
About winding roads........................................................................................................................ |
22 |
||||||||||
|
Switching on winding roads |
............................................................................................................ |
|
22 |
|||||||
Planning a route with winding roads............................................................................................... |
22 |
||||||||||
|
Winding roads and itineraries |
.......................................................................................................... |
23 |
||||||||
|
|
2 |
|
||||||||
Advanced Lane Guidance |
24 |
|||||||||
|
|
|
|
|
|
|
|
|
||
|
|
About lane guidance |
........................................................................................................................ |
|
|
|
24 |
|||
|
Using lane guidance ......................................................................................................................... |
24 |
||||||||
Itinerary planning |
26 |
|||||||||
|
About Itineraries ............................................................................................................................... |
26 |
||||||||
|
Creating an Itinerary ......................................................................................................................... |
26 |
||||||||
|
Start using an Itinerary ..................................................................................................................... |
27 |
||||||||
|
Organising an Itinerary..................................................................................................................... |
27 |
||||||||
|
Sharing an Itinerary .......................................................................................................................... |
28 |
||||||||
|
Deleting an Itinerary ......................................................................................................................... |
29 |
||||||||
|
|
Draft |
|
|||||||
|
Sorting or reversing an Itinerary...................................................................................................... |
29 |
||||||||
|
Saving an Itinerary ........................................................................................................................... |
30 |
||||||||
Changing your route |
31 |
|||||||||
|
Making changes to your route......................................................................................................... |
31 |
||||||||
|
Change route menu.......................................................................................................................... |
31 |
||||||||
Recording your route |
33 |
|||||||||
|
|
About recording your oute |
............................................................................................................. |
|
33 |
|||||
|
Starting route eco ding................................................................................................................... |
33 |
||||||||
|
Uploading and sha ing outes |
|
34 |
|||||||
|
|
Installing Tyre |
................................................................................................................................... |
|
|
34 |
||||
|
|
Tyre FAQs |
......................................................................................................................................... |
|
|
34 |
||||
|
About GPX files ................................................................................................................................ |
34 |
||||||||
|
Converting a GPX file into an itine a y ............................................................................................ |
35 |
||||||||
|
About ITN files .................................................................................................................................. |
35 |
||||||||
|
|
Loading an ITN file............................................................................................................................ |
|
|
35 |
|||||
View map |
37 |
|||||||||
|
|
|
|
|||||||
|
About viewing the map.................................................................................................................... |
37 |
||||||||
|
View map .......................................................................................................................................... |
37 |
||||||||
|
Options.............................................................................................................................................. |
38 |
||||||||
|
Cursor menu ..................................................................................................................................... |
38 |
||||||||
Map corrections |
40 |
|||||||||
|
|
|
|
|||||||
|
About Map Share ............................................................................................................................. |
40 |
||||||||
|
|
Correcting a map error |
..................................................................................................................... |
40 |
||||||
|
Types of map correction .................................................................................................................. |
40 |
||||||||
Sounds and voices |
44 |
|||||||||
|
|
|
||||||||
|
About sounds and voices ................................................................................................................ |
44 |
||||||||
3 |
|
|||||||||
Sound and volume control .............................................................................................................. |
44 |
Change voice .................................................................................................................................... |
44 |
Disable voice / Enable voice ............................................................................................................ |
45 |
Voice settings ................................................................................................................................... |
45 |
Points of Interest |
46 |
|
|
About Points of Interest ................................................................................................................... |
46 |
Creating POIs .................................................................................................................................... |
46 |
Using POIs to plan a route ............................................................................................................... |
47 |
Showing POIs on the map ............................................................................................................... |
48 |
Calling a POI...................................................................................................................................... |
48 |
Setting warnings for POIs ................................................................................................................ |
49 |
HomeDraftand Favourites ....................................................................................................................... |
61 |
Manage POIs..................................................................................................................................... |
49 |
Hands-free calling |
50 |
||
|
|
|
|
About hands-free calls ..................................................................................................................... |
50 |
||
|
Using a headset |
................................................................................................................................ |
50 |
Connecting to your phone ............................................................................................................... |
51 |
||
Your phonebook............................................................................................................................... |
52 |
||
Making a call using speed di l......................................................................................................... |
52 |
||
Making a call ..................................................................................................................................... |
52 |
||
Receiving a call ................................................................................................................................. |
53 |
||
Auto-answer ..................................................................................................................................... |
53 |
||
Connecting mo e phones to your device........................................................................................ |
54 |
||
Mobile phone menu ......................................................................................................................... |
54 |
||
Favourites |
55 |
About Favourites .............................................................................................................................. |
55 |
Creating a Favou ite ......................................................................................................................... |
55 |
Using a Favou ite.............................................................................................................................. |
56 |
Changing the name of a Favou ite .................................................................................................. |
57 |
eleting a Favourite ......................................................................................................................... |
57 |
Change Home location..................................................................................................................... |
57 |
Options |
59 |
|
|
About Options .................................................................................................................................. |
59 |
Battery saving ................................................................................................................................... |
59 |
Brightness preferences .................................................................................................................... |
59 |
Change map colours ........................................................................................................................ |
59 |
Change vehicle symbol .................................................................................................................... |
60 |
Connect to headset .......................................................................................................................... |
60 |
Safety Alerts menu ........................................................................................................................... |
60 |
Help me............................................................................................................................................. |
61 |
Keyboard preferences...................................................................................................................... |
61 |
Language .......................................................................................................................................... |
62 |
Manage POIs..................................................................................................................................... |
62 |
|
4 |
Map corrections................................................................................................................................ |
|
|
63 |
|||
Mobile phone menu ......................................................................................................................... |
|
|
63 |
|||
|
Planning preferences |
....................................................................................................................... |
|
|
|
64 |
Quick Menu preferences .................................................................................................................. |
|
|
64 |
|||
Reset factory settings ....................................................................................................................... |
|
|
65 |
|||
Safety warnings ................................................................................................................................ |
|
|
65 |
|||
Set clock............................................................................................................................................ |
|
|
65 |
|||
Speed Cameras menu...................................................................................................................... |
|
|
65 |
|||
Start or Stop recording .................................................................................................................... |
|
|
66 |
|||
Start up ............................................................................................................................................. |
|
|
66 |
|||
|
Status bar preferences |
..................................................................................................................... |
|
|
67 |
|
Street name settings ........................................................................................................................ |
|
|
67 |
|||
Switch map ....................................................................................................................................... |
|
|
68 |
|||
AboutDraftgetting help............................................................................................................................ |
80 |
|||||
Trip statistics..................................................................................................................................... |
|
|
68 |
|||
Units .................................................................................................................................................. |
|
|
68 |
|||
Use night colours / Use day colours ............................................................................................... |
|
68 |
||||
Voices................................................................................................................................................ |
|
|
69 |
|||
Winding route preference ................................................................................................................ |
|
|
69 |
|||
Speed Cameras |
|
|
70 |
|||
About Speed Cameras ..................................................................................................................... |
|
|
70 |
|||
Subscribing to this service............................................................................................................... |
|
|
70 |
|||
Updating locations for ale ts............................................................................................................ |
|
|
70 |
|||
Speed camera wa nings .................................................................................................................. |
|
|
70 |
|||
Changing the way you a e w |
ned.................................................................................................. |
|
71 |
|||
Speed camera symbols.................................................................................................................... |
|
|
71 |
|||
Report button.................................................................................................................................... |
|
|
72 |
|||
Reporting a new speed c me |
while on the move ....................................................................... |
73 |
||||
Reporting a new speed c me |
while |
t home .............................................................................. |
73 |
|||
Reporting inco ect came le ts ................................................................................................... |
|
73 |
||||
Types of fixed speed came a you can |
epo t ................................................................................. |
74 |
||||
Average speed check came a wa nings ......................................................................................... |
74 |
|||||
Speed Cameras menu...................................................................................................................... |
|
|
75 |
|||
anger Zones |
|
|
77 |
|||
|
|
|
|
|
||
|
anger zones in France.................................................................................................................... |
|
|
77 |
||
|
anger zone warnings ..................................................................................................................... |
|
|
77 |
||
Changing the way you are warned.................................................................................................. |
|
77 |
||||
Report button.................................................................................................................................... |
|
|
78 |
|||
Reporting a new danger zone while on the move .......................................................................... |
78 |
|||||
Reporting a new danger zone while at home ................................................................................. |
78 |
|||||
Safety Alerts menu ........................................................................................................................... |
|
|
78 |
|||
Help |
|
|
80 |
|||
|
|
|
||||
Using Help to phone a local service ................................................................................................ |
|
80 |
||||
Help menu options ........................................................................................................................... |
|
|
80 |
|||
|
|
|
|
|
5 |
|

TomTom HOME |
82 |
About TomTom HOME .................................................................................................................... |
82 |
Installing TomTom HOME................................................................................................................ |
82 |
MyTomTom account........................................................................................................................ |
82 |
Updating your device ....................................................................................................................... |
83 |
Backing up your navigation device ................................................................................................. |
84 |
Introducing HOME help ................................................................................................................... |
84 |
Addendum |
85 |
Addendum |
90 |
Draft |
|
Copyright notices |
93 |
Copyright notices |
94 |
6

What's in the box
What's in the box
WORK IN PROGRESS - IMAGES ARE COMING
TomTom RIDER navigation device
|
Draft |
|||||||
Charging bike mount and battery cable |
||||||||
|
|
|
|
|
|
|
||
Tyre route software for your computer |
|
|||||||
|
|
|
|
|
|
|
||
|
USB home charger |
|
|
|
||||
|
|
|
|
|
|
|||
|
RAM mounting kit |
|
|
|
||||
|
|
|
|
|
||||
|
Documentation pack |
|
|
|||||
|
|
|
||||||
Extra items supplied in Premium p ck: |
|
|||||||
|
|
|
||||||
|
Car mounting kit |
|
|
|||||
|
|
|||||||
|
Travel carry case |
|
||||||
Anti-theft solution
For more information, go to tomtom.com/ ccesso ies.
7

Read me first
Mounting your navigation device
Attach the RAM™ mount kit to your motorcycle as shown on the Installation Poster, then place
Draft |
|||||||||||||||
your TomTom RIDER in the holder. When you are attaching the mount kit to your motorcycle, |
|
|
|
|
|
|
|||||||||
follow these guidelines: |
|
|
|
|
|
|
|
|
|
|
|
|
|||
|
|
|
|
|
|
|
|
|
|
|
|
|
|||
|
If you are unsure about attaching the mount kit yourself, ask a professional o fit it for you. |
|
|
|
|
|
|
|
|||||||
|
|
|
|
|
|
|
|
|
|
|
|
|
|||
|
If you choose to attach the mount kit yoursel , note |
hat he Ac ive Dock has a built-in fuse. |
|
|
|
||||||||||
|
This means that you don’t need to add a use yourself while per orming he connec ion be- |
|
|
|
|||||||||||
|
tween the device and the motorcycle battery. |
|
|
|
|
|
|
|
|
|
|
||||
|
|
|
|
|
|
|
|
|
|||||||
|
Make sure that the mount kit does not inter ere wi h any of he con rols on he mo orcycle. |
|
|
|
|||||||||||
|
|
|
|
|
|
|
|
|
|||||||
|
Always use the correct tools. If you use unsuitable ools, you may damage or break he mount |
||||||||||||||
|
kit. |
|
|
|
|
|
|
|
|
|
|
|
|
||
|
|
|
|
|
|
|
|||||||||
|
Do not overtighten nuts. You m y cr ck p rts of the mount kit or d m ge your handlebars if |
|
|||||||||||||
|
you overtighten the nuts. |
|
|
|
|
|
|
|
|
|
|
||||
|
|
|
|
|
|||||||||||
|
If you are using the u-bolt, don’t forget to put the rubber c ps provided over the exposed |
|
|
|
|||||||||||
|
threads. |
|
|
|
|
|
|
|
|
|
|
||||
|
|
|
|||||||||||||
|
Damage due to modific tions, imp oper inst ll tion, o d h z rds or ccident, are not cov- |
|
|
||||||||||||
|
ered. Neither RAM nor TomTom sh ll be li ble for |
ny injury, loss, or d mage, direct or con- |
|
||||||||||||
|
sequential, a ising out of imp oper inst ll tion, or in |
bility to use product. Before use, the user |
|||||||||||||
shall determine the suit bility of the p oduct for its intended use. The user assumes all risk and liability, whatsoeve , in connection with the mount.
Using a headset
We recommend using a compatible headset with your TomTom RIDER to hear spoken instructions, make and eceive hands-f ee phonecalls and hear warning sounds on your TomTom RIDER. This makes riding with your TomTom RI ER as safe as possible. For more information and a full list of compatible headsets, go to tomtom.com/riderheadsets.
The instructions below describe how to set up a Bluetooth® headset.
1. To turn the headset on, press and hold the on/off button for 10 seconds, until the LED flashes blue 3 times.
An ascending alert tone is played. When the headset is on, the LED flashes blue every 3 seconds.
2. To turn the headset off, press and hold the on/off button for 3 seconds, until the LED flashes red 3 times.
A descending alert tone is played.
If you did not establish a Bluetooth connection between your Bluetooth headset and your TomTom RIDER when you first turned your TomTom RIDER on, you can establish the connection at any time.
3. From the Main Menu, tap options.
4. Tap Connect to headset and follow the instructions to establish the connection.
8
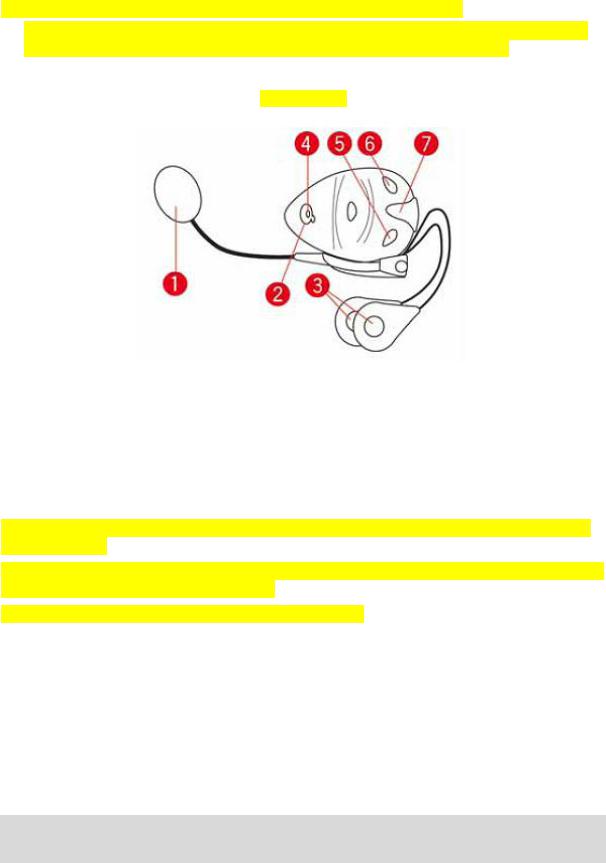
5.Attach your headset to your helmet as shown at the start of this guide.
Make sure you position the microphone correctly. For best results, don’t position the microphone directly in front of your mouth, position it just to the side of your mouth.
TEMPORARY IMAGE
|
|
|
|
|
|
|
|
|
|
|
|
|
|
|
|
|
|
||||
1. |
Microphone |
|
|
|
|
|||||
|
|
|
|
|
|
|||||
2. |
On/off button |
|
|
|
||||||
|
|
|
|
|
||||||
3. |
Speakers |
|
|
|
|
|||||
|
|
|
|
|
|
|
|
|
|
|
4. |
LED |
|
|
|
|
|
|
|
|
|
|
|
|
|
|||||||
5. |
Volume down |
|
|
|||||||
|
|
|
||||||||
6. |
Volume up |
|
|
|||||||
|
|
|||||||||
7. |
Charging connector |
Draft |
||||||||
|
|
|
||||||||
Before you can use your Bluetooth he dset, fully ch ge the he dset using the charger supplied with the headset.
To fully charge the headset takes between 2 and 3 hou s. When charging, the LED is a steady red. When charging is finished, the LED tu ns off.
When the batteries are running low, an alert tone is played.
Switching on
Your TomTom RI ER switches on when you switch your motorcycle ignition on. Your TomTom RI ER switches off when you switch your ignition off.
The first time you switch on your TomTom RI ER, it may take up to 20 seconds to start. Before you use your TomTom RIDER for the first time, it’s a good idea to charge it fully.
The battery in your TomTom RIDER navigation device charges when you connect it to the home charger or to your computer.
Note: You should plug the USB connector directly into a USB port on your computer and not into a USB hub or USB port on a keyboard or monitor.
9

Tip: To switch your TomTom RIDER on when your motorcycle engine is not running, press and hold the On/Off button for 2 seconds, or until your TomTom RIDER starts. To switch off your TomTom RIDER, press and hold the On/Off button for 2 seconds.
Setting up
Important: Take care to select the correct language as the language you choose will be used for Draftall text on the screen.
When you first switch on your device, you have to answer a few ques ions o set up he device. Answer the questions by tapping the screen.
GPS receeption
Your TomTom RIDER must be outside to be able to loca e your current posi ion. Make sure hat you are in an open place without tall buildings or trees around you.
The first time you start your TomTom RIDER, it can take a ew minu es or he device o find your
current position. In the future, your position will be ound much s er, norm lly wi hin a few seconds.
Your TomTom RIDER does not tr nsmit your loc tion, so others c nnot use it to track you while you are driving.
TomTom RIDER uses a GPS eceiver to loc te your cu ent position.
Using the anti-theft solution
If your box includes an anti-theft solution, it is supplied in two p rts: A RAM lock for the mount.
This lock prevents the unsc ewing of the RAM a m f om the bike. A lock for the TomTom RI ER itself.
This lock prevents the disconnection of the TomTom RIDER from the dock.
Important: Both locks have keys so you need to make sure that you keep these two extra keys with you at all times!
10
Safety
Safety messages
Please read and take note of the following important safety messages:
Check your tyre pressure regularly.
ServiceDraftyour vehicle regularly.
Medication can affect your riding or driving ability.
Always use seat belts.
Before setting off on a motorbike, fasten your helmet correc ly.
If riding a bike, always wear protective clothing.
When riding a motor bike, be extra vigilant and always ride de ensively.
Don’t drink and drive.
Most accidents happen less th n 5 km from home.
Obey the rules of the ro d.
Always use your turn indic tors.
Every 2 hours, take a bre k for t le st 10 minutes.
Keep your seat belts on.
Keep a safe distance f om the vehicle in f ont.
11
The Driving View
About the Driving View
DraftWhen your TomTom RIDER navigation device starts for the first time, you are shown the Driving View along with detailed information about your current posi ion.
Tap the centre of the screen at any time to open the Main Menu.
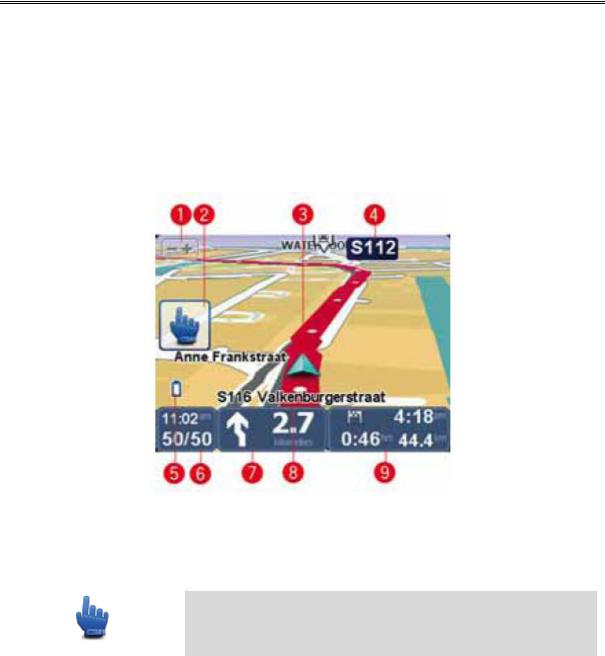
The Driving View
TEMPORARY IMAGE
1. Zoom button - tap this button to zoom in and out.
When tapped, large + an d- buttons appear for easy use when wearing gloves. 2. Quick menu.
Tip: When you see this symbol in the guide, it means that this is an option that can be added to your Quick Menu for easy access. For more information, see Quick Menu in this guide.
3.Your current position.
4.The name of the next major road or road sign information, if applicable.
5.Battery level indicator.
6.Your speed and the speed limit, if known.
Tap this area to repeat the last spoken instruction and to change the volume. When tapped, large + and - buttons appear for easy use when wearing gloves.
7.Navigation instruction for the road ahead.
12
Tap this panel on the status bar to switch between 2D and 3D views of the Driving View.
 Quick Menu option!
8.The name of the street you are on.
9.The remaining journey time, the remaining distance and your estimated arrival time. Tap this part of the status bar to open the Route Summary screen.
Draft
13
Main Menu
About the Main Menu
The Main Menu is the starting point for planning a route, looking at a map or changing your device Draftsettings.
To open the Main Menu from the Driving View, tap the cen re of he screen.
To return to the D iving View f om the M in Menu, t p done.
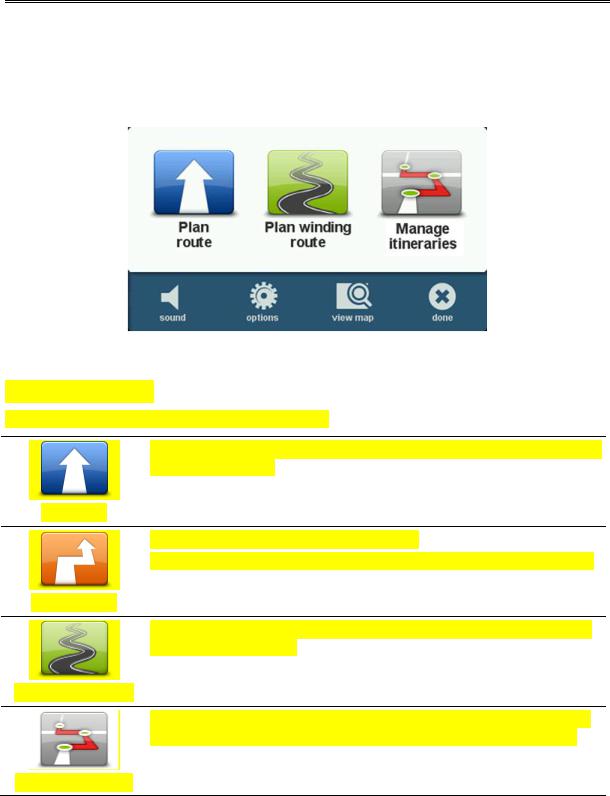
Main Menu buttons
The following buttons a e shown on the M in Menu:
Tap this button to plan a new oute. This button is shown when you have not planned a oute.
Plan route
Tap this button to change the current route.
This button is only shown while there is a planned route on your device.
Change route
Tap this button to plan a route that avoids unnecessary motorways and includes winding roads.
Plan winding route
Tap this button to plan a journey that includes waypoints and your final destination. You can also access the route files saved on your device.
Manage itineraries
14

|
|
|
|
|
|
|
|
|
|
|
|
|
|
|
|
|
|
|
|
|
|
|
|
|
|
|
|
|
|
|
|
|
|
|
|
|
|
|
|
|
|
|
|
|
|
|
|
|
|
|
|
|
sound |
|
|
|
|
|
Quick Menu option! |
|
|
|
|
|
|
|
|
|
|
||
|
|
|
|
|
|
|
|
|
|
|
|
|
|
|
|
|
|
|
|
|
|
|
|
|
|
|
|
|
|
|
|
|
|
|
|
|
|
|
|
|
|
|
|
|
|
||
|
|
|
|
|
|
|
|
|
|
|
|
|
Tap this button to turn the sound off. |
|
|
|
|
|
|
|
|||
|
|
|
|
|
|
|
|
|
|
|
|
|
|
|
|
|
|
|
|
|
|
||
|
|
|
|
|
|
|
|
|
|
|
|
|
|
|
|
|
|
|
|
|
|
|
|
|
|
|
|
|
|
|
|
|
|
|
|
|
Tap this button to turn the sound off. |
|
|
|
|
|
|
|
|||
|
|
|
|
|
|
|
|
|
|
|
|
|
|
|
|
|
|
|
|
|
|
|
|
|
|
|
|
|
|
|
|
|
|
|
|
|
|
|
|
|
|
|
|
|
|
||
|
|
|
|
|
sound |
|
|
|
|
|
|
|
|
|
|
|
|
|
|
|
|
||
|
|
|
|
|
|
|
|
|
|
|
|
|
|
|
|
|
|
|
|
||||
|
|
|
|
|
|
|
|
|
|
|
|
|
|
|
|
|
|
|
|
|
|
|
|
|
|
|
|
|
|
|
|
|
|
|
|
|
Tap this button to adjust the settings for your device. For more infor- |
|
|
||||||||
|
|
|
|
|
|
|
|
|
|
|
|
|
mation, see Options in this guide. |
|
|
|
|
|
|
|
|
||
|
|
|
|
|
|
|
|
|
|
|
|
|
|
|
|
|
|
|
|
|
|
|
|
|
|
|
|
options |
|
|
|
|
|
|
|
|
|
|
|
|
|
|
|
||||
|
|
|
|
|
|
|
|
|
|
|
|
|
|
|
|
|
|
|
|
|
|||
|
|
|
|
|
|
|
|
|
|
|
|
|
|
|
|
|
|
|
|
|
|
|
|
|
|
|
|
|
|
|
|
|
|
|
|
|
Tap this button to look at the map. |
|
|
|
|
|
|
|
|||
|
|
|
|
|
|
|
|
|
|
|
|
|
Draft |
||||||||||
|
|
|
|
|
|
|
|||||||||||||||||
|
|
view map |
|
||||||||||||||||||||
|
|
|
|
|
|
|
|
|
|
|
|
|
|
||||||||||
|
|
|
|
|
|
|
|
|
|
|
|
|
|
|
|
|
|||||||
|
|
|
|
|
|
|
|
|
|
|
|
|
|
|
|
|
|
|
|
|
|
|
|
|
|
|
|
|
|
|
|
|
|
|
|
|
This button to show or hide the compass in |
he Driving View. |
|
|
|||||||
|
|
|
|
|
|
|
|
|
|
|
|
|
|
|
|
||||||||
|
|
|
|
|
|
|
|
|
|
|
|
|
The compass always shows the direc ion you are |
ravelling. For example, |
|
||||||||
|
|
|
|
|
|
|
|
|
|
|
|
|
if it points to the right, you re r velling o |
he E |
st. |
|
|||||||
|
|
|
compass |
|
|
|
|||||||||||||||||
|
|
|
|
|
|
|
|
|
|
|
|
|
|
|
|
|
|||||||
|
|
|
|
|
|
|
|
|
|
|
|
|
|
|
|
|
|
|
|
|
|
|
|
15

Quick Menu
About the Quick Menu
DraftThe Quick Menu offers a fast and safe way to use your TomTom RIDER.
When you use the Quick Menu, the number of taps you need o make is reduced and his makes the device easier to use with gloves.
There are several Quick Menu items to choose from. You can choose just one or several depending on the features you use the most.
Tip: When you see this symbol in he guide, it means hat his is an option that can be added to your Quick Menu or easy access.
Setting up the Quick Menu
To set up the Quick Menu, do the following:
1. Tap the screen to b ing up the M in Menu. 2. Tap options in the Main Menu.
3. Tap Quick menu p efe ences.
4. Select one or mo e checkboxes next to the options you w nt to include in your Quick Menu. 5. Tap Done.
Your Quick Menu is now eady to use. To use the Quick Menu, go to the Driving View and tap this button:
Using the Quick Menu
Here are some examples of how you can use the Quick Menu:
Changing a route to include a petrol station normally requires 5-6 taps but when you use the Quick menu, you only need to tap twice.
When you use the Call button in the Mobile phone menu, you can call any phone number, but it requires several taps. The Call button in the Quick Menu, however, is like a speed-dial button and allows you to call a pre-set number with very few taps.
If you want to skip a waypoint on your scenic route, you can do with this with two taps in the Quick Menu by using Go to previous waypoint or Go to next waypoint. It takes at least six taps using the Main Menu.
16
Planning a route
Planning a route with winding roads
1. |
Tap the screen to open the Main Menu. |
|
|
||
Draft |
|||||
2. |
Tap Plan winding route. |
|
|
|
|
|
You can enter an address in various ways, but we will en er |
he full address. |
|||
3. |
Tap Address. |
|
|
|
|
4. |
Tap Street and house number. |
|
|
||
5. |
Start to type the name of the town where your journey will begin and ap on he name when it |
||||
|
appears in the list. |
|
|
|
|
|
Tip: When you plan a route for the first time you are asked |
o select |
he coun ry or s a e. |
||
|
Your choice is saved and used for all future routes. You can change |
his se ing by apping on |
|||
|
the flag and selecting a new country or st te. |
|
|
||
6. |
Enter the street name and the house number, then t p Done. |
|
|||
|
Tip: Before you start to enter |
street n me, City centre is shown t the top of the list. This is |
|||
|
useful if you do not have |
n |
dd ess nd only need gener l directions. |
||
7. |
Tap Done. |
|
|
|
|
|
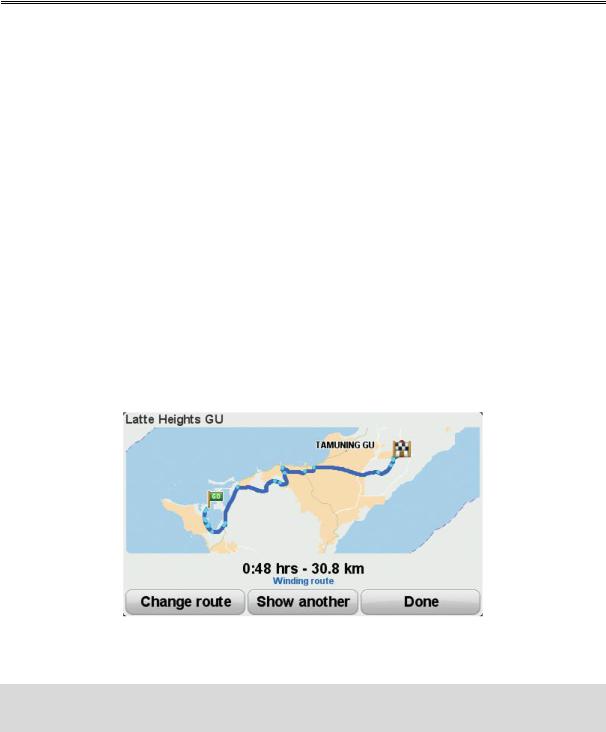
The route is planned and |
summ y of the oute is shown. |
|
|
|
8. |
Tap Done. |
|
|
|
|
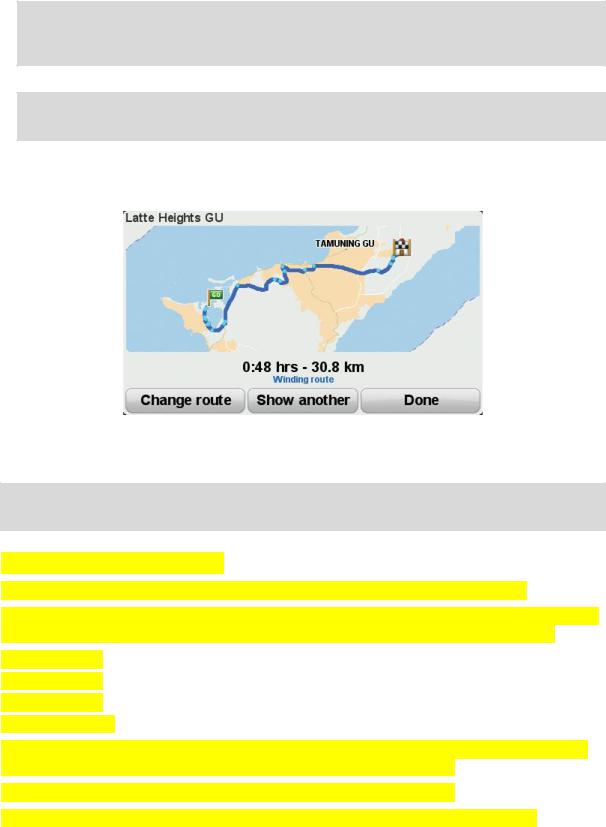
Your navigation device is ready to guide you to your destination.
Tip: If you are not happy with the selected route, tap Show another in the Route Summary screen to quickly see an alternative route.
17
Planning a route with a new starting point
To plan a route in advance of travelling or to use a starting point that isn't your current location, do the following:
1.Tap the screen to open the Main Menu.
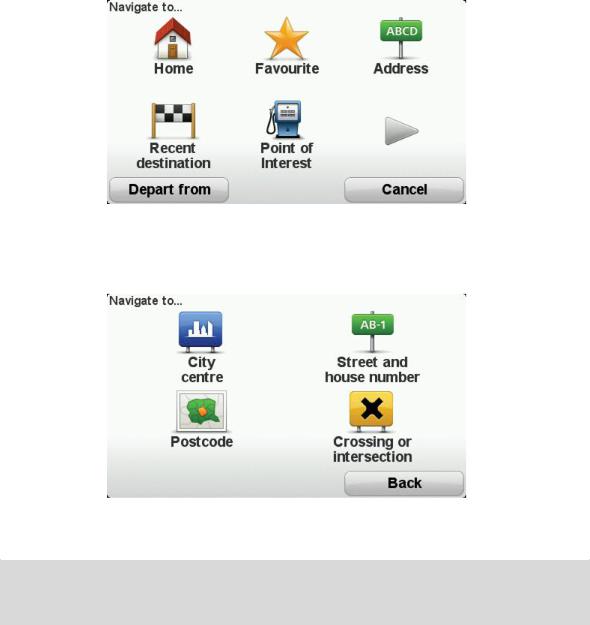
2.Tap Plan route.
3.Tap Depart from.
6.Start toDrafttype the name of the town where your journey will begin and tap on the name when it appears in the list.
Tip: When you plan a route for the first time you are asked to select the country or state. Your choice is saved and used for all future routes. You can change this setting by tapping on the flag and selecting a new country or state.
18
|
Draft |
||
7. |
Enter the street name and the house number, then ap Done. |
|
|
|
Tip: Before you start to enter a street name, City cen re is shown at he op of |
he list. This is |
|
|
useful if you do not have an address and only need general direc ions. |
|
|
8. |
Enter the destination address, then select Now when asked or he depar ure |
ime and hen |
|
|
tap Done. |
|
|
|
The route is planned and summ ry of the route is shown. |
|
|
|
Tip: |
Quick Menu option! You c n dd oute summ ry to the Quick Menu. |
|
9. |
Tap |
one. |
|
Your navigation device is ready to guide you to your destination.
Planning a route
1.Tap the screen to open the Main Menu.
2.Tap Plan route.
You can enter an address in various ways, but we will enter the full address.
19
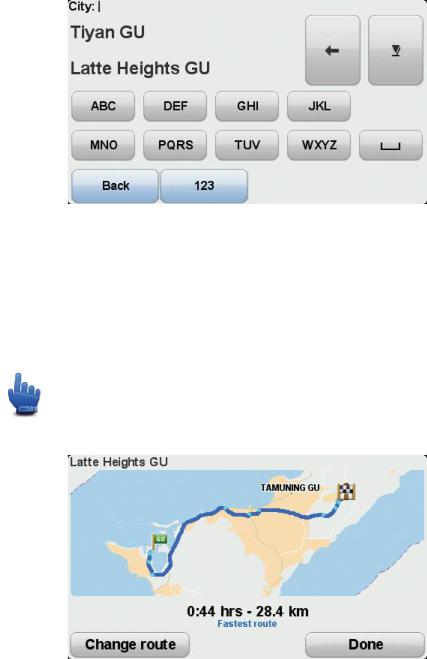
3. Tap Address.
|
Draft |
4. |
Tap Street and house number. |
5. |
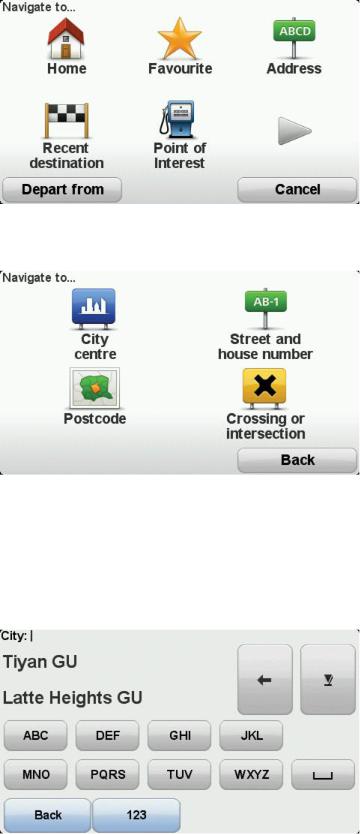
Start to type the name of the town whe e your jou ney will begin nd t p on the name when it |
|
appears in the list. |
|
Tip: When you plan a oute for the fi st time you a e asked to select the country or state. |
|
Your choice is saved and used for all futu e outes. You can change this setting by tapping on |
|
the flag and selecting a new country or state. |
|
|
6. |
Enter the street name and the house number, then tap Done. |
|
20 |
Tip: Before you start to enter a street name, City centre is shown at the top of the list. This is useful if you do not have an address and only need general directions.
7.Tap Done.
The route is planned and a summary of the route is shown.
Tip:  Quick Menu option! You can add route summary to the Quick Menu.
8.Tap DoneDraft.
Your navigation device is e dy to guide you to your destin tion.
21
Winding routes
About winding roads
DraftThe winding routes feature is for planning a route that avoids unnecessary motorways and includes winding roads, with the aim of making the route a fun and en er aining ride. When planning the route, your TomTom RIDER tries to guide you out of he ci y as quickly as possible.
Switching on winding roads
1. Tap the screen to bring up the Main Menu. 2. Tap options.
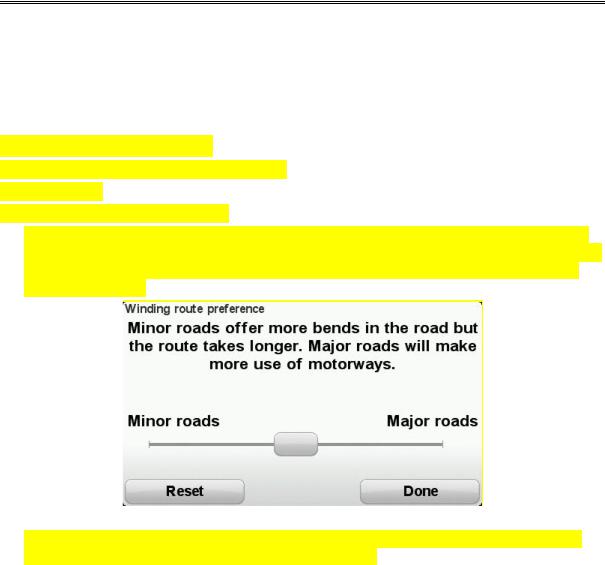
3. Tap Winding routes preferences.
Some locations in the world have a lot of winding roads, o hers have very ew due o larger populations or lots of cities. If you think th t the winding ro ds sugges ed in your area are oo winding or not winding enough, you c n ch nge the rel ive moun s of di erent ypes of roads in your route.
Move the slider to choose the extent to which minor or major roads are part of your route. Move the slider to the left to choose more winding roads.
Planning a route with winding roads
1.Tap the screen to open the Main Menu.
2.Tap Plan winding route.
You can enter an address in various ways, but we will enter the full address.
3.Tap Address.
4.Tap Street and house number.
5.Start to type the name of the town where your journey will begin and tap on the name when it appears in the list.
22
Tip: When you plan a route for the first time you are asked to select the country or state. Your choice is saved and used for all future routes. You can change this setting by tapping on the flag and selecting a new country or state.
6.Enter the street name and the house number, then tap Done.
Tip: Before you start to enter a street name, City centre is shown at the top of the list. This is useful if you do not have an address and only need general directions.
7.Tap Done.
The route is planned and a summary of the route is shown.
8. Tap DoneDraft.
Your navigation device is e dy to guide you to your destin tion.
Tip: If you are not happy with the selected oute, t p Show nother in the Route Summary screen to quickly see an alte n tive oute.
Winding roads and itine a ies
You can also use the winding outes featu e in combination with the itinerary planner.
There are two methods for using winding routes with itineraries. The first is to select just city centres and a route is planned bypassing those cities but using them as a guide. For example:
1. City centre 1
2. City centre 2
3. City centre 3
4. Home location
The first method, as shown in the example above, calculates a route from your current position using the three city centres as a guide and finishes at your Home location.
The second method uses actual locations that you know you want to visit.
For more information, see Creating an itinerary with winding roads - Rider 5 (page 30)
23

Advanced Lane Guidance
About lane guidance
Note
Draft: Lane guidance is not available for all junctions or in all countries.
Your TomTom RIDER navigation device helps you prepare for mo orway exi s and junc ions by showing the correct driving lane for your planned route.
As you approach an exit or junction, the lane you need is shown on he screen.
Using lane guidance
There are two types of lane guidance: Lane images
Lane images a e pe manently switched on.
Tip: Tap anywhe e on the sc een to etu n to the D iving View. Instructions in the status bar
Lane guidance in the status bar can be switched on and off.
24

To switch off lane guidance in the status bar, tap options in the Main Menu, then tap Status bar settings. Clear the checkbox for Show lane guidance.
Tip: If no lane guidance is shown in the status bar and all lanes are highlighted, you can use any lane.
Draft
25
Itinerary planning
About Itineraries
An Itinerary is a plan for a journey including more locations than your final destination. You could use an Itinerary for trips such as:
A riding holiday through a country with lots of stops.
A two day bike ride with an overnight stop.
A short ride which passes by Points of Interest.
A scenic route from a friend that you downloaded using HOME or he in ernet.
In all these examples you could tap Navigate to... or each place. However, if you use an I inerary, you can save time by planning everything in advance.
An Itinerary can include the following items:
Destination - a location on your journey where you w nt o s op.
Waypoint - a location on your journey where you w nt to tr vel through without stopping.
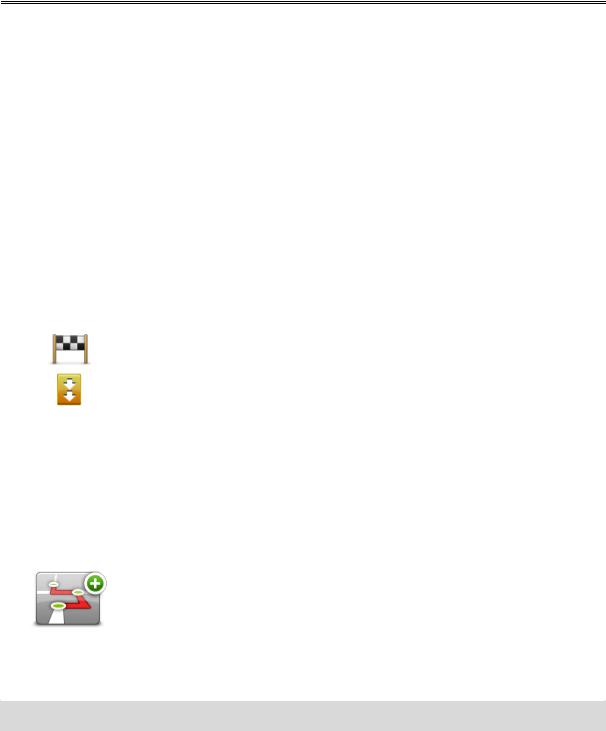
Destin tions |
e shown using this symbol. |
Waypoints |
e shown using this symbol. |
Creating an Itine a y
1.Tap the screen to b ing up the Main Menu.
2.Tap Manage itineraries.
3.Tap Create new.
The Itinerary planning screen opens. At first, there are no items in the Itinerary.
4.Tap Add and select a location.Draft
Tip: You can add items to your Itinerary in any order and rearrange the order later.
26
Start using an Itinerary
When you use an Itinerary to navigate, the route will be calculated to the first destination on the Itinerary. Your TomTom RIDER calculates the remaining distance and time to the first destination and not for the whole Itinerary.
As soon as you start to use an Itinerary, the route is calculated from your current position. You do not need to set a departure point.
When you have passed a waypoint or reached a destination, it is marked as visited.
Waypoints are shown on the map. Your device will not warn you when you are approaching a waypoint or when you arrive at a waypoint.
1. |
Tap the screen to bring up the Main Menu. |
|
|
tionDraft |
|
2. |
Tap Manage itineraries. |
|
3. |
Tap Start navigation. |
|
|
You are asked if you want to n vig te to your irst destin tion. |
|
|
|
Tip: You c n dd the following menu items to your Quick |
|
|
Menu: Continue Itine y, Go to previous w ypoint and Go to |
|
|
next w y point. |
Organising an Itine a y
To edit an itinera y, tap Manage itine a ies and then tap Edit current.
Tap an item on your Itinerary to edit it. You then see a range of Itinerary editing features as shown below:
|
You can change a destination into a waypoint using this button. |
|
Remember that waypoints are points on your journey to your destination |
|
that you want to pass and destinations are places where you want to |
Mark as waypoint |
stop. |
|
|
|
This button is only shown if the item you tapped is a destination. |
|
|
|
You can change a waypoint into a destination using this button. |
|
Remember that destinations are places where you want to stop, and |
|
waypoints are points on your journey to your destination that you want |
Mark as destina- |
to pass. |
|
|
|
This button is only shown if the item you tapped is a waypoint. |
|
|
27
|
|
Tap this button to miss out part of your Itinerary. Your TomTom RIDER |
|
|
|
will ignore this item and all the items before it in the Itinerary. |
|
|
|
It will navigate you to the next item in the Itinerary. |
|
|
Mark "visited" |
This button is only shown if you are still due to visit this item. |
|
|
|
|
|
|
|
Tap this button to repeat part of your Itinerary. Your device will navigate |
|
|
|
you to this item followed by the rest of the items in the Itinerary. |
|
|
|
This button is only shown if you have already visited this item. |
|
Draft |
|||
|
Mark " to visit" |
|
|
|
|
Tap this button to move the item up he I inerary. |
|
|
|
This button is unavailable if the i em is at he op of he I inerary. |
|
|
Move item up |
|
|
|
|
Tap this button to move the item down he I inerary. |
|
|
|
This button is unavailable if the i em is at he bo |
om of he I inerary. |
|
Move item down |
|
|
|
|
Tap this button to see the loc ion of he i em on |
he map. |
|
Show on map |
|
|
|
|
Tap this button to delete the item f om the Itiner |
ry. |
Delete item
Sharing an Itinerary
To share an itinerary with a friend using Bluetooth, do the following:
Sending a file
1. Tap the screen to bring up the Main Menu. 2. Tap Manage itineraries.
3. Tap Share.
4. Tap Send to another device.
5. Make sure that the other device is read to receive the file and then tap Continue. 6. Choose the device from the list.
28
7.Tap the itinerary file that you want to share. The file is sent.
Receiving a file
1. |
Tap the screen to bring up the Main Menu. |
2. |
Tap Manage itineraries. |
3. |
Tap Share. |
|
Draftof the Itinerary. |
4. |
Tap Receive from another device. |
5. |
If the file is waiting already, tap Yes to receive it. |
|
Tip: Your device name is TomTom RIDER. |
Deleting an Itinerary |
|
1. |
Tap the screen to bring up the M in Menu. |
2. |
Tap Manage itine a ies. |
3. |
Tap Delete. |
|
Your list of itine a ies opens. |
4. |
Tap an itinera y to select it. |
5. |
Tap Yes to confirm that you want to delete the itinerary. |
Sorting or reversing an Itinerary
To sort or reverse an Itinerary, tap Manage itineraries, followed by Edit current and then Options:
|
To sort the Itinerary into an order which starts from your current location, |
|
tap Sort from my location. |
|
This is useful if you are following a scenic route you downloaded using |
Sort from my loca- |
HOME or the internet. |
|
|
tion |
Use this option to drive directly to the closest point on the route and then |
|
follow the route from there, instead of starting at the official starting point |
|
|
29
Loading...