


ONE (2nd Edition)
Table of contents
 Loading...
TomTom ONE
Chapter 1
What’s in the box
2
What’s in the box
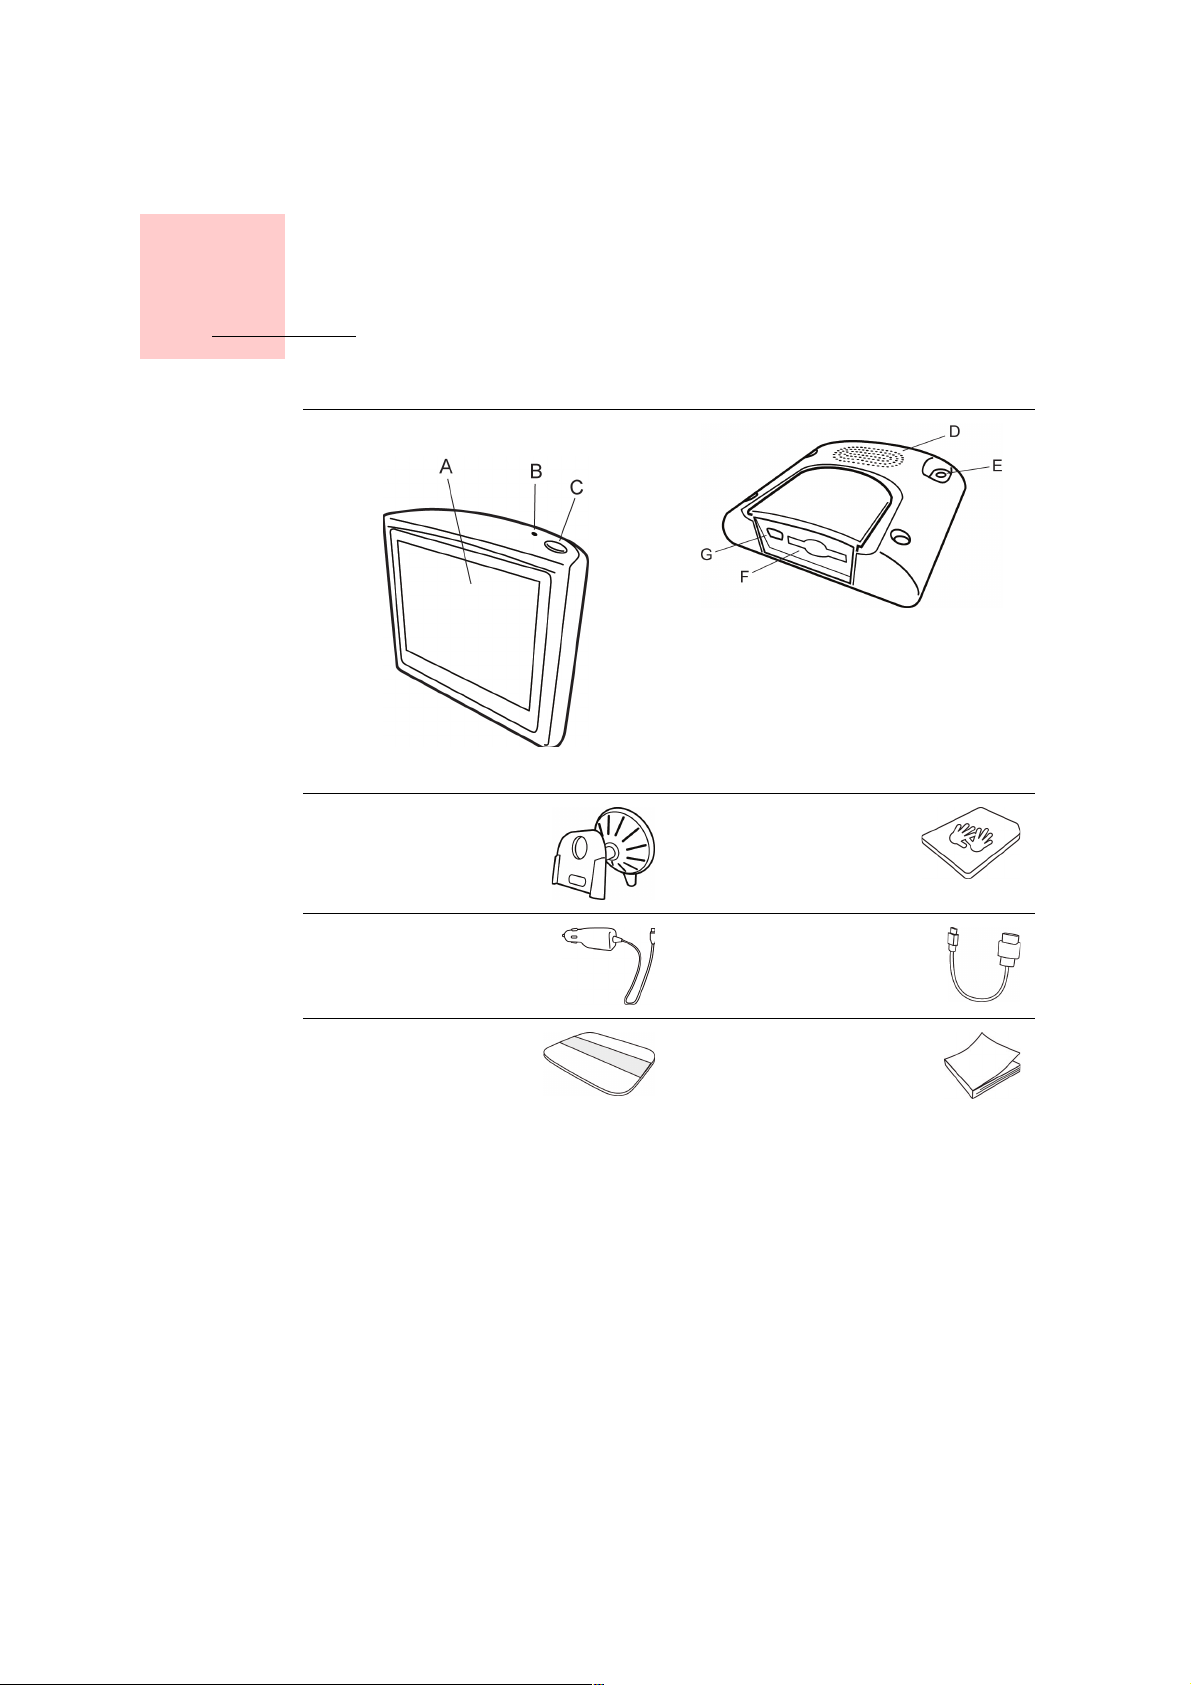
a Your TomTom ONE
A Touchscreen
B Charging LED
C On/Off button
D Speaker
E External antenna connector
F Memory card slot
G USB connector
b Windshield Holder c Memory card (SD
card)
d USB Car Charger e USB cable
f Product code card g Documentation pack

Chapter 2
Before You Start...
3
Before You Start...
Everyone Loves TomTom ONE
So never leave your ONE in your car when you’re not using it - it’s an easy target
for thieves.
Always take your ONE, the windshield holder, and the car charger with you; don’t
leave any TomTom products on display.
Always store your ONE in the carry case to protect the screen.
Back Up Your TomTom ONE
It’s always a good idea to make a backup of the contents of your TomTom ONE.
You can make a backup using TomTom HOME.
For more information about TomTom HOME, see
Using TomTom HOME
on
page 44.
Use the safety preferences
To make driving even safer with your TomTom ONE, use the
Safety preferences
in
the Preferences menu.
You can choose to use the safety lock. If the safety lock is enabled, only a few
buttons and features are available while you are driving. When you are stationary,
all the buttons and features are available.
You can also choose to turn the map display off.
For more information, see
Safety preferences
on page 30.
Secure your TomTom ONE
Set a password for your TomTom ONE so that only you can use it. Every time you
start your ONE you will have to enter your password.
To set your password, run your ONE using TomTom HOME. From the Preferences
menu, click
Set owner
to set a password.
To set the password, you have to run your ONE using TomTom HOME. You can
then use TomTom HOME to set the password. To set a password on your device,
do the following:
1. Connect your ONE to your computer and switch it on.
2. Start TomTom HOME if it does not start automatically.
If you do not have TomTom HOME installed, insert the CD that came with your
ONE to install it.
Safety
preferences
4
Alternatively, you can download TomTom HOME from
www.tomtom.com
.
Make sure you always have the latest version of TomTom HOME. For more
information about TomTom HOME, see
Using TomTom HOME
on page 44.
3. In the Planning section, select your ONE.
A picture of your ONE is shown in the main section of TomTom HOME.
4. Click the On/Off button on the picture of your ONE to switch it on in TomTom
HOME.
Your ONE starts in TomTom HOME. You can now set the password on your ONE
using TomTom HOME. Don't unplug your ONE, just use it as you normally would
by clicking the buttons shown on your computer.
5. From the Main Menu in your device, click
Change preferences
.
6. Click
Set owner
. You may have to click the arrow until you reach the page where
Set owner
is shown.
If you cannot find the button
Set owner
, make sure that all buttons are shown
in your ONE. Tap the button
Show ALL menu options
. All buttons will now be
shown.
You can now set the password for your ONE. You can also set your name and
address, which will then be shown when your ONE starts up.
Ta k e car e of y ou r TomTo m ON E
It is important to take care of your ONE and to clean it correctly.
• Use a soft cloth to wipe the screen of your ONE; do not use any liquid cleaners.
• If your ONE gets wet, dry it with a soft cloth.
• Do not open the casing of your ONE under any circumstances. Doing so may
be dangerous and will invalidate your warranty.
• Do not use the memory card (SD card) with any device other than a TomTom
device. Other devices may damage the memory card.
• Do not expose your ONE to high or low temperatures, which can cause
permanent damage. For example, don’t leave it in the car on hot summer days
or during cold winter nights.
Set owner
Chapter 3
Getting started
5
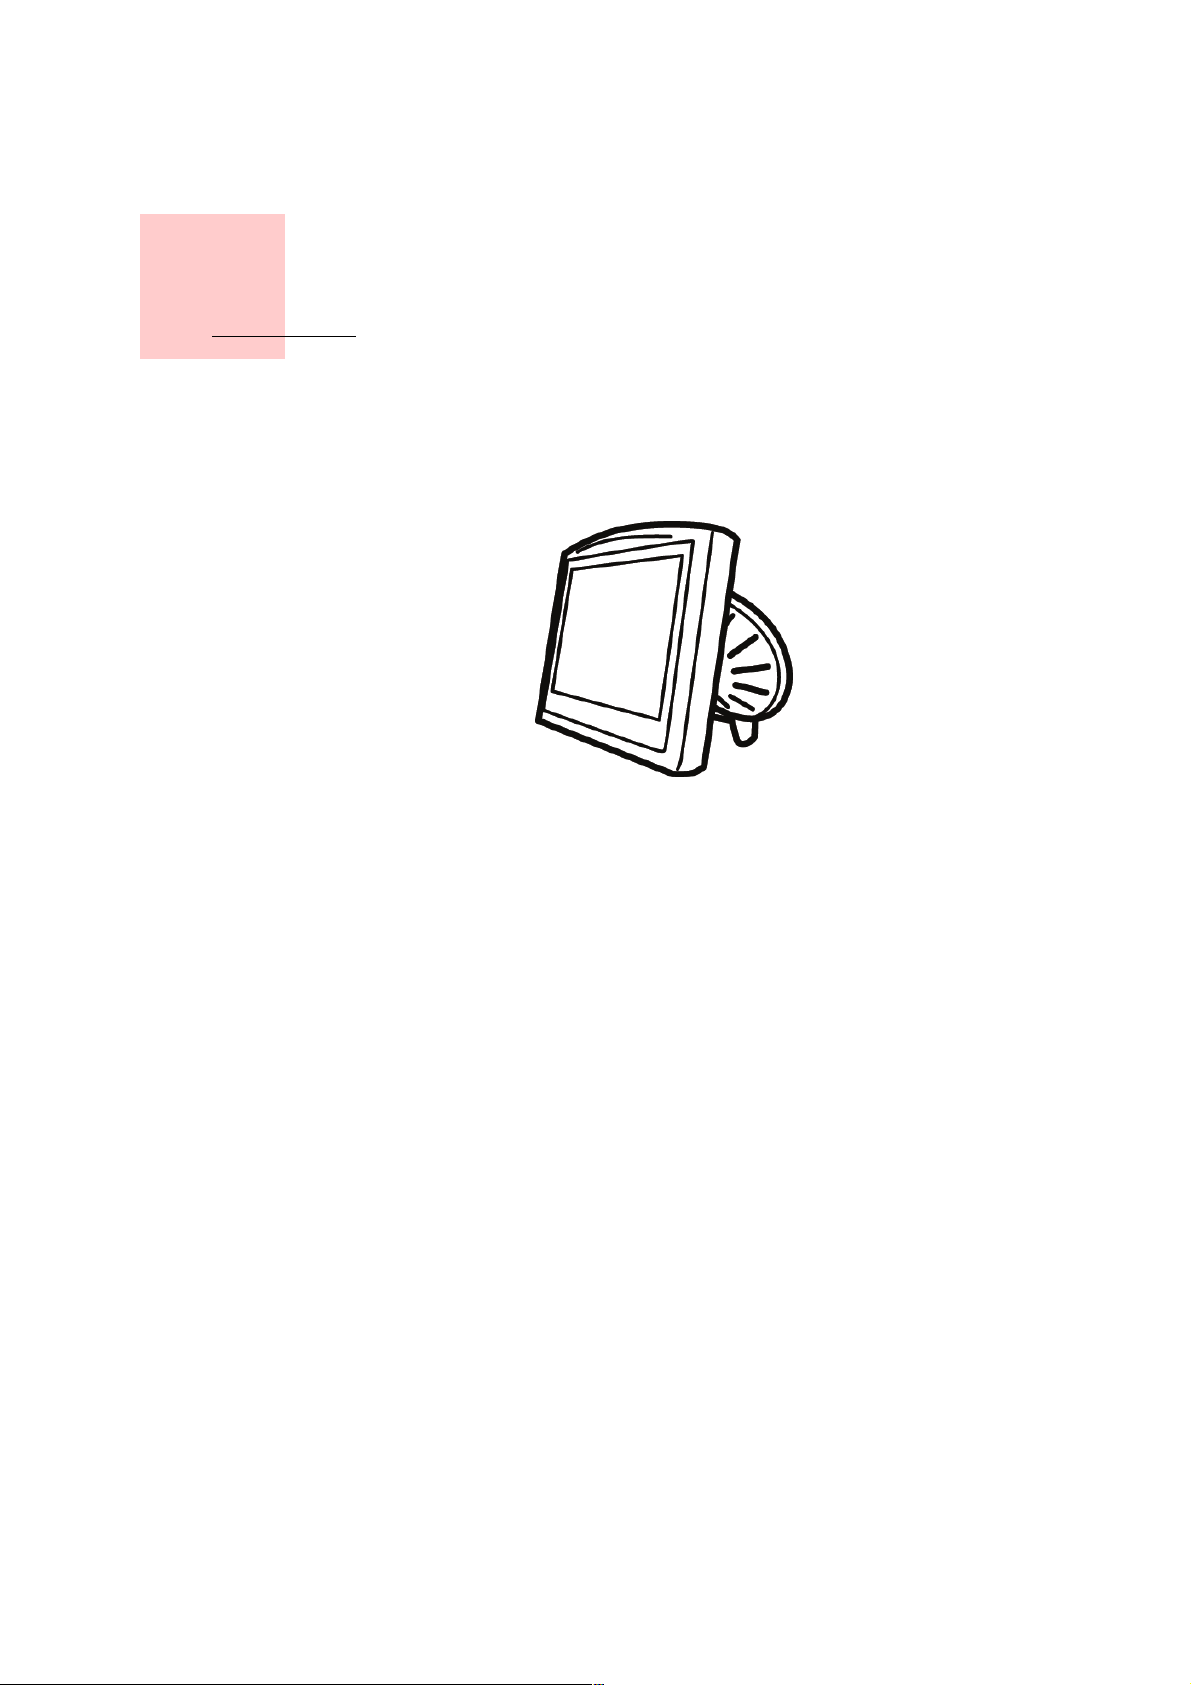
Getting started
Switching on
Follow the instructions on the Installation Poster to dock your TomTom ONE in
your car.
The first time you switch on your TomTom ONE, it may take up to 20 seconds to
start. To switch off your TomTom ONE, press and hold the On/Off button for 2
seconds.
Setting up
You have to answer a few questions to set up your TomTom ONE. Answer the
questions by tapping the screen. You will use the touchscreen for everything you
do with your ONE.
You can change these settings at any time using the Preferences menu. For
information about the Preferences menu, see
Preferences
on page 29.
Once you have answered the questions, your ONE will display the Driving View.
The Driving View is shown in black and white until your ONE locates your current
position.
For more information about the Driving View, see
Driving View
on page 13.
Locating your current position
Your TomTom ONE must be outdoors to locate your current position. The first time
you start your ONE, it can take up to 5 minutes to find your current position. If it
takes longer than 5 minutes, make sure that you are in an open place without tall
buildings or trees around you.
In the future, your position will be found much faster, normally within a few
seconds.
Once your ONE has located your current position, the Driving View is shown in full
color and shows your position on the map.

6
Note: Your TomTom ONE does not transmit your position. You can, however,
send your position to TomTom Buddies. For more information, visit
www.tomtom.com/plus
Note: Some vehicles have a heat reflective shield embedded in the
windshield that may prevent TomTom ONE from locating your current
position. If this is a problem in your vehicle, use the TomTom External
Antenna Kit (available as an accessory).
Chapter 4
Making your first trip
7
Making your first trip
Planning a route with TomTom ONE is very simple. To plan your first route, follow
the steps below.
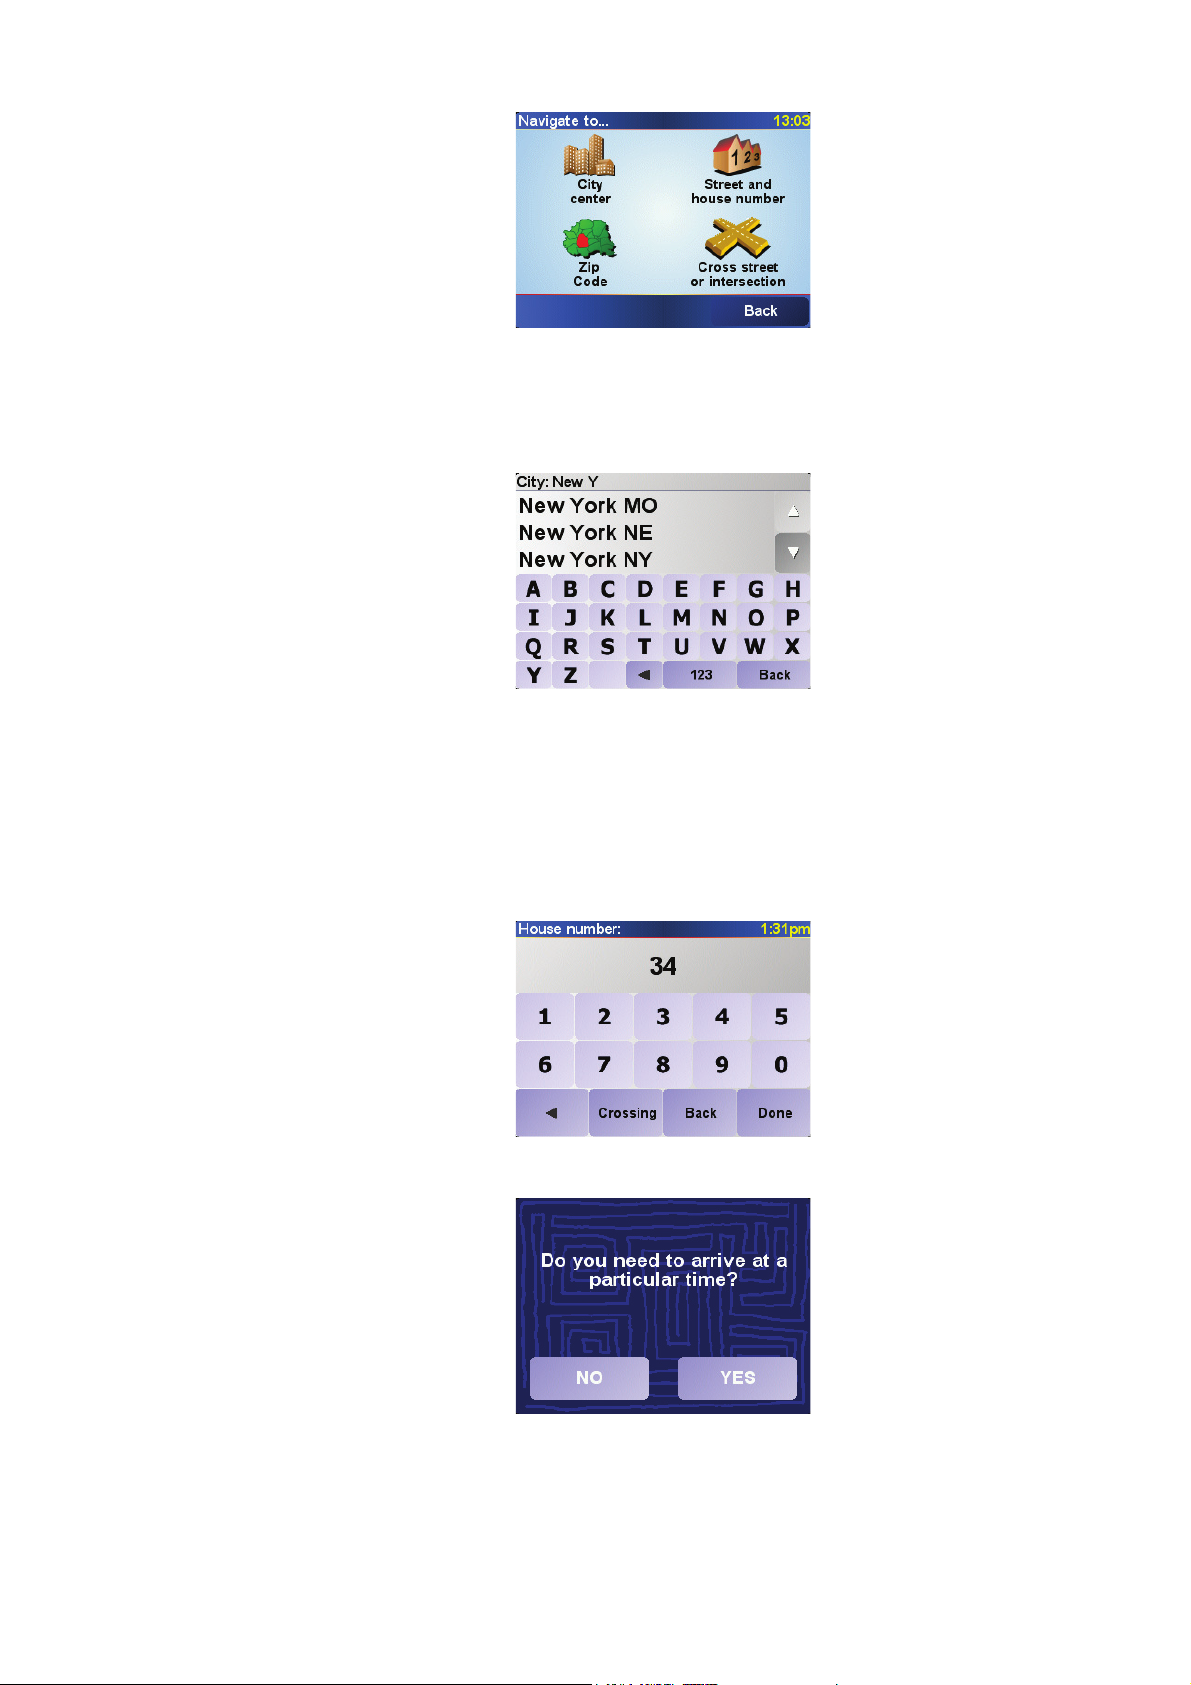
1. Tap the screen to bring up the main menu.
2. Tap
Navigate to...
For your first journey, we will navigate to an address.
3. Tap
Address
.
When you enter an address, you can choose from four options:
•
City center
- tap this button to set your destination as the center of a city or
town.
•
Street and house number
- tap this button to set an exact address as your
destination.
•
Postcode
- tap this button to enter a postcode as your destination.
•
Crossing or intersection
- tap this button to set your destination as the point
where two streets meet.
Note: You should always plan your journeys before you start driving. It is
dangerous to plan routes when you are already moving.
Note: You can enter a zip code for any country. In the UK and the
Netherlands, zip codes are detailed enough to identify a house on their own.
In other countries you can enter a zip code to identify a town or area. You
will then have to enter a street and address.
8
For your first trip, we will enter an exact address.
4. Tap
Street and house number
.
5. Start to type the name of the town where you want to go.
As you type, the names of the towns that match what you have typed are
shown.
6. Start to type the name of the street.
As with the name of the town, the names of the streets that match what you
have typed are shown.
7. Now enter the house number of your destination and then tap
Done
.
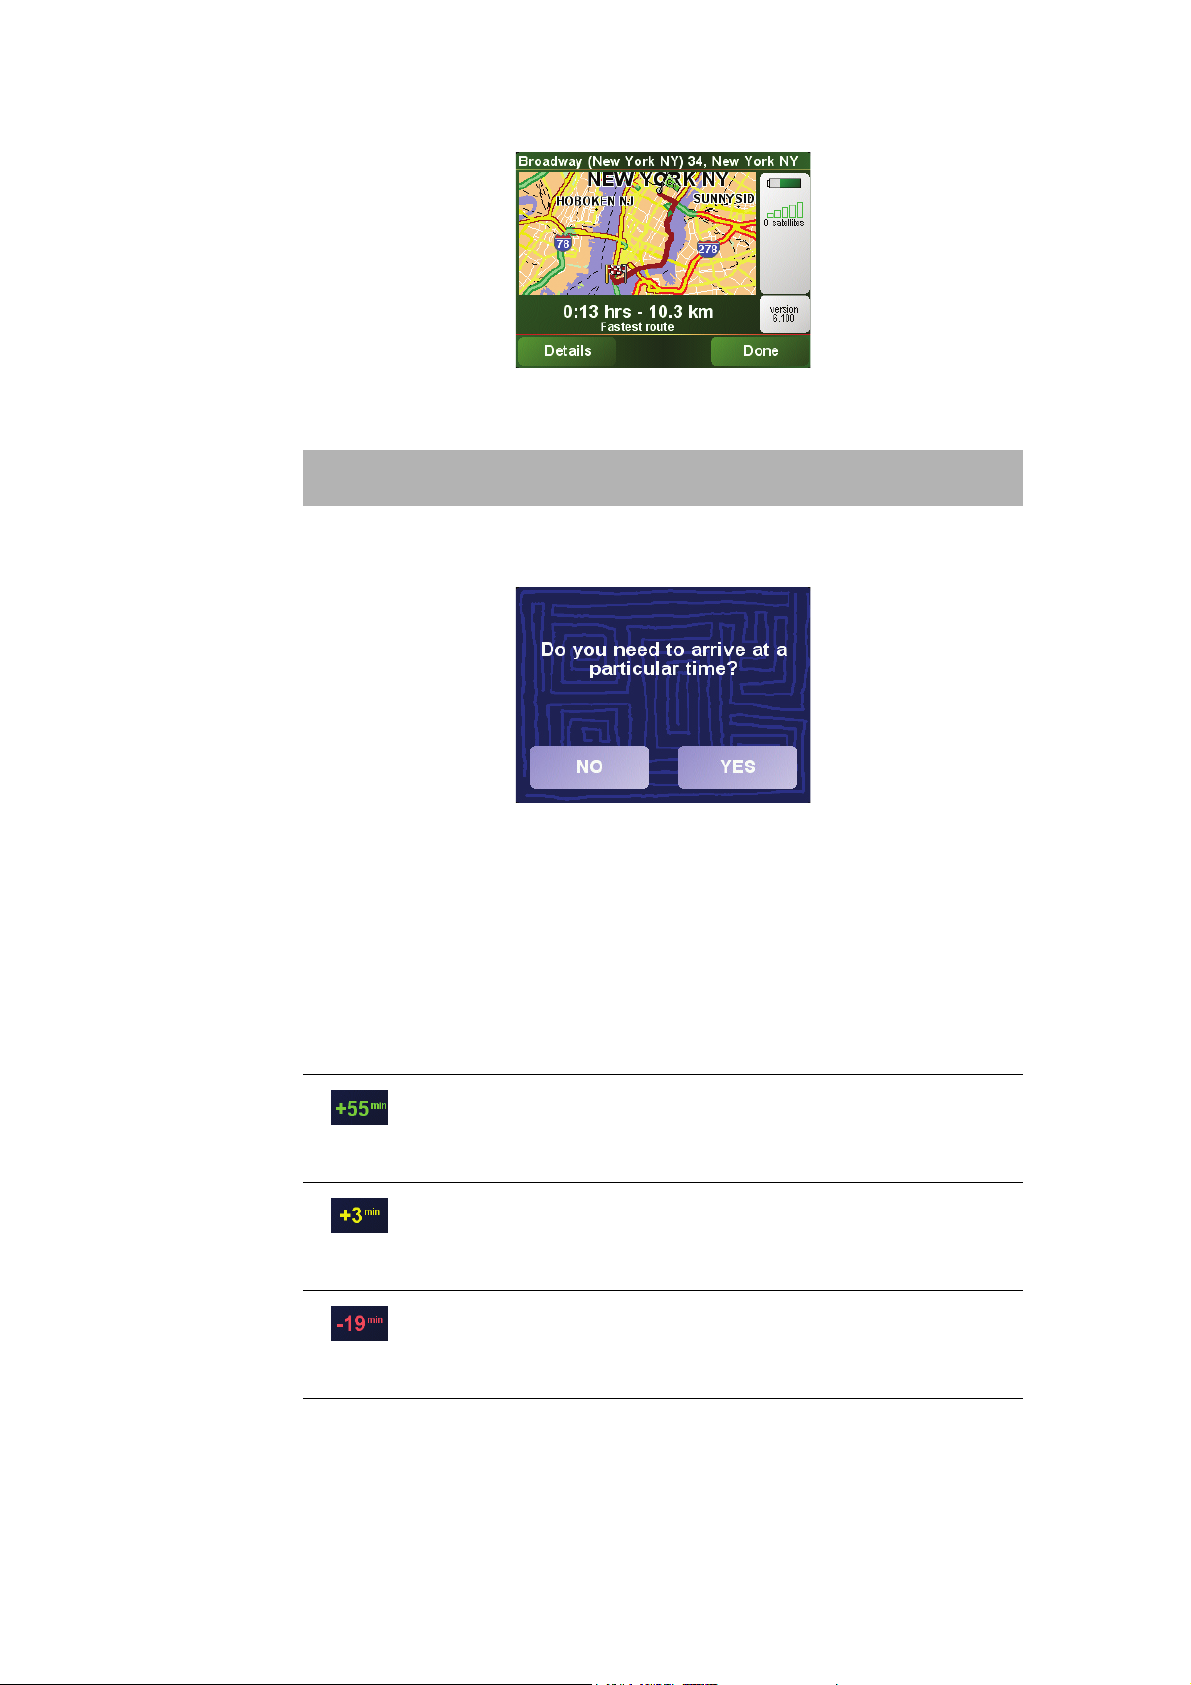
8. ONE asks you whether you need to arrive at a particular time.
Ta p
YES
to enter an arrival time. ONE shows you whether you will arrive on
time. For more information, see
Arrival times
on page 9.
The route is then calculated by your TomTom ONE.
9
9. When the route has been calculated, tap
Done
.
TomTom ONE will immediately start guiding you to your destination with spoken
instructions and visual instructions on the screen.
Arrival times
Ta p
YES
to enter an arrival time.
Your ONE calculates your arrrival time and shows you whether you will arrive on
time.
You can also use this information to work out when you need to leave. If your ONE
shows you that you will arrive 30 minutes early, you can wait and leave in 30
minutes time, rather than arrive early.
Your arrival time is constantly recalculated during your trip. The status bar shows
whether you will arrive on time or late, as shown below:
Note: Before you can plan a route in this way, TomTom ONE must first
locate your current position.
You will arrive 55 minutes before the arrival time you entered.
If the estimated arrival time is more than five minutes before the
time you entered, it is shown in green.
You will arrive 3 minutes before the arrival time you entered.
If the estimated arrival time is less than 5 minutes before the
time you entered, it is shown in yellow.
You will arrive 19 minutes late.
If the estimated arrival time is later than the time you entered, it
is shown in red.
10
What are the other navigation options?
When you tap
Navigate to...
, you can set your destination in many ways, not just
by entering the address. The other options are listed below:
Planning in advance
You can also use your ONE to plan trips in advance by selecting both your starting
point and your destination. You could, for example, do the following:
• Find out how long a trip is going to take before you start.
• Check the route of a trip you are planning.
• Check a route for someone who is coming to you and explain the route to them.
To plan a route in advance, follow these steps:
1. Tap the screen to bring up the main menu.
2. Tap
Advanced planning
.
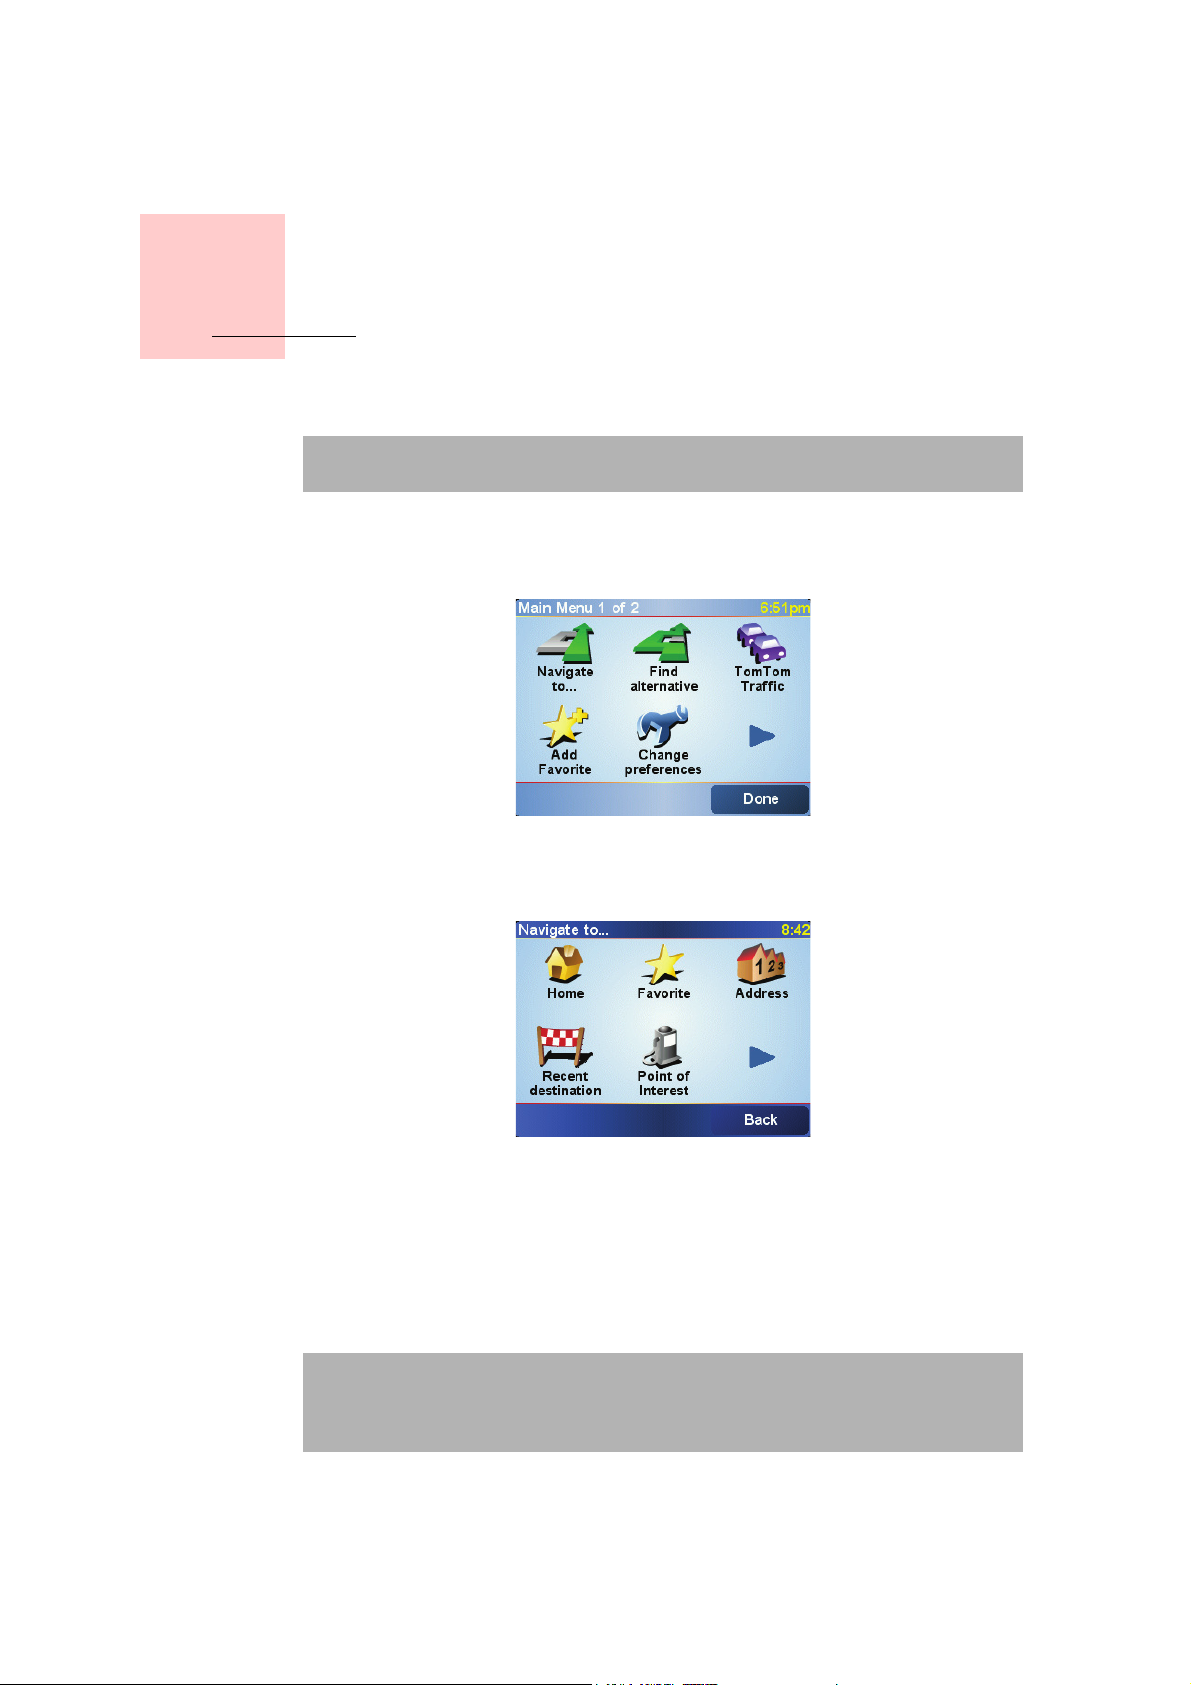
Home
Tap this button to navigate to your Home location.
You will probably use this button more than any other.
For information about setting your Home location, see Change Home
location on page 31.
Favorite
Tap this button to select a Favorite as your destination.
For more information about Favourites, see Favorites on page 19.
Recent
destination
Tap this button to select your destination from a list of places you have
recently used as destinations.
Point of
Interest
Tap this button to navigate to a Point of Interest (POI).
For more information about POIs and navigating to a POI, see Points of
Interest on page 22.
Point on map
Tap this button to select a point on the map as your destination using the
map browser.
For more information about the map browser, see Using the Map on
page 17.
Latitude
Longitude
Tap this button to enter a destination with latitude and longitude values.
To m Tom
Buddy
Tap this button to navigate to the current position of a TomTom Buddy. Don’t
forget that the Buddy may move before you reach him.
For more information about TomTom Buddies, see TomTom PLUS on
page 42.
11
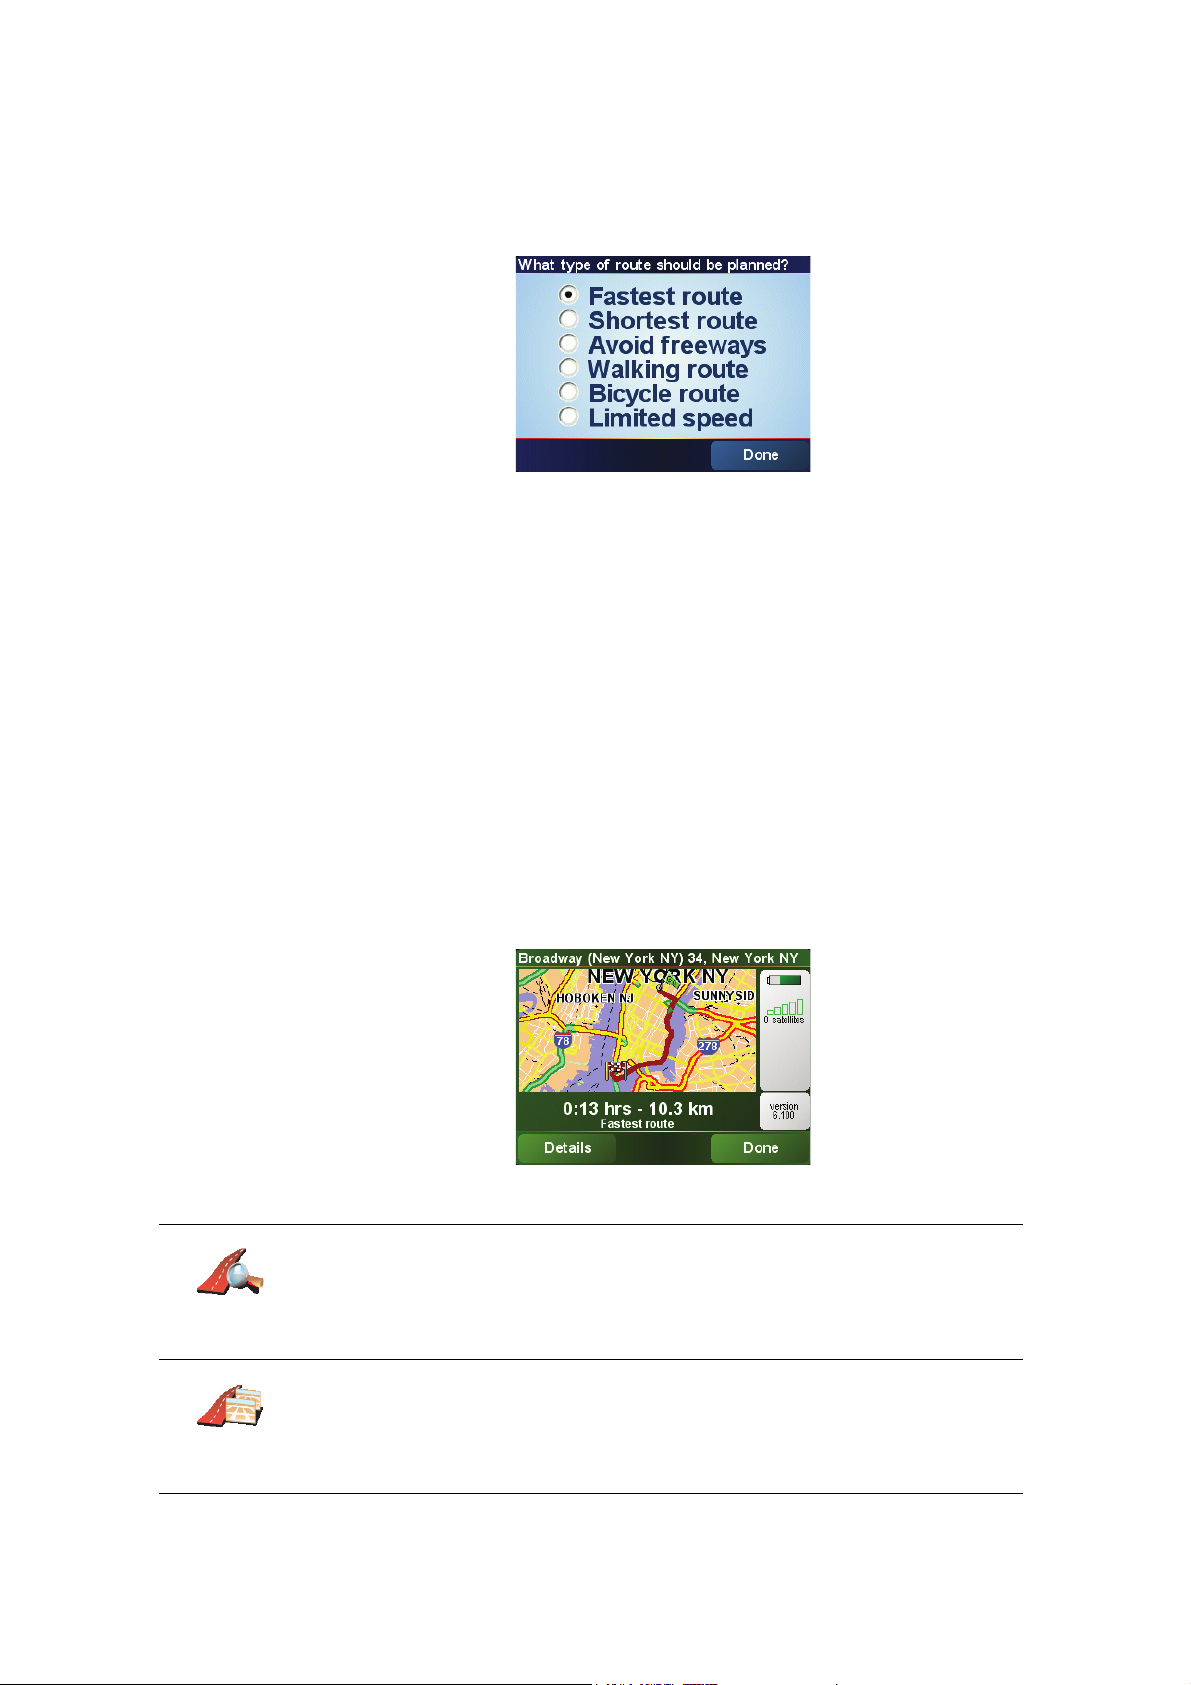
3. Select the starting point for your trip in the same way as you would normally
select your destination.
4. Set the destination for your trip.
5. Choose the type of route that should be planned.
•
Fastest route
- the route which takes the least time.
•
Shortest route
- the shortest distance between the locations you set. This
may not be the quickest route, especially if the shortest route is through a
town or city.
•
Avoid freeways
- a route which avoids freeways.
•
Walking route
- a route designed for making the journey on foot.
•
Bicycle route
- a route designed for making the journey on a bicycle.
•
Limited speed
- a route for a vehicle which can only drive at a limited speed.
You have to specify the maximum speed.
6. Your TomTom ONE plans the route between the two locations you selected.
More information about a route
To find out about your route in detail, tap the
Details
button on the route summary
screen.
You can then select from the following options:
Browse as
text
Tap this button for a list of all the turn instructions on the route.
This is particularly useful if you need to explain a route to someone else.
Browse as
images
Tap this button to see each turn in the trip. Tap the right and left arrows to
move forwards and backwards through the trip.
Tap the screen to turn off the 3D display and view the map from above.
12
Browse map
of route
Tap this button to see an overview of the route using the map browser.
For more information about the map browser, see Using the Map on
page 17.
Show route
demo
Tap this button to watch a demo of the trip. You can interrupt the demo at
any time by tapping the screen.
Show route
summary
Tap this button to open the route summary screen.
Chapter 5
Driving View
13
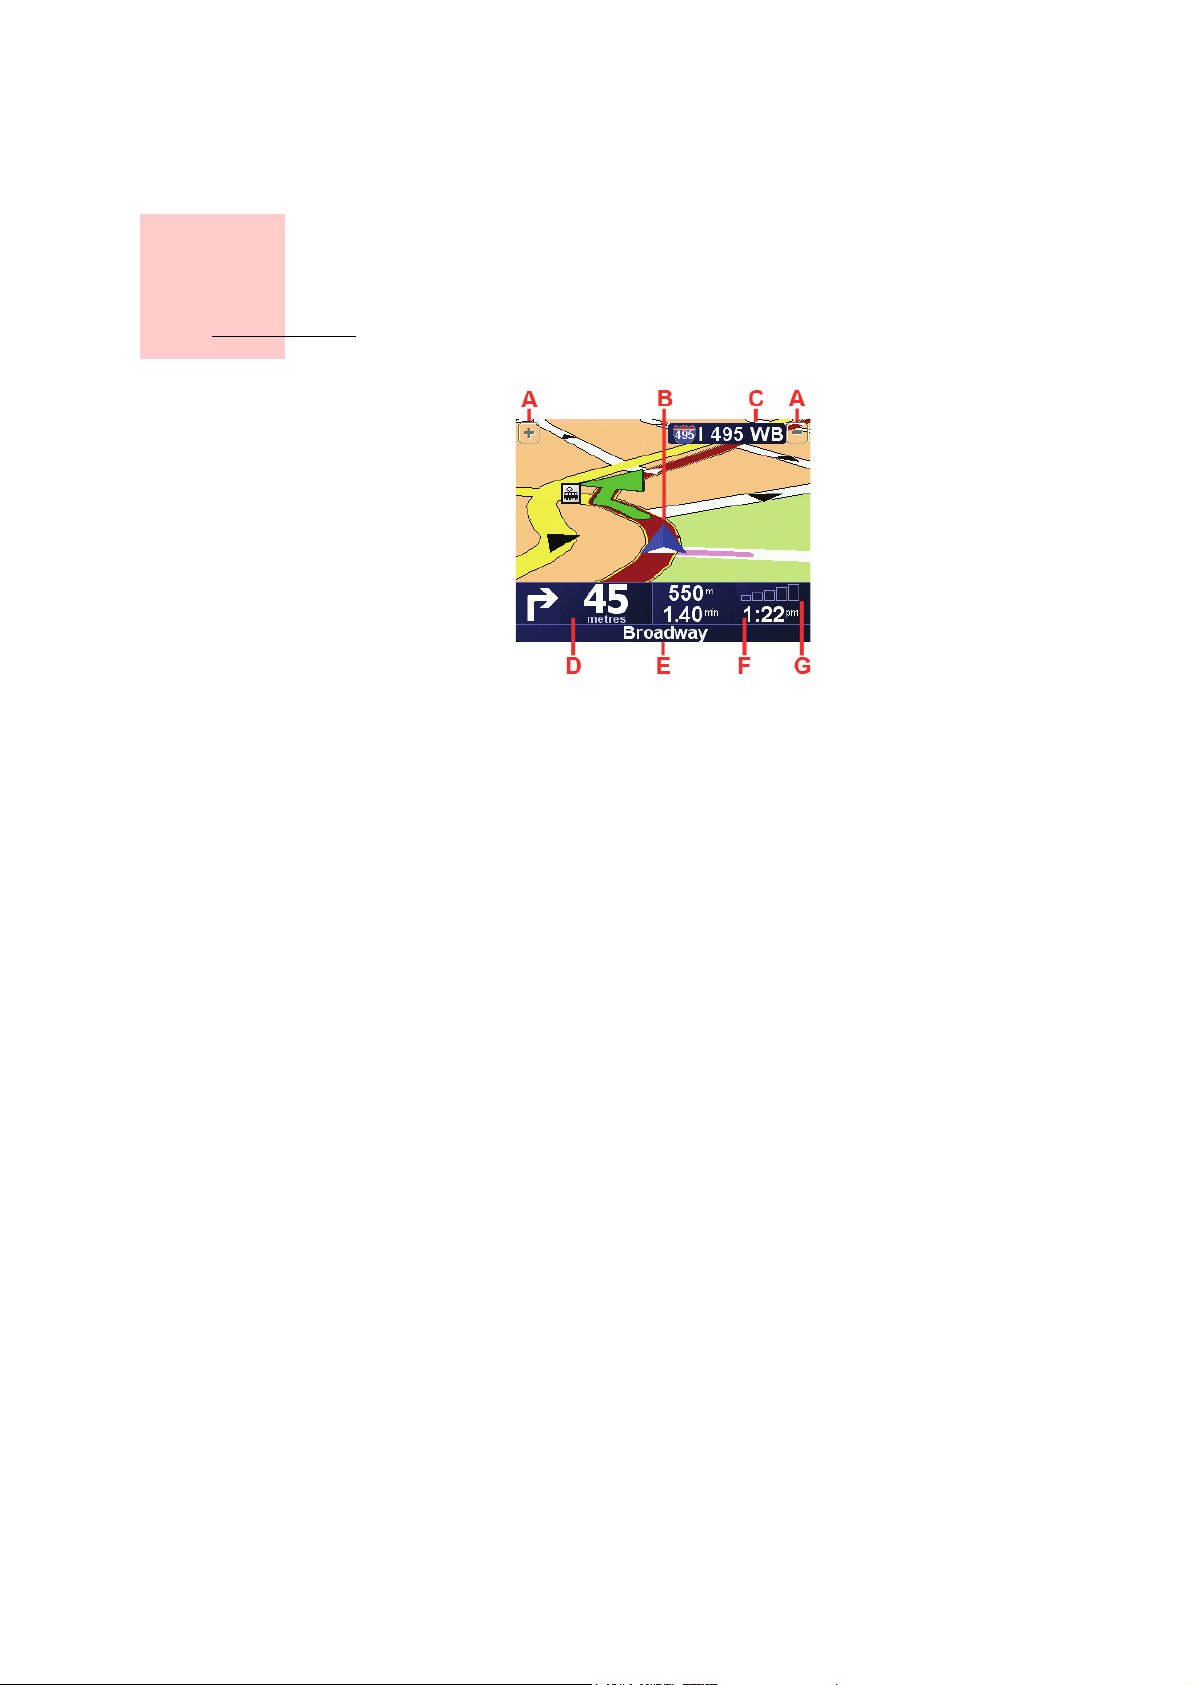
Driving View
A
Buttons to zoom in and zoom out on your position.
B
Your c u r r e n t p o s i t io n .
C
The name of the next major road or road sign information, if applicable.
D
The next instruction.
This area shows you what to do and when you will have to do it.
Tap this area to repeat the last spoken instruction and to change the volume.
E
The name of the next street to turn onto.
F
Information about your trip.
Normally this area shows the remaining trip time, remaining distance, and
arrival time. To set which information is displayed, tap
Status bar preferences
in the
Preferences
menu.
G
Indicator of the strength of the GPS signal.
For more information about GPS, see
How Does Navigation Work?
on
page 46.
Chapter 6
Menus
14
Menus
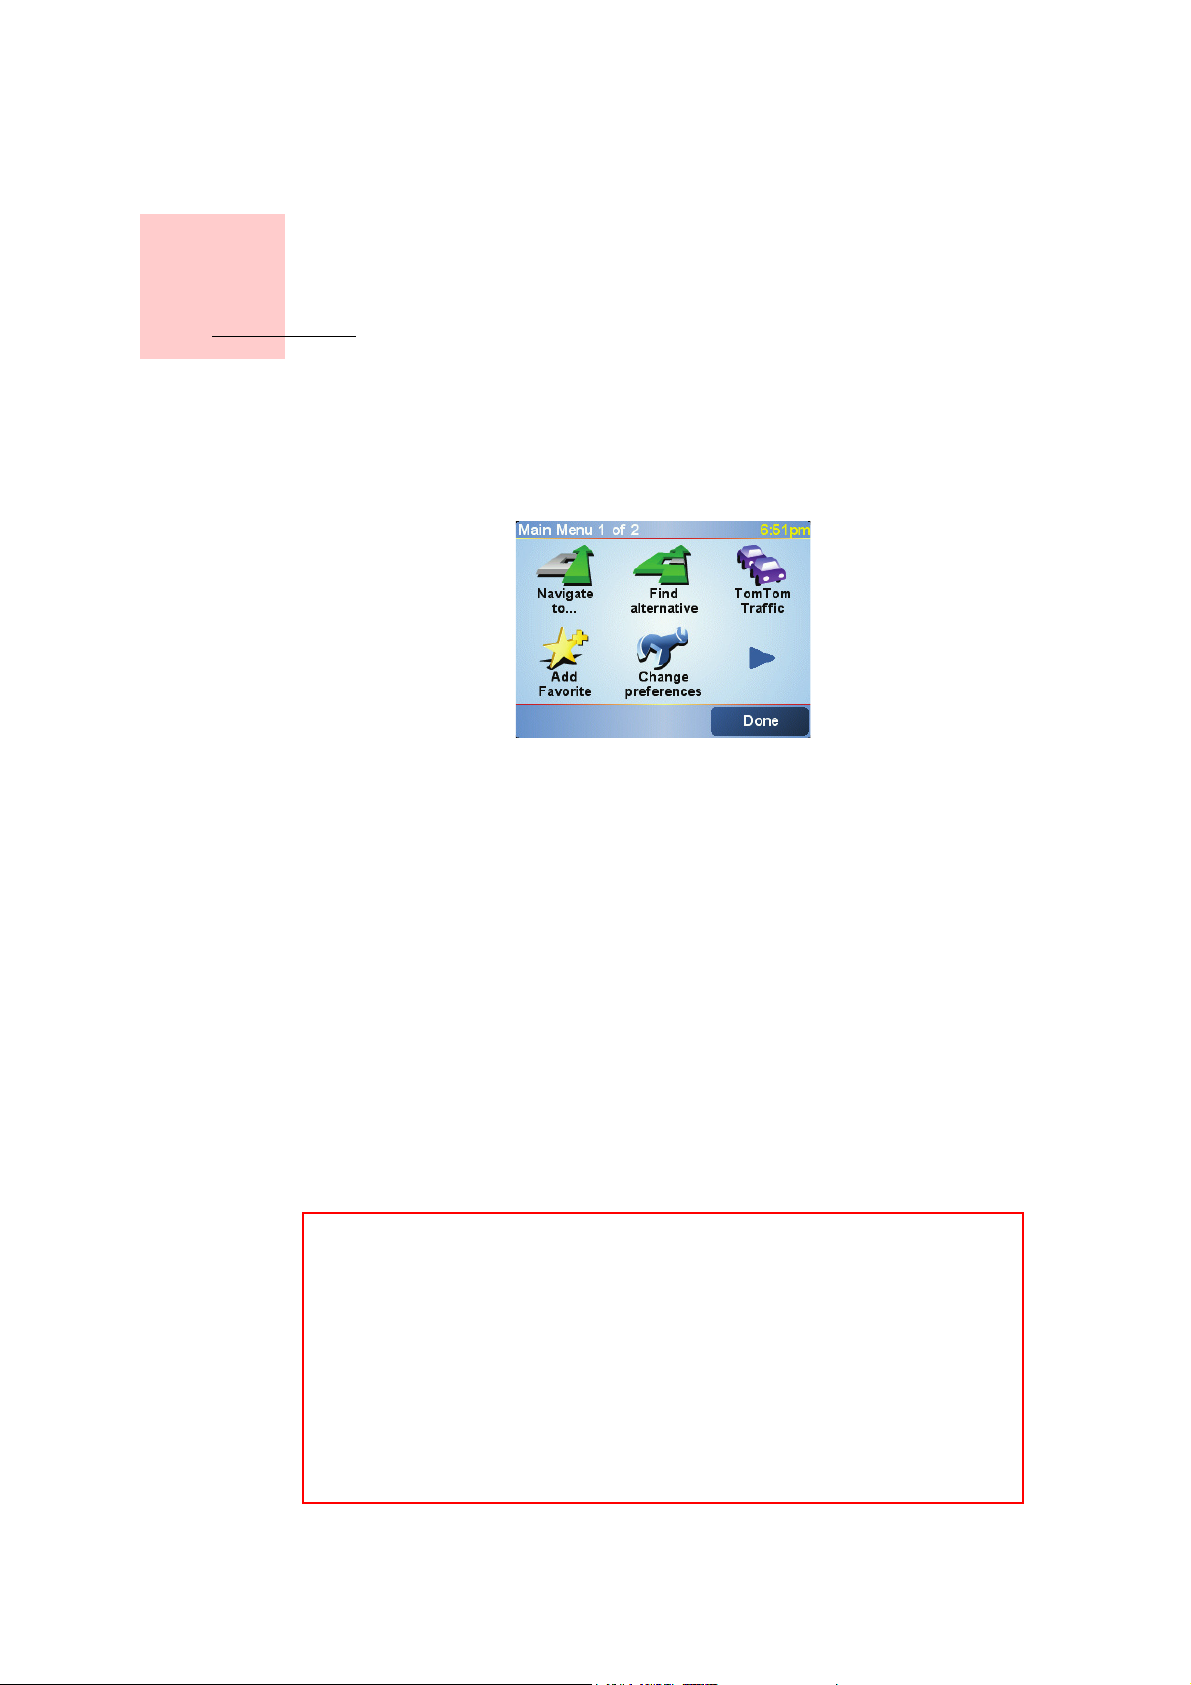
Main menu
Tap the screen at any time when TomTom ONE displays the Driving View to open
the Main Menu.
•
Navigate to...
Tap this button to start planning a route.
•
Find alternative...
Tap this button if you want to avoid part of your route, travel via a specific
location or calculate an alternative route.
•
TomTom Traffic
Tap this button to enable or disable traffic information. For more information,
see
TomTom Traffic
on page 40.
•
Add favorite
Tap this button to create a Favorite.
•
Change preferences
This button opens the Preferences menu. You can change many things about
the way TomTom ONE looks and behaves. For more information, see
Preferences
on page 29.
Hidden buttons and features
When you first start using your TomTom ONE, not all of the buttons will be
displayed in the menu.
Many buttons and some more advanced features are hidden because you
will not need these features very often.
To show all buttons and features, tap Show ALL menu options in the
Preferences menu.
To hide these buttons again, tap Show fewer menu options in the
Preferences menu.
Chapter 7
Finding alternative routes
15
Finding alternative routes
Once you have planned a route, you may want to change something about the
route, without changing your destination.
Why change the route?
Maybe for one of these reasons:
• You can see a roadblock or a line of traffic ahead.
• You want to travel via a particular location, to pick someone up, stop for lunch
or fill up with gas.
• You want to avoid a difficult intersection or a road you don’t like.
Find
alternative...
Ta p Find alternative... in the Main Menu to change the route that is currently
planned.
Then tap one of the options below.
Calculate
alternative
Tap this button to calculate an alternative to the route already planned.
Your ONE will look for another route from your current location to your
destination.
If you decide you would prefer to use the original route after all, tap
Recalculate original.
Why would I need to do this?
Apart from the roads near your position and near your destination, the new
route will use totally different roads to reach your destination. This is an
easy way of calculating a totally different route.
Avoid
roadblock
Tap this button if you can see a roadblock or a line of traffic ahead. You then
have to choose how much of the route ahead you want to avoid.
Choose from the different options: 100m, 500m, 2000m, 5000m. Your ONE
will recalculate your route avoiding the section of the route for the distance
you selected.
Don’t forget that once a new route is calculated, you may have to turn off the
road you are on very soon.
If the roadblock suddenly clears, tap Recalculate original to return to your
original route.
16
Travel vi a...
Tap this button to change your route so that it passes a particular location,
perhaps to pick someone up on the way.
You choose the location you want to pass in the same way as you choose a
destination. So you can select from all the same options: for example,
Address, Favorite, Point of Interest and Point on map.
Your ONE will calculate a new route to your destination that passes the
location you chose.
Using this button, you can only travel via one location. If you want to pass
more than one, use an Itinerary. For more information, see Itinerary
planning on page 26.
Recalculate
original
Tap this button to return to the original route without any deviations for
roadblocks or to travel via particular locations.
Avoid part of
route
Tap this button to avoid a part of the route. Use this button if you see that
your route includes a road or junction you don’t like, or which is well-known
for traffic problems.
You then choose the road you want to avoid from a list of the roads on your
route.
Minimize
traffic delays
Tap this button to recalculate your route so that it avoids traffic problems as
much as possible. Your ONE will check if there are any traffic problems on
your route and work out the best route to avoid the problems.
For more information about using TomTom Traffic, see TomTom Traffic on
page 40.
Loading...