


 Loading...
TomTom GO

1.What’s in the box
aYour TomTom GO
A

 C D
C D
B
J
F
H
I
G


 K E
K E
AMicrophone
BCharging light
COn/off button
DLight sensor
EReset button
FSpeaker
GMemory card slot (SD card not included) for optional additional maps
HUSB connector
ITomTom connector / RDS-TMC connector
JExternal antenna connector
KAudio out connector
bWindscreen holder |
cDocumentation pack |
dCar charger |
eHome dock |
|
|
2
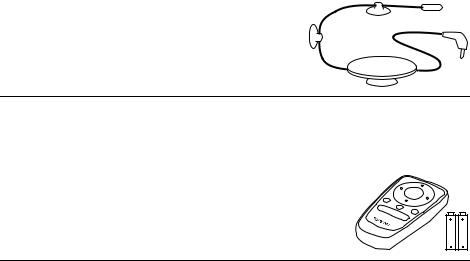
Included with TomTom GO 520T, 720T and 920T
fRDS-TMC Traffic Receiver
Included with TomTom GO 920 and 920T
gRemote control
3

2.Before you start...
Switching on and off
To switch your TomTom GO on or off, press and hold the On/Off button for 2 seconds. The first time you switch on, it may take a short while for your device to start.
Note: In rare cases, your GO may not start correctly. If this happens, press the reset button, then switch on the device again.
Setting up
To set up your TomTom GO you need to answer a few questions by tapping the screen.
Important: Take care to select the correct language, since the language you choose will be used for all menus and written instructions.
Battery notes
We recommend that you fully charge your TomTom GO the first time that you connect it to the Home dock. It takes up to 2 hours to charge the battery completely.
When you place your GO in the Home dock, you are asked if you wish to connect to the computer. If you select No, the device will switch off if you do not tap the screen for three minutes. This happens so that the battery can recharge at a faster rate.
For information on connecting your computer, see Using TomTom HOME (89).
Note: Your TomTom GO uses a small amount of battery power to remember the last screen being shown when the device is switched off.
If you do not charge your GO for a prolonged period of time, the next time you start your GO it will show the default starting screen. All other device settings will still be maintained.
Improving reception
If your TomTom GO takes longer than 5 minutes to find your current position, make sure that the device is in an open space away from tall objects, such as buildings or trees.
4

When you connect your TomTom GO to your computer, you can use TomTom HOME to download information about GPS satellite positions during the next 7 days. This helps your GO to find your position faster.
Important: Some vehicles have heat reflective shielding in the windscreen. This may prevent your GO from locating your current position.
The TomTom External Antenna Kit (available for purchase as an accessory) can help to improve reception.
Windscreen holder
Use the windscreen holder to install your TomTom GO inside your car.
To attach the holder, press the suction cup firmly to the windscreen in your car, in an area of the windscreen where the glass is flat.
Make sure that both the holder and your windscreen are clean and dry before you attach the holder. Place the holder so that it does not interfere with your view of the road.
Home dock
The Home dock is used for charging your TomTom GO when it is not in the car and for connecting your GO to your computer.
When connected to your computer, you can use TomTom HOME to manage your GO. For information about TomTom HOME, see Using TomTom HOME (89).
Take care of your TomTom GO
Never leave your TomTom GO or accessories on view when you leave the car or they may become an easy target for thieves.
You can set a password for your TomTom GO which must be entered every time you start your GO. For more information, see Using TomTom HOME (89).
It is important to take care of your GO.
•Your GO is not designed for use in extreme temperatures and any such exposure may cause permanent damage.
•Do not open the casing of your GO under any circumstances. Doing so may be dangerous and will invalidate the warranty.
•Wipe or dry the screen of your GO using a soft cloth. Do not use any liquid cleaners.
5

3.Driving View
When your TomTom GO starts, you are shown the Driving View along with detailed information about your current location.
Tap the centre of the screen at any time to open the Main Menu.
Note: The Driving View is shown in black and white until your GO locates your current position.
ATap + and - to zoom in and out. BYour current position.
CThe name of the next major road or road sign information, if applicable. DNavigation instruction for the road ahead.
Tap this area to repeat the last spoken instruction and to change the volume.
EThe name of the next street to turn onto.
FInformation about your journey such as journey time, remaining distance and arrival time.
To select what will be shown, tap Status bar preferences in the Preferences menu.
GGPS signal strength. HTraffic bar
To set up Traffic information, tap the Traffic bar to open the Traffic menu or tap TomTom Traffic in the Main Menu.
IQuick menu - For more information, refer to the full manual.
6

4.Enhanced Positioning Technology
Note: Enhanced Positioning Technology is available on the TomTom GO 920 and 920T.
Enhanced Positioning Technology or EPT estimates your location when GPS reception is poor, such as when you drive between tall buildings.
Your GO uses positioning sensors to monitor your acceleration and direction and then estimates your current location.
EPT only helps your GO to estimate your location. Calculating your precise location is only possible when your GO receives a strong GPS signal.
When your GO is using EPT to estimate your location, the EPT icon is shown on the status bar.
Your GO calibrates EPT automatically. If calibration is not complete when your GO loses GPS reception, EPT cannot be used and the screen is shown in grey, for example, when there is no GPS reception at the beginning of a journey.
AEPT icon.
BYour current position.
Calibration
Calibration is done automatically and requires no interaction from you. However, it is useful to have basic understanding of the calibration procedure.
Your TomTom GO resets the positioning sensors each time the device is switched on. To help improve accuracy in estimating your location, your GO calibrates the sensors throughout your journey.
The following conditions are required for successful calibration:
•Your GO is receiving a strong GPS signal.
•The car has been stationary for at least 5 seconds and then travels along a straight and level section of road for at least one minute.
7
5.Making your first journey
Planning a route with your TomTom GO is easy. To plan your first route, follow the steps below.
Important: You should always plan your journey before you start driving. It is dangerous to plan a route while driving.
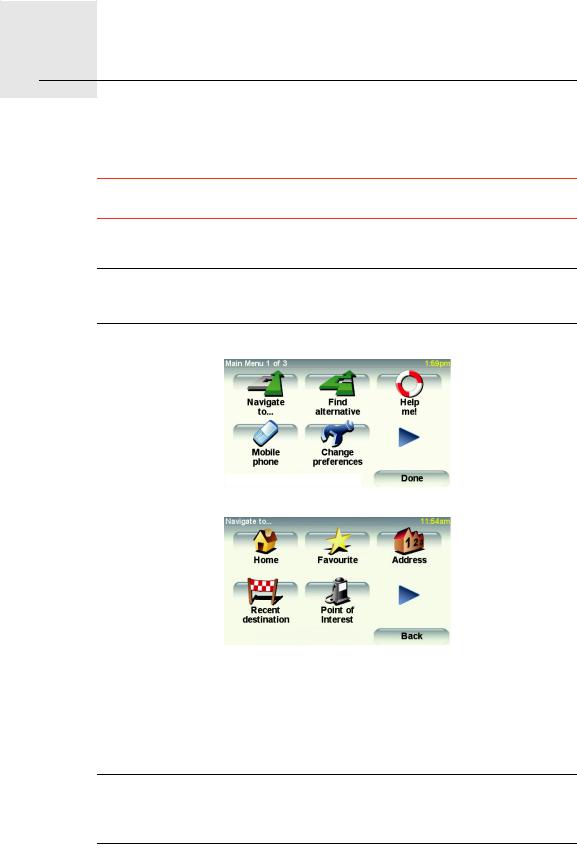
1. Tap the screen to bring up the Main Menu.
Note: The buttons on your GO are shown in full colour unless a button is currently unavailable. For example, the button named Find alternative... in the Main Menu is not available until you have planned a route.
2.Tap Navigate to...
3.Tap Address.
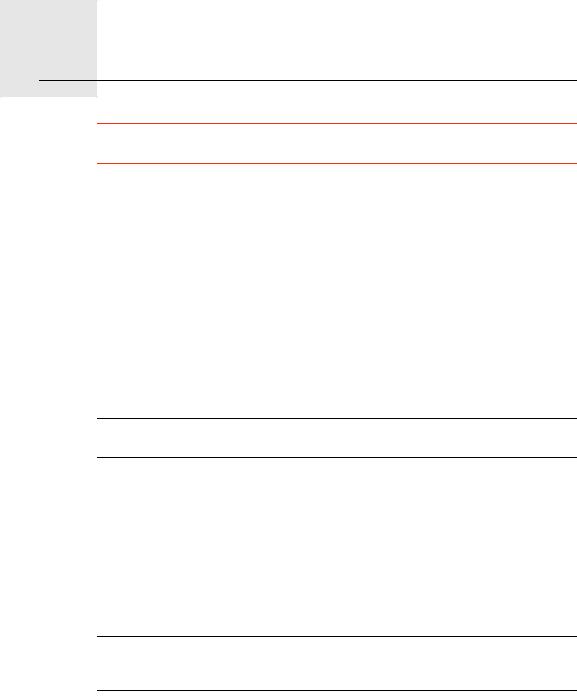
When you enter an address, you can choose from the following options:
•City centre - tap this button to set your destination as the centre of a city or town.
•Street and house number - tap this button to set an exact address as your destination.
•Postcode - tap this button to enter a postcode as your destination.
Note: You can enter a postcode for any country. In the UK and the Netherlands, postcodes are detailed enough to identify a house on their own. In other countries you can enter a postcode to identify a town or area. You will then have to enter a street and house number.
8
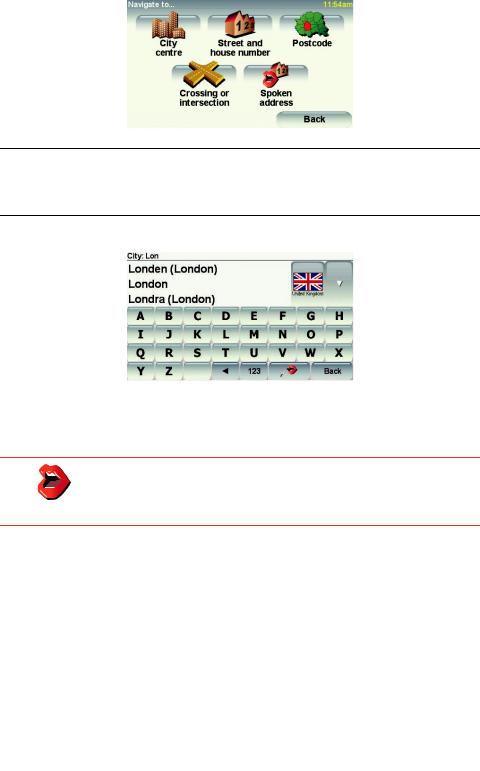
•Crossing or intersection - tap this button to set your destination as the point where two streets meet.
•Spoken address - tap this button to set your destination by announcing the address to your GO. For more information, see Spoken address (21).
For your first journey, we will enter an exact address. 4. Tap Street and house number.
Note: When planning a trip for the first time your GO asks you to choose a country. Your choice is saved and used for all routes you plan.
You can change this setting at any time by tapping the country flag.
5. Start to type the name of the town where you want to go.
As you type, the names of the towns that match what you have typed are shown. When your destination appears in the list, tap the name of the town to set the destination.
Tip: Instead of typing the name, tap this button to say the address by speaking to your GO.
For more information, see Spoken address (21)
6.Start to type the name of the street and select it when it is shown.
As with the name of the town, the names of the streets that match what you have typed are shown. When your destination appears in the list, tap the name of the street to set the destination.
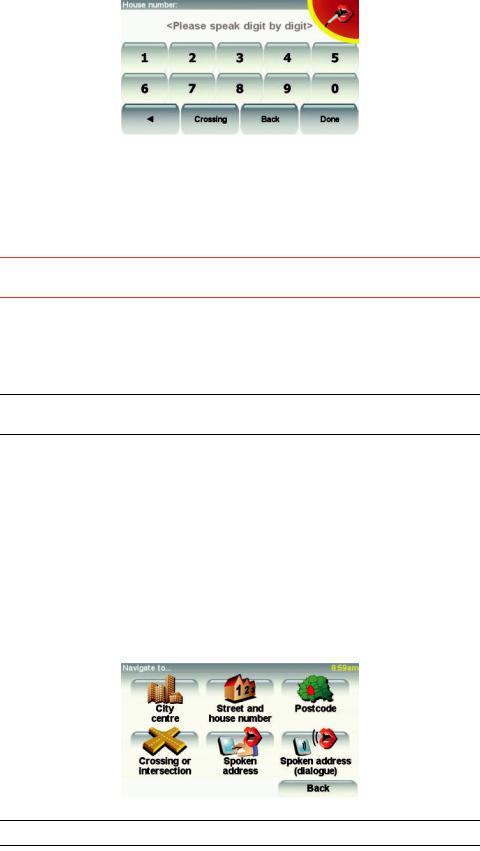
7.Now enter the house number of your destination and then tap Done.
8.Your GO asks if you need to arrive at a particular time. For this exercise, tap
NO.
9

The route is calculated by your GO.
9. When the route has been calculated, tap Done.
Your GO will immediately begin to guide you to your destination, using both spoken instructions and on-screen directions.
Arrival times
Status bar preferences
When you plan a route, your TomTom GO asks you if you need to arrive at a particular time.
Tap YES to enter a preferred arrival time.
Your GO calculates your arrival time and shows you whether you will arrive on time.
You can also use this information to work out when you need to leave. If your GO shows that you will arrive 30 minutes early, you can wait and leave in 30 minutes time, rather than arrive early.
Your arrival time is constantly recalculated during your journey. The status bar shows whether you will arrive on time or if you are going to be late, as shown below:
You will arrive 55 minutes before the arrival time you entered.
If the estimated arrival time is more than five minutes before the time you entered, it is shown in green.
You will arrive 3 minutes before the arrival time you entered.
If the estimated arrival time is less than 5 minutes before the time you entered, it is shown in yellow.
You will arrive 19 minutes late.
If the estimated arrival time is later than the time you entered, it is shown in red.
Tap Status bar preferences in the Preferences menu, to enable or disable arrival time notifications.
Select the required options on the first menu screen and then tap Done. To enable arrival time notifications, select Show leeway to arrival time. To disable arrival time notifications, unselect Show leeway to arrival time.
10
What are the other navigation options?
When you tap Navigate to..., you can set your destination in many ways, not just by entering the address. The other options are listed below:
Tap this button to navigate to your Home location.
You will probably use this button more than any other.
Home |
For information about setting your Home location, see Change Home |
|
location (52). |
|
|
|
Tap this button to select a Favourite as your destination. |
|
For more information about Favourites, see Favourites (32). |
Favourite
Tap this button to enter an address as your destination.
 1
1
2
3
Address
Tap this button to select your destination from a list of places you have recently used as destinations.
Recent destination
Tap this button to navigate to a Point of Interest (POI).
For more information about POIs and navigating to a POI, see Points of
Interest (38).
Point of
Interest
Tap this button to select your GPS position, as your destination.
For more information about GPS, see Global Positioning System (GPS) (88).
GPS position
Tap this button to select a point on the map as your destination using the
map browser.
Point on map For more information about the map browser, see Driving View (6).
Tap this button to enter a destination using latitude and longitude values.
Latitude
Longitude
Tap this button to navigate to the current position of a TomTom Buddy. Don’t forget that the Buddy may move before you reach him.
TomTom
For more information about TomTom Buddies, see TomTom PLUS (65).
Buddy
11

Tap this button to select your last recorded position, as your destination.
|
For more information about the GPS, see Global Positioning System (GPS) |
Position of |
(88). |
last stop |
|
Spoken address
|
Instead of typing addresses, you can now enter an address by speaking to |
|
your GO. |
|
|
|
Note: The speech recognition feature is currently only available for entering |
|
addresses and for responding to special notifications. |
|
|
|
|
|
In the Main menu tap Navigate to..., then tap Address, then tap Spoken |
|
address or Spoken address (dialogue) and speak when prompted. |
Spoken |
For more information, see Spoken address (21) |
address |
|
Spoken address (dialogue)
Planning a route in advance
You can also use your GO to plan journeys in advance by selecting both your starting point and your destination. You could, for example, do the following:
•Find out how long a journey is going to take before you start.
•Check the route of a journey you are planning.
•Check a route for someone who is coming to visit you, so that you can explain the route to them.
To plan a route in advance, follow these steps:
1.Tap the screen to bring up the main menu.
2.Tap the arrow button to move to the next menu screen and tap Prepare route.
Prepare route
3.Select the starting point for your journey in the same way that you would select your destination.
4.Set the destination for your journey.
5.Choose the type of route that should be planned.
•Fastest route - the route which takes the least time.
•Shortest route - the shortest distance between the locations you set. This may not be the quickest route, especially if the shortest route is through a town or city.
12

•Avoid motorways - a route which avoids motorways.
•Walking route - a route designed for making the journey on foot.
•Bicycle route - a route designed for making the journey on a bicycle.
•Limited speed - a route for a vehicle which can only be driven at a limited speed. You have to specify the maximum speed.
6.Your TomTom GO plans the route between the two locations you selected.
More information about a route
You can access these options for the route you last planned, by tapping View route in the Main Menu.
To find out about your route in detail, tap the Details button on the route summary screen.
You can then select from the following options:
Tap this button for a list of all the turn instructions on the route.
This is very useful if you need to explain a route to someone else.
Browse as text
|
Tap this button to see each turn in the journey. Tap the right and left arrows |
|
to move forwards and backwards through the journey. |
Browse as |
Tap the screen to turn off the 3D display and view the map from above. |
images |
|
Tap this button to see an overview of the route using the map browser.
For more information about the map browser, see Driving View (6).
Browse map of route
Tap this button to watch a demo of the journey. You can interrupt the demo at any time by tapping the screen.
Show route demo
Tap this button to open the route summary screen.
Show route summary
13
6.Finding alternative routes
Once you have planned a route, you may want to change something about the route, without changing your destination.
Why change the route?
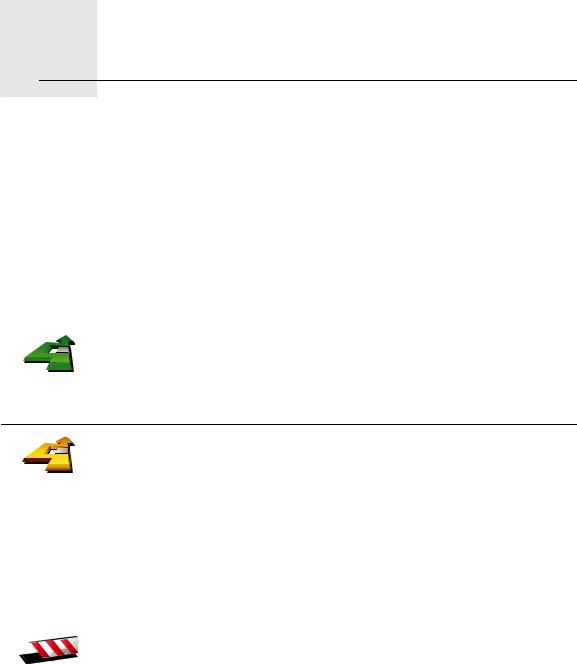
Find alterna-
tive...
Maybe for one of these reasons:
•You can see a roadblock or a line of traffic ahead.
•You want to travel via a particular location, to pick someone up, stop for lunch or fill up with petrol.
•You want to avoid a difficult junction or a road you don’t like.
Tap Find alternative... in the Main Menu to change the route that is currently planned.
Then tap one of the options below.
Calculate alternative
Tap this button to calculate an alternative to the route already planned.
Your GO will look for another route from your current location to your destination.
If you decide you would prefer to use the original route after all, tap
Recalculate original.
Why would I need to do this?
|
Apart from the roads near your position and near your destination, the new |
|
route will use totally different roads to reach your destination. This is an |
|
easy way of calculating a totally different route. |
|
|
|
Tap this button if you can see a roadblock or a line of traffic ahead. You then |
|
have to choose how much of the route ahead you want to avoid. |
Avoid |
Choose from the different options: 100m, 500m, 2000m, 5000m. Your GO |
roadblock |
will recalculate your route avoiding the section of the route for the distance |
|
you selected. |
|
Don’t forget that once a new route is calculated, you may have to turn off |
|
the road you are on very soon. |
|
If the roadblock suddenly clears, tap Recalculate original to return to your |
|
original route. |
|
|
14

|
Tap this button to change your route so that it passes a particular location, |
|
perhaps to pick someone up on the way. |
Travel via... |
You choose the location you want to pass in the same way as you choose a |
|
destination. So you can select from all the same options: for example, |
|
Address, Favourite, Point of Interest and Point on map. |
|
Your GO will calculate a new route to your destination that passes the |
|
location you chose. |
|
Using this button, you can only travel via one location. If you want to pass |
|
more than one, use an Itinerary. For more information, see Itinerary |
|
planning (43). |
|
|
|
Tap this button to return to the original route without deviations to avoid |
|
roadblocks or travelling via particular locations. |
Recalculate |
|
original |
|
|
|
|
Tap this button to avoid a part of the route. Use this button if you see that |
|
your route includes a road or junction you don’t like, or which is well- |
|
known for traffic problems. |
Avoid part of |
You then choose the road you want to avoid from a list of the roads on your |
route |
|
|
route. |
|
|
|
Tap this button to recalculate your route so that it avoids traffic problems as |
|
much as possible. Your GO will check if there are any traffic problems on |
|
your route and work out the best route to avoid the problems. |
Minimise |
For more information about using TomTom Traffic, see TomTom Traffic |
traffic delays |
(73). |
|
|
|
|
15

7.Sounds and voices
The sound on your TomTom GO is used for features such as:
•Spoken instructions
•Hands-free calls
•Warnings
•Music
For information on making hands-free calls on your GO, see Hands-free calling (46).
For information on playing music on your GO, see Music and media (26)
How do I change the volume level?
You can change the volume in three ways:
•Tap the bottom left hand area of the Driving View. The last spoken instruction is repeated and the volume level is shown.
Move the volume slider to adjust the volume.
•In the Main Menu, tap Change preferences, then tap Volume preferences. Tap Test to check your changes.
•You can set your GO to change the volume automatically depending on how noisy it is in the car.
Changing the volume automatically
Volume preferences
Your TomTom GO can change the volume automatically.
1.In the Main Menu, tap Change preferences.
2.Tap Volume preferences.
3.Select Link volume to noise level.
4.Tap Done.
16

Selecting a voice
|
To change the voice being used by your TomTom GO, tap Change voice in |
|
the Preferences menu and select a voice from the list. |
|
Your TomTom GO has two different kinds of voices: |
Change voice |
• Computer voices |
|
These are generated by your GO. They provide spoken instructions |
|
while you are driving and can pronounce street names and announce |
|
messages, traffic reports, weather reports, tips and tutorials. |
|
• Human voices |
|
These are recorded by an actor. |
|
|
|
Note: Human voices only provide spoken instructions. |
|
|
|
|
How do computer voices work?
Your TomTom GO makes use of text-to-speech technology to generate computer voices. A text-to-speech program converts written text, for example an instruction like “Turn right”, into the sound of a human voice.
The text-to-speech program looks at the whole sentence to make sure that the sound you hear is as close to the real thing as possible. The program is also able to recognise and quite accurately pronounce foreign place and street names. For example, the English voice can read French street names.
Note: If you select a Human voice, this will only be able to announce commands, but not street names. If you would like street names to be announced, you will need to select a computer voice.
Internal and external speakers
Your TomTom GO contains a high quality speaker. This is used to play all the sounds on your GO unless you connect to external speakers.
You can connect external speakers to your GO in the following ways:
• Using an audio cable.
Note: If your car stereo has a line-in connector, you can play sound from your GO through your car speakers.
•Connecting a Bluetooth® Hi-Fi headset or speakers.
•Tuning the FM Transmitter in your GO to use your car radio speakers.
FM transmitter
There is an FM Transmitter inside your GO that works like a radio station. This means you can hear the instructions made by your GO and play your mp3 songs through your car radio speakers.
Setting up
• In the Main Menu tap Change preferences, then tap Speaker preferences.
17

•Switch on your car radio.
•Tune your car radio to a frequency that is not being used by a radio station.
•Tap Change and set the frequency on your GO to use the same frequency as your car radio.
If you drive into an area where a radio station transmits on the same frequency you are using for the FM Transmitter, you may have to use another frequency.
Using more than one speaker
You can select different speakers to be used for specific events, such as using the internal speaker for TomTom GO instructions and external speakers for hearing handsfree phone calls and listening to music.
•Internal speaker
•Bluetooth Hi-Fi device
•Line-out (audio cable)
•FM to your car radio
Is it difficult to hear spoken instructions when music is playing?
When you choose to use a Bluetooth® Hi-Fi device for music and spoken instructions, you are asked if you want to pause music when spoken instructions are announced. By default, music is always paused for spoken instructions.
When you receive a hands-free phonecall, music is always paused and spoken instructions are not given.
For information about making hands-free calls on your GO, see Hands-free calling (46).
Using the audio cable
To play sound through your car stereo or other external speaker using an audio cable, do the following:
1.Plug the audio cable into the audio out connector on your GO.
2.Plug the audio cable into the line in connector on your car stereo or other external speaker.
Note: Not all car stereos have a line in connector. Check the manual for your car stereo for specific information.
3.If you are using your car stereo, select line in connector on your car stereo as the input source.
4.On your GO, tap Speaker preferences in the Preferences menu. Tap this button to change the speaker settings.
Speaker preferences
5.Select the speaker you want your GO to use for announcing instructions.
• Internal speaker
18

•Bluetooth Hi-Fi device
•Line-out (audio cable)
•FM to your car radio
6.Select the speaker you want your GO to use for playing music.
•Internal speaker
•Bluetooth Hi-Fi device
•Line-out (audio cable)
•FM to your car radio
7.Tap Done.
8.Your GO asks you whether you want to use an external Bluetooth® Hi-Fi speaker. Tap NO.
Your GO will confirm that when the device is connected, the sound you have selected will be played through the audio cable.
Note: You cannot listen to your car stereo and use the audio cable to play sound from your GO on the car stereo at the same time.
For information about listening to music using your GO, see Music and media (26).
Using Bluetooth® Hi-Fi speakers
Your GO can play sound through Bluetooth® Hi-Fi speakers, such as a Bluetooth® Hi-Fi headset, or a car stereo which uses Bluetooth®.
To play sound over Bluetooth® Hi-Fi speakers, do the following:
1.Tap Speaker preferences in the Preferences menu. Tap this button to change the speaker settings.
Speaker preferences
2.Select the speaker you want your GO to use for announcing instructions.
•Internal speaker
•Bluetooth Hi-Fi device
•Line-out (audio cable)
•FM to your car radio
3.Select the speaker you want your GO to use for playing music.
•Internal speaker
•Bluetooth Hi-Fi device
•Line-out (audio cable)
•FM to your car radio
4.Tap Done.
5.Your GO asks you to confirm that you want to use an external Bluetooth® Hi-Fi speaker. Tap YES.
Your GO will start searching for Bluetooth® Hi-Fi devices.
6.Select your Bluetooth® Hi-Fi device from the list of devices found by your GO.
Your GO will try to establish a Bluetooth® connection with your device.
19
Your device may require you to enter a password on your GO before a Bluetooth® connection can be established. See the documentation for your Bluetooth® Hi-Fi device for more information.
Once connected, sound will be played through the external Bluetooth® Hi-Fi device.
If your GO cannot establish a Bluetooth® connection then all sound will be played through the internal speaker or through the audio cable if it is connected to an external audio device with speakers.
20
8.Spoken address
Spoken address (dialogue)
Spoken address
Important: You should always plan your journey before you start driving. It is dangerous to plan a route while driving.
When you plan a journey with your TomTom GO, instead of tapping the screen to type in an address, you can use speech recognition to say the address.
Tap this button to enter an address using only speech. Using this option, your GO can recognise the following:
•Commands: Yes, No, Back, Done, OK, Crossing.
•Street names.
•Place names.
•Numbers: Numbers should be pronounced as individual numerals. For example, to say the number 35, say, "Three" and then say, "Five."
Using Spoken address (dialogue), you can enter information without tapping the screen.
Tap this button to enter an address using both speech and by tapping the screen. Using this option your GO can recognise the following:
•Street names.
•Place names.
Using Spoken address is typically faster than using Spoken address (dialogue).
When this button is shown on the keyboard you can enter information by speaking instead of typing. Tap this button to enter information using speech recognition.
Tip: When this button is shown in grey, you cannot use speech to enter an address.
Your GO recognises place and street names spoken using the local language and pronunciation.
It is not possible to using speech recognition to say place and street names in all countries.
21

Speaking to your TomTom GO
When any of the following symbols are shown on the screen, it is possible to enter information using speech.
Sound level correct - When the recording level is shown in green, the device hears your voice at the correct level.
Sound level low - When the recording level is shown in yellow, the device has difficulty in hearing your voice. This may mean that you need to speak more loudly or move closer to the device.
Sound level high - When the recording level is shown in red, the device has difficulty in hearing your voice. This may mean that there is too much background noise or that you are speaking too loud.
Planning a journey using speech recognition
Important: You should always plan your journey before you start driving. It is dangerous to plan a route while driving.
To plan a route using speech, do the following: 1. Tap Navigate to... in the Main menu.
2. Tap Address.
For this example, we will navigate to an address using only speech to enter the address.
3. Tap Spoken address (dialogue).
22

4. Say the city name.
When you say the city name, you are then shown a list of six names that match what you said.
Your GO tells you the name at the top of the list. If the name you hear is correct, then say, "Done" or "OK" or "Yes" or "One" or tap on the name.
If the city name you hear is not correct, but the name appears in the list, then say the number next to the correct name or tap on the correct name.
For example, if the correct name is Rotterdam and this name is number two in the list, you could say, "Two" or tap on the name, Rotterdam.
If the city name is not shown in the list, then say "Back" or "No" or tap the Back button to return to the previous screen. Then say the city name again.
Note: You need to say numbers in the same language that is used for menu buttons.
5.Say the street name.
As with city name, you are then shown a list of six names that closely match what you said.
Your GO tells you the name at the top of the list. If the name you hear is correct, then say, "Done" or "OK" or "Yes" or "One" or tap on the name.
Note: Different locations may have similar names, such as a road that has multiple postcode locations. In such cases, all of these locations are shown in the list and you need to look at the screen and select the correct location.
If the street name you hear is not correct, but the name appears in the list, then say the number next to the correct name or tap on the name.
For example, if the correct name is Rembrandtplein and this name is number three in the list, you could say, "Three" or tap on the name, Rembrandtplein.
For example, looking at the list shown here, if the correct name is Rembrandtplein, you could say, "Two" or tap on the name, Rembrandtplein.
23
If the street name is not shown in the list, then say "Back" or "No" or tap the Back button to return to the previous screen. Then say the street name again.
6. Say the house number.
Numbers should be pronounced as individual numerals, but without waiting in between each digit. For example, you would say the number 357 as one continuous sentence, "Three, five, seven,".
If the number is shown incorrectly, say, "Back" or "No" or tap the Backspace key. Then say the number again.
Tip: If you say, "Back" when there are no numbers shown on the screen, then your GO will return you to the previous screen.
When the number is shown correctly say, "Done" or "OK." Alternatively, enter the number by tapping the screen.
To select a crossroads as the location, say, "Crossing".
Note: You need to say numbers in the same language that is used for menu buttons.
7.Your GO asks if you need to arrive at a particular time. For this exercise, tap
NO.
The route is calculated by your GO.
8.When the route has been calculated, tap Done.
More ways to speak to your TomTom GO
There are various ways to enter an address using speech.
To see the options available, Tap Navigate to... in the Main menu and then tap
Address.
Note: Postcode address entry is not possible using speech.
24
•City centre - to say the centre of a city or town, tap this button and then tap the speech button at the bottom of the keyboard on the next screen.
•Street and house number - to say an address, tap this button and then tap the speech button at the bottom of the keyboard on the next screen.
•Crossing or intersection - to say the point where two streets meet, tap this button and then tap the speech button at the bottom of the keyboard on the next screen.
•Spoken address - tap this button to enter an address using speech and by tapping the screen.
•Spoken address (dialogue) - tap this button to enter an address only using speech. You can still tap the screen for entering certain details if you prefer.
25
9.Music and media
Important: Only select music and media when you are stationary. It is dangerous to select songs and make adjustments while you are driving.
Your TomTom GO can play mp3 audio files and Audible® Audiobooks and display HTML and text documents and photos.
Putting music and photos on your GO
Transfer music files and photos to your TomTom GO from your computer using TomTom HOME.
For information about using TomTom HOME, Using TomTom HOME (89)
Playing music and audiobooks
1.Tap Music and media in the Main Menu.
2.Tap TomTom Jukebox to start the Jukebox.
Note: You can create playlists using a third-party application like iTunes, Musicmatch or Winamp.
•Playlist - tap this button to select a playlist.
•Artist - tap this button to select a song by a particular singer or group.
•Album - tap this button to select from a list of all the albums on your GO.
•Song - tap this button to select from all the songs on your GO.
•Genre - tap this button to select a particular type of music.
•Audiobooks - tap this button to select an Audiobook.
Note: Not all mp3 files contain information about the song, such as the artist or genre. If the file contains no information, the file name is used as the song title.
Now playing
As soon as you choose a song or Audiobook, your TomTom GO starts playing that song, followed by the rest of the songs on the list.
26

A B
C D E D F
AInformation about the song.
BVolume - change the volume by moving the slider.
CThe Options button. You can, for example, choose to repeat a song and shuffle the songs. You can change these options:
•Shuffle songs - the next song is selected randomly.
•Repeat song - repeat the current song.
•Reduce brightness - brightness is only reduced on the playing screen.
•Show music button in Driving View - enables fast access to your music.
•Automatically switch to Driving view - when a song begins playing, the Driving View is shown.
•Slideshow - your photos are shown while your music is playing..
DGo to the previous or next song. EPlay or Pause the selected song.
FTap the Back button to go back to the TomTom Jukebox player. The music will continue to play unless you tap the button Playing... in the Jukebox to stop the music.
When you listen to Audiobooks, there are also buttons for going to the next and previous chapter. When you stop listening to an Audiobook, your GO remembers where you stopped.
To find out more about Audiobooks, go to the shop area in TomTom HOME.
FM transmitter
There is an FM Transmitter inside your GO that works like a radio station. This means you can hear the instructions made by your GO and play your mp3 songs through your car radio speakers.
Getting started
•In the Main Menu tap Change preferences, then tap Speaker preferences.
•Switch on your car radio.
•Tune your car radio to a frequency that is not being used by a radio station.
•Tap Change and set the frequency on your GO to use the same frequency as your car radio.
If you drive into an area where a radio station transmits on the same frequency you are using for the FM Transmitter, you may have to use another frequency.
Using your iPod® with your TomTom GO
You can connect your iPod to your GO with the TomTom iPod Connect Cable, which is available as an accessory.
27
You can then control your iPod from your GO. Sound from your iPod will be played over the internal speaker in your GO, or an external speaker if selected.
For more information about using different speakers, see Internal and external speakers (17).
To use your iPod with your GO, do the following:
1.Plug the iPod Connect Cable into your iPod and into the windscreen dock.
2.In the Main Menu, tap Music and Media and then iPod control.
3.Follow the instructions on the screen to finish the connection.
You can now control your iPod through your GO. You select songs using the same buttons shown above in Playing music and audiobooks.
Looking at photos
1.Tap Music and media in the Main Menu.
2.Tap Photo gallery.
The Photo gallery starts, showing small versions (thumbnails) of all the photos on your GO.
Tap the arrows to move up and down the page of thumbnails.
Tap Slideshow to start a slideshow.
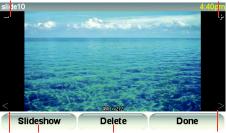
Tap the thumbnail of a photo to view a large version of that photo.
A A
B C D B
AButtons to zoom in and zoom out on the photo.
BButtons to move to the next and the previous photo.
CTap Slideshow to start a slideshow.
DTap Delete to delete a photo.
28

10.Help me!
Help me! provides an easy way to navigate to emergency services centres and other specialist services and contact them by phone.
For example, if you are involved in a car accident, you could use Help me! to call the nearest hospital and tell them your exact location.
Tip: If you do not see the Help me! button in the Main Menu, tap Show ALL menu options in the Preferences menu.
How do I use Help me! to phone a local service?
You can use Help me! to find and make contact with a service centre.
When you select a service centre, your current location and the phone number of the POI are shown.
If your phone is connected to your GO, your current location and the service centre phone number are shown, and your TomTom GO automatically prepares for making a phone call. The phone call will only be dialled, when you tap Dial.
If your phone is not connected, your current location and the service centre phone number are shown, but your TomTom GO does not prepare for making a phone call.
To use Help me! to locate a service centre, contact the centre by phone and navigate from your current location to the centre, do the following:
1.Tap the screen to bring up the Main Menu.
2.Tap Help me!
3.Tap Phone for help.
4.Select the type of service you require, for example, Nearest hospital.
5.Select a centre from the list, the nearest is shown at the top of the list.
Your GO shows the location of the service centre on the map and the contact details.
6.To navigate your way to the centre on foot, tap Walk there.
Your GO starts guiding you to your destination.
29
Options
Use your TomTom GO to find the location of a service, and the contact details.
• Emergency services
Phone for help |
• Emergency breakdown services |
|
|
|
|
|
• Nearest police station |
|
|
• Nearest doctor |
|
|
• Nearest hospital |
|
|
• Nearest public transport |
|
|
• Nearest car repair services |
|
|
• Nearest dentist |
|
|
• Nearest pharmacy |
|
|
• Nearest vet |
|
|
|
|
|
Note: In some countries, information may not be available for all services. |
|
|
|
|
|
|
|
|
|
|
|
Use your TomTom GO to navigate your way by road to a service centre. |
|
|
• Nearest car repair services |
|
Drive to help |
• Nearest hospital |
|
•Nearest doctor
•Nearest police station
•Nearest pharmacy
•Nearest dentist
Note: In some countries, information may not be available for all services.
Use your TomTom GO to navigate your way on foot to a service centre.
• Nearest petrol station
Walk to help |
• Nearest public transport |
|
•Nearest police station
•Nearest pharmacy
•Home
•Nearest doctor
Note: In some countries, information may not be available for all services.
Your TomTom GO shows your current location.
You can then tap Phone for help to select the type of service you want to
contact.
Where am I?
30
Loading...