


TomTom Bandit
Reference Guide
1.0
Contents
Welcome |
4 |
|
|
Product Safety Information |
5 |
|
|
TomTom Bandit |
6 |
|
|
TomTom Bandit Quick Start...................................................................................... |
7 |
Charging your TomTom Bandit .............................................................................. |
7 |
Inserting a memory card...................................................................................... |
9 |
Setting up ..................................................................................................... |
10 |
Installing the basic mount .................................................................................. |
11 |
Installing the 360 pitch mount............................................................................. |
13 |
Switching your TomTom Bandit on and off.............................................................. |
15 |
Recording...................................................................................................... |
16 |
Video highlights .............................................................................................. |
17 |
Your TomTom Bandit............................................................................................ |
19 |
Getting started ............................................................................................... |
19 |
About your TomTom Bandit ................................................................................ |
19 |
What's on the screen ........................................................................................ |
21 |
Charging your TomTom Bandit ............................................................................ |
21 |
Inserting a memory card.................................................................................... |
23 |
Video and Photo modes and settings ..................................................................... |
25 |
TomTom Bandit status ...................................................................................... |
27 |
Switching your TomTom Bandit on and off.............................................................. |
28 |
Connecting to the Mobile app ............................................................................. |
29 |
Resetting your TomTom Bandit ........................................................................... |
29 |
Receiving updates ........................................................................................... |
29 |
Caring for your TomTom Bandit ........................................................................... |
30 |
Deleting videos and photos, and formatting the memory card ...................................... |
30 |
Using peripherals ................................................................................................ |
31 |
Installing the basic mount .................................................................................. |
31 |
Installing the 360 pitch mount............................................................................. |
33 |
Using the bike mount ....................................................................................... |
36 |
Using the optional remote control ........................................................................ |
38 |
Using lens covers............................................................................................. |
39 |
Adding sensors................................................................................................ |
42 |
Recording videos ................................................................................................. |
45 |
About recording videos ..................................................................................... |
45 |
Recording a video ............................................................................................ |
45 |
Video highlights .............................................................................................. |
46 |
Managing your videos and photos ......................................................................... |
46 |
Taking photos..................................................................................................... |
47 |
About taking photos ......................................................................................... |
47 |
Taking single photos......................................................................................... |
47 |
Taking burst photos ......................................................................................... |
48 |
Managing your videos and photos ......................................................................... |
48 |
Activities .......................................................................................................... |
49 |
About activities .............................................................................................. |
49 |
Viewing metrics on your camera .......................................................................... |
49 |
Settings ............................................................................................................ |
50 |
About settings ................................................................................................ |
50 |
About Bluetooth.............................................................................................. |
50 |
About Wi-Fi ................................................................................................... |
50 |
About QuickGPSFix .......................................................................................... |
51 |
2 |
|

General settings.............................................................................................. |
51 |
Batt-Stick |
55 |
About the Batt-Stick............................................................................................. |
56 |
Charging your TomTom Bandit ................................................................................ |
57 |
Inserting a memory card........................................................................................ |
59 |
Transferring data from the Batt-Stick ....................................................................... |
61 |
Mobile App |
63 |
About the TomTom Bandit Mobile app ....................................................................... |
64 |
Connecting to the Mobile app ................................................................................. |
65 |
Login to TomTom MySports .................................................................................... |
66 |
Disconnecting from the Mobile app........................................................................... |
67 |
What's on the screen ............................................................................................ |
68 |
My Library ......................................................................................................... |
70 |
Viewing a video or photo in My Library .................................................................. |
71 |
Adding a highlight to a video .............................................................................. |
72 |
Uploading your photos ...................................................................................... |
72 |
Deleting a video or photo .................................................................................. |
72 |
Creating a story using the mobile app ....................................................................... |
74 |
Just shake to edit ............................................................................................ |
74 |
Manually selecting your video highlights ................................................................ |
75 |
Uploading your video story................................................................................. |
76 |
Camera status .................................................................................................... |
77 |
Preferences ....................................................................................................... |
78 |
App Settings .................................................................................................. |
78 |
Data Settings.................................................................................................. |
78 |
Help us improve .............................................................................................. |
78 |
About........................................................................................................... |
78 |
Addendum......................................................................................................... |
79 |
Copyright notices ................................................................................................ |
84 |
3

Welcome
This Reference Guide explains everything you need to know about your new TomTom Bandit. Using your TomTom Bandit you can easily record your action adventures by doing the following:
Record videos.
Automatically and manually add highlights to your videos.
Easily create video stories using the TomTom Bandit Mobile app.
Use your smartphone to quickly and easily publish your video stories online within moments of the action.
Take single photos or burst photos.
Relive and share your action adventures!
If you want a quick read of the essentials, we recommend that you read the TomTom Bandit Quick Start.
To create your video story and share your videos and photos on the move, download the TomTom Bandit Mobile app from tomtom.com/cam.
Don't forget to login with a TomTom MySports account using the Mobile app, then update your TomTom Bandit with the latest firmware.
To quickly get to know your TomTom Bandit, go to:
Product Safety Information
About your TomTom Bandit
Using the universal mount
Recording a video
Taking single photos
Settings
Mobile App
Tip: There are also frequently asked questions (FAQs) at tomtom.com/support. Select your product model from the list or enter a search term.
We hope you enjoy reading about and, most importantly, having fun with your new TomTom Bandit!
4

Product Safety
Information
Before you use your TomTom Bandit, please read all the safety precautions carefully. Failure to follow the guidelines and instructions could result in an accident or collision that causes death or serious injury and/or damage to your TomTom Bandit.
Obey all local laws and pay close attention to your surroundings before and while using your TomTom Bandit. Never adjust or check your TomTom Bandit while operating a bicycle, a motorcycle, a car, or any other vehicle type.
Only use approved accessories made specifically for your TomTom Bandit.
Always wear a helmet and protective gear that is appropriate for your activity.
Make sure your TomTom Bandit is secure before you start every activity. Regularly check the security of the mount. If the activity involves shocks or vibration, use a lanyard to prevent loss of the TomTom Bandit if the mount fails.
Never mount your TomTom Bandit in such a way that will obstruct or impair your view. Any major impact (for example, dropping or bumping) may damage your TomTom Bandit.
Your TomTom Bandit may get hot. Certain parts of your TomTom Bandit could (in rare cases) cause skin irritation.
Do not use or store your TomTom Bandit in a hot places such as a car, or in dusty, humid or steamy places for extended periods of time.
With the standard lens cover your TomTom Bandit is splash-proof. If you want to use the TomTom Bandit in water or underwater to depths down to 50 m (5 ATM), or for activities on the water surface, for example surfing, install the optional waterproof (IPX8) lens cover. If any abnormality is found during use, switch off your TomTom Bandit immediately. Water inside your TomTom Bandit or Batt-Stick can cause damage and could cause an explosion or fire.
Keep your TomTom Bandit lens cover and Batt-Stick clean, especially the seals. Check the lens cover and Batt-Stick seals for debris, damage and cracks. Small debris and cracks can cause leakage and may damage your TomTom Bandit.
After every use in water or near sand, mud or other foreign materials, rinse the outside of your TomTom Bandit with clean water. After cleaning, dry the camera with a clean, dry and lint-free cloth. On the Batt-Stick, open the external contact cap and dry both the contacts and the cap. Not doing this can cause corrosion or camera failure.
5

TomTom Bandit
6
TomTom Bandit Quick Start
Charging your TomTom Bandit
You can charge your TomTom Bandit in the following two ways:
Charging the Batt-Stick using a USB socket
Important: If you remove the Batt-Stick or lens cover be extra careful not to let dirt or water enter the TomTom Bandit or the Batt-Stick. Only remove the Batt-Stick or lens cover in clean and dry conditions.
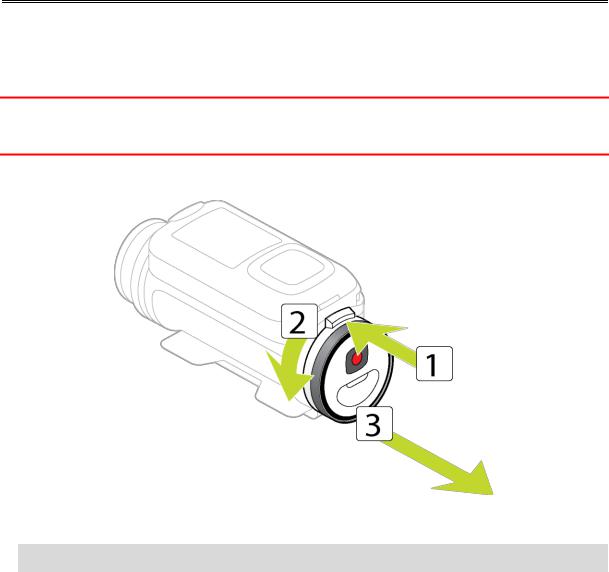
1.Press the Batt-Stick release button, then turn the Batt-Stick anticlockwise and pull it out of the TomTom Bandit.
2.Insert the Batt-Stick USB connector into your computer's USB socket or a standard USB wall-charger.
Tip: While the Batt-Stick is charging, the LEDs show the charge level and one LED flashes.
3.To see the power level of the Batt-Stick, remove the USB connector from the USB charging socket, then press the START button.
The LEDs light up to show the power level.
7
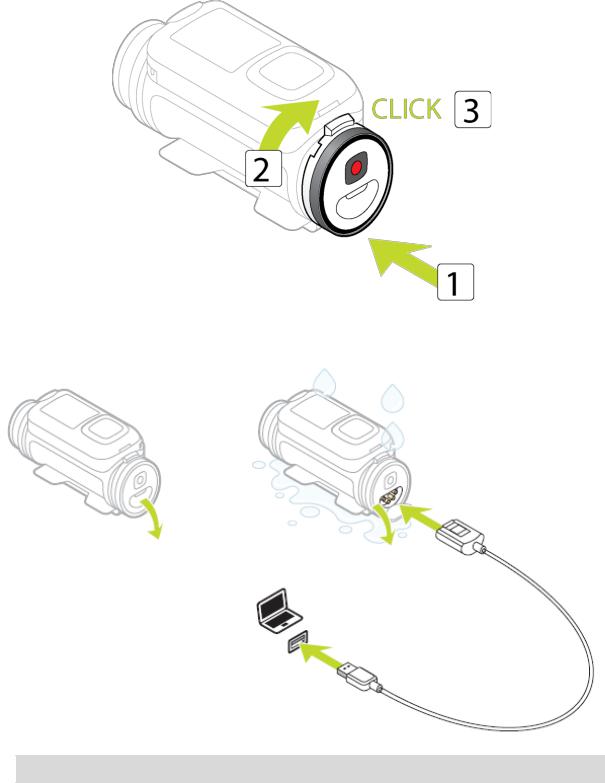
4.When the Batt-Stick is charged, insert the Batt-Stick into the TomTom Bandit and turn clockwise it until it locks.
Charging the TomTom Bandit using the optional power cable
5. Open the connector cap on the back of the Batt-Stick.
Tip: You don't have to remove the Batt-Stick from the TomTom Bandit.
6.Connect the power cable to the Batt-Stick connector and to a USB socket.
You can see the battery power level on the STATUS screen in the SETTINGS menu.
8
Inserting a memory card
The photos you take and the videos you record are stored on a microSD card that is located in the Batt-Stick. Use a microSD card that is a Class 10 standard or higher. Go to tomtom.com/support for a list of approved compatible microSD cards.
Note: If you insert a microSD card that is too slow to work with your TomTom Bandit, the TomTom Bandit shows you a message and you are asked to use a compatible microSD card.
Tip: MicroSD cards can degrade over time, and performance may decrease as the microSD card fills up.
Important: If you remove the Batt-Stick or lens cover be extra careful not to let dirt or water enter the TomTom Bandit or the Batt-Stick. Only remove the Batt-Stick or lens cover in clean and dry conditions.
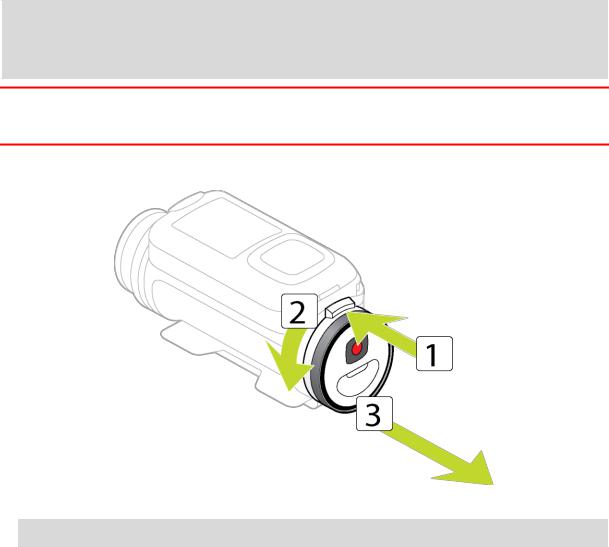
1.Press the Batt-Stick release button, then turn the Batt-Stick anti-clockwise and pull it out of the TomTom Bandit.
2.Insert the microSD card into the memory card slot in the Batt-Stick.
Important: The microSD card must be inserted with the contacts facing up.
9

3. Insert the Batt-Stick into the TomTom Bandit and turn it until it locks.
Setting up
Note: The language you choose will be used for all text on the screen. You can always change the language later in Language and Units in the Settings menu.
When you first switch on your TomTom Bandit, you have to answer a few questions to set it up. Answer the questions by pressing the button to move up, down, left or right on the screen.
Tip: You do not need to connect your TomTom Bandit to the internet or to the mobile application to set it up for first use.
10
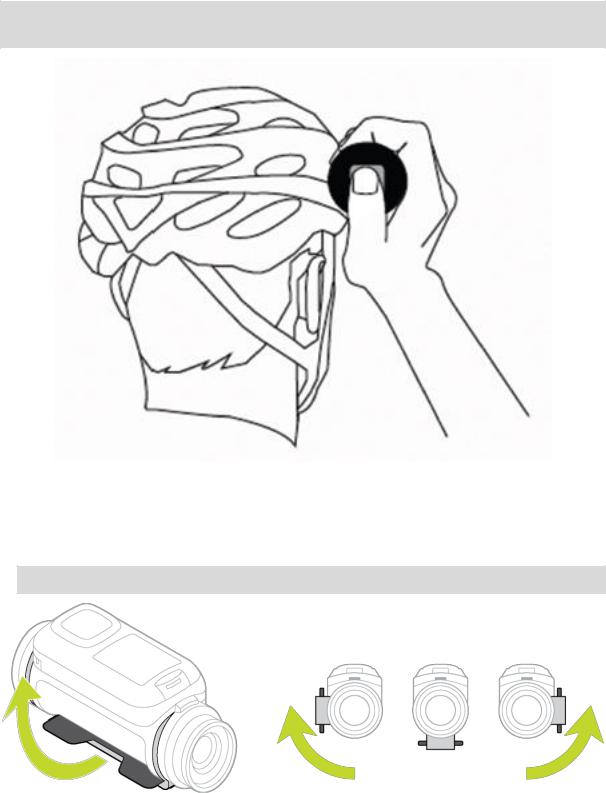
Installing the basic mount
The basic mount kit lets you mount your TomTom Bandit on a helmet or other flat or slightly curved surface. Flat and curved basic mounts are supplied.
Tip: Additional mounts are available as accessories.
Tip: To install your TomTom Bandit on handlebars, use the optional bike mount.
1.Before you install a mount, find the best position for your TomTom Bandit.
Attach the mount only to a smooth and hard surface. The mount won't securely attach to porous, textured or soft surfaces.
To mount the TomTom Bandit at different angles and on the left or right side of a helmet, you can turn the TomTom Bandit's base more than 180 degrees around the body.
Tip: Use the Mobile app live viewfinder to set the TomTom Bandit to the correct view.
2. Clean the area where you want to install the basic mount.
11
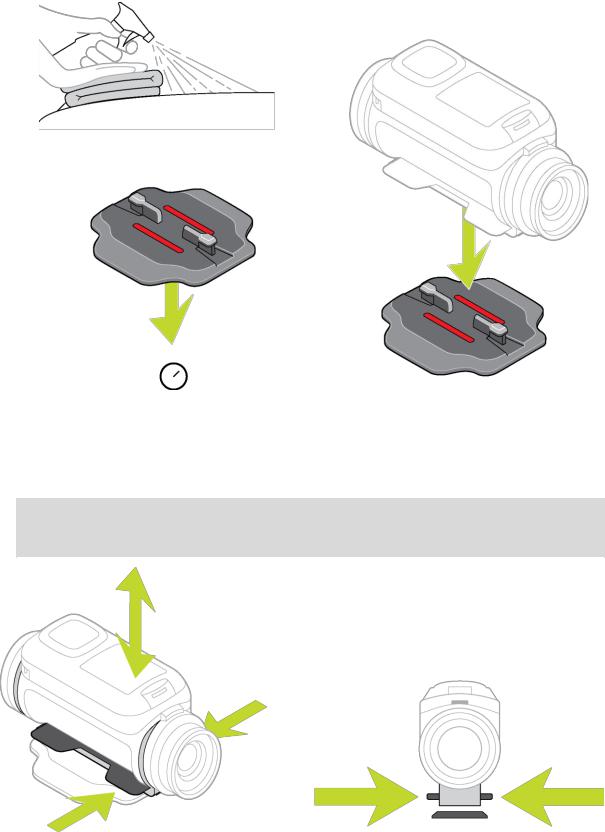
Wax, oil, dirt and moisture reduce adhesion, which can result in a weak bond. Make sure that the area is completely dry.
3.Make sure the mount is aligned in the correctly direction then, in dry, room-temperature conditions, attach the mount. Push the mount firmly down on to the surface.
The mount won't securely attach if you install it in damp and cold conditions.
4.Wait 24 hours for the adhesive to cure.
5.Install the TomTom Bandit on the mount. Make sure the TomTom Bandit is secure.
Important: Make sure your TomTom Bandit is secure before you start every activity. Regularly check the security of the mount. If the activity involves shocks or vibration, use a lanyard to prevent loss of the TomTom Bandit if the mount fails.
12
Installing the 360 pitch mount
The 360 pitch mount kit lets you mount your TomTom Bandit on a helmet or other flat or slightly curved surface. Flat and curved mount bases are supplied. Once installed, you can easily adjust the direction and angle of your TomTom Bandit.
Tip: Additional mounts are available as accessories.
Tip: To install your TomTom Bandit on handlebars, use the optional bike mount.
1.Before you install a mount, find the best position for your TomTom Bandit.
Attach the mount only to a smooth and hard surface. The mount won't securely attach to porous, textured or soft surfaces.
To install the TomTom Bandit at different angles and on the left or right side of a helmet, you can turn the TomTom Bandit's base more than 180 degrees around the TomTom Bandit body.
Tip: Use the Mobile app live viewfinder to set the TomTom Bandit to the correct view.
2. Clean the area where you want to install the mount.
13

Wax, oil, dirt and moisture reduce adhesion, which can result in a weak bond. Make sure that the area is completely dry.
3.In dry, room-temperature conditions, attach the mount base. Push the mount base firmly down on to the surface.
The mount base won't securely attach if you install it in damp and cold conditions.
4.Wait 24 hours for the adhesive to cure.
5.Install the 360 pitch mount on the mount base. Push down the TomTom Bandit plate to lock the pitch mount on the base.
14
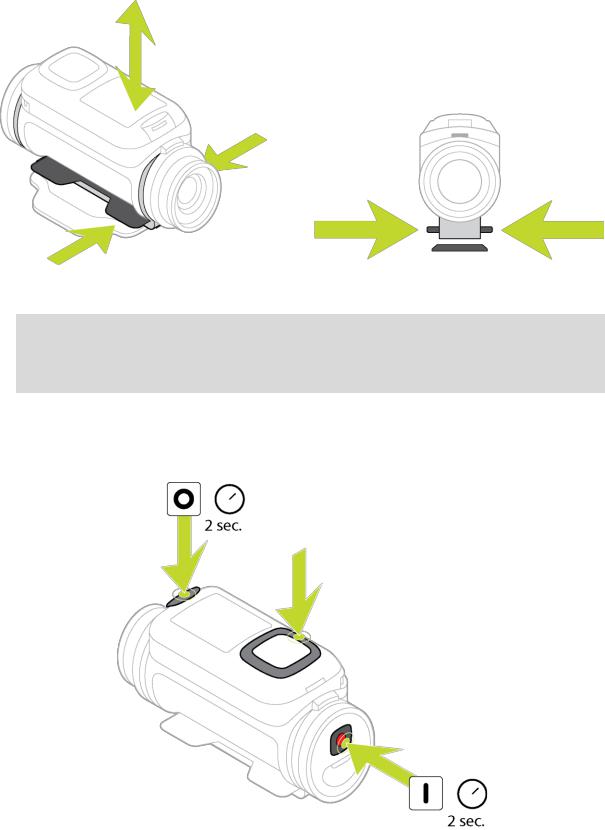
6. Install the TomTom Bandit on the 360 pitch mount. Make sure the TomTom Bandit is secure.
7.Adjust the position of the TomTom Bandit, then push the pitch mount lever to the closed position to lock the pitch mount.
Tip: Use the Mobile app live viewfinder to set the TomTom Bandit to the correct view.
Important: Make sure your TomTom Bandit is secure before you start every activity. Regularly check the security of the mount. If the activity involves shocks or vibration, use a lanyard to prevent loss of the TomTom Bandit if the mount fails.
Switching your TomTom Bandit on and off
Your TomTom Bandit can be on, off, or in standby. You can only switch the TomTom Bandit on and off using the buttons on the TomTom Bandit.
15
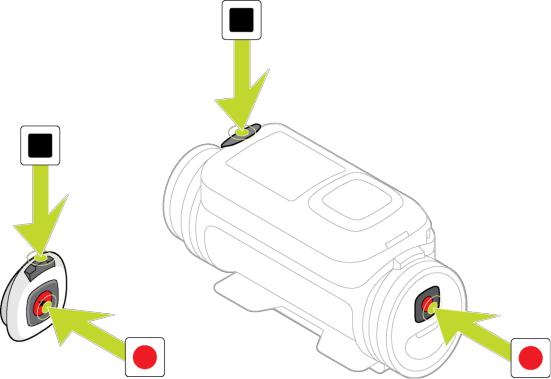
Switching on your TomTom Bandit
Press the START button at the back of the TomTom Bandit for 2 seconds to switch your TomTom Bandit on. The TomTom logo is shown, and the red LEDs flash and you hear the start-up sound. If no microSD card is inserted into the Batt-Stick, you are asked to insert a memory card so that the TomTom Bandit can switch on.
If the TomTom Bandit is in standby mode, press the control button to wake up the TomTom Bandit. The TomTom Bandit stays on during the following conditions:
The TomTom Bandit is recording a video or you are taking photos.
You are using the screen to set-up the TomTom Bandit.
You are operating the TomTom Bandit from your mobile phone using Wi-Fi or Bluetooth.
Switching off your TomTom Bandit
Press the STOP button at the front of the TomTom Bandit for 2 seconds to switch it off. The red LEDs flash and you hear the shut-down sound.
The TomTom Bandit will automatically shut down if the battery power becomes too low.
Standby
To save power the TomTom Bandit automatically switches to standby after a few minutes if it's not being used.
You can wake up the TomTom Bandit by pressing the control button, using the remote control, or using the Mobile app. If you press the START button, the TomTom Bandit will start recording or taking photos, depending on the mode you have set.
The TomTom Bandit switches off after two hours in standby.
Recording
Your TomTom Bandit has separate START and STOP buttons, both on the TomTom Bandit and on the remote control. Separate buttons make it easy to start recording, add video highlights and stop recording because the function of the buttons is always the same.
16

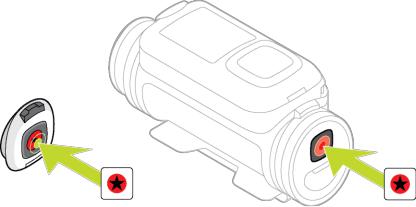
Start recording
When your TomTom Bandit is switched on or in standby mode, press the START button to start recording in your currently selected mode, for example video recording or photo burst. You can also start recording using the optional remote control, or using the Mobile app.
You hear a beep sound when recording starts, then the red LEDs in the START and STOP buttons flash continuously.
Press the START button again to manually highlight your video.
Stop recording
Press the STOP button to stop recording and go back to standby mode. You can also stop recording using the optional remote control, or using the Mobile app.
You hear a beep sound when recording stops, and the red LEDs in the START and STOP buttons stop flashing.
Video highlights
Highlights are added to your video while you are recording a video. A highlight marks an exciting part of your action video, for example a high speed, a jump or even a beautiful view, that you might like to view later and add to your video story. A video can contain many highlights.
The highlights let you easily playback your video, create your video story and share your video using the TomTom Mobile app. In the Mobile app, your highlights are shown separately from the video they are in. Each single highlight marks a 6 second length of video.
Highlights are added in two ways:
Tip: You can also add highlights to your video when you view it in the Mobile app.
Automatic highlighting
Highlights are automatically added to your video using inputs from sensors to highlight the most exciting parts of the action. The following inputs from built-in sensors are used:
Maximum speeds.
Maximum g-force.
Maximum acceleration.
Maximum deceleration.
Vertical speed.
The following inputs from external sensors are used: Heart rate (if a heart rate monitor is attached). Automatic highlighting is always on.
Manual highlighting
You can add a highlight manually to your video when something exciting or memorable happens, either before or after the event.
Manually highlight your video when something happens that automatic highlighting might not detect, for example a beautiful view, the high point of a walk or being with your friends.
17
To manually highlight while recording a video, press the START button on the TomTom Bandit or the remote control, or the highlight button on the Mobile app.
If you are using the TomTom Bandit without the Mobile app, when you have manually added a highlight, the screen shows a star symbol and the message New highlight.
18

Your TomTom Bandit
Getting started
Before you start making videos, it's a good idea to charge your TomTom Bandit, then download any software updates and download QuickGPSfix.
You can download software updates and QuickGPSfix using the Mobile app.
Note: QuickGPSfix helps your TomTom Bandit get a GPS fix and find your location quickly.
1.First, charge your TomTom Bandit.
2.Download and install the Mobile app.
3.Insert a compatible microSD card into the memory card slot in the Batt-Stick.
4.Create a TomTom MySports account on the Mobile app and register your TomTom Bandit.
After your TomTom Bandit is charged, you can record a video.
Battery life
When the battery is fully charged, your TomTom Bandit can be used for up to three hours of recordings with GPS reception. The video resolution and frame rate used to record videos also affects battery life: a recording at a higher resolution or frame rate will use more power.
The TomTom Bandit enters standby mode when it has not be used for a short time. After two hours the TomTom Bandit automatically switches off.
TomTom Bandit Mobile app
You can download the TomTom Bandit Mobile app for free from your usual app store or by going to tomtom.com/cam.
To learn more, go to Mobile App in this guide.
Connecting your TomTom Bandit to your smartphone
To learn more, go to Phone settings in this guide.
About your TomTom Bandit
Your TomTom Bandit is a modular construction that is easily disassembled so you can swap parts, for example to install a new Batt-Stick or replace the lens cover.
19
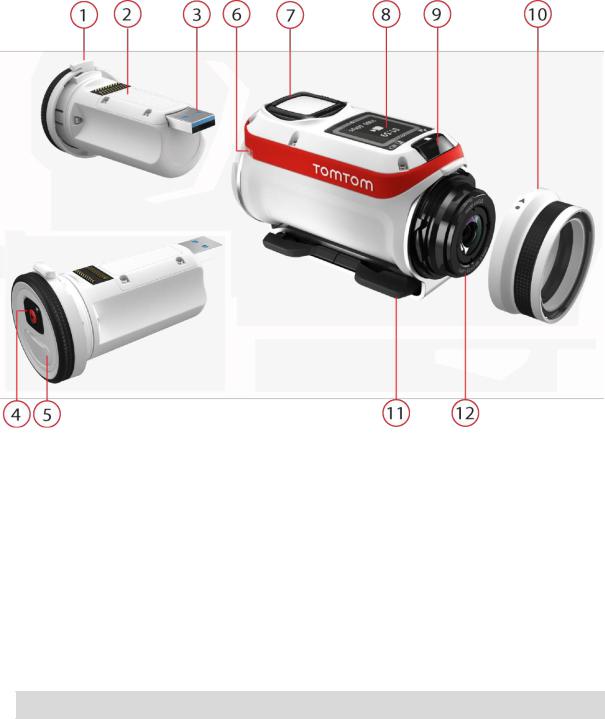
1.Batt-Stick 1900 mAh.
2.Battery power indicator.
3.USB 3.0 connector for charging and data transfer.
4.ON, START and manual highlighting button.
5.Connector with cap for optional power cable and external audio cable.
6.Attachment for a lanyard.
7.Control button to move up, down, left or right to other screens on the TomTom Bandit display:
Move up or down to select items in a menu.
Move right to select an item and open the menu for that item.
Move left to exit a menu.
To select an option in a menu, make sure it is highlighted when you leave the menu. Your TomTom Bandit remembers the option you highlighted.
If an option in a menu switches on and off, move right to change the setting.
Note: The control button is disabled when you use the TomTom Bandit deep underwater.
8.Screen.
9.STOP and OFF button.
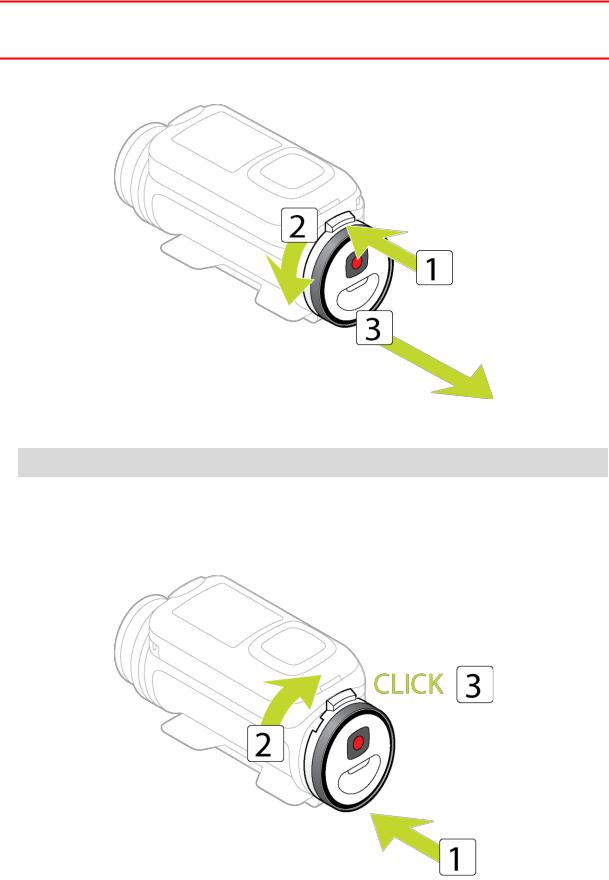
10.Lens cover.
The standard lens cover is splash-proof (IPX7). If you want to use the TomTom Bandit in water or underwater to depths down to 50 m, or for activities on the water surface, for example surfing, install the optional waterproof (IPX8) lens cover.
11.Rotatable mount rings with quick-release.
12.Lens (a lens cover must always be fitted to protect the lens).
20
What's on the screen
The TomTom Bandit screen lets you select the type of video or photo you want to record, and lets you change the settings for each video and photo mode. You move to other screens using the control button by doing the following:
Move up or down to select items in a menu.
Move right to select an item and open the menu for that item.
Move left to exit a menu.
To select an option in a menu, make sure it is highlighted when you leave the menu. Your TomTom Bandit remembers the option you highlighted.
If an option in a menu switches on and off, move right to change the setting.
Note: The control button is disabled when you use the TomTom Bandit deep underwater.
You can see the following screens:
Camera Status |
The Camera Status screen is shown when you are not recording videos or |
screen |
photos. This screen shows the mode and the specific settings you have |
|
selected. |
Mode screen |
The Mode screen lets you choose the mode you want to use. The modes |
|
are Photo, Video, Slow Motion, Time Lapse, and Cinematic. |
Recording screen |
The Recording screen is shown when you are recording a video or taking |
|
photos. The screen shows you the remaining time you can still record, and |
|
the time you have already recorded, or the number of photos taken. |
Settings screen |
The Settings screen lets you change the settings for the selected mode |
|
and the general settings for the TomTom Bandit. |
|
Selecting Status will show you the status of the TomTom Bandit. |
Video and Photo |
For each Video and Photo mode you can set different settings to |
settings |
customize the video or photo. For example, you can set the frame rate, |
|
the lens angle, and the scene. |
General settings |
The General settings set the options for the TomTom Bandit, for example |
|
Language, Units and Sound. |
Icons on the TomTom Bandit Status screen
The following icons may be shown along the top of the Camera Status and Recording screens:
This symbol shows the strength of GPS reception. While your TomTom Bandit is looking for GPS satellites, the satellite image flashes.
The heart symbol shows that your TomTom Bandit is connected to a Heart Rate Monitor. When your TomTom Bandit is trying to connect to the Heart Rate Monitor, the heart flashes.
This symbols shows that a memory card is inserted.
This symbol shows the battery status.
Charging your TomTom Bandit
You can charge your TomTom Bandit in the following two ways:
21
Charging the Batt-Stick using a USB socket
Important: If you remove the Batt-Stick or lens cover be extra careful not to let dirt or water enter the TomTom Bandit or the Batt-Stick. Only remove the Batt-Stick or lens cover in clean and dry conditions.
1.Press the Batt-Stick release button, then turn the Batt-Stick anticlockwise and pull it out of the TomTom Bandit.
2.Insert the Batt-Stick USB connector into your computer's USB socket or a standard USB wall-charger.
Tip: While the Batt-Stick is charging, the LEDs show the charge level and one LED flashes.
3.To see the power level of the Batt-Stick, remove the USB connector from the USB charging socket, then press the START button.
The LEDs light up to show the power level.
4.When the Batt-Stick is charged, insert the Batt-Stick into the TomTom Bandit and turn clockwise it until it locks.
22
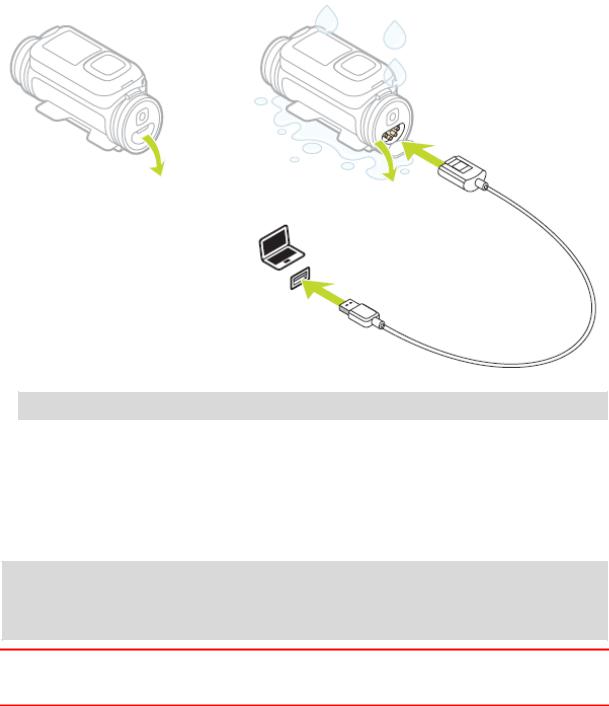
Charging the TomTom Bandit using the optional power cable
1. Open the connector cap on the back of the Batt-Stick.
Tip: You don't have to remove the Batt-Stick from the TomTom Bandit.
2.Connect the power cable to the Batt-Stick connector and to a USB socket.
You can see the battery power level on the STATUS screen in the SETTINGS menu.
Inserting a memory card
The photos you take and the videos you record are stored on a microSD card that is located in the Batt-Stick. Use a microSD card that is a Class 10 standard or higher. Go to tomtom.com/support for a list of approved compatible microSD cards.
Note: If you insert a microSD card that is too slow to work with your TomTom Bandit, the TomTom Bandit shows you a message and you are asked to use a compatible microSD card.
Tip: MicroSD cards can degrade over time, and performance may decrease as the microSD card fills up.
Important: If you remove the Batt-Stick or lens cover be extra careful not to let dirt or water enter the TomTom Bandit or the Batt-Stick. Only remove the Batt-Stick or lens cover in clean and dry conditions.
23
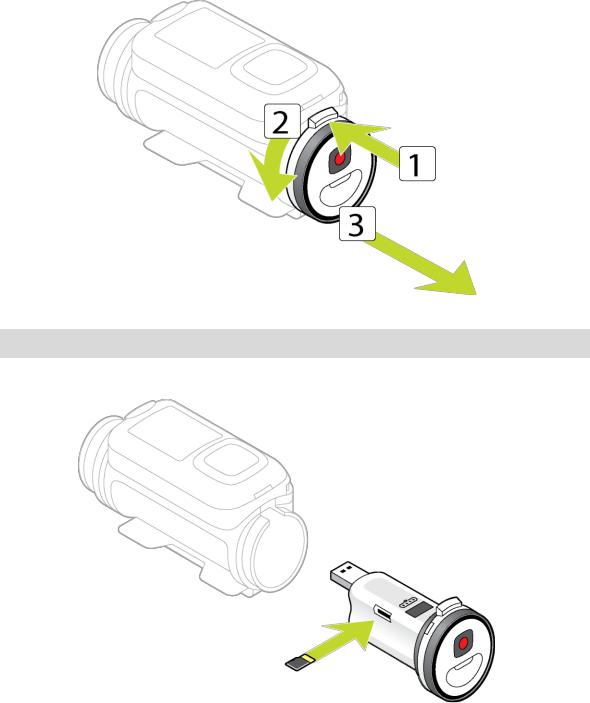
1.Press the Batt-Stick release button, then turn the Batt-Stick anti-clockwise and pull it out of the TomTom Bandit.
2.Insert the microSD card into the memory card slot in the Batt-Stick.
Important: The microSD card must be inserted with the contacts facing up.
24
3. Insert the Batt-Stick into the TomTom Bandit and turn it until it locks.
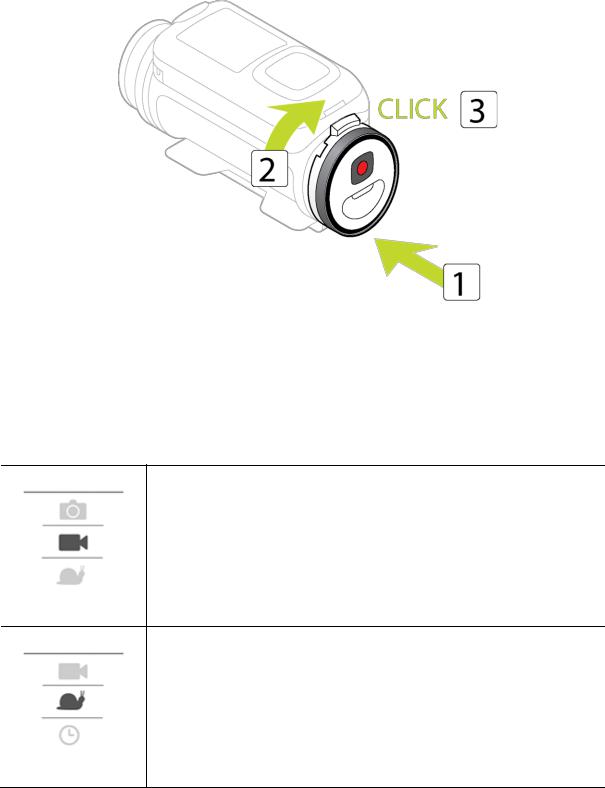
Video and Photo modes and settings
Each video and photo mode has its own settings.
TomTom Bandit modes
Select a mode directly on the TomTom Bandit or from the Mobile App. When you have selected a mode you can change the video or photo settings for the mode.
Normal high-quality video mode.
Video
Videos are recorded at a multiple of the normal frame rate (2x, 4x, or 8x), but the video is saved with the normal frame rate (30 fps) for playback, which results in slow motion video.
Audio and sensor data are also recorded in the slow motion mode. The available slow motion rate depends on the video resolution you choose.
Slow Mo
25
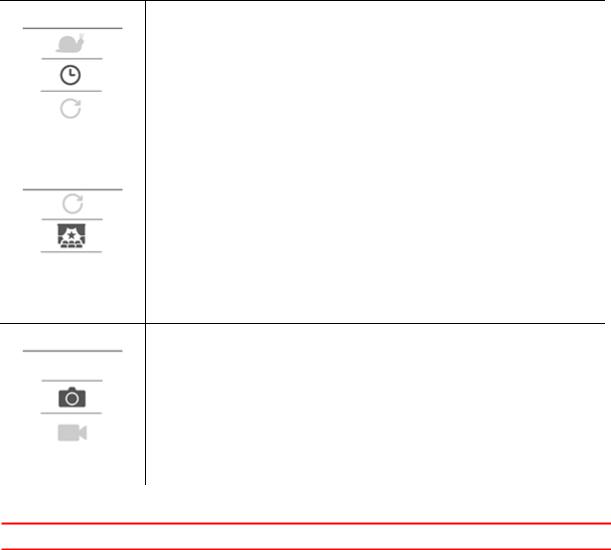
|
When in TIMELAPSE MODE, the TomTom Bandit records a time-lapse video |
|
directly as a video recording at the currently set resolution and at the |
|
normal frame rate. |
|
You can choose the interval between recording. Time-lapse recording |
|
stops when the battery level is low, when the memory card is full or when |
|
you press the STOP button. |
|
No audio or sensor information is recorded during a time-lapse video, but |
|
GPS information is recorded at the start of the video if a signal is |
Timelapse |
available. |
|
|
|
|
|
CINEMATIC is the highest resolution mode, capturing video at 4K or 2.7K. |
|
For normal use, you should find that 1080p offers sufficiently high quality |
|
video. |
Cinematic
Photo mode has the following options:
Normal - For taking a single photo.
Burst - For taking a series of photos in a very short time.
Photo
Video settings
Important: You can also change settings using the Mobile App on your smartphone.
Each video mode has its own settings.
From the Camera Status screen, move down to the SETTINGS menu and select the mode settings, for example VIDEO. Move right, then select the settings you want to change.
Video settings
Size |
|
1080p at 30 fps |
|
1080p at 60 fps |
|
|
720p at 60 fps |
|
|
720p at 120 fps |
|
View |
|
Wide |
|
|
Normal |
|
|
|
Slo Mo settings |
|
|
Size |
|
1080p at 2x speed |
|
720p at 4x speed |
|
|
WVGA at 6x speed |
|
View |
|
Wide |
|
|
Normal |
|
|
|
26
 Loading...