


 Loading...
Quick Start Manual
Revised November 30, 2007
After Sound Forge® Audio Studio™ software is installed and you start it for the first time, the registration wizard appears. This wizard offers easy steps that allow you to register the software online with Sony Creative Software Inc.
Registration assistance
If you do not have access to the Internet, registration assistance is available during normal weekday business hours. Please contact our Customer Service Department by dialing one of the following numbers:
Telephone/Fax |
Country |
|
1-800-577-6642 |
(toll-free) |
US, Canada, and Virgin Islands |
+608-204-7703 |
|
for all other countries |
1-608-250-1745 |
(Fax) |
All countries |
Customer service/sales
For a detailed list of customer service options, we encourage you to visit http://www.sonycreativesoftware.com/support/custserv.asp. Use the following numbers for telephone support during normal weekday business hours:
Telephone/Fax |
Country |
|
1-800-577-6642 |
(toll-free) |
US, Canada, and Virgin Islands |
+608-204-7703 |
|
for all other countries |
1-608-250-1745 |
(Fax) |
All countries |
Technical support
For a detailed list of technical support options, we encourage you to visit http://www.sonycreativesoftware.com/support/default.asp. To listen to your support options by telephone, please call 608-256-5555.
About your rights in Sound Forge Audio Studio software
Sound Forge Audio Studio software is licensed to you under the terms of the End User License Agreement you entered into with Sony Creative Software Inc.
About your privacy
Sony Creative Software Inc. respects your privacy and is committed to protecting personal information. Your use of the software is governed by the Software Privacy Policy. Please review its contents carefully as its terms and conditions affect your rights with respect to the information that is collected by the software. For your reference, a copy of the Software Privacy Policy is located at http://sonycreativesoftware.com/corporate/privacy.asp.
Proper use of software
Sound Forge Audio Studio software is not intended and should not be used for illegal or infringing purposes, such as the illegal copying or sharing of copyrighted materials. Using Sound Forge Audio Studio software for such purposes is, among other things, against United States and international copyright laws and contrary to the terms and conditions of the End User License Agreement. Such activity may be punishable by law and may also subject you to the breach remedies set forth in the End User License Agreement.
Legal notices
ACID, ACIDized, ACIDplanet.com, ACIDplanet, the ACIDplanet logo, ACID XMC, Artist Integrated, the Artist Integrated logo, Beatmapper, Cinescore, CD Architect, DVD Architect, Jam Trax, Perfect Clarity Audio, Photo Go, Sound Forge, Super Duper Music Looper, Vegas, Vision Series, and Visual Creation Studio are the trademarks or registered trademarks of Sony Creative Software Inc. in the United States and other countries. All other trademarks or registered trademarks are the property of their respective owners in the United States and other countries.
Thomson Fraunhofer MP3
MPEG Layer-3 audio coding technology licensed from Fraunhofer IIS and Thomson.
Supply of this product does not convey a license nor imply any right to distribute content created with this product in revenue generating broadcast systems (terrestrial, satellite, cable and/or other distribution channels), streaming applications (via internet, intranets and/or other networks), other content distribution systems (pay-audio or audio on demand applications and the like) or on physical media (compact discs, digital versatile discs, semiconductor chips, hard drives, memory cards and the like).
An independent license for such use is required. For details, please visit:
http://mp3licensing.com.
Microsoft DirectX programming interface
Portions utilize Microsoft® DirectX® technologies. Copyright © 1999 – 2007 Microsoft Corporation. All rights reserved.
Microsoft Windows Media 9
Portions utilize Microsoft Windows Media® technologies. Copyright © 1999 – 2007 Microsoft Corporation. All rights reserved.
Real, RealMedia, RealAudio, and RealVideo applications
2007 RealNetworks, Inc. Patents Pending. All rights reserved. Real®, Real Media®, RealAudio®, RealVideo®, and the Real logo are trademarks or registered trademarks of RealNetworks, Inc. in the United States and other countries.
PNG file format
Copyright © 2007. World Wide Web Consortium (Massachusetts Institute of Technology, European Research Consortium for Informatics and Mathematics, Keio University). All rights reserved. This work is distributed under the W3C Software License in the hope that it will be useful, but WITHOUT ANY WARRANTY; without even the implied warranty of MERCHANTIBILITY or FITNESS FOR A PARTICULAR PURPOSE. http://www.w3.org/Consortium/Legal/2002/copyright-software-20021231.
Apple QuickTime
Apple® QuickTime® application is a trademark of Apple, Inc. in the United States and other countries.
Apple Macintosh Audio Interchange File Format (AIFF) file format.
Apple® Macintosh® Audio Interchange™ File Format (AIFF) is a trademark of Apple, Inc. in the United States and other countries.
Targa file format
The Targa™ file format is a trademark of Pinnacle Systems, Inc.
Tagged Image File Format (TIFF)
Adobe Tagged Image™ File Format is a registered trademark of Adobe Systems Incorporated in the United States and other countries. All rights reserved.
Steinberg Media Technologies AG.
VST is a registered trademark of Steinberg Media Technologies AG.
ASIO is a trademark of Steinberg Media Technologies AG.
Gracenote
CD and music-related data from Gracenote, Inc., copyright © 2000-2007 Gracenote. Gracenote Software, copyright 2000-2007 Gracenote. This product and service may practice one or more of the following U.S. Patents: #5,987,525; #6,061,680; #6,154,773, #6,161,132, #6,230,192, #6,230,207, #6,240,459, #6,330,593, and other patents issued or pending. Services supplied and/or device manufactured under license for following Open Globe, Inc. United States Patent 6,304,523.
Gracenote and CDDB are registered trademarks of Gracenote. The Gracenote logo and logotype, MusicID, and the “Powered by Gracenote” logo are trademarks of Gracenote.
LPEC
"LPEC" is a trademark of Sony Corporation.

Ogg File Formats
©2007, Xiph.org Foundation
Neither the name of the Xiph.org Foundation nor the names of its contributors may be used to endorse or promote products derived from this software without specific prior written permission.
This software is provided by the copyright holders and contributors “as is” and any express or implied warranties, including, but not limited to, the implied warranties of merchantability and fitness for a particular purpose are disclaimed. In no event shall the foundation or contributors be liable for any direct, indirect, incidental, special, exemplary, or consequential damages (including, but not limited to, procurement of substitute goods or services; loss of use, data, or profits; or business interruption) however caused and on any theory of liability, whether in contract, strict liability, or tort (including negligence or otherwise) arising in any way out of the use of this software, even if advised of the possibility of such damage.
Sony Creative Software Inc.
1617 Sherman Avenue
Madison, WI 53704
USA
The information contained in this manual is subject to change without notice and does not represent a guarantee or commitment on behalf of Sony Creative Software Inc. in any way. All updates or additional information relating to the contents of this manual will be posted on the Sony Creative Software Inc. Web site, located at http:// www.sonycreativesoftware.com. The software is provided to you under the terms of the End User License Agreement and Software Privacy Policy, and must be used and/or copied in accordance therewith. Copying or distributing the software except as expressly described in the End User License Agreement is strictly prohibited. No part of this manual may be reproduced or transmitted in any form or for any purpose without the express written consent of Sony Creative Software Inc.
Copyright © 2007. Sony Creative Software Inc.
Program Copyright © 2007. Sony Creative Software Inc. All rights reserved.

Table of 
Contents 
Introduction . . . . . . . . . . . . . . . . . . . . . . . . . . . . . . . . . . . . . . . . . . . . . . . . . . . . 3
Introducing Sound Forge Audio Studio software . . . . . . . . . . . . . . . . . . .3 System requirements . . . . . . . . . . . . . . . . . . . . . . . . . . . . . . . . . . . . . . . . . . . . .3 Installing Sound Forge Audio Studio software . . . . . . . . . . . . . . . . . . . . .3 Getting help . . . . . . . . . . . . . . . . . . . . . . . . . . . . . . . . . . . . . . . . . . . . . . . . . . . . . .4
Show Me How tutorials . . . . . . . . . . . . . . . . . . . . . . . . . . . . . . . . . . . . . . . . . . . . . . .4
Learning the Sound Forge Audio Studio Workspace . . . . . . . . . . . . . . 5
The main window. . . . . . . . . . . . . . . . . . . . . . . . . . . . . . . . . . . . . . . . . . . . . . . . .5
Main window components . . . . . . . . . . . . . . . . . . . . . . . . . . . . . . . . . . . . . . . . . . .5
The data window . . . . . . . . . . . . . . . . . . . . . . . . . . . . . . . . . . . . . . . . . . . . . . . . .6
Data window components . . . . . . . . . . . . . . . . . . . . . . . . . . . . . . . . . . . . . . . . . . .6 Playbar . . . . . . . . . . . . . . . . . . . . . . . . . . . . . . . . . . . . . . . . . . . . . . . . . . . . . . . . . . . . . .7
Toolbars . . . . . . . . . . . . . . . . . . . . . . . . . . . . . . . . . . . . . . . . . . . . . . . . . . . . . . . . . .7
Docking a toolbar . . . . . . . . . . . . . . . . . . . . . . . . . . . . . . . . . . . . . . . . . . . . . . . . . . . .7 Floating a toolbar . . . . . . . . . . . . . . . . . . . . . . . . . . . . . . . . . . . . . . . . . . . . . . . . . . . .7 Displaying a toolbar . . . . . . . . . . . . . . . . . . . . . . . . . . . . . . . . . . . . . . . . . . . . . . . . . .7 Standard toolbar . . . . . . . . . . . . . . . . . . . . . . . . . . . . . . . . . . . . . . . . . . . . . . . . . . . . .8 Transport bar . . . . . . . . . . . . . . . . . . . . . . . . . . . . . . . . . . . . . . . . . . . . . . . . . . . . . . . .9
Getting Started. . . . . . . . . . . . . . . . . . . . . . . . . . . . . . . . . . . . . . . . . . . . . . . . . 11
Opening a file . . . . . . . . . . . . . . . . . . . . . . . . . . . . . . . . . . . . . . . . . . . . . . . . . . 11 Working with video files . . . . . . . . . . . . . . . . . . . . . . . . . . . . . . . . . . . . . . . . 11 Playing a file . . . . . . . . . . . . . . . . . . . . . . . . . . . . . . . . . . . . . . . . . . . . . . . . . . . . 12
Viewing selection status . . . . . . . . . . . . . . . . . . . . . . . . . . . . . . . . . . . . . . . . . . . . 12 Scrubbing . . . . . . . . . . . . . . . . . . . . . . . . . . . . . . . . . . . . . . . . . . . . . . . . . . . . . . . . . . 12
Creating a new data window . . . . . . . . . . . . . . . . . . . . . . . . . . . . . . . . . . . . 13
Copying data to a new file . . . . . . . . . . . . . . . . . . . . . . . . . . . . . . . . . . . . . . . . . . 13
Saving a file. . . . . . . . . . . . . . . . . . . . . . . . . . . . . . . . . . . . . . . . . . . . . . . . . . . . . 14 Editing audio . . . . . . . . . . . . . . . . . . . . . . . . . . . . . . . . . . . . . . . . . . . . . . . . . . . 14
Copying . . . . . . . . . . . . . . . . . . . . . . . . . . . . . . . . . . . . . . . . . . . . . . . . . . . . . . . . . . . 14
Pasting . . . . . . . . . . . . . . . . . . . . . . . . . . . . . . . . . . . . . . . . . . . . . . . . . . . . . . . . . . . . 15
Cutting . . . . . . . . . . . . . . . . . . . . . . . . . . . . . . . . . . . . . . . . . . . . . . . . . . . . . . . . . . . . 16
Deleting . . . . . . . . . . . . . . . . . . . . . . . . . . . . . . . . . . . . . . . . . . . . . . . . . . . . . . . . . . . 17
Trimming/Cropping . . . . . . . . . . . . . . . . . . . . . . . . . . . . . . . . . . . . . . . . . . . . . . . . 17
Mixing . . . . . . . . . . . . . . . . . . . . . . . . . . . . . . . . . . . . . . . . . . . . . . . . . . . . . . . . . . . . . 17
Using undo and redo . . . . . . . . . . . . . . . . . . . . . . . . . . . . . . . . . . . . . . . . . . . 18 Zooming and magnifying . . . . . . . . . . . . . . . . . . . . . . . . . . . . . . . . . . . . . . . 18
Zooming the time ruler (horizontal) . . . . . . . . . . . . . . . . . . . . . . . . . . . . . . . . . 19
TABLE OF CONTENTS | 1
Zooming the level ruler (vertical) . . . . . . . . . . . . . . . . . . . . . . . . . . . . . . . . . . . 19 Using the Magnify tool . . . . . . . . . . . . . . . . . . . . . . . . . . . . . . . . . . . . . . . . . . . . . 20
Changing File Attributes and Formats . . . . . . . . . . . . . . . . . . . . . . . . . . .21
Editing file attributes. . . . . . . . . . . . . . . . . . . . . . . . . . . . . . . . . . . . . . . . . . . . 21
Editing attributes in the Properties dialog . . . . . . . . . . . . . . . . . . . . . . . . . . . 21 Editing attributes in the status bar . . . . . . . . . . . . . . . . . . . . . . . . . . . . . . . . . . 21
Changing the sample rate . . . . . . . . . . . . . . . . . . . . . . . . . . . . . . . . . . . . . . . 21 Changing the bit depth . . . . . . . . . . . . . . . . . . . . . . . . . . . . . . . . . . . . . . . . . 22 Converting mono/stereo channels . . . . . . . . . . . . . . . . . . . . . . . . . . . . . . 23 Converting file formats. . . . . . . . . . . . . . . . . . . . . . . . . . . . . . . . . . . . . . . . . . 23
Save as type . . . . . . . . . . . . . . . . . . . . . . . . . . . . . . . . . . . . . . . . . . . . . . . . . . . . . . . . 23 Template . . . . . . . . . . . . . . . . . . . . . . . . . . . . . . . . . . . . . . . . . . . . . . . . . . . . . . . . . . 23
Using Markers and Regions . . . . . . . . . . . . . . . . . . . . . . . . . . . . . . . . . . . . .25
Using markers . . . . . . . . . . . . . . . . . . . . . . . . . . . . . . . . . . . . . . . . . . . . . . . . . . 25
Inserting markers . . . . . . . . . . . . . . . . . . . . . . . . . . . . . . . . . . . . . . . . . . . . . . . . . . . 25
Using regions . . . . . . . . . . . . . . . . . . . . . . . . . . . . . . . . . . . . . . . . . . . . . . . . . . 25
Inserting regions . . . . . . . . . . . . . . . . . . . . . . . . . . . . . . . . . . . . . . . . . . . . . . . . . . . 25 Editing markers and regions . . . . . . . . . . . . . . . . . . . . . . . . . . . . . . . . . . . . . . . . 26 Previewing a marker or region . . . . . . . . . . . . . . . . . . . . . . . . . . . . . . . . . . . . . . 27 Creating new files from regions . . . . . . . . . . . . . . . . . . . . . . . . . . . . . . . . . . . . . 27
Using the Regions List. . . . . . . . . . . . . . . . . . . . . . . . . . . . . . . . . . . . . . . . . . . 27
Displaying the Regions List . . . . . . . . . . . . . . . . . . . . . . . . . . . . . . . . . . . . . . . . . 28 Working with the Regions List . . . . . . . . . . . . . . . . . . . . . . . . . . . . . . . . . . . . . . 28
Applying Processes and Effects. . . . . . . . . . . . . . . . . . . . . . . . . . . . . . . . . .29
Adding plug-ins from the Process, Effects, or FX Favorites menu . . 29
Applying an effect . . . . . . . . . . . . . . . . . . . . . . . . . . . . . . . . . . . . . . . . . . . . . . . . . . 29
Recording, Extracting, and Burning . . . . . . . . . . . . . . . . . . . . . . . . . . . . . .31
Specifying recording and playback options . . . . . . . . . . . . . . . . . . . . . . 31 Recording audio . . . . . . . . . . . . . . . . . . . . . . . . . . . . . . . . . . . . . . . . . . . . . . . . 31
Starting recording . . . . . . . . . . . . . . . . . . . . . . . . . . . . . . . . . . . . . . . . . . . . . . . . . . 31 Recording remotely . . . . . . . . . . . . . . . . . . . . . . . . . . . . . . . . . . . . . . . . . . . . . . . . 33
Extracting audio from CDs . . . . . . . . . . . . . . . . . . . . . . . . . . . . . . . . . . . . . . 33 Burning CDs . . . . . . . . . . . . . . . . . . . . . . . . . . . . . . . . . . . . . . . . . . . . . . . . . . . . 34
Burning single tracks (track-at-once) . . . . . . . . . . . . . . . . . . . . . . . . . . . . . . . . 35 Burning a disc (disc-at-once) . . . . . . . . . . . . . . . . . . . . . . . . . . . . . . . . . . . . . . . . 36
Index . . . . . . . . . . . . . . . . . . . . . . . . . . . . . . . . . . . . . . . . . . . . . . . . . . . . . . . . . . . . i
2 | TABLE OF CONTENTS

Chapter 1  Introduction
 Introducing Sound Forge Audio Studio software
Thank you for purchasing Sound Forge® Audio Studio™ software and for your continued support of the Sony Creative Software Inc. family of products. The software provides you with the powerful features you have come to expect, as well as a number of new features designed to make digital audio editing quick and easy.
System requirements
The following lists the minimum system requirements for using Sound
Forge Audio Studio software:
•Microsoft® Windows® XP or Windows Vista™
•900 MHz processor
•256 MB RAM
•150 MB hard-disk space for program installation
•Microsoft Windows-compatible sound card
•DVD-ROM drive (for installation from a DVD only)
•Supported CD-recordable drive (for CD burning only)
•Microsoft DirectX® 9.0c or later (included on application disc)
You must provide your registration information to Sony Creative Software Inc. to activate the software.
Installing Sound Forge Audio Studio software
The install utility, setup.exe, located on the Sound Forge Audio Studio application disc, creates the necessary folders and copies all files required to operate Sound Forge Audio Studio software.
1.Place the Sound Forge Audio Studio application disc in the drive. The setup screen is displayed (if AutoPlay is enabled for your CD-ROM or DVD-ROM drive).
If DVD-ROM AutoPlay is not enabled, click the Start button and choose Run. In the Run dialog that appears, type the DVD-ROM drive’s letter and add :\setup.exe. Click OK to start the installation.
2.Click Install, and follow the on-screen prompts to install the appropriate version of Sound Forge Audio Studio for your computer.
INTRODUCTION | 3

Getting help
To access online help, choose Contents and Index from the Help menu or press F1.
Toolbar 
Tabs 
Information pane
The following table describes the four tabs of the online help window.
Tab Description
Contents Provides a list of available help topics. Click a closed book  to open the pages,
|
and then click on a topic page . |
Index |
Provides a complete listing of the help topics available. Scroll through the list of |
|
available topics or type a word in the Type in the keyword to find box to |
|
quickly locate topics related to that word. Select the topic and click the Display |
|
button. |
|
|
Search |
Allows you to enter a keyword and display all of the topics in the online help |
|
that contain the keyword you have entered. Type a keyword in the Type in the |
|
word(s) to search for box and click the List Topics button. Select the topic from |
|
the list and click the Display button. |
|
|
Favorites |
Allows you to keep topics that you revisit often in a separate folder. To add a |
|
topic to your favorites, click the Add button on the Favorites tab. |
|
|
Show Me How tutorials
You can learn more about many of the features in Sound Forge Audio Studio by using the interactive Show Me How tutorials installed with the software.
By default, Show Me How tutorials display upon startup of the application. However, you can access them at any time from the Help menu by choosing Show Me How.
Tip: To turn off automatic display of the Show Me How tutorials, clear the Show at Startup check box at the bottom of the tutorial window.
4 | INTRODUCTION
Chapter 2  Learning the Sound Forge Audio Studio
 Workspace
This chapter provides an overview of Sound Forge® Audio Studio™ toolbars and controls.
The main window
When you start the application, the main window is displayed. The main window’s workspace is where you perform all audio editing.
Menu bar
Standard
toolbar |
|
|
|
|
|
Transport |
|
|
bar |
|
Channel |
|
||
|
|
Meters |
|
|
(docked) |
Workspace
Status bar
Main window components
The following table describes the major components of the main window.
Component |
Description |
Menu bar |
Displays the menu headings for the available functions. |
|
|
Standard toolbar |
Provides quick access to some of the most common tasks in the |
|
application (pg. 8). |
|
|
Transport bar |
Provides quick access to basic audio transport functions (pg. 9). |
|
|
Status bar |
Help and processing information appears on the left side. The |
|
boxes on the right side display the playback sample rate, bit depth, |
|
channel configuration, length of the active data window, and total |
|
free storage space (pg. 21). |
|
|
Channel Meters |
Displays the level of the output audio signal. These meters can be |
|
toggled on/off by choosing Channel Meters from the View menu. |
|
Right-clicking the channel meters displays a shortcut menu that |
|
allows you to precisely configure the appearance of the meters. |
|
|
Workspace |
This is the area located behind the data windows. Audio selections |
|
dragged to the workspace automatically become new data |
|
windows. Windows such as the Regions List and Explorer can be |
|
docked along the edges of the workspace. |
|
|
LEARNING THE SOUND FORGE AUDIO STUDIO WORKSPACE | 5
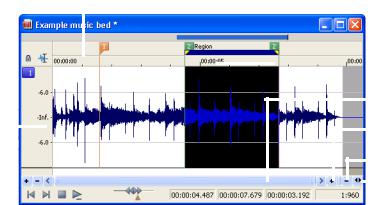
The data window
Data windows contain audio data (as a waveform) as well as a number of controls and commands used to edit and process audio.
|
|
|
|
Title bar Time ruler |
|
|
|
|
|
|
|
|
|
|
|||||||||||||
|
|
|
|
|
|
|
|
|
|
|
|
|
|
|
|
|
|
|
|
|
|
|
|
|
|
|
Overview bar |
Edit Tool |
|
|
|
|
|
|
|
|
|
|
|
|
|
|
|
|
|||||||||||
|
|
|
|
|
|
|
|
|
|
|
|
|
|
|
|
Marker |
|||||||||||
|
|
|
|
|
|
|
|
|
|
|
|
|
|
|
|||||||||||||
Selector |
|
|
|
|
|
|
|
|
|
|
|
|
|
|
|
|
|
|
|
|
|
|
|
||||
|
|
|
|
|
|
|
|
|
|
|
|
|
|
|
|
|
|
|
|
|
|
bar |
|||||
|
|
|
|
|
|
|
|
|
|
|
|
|
|
|
|
|
|||||||||||
|
|
|
|
|
|
|
|
|
|
|
|
|
|
|
|
|
|
|
|
|
|
|
|
|
|
|
|
Level |
|
|
|
|
|
|
|
|
|
|
|
|
|
|
|
|
|
|
Position |
||||||||
|
|
|
|
|
|
|
|
|
|
|
|
|
|||||||||||||||
ruler |
|
|
|
|
|
|
|
|
|
|
|
|
|
|
scroll bar |
||||||||||||
|
|
|
|
|
|
|
|
|
|
|
|
|
|
||||||||||||||
Waveform |
|
|
|
|
|
|
|
|
|
|
|
|
|
|
|
Time zoom |
|||||||||||
display |
|
|
|
|
|
|
|
|
|
|
|
|
|
|
resolution |
||||||||||||
|
|
|
|
|
|
|
|
|
|
|
|
|
|
||||||||||||||
|
|
|
|
|
|
|
|
|
|
|
|
|
|
|
|
|
|
|
|
|
|
|
|
|
Time zoom in/ |
||
Level |
|
|
|
|
|
|
|
|
|
|
|
|
|
|
|
|
|
|
|
|
out |
||||||
|
|
|
|
|
|
|
|
|
|
|
|
|
|
|
|
|
|
|
|
|
Maximize |
||||||
|
|
|
|
|
|
|
|
|
|
|
|
|
|
|
|
|
|
|
|
|
|
|
|
|
|
||
zoom in/ |
|
|
|
|
|
|
|||||||||||||||||||||
|
|
|
|
|
|
|
|
|
|
|
|
|
|
width |
|||||||||||||
out |
|
|
|
|
|
|
|
|
|
|
|
|
|
|
|
||||||||||||
|
|
|
|
|
|
|
|
|
|
|
|
|
|
|
|
||||||||||||
|
|
|
|
|
|
|
|
|
|
|
|
Scrub |
|
control |
|
|
|
|
|
|
|
|
|
|
|||
|
|
|
|
|
|
|
|
Playbar |
|
Selection status boxes |
|||||||||||||||||
Data window components
The following table describes the data window components.
Component |
Description |
Title bar |
Displays the file name. If title information is included in the summary of a file, it |
|
appears here instead of the file name. Double-click to maximize and restore the |
|
window. |
|
|
Level ruler |
Displays the amplitude of the waveform. Right-click to display the level ruler |
|
shortcut menu. Drag to shift the view up/down when zoomed in vertically. |
|
|
Time ruler |
Displays the current location in the data window. Right-click to display the time |
|
ruler shortcut menu. Drag to scroll the data window. |
|
|
Marker bar |
Displays the position of region end points, loop end points, and markers. You |
|
can place, name, and position markers and regions anywhere in the data |
|
window. These informational tags can serve as cues or reminders highlighting |
|
important events in your project. |
|
|
Edit Tool Selector |
Toggles through the Edit, Magnify, and Pencil tools. |
|
|
Playbar |
Contains audio transport buttons, including Go to Start, Go to End, Stop, and |
|
Play. For more information on the playbar, please see page 7. |
|
|
Selection status |
Displays the beginning, end, and length of a selection. If no selection exists, only |
boxes |
the cursor position displays. Double-click the leftmost box to edit the current |
|
cursor position or selection start position. Double-click either of the other two |
|
boxes to edit the selection end position or the selection length. Right-click to |
|
display the status format shortcut menu. |
|
|
Waveform display |
Displays a graphical representation of an audio file. The horizontal axis |
|
represents time, and the vertical axis represents amplitude. Right-click within |
|
this display to open the waveform display shortcut menu. |
|
|
Scrub control |
Scrolls playback of your project at varying speeds. |
|
|
Position scroll bar |
Scrolls forward/backward through an audio file to display sections of the file not |
|
visible in the current area of the waveform display. |
|
|
6 | LEARNING THE SOUND FORGE AUDIO STUDIO WORKSPACE

Overview bar |
Allows for quick navigation and playback of any part of an audio file. The |
|
overview bar also indicates the portion of the waveform currently depicted in |
|
the waveform display, as well as the selected region. Click to move the cursor. |
|
Double-click to center the cursor in the waveform display. Right-click to start or |
|
pause playback. Drag to activate the audio event locator. |
|
|
Time zoom |
Specifies the number of samples of data represented by each horizontal point |
resolution |
on the screen. This determines the length of time displayed in the data window. |
|
Smaller resolution values display less time. |
|
|
Time zoom in/out |
Changes the zoom resolution for the time (horizontal) axis. |
|
|
Level zoom in/out |
Changes the zoom resolution for the level (vertical) axis. |
|
|
Playbar
The playbar is located in the bottom-left corner of a data window. You can use the playbar to navigate and play audio files in a variety of ways.
Go to Start: moves the cursor to |
Stop: stops playback and returns the cursor to its |
the start of the file. |
position prior to playback. |
Go to End: moves the cursor to the end of the file.
Play Normal: plays from the cursor to the end of the file. If there is a selection, plays from the beginning of the selection to the end of the selection.
Toolbars
Sound Forge Audio Studio toolbars contain buttons used to quickly execute many of the program’s commands and functions. Toolbars can be dragged throughout the workspace, docked, resized, hidden, and customized.
Docking a toolbar
When you drag a floating toolbar to any edge of the main screen, the toolbar docks on that edge.
Floating a toolbar
When you drag a docked toolbar away from an edge, the toolbar becomes a floating toolbar.
Displaying a toolbar
1.From the View menu, choose Toolbars. The Preferences dialog appears with a list of available toolbars.
2.To display a toolbar, select the corresponding check box and click OK.
LEARNING THE SOUND FORGE AUDIO STUDIO WORKSPACE | 7
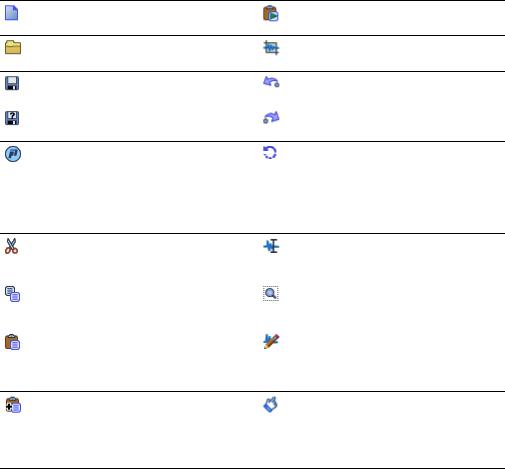
Standard toolbar
The Standard toolbar displays by default when you start the application. The buttons on this toolbar provide quick access to many common commands.
New: creates a new data window.
Play Clipboard: plays the audio on the clipboard.
Open: displays the Open dialog.
Trim/Crop: removes all data from the file that is not currently selected.
Save: saves the current audio data. |
Undo: reverses the last edit operation. |
|
|
Save As: saves the current file with a new |
Redo: reverts the previously undone edit |
name or format. |
operation. |
Publish: opens the Publish Setup wizard so you can upload your media file to the Web.
Repeat: repeats the last operation. This command can be used with most processing functions. The previous operation’s parameters are repeated. To specify new parameters, hold Shift and click this button.
Cut: removes selected audio data and |
Edit Tool: selects the Editing tool. |
places it on the clipboard. This command |
|
has no effect if there is no selection. |
|
|
|
Copy: copies selected audio data to the |
Magnify Tool: selects the Magnify tool. |
clipboard. This command has no effect if |
|
there is no selection. |
|
|
|
Paste: inserts a copy of the clipboard data |
Pencil Tool: selects the Pencil tool. |
at the current insertion point. If there is a |
|
selection, this command replaces the |
|
selected data with the clipboard data. |
|
Mix: mixes a copy of the clipboard data with the current audio file. The mix start point is either the cursor point or the start or end of the selection in the destination data window.
Show Me How: starts the Sound Forge Audio Studio Show Me How tutorials.
8 | LEARNING THE SOUND FORGE AUDIO STUDIO WORKSPACE
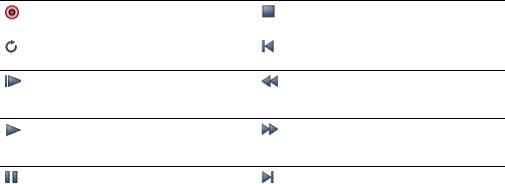
Transport bar
The transport bar also displays by default and contains basic audio transport buttons.
Record: records data to a new or existing |
Stop: stops playback and returns the |
data window. |
cursor to its prior position. |
|
|
Loop Playback: toggles Loop Playback |
Go To Start: moves the cursor to the start |
mode on and off. |
of the file. |
Play All: plays the entire file from beginning to end, regardless of cursor position or selection.
Rewind: moves the cursor backward in the current file.
Play: plays the file from the current cursor position or plays the selection, if one exists.
Forward: moves the cursor forward in the current file.
Pause: pauses playback and maintains the |
Go To End: moves the cursor to the end of |
cursor at its current position. |
the file. |
|
|
LEARNING THE SOUND FORGE AUDIO STUDIO WORKSPACE | 9
Loading...