


HD COLOR CAMERA
HDC1000
HDC1400
HDC1500
HDC1550
HDC1580
MAINTENANCE MANUAL Volume 1 1st Edition (Revised 4)
Serial No. 10001 and Higher: HDC1000 (UCJ) Serial No. 40001 and Higher: HDC1000 (CE) Serial No. 10001 and Higher: HDC1400 (UC) Serial No. 10001 and Higher: HDC1500 (SY) Serial No. 40001 and Higher: HDC1500 (CE) Serial No. 10001 and Higher: HDC1550 (UC) Serial No. 40001 and Higher: HDC1550 (CE) Serial No. 400001 and Higher: HDC1550 (CE) Serial No. 50001 and Higher: HDC1580 (CN)
! WARNING
This manual is intended for qualified service personnel only.
To reduce the risk of electric shock, fire or injury, do not perform any servicing other than that contained in the operating instructions unless you are qualified to do so. Refer all servicing to qualified service personnel.
! WARNUNG
Die Anleitung ist nur für qualifiziertes Fachpersonal bestimmt.
Alle Wartungsarbeiten dürfen nur von qualifiziertem Fachpersonal ausgeführt werden. Um die Gefahr eines elektrischen Schlages, Feuergefahr und Verletzungen zu vermeiden, sind bei Wartungsarbeiten strikt die Angaben in der Anleitung zu befolgen. Andere als die angegeben Wartungsarbeiten dürfen nur von Personen ausgeführt werden, die eine spezielle Befähigung dazu besitzen.
! AVERTISSEMENT
Ce manual est destiné uniquement aux personnes compétentes en charge de l’entretien. Afin de réduire les risques de décharge électrique, d’incendie ou de blessure n’effectuer que les réparations indiquées dans le mode d’emploi à moins d’être qualifié pour en effectuer d’autres. Pour toute réparation faire appel à une personne compétente uniquement.
Laser Diode Properties
Wave length : 1310 ± 40 nm Emission duration : Pulse Modulation Laser output power : 141 +_3729 uW
CAUTION
Use of controls or adjustments or performance of procedures other than those specified herein may result in hazardous radiation exposure.
CLASS 1 LASER PRODUCT
LASER KLASSE 1 PRODUKT
LUOKAN 1 LASERLAITE
KLASS 1 LASER APPARAT
This HD Color Camera is classified as a CLASS 1 LASER PRODUCT.
CAUTION
The use of optical instruments with this product will increase eye hazard.
HDC1000/V1(E)
CAUTION
Danger of explosion if battery is incorrectly replaced.
Replace only with the same or equivalent type recommended by the manufacturer.
Dispose of used batteries according to the manufacturer’s instructions.
Vorsicht!
Explosionsgefahr bei unsachgemäßem Austausch der Batterie.
Ersatz nur durch denselben oder einen vom Hersteller empfohlenen ähnlichen Typ. Entsorgung gebrauchter Batterien nach Angaben des Herstellers.
ATTENTION
Il y a danger d’explosion s’il y a remplacement incorrect de la batterie.
Remplacer uniquement avec une batterie du même type ou d’un type équivalent recommandé par le constructeur.
Mettre au rebut les batteries usagées conformément aux instructions du fabricant.
HDC1000/V1(E)
ADVARSEL!
Lithiumbatteri-Eksplosionsfare ved fejlagtig håndtering.
Udskiftning må kun ske med batteri af samme fabrikat og type.
Levér det brugte batteri tilbage til leverandøren.
ADVARSEL
Lithiumbatteri - Eksplosjonsfare. Ved utskifting benyttes kun batteri som
anbefalt av apparatfabrikanten. Brukt batteri returneres apparatleverandøren.
VARNING
Explosionsfara vid felaktigt batteribyte. Använd samma batterityp eller en likvärdig typ som rekommenderas av apparattillverkaren. Kassera använt batteri enligt gällande föreskrifter.
VAROITUS
Paristo voi räjähtää jos se on virheellisesti asennettu.
Vaihda paristo ainoastaan laitevalmistajan suosittelemaan tyyppiin.
Hävitä käytetty paristo valmistajan ohjeiden mukaisesti.
1 (P)

Voor de klanten in Nederland
Gooi de batterij niet weg maar lever deze in als klein chemisch afval (KCA).
Für Kunden in Deutschland
Entsorgungshinweis: Bitte werfen Sie nur entladene Batterien in die Sammelboxen beim Handel oder den Kommunen. Entladen sind Batterien in der Regel dann, wenn das Gerät abschaltet und signalisiert “Batterie leer” oder nach längerer Gebrauchsdauer der Batterien “nicht mehr einwandfrei funktioniert”. Um sicherzugehen, kleben Sie die Batteriepole z.B. mit einem Klebestreifen ab oder geben Sie die Batterien einzeln in einen Plastikbeutel.
For the customers in Taiwan only
2 (P)
HDC1000/V1(E)
Table of Contents
Manual Structure
Purpose of this manual ................................................................. |
4 |
Related manuals ........................................................................... |
4 |
1. |
Service Overview |
|
|
1-1. |
Checking before Installation ........................................... |
1-1 |
|
1-1-1. |
Checking the ROM and Software Version ............ |
1-1 |
|
1-2. |
Connectors and Cables ................................................... |
1-2 |
|
1-2-1. |
Connector Input/Output Signals ............................ |
1-2 |
|
1-2-2. |
Wiring Diagrams for Cables ................................. |
1-9 |
|
1-2-3. |
Connection Connectors/Cables ........................... |
1-10 |
|
1-2-4. |
Note in Connecting CCU Connector |
|
|
|
|
(HDC1000/1400/1500/1580) .............................. |
1-10 |
1-3. |
Location of Printed Circuit Boards ............................... |
1-11 |
|
1-4. |
Opening/Closing the Side Panel ................................... |
1-14 |
|
1-5. |
Switch Settings ............................................................. |
1-15 |
|
1-6. |
Notes for Replacing Parts ............................................. |
1-19 |
|
1-6-1. |
Notes for Replacing the Flexible Card Wire ....... |
1-19 |
|
1-6-2. |
Notes for Replacing the Board ............................ |
1-20 |
|
1-6-3. |
Notes for Replacing the Connector |
|
|
|
|
on the Board ........................................................ |
1-20 |
1-6-4. |
Notes for HDC1400 and HDC1580 .................... |
1-20 |
|
1-7. |
Cleaning the Vent Portion of the Fan |
|
|
|
(HDC1400/1500/1550/1580) ........................................ |
1-21 |
|
1-8. |
Cleaning of Connector/Cable |
|
|
|
(HDC1000/1400/1500/1580) ........................................ |
1-22 |
|
1-8-1. |
When the Optical Connector Cleaner |
|
|
|
|
(Commercially Available) is Available ............... |
1-22 |
1-8-2. |
When the Optical Connector Cleaner |
|
|
|
|
(Commercially Available) is not Available ........ |
1-23 |
1-9. |
Setting the Utility Out Voltage (HDC1000) ................. |
1-24 |
|
1-10. |
Notes on Flexible Card Wire ........................................ |
1-24 |
|
1-10-1. |
Disconnecting/Connecting Flexible Card |
|
|
|
|
Wire ..................................................................... |
1-24 |
1-10-2. |
Forming of the Flexible Card Wire ..................... |
1-26 |
|
1-11. |
Notes on Replacement of Circuit Board ....................... |
1-27 |
|
1-11-1. |
Description on EEPROM Data ........................... |
1-27 |
|
1-11-2. |
Adjustment after Replacement of Board ............. |
1-27 |
|
1-11-3. |
Adjustment and Setting Items when |
|
|
|
|
Replacing AT-163 Board .................................... |
1-27 |
1-12. Setting Microphone Power and Intercoms ................... |
1-28 |
|
1-12-1. How to Supply a Power of +12 V ....................... |
1-28 |
|
1-12-2. |
Setting Intercoms ................................................. |
1-28 |
1-13. Upgrading the Software ................................................ |
1-29 |
|
1-13-1. Upgrading the MAIN Program ........................... |
1-29 |
|
1-13-2. Upgrading the Boot Program .............................. |
1-30 |
|
1-14. Writing and Rewriting the PLD Internal Data .............. |
1-31 |
|
1-15. Note on Replacement of Lithium Battery ..................... |
1-32 |
|
1-16. Recommended Replacing Parts .................................... |
1-33 |
|
1-16-1. |
HDC1000 ............................................................ |
1-33 |
1-16-2. |
HDC1400/1500/1550/1580 ................................. |
1-34 |
1-16-3. |
Periodic Check/Replacement Parts ..................... |
1-35 |
1-17. Description of CCD Block Number ............................. |
1-36 |
|
1-18. Optional Fixtures .......................................................... |
1-36 |
|
1-19. Notes on Repair Parts ................................................... |
1-36 |
|
1-20. Unleaded Solder ............................................................ |
1-36 |
|
2. Replacement of Main Parts
2-1. Replacing the CCD Unit ................................................. |
2-1 |
|
2-1-1. |
HDC1000 .............................................................. |
2-1 |
2-1-2. |
HDC1400/1500/1550/1580 ................................... |
2-3 |
2-2. Replacement of CCD Unit Boards ................................. |
2-4 |
|
2-2-1. |
DR-528 Board ....................................................... |
2-4 |
2-2-2. |
CN-2579 Board ..................................................... |
2-4 |
2-2-3. |
PA-317 Board ........................................................ |
2-5 |
2-2-4. |
TG-243 Board ....................................................... |
2-5 |
2-2-5. |
CN-2578 Board ..................................................... |
2-6 |
2-3. Replacing the Filter Disk Unit ........................................ |
2-7 |
|
2-3-1. |
HDC1000 .............................................................. |
2-7 |
2-3-2. |
HDC1400/1500/1550/1580 ................................... |
2-7 |
2-4. Replacing the Fan (HDC1000) ....................................... |
2-8 |
|
2-4-1. |
DC Fan (TOP) ....................................................... |
2-8 |
2-5. Replacing the Fan (HDC1400/1500/1550/1580) ............ |
2-9 |
|
2-5-1. |
DC Fan (Front) ...................................................... |
2-9 |
2-5-2. |
DC Fan (Rear) ..................................................... |
2-10 |
2-6. Replacing the VF DISP Switches |
|
|
(HDC1400/1500/1550/1580) (SW-1237 Board) .......... |
2-11 |
|
2-7. Replacing the Side Switch Panel Assembly |
|
|
(HDC1400/1500/1550/1580) (SW-1240 Board) .......... |
2-12 |
|
HDC1000/V1(E) |
1 |
2-8. Replacing the Connectors |
|
|
(HDC1400/1500/1550/1580) ........................................ |
2-12 |
|
2-8-1. |
EARPHONE Jack (CN-2640 Board) .................. |
2-12 |
2-8-2. |
DC IN Connector (CN-2623 Board) ................... |
2-13 |
2-8-3. |
INTERCOM 1/2 Connector |
|
|
(CN-2618 Board) ................................................. |
2-14 |
2-8-4. |
LENS Connector (CN-2616 Board) .................... |
2-14 |
2-8-5. |
MIC 1 IN Connector (CN-2615 Board) .............. |
2-15 |
2-8-6. |
REMOTE Connector (CN-2622 Board) ............. |
2-15 |
2-8-7. |
RET IN, TEST OUT Connector |
|
|
(CN-2620 Board) ................................................. |
2-16 |
2-8-8. |
SDI 1 Connector (HDC1500) .............................. |
2-16 |
2-8-9. |
SDI 2 Connector (HDC1500) |
|
|
SDI Connector (HDC1400/1550) ........................ |
2-17 |
2-8-10. |
BUILD UP Connector |
|
|
(Hot Shoe Assembly) .......................................... |
2-17 |
2-9. Replacing the Encapsulated Cable Assembly/ |
|
|
TRIAX Assembly ......................................................... |
2-18 |
|
2-9-1. |
HDC1000 (Encapsulated Cable Assembly) ........ |
2-18 |
2-9-2. |
HDC1400/1500/1580 |
|
|
(Encapsulated Cable Assembly) .......................... |
2-19 |
2-9-3. |
HDC1550 (TRIAX Assembly) ............................ |
2-20 |
2-10. Replacing the DC/DC Converter Unit .......................... |
2-21 |
|
2-10-1. |
HDC1000 ............................................................ |
2-21 |
2-10-2. |
HDC1400/1500/1550/1580 ................................. |
2-21 |
2-11. Replacing the Switching Regulator .............................. |
2-22 |
|
2-11-1. |
HDC1000 ............................................................ |
2-22 |
2-11-2. |
HDC1400/1500/1580 .......................................... |
2-23 |
2-11-3. |
HDC1550 ............................................................ |
2-24 |
2-12. Replacing the Boards (HDC1000) ................................ |
2-25 |
|
2-12-1. |
MB-1060 Board ................................................... |
2-25 |
2-13. Replacing the Boards (HDC1400/1500/1550/1580) .... |
2-28 |
|
2-13-1. |
CN-2617 Board ................................................... |
2-28 |
2-13-2. |
MB-1059 Board ................................................... |
2-29 |
2-14. Checking SDI-84 Board (HDC1400/1500/1580) ......... |
2-30 |
|
3. |
Electrical Alignment |
|
|
3-1. |
Preparations .................................................................... |
3-1 |
|
3-1-1. |
Equipment Required .............................................. |
3-1 |
|
3-1-2. |
Precautions on Adjustments .................................. |
3-1 |
|
3-1-3. |
File Data at Adjustment ......................................... |
3-1 |
|
3-1-4. |
Maintaining the Grayscale Chart ........................... |
3-2 |
|
3-1-5. |
Description on Setup Menu ................................... |
3-4 |
|
3-1-6. |
Connection of Equipment ...................................... |
3-5 |
|
3-1-7. |
Initial Settings ....................................................... |
3-6 |
|
3-1-8. |
Adjustment Items and Setup Menu Items ............. |
3-7 |
|
3-2. |
Automatic Adjustment .................................................... |
3-8 |
|
3-3. |
Electrical Alignment ....................................................... |
3-8 |
|
3-3-1. |
Clamp Level Adjustment between Channel A |
|
|
|
|
and Channel B ....................................................... |
3-8 |
3-3-2. |
BLACK SET Adjustment ...................................... |
3-9 |
|
3-3-3. |
Sensitivity Adjustment .......................................... |
3-9 |
|
3-3-4. |
V-SUB Adjustment ............................................. |
3-10 |
|
3-3-5. |
BLACK SHADING Adjustment ......................... |
3-11 |
|
3-3-6. |
White Shading Adjustment ................................. |
3-11 |
|
3-3-7. |
RPN Adjustment ................................................. |
3-13 |
|
3-4. Video System Level Adjustment .................................. |
3-14 |
||
3-4-1. |
H/V Ratio Adjustment ......................................... |
3-14 |
|
3-4-2. |
Detail Level Adjustment ..................................... |
3-15 |
|
3-4-3. |
Crispening Adjustment ........................................ |
3-15 |
|
3-4-4. |
Level Dependent Adjustment .............................. |
3-16 |
|
3-4-5. |
Detail Clip Adjustment ........................................ |
3-16 |
|
3-4-6. |
Auto-iris Adjustment ........................................... |
3-17 |
|
3-4-7. |
Pedestal Level Adjustment .................................. |
3-18 |
|
3-4-8. |
Flare Adjustment ................................................. |
3-18 |
|
3-4-9. |
Gamma Correction Adjustment .......................... |
3-19 |
|
3-4-10. |
Knee Point/Knee Slope Adjustment .................... |
3-19 |
|
3-4-11. |
White Clip Level Adjustment ............................. |
3-20 |
|
3-4-12. |
File Store ............................................................. |
3-21 |
|
3-5. |
ND Offset Adjustment .................................................. |
3-22 |
|
3-6. Adjustment Preparation of HDC1550 .......................... |
3-23 |
||
3-6-1. |
Equipment Required ............................................ |
3-23 |
|
3-6-2. |
Precautions on Adjustments ................................ |
3-23 |
|
3-6-3. |
Connection .......................................................... |
3-24 |
|
3-7. |
TONE Adjustment (HDC1550) .................................... |
3-25 |
|
3-7-1. |
CHU DATA/TONE Frequency Adjustment ....... |
3-25 |
|
3-7-2. |
CCU DATA Demodulation Adjustment ............. |
3-25 |
|
2 |
HDC1000/V1(E) |
3-8. Video System Adjustment (HDC1550) ........................ |
3-26 |
|
3-8-1. |
Demodulation Tuning Adjustment ...................... |
3-26 |
3-8-2. |
Return Sync Level Adjustment ........................... |
3-26 |
3-8-3. |
Return Frequency Adjustment ............................ |
3-27 |
3-8-4. |
74 MHz Clock Duty Adjustment ........................ |
3-28 |
3-8-5. |
CHU Y Level Adjustment ................................... |
3-28 |
3-8-6. |
CHU C Level Adjustment ................................... |
3-28 |
3-8-7. |
MX-109 Prompter Adjustment ............................ |
3-29 |
3-8-8. |
Return DC Level Adjustment .............................. |
3-31 |
3-9. Audio System Adjustment (HDC1550) ........................ |
3-32 |
|
3-9-1. |
Frequency Adjustment ........................................ |
3-32 |
3-9-2. |
Audio Modulation Adjustment ............................ |
3-33 |
3-9-3. |
INCOM 1 Demodulation/ |
|
|
Output Level Adjustments .................................. |
3-34 |
3-9-4. |
INCOM 2 Demodulation/ |
|
|
Output Level Adjustments .................................. |
3-35 |
3-9-5. |
PGM 1 Demodulation/ |
|
|
Output Level Adjustments .................................. |
3-36 |
3-9-6. |
PGM 2 Demodulation/ |
|
|
Output Level Adjustments .................................. |
3-37 |
3-10. RPN Compensation ...................................................... |
3-38 |
|
3-10-1. |
Automatic Compensation (APR) ........................ |
3-38 |
3-10-2. |
Manual RPN Compensation Adjustment ............ |
3-38 |
3-10-3. |
Procedures to be Taken When the RPN |
|
|
Compensation Fails ............................................. |
3-39 |
3-10-4. |
Performing Automatic RPN Detection |
|
|
Effectively ........................................................... |
3-40 |
3-10-5. |
RPN Compensation Flowchart ............................ |
3-41 |
4. |
File System |
|
4-1. |
File Structure .................................................................. |
4-1 |
4-2. |
Operator File ................................................................... |
4-2 |
4-3. |
Preset Operator File ........................................................ |
4-3 |
4-4. |
Scene File ........................................................................ |
4-4 |
4-5. |
Reference File ................................................................. |
4-6 |
4-6. |
Lens File ......................................................................... |
4-8 |
4-7. |
OHB File ....................................................................... |
4-10 |
4-8. |
File Items ...................................................................... |
4-12 |
5. |
Setup Menu |
|
5-1. |
Entering the SERVICE Menu ......................................... |
5-1 |
5-2. |
Settable Special Functions .............................................. |
5-2 |
HDC1000/V1(E) |
3 |

Manual Structure
Purpose of this manual
This manual is the maintenance manual Volume 1 for HD Color Camera HDC1000/ 1400/1500/1550/1580.
This manual describes the information items that premise the service based on the components parts such as service overview, replacement of main parts, electrical alignment, file system, SERVICE menu, assuming use of system and service engineers.
Related manuals
Besides this maintenance manual Volume 1 the following manual is available for this unit.
.HDC1000 Series Operation Manual (Supplied with HDC1000)
This manual is necessary for application and operation of HDC1000. Part number: 3-903-903-0X
.HDC1500 Series Operation Manual (Supplied with HDC1400/1500/1550)
This manual is necessary for application and operation of HDC1400/1500/1550.
Part number: 3-868-749-0X
.HDC1580 Operation Manual (Supplied with HDC1580)
This manual is necessary for application and operation of HDC1580. Part number: 3-992-285-0X
.Maintenance Manual Volume 2 (Available on request)
Describes the parts list, semiconductor pin assignments, block diagrams, schematic diagrams and board layouts of HDC1000/1400/1500/1550/1580.
Part number: 9-968-213-0X
.“Semiconductor Pin Assignments” CD-ROM (Available on request)
This “Semiconductor Pin Assignments” CD-ROM allows you to search for semiconductors used in Broadcast and Professional equipment.
The maintenance manual Volume 2 contains a complete list of semiconductors and their ID Nos., and thus should be used together with the CD-ROM.
Part number: 9-968-546-06
4 |
HDC1000/V1(E) |

Section 1
Service Overview
1-1. Checking before Installation
1-1-1. Checking the ROM and Software Version
When connecting the peripheral equipment in the list below to HDC1000/1400/ 1500/1550/1580, be sure to check that the ROM and software version on each peripheral device is corresponding to the camera to be connected.
If the ROM and software version is lower than the specified below, be sure to perform ROM replacement and updating the software.
If ROM replacement and updating the software are required, contact your local Sony Sales Office/Service Center.
ROM
Peripheral equipment |
Board name |
Ref No. |
Rom version |
MSU-700A/750 |
CPU-293/CPU-286 |
IC5, IC6/IC5, IC6 |
Ver. 1.30 or higher |
|
|
|
|
CNU-700 |
AT-89 or AT-89A |
IC4, IC5 |
Ver. 3.20 or higher |
|
|
|
|
CNU-500 |
AT-100 |
IC4, IC5 |
Ver. 2.80 or higher |
|
|
|
|
RCP-720/721 |
MPU-79 |
IC10 |
Ver. 2.90 or higher |
|
|
|
|
RCP-730/731 |
MPU-79 |
IC10 |
Ver. 2.90 or higher |
|
|
|
|
RCP-740/741 |
MPU-79 |
IC10 |
Ver. 2.90 or higher |
|
|
|
|
RCP-700/701 |
MPU-92 |
IC6 |
Ver. 2.90 or higher |
|
|
|
|
RM-B150 |
CPU-266 |
IC4 |
Ver. 1.00 or higher |
|
|
|
|
HDCU-900 |
AT-141 |
IC105, IC106 |
Ver. 1.40 or higher |
|
|
|
|
Software
Peripheral equipment |
Board name |
Software version |
RCP-750/751 |
MPU-123 |
Ver. 1.21 or higher |
|
|
|
RM-B750 |
MPU-124 |
Ver. 1.00 or higher |
|
|
|
HDCU1000 |
AT-141 |
Ver. 1.21 or higher |
|
|
|
HDCU1500 |
AT-149 |
Ver. 1.00 or higher |
|
|
|
MSU-900 |
CPU-396 |
Ver. 1.02 or higher |
|
|
|
HDCU-950 |
AT-149 |
Ver. 1.11 or higher |
|
|
|
HDC1000/V1(E) |
1-1 |

1-2. Connectors and Cables
1-2-1. Connector Input/Output Signals
HDC1000 Connector Layout
!\ |
2 3 4 57 0 !' !, 8 9 |
!= !; != |
!- ![ !] 1
1-2 |
HDC1000/V1(E) |
HDC1400/1500/1550/1580 Connector Layout
!= |
|
|
!= |
|
|
|
|
6 |
|
|
1 |
8 |
|
|
0 |
!' |
|
|
5 |
!, |
|
|
2**1 |
|
|
|
|
9 |
|
|
*2 |
|
|
|
4 |
!] |
|
|
7* |
|
|
|
|
!. |
!- !- |
3*1 |
*1 |
*2 |
 !;
!;
 !\
!\
*: HDC1500 only
*1: There are no connectors on HDC1580.
*2: There are no connectors on HDC1400/1550.
HDC1000/V1(E) |
1-3 |
Input/Output Signals
1CCU connector (HDC1000/1400/1500/1580)
BTA S-004A/005A/006A compliant 1.485 Gbps serial
HDCU/HDFX connector (HDC1550)
UC: King Triax connector
CE: Fisher Triax connector
Output Signals
2SDI 1 (HDC1000/1500)
HD SDI signal BTA-S004A compliant
BNC type 75 Z, 0.8 V p-p 1.485 Gbps
3SDI 2 (HDC1000/1500) SDI (HDC1400/1550)
HD SDI signal BTA-S004A compliant BNC type 75 Z, 1.0 V p-p or
SD SDI signal
4TEST OUT
BNC type 75 Z, 1.0 V p-p
5PROMPTER OUT (HDC1000/1400/1500/1580)
BNC type 75 Z, 1.0 V p-p
6EARPHONE OUT (HDC1400/1500/1550/1580)
EARPHONE mini jack
7PROMPTER2 OUT (HDC1500)
BNC type 75 Z, 1.0 V p-p
Input Signals
5GENLOCK IN (HDC1400/1500/1550/1580)
BNC type 75 Z, 1.0 V p-p (For future use)
5RET IN (HDC1400/1500/1550/1580)
BNC type 75 Z, 1.0 V p-p (For future use)
7 Not used
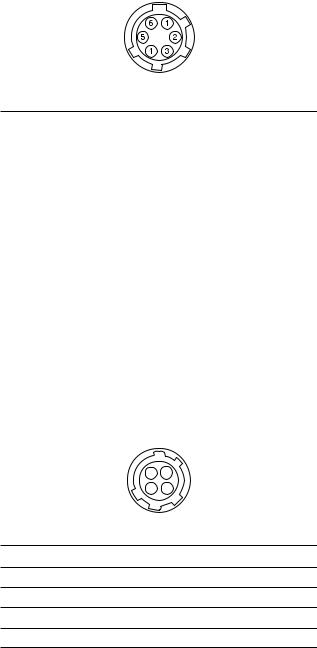
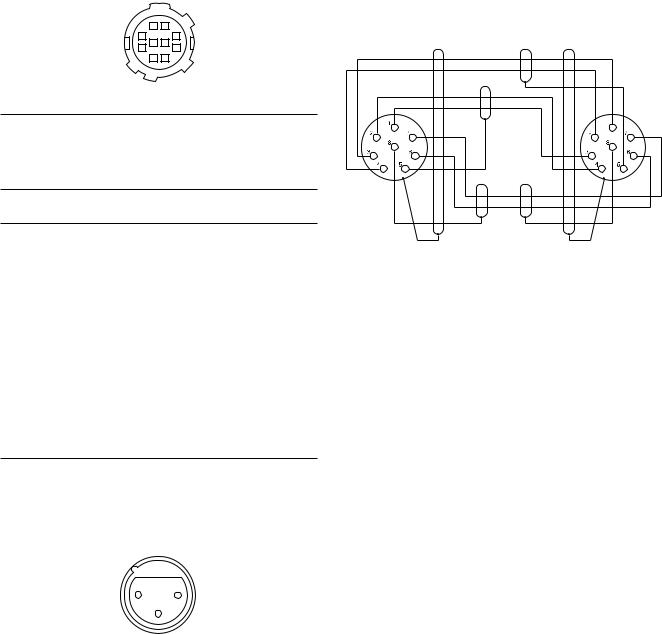
8 RET CONTROL (6P FEMALE)
(External view)
No. |
Signal |
I/O |
Specifications |
1 |
INCOM 1 |
IN |
Zi >10 kZ |
|
MIC-ON/OFF |
|
ON : GND |
|
|
|
OFF : OPEN |
|
|
|
|
2 |
INCOM 2 |
IN |
Zi >10 kZ |
|
MIC-ON/OFF |
|
ON : GND |
|
|
|
OFF : OPEN |
|
|
|
|
3 |
GND |
—— |
|
|
|
|
|
4 |
RET 3-ON/OFF |
IN |
Zi >10 kZ |
|
|
|
ON : GND |
|
|
|
OFF : OPEN |
|
|
|
|
5 |
RET 1-ON/OFF |
IN |
Zi >10 kZ |
|
|
|
ON : GND |
|
|
|
OFF : OPEN |
|
|
|
|
6 |
RET 2-ON/OFF |
IN |
Zi >10 kZ |
|
|
|
ON : GND |
|
|
|
OFF : OPEN |
|
|
|
|
9 DC OUT (4P FEMALE)
|
|
4 |
1 |
|
|
3 |
2 |
|
|
(External view) |
|
No. Signal |
I/O |
Specifications |
|
1 |
UNREG GND |
—— |
GND for POWER |
2 |
NC |
|
No connection |
3 |
NC |
|
No connection |
4 |
UNREG |
OUT |
+12 V dc 500 mA (max) |
1-4 |
HDC1000/V1(E) |

!/ REMOTE (8P FEMALE) |
!= INTERCOM 1/2 (5P FEMALE) |
1
2 7
3 8 6
4 5
(External view)
No. Signal |
|
I/O |
Specifications |
|
|
for RCP |
for TRUNK |
|
|
|
|
(RS422A) |
|
|
|
|
|
|
|
1 |
TX (X) |
TX1 (+) |
OUT |
SERIAL DATA OUT |
|
|
|
|
|
2 |
TX (Y) |
TX1 (_) |
OUT |
/TRUNK1 DATA OUT |
|
|
|
|
(for RS-422A) |
|
|
|
|
|
3 |
TX (X) |
RX1 (+) |
IN |
SERIAL DATA IN |
|
|
|
|
|
4 |
TX (Y) |
RX1 (_) |
IN |
/TRUNK1 DATA IN |
|
|
|
|
(for RS-422A) |
|
|
|
|
|
5 |
TX-GND |
|
—— |
GND for TX |
|
|
|
|
|
6 |
POWER (+) OUT |
OUT |
UNREG +10.5 V to 17 V dc, |
|
|
|
|
|
200 mA (max) |
|
|
|
|
|
7 |
POWER (_) OUT |
—— |
GND for UNREG-OUT |
|
|
|
|
|
|
8 |
VIDEO (X) |
|
OUT |
75 Z, 1.0 V p-p |
|
|
|
|
(SD Video) |
|
|
|
|
|
|
CHASSIS GND |
—— |
CHASSIS GND |
|
|
|
|
|
|
!- AUDIO IN CH1/CH2 (3P FEMALE)
|
|
2 |
1 |
|
|
|
|
3 |
|
|
|
(External view) |
||
|
|
|
|
|
No. Signal |
I/O |
|
Specifications |
|
|
|
|
|
|
1 |
AUDIO 1/2 (G) |
—— |
|
_60 dBu, _50 dBu, _40 dBu, |
|
|
|
|
_30 dBu, _20 dBu, selectable |
2 |
AUDIO 1/2 (X) |
IN |
|
|
|
|
|
|
|
3 |
AUDIO 1/2 (Y) |
IN |
|
High impedance, Balanced |
|
|
|
|
|
|
|
|
|
(0 dBu = 0.775 Vrms) |
(External view)
No. |
Signal |
|
I/O |
Specifications |
|
1 |
EXT-INCOM-T (Y) |
IN |
_20 dBu (CARBON MIC) |
||
|
|
|
_60 dBu (DYNAMIC MIC) |
||
2 |
EXT-INCOM-T (X) |
IN |
|||
|
|
|
|
|
|
3 |
GND |
|
—— |
|
|
|
|
|
|
|
|
4 |
EXT-INCOM- |
|
OUT |
0 dBu |
|
|
LEFT (X) |
|
|
|
|
|
|
|
|
|
|
5 |
EXT-INCOM- |
|
OUT |
0 dBu |
|
|
RIGHT (X) |
|
|
|
|
|
|
|
|
|
|
|
|
|
|
(0 dBu = 0.775 Vrms) |
|
![ AC OUT (HDC1000) |
|
|
|||
(For service personnel only) |
|
||||
|
E |
|
|
|
|
|
|
|
|
N |
L |
|
L |
N |
|
E |
|
|
|
|
|
|
|
|
UC, J |
|
|
CE |
|
|
(External view) |
|
(External view) |
||
|
|
|
|
|
|
No. Signal |
|
I/O |
Specifications |
|
|
|
|
|
|
|
|
E |
GND |
|
—— |
CHASSIS GND |
|
|
|
|
|
|
|
N |
UTL (C) |
|
OUT |
. AC 100/120 V, 200 VA or |
|
|
|
|
|
below (UC, J) |
|
|
|
|
|
. AC 230 V (CE) |
|
L |
UTL (H) |
|
OUT |
||
|
|
|
|
|
|
!] DC IN (4P MALE)
(External view)
No. |
Signal |
I/O |
Specifications |
1 |
EXT_DC (C) |
—— |
GND for DC (+) |
|
|
|
|
2 |
NC |
|
No connection |
|
|
|
|
3 |
NC |
|
No connection |
|
|
|
|
4 |
EXT_DC (H) |
IN |
+10.5 to 17 V dc |
|
|
|
|
HDC1000/V1(E) |
1-5 |

!\ LENS (36P FEMALE) (HDC1000)
18 |
1 |
36 |
19 |
(External view)
No. |
Signal |
I/O |
Specifications |
1 |
NC |
|
No connection |
|
|
|
|
2 |
NC |
|
No connection |
|
|
|
|
3 |
NC |
|
No connection |
|
|
|
|
4 |
LENS +12 V |
OUT |
+12 V (at 2 A) |
|
|
|
|
5 |
GND (LENS) |
—— |
GND for +12 V (LENS) |
|
|
|
|
6 |
GND (SIG) |
—— |
GND |
|
|
|
|
7 |
NC |
|
No connection |
|
|
|
|
8 |
LENS-EXT-1 |
IN |
*2 (LENS SERIAL DATA) |
|
(SERIAL RXD) |
|
|
|
|
|
|
9 |
LENS-EXT-2 |
IN |
*2 |
10 |
LENS-EXT-3 |
IN |
*2 |
11 |
LENS-SERVO |
OUT |
ON : GND |
|
|
|
OFF : High impedance |
|
|
|
|
12 |
IRIS-POSI |
IN |
Zi >10 kZ |
|
|
|
2 to 7 V |
|
|
|
“3.4 ± 0.1 V (F16)” |
|
|
|
“6.2 ± 0.1 V (F2.8)” |
13 |
ZOOM-POSI |
IN |
Zi >10 kZ |
|
|
|
2 to 7 V |
|
|
|
“2 V (WIDE), 7 V (TELE)” |
|
|
|
|
14 |
RET 1-ON |
IN |
Zi >10 kZ |
|
|
|
ON : GND |
|
|
|
OFF : High impedance |
|
|
|
|
15 |
RET 2-ON |
IN |
Zi >10 kZ |
|
|
|
ON : GND |
|
|
|
OFF : High impedance |
|
|
|
|
16 |
FOCUS-POSI |
IN |
Zi >10 kZ |
|
|
|
2 to 7 V |
|
|
|
“2 V (MIN), 7 V (∞ )” |
17 |
IRIS-CONT |
OUT |
2 to 7 V |
|
|
|
“3.4 ± 0.1 V (F16)” |
|
|
|
“6.2 ± 0.1 V (F2.8)” |
|
|
|
Zo <1 kZ |
|
|
|
|
18 |
IRIS-AUTO |
OUT |
AUTO : GND |
|
/MANU |
|
MANU : High impedance |
|
(SERIAL TXD) |
|
Zo <1 kZ |
|
|
|
(LENS SERIAL DATA) |
|
|
|
|
19 |
NC |
|
No connection |
|
|
|
|
20 |
NC |
|
No connection |
|
|
|
|
21 |
LENS R TALLY |
OUT |
ON : GND |
|
|
|
OFF : High impedance |
|
|
|
Zo <1 kZ |
|
|
|
|
22 |
LENS-PUPIL-POSI |
IN |
Zi >10 kZ |
|
|
|
1 to 4 V |
|
|
|
1 V : _7.5d |
|
|
|
4 V : +7.5d |
|
|
|
|
No. |
Signal |
I/O |
Specifications |
23 |
RET 3-ON |
IN |
Zi >10 kZ |
|
|
|
ON : GND |
|
|
|
OFF : High impedance |
|
|
|
|
24 |
LENS-ADR-0 |
IN |
*1 |
25 |
LENS-ADR-1 |
IN |
*1 |
26 |
LENS-ADR-2 |
IN |
*1 |
27 |
LENS-ADR-3 |
IN |
*1 |
28 |
EXT 1-ON |
OUT |
ON : GND |
|
|
|
OFF : High impedance |
|
|
|
|
29 |
EXT 2-ON |
OUT |
ON : GND |
|
|
|
OFF : High impedance |
|
|
|
|
30 |
F DEM (FAR) |
IN |
No connection |
|
|
|
|
31 |
INCOM 1- |
IN |
Zi >10 kZ |
|
ENG/PROD |
|
ENG : GND |
|
|
|
PRD : High impedance |
|
|
|
|
32 |
INCOM 2- |
IN |
Zi >10 kZ |
|
ENG/PROD |
|
ENG : GND |
|
|
|
PRD : High impedance |
|
|
|
|
33 |
INCOM 1-MIC-ON |
IN |
Zi >10 kZ |
|
|
|
ON : GND |
|
|
|
OFF : High impedance |
|
|
|
|
34 |
INCOM 2-MIC-ON |
IN |
Zi >10 kZ |
|
|
|
ON : GND |
|
|
|
OFF : High impedance |
|
|
|
|
35 |
F-CONT-SIG |
OUT |
No connection |
|
|
|
|
36 |
F-DEM (NEAR) |
IN |
No connection |
|
|
|
|
*1 Zi >10 kZ
1 : High impedance
0 : 0 +_00.5 V
LENS ADRS 0 (low-order bit) LENS ADRS 3 (high-order bit )
*2 Zi >10 kZ
1 : High impedance
0 : 0 ±0.5 V
EX1 |
EX2 |
EX3 |
MODE |
|
1 |
1 |
1 |
EXTENDER OFF |
|
|
|
|
|
|
1 |
0 |
1 |
EXT-1 |
(x1.5) ON |
|
|
|
|
|
0 |
1 |
1 |
EXT-2 |
(x2) ON |
|
|
|
|
|
0 |
0 |
1 |
EXT-3 |
(x2.5) ON |
|
|
|
|
|
1-6 |
HDC1000/V1(E) |

!\ LENS (12P FEMALE) (HDC1400/1500/1550/ 1580)
(External view)
|
|
|
OFF : OPEN |
|
|
|
EX 2 ON |
|
|
|
EX 0.8 ON |
10 |
ZOOM |
IN |
WIDE : 2 V |
|
POSITION |
|
TELE : 7 V |
11 |
FOCUS POSI |
IN |
∞ : 7 V |
12 |
(/LENS RX) |
OUT |
min. : 2 V |
(LENS TX) |
Specifications |
||
No. |
Signal |
I/O |
|
1 |
RET VIDEO |
IN |
ENABLE : 0 V |
|
ENABLE |
|
DISABLE : +5 V or OPEN |
2 |
VTR CTL |
IN |
ENABLE : 0 V |
|
|
|
DISABLE : +5 V or OPEN |
3 |
GND |
—— |
GND for UNREG |
4 |
SERVO MA/AT |
OUT |
AUTO : +5 V |
|
|
|
MANU : 0 V or OPEN |
5 |
IRIS POSITION |
OUT |
+3.4 V (F16) to |
|
|
|
+6.2 V (F2.8) |
6 |
UNREG |
OUT |
+10.5 V to +17 V |
7 |
IRIS POSITION |
IN |
+3.4 V (F16) to |
|
|
|
+6.2 V (F2.8) |
8 |
IRIS AT/MA |
OUT |
AUTO IRIS : 0 V |
|
|
|
MANUAL IRIS : +5 V |
9 |
EXTENDER |
IN |
EX 2 ON : GND |
|
ON/OFF |
|
EX 0.8 ON : 30 kZto GND |
30 kΩ
!; VF (25P FEMALE) (HDC1000)
13 12 11 10 |
9 |
8 |
7 |
6 |
5 |
4 |
3 |
2 |
1 |
|
25 24 |
23 22 21 |
|
20 19 |
18 |
|
17 16 |
15 |
|
14 |
|
(External view)
No. |
Signal |
I/O |
Specifications |
1 |
VF-Y (X) |
OUT |
1.0 V p-p, Zo = 75 Z |
|
|
|
|
2 |
VF-GND (Pr) |
—— |
GND for VF-Pr (X) |
|
|
|
|
3 |
VF-Pr (X) |
OUT |
0.7 V p-p, Zo = 75 Z |
|
|
|
|
4 |
VF-GND (Pb) |
—— |
GND for VF-Pb (X) |
|
|
|
|
5 |
VF-Pb (X) |
OUT |
0.7 V p-p, Zo = 75 Z |
|
|
|
|
6 |
PEAKING |
IN |
0 to 5 V dc |
|
LEVEL |
|
|
|
|
|
|
7 |
VF-UNREG |
OUT |
+10.5 to +20 V |
|
|
|
|
8 |
VF-UNREG |
|
|
|
|
|
|
9 |
NC |
|
No connection |
|
|
|
|
10 |
S-DATA |
IN/OUT |
TTL level |
|
|
|
|
11 |
TALLY (R)-VF |
OUT |
ON : +5 V |
|
|
|
OFF : 0 V |
|
|
|
|
12 |
EFFECT |
OUT |
ON : +5 V |
|
|
|
OFF : 0 V |
|
|
|
|
13 |
NC |
|
No connection |
|
|
|
|
14 |
VF-GND (Y) |
—— |
GND for VF-Y (X) |
|
|
|
|
15 |
S-CK |
OUT |
TTL level |
|
|
|
|
16 |
BATT IND |
OUT |
ON : +5 V |
|
|
|
OFF : 0 V |
|
|
|
|
17 |
CHASSIS GND |
—— |
GND |
|
|
|
|
18 |
TALLY (G)-VF |
OUT |
ON : +5 V |
|
|
|
OFF : 0 V |
|
|
|
|
19 |
GND (UNREG) |
—— |
GND for VF-UNREG |
|
|
|
|
20 |
GND (UNREG) |
|
|
|
|
|
|
21 |
VF-SEL |
IN |
BW : 0 V |
|
|
|
COLOR : +5 V |
|
|
|
|
22 |
H EXPAND |
OUT |
ON : GND |
|
|
|
OFF : +5 V |
|
|
|
|
23 |
NC |
|
No connection |
|
|
|
|
24 |
NC |
|
No connection |
|
|
|
|
25 |
V EXPAND |
OUT |
ON : GND |
|
|
|
OFF : +5 V |
|
|
|
|
HDC1000/V1(E) |
1-7 |

!; VF (20P FEMALE) (HDC1400/1500/1550/1580) |
!' CRANE (12P FEMALE) |
|
|
|
|
|
1 |
9 |
|
|
2 |
10 |
|
8 |
|
3 |
11 |
12 |
7 |
|
|
4 |
|
6 |
|
|
5 |
|
|
(External view)
No. |
Signal |
I/O |
Specifications |
1 |
S-DATA |
IN/OUT |
TTL level |
|
|
|
|
2 |
NC |
|
No connection |
|
|
|
|
3 |
NC |
|
No connection |
|
|
|
|
4 |
SCK |
OUT |
TTL level |
|
|
|
|
5 |
NC |
|
No connection |
|
|
|
|
6 |
NC |
|
No connection |
|
|
|
|
7 |
NC |
|
No connection |
|
|
|
|
8 |
G TALLY |
OUT |
ON : 5 V |
|
|
|
OFF : GND |
|
|
|
|
9 |
NC |
|
No connection |
|
|
|
|
10 |
NC |
|
No connection |
|
|
|
|
11 |
NC |
|
No connection |
|
|
|
|
12 |
Y VIDEO |
OUT |
1.0 V p-p, Zo = 75 Z |
|
|
|
|
13 |
VIDEO GND |
—— |
GND for VIDEO |
|
|
|
|
14 |
Pb VIDEO |
OUT |
± 0.35 V p-p, Zo = 75 Z |
|
|
|
|
15 |
Pr VIDEO |
OUT |
± 0.35 V p-p, Zo = 75 Z |
|
|
|
|
16 |
NC |
|
No connection |
|
|
|
|
17 |
R TALLY |
OUT |
ON : 5 V |
|
|
|
OFF : GND |
|
|
|
|
18 |
NC |
|
No connection |
|
|
|
|
19 |
UNREG GND |
—— |
GND for UNREG |
|
|
|
|
20 |
UNREG |
OUT |
+10.5 V to +17 V |
|
|
|
|
(External view)
No. |
Signal |
|
I/O |
Specifications |
1 |
Pr VIDEO (X) |
|
OUT |
± 0.35 V p-p, Zo = 75 Z |
|
|
|
|
|
2 |
Pb VIDEO (X) |
|
OUT |
± 0.35 V p-p, Zo = 75 Z |
|
|
|
|
|
3 |
NC |
|
|
No connection |
|
|
|
|
|
|
for |
for |
|
|
|
RS422A |
RS232C |
|
|
|
|
|
|
|
4 |
TX0 (+) |
TX1 |
OUT |
TRUNK Data out |
|
|
|
|
|
5 |
TX0 (_) |
TX0 |
OUT |
|
|
|
|
|
|
6 |
RX0 (_) |
RX0 |
IN |
TRUNK Data in |
|
|
|
|
|
7 |
RX0 (+) |
RX1 |
IN |
|
|
|
|
|
|
8 |
GND (VIDEO) |
|
—— |
GND for VIDEO |
|
|
|
|
|
9 |
Y VIDEO (X) |
|
OUT |
1.0 V p-p, Zo = 75 Z |
|
|
|
|
|
10 |
GND |
|
—— |
GND for SCL/SDA |
|
|
|
|
|
11 |
SCL EXT-VF |
|
OUT |
TTL level |
|
|
|
|
|
12 |
SDA EXT-VF |
|
IN/OUT |
TTL level |
|
|
|
|
|
1-8 |
HDC1000/V1(E) |
!, TRACKER (10P FEMALE)
|
8 |
1 |
|
7 |
10 |
9 |
2 |
6 |
3 |
||
|
5 |
4 |
|
(External view)
No. |
Signal |
I/O |
Specifications |
1 |
TRACKER |
OUT |
TRACKER RECEIVE/PGM |
|
LEFT |
|
_20 dBu unbalanced |
|
|
|
|
2GND (TALK) —— GND for TRACKER TALK
3GND (RECEIVE/ —— GND for RECEIVE/PGM/TL
PGM/TL)
4 |
TRACKER RIGHT |
OUT |
TRACKER RECEIVE/PGM |
|
|
|
|
_20 dBu unbalanced |
|
|
|
|
|
|
5 |
UNREG |
OUT |
+12 V (+10.5 to +17.0 V) |
|
|
|
|
|
|
6 |
GND (UNREG) |
—— |
GND for UNREG |
|
|
|
|
|
|
7 |
TRACKER |
IN |
TRACKER TALK |
|
|
TALK (X) |
|
0 dBu /_20 dBu |
|
|
|
|
|
|
8 |
TRACKER |
IN |
High impedance balanced |
|
|
TALK (Y) |
|
|
|
|
|
|
|
|
9 |
G TALLY |
OUT |
ON : |
GND |
|
|
|
OFF : High impedance |
|
|
|
|
|
(Open collector) |
|
|
|
|
|
10 |
R TALLY |
OUT |
ON : |
GND |
|
|
|
OFF : High impedance |
|
|
|
|
|
(Open collector) |
(0 dBu = 0.775 Vrms)
!.MIC 1 IN (3P FEMALE) (HDC1400/1500/1550/ 1580)
|
|
|
2 |
1 |
|
|
|
|
|
3 |
|
|
|
|
(External view) |
||
|
|
|
|
||
No. Signal |
I/O |
|
Specifications |
||
|
|
|
|
|
|
1 |
MIC 1 |
(G) |
—— |
|
_60 dBu, _50 dBu, _40 dBu, |
|
|
|
|
|
_30 dBu, _20 dBu, selectable |
2 |
MIC 1 |
(X) |
IN |
|
|
|
|
|
|
|
|
3 |
MIC 1 |
(Y) |
IN |
|
High impedance, Balanced |
|
|
|
|
|
|
|
|
|
|
|
(0 dBu = 0.755 Vrms) |
1-2-2. Wiring Diagrams for Cables
CCA-5 Cable
Black
White
Orange
White
Brown
Red
White
Red
Brown |
Brown |
— 8P CONNECTOR (MALE) —
(WIRING SIDE)
HDC1000/V1(E) |
1-9 |

1-2-3. Connection Connectors/Cables
Connection made with the connector panels during installation or service, should be made with the connectors/ complete cable assemblies specified in the following list, or equivalent parts.
Indication |
Connection connector/cable |
TEST OUT |
1-569-370-12 Plug, BNC |
PROMPTER OUT |
|
SDI 1/2 |
|
(BNC) |
|
|
|
AUDIO IN CH1/CH2 |
1-508-084-00 XLR, 3P Male or |
MIC 1 IN |
ITT Cannon XLR-3-12C equivalent |
(3P FEMALE) |
|
|
|
RET CONTROL |
1-560-078-00 Plug, 6P Male or |
(6P FEMALE) |
HIROSE HR10-7PA-6P equivalent |
|
|
DC OUT |
1-566-425-11 Plug, 4P Male or |
(4P FEMALE) |
HIROSE HR10A-7P-4P equivalent |
|
|
INTERCOM 1/2 |
1-508-370-11 XLR, 5P Male or |
(5P FEMALE) |
ITT Cannon XLR-5-12C equivalent |
|
|
DC IN |
1-508-362-00 XLR, 4P Female or |
(4P MALE) |
ITT Cannon XLR-4-11C equivalent, or |
|
Cable assembly 1-551-577-00 |
|
(Supplied with AC-550/550CE) |
|
|
CRANE |
1-819-261-11 Connector, |
(12P FEMALE) |
Round Type 12P |
|
|
REMOTE |
.1-766-848-11 Plug, 8P Male or |
(8P FEMALE) |
CCA-5 cable assembly |
|
(CCA-5-10 (10 m) /CCA-5-3 (3 m)) |
|
(option) *2 *3 |
|
.REMOTE cable 1-783-372-11 |
|
(supplied with RM-B150, 10 m) *1 *2 *3 |
TRACKER |
1-506-522-12 Connector, |
(10P FEMALE) |
Round Type 10P |
|
|
*1: Use of REMOTE cable enables to monitor video signals. (The pin 8 is available for the video signal line.)
The down-converted SD signal is output.
*2: If using a cable of length different from a standard product, contact your local Sony Sales Office/Service Center.
n
*3: The pin 8 of CCA-5 cable is GND (ground).
The pin 8 of REMOTE cable is not GND (ground).
1-2-4. Note in Connecting CCU Connector
(HDC1000/1400/1500/1580)
It is recommendable to clean the optical contact portions mentioned below before connecting this unit to the camera control unit.
. CCU connector of this unit
. Camera connector of the camera control unit
. Optical/Electrical cable
For details on a cleaning method, refer to Section 1-8 “Cleaning of Connector/Cable”.
1-10 |
HDC1000/V1(E) |
1-3. Location of Printed Circuit Boards
HDC1000
SWITCHING REGULATOR
DC-DC COVERTER
AT-166
CN-2671
SW-1233
CN-2608
CN-2603 (for UCJ)
CN-2603B (for CE)
CN-2671
CN-2606
CN-2607
CN-2604
CN-2605
PA-317
BI-175
CN-2609
LE-291
CN-2602
SDI-84
TG-243
DR-528
 BI-175
LE-309 AT-163
AU-298
DAP-33
VDA-63
MB-1060
DPR-265
CN-2579
BI-175
CN-2578
HDC1000/V1(E) |
1-11 |
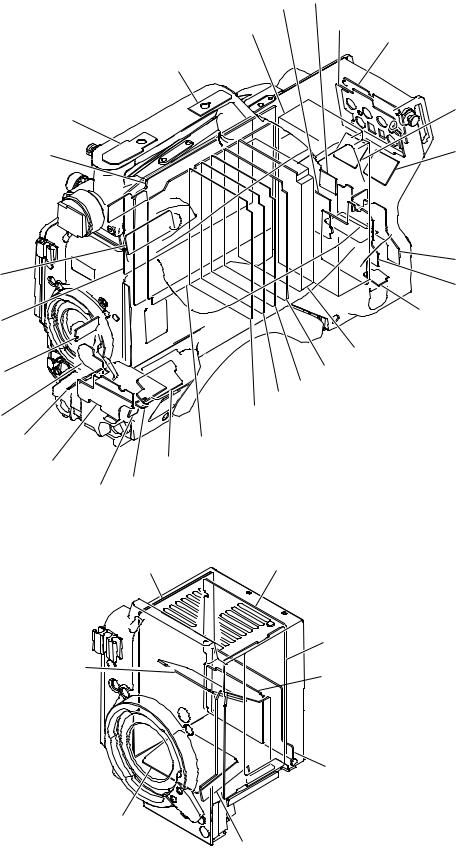
HDC1400/1500/1580
SW-1236
DPR-265 (HDC1400/1500)
DPR-265C (HDC1580)
CN-2614B 
SW-1237
SDI-84 (HDC1500)
SDI-84C (HDC1400/1580)
SW-1238
CN-2615
CN-2616
SW-1239
SW-1245
CN-2620
CN-2622
SW-1241 (HDC1400, HDC1500 (SY))
SW-1241B (HDC1500 (CE)/HDC1580)
SWITCHING REGULATOR
SW-1273
LE-308
CN-2618
CN-2618
 CN-2640
 SW-1242
CN-2619
CN-2621
CN-2623
DC-DC COVERTER
AT-163
AU-298
DAP-33
VDA-63
MB-1059
SW-1240
CN-2617
|
TG-243 (HDC1500) |
PA-317 (HDC1400/1500) |
TG-243B (HDC1400) |
PA-317C (HDC1580) |
TG-243C (HDC1580) |
DR-528
BI-175
 BI-175
CN-2579
BI-175
CN-2578
1-12 |
HDC1000/V1(E) |

HDC1550
|
|
CN-2620 |
CN-2622 |
|
|
SW-1241 (for UC) |
|
|
|
|
|
|
SWITCHING REGULATOR |
SW-1241B (for CE) |
|
|
SW-1273 |
||
|
|
FL-338 |
|
|
|
|
|
|
LE-308 |
|
FL-337 |
|
MX-109 |
|
|
|
|
|
CN-2618 |
SW-1236 |
|
|
|
DPR-265B |
|
|
CN-2618 |
TR-136 |
|
|
|
|
|
|
CN-2640 |
CN-2614 |
|
|
|
|
|
|
SW-1242 |
|
|
|
CN-2619 |
SW-1237 |
|
|
CN-2621 |
|
|
|
|
|
|
|
CN-2623 |
|
|
|
DC-DC COVERTER |
SW-1238 |
|
|
AT-163 |
|
|
|
AU-298 |
|
|
DAP-33 |
|
CN-2615 |
|
VDA-63 |
|
|
|
|
|
CN-2616 |
|
MB-1059 |
|
SW-1239 |
SW-1240 |
|
|
|
|
|
|
|
CN-2617 |
|
|
|
SW-1245 |
|
|
|
PA-317 |
|
TG-243 |
|
|
|
|
DR-528
BI-175
 BI-175
CN-2579
BI-175
CN-2578
HDC1000/V1(E) |
1-13 |
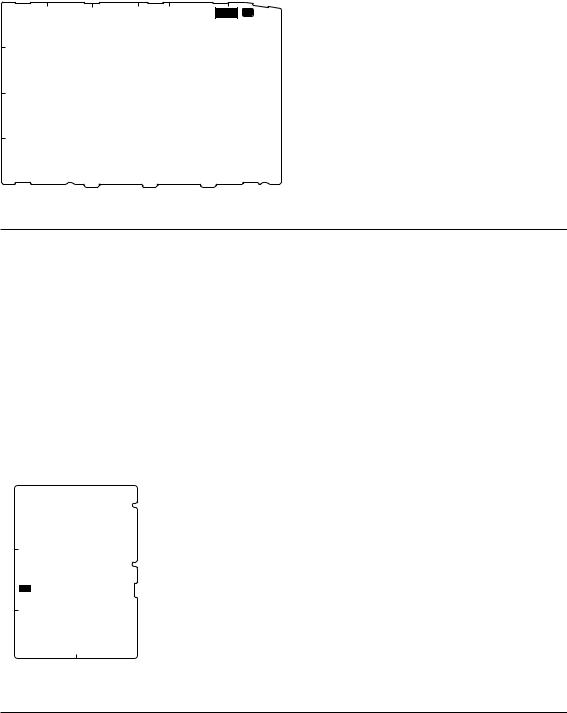
1-4. Opening/Closing the Side Panel
HDC1000
1.Unscrew the two lock screws of the side panel.
2.While sliding the safety lock toward the lens, open the side panel by holding the handle.
3.Close the side panel and tighten securely the lock screws of the side panel.
n
Closing the side panel brings the safety lock to an automatic locking.
Safety lock |
Handle |
Lock screws of the side panel |
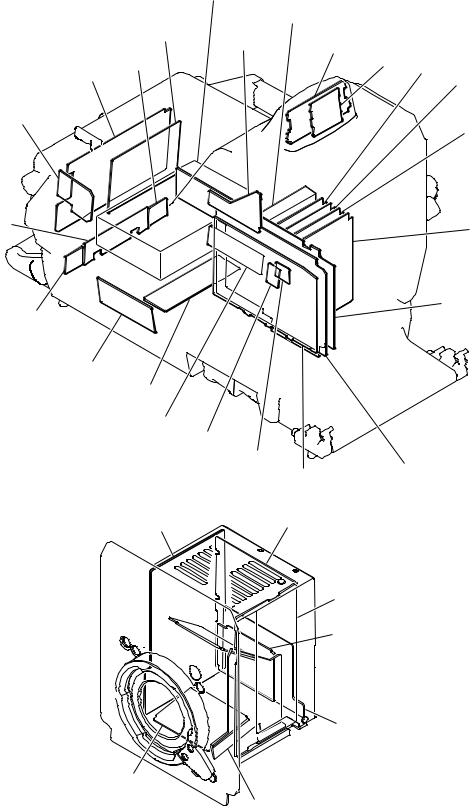
HDC1400/1500/1580
1.Unscrew the nine screws as shown in the figure, then open the inside panel and outside panel.
2.Release the hanging band (FRONT) and hanging band (REAR) from the inside panel.
3.Disconnect the harness from the connector (CN1) on the SW-1240 board, and remove the inside panel.
4.Disconnect the harness from the switching regulator connector, and remove the outside panel.
Outside panel |
Switching regulator |
|
|
Hanging Band |
|
|
(REAR) |
|
Screws |
|
|
Hanging Band |
CN1 |
|
(FRONT) |
|
|
SW-1240 board |
Inside panel |
Screws |
|
||
5. Reinstall the panels by reversing the steps above.
1-14
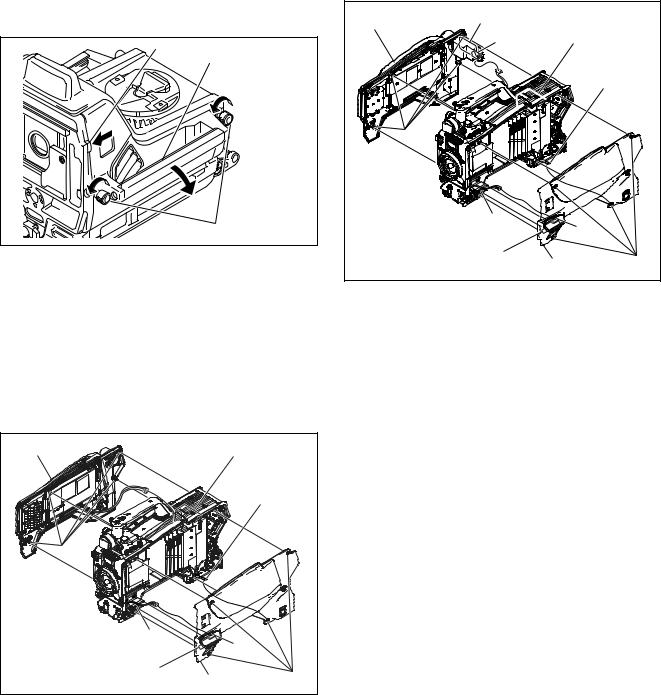
HDC1550
1.Unscrew the nine screws as shown in the figure, then open the inside panel and outside panel.
2.Release the hanging band (FRONT) and hanging band (REAR) from the inside panel.
3.Disconnect the harness from the connector (CN1) on the SW-1240 board, and remove the inside panel.
4.Disconnect the harness from the connector (CN3) on the FL-337 board, and remove the outside panel.
Outside panel |
FL-337 board |
|
|
|
CN3 |
Switching regulator |
|
|
|
|
|
|
|
Hanging Band |
|
|
|
(REAR) |
|
Screws |
|
|
|
Hanging Band |
CN1 |
|
|
(FRONT) |
|
|
|
SW-1240 board |
Inside panel |
Screws |
|
|
|
||
5. Reinstall the panels by reversing the steps above.
HDC1000/V1(E)

1-5. Switch Settings
AT-163 Board
A B C
1
S1
2
3
4
5
AT-163 BOARD (SIDE A)
Ref. No. |
Name |
Description |
Factory setting |
S1-1 |
Reserve |
Not used (Fixed to OFF) |
OFF |
|
|
|
|
S1-2 |
All Preset |
FRAM clear |
OFF |
|
|
|
|
S1-3 |
Reserve |
Not used (Fixed to OFF) |
OFF |
|
|
|
|
S1-4 |
Firmware Load |
Forcibly upgrading of firmware |
OFF |
|
|
|
|
AT-166 Board (HDC1000)
C B A
1
2
S1
AT-166 BOARD (SIDE B)
Ref. No. |
Name |
Description |
Factory setting |
S1-1 |
ICE |
Not used (Fixed to OFF) |
OFF |
|
|
|
|
S1-2 |
WRITER |
Switch ON for software upgrading |
OFF |
|
|
|
|
S1-3 |
TEST1 |
Not used (Fixed to OFF) |
OFF |
|
|
|
|
S1-4 |
TEST2 |
Not used (Fixed to OFF) |
OFF |
|
|
|
|
HDC1000/V1(E) |
1-15 |

AU-298 Board
D |
|
|
|
|
|
|
|
|||||
|
|
|
S3 |
|
|
|
|
|
|
|
||
|
|
|
|
|
|
|
|
|
|
|||
|
|
|
|
|
|
|
|
|
|
|||
C |
|
|
|
|
|
|
|
|||||
B |
|
|
|
|
|
|
|
|||||
A |
|
|
|
|
|
|
|
|||||
|
|
|
S1 |
S2 |
|
|
|
|
|
|||
|
|
|
|
|
|
|
|
|||||
|
|
|
|
|
|
|
|
|
|
|
|
|
1 |
|
|
2 |
3 |
|
|
|
|||||
AU-298 BOARD (SIDE A) |
|
|
||||||||||
|
|
|
|
|
|
|
|
|
|
|
|
|
|
Ref. No. |
|
|
Name |
Description |
Factory setting |
||||||
|
|
|
|
|
|
|
|
|
|
|
|
|
|
S1 |
|
|
Reserve |
Not used (Fixed to NORM) |
NORM |
||||||
|
|
|
|
|
|
|
|
|
|
|
|
|
|
S2 |
|
|
Reserve |
Not used (Fixed to NORM) |
NORM |
||||||
|
|
|
|
|
|
|
|
|
|
|
|
|
|
S3-1 |
|
|
AB POWER MIC1 |
Switch ON to supply +12 V for MIC POWER to the |
OFF |
||||||
|
|
|
|
|
|
|
|
|
|
|
microphone connected to the AUDIO IN CH1 connector. |
|
|
|
|
|
|
|
|
|
|
|
|
|
|
|
S3-2 |
|
|
AB POWER MIC2 |
Switch ON to supply +12 V for MIC POWER to the |
OFF |
||||||
|
|
|
|
|
|
|
|
|
|
|
microphone connected to the AUDIO IN CH2 connector. |
|
|
|
|
|
|
|
|
|
|
|
|
|
|
DPR-265 Board (HDC1000/1400/1500/1550)
DPR-265C Board (HDC1580)
A |
B |
C |
D |
E |
F |
5
4
3

 S13
S13
2
1
DPR-265/265C BOARD (SIDE A)
Ref. No. |
Name |
Description |
Factory setting |
S13 |
Reserve |
Not used (Fixed to OFF) |
OFF |
|
|
|
|
1-16 |
HDC1000/V1(E) |
SDI-84 Board (HDC1000/1500)
SDI-84C Board (HDC1400/1580)
A |
B |
C |
D |
E |
F |
|
1 |
|
|
|
|
S201 |
S202 |
2
3
4
SDI-84/84C BOARD (SIDE A)
Ref. No. |
Name |
Description |
Factory setting |
|
|
|
|
|
|
|
|
|
HDC1000/1500 |
HDC1400/1580 |
|
|
|
|
|
S201-1 |
TEST |
Not used (Fixed to OFF) |
OFF |
OFF |
|
|
|
|
|
S201-2 |
PROMPTER2 OUT |
Switch ON for PROMPTER2 |
ON (active) |
OFF |
|
|
|
|
|
S201-3 |
VBS RET IN |
Switch ON for VBS RET |
OFF (non-active) |
OFF |
|
|
|
|
|
S201-4 to 8 |
Reserve |
Not used (Fixed to OFF) |
OFF |
OFF |
|
|
|
|
|
S202 |
LD RESET |
Not used (Fixed to OFF) |
OFF |
OFF |
|
|
|
|
|
TG-243 Board (HDC1000/1500)
TG-243B Board (HDC1400)
TG-243C Board (HDC1580)
C
B
S1
A
1 2
TG-243/243C BOARD (SIDE A)
Ref. No. |
Name |
Description |
Factory setting |
S1 |
Test |
Not used |
OFF |
|
|
|
|
HDC1000/V1(E) |
1-17 |

TR-136 Board (HDC1550)
A B C D
1 S1
2
3
TR-136 BOARD (SIDE A)
Ref. No. |
Name |
Description |
Factory setting |
S1-1 |
|
When this switch is set to ON, the multiformat |
OFF |
|
|
color-bar signal is output from the built-in video |
|
|
|
test signal generator. |
|
|
|
|
|
S1-2 |
|
Spare (not used) |
OFF |
S1-3 |
|
|
|
|
|
|
|
S1-4 |
|
When this switch is set to ON, the 400 Hz sine wave |
OFF |
|
|
is output from the built-in audio test signal generator. |
|
|
|
|
|
S1-5 |
|
When this switch is set to ON, the 1 kHz sine wave |
OFF |
|
|
is output from the built-in audio test signal generator. |
|
|
|
|
|
S1-6 to S1-8 |
|
Spare (not used) |
OFF |
|
|
|
|
1-18 |
HDC1000/V1(E) |

1-6. Notes for Replacing Parts
There are two kinds of types in the parts below used in this unit.
.Flexible card wires (Refer to Section 1-6-1.)
.Boards (Refer to Section 1-6-2.)
.Connectors on the board (for flexible card wires) (Refer to Section 1-6-3.)
When replacing the parts above, be sure to follow the instructions described in “1-6-1. Notes for Replacing the Flexible Card Wire”, “1-6-2. Notes for Replacing the Board”, and “1-6-3. Notes for Replacing the Connector on the Board”.
Be sure to use the specified parts. Using un-specified parts causes the change in the characteristics of this unit and the unit does not work properly.
Spare parts are listed in the spare parts list of “Spare Parts” Section. In the spare parts list, (GOLD) or (SILVER) is put after each part name to distinguish two kinds of types (gold and silver).
1-6-1. Notes for Replacing the Flexible Card Wire
When replacing the flexible card wires listed below, confirm the conductive (terminal) part color of the flexible card wires and follow the procedure below.
1.Replace the flexible card wire with a flexible card wire whose conductive part is gold when the conductive part of a flexible card wire is gold.
n
For the board on which a connector whose contact surface is gold is used, “G” is put after the board name by silkscreen printing or a “G” seal is attached to the empty space on the board. Example: AT-166G
2.Replace the flexible card wire with a flexible card wire whose conductive part is silver when the conductive part of a flexible card wire is silver. In this case, silk “G” or a “G” seal is not put on the board name.
When the conductive part is gold (HDC1000)
Board |
|
Flexible card wire |
Board |
|
|
|
|
|
|
|
|
Pin |
Gold : Parts No. |
|
|
|
|
|
|
AT-166G |
30 |
1-831-132-11 |
SW-1233G |
|
|
|
|
|
|
CN-2609G |
30 |
1-831-118-11 |
MB-1060G |
|
|
|
|
|
|
CN-2579G |
40 |
1-831-658-11 |
PA-317G |
|
|
|
|
|
|
CN-2579G |
30 |
1-831-656-11 |
DR-528G |
|
|
|
|
|
|
DR-528G |
45 |
1-831-659-11 |
TG-243G |
|
|
|
|
|
|
When the conductive part is gold (HDC1500/1550)
Board |
|
Flexible card wire |
Board |
|
|
|
|
|
|
|
|
Pin |
Gold : Parts No. |
|
|
|
|
|
|
CN-2619G |
40 |
1-831-662-11 |
MB-1059G |
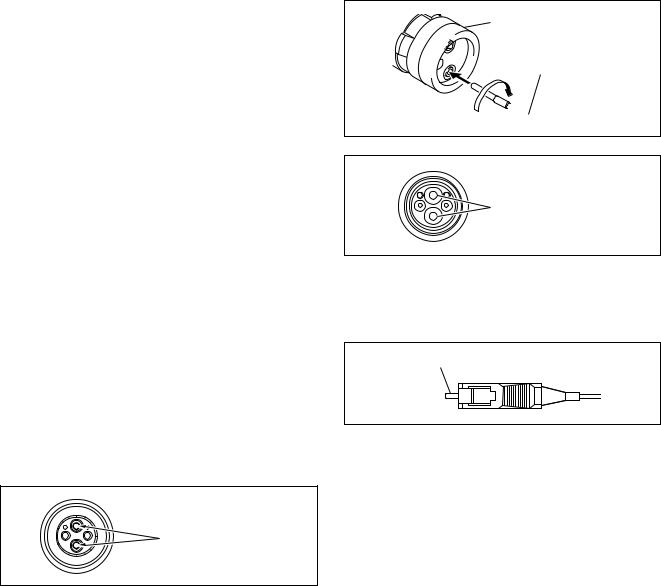
|
|
|
|
|
|
CN-2621G |
36 |
1-831-663-11 |
MB-1059G |
|
|
|
|
|
|
MB-1059G |
36 |
1-831-661-12 |
SW-1273G |
|
|
|
|
|
|
CN-2579G |
40 |
1-831-658-11 |
PA-317G |
|
|
|
|
|
|
CN-2579G |
30 |
1-831-656-11 |
DR-528G |
|
|
|
|
|
|
DR-528G |
45 |
1-831-659-11 |
TG-243G |
|
|
|
|
|
|
When the conductive part is silver (HDC1000)
Board |
|
Flexible card wire |
Board |
||
|
|
|
|
|
|
|
|
Pin |
Silver : Parts No. |
|
|
|
|
|
|
|
|
AT-166 |
30 |
1-823-558-11 |
|
SW-1233 |
|
|
|
|
|
|
|
CN-2609 |
30 |
1-757-644-11 |
|
MB-1060 |
|
|
|
|
|
|
|
CN-2579 |
40 |
1-830-485-11 |
|
PA-317 |
|
|
|
|
|
|
|
CN-2579 |
30 |
1-830-735-11 |
|
DR-528 |
|
|
|
|
|
|
|
DR-528 |
45 |
1-830-484-11 |
|
TG-243 |
|
|
|
|
|
|
|
When the conductive part is silver (HDC1500/1550)
Board |
Flexible card wire |
Board |
||
|
|
|
|
|
|
Pin |
Silver : Parts No. |
|
|
|
|
|
|
|
CN-2619 |
40 |
1-830-483-11 |
|
MB-1059 |
|
|
|
|
|
CN-2621 |
36 |
1-830-752-11 |
|
MB-1059 |
|
|
|
|
|
MB-1059 |
36 |
1-830-482-11 |
|
SW-1273 |
|
|
|
|
|
CN-2579 |
40 |
1-830-485-11 |
|
PA-317 |
|
|
|
|
|
CN-2579 |
30 |
1-830-735-11 |
|
DR-528 |
|
|
|
|
|
DR-528 |
45 |
1-830-484-11 |
|
TG-243 |
|
|
|
|
|
HDC1000/V1(E) |
1-19 |

1-6-2. Notes for Replacing the Board
Replace the board with a board of the same number as the spare part number of the board to be removed when replacing a board.
Example: A spare part number is put on the board.
A spare part number is put on side A or B of the board
A-1159-990-A
by silk-screen printing or a spare part code label (spare part number) is attached on side A or B.
Spare part number
1-6-3. Notes for Replacing the Connector on the Board
There are two types of connectors for the flexible card wire mounted on the board used in this unit. Distinguish them in the procedure below when replacing these connectors.
1.The contact surface of the connector used for a board is gold when the conductive part of a flexible card wire is gold.
In a spare parts list, (GOLD) is put after the part name.
2.The contact surface of the connector used for a board is silver when the conductive part of a flexible card wire is silver.
In a spare parts list, (SILVER) is put after the part name.
1-6-4. Notes for HDC1400 and HDC1580
The contact of flexible card wire used in the HDC1400 and HDC1580 is gold-plated. Therefore, when the flexible card wire needs to be replaced, use the part listed below.
Also, for the board on which a connector whose contact surface is gold is used, "G" is put after the board name by silkscreen printing or a "G" seal is attached to the empty space on the board. Example: CN2619G
Board |
|
Flexible card wire |
Board |
|
|
|
|
|
|
|
|
Pin |
Gold : Parts No. |
|
|
|
|
|
|
CN-2619G |
40 |
1-833-557-11 |
MB-1059G |
|
|
|
|
|
|
CN-2621G |
36 |
1-831-663-11 |
MB-1059G |
|
|
|
|
|
|
MB-1059G |
36 |
1-831-661-12 |
SW-1273G |
|
|
|
|
|
|
CN-2579G |
40 |
1-831-658-11 |
PA-317CG *1/PA-317G *2 |
|
CN-2579G |
30 |
1-831-656-11 |
DR-528G |
|
|
|
|
|
|
DR-528G |
45 |
1-831-659-11 |
TG-243CG *3/TG-243BG *4 |
|
*1, *3: For HDC1580
*2, *4: For HDC1400
1-20 |
HDC1000/V1(E) |

1-7. Cleaning the Vent Portion of the
Fan (HDC1400/1500/1550/1580)
The ventilate bracket for preventing from dust is attached in the vent portion of the fan. Clean the ventilate bracket every two or three months. Clogging may cause the temperature increases inside the camera and result in a trouble.
1.Loosen the two screws with stopper, and remove the shoulder pad assembly.
2.Remove the two screws, and remove the ventilate bracket.
3.Remove dust on the ventilate bracket with a vacuum cleaner.
|
Screws with stopper |
Precision |
Ventilate bracket Shoulder pad assembly |
P2 x4 |
HDC1000/V1(E) |
1-21 |
1-8. Cleaning of Connector/Cable
(HDC1000/1400/1500/1580)
The photo receptive condition of the optical connector can be checked at OPTICAL CONDITION of the DPR board of the camera control unit.
When lit in green: Normal (_17 dBm or above) When lit in yellow: Normal (_17 to _20 dBm) When lit in red: Abnormal (Less than _20 dBm)
When lit in red, be sure to clean the optical contact portions.
When lit in yellow, cleaning is recommended.
The attenuation of the photo-receptive level may cause transmission error between the camera and HDCU. In the case of attenuation, be sure to clean optical contact portions proceeding as follows. The optical contact portions exist in the optical connector on the camera or HDCU, and in the optical/electrical cables.
1-8-1. When the Optical Connector Cleaner
(Commercially Available) is Available
Tools required
.Optical connector cleaner (commercially available) Product name: CLETOP®
14100402 or 14100403 (stick type) or equivalent 14100402: 2.0 mm
14100403: 2.0/2.5 mm double ended m
.Alcohol is not necessary during cleaning.
.Number of possible wipes is one cleaning per a piece. Do not reuse it.
Cleaning procedure [Male connector]
Clean the tip of the white optical contacts using the optical connector cleaner.
[Female connector]
1.Insert the optical connector cleaner straight. Ensure that it is held straight when inserting.
2.Apply sufficient pressure (approximately 600 g to 700 g) to ensure that the optical contact is a little depressed.
3.While pressing the optical connector cleaner against the tip of the optical contact, rotate the optical connector cleaner by 4 to 5 turns clockwise. Holding the optical connector cleaner at around its support facilitates to apply the pressure.
Alignment sleeve
Optical connector cleaner
Support 

Optical contacts (white)
[Connector]
Clean the tip of the white optical contacts using the optical connector cleaner.
Optical contacts (white)
Optical contacts (white)
1-22 |
HDC1000/V1(E) |
 Loading...