


Smeg SF6381X, SF65X, SF65N, SF166, SF381X User Manual
...
|
|
|
Contents |
|
|
|
|
|
|
|
|
1 |
Instructions |
30 |
|
||
|
|
1.1 |
How to read the user manual |
30 |
|
|
|
1.2 |
This user manual |
30 |
|
|
|
1.3 |
Appliance purpose |
30 |
|
|
|
1.4 |
General safety instructions |
30 |
|
|
|
1.5 |
Manufacturer liability |
31 |
|
|
|
1.6 |
Identification plate |
31 |
|
|
|
1.7 |
Disposal |
31 |
|
|
2 Description |
32 |
|
||
|
|
2.1 |
General Description |
32 |
|
|
|
2.2 |
Control panel |
34 |
|
|
|
2.3 |
Other parts |
35 |
|
|
|
2.4 |
Available accessories |
36 |
|
|
3 Use |
|
38 |
|
|
|
|
3.1 |
Instructions |
38 |
|
|
|
3.2 |
First use |
38 |
|
|
|
3.3 |
Using the accessories |
38 |
|
|
|
3.4 |
Using the oven |
40 |
|
|
|
3.5 |
Cooking advice |
43 |
|
|
4 Cleaning and maintenance |
46 |
|
||
|
|
4.1 |
Instructions |
46 |
|
|
|
4.2 |
Cleaning the surfaces |
46 |
|
|
|
4.3 |
Ordinary daily cleaning |
46 |
|
|
|
4.4 |
Food stains or residues |
46 |
|
|
|
4.5 |
Removing the door |
46 |
|
|
|
4.6 |
Cleaning the door glazing |
47 |
|
|
|
4.7 |
Removing the internal glass panels |
47 |
|
|
|
4.8 |
Cleaning the inside of the oven |
48 |
|
|
|
4.9 |
Vapor Clean: assisted oven cleaning (on some models only) |
49 |
|
|
|
4.10 Extraordinary maintenance |
51 |
|
|
5 |
Installation |
52 |
|
||
|
|
5.1 |
Electrical connection |
52 |
|
|
|
5.2 |
Cable replacement |
52 |
|
|
|
5.3 |
Positioning |
53 |
|
We advise you to read this manual carefully, which contains all the instructions for maintaining the appliance's aesthetic and functional qualities.
For further information on the product: www.smeg.com
EN
29
Instructions
1 Instructions
1.1 How to read the user manual
This user manual uses the following reading conventions:
Instructions
General information on this user manual, on safety and final disposal.
Description
Description of the appliance and its accessories.
Use
Information on the use of the  appliance and its accessories,
cooking advice.
Cleaning and maintenance
Information for proper cleaning and maintenance of the appliance.
Installation
Information for the qualified technician: installation, operation and inspection.
Safety instructions
Information
Advice
1. Use instruction sequence.
• Single use instruction.
1.2 This user manual
This user manual is an integral part of the appliance and must therefore be kept in its entirety and in an accessible place for the whole working life of the appliance.
1.3 Appliance purpose
This appliance is intended for cooking food in the home environment. Every other use is considered improper.
This appliance must not be used by people (including children) of reduced physical and mental capacity, or lacking in experience in the use of electrical appliances, unless they are supervised or instructed by adults who are responsible for their safety.
1.4 General safety instructions
For your safety and to avoid damage to the appliance, always respect the general safety instructions indicated below. In general
•have qualified personnel carry out installation and assistance interventions according to the standards in force.
•Read this user manual carefully before using the appliance.
•Do not modify this appliance.
•Do not attempt to repair the appliance yourself or without the intervention of a qualified technician.
•If the power supply cable is damaged, contact the technical assistance centre immediately and they will replace it.
30
Instructions
For this appliance
•Do not obstruct ventilation openings and heat dispersal slots.
•Do not insert pointed metal objects (cutlery or utensils) into the slots in the appliance.
•Do not rest any weight or sit on the open door of the appliance.
•Take care that no objects are stuck in the doors.
•Do not use the appliance to heat rooms for any reason.
1.5 Manufacturer liability
The manufacturer declines all responsibility for damage to persons or property caused by:
•use of the appliance other than the one envisaged,
•non-observance of the user manual provisions.
•tampering with a single part of the appliance,
•use of non-original spare parts.
1.6 Identification plate
The identification plate bears the technical data, serial number and brand name of the appliance. Do not remove the identification plate for any reason.
1.7 Disposal
This appliance must be disposed of separately from other waste
(Directives 2002/95/EC, 2002/ 96/EC, 2003/108/EC). The appliance does not contain substances in quantities sufficient to be considered hazardous to health and the environment, in accordance with current European directives.
To dispose of the appliance: |
|
|
• Remove the doors and leave the |
|
|
accessories (racks and trays) in their |
|
|
normal working positions, so that |
|
|
EN |
||
children cannot get stuck in the oven |
||
|
||
compartment. |
|
|
• Cut the power supply cable and remove |
|
|
it along with the plug. |
|
|
Power voltage |
|
|
Danger of electrocution |
|
•Disconnect the main power supply.
•Disconnect the power cable from the electrical system.
•Consign the appliance to the appropriate selective collection centres for electrical and electronic equipment waste, or deliver it back to the retailer when purchasing an equivalent product, on a one for one basis.
Our appliances are packed in nonpolluting and recyclable materials.
• Consign the packing materials to the appropriate selective collection centres.
Plastic packaging
Danger of suffocation
•Do not leave the packaging or any part of it unattended.
•Do not let children play with the packaging plastic bags.
31

Description
2 Description
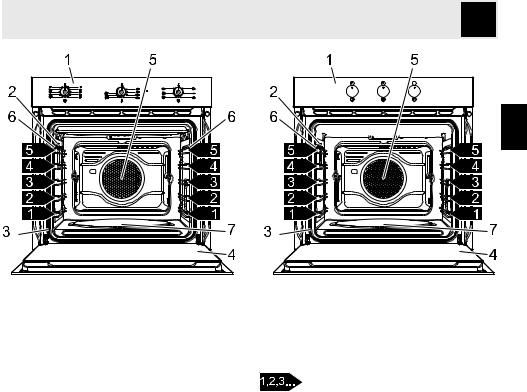
2.1 General Description
Multifunction models
32
Description


 EN
EN
|
|
Models with pizza plate |
|
1 |
Control panel |
5 |
Fan |
2 |
Oven light |
6 |
Rack/tray support frames |
3 |
Seal |
7 |
Pizza plate |
4 |
Door |
|
Frame shelf |
33
Description
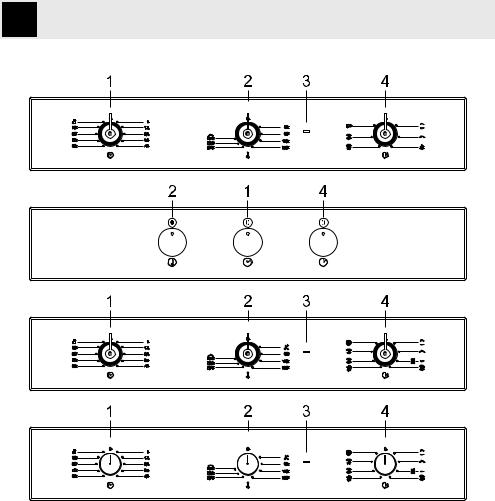
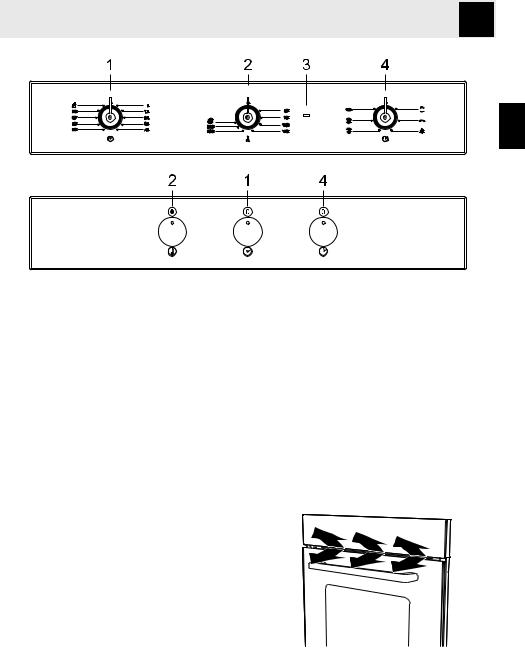
2.2 Control panel
Multifunction models
34
Description
EN
Models with pizza plate
Timer knob (1)
It allows you to use the timer or to perform manual cooking.
Temperature knob (2)
This knob allows you to select the cooking temperature.
Turn the knob clockwise to the required value, between the minimum and maximum settings.
Thermostat indicator light (3)
required function, set the cooking temperature using the temperature knob.
2.3 Other parts
Oven shelves
The oven features shelves for positioning trays and racks at different heights. The insertion heights are indicated from the bottom upwards (see 2.1 General Description).
Cooling fan
When the indicator light is flashing, it indicates that the oven is heating up to reach the set temperature. Once the temperature has been reached, the light remains lit until the oven is switched off. In pyrolytic models, the light switches on when the automatic cleaning cycle (pyrolysis) starts and remains lit until the cycle is complete.
Function knob (4)
The oven's various functions are suitable for different cooking modes. After selecting the
The fan cools the oven and comes into operation during cooking.
The fan causes a steady outflow of air from above the door which may continue for a
35
Description
brief period of time even after the appliance has been turned off.
Internal light
The oven light comes on when the door is opened or any function is selected.
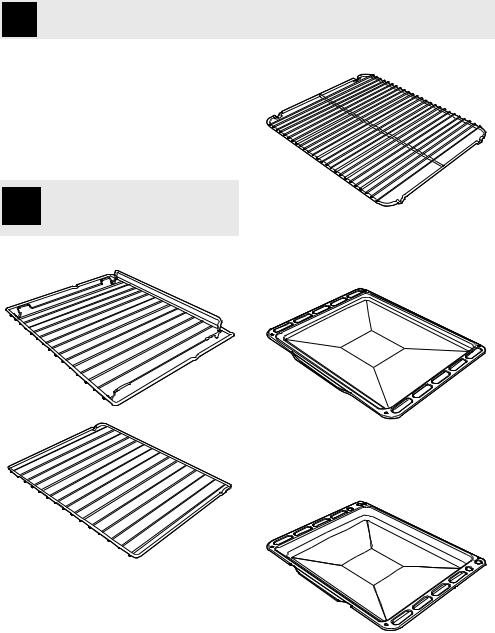
2.4 Available accessories
Some models are not provided with all accessories.
Rack
useful for holding cooking containers.
Tray rack
to be placed over the top of the oven tray; for cooking foods which may drip.
Oven tray
useful for collecting fat from foods placed on the rack above.
Deep tray
useful for collecting fat from foods placed on the rack above and for cooking pies, pizzas and baked desserts.
36
 Loading...