


Contents
1.INSTRUCTIONS FOR SAFE AND PROPER USE________________ 4
2.INSTALLATION __________________________________________ 6
3.DESCRIPTION OF CONTROLS _____________________________ 8
4.USE OF THE OVEN______________________________________ 17
5.AVAILABLE ACCESSORIES _______________________________ 18
6.COOKING HINTS________________________________________ 19
7.CLEANING AND MAINTENANCE ___________________________ 25
8.ADDITIONAL MAINTENANCE ______________________________ 29
INSTRUCTIONS FOR THE INSTALLER: these are intended for the qualified technician who must install the appliance, set it functioning and carry out an inspection test.
INSTRUCTIONS FOR THE USER: these contain user advice, description of the controls and the correct procedures for cleaning and maintenance of the appliance.
3
Introduction
1. INSTRUCTIONS FOR SAFE AND PROPER USE
THIS MANUAL IS AN INTEGRAL PART OF THE APPLIANCE AND THEREFORE MUST BE KEPT IN ITS ENTIRETY AND IN AN ACCESSIBLE PLACE FOR THE WHOLE WORKING LIFE OF THE OVEN. WE ADVISE CAREFUL READING OF THIS MANUAL AND ALL THE INSTRUCTIONS THEREIN BEFORE USING THE OVEN. INSTALLATION MUST BE CARRIED OUT BY QUALIFIED PERSONNEL IN ACCORDANCE WITH THE REGULATIONS IN FORCE. THIS APPLIANCE IS INTENDED FOR DOMESTIC USES AND CONFORMS TO CURRENT REGULATIONS IN FORCE. THE APPLIANCE HAS BEEN BUILT TO CARRY OUT THE FOLLOWING FUNCTIONS: COOKING AND HEATING-UP OF FOOD. ALL OTHER USES ARE CONSIDERED IMPROPER.
THE MANUFACTURER DECLINES ALL RESPONSIBILITY FOR IMPROPER USE.
DO NOT LEAVE THE PACKING IN THE HOME ENVIRONMENT. SEPARATE THE VARIOUS WASTE MATERIALS AND TAKE THEM TO THE NEAREST SPECIAL GARBAGE COLLECTION CENTRE.
IT IS OBLIGATORY FOR THE ELECTRICAL SYSTEM TO BE EARTHED ACCORDING TO THE METHODS REQUIRED BY SAFETY RULES.
WHEN LINKING UP TO MAINS BY PLUG AND SOCKET, MAKE SURE THAT BOTH ARE COMPATIBLE AND CONNECT BY MEANS OF A POWER CABLE COMPLYING WITH APPLICABLE REGULATIONS.
THE SOCKET MUST BE ACCESSIBLE AFTER THE APPLIANCE HAS BEEN BUILT IN.
NEVER UNPLUG BY PULLING ON THE CABLE.
DO NOT OBSTRUCT VENTILATION OUTLETS AND HEAT DISPERSAL SLITS.
IMMEDIATELY AFTER INSTALLATION CARRY OUT A BRIEF INSPECTION TEST OF THE OVEN, FOLLOWING THE INSTRUCTIONS BELOW. SHOULD THE APPLIANCE NOT FUNCTION, DISCONNECT IT FROM THE SUPPLY AND CALL THE NEAREST TECHNICAL ASSISTANCE CENTRE.
NEVER ATTEMPT TO REPAIR THE APPLIANCE.
ALWAYS CHECK THAT THE CONTROL KNOBS ARE IN THE “ZERO” (OFF) POSITION WHEN YOU FINISH USING THE OVEN.
4
Introduction
NEVER PUT INFLAMMABLE OBJECTS IN THE OVEN: THEY COULD BE ACCIDENTALLY CATCH LIGHT AND CAUSE FIRES.
DURING USE THE APPLIANCE BECOMES VERY HOT. TAKE CARE NOT TO TOUCH THE HEATING ELEMENTS INSIDE THE OVEN. TO AVOID BURNS AND SCALDS CHILDREN SHOULD BE KEPT AWAY
THE I.D. PLATE WITH TECHNICAL DATA, REGISTRATION NUMBER AND BRAND NAME IS POSITIONED VISIBLY ON THE OVEN DOOR FRAME.
THE PLATE MUST NOT BE REMOVED.
THIS APPLIANCE IS DESIGNED FOR COOKING FOOD AND IT SHALL NOT BE USED AS A SPACE HEATER.
DO NOT SPRAY AEROSOLS IN THE VICINITY OF THIS APPLIANCE WHILE IT IS IN OPERATION.
THE OVEN IS DESIGNED FOR USE BY ADULTS. DO NOT ALLOW CHILDREN TO GO NEAR OR PLAY WITH IT. IT’S NOT INTENDED FOR USE BY YOUNG CHILDREN OR INFIRM PERSONS WITHOUT SUPERVISION.
BEFORE THE APPLIANCE IS PUT INTO OPERATION, ALL THE LABELS AND PROTECTIVE FILMS APPLIED INSIDE OR OUTSIDE MUST BE REMOVED.
WHERE THIS APPLIANCE IS INSTALLED IN MARINE CRAFT OR IN CARAVANS, IT SHALL NOT BE USED AS A SPACE HEATER.
The manufacturer declines all responsibility for damage to persons or things caused by non-observance of the above guidlines or by interference with any part of the appliance or by the use of non-original spares.
5
Instructions for the installer
2. INSTALLATION
2.1 Electrical connection
Check that the mains voltage and power cable ratings are as per the information provided on the label attached to the oven door frame.
This label must never be removed.
It is obligatory for the electrical system to be earthed according to the methods required by safety rules.
If a plug and socket connection is being used make sure that the plug and socket are compatible. Avoid use of adapters and shunts as these could cause overheating and risk of burns.
If a fixed connection is being used fit cable line with an omnipolar circuit breaker with a contact opening gap equal to or greater than 3 mm in an easily accessible position in proximity to the oven.
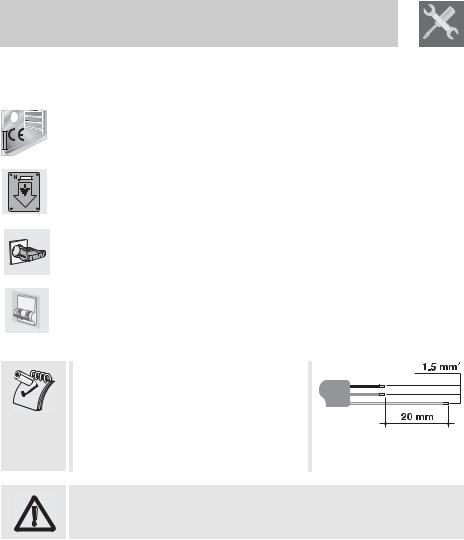
For operation on 230V : use an H05RR-F / H05RN-F type three-core cable (3 x 1.5 mm2).
The cable end to be connected to the appliance must be provided with an earth wire (yellow-green) at least 20 mm longer.
The manufacturer declines all responsibility for damage to persons or things caused by non-observance of the above guidelines or by interference with any part of the appliance.
6

Instructions for the installer
2.2 Installing the oven
The oven is designed for installation into any piece of furniture as long as it is heat-resistant. Proceed according to the dimensions shown in Figures 1, 2 and 3. For installing under a work top, follow the dimensions given in Figure 3. For installing under a work top beneath a hob with controls connected to the oven, ensure a minimum clearance from any side walls of at least 110 mm as shown in Figure 1.
For installing in a column, follow the dimensions given in Figure 2 allowing for a clearance of 80 to 90 mm at the top and sides of the column. Tighten the four screws (ref.A) inside the frame to secure (Fig. 1).
For installing beneath a separate hob, allow for a rear and bottom clearance as shown in Figure 1 (ref. B). See relevant instructions for fitting and securing the hob.
Never use the oven door to lever the oven into place when fitting.
Avoid exerting too much pressure on the oven door when open.
7
Instructions for the user
3. DESCRIPTION OF CONTROLS
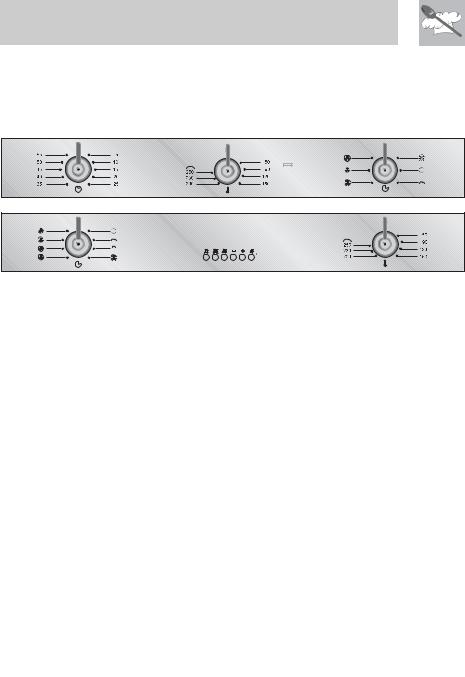
3.1 Front control panel
All the oven controls are grouped together on the front panel.
Before using the oven check that the electronic programmer is showing the symbol  (see paragraph “3.2 Electronic programmer”.
The user has only to press the central key 

 for 1 - 2 seconds to enable use of the oven on first use or after a power blackout.
THERMOSTAT CONTROL KNOB
Cooking temperature is selected by turning the knob clockwise to the desired setting, between 50° and 250°C.
8
Instructions for the user
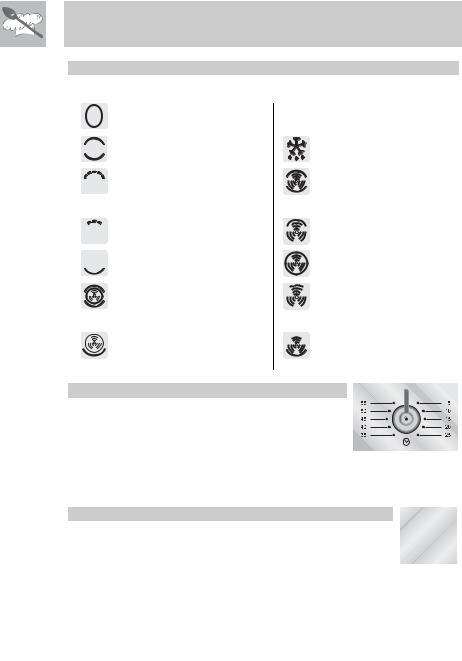
FUNCTION CONTROL KNOB
Rotate the knob in either direction to select desired function from the following:
NO FUNCTION SET
UPPER AND LOWER |
DEFROSTING |
HEATING ELEMENT |
|
WIDE GRILL ELEMENT |
UPPER AND LOWER |
|
HEATING ELEMENT + |
|
VENTILATION |
GRILL ELEMENT |
FULL GRILL ELEMENT + |
|
VENTILATION |
LOWER HEATING |
VENTILATED |
ELEMENT |
HEATING ELEMENT |
UPPER AND LOWER |
GRILL ELEMENT + |
HEATING ELEMENT + |
VENTILATION |
VENTILATED HEATING |
|
ELEMENT |
|
LOWER HEATING |
LOWER HEATING |
ELEMENT + VENTILATED |
ELEMENT + |
HEATING ELEMENT |
VENTILATION |
MINUTE COUNTER KNOB
Turn the knob clockwise to the desired time.
Time is expressed in minutes (maximum 55 minutes).
Adjustment is continuous so that intermediate times between markings can also be set. Alarm activation at end of pre-set time does not turn off the oven (no end of cooking).
THERMOSTAT INDICATOR LIGHT (ORANGE)
When this light comes on, the oven is heating up.
When this light goes out, the preset heating temperature has been reached.
When the light flashes, the temperature inside the oven is steady.
PILOT LIGHT (GREEN)
This light comes on when any of the oven elements is receiving power.
9

Instructions for the user
3.2 Electronic Analogue Clock
 LIST OF FUNCTIONS
MINUTE-MINDER BUTTON
AUTOMATIC SWITCH-OFF TIMING BUTTON
TIME SETTING AND RESET
VALUE DECREASE BUTTON
VALUE INCREASE BUTTON
3.2.1 Setting the time
When the oven is used for the first time, or after a power blackout, the
display flashes on and off at regular intervals. Press the 

 key for 1/2 seconds to stop the display flashing and start setting of the current time.
Press the value modification keys  or
or 

 to increase or decrease by one minute for each time a key is pressed.
Press one of the two value modification keys until the current time appears. The clock will start from the time set 6/7 seconds after the last key is pressed.
At the end of each programmed cooking operation, the clock gives 8 beeps, repeated 3/4 times at intervals of about 1 and a half minutes. The beeps can be stopped at any moment by pressing any key.
10

Instructions for the user
3.2.2 Minute-minder
This function does not stop cooking but just triggers the beeps.
- When the  key is pressed the display illuminates, appearing as shown in figure 1;
-Press the  or
or  keys within 6/7 seconds to
set the minute-minder. Whenever a key is pressed, 1 outside segment, representing 1 cooking minute will light up (figure 2 shows 10 cooking minutes).
- The countdown will start 6/7 seconds after the last key is pressed; at the end of it, you will hear
- |
the beeps. |
|
|
During cooking with countdown, the current |
|||
|
time can be displayed by pressing the |
|
key |
|
|
||
once; press again to return to the minuteminder display.
-At the end of the countdown, the oven has to be switched off by hand, by turning the thermostat and the function selector to 0.
1
2
11
 Loading...