


 Universal
ReMOte
COntROl
IAN: 33137 |
|
universal remote Control |
Yleiskaukosäädin |
COMAG Handels AG |
|
||
|
Operation and Safety Notes |
Käyttöja turvaohjeet |
|
Zillenhardtstraße 41 |
|
||
|
|
|
|
D-73037 Göppingen |
|
|
|
|
|
universalfjärrkontroll |
|
|
|
Bruksanvisning och säkerhetsanvisningar |
|
|
|
|
Last Information Update · Tietojen tila · Informationsstatus: |
3A |
|
|
3A |
|
|
|||
|
|
|
|
|
06 / 2009 · Ident.-No.: 062009-3 A |
|
|
|
|
GUarantEe
Sender please use block-writing in boxes with CAPITAL LETTERS
good |
|
|
|
|
|
|
|
|
|
|
|
|
|
|
|
|
|
|
Surname |
||||||||||||||||
|
|
||||||||||||||||
returningthe |
|
|
|
|
|
|
|
|
|
|
|
|
|
|
|
|
|
|
|
|
|
|
|
|
|
|
|
|
|
|
|
|
|
|
|
|
Firstname |
||||||||||||||||
|
|
||||||||||||||||
|
|
|
|
|
|
|
|
|
|
|
|
|
|
|
|
|
|
|
|
|
|||||||||||||||
it to |
|
Street |
|||||||||||||||
|
|
|
|
|
|
|
|
|
|
|
|
|
|
|
|
|
|
enclose |
|
|
|
|
|
|
|
|
|
|
|
|
|
|
|
|
|
|
Postcode and city |
||||||||||||||||
|
|
||||||||||||||||
andcard |
|
|
|
|
|
|
|
|
|
|
|
|
|
|
|
|
|
|
|
|
|
|
|
|
|
|
|
|
|
|
|
|
|
|
|
|
Telephone no. with area code |
||||||||||||||||
|
|
||||||||||||||||
|
|
|
|
|
|
|
|
|
|
|
|
|
|
|
|
|
|
cut this |
Universal Remote Control |
|
|
|
|
|
Signature of buyer |
|
Please |
|
|
|
Faulty-Description: |
|
#
|
|
|
|
t |
h |
|
|
|
|
n |
s |
||
|
|
o |
|
|
||
|
|
m |
|
|
|
• |
|
6 |
|
|
|
• |
|
3 |
|
|
|
|
|
|
|
|
|
|
|
|
|
• |
|
|
|
|
|
|
Guarantee |
||||||
• |
|
|
|
|
|
• |
|
|
|
|
|
|
|
|
|
|
|
ur |
|
|
COMAG Service Centre
Unit 1 Longs Industrial Estate Englands Lane Gorleston Great Yarmouth
Norfolk NR31 6BE
Service-Hotline:
00 44 (0) 8708 900137
E-mail: info@comag-ag.co.uk
Universal Remote Control
10 in 1
Instruction manual
Version 2.2_GB, 08.06.2009
Technical data, design, equipment and items supplied subject to change.

Introduction
This instruction manual explains the
•intended use,
•safety measures
•advantages
of this universal remote control (to be known as the remote control).
This instruction manual does not describe in detail how to use the remote control with your device. Please see the information and instructions in the manual for your device.
Everyone who
•starts
•uses
•cleans
•disposes of
this remote control must fully understand the contents of this instruction manual.
This instruction manual is a component of the product. Always store the instruction manual near the remote control.
Instruction manual layout
This instruction manual is written in such a way that certain layout elements correspond to certain kinds of information. This makes it easier to distinguish between
normal text,
• lists and
actions.
•All buttons are shown in the instruction manual with the corresponding button number and sometimes with a picture of the button e.g. EXIT button (16) .
.
•The navigation buttons (13)  will be shown using the symbols
  and
and  .
.
•Using the  buttons you can go one step forward or backwards in the menus.
•Information that appears on the screen will be shown either as a picture of the display e.g.
Or as text with a grey background e.g. CODE SETUP.
•Where you see the  symbol extra information will be given.
3

Table of contents
Introduction ....................................................................................... |
2 |
Instruction manual layout ................................................................ |
3 |
Table of contents .............................................................................. |
4 |
Safety instructions ........................................................................... |
6 |
Intended use ....................................................................................... |
6 |
Important safety instructions ...................................................... |
6 |
Avoiding suffocation............................................................................ |
6 |
Avoiding injury .................................................................................... |
7 |
Avoiding damage ................................................................................ |
7 |
Safe use of batteries........................................................................... |
8 |
Safety warnings .................................................................................. |
9 |
Items supplied................................................................................. |
10 |
Description ...................................................................................... |
11 |
Inserting the batteries .................................................................... |
12 |
Button layout................................................................................... |
14 |
Using your remote control............................................................. |
17 |
Menu Navigation ............................................................................. |
19 |
Cancelling an action ......................................................................... |
20 |
Code Functions............................................................................... |
21 |
Choosing device codes via the display............................................. |
21 |
Entering a device code from the code list......................................... |
23 |
Manual code search ......................................................................... |
24 |
Code search by manufacturer name ................................................ |
26 |
Identifying the code........................................................................... |
28 |
Using combi devices......................................................................... |
28 |
System set up options / Punch Through...................................... |
31 |
Programming Punch Through (VOL / MUTE) onto another type of |
|
device................................................................................................ |
32 |
Turning off Punch Through (VOL/MUTE) for a certain device ......... |
33 |
4 |
|

Reverting the Punch Through (VOL/MUTE) back to factory |
|
settings.............................................................................................. |
34 |
Punch Through playback function .................................................... |
35 |
Settings............................................................................................ |
37 |
Setting the time................................................................................. |
37 |
Setting the date................................................................................. |
38 |
Backlight ........................................................................................... |
39 |
RESET - factory settings .................................................................. |
40 |
Timer Settings ................................................................................. |
42 |
Setting the sleep timer ...................................................................... |
43 |
Turning the sleep timer off ................................................................ |
44 |
Command timer ................................................................................ |
44 |
Programming the command timers .................................................. |
45 |
Learn Function ................................................................................ |
49 |
Using the learn function .................................................................... |
49 |
Programming commands.................................................................. |
51 |
Deleting commands .......................................................................... |
53 |
Macros ............................................................................................. |
55 |
Programming macros ....................................................................... |
56 |
Building in delays.............................................................................. |
57 |
Carrying out macros ......................................................................... |
58 |
Deleting macros................................................................................ |
58 |
ALL OFF Function .......................................................................... |
60 |
After use .......................................................................................... |
61 |
Cleaning the remote control ............................................................. |
61 |
Not using the remote control for an extended period of time ........... |
61 |
Hints and Tips / Troubleshooting ................................................. |
62 |
Glossary .......................................................................................... |
64 |
Disposal ........................................................................................... |
66 |
Technical Data ................................................................................ |
67 |
Manufacturer ................................................................................... |
68 |
Warranty .......................................................................................... |
69 |
Declaration of Conformity.............................................................. |
70 |
|
5 |

Safety instructions
Read the safety instructions carefully before you use the remote control.
Take note of all warnings in the manual.
Intended use
The remote control is for the indoor use and set up of consumer electronic devices.
It is intended exclusively for this use and may only be used for this purpose. It may only be used as described in this instruction manual. Any other usage not as intended can lead to damage to the remote control or to devices.
 Important safety instructions
Avoiding suffocation
•Never allow children to play with the plastic bag or other packaging.
•Keep the plastic bag or other packaging away from children.
6
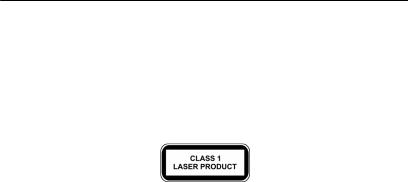
Avoiding injury
•There is a Class 1 laser in the infra red diode of the remote control.
•The device is fitted with a safety system that prevents dangerous laser streams from leaving the device during normal use. To avoid damaging your eyes, never manipulate or damage the device's safety system.
Avoiding damage
•Never sit on the remote control and do not place any heavy objects on it.
•Clean the remote control regularly.
•Do not use any harsh products when cleaning the remote control
•Always use qualified professionals to repair and service the remote control.
•Do not expose the remote control to dust, strong sunlight, moisture, high temperatures or strong vibrations.
7

Safe use of batteries
•Keep batteries away from children. If a battery is swallowed, seek immediate medical attention.
•When inserting the batteries check that the contacts in the device and the batteries are not dirty. Clean them if necessary.
•Always use new batteries. Do not use old and new batteries together.
•Do not mix different types of batteries.
•Check the batteries are inserted with the correct polarity (+/-).
•WARNING! If the batteries are not changed correctly they could explode. Only replace batteries with the same or equivalent type.
•Never attempt to recharge batteries as they could explode!
•Store batteries in a cool, dry place. Direct, intense heat can damage the batteries. Never put the remote control on a powerful heat source.
•Never short circuit the batteries.
•Never throw the batteries into fire.
•If the remote control is not going to be used for a long period of time, remove the batteries.
•Take leaking batteries out of the remote control straight away. There is a danger of corrosion due to battery acid.
•Clean the contacts with a clean dry cloth before you insert new batteries.
8
Safety warnings
In this instruction manual there are the following categories of safety warnings:
 Danger!
Instructions with the word DANGER warn about possible bodily injury.
 Warning!
Instructions with the word WARNING warn about possible damage to property or the environment.
Useful advice about using the remote control
9
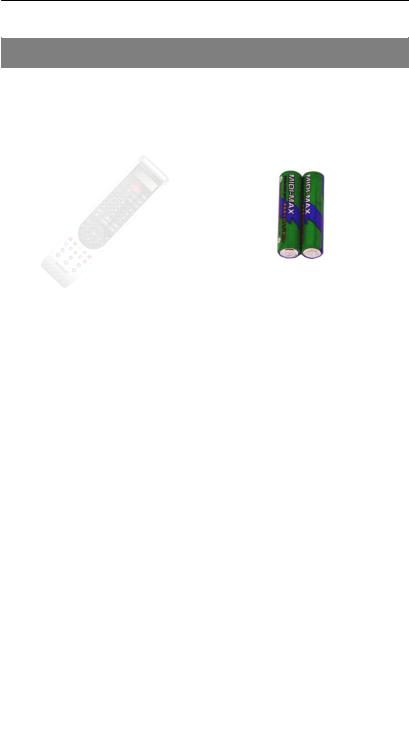
Items supplied
After purchase ensure you have the following:
|
No. 1 |
|
|
|
No. 2 |
||
|
|
|
|
|
|
|
|
|
|
|
|
|
|
|
|
|
Universal Remote Control |
LR 03/AAA/1.5V Batteries |
|||||
|
|
|
|
|
|
(May differ from shown) |
|
|
|
|
|
|
|
|
|
|
|
|
|
|
|
|
|
|
No. |
|
Quantity |
|
Explanation |
|
|
|
|
|
|
|
|||
|
1 |
|
1 |
|
Universal Remote Control |
|
|
|
|
|
|
|
|||
|
2 |
|
1 pair |
|
LR 03/AAA/1.5V Batteries |
|
|
|
|
|
|
|
|
||
|
|
|
1 |
|
Base |
|
|
|
|
|
|
|
(not shown) |
|
|
|
|
|
1 |
|
Instruction manual |
|
|
|
|
|
|
|
(not shown) |
|
|
|
|
|
1 |
|
Code List with device codes |
|
|
|
|
|
|
|
(not shown) |
|
|
|
|
|
|
|
|
|
|
10

Description
This remote control has 10 device buttons (source buttons) and can therefore replace up to ten normal remote controls ("10 in 1 function"). These could be remote controls for practically any type of consumer electronic device.
The description on source button (2) (TV, VCR, CBL, ASAT, DSAT, DVD, AUX1, CD, AMP, AUX2) are for convenience only.
With the exception of the  button you can use all the buttons with each device in "Flex-Mode".
Further instructions about "Flex-Mode" can be found on page 21 in the Code Functions chapter.
11
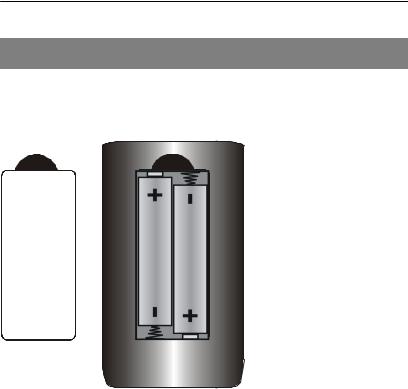
Inserting the batteries
Reverse of the remote control:
2 LR03/AAA/1.5V batteries are required (included).
To remove the battery compartment cover press the lock. Lift and remove the battery compartment cover. Insert both batteries into the compartment, paying close attention to the polarity +/-. Replace the cover.
Settings after changing the batteries
When the batteries are correctly inserted the display is switched on. It will show the active mode ("TV"), the day of the week and the time.
12

To set the time and date please read the Settings chapter on page 37.
After battery insertion the mode, time, date, and the back light duration will revert back to the factory settings.
After you have inserted the batteries you can begin to program your universal remote control with your devices.
With the common infra red codes the remote control works with most but not all makes and models.
This remote control offers functions that your device might not be able to use. Some special functions of your device may not be supported by the remote control. In this case it can learn the commands from your original remote control using the learning function and transfer them to itself.
It may be that some of the functions of the device must be implemented differently on the universal remote than on the original remote. Please read these instructions completely before use to get to know all the options of your remote control. Also read the instructions of the devices that you wish to operate with the remote control
13

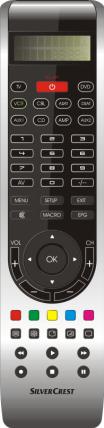
Button layout
14

1. LCD Display
(schematic representation of all segments)
2.Source buttons (devices):- TV, VCR, CBL, ASAT, DSAT, DVD, AUX1, CD, AMP, AUX2
3.Number buttons: 0-9 for direct choice of channel
4. : Select AV input / switch to external devices
5. : Opens the device menu (if available)
6. : Mute button.
7.VOL +/-: Volume control up/down
8.TELETEXT: Colour buttons for operating Teletext functions
9.Operating buttons for Video Recorder / CD / DVD
 : Record
This button must be pressed twice to start recording.
 : Stop
 : Pause
 : Play
 : Fast Forward
 : Rewind
10. : Turn Teletext on.
Device specific, on some devices this button will also be used for turning Teletext on and off.
 : Stop at a specific Teletext page.
 : Display or choice of channel information.
15
 : Teletext and TV at the same time
 : Turn Teletext off. 11.CH +/-: Change channel
12. : Confirm options.
13. : Navigation buttons.
14. : Show electronic programme information (dependent on channel and device).
15. : Macro functions.
16. : Exit or go back a step in menus and device functions.
17. : Programming mode and shift function button 18.
 : Enter two digit numbers in combination with
the number buttons.
19.  : Turn the devices on and off.
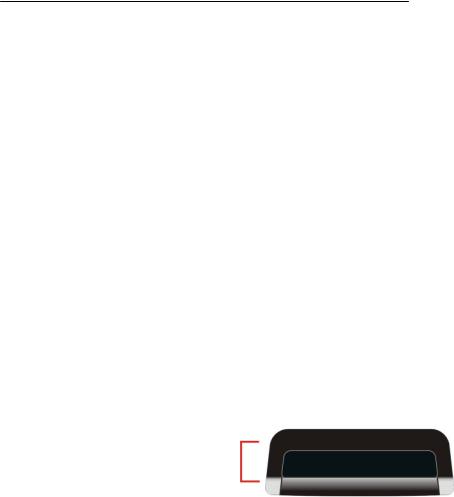
Transmitting and receiving diode
Behind the transparent cover is the transmitting diode which sends the infra red signals and the receiving diode which learns the codes of other remote controls.
16
Using your remote control
Standard Display
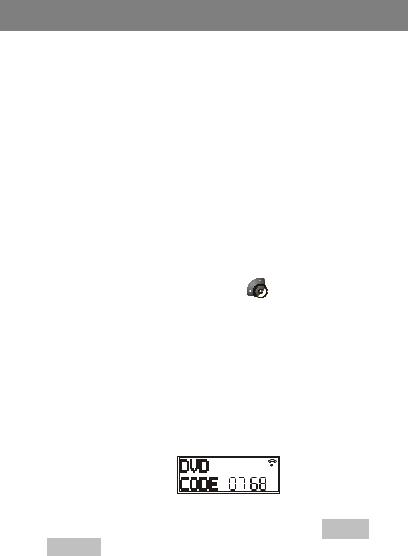
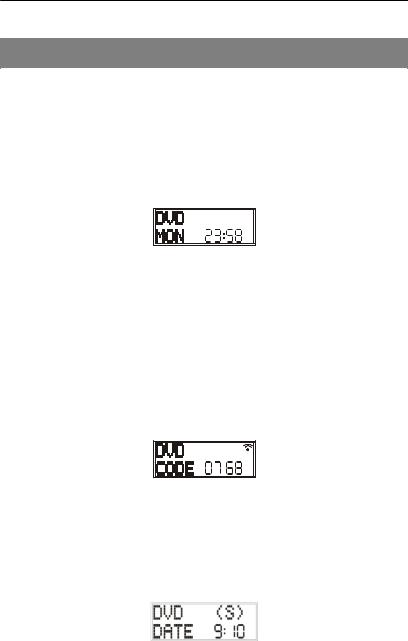
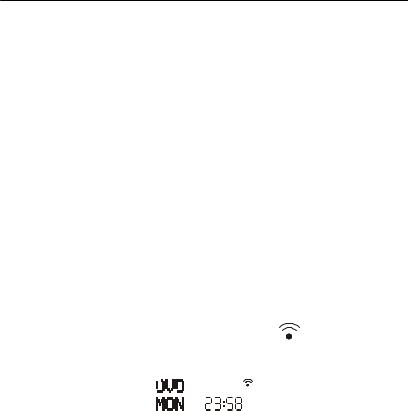
The active mode (device type) is shown on the first line e.g. DVD
The day of the week and the time is shown on the second line.
Selecting a mode or device
With a source button (2) you can select a mode or device that you wish to program to this source button.
The description of the corresponding source button (2) is shown on the first line e.g.
The code that has been programmed to the device is shown on the second line as long as the source button
(2) is pressed.
Setup (Shift) Button
After briefly pressing the setup button (17)  the active device group e.g. DVD, will appear on the first line next to the sign for the activated shift function (S). The date will appear on the second line.
17
Press the EXIT button (16)  to go back to the standard display.
Most buttons can be used for two functions. To access the second function activate the shift function.
Prolonging battery life
Should a button accidentally remain pressed down (e.g. because an object is lying on the remote control) the remote control will send 350 infra red signals (this takes about 30 seconds) and stops the transmission. This prevents the batteries from being drained unnecessarily.
Display after pressing buttons |
|
||||
Every time a button is pressed the |
symbol |
||||
“transmitting” appears on the display |
|
||||
|
|
|
|
|
|
|
|
|
|
|
|
|
|
|
|
|
|
|
|
|
|
|
|
|
|
|
|
|
|
Settings after changing the batteries
When the batteries are correctly inserted the display is switched on. It will show the active mode ("TV"), the day of the week and the time.
TV Mode
When selecting the  button there is no option to select
the type of device because the source button (2)  can only be programmed with TV codes.
18
Menu Navigation
To open the setup menu hold down the setup button (17)
 until the display shows
  and the word "SET" appears, press the setup button (17)
  again to call up further menus:
CODE SETUP > SYSTEM SETUP > TIMER SETUP > LEARN SETUP > MACRO SETUP > EXIT SETUP
To open a menu, press OK (12) .
.
To select between the sub menus, press the navigation buttons and
and .
.
1 |
CODE SETUP - to programme |
|
|
device codes by inputting a code or |
|
|
by using the search function. |
|
|
|
|
2 |
SYSTEM SETUP - for time / date |
|
|
and altering volume etc. |
|
|
|
|
3 |
TIMER SETUP – |
|
|
to program timers |
|
|
|
|
4 |
LEARN SETUP – |
|
|
to learn functions |
|
|
|
|
5 |
MACRO SETUP – |
|
|
to program macros |
|
|
|
|
6 |
EXIT SETUP – |
|
|
to exit the setup menu |
|
|
|
|
19

Cancelling an action
If you wish to cancel an action, wait about 25 seconds (the time is dependant on where the action was stopped) until the setup menu closes itself automatically and
 appears on the display.
Whilst the remote control is carrying out a function
 will be shown on the display.
20
 Loading...