


O d
W

Table of Contents
Operating instructions
Installation instructions
" #%! ' #" |
#" %" " |
* &' |
&$#& |
|
|
|
|
|
|
||
%#' ' #" # ' ") %#"! "' "'& " '$& |
|
|
|||||||||
" % & '+ "&'%( ' #"& |
|
|
|
|
|
|
|
6 |
|
||
"'%# ( " +#(% * & %, %+ % |
|
|
|
|
|
|
|
||||
#% (& " +#(% * & %, %+ % #% |
' |
|
%&' |
|
' ! |
|
|||||
%$% " %' " " # " ' (" %+ |
|
|
|
|
|||||||
' % "'& |
" " " |
$%# ( '& |
|
|
|
|
|
|
|
|
|
%# % !! & " (" ' #"&
& " %+ " * ' &' " % & '' " & |
|
|
|
5 |
|
|||||||||||||||
& " %+ " * ' |
" ) ( |
& '' " & |
|
|
|
|
|
|
||||||||||||
(% " * & " %+ " |
|
|
|
|
|
|
|
|
5 |
|
|
|||||||||
A ' % * & " %+ " |
|
|
|
|
|
|
|
|
|
|
|
|
|
|
|
|
|
|||
$ $$ ' #"& |
|
|
|
|
|
|
|
|
|
|
|
|
|
|
|
|
||||
!# $%# % !! |
|
|
|
|
|
|
|
|
|
|
|
|
|
|
|
|
|
|
||
" " |
" |
% |
|
|
|
|
|
|
|
|
|
|
|
|
|
|
|
|
|
|
$ * ' |
! "#% $%# !& |
|
|
|
|
|
|
|
|
|
|
|
||||||||
#"&(!$' #" |
) ( & |
|
|
|
|
|
|
|
|
|
|
|
|
|
|
5 |
|
|
||
(&'#! % |
& %) |
|
|
|
|
|
|
|
|
|
|
|
|
|
|
5 |
|
|
||
"&' " |
#"" ' " |
|
" |
'% "&$#%' " |
|
|
|
|
5 |
|
||||||||||
2

The |
new washer(dryer which you have just purchase |
is a |
modern high(quality domestic appliance |
Your washer(dryer is distinguished by its economical consumption of energy water and detergent
Each washer(dryer which leaves our factory is checked carefully to ensure that it functions properly and is in perfect condition If you have any question especially with respect to installing and connecting
your washer(dryer ( please do not hesitate |
to contac |
our customer service department |
|
Further information and a selection of our |
products |
can be found on our internet page: |
|
http: www siemens de hausgeraete |
|
Please read these operating and installation instructions and all other information enclosed with'the washer(dryer and act accordingly
These operating and installation instructions describe various models Differences are indicated in the appropriate places
Retain all |
documentation |
for subsequent use or for |
the next |
owner of the |
appliance |
3

c ce i g wa e
The shi$$i"g |
$ackage has $r#tected y#ur "ew |
||
a$$ ia"ce |
#" |
its way t# y#ur h#!e. A |
uti ised |
!ateria s |
are |
ec# #gica y har! ess a"d |
recyc ab e. |
|
P ease |
c#"tribute |
t# |
a |
better |
e"vir#"!e"t |
by |
||||||||
|
dis$#si"g #f $ackagi"g |
!ateria s i" a" |
|
|
|||||||||||
|
e"vir#"!e"ta y |
c#"sci#us |
!a""er. |
|
|
|
|||||||||
|
P ease |
ask |
y#ur |
dea er |
|
#r i"quire |
at y#ur |
#ca |
|||||||
|
auth#rity ab#ut curre"t |
!ea"s |
#f |
dis$#sa . |
|
||||||||||
|
Ri k |
f ch ki g! |
|
|
|
|
|
|
|
||||||
|
D# |
"#t |
et |
chi dre" |
$ ay |
with |
$ackagi"g |
a"d |
|||||||
|
ass#ciated $arts. |
Risk |
#f ch#ki"g |
#" $ astic fi ! |
|||||||||||
|
a"d.c# a$sib e |
|
b#xes. |
|
|
|
|
|
|
|
|||||
|
O d a$$ ia"ces |
are |
"#t |
w#rth ess |
rubbish! |
|
|
||||||||
|
|
|
|||||||||||||
|
|
|
|||||||||||||
|
E"vir#"!e"t/c#"sci#us recyc i"g |
ca" rec ai! |
|
||||||||||||
|
va uab e |
raw |
!ateria s. |
|
|
|
|
|
|
|
|||||
|
Da ge |
f |
|
dea h! |
|
|
|
|
|
|
|
||||
|
U"$ ug |
!ai"s |
|
$ ug |
#" |
redu"da"t |
a$$ ia"ces. |
||||||||
|
Cut.#ff.!ai"s |
cab e |
a"d |
discard |
with !ai"s |
$ ug. |
|||||||||
|
Destr#y |
the |
#ck |
#" the |
d##r. |
T# |
$reve"t |
$ ayi"g |
|||||||
|
chi dre" |
fr#! |
|
bec#!i"g tra$$ed a"d e"da"gered, |
|||||||||||
|
e"sure |
that |
the |
d##r |
#cki"g |
!echa"is! |
is |
disab ed |
|||||||
|
U"$ack |
the |
a$$ ia"ce |
a"d dis$#se #f the |
$ackagi"g |
||||||||||
|
|||||||||||||||
|
|||||||||||||||
|
i" a" e"vir#"!e"ta y/res$#"sib e |
!a""er. |
|
|
|||||||||||
|
This |
a$$ ia"ce |
is |
abe ed i" |
acc#rda"ce |
with |
|||||||||
|
Eur#$ea" Directive 2002/96/EC |
c#"cer"i"g |
used |
||||||||||||
|
e ectrica |
a"d |
|
e ectr#"ic |
|
a$$ ia"ces |
(waste |
e ectrica |
|||||||
|
a"d |
e ectr#"ic |
equi$!e"t / WEEE). |
|
|
||||||||||
|
The |
guide i"e |
|
deter!i"es |
the |
fra!ew#rk f#r |
the retu |
||||||||
a"d |
recyc i"g |
|
#f |
used |
a$$ ia"ces |
as a$$ icab e |
|||||||||
|
thr#ugh#ut |
the |
EU. |
|
|
|
|
|
|
|
|
||||
4

Protection of the environment /
hints |
and |
tips |
|
|
Yo(% *a&he%.d%+e% (&e& *a'e%, ene%g+ and de'e%gen' |
|
|
efficien'l+, 'he%eb+ p%o'ec'ing 'he en)i%onmen' and |
|
|
%ed(cing +o(% ho(&ehold co&'&. See-page 5 fo% |
|
|
con&(mp'ion )al(e& of +o(% appliance. |
Hints and |
tips |
U&ing +o(% *a&he%.d%+e% in an efficien' and |
|
|
en)i%onmen'all+ f%iendl+ manne%: |
|
|
Take ad)an'age of %ecommended load q(an'i'+. |
|
|
The %ecommended load q(an'i'+ i& indica'ed in ' |
|
|
di&pla+ field acco%ding 'o 'he &elec'ed p%og%amme |
Wi'h &malle% amo(n'& of la(nd%+, 'he load adj(&' %ed(ce& 'he *a'e% and ene%g+ con&(mp'ion.
Selec' 'hecotton 6 °C stains p%og%amme in&'ead ofcotton 9 °C. The longe% *a&hing 'ime in 'hi& 60 ºC p%og%amme mean& 'ha' 'he cleaning effec'& a%e compa%able *i'h 'ho&e of
a-90 ºC p%og%amme, al'ho(gh 'he po*e% con&(mp'ion i& con&ide%abl+ lo*e%.
Do no' (&e p%e*a&h fo% ligh'l+ 'o no%mall+ &oiled *a&hing.
Add de'e%gen' acco%ding 'o 'he deg%ee of &oiling, amo(n' of la(nd%+ and *a'e% ha%dne&&, and
ob&e%)e 'he de'e%gen' man(fac'(%e%'& in&'%(c'ion&.
If *a&hing |
i& |
'hen 'o be d%ied in 'he appliance, |
|
&elec' 'he highe% &pin &peed . beca(&e 'he mo% |
|||
*a'e% |
'ha' |
i& |
&p(n o(' of 'he appliance, 'he le& |
'ime |
and |
ene%g+ i& %eq(i%ed 'o d%+ i'. |
|
5

General safety instructions
Your washer dryer is intended for
- |
use |
in the |
household only |
- |
for |
washing |
machine washable fabrics in washing |
|
lye |
|
|
-operation with cold drinking water and commer cially available detergents and cleaning products
which are suitable for use in washing machines
Do not leave children unsupervised near the washer dryer
Keep pets away from the washer dryer
Do |
not |
insert pull out the mains plug |
with wet han |
Do |
not |
pull out the mains plug by tugging the cab |
|
Do |
not |
touch the loading door when washing drying |
|
at |
high |
temperatures |
|
Caution when draining hot water |
|
||
Do |
not |
climb onto the washer dryer |
|
Do |
not |
lean on the open washer dryer |
door |
Due to the use of the condensation principle in dry please keep the connected water tap open during t drying process if the water supply is cut off heat steam will come outRisk of scalding!
6

Introducing your washer dryer
|
c a |
|
||
c |
|
|
|
|
e e |
|
|
|
|
e e e |
e a |
|
a |
|
e e
e e e a a a a e a e e e
b ea a e e
e e 2
e e ab e e
e ab e e e
e e e e
|
|
a |
c |
|
|
c |
f a |
7
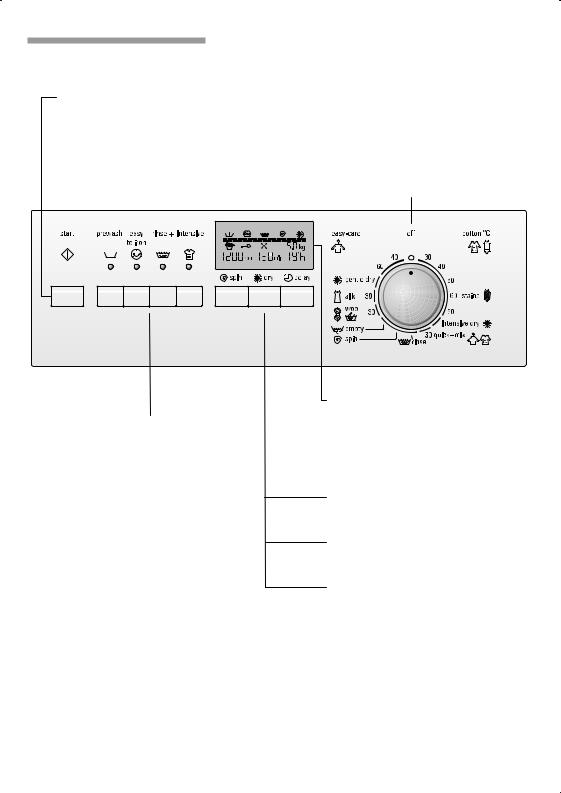
Control panel
button
For starting the washing/drying cycleprogramme must have been selected
Programme selector
For switching the machine on and off and for
|
|
|
selecting |
the |
programme |
|
|
||||
|
|
|
Can be rotated in either |
direction |
|||||||
|
|
|
The programme selector |
does not rotate while |
|||||||
|
|
|
the programme is running the programme |
||||||||
|
|
|
sequence |
|
is |
electronically |
controlled |
||||
|
|
|
|
|
|
|
|
|
|
|
|
|
|
|
|
|
|
|
|
|
|
|
|
|
|
|
|
|
|
|
|
|
|
|
|
|
|
|
|
|
|
|
|
|
|
|
|
|
|
|
|
|
|
|
|
|
|
|
|
|
|
|
|
|
|
|
|
|
|
|
|
|
|
|
|
|
|
|
|
|
|
|
|
|
|
|
|
|
|
|
|
|
|
|
|
|
|
|
|
|
|
|
|
|
|
|
|
|
|
|
|
|
|
|
|
|
|
|
|
|
|
|
|
|
|
|
|
|
|
|
|
|
|
|
|
|
|
|
|
|
|
|
|
|
|
|
|
|
|
|
|
|
|
|
|
|
|
|
|
|
|
|
|
|
|
|
|
|
|
|
|
|
|
|
|
|
|
|
|
|
|
|
|
|
|
|
|
|
|
|
|
|
|
|
|
|
|
|
|
|
|
|
|
|
|
|
|
|
|
|
|
|
|
|
|
|
|
|
|
|
|
|
|
|
|
|
|
|
|
|
|
|
|
|
|
|
|
|
|
|
|
|
|
|
|
|
|
|
|
|
|
|
|
|
|
|
|
|
|
|
|
|
|
|
|
|
|
|
|
|
|
|
|
|
|
|
|
|
|
|
|
|
|
|
|
|
|
|
|
|
|
|
|
|
|
|
|
|
|
|
|
|
|
|
|
|
|
|
|
|
|
|
|
|
|
|
|
|
|
|
|
|
|
|
|
|
|
|
|
|
|
|
|
|
|
|
|
|
|
|
|
|
|
|
|
|
|
|
|
|
|
|
|
|
|
|
|
|
|
|
|
|
|
|
|
Buttons |
for additional |
options |
|
|
|
|
|
||||||||||
in |
addition |
to |
|
the programme if required |
|||||||||||||
: |
|
|
|
|
Actuate prewash |
|
|
|
|
|
|||||||
w : |
|
|
|
|
Gentle |
spin |
|
|
|
|
|
|
|||||
: |
|
|
|
|
Additional |
rinsing |
cycle |
||||||||||
v : |
|
|
|
|
Intensive |
wash |
|
|
|
|
|
||||||
Additional options can be combined |
|||||||||||||||||
The |
indicator |
lights |
of |
the |
buttons |
come on |
|||||||||||
if the additional options are active |
|
|
|
||||||||||||||
Switching |
|
off |
the |
additional |
option: |
Press |
|||||||||||
the |
button |
again |
Indicator |
light |
goes out |
||||||||||||
Display panel
Indicates the settings which have been selected e g spin speed time delay childproof lock recommended load as well as programme progress
Button B
Selects the spin speed or no final spin
Button
Selects the drying time
Button X
Selects the start time delays the start of the programme
8
Display panel
Display |
|
|
|
|
|
Notes |
|
|
|
|
|
|
|
|
|
|
|
|
|
|
|
|
|
|
|
|
|
|
|
||||
P |
Prewash |
|
|
|
On |
if |
selected |
|
|
|
|
|
||||
Q |
Washing |
|
|
|
Not on if rinse, spin drain or |
|||||||||||
|
|
|
|
|
|
drying |
additional |
programme |
||||||||
|
|
|
|
|
|
was |
selected |
|
|
|
|
|
||||
K |
Rinse |
|
|
|
|
Not on if spin, drain or drying |
||||||||||
|
|
|
|
|
|
additional |
|
programme |
was |
|||||||
|
|
|
|
|
|
selected |
|
|
|
|
|
|
|
|
||
B |
Final |
spin |
/ |
Empty |
Not |
on |
if |
|
a programme |
with the |
||||||
|
|
|
|
|
|
--- |
setting |
(without final spin) |
||||||||
|
|
|
|
|
|
or |
drying |
programme |
is |
running |
||||||
|
Dry |
|
|
|
|
On if the drying programmes an |
||||||||||
|
|
|
|
|
|
drying |
time |
was |
selected |
|||||||
|
Progress |
bar |
|
For |
the |
programme |
status |
|||||||||
|
|
|
|
|
|
|||||||||||
: |
Overdosage |
|
|
On if too much detergent |
||||||||||||
|
|
|
|
|
|
dispensed |
|
|
|
|
|
|
|
|||
G |
Childproof |
lock |
On |
if |
selected |
|
|
|
|
|
||||||
|
Fan |
|
|
|
|
On if the drying programmes an |
||||||||||
|
|
|
|
|
|
drying |
time |
was |
selected |
|||||||
5.04kg* |
Recommended load |
Not on if rinse, spin, drain or |
||||||||||||||
|
|
|
|
|
|
additional |
|
programme |
was |
|||||||
|
|
|
|
|
|
selected |
|
|
|
|
|
|
|
|
||
|
|
|
|
|
|
|||||||||||
12004rpm* |
Spin |
speed |
or |
Maximum spin speed of the |
||||||||||||
---* |
No |
final |
spin |
programme |
or |
selected |
speed |
|||||||||
|
|
|
|
|
|
|
|
|
|
|
||||||
120min* |
Drying |
duration |
Expected |
|
drying |
programme |
||||||||||
|
|
|
|
|
|
duration |
|
|
|
|
|
|
|
|
||
1:17* |
Programme |
durationExpected |
|
programme |
duration |
|||||||||||
Other displays at this location: |
|
|
|
|
|
|
|
|
|
|||||||
19'h* |
Start |
time |
|
|
Selected |
start |
time |
|
|
|
||||||
-0- |
End |
of |
programme |
|
|
|
|
|
|
|
|
|
|
|
||
|
or |
|
|
|
|
|
|
|
|
|
|
|
|
|
|
|
--- |
End |
of |
programme |
|
|
|
|
|
|
|
|
|
|
|
||
|
without |
final |
spin or |
|
|
|
|
|
|
|
|
|
|
|||
F02* |
Fault |
displays |
See |
page |
47 |
|
|
|
|
|
||||||
* Example of |
the |
display |
|
|
|
|
|
|
|
|
|
|
||||
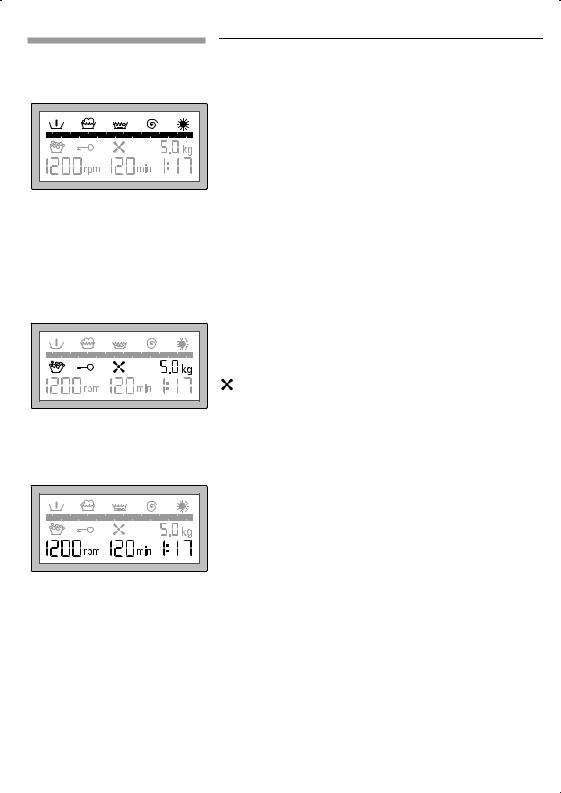
9

Programme status disp ay The |
first row of symbols and |
the progress bar belo |
||||||||||
|
|
form the programme status display. The progress b |
||||||||||
|
|
consists of a frame and several segments. |
|
|||||||||
|
|
When the programme has been selected, the |
|
|||||||||
|
|
symbols for the individual programme sections are |
||||||||||
|
|
displayed. |
|
|
|
|
|
|
|
|||
|
|
The |
frame |
of |
the |
progress bar flashes |
and requests |
|||||
|
|
the |
|
programme |
to |
start. |
|
|
|
|||
|
|
When the programme has started, the |
almost |
empty |
||||||||
|
|
bar |
is displayed which fills up with segments |
from |
||||||||
|
|
to |
|
right |
while |
the |
programme |
is running. |
|
|||
|
|
The symbols indicate the programme sections which |
||||||||||
|
|
have not yet run and go out when the particular |
||||||||||
|
|
programme |
section |
has run. |
|
|
|
|||||
|
|
At |
|
the end |
of |
the programme all symbols have go |
||||||
|
|
out |
|
and |
the progress |
bar is |
full. |
|
|
|||
: Overdosage |
The |
automatic |
safety |
system |
detects excessive |
froth |
||||||
|
|
in |
the appliance due |
to a highly frothing detergent |
||||||||
|
|
an overdosage. At the end of the programme this |
||||||||||
|
|
indicated in the display field by:thesymbol. |
|
|||||||||
|
|
Dispense |
less |
detergent for the next wash with sim |
||||||||
|
|
items of washing (same degree of soiling and |
wash |
|||||||||
|
|
load). |
|
|
|
|
|
|
|
|
||
|
|
Overdosage of detergent may cause excessive froth |
||||||||||
|
|
formation |
and |
impair |
the washing and |
rinsing |
results |
|||||
|
|
A |
rinse |
cycle |
is automatically |
run. |
|
|
||||
|
|
i The : symbol goes out when the appliance |
||||||||||
|
|
|
switches off at the end of the programme or if |
|||||||||
|
|
|
programme |
is changed. |
|
|
|
|||||
G Chi dproof |
ock |
The |
activated childproof lock |
prevents |
the selected |
|||||||
|
|
programme from being changed while the |
|
|||||||||
|
|
programme |
is |
running. |
|
|
|
|||||
Fan |
|
The |
fan |
works |
at the last 10 minutes of drying du |
|||||||
|
|
for |
|
cooling |
the |
laundry. |
|
|
|
|||
|
|
i |
Do not interrupt this cooling process. |
|
||||||||
Recommended |
oad |
The |
recommended |
load is displayed depending |
on |
|||||||
|
|
the selected programme and additional functions, se |
||||||||||
|
|
from page |
21. |
|
|
|
|
|
|
|||
10
Spin sp d |
The maximum |
spin speed is displayed depending o |
|
|
the selected programme and additional functions. |
||
|
You can reduce this speed, see |
page 30. |
|
Pro r mm dur tion |
When the programme has been |
selected, the |
|
|
expected programme duration (time after which the |
||
|
programme is expected to ) endis displayed. |
||
|
The programme duration is displayed in hours and |
||
|
minutes, e.g. |
|
|
|
1:17 = 1 hour and 17 minutes |
|
|
|
0:35 = 35 minutes. |
|
|
|
When the programme has started, the :colonflashes |
||
|
between hours and minutes and the programme |
||
|
duration counts down in minutes. |
||
|
When the programme ends, the |
displays shows. |
|
|
i While the programme is running, the programme |
||
|
duration may be extended or reduced for the |
||
|
following reasons. |
|
|
|
R du tions |
in tim occur because of: |
|
-small loads,
-reduced heating times, e.g. if the water is very
In r s s in tim occur because of:
-additional rinse cycle if excessive foam is in the laundry,
- |
multiple |
spinning |
if the laundry is |
distributed |
poor |
|||
|
in the |
drum, |
|
|
|
|
|
|
- increased |
heating |
times, |
e.g. when |
the water |
is |
|||
|
cold, |
|
|
|
|
|
|
|
- |
water pressure |
too low, |
option, e.g.and/orv |
|
||||
- |
selection |
of an |
additional |
|
||||
|
after the |
programme has |
started, |
|
|
|||
-very absorbent washing extends the heating duration.
St rt tim |
You |
can |
delay the |
start time, see page 31. |
|
Dryin dur tion |
You |
can |
set |
the drying duration. When the washing |
|
|
and drying without a break was selected, drying |
||||
|
duration will add in programme duration |
||||
|
automatically. |
Cotton |
programmes will prolong |
||
|
5 minutes |
for |
good |
washing performance. |
|

B for using your w sh r dry r for th first tim
Pr p ring your w sh r dry r
Att ntion
The washer(dryer must have been installed and connected properly (refer to page 54).
i The washer(dryer was tested before leaving the factory. To remove any water left over from testi procedures, the first washing cycle should be carried outwithout laundry in the machine.
Turn the tap on.
Pull out the detergent drawer all the way.
Pour approx. 1 litre of water into chamber'II of the detergent dispenser.
Half |
fill the measuring beaker with detergent and |
pour |
into chamberII. |
i Do not use any special detergents for delicates woollens (excessive foam).
Close the detergent drawer.
Close the washer(dryer door.
Set the programme selector otton 90°C.
Press theM button. The programme starts.
The programme ends when all symbols in the uppe row of the display field go out, the progress bar is completely filled and the programme duration is on
0 :
Turn the programme selectorHto off.
12
Preparing, sorting and loading the laundry
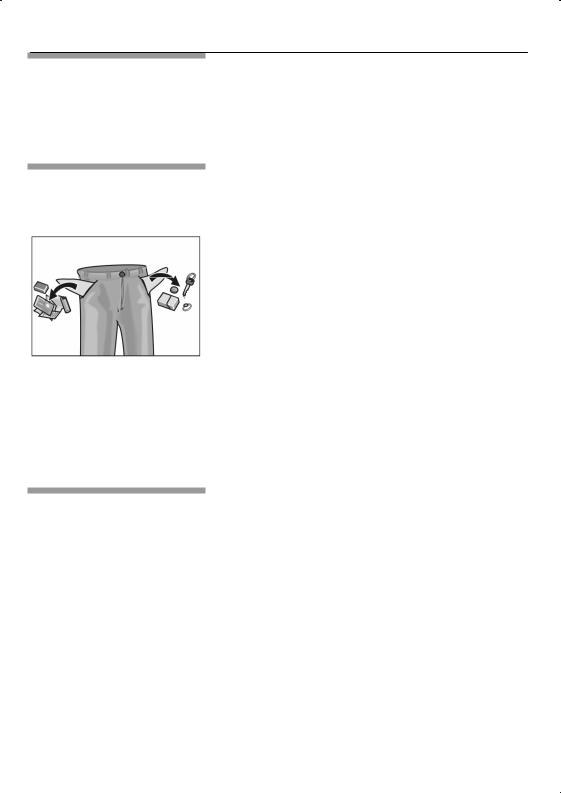
Preparing the laundry
Attention
Loose debris (e.g. coins, paper clips, needles, nails) can damage items of clothing as well as parts of t washer.dr+er (e.g. drum).
|
Empt+ all pockets on items of clothing. |
|
|
Brush sand out of pockets and cuffs/turn.ups. |
|
|
Close zips, fasten pillow cases/cushion covers. |
|
|
Remove curtain runners or tie up in a net/bag. |
|
|
Wash in a net/cushion |
cover: |
- |
-delicates, e.-g. tights, |
curtains, |
- |
-small laundr+ items, |
e.-g. socks, handkerchiefs, |
Preparing laundry for drying
- -underwired bras (underwire ma+ become deta. ched during washing and cause damage).
Trousers, knitwear and knitted textiles, e.g. -jerse+ garments, T.shirts or sweatshirts should be turned inside out.
Onl+ tumble.dr+ textiles which have been washed rinsed and spun.
Remove as much water as possible from the
laundr+. Do not press the button for |
reducing th |
spin speed. |
|
Before tumble.dr+ing, eas+.care items |
should also |
be spun using the appropriate spin programme (see programme table).
In order to ensure uniform dr+ing, sort the items according to fabric t+pe and degree of dr+ing required.
3
Easy$care items should if possible be removed from the machine while still slightly damp and allowed to continue drying in the open air
Overdrying may cause excessive creasing
Items which require ironing do not have to be
ironed |
immediately |
after being tumble$dried |
It is |
a good idea |
to fold or roll them together |
while so that any remaining moisture is evenly distributed
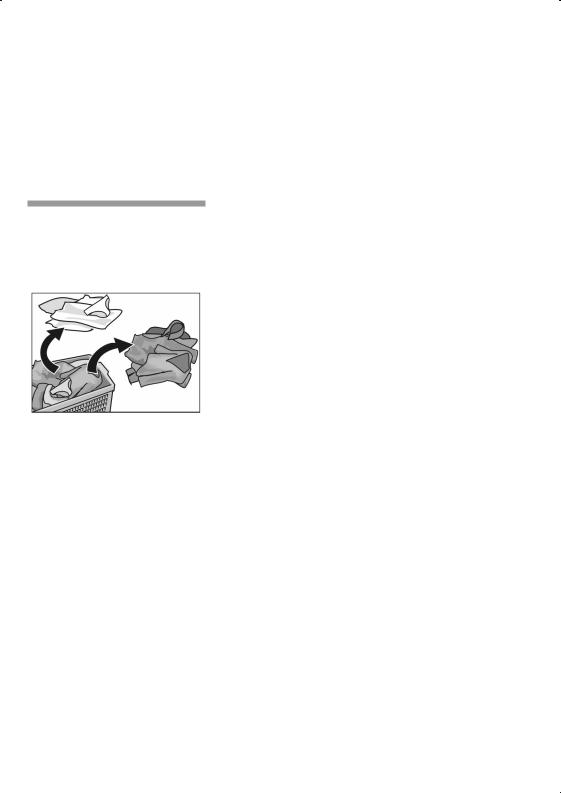
Attention
Sorting the laundry Washing may become discoloured Do not wash ne coloured washing with other washing
According to colour and degree of dirt
White items may become grey Wash white and coloured items separately
Degrees of dirt |
Lightly |
soiled |
|
|
|
|
|
|
No visible soiling or stains Washing has probably |
||||||
|
absorbed body odour |
|
|
|
|
||
|
- Light$weight summer clothing and sportswear |
||||||
|
worn |
for |
several hours |
|
|
|
|
|
- T$shirts |
shirts blouses |
worn |
for |
up to |
one day |
|
|
- Bed |
linen guest towels |
used |
for |
one |
day |
|
14

Normally soiled
Visible soiling and/or a few light stains.
-T)shirts, shirts, blouses soaked in sweat or worn several times.
- |
Underpants, |
briefs |
worn for one |
day. |
|
|
||
- |
Tea |
towels, |
hand |
towels, |
bed linen used |
for |
up |
|
|
one |
week. |
|
|
|
|
|
|
- |
Curtains (without |
nicotine |
soiling) |
used for |
up |
to |
||
|
six |
months. |
|
|
|
|
|
|
Very soiled |
|
|
|
|
|
|
||
Visible |
soiling |
and/or |
stains. |
|
|
|
|
|
- Kitchen towels used for up to one week.
-Fabric serviettes.
-Baby bibs.
-Children's outer clothing or football jerseys and
shorts soiled with grass and/or earth.
-Work clothes, e.g. mechanic's overalls, baker's and butcher's clothing.
Typical |
stains |
|
|
- |
Skin |
grease, cooking oil/fat, |
sauces, mineral oil, |
|
wax |
(containing fat/oil). |
|
- |
Tea, |
coffee, red wine, fruit, |
vegetables (which ca |
|
be |
bleached). |
|
-Blood, egg, milk, starch (containing protein, carbo hydrate).
- Soot, |
earth, sand (pigments), tennis clothing soile |
with |
red clay. |
15

Rem vi g stai s
Remove/pretreat stains as soon as possible after the have occurred.
|
|
First dab with a soapy solution. Do not rub. |
||||
|
|
Then select the appropriate programme and wash th |
||||
|
|
item. |
|
|
|
|
|
|
Stubborn/dried in stains can sometimes only be |
||||
|
|
removed |
by |
washing |
several |
times. |
S rti g |
lau dry acc rdi g |
O ly wash |
lau dry |
that is |
labelled with the |
|
t the |
i structi s the |
f ll wi g |
care symb ls: |
|
||
care labels
abc de
hard%wearing textiles, heat%resistant textiles e.g. made from cotton or linen
fgh
for easy%care textiles
e.g. cotton, linen, synthetic materials or blended fabrics
kflg
for easy%care, washable textiles
e.g. silk, satin, synthetic materials or blended fabrics (e.g. curtains)
6kflg
for hand and machine washable wool or wool%rich textiles
e.g. cashmere, mohair or angora, also suited for hand washable silk.
Do not |
wash laundry items which bear the following |
care label in the washer%dryer: |
|
B = |
do not wash |
16

Only |
dry laundry that is labelled with the follo |
care |
symbols: |
E = |
tumble&dry at normal heat setting (intensive dry |
D = |
tumble&dry at low heating setting (gentle dry) |
i The following textiles should not be tumble&dried:
-Laundry marked with the care symbolF = do not tumble&dry
- |
Wollens |
or |
items containing |
wool. |
|
|
- |
Risk |
of |
shrinking! |
|
- |
Delicate |
fabric (silk, synthetic |
net curtains). |
||
|
- |
Risk |
of |
creasing! |
|
- Items containing foam rubber or similar material.
-Items which have been treated with inflammable solvents, such as stain removes, petrol, paint thin ners. Explosion hazard!
-Items still containing hair lacquer or similar sub& stances. angerous vapors!
-Dripping&wet laundry.Waste of energy!
7
|
Risk |
of explosion! |
|
||
Loading the laundryItems of |
clothing that have been pretreated with |
|
|
solvent'based cleaning agents e g stain remover |
|
|
and dry |
cleaning spirit represent an explosion hazar |
|
once loaded into the washer'dryer Before loading t |
|
|
laundry |
rinse thoroughly by hand |
Attention
Foreign objects in the drum may damage the laund
Before loading the laundry check that there is no
debris in |
the |
drum |
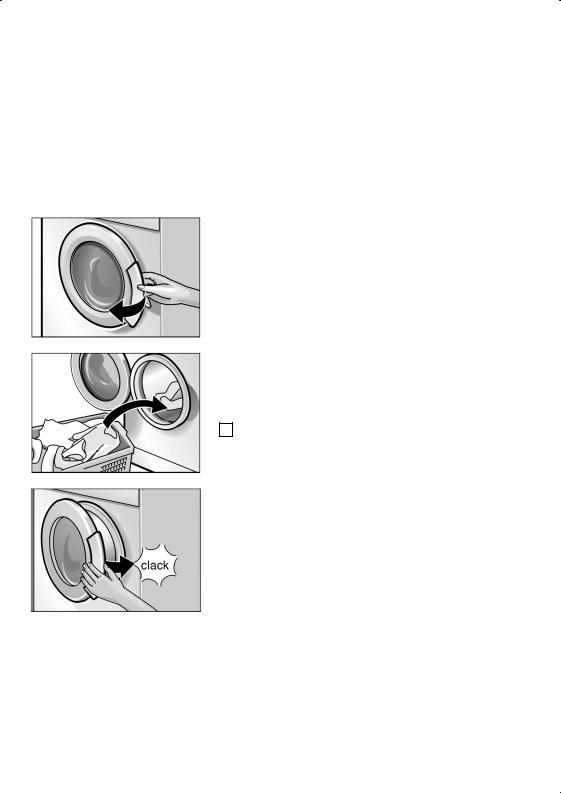
Open |
the |
washer'dryer door |
Unfold the sorted items of clothing and place th loosely into the drum Mix large and small items
Laundry items which vary in size are more evenl distributed during the spin cycle
i Do not exceed recommended loads Overloading will cause poor wash results and encourage creasing
Close the washer'dryer door
Take care not to trap any items of clothing between the loading door and rubber seal
18

eter ents |
and clean n |
|
|||
products |
|
|
|
|
|
|
R sk |
of po son n ! |
|
|
|
|
|
|
|||
os n deter ent |
|
|
|||
Keep detergents |
and additives out of the reach |
||||
|
of children. |
|
|
|
|
|
Dose detergent according to |
|
|||
|
the water hardness. You can find out the water |
||||
|
hardness from |
your water |
utility company. |
||
|
the |
amount of |
laundry. |
|
|
|
the degree of soiling. |
|
|||
|
Information on |
soiling |
can |
be found on page 4. |
|
|
the |
specifications of |
the detergent manufacturer. |
||
|
The correct dosage reduces the impact on the |
||||
|
environment and produces a good washing result. |
||||
|
Pour liquid detergent into the corresponding |
||||
|
dispenser. |
|
|
|
|
|
Too l ttle deter ent: |
|
|
||
|
- The laundry is not washed clean and eventually |
||||
|
becomes grey |
and hard. |
|
||
|
- Greyish&brown dots (grease spots) may stain the |
||||
|
laundry. |
|
|
|
|
|
- The |
heating elements |
are |
calcifying. |
|
Too muc deter ent:
- The environment is loaded.
-Excessive froth may be generated during the wa cycle causing a reduction in the washing mechanism. This may be the cause of poor washing and rinsing results.
9
Adding detergent/ cleaning product
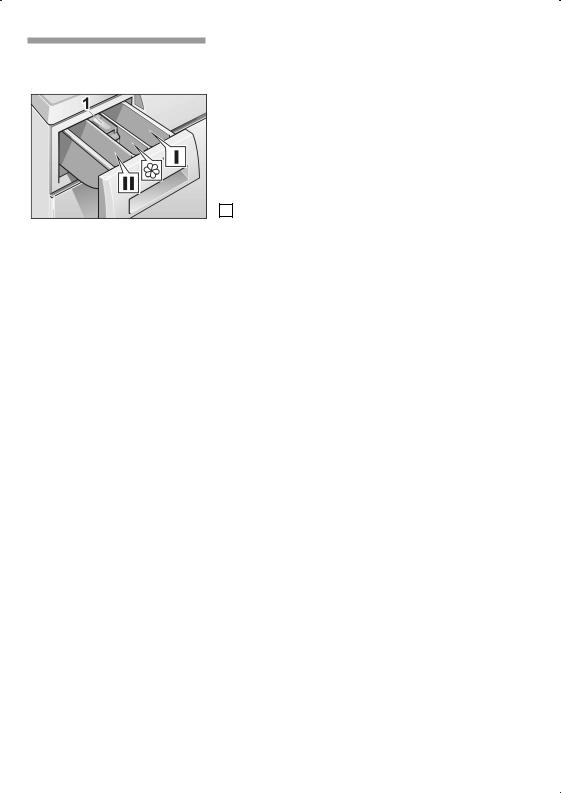
Dispenser I
Detergent for prewash or starch.
Dispenser II
Detergent for main wash, water softener, pre!soaking agent, bleach and stain removal product.
Dispenser 2
Cleaning product, e.g. fabric softener or fabric conditioner (do not fill above the lower edge of the insert ).
i Concentrated or viscous fabric softener or fabric conditioner must be diluted with a little water before it is poured into the dispenser (prevents th overflow from becoming blocked).
Pull out the detergent drawer all the way.
Pour in detergent and/or cleaning product.
Close the detergent drawer.
 Loading...