


MUSIC Pro
User Guide
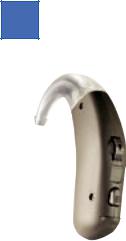
Behind-the-Ear Instruments
s
Siemens Hearing Solutions

A friendly guide to your new Siemens
hearing instruments
Congratulations!
You have decided in favour of hearing instruments from Siemens. You have taken an important step towards being able to hear better.
From now on, your new hearing instruments will be your constant companions.You will profit from our many years of research and experience in microelectronics. Soon it will be easy for you to hear again. Good hearing is an important requirement for your physical well being. Your new hearing instruments will help you actively participate with pleasure in the world of language and music again.
And as with any constant companion, you’ll need some time at first to get used to handling your hearing instruments. With a little patience, we trust that your new hearing experience will be all the more pleasant for you.
These user guide should help you build friendship quickly with your new partners in matters relating to better hearing. We want to help you to handle your hearing instruments correctly, so that they will become an important part of your life.
Wishing you much success,
Your Siemens team
2

The best way to use your new hearing instruments
In this brief guide you will find instructions for inserting, placing and adjusting your hearing instruments. There are also tips and information on correct handling, cleaning, care and battery changing. And naturally information about how you can solve some failures yourself if you cannot visit a hearing instrument specialist immediately.
One important note: Your hearing success depends largely on how well your instruments fit in the ears and how carefully you maintain and handle them.
This is your |
Contents: |
|
|
|
|
|
|
|
|
Instrument |
|
|
|
|
|
|
|
|
|
|
MUSIC Pro |
Page 5 |
Pro |
|
|
|
|
|
|
|
MUSIC Pro S |
Page 15 |
Pro S |
|
|
|
|
|
|
|
MUSIC Pro SP |
Page 23 |
Pro SP |
|
|
|
|
|
|
|
MUSIC Pro Dir |
Page 31 |
Pro Dir |
|
Applicable to all INFINITI Pro instruments |
|
All |
||
How to insert your ear mould |
Page 42 |
|
|
|
Handling batteries |
Page 44 |
|
|
|
Notes for cleaning and care |
Page 45 |
|
|
|
The best way to handle your hearing instruments |
Page 47 |
|
|
|
How to solve some failures yourself |
Page 48 |
|
|
|
Hearing training made easy |
Page 51 |
|
|
|
3
4
MUSIC Pro
|
|
|
|
|
|
|
|
Description of the MUSIC Pro |
|
|
|
|
|
||
hearing instrument |
Page |
6 |
|
|
|
||
Pro |
|||||||
Battery changing |
Page |
7 |
|
|
|||
|
|
|
|||||
|
|
|
|
|
|
||
Safety notes for batteries |
Page |
8 |
|
|
|
||
|
|
|
|
||||
How to switch your instrument on/off |
Page 9/10 |
|
|||||
|
|
|
|
|
|
||
Setting the loudness |
Page |
9 |
|
|
|
||
|
|
|
|
|
|
||
Program button |
Page |
10 |
|
|
|
||
|
|
|
|
|
|
||
Telecoil |
Page |
11 |
|
|
|
||
|
|
|
|
|
|
||
Audio input program |
Page |
12 |
|
|
|
||
|
|
|
|
|
|
||
Battery compartment lock |
Page |
13 |
|
|
|
||
|
|
|
|
|
|
||
Applicable to all MUSIC Pro instruments |
|
|
|
|
|
||
How to insert your ear mould |
Page |
42 |
|
|
|
||
Handling Batteries |
Page |
44 |
|
|
|
||
Notes for cleaning and care |
Page |
45 |
|
|
|
||
The best way to handle your hearing instruments Page |
47 |
|
|
|
|||
How to solve some failures yourself |
Page |
48 |
|
|
|
||
Hearing training made easy |
Page |
51 |
|
|
|
||
5

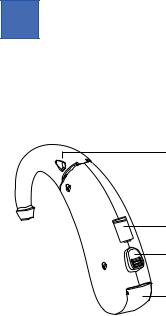
Description of the MUSIC Pro hearing instrument
Microphone opening
Volume Control
Programming socket
Program button with on/off function
Battery compartment with on/off function and lock
For your instrument you will need BatteryType 13.
6
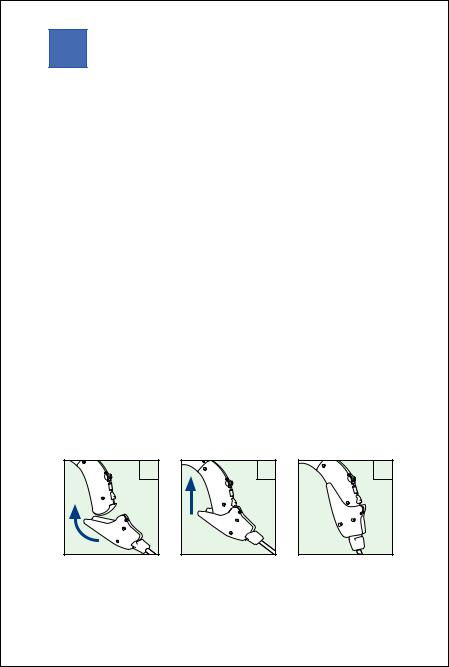
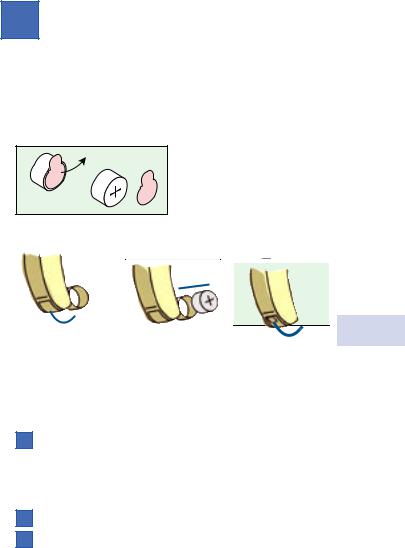
Battery changing
You should always pull off the protective foil only if you actually use the battery.
Pro
Open the |
Insert the |
Close the |
battery |
battery |
battery |
compartment |
|
compartment |
When inserting the battery please pay attention to the plus side on the battery.
The plus (+) side of the battery is always the smooth side. You can recognise the minus (–) side by the coloured ring.
You should always keep spare batteries at hand.
If you feel you cannot change the battery yourself, ask someone to help you: a family member, friend or your hearing instrument specialist.
7

The batteries last from a few days up to several weeks according to the way they are used.You can recognise when a change of batteries becomes necessary, because your hearing instruments become noticeably quieter towards the end of the battery’s life. Then it is time for new batteries.
Two warning tones sound once per minute indicating that you must insert a new battery.
1 min.
Your hearing instrument specialist can switch off the warning tones if required.
Safety notes for batteries
WARNING
Keep batteries away from children! Batteries must not be swallowed.
Remove the batteries when the instrument is not in use over a prolonged period. Replace leaking batteries without delay.
Do not throw away your dead batteries!
Return them to your hearing instrument specialist for proper, environmentally conscious disposal.
8
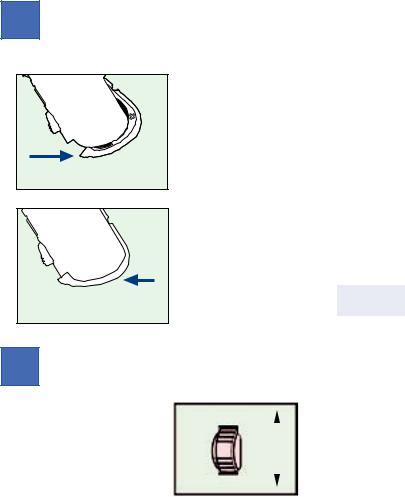
How to switch your instrument on /off
fig. 1
Push to switch ”OFF”
fig. 2
Push to switch ”ON”
There are 2 ways to switch your Instruments ON/OFF.
First way
Press the battery compartment to the rear up to the first stop in order to switch OFF the instrument.
Please note: if you press further than to the first stop, the battery might fall out! (see fig. 1)
Close the battery compartment to switch ON the instrument (see fig. 2)
Second way is by using
the program button. See Pro chapter “Program button”.
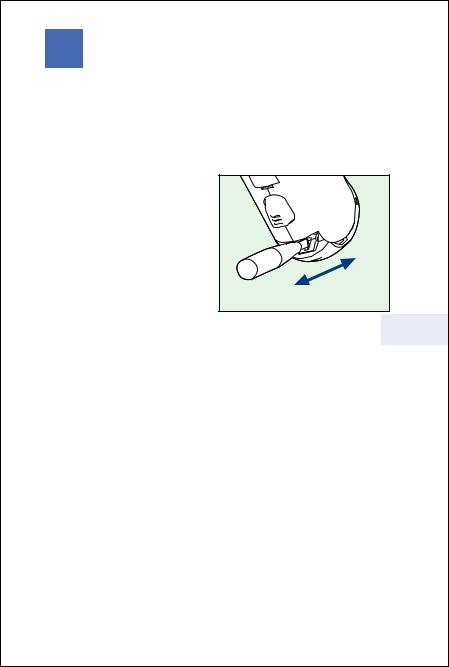
Setting the loudness
MUSIC Pro hearing instru- |
|
|
louder |
|
|
||
ments are fully automatic. |
|
|
|
|
|
|
|
It is therefore not necessary |
2 |
|
turn |
for you to change the loud- |
|
||
|
|||
ness manually. |
|
|
|
However, if you still wish |
|
|
quieter |
to do so, MUSIC Pro offers |
|
|
|
you a volume control. |
|
|
|
Your hearing instrument specialist can program the possible adjustment range for you. If you do not want to use the volume control, then your hearing instrument specialist can also switch it off.
9
Program button
How to switch your instrument ON/OFF
If the hearing instrument has already been operated it can be switched off by pressing the program button for at least 2 sec.
To switch it on again press the program button for at least 2 sec. The instrument diverts to program “1”.
Every operation is acknowledged by beeps tones.
How to select the programs
MUSIC Pro has 4 hearing programs. Program 1 to 3 is selected with the program button. Program 4 is activated by the audio shoe. Each time when the instrument diverts between the programs, the respective program is confirmed by beep tones. The number of beep tones is identical with the selected program. That means when program “3“ is selected, three beep tones are heard.
Program overview
See below to check how your hearing instrument specialist has programmed your MUSIC Pro instrument.
Hearing |
beeps your |
|
program |
|
MUSIC Pro |
|
|
|
|
|
|
1 |
|
|
2 |
|
|
3 |
|
|
4 |
|
audio shoe |
10
Telecoil
The telecoil is intended for telephone conversations and for using induction loops, e.g. in churches, theaters or lecture rooms. In order to be able to use the telephone coil, your telephone also must be suitable for hearing instruments and emit an adequate magnetic field. It is mostly older telephones which meet these requirements.
Unfortunately, modern phones, particularly cordless telephones and mobile phones, do NOT all emit a magnetic field. In these cases we recommend that you use the normal hearing programs for telephone conversations (see also pages 53/54).
Pro
11
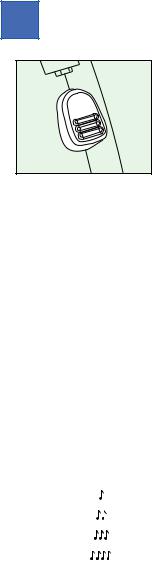
Audio input program
Your hearing instrument has an audio input. This enables accessories to be connected. In this way you can understand better in certain hearing situations.
The contacts for the audio input are located under the type plate. Before using the audio input for the first time the covering type plate must be exchanged against the supplied type plate providing openings for the audio contacts. Your hearing instrument specialist will do this for you.The coloured type plates can be used to identify your left (blue) and right (red) hearing instrument.
Your hearing instrument recognises immediately when an audio shoe is fitted and diverts then automatically to program ”4”. You can notice this by the four beep tones 
 .
.
Fitting the audio shoe to the hearing instrument
Hook the audio shoe in from the front and press it to the rear into the detent on the inner curve of the instrument.
1 |
2 |
3 |
Safety note for instruments with audio input
The audio input can only be connected to power supplied devices if they fulfil at least the safety provisions of
IEC 65 / DIN VDE 0860.
12
Battery compartment lock
Your instruments are |
|
|
|
equipped with a battery |
|
|
|
compartment lock. This is |
|
|
|
intended to prevent the |
|
|
|
unintentional removal of |
|
|
|
batteries from their com- |
|
|
|
partment, such as by small |
lock |
|
|
children. |
|
||
|
|
||
To lock the battery com- |
unlock |
|
|
partment open the battery |
|
|
|
compartment up to the first stop. Push the slide in the |
Pro |
||
battery compartment to the right with a suitable tool. |
|||
|
|||
To unlock the battery compartment again, open the |
|
||
battery compartment up to the first stop. Push the slide |
|
||
in the battery compartment to the left with a suitable tool. |
|
||
If you feel you cannot do this yourself, your hearing instrument |
|
||
specialist will be pleased to help you. |
|
|
|
13
14
MUSIC Pro S
|
|
|
|
|
|
|
Description of the MUSIC Pro S |
|
|
|
|
|
|
hearing instrument |
Page |
16 |
|
|
|
|
Battery changing |
Page |
17 |
|
|
|
|
|
|
|
|
|
Pro S |
|
Safety notes for batteries |
Page |
18 |
|
|
||
How to switch your instrument on/off |
Page19/20 |
|
||||
|
||||||
|
|
|
|
|
|
|
Battery compartment lock |
Page |
19 |
|
|
|
|
|
|
|
|
|
|
|
Program button |
Page |
20 |
|
|
|
|
|
|
|
|
|
|
|
Telecoil |
Page |
21 |
|
|
|
|
|
|
|
|
|
|
|
Applicable to all INFINITI Pro instruments |
|
|
|
|
|
|
How to insert your ear mould |
Page |
42 |
|
|
|
|
Handling Batteries |
Page |
44 |
|
|
|
|
Notes for cleaning and care |
Page |
45 |
|
|
|
|
The best way to handle your hearing instruments Page |
47 |
|
|
|
||
How to solve some failures yourself |
Page |
48 |
|
|
|
|
Hearing training made easy |
Page |
51 |
|
|
|
|
15
Description of the MUSIC Pro S hearing instrument
Microphone opening
Programming socket
Program button with on/off function
Battery compartment with on/off function and lock
For your instrument you will need BatteryType 13.
16
Battery changing
You should always pull off the protective foil only if you actually use the battery.
|
|
▼ |
|
|
|
▼ |
|
|
|
▼ |
|
|
|
|
|
|
|
Open the |
|
|
|||
Insert the |
Close the |
||||
battery |
battery |
battery |
|||
compartment |
|
|
compartment |
||
Pro S
When inserting the battery please pay attention to the plus side on the battery.
The plus (+) side of the battery is always the smooth side.You can recognise the minus (–) side by the coloured ring.
You should always keep spare batteries at hand.
If you feel you cannot change the battery yourself, ask someone to help you: a family member, friend or your hearing instrument specialist.
17
 Loading...