


Issued by
Information and Communication mobile Haidenauplatz 1
D-81667 Munich
© Siemens AG 2002
All rights reserved. Subject to availability. Rights of modification reserved.
Siemens Aktiengesellschaft
s
Be inspired
MT
50
www.my-siemens.com
Thank you for buying a Siemens mobile phone. We wish you a lot of enjoyment and pleasure with it.
If you read through the user guide carefully, you will get to know all the functions of the phone.
In particular, please observe the safety precautions (p. 3) and PIN security (p. 10).
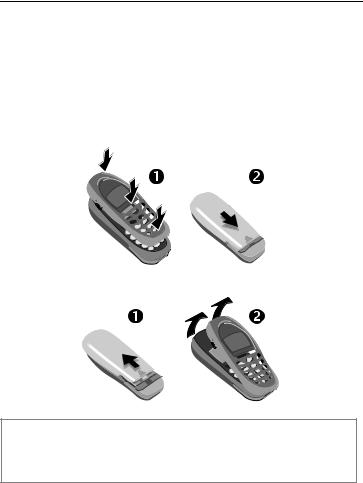
The front and back covers of the casing (CLIPit™ Covers, my-CLIPit™: p. 12 and p. 87) can be changed in a matter of seconds - no tools required:
To attach
To remove
Note
Your phone's display and the display cover of the upper shell are delivered with a protective film. Remove this film before getting started.
In rare cases the static discharge may cause discolouration at the edges of the display. However this will disappear within 10 minutes.
Contents |
1 |
Safety precautions ..................... |
3 |
Overview phone ......................... |
4 |
General instructions ................... |
5 |
User guide ............................... |
5 |
Soft keys .................................. |
5 |
Getting started ........................... |
7 |
Insert SIM card/battery ............. |
7 |
Charging .................................. |
8 |
Switch on, off/PIN entry ............. |
9 |
Security .................................... |
10 |
Codes .................................... |
10 |
Prevent accidental activation ... |
11 |
My phone ................................. |
12 |
Making a phone call ................. |
13 |
Dialling with number keys ...... |
13 |
End call .................................. |
13 |
Set volume ............................. |
13 |
Redial previous numbers ........ |
13 |
When a number is busy .......... |
14 |
Accept call ............................. |
14 |
Reject call .............................. |
14 |
Hold call ................................. |
15 |
Call waiting/Swap ................... |
15 |
Conference ............................ |
16 |
Call menu .............................. |
16 |
Babysitter ............................... |
17 |
Records .................................. |
17 |
Phonebook ............................... |
19 |
<New entry> .......................... |
19 |
Call/search for an entry ........... |
19 |
Group .................................... |
21 |
Location ................................. |
22 |
Record no. .............................. |
23 |
Assign picture ......................... |
23 |
Message (SMS) ......................... |
24 |
Read messages ....................... |
24 |
Inbox/outbox .......................... |
25 |
Archive ................................... |
25 |
Compose a message ............... |
26 |
Predefined text ....................... |
27 |
SMS to group .......................... |
27 |
Text entry with "T9" ................ |
28 |
Picture & Sound ...................... |
30 |
Message setup ........................ |
30 |
Surf & fun ................................. |
32 |
Internet (WAP) ........................ |
32 |
Games & more ........................ |
35 |
Bitmap viewer ........................ |
37 |
Select bitmap style ................. |
38 |
Own greeting ......................... |
38 |
Screensaver ............................ |
38 |
Melody manager .................... |
39 |
Ringer tones ........................... |
40 |
Voice message/Mailbox ............ |
41 |
Cell broadcast ........................... |
42 |
Duration/charges ...................... |
43 |
Display ................................... |
43 |
Charge settings ...................... |
43 |
Divert ........................................ |
44 |
See also Index at the end of this user guide
2 |
Contents |
Groups ...................................... |
46 |
SMS to group ......................... |
46 |
Call to group .......................... |
46 |
Group setup ........................... |
48 |
Organiser ................................. |
49 |
Diary ...................................... |
49 |
Greetings ............................... |
50 |
Notes ..................................... |
51 |
Missed alarms ........................ |
52 |
Alarm clock ............................ |
52 |
Clock ......................................... |
53 |
Time/date .............................. |
53 |
Date format ........................... |
53 |
Auto display ........................... |
53 |
Auto phone off ....................... |
53 |
Auto timezone ....................... |
53 |
Profiles ..................................... |
54 |
Setup ..................................... |
54 |
Car Kit .................................... |
55 |
Headset ................................. |
55 |
Aircraft mode ......................... |
55 |
My menu .................................. |
56 |
Fast access key ......................... |
57 |
Left soft key ........................... |
57 |
Speed dialling keys ................. |
58 |
Audio ........................................ |
59 |
Ringer setting ........................ |
59 |
Volume .................................. |
59 |
Call screening ........................ |
59 |
Silent alert ............................. |
59 |
Key tones ............................... |
59 |
Minute beep ........................... |
60 |
Information tones ................... |
60 |
Melody manager .................... |
60 |
Ringer tones ........................... |
60 |
Setup ........................................ |
61 |
Device .................................... |
61 |
Security .................................. |
63 |
Network ................................. |
64 |
User group ............................. |
66 |
During a call ........................... |
67 |
Clock ...................................... |
67 |
Connectivity ........................... |
67 |
Accessories ............................. |
70 |
Fax/data mode using a PC ........ |
72 |
Notes A-Z .................................. |
73 |
Display symbols (selection) ...... |
81 |
Questions & Answers ................ |
82 |
Siemens Service ........................ |
85 |
Specifications/maintenance ..... |
86 |
Accessories ............................... |
87 |
Basics ..................................... |
87 |
Data/Applications ................... |
87 |
Car Solutions .......................... |
88 |
Innovations ............................ |
88 |
Index ......................................... |
89 |
See also Index at the end of this user guide
Safety precautions |
3 |
Switch off in hospitals or in the vicinity of medical devices, e.g. pacemakers or hearing aids.
Mobile phones can interfere with the function of these devices.
A minimum distance of 20 cm between pacemaker and mobile phone should be kept.
When using the mobile phone, hold it to the ear which is farther removed from the pacemaker.
Always use the handsfree kit for calls while driving (p. 70)!
Mobile phones must be switched off at all times in an aircraft. To prevent accidental activation, see (p. 11).
Switch off near petrol stations, fuel depots, chemical plants or blasting operations.
Mobile phones can interfere with the operation of technical installations.
The ring tone is reproduced through the earpiece. To avoid damage to hearing, first accept the call, then hold the phone to the ear.
SIM card may be removed. Caution! Small parts could be swallowed by children.
The mains voltage specified on the power supply unit must not be exceeded.
We recommend you use only original Siemens batteries (100% mercury-free) and charging devices. Otherwise considerable health risks and damage to the product cannot be excluded.
Neither the phone nor the battery (100% mercury-free) may be opened under any circumstances (except when exchanging the battery, SIM card or top shell). Any other changes to this device are strictly prohibited, as they will invalidate the type approval criteria required for operation of the unit.
Please note:
Dispose of used batteries and phones according to the legal regulations.
Mobile phones can interfere with the operation of nearby TVs, radios or PCs.
We recommend you use only original Siemens accessories to avoid possible damage and to comply with the existing regulations.
Improper use invalidates the warranty!

4 |
Overview phone |
Loudspeaker Display indicators
Signal strength/ battery level.
Call key W
Select displayed phone number or name, accept calls. Display last calls in standby mode.
Phonebook key
Press once for Phonebook Press twice for Groups
* Hold down
In standby mode:
Switch signal tones on and off.
Microphone Device interface
Connection for charger, headset etc.
Integrated antenna
|
Do not interfere with the |
|
provider |
phone above the battery |
|
cover unnecessarily. This |
||
12:30 |
||
reduces the signal strength. |
||
Menu |
S On/Off/End key |
|
|
Press briefly: |
|
|
End call/function and return |
|
|
to standby mode. In menus: |
|
|
one menu level back. |
|
|
Hold down: |
|
|
Switch phone on/off. |
|
|
From menus: return to |
|
|
standby mode. |
|
|
#Hold down |
|
|
In standby mode: |
|
|
Switch key lock on and off. |
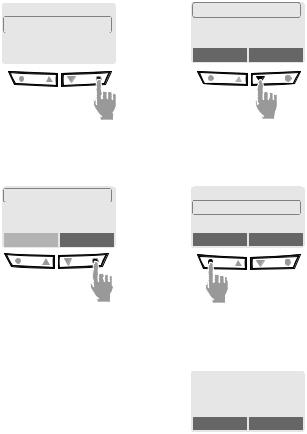
Soft keys
The current functions of these keys are displayed in the grey fields as text or icons.
These keys display the quick selection and menu in standby mode. Factory default:
§New SMS§ or e.g. p (SIM service) and §Menu§ (main menu).
< a
Service provider 01.05.2002 12:30
New SMS |
|
Menu |
To call up a function displayed, press the soft key underneath the function.
Example: Press the right soft key on the right to call up the menu.
Press the soft keys on the inside to scroll through menus and lists.

General instructions |
5 |
User guide
The following symbols are used to explain operation:
J |
Enter numbers or letters. |
S |
On/Off/End key. |
T |
Phonebook key. |
W |
Call key. |
MN Press on the inside to scroll up and down.
KL Press on the outside to call a |
|
|
function (soft key). |
§Menu |
Displays a soft key function. |
~Function depends on the service provider, special registration may be necessary.
Soft keys
Steps for calling a function are shown in a condensed form in this user guide, e.g.: to display the call list for missed calls:
§Menu ¢Records ¢Missed calls
This corresponds to:
n <Service providera
01.05.2002 |
12:30 |
|
|
|
|
New SMS |
Menu |
|
§Menu§ Open menu.
From standby mode: Press right soft key on the right.
oHelp
©Messages Records
Select
N Scroll to Records.
Press right soft key on the left to scroll downwards.
6 |
General instructions |
p |
Messages |
r |
+49892325678 |
|
||
|
š Records |
|
Office |
|
||
|
Get in touch |
|
Carol |
|
||
|
|
|
|
|
View |
Options |
|
|
Select |
|
|||
§Select§ Press.
Press right soft key on the right to open the Records submenu.
q |
Missed calls |
|
Calls received |
|
Calls dialled |
Select
N Scroll to the required entry.
Press right soft key on the left to scroll downwards.
s+49892325678Office Carol
View Options
§Select§ Press.
Press right soft key on the right to open the list of Missed calls.
View |
Press. |
|
|
Press left soft key on the left to |
|
|
display the phone number with |
|
|
date and time. |
|
t |
Office |
|
|
+49322325774 |
|
|
01.05.2002 |
12:30 |
|
View |
Options |
Getting started |
7 |
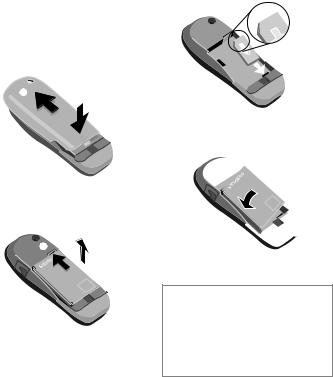
Insert SIM card/battery
The service provider supplies you with a SIM card on which all the important data for your line is stored. If the SIM card has been delivered in credit card size, snap the smaller segment out and remove any rough edges.
•Press grooved area n, then lift cover o.
o n
•Press latch in the direction indicated by the arrow p, lift battery at the cutout on side of the phone, then tilt upwards and remove q.
p
q
•Insert SIM card in the opening (contacts pointing downwards) and push gently until it engages (make sure the angled corner is in the correct position r).
r
•Insert battery into the phone side-
ways s, then press downwards t, until it engages.
 t
t
s


•Replace cover and press downwards until it engages.
Note
Always switch off phone before removing the battery!
Only 3-Volt SIM cards are supported. Please contact your service provider, if you have an older card.
Functions without SIM card ............... |
p. 80 |
8 |
Getting started |
Charging
The battery is not fully charged when delivered, so:
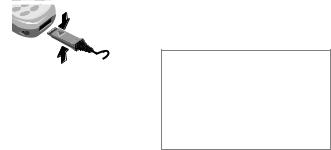
•Plug in charger cable at the bottom of the phone, plug in the power supply unit to the mains power socket and charge for at least two hours.
•Push the sides of the charger cable plug together and pull to remove it.
Display when charging is in progress
`When charging is in progress.
e End of charging.
Charging time
An empty battery is fully charged after about 2 hours. Charging is only possible in an ambient temperature of 5°C to 40°C (the charge icon flashes as a warning when the temperature is 5°C above/below this range). The voltage specified on the power supply must not be exceeded.
Charge icon not visible
If the battery is totally discharged no charge icon is displayed when the charger is plugged in. It will appear after two hours at most. In this case the battery is fully charged after 3-4 hours.
Only use the charger provided!
Display while in service
Charge level display during operation (full-empty):
a}b{c
A beep sounds when the battery is nearly empty.
Note
The charger heats up when used for long periods. This is normal and not dangerous.
Operating times................................. |
p. 76 |
Battery care (only NiMH) ................... |
p. 62 |
Quality declaration for battery ........... |
p. 76 |
Switch on, off/PIN entry |
9 |
Switch on, off
S Hold down On/Off/End key to switch on or off.
Enter PIN
The SIM card can be protected with a 4-8 digit PIN.
J |
|
Enter your PIN code using |
||||||
|
the number keys (the dis- |
|||||||
|
|
play shows a series of as- |
||||||
|
|
terisks, if you make a |
||||||
|
|
mistake press §Clear§). |
||||||
|
|
|
|
|
|
|
Please enter |
|
|
|
|
|
|
|
|
||
|
|
|
|
|
|
|
your PIN: |
|
|
|
|
|
|
|
|
||
|
|
|
|
|
|
|
* * * * |
|
|
|
|
|
|
|
|
|
|
|
|
|
|
|
|
|
|
|
|
|
|
Clear |
OK |
||||
§OK§ Confirm input with the right key (press on the outside).
Logging on to the network will take a few seconds.
Standby mode
< |
a |
Service provider |
|
01.05.2002 |
12:30 |
New SMS |
Menu |
When the name of the service provider appears on the display, the phone is in standby mode and ready for use.
Note |
|
< Signal strength ....................... |
p. 77 |
pSIM services (optional) ......... |
p. 77 |
§New SMS§......................................... |
p. 26 |
§SOS§ ................................................. |
p. 73 |
Change PIN....................................... |
p. 10 |
SIM card problems ............................ |
p. 77 |
Clear SIM card barring ...................... |
p. 11 |
Other network.................................... |
p. 64 |
Set time ............................................. |
p. 53 |

10 |
Security |
The phone and SIM card are protected against misuse by several security codes.
Keep these confidential numbers in a safe place where you can access them again if required.
PIN |
Protects your SIM card (person- |
|
al identification number). |
PIN2 |
This is needed to set the charge |
|
detail display and to access |
|
additional functions on special |
|
SIM cards. |
PUK |
Key code. Used to unlocked |
PUK2 |
SIM cards after the wrong PIN |
|
has been entered. |
Phone |
Protects your phone. Must be |
code |
entered at the first security set- |
|
ting. |
§Menu ¢Setup¢Security
¢then select a function
Codes
PIN control
The PIN is usually requested each time the phone is switched on. You can deactivate this feature but you risk unauthorised use of the phone.
§Select§ Press.
J Enter PIN.
§OK§ Confirm input.
§Change§ Press.
§OK§ Confirm.
Some service providers do not permit this function.
Change PIN
You can change the PIN to any
4-8 digit number you may find easier to remember.
J Enter old PIN.
§OK§ Press.
J, §OK§ Enter new PIN.
J, §OK§ Repeat new PIN.
Change PIN2
(display only if PIN 2 is available). Proceed as with Change PIN.

Security |
11 |
Change phonecode
You define and enter the phone code (4-8 digits) when calling up a phone code protected function (e.g. Babysitter, p. 17) for the first time. It is then valid for all functions. If you have forgotten it, please call Siemens Service (p. 85).
Clear SIM card barring
If the PIN is entered incorrectly three times, the SIM card is barred. Enter the PUK (MASTER PIN) provided by your service provider together with the SIM card according to instructions. If PUK (MASTER PIN) has been lost, please contact your service provider.
Note |
|
Screensaver...................................... |
p. 38 |
Auto key lock..................................... |
p. 61 |
Further security settings.................... |
p. 63 |
|
|
Prevent accidental activation
Even if PIN entry is deactivated (see p. 10), confirmation is required to switch on the phone.
This prevents accidental activation of the phone, e.g. when you are carrying it in a bag or when you are travelling in an aircraft.
S Hold down.
Please confirm switch on
OK Cancel
§OK Press to switch on the phone.
§Cancel§ Press (or no further input) to stop switch-on procedure. The phone does not switch on.
12 |
My phone |
Your phone offers a number of functions so that you can adapt it to meet your personal requirements.
Ringer tones
Assign individual ring tones to caller groups or anniversaries (p. 40).
The melody manager is available for managing the ring tones (p. 39).
Logos, screensavers, animations
Adjust your phone according to your own wishes in the following areas to give it a personal touch:
To switch on
Select a bitmap style (p. 38) and a greeting (p. 38) that you create yourself.
Screensaver (p. 38)
You can set an analogue clock or an individual picture as screensaver.
(Provider) logo (p. 37)
Select an individual picture from the bitmap viewer.
Where do I get what?
You can order additional ring tones, logos and screensavers on the Internet and receive them via SMS:
www.my-siemens.com/ringtones www.my-siemens.com/logos www.my-siemens.com/screensaver
Or you can directly download them via WAP:
wap.my-siemens.com
Siemens City Portal
Further services for your mobile phone (e.g. a Photo Logo Composer to create personal pictures for your Phonebook (p. 23)) can be found at:
www.my-siemens.com/city
The Siemens City Portal also offers a list of countries in which these services are available.
CLIPit™ Covers
Select different colours for the top and bottom covers from the Siemens City Portal. Or use a personal photo to make your phone unique (p. 87):
www.my-siemens.com/my-clipit
My menu
Create your own menu with frequently used functions, phone numbers or WAP pages (p. 56).
Making a phone call |
13 |
Dialling with number keys
The phone must be switched on (standby mode).
J |
Enter the number (always |
with prefix, if necessary |
|
|
with the international |
|
dialling code). |
|
§Clear§ A short press clears |
|
the last digit, a long press |
W |
clears the entire number. |
Press the Call key. The |
|
|
phone number displayed |
|
is dialled. |
End call |
|
S |
Press the End key briefly. |
Call is ended. Press this |
|
key even if the person on the other end of the line has hung up first.
Set volume
MN You can adjust the handset volume with the scroll keys (only during the call).
If a Car Kit is used, its volume setting does not affect the usual setting on the phone.
Redial previous numbers
To redial the phone number last called:
W Press the Call key twice.
To redial other numbers that were dialled previously:
W Press the Call key once.
MN Pick out the required phone number from the list, then press ...
W ... to dial.
Note |
|
? Store number............................ |
p. 19 |
§Options§ Call lists............................. |
p. 17 |
§Hold§................................................. |
p. 15 |
;menu§ Call menu .......................... |
p. 16 |
§Divert§ Divert set .............................. |
p. 73 |
International dialling codes............... |
p. 75 |
Auto key lock ..................................... |
p. 61 |
Phone number memo........................ |
p. 76 |
Microphone off .................................. |
p. 16 |
Phone number transmission off/on |
p. 67 |
(Hide ID)............................................ |
|
Control codes (DTMF)....................... |
p. 73 |

14 |
Making a phone call |
When a number is busy
If the called number is busy or cannot be reached because of network problems several options are available (depending on the service provider). An incoming call or any other use of the phone interrupts these functions.
Either
Auto redial previous numbers
§Auto dial§ Press. The number is automatically dialled for up to 15 minutes at increasing intervals. End with:
S End key.
or |
|
Call back |
~ |
§Call back§ Press. Your phone rings when the busy number is free. Press the Call key to dial the number.
Reminder
§Prompt§ Press. A beep reminds you to redial the displayed phone number after
15 minutes.
Accept call
+
+498912345 Reply Reject
The phone must be switched on (standby mode). An incoming call will interrupt any other use of the phone.
§Reply§ Press. or
W Press.
If the phone number has been transmitted by the network, it is displayed. If it is stored in the Phonebook, the corresponding name is displayed instead.
Reject call
§Reject§ |
Press. |
|
or |
|
|
S press briefly. |
|
|
|
|
|
Note |
|
|
U Missed calls........................... |
p. 18 |
|
Accept call using any key .................. |
p. 61 |
|

Making a phone call |
15 |
Hold call
You can call another number during a call.
<a
Z
 Z
Z
Carol
Hold Amenu
§Hold§ The current call is put on hold. Now dial the new phone number.
When the connection is established press...
§Swap§ ... to swap back and forth between both calls.
Note |
|
;menu§ Call menu.......................... |
p. 16 |
Call waiting/Swap |
~ |
You may need to register for this service with your service provider and set your phone accordingly (p. 67).
During a call, you may be advised that there is another call waiting. You will hear a special tone during the call. You have the following options:
Accept the waiting call
§Swap§ |
Accept the waiting call |
|
and place the current call |
|
on hold. |
|
To swap between the two |
|
calls, press §Swap§ each |
|
time. |
End the current call: |
|
|
Press. The following que- |
S ry is displayed: "Return to |
|
|
the call on hold?" |
§Yes§ |
Return to the held call. |
or |
|
§No§ |
The held call is ended. |
Reject waiting call |
|
§Reject§ |
Reject the waiting call, |
|
the caller will hear the |
|
busy tone. |
or |
|
§Divert§ |
If this is set, the waiting |
|
call will be diverted, to the |
|
mailbox for example. |
End current call |
|
S End the current call. |
|
§Reply§ |
Accept the new call. |

16 |
Making a phone call |
Conference |
~ Call menu |
Call up to 5 parties one by one and link them together in a phone conference. Some of the functions described may not be supported by your service provider or must be enabled specifically.
You have established a connection:
<a
Z
 Z
Z
Carol
Hold Amenu
§Hold§ The current call is put on hold. Now dial a new number. When the new connection is established...
;menu§ ... open menu and select Conference. The held call is joined.
Repeat procedure until all participants are linked together (up to 5 participants).
End
S All calls in the conference are ended simultaneously when the End key is pressed.
The following functions are only available during a call:
;menu§ Open menu.
Micro- |
Switch microphone on/off. |
phone on |
If switched off, the person |
|
on the other end of the line |
|
cannot hear you (muting). |
|
Alternatively: |
|
* Hold down. |
|
However, numbers being |
|
entered are audible when |
|
Send DTMF tones is active. |
Volume |
Adjust handset volume. |
Conference |
(see left) |
Duration/ |
While the connection contin- |
charges |
ues, the call duration and |
|
(if set, p. 43) the charge de- |
|
tails are displayed. |
Send DT- |
(p. 73) |
MF tones |
|
Call |
The original call is joined to |
transfer |
the second one. For you, |
~ |
both calls are now ended. |
Main menu |
Access to the main menu. |
Call status |
List all held and active calls |
|
(e.g. participants in a confer- |
|
ence). |

Making a phone call |
17 |
Babysitter
Only one phone number can be dialled. Hold down the right soft key on the right.
Switch on
§Menu ¢Setup
¢Security¢Babysitter
§Select§ Press.
J Enter phone code:
When first prompted, you define and enter the phone code (4-8 digits).
Please do not forget this code!
§OK§ Confirm input.
§Change§ Press.
@/J Select phone number from the Phonebook (p. 19), or enter a new one (with name).
OK The babysitter is now active.
Switch off
#Hold down.
J Enter phone code.
§Change§ |
Press. |
|
§OK |
Confirm input. |
|
|
|
|
Note |
|
|
Change phone code.......................... |
p. 11 |
|
Records
Your phone stores the phone numbers of calls for convenient redialling.
§Menu ¢Records
§Select§ Press.
MN Choose call list.
§Select§ Press.
MN Select phone number.
W Dial phone number or
§View§ Display information on the phone number.

18 |
Making a phone call |
§Menu ¢Records
¢Select function
The following call lists are available:
Missed calls |
~ |
The phone numbers of calls that you have received but not answered can be recorded for call back purposes.
When you have missed a call, the following icon appears in the display above the left soft key in standby mode:
U
If you press the left soft key, the phone number is displayed.
Requirement:
The network supports the "Caller Identity" feature.
Calls received |
~ |
All accepted calls are listed. Requirement:
The network supports the "Caller Identity" feature.
Calls dialled
Access to the last ten numbers you dialled.
W |
Fast access in standby |
|
mode. |
Erase records
The contents of all call lists are deleted.
Records menu
The call list menu can be called up if an entry is highlighted.
§Options§ Open list menu.
View |
View entry. |
Correct no. |
Load number into display |
|
and correct it there if nec- |
|
essary. |
Save no. to |
Store entry in the Phone- |
d |
book. |
Delete |
Delete entry after confirma- |
|
tion. |
Delete all |
Delete all entries of the call |
|
list after confirmation. |
Note
NPress the right soft key on the left in standby mode for easy access to call lists.
Phonebook 19
Enter frequently used phone numbers in the Phonebook with a special name. To dial them, simply highlight the name. If a phone number is stored with a name, it appears on the display when you are called. Entries that belong together can be combined to form a group.
<New entry>
T Open Phonebook.
<Own numbers> <New entry> <Groups>
Select
<New entry>
Select.
MN Activate input fields.
J Maketries: the following en-
Phone Number
Enter phone number (with prefix).
Name
Enter (Text entry, p. 20).
Group
The entry can be assigned to a group, for example:
VIP, Leisure, Office, Family
(p. 21 and p. 46).
Location
Select a storage location such as
SIM card, SIM protected or mobile phone
(p. 22).
Record no.
(storage location number)
Each entry is automatically assigned a number under which it can also be selected (p. 23).
§Save§ Press.
Call/search for an entry
T Open Phonebook.
Select a name with the |
|
J/N first letter and/or scroll. |
|
W Dial number. |
|
|
|
Note |
|
§+List International dialling code ...... |
p. 75 |
Own numbers.................................... |
p. 76 |
Store control codes ........................... |
p. 73 |
|
|

20 Phonebook
Text entry
Press number key repeatedly until the required letter is displayed. The cursor advances after a short delay.
2 Press once for a, twice for b etc. The first letter in each name is automatically written in UPPERCASE.
Ä,ä/1-9 Umlauts and numbers are displayed after the relevant letters.
§Clear Press briefly to delete the letter before the cursor, hold down to erase the whole name.
MN Move the cursor (forward/ back).
*Press briefly:
Switch between uppercase, lowercase and digits.
Hold down:
Set input language and text mode.
# Activate/deactivate T9 (p. 62).
0Write: . ,? ! 0 + - :
1Space.
@, Ó , etc. Enter special characters, see p. 74.
Phonebook menu
§Options |
Open menu. |
|
|
View |
Display entry. |
Edit |
Display phone number and |
|
name for changes. |
New |
Create a new Phonebook en- |
entry |
try. |
Delete |
Delete entry from the Phone- |
|
book. |
Delete all |
Delete all entries after confir- |
|
mation. |
Send |
as entry: Send Phonebook |
SMS... |
entry to recipient. |
|
as text: Send entry as text of |
|
an SMS message. |
Picture |
Assign an individual picture to |
|
the phone number (p. 23). |
Capacity |
Display the maximum and |
|
available capacity. |

Phonebook 21
Group
If there are many Phonebook entries it is best to assign them to a group, e.g.:
VIP, Leisure, Office, Family
A special melody can sound (p. 40) and/or a symbol can be displayed (p. 22) if the phone number of a call is registered in a group.
Select group
T Two short presses or one long press on Phonebook (in standby mode).
MN Select group. The number of entries is displayed in brackets after the group name.
Group menu
§Options |
Open menu. |
|
|
View |
Display all entries assigned to |
members |
the group. |
Rename |
Change the current name of |
group |
the group. |
Group |
Assign a symbol to a group |
symbol |
(p. 22). |
Call to |
Call up to 5 members of a |
group |
group one by one and link |
~ |
them together in a confer- |
|
ence (p. 46). |
SMS to |
Send an SMS to all members |
group |
of a group (p. 46). |
|
|
Change group assignment
|
¿ VIP |
(17) |
You can assign a Phonebook entry to |
|||
|
a group when you enter it (p. 19). |
|||||
|
½ Leisure |
(9) |
||||
|
To change the group assignment or |
|||||
|
¾ Office |
(7) |
to assign to a group later: |
|||
|
|
|
|
When the Phonebook is open: |
||
|
View |
Options |
||||
§View§ |
Press. All entries of the |
MN Select entry. |
||||
§View§ |
Press. |
|||||
|
selected group are dis- |
|||||
|
§Change§ |
Press. |
||||
|
played. |
|
|
|||
|
|
|
|
MN Scroll to Group. |
||
|
|
|
|
§Change§ Press and select a new |
||
|
|
|
|
|
Group. |
|
|
|
|
|
§Save§ |
Confirm assignment. |
|

22 Phonebook
Group entry menu
§Options |
Open menu. |
|
|
View |
Display entry. |
Edit |
Display the entry for changes. |
New |
Open Phonebook and add an |
entry |
entry to the current group. |
Remove |
Remove entry only from the |
entry |
group. |
Remove |
Remove all members from the |
entries |
selected group. |
Send |
as entry: Send a Phonebook |
SMS... |
entry to recipient. |
|
as text: Send entry as text of |
|
an SMS message. |
Picture |
Assign a picture/symbol to |
|
phone number. |
Group symbol
You can assign one of many standard symbols to a group. Three symbols are displayed at one time.
The centre symbol is the current selection.
MN Choose symbol.
§OK§ Add symbol to the group entry.
Location
An entry can be moved from the Phonebook to the other storage locations.
T Open Phonebook.
MN Select entry.
§Options§ Open menu and select
Edit.
MN Go to the input field
Location.
SIM (standard) I
Entries that are stored in the Phonebook on the SIM card can also be used on a different GSM Phone.
Protected SIM , |
~ |
Phone numbers can be stored
in protected locations on a special SIM card. A PIN 2 is needed for editing (p. 10).
Mobile (phone memory) W
Phonebook entries are stored here if the memory of the SIM card is full.

Phonebook 23
Record no.
A record number (storage location number) is automatically assigned to every new entry in the Phonebook.
Call
J Enter record number.
#Press.
W Press.
Edit
Select entry in the Phonebook. §Options§ Press and select Edit.
MN Go to Record no.
§Change§ Press repeatedly until the required (available) number is displayed.
§Save§ Press.
Assign picture
Assign an individual picture to phone numbers. This picture will appear in the display when there is a call from this number.
Assign picture
T Open Phonebook.
MN Select entry.
§Options Open menu and select
Picture.
The list ¸ with your Own pictures is displayed.
MN Select entry.
§Load§ The bitmap viewer (p. 37) is opened and the picture is displayed.
§Select§ The picture is assigned to the phone number.
It appears with a rsymbol in the Phonebook.
Delete/change picture
If a picture is assigned to a phone number, it can be deleted or replaced.
MN Select entry with picture rin the Phonebook.
§Options§ Press
MN ^ Select Picture
§Delete The assignment is cleared.
or
§Select§ The picture list is displayed for new selection.
Note
A picture can be assigned to several phone numbers.
Add pictures to the picture list ........... |
p. 37 |
Siemens City Portal........................... |
p. 12 |

24 |
Message (SMS) |
You may transmit and receive very long text messages (up to 760 characters) on your phone, which are automatically composed from several "normal" SMS messages (note the accruing charges).
Depending on the service provider, e-mails and faxes can also be sent via SMS (change setting if necessary, p. 30).
Read messages
©Display indicates a new message.
 < a
< a
Service provider 01.05.2002 23:45
©Menu
Press the soft key underneath the letter symbol to read the message.
Date/time |
01.05.2002 |
|
23:45 |
|
No./sender |
017198987676 |
|
||
Message |
Do we meet tomorrow? |
|||
|
|
|
|
|
|
|
Reply |
Options |
|
MN Scroll through the message line by line.
§Reply§ Reply menu shown below.
§Options§ Inbox/outbox menu (p. 25).
Pictures and sounds in SMS
Pictures or sounds can be part of messages you receive.
Pictures are shown in the message, sounds are indicted as notes.
If a note is reached when scrolling through the message, the corresponding sound is played. For sending pictures and sounds see p. 30.
Note |
|
¨ Message store full .................. |
p. 75 |
Use §highlighted§ phone number ...... |
p. 76 |
Reply menu
§Reply§ Open reply menu.
Write message |
Create a new reply text |
|
(p. 26). |
Edit |
Edit message received |
|
or assign a new text to |
|
it. |
Answer is YES |
Add YES to the mes- |
|
sage. |
Answer is NO |
Add NO to the mes- |
|
sage. |
Call back |
Append a standard |
Delay |
text to the message as |
Thanks |
a reply. |
|
When the message has been edited in the editor, it can be stored or sent with §Options§.

Message (SMS) |
25 |
Inbox/outbox
§Menu§¢Messages ¢Inbox or Outbox
The list of saved messages is shown.
Є Barbara
©Carol
©023598765432
|
|
View |
|
Options |
|
§Options§ |
See below. |
|
|
|
|
|
|
|
|
|
|
Symbol |
Inbox |
Outbox |
|||
Є |
Read |
Not sent |
|||
©Unread Sent
Inbox/outbox menu
Different functions are available depending on the context:
§Options§ |
Open menu. |
|
|
View |
Read entry. |
Reply |
Directly answer incoming |
|
SMS messages. |
Send |
Dial number or select from |
|
the Phonebook, then send. |
Edit |
Open editor for changes. |
Delete |
Delete selected message. |
Picture & |
List pictures and sounds |
Sound |
included in the message. |
(EMS, p. 74) |
|
Capacity |
Display maximum and |
|
available capacity. |
Status |
(Outbox list only) Request |
report ~ |
delivery confirmation for |
|
messages sent. |
Mark as |
Mark the message as un- |
unread |
read. |
Save no. to |
Copy a selected phone |
d |
number to the Phonebook. |
Move to |
Move message to the |
archive |
archive. |
Archive
§Menu§¢Messages¢Archive
The list of messages recorded on the phone is shown. Different functions are available depending on the context:
Delete all |
Delete all entries after con- |
|
firmation. |

26 |
Message (SMS) |
Archive menu
§Options§ |
Open menu. |
|
|
View |
Read entry. |
Mark text |
Highlight text to be edited. |
Delete |
Delete selected message. |
Delete all |
Delete all saved messages |
|
after confirmation. |
Rename |
Rename the entry. |
Sort |
Set sort criteria (alphabeti- |
|
cal, time). |
Attributes |
Display name, size and |
|
date. |
Capacity |
Display maximum and |
|
available capacity for SMS |
|
archive, special graphics |
|
etc. |
Compose a message
§Menu§¢Messages¢New SMS
J |
Text input using "T9" (p. 28) |
allows you to quickly cre- |
|
|
ate long SMS messages |
|
using just a few key en- |
|
tries. |
|
§Clear§ Press briefly to de- |
|
lete letter by letter, hold |
|
down to delete the entire |
|
word. |
W Press.
@/J Dial number or pick out from the Phonebook.
§OK§ Confirm. The message is sent to the service centre for transmission.
§OK§ Return to the editor.
§Options§ Open menu and select Save to store the message.
Display in the uppermost line:
|
T9 Abc SMS 1 |
748 |
|
|
We start at 8 a.m. |
|
|
T9 |
T9 active. |
|
|
abc/Abc/ |
Lowercase/uppercase letters |
||
ABC/123 |
or digits. |
|
|
SMS |
Display title. |
|
|
1Number of the required SMS messages.
748Number of characters still available.
Note |
|
Insert pictures & sounds into text ...... |
p. 30 |
If Message type, Validity period, |
p. 30 |
Service centre: are requested ........ |
|
Send melodies .................................. |
p. 39 |
Send graphics ................................... |
p. 37 |
Enter special characters.................... |
p. 74 |
SMS status report.............................. |
p. 78 |
|
|

Message (SMS) |
27 |
Text menu
§Options§ Open the text menu.
Send |
Dial the number or select |
|
from the Phonebook, then |
|
send. |
Save |
Save the composed mes- |
|
sage in the outbox list. |
Picture & |
Add pictures and sounds to |
Sound |
message (p. 30). |
Format |
Line feed |
|
Small font, Medium font, |
|
Large font |
|
Underline |
|
Left, Right, Center (align) |
|
Mark text (highlight text with |
|
the scroll key) |
Clear text |
Delete the whole text. |
Insert text |
Insert predefined text frag- |
|
ment. |
Insert from |
Open Phonebook and copy |
d |
phone number into the mes- |
|
sage. |
Bookmark |
Insert URL from the WAP |
|
bookmarks into the text. |
T9 input |
T9 preferred: |
(p. 28) |
Activate/deactivate T9 input. |
|
|
|
Input language: |
|
Select the language in which |
|
the message is to be com- |
|
posed. |
Predefined text
Standard text fragments which can be added to messages are stored in the phone. You can also create five additional text fragments yourself.
Write text fragments
§Menu§¢Messages¢Predefined text
<New entry>
Select.
J |
Write text fragment. |
§Save§ |
Press. |
Use text fragments |
|
J |
Compose message |
(p. 26). |
|
§Options§ |
Open the text menu. |
Insert text Select.
MN Select text fragment from the list.
§Select§ Confirm. The text fragment is inserted in the message at the cursor position.
SMS to group
You can send messages (SMS) as "circulars" to all members of a group (p. 46).
 Loading...