


MODEL
FO-2081
DIGITAL MULTIFUNCTIONAL
SYSTEM
OPERATION GUIDE (for general information)

CONTENTS
|
INTRODUCTION .............................................................................................. |
4 |
|
MAIN FEATURES ............................................................................................. |
5 |
1 |
PREPARATIONS |
|
|
PART NAMES ................................................................................................... |
7 |
|
POWER ON AND OFF ................................................................................... |
10 |
|
SETTING THE DATE AND TIME .................................................................... |
11 |
2 |
LOADING PAPER |
|
|
PAPER ............................................................................................................ |
16 |
|
LOADING THE PAPER TRAY ........................................................................ |
17 |
|
BYPASS FEED (including special paper) ....................................................... |
19 |
|
CHANGING A TRAY'S PAPER SIZE SETTING ............................................. |
21 |
3 |
MAKING COPIES |
|
|
NORMAL COPYING ....................................................................................... |
22 |
|
SELECTING THE TRAY ................................................................................. |
25 |
|
MAKING A COPY DARKER OR LIGHTER .................................................... |
26 |
|
REDUCTION/ENLARGEMENT/ZOOM .......................................................... |
27 |
4 |
CONVENIENT COPY FUNCTIONS |
|
|
AUTOMATIC TWO-SIDED COPYING ............................................................ |
28 |
|
SORT COPY .................................................................................................. |
31 |
|
COPYING MULTIPLE ORIGINALS ONTO A SINGLE SHEET OF PAPER |
|
|
(2 IN 1 copy) ................................................................................................... |
33 |
|
CREATING MARGINS WHEN COPYING (Margin shift) ................................ |
36 |
|
ID CARD COPY .............................................................................................. |
38 |
5 |
INSTALLING THE SOFTWARE |
|
|
SOFTWARE ................................................................................................... |
39 |
|
BEFORE INSTALLATION ............................................................................... |
40 |
|
INSTALLING THE SOFTWARE ...................................................................... |
41 |
|
CONFIGURING THE PRINTER DRIVER ...................................................... |
53 |
|
SETTING UP BUTTON MANAGER ............................................................... |
55 |
1

6 |
PRINTER FUNCTIONS |
|
|
PRINTER/SCANNER FUNCTIONS ............................................................... |
57 |
|
USING THE PRINTER MODE ....................................................................... |
58 |
|
BASIC PRINTING ........................................................................................... |
59 |
|
OPENING THE PRINTER DRIVER FROM THE "START" BUTTON ............. |
61 |
|
PRINTER DRIVER SETTINGS ...................................................................... |
62 |
|
TWO-SIDED PRINTING ................................................................................. |
63 |
|
PRINTING MULTIPLE PAGES ON ONE PAGE .............................................. |
65 |
|
FITTING THE PRINTED IMAGE TO THE PAPER ......................................... |
66 |
|
ROTATING THE PRINT IMAGE 180 DEGREES ............................................ |
67 |
|
PRINTING A WATERMARK ........................................................................... |
68 |
|
PRINTING TEXT AND LINES/GRAPHICS IN BLACK ................................... |
69 |
|
PRINTER UTILITY ......................................................................................... |
70 |
|
USING THE PRINTER UTILITY ..................................................................... |
71 |
|
ABOUT THE WEB PAGES ............................................................................. |
76 |
|
ABOUT THE WEB PAGES (FOR USERS) ..................................................... |
77 |
|
CONFIGURING THE PRINTER CONDITION SETTINGS ............................. |
78 |
|
ABOUT THE WEB PAGES |
|
|
(FOR THE ADMINISTRATOR) ....................................................................... |
81 |
|
PROTECTING INFORMATION PROGRAMMED IN THE WEB PAGE |
|
|
([Passwords]) .................................................................................................. |
82 |
|
KEY OPERATOR PROGRAMS ...................................................................... |
83 |
|
E-MAIL STATUS AND E-MAIL ALERT SETTINGS ........................................ |
85 |
|
REMOVING THE SOFTWARE ....................................................................... |
88 |
|
PRINTER SPECIFICATIONS ......................................................................... |
88 |
|
PRINTER DRIVER SPECIFICATIONS ........................................................... |
89 |
|
USING THE SCANNER MODE ...................................................................... |
90 |
7 SCANNER AND FAX FUNCTIONS |
|
|
|
ABOUT THE SCAN TO USB AND NETWORK SCANNER FUNCTION ........ |
91 |
|
SETTINGS AND PROGRAMMING REQUIRED FOR THE NETWORK |
|
|
SCANNER FEATURE ..................................................................................... |
92 |
|
ABOUT THE WEB PAGE (FOR USERS) ....................................................... |
93 |
|
ABOUT THE WEB PAGE (FOR THE ADMINISTRATOR) ............................ |
112 |
|
SCANNING USING THE KEYS ON THE MACHINE ................................... |
117 |
|
TRANSMISSION METHODS FOR SCAN TO E-MAIL ................................. |
120 |
|
SCANNING FROM YOUR COMPUTER ...................................................... |
128 |
8 |
USER SETTINGS |
|
|
USER PROGRAMS ...................................................................................... |
134 |
|
SELECTING A SETTING FOR A USER PROGRAM ................................... |
140 |
2

9 |
TROUBLESHOOTING AND MAINTENANCE |
|
|
DISPLAY MESSAGES .................................................................................. |
142 |
|
TROUBLESHOOTING THE MACHINE ........................................................ |
147 |
|
PROBLEMS DURING SETUP THE SOFTWARE ........................................ |
154 |
|
MISFEED REMOVAL ................................................................................... |
157 |
|
TD (TONER/DEVELOPER) CARTRIDGE REPLACEMENT ........................ |
161 |
|
DRUM CARTRIDGE REPLACEMENT ......................................................... |
163 |
|
CHECKING THE TOTAL COUNT AND DRUM CARTRIDGE LIFE .............. |
165 |
|
CLEANING THE MACHINE ......................................................................... |
166 |
|
TRANSFER CHARGER ............................................................................... |
168 |
|
ABOUT SUPPLIES AND OPTIONS ............................................................. |
169 |
10 |
OPTIONAL EQUIPMENT |
|
|
250-SHEET PAPER FEED UNIT (MX-CS10) ............................................... |
170 |
3
INTRODUCTION
Some model may not be available in some countries.
Conventions used in this manual and online manual
•The illustrations in this manual show the FO-2081. The appearance of your machine may be different depending on the model and options installed, however, the basic operations are the same.
•Where "FO-XXXX" appears in this manual, please substitute the name of your model for "XXXX". For the name of your model, see the operation panel on the machine.
•Illustrations of driver screens and other computer screens show the screens that appear in Windows Vista. Some of the names that appear in these illustrations may differ slightly from the screens that appear in other operating systems.
•The explanations in this manual assume that the person who will install the product and the users of the product have a working knowledge of Microsoft Windows.
•This operation guide refers to the Reversing Single Pass Feeder as the "RSPF".
•In this manual, the following icons are used to provide the user with information pertinent to the use of the machine.
Warns that injury may result if the contents of the warning are not properly followed.
Cautions that damage to the machine or one of its components may result if the contents of the caution are not properly followed.
Notes provide useful information on the specifications, functions, performance, and operation of the machine.
The display screens, messages, and key names shown in the manual may differ from those on the actual machine due to product improvements and modifications.
4
MAIN FEATURES
High-speed laser copying
First-copy time*1 is only 8.0*2 seconds.
Copying speed is 20 copies per minute. This is ideal for business use and provides a big boost to workplace productivity.
*1 The first-copy time is measured after the power save indicator turns off following power on, using the document glass with the polygon rotating in the copy ready state and "LSU SETTING" set to ON in the user programs (8-1/2" x 11", paper fed from paper tray).
*2 When user program 24 is set to OFF.
High-quality digital image
•High-quality copying at 600 dpi is performed.
•In addition to automatic exposure adjustment, two original modes can be selected: "TEXT" for text-only originals, and "PHOTO" for photographs. The exposure can be adjusted to five levels in each mode.
•The photo mode copying function allows clear copying of delicate halftone original images such as monochrome photos and color photos.
Enhanced copying features
•Zoom copies can be made from 25% to 400% in increments of 1%. (When the RSPF is being used, the zoom copy ratio range is 50% to 200%.)
•Continuous copying of up to 99 copies is possible.
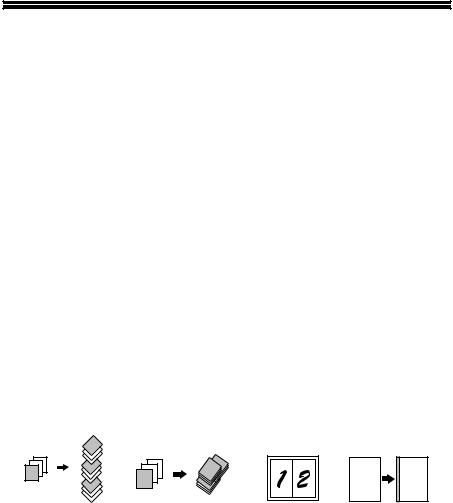
•Sets of output can be offset from each other for easy separation (offset function).
•Sorting by sets is possible without the need for a sorter or other special device (Sort copy).
•Includes convenient features such as margin shift, 2 IN 1 copy, and automatic twosided copying.
|
1 |
|
2 |
|
3 |
|
3 |
1 |
2 |
2 |
|
|
3 |
|
2 |
|
3 |
Sort copy
3 |
1 |
1 |
|
|
|
2 |
|
|
A |
A |
|
1 |
|
|
|
||
|
|
|
|
||
Offset function |
2 IN 1 copy |
Margin shift |
|||
Scan once/Print many
•The machine is equipped with a memory buffer allowing the machine to scan an original once and make up to 99 copies of the scanned image. This improves workflow, reduces operating noise from the machine and reduces wear and tear on the scanning mechanism, which provides for a higher reliability.
5

LCD panel displays messages
The LCD panel displays messages that show function settings and the status of the machine.
Laser printer function
•Printer function
The accompanying printer driver can be installed to enable use of the machine as a printer.
•Network printer function
A LAN connector is provided as a standard feature that allows the machine to be used as a network printer.
Color scanner function
•The accompanying scanner driver can be installed and the machine connected to a computer using a USB cable to enable use as a scanner.
Environment and people friendly design
•Preheat mode and auto power shut-off mode are provided to reduce power consumption when the machine is not in use.
•A universal design has been implemented in the product whereby the height of the operation panel and shape of the keys are designed to be usable by as many people as possible.
6

1 |
Chapter 1 |
PREPARATIONS |
This chapter provides basic information that you should know before using the machine.
PART NAMES
1 |
|
|
2 |
5 |
|
|
||
3 |
6 |
|
7 |
||
4 |
||
|
Interface
USB connector
 (Device)
USB
 connector (Host)
 LAN connector
RSPF
 Original guides
Document |
feeder cover |
Exit area
Document feeder tray
Bypass tray
17
TD (Toner/Developer) Drum cartridge cartridge 

10 |
11 |
12 |
12
13
1Document glass
2Operation panel
3Front cover
4Paper tray
5Side cover
6Side cover open button
7Bypass tray paper guides
8Original output tray extension
9Paper output tray
3 |
15 |
10Paper output tray extension
11Power switch
12Handles
13Power cord
14Fusing unit release lever
15Transfer charger
16Charger cleaner
17Paper holder arm
The paper output tray has a paper holder arm. The paper holder arm presses gently on the output paper to stack it.
7
PREPARATIONS
Operation panel
1 |
2 |
6 |
7 |
8 |
9 |
10 |
11 |
12 |
13 |
14 |
15 |
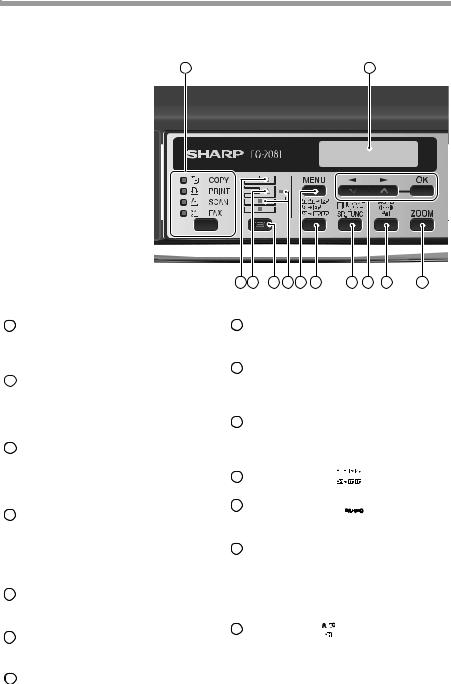
1[MODE SELECT] key / Mode indicators
Press this key to select the mode. The indicator of the selected mode lights (copy, printer, scanner mode indicators).
2Display
This shows messages indicating the machine status and any problems that occur, as well as user programs and function setting menus.
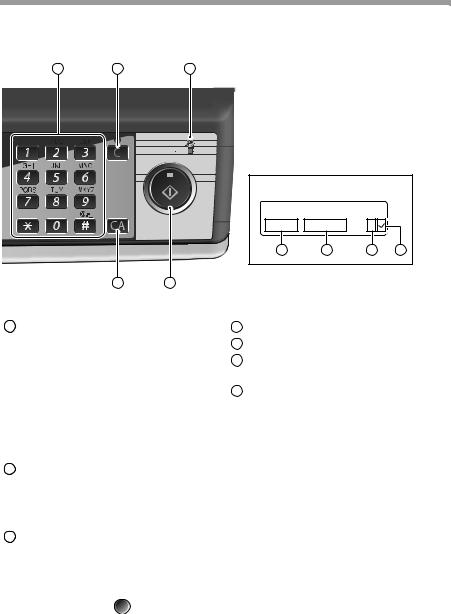
3Numeric keys
Use these to enter the number of copies and other numerical settings.
The keys can also be used to select items in function setting menus.
4[CLEAR] key (  )
)
Use this to clear the set number of copies, as well as cancel a job that is in progress. When a setting menu appears, use this key to move back to the previous menu level.
5Power save indicator
This lights up when the power save function is activated.
6RSPF indicator
This lights up when an original is placed in the RSPF.
7Error indicator
8 [TRAY SELECT] key (  )
)
Use to select the paper tray that has the desired paper for copying.
9Tray location indicator
Indicates the selected paper tray. The indicator blinks when the tray is out of paper or is not closed.
10 [MENU] key
Press this key to select the paper size for copying, to configure a user program or to display the total count.
11 [2-SIDED COPY (
 )] key
Use to copy both sides of an original.
12 [E-SORT/SP.FUN ( 
 )] key
Press to select the sort function, 2 IN 1 copy function, or margin shift function.
13 [ ] key (
 ), [
), [ ] key (
 ), [OK] key
Press the [ ] key (
  ) or [
 ] key
] key
(
 )to select an item in a function setting menu.
Press the [OK] key to enter a selection.
14 [EXPOSURE ( 


 )] key
Use to switch from auto exposure adjustment to text mode or photo mode.
This lights steadily or blinks when a paper misfeed or other error occurs.
8
PREPARATIONS
3 |
4 |
5 |
Display
READY TO COPY. |
|
|
|
100% |
8.5x11 |
0 |
|
18 |
19 |
20 |
21 |
16 17
15 [ZOOM] key
Press to select an enlargement or reduction ratio.
To select a preset ratio setting, press the [ZOOM] key and select the desired preset ratio. To select a ratio that is not preset, press the [ZOOM] key, select the preset ratio that is closest to the desired ratio, and then press the [ ] key (
  ) or [
 ] key (
  ) to increase or decrease the ratio in increments of 1%.
16[CLEAR ALL] key ( )
)
This returns all functions to the default settings. When pressed in a setting menu, this returns the settings and display to the initial state.
17[START] key (  ) / Ready indicator
The ready indicator lights up when copying or scanning is possible.
To begin copying, press the [START]
key (  ).
).
The [START] key (  ) is also pressed to return to normal operation from auto power shut-off mode.
18Shows the current copy ratio.
19Shows the selected paper size.
20Shows the number of copies that has been entered with the numeric keys.
21A checkmark "  " appears when the exposure has been changed, or when two-sided copying, sort, 2 IN 1, or margin shift is selected.
9
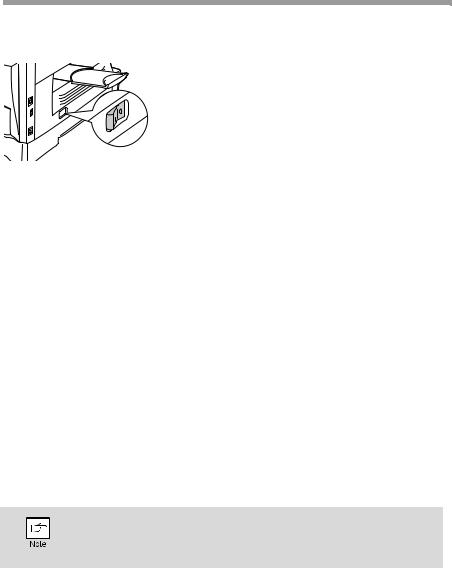
POWER ON AND OFF
The power switch is located on the left side of the machine.
If you use the machine in a country other than the country where the machine was purchased, you will need to make sure that your local power supply is compatible with your model. If you plug the machine into an incompatible power supply, irreparable damage to the machine will result.
Power on
Turn the power switch to the "ON" position.
The ready indicator will light up and other indicators which show the initial settings of the
display will also light up to indicate the ready
condition. For the initial settings, see the "Initial settings" (below).
You can select copy settings and press the [START] key (  ) after the power switch is turned on. Copying will start automatically.
Only insert the power cord into a properly grounded wall socket.
Do not use extension cords or power strips.
Language setting
The first time the power is turned on after shipment from the factory, a message will appear in English in the display asking you to select the language. Select the language with the [ ] key (
  ) or [
 ] key (
 ) and then press the [OK] key. The language can also be changed in the user programs (p.137).
10
SETTING THE DATE AND TIME
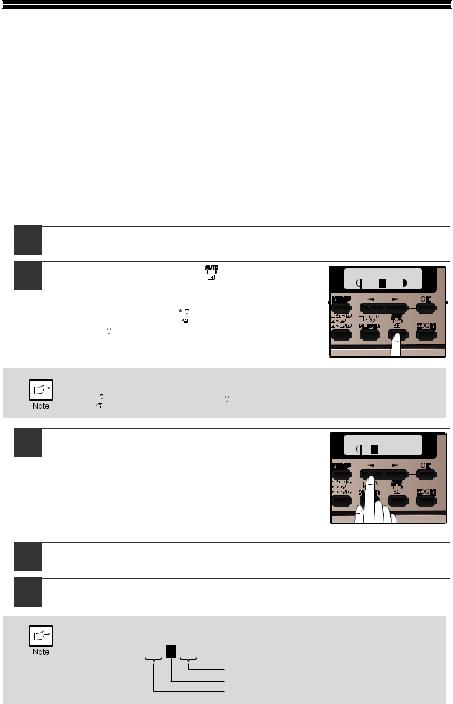
Following to the language setting, Date and Time setting screen appears. Set the date and time by pressing the keys on the operation panel as shown below.
If you enter an incorrect number, press the [CLEAR] key (  ) and re-enter the number.
The time can be displayed in 12-hour or 24-hour format. "Month/Day/Year", "Day/ Month/Year" or "Year/Month/Day" can be selected for the order of display of the date.
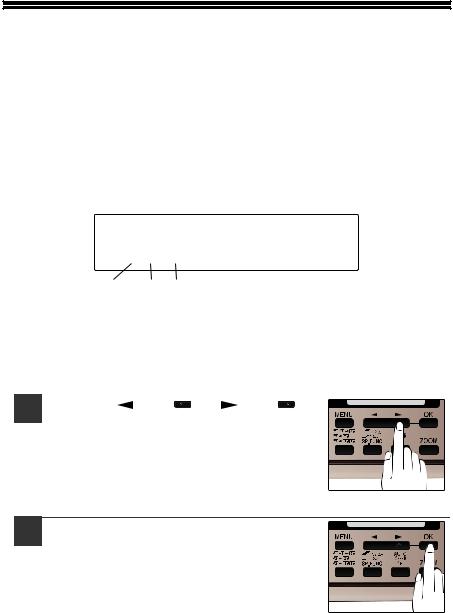
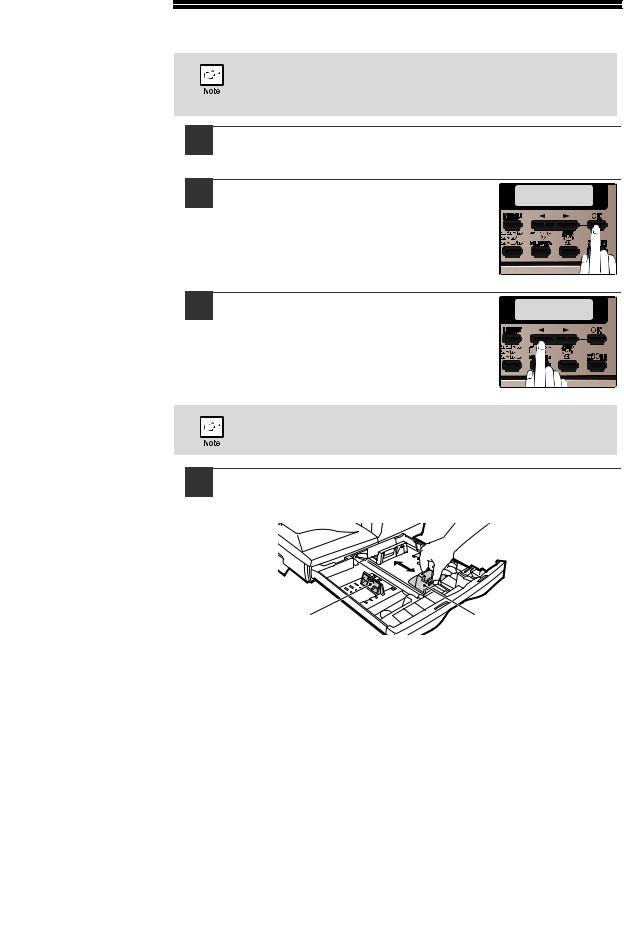
Use the following procedure to set the date and time:
1 |
|
|
|
|
|
|
|
|
Enter the year (two digits), month (two digits), and day (two |
||||||
|
|
digits) with the numeric keys and then press the [OK] key. |
|||||
|
|
||||||
|
|
ENTER DATE (2010-) |
|||||
|
|
2011/05/02 |
|
||||
|
|
Year |
|
|
|
|
|
|
|
Month Day |
|||||
|
|
The year can be entered from 2010. |
|||||
|
|
|
|
|
|
||
2 |
|
Enter the time (hour (two digits) and minute (two digits)) with |
|
||||
|
|
the numeric keys. |
|||||
|
|
||||||
|
|
Enter the hour in the following range: |
|||||
|
|
When 12-hour format is selected: 01 to 12 |
|||||
|
|
When 24-hour format is selected: 00 to 23 |
|||||
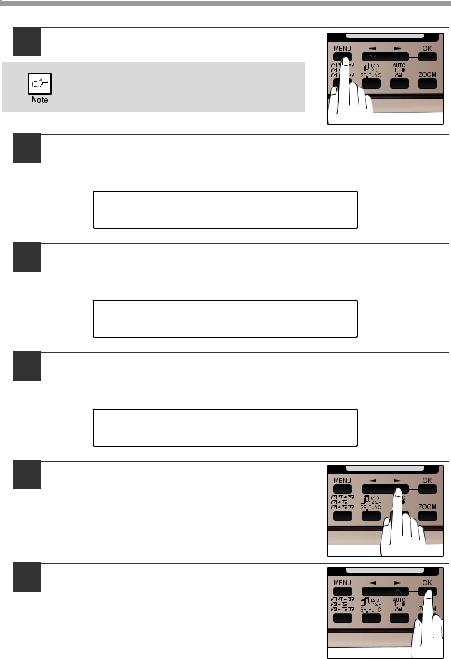
3 |
|
|
|
|
|
|
|
|
Press the [ |
] key ( ) or [ ] key ( ) to |
|
||||
select "AM" or "PM".
When 24-hour format is selected, do not perform this step.
4 Press the [OK] key.
11
PREPARATIONS
To change the display format to 12-hour or 24-hour format, follow the steps below:
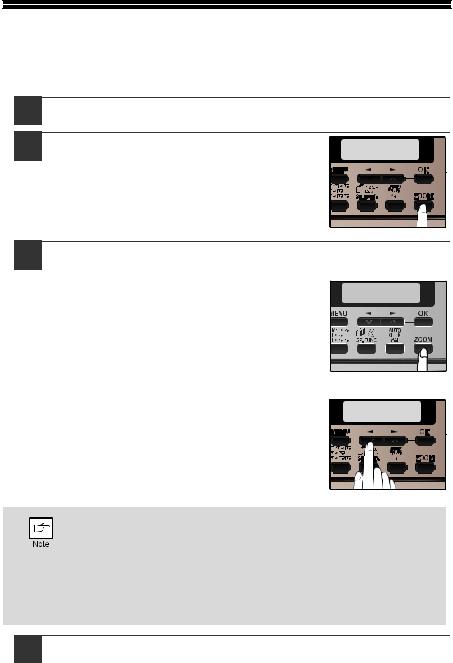
1 Press the [MENU] key.
Be sure that the COPY mode is selected before pressing [MENU] key.
2 Press the [ ] key (
  ) or [
 ] key (
  ) until "1:USER PROGRAM" appears, and then press the [OK] key.
Selection
"1:USER PROGRAM"
3 Press the [ ] key (
  ) or [
 ] key (
 ) until "32:DATE&TIME FORMAT" appears, and then press the [OK] key.
Selection
"32:DATE&TIME FORMAT"
4 Press the [ ] key (
 ) or [
 ] key (
 ) until "1:TIME FORMAT" appears, and then press the [OK] key.
Selection
"1:TIME FORMAT"
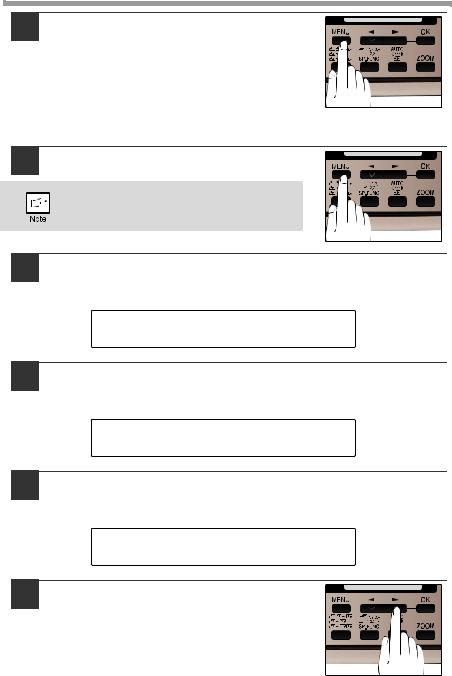
5 Press the [ ] key (
 ) or [
 ] key (
 ) to select "1:12HOUR" or "2:24HOUR".
6 Press the [OK] key.
12
PREPARATIONS
7 Press the [MENU] key.
Press the [MENU] key to exit.
To change the order of display of the date, follow the steps below:
1 Press the [MENU] key.
Be sure that the COPY mode is selected before pressing [MENU] key.
2 Press the [ ] key (
  ) or [
 ] key (
  ) until "1:USER PROGRAM" appears, and then press the [OK] key.
Selection
"1:USER PROGRAM"
3 Press the [ ] key (
  ) or [
 ] key (
 ) until "32:DATE&TIME FORMAT" appears, and then press the [OK] key.
Selection
"32:DATE&TIME FORMAT"
4 Press the [ ] key (
 ) or [
 ] key (
 ) until "2:DATE FORMAT" appears, and then press the [OK] key.
Selection
"2:DATE FORMAT"
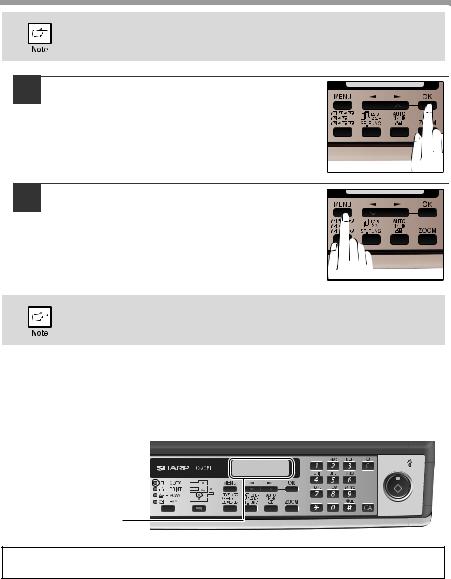
5 Press the [ ] key (
 ) or [
 ] key (
 ) to select the display order.
The selections are as follows: 1:MMDDYYYY 2:DDMMYYYY 3:YYYYMMDD
13
PREPARATIONS
This selection does not affect the order of the date that appears in "SETTING THE DATE AND TIME" in step 1 on page 11.
The date in this step always appears in the format "YYYYMMDD".
6
7
Press the [OK] key.
Press the [MENU] key.
Press the [MENU] key to exit.
To change the date and time or the format after once they are set, see page 134 (USER PROGRAMS) and select program number 31 or 32 of copy mode.
Initial settings
The machine reverts to the initial settings when it is first turned on, when the [CLEAR ALL] key ( ) is pressed, or when no keys are pressed for the preset "AUTO CLEAR" time following the end of a copy job. When the machine reverts to the initial settings, all settings and functions selected to that point are canceled. The "AUTO CLEAR" can be changed in the user programs. (p.134)
When in the copy mode
READY TO COPY. |
|
|
100% |
8.5x11 |
0 |
The main screen of copy mode appears
Copy ratio: 100%, Exposure: Automatic
Copy quantity: 0, All special copier modes: Off
Scanning unit (scan head)
When the machine is able to copy or scan (the ready indicator is on), the scanning unit is lit.
14
PREPARATIONS
Power off
Make sure that the machine is not in operation and then turn the power switch to the "OFF" position.
If the power switch is turned off while the machine is
in operation, a misfeed may occur and the job that
was in progress will be canceled.
In cases where the machine will not be used for a long time, turn off the power switch and remove the power cord from the outlet.
Check the following to make sure the machine is not in operation:
•The ready indicator is lit. (Initial state)
•The power save indicator is lit. (preheat mode or auto shut-off mode)
Power save modes
The machine has two power save modes to reduce overall power consumption and thereby reduce the cost of operation. In addition, these modes conserve natural resources and help reduce environmental pollution. The two power save modes are preheat mode and auto power shut-off mode.
Preheat mode
This function automatically switches the machine to a low power consumption state if the set duration of time elapses without the machine being used when the power is on. In this mode, the power save indicator lights up. Normal operation automatically resumes when a key on the operation panel is pressed, an original is placed, a print job is received.
Auto power shut-off mode
This function automatically switches the machine to a state that consumes even less power than preheat mode if the set duration of time elapses without the machine being used when the power is on. The power save indicator lights up, the display shows a message indicating that the machine is in auto power shut-off mode. To resume normal operation, press the [START] key (  ). Normal operation also resumes automatically when a print job is received or scanning is begun from a computer. While in auto power shut-off mode, no keys (except the [START] key (
  )) can be used.
The preheat activation time and the auto power shut-off time can be changed with "PREHEAT MODE" and "AUTO SHUT-OFF TIME" in the user programs. It is suggested that you set times that are appropriate for your usage of the machine. (p.134 and p.135)
Check RSPF open function
When enabled, this function may help prevent wasteful use of toner that occurs when the RSPF cover is not completely closed.
If the start (  ) key is pressed when the RSPF cover is not completely closed, "CLOSE THE SPF/RSPF COVER." will appear in the display and copying may not take place. If copying does not take place, copying can be performed by pressing the start (
  ) key again, however, the scan size set in "CHANGING A TRAY'S PAPER SIZE SETTING" (p.21) or "VALID COPY WIDTH" (program number 25) (p.137) will be used. If the RSPF cover is completely closed after "CLOSE THE SPF/RSPF COVER." appears, copying will take place at the normal size.
15

2 |
Chapter 2 |
LOADING PAPER |
The tray location indicator will blink when there is no paper in the selected paper tray, or when the selected paper tray is not closed or is improperly closed.
PAPER
For best results, use only SHARP recommended paper.
Paper tray type |
Paper type |
Size |
Weight |
Capacity |
Paper tray |
Standard paper |
5-1/2" x 8-1/2" (Invoice) |
15 lbs. to 21 lbs. |
250 sheets *1 |
|
Recycled |
8-1/2" x 11" (Letter) |
(56 g/m2 to 80 g/m2) |
(The paper |
|
paper |
8-1/2" x 13" (Foolscap) |
|
should not |
|
|
8-1/2" x 14" (Legal) |
|
exceed the |
|
|
|
|
line on the |
|
|
|
|
tray) |
|
|
|
|
|
Bypass tray |
Standard paper |
3-1/2" x 5-1/2" to |
15 lbs. to 21 lbs. |
50 sheets *1 |
|
Recycled |
8-1/2" x 14" |
(56 g/m2 to 80 g/m2) |
|
|
paper |
|
|
|
|
|
|
|
|
|
Thick paper |
|
28 lbs. to 34.5 lbs. |
Load one |
|
|
|
(106 g/m2 to 128 g/m2)*3 |
sheet at a time |
|
Transparency |
|
||
|
|
|
in the bypass |
|
|
film/Labels |
|
|
|
|
|
|
tray. |
|
|
|
|
|
|
|
Envelopes *2 |
Monarch |
|
|
|
|
|
||
|
|
(3-7/8" x 7-1/2") |
|
|
|
|
Commercial 9 |
|
|
|
|
(3-7/8" x 8-7/8") |
|
|
|
|
Commercial 10 |
|
|
|
|
(4-1/8" x 9-1/2") |
|
|
|
|
|
|
|
*1 The number of sheets of paper that can be loaded varies depending on the weight of the paper.
*2 Do not use non-standard envelopes or envelopes that have metal clasps, plastic snappers, strings, windows, linings, self-adhesive strips, patches or synthetic materials. Do not use envelopes that are filled with air or envelopes that have labels or stamps attached. These will damage the machine.
*3 When using paper heavier than 28lbs. (104 g/m2), use paper that is 8-1/2" x 11" or smaller.
16
LOADING PAPER
Special papers
Follow these guidelines when using special papers.
●Use SHARP recommended transparency film and label sheets. Using other than SHARP recommended paper may result in misfeeds or smudges on the output. If other than SHARP recommended media must be used, feed each sheet one at a time using the bypass tray (do not attempt continuous copying or printing).
●There are many varieties of special paper available on the market, and some cannot be used with this machine. Before using special paper, contact a SHARP service center.
●Before using other than SHARP recommended paper, make a test copy to see if the paper is suitable.
LOADING THE PAPER TRAY
Make sure that the paper is not torn, is free of dust, and has no wrinkles or curled edges.
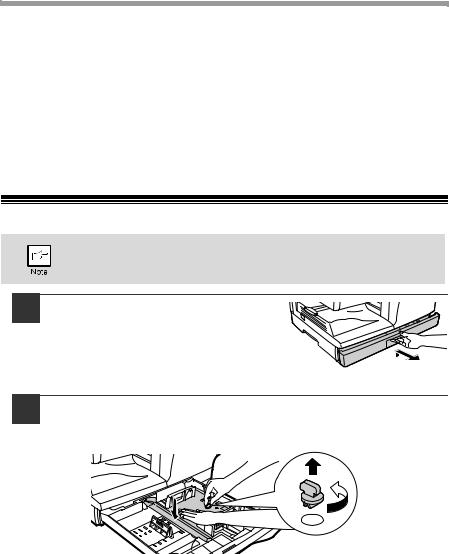
1 Raise the handle of the paper tray and pull the paper tray out until it stops.
2 Remove the pressure plate lock. Rotate the pressure plate lock in the direction of the arrow to remove it while pressing down on the pressure plate of the paper tray.
17
LOADING PAPER
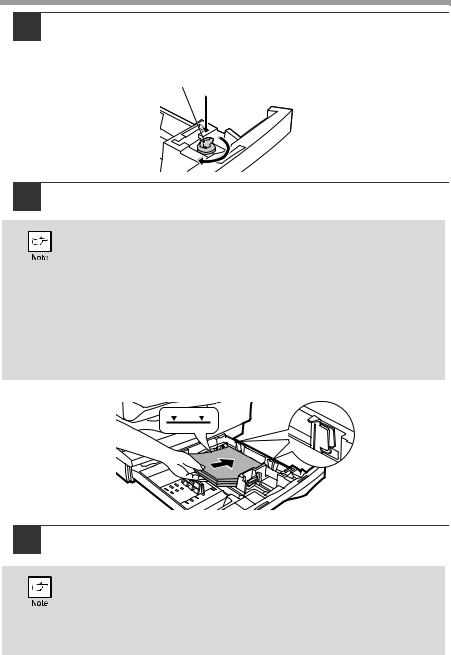
3 Store the pressure plate lock which has been removed in step 2. To store the pressure plate lock, rotate the lock to secure it as shown below.
Pressure plate lock
4 Fan the paper and insert it into the tray. Make sure that the edges go under the corner hooks.
• Do not load paper above the maximum height line (  ). Exceeding the line will cause a paper misfeed.
• If the paper is not fanned, double-feeds or misfeeds may occur.
•Make sure the stack of paper is straight before loading it. When adding paper, take the remaining paper out and combine it into a single stack with the new paper.
•Make sure that all the paper in the stack is the same size and type.
•When loading paper, ensure that there is no space between the paper and the guide, and make sure that the guide is not set too narrow and causes the paper to bend. Incorrect loading will cause the paper to skew or misfeed.
5 Gently push the paper tray back into the machine.
• If you loaded a different size of paper than was loaded previously in the tray, go to "CHANGING A TRAY'S PAPER SIZE SETTING" (p.21)
• When not using the machine for an extended period, remove all paper from the paper tray and store it in a dry place. If paper is left in the machine for an extended period, the paper will absorb moisture from the air, resulting in paper jams.
18
BYPASS FEED (including special paper)
The bypass tray can be used to feed standard paper, transparency film, labels, envelopes, and other special purpose paper.
Important points when inserting paper in the bypass tray
Up to 50 sheets of standard copy paper can be inserted in the bypass tray. (Capacity will vary depending on the type of paper loaded.)
Be sure to place envelopes horizontally as shown in the following diagram.
Available Not
Available
•When loading envelopes, make sure that they are straight and flat and do not have loosely glued construction flaps (not the closure flap).
•Special papers except SHARP recommended transparency film, labels, and envelopes must be fed one sheet at a time through the bypass tray.
•When adding paper, first remove any paper remaining in the tray, combine it with the paper to be added and then reload as a single stack. The paper to be added must be the same size and type as the paper already in the tray.
•Do not use paper that is smaller than the original. This may cause smudges or unclean images.
•Do not use paper that has already been printed on by a laser printer or plain paper fax machine. This may cause smudges or unclean images.
Envelopes
Do not use the following envelopes, as misfeeds will occur.
•Envelopes with metal tabs, clasps, strings, holes, or windows.
•Envelopes with rough fibers, carbon paper, or glossy surfaces.
•Envelopes with two or more flaps.
•Envelopes with tape, film, or paper attached to the flap.
•Envelopes with a fold in the flap.
•Envelopes with glue on the flap to be moistened for sealing.
•Envelopes with labels or stamps.
•Envelopes that are slightly inflated with air.
•Envelopes with glue protruding from the seal area.
•Envelopes with part of the seal area peeled off.
•Be sure to select com9, com10 or Monarch in the paper size setting of the printer driver. (For detailed information on the printer driver, refer to the online manual.)
19
LOADING PAPER
Loading paper in the bypass tray
• Paper must be fed narrow side first into the feed slot.
• Special papers such as transparency film, labels, and envelopes must be fed one sheet at a time through the bypass tray.
• When copying onto transparency film, remove each copy promptly. Do not let copies stack up.
1 Open the bypass tray and extend the tray.
To close the bypass tray, perform step 1 and then step 2 in the illustration and push the round projections at the right of the tray until they click.
2 Set the bypass tray paper guides to the paper width. Insert the paper (print face down) all the way into the bypass tray.
Print face
3 Press the [TRAY SELECT] key ( ) to select the bypass tray.
Note for loading thick paper
Copying on thick paper requires higher fusing temperature setting. Set the user program 29 to "2 (HEAVY PAPER)" when using thick paper. (See page 137.)
20
CHANGING A TRAY'S PAPER SIZE SETTING
Follow these steps to change a tray's paper size setting.
• The paper size setting cannot be changed when the machine has stopped temporarily due to running out of paper or a misfeed.
• During printing (even in copy mode), the paper size setting cannot be changed.
1 Press the [MENU] key.
Press the [ ] key (
 ) or [
 ] key (
 ) until "PAPER SIZE" appears, and then press the [OK] key.
2 Press the [ ] key (
 ) or [
 ] key (
 ) to select the tray, and then press the [OK] key.
PAPER SIZE 1:TRAY1
3 Press the [ ] key (
 ) or [
 ] key (
 ) to select the paper size, and then press the [OK] key.
The paper size changes as follows each time the [ ] key (
 ) or [
 ] key (
 ) is pressed:
"8.5 x 14"→"8.5 x 13"→"8.5 x 11"→"5.5 x 8.5"→ "A4"→"B5"→"A5".
TRAY1
1:8.5x11
When you have finished configuring the tray's paper size setting, press the [MENU] key.
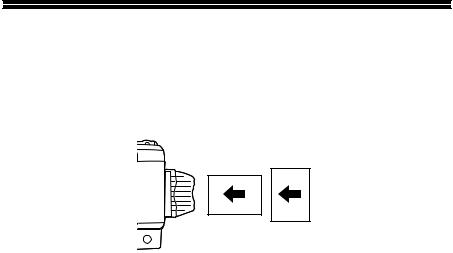
4 Squeeze the lock lever of the front guide and slide the front guide to match the width of the paper, and move the left guide to the appropriate slot as marked on the tray.
Left |
Front |
guide |
guide |
•The front guide is a slide-type guide. Grasp the locking knob on the guide and slide the guide to the indicator line of the paper to be loaded.
•The left guide is an insert-type guide. Remove it and then insert it at the indicator line of the paper to be loaded.
21
3 |
Chapter 3 |
MAKING COPIES |
This chapter explains basic copying functions.
NORMAL COPYING
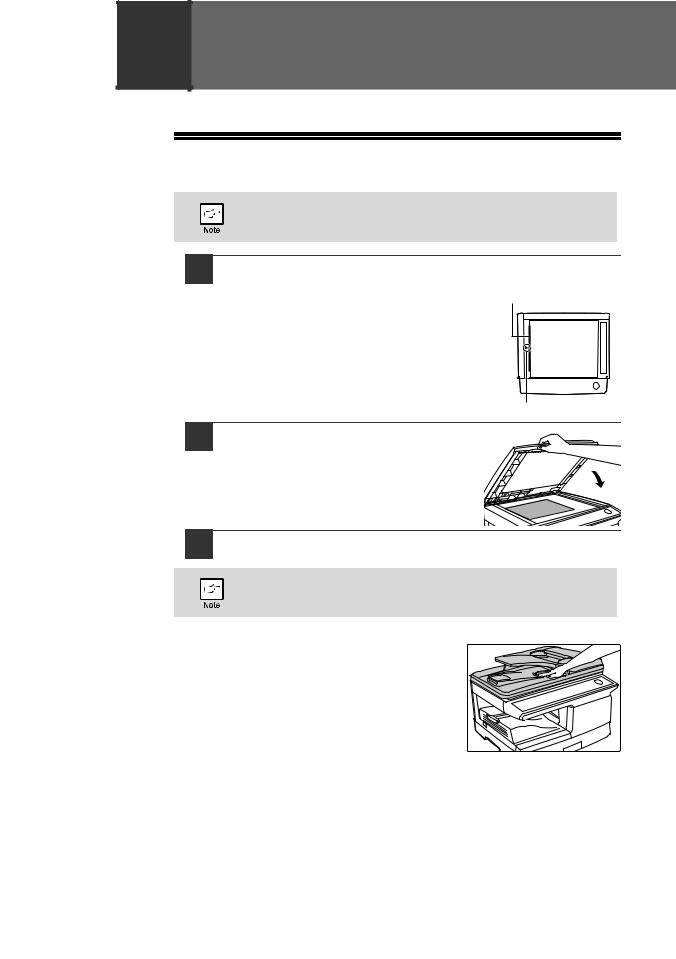
Using the document glass
• The document glass can scan up to an 8-1/2" x 14 original.
•When a copy is made, the edges will not be copied (image loss).
1Open the RSPF, and place the original face down on the document glass.
[How to place the original] |
Original scale |
Align the original with the original scale and the centering ( ) mark.

 mark
mark
2 Gently close the RSPF.
3 Select the number of copies and other copy settings, and then press the [START] key (  ).
).
• To stop copying in the middle of a run, press the [CLEAR] key (  ).
).
• For the copy settings, see pages 25 through 37.
Copying books or originals with folds or creases
Press down on the RSPF while copying as shown. If the RSPF is not completely closed, shadows may appear on the copy or it may be fuzzy. Straight originals with folds or creases well before placing.
22

MAKING COPIES
Using the RSPF
• Originals that are 5-1/2" x 8-1/2" to 8-1/2" x 14" and 14 lbs. to 24 lbs. (56 g/m2 to 90 g/m2) can be used. A maximum of 50 pages can be placed at once.
•Straighten curled originals before placing them in the document feeder tray. Curled originals may cause misfeeds.
•Place originals horizontally.
•Before placing originals in the document feeder tray, be sure to remove any staples or paper clips from them.
•When a copy is made, the edges will not be copied (image loss).
•When using the margin shift function, check the position of the margins carefully. (p.36)
1Make sure that an original has not been left on the document glass.
2Adjust the original guides to the size
of the originals.
3 |
Set the original(s) face up in the |
Original face up |
|
document feeder tray. |
|
|
|
|
|
The RSPF indicator on the operation panel |
|
|
will light up. If this indicator does not light up, |
|
|
the originals are not properly set or the RSPF |
|
|
is not properly closed. |
|
4 |
Select the number of copies and other copy settings, and then |
|
|
press the [START] key ( ). |
|
• The default output mode for copying from the RSPF is sort mode (P.31), and a checkmark "  " will automatically appear in the display (P.9). If "SORT AUTO SELECT" is disabled in the user programs, the default output mode will be non-sort mode. (P.137)
•To stop copying in the middle of a run, press the [CLEAR] key ( ).
).
•For the copy settings, see pages 25 through 37.
23
MAKING COPIES
Originals that cannot be used in the RSPF
The following originals cannot be used. These may cause misfeeds or smudging and unclear images.
•Transparencies, tracing paper, other transparent or translucent paper, and photographs.
•Carbon paper, thermal paper.
•Originals that are creased, folded, or torn.
•Glued originals, cut-out originals.
•Originals with binder holes.
•Originals printed using an ink ribbon (thermal transfer printing), originals on thermal transfer paper.
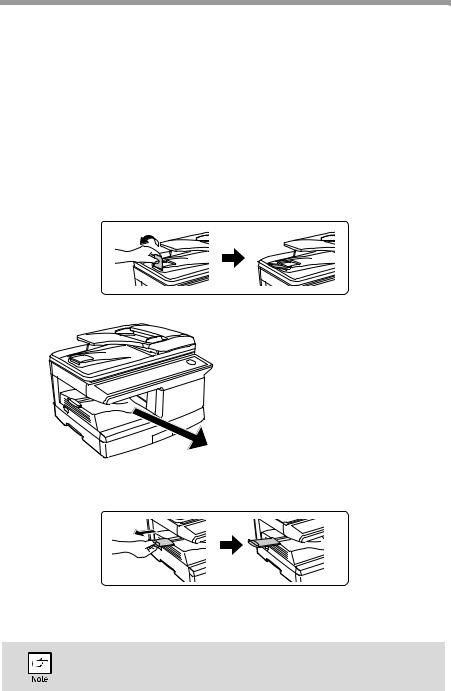
Original output tray extension
When placing an original of 8-1/2" x 14" paper size maximum, pull out the original output tray extension.
Capacity of paper output tray
The paper output tray can hold a maximum of 200 pages. If more than 200 pages are allowed to accumulate, a paper jam may occur.
Paper output tray extension
When copying onto paper larger than 8-1/2" x 14" size, pull out the paper output tray extension.
Paper holder arm
The paper output tray has a paper holder arm. The paper holder arm presses gently on the output paper to stack it (p.7).
After removing paper, if you need to return the paper to the paper output tray, lift up the paper holder arm and place the paper under the arm.
24
MAKING COPIES
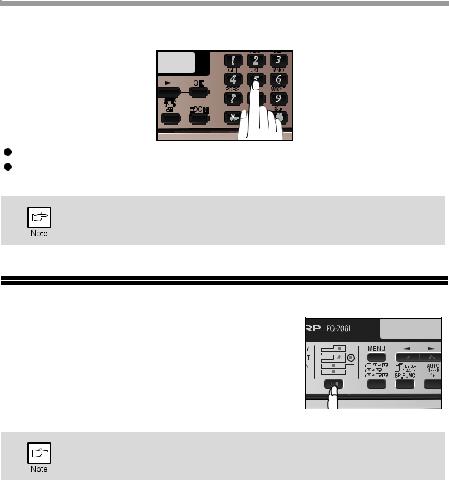
Setting the number of copies
Press the numeric keys to set the number of copies.
PY.
5 55
The set number of copies appears in the display. A maximum of 99 copies can be set. If you wish to make only a single copy, copying is possible with the display showing "0".
If you enter the wrong number, press the [CLEAR] key ( ) and enter the correct number.
SELECTING THE TRAY
Press the [TRAY SELECT] key ( ).
).
Each time, you press the [TRAY SELECT] key ( ), the location indicated by the tray location indicator changes in the following order : paper tray→bypass tray.
READY TO COPY. 100% EXTRA
The tray location indicator will blink when there is no paper in the paper tray, or when the tray is not closed or is improperly closed.
25
MAKING A COPY DARKER OR LIGHTER
Automatic exposure adjustment is initially enabled. This function automatically adjusts the copy image according to the original being copied. If you wish to select the exposure level yourself, follow the steps below. (Select from two original types and five exposure levels for each original type.) The exposure level used in automatic exposure adjustment can also be changed with "AE LEVEL ADJUST" in the user programs (p.136).
Original types
●AUTO ...... Automatic exposure adjustment is enabled and the exposure is automatically adjusted according to the original being copied. The exposure is lowered for colored areas and background shadows.
●TEXT....... The exposure is raised for light areas and lowered for dark backgrounds to make text easier to read.
●PHOTO ... Halftones in the photo are reproduced with greater clarity.
1
2
Check the original and place the original(s).
Press the [EXPOSURE ( )] key to select |
TEXT |
the original type. |
| | | | | |
|
The original image type changes as follows each time the [EXPOSURE ( 


 )] key is pressed: "AUTO" (


 ) → "TEXT"(

 ) → "PHOTO"(
  ).
).
To return to auto exposure adjustment, press the [EXPOSURE ( 


 )] key until "AUTO" (


 ) appears.
3 If needed, adjust the exposure level for TEXT (

 ) or PHOTO (
  ).
).
For a darker image, press the [ ] key (
 ). For a lighter image, press the [
 ] key (
  ).
).
TEXT
| | | | | 
4
5
Press the [OK] key.
Select the number of copies and any other copy settings, and then press the [START] key (  ).
).
Exposure value guidelines (When in "TEXT"(

 ) setting)
 | | | | |
Colored text or text written in pencil
Normal originals
Dark originals like newspapers
26
REDUCTION/ENLARGEMENT/ZOOM
Copies can be reduced down to 25% or enlarged up to 400%. (When the RSPF is being used, the zoom copy ratio range is 50% to 200%.) The [ZOOM] key can be pressed to quickly select a ratio from among eight preset ratios. In addition, the [ ] key (
  ) and [
 ] key (
 ) can be pressed to select the ratio in increments of 1%.
1
2
Check the original and paper size, and place the original(s).
Press the [ZOOM] key. |
COPY RATIO |
- 100% +
3 Press the [ZOOM] key and/or [ ] key (
 ) or [
 ] key (
 ) to select the desired copy ratio and then press the [OK] key.
Selecting a preset ratio
The preset ratios change as follows each time the [ZOOM] key is pressed:
"100%" → "78%" → "64%" → "50%" → "25%" → "400%" → "200%" → "129%".
Fine adjustment of the ratio
The ratio can be adjusted from 25% to 400% in increments of 1%.
Use the [ ] key (
 ) or the [
 ] key (
 ) for fine adjustment.
8.5x14 TO 8.5x11
- 78% +
ZOOM
- 99% +
• To return the ratio to 100%, press the [ZOOM] key until 100% appears.
• Press the [ZOOM] key to set the approximate ratio, then press the [ ] key (
 ) or [
 ] key (
 ).
).
•To decrease or increase the zoom ratio rapidly, hold down the [ ] key (
 ) or [
 ] key (
 ).
).
The ratio will stop changing at each of the preset ratios. To continue changing the ratio, release the key and then hold it down again.
4 Select the number of copies and any other copy settings, and then press the [START] key (  ).
).
The copy will be delivered to the paper output tray.
27
|
4 |
Chapter 4 |
||
|
CONVENIENT COPY |
|||
|
FUNCTIONS |
|||
|
|
|
|
|
|
|
|
|
|
AUTOMATIC TWO-SIDED COPYING
Two originals can be automatically copied onto both sides of a single sheet of paper. When the RSPF is used, two-sided copies of two-sided originals can easily be made.
|
|
|
|
|
|
|
|
|
|
|
Original → Paper |
|
|
|
|
|
|
|
|
|
Usable paper |
|||||||||||||
|
|
|
|
|
One-sided original → Two sides |
5-1/2" x 8-1/2", |
||||||||||||||||||||||||||||
|
|
|
|
|
|
|
|
|
|
|
|
|
|
|
|
|
|
|
|
|
|
|
|
|
|
|
|
|
|
|
|
|
|
|
Document |
|
|
|
|
|
|
|
|
|
|
|
|
|
|
|
|
|
|
|
|
|
|
|
|
|
|
|
|
|
|
|
|
|
8-1/2" x 11", |
|
|
|
|
|
|
|
|
|
|
|
|
|
|
|
|
|
|
|
|
|
|
|
|
|
|
|
|
|
|
|
|
|
||
|
|
|
|
|
|
|
|
|
|
|
|
|
|
|
|
|
|
|
|
|
|
|
|
|
|
|
|
|
|
|
|
|
||
|
|
|
|
|
|
|
|
|
|
|
|
|
|
|
|
|
|
|
|
|
|
|
|
|
|
|
|
|
|
|
|
|
8-1/2" x 13", |
|
|
|
|
|
|
|
|
|
|
|
|
|
|
|
|
|
|
|
|
|
|
|
|
|
|
|
|
|
|
|
|
|
|
||
glass |
|
|
|
|
|
|
|
|
|
|
|
|
|
|
|
|
|
|
|
|
|
|
|
|
|
|
|
|
|
|
|
|
|
8-1/2" x 14" |
|
|
|
|
|
|
|
|
|
|
|
|
|
|
|
|
|
|
|
|
|
|
|
|
|
|
|
|
|
|
|
|
|
|
• The bypass tray |
|
|
|
|
|
|
|
|
|
|
|
|
|
|
|
|
|
|
|
|
|
|
|
|
|
|
|
|
|
|
|
|
|
|
|
|
|
|
|
|
|
|
|
|
|
|
|
|
|
|
|
|
|
|
|
|
|
|
|
|
|
|
|
|
|
|
|
|
|
cannot be used. |
|
|
|
|
|
|
|
|
|
|
|
|
|
|
|
|
|
|
|
|
|
|
|
|
|
|
|
|
|
|
|
|
|
|
|
|
|
|
|
|
|
|
|
|
|
|
|
|
|
|
|
|
|
|
|
|
|
|
|
|
|
|
|
|
|
|
|
|
|
|
|
|
|
|
|
|
|
|
|
|
|
|
|
|
|
|
|
|
|
|
|
|
|
|
|
|
|
|
|
|
|
|
|
|
|
|
|
|
|
|
|
|
|
|
|
|
|
|
|
|
|
|
|
|
|
|
|
|
|
|
|
|
|
|
|
|
|
|
|
5-1/2" x 8-1/2", |
|
|
One-sided |
|
|
|
|
|
|
|
|
|
|
|
|
|
|
|
|
Two-sided |
8-1/2" x 11", |
||||||||||||||
|
|
|
|
|
|
Two-sided |
|
8-1/2" x 13", |
||||||||||||||||||||||||||
|
|
original → |
|
|
|
|
original → |
|
original → |
8-1/2" x 14" |
||||||||||||||||||||||||
RSPF |
|
Two sides |
|
|
|
|
Two sides |
|
One side |
• Special paper cannot |
||||||||||||||||||||||||
|
|
|
|
|
|
|
|
|
|
|
|
|
|
|
|
|
|
|
|
|
|
|
|
|
|
|
|
|
|
|
|
|
be used. |
|
|
|
|
|
|
|
|
|
|
|
|
|
|
|
|
|
|
|
|
|
|
|
|
|
|
|
|
|
|
|
|
|
|
|
• The bypass tray can |
|
|
|
|
|
|
|
|
|
|
|
|
|
|
|
|
|
|
|
|
|
|
|
|
|
|
|
|
|
|
|
|
|
|
|
|
|
|
|
|
|
|
|
|
|
|
|
|
|
|
|
|
|
|
|
|
|
|
|
|
|
|
|
|
|
|
|
|
|
|
|
|
|
|
|
|
|
|
|
|
|
|
|
|
|
|
|
|
|
|
|
|
|
|
|
|
|
|
|
|
|
|
|
|
only be used when |
|
|
|
|
|
|
|
|
|
|
|
|
|
|
|
|
|
|
|
|
|
|
|
|
|
|
|
|
|
|
|
|
|
|
making one-sided |
|
|
|
|
|
|
|
|
|
|
|
|
|
|
|
|
|
|
|
|
|
|
|
|
|
|
|
|
|
|
|
|
|
|
|
|
|
|
|
|
|
|
|
|
|
|
|
|
|
|
|
|
|
|
|
|
|
|
|
|
|
|
|
|
|
|
|
|
|
|
|
|
|
|
|
|
|
|
|
|
|
|
|
|
|
|
|
|
|
|
|
|
|
|
|
|
|
|
|
|
|
|
|
|
|
|
|
|
|
|
|
|
|
|
|
|
|
|
|
|
|
|
|
|
|
|
|
|
|
|
|
|
|
|
|
|
|
|
|
|
|
|
|
|
|
|
|
|
|
|
|
|
|
|
|
|
|
|
|
|
|
|
|
|
|
|
|
|
|
|
|
|
|
|
copies from two- |
|
|
|
|
|
|
|
|
|
|
|
|
|
|
|
|
|
|
|
|
|
|
|
|
|
|
|
|
|
|
|
|
|
|
|
|
|
|
|
|
|
|
|
|
|
|
|
|
|
|
|
|
|
|
|
|
|
|
|
|
|
|
|
|
|
|
|
|
|
sided originals. |
|
|
|
|
|
|
|
|
|
|
|
|
|
|
|
|
|
|
|
|
|
|
|
|
|
|
|
|
|
|
|
|
|
|
|
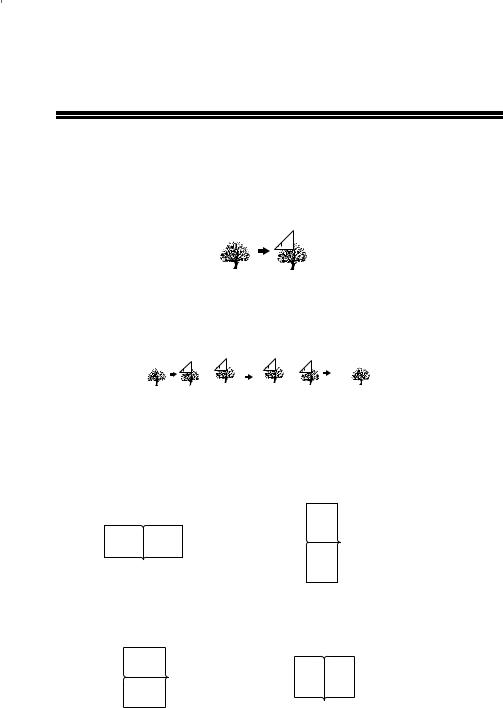
When performing automatic two-sided copying of one-sided originals, the orientation of the copied image can be selected according to the binding position of the paper.
SHORT EDGE: Select when binding the paper at the short edge.
A
A B
B
(Paper orientation: Landscape) (Paper orientation: Portrait)
LONG EDGE: Select when binding the paper at the long edge.
A
A B
B
(Paper orientation: Landscape) (Paper orientation: Portrait)
28
CONVENIENT COPY FUNCTIONS
Using the document glass
1 Place the original that you wish to copy onto the front side of the paper on the document glass and close the RSPF.
2 Press the [2-SIDED COPY ( 
 )] key until "1 TO 2" appears, and then press the [OK] key.
2-SIDED COPY  1 TO 2
3 Press the [ ] key (
 ) or [
 ] key (
 ) to select the binding edge and then press the [OK] key.
Select "LONG EDGE" or "SHORT EDGE". The "LONG EDGE" and "SHORT EDGE" are shown in the illustration on the preceding page.
BINDING EDGE  LONG EDGE
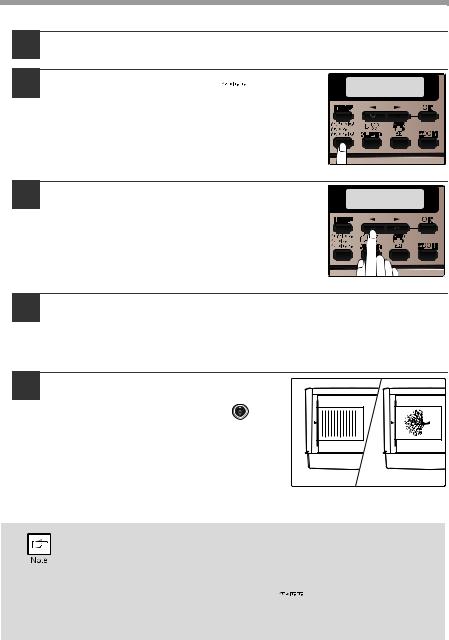
4 Select the number of copies and any other settings, and then press the [START] key (  ).
).
"[START] : NEXT SCAN [#] : START PRINT" appears and the original is scanned into memory.
To immediately print the scanned image, press the [  ] key.
5 Replace the original with the next |
|
|
|
original and close the RSPF, and |
|
|
|
then press the [START] key ( |
). |
|
|
Repeat step 5 until all originals have been |
|
|
|
scanned. |
|
1 |
2 |
Copies will be output each time two originals |
|
|
|
have been scanned. |
|
|
|
When the number of original pages is odd |
The first original |
The second original |
|
|
|
||
and "[START] : NEXT SCAN [#] : START
PRINT" appears, press the [ ] key after all pages have been scanned.
• If you need to clear the data scanned into memory, press the [CLEAR] key ( ). When the [CLEAR] key (
 ) is pressed, the number of copies setting is also cleared.
• To cancel automatic two-sided copying, press the [CLEAR ALL] key ( ) or press the [2-SIDED COPY (
 )] key, select the "1 TO 1", and then press the [OK] key.
• If the special function sort mode was selected in step 4, copying will not begin until the [ ] key is pressed.
29
 Loading...