


R
Free standing type Freistehende AusfŸhrung
Type de table / installation murale De sobremesa / instalaci—n en la pared Tipo da scrivania / parete Tafelmodel / wandmodel
*Plasmacluster is a trademark of Sharp Corporation.
FU-S51E
AIR PURIFIER
OPERATION MANUAL |
ENGLISH |
|
|
||
LUFTREINIGER |
|
|
DEUTSCH |
||
BEDIENUNGSANLEITUNG |
DEUTSCH |
|
|
||
|
|
|
|
|
|
PURIFICATEUR D'AIR |
FRAN‚AIS |
|
MANUEL D'UTILISATION |
||
|
||
|
|
|
|
|
|
PURIFICADOR DE AIRE |
ESPA„OL |
|
MANUAL DE USO |
||
|
||
|
|
|
|
|
|
PURIFICATORE |
ITALIANO |
|
MANUALE OPERATIVO |
||
DELL'ARIA |
|
|
|
|
|
LUCHTREINIGER |
NEDERLANDS |
|
GEBRUIKSAANWIJZING |
||
|
||
|
● |

Please read before operating your new Air Purifier
The air purifier draws in room air from its air intake, lets the air pass through a Active Carbon Filter (deodorization filter) and a HEPA Filter (dust collection filter) inside of the unit, then discharges the air from its air outlet. The air purifier unit repeats this process by moving its internal fan.
As air passes through, a new HEPA Filter can remove 99.97% of dust particles, of as small as 0.3 microns. The Active Carbon Filter gradually absorbs odour elements as they repeatedly pass through the filter. (Odour elements are absorbed by HEPA Filter as well.)
Some odour ingredients absorbed by the filters may become separated and may be discharged through the air outlet and result in additional odour. Depending on the usage environment, especially when the product is used in a condition significantly more severe than household use, this odour may become strong in a shorter period than expected.
If the odour persists, then the filters are fully expended and it is necessary to purchase the optional replacement filter.
NOTE
•The air purifier is designed to remove air-suspended dust and odour, but not harmful gases (for example, carbon monoxide contained in cigarette smoke). If the odour sources still exist, it cannot completely remove the odour. (for example, odours from construction materials and pet odours).
•It is suggested to open the window a bit when you are smoking in order to facilitate ventilation.

ENGLISH
FEATURES
ION SHOWER
New ION SHOWER Operation Mode releases the concentrated Plasmacluster Ions, and effectively removes the pollen and mold, and also controls the activity of airborne virus, mold, and allergen.
Plasmacluster Ion Control
Your new air purifier will control the ratio of negative ions and positive ions depending on the condition of the room.
• Clean Mode
Approximately the same numbers of positive and negative ions are discharged.
• AUTO Plasmacluster Ion Mode
The unit will switch between Clean Mode and Ion Control Mode* automatically depending on the amount of impurities in the air detected by the odour and dust sensors.
*Ion Control Mode
Negative ions will be released in an increased rate and controls the ion balance.
• Filters
1)Washable Active Carbon Filter
Absorbs odour elements. Washable to maintain optimum deodorization performance.
2)HEPA (High Efficiency Particulate Air) Filter with Microbial Control
High-efficiency particle collection including pollen and dust.
CONTENTS
IMPORTANT SAFETY INSTRUCTIONS .... |
E-2 |
|
|
• WARNING .................................................... |
E-2 |
|
|
• CAUTIONS CONCERNING OPERATION ... |
E-3 |
|
|
• INSTALLATION GUIDELINES ..................... |
E-3 |
|
|
• FILTER GUIDELINES .................................. |
E-3 |
|
|
PART NAMES.......................................... |
E-4 |
|
|
• MAIN UNIT DISPLAY ................................... |
E-4 |
|
|
• ILLUSTRATIVE DIAGRAM .......................... |
E-4 |
|
|
• BACK ........................................................... |
E-5 |
|
|
• INCLUDED................................................... |
E-5 |
ENGLISH |
|
PREPARATION |
E-6 |
||
|
|||
• FILTER INSTALLATION ............................... |
E-6 |
|
|
OPERATION ............................................ |
E-8 |
|
|
• MAIN UNIT OPERATION ............................. |
E-8 |
|
|
CARE AND MAINTENANCE................. |
E-10 |
|
|
• MAIN UNIT................................................ |
E-10 |
|
|
• FILTER ...................................................... |
E-10 |
|
|
• SENSORS ................................................ |
E-10 |
|
|
• WASHABLE ACTIVE CARBON FILTER CARE .... |
E-11 |
|
|
• FILTER REPLACEMENT |
E-12 |
|
|
GUIDELINES ............................................ |
|
||
TROUBLESHOOTING........................... |
E-13 |
|
|
SPECIFICATIONS ................................. |
E-14 |
|
INFORMATION ON PROPER DISPOSAL ... E-15
Thank you for purchasing the SHARP Air Purifier. Please read this manual carefully for the correct usage information. Before using this product, be sure to read the section: “Important Safety Instructions.”
After reading this manual, retain it in a convenient location for future reference.
E-1

IMPORTANT SAFETY INSTRUCTIONS
When using electrical appliances, basic safety precautions should be followed, including the following:
WARNING - To reduce the risk of electrical shock, fire or injury to persons:
•Read all instructions before using the air purifier.
•Use only a 220-240 volt outlet.
•Do not use the air purifier if the power cord or plug is damaged or the connection to the wall outlet is loosened.
•Periodically remove dust from the power plug.
•Do not insert fingers or foreign objects into the intake or air outlet.
•When removing the power plug, always hold the plug and never pull the cord.
Electrical shock and/or fire from short circuit may occur as a result.
•Do not remove the plug when your hands are wet.
•Do not use this air purifier near gas appliances or fireplaces.
•Remove the power plug from the wall outlet before cleaning the unit and when not using the unit.
Electrical shock from bad insulation and/or fire from short circuit may occur as a result.
•If the power cord is damaged, it must be replaced by the manufacturer, its service agent, Sharp authorized Service Centre or similarly qualified person in order to avoid a hazard.
•Do not operate when using aerosol insecticides or in rooms where there is oily residue, incense, sparks from lit cigarettes, chemical fumes in the air or in very high humidity condition, such as a bathroom.
•Be cautious when cleaning the air purifier. Strong corrosive cleansers may damage the exterior.
•Only Sharp Authorized Service Centre should service this air purifier. Contact the nearest Service Centre for any problems, adjustments, or repairs.
NOTE - Radio or TV Interference
If this air purifier should cause interference to radio or television reception, try to correct the interference by one or more of the following measures:
•Reorient or relocate the receiving antenna.
•Increase the separation distance between the air purifier and radio/TV receiver.
•Connect the equipment into an outlet on a circuit different from that to which the receiver is connected.
•Consult the dealer or an experienced radio/TV technician for help.
E-2

IMPORTANT SAFETY INSTRUCTIONS
CAUTIONS CONCERNING OPERATION
• Do not block the intake and air outlet.
• Do not use the unit near or on hot objects, such as stoves or heaters or where it may come into contact with steam.
• Do not lay the unit down when using.
• Always hold the handle on the back of the unit when moving it.
Holding the front panel when carrying may cause it to detach, thus dropping the unit and resulting in bodily injury.
• Do not operate the unit without the filter.
• Do not wash and reuse HEPA filter .
It not only does not improve filter performance, it may cause electric shock or malfunction.
• Clean the exterior with a soft cloth only.
The unit surface may be damaged or cracked. |
|
In addition, the sensors may malfunction as a result. |
ENGLISH |
|
INSTALLATION GUIDELINES
•During the operation of the product, please place the unit at least 2m away from equipments which involve electric wave such as televisions, radios or wave clocks, in case electrical interference occurs to such equipment.
•Avoid a location where the sensor is exposed to direct wind.
The unit may not operate properly.
•Avoid locations where curtains, etc., come into contact with the intake or air outlet.
Curtains, etc., may become dirty or a malfunction may occur.
•Avoid locations where the unit is exposed to condensation, due to drastic temperature changes.
(Use under appropriate conditions between 0 and 35˚C in the room.)
•Place on a stable surface with sufficient air circulation.
When placing the unit on a heavily carpeted area, it may cause the unit to vibrate slightly.
•Do not install when there is generation of lampblack, such as in a kitchen, etc.
The unit surface may crack or the sensor may malfunction as a result.
•Leave about 60cm of space from the wall.
The wall behind the air outlet may become dirty as time passes. When using the unit for extended period of time in the same location, use a vinyl sheet, etc., to prevent the wall from becoming dirty. In addition, periodically clean the wall.
FILTER GUIDELINES
• Follow the instructions in this manual for correct care and maintenance of the filters.
E-3

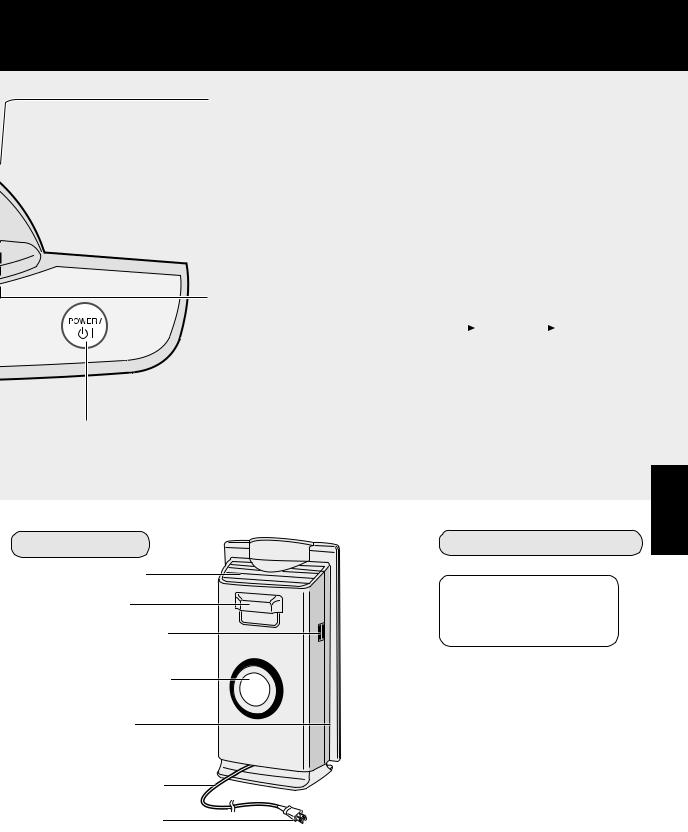
PART NAMES
MAIN UNIT DISPLAY
AUTO Operation Indicator Light
Pollen Mode Indicator Light
Fan Speed Indicator Lights
Plasmacluster Ion Mode
Indicator Lights
Plasmacluster Ion Mode
Selection Button
Mode Selection Button
ION SHOWER Indicator Light
ION SHOWER Mode Button
ILLUSTRATIVE DIAGRAM
Date Label |
Odour Sensor |
|
Main Unit |
|
HEPA Filter |
|
(blue / white) |
|
Washable Active |
|
Carbon Filter |
Filter Support
Front Panel
E-4

Plasmacluster Indicator Light
(Please refer page E-9)
Blue light
When the Plasmacluster ion operation is in Clean Mode, or in AUTO Plasmacluster Ion Mode and the air in the room is impure, the light will be activated and the unit will operate in Clean Mode.
Green light
When the Plasmacluster ion operation is in the Ion Control Mode, during AUTO Plasmacluster Ion Mode and the air in the room is clean, this light will be activated and the unit will operate in Ion Control Mode.
Cycles of blue and green
When the Plasmacluster ion operation is in the ION SHOWER Mode ,
Plasmacluster Indicator Light will repeat its colour cycles between blue and green.
CLEAN - SIGN Light
The colour changes according to Clean |
Slightly Impure |
Very Impure |
|||||||
the air condition. |
|
|
|
|
|
|
|
|
|
Green |
|
|
Yellow |
|
|
|
Red |
|
|
|
|
|
|
|
|
|
|||
ABOUT THE CLEAN-SIGN
• The condition of the CLEAN-SIGN depends on the room air condition detected by the Dust and Odour Sensors when the plug is inserted into the wall outlet.
• It is possible to have a green CLEAN-SIGN with impurities in the air at the time that the air purifier was just introduced to the room environment. After a while, however, the base impurity rate will be adjusted to detect room air condition correctly.
POWER ON/OFF Button |
DETERMINING THE BASE IMPURITY RATE |
|
|
|
For the first 30 seconds after the power plug is inserted into the wall outlet, the |
|
unit will check the conditions of the air. If operation is set to ON during this time, |
|
the CLEAN-SIGN LIGHT will alternately flash in green, yellow and red. |
ENGLISH
BACK |
INCLUDED |
Air Outlet
• Operation manual
Handle Dust Sensor
Rating Label
Air Inlet
Power Cord
Power Plug
(Sharp of plug depends on country.)
E-5

PREPARATION Be sure to remove the power plug from the wall outlet.
FILTER INSTALLATION
To maintain the quality of the filters, they are installed in the main unit and packed in plastic bags. Be sure to remove the filters from the plastic bags before using the unit.
1 Remove the filters
Front Panel
1 Remove the Front Panel.
Pull the Front Panel on the lower sides, and lift up.
2 Remove the Filter Support.
Push in the hooks on top, then pull the Filter Support.
3 Remove the HEPA Filter.
Filter Support
HEPA Filter
4 Remove the HEPA Filter from the plastic bag.
HEPA Filter
5Remove the Active Carbon Filter from the carton box, and also remove from the plastic bag.
Active Carbon Filter
(At open)
E-6

2 |
Install the filters |
Tab |
|
(blue)
HEPA Filter
Band(blue)
ENGLISH
Filter Support
Date Label
Front Panel

OPERATION
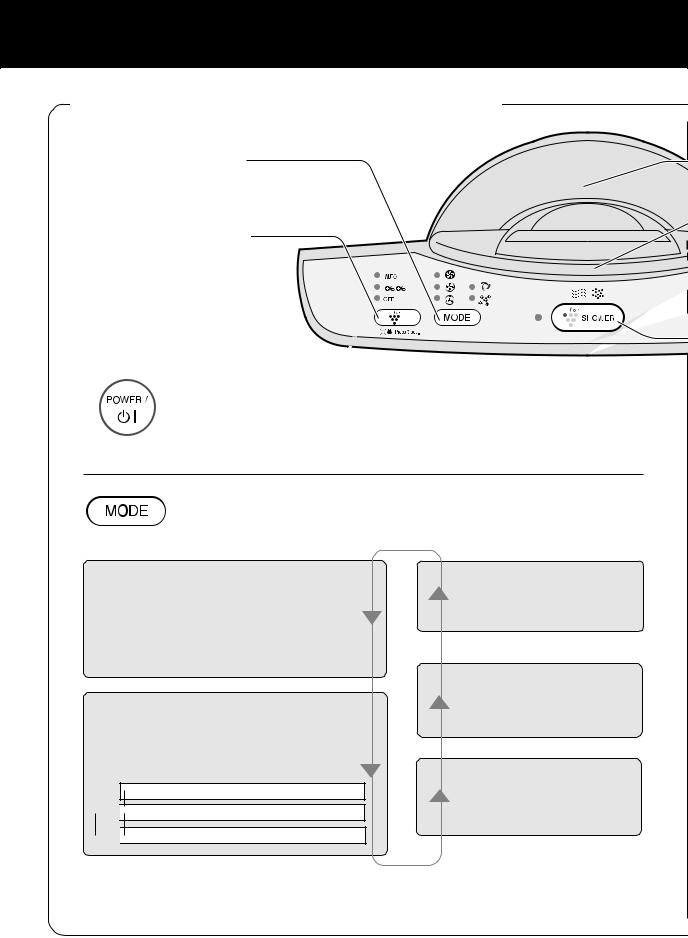
MAIN UNIT OPERATION
Mode Selection Button
Plasmacluster Ion Mode
Selection Button
Power ON/OFF Button
• Used to start operation (short beep) and stop operation (long beep)
•Plasmacluster Indicator Light and Fan Speed Indicator Light turn on/off.
•Unless unplug the power cord, the operation starts in the previous mode the unit was operated in.
•When stop operation during ION SHOWER Operation, the unit will back to the prior operation of ION SHOWER Operation.
MODE Selection Button
• The operation mode can be switched.
AUTO operation 
The fan speed is automatically switched (HIGH*, MEDIUM, SILENT) depending on the amount of impurities in the air. The sensors detect the impurities for efficient air purification.
POLLEN mode operation 
The unit will operate at HIGH* fan speed for 10 minutes, then will alternate between MEDIUM and HIGH* for 20 minutes.
10 minutes: HIGH fan speed

 20 minutes: MEDIUM fan speed
20 minutes: HIGH fan speed
*HIGH fan speed is an intermediate speed between MEDIUM and MAX.
SILENT operation 
The unit will operate quietly using minimal air intake.
MEDIUM operation 
The unit will operate at a fan speed of MEDIUM.
MAX operation 
The unit will operate at a fan speed of MAX.
E-8
Plasmacluster Indicator Light
CLEAN - SIGN Light
POWER ON/OFF Button
ION SHOWER Mode Button
ION SHOWER Mode Button
When pushing the ION SHOWER Mode button, the ION SHOWER operation will be activated. (Direct start is available even when the unit is not turned on.)
The concentrated Plasmacluster Ions (ION SHOWER) will be generated in the room like a shower for 15 minutes, repeating the airflow cycles between strong and gentle. (The Plasmacluster Indicator Light repeats its colour cycles between blue and green.), and effectively controls the airborne dust, pollen, mold, and allergen.
•When the operation finishes, the unit will return to the prior operation. •When pushing the ION SHOWER button while the ION SHOWER operation mode is working, the unit will return to the prior operation.
Plasmacluster Ion Mode Selection Button
The Plasmacluster Ion mode can be switched.
AUTO
*Ion Control Mode Negative ions will be released in an increased rate and controls the ion balance.
The unit will switch between Clean Mode and the Ion Control Mode* automatically depending on the amount of impurities in the air as detected by the dust and odour sensors. Clean Mode will operate for 10 minutes when the Auto function is selected.
CLEAN 

The unit will constantly operate in the Clean Mode, in which the same numbers of positive and negative ions are discharged. The Plasmacluster Indicator Light is blue.
OFF
The generation of ions will stop and the Plasmacluster Indicator Light will go out.
LIGHTS ON/OFF Button
(Please press the Plasmacluster Ion Mode Selection Button for 3 seconds.)
Switches the Plasmacluster Indicator Light and CLEAN-SIGN Light either ON or OFF.
ENGLISH
E-9

CARE AND MAINTENANCE
To maintain optimum performance of this air purifier, please clean the unit including the sensor and filters periodically.
When cleaning the unit, be sure to unplug the power cord, and never handle the plug with wet hands. Electrical shock and/or bodily injury may occur as a result.
MAIN UNIT
Care Cycle 1 month
To prevent dirt or stains on the main unit, clean as often as necessary. If stains are allowed to remain, they may become hard to clean.
Wipe with a dry, soft cloth
For stubborn stains or dirt, use a soft cloth dampened with warm water.
Do not use volatile fluids
Benzene, paint thinner, polishing powder, etc., may damage the surface.
Do not use detergents
Detergent ingredients may damage the unit.
Keep the unit away from water
FILTER
Care Cycle 2 months
Clean the top surface of the Washable Active
Carbon Filter lightly with a vacuum cleaner.
Washable Active Carbon Filter
SENSORS (DUST SENSOR, ODOUR SENSOR)
Care Cycle 2 months
Remove dust from the surface of the hole of the |
Sensor Cover |
sensors using a vacuum cleaner. |
|
SENSOR FILTER CARE |
|
|
(The sensor Filter is in the sensor cover.) |
|
|
Detach the sensor filter and tap it lightly with your |
|
|
hand to remove the dust. |
Hole of Odour Sensor |
|
If it is very dirty, wash it with water and then allow |
||
|
||
it to dry thoroughly. |
|
Sensor Cover
Sensor Filter
It does not have a front and a back.
E-10

WASHABLE ACTIVE CARBON FILTER CARE
Care Cycle 2 months
HAND WASH ONLY!
DO NOT TUMBLE DRY!
Washable Active
Carbon Filter
1Fill a large container with lukewarm water, add a mild kitchen detergent
and stir.
Dilute as indicated on the detergent container.
2Allow the filter to soak approximately 10 minutes before washing.
If the filter surface is very dirty, scrub with an old toothbrush.
3Rinsewater. thoroughly with clean
CAUTION
If rinsing in a container, be sure to rinse 3 to 4 times so that the odour is rinsed thoroughly from the filter.
4 Remove excess water.
The filter will be saturated with water after rinsing. To decrease drying time, wrap the filter in an old thick towel so
that excess water can be removed.
CAUTION
Some carbon may adhere to the towel, but it is harmless.
5Dry the filter outdoors if possible in a well ventilated area.
CAUTION
•The wet filter is heavy. Fix it securely for drying to make sure it does not fall down.
•The filter takes longer time to dry in winter, on rainy days. Wash it on a day when the weather is good and dry it in the sun. Move it indoors at night to prevent freezing.
•Dry the filter outdoors in a well ventilated area. If dried indoors, the water dripping off the filter may soil your floor.
•Make sure that the activated carbon has not shifted to one side of the filter. If it has, distribute it evenly with your fingers.
•Let the filter dry thoroughly.
If used while the filter is still moist, then
the air that is exhausted from the main unit will have an odour. It may take 1 or 2 days to dry.
6 Reinstalling the Filters.
Reinstall the filters as shown on Page E-6,7
ENGLISH
E-11

CARE AND MAINTENANCE
FILTER REPLACEMENT GUIDELINES
The replacement period differs depending on the room environment, the usage hours and location of the Air Purifier.
If dust or odours persists, replace the filters.
(Refer to “Please read before operating your new Air Purifier”)
HEPA Filter / Washable Active Carbon Filter
Up to 5 years after opening
Guide for filter replacement timing
•Filter life can be greatly reduced in poor environment.
The presence of cigarette smoke, pet dander and other concentrations of airborne particles will cause filters to become clogged in less time. Please check filters regularly and replace as needed.
Replacement Filters |
Model |
• HEPA Filter : 1 unit |
|
FZ-S51SEF |
• Washable Active Carbon Filter : 1 unit |
|
|
|
REPLACING THE FILTERS
1.See page E-6,7 for directions on how to install the filters when replacing.
2.Fill in the usage start date of the filters on the Date Label.
Disposal of Filters
Please dispose of replaced filters according to the local disposal laws and regulations.
HEPA Filter Materials:
• Filter: Polypropylene • Frame: Polyester
Active Carbon Filter Materials:
• Deodorizer: Activated charcoal • Net: Polypropylene 60%, Polyester 40%
E-12

TROUBLESHOOTING
Before calling for repair, please review the list below, since the problem may not be a unit malfunction.
SYMPTOM |
REMEDY (not a malfunction) |
|
|
|
|
Odours and smoke are not |
• Clean or replace the filters if they appear to be heavily soiled. |
|
removed. |
(Refer to E-11, E-12) |
|
|
|
|
The CLEAN-SIGN Light lights |
• The air could be impure at the time the unit was plugged in. |
|
green even when the air is |
(Refer to E-5) Pull out the plug from the electrical outlet, and |
|
impure. |
insert the plug one minute later. |
|
|
|
|
The CLEAN-SIGN Light lights |
• The sensitivity of the sensors become unstable when the |
|
opening of the odour sensor or dust sensor is dirty or is clogged. |
||
yellow or red even when the air |
||
Clean the dust around the sensor opening using a vacuum |
||
is clean. |
||
cleaner. (Refer to E-10) |
||
|
||
|
|
|
The Plasmacluster Indicator |
• When in Ion Control Mode (or Clean Mode), the Plasmaclus- |
|
Light remains green (or blue) |
||
ter Indicator Light colour will not change. |
||
and does not change. |
||
|
||
|
|
|
A clicking or ticking sound is |
• Clicking sound is emitted when the unit is in the Ion Control |
|
Mode, and ticking sound is emitted when the unit is generating |
||
heard from the unit. |
ions. |
|
|
If the sound is irritating, set the unit away from you. |
|
|
|
|
|
• Check to see if the filters are heavily soiled. |
|
The discharged air has an aroma |
Replace the filters. |
|
• Plasmacluster Air Purifiers emit small traces of ozone which |
||
or odour. |
||
may produce an odour. These ozone emissions are well below |
||
|
||
|
safety levels . |
|
|
|
|
The unit does not operate when |
• Is the unit installed in a location that is difficult for the sensor |
|
to detect cigarette smoke? |
||
cigarette smoke is in the air. |
• Are the dust or odour sensor openings blocked or clogged? |
|
|
(In this case, clean the openings.) (Refer to E-10) |
|
|
|
|
The Plasmacluster Indicator |
• Check to see if the Lights OFF Mode is selected. If so, then |
|
press the Plasmacluster Ion Mode Selection Button for 3 |
||
Light or the CLEAN-SIGN Light |
||
seconds to activate the indicator lights. |
||
will not activate. |
||
(Refer to E-9) |
||
|
||
|
|
|
Plasmacluster Indicator Light |
|
|
(repeats colour cycles between |
• The ION SHOWER operation is working. |
|
blue and green ) |
|
|
|
|
ENGLISH
ERROR DISPLAY
LAMP INDICATION |
REMEDY |
|
|
|
Fan motor disconnected or abnormal. |
The “Silent” Fan Speed Indica- |
Operation stops. |
tor Light blinks. |
• Pressing the POWER ON/OFF button will reset the error |
|
display, but if error occurs again, contact the Sharp Service |
|
Centre. |
|
|
E-13

SPECIFICATIONS
|
Model |
|
|
FU-S51E |
|
|
|
|
|
|
|
|
Power supply |
|
220-240V 50/60Hz |
|
|
|
|
|
|
|
|
Fan |
Fan Speed Adjustment |
MAX |
|
MED |
SILENT |
Speed |
Rated Power |
46 W |
|
8.6W |
3.7 W |
Operation |
|
|
|
|
|
Air Flow Volume |
306m3/hour |
|
138m3/hour |
30m3/hour |
|
|
Applicable Floor Surface |
|
|
~38m2*1 |
|
|
Cord Length |
|
|
2.0m |
|
|
Dimensions |
338mm(W)x207mm(D)x620mm(H) |
|||
|
Weight |
|
|
6.5kg |
|
*1 • The applicable floor surface area is appropriate for operating the unit at maximum fan speed.
•Applicable floor surface area indicates the space where a certain amount of dust particles can be removed in 30 minutes.
Standby Power |
In order to operate the electrical circuits while the power plug is inserted in |
|
the wall outlet, this product consumes about 0.8W of standby power. |
|
For energy conservation, unplug the power cord when the unit is not in use. |
E-14

Attention: Your product is marked with this symbol. It means that used electrical and electronic products should not be mixed with general household waste. There is a separate collection system for these products.
A. Information on Disposal for Users (private households)
1. In the European Union
Attention: If you want to dispose of this equipment, please do not use the ordinary dust bin!
Used electrical and electronic equipment must be treated separately and in accordance with legislation that requires proper treatment, recovery and recycling of used electrical and electronic equipment.
Following the implementation by member states, private households within the EU states may return their used electrical and electronic equipment to designated collection facilities free of charge*. In some countries* your local retailer may also take back your old product free of charge if you purchase a similar new one.
*) Please contact your local authority for further details.
If your used electrical or electronic equipment has batteries or accumulators, please dispose of these separately beforehand according to local requirements.
By disposing of this product correctly you will help ensure that the waste undergoes the necessary treatment, recovery and recycling and thus prevent potential negative effects on the environment and human health which could otherwise arise due to inappropriate waste handling.
2. In other Countries outside the EU
If you wish to discard this product, please contact your local authorities and ask for the correct method of disposal.
For Switzerland: Used electrical or electronic equipment can be returned free of charge to the dealer, even if you don’t purchase a new product. Further collection facilities are listed on the homepage of www.swico.ch or www.sens.ch.
B. Information on Disposal for Business Users.
1. In the European Union
If the product is used for business purposes and you want to discard it:
Please contact your SHARP dealer who will inform you about the take-back of the product. You might be charged for the costs arising from take-back and recycling. Small products (and small amounts) might be taken back by your local collection facilities.
For Spain: Please contact the established collection system or your local authority for take-back of your used products.
2. In other Countries outside the EU
If you wish to discard of this product, please contact your local authorities and ask for the correct method of disposal.
ENGLISH
E-15

Bitte lesen, bevor Sie Ihr neues
Luftreinigungsgerät in Betrieb nehmen
Das LuftreinigungsgerŠt saugt Raumluft durch seinen Lufteinlass ein, lŠsst diese Luft im Inneren des GerŠtes einen Aktivkohlefilter (zur Desodorierung) und einen HEPA-Filter (zum Entfernen von Schwebeteilchen) passieren und gibt die gereinigte Luft wieder in den Raum zurŸck. Mit Hilfe des eingebauten Ventilators wird dieser Vorgang stetig wiederholt.
Ein neuwertiger HEPA-Filter kann 99,97 % an Schwebeteilchen (bis zu einer Grš§e von 0,3 Mikrometer) aus der durchstršmenden Luft entfernen. Der Aktivkohlefilter reinigt die Luft schrittweise von unangenehmen GerŸchten, wenn diese wiederholt den Filter passiert. (Auch der HEPA-Filter trŠgt zur Entfernung von unangenehmen GerŸchen bei.)
Manche ausgefilterten Geruch-verursachenden Stoffe kšnnen sich absetzen und werden wieder durch den Luftauslass an die Raumluft abgegeben. Je nach Einsatzbedingungen - insbesondere dann, wenn das GerŠt erheblich stŠrker als beim Einsatz im Haushalt beansprucht wird - kšnnen solche GerŸche in kurzer Zeit an IntensitŠt gewinnen.
Falls solche GerŸche Ÿber lŠngere Zeit auftreten, sind die Filter aufgebraucht und mŸssen durch separat erhŠltliche Austauschfilter ersetzt werden.
HINWEIS
¥Das LuftreinigungsgerŠt wurde zur Entfernung von schwebenden Geruchsund Staubpartikeln, nicht jedoch zur Entfernung von schŠdlichen Gasen (zum Beispiel Kohlenmonoxid aus Zigarettenrauch) aus der Luft entwickelt. Sofern die Ursache des Geruchs bestehen bleibt, kann der Geruch natŸrlich nicht vollstŠndig aus der Luft entfernt werden. (Beispiel: GerŸche von Baumaterialien oder durch Tiere verursachte GerŸche.)
¥Wenn Sie rauchen, šffnen Sie am besten das Fenster ein wenig, damit fŸr ausreichende BelŸftung gesorgt ist.
HEPA-Filter

 Aktivkohlefilter


DEUTSCH
LEISTUNGSMERKMALE
IONENDUSCHE
Der neue IONENDUSCHE-Betriebsmodus gibt konzentrierte Plasmacluster-Ionen frei, beseitigt Pollen und Schimmel auf effektive Weise und hemmt obendrein die AktivitŠt von schwebenden Viren, Schimmel und allergieauslšsenden Stoffen.
Plasmacluster-Ionen- Steuerung
Ihr neuer Luftreiniger steuert das VerhŠltnis zwischen negativen und positiven Ionen je nach Raumbedingung.
¥ Reinigungsmodus
Hierbei werden positive und negative Ionen zu etwa gleichen Teilen freigegeben.
¥AUTO-Plasmacluster-Ionen- Modus
In diesem Modus schaltet das GerŠt automatisch zwischen Reinigungsmodus und IonenSteuerungsmodus um - je nach StŠrke der Luftverunreinigung, die von den Geruchsund Staubsensoren erkannt wird.
¥ Filter
1)Auswaschbarer Aktivkohlefilter
Absorbiert unangenehme GerŸche. Der Filter ist auswaschbar, um seinen Zweck stets optimal erfŸllen zu kšnnen.
2)HEPA-Filter (HEPA = High Efficiency Particulate Air).
Dieser Filter sammelt Schwebeteilchen auf effektive Weise
- einschlie§lich Pollen und Staub.
INHALT
WICHTIGE SICHERHEITSHINWEISE ....... |
D-2 |
|
|
¥ WARNUNG ................................................. |
D-2 |
|
|
¥ SICHERHEITSHINWEISE F†R DEN |
D-3 |
|
|
BETRIEB ..................................................... |
|
||
¥ RICHTLINIEN ZUR INSTALLATION ........... |
D-3 |
|
|
¥ RICHTLINIEN ZUM UMGANG MIT |
D-3 |
|
|
FILTERN ..................................................... |
|
||
BEZEICHNUNGEN DER EINZELNEN |
|
|
|
KOMPONENTEN ..................................... |
D-4 |
|
|
¥ ANZEIGEN AM HAUPTGER€T .................. |
D-4 |
|
|
¥ EXPLOSIONSZEICHNUNG ....................... |
D-4 |
|
|
¥ R†CKSEITE ............................................... |
D-5 |
|
|
¥ IM LIEFERUMFANG ................................... |
D-5 |
|
|
VORBEREITUNG .................................... |
D-6 |
|
|
¥ FILTERINSTALLATION ............................... |
D-6 |
|
|
|
|
|
|
BETRIEB ................................................. |
D-8 |
DEUTSCH |
|
¥ BETRIEB DES HAUPTGER€TES |
D-8 |
||
|
|||
PFLEGE UND WARTUNG .................... |
D-10 |
|
|
.........................................¥ HAUPTGER€T |
D-10 |
|
|
¥ FILTER ...................................................... |
D-10 |
|
|
¥ SENSOREN .............................................. |
D-10 |
|
|
¥ PFLEGE DES AUSWASCHBAREN |
D-11 |
|
|
AKTIVKOHLEFILTERS ............................. |
|
||
¥ HINWEISE ZUM FILTERAUSTAUSCH .... |
D-12 |
|
|
ST…RUNGSBESEITIGUNG .................. |
D-13 |
|
|
TECHNISCHE DATEN ........................... |
D-14 |
|
|
ENTSORGUNGSINFORMATIONEN ..... |
D-15 |
|
Vielen Dank fŸr den Kauf des LuftreinigungsgerŠtes von SHARP. Bitte lesen Sie diese Anleitung gut durch, damit Sie das GerŠt problemlos bedienen kšnnen. Bevor Sie das Produkt benutzen, lesen Sie in jedem Fall den Abschnitt: ÒWichtige
SicherheitshinweiseÓ.
Bewahren Sie diese Anleitung auf, damit Sie spŠter darin nachlesen kšnnen.
D-1

WICHTIGE SICHERHEITSHINWEISE
Bei der Benutzung von ElektrogerŠten sollten Sie sich stets an einige grundlegende Sicherheitshinweise halten. Dazu zŠhlen die folgenden Dinge:
WARNUNG - Damit es nicht zu StromschlŠgen, BrŠnden oder Verletzungen kommt: Y INSTRUCTIONS¥ Lesen Sie sŠmtliche Anweisungen, bevor Sie das LuftreinigungsgerŠt benutzen.
¥ Benutzen Sie ausschlie§lich eine Steckdose, die 220 bis 240 V fŸhrt.
¥ Benutzen Sie das LuftreinigungsgerŠt nicht, wenn das Stromkabel beschŠdigt oder die Steckdose locker ist.
¥ Befreien Sie den Anschlussstecker hin und wieder von Staubansammlungen.
¥ Stecken Sie weder Ihre Finger noch sonstige Fremdkšrper in den Lufteinlass oder Luftauslass.
¥ Wenn Sie den Netzstecker ziehen, greifen Sie ihn grundsŠtzlich am Stecker selbst, ziehen Sie niemals am Kabel.
Wenn Sie am Kabel ziehen, kšnnen Sie einen Stromschlag bekommen oder einen Kurzschluss verursachen.
¥ BerŸhren Sie den Stecker niemals mit feuchten oder gar nassen HŠnden.
¥ Benutzen Sie das LuftreinigungsgerŠt nicht in der NŠhe von GasgerŠten oder offenen Flammen.
¥ Ziehen Sie den Netzstecker aus der Steckdose, bevor Sie das GerŠt reinigen oder wenn Sie es nicht benutzen.
Wenn Sie dies nicht tun, kšnnen Sie durch nicht mehr funktionierende Isolierung einen Stromschlag bekommen oder einen Brand durch Kurzschluss verursachen.
¥ Falls das Netzkabel beschŠdigt wird, muss es durch den Hersteller, eine seiner ServiceNiederlassungen, einen durch Sharp autorisierten Dienstleister oder eine gleichwertig qualifizierte Person ersetzt werden, damit es nicht zu GefŠhrdungen kommt.
¥ Betreiben Sie das GerŠt nicht, wenn Insektenspray benutzt wird, nicht in šligen RŠumen, nicht an Stellen, an denen mit RŠucherstŠbchen oder glŸhenden Zigaretten hantiert wird, an denen sich chemische DŠmpfe in der Luft befinden und nicht in feuchten RŠumen, wie zum Beispiel Badezimmern.
¥ Gehen Sie sorgsam vor, wenn Sie den Luftreiniger reinigen. Sehr krŠftige Reinigungsmittel kšnnen das GehŠuse beschŠdigen.
¥ Wartungsarbeiten an Ihrem LuftreinigungsgerŠt sollten nur von einem von Sharp autorisierten
Dienstleister durchgefŸhrt werden. Wenden Sie sich an Ihre nŠchste Service-Niederlassung, falls Sie einmal Probleme haben sollten oder das GerŠt justiert oder repariert werden muss.
HINWEIS - Radiooder Fernsehstšrungen
Falls Ihr Luftreiniger Stšrungen des Radiooder Fernsehempfang verursachen sollte, versuchen Sie, die Stšrung durch eine oder mehrere der folgenden Ma§nahmen zu beheben:
¥Richten Sie die Empfangsantenne anders aus oder platzieren Sie diese an einer anderen Stelle.
¥Vergrš§ern Sie den Abstand zwischen Luftreiniger und Radio-/FernsehempfŠnger.
¥Schlie§en Sie das EmpfangsgerŠt an einen Stromkreis an, der vom Stromkreis des LuftreinigungsgerŠtes getrennt ist.
¥Bitten Sie Ihren HŠndler oder einen erfahrenen Radio-/Fernsehtechniker um Hilfe.
D-2
WICHTIGE SICHERHEITSHINWEISE
SICHERHEITSHINWEISE F†R DEN BETRIEB
¥Blockieren Sie weder Lufteinlass noch Luftauslass.
¥Benutzen Sie das GerŠt nicht in der NŠhe oder auf hei§en Objekten wie z. B. Herden. Meiden Sie Stellen, an denen das GerŠt in Kontakt mit Dampf geraten kšnnte.
¥Legen Sie das GerŠt nicht auf die Seite.
¥Wenn Sie das GerŠt bewegen, fassen Sie es grundsŠtzlich am Griff an der RŸckseite.
Wenn Sie das GerŠt beim Transportieren an der Vorderseite greifen, kann sich diese lšsen, das GerŠt hinfallen und Verletzungen verursachen.
¥Betreiben Sie das GerŠt nicht ohne Filter.
¥Waschen Sie den HEPA-Filter nicht aus, verwenden Sie ihn nicht erneut.
Die Filterleistung wŸrde dadurch nicht verbessert; obendrein besteht die Gefahr von StromschlŠgen oder Fehlfunktionen.
¥Reinigen Sie die Au§enseite des GehŠuses lediglich mit einem weichen Tuch.
Ansonsten kšnnen die OberflŠchen Schaden nehmen.
DarŸber hinaus kšnnen die Sensoren durch den Einsatz von ungeeigneten Putzmitteln ausfallen.
RICHTLINIEN ZUR INSTALLATION
¥ |
Stellen Sie das Produkt so auf, dass es sich mindestens 2 m von GerŠten entfernt befindet, |
|
|
die elektromagnetische Felder erzeugen kšnnen oder mit Hochfrequenz arbeiten: Zum Beispiel |
|
|
FernsehgerŠte, Radios, Radiowecker, und so weiter. |
|
|
DEUTSCH |
|
¥ |
Meiden Sie einen Aufstellungsort, an dem sich der Sensor im Luftzug (Wind) befindet. |
|
|
In diesem Fall kann das GerŠt nicht richtig arbeiten. |
|
¥ |
Meiden Sie Stellen, an denen VorhŠnge, Gardinen oder Šhnliche GegenstŠnde in Kontakt |
|
|
mit dem Lufteinlass oder Luftauslass geraten kšnnen. |
|
|
VorhŠnge, Gardinen, und so weiter kšnnen verschmutzt werden, au§erdem kšnnen |
|
|
Fehlfunktionen auftreten. |
|
¥ |
Meiden Sie Orte, an denen es durch drastische Temperaturschwankungen zu Kondensation |
|
|
kommen kann. |
|
|
(Betreiben Sie das GerŠt bei Umgebungstemperaturen zwischen 0 und 35 °C.) |
|
¥ |
Stellen Sie das GerŠt auf einen stabilen Untergrund, wŠhlen Sie eine Stelle, an der die Luft frei |
|
|
zirkulieren kann. |
|
|
Bei der Aufstellung auf einem weichen Untergrund (z. B. Teppich) kann das GerŠt in leichte |
|
|
Schwingungen geraten. |
|
¥Meiden Sie Aufstellungsorte, an denen Ru§ anfŠllt; z. B. in der KŸche.
Das GehŠuse des GerŠtes kann Schaden nehmen, die Sensoren kšnnen ausfallen.
¥Sorgen Sie dafŸr, dass das GerŠt mit einem Mindestabstand von 60 cm zur Wand aufgestellt wird.
Im Laufe der Zeit kann sich an der Wand hinter dem Luftauslass Schmutz ansammeln. Wenn Sie das GerŠt lŠngere Zeit am selben Ort betreiben, schŸtzen Sie die Wand z. B. mit einer Folie vor Verschmutzung. DarŸber hinaus sollten Sie die Wand von Zeit zu Zeit reinigen.
RICHTLINIEN ZUM UMGANG MIT FILTERN
¥ Zu richtigen Pflege und Wartung der Filter folgen Sie den Anweisungen in dieser Bedienungsanleitung.
D-3

BEZEICHNUNGEN DER EINZELNEN KOMPONENTEN
ANZEIGEN AM HAUPTGER€T
$#%!&
$#%!&
EXPLOSIONSZEICHNUNG |
|
Datumskennzeichnung |
Geruchsse |
Date Label |
Odour Sensor |
|
HauptgerŠt |
|
Main Unit |
|
- |
|
HEPAFilter |
|
AuswaschbarerWashable Active |
|
AktivkohlefilterCarbon Filter |
FilterhalterSupport
FrontplattePanel
D-4
Blaue Leuchte
Im Plasmacluster-Ionen-Betrieb: Wenn das GerŠt im Reinigungsmodus oder im AUTO-Plasmacluster-Ionen-Modus arbeitet und feststellt, dass die Luft im Raum verunreinigt ist, leuchtet diese Anzeigeleuchte auf, das GerŠt arbeitet im Reinigungsmodus.
GrŸne Leuchte
Im Plasmacluster-Ionen-Betrieb: Wenn das GerŠt im Ionen-Steuerungsmodus oder im AUTO-Plasmacluster-Ionen-Modus arbeitet und feststellt, dass die Luft im Raum sauber ist, leuchtet diese Anzeigeleuchte auf, das GerŠt arbeitet im IonenSteuerungsmodus.
Blaue und grŸne Leuchte
Im Plasmacluster-Ionen-Betrieb: Wenn die Ionendusche aktiv ist, leuchten grŸne und blaue Anzeigen.
!" #
|
Die Farbe dieser Leuchte Sauber |
Leicht verunreinigt |
Stark verunreinigt |
||||||||
|
Šndert sich abhŠngig vom |
|
|
|
|
|
|
|
|
|
|
|
GrŸn |
|
|
|
Gelb |
|
|
|
Rot |
|
|
|
Zustand der Luft. |
|
|
|
|
|
|
|
|||
|
|
|
|
|
|
|
|
|
|
|
|
|
†BER DIE REINHEITSGRAD-ANZEIGE |
|
|
|
|
|
|
|
|
||
|
¥ Der Status der Reinheitsgrad-Anzeige hŠngt vom Zustand der Raumluft ab, |
||||||||||
|
der von den Staubund Geruchssensoren bei eingeschaltetem GerŠt erkannt |
||||||||||
|
wird. |
|
|
|
|
|
|
|
|
|
|
|
¥ Es ist mšglich, dass die Reinheitsgrad-Anzeige trotz verunreinigter Luft grŸn |
||||||||||
|
leuchtet, wenn das GerŠt gerade erst in Betrieb genommen wurde. Allerdings |
||||||||||
' %!!& ( |
wird der tatsŠchliche Basis-Verschmutzungsgrad nach einer Weile richtig erkannt |
||||||||||
und die Anzeige entsprechend angepasst. |
|
|
|
|
|||||||
|
ERKENNUNG DES BASIS-VERSCHMUTZUNGSGRADES |
|
|
|
|
||||||
|
Nachdem der Stecker in die Steckdose gesteckt wurde, wird in den ersten 30 |
||||||||||
|
Sekunden der Zustand der Luft ŸberprŸft. Wenn das GerŠt in dieser Zeit gestartet |
||||||||||
|
wird, blinkt die Reinheitsgrad-Anzeige abwechselnd grŸn, gelb und rot. |
||||||||||
R†CKSEITE |
IM LIEFERUMFANG |
Luftauslass |
|
Air Outlet |
|
HandleGriff |
¥ Bedienungsanleitung |
|
|
Staubsensor |
|
Dust Sensor |
|
RatingTypenschildLabel |
|
LufteinlassAir I et |
|
PowNetzkabelr Cord |
|
PowerNetzsteckerPlug |
|
(Die Form des Steckers ist landesspezifisch unterschiedlich)
DEUTSCH
D-5

VORBEREITUNG Achten Sie darauf, dass der Netzstecker nicht eingesteckt ist.
FILTERINSTALLATION
Um die QualitŠt der Filter zu bewahren, befinden sich diese in Plastikbeuteln verpackt im HauptgerŠt. Denken Sie daran, die Filter aus den Plastikbeuteln zu nehmen, ehe Sie das GerŠt in Betrieb nehmen.
1 Filter herausnehmen
Frontplatte
1 Frontplatte abnehmen.
Fassen Sie die Frontplatte unten an den Seiten, ziehen
Sie sie etwas nach vorne und heben Sie sie ab.
2 |
Filterhalter herausnehmen. |
|
DrŸcken Sie auf die Haken am Oberteil, nehmen Sie den |
|
|
|
Filterhalter dann heraus. |
|
|
HEPA-Filter |
|
3 herausnehmen. |
Filterhalter |
|
|
|
|
|
HEPA-Filter |
|
4HEPA-Filter aus dem Plastikbeutel herausnehmen.
HEPA-Filter
5 Aktivkohlefilter aus dem Karton nehmen, Plastikbeutel entfernen.
Aktivkohlefilter
(gešffnet)
D-6

2Filter installieren
1 HEPA-Filter in das HauptgreŠt einsetzen.
Achten Sie darauf, den HEPA-Filter richtig herum einzulegen.
Setzen Sie den Filter nicht falsch herum ein; das GerŠt arbeitet dann nicht richtig.
HEPA-Filter
Band (blau)
2Filterhalter unter die BŠnder (an 2 Stellen ) an den Ecken des Aktivkohlefilters schieben.
Filterhalter
Aktivkohlefilter
3 Filterhaltereinsetzen. wieder in das HauptgerŠt
4 Datum des ersten Gebrauchs eintragen (Datumskennzeichnung).
Filterhalter 


 Datumskennzeichnung
Diese Angabe hilft Ihnen, die Filter zum richtigen Zeitpunkt auszutauschen.
5 Frontplatte wieder aufsetzen. |
|
Setzen Sie die Frontplatte leicht gekippt von |
Frontplatte |
oben her auf, lassen Sie dann die Haken unten |
|
einrasten. |
|
DEUTSCH
D-7
BETRIEB
BETRIEB DES HAUPTGER€TES
Auswahltaste: Modus
Auswahltaste:
Plasmacluster-Ionen-
Modus
EIN-/AUSSCHALTER
¥ Zum Starten (kurzer Piepton) und zum Stoppen (langer Piepton) des GerŠtes.
¥Plasmacluster-Anzeigeleuchte und Ventilatorgeschwindigkeit-Anzeigeleuchte einund ausschalten.
¥Solange der Netzstecker nicht gezogen wird, beginnt der Betrieb im zuletzt eingestellten Modus.
Auswahltaste: MODUS
¥ Zum Umschalten des Betriebsmodus.
AUTO-Betrieb 
Je nach Verunreinigungsgrad der Luft wird die Ventilatorgeschwindigkeit automatisch geregelt: (HOCH*, MITTEL, LEISE) Durch die Sensoren wird der Verunreinigungsgrad der Luft erkannt und der Betrieb des GerŠtes entsprechend angepasst.
POLLEN-Modus 
Das GerŠt arbeitet zunŠchst 10 Minuten mit HOHER Ventilatorgeschwindig keit, danach schaltet es alle 20 Minuten zwischen MITTEL und HOCH* um.
10 Minuten: HOHE Ventilatorgeschwindigkeit

 20 Minuten: MITTLERE Ventilatorgeschwindigkeit


 20 Minuten: HOHE Ventilatorgeschwindigkeit
*Die HOHE Ventilatorgeschwindigkeit liegt zwischen MITTEL und MAXIMAL.
LEISE 
Das GerŠt arbeitet sehr ruhig, wŠlzt dabei nur minimale
Luftmengen um.
MITTEL 
Das GerŠt arbeitet mit einer mittleren Ventilatorgeschwindigkeit.
MAXIMAL 
Das GerŠt arbeitet mit maximaler Ventilatorgeschwindigkeit.
D-8

Anzeigeleuchte: Plasmacluster
REINHEITSGRAD-Anzeige
EIN-/AUSSCHALTER!!
Auswahltaste: IONENDUSCHE
Taste IONENDUSCHE
Durch DrŸcken dieses Schalters aktivieren Sie die IONENDUSCHE. (Diese Funktion kšnnen Sie sofort starten, auch wenn das GerŠt nicht eingeschaltet ist.)
Die konzentrierten Plasmacluster-Ionen (IONENDUSCHE) werden 15 Minuten lang wie eine Dusche in den Raum abgegeben, der Luftstrom variiert dabei zwischen krŠftig und sanft. (Die PlasmaclusterAnzeigeleuchte wechselt dabei zwischen blau und grŸn.) Staub, Pollen,
Schimmel und allergieauslšsende Stoffe werden dabei effektiv entfernt. ¥Nach dem Abschluss dieser Funktion wechselt das GerŠt wieder in den
zuvor eingestellten Modus.
¥Wenn Sie die Taste IONENDUSCHE drŸcken, wŠhrend das GerŠt bereits in diesem Modus arbeitet, wird wieder der zuvor eingestellte Modus ausgefŸhrt.
Auswahltaste: Plasmacluster-Ionen-Modus
Zum Umschalten in den Plasmacluster-Ionen-Modus.
AUTO
In diesem Modus schaltet das GerŠt automatisch zwischen Reinigungsmodus und Ionen-Steuerungsmodus um - je nach StŠrke der Luftverunreinigung, die von den Geruchsund Staubsensoren
erkannt wird.
REINIGEN 

Das GerŠt arbeitet dauerhaft im Reinigungsmodus, dabei wird eine etwa gleiche Anzahl von positiven und negativen Ionen abgegeben. Die Plasmacluster-Anzeigeleuchte leuchtet blau.
IONEN OFF
Es werden keine Ionen mehr abgegeben, die Plasmacluster-
Anzeigeleuchte erlischt.
LEUCHTEN EIN/AUS
(Halten Sie die Auswahltaste fŸr den Plasmacluster-Ionen-Modus 3
Sekunden lang gedrŸckt.)
Schaltet die Anzeigeleuchten fŸr Plasmacluster und Reinheitsgrad entweder ein oder aus.
DEUTSCH
D-9

PFLEGE UND WARTUNG
Damit Ihr LuftreinigungsgerŠt stets optimal arbeiten kann, reinigen Sie das GerŠt einschlie§lich
Sensoren und Filtern in regelmŠ§igen AbstŠnden.
Vor dem Reinigen des GerŠtes ziehen Sie in jedem Fall den Netzstecker. Denken Sie daran, den Stecker niemals mit feuchten oder gar nassen HŠnden anzufassen. Wenn Sie diese Sicherheitsma§nahme nicht beachten, kšnnen StromschlŠge und/oder Verletzungen die Folge sein.
HAUPTGER€T
ReinigungzyklusCare Cycle 1monatlichmonth
Damit das HauptgerŠt nicht verschmutzt, reinigen Sie es so oft wie nštig. Je lŠnger eine
Verschmutzung am GerŠt verbleibt, desto schwieriger lŠsst sie sich fŸr gewšhnlich entfernen.
Mit einem trockenen, weichen Tuch abwischen
HartnŠckige Verschmutzungen entfernen Sie mit einem weichen Tuch, das sie mit warmem Wasser angefeuchtet haben.
Verwenden Sie keine flŸchtigen Reinigungsmittel
Benzin, VerdŸnnung, Poliermittel und Šhnliche Substanzen kšnnen die OberflŠche des GerŠtes eingreifen.
Benutzen Sie keine Reinigungsmittel
Die Inhaltsstoffe von Reinigungsmitteln kšnnen das GerŠt beschŠdigen.
Halten Sie das GerŠt von Feuchtigkeit fern
FILTER
ReinigungzyklusCare Cycle 
 Alle2 months2 Monate
Reinigen Sie die Au§enseite des auswaschbaren
Aktivkohlefilters sanft mit einem Staubsauger.
Auswaschbarer Aktivkohlefilter lavable
SENSOREN (STAUBSENSOR, GERUCHSSENSOR)
ReinigungzyklusCare Cycle Alle2 months2 Monate |
|
|
Benutzen Sie einen Staubsauger, um Staub aus |
Sensorabdeckung |
|
den Sensoršffnungen zu entfernen. |
||
|
||
PFLEGE DES SENSORFILTERS |
|
|
(Der Sensorfilter befindet sich in der |
|
|
Sensorabdeckung.) |
|
|
Lšsen Sie den Sensorfilter und Klopfen. |
|
|
Sie leicht mit der Hand darauf, um Staub zu |
|
|
entfernen. Falls der Filter stark verschmutzt sein |
Geruchssensoršffnung |
|
sollte, waschen Sie ihn mit Wasser aus und |
|
|
lassen ihn dann grŸndlich trocknen. |
|
|
Sensorabdeckung |
|
|
Sensorfilter |
|
|
Vorderund RŸckseite sind |
|
|
identisch. |
|
D-10
PFLEGE DES AUSWASCHBAREN AKTIVKOHLEFILTERS
ReinigungzyklusCare Cyclle 
 Alle2 months2 Monate

NUR VON HAND WASCHEN! NICHT IN DEN W€SCHETROCKNER LEGEN!
A u s w a s c h b a r e r
Aktivkohlefilter
1FŸllen Sie einen gro§en BehŠlter mit warmem Wasser, geben Sie etwas SpŸlmittel hinein und rŸhren Sie gut um.
Halten Sie sich dabei an die
Anweisungen auf der Verpackung des
SpŸlmittels.
2Lassen Sie den Filter etwa 10 Minuten lang einweichen, bevor Sie ihn mit der Hand auswaschen.
Falls der Filter sehr stark verschmutzt sein sollte, schrubben Sie ihn mit einer alten ZahnbŸrste.
3SpŸlen sie grŸndlich mit klarem Wasser.
ACHTUNG
Falls Sie den Filter in einem BehŠlter ausspŸlen, spŸlen Sie dreibis viermal, damit keine RŸckstŠnde zurŸckbleiben.
4 EntfernenWasser. Sie ŸberschŸssiges
Nach dem SpŸlen ist der Filter mit Wasser vollgesogen. Damit er schneller trocknet, wickeln Sie den Filter in ein altes Handtuch ein, damit ŸberschŸssiges Wasser herausgezogen wird.
ACHTUNG
Am Handtuch kann etwas Kohle haften bleiben. Dies ist jedoch všllig harmlos.
5Trocknen Sie den Filter am besten an einer gut belŸfteten Stelle im Freien.
ACHTUNG
¥Der nasse Filter ist recht schwer. Befestigen Sie ihn gut zum Trocknen, damit er nicht herunterfallen kann.
¥Bei kŸhlen Temperaturen und an regnerischen Tagen braucht der Filter lŠnger zum Trocknen. Waschen Sie den Filter am besten an einem schšnen Tag und lassen Sie ihn in der Sonne trocknen. Nachts holen Sie den Filter am besten ins Haus, damit er nicht einfrieren kann.
¥Trocknen Sie den Filter am besten an einer gut belŸfteten Stelle im Freien. Wenn Sie den Filter im Haus trocknen, kann es passieren, dass Ihr Bodenbelag durch Wassertropfen verschmutzt wird.
¥Achten Sie darauf, dass sich die Aktivkohle nicht zu einer Seite des Filters verschiebt. Falls dies geschehen sollte, verteilen Sie die Kohle gleichmŠ§ig mit Ihren Fingern.
¥Lassen Sie den Filter grŸndlich trocknen. Wenn Sie den Filter im noch feuchten
Zustand wieder einsetzen, nimmt die ausgegebene Luft einen eigenen Geruch an. Der Filter braucht etwa ein bis zwei Tage zum Trocknen.
6 Filter wieder einsetzen.
Setzen Sie die Filter wieder wie auf den Seiten D-6 und D-7 gezeigt ein.
DEUTSCH
D-11
PFLEGE UND WARTUNG
HINWEISE ZUM FILTERAUSTAUSCH
Der Zeitraum, nach dem die Filter ersetzt werden mŸssen, hŠngt von den Bedingungen im Raum, den Betriebsstunden und dem Aufstellungsort des Luftreinigers ab.
Wenn sich Staub oder GerŸche nicht mehr entfernen lassen, tauschen Sie die Filter aus.
(Siehe ÒBitte lesen, bevor Sie Ihr neues LuftreinigungsgerŠt in Betrieb nehmenÓ.)
HEPA-Filter / Auswaschbarer Aktivkohlefilter
Etwa 5 Jahre nach Inbetriebnahme
Hinweise zum Zeitpunkt des Filtertausches
¥Unter ungŸnstigen Einsatzbedingungen kann ein vorzeitiger Austausch der Filter notwendig sein.
In RŠumen, in denen geraucht wird, in denen sich Tiere aufhalten oder in denen sonstige Schwebeteilchen vorkommen, verstopfen die Filter schneller. Bitte ŸberprŸfen Sie die Filter
regelmŠ§ig und tauschen Sie sie wenn nštig aus.
Austauschfilter
Modell FZ-S51SEF
¥HEPA-Filter: 1 Verpackungseinheit
¥Auswaschbarer Aktivkohlefilter: 1 Verpackungseinheit
FILTERAUSTAUSCH
1.Auf den Seiten D-6 und D-7 finden Sie Anweisungen zum Installieren der Filter nach dem Austausch.t.
2.Tragen Sie das Datum des ersten Gebrauchs ein (Datumskennzeichnung).
Filterentsorgung
Bitte entsorgen Sie ausgetauschte Filter gemŠ§ der šrtlichen Gesetze und Bestimmungen.
D-12
 Loading...