


 Loading...
R
FU-28H
Wall-mounting type Wandmontage Type mural
De montaje en pared Tipo da montare sul muro Wandmodel
AIR PURIFIER
INSTALLATION MANUAL OPERATION MANUAL
LUFTREINIGER
INSTALLATIONSHANDBUCH BEDIENUNGSANLEITUNG
PURIFICATEUR D’AIR
MANUEL D’INSTALLATION MANUEL D’UTILISATION
PURIFICADOR DE AIRE
MANUAL DE INSTALACIÓN MANUAL DE USO
PURIFICATORE DELL’ARIA
MANUALE D’INSTALLAZIONE MANUALE OPERATIVO
LUCHTREINIGER
IINSTALLATIEHANDLEIDING GEBRUIKSAANWIJZING
ENGLISH DEUTSCH FRANÇAIS ESPAÑOL ITALIANO NEDERLANDS
*Plasmacluster is a trademark of Sharp Corporation.
ENGLISH
HOW SHARP AIR PURIFIER WORKS
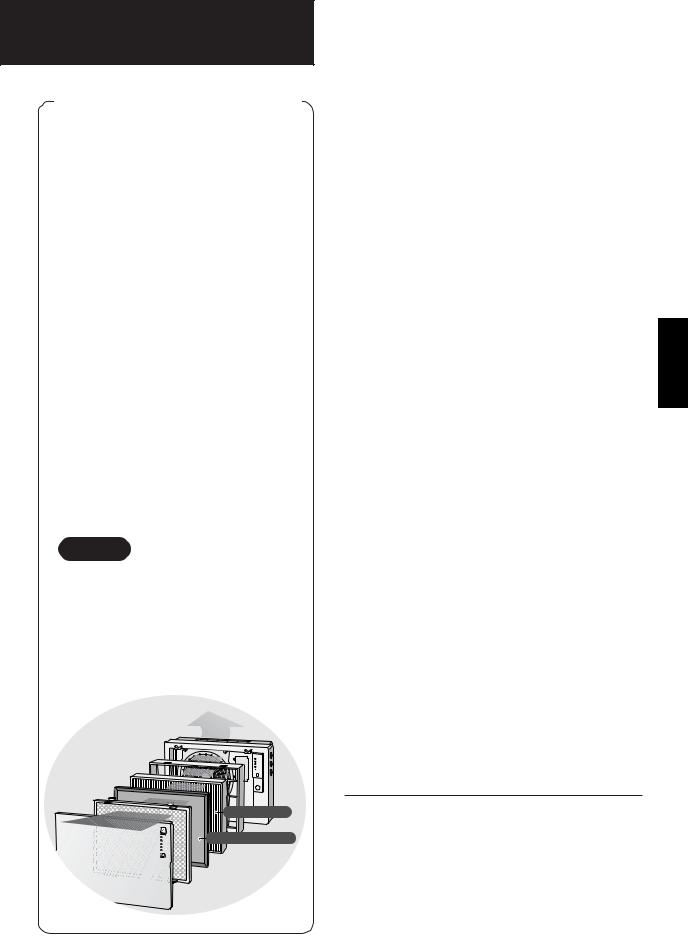
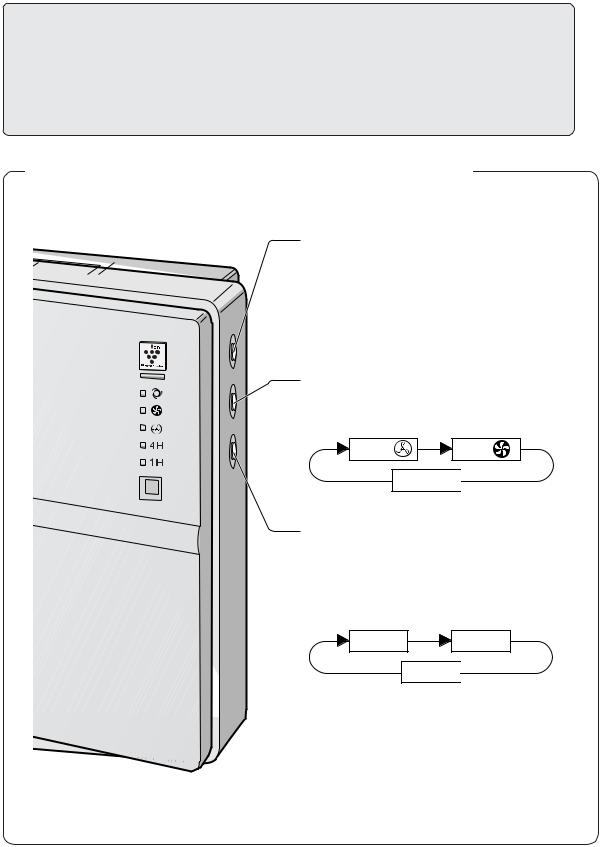
An air purifier draws in room air from its air intake, lets the air pass through an Active Carbon Filter (Deodorizing Filter) and a HEPA Filter (dust collection filter) inside of the unit, then discharges the air from its air outlet. The air purifier unit repeats this process by moving its internal fan.
As air passes through, the HEPA Filter can remove dust particles. The Active Carbon Filter gradually absorbs odour elements as they repeatedly pass through the filter.
(Odour elements are absorbed by HEPA Filter as well.)
Some odour ingredients absorbed by the filters may become separated and may be discharged through the air outlet and result in additional odour. Depending on the usage environment, this odour may become strong in a shorter period than expected. In this case, purchase the optional replacement filter kit FZ-28SEF.
NOTE
The air purifier is designed to remove air-suspended dust and odour, but not harmful gases (for example, carbon monoxide contained in cigarette smoke). Neither can it completely remove odours that are always present (for example, odours from construction materials and pet odours).
CONTENTS
IMPORTANT SAFETY INSTRUCTIONS .... |
E-2 |
• WARNING .................................................... |
E-2 |
• CAUTIONS CONCERNING OPERATION ... |
E-2 |
• REMOTE CONTROL LIMITATIONS ............ |
E-3 |
• CAUTIONS WHEN MOUNTING |
E-3 |
THIS PRODUCT TO A WALL ....................... |
|
• FILTER GUIDELINES .................................. |
E-3 |
PART NAMES .......................................... |
E-4 |
• MAIN UNIT DISPLAY ................................... |
E-4 |
• BACK ........................................................... |
E-4 |
• ACCESSORIES ........................................... |
E-4 |
PREPARATION........................................ |
E-5 |
• INSERTING BATTERIES |
E-5 |
IN THE REMOTE CONTROL ...................... |
|
• REMOTE CONTROL USE ........................... |
E-5 |
INSTALLATION ....................................... |
E-6 |
FILTER INSTALLATION ........................ |
E-10 |
OPERATION .......................................... |
E-12 |
• MAIN UNIT OPERATION .......................... |
E-12 |
• REMOTE CONTROL OPERATION .......... |
E-13 |
CARE AND MAINTENANCE ................. |
E-14 |
• FILTER REPLACEMENT |
E-14 |
GUIDELINES ............................................ |
|
• MAIN UNIT ................................................ |
E-15 |
• ODOUR SENSOR .................................... |
E-15 |
• PRE-FILTER ............................................. |
E-15 |
SPECIFICATIONS ................................. |
E-15 |
TROUBLE SHOOTING .......................... |
E-16 |
ENGLISH
HEPA Filter |
Active Carbon Filter |
Thank you for purchasing the SHARP FU-28H. Please read this manual carefully for the correct usage information. Before using this product, be sure to read the section: “Important Safety Instructions.”
After reading this manual, retain it in a convenient location for future reference.
E-1

IMPORTANT SAFETY INSTRUCTIONS
When using electrical appliances, basic safety precautions should be followed, including the following:
WARNING - To reduce the risk of electrical shock, fire or injury to persons:
•Read all instructions before using the air purifier.
•Use only a 220-240 volt outlet .
•Do not use the air purifier if the power cord or plug is damaged or the connection to the wall outlet is loose.
•Periodically remove dust from the power plug.
•Do not insert fingers or foreign objects into the intake or air outlet.
When removing the power plug, always hold the plug and never pull the cord.
Electrical shock and/or fire from short circuit may occur as result.
•Do not use this air purifier near gas appliances or fireplaces.
•Remove the power plug from the wall outlet before cleaning the unit and when not using the unit.
Electrical shock from bad insulation and / or fire from short circuit may occur as a result.
•If the power cord is damaged, it must be replaced by the manufacturer, its service agent, Sharp authorized service or similarly qualified person in order to avoid a hazard.
•Do not operate when using aerosol insecticides or in rooms where there is oily residue, incense, sparks from lit cigarettes, chemical fumes in the air or a humidity condition.
•Use care when cleaning the air purifier. Strong corrosive cleansers may damage the exterior.
•Only Sharp Authorized Servicers should service this air purifier. Contact the nearest Servicer for any problems, adjustments, or repairs.
•The batteries must be removed from the remote control before disposal, and the batteries must be disposed of safely.
CAUTIONS CONCERNING OPERATION
•Do not block the intake and air outlet.
•Do not use the unit near or on hot objects, such as range or where it may come into contact with steam.
•Always hold the main unit when moving it.
Holding the front panel when carrying may cause it to detach, thus dropping the unit and resulting in bodily injury.
•Do not operate the unit without the filter.
•Do not wash the Active Carbon Filter and the HEPA Filter.
Not only it does not improve filter performance, it may cause electric shock or malfunction.
•Clean the exterior with a soft cloth only.
The unit surface may be damaged or cracked.
In addition, the sensor may malfunction as a result.
E-2

REMOTE CONTROL LIMITATIONS
DO NOT USE THE REMOTE CONTROL IN THE FOLLOWING LOCATIONS:
•Any location where there is inverter lighting equipment or electronic spontaneous lighting equipment
The remote control may become inoperative. In this case, move away from such lighting equipment or change direction.
•Location exposed to direct sunlight or fluorescent.
The unit may not receive signals from the remote control.
CAUTIONS WHEN MOUNTING THIS PRODUCT ON A WALL
• Avoid a location where the sensor is exposed to direct wind. |
|
|
The unit may not operate properly. |
|
|
• Avoid a location where curtains, etc., come into contact with the intake or air outlet. |
ENGLISH |
|
Curtains, etc., may become dirty or a malfunction may occur. |
||
|
||
• Avoid locations where the unit is exposed to condensation, due to drastic temperature changes. |
|
|
• Place on a stable surface with sufficient air circulation. |
|
|
• Install the unit on a wall, wooden pillar, crosspiece, etc. that is flat and strong enough. |
|
|
• Do not install the unit on a thin wall or on plasterboard. The unit may fall down if installed on an |
|
|
insufficiently strong wall. |
|
|
• To install the unit on a wooden wall that is less than 10 mm thick, consult your dealer and have |
|
|
them confirm the strength of the wall before installation. |
|
|
• Always hold the main unit when moving it. |
|
|
Holding the front panel may cause it to become detached, thus dropping the unit and resulting in |
|
|
bodily injury. |
|
|
• Do not install when there is generation of lampblack, such as in a kitchen, etc. |
|
|
The unit surface may crack or the sensor may malfunction as a result. |
|
FILTER GUIDELINES
• Follow the instructions in this manual for correct care and maintenance of the filters.
This equipment complies with the requirements of Directives 89/336/EEC and 73/23/EEC as amended by 93/68/EEC.
E-3

PART NAMES
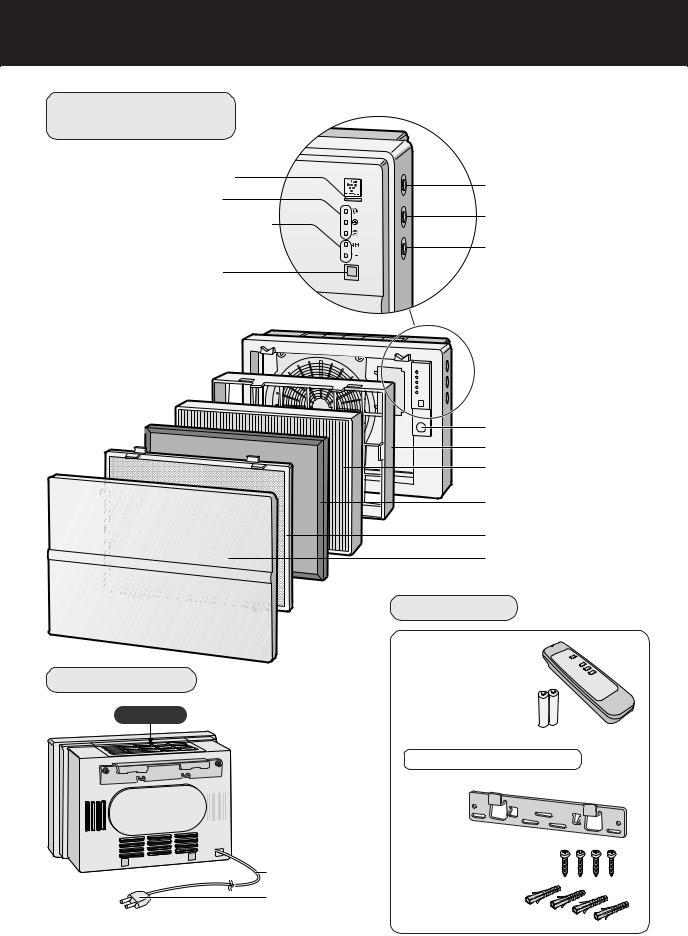
MAIN UNIT DISPLAY
Plasmacluster Indicator Light |
Power ON/OFF button |
|
|
Fan Speed Indicator Lights |
|
OFF Timer Display Indicator Lights |
Fan Control button |
|
|
|
OFF Timer button |
Remote Control Receiver |
|
Odour Sensor |
Filter Frame |
HEPA Filter (white) |
(with Microbial Control Filter)(blue) |
Active Carbon Filter |
(Deodorizing Filter) |
Stainless Steel Pre-Filter |
Front Panel
BACK
Air Outlet
Power Cord
Adjusting Guide
Power Cord
Power Plug
(Shape of plug depends on country)
ACCESSORIES
Remote Control
(1 unit)
Battery
(R6(AA) battery X 2 )
Operation Manual
Wall mounting kit
• Wall mounting bracket
• Wood screws (4 pcs)
• Fisher plugs (4 pcs)
E-4
PREPARATION
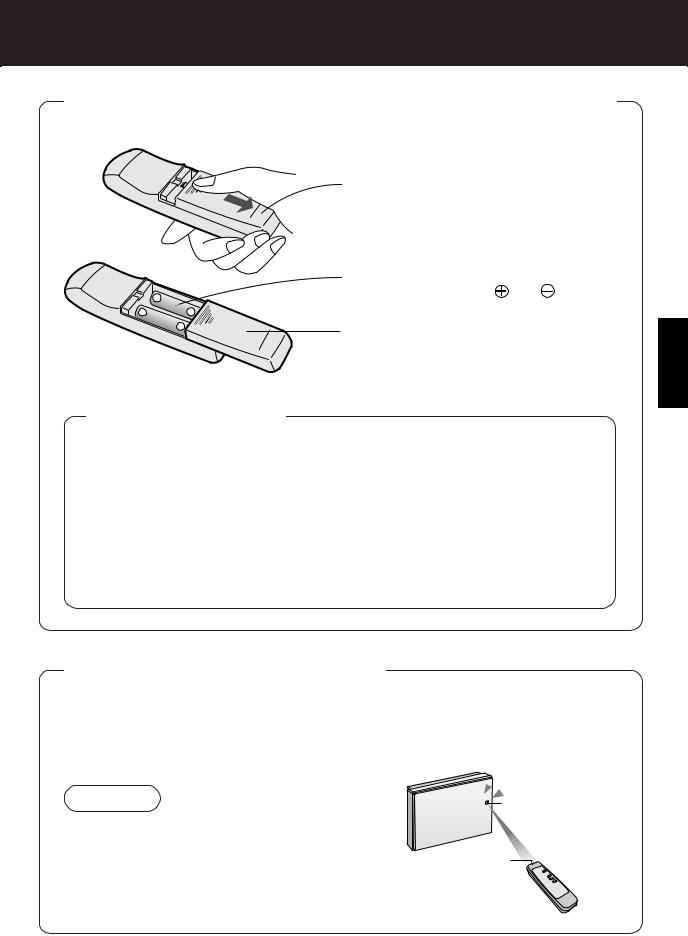
INSERTING BATTERIES IN THE REMOTE CONTROL
1 Remove the back cover
Press and slide the back cover to remove.
|
|
|
Insert batteries |
|
|
|
2 Insert batteries with and as shown |
|
|
below. |
|
|
|
|
|
|
|
|
|
|
|
|
3 Close the back cover |
|
|
|
About the batteries
•The battery life is about 1 year.
•Replace the batteries when the remote control becomes inoperative.
•Incorrect usage of the batteries may cause battery fluid leakage and/or damage. Take care of the following when handling:
•When replacing the batteries, replace both batteries with new ones of the same type. (Use R6 (AA) manganese batteries (2 units).)
•When not using the unit or remote control for an extended period, remove the batteries. This prevents malfunction of the remote control from battery fluid leakage.
•The batteries of the accessory are for initial use only and may be depleted within 1 year.
REMOTE CONTROL USE
•Operate the remote control facing the main unit receiver.
•The signal range is about 7m (front).
•Make sure there are no objects blocking the path of the signal.
•A beep sound will be heard from the main unit when a signal is received.
NOTE |
Receiver |
•Avoid dropping or damaging the remote control, using in a high humidity condition, in direct sun-
light or near a heat source. |
Transmitter |
ENGLISH
E-5

INSTALLATION
FOR APPROPRIATE INSTALLATION
To remove room odour
Installing the unit high up on the wall is most effective.
To remove room dust
Comparatively large dust particles such as pollen and house dust collect in the lower strata of the room air.
Select a location in the room where the air circulation is good.
This improves the cleaning performance and causes Plasmacluster ions to spread throughout the room.
Operating Conditions
Please operate the unit under the following conditions.
It is recommended to use the unit in a room where the temperature is in the range of 0 - 35C°. Avoid locations where the unit is exposed to condensation, due to drastic temperature changes.
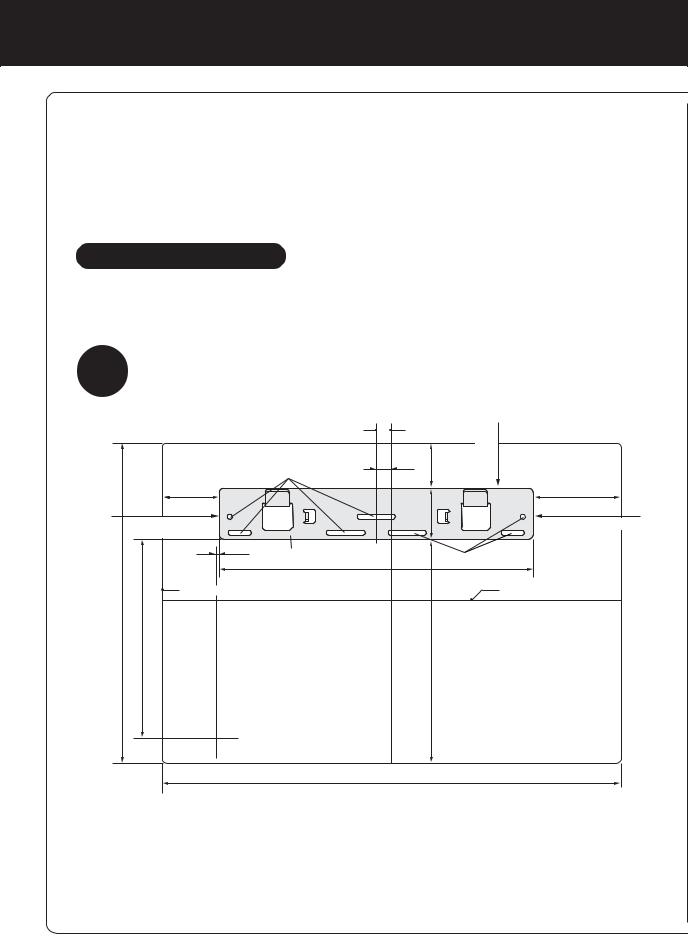
1 |
Determine the mounting location |
Leave space around the bracket referring to the drawing below. The unit cannot |
|
be mounted if there is insufficient spacing around the bracket. |
|
Center line of Wall mounting bracket |
Center line of |
more |
ceiling |
|||
|
main unit |
|
|||||
|
|
|
|
||||
|
|
Screw Holes |
16mm |
48mm |
|
45cm or |
from the |
|
|
|
|
||||
|
|
|
|
|
|||
|
60mm |
|
|
54mm |
|
|
92mm |
|
70cm or more from |
|
|
|
|
70cm or more from |
|
|
|
|
|
|
|
||
|
side wall |
|
|
|
|
|
side wall |
|
3mm |
Wall mounting bracket |
|
|
Screw Holes |
||
|
|
|
|
||||
|
|
330mm |
|
|
|||
|
|
|
|
|
|
|
|
unit) |
Size of main unit |
|
|
|
|
|
Center line of main unit |
337mm (Size of main |
|
|
|
|
|
||
207mm |
|
|
235mm |
|
|
|
|
|
Power cord |
|
|
|
|
|
|
482mm (Size of main unit)
Installation Cautions
•Before fixing the wall mounting bracket, make sure there is nothing that could obstruct installation of the unit. Then fix the wall mounting bracket through screw holes with the supplied wood screws.
•Install the unit on a wall, wooden pillar, crosspiece or the like that is flat and strong enough..
•If the wall is weak or made of concrete, have the unit installed by a specialist such as an electric appliance store.
•Avoid locations near inverter lamps or where the unit is exposed to direct sunlight.
E-6
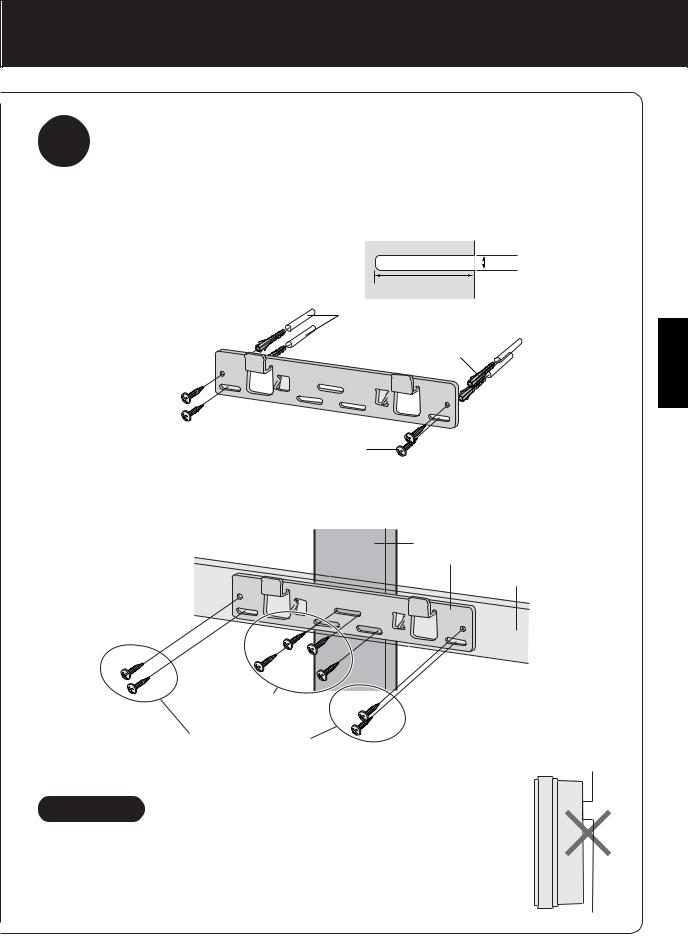
2 |
Mount wall mounting bracket |
• Mount the bracket using the included wood screws so that it is maintained level. |
 Installation on a concrete, block or mortar surface
Drill holes of at least 35 mm depth and 5 mm diameter into the wall, drive in Fisher plugs, and fix the unit with wood screws.
φ5mm
35mm
Hole on the wall
Fisher plug
Wood screw
 Installation on a wooden pillar, crosspiece or other wooden surface
Use wood screws for installation.
Wooden pillar
Wall mounting bracket
Wooden crosspiece
Installation on a wooden pillar
Installation on a wooden crosspiece
Wood screws (4)
Caution
•To install the unit on a wooden wall that is less than 10 mm thick, consult your dealer and have them confirm the strength of the wall before installation.
•Install the unit on a wall, wooden pillar, crosspiece, etc. that is flat and strong enough.
•Make sure that the unit is installed in an upright position, without leaning to the right or left.
ENGLISH
E-7
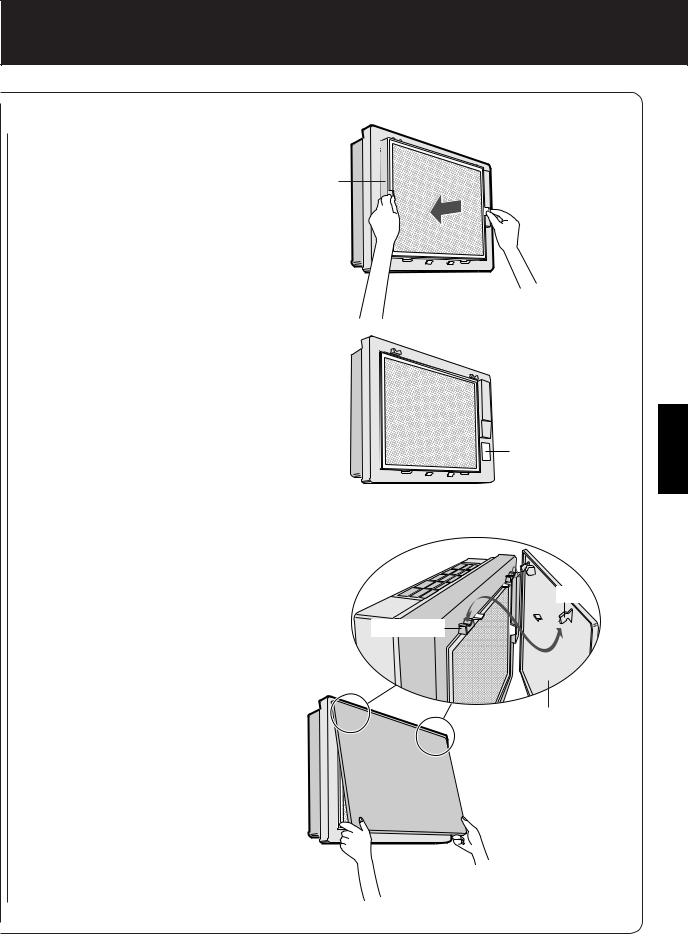
INSTALLATION
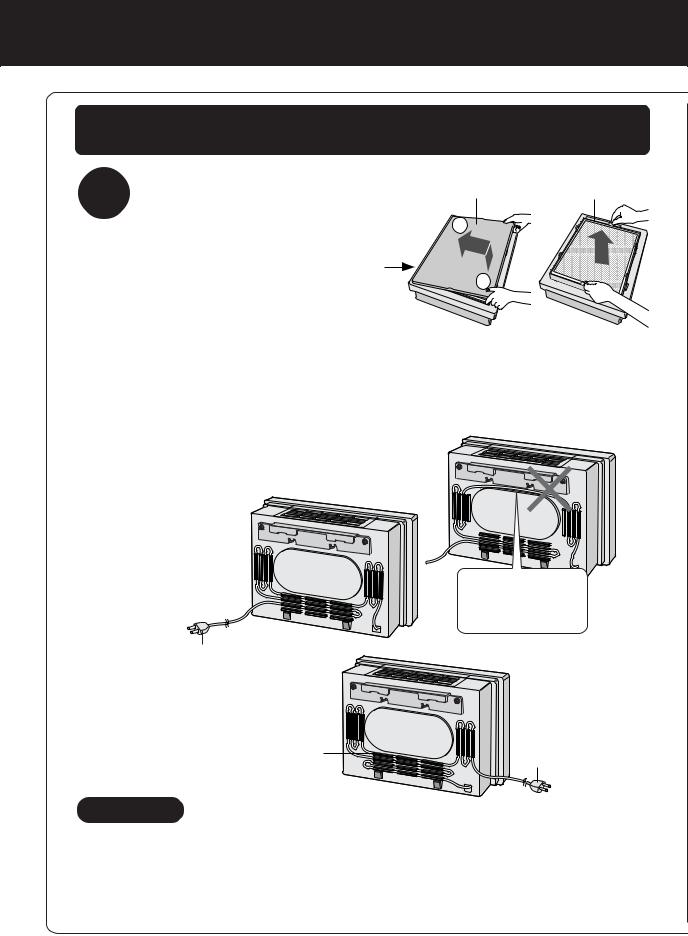
Before starting the wall installation, be sure to remove the front panel and filter frame.
3 Install the unit on the wall.
Front Panel |
Filter Frame |

 2
2


1 Place the unit facing up, remove the Front
Panel and Filter Frame. Air Outlet


 1
1

2 Adjust the length of the power cord.
1 Measure the distance between the unit and the wall outlet. (Refer to E-6)
2 Place the unit face down, and insert the power cord into the power cord adjusting guide so as to adjust it to the measured length.
Power Cord Adjusting Guide 
Do not wire the power cord right below the wall mounting bracket.
In case the power plug to be lead to the right of the unit.
Power cord adjusting guide
In case the power plug to be lead to the left of the unit.
Cautions
•To avoid scratching or damaging the unit, place it on a soft piece of cloth until it is installed on the wall.
•Do not lead the power cord together with other cord and do not twist it.
•Never modify the power cord.
•Take care not to damage the power cord.
E-8
3 Apply a mark (tape, etc.) 8 cm above both ends of the wall mounting bracket.
4 Lift up the unit so that the hooking holes on the unit are aligned with the marks, hook the unit onto the wall mounting bracket and slide it to the right.
When positioned correctly, the unit will move down slightly until it engages.
Alignment with the right hooking holes
mark

 Wall mounting bracket about 8 cm
1
claw socket
Alignment with the left hooking holes
mark
about 8 cm
 2
2
claw socket
5 Double-check the installation.
Make sure that the claws of the unit are hooked in properly. If they are not, the unit will move sideways. In addition, the unit may fall off the wall and be damaged.
• Make sure that the power cord is not caught in the unit.
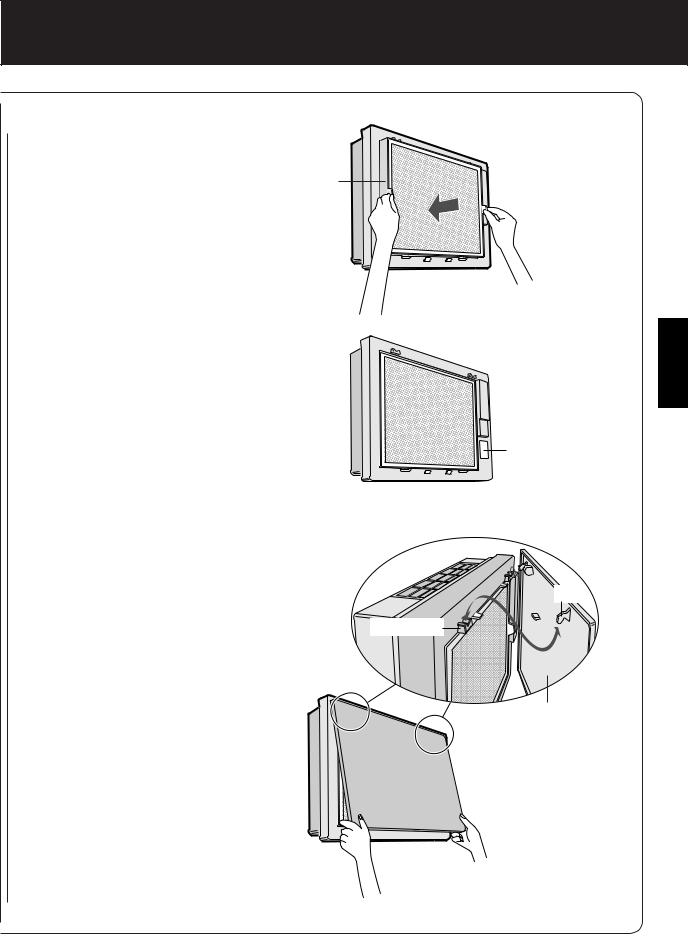
6 Remove the mark. |
2 |
2 |
|
HOW TO REMOVE THE UNIT |
|
Pull the power plug out of the wall outlet and remove |
|
the Front Panel and Filter Frame. Holding the unit by |
|
its lower corners, lift it up slightly, then slide it to the |
1 |
right or left and lift it off toward the top. |
ENGLISH
E-9
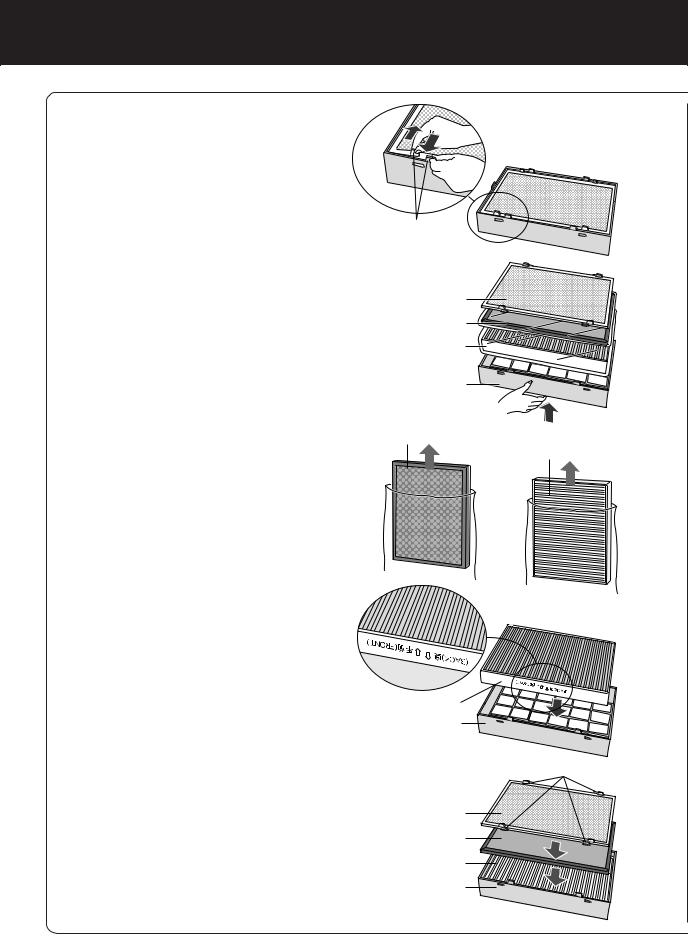
FILTER INSTALLATION |
Be sure to remove the filters from the |
plastic bags before using the unit. |
|
|
|
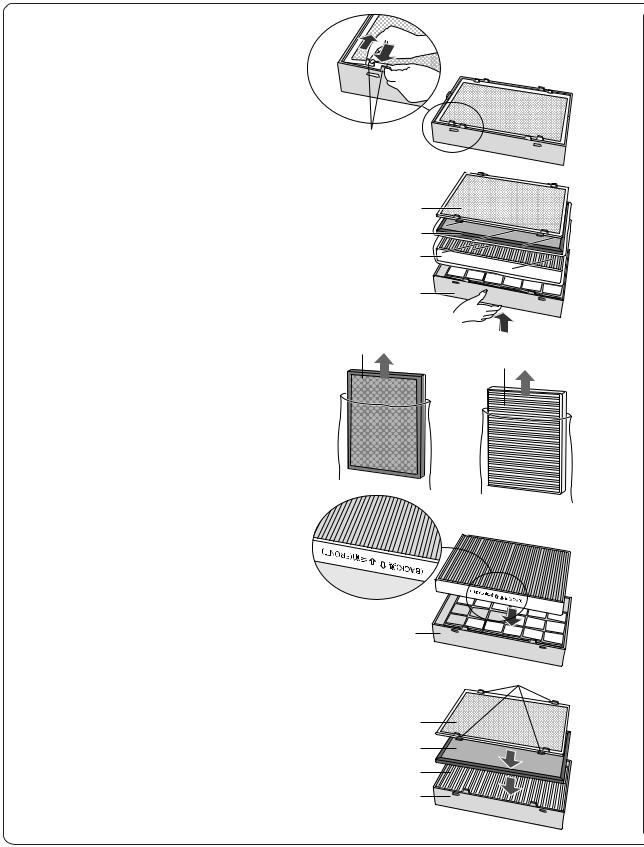
1 Remove the Pre-Filter, Active Carbon Filter and HEPA Filter from the Filter Frame.
How to Remove the Stainless |
Steel Pre-Filter |
Tabs
2 Remove the Active Carbon Filter and HEPA Filter from the plastic bags.
3 Place the HEPA Filter within the Filter Frame.
Do not install the filter backwards or the unit will not operate properly.
Pre-Filter
Active Carbon Filter
HEPA Filter
Filter Frame
Active Carbon Filter
HEPA Filter
4 Place the Active Carbon Filter within the Filter Frame on top of the HEPA Filter.
The Active Carbon Filter does not have a front and a back.
5 Next, place the Pre-Filter within the Filter Frame.
Fit the 4 tabs of the Pre-Filter into the holes in the Filter Frame.
HEPA Filter 

Filter Frame
Tabs
Pre-Filter
Active Carbon Filter
HEPA Filter
Filter Frame
E-10
6 Mount the Filter Frame to the main unit.
7 Fill in the usage start date on the Date Label.
Use the date as a guide for the Filter Replacement schedule.
Filter Frame
Date Label
 Claw
Claw
8 Mount the Front Panel to the main unit.
9 Insert the power plug into the wall outlet and check on/off operation using the remote control.
Claw socket |
Front Panel
ENGLISH
E-11

OPERATION |
For the first 30 seconds after the plug is inserted into the |
wall outlet, the unit will check the conditions of the air. |
|
|
|
•Auto Operation
Odour sensor checks the amount of impurities in the air and the fan speed switches automatically.
•Manual Operation
Regardless of the amount of impurities, desired fan speed can be switched between Silent and Max.
MAIN UNIT OPERATION
POWER ON/OFF button
• Used to start AUTO operation (short beep) and stop operation (long beep).
• Plasmacluster Indicator Light and Fan Speed Indicator Light (AUTO) turn on/off.
• Unless unplug the power cord, the operation starts in the previous mode the unit was operated in.
Fan Control button
The fan speed can be switched among Silent,
Max and AUTO.
Silent |
Max |
AUTO

OFF Timer button
• The set timer switches every time the button is pressed as shown below.
• When “4 hours” is selected “4 H” indicator light activates. When the remaining time becomes
1 hour, then indicator light switches to “1 H”.
1 hour |
4 hours |
Cancel 
E-12
Plasmacluster Ion Operation
While the product is in operation, the unit will constantly discharge approximately the same amount of Positive and Negative cluster ions. This is effective for reducing some airborne mold.
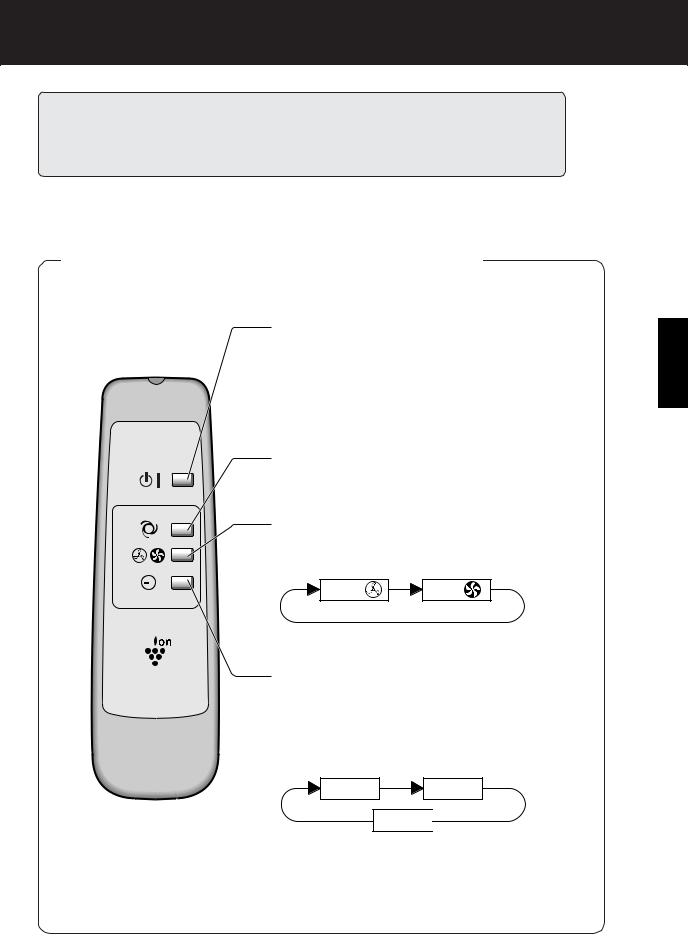
REMOTE CONTROL OPERATION
POWER ON/OFF button
• Used to start AUTO operation (short beep) and stop operation (long beep).
• Plasmacluster Indicator Light, and Fan Speed Indicator Light (AUTO) turn on/off.
•Unless unplug the power cord, the operation starts in the previous mode the unit was operated in.
AUTO (Fan Speed) button
The fan speed switches automatically depending on the amount of impurities in the air.
MANUAL (Fan Speed) button
The fan speed can be switched between Silent,
Max.
Silent |
Max |
OFF Timer button
•The set timer switches every time the button is pressed as shown below.
•When “4 hours” is selected “4 H” indicator light activates. When the remaining time becomes 1 hour, then indicator light switches to “1 H”.
1 hour |
4 hours |
Cancel 
ENGLISH
E-13

CARE AND MAINTENANCE
To maintain optimum performance of this air purifier, please clean the unit including the sensor and filters periodically.
When cleaning the unit, be sure to unplug the power cord, and never handle the plug with wet hands. Electrical shock and/or bodily injury may occur as a result.
FILTER REPLACEMENT GUIDELINES
Depending on the usage environment, air outlet odour may become strong after several months.
If dust or odours cannot be removed easily, replace the filters.
(Refer to HOW SHARP AIR PURIFIER WORKS E-1)
Guide for filter replacement timing
•The following filter life and replacement period is based on the condition of smoking 10 cigarettes per day, reducing the dust collection/deodorization power to half compared with that of new filters.
• HEPA Filter |
|
About 12 months after opening |
|
||
• Active Carbon Filter |
About 12 months after opening |
|
|
|
|
REPLACING THE FILTERS
See page E-10,11 for directions |
Date Label |
1 on how to install the filters when |
|
replacing. |
|
2 Fill in the usage start date of the filters on the Date Label.
Replacement Filters
Model: FZ-28SEF
•HEPA Filter: 1 unit
•Active Carbon Filter: 1 unit
Please ask for replacement filters at your dealer of purchase.
Washable |
Not Washable |
Pre-Filter
Disposal of Filters
Please dispose of replaced filters according to the local disposal laws and regulations.
HEPA Filter materials:
•Filter: Polypropylene
•Frame: Polyester
•Microbial Control Filter: Polypropylene, polyethylene
Active Carbon Filter Materials:
•Deodorizer: Activated charcoal
•Frame: Paper
•Net: Polypropylene 60% Polyester 40%
Front Panel |
Active Carbon Filter |


 HEPA Filter
(with Microbial control Filter)
 Filter Frame
 Main Unit
E-14
MAIN UNIT
To prevent dirt or stains on the main unit, clean as often as necessary. If stains are allowed to remain, they may become hard to clean.
Wipe with a dry, soft cloth
For stubborn stains or dirt, use a soft cloth dampened with warm water.
Do not use volatile fluids
Benzene, paint thinner, polishing powder, etc., may damage the surface.
Do not use detergents
Detergent ingredients may damage the unit.
Keep the unit away from water
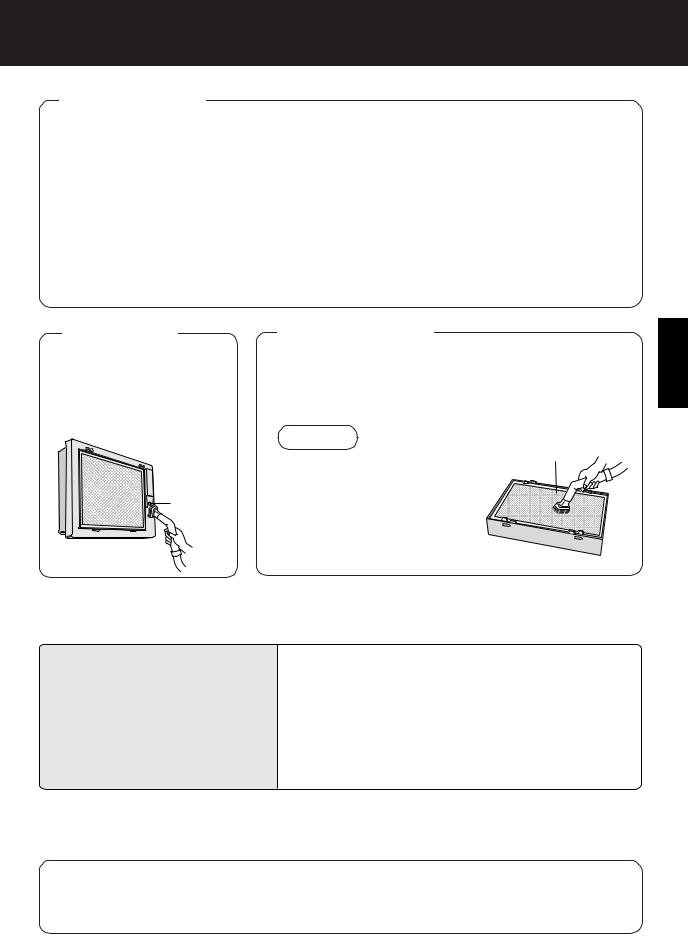
ODOUR
SENSOR
Remove dust from the surfaces of the sensor openings with a vacuum cleaner.
O d o u r
Sensor
PRE-FILTER
Remove the Filter Frame, Clean the top surface of the Pre-Filter lightly with a vacuum cleaner.
If it is contaminated heavily, remove it from the Filter Frame to wash it.
NOTE
Pre-Filter
• In case of washing, use a soft
brush etc. and cold/warm water.
• Metal brushes or scrub brushes may cause damage.
• After washing, leave it in the shade until it gets dried. Then place it back to the Filter Frame.
SPECIFICATIONS
|
Model |
FU-28H-S |
|
|
|
Power supply |
220-240V 50/60Hz |
|
|
Fan speed |
Fan speed Adjustment |
MAX |
|
SILENT |
Rated Power |
29 W |
|
3.1 W |
|
Operation |
|
|||
Air Flow Volume |
168m3/hour |
|
30m3/hour |
|
|
|
|||
|
Applicable Floor Surface |
~21 |
m2 |
|
|
Cord Length |
2.5m |
|
|
|
Dimensions |
482mm(W)x142mm(D)x337mm(H) |
||
|
Weight |
6.2kg |
|
|
* The applicable floor surface area is the surface area for when operating the unit in MAX fan level. (JEM 1467, The Japan Electrical Manufacturers’ Association)
Applicable floor surface area indicates the space where a certain amount of dust pollution can be removed in 30 minutes.
About the reduction of standby power
In order to operate the electrical circuits while the power plug is inserted in the wall outlet, this product consumes about 1.0W of standby power.
For the conservation of energy, remove the power plug when not using the unit.
ENGLISH
E-15

TROUBLESHOOTING
Before calling for repair, please review the list below, since the problem may not be a unit malfunction.
SYMPTOM |
REMEDY (not a malfunction) |
|
|
The Remote Control does not |
• Have the batteries been depleted? |
work |
• Are the batteries inserted correctly? |
|
• Is a fluorescent lighting in the room flickering due to serv- |
|
ice life? (Refer to E-5,E-9) |
|
|
Odours and smoke are not re- |
• Replace the filters if they appear to be heavily soiled. |
moved |
(Refer to E-14) |
|
|
A ticking sound is heard from |
• Ticking sound is emitted when the unit is generating ions. |
the unit |
This is normal and not a malfunction. |
|
|
The discharged air has an |
• Check to see if the filters are heavily soiled. |
aroma or odour. |
Replace filters (Refer to E-14) |
|
• Plasmacluster Air Purifiers emit small traces of ozone |
|
which may produce an odour. These ozone emissions |
|
are below safety levels set by the IEC 60335-2-65. |
|
|
The unit does not operate when |
• Is the unit installed in a location that is difficult for the |
cigarette smoke is in the air. |
sensor to detect cigarette smoke? |
|
• Are the odour sensor openings blocked or clogged? |
|
(In this case, clean the openings.) (Refer to E-15) |
|
|
ERROR DISPLAY
LAMP INDICATION |
REMEDY |
|
|
The “Silent” Fan Speed Indi- |
Fan motor disconnected or abnormal. |
cator Light blinks. |
Operation stops. |
|
• Pressing the ON/OFF button will reset the error display, |
|
but if error occurs again, contact the shop where you |
|
purchased the unit. |
|
|
E-16

DEUTSCH
WISSENSWERTES DARÜBER, WIE DER SHARP LUFTREINIGER ARBEITET
Ein Luftreiniger saugt Raumluft durch seine Lufteinsaugöffnung ein, leitet sie durch einen Aktivkohlefilter (Desodorisierungsfilter) und einen HEPA-Filter (Staubsammelfilter) in das Gerät und gibt sie dann durch seine Luftauslassöffnung wieder ab. Der Luftreiniger wiederholt diesen Prozess mit seinem internen Gebläse.
Sobald Luft durchgeleitet wird, kann der HEPA-Filter Staubpartikel entfernen. Der Aktivkohlefilter absorbiert nach und nach die Geruchselemente, sobald sie wiederholt den Filter passieren.
(Geruchselemente werden auch vom HEPA-Filter absorbiert.)
Einige von den Filtern absorbierten Geruchsbestandteile werden möglicherweise geteilt und von der Luftauslassöffnung ausgegeben, wodurch zusätzlicher Geruch entsteht. Je nach Verwendungsumgebung - insbesondere, wenn das Produkt unter härteren Bedingungen als im Haushalt verwendet wird - kann dieser Geruch früher als erwartet strenger werden.
Kaufen Sie in solch einem Fall den optionalen Austauschfiltersatz FZ-28SEF.
HINWEIS
Der Luftreiniger ist dafür bestimmt, in der Luft schwebenden Staub und Geruch zu entfernen, jedoch nicht schädliche Gase (z. B. Kohlenmonoxid in Zigarettenrauch). Ferner kann er auch keine Gerüche entfernen, die stets vorhanden sind (z. B. Gerüche von Baumaterialien und Tieren).
HEPA-Filter
Aktivkohlefilter
HEPA Filter |
 Activkohlefilter
INHALTSVERZEICHNIS
WICHTIGE SICHERHEITS- |
|
VORSCHRIFTEN ........................................ |
D-2 |
• WARNUNG ................................................. |
D-2 |
• VORSICHTSHINWEISE HINSICHT- |
D-2 |
LICH DES BETRIEBS ................................. |
|
• FERNBEDIENUNGSEINSCHRÄN- |
D-3 |
KUNGEN ..................................................... |
•VORSICHTSHINWEISE HINSICHTLICH DER WANDBEFESTIGUNG
DES GERÄTS ............................................. |
D-3 |
|
||
• FILTER-RICHTLINIEN ................................ |
D-3 |
|
||
TEILEBEZEICHNUNGEN ........................ |
D-4 |
|
||
• DISPLAY DES HAUPTGERÄTS ................. |
D-4 |
|
||
• RÜCKSEITE ............................................... |
D-4 |
|
||
• ZUBEHÖR .................................................. |
D-4 |
|
||
VORBEREITUNG |
D-5 |
|
||
DEUTSCH |
||||
• EINLEGEN DER BATTERIEN |
D-5 |
|||
|
||||
IN DIE FERNBEDIENUNG ......................... |
|
|||
• VERWENDUNG DER FERNBEDIE- |
D-5 |
|
||
NUNG ......................................................... |
|
|||
......................................INSTALLATION |
D-6 |
|
||
FILTERINSTALLATION ......................... |
D-10 |
|
||
BETRIEB .............................................. |
D-12 |
|
||
• BEDIENUNG DES HAUPTGERÄTS ........ |
D-12 |
|
||
• BEDIENUNG DER FERNBEDIENUNG .... |
D-13 |
|
||
PFLEGE UND WARTUNG ................... |
D-14 |
|
||
• FILTERAUSTAUSCH-RICHTLINIEN ........ |
D-14 |
|
||
• HAUPTGERÄT ......................................... |
D-15 |
|
||
• GERUCHSSENSOR ................................. |
D-15 |
|
||
• VORFILTER .............................................. |
D-15 |
|
||
TECHNISCHE DATEN ........................... |
D-15 |
|
||
STÖRUNGSBESEITIGUNG ................. |
D-16 |
|
||
|
|
|
|
|
Vielen Dank, dass Sie sich für den FU-28H von SHARP entschieden haben. Lesen Sie sich hinsichtlich ordnungsgemäßer Verwendungsinformationen dieses Handbuch sorgfältig durch. Lesen Sie vor dem Gerätebetrieb unbedingt den Abschnitt: “Wichtige Sicherheitsvorschriften.”
Bewahren Sie dieses Handbuch nach der Durchsicht für ein späteres Nachschlagen griffbereit auf.
D-1

WICHTIGE SICHERHEITSVORSCHRIFTEN
Bei der Verwendung von Elektrogeräten sollten grundlegende Sicherheitsvorsichtsmaßnahmen einschließlich den folgenden beachtet werden:
WARNUNG - Um das Risiko eines elektrischen Schlages, Brandes oder Personenschadens zu reduzieren:
•Lesen Sie alle Vorschriften, bevor Sie den Luftreiniger in Betrieb nehmen.
•Verwenden Sie ausschließlich eine 220-240-Volt-Steckdose.
•Verwenden Sie den Luftreiniger nicht, wenn das Netzkabel oder der Stecker beschädigt oder der Anschluss zur Wandsteckdose locker ist.
•Entfernen Sie regelmäßig Staub vom Netzstecker.
•Stecken Sie keine Finger oder Gegenstände in die Einsaugund Auslassöffnungen.
Halten Sie beim Herausziehen des Netzsteckers stets den Stecker fest und ziehen Sie nicht am Kabel.
Anderenfalls könnten ein elektrischer Schlag und/oder ein Brand aufgrund eines Kurzschlusses verursacht werden.
•Verwenden Sie diesen Luftreiniger nicht in der Nähe von Gasgeräten oder Kaminen.
•Ziehen Sie den Netzstecker von der Wandsteckdose ab, bevor das Gerät gereinigt wird und wenn das Gerät nicht verwendet wird.
Aufgrund einer schlechten Isolierung könnte ein Stromschlag, und aufgrund eines Kurzschlusses könnte ein Band entstehen.
•Wenn das Netzkabel beschädigt ist, muss es vom Hersteller, seinem Servicetechniker, von einem von Sharp autorisierten Kundendienst oder einer entsprechend qualifizierten Person ausgetauscht werden, um eine Gefährdung zu vermeiden.
•Nehmen Sie das Gerät nicht in Betrieb, wenn Aerosolinsektizide verwendet werden, und nicht in Räumen, in denen Ölrückstände, Duftkerzen, Funken von angezündeten Zigaretten, chemische Dämpfe in der Luft oder große Feuchtigkeit zu finden ist.
•Gehen Sie beim Reinigen des Luftreinigers vorsichtig vor. Starke Korrosionsreiniger können das Außengehäuse beschädigen.
•Nur von Sharp autorisierte Servicetechniker dürfen diesen Luftreiniger warten. Wenden Sie sich bei Problemen, für Einstellungen oder Reparaturarbeiten an den Servicedienst in Ihrer Nähe.
•Die Batterien müssen aus der Fernbedienung herausgenommen werden, bevor sie entsorgt wird, und die Batterien müssen sicher entsorgt werden.
VORSICHTSHINWEISE HINSICHTLICH DES BETRIEBS
•Blockieren Sie nicht die Einsaugund Auslassöffnungen.
•Nehmen Sie das Gerät nicht in der Nähe von heißen Gegenständen, wie beispielsweise neben einem Küchenherd, in Betrieb, oder dort, wo es in Kontakt mit Dampf kommen könnte.
•Halten Sie stets das Hauptgerät fest, wenn es bewegt wird.
Wenn Sie das Gerät am Frontgehäuse anfassen, kann sich dieses lösen und das Gerät herunterfallen, was Verletzungen zur Folge haben könnte.
•Verwenden Sie das Gerät nicht ohne Filter.
•Waschen Sie die Filter nicht und verwenden Sie sie nicht wieder.
Dadurch wird nicht nur die Filterleistung verschlechtert, es könnte zudem ein elektrischer Schlag oder eine Fehlfunktion verursacht werden.
•Reinigen Sie das Außengehäuse nur mit einem weichen Tuch.
Die Geräteoberfläche könnte beschädigt werden oder Risse bekommen. Außerdem könnte eine Sensorfehlfunktion verursacht werden.
D-2
FERNBEDIENUNGSEINSCHRÄNKUNGEN
SEHEN SIE AN FOLGENDEN ORTEN VON EINEM BETRIEB DER FERNBEDIENUNG AB:
• Orte mit Inverter-Lichtanlagen oder elektronisch selbststeuernden Lichtanlagen
Die Fernbedienung könnte funktionsunfähig werden. Bewegen Sie in diesem Fall die Fernbedienung von solchen Lichtanlagen weg oder ändern Sie die Richtung.
• Orte mit direkter Sonneneinstrahlung oder Fluoreszenzeinstrahlung.
Das Gerät empfängt möglicherweise keine Signale von der Fernbedienung.
• VORSICHTSHINWEISE HINSICHTLICH DER WANDBEFESTIGUNG DES GERÄTS
• Vermeiden Sie Orte, an denen der Sensor direktem Wind ausgesetzt ist.
Anderenfalls funktioniert das Gerät möglicherweise nicht einwandfrei.
• Vermeiden Sie Orte, an denen Vorhänge usw. die Einsaugoder Auslassöffnung berühren könnten.
Vorhänge usw. können schmutzig werden oder eine Fehlfunktion könnte verursacht werden.
• Vermeiden Sie Orte, an denen das Gerät aufgrund von drastischen Temperaturschwankungen Kondensation ausgesetzt wäre.
• Stellen Sie das Gerät auf eine solide Fläche mit ausreichender Luftzirkulation. |
DEUTSCH |
|
|
• Befestigen Sie das Gerät an einer Wand, einem Holzpfeiler, einem Querbalken o. Ä., die bzw. der |
|
eben und stark genug ist. |
|
• Befestigen Sie das Gerät nicht an einer dünnen Wand oder an einer Gipswand. Das Gerät könnte |
|
herunterfallen, wenn es an einer Wand mit unzureichender Stärke befestigt wird. |
|
• Wenn das Gerät an einer Holzwand befestigt werden soll, die weniger als 10 mm dick ist, wenden |
|
Sie sich an Ihren Händler, damit er die Stärke der Wand vor der Installation überprüft. |
|
• Halten Sie stets das Hauptgerät fest, wenn es bewegt wird. |
|
Wenn Sie das Gerät am Frontgehäuse anfassen, kann sich dieses lösen und das Gerät herunterfallen, |
|
was Verletzungen zur Folge haben könnte. |
|
• Installieren Sie das Gerät nicht dort, wo Lampenruß erzeugt wird, wie beispielsweise in einer |
|
Küche o. Ä. |
|
Die Geräteoberfläche könnte Risse bekommen oder beim Sensor könnte eine Fehlfunktion verursacht |
|
werden. |
|
FILTER-RICHTLINIEN
•Befolgen Sie die Anleitung in diesem Handbuch hinsichtlich einer ordnungsgemäßen Pflege und Wartung der Filter.
Dieses Gerät stimmt mit den Anforderungen der Direktiven 89/336/EEC und 73/23/EEC, ergänzt durch 93/68/EEC, überein.
D-3
TEILEBEZEICHNUNGEN
DISPLAY DES
HAUPTGERÄTS
Plasmacluster-Anzeigelampe |
Netztaste EIN/AUS |
|
Gebläsegeschwindigkeits- |
||
|
||
Anzeigelampen |
Gebläse-Steuertaste |
|
AUS-ZEITSCHALTER-Anzeigelampen |
||
|
|
AUS-ZEITSCHALT- |
Fernbedienungsempfänger |
ER-Taste |
|
Geruchssensor
Filterrahmen
HEPA-Filter (weiß)
(mit Mikrobenkontrollfilter)(blau)
Aktivkohlefilter
(Desodorierungsfilter)
Nichtrostender Vorfilter
Frontgehäuse
RÜCKSEITE
Luftauslass


 NetzkabelEinstellungsführung
Netzkabel
Netzstecker
(Form des Steckers hängt vom Land ab)
ZUBEHÖR
Fernbedienung
(1 Gerät)
Batterie
(R6-Batterie (AA) × 2)
Bedienungshandbuch
Wandbefestigungssatz
• Wand-Befestigungshalter
• Holzschrauben (4 St.)
• Fischer-Dübel (4 St.)
Luftaustritt
D-4

VORBEREITUNG
EINLEGEN DER BATTERIEN IN DIE FERNBEDIENUNG
1 Nehmen Sie den Deckel des Batteriefachs ab.
Drücken Sie auf den Deckel und schieben Sie ihn, um ihn abzunehmen.
2 Legen Sie die Batterien ein.
Legen Sie die Batterien mit der Polarität  und
und  wie neben stehend gezeigt ein.
3 Schließen Sie das Batteriefach.
Wissenswertes über die Batterien
• Die Lebensdauer der Batterien beläuft sich auf etwa 1 Jahr. |
DEUTSCH |
keit ausläuft und/oder ein Schaden verursacht wird. Achten Sie beim Handhaben |
|
• Tauschen Sie die Batterien aus, wenn die Fernbedienung funktionsunfähig ist. |
|
• Eine falsche Verwendung der Batterien kann dazu führen, dass Batterieflüssig- |
|
der Batterien auf Folgendes: |
|
• Wenn die Batterien ausgetauscht werden, müssen beide Batterien durch neue |
|
des gleichen Typs ersetzt werden. (Verwenden Sie R6 (AA)-Manganbatterien |
|
(2 Stück).) |
|
• Nehmen Sie die Batterien heraus, wenn das Gerät oder die Fernbedienung |
|
über einen längeren Zeitraum hinweg nicht verwendet wird. Dadurch wird ver- |
|
hindert, dass die Fernbedienung durch Austreten der Batterieflüssigkeit nicht |
|
einwandfrei funktioniert. |
|
• Die beiliegenden Batterien sind für den anfänglichen Betrieb bestimmt und |
|
könnten innerhalb eines Jahres erschöpft sein. |
|
VERWENDUNG DER FERNBEDIENUNG
•Bedienen Sie die Fernbedienung, wenn Sie sich direkt vor dem Hauptgerät-Empfän- ger befinden.
•Der Signalbereich liegt bei etwa 7 m (Vorderseite).
•Vergewissern Sie sich, dass keine Gegenstände den Signalpfad blockieren.
•Wenn ein Signal empfangen wird, gibt das Hauptgerät einen Piepton aus.
HINWEIS
•Lassen Sie die Fernbedienung nicht fallen und beschädigen Sie sie nicht; verwenden Sie sie nicht an einem Ort mit hoher Feuchtigkeit, mit direkter Sonneneinstrahlung oder in der Nähe einer Heizquelle.
Empfänger
Transmitter 
D-5
INSTALLATION
FÜR EINE SACHGEMÄSSE INSTALLATION
Zum Entfernen von Raumgeruch
Das Installieren des Gerätes oben an der Wand ist am wirksamsten.
Zum Entfernen von Staub
Vergleichsweise große Staubpartikel wie Pollen und Hausstaub sammeln sich in der unteren Schicht der Raumluft.
Wählen Sie einen Ort im Raum, an dem die Luftzirkulation gut ist.
Dies verbessert die Reinigungsleistung, und die Plasmacluster-Ionen können sich im ganzen Raum verteilen.
Betriebsbedingungen
Nehmen Sie das Gerät unter den folgenden Bedingungen in Betrieb.
Es ist empfehlenswert, das Gerät in einem Raum mit einer Temperatur zwischen 0 - 35 °C in Betrieb zu nehmen. Vermeiden Sie Orte, an denen das Gerät aufgrund von drastischen Temperaturschwankungen Kondensation ausgesetzt wäre.
1 |
Bestimmen Sie die Montagestelle. |
Lassen Sie um den Halter herum Platz, siehe die unten stehende Zeichnung. |
|
Das Gerät kann nicht montiert werden, wenn nicht genug Platz um den Halter |
herum frei ist.
337 mm (Größe des Hauptgeräts)
Mittellinie des Wand-Befestigungshalters |
Mittellinie des |
Mindestens voncm45der |
entferntDecke |
||
|
|
|
48mm |
||
|
|
Hauptgeräts |
|
|
|
|
Schraublöcher |
16mm |
|
|
|
|
|
|
|
|
|
60mm |
|
|
54mm |
|
92mm |
Mindestens 70 cm von |
|
|
|
Mindestens 70 cm von der |
|
der Seitenwand entfernt |
|
|
|
|
Seitenwand entfernt |
3mm |
Wand-Befestigungshalter |
|
Schraublöcher |
||
|
330mm |
|
|||
|
|
|
|
|
|
|
Größe des Hauptgeräts |
Mittellinie des Hauptgeräts |
|
|
|
207mm |
|
235mm |
 Mittellinie des Hauptgeräts
482 mm (Größe des Hauptgeräts)
Vorsichtsmaßnahmen bei der Installation
•Stellen Sie vor dem Befestigen des Wand-Befestigungshalters sicher, das nichts die Installation des Gerätes behindert. Befestigen Sie dann den Wand-Befestigungshalter mit Hilfe der im Lieferumfang enthaltenen Holzschrauben in den Schraubenlöchern.
•Befestigen Sie das Gerät an einer Wand, einem Holzpfeiler, einem Querbalken o. Ä., die bzw. der eben und stark genug ist.
•Wenn die Wand zu schwach oder aus Beton ist, lassen Sie das Gerät von einem Spezialisten wie beispielweise von einem Elektriker installieren.
•Vermeiden Sie Orte neben Inverter-Lampen, oder Orte, an denen das Gerät direkter Sonneneinstrahlung ausgesetzt ist.
D-6

2 |
Befestigen Sie den Wand-Befestigungshalter. |
• Befestigen Sie den Halter mit den beiliegenden Holzschrauben so, dass er horizontal bleibt. |
 Installation auf Beton, an einem Pfeiler oder an einer Mörteloberfläche
Bohren Sie Löcher von mindestens 35 mm Tiefe und einem Durchmesser von 5 mm in die Wand, passen Sie die Fischer-Dübel ein und befestigen Sie das Gerät mit den Holzschrauben.
φ5mm
35mm
Loch in der Wand
Fischer-Dübel

Holzschraube
 Installation an Holzpfeilern, Querbalken oder einer anderen Holzfläche
Verwenden Sie für die Installation Holzschrauben.
Holzpfeiler
Wand-Befestigungshalter
Holzquerbalken
Installation an einem Holzpfeiler
Installation an einem
Holzquerbalken
Holzschrauben (4)
Vorsicht
•Wenn das Gerät an einer Holzwand befestigt werden soll, die weniger als 10 mm dick ist, wenden Sie sich an Ihren Händler, um die Stärke der Wand vor der Installation überprüfen zu lassen.
•Befestigen Sie das Gerät an einer Wand, einem Holzpfeiler, einem Querbalken o. Ä., die bzw. der eben und stark genug ist.
•Stellen Sie sicher, dass das Gerät in aufrechter Position installiert wird, ohne dass es sich nach rechts oder links neigt.
DEUTSCH
D-7

INSTALLATION
Vergewissern Sie sich vor der Wandmontage, dass das Frontgehäuse und der Filterrahmen entfernt werden.
3 |
Installieren Sie das Gerät an |
der Wand. |
Frontgehäuse Filterrahmen
2 |
1 Legen Sie das Gerät mit der Vorderseite nach oben ab, entfernen Sie das Frontgehäuse und den Filterrahmen.
Luftaustritt 


 1
1


2 Stellen Sie die Länge des Netzkabels ein.
1 Messen Sie den Abstand zwischen dem Gerät und der Wandsteckdose. (siehe Seite D-6)
2 Legen Sie das Gerät mit der Vorderseite nach unten ab und stecken Sie das Netzkabel in die Netzkabel-Einstellung, um es auf die gemessene Länge einzustellen.
Netzkabel-  Einstellungsführung
Verlegen Sie das Netzkabel nicht gleich unter des WandBefestigung shalter.
Wenn das Netzkabel rechts aus dem Gerät führt.
Netzkabel-Einstellungsführung 
Wenn das Netzkabel links aus dem Gerät führen soll.
Vorsicht
•Legen Sie das Gerät bis zur Montage auf ein weiches Tuch, damit das Gerät nicht zerkratzt oder beschädigt wird.
•Verlegen Sie das Kabel nicht zusammen mit anderen Kabeln und verdrillen Sie sie nicht.
•Modifizieren Sie niemals das Netzkabel.
•Beschädigen Sie das Netzkabel nicht.
D-8

3 Befestigen Sie eine Markierung (Klebeband o. Ä.) 8 cm über beiden Enden des Wand-Befestigungshalters.
4 Heben Sie das Gerät an, so dass die Einhaköffnungen am Gerät an den Markierungen ausgerichtet sind, haken Sie das Gerät in den Wand-Befestigungshalter ein und schieben Sie es nach rechts.
Wenn es korrekt positioniert ist, bewegt sich das Gerät ein wenig nach unten, bis es einrastet.
Ausrichtung der rechten Einhaköffnungen
Markierung
etwa 8 cm
Wand-Befestigungshalter
1
Klammerbuchse
Ausrichtung der linken Einhaköffnungen
Markierung
etwa 8 cm
 2
2
Klammerbuchse
5 Überprüfen Sie die Installation genauestens.
Vergewissern Sie sich, dass die Klammern des Gerätes richtig eingehakt sind. Wenn sie es nicht sind, verschiebt sich das Gerät zur Seite. Außerdem kann das Gerät herunterfallen und beschädigt werden.
• Vergewissern Sie sich, dass das Netzkabel nicht im Gerät eingeklemmt ist.
6 Entfernen Sie die Markierung.
WIE DAS GERÄT ABGENOMMEN WIRD
Ziehen Sie das Netzkabel von der Wandsteckdose ab und entfernen Sie das Frontgehäuse und den Filterrahmen. Halten Sie das Gerät an den unteren Ecken fest, heben Sie es etwas an, schieben Sie es dann nach rechts oder links und heben Sie es nach oben heraus.
2
2
1
DEUTSCH
D-9
|
Entfernen Sie vor Inbetriebnahme des |
FILTERINSTALLATION Geräts unbedingt die Plastikbeutel. |
|
|
Wie der rostfreie Vorfilter |
Entfernen Sie den Vorfilter, |
entfernt wird |
1 den Aktivkohlefilter und
den HEPA-Filter vom Filterrahmen.
Halteklammern
2 Entnehmen Sie den Aktivkohlefilter und den HEPAFilter aus den Plastikbeuteln.
3 Setzen Sie den HEPA-Filter im Filterrahmen ein.
Installieren Sie den Filter nicht falsch herum, da dass Gerät ansonsten nicht einwandfrei funktioniert.
4 Setzen Sie den Aktivkohlefilter im Filterrahmen über dem HEPA-Filter ein.
Der Aktivkohlefilter besitzt keine Vorderund Rückseite.
5 Setzen Sie als nächstes den Vorfilter im Filterrahmen ein.
Passen Sie die 4 Halteklammern des Vorfilters in die Öffnungen im Filterrahmen ein.
Vorfilter
Aktivkohlefilter
HEPA-Filter
Filterrahmen
Aktivkohlefilter
HEPA-Filter
HEPA-Filter
Filterrahmen
Halteklammern
Vorfilter
Aktivkohlefilter
HEPA-Filter
Filterrahmen
D-10
6 Befestigen Sie den Filter-
rahmen am Hauptgerät. Filterrahmen
7 Notieren Sie das Verwendungsstartdatum auf dem Datumsaufkleber.
Verwenden Sie das Datum als |
|
|
Richtlinie für den Filteraustausch- |
Datumsaufkleber |
|
plan. |
||
|
 Klammer
Befestigen Sie das Front- |
Klammerbuchse |
8 gehäuse am Hauptgerät. |
|
Frontgehäuse
9 Stecken Sie das Netzkabel in die Wandsteckdose ein und prüfen Sie den Ein-/Aus-Betrieb mit der Fernbedienung.
DEUTSCH
D-11
BETRIEB |
In den ersten 30 Sekunden nach Einstecken des Steckers in die |
|
Wandsteckdose überprüft das Gerät die Luftbedingungen. |
||
|
||
|
|
•Automatischer-Betrieb
Der Geruchssensor überprüft das Volumen der Verunreinigung in der Luft, und die Gebläsegeschwindigkeit wird automatisch umgeschaltet.
•Manueller Betrieb
Die gewünschte Gebläsegeschwindigkeit kann ungeachtet des Verunreinigungsvolumens zwischen “Leise” und “Max” umgeschaltet werden.
BEDIENUNG DES HAUPTGERÄTS
Netztaste EIN/AUS
• Zum Starten des AUTO-Betriebs (kurzer Piepton) und Stoppen des Betriebs (langer Piepton).
• Plasmacluster-Anzeigelampe und Gebläsege- schwindigkeits-Anzeigelampe (AUTO) Ein-/ Ausschaltung
• Sofern das Netzkabel nicht abgezogen wurde, startet der Betrieb im zuvor eingestellten Modus, in dem das Gerät betrieben worden war.
GEBLÄSESTEUER-Taste
Die Gebläsegeschwindigkeit kann zwischen “Leise”, “Max” und “AUTO” umgeschaltet werden.
Leise |
Max |
AUTO

AUS-Zeitschalter-Taste
• Der Einstelltimer wird bei jeder Tastenbetätigung wie unten gezeigt umgeschaltet.
• Wenn “4 Stunden” wird eingestellt, der “4 H” Lampe leuchtet. Wenn die verbleibende Zeit wird 1 Stunde, dre Lampe wechselt auf “1 H”.
1 Stunde |
4 Stunden |
Abbruch 
D-12
Loading...