


 Loading...
MODEL
FO-P710 FO-A760
FACSIMILE
OPERATION MANUAL

Datalight is a registered trademark of Datalight, Inc.
FlashFXTM is a trademark of Datalight, Inc.
Copyright 1993 - 2004 Datalight, Inc. All Rights Reserved. U.S. Patent Office 5.860.082/6.260.156

WARRANTY
Business Products
Congratulations on Your Purchase!
This Sharp product is warranted against faults in material and manufacture for the period as stated in the table below.
In the event of any defect arising in the equipment during the warranty period, such repairs should only be carried out by the Dealer from which the unit was originally purchased or a Service Centre approved by Sharp to service this type of equipment. These repairs would be carried out at no charge to the owner, subject to the conditions specified herein.
The owner is responsible for any transportation and insurance costs if the product has to be returned for repair.
This warranty does not extend to accessories or defects or injuries caused by or resulting from causes not attributable to faulty parts or the manufacture of the product, including but not limited to, defect or injury caused by or resulting from misuse, abuse, neglect, accidental damage, improper voltage, liquid spillage, vermin infestation, software, use of consumables other than those approved by Sharp or any alterations made to the product which are not authorised by Sharp.
Please retain your sales documentation, as this should be produced to validate a warranty claim.
This warranty is in addition to and in no way limits, varies or excludes any express and implied rights and remedies under any relevant legislation in the country of sale. However to the extent permitted by such legislation. Sharp excludes any liability for any indirect or consequential damage arising from the purchase or use of the product.
To the extent permitted by law, Sharp excludes all implied warranties and conditions and where the product is one that is not normally required for personal, domestic or household use. Sharp limits its liability to repair or replacement (at Sharp's option) of materials or workmanship which are found by Sharp to be defective.
WARRANTY PERIODS
Computers & Peripherals |
12 months |
Copiers & Ancillaries |
6 months |
Electronic Cash Registers |
12 months |
Facsimile |
12 months |
Projection Equipment |
24 months (excluding lamps and air filters) |
Information Display Panel |
12 months |
POS Terminals |
12 months |
Multi Function Device |
12 months |
|
|
|
|
|
|
|
|
|
|
|
F |
|
|
|
|
|
|
|
|
|
|
|
|
|
ATION |
O |
D |
|
|
|
|
|
|
||||
|
|
|
|
|
|
|
|
|
|
|
|
|
|
|||||
|
|
|
|
|
|
|
|
|
|
|
E |
|
|
|
|
|
|
|
|
|
|
|
|
|
R |
LIMIT |
|
|
2148 |
|
|
|
|
||||
|
|
|
CORPOPT |
|
405 |
|
|
|
|
|
|
|||||||
|
|
|
|
|
|
Y |
|
Drive |
|
|
|
|
|
|
||||
|
|
|
|
|
LIA 039 |
|
|
|
|
|
|
|||||||
SHARP |
|
A |
|
|
|
|
SW |
|
|
|
|
|
|
|||||
|
|
40 |
|
|
|
|
|
|
|
|
|
|
|
|
7) |
|||
|
|
|
|
Huntingwood |
N |
|
|
|
|
|
|
|
|
|||||
|
|
|
R |
|
003 |
|
|
|
|
|
|
|
|
|
|
|||
U |
T |
|
|
|
|
|
|
|
|
|
|
|
|
|
|
|
||
|
|
|
|
|
|
|
|
|
|
|
|
N |
|
|
0 |
|||
A |
ABN |
|
|
|
|
|
|
|
|
|
2 |
|
|
|||||
|
|
|
|
|
Huntingw |
|
|
|
|
|
|
5 |
. |
0 |
|
|||
|
|
|
|
|
|
|
|
|
|
|
|
|
|
|||||
|
|
1 |
|
|
|
|
|
|
|
form01 |
(JA |
|
|
|
|
|||
|
|
|
|
|
|
|
|
SP |
|
|
|
|
|
|||||
|
|
|
|
|
|
|
|
|
|
|
|
|
|
|
|
|||
IMPORTANT NOTICE: This warranty applies to products sold in Australia

FOR LOCATION ENQUIRIES WITHIN
AUSTRALIA
REGARDING YOUR LOCAL
SHARP APPROVED SERVICE CENTRE
VISIT OUR WEBSITE AT
www.sharp.net.au
OR CALL SHARP CUSTOMER CARE
1300 135 022
(LOCAL CALL COST APPLY WITHIN AUSTRALIA)
SHARP CORPORATION OF AUSTRALIA PTY LTD
SPform019(JUNE 2004)

Table of Contents
Introduction |
2 |
A Look at the Operation Panel |
6 |
1. Installation |
9 |
Unpacking Checklist. . . . . . . . . . . . . . 9
Setup . . . . . . . . . . . . . . . . . . . . . . . . . 9
Imaging Film. . . . . . . . . . . . . . . . . . . 10
Loading Paper . . . . . . . . . . . . . . . . . 12
Initial Settings. . . . . . . . . . . . . . . . . . 13
Setting the Reception Mode. . . . . . . 15
Volume Adjustment . . . . . . . . . . . . . 15
2. Sending Faxes |
17 |
Transmittable Documents . . . . . . . . |
17 |
Loading the Document . . . . . . . . . . . |
17 |
Resolution and Contrast. . . . . . . . . . |
18 |
Sending a Fax: Normal Dialling . . . . |
19 |
Storing Numbers . . . . . . . . . . . . . . . |
20 |
Sending a Fax: Auto Dialling . . . . . . |
22 |
Making Phone Calls . . . . . . . . . . . . . |
25 |
3. Receiving Faxes |
26 |
Using TEL/FAX (T/F) Mode . . . . . . . |
26 |
Using FAX Mode . . . . . . . . . . . . . . . |
27 |
Using TEL Mode . . . . . . . . . . . . . . . |
27 |
Using A.M. Mode (FO-A760) . . . . . . |
29 |
Reception to Memory . . . . . . . . . . . . |
29 |
4. Answering System (FO-A760 |
|
only) |
31 |
Recording an OGM . . . . . . . . . . . . . |
31 |
Using the Answering System . . . . . . |
31 |
Answering System Settings . . . . . . . |
33 |
Override Ringing . . . . . . . . . . . . . . . |
34 |
Remote Operations . . . . . . . . . . . . . |
35 |
5. Making Copies |
38 |
6. Caller ID (Requires Service) 39
Activating Caller ID . . . . . . . . . . . . . . 39
Caller ID List . . . . . . . . . . . . . . . . . . . 39
Blocking Calls . . . . . . . . . . . . . . . . . . 41
7. |
Key Lock Function |
43 |
8. |
Distinctive Ring (Requires |
|
|
Service) |
45 |
9. |
Maintenance |
46 |
Cleaning the Machine . . . . . . . . . . . . |
46 |
|
Cleaning the Print Head and Rollers |
47 |
|
10. Troubleshooting |
50 |
|
Problems and Solutions . . . . . . . . . . |
50 |
|
Messages and Signals . . . . . . . . . . . |
54 |
|
Clearing Paper Jams . . . . . . . . . . . . |
57 |
|
Quick Reference Guide |
60 |
|
Index |
61 |
|
1

Introduction
Specifications
Imaging film |
Initial sample roll (included with machine): |
|
Yields approx. 20 A4 pages |
|
Replacement roll (not included): |
|
FO-31CR (33 m x one roll) |
|
(one roll yields approx. 100 A4 pages) |
Paper tray capacity
Recording system Effective printing width Memory capacity
Approx. 10 A4 sheets (80 g/m2) (at room temperature)
Thermal transfer recording
205 mm max.
FO-P710: Approximately 40 average pages
FO-A760: Approximately 50 average pages with no voice messages recorded, or 15 minutes of voice messages (including OGMs) with no documents in memory (maximum of 30 voice messages).
Modem speed |
14,400 bps with auto fallback to lower speeds. |
Transmission time* |
Approx. 9 seconds |
Compatibility |
ITU-T (CCITT) G3 mode |
Compression scheme |
MH, H2, MMR |
Automatic dialling |
100 numbers; 3 Rapid Keys |
Effective scanning width |
205 mm max. |
Scanning resolution |
Horizontal: 8 pels/mm |
|
Vertical: |
|
Standard: 3.85 lines/mm |
|
Fine /Halftone: 7.7 lines/mm |
|
Super fine: 15.4 lines/mm |
Halftone (greyscale) |
64 levels |
Applicable telephone line |
Analog public switched telephone network |
*Based on Sharp Standard Chart at standard resolution, excluding time for protocol signals (i.e.,
ITU-T phase C time only)
2
Reception modes |
TEL/FAX,TEL, FAX, A.M. |
|
(A.M. mode is only available on the FO-A760) |
Automatic document |
A4: 10 sheets max. (80 g/m2) |
feeder |
|
Contrast control |
Automatic/Dark selectable |
Copy function |
Single / Multi (9 copies/page) |
Display |
16-digit LCD display |
Power requirements |
230-240 V AC, 50 Hz |
Power consumption |
Standby: 1.5 W (only when Caller ID and distinctive ring |
|
are set to NO) |
|
Maximum: 90 W |
Operating temperature |
5 - 35°C |
Humidity |
30 - 85% RH |
Dimensions (without |
Width: 296 mm |
attachments) |
Depth: 180 mm |
|
Height: 86 mm |
Weight (without |
Approx. 2.3 kg |
attachments) |
|
As a part of our policy of continuous improvement, SHARP reserves the right to make design and specification changes for product improvement without prior notice. The performance specification figures indicated are nominal values of production units. There may be some deviations from these values in individual units.
Important: This machine is not designed for use on a line which has call waiting, call forwarding, or certain other special services offered by your telephone company (errors may occur during transmission and reception of faxes).
This machine is not compatible with digital telephone systems.
3
Important safety information
For your safety, if any of your equipment is not operating properly or should any physical damage occur to the equipment where internal parts may become exposed, the equipment should be immediately disconnected from the phone line and then the power line and returned to a SHARP authorised Service Centre for inspection, repair, or disposal.
Installing or modifying telephone lines should only be done by an ACMA licensed serviceman.
This facsimile machine is designed for use in Australia only.
Do not disassemble this machine or attempt any procedures not described in this manual. Refer all servicing to qualified service personnel.
Do not install or use the machine near water, or when you are wet. For example, do not use the machine near a bath tub, wash bowl, kitchen sink or laundry tub, in a wet basement, or near a swimming pool. Do not spill any liquids on the machine.
Unplug the machine from the power outlet and telephone socket and consult a qualified service representative if any of the following situations occur:
-Liquid has been spilled into the machine or the machine has been exposed to rain or water.
-The machine produces odors, smoke, or unusual noises.
-The power cord is frayed or damaged.
-The machine has been dropped or the housing damaged.
Do not allow anything to rest on the power cord, and do not install the machine where people may walk on the power cord.
This machine must only be connected to a 230-240 V AC, 50 Hz, earthed (3-prong) outlet. Connecting it to any other kind of outlet will damage the machine.
Never insert objects of any kind into slots or openings on the machine. This could create a risk of fire or electric shock. If an object falls into the machine that you cannot remove, unplug the machine and consult a qualified service representative.
Do not place this machine on an unstable cart, stand or table. The machine could be seriously damaged if it falls.
Never install telephone wiring during a lightning storm.
Never install telephone sockets in wet locations unless the socket is specifically designed for wet locations.
Never touch bare telephone wires or terminals unless the telephone line has been disconnected at the network interface.
Use caution when installing or modifying telephone lines.
4
Avoid using a telephone (other than a cordless type) during an electrical storm. There may be a remote risk of electric shock from lightning.
Do not use a telephone to report a gas leak in the vicinity of the leak.
The power outlet must be installed near the equipment and must be easily accessible.
WARNING NOTICE:
NO calls can be made to or from this fax machine during a mains power failure.
WARNING: Australian Communications and Media Authority (ACMA) regulations state that no unauthorised changes or modifications to this equipment are permitted.
Note: Complies with ACMA standard AS/NZS CISPR22 regarding emission of electromagnetic interference.
These limits are designed to provide reasonable protection against interference in an installation. This equipment generates, uses, and can radiate radio frequency energy and, if not installed and used in accordance with the instructions, may cause interference. However, there is no guarantee that interference will not occur in a particular installation.
If this equipment does cause interference to radio or television reception, which can be determined by turning the equipment off and on, the user is encouraged to try to correct the interference by one or more of the following measures:
-Reorient or relocate the receiving antenna.
-Increase the separation between the equipment and the receiver.
-Connect the equipment to an outlet on a different circuit to that which the receiver is connected.
-Consult the dealer or an experienced radio/TV technician for help.
The Ringer Equivalence Number (REN) for this equipment is written on the back of the machine. The sum of all Ringer Equivalence Numbers (REN's) on your telephone line should not exceed 3 to assure correct service from your telephone company.
5
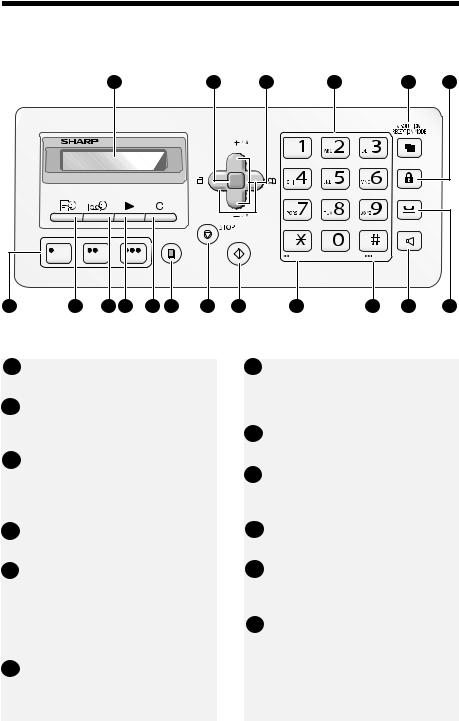
A Look at the Operation Panel
1 |
2 |
3 |
4 |
5 |
6 |
|
REDIAL |
F |
|
|
|
|
|
|
|
|
|
|
|
|
|
HOLD |
|
|
START |
|
COPY/ |
REPEAT |
SKIP |
HELP |
|
|
7 8 9 10 11 12 13 14 15 16 17 18
Note: The above illustration shows the operation panel of the FO-A760.
1Display: This displays messages to help you operate the machine.
2Function key: Press this key followed by the arrow keys to select special functions and settings.
3Arrow keys: Use to scroll through and select settings, and to search for numbers in the phonebook (p. 22).
4Number keys: Use to dial fax numbers.
5RESOLUTION/RECEPTION key
When a document is in the feeder, press to adjust the scanning resolution (p. 18). At any other time, press to select the reception mode (p. 15).
6Key Lock key: Use to activate or release the Key Lock function (p. 43).
7Rapid Keys: Numbers stored in the phonebook can be assigned to these keys for one-touch dialing (p. 22).
8MEMO key: Press to record a memo (FO-A760 only).
9Forward Rec. key: Press to record a greeting (outgoing message) (FOA760 only).
10PLAY key: Press to play messages (FO-A760 only).
11DELETE key: Press to delete various data from the machine (FOA760 only).
12COPY/HELP key: When a document is in the feeder, press this key to make a copy of the document (p. 38). At any other time, press this key to print out the Help List, a quick reference guide to the operation the machine.
6
13STOP key: Press to cancel an operation before it is completed.
14START key: Press after dialling to send a fax (p. 19).
15REPEAT key: Press while listening to a message to repeat it (FO-A760 only).
16SKIP key: Press while listening to a message to skip it (FO-A760 only).
Sleep mode
17SPEAKER key: Press before dialing to listen to the line and fax tones through the speaker when faxing (Normal Dialling, p. 19). Note: This is not a speakerphone.
It cannot be used for speaking.
18HOLD key (FO-A760) HOLD/DELETE key (FO-P710):
Press during a call to put the call on hold.
On the FO-P710, this key is also used to delete various data from the machine.
The machine will automatically enter sleep mode if left unused for a certain period of time. When this happens, only the time will appear in the display. To wake the machine, simply press any key on the operation panel and wait briefly until the machine returns to the normal state.
Monitoring phone conversations
When speaking through the handset, you can press  to allow a third person
to listen to the conversation through the speaker. (To turn off the speaker, press the key again.)
To adjust the volume of the speaker when monitoring a conversation, press |
F |
||
|
|
|
|
or |
F |
(the volume reverts to the lowest setting each time the handset is |
|
|
|
||
replaced).
Note that the speaker cannot be used for speaking; it is only for listening.
To avoid feedback (a loud howling sound), be sure to turn off the speaker (press  once again) before you replace the handset.
7

Entering letters
When the display prompts you to enter a name or other text, press the number keys for each letter as shown below.
Note: To enter a number in a name, press |
F |
and then press the desired number. |
To switch back to letter entry mode, press |
F |
again. (“ABC” appears at the right |
of the display when letter entry mode is selected, and “123” appears when number entry mode is selected. )
A = |
G = |
N = |
U = |
TUV 8 |
|
|
B = |
H = |
O = |
V = |
TUV 8 |
|
|
C = |
I = |
P = |
W = |
|
|
|
D = |
J = |
Q = |
X = |
|
|
|
E = |
K = |
R = |
Y = |
|
|
|
F = |
L = |
S = |
Z = |
|
|
|
|
M = |
T = TUV 8 |
|
|
|
|
Example: SHARP = 7777 44 2 777 |
F |
7 |
|
|
|
|
|
|
|
|
|||
♦ To enter two letters in succession that require the same key, press |
F |
after |
||||
|
||||||
|
entering the first letter to move the cursor to the right. |
|
|
|
||
♦ To backspace and clear a mistake, press |
on the FO-P710, or |
|
C |
|||
|
|
|||||
on the FO-A760.
♦To enter a lower case letter, continue pressing the key for the letter until the lower case letter appears.
♦Press  repeatedly to enter , : ! ? & / ( ) [ ] (space) Press
  repeatedly to enter @ . / - _
8

1. Installation
Unpacking Checklist
Handset Handset |
Phone Adapter |
cord |
line cord |
Sample roll of |
Manual |
imaging film (already |
|
loaded in machine) |
|
Points to keep in mind when setting up
♦Do not place the machine in direct sunlight.
♦Do not place the machine near heaters or air conditioners.
♦Keep dust away from the machine.
♦Keep the area around the machine clear.
About condensation
If the machine is moved from a cold to a warm place, condensation may form on the scanning glass, preventing proper document scanning. To remove the condensation, turn on the power and wait approximately two hours before using the machine.
Unpacking Checklist
Setup
Connecting the handset
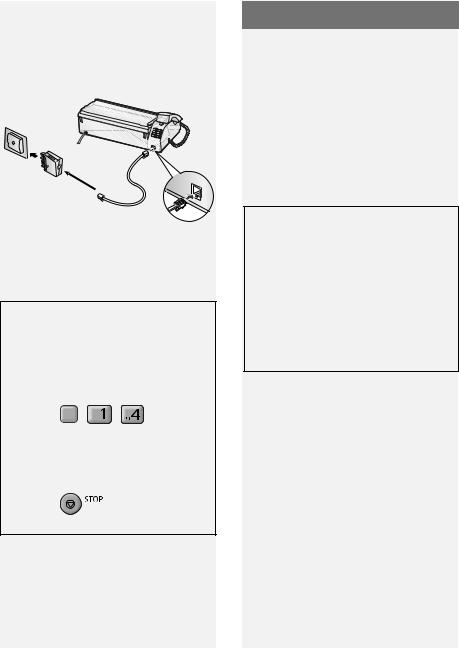
Connecting the power cord
Plug the power cord into a 230-240 V, 50 Hz, earthed (3-prong) AC outlet.
♦The power outlet must be installed near the equipment and must be easily accessible.
When disconnecting the machine, always disconnect the phone line before you disconnect the power cord. When re-connecting the machine, always connect the power cord before connecting the phone line.
It is recommended that you install surge protectors for the power and telephone lines. Surge protectors can be purchased at most telephone specialty stores.
1. Installation
9
Imaging Film
Connecting the phone line
Connect the phone line cord to the TEL. LINE socket and a wall telephone socket (use the provided adapter if needed).
TEL.LINE
Wall socket
TEL. LINE socket
Setting the Dial Mode
The machine is initially set for tone dialling. If you are on a pulse dial line, you must change the DIAL MODE setting to pulse.
1 Press F , |
, |
. |
2 Press  to select TONE, or
  to select PULSE.
3 Press |
to exit. |
Imaging Film
Checking the pre-loaded sample roll
A sample roll of imaging film has been pre-loaded in the machine. Perform steps 1 to 2 and 5 to 7 of Replacing the imaging film below to check the film and make sure it is taut.
♦The sample roll of imaging film can print about 20 pages.
If [FILM END] appears
If [FILM END] appears in the display for longer than 10 seconds, open the machine (see Steps 1 and 2 of
Replacing the imaging film below) and check the film. If the film has completely wound onto the front spool, replace the film. Otherwise, perform Steps 5 to 7 of Replacing the imaging film to remove slack.
Replacing the imaging film
Replacement film
Please purchase the following imaging film:
SHARP FO-31CR (33 m x one roll)
Follow the steps below to replace the imaging film.
Note: Before replacing the imaging film, remove any paper from the paper tray and push in the tray extension.
10

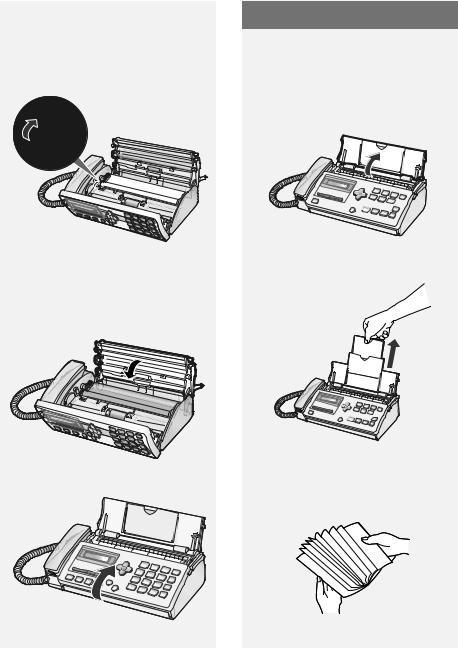
1 Open the operation panel.
2Press the release and open the print compartment cover.
Imaging Film
4Insert the new roll of film into the print compartment:
a. Fit the right ends of the spools onto the pins.
1. Installation
Press green release
3Remove the used roll from the compartment, lifting the left ends of the spools first.
b. Place the left ends so that the shafts of the gears fit into the holders.
11
Loading Paper
5Turn the front gear in the direction shown until the film is taut.
•If there is a label on the film, continue to turn the gear until the label is no longer visible.
Loading Paper
Approximately 10 sheets of A4-size
paper (80 g/m2) can be loaded in the paper tray (at room temperature).
1 If the paper tray is closed, open it.


6 Close the print compartment cover. |
2 Pull out the tray extension. |
•Press down on the  marks on both sides of the cover to make sure it clicks into place.


7 |
Close the operation panel. |
3 Fan the paper, and then tap the |
|
edges against a flat surface to even |
|||
|
|
the stack.
12

4Insert the stack of paper into the tray, print side down.
•If paper remains in the tray, take it out and combine it into a single stack with the new paper.
•Printing on the reverse side of the paper may result in poor print quality.
•Do not use paper that has already been printed on or is curled.
Note: If paper is left in the tray a long time, it will become curled. Curled paper will not feed properly and may cause a paper jam.
When not using the machine:
When not using the machine, keep the paper tray closed.
Initial Settings
Initial Settings
Setting the date and time
Set the date and time in the machine.
♦The date and time will be printed automatically at the top of all fax pages you send. The date and time also appear in the display.
1 Press F , |
, |
. |
•The currently set date appears (example): [DATE 15-08-2008]
2Enter a two-digit number for the day ("01" to "31").
Example: the 5th 
 [DATE 05-08-2008]
•To backspace and clear a mistake,
press  on the FO-P710, or
C
on the FO-A760.
3Enter a two-digit number for the month ("01" for January, "02" for February, "12" for December, etc.).
Example: January 
 [DATE 05-01-2008]
4Enter the year (4 digits). Example: 


•The currently set time appears (example): [TIME 12:19]
5Enter a two-digit number for the hour ("00" to "23") and a two-digit number for the minute ("00" to "59").
Example: 9:25 


1. Installation
13

Initial Settings
6 Press 

 .
.
Display: [OWN NUMBER SET]
7 Press 

 to exit.
Entering your fax number
Enter your fax number in the machine.
♦Your entered fax number will be printed automatically at the top of all fax pages you send.
1 Press F , |
, |
2Press  to select SET.
(To clear your number, press  twice and go to Step 5.)
3Enter your fax number with the number keys (max. 20 digits).
•To insert a space, press  . To enter “+”, press
•To backspace and clear a mistake,
press |
on the FO-P710, or |
C |
on the FO-A760. |
|
4 Press 

 .
.
Display: [OWN NAME SET]
5 Press 

 to exit.
Entering your name
Enter your name in the machine.
♦Your entered name will be printed automatically at the top of all fax pages you send.
1Press F ,  ,
,  .
.
2Press  to select SET.
(To clear your name, press  twice and go to Step 5.)
3Enter your name by pressing number keys for each letter as shown in the chart on page 8. Up to 24 characters can be entered.
•To backspace and clear a mistake,
press |
on the FO-P710, or |
C |
on the FO-A760. |
|
4 Press 

 .
.
Display: [DIAL MODE]
5 Press 

 to exit.
14

Setting the Reception Mode
The machine has the following modes for receiving incoming faxes:
FAX mode:
Select this mode when you only want to receive faxes on your line. The machine automatically answers all calls and receives incoming faxes.
TEL mode:
This mode is the most convenient for receiving phone calls. Faxes can also be received; however, all calls must first be answered by picking up the machine's handset.
TEL/FAX (T/F) mode:
This mode is convenient for receiving both faxes and voice calls. The machine answers all calls on a preset number of rings. If the machine detects that a call is a voice call (including a manually dialled fax), it will make a special ringing sound to alert you to answer. If the machine detects that the call is an automatically dialled fax, it will begin reception.
A.M. ( 


 ) mode (FO-A760 only):
Select this mode when you go out and want the machine’s answering system to answer all calls. Voice messages will be recorded, and fax messages will be received automatically.
Setting the Reception Mode
Setting the reception mode
To set the reception mode, make sure a document is not loaded in the feeder,
and then press  until the desired mode appears in the display.
♦For more information on receiving faxes, see Chapter 3.
Volume Adjustment
Speaker volume
1 Press  .
.
2 |
Press |
F |
or |
F |
to select the |
|
|
desired level.
•Press  again to turn off the speaker.
Ringer volume
1 |
Press |
F |
or |
F |
to select |
|
|
HIGH, MIDDLE, LOW, or OFF.
(Make sure  has not been pressed.)
•The ringer will ring once at the selected level.
2If you selected “OFF OK?” to turn off the ringer, press 

 .
.
Note: When the reception mode is set to TEL, the ringer will still ring at LOW if turned off.
1. Installation
15

Volume Adjustment
Key Tone setting
The machine normally sounds a beep each time you press a key on the operation panel. This confirms that the key has been correctly pressed.
If desired, you can turn off the beep sound. Follow the steps below.
1 Press F , |
, and |
. |
2Press  (YES) to turn on the beep sound.
Press  (NO). to turn off the beep sound.
3Press 

 to exit.
16
2. Sending Faxes
Transmittable Documents
Minimum document size/weight
148 x 140 mm
52 g/m2
Maximum document size/weight:
Loading up to 10 sheets at once:
A4 (210 x 297 mm)
80 g/m2
Loading 1 sheet at a time:
210 x 356 mm
157 g/m2
The maximum scanning width is
205 mm, and the top and bottom 5 mm of a document cannot be scanned.
Other restrictions
♦The scanner cannot recognise yellow, greenish yellow, or light blue ink.
♦Remove all clips, staples, and pins before loading documents in the feeder (these will damage the machine).
♦Ink, glue, or correcting fluid on a document must be dry before scanning.
Transmittable Documents
♦ Documents which are taped, torn, |
|
|
|
smaller than the minimum size, |
|
|
|
carbon backed, easily smudged, or |
Sending |
Faxes |
|
have a slick, coated surface should be |
|||
|
|
||
photocopied, and the copy loaded in |
|
|
|
the feeder. |
|
|
|
♦ Documents that are curled or have a |
2. |
|
|
|
|
||
wave-like pattern must be flattened. |
|
|
Loading the Document
Up to 10 A4-size sheets can be placed in the feeder at once. The sheets will feed automatically starting from the bottom sheet.
♦To send or copy more than the maximum number of sheets, place the additional sheets gently in the feeder just before the last sheet is scanned. Do not force the sheets in, as this may cause double-feeding or jamming.
♦For large or thick sheets that must be loaded one at a time, insert each sheet into the feeder as the previous sheet is being scanned. Insert gently to avoid double-feeding.
1Adjust the document guides to the width of your document.
17
Loading...