


 Loading...
MODEL
FO-2081
DIGITAL MULTIFUNCTIONAL
SYSTEM
OPERATION GUIDE (for facsimile)

Note
•This manual describes how to use the fax function of the machine.
Part names and functions shared with the copy function (for example, the misfeed indicator and add paper indicator), are described in the Operation Guide (for general information). For more information, please read the Operation Guide (for general information).
•This operation guide refers to the Reversing Single Pass Feeder as the "RSPF".

TABLE OF CONTENTS
QUICK REFERENCE GUIDE .................................................................................................................... |
3 |
LIST OF FAX FUNCTIONS........................................................................................................................ |
6 |
1 |
INITIAL SETTINGS |
|
PART NAMES................................................. |
11 |
|
A LOOK AT THE FAX OPERATION PANEL ..... |
12 |
|
ABOUT THE LIQUID CRYSTAL DISPLAY.... |
14 |
|
USING THE ARROW KEYS ........................... |
14 |
|
ADJUSTING THE BEEP VOLUME ................ |
14 |
|
ADJUSTING THE RINGING VOLUME........... |
15 |
|
SETTING THE LENGTH OF ALARM BEEPS .... |
16 |
|
ADJUSTING THE ALARM BEEP VOLUME .. |
17 |
|
FAX SETUP .................................................... |
18 |
|
● HOW TO ENTER CHARACTERS ................. |
18 |
|
● ENTERING YOUR NAME AND FAX NUMBER..... |
19 |
|
● DAYLIGHT SAVING TIME SETTING .................... |
21 |
|
● SELECTING THE TRANSMISSION MODE .. |
22 |
|
● SELECTING THE RECEPTION MODE......... |
23 |
|
● SETTING THE NUMBER OF RINGS FOR |
|
|
|
AUTO RECEPTION ....................................... |
24 |
● SETTING THE NUMBER OF RINGS FOR |
|
|
|
MANUAL RECEPTION .................................. |
25 |
● SELECTING THE RECEPTION PAPER SIZE .. |
25 |
|
● SETTING THE TRAY SELECTION................... |
26 |
|
● SETTING THE DIAL MODE .......................... |
27 |
|
● SETTING THE NUMBER OF RECALL TIMES...... |
28 |
|
● SETTING THE RECALL INTERVAL.............. |
30 |
|
● SETTING THE INDEX FUNCTION................ |
32 |
|
● SETTING RESOLUTION PRIORITY ............. |
33 |
|
● SETTING UP THE MACHINE FOR USE WITH |
||
|
A PC MODEM................................................ |
34 |
● USING THE REMOTE RECEPTION |
|
|
|
FUNCTION .................................................... |
35 |
● DISTINCTIVE RINGING ................................ |
37 |
|
● STORING NUMBERS FOR AUTOMATIC |
|
|
|
DIALING......................................................... |
38 |
● STORING NUMBERS UNDER GROUP KEYS ..... |
41 |
|
USING THE MACHINE WITH AN ANSWERING |
||
MACHINE......................................................... |
44 |
|
● USING AN ANSWERING MACHINE ............ |
44 |
|
● ANSWERING MACHINE BACKUP............... |
44 |
|
2 |
CHOOSING SUITABLE MEDIA |
|
ORIGINALS SUITABLE FOR FAXING ........... |
45 |
|
● SIZE AND WEIGHT ...................................... |
45 |
|
● UNSUITABLE ORIGINALS ........................... |
46 |
|
1

3 |
HOW TO USE THE FAX FUNCTION |
|
SENDING ORIGINALS ................................... |
47 |
|
● SETTING THE ORIGINAL ............................. |
47 |
|
OPTIONAL TRANSMISSION SETTINGS ...... |
49 |
|
● ORIGINAL SIZE............................................. |
49 |
|
● RESOLUTION................................................ |
50 |
|
● CONTRAST ................................................... |
50 |
|
● COVER SHEET ............................................. |
51 |
|
● MESSAGE FUNCTION.................................. |
52 |
|
● TWO-SIDED ORIGINAL TRANSMISSION |
|
|
|
FUNCTION .................................................... |
53 |
DIALING AND TRANSMITTING..................... |
54 |
|
● DIRECT KEYPAD DIALING........................... |
54 |
|
● RAPID KEY DIALING .................................... |
54 |
|
● SPEED DIALING ........................................... |
54 |
|
● CHAIN DIALING ............................................ |
55 |
|
● NORMAL DIALING USING THE [SPEAKER] |
||
|
KEY................................................................ |
55 |
● USING THE SEARCH KEY ........................... |
56 |
|
● REDIALING.................................................... |
56 |
|
IF THE MEMORY BECOMES FULL WHILE |
|
|
SCANNING AN ORIGINAL............................. |
57 |
|
CANCELING (DELETING) A STORED FAX JOB...57
RECEIVING FAXES........................................ |
58 |
● USING AUTO MODE..................................... |
58 |
● USING MAN. MODE...................................... |
58 |
● USING A.M. MODE ....................................... |
58 |
OPTIONAL RECEPTION SETTINGS ............. |
59 |
● TWO-SIDED RECEPTION ............................ |
59 |
● RECEIVE REDUCE ....................................... |
60 |
WHEN USING MANUAL SENDING AND |
|
RECEIVING..................................................... |
61 |
SENDING A FAX DIRECTLY FROM A |
|
COMPUTER (PC-Fax) .................................... |
62 |
4 |
SPECIAL FUNCTIONS |
|
MEMORY |
......................................................... |
63 |
DATA TRANSFER........................................... |
64 |
|
TRANSMISSION RESERVATION................... |
66 |
|
BROADCASTING ............................................ |
67 |
|
POLLING |
......................................................... |
69 |
● POLLING ...................................................... |
69 |
|
● SERIAL POLLING......................................... |
70 |
|
● POLLING TRANSMISSION (MEMORY |
|
|
POLLING) ..................................................... |
71 |
|
● RESTRICTING POLLING MACHINES |
|
|
(POLLING SECURITY) ................................. |
73 |
|
TIMER OPERATIONS ..................................... |
75 |
|
● CANCELING A TIMER TRANSMISSION JOB.. 76 |
||
ANTI JUNK FAX .............................................. |
77 |
|
OPERATION IN COPY, PRINTER, SCANNER, |
||
AND FAX MODES ........................................... |
80 |
|
5 |
TROUBLESHOOTING |
|
PRINTING OUT REPORTS ............................. |
81 |
|
● ACTIVITY REPORT AUTO LISTING ............ |
84 |
|
● PRINTING TRANSACTION REPORTS........ |
85 |
|
TROUBLESHOOTING..................................... |
86 |
|
MESSAGES AND SIGNALS ........................... |
87 |
|
● DISPLAY MESSAGES.................................. |
87 |
|
● AUDIBLE SIGNALS ...................................... |
87 |
|
INDEX .............................................................. |
|
88 |
2
QUICK REFERENCE GUIDE
The following quick reference guide provides brief explanations the operation of the machine.
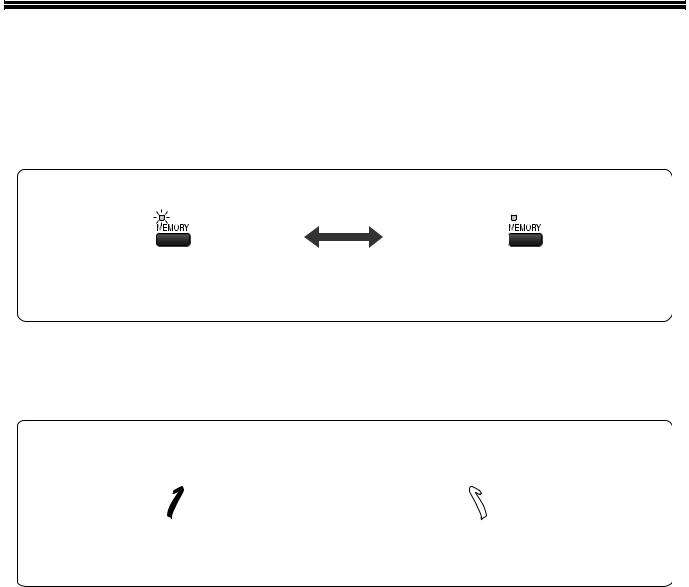
Selecting the transmission mode (p.22)
Memory transmission mode |
Direct transmission mode |
The indicator lights up when |
Press the |
The indicator is off when |
memory transmission mode |
[MEMORY] key |
direct transmission mode |
is selected. |
to change modes. |
is selected. |
Place the original
Using the RSPF (p.47) |
Using the document glass (p.48) |
||||
|
|
|
|
|
|
|
|
|
|
|
|
Place the original face up |
Place the original face down |
(up to 50 pages at once) |
|
3
Sending a fax
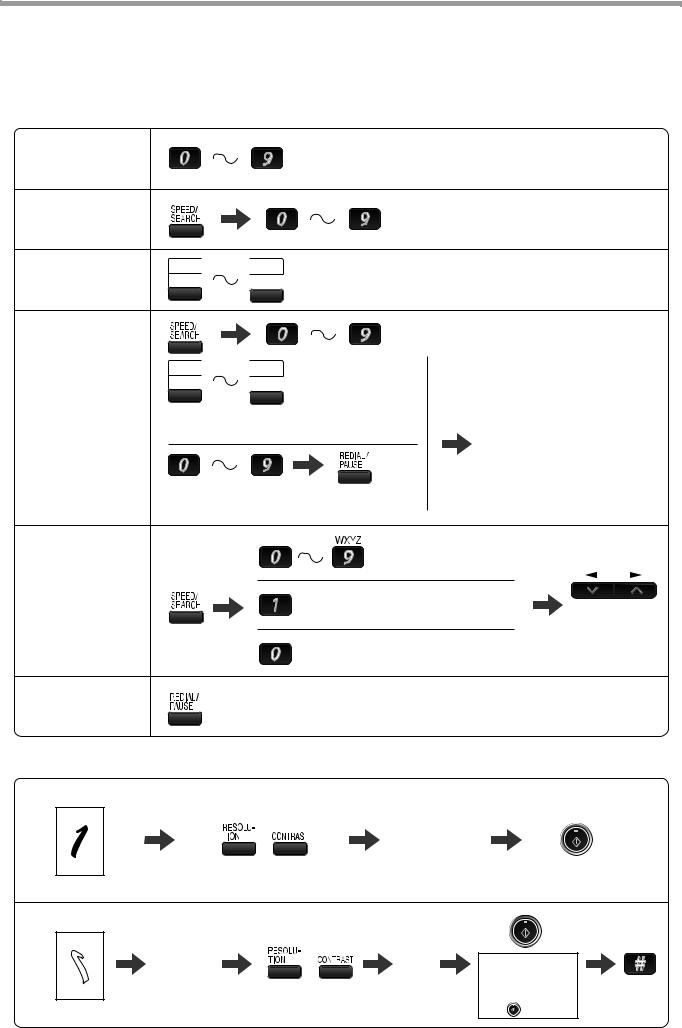
Dialing methods
Direct Dialing |
|
|
Press the numeric keys to dial. |
||
(p.54) |
|
|
|
|
|
Speed Dialing |
|
|
|
Enter a two-digit |
|
(p.54) |
|
|
|
Speed Dial number. |
|
Rapid Key |
01 |
09 |
* It is not necessary to press the [START] key |
||
10 |
18 |
||||
Dialing (p.54) |
after pressing a Rapid Key. |
||||
|
|
||||
Chain Dialing |
|
|
|
|
|
(p.55) |
|
|
|
|
|
|
01 |
09 |
|
|
|
|
10 |
18 |
|
|
|
|
|
Speed Dial number or Rapid Key set for |
|
||
|
|
Chain Dialing when stored. |
Dial the next part of the number |
||
|
|
|
|
||
|
|
|
|
(a Group Key cannot be used). |
|
|
|
Dial with the numeric keys and then |
|
||
|
|
press the [REDIAL/PAUSE] key. |
|
||
Search Dialing |
|
|
Enter the first letter of the |
||
(p.56) |
|
|
stored name. |
||
Press when the first character of the
name is a special character or number.
Select the destination.
Search by fax numbers.
Redialing
(p.56) |
Redial the last number dialed. |
Sending a fax
Using the RSPF
|
|
Dial. |
|
|
Place the original. (p.47) |
Adjust the resolution |
|
|
|
and contrast. (p.50) |
|
|
||
Using the document glass |
|
|
||
Specify the |
Dial. |
If you are faxing a |
||
original size. |
||||
multi-page original, |
||||
(p.49) |
Adjust the resolution |
|
change pages and |
|
|
|
press the [START] |
||
Place the original. (p.48) |
and contrast. (p.50) |
|
||
|
key ( ). |
|||
4
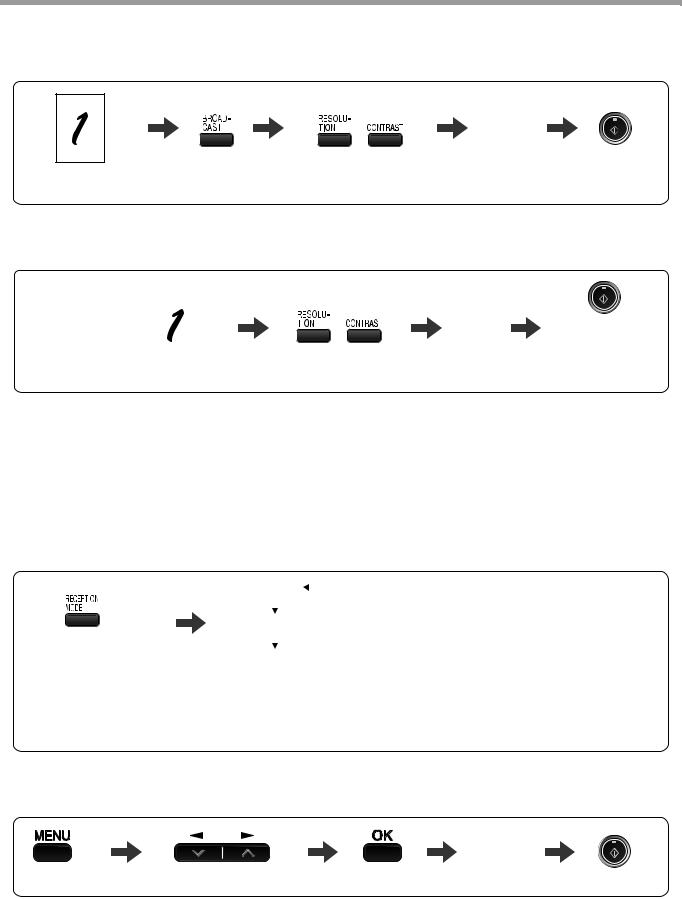
Sending a fax to multiple destinations (Broadcasting) (p.67)
Dial.
Adjust the resolution
Place the original.
and contrast. (p.50)
Storing a fax job while another job is in progress
|
|
|
|
|
|
|
|
Fax transmission |
|
|
|
|
|
|
|
or reception in |
|
|
|
|
|
Dial. |
|
|
|
|
|
|
The fax will be |
||
progress |
|
|
|
|
|
||
|
|
|
|
|
transmitted after |
||
|
|
|
|
|
|
||
|
|
|
|
Adjust the resolution |
|
previous jobs are |
|
|
|
|
|
|
|||
Place the original. |
|
completed. |
|||||
and contrast. (p.50) |
|
|
|||||
|
|
||||||
|
|
|
|
|
|
||
Automatically sending a fax at a specified time (timer transmission)
To set up a timer transmission, see "TIMER OPERATIONS" (p.75).
Receiving a fax
Selecting the reception mode (p.58)
|
|
"AUTO" |
|
||
|
|
|
|||
|
|
|
|
|
|
|
|
|
|
|
|
|
|
"MAN." |
|||
Press until the desired |
|
|
|
||
"A.M." |
|||||
reception mode appears |
|||||
in the display. |
|
|
|
||
|
|
|
|||
"AUTO" : Faxes are automatically received.
"MAN." : Select this mode when an extension phone is connected to the machine to receive phone calls. To receive a fax, answer the call on the phone and then press the [START] ( ) key.
"A.M." : Select this mode when an answering machine is connected to the machine. Faxes will be received automatically.
Calling a fax machine and requesting automatic transmission of an original placed in that machine (p.69)
Dial.
Select "POLLING MODE".
*Another fax machine can also call your fax machine and request automatic transmission of a original placed in your machine. For this to take place, the reception mode of your machine must be set to "AUTO".
5

LIST OF FAX FUNCTIONS
The FAX MAIN MENU is used to configure settings for the fax function and program information such as the fax number of the machine. The settings in the FAX MAIN MENU are shown below.
The procedure for configuring settings is explained in "SELECTING SETTINGS FOR THE FUNCTION" (p.10).
|
|
Menu item |
|
Settings (factory default setting appears in bold) |
Page |
|
|
|
|
|
|
0 : RX DATA TRANSFER |
|
|
|
||
|
|
|
|
||
|
1 |
: DATA TRANSFER |
Enable transfer of received faxes to another fax machine when |
65 |
|
|
|
|
printing is not possible. |
||
|
|
|
|
||
|
|
|
|
|
|
|
2 |
: FAX NUMBER |
Program the fax number of the machine to which received faxes |
64 |
|
|
|
|
will be transferred. |
||
|
|
|
|
||
|
|
|
|
|
|
1 : TIMER MODE |
|
|
|
||
|
|
|
|
||
|
1 |
: SET |
Set up a transmission or polling job to take place automatically |
75 |
|
|
|
|
at a specified time. |
||
|
|
|
|
||
|
|
|
|
|
|
|
2 |
: CLEAR |
Cancel a timer transmission job. |
75 |
|
|
|
|
|
|
|
2 : ENTRY MODE |
|
|
|
||
|
|
|
|
||
|
1 |
: FAX NUMBER |
Store (or delete) fax numbers in Rapid Keys, Speed Dial |
|
|
|
|
|
numbers, and Group Keys. |
38, 40, |
|
|
|
|
1 |
: RAPID KEY |
|
|
|
|
41, 43 |
||
|
|
|
2 |
: SPEED # |
|
|
|
|
|
||
|
|
|
3 |
: GROUP KEY |
|
|
|
|
|
|
|
|
2 |
: OWN PASSCODE SET |
Program the name and phone number of the user of the |
19 |
|
|
|
|
machine. |
||
|
|
|
|
||
|
|
|
|
|
|
|
3 |
: PASSCODE # MODE |
Store fax numbers that are allowed to poll the machine when |
74 |
|
|
|
|
polling security is used. |
||
|
|
|
|
||
|
|
|
|
|
|
|
4 |
: DAY LIGHT SAVING |
Enable automatic adjustment of the clock at the beginning and |
21 |
|
|
|
|
end of daylight savings time. |
||
|
|
|
|
||
|
|
|
|
||
3 : MEMORY STATUS |
Check and delete stored fax jobs waiting for transmission and |
57 |
|||
|
|
|
automatic recall jobs. |
||
|
|
|
|
||
|
|
|
|
||
4 : USER PROGRAM |
|
|
|
||
|
|
|
|
||
|
1 |
: DOC. GLASS SIZE |
Set the size of an original faxed from the document glass. |
|
|
|
|
|
1 |
: 8.5x11 |
49 |
|
|
|
2 |
: 8.5x14 |
|
|
|
|
|
||
|
|
|
3 |
: A4 |
|
|
|
|
|
|
|
|
2 |
: FIXED DOC. SIZE |
Set the default size of originals faxed from the document glass. |
|
|
|
|
|
1 |
: 8.5x11 |
49 |
|
|
|
2 |
: 8.5x14 |
|
|
|
|
|
||
|
|
|
3 |
: A4 |
|
|
|
|
|
|
|
|
3 |
: RESO. PRIORITY |
Set the default resolution for fax transmission. |
|
|
|
|
|
1 |
: STANDARD |
33 |
|
|
|
2 |
: FINE |
|
|
|
|
|
||
|
|
|
3 |
: SUPER FINE |
|
|
|
|
|
|
|
|
4 |
: # OF RINGS (AUTO) |
Set the number of rings on which the machine answers calls in |
|
|
|
|
|
automatic reception mode. |
24 |
|
|
|
|
0 |
- 9 (2) |
|
|
|
|
|
|
|
|
5 |
: # OF RINGS (MANUAL) |
Set the number of rings on which the machine answers calls in |
|
|
|
|
|
manual reception mode. |
25 |
|
|
|
|
0 |
- 9 (0) |
|
|
|
|
|
|
|
6
|
|
|
|
|
|
|
|
|
|
|
|
|
Menu item |
|
|
Settings (factory default setting appears in bold) |
Page |
|
|
|
|
||
|
6 : AUTO LISTING |
Enable automatic printing of the Activity Report when |
|
||
|
|
information on a total of 50 fax transmissions/receptions |
|
||
|
|
accumulates. |
84 |
||
|
|
1 |
: ON |
|
|
|
|
2 |
: OFF |
|
|
|
|
|
|
||
|
7 : PRINT SELECTION |
1 : TRANSMISSION |
|
||
|
|
|
Select the condition for printing reports on fax transmissions. |
|
|
|
|
|
1 |
: ALWAYS PRINTS |
85 |
|
|
|
2 |
: ERROR ONLY |
|
|
|
|
3 |
: NEVER PRINTS |
|
|
|
|
|
|
|
|
|
2 |
: BROADCAST |
|
|
|
|
|
Select the condition for printing reports on broadcast |
|
|
|
|
|
transmissions. |
85 |
|
|
|
|
1 |
: ALWAYS PRINTS |
|
|
|
|
|
||
|
|
|
2 |
: ERROR ONLY |
|
|
|
|
3 |
: NEVER PRINTS |
|
|
|
|
|
|
|
|
|
3 |
: RECEPTION |
|
|
|
|
|
Select the condition for printing reports on received faxes. |
|
|
|
|
|
1 |
: ALWAYS PRINTS |
85 |
|
|
|
2 |
: ERROR ONLY |
|
|
|
|
3 |
: NEVER PRINTS |
|
|
|
|
|
|
|
|
|
4 |
: IMAGE MEM. PRINT |
|
|
|
|
|
Enable printing of the original image on transaction reports. |
|
|
|
|
|
1 |
: ALWAYS PRINTS |
85 |
|
|
|
2 |
: ERROR ONLY |
|
|
|
|
3 |
: NEVER PRINTS |
|
|
|
|
|
||
|
8 : RECALL TIMES BUSY |
Set the number of recall attempts that are made when the line is |
|
||
|
|
busy. |
28 |
||
|
|
00 - 14 (02) |
|
||
|
|
|
|
||
|
9 : RECALL TIMES ERR |
Set the number of recall attempts that are made when a |
|
||
|
|
communication error occurs. |
29 |
||
|
|
0 |
- 1 (1) |
|
|
|
|
|
|
||
|
10 : RECALL INT. BUSY |
Set the interval between recall attempts when the line is busy. 1 |
|
||
|
|
to 15 minutes can be selected. |
30 |
||
|
|
01 - 15 min. (03 min.) |
|
||
|
|
|
|
||
|
11 : RECALL INT. ERR |
Set the interval between recall attempts when a communication |
|
||
|
|
error occurs. 0 to 15 minutes can be selected. |
31 |
||
|
|
00 - 15 min. (01 min.) |
|
||
|
|
|
|
||
|
12 : SECURITY SELECT |
Enable the polling security function. |
|
||
|
|
1 |
: ON |
73 |
|
|
|
2 |
: OFF |
|
|
|
|
|
|
||
|
13 : FAX REMOTE |
Set the 1-digit number used to activate remote fax reception. |
36 |
||
|
NUMBER |
0 - 9 (5) |
|||
|
|
||||
|
|
|
|
||
|
14 : REMOTE RECEPTION |
Enable the remote reception function. |
|
||
|
|
1 |
: ON |
35 |
|
|
|
2 |
: OFF |
|
|
|
|
|
|
||
|
15 : FAX SIGNAL RCV |
Enable automatic fax reception when a fax tone is heard after |
|
||
|
|
answering a call on an extension phone. |
34 |
||
|
|
1 |
: ON |
||
|
|
|
|||
|
|
2 |
: OFF |
|
|
|
|
|
|
|
|
7
|
|
|
|
|
|
|
|
|
|
|
Menu item |
|
Settings (factory default setting appears in bold) |
Page |
|
|
|
|
|
|
16 : RCV REDUCE |
When a fax is received that is larger that the printing paper, |
|
|
|
|
enable reduction of the fax to the size of the paper to avoid the |
|
|
|
|
fax being cut off. |
60 |
|
|
|
1 |
: ON |
|
|
|
2 |
: OFF |
|
|
|
|
|
|
|
17 : BEEP LENGTH |
Set the length of the beep that sounds when fax transmission or |
|
|
|
|
reception ends. |
|
|
|
|
1 |
: 3 SEC |
16 |
|
|
2 |
: 1 SEC |
|
|
|
3 |
: NO BEEP |
|
|
|
|
|
|
|
18 : RINGER VOLUME |
Set the volume of the ringer. |
|
|
|
|
1 |
: OFF |
|
|
|
2 |
: LOW |
15 |
|
|
3 |
: MIDDLE |
|
|
|
4 |
: HIGH |
|
|
|
|
|
|
|
19 : BEEPER VOLUME |
Set the volume of the beep that sounds when a key is pressed. |
|
|
|
|
1 |
: OFF |
|
|
|
2 |
: LOW |
17 |
|
|
3 |
: MIDDLE |
|
|
|
4 |
: HIGH |
|
|
|
|
|
|
|
20 : DIAL MODE |
Set the dial mode for the type of line you are on. |
|
|
|
|
1 |
: TONE |
27 |
|
|
2 |
: PULSE |
|
|
|
|
|
|
|
21 : DISTINCTIVE RING |
Set the ring pattern for distinctive ring. |
|
|
|
|
1 |
: OFF |
|
|
|
2 |
: STANDARD |
|
|
|
3 |
: PATTERN 1 |
37 |
|
|
4 |
: PATTERN 2 |
|
|
|
|
||
|
|
5 |
: PATTERN 3 |
|
|
|
6 |
: PATTERN 4 |
|
|
|
7 |
: PATTERN 5 |
|
|
|
|
|
|
|
22 : INDEX PRINT |
Enable printing of a black mark (index) at the top of each |
|
|
|
|
received fax page. |
32 |
|
|
|
1 |
: ON |
|
|
|
|
||
|
|
2 |
: OFF |
|
|
|
|
|
|
|
23 : 2-SIDED RX |
Print on both sides of the paper when a multi-page fax is received. |
|
|
|
|
1 |
: ON |
59 |
|
|
2 |
: OFF |
|
|
|
|
|
|
|
24 : TRAY SELECTION |
Set the tray for printing received faxes. |
|
|
|
(When the 250-sheet paper |
1 : AUTO |
26 |
|
|
feed unit is installed.) |
2 : TRAY 1 |
||
|
|
|||
|
|
3 |
: TRAY 2 |
|
|
|
|
|
|
5 :ANTI JUNK FAX |
|
|
|
|
|
|
|
|
|
|
1 : ANTI JUNK SELECT |
Enable the anti junk function to block fax reception from |
|
|
|
|
specified fax numbers. |
77 |
|
|
|
1 |
: ON |
|
|
|
|
||
|
|
2 |
: OFF |
|
|
|
|
|
|
|
2 : JUNK FAX # |
Program (or delete) fax numbers from which fax reception is to |
|
|
|
|
be blocked. |
78 |
|
|
|
1 |
: SET |
|
|
|
|
||
|
|
2 |
: CLEAR |
|
|
|
|
|
|
8
|
|
|
|
|
|
|
|
|
|
|
|
|
|
|
Menu item |
Settings (factory default setting appears in bold) |
Page |
|
|
|
|
|
|
6 |
: A.M. MODE |
|
|
||
|
|
|
|
|
|
|
|
1 |
: AUTO RECEIVE |
Enable fax reception when the answering machine is full and |
|
|
|
|
|
cannot receive messages or otherwise fails. |
44 |
|
|
|
|
1 : ON |
|
|
|
|
|
|
|
|
|
|
|
2 : OFF |
|
|
|
|
|
|
|
7 |
: MEMORY POLL MODE |
|
|
||
|
|
|
|
|
|
|
|
1 |
: 1 TIME |
Perform polling transmission once. |
71 |
|
|
|
|
|
|
|
|
2 |
: REPEAT |
Perform polling transmission repeatedly. |
71 |
|
|
|
|
|
|
8 |
: POLLING MODE |
Poll another fax machine. |
69 |
||
|
|
|
|
||
9 |
: SERIAL POLL MODE |
Sequentially poll multiple fax machines. |
70 |
||
|
|
|
|
|
|
9
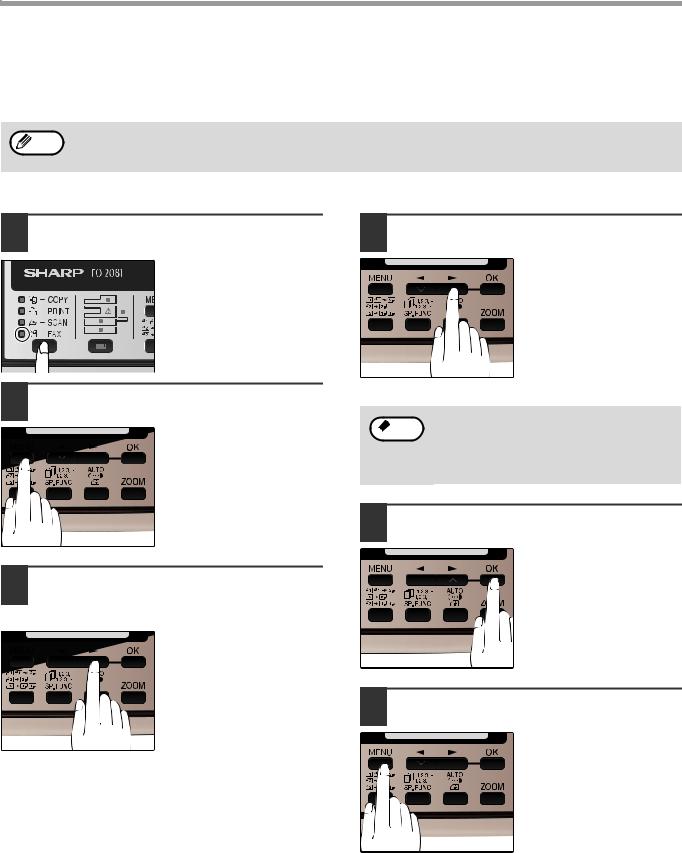
SELECTING SETTINGS FOR THE FUNCTION
The general procedure for configuring settings for the fax function is explained below. Follow this procedure to configure the settings explained on pages 6 through 9.
An item can also be selected after pressing the [MENU] key by pressing the numeric key for the item (the key Note corresponding to the number that appears in front of the item). When the numeric key is pressed, the item is
selected or entered.
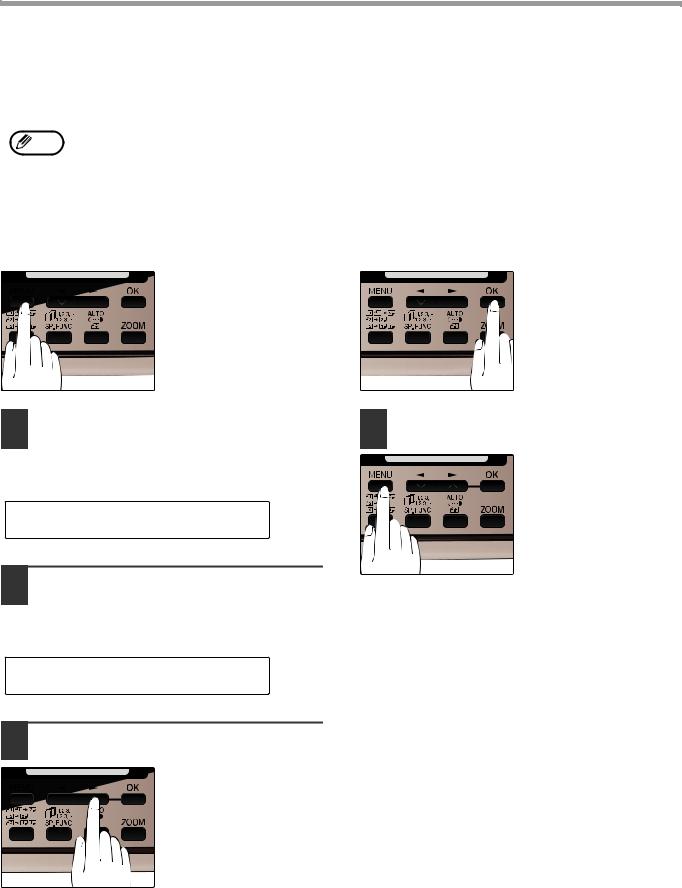
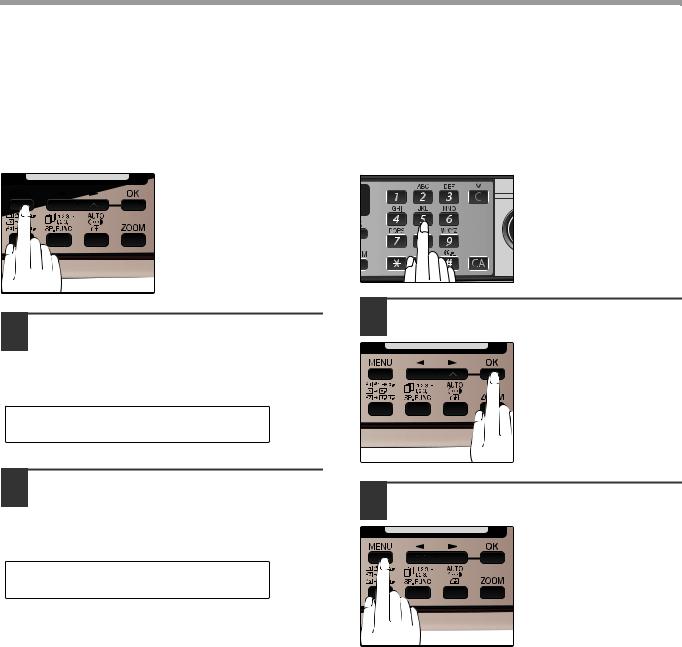
1 Press the [MODE SELECT] key to select fax mode.
The "FAX" indicator lights up to indicate that fax mode is selected.
2 Press the [MENU] key.
"FAX MAIN MANU" will appear in the display.
3 Press the [ ] key (
 ) or [
 ] key (
 ) to select a menu item and press the [OK] key.
The item is selected. Repeat this step until the item that you wish to configure appears.
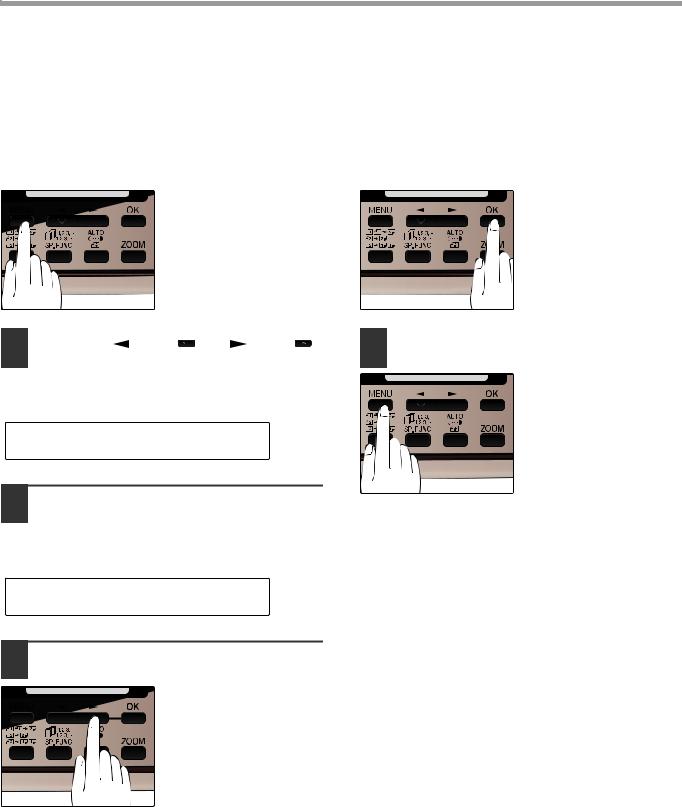
4 Select a setting or enter information.
To select a setting:
Press the [  ] key (
 ) or [
 ] key (
 ) until the setting is selected.
To enter information:
Press the numeric keys to enter characters or numbers.
• If you mistakenly select the wrong item,  Note press the [CLEAR] key (
  ) and repeat
the procedure from step 2.
•To cancel a setting for a fax function, press the [MENU] key.
5 Press the [OK] key.
The setting or information is entered.
6 Press the [MENU] key.
Press the [MENU] key to exit.
10

1 |
Chapter 1 |
INITIAL SETTINGS |
PART NAMES
1
2
3
5
4
RSPF
Original guides
Document |
feeder cover |
Exit area
Document feeder tray
Bypass tray
TEL  TEL jack
 LINE jack LINE
1Document glass
2Operation panel
3Front cover
4Paper tray
5Bypass tray paper guides
|
6 |
|
7 |
|
8 |
|
9 |
9 |
10 |
|
6Paper output tray
7Paper output tray extension
8Power switch
9Handles
10 Power cord
11
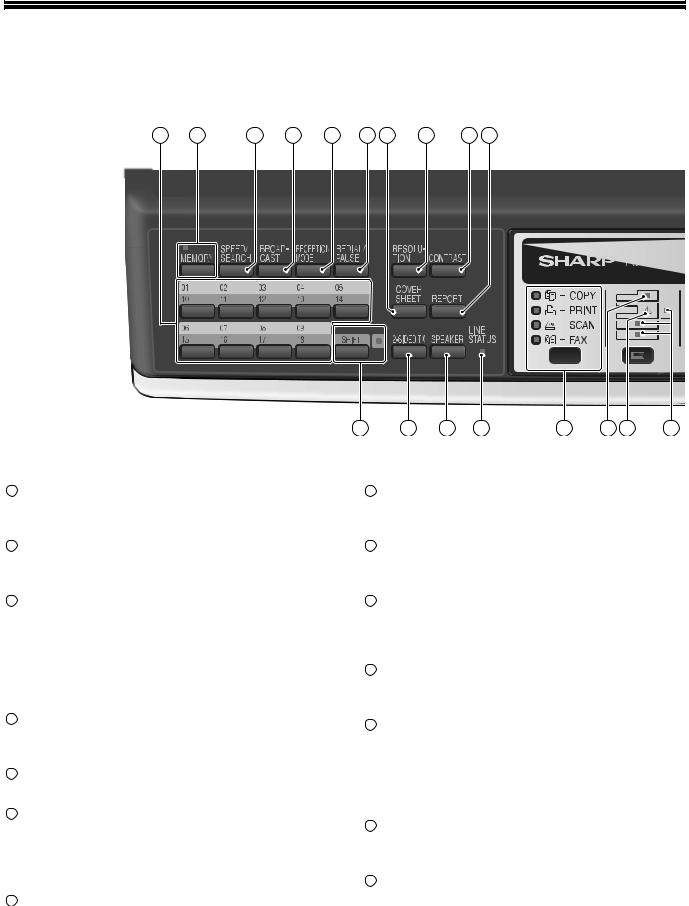
A LOOK AT THE FAX OPERATION PANEL
1 |
2 |
3 |
4 |
5 |
6 |
7 |
8 |
9 |
10 |
1Rapid keys
Press one of these keys to dial a fax or telephone number automatically.
2[MEMORY] key / indicator
Used for sending faxes in memory (indicator is lit) or direct sending (indicator is not lit).
3[SPEED/SEARCH] key
Press this key to dial a two digit Speed Dial number.
During character inputting, use this key to delete an incorrect entry.
Also, press this key twice to search for an automatic dialing number.
4[BROADCAST] key
Press this key to send originals to a group of receiving fax machines.
5[RECEPTION MODE] key
Press this key to select the mode of reception.
6[REDIAL/PAUSE] key
Press this key to automatically redial the last number you dialed.
Also, press this key to insert a pause when entering numbers.
7[COVERSHEET] key
Press this key to automatically add a cover sheet and message to a fax.
13 |
14 |
15 |
16 |
17 |
18 |
19 |
20 |
8[RESOLUTION] key
Press this key to adjust the resolution before sending faxes.
9[CONTRAST] key
Press this key to adjust the contrast before sending faxes.
10[REPORT] key
Press this key to print out a report of a fax transaction and also when receiving a confidential fax.
11Display
Shows various messages during fax operation and programming.
12[CLEAR] key (  )
)
Press this key to stop an operation before it is completed, or to delete the number that was last input.
When a setting menu appears, use this key to move back to the previous menu level.
13[SHIFT] key / indicator
Press this key to switch between upper and lower case.
14[2-SIDED TX] key
Press this key to fax a two-sided original.
12
INITIAL SETTINGS
11 |
12 |
21 |
22 |
23 |
24 |
25 |
26 |
27 |
28 |
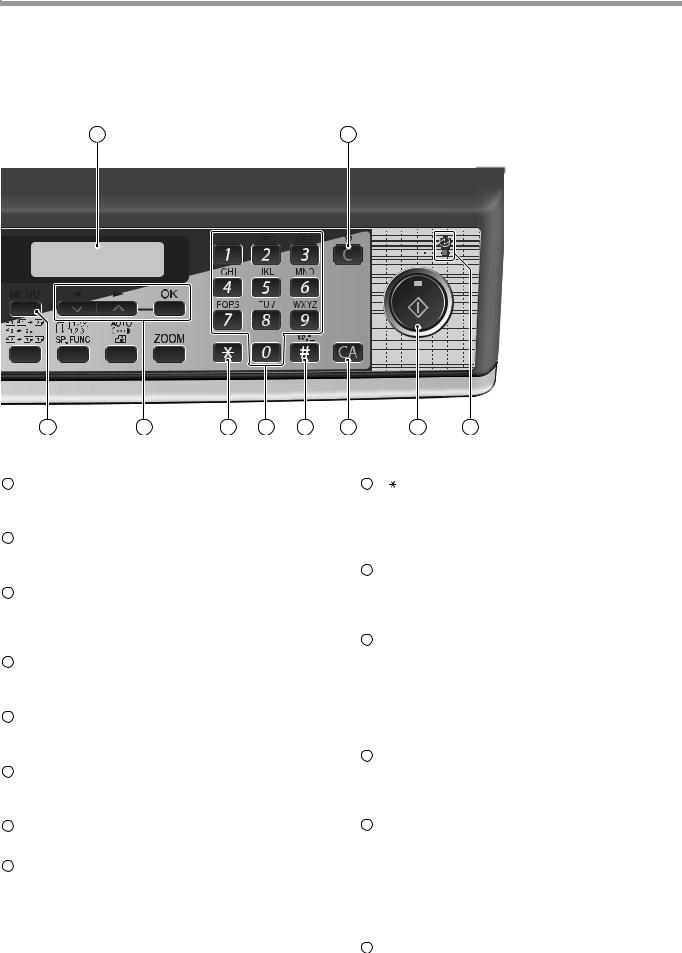
15 [SPEAKER] key |
|
|
|
|
23 |
[ ] key |
|
Press this key to begin manual dialing. (To close the line, press the [SPEAKER] key again.)
16LINE STATUS indicator
Lit when sending/receiving faxes, blinking when receiving data.
17[MODE SELECT] key / Mode indicators
Press this key to select the mode. The indicator of the selected mode lights (copy, printer, scanner, fax mode indicators).
18RSPF indicator
This lights up when an original is placed in the RSPF.
19Error indicator
This lights steadily or blinks when a paper misfeed or other error occurs.
20Tray location indicator
Indicates the selected paper tray. The indicator blinks when the tray is out of paper or is not closed.
21[MENU] key
Press this key to configure a user program.
22[  ] key (
  ), [
), [  ] key (
  ), [OK] key
Press the [  ] key (
  ) or [
  ] key (
  ) to select an item in a function setting menu.
Press the [OK] key to enter a selection.
Press this key to enter symbols during a name storing procedure.
Press the "  " key to change from pulse dialing to tone dialing mode.
24Numeric keys
Press these keys to dial numbers, and enter numbers and letters during number/name storing procedures.
25[#] key
Press this key to enter symbols during a name storing procedure. The [#] key scrolls through symbols in the opposite direction of the [  ] key. When dialing, press this key after you are finished scanning originals into memory from the document glass.
26[CLEAR ALL] key (  )
)
This returns all functions to the default settings. When pressed in a setting menu, this returns the settings and display to the initial state.
27[START] key (  )/ indicator
Used for the following:
•To begin sending a fax.
•Reading an original into memory from the document glass.
•Manually receiving a fax.
•Entering and setting information.
28Power save indicator
This lights up when the power save function is activated.
13
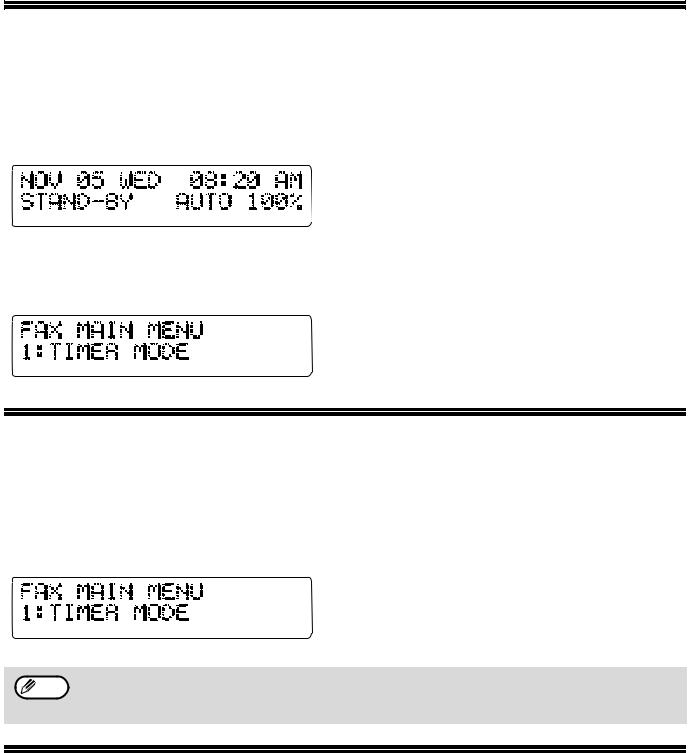
ABOUT THE LIQUID CRYSTAL DISPLAY
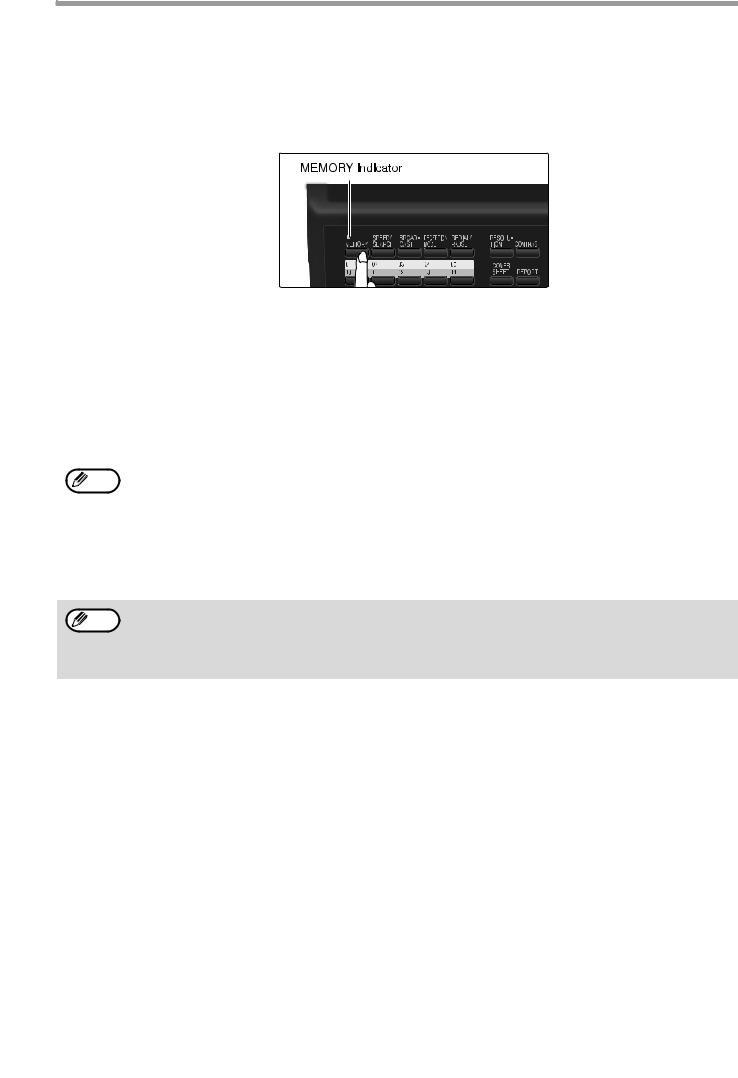
The machine is equipped with a two-line liquid crystal display (LCD) on the operation panel for displaying various messages and settings during operation. This LCD can display up to 20 characters on each line. When the machine is idle, the LCD shows the date, time, reception mode and the stand-by memory available.
Example:
When an original is placed in the RSPF, the second line changes from "STAND-BY" to "SEND READY".
When the [MENU] key is pressed to configure a setting, the display appears as shown below.
Example:
The selected setting or entered information appears on the second line.
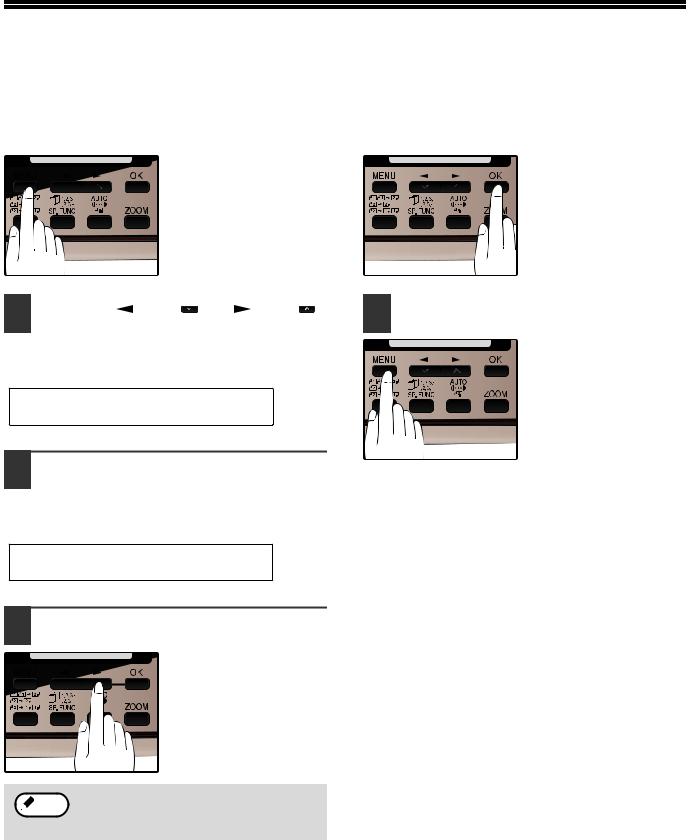
USING THE ARROW KEYS
To configure settings and program information, press the [MENU] key and then press the [  ] key (
  ) or [
  ] key (
  ) to select the item that you wish to configure.
The arrows keys can also be used while entering characters to move the cursor.
Example:
Press the [  ] key (
  ) or [
  ] key (
  ) to change the item selection that appears on the second line.
An item can also be selected after pressing the [MENU] key by pressing the numeric key for the item Note (the key corresponding to the number that appears in front of the item). When the numeric key is
pressed, the item is selected or entered.
ADJUSTING THE BEEP VOLUME
You can adjust the volume of the beep that sounds when a key is pressed.
The key beep volume is adjusted with "KEY TOUCH SOUND" (Program number 15) in the user programs of copy mode. See "User Programs" in the Operation Guide (for general information).
14
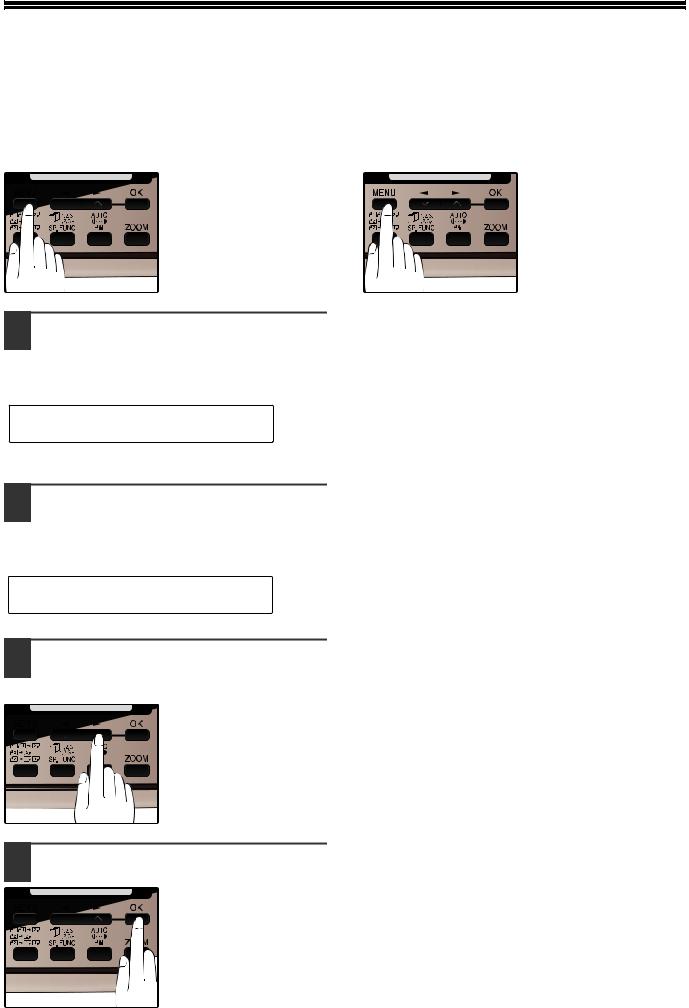
ADJUSTING THE RINGING VOLUME
Adjust the ringing volume of the machine following the procedure below.
1 |
Press the [MENU] key. |
|
5 |
Press the [OK] key. |
||||||
|
|
|
|
|
|
|
|
|
|
|
|
|
|
|
|
|
|
|
|
|
|
|
|
|
|
|
|
|
|
|
|
|
|
|
|
|
|
|
|
|
|
|
|
2 Press the [ ] key ( ) or [ ] key ( ) |
6 Press the [MENU] key. |
||
until "4:USER PROGRAM" appears, |
|
|
|
and then press the [OK] key. |
|
|
Press the [MENU] key to |
|
|
|
exit. |
Selection |
|
|
|
|
|
|
|
"4:USER PROGRAM"
3 Press the [ ] key (
 ) or [
 ] key (
 ) until "18:RINGER VOLUME" appears, and then press the [OK] key.
Selection
"18:RINGER VOLUME"
4 Press the [ ] key (
 ) or [
 ] key (
 ) to set the ringer volume.
The selections are as
follows:
1:OFF
2:LOW
3:MIDDLE
4:HIGH
To turn off the ringer, select "1:OFF".
 Note An extension phone will still ring when the machine ringer is set to "1:OFF".
15
SETTING THE LENGTH OF ALARM BEEPS
You can select the length in seconds of the alarm beeps (emitted at the end of transmission and reception) following the procedure below.
1 |
Press the [MENU] key. |
|
6 |
Press the [MENU] key. |
|
|
|
|
|
Press the [MENU] key to exit.
2 Press the [ ] key (
 ) or [
 ] key (
 ) until "4:USER PROGRAM" appears, and then press the [OK] key.
Selection
"4:USER PROGRAM"
3 Press the [ ] key (
 ) or [
 ] key (
 ) until "17:BEEP LENGTH" appears, and then press the [OK] key.
Selection
"17:BEEP LENGTH"
4 Press the [ ] key (
 ) or [
 ] key (
 ) to set the alarm beeps to the desired length or to turn them off.
The selections are as
follows:
1:3SEC 2:1SEC 3:NO BEEP
5 Press the [OK] key.
16
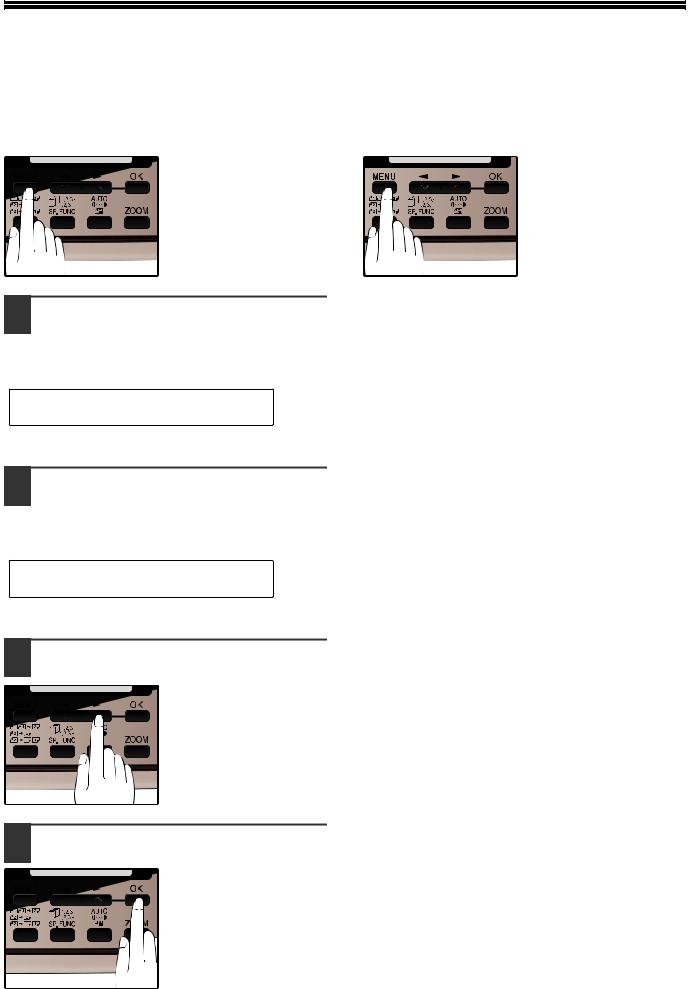
ADJUSTING THE ALARM BEEP VOLUME
Adjust the volume of alarm beeps (emitted at the end of transmission and reception) following the procedure below.
1 |
Press the [MENU] key. |
|
6 |
Press the [MENU] key. |
|
|
|
|
|
Press the [MENU] key to exit.
2 Press the [ ] key (
 ) or [
 ] key (
 ) until "4:USER PROGRAM" appears, and then press the [OK] key.
Selection
"4:USER PROGRAM"
3 Press the [ ] key (
 ) or [
 ] key (
 ) until "19:BEEPER VOLUME" appears, and then press the [OK] key.
Selection
"19:BEEPER VOLUME"
4 Press the [ ] key (
 ) or [
 ] key (
 ) to set the alarm volume.
The selections are as
follows:
1:OFF
2:LOW
3:MIDDLE
4:HIGH
To turn off the alarm, select "1:OFF".
5 Press the [OK] key.
17
FAX SETUP
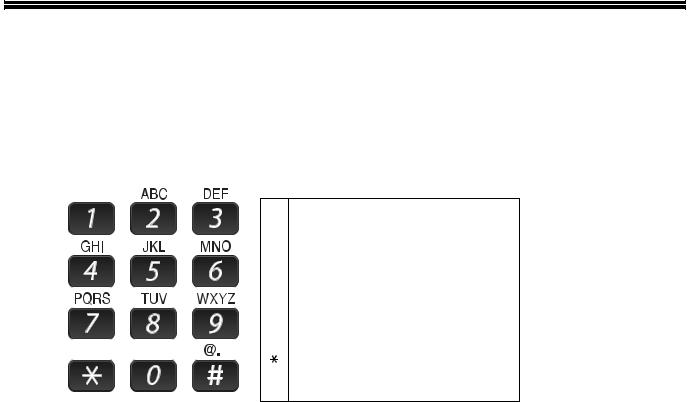
HOW TO ENTER CHARACTERS
You can enter letters with the numeric keys. Letters are marked above each of the numeric keys [2] through [9]. To enter a letter, press the appropriate key repeatedly until the desired letter appears (the number of the key appears first, followed by letters in the order marked above the key). The keys used for entering characters are shown below.
The following characters can be entered with the numeric keys:
|
|
|
key |
|
Characters that can be entered |
|||||||
|
|
|
1 |
1 |
Space |
|
|
|
|
|
|
|
|
|
|
2 |
A |
B |
C |
2 |
a |
b |
c |
|
|
|
|
|
3 |
D |
E |
F |
3 |
d |
e |
f |
|
|
|
|
|
4 |
G |
H |
I |
4 |
g |
h |
i |
|
|
|
|
|
5 |
J |
K |
L |
5 |
j |
k |
l |
|
|
|
|
|
6 |
M |
N |
O |
6 |
m |
n |
o |
|
|
|
|
|
7 |
P |
Q |
R |
S |
7 |
p |
q |
r |
s |
|
|
|
8 |
T |
U |
V |
8 |
t |
u |
v |
|
|
|
|
|
9 |
W |
X |
Y |
Z |
9 |
w |
x |
y |
z |
|
|
|
|
* } { ] [ ? > = ; : , + ) ('& % $"!/_-.@ # |
||||||||
|
|
|
|
|||||||||
|
|
|
0 |
0 |
|
|
|
|
|
|
|
|
## @.-_/ !"$ % &'( )+ ,: ; = > ? [ ] { } *
●To enter two characters in succession which require using the same key, press the [ ] key (
 ) once after entering the first character, and then enter the second character.
●If you enter an incorrect character or number, follow these steps to correct the mistake.
1.Press the [ ] key (
 ) or [
 ] key (
 ) to move the cursor to the character immediately following the incorrect character.
2.Press the [CLEAR] key (  ).
).
The character in front of the cursor is deleted.
3.Enter the correct character.
The character is inserted in front of the cursor.
18
INITIAL SETTINGS
ENTERING YOUR NAME AND FAX NUMBER
Note |
You can view all of the items in the menu display by pressing the [MENU] key, then using the [ ] key ( ) or |
|
[ ] key ( ) to scroll through the function list. Pressing the [OK] key chooses the displayed function. |
||
|
||
|
Procedures for inputting various items (name, telephone number, date, etc.) are given as follows. |
|
|
|
To have your name and fax number printed at the top of every page you transmit, program them by pressing the operation panel keys as shown below.
●If you enter an incorrect character or number, follow these steps to correct the mistake.
1.Press the [ ] key (
 ) or [
 ] key (
 ) to move the cursor to the character immediately following the incorrect character.
2.Press the [CLEAR] key (  ).The character in front of the cursor is deleted.
3.Enter the correct character.
IMPORTANT
FCC regulations require that your name, telephone/fax number, and the date and time appear on each fax message you send. Enter your name and fax number here and set the date and time as explained in the following section to have the fax machine include this information automatically at the top of your fax messages.
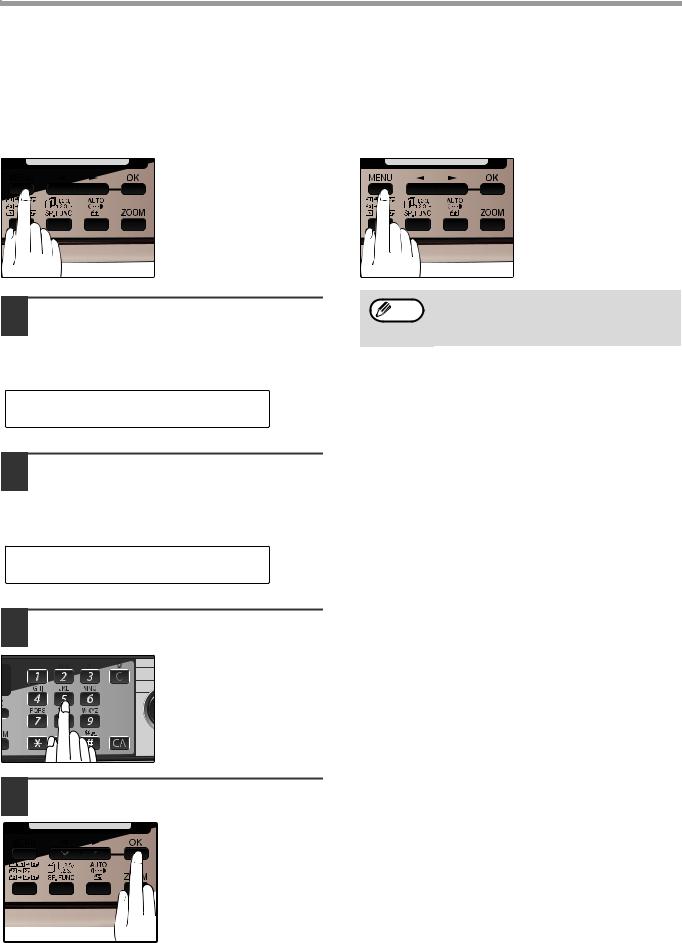
Use the following procedure to enter your name and fax number:
1 |
Press the [MENU] key. |
|
5 |
Enter your fax number with the |
|
|
|
|
numeric keys. |
Enter your own fax number (maximum 20 digits) by pressing the Numeric keys.
To insert a "+", press the [  ] key.
2 Press the [ ] key (
 ) or [
 ] key (
 ) until "2:ENTRY MODE" appears, and then press the [OK] key.
Selection
"2:ENTRY MODE"
3 Press the [ ] key (
 ) or [
 ] key (
 ) until "2:OWN PASSCODE SET" appears, and then press the [OK] key.
Selection
"2:OWN PASSCODE SET"
4 Press the [ ] key (
 ) or [
 ] key (
 ) to select "1:SET" and then press the [OK] key.
Selection
"1:SET"
6 Press the [OK] key.
"ENTER NAME" will appear in the display.
7 Enter your name with the numeric keys.
Enter your name by pressing the appropriate Numeric keys as shown
on the left. Press each
key repeatedly until the
desired letter appears in
the display (maximum of 36 characters).
To enter a space, press the [1] key twice.
19
INITIAL SETTINGS
8 Press the [OK] key.
9 Press the [MENU] key.
Press the [MENU] key to exit.
20
INITIAL SETTINGS
DAYLIGHT SAVING TIME SETTING
Enable this setting to have the internal clock automatically move forward and backward at the beginning and end of Daylight Saving Time.
Note |
If a transmission is in progress when the clock adjustment time for daylight savings time arrives, the clock will not |
|
be adjusted until the transmission ends. |
||
|
||
|
|
Follow these steps to enable Daylight Saving Time.
1 |
Press the [MENU] key. |
|
5 |
Press the [OK] key. |
||||||
|
|
|
|
|
|
|
|
|
|
|
|
|
|
|
|
|
|
|
|
|
|
|
|
|
|
|
|
|
|
|
|
|
|
|
|
|
|
|
|
|
|
|
|
2 Press the [ ] key (
 ) or [
 ] key (
 ) until "2:ENTRY MODE" appears, and then press the [OK] key.
Selection
"2:ENTRY MODE"
3 Press the [ ] key (
 ) or [
 ] key (
 ) until "4:DAY LIGHT SAVING" appears, and then press the [OK] key.
Selection
"4:DAY LIGHT SAVING"
4 Press the [ ] key (
 ) or [
 ] key (
 ) to select "1:ON" or "2:OFF".
Select "1:ON" to enable
the function.
Select "2:OFF" to disable the function.
6 Press the [MENU] key.
Press the [MENU] key to exit.
21
INITIAL SETTINGS
SELECTING THE TRANSMISSION MODE
The machine has two modes for sending faxes: memory transmission and direct transmission. To change modes, press the [MEMORY] key. The MEMORY indicator lights up when memory transmission is selected, and goes off when direct transmission is selected.
Transmission takes place as follows in each mode:
Memory transmission (the MEMORY indicator is lit)
When a fax is sent from the RSPF and there are no previously stored fax jobs and no job in progress (the telephone line is not being used), dialing and scanning begin at the same time. Each page is transmitted after it is scanned. This transmission method is called Quick Online transmission.
If there are previously stored fax jobs or a job in progress, or the fax is being sent from the document glass, the fax is temporarily scanned into memory before transmission.
Note |
When a fax is sent by transmission reservation (p.66), broadcast transmission (p.67), broadcasting using a Group |
|
key (p.68), or timer transmission (p.75), the fax is scanned into memory before transmission. |
||
|
||
|
|
Direct transmission (the MEMORY indicator is off)
The fax is sent directly after the destination is dialed and the connection established.
The machine memory is not used for direct transmission, and thus direct transmission is possible even when the memory is full.
Note |
• |
A fax job cannot be stored while a direct transmission is in progress. |
• |
Only one page can be sent from the document glass by direct transmission. |
•A subsequent function cannot be used while a direct transmission is in progress.
Transmission reservation (p.66), broadcast transmission (p.67), broadcasting using a Group key (p.68), or timer transmission (p.75)
22
INITIAL SETTINGS
SELECTING THE RECEPTION MODE
Your machine has three modes for receiving incoming calls and faxes:
●AUTO mode:
Select this mode when you only want to receive faxes on your telephone line. The machine will automatically answer all calls and receive incoming faxes.
●MAN. mode:
This is the most convenient mode for receiving phone calls if you have an extension phone. To have true manual mode, the machine must be set to not answer while in MAN. mode (see "SETTING THE NUMBER OF RINGS FOR MANUAL RECEPTION" (p.25)). You can also receive faxes; however, all calls must first be answered by picking up the receiver on the extension phone.
●A.M. mode:
Select this mode when an answering machine is connected to the machine and you want the answering machine to answer all calls. This allows you to receive both voice messages and faxes while you are out.
If you are using distinctive ringing as described in "DISTINCTIVE RINGING" on page 37, you must set the Note reception mode to AUTO. This is true, as well, if you are using an answering machine with distinctive ringing (in
this case, the answering machine must be connected to a separate wall jack, not to your machine).
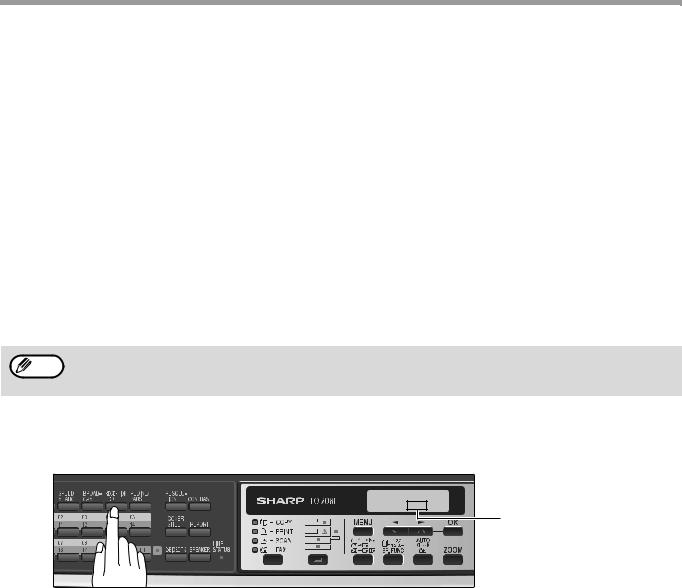
To select the reception mode, press the [RECEPTION MODE] key until the desired reception mode appears in the display.
NOV 05 WED 8:20 AM
STAD-BY AUTO 100%
The selected reception mode appears.
For more information on reception modes, refer to "RECEIVING FAXES" (p.58)".
23
INITIAL SETTINGS
SETTING THE NUMBER OF RINGS FOR AUTO RECEPTION
You can set the number of rings before the machine answers in AUTO mode following the procedure below.
1 |
Press the [MENU] key. |
|
6 |
Press the [MENU] key. |
|
|
|
|
|
2 Press the [ ] key (
 ) or [
 ] key (
 ) until "4:USER PROGRAM" appears, and then press the [OK] key.
Press the [MENU] key to exit.
Note |
If an external telephone is connected, the |
|
external telephone will ring one time when |
||
|
||
|
auto reception is set to 0 rings. |
Selection
"4:USER PROGRAM"
3 Press the [ ] key (
 ) or [
 ] key (
 ) until "4:# OF RINGS (AUTO)" appears, and then press the [OK] key.
Selection
"4:# OF RINGS (AUTO)"
4 Press a numeric key to select the number of rings.
Select the number of rings you would like to use (0 to 9).
5 Press the [OK] key.
24
INITIAL SETTINGS
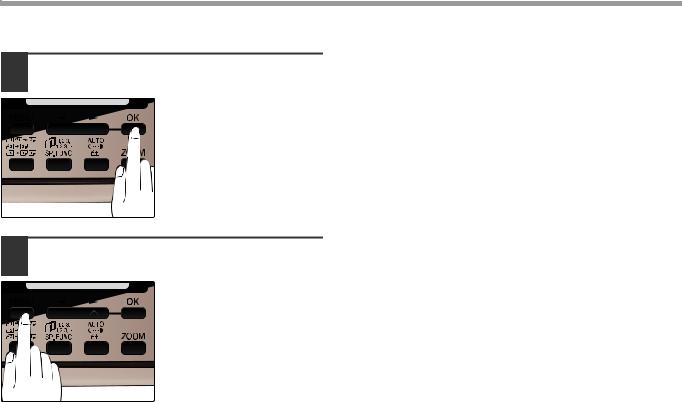
SETTING THE NUMBER OF RINGS FOR MANUAL RECEPTION
The number of rings before the machine answers in MANUAL mode can also be set.
If you do not want the machine to answer at all in MANUAL Mode, select "0" in Step 4 below.
1 |
Press the [MENU] key. |
|
4 |
Press a numeric key to select the |
|
|
|
|
number of rings. |
Select the number of rings you would like to use (0 to 9).
2 Press the [ ] key (
 ) or [
 ] key (
 ) until "4:USER PROGRAM" appears, and then press the [OK] key.
Selection
"4:USER PROGRAM"
3 Press the [ ] key (
 ) or [
 ] key (
 ) until "5:# OF RINGS (MANUAL)" appears, and then press the [OK] key.
Selection
"5:# OF RINGS (MANUAL)"
5 Press the [OK] key.
6 Press the [MENU] key.
Press the [MENU] key to exit.
SELECTING THE RECEPTION PAPER SIZE
Set the size of paper to be used to print received faxes. A size setting other than "A4", "8.5x11", or "8.5x14" is regarded as out of paper. To set the paper size, see "LOADING PAPER" in the Operation Guide (for general information).
25
INITIAL SETTINGS
SETTING THE TRAY SELECTION
(when the 250-sheet paper feed unit is installed)
Follow the steps below to select the paper tray for received faxes.
1 |
Press the [MENU] key. |
|
5 |
Press the [OK] key. |
||||||
|
|
|
|
|
|
|
|
|
|
|
|
|
|
|
|
|
|
|
|
|
|
|
|
|
|
|
|
|
|
|
|
|
|
|
|
|
|
|
|
|
|
|
|
2 Press the [ ] key ( ) or [ ] key ( ) |
6 Press the [MENU] key. |
||
until "4:USER PROGRAM" appears, |
|
|
|
and then press the [OK] key. |
|
|
Press the [MENU] key to |
|
|
|
exit. |
Selection |
|
|
|
|
|
|
|
"4:USER PROGRAM"
3 Press the [ ] key (
 ) or [
 ] key (
 ) until "24:TRAY SELECTION" appears, and then press the [OK] key.
Selection
"24:TRAY SELECTION"
4 Press the [ ] key (
 ) or [
 ] key (
 ) to select the tray selection.
The selections are as
follows: 1:AUTO 2:TRAY 1 3:TRAY 2
26
Loading...