


 Loading...
R U G G E D I Z E D M O B I L E P H O N E
User Manual
Please read this manual before operating your device, and keep it for future reference.

Legal Notices
Intellectual Property
All Intellectual Property, as defined below, owned by or which is otherwise the property of Samsung or its respective suppliers relating to the SAMSUNG Phone, including but not limited to, accessories, parts, or software relating there to (the “Phone System”), is proprietary to Samsung and protected under federal laws, provincial laws, and international treaty provisions. Intellectual Property includes,
but is not limited to, inventions (patentable or unpatentable), patents, trade secrets, copyrights, software, computer programs, and related documentation and other works of authorship. You may not infringe or otherwise violate the rights secured by the Intellectual Property. Moreover, you agree that you will not (and will not attempt to) modify, prepare derivative works of, reverse engineer, decompile, disassemble, or otherwise attempt to create source code from the software. No title to or ownership in the Intellectual Property is transferred to you. All applicable rights of the Intellectual Property shall remain with SAMSUNG and its suppliers.
Open Source Software
Some software components of this product incorporate source code covered under GNU General Public License (GPL), GNU Lesser General Public License (LGPL), OpenSSL License, BSD License and other open source licenses. To obtain the source code covered under the open source licenses, please visit:
http://opensource.samsung.com.
Disclaimer of Warranties;
Exclusion of Liability
EXCEPT AS SET FORTH IN THE EXPRESS WARRANTY CONTAINED ON THE WARRANTY PAGE ENCLOSED WITH THE PRODUCT, THE PURCHASER TAKES THE PRODUCT “AS IS”, AND SAMSUNG MAKES NO EXPRESS OR IMPLIED
WARRANTY OF ANY KIND WHATSOEVER WITH RESPECT TO THE PRODUCT, INCLUDING BUT NOT LIMITED TO THE MERCHANTABILITY OF THE PRODUCT OR ITS FITNESS FOR ANY PARTICULAR PURPOSE OR USE; THE DESIGN, CONDITION OR QUALITY OF THE PRODUCT; THE PERFORMANCE OF THE PRODUCT; THE WORKMANSHIP OF THE PRODUCT OR THE COMPONENTS CONTAINED THEREIN; OR COMPLIANCE OF THE PRODUCT WITH THE REQUIREMENTS OF ANY LAW, RULE, SPECIFICATION OR CONTRACT PERTAINING THERETO. NOTHING CONTAINED IN THE INSTRUCTION MANUAL SHALL BE CONSTRUED TO CREATE AN EXPRESS OR IMPLIED WARRANTY OF ANY KIND WHATSOEVER WITH RESPECT TO THE PRODUCT. IN ADDITION, SAMSUNG SHALL NOT BE LIABLE FOR ANY DAMAGES OF ANY KIND RESULTING FROM THE PURCHASE OR USE OF THE PRODUCT OR ARISING FROM THE BREACH OF THE EXPRESS WARRANTY, INCLUDING INCIDENTAL, SPECIAL OR CONSEQUENTIAL DAMAGES, OR LOSS OF ANTICIPATED PROFITS OR BENEFITS.
Modification of Software
SAMSUNG IS NOT LIABLE FOR PERFORMANCE ISSUES OR INCOMPATIBILITIES CAUSED BY YOUR EDITING OF REGISTRY SETTINGS, OR YOUR MODIFICATION OF OPERATING SYSTEM SOFTWARE.
USING CUSTOM OPERATING SYSTEM SOFTWARE MAY CAUSE YOUR DEVICE AND APPLICATIONS TO WORK IMPROPERLY. YOUR CARRIER MAY NOT PERMIT USERS TO DOWNLOAD CERTAIN SOFTWARE, SUCH AS CUSTOM OS.
IF YOUR CARRIER PROHIBITS THIS, IF YOU ATTEMPT TO DOWNLOAD SOFTWARE ONTO THE DEVICE WITHOUT AUTHORIZATION, YOU WILL BE NOTIFIED ON THE SCREEN THAT UNAUTHORIZED SOFTWARE HAS BEEN DETECTED. YOU SHOULD THEN POWER DOWN THE DEVICE AND CONTACT YOUR CARRIER TO RESTORE THE DEVICE TO THE CARRIER AUTHORIZED SETTINGS.
Legal Notices |
i |
|
|
|
|
©2014 Samsung Electronics
Samsung is a registered trademark of Samsung Electronics Co., Ltd.
The actual available capacity of the internal memory is less than the specified capacity because the operating system and default applications occupy part of the memory. The available capacity may change when you upgrade the device.
Nuance®, VSuite™, T9® Text Input, and the Nuance logo are trademarks or registered trademarks of Nuance Communications, Inc., or its affiliates in the United States and/or other countries.
ACCESS® and NetFront™ are trademarks or registered trademarks of ACCESS Co., Ltd. in Japan and other countries.
The Bluetooth® word mark, figure mark (stylized “B Design”), and combination mark (Bluetooth word mark and “B Design”) are registered trademarks and are wholly owned by the Bluetooth SIG.
microSD™ and the microSD logo are Trademarks of the SD Card Association.
Wi-Fi is a registered trademark of the Wireless Fidelity Alliance, Inc.
Swype and the Swype logos are trademarks of Swype, Inc.
IC Notice
This Class B digital apparatus complies with Canadian ICES-003.
This device complies with Industry Canada licence exempt RSS standard(s). Operation is subject to the following two conditions:
(1)this device may not cause interference, and
(2)this device must accept any interference, including interference that may cause undesired operation of the device.
Legal Notices |
ii |
|
|
|
|

Table of Contents
Getting Started............................................................. |
1 |
Front View........................................................................... |
2 |
Closed and Side Views.............................................. |
4 |
Assemble Your Device................................................ |
5 |
Set Up Your Device....................................................... |
8 |
Know Your Device................................................... |
10 |
Home Screen.................................................................. |
11 |
Status Bar.......................................................................... |
13 |
Navigation......................................................................... |
14 |
Entering Text.................................................................... |
16 |
Calling.................................................................................. |
19 |
Calling.................................................................................. |
20 |
Applications.................................................................... |
25 |
Menu..................................................................................... |
26 |
Address Book................................................................. |
27 |
Alarms................................................................................. |
31 |
PTT........................................................................................ |
32 |
Bluetooth............................................................................ |
38 |
Browser............................................................................... |
40 |
Camera............................................................................... |
42 |
Downloads........................................................................ |
44 |
Messaging........................................................................ |
45 |
Music Player.................................................................... |
49 |
My Files.............................................................................. |
51 |
Settings and Tools....................................................... |
53 |
Wi-Fi...................................................................................... |
54 |
Settings............................................................................... |
55 |
Sound Profiles................................................................ |
56 |
Display................................................................................. |
58 |
Time and Date................................................................ |
60 |
Phone................................................................................... |
61 |
Call......................................................................................... |
62 |
Backup Manager.......................................................... |
66 |
Security............................................................................... |
67 |
PC Connections............................................................ |
69 |
Network.............................................................................. |
70 |
Memory............................................................................... |
72 |
Reset.................................................................................... |
74 |
Software Update........................................................... |
75 |
About Phone.................................................................... |
76 |
TalkBack............................................................................. |
77 |
PTT Hotkey....................................................................... |
78 |
Tools....................................................................................... |
79 |
Voice Recognition........................................................ |
80 |
Voice Recorder.............................................................. |
82 |
Calendar............................................................................. |
84 |
Logs...................................................................................... |
86 |
Compass........................................................................... |
87 |
Tasks.................................................................................... |
88 |
Memo................................................................................... |
89 |
Calculator.......................................................................... |
90 |
Tip Calculator.................................................................. |
91 |
Converter........................................................................... |
92 |
World Clock..................................................................... |
93 |
Timer.................................................................................... |
94 |
Stopwatch.......................................................................... |
95 |
Safety Information................................................... |
96 |
Warning............................................................................... |
97 |
Caution................................................................................ |
99 |
TOC |
iii |
|
|
|
|

Getting Started
Learn about your mobile device hardware, assembly procedures, and how to get started using your new device.
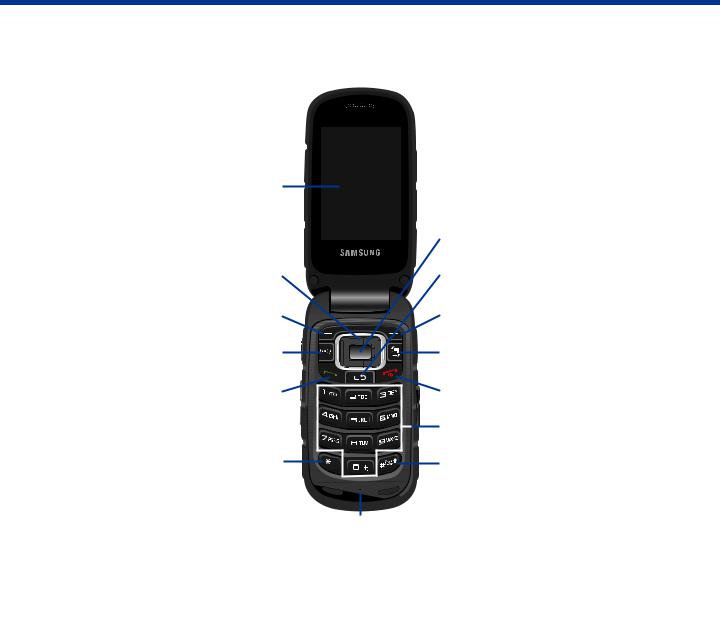
Front View

 Earpiece
Main display
|
Centre/Select key |
Navigation keys |
Clear key |
Left soft key |
Right soft key |
Voice recognition key |
Multitasking key |
Send key |
Power/Exit/End key |
|
Alphanumeric keypad |
Asterisk key |
Pound key |
|
Microphone |
•Alphanumeric keypad: Use these keys to enter numbers, letters, and some special characters.
Press and hold the  1 key to access your voicemail messages. Press and hold the
  0 key to enter a prefix code for an international call.
•Asterisk key: Enter an asterisk character for calling features. In text mode, press the asterisk key to change the character input type. When dialing a number, press and hold the asterisk key to enter a pause between numbers.
•Clear key: Delete characters in text mode. When navigating menus, the Clear key returns you to the previous screen.
•Earpiece: Listen to phone calls and voicemail.
•Voice recognition key: Shortcut key to the Voice Recognition app.
•Left soft key: Select the option indicated on the bottom left of the screen.
•Centre/Select key: Press this key to enter menus and confirm selections. When an option appears in the centre of a screen, use the Centre/Select key to choose the option.
•
•
Main display: The interactive display of the phone.
Microphone: Audio receiver to speak into for phone calls.
Getting Started |
2 |
Front View |
|
|
|
•Multitasking key: Press to bring up the Application Switch window, which allows you to switch to another application without closing any application that is currently open. You can select the Phone, Messaging, Browser, and
Music Player apps, or close all open apps.
•Navigation keys: Navigate through menus, pages, and applications using the Up, Down, Right, and Left navigation keys.
•Pound key: Enter the pound character (#) for calling features. In text entry mode, press the Pound key to enter a space between characters. When on a Home screen, press and hold the Pound key to set the phone on Vibrate alert mode.
•Power/Exit/End key: Press and hold this key to turn the phone on and off. When on a phone call, press this key to end the call. When in a menu or application, press this key to exit the screen or application window.
•Right soft key: Select the option indicated on the bottom right of the screen.
•Send key: Dial or receive a call. In standby mode, press the key once to view the call logs. Press the Send key again to dial a number in the call log.
When the phone is turned off, you can press and hold the Send key to turn the phone on.
Getting Started |
3 |
Front View |
|
|
|
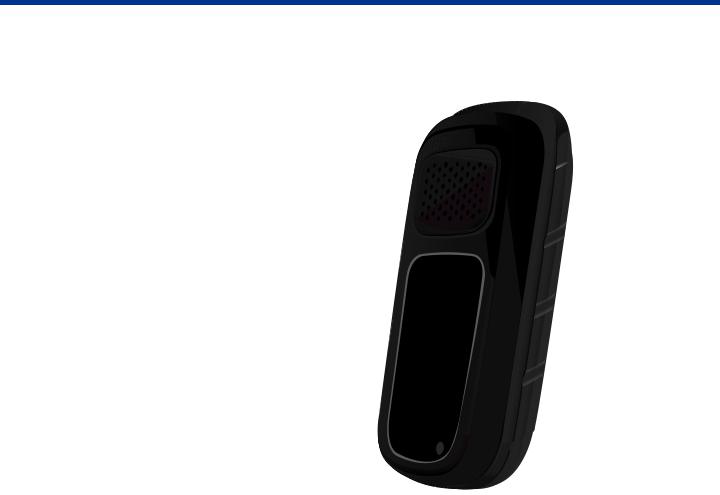
Closed and Side Views
Speaker |
|
PTT Hotkey |
Speaker key |
Volume keys |
|
|
|
|
USB/Headset |
|
|
|
|
port |
|
|
|
|
|
|
|
|
|
|
|
|
Cover display |
|
|
|
|
|
Camera
•Camera: Takes pictures and record videos.
•Cover display: View an incoming call or message. The Cover display also shows the date, time, network, and other icons, as well as alerts and alarms.
•PTT Hotkey: By default, this key launches Push to Talk (PTT). This hotkey can be reassigned to launch a different application. See PTT Hotkey.
•Speaker: Plays music and other audio files. It can also be turned on during calls to allow others to hear the conversation (when appropriate).
•Speaker key: During a call, press this key to turn the speaker on. When the phone is turned on and closed, press and hold this key to turn on and use the camera in Self Shot mode. See Using the Self Shot Feature.
•USB/Headset port: Plug in the travel charger, optional PC connection cable, or optional headset.
•Volume keys: Control volume levels for audio and ringtones. If you wish to silence an incoming call alert, press the Down volume key. The Volume keys can also be used to navigate up and down menus.
Getting Started |
4 |
Closed and Side Views |
|
|
|
Assemble Your Device
Prior to use, it is necessary to install the SIM card, optional memory card (not included), and the battery.
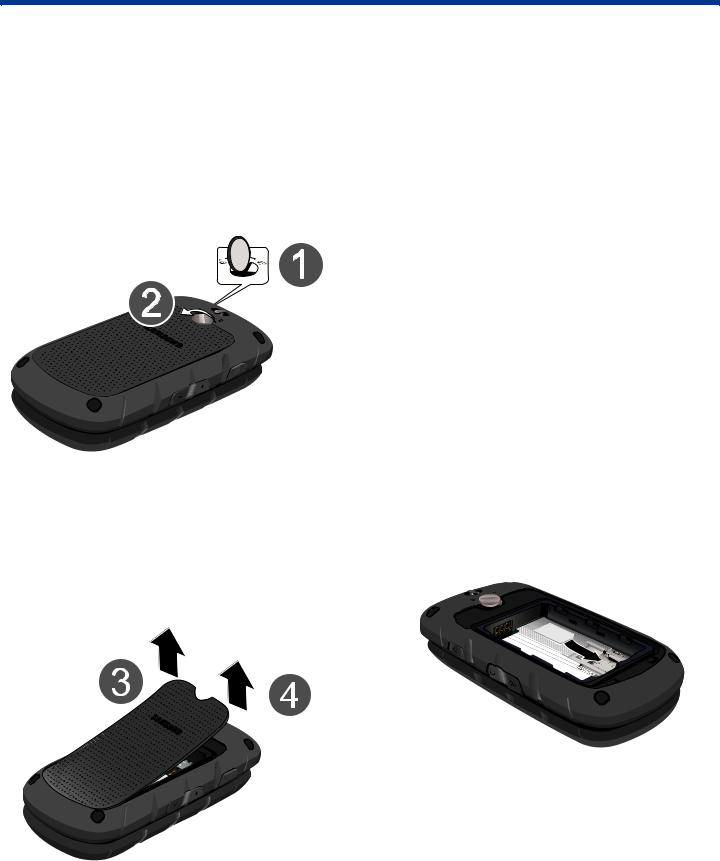
Remove the Back Cover
1.Use an object, such as a coin, and insert it in the slot on the back cover lock (1). Turn the lock counter-clockwise to open the battery cover (2). Lift the cover up and away from the phone.
2.Use the groove at the top left corner of the cover
(3) to lift the cover up and away from the back of the phone (4).
Warning: Do not bend or twist the back cover excessively. Doing so may damage the cover.
Install the SIM Card
When you subscribe to a cellular network, you are provided with a plug-in SIM card. During activation, your SIM card will be loaded with your subscription details, such as your PIN, available optional services, and others features.
Warning: Please be careful when handling the SIM card to avoid damaging it. Keep all SIM cards out of reach of small children.
To install a SIM card:
1.Remove the back cover and battery.
2.Carefully slide the SIM card into the SIM card slot until the card locks into place.
Make sure that the card’s gold contacts face into the phone and that the angled corner of the card is positioned as shown.
Caution: If the card is not inserted correctly, the device will not detect the SIM card. Re-orient the card and place it back into the slot if the SIM is not detected.
Getting Started |
5 |
Assemble Your Device |
|
|
|

Install an Optional Memory Card
You can install an optional microSD or microSDHC memory card (not included) to expand available memory space.
Note: A memory card can be installed at any time; it is not necessary to install it prior to using the device.
To add additional memory to your phone, you can insert a microSD card into the memory card slot, located on top of the SIM card, inside the back of the phone.
Use the following instructions and illustrations to properly install a microSD card.
Note: Your phone supports microSD cards to a maximum size of 32GB.
1.Remove the back cover and the battery.
2.Slide the microSD card into the slot as shown in the diagram.
Warning! Please note the printed circuit side faces down when inserting the card.
To remove a microSD card:
►► Press down and gently slide it out of the socket.
Install the Battery
1.Insert the battery into the opening on the back of the phone, making sure the connectors align.
2.Gently press down to secure the battery.
Replace the Back Cover
1.Place the cover back on the bottom of the handset (1) then press down firmly (2).
2.Press down along the edges to make sure the cover is flush with the phone and that there is a tight seal.
3.Turn the slot on the back cover lock clockwise until the cover locks.
Note: When placing the cover back on the phone, press down firmly along the edges to ensure that the cover is flush with the phone. This ensures that the battery compartment is pressurized.
Getting Started |
6 |
Assemble Your Device |
|
|
|
Charge the Battery
Your device is powered by a rechargeable, standard Li-Ion battery. A Wall/USB Charger (charging head and USB cable) is included with the device for charging the battery from any standard outlet.
The battery comes partially charged. A fully discharged battery requires up to four hours of charge time. You can use the device while charging.
Caution: Use only Samsung-approved charging devices and batteries. Samsung accessories are designed to maximize battery life. Using other accessories may invalidate your warranty and may cause damage.
1.Open the side slot and plug the connector of the travel adapter jack into the jack on the side of the phone.
2.Insert the USB cable into the port.
3.Connect the USB cable to the charging head, and then plug the charging head into a standard outlet.
4.When charging is complete, unplug the charging head from the outlet and remove the USB cable from the device.
Caution: Failure to unplug the wall charger before you remove the battery can cause damage to the device.
When to Charge the Battery
When the battery is weak and only a few minutes of operation remain, the battery icon ( 
 ) blinks and the device sounds a warning tone at regular intervals.
In this condition, your device conserves its remaining battery power by dimming the screen.
When the battery level becomes too low, the device automatically turns off.
►► For a quick check of your battery level, view the battery charge indicator located in the Status Bar of the display. A full blue icon ( 


 ) indicates a full charge.
You can also choose to display a percentage value. Viewing a percentage value can provide a better idea of the remaining charge on the battery.
MicroUSB to 3.5mm Converter
To use a headset with your phone, connect the microUSB-to-3.5mm converter that is included with your phone.
1.Open the slot on the side of the phone.
2.Plug the connector of the converter into the USB jack.
3.Plug the 3.5mm headset jack into the converter.
Note: The following illustration shows the correct method for connecting the converter. If an incorrect method is attempted, damage to the accessory port will occur therefore voiding the phone’s warranty.
2
1
3
Getting Started |
7 |
Assemble Your Device |
|
|
|

Set Up Your Device
Turning the Phone On or Off
1.Open the phone.
2.Press and hold the  Power key until the phone power-on screen displays.
Note: Do not turn on the phone when mobile phone use is prohibited.
3.If the phone asks, enter a password and
press  OK or the
  Centre key. For more information, see Security.
The Home screen displays while the phone searches for your network. After the phone finds your network and displays adequate signal strength bars, you can make or receive calls.
Note: The display language is preset to Automatic at the factory. To change the language, use the
Language menu. For more information, see Language.
4.When you want to switch off the phone, press
and hold the  Power key until the power-off image displays.
Initial Setup
When you turn on the device for the first time, you are asked to select certain preferences as follows:
1.Language: Select your preferred language. Press the  Right soft key to select Next.
2.Select theme: Select the colour and layout theme for the appearance of the display screens. Press the  Right soft key to select Next.
3.Time zone: Use the Right and Left Navigation keys to select your time zone. Press the
 Right soft key to select Next.
4.Time: Set the current time and your preferred time format. By default, the device updates its clock according to the time on the network (either mobile or Wi-Fi network). Press the  Right soft key to select Next.
5.Date: Set the current date and your preferred date format. By default, the device updates its clock according to the date on the network (either mobile or Wi-Fi network). Press the  Right soft key to select Next.
6.Profile: Select your preferred sound profile. For more information, please see Sound Profiles. Press the  Right soft key to select Next.
Initial setup is complete.
Setting Up Your Voicemail
Note: If your service provider did not preconfigure your voicemail server number, store the
voicemail server number before accessing the server. Your service provider can give you the number. For more information, see
Changing the Voicemail Name and Number.
Setting Up Your Personal Options
To set up your personal options:
1.Open the phone to access the keypad.
2.From a Home screen, press and hold the  One key.
3.Follow the voicemail prompts. If you need additional help setting up your voicemail, contact your service provider.
Getting Started |
8 |
Set Up Your Device |
|
|
|
Changing the Voicemail Name and Number
Your SIM card gives you the default service number of the voicemail centre. However, you may need to change the number. Use the following procedures to change your voicemail number.
1.From a Home screen, press Menu > Messaging
> Settings > Voicemail number.
The Voicemail screen displays.
2.To change the existing Voicemail number, highlight the first Voicemail field with the phone number and press Select. On this page you can change the name (Name field) and the number (center address field). Press and hold the
 Clear key to delete the current entry. Use the keypad to enter a replacement name and/or number for the Voicemail box. Press either Save or the
  Center key to save your changes.
3.To add another Voicemail box, highlight the second Voicemail field (empty) and press Select. On this page you can add a name (Name field) and the number (center address field). Use the keypad to enter a name and/or number for the secondary Voicemail box. Press either Save or the  Center key to save your changes.
4.Press the  End key to return to Idle mode.
Getting Started |
9 |
Set Up Your Device |
|
|
|

Know Your Device
Learn some of the key features of your mobile device, including the screens and icons, as well as how to navigate the device and enter text using the keyboard.
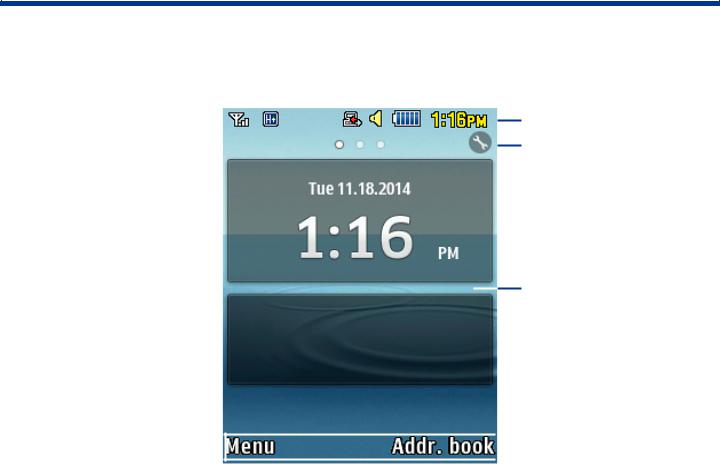
Home Screen
•Customizable display: Certain Widgets can be added to the main display screens for convenience.
•Edit: Select this icon to edit the pages and widgets that appear on the display.
Status bar
Edit
Customizable display
 Soft key options
•Soft key options: Dynamic options that appear for the Right and Left soft keys. In some cases, an option appears in the center that can be selected by the Center/Select key.
•Status Bar: Displays device status icons (right) and notification icons (left).
Know Your Device |
11 |
Home Screen |
|
|
|
The Home screen is the starting point for using your device.
Manage Pages and Widgets
Your device comes with eight customizable pages for the Main display. You can change what appears on each page, adding up to two Widgets per screen.
1.From a Home screen, press either the Up or Down Navigation key, highlight the Edit icon, and press the  Center key.
2.Use the Navigation keys to highlight a page and a Widget or a placeholder for a Widget.
3.Press Options. The following options appear:
-- Save: Save the page with the current Widgets.
-- Add: Add a Widget to the current position on the page.
-- Move: Move a widget to a new page.
-- Remove widget: Remove the widget (only appears if there is a Widget in the current position).
-- Remove page: Remove the page from the list of Home screens. This also removes all widgets on the page. Remove page appears only if there is at least one Widget on the page.
-- Reset: Reset the page, removing all widgets on it.
Change Display Appearance
You can change and customize several features of the Main and Cover display. See Display for more details.
Viewing Received Messages
When on a Home screen, new text messages, multimedia messages, and voice messages display on a separate page of the Main Screen. Use the navigation keys to select the type of message you would like to review.
Press Open (in the case of Voicemail, the soft key displays Dial and dials your Voicemail). The Messaging, Recent Calls, or Voice Mail screens display with the details of the incoming
communication. If you exit from this screen, navigate to the Messaging or Recent Calls screen to check Voicemail messages. Or, dial your Voicemail contact to access the message.
Know Your Device |
12 |
Home Screen |
|
|
|

Status Bar
The Status Bar at the top of the Main display provides device information (such as network status, battery charge, and time) and message notifications.
Status Bar Icons
Battery level.
Normal sound mode is enabled.
Silent mode is enabled.
Driving mode is enabled.
Meeting mode is enabled.
Outdoor mode is enabled.
My profile is enabled.
Wi Fi is active.
Signal strength.
No wireless network is available.
E |
The device is connected to an EDGE |
|
network. |
||
|
||
|
|
|
3G |
The device is connected to a UTMS |
|
network. |
||
|
||
|
|
|
H+ |
The device is connected to an HSDPA, |
|
HSPA or HSPA+ network. |
||
|
Status Bar Icons
An optional memory card is installed.
Connected to a computer using a
USB cable.
New voicemail message has been received.
New text message has arrived.
New multimedia message has arrived.
A call is in progress.
Know Your Device |
13 |
Status Bar |
|
|
|

Navigation
Command Keys
There are several command keys that you can use to navigate your phone. These keys are referenced throughout this user manual.
Soft Keys
There are two soft keys: the  Left Soft key and the
  Right Soft key . The roles of the soft keys vary depending on the function you are currently using. The labels on the bottom line of the display, just above each soft key, indicate the current function of the corresponding key.
Left Soft key
Some functions of the Left soft key are:
•On a Home screen, press the left soft key to open the Menu.
•When in the main menu, the left soft key function is Options.
Right Soft Key
Some functions of the Right soft key are:
•In a Home screen, press the right soft key to open the Address Book or Shortcuts.
•When in a menu mode, the right soft key function is Back.
Clear Key
The  Clear key can be used for the following functions:
•If you enter an incorrect character, briefly press it to backspace and delete the character.
•Press and hold it to erase an entire sentence.
•Briefly press it to back up one menu level.
End Key
The  End key can be used for the following functions:
•Press and hold it to turn your phone on or off.
•Press it once to disconnect a call.
•Press it to return to the Home screen from any menu.
Send Key
Use the  Send key to for the following functions:
•Press it once to answer calls.
•Enter a number and briefly press it to make a call.
•Briefly press it in the Home screen to display a list of recent calls to and from your phone.
•Press it twice in standby mode to call the most recent number.
•Press it to pick up a waiting call.
•Press and hold it to turn on your phone when the phone is off.
Navigation Keypad
Use the directional keys on the Navigation keypad to browse menus, sub-menus, and lists. Press the Up or Down Navigation keys when browsing the web to jump highlighted links on the web page.
Tip: The  Center Navigation key can often be used instead of the Select soft key.
Know Your Device |
14 |
Navigation |
|
|
|
Menu Navigation
Menus and sub-menus can be accessed by scrolling through them using the Navigation keys or by using the shortcut keys.
Accessing a Menu Function by Scrolling
1.From a Home screen, press  Menu.
Menu.
2.Scroll using the Right and Left Navigation keys to reach a main menu item, such as Settings. Press  Select to enter the menu.
3.If the menu contains sub-menus, you can access them by first highlighting the option and then by pressing Select.
4.If the menu you selected contains further options, repeat this step.
5.To scroll through these menus, press either the Up or Down Navigation key or the Volume key (located on the left side of your phone). Press Select to make your selection.
6.To return to the previous menu level, press Back or  Clear.
7.To exit the menu without changing the settings, press  Exit.
Exit.
Using Shortcut Numbers
Numbered menu items, such as menus, sub-menus, and options can be quickly accessed by using their shortcut numbers. In Menu mode, Main Menus can be accessed by pressing the number keys (1 to
0, * and #) corresponding to their location on the screen.
Shortcuts
Your phone offers shortcuts from Idle mode that can be customized for your ease and specific needs. The shortcuts menu is accessed by pressing the right soft key when on a Home screen.
Note: If there is only one shortcut configured, then that app’s name appears above the right soft key. If two or more shortcuts are configured, then the word Shortcuts appears above the right soft key.
To see the shortcuts that can be added, from Idle mode, press Menu > Settings > Phone > Shortcuts. The following shortcuts are available:
•Address Book: Access the device’s Address Book.
•Bluetooth: Turn the Bluetooth functionality of the device on or off.
•Messages: View messages.
•Create message: Create a new message.
•Camera: Access the Camera app.
•Music Player: Access the Music app.
•Browser: Access the Internet Browser app.
•Calendar: Access the Calendar app.
•Alarms: Set or alter alarm settings, including a Wake-up Alarm.
•Tasks: Access saved tasks.
•Memo: Access the Memo app.
•My Files: Access the My Files app to view files stored on the device.
Selecting Options
To view the various functions and options available and to select the one you want:
1.Press the appropriate soft key.
2.To select the function displayed or the option highlighted, press  Select.
3.To view the next function or highlight the next option on a list, press the Down Navigation key or the Down Volume key on the left side of the phone.
4.To move back to the previous function or option on a list, press the Up Navigation key or the Up Volume key on the left side of the phone.
5.To move back up one level in the menu structure, press Back.
6.To exit the menu structure without changing the settings, press  Exit.
Exit.
Know Your Device |
15 |
Navigation |
|
|
|

Entering Text
Learn how to select the desired text input method when entering text and characters. This section also describes how to use the T9 predictive text system to reduce the key strokes required to enter text.
Text Input Methods
Text input can either be Alphabetic or Predictive. To switch between the two methods while entering text, press Options > Predictive text on/off.
Note: The Predictive text option indicates the input method you wish to switch to, not the current method. For example, Predictive text on means that you are currently using Alphabetic input and want to switch to Predictive text.
ABC (Alphabetic) Input Method (abc, Abc, and ABC)
Use this input method to enter letters by pressing the key labeled with the letter you want. Press the key repeatedly until the desired letter, character, or number displays.
The abc mode makes all characters of the word lowercase. The Abc mode makes the initial character an uppercase while the remaining characters are lowercase. The ABC mode makes all characters of the word uppercase. The 123 mode only allows numbers to be entered.
T9 Predictive Text Input Method (T9Eab, T9EAb, and T9EAB)
Use this input method to enter words with only one keystroke per letter. Each key on the keypad has more than one letter; for example, pressing the  5 key can enter J, K, or L. However, the T9 method automatically compares the series of keystrokes you make with an internal linguistic dictionary to determine the most likely word or words, thus requiring far fewer keystrokes than the Alphabetic method.
The T9Eab mode makes all characters lowercase. The T9EAb mode makes the initial character an uppercase while the remaining characters are left as lowercase. The T9EAB mode makes all characters uppercase. The 123 mode only allows numbers to be entered.
Note: The E in T9E indicates English and F is for French.
Changing the Text Input Method
When you are in a field that holds characters (such as in a text message), the text input method
indicator displays. Use the following steps to change the text input method:
1.Press Options > Predictive text on/off.
2.After you have selected an input method, press
the  Pound key to switch between the capitalization and numeric modes.
Know Your Device |
16 |
Entering Text |
|
|
|
Using the Alphabetic Input
Method
To use the ABC Alphabetic input method, use the  Two through
  Nine keys to enter your text.
1.Press the key labeled with the letter you want:
-- Once for the first letter,
-- Twice for the second letter, and so on.
2.Select the other letters in the same way.
Note: The cursor moves to the right when you press a different key. When entering the same letter twice or a different letter on the same key, just wait for
a few seconds for the cursor to move to the right automatically, and then select the next letter.
Keys
The following chart lists the keys and the characters associated with each key. English, Spanish, and French letters are shown:
. , / @ ? ! ‘ - : ( ) 1
A a B b C c Ä ä À à Å å Æ æ Ç ç 2
D d E e F f È è É é F D 3
G g H h I i Ì ì G 4
J j K k L l L 5
M m N n O o Ñ ñ Ö ö Ò ò Ø W 6
P p Q q R r S s b S Y P 7
T t U u V v Ü ü Ù ù Q 8
W w X x Y y Z z X 9
(space) 0
Using Predictive Text
T9 Predictive Text input method is based on a builtin dictionary. A series of keystrokes is interpreted by the phone using this dictionary to determine the likely word.
Enter a Word in T9 Mode
To type using Predictive text:
1.Begin entering a word by pressing the  Two
Two
through  Nine keys. Press each key only once for each letter. The built-in dictionary lists potential words that match the entered keystrokes.
For example: To enter “Hello”, press  ,
,  ,
,  ,
,  ,
, 
The word that you are typing displays on the screen. The word changes as you press additional keys.
2.Enter the whole word before editing or deleting the keystrokes. When the word displays correctly, go to Step 3.
If the desired word does not display, press the Down navigation key to see alternative word choices.
Note: The words “Of” and “Me” both use  Six and
  Three. The phone displays the most commonly used choice first.
3.Insert a space by pressing the  Zero key and start entering the next word.
4.To add punctuation, press the  One key to select the most common punctuation symbols.
Know Your Device |
17 |
Entering Text |
|
|
|
Add a New Word to the T9 Dictionary
1.After pressing the keys corresponding to the word you want to add, press the Down
navigation key to display the alternative words.
2.When the last alternative word displays, Spell word displays.
3.Press Spell word.
4.Enter the word you want to add using the Alphabetic method.
5.Press Add or the  Center key.
The word is added to the T9 dictionary and becomes the first word for the associated series of keys.
Note: This feature may not be available for some languages.
•To enter periods, hyphens, colons, or parenthesis, press and hold the  Asterisk key. T9 mode applies grammar rules to ensure that correct punctuation is used.
•To shift case in T9 mode, press the  Pound key to toggle between Initial capital, Capital lock, Lower case, and Numeric modes.
•You can move the cursor by using the Left and Right Navigation keys.
•To delete letters, press the  Clear key. Press and hold
  Clear to clear the display.
Using the Symbols Input Method
The Symbol input method enables you to insert symbols and punctuation marks into text.
1.To enter symbol mode, press the  Asterisk key.
2.Use the Up and Down Navigation keys to scroll through pages of available symbols.
3.Use the either the number keys to select a symbol.
4.To return to your message, press OK or the
 Center key. Press Cancel to return to your message without entering a symbol.
Note: After the first symbol has been selected for entering text, the first page to appear after pressing the  Asterisk key is called My favorites, which saves the symbols you use the most.
Using the 123 Numeric Input
Method
The Numeric mode enables you to enter numbers into a text message. Press the keys corresponding to the digits you want to enter.
Know Your Device |
18 |
Entering Text |
|
|
|

Calling
Make telephone calls using a variety of calling features and services.

Calling
Learn how to make or answer a call. Explore features and functionality associated with making or answering a call.
Making a Call
When the Home screen displays, enter the area code and phone number, and then press  Send.
Send.
Note: When you activate the Auto Redial option in the Voice Call menu, the phone automatically redials up to 10 times when the person does not answer the call or is already on the phone.
Making an International Call
1.Press and hold  Zero. The plus (+) character displays.
2.Enter the local country exit code, the destination country code, area code, and phone number
3.Press  Send.
Send.
Correcting an Entered Number
Use the following steps to correct a typing mistake while dialing.
1.After entering a number:
-- To clear the last digit displayed, press
 Clear.
-- To clear another digit in the number, press the Left or Right Navigation key until the cursor is immediately to the right of the digit to clear. Press  Clear.
-- To enter a missing digit, press the Left or Right Navigation key until the cursor is in position and enter the digit.
-- To clear the whole display, press and hold
 Clear.
2. Press  End to return to the Home screen.
Ending a Call
When you want to end your call, press  End or close the phone.
Manual Pause Dialing
When you call automated systems, you are often required to enter a password or account number. Instead of manually entering the numbers each time, you can dial the numbers along with special characters called pauses.
To manually call a number with pauses without storing it in your Contacts list:
1.From a Home screen, enter a phone number.
2.Press and hold the  Asterisk key to add a two-second pause. The letter P will appear where the pause has been set.
3.Continue to enter numbers, if desired.
Tip: You can create pauses longer than two seconds by entering multiple P pauses.
Calling |
20 |
Calling |
|
|
|
Redialing the Last Number
To display the last number dialed:
1.From a Home screen, press the  Send key to view the Recent Calls menu. The last number
dialed displays as the first item in a list of recent calls. If the caller is listed in your Address Book, the associated name displays.
2.Press  Send to call.
Dialing a Number From the Recent Calls Menu
All incoming, outgoing, and missed calls are listed in the Recent Call menu. If the caller is listed in your Address Book, the associated name displays.
To access the Recent Calls menu:
1.From a Home screen, press  Send.
Send.
2.Use the Left and Right Navigation keys to scroll through the Recent Calls pages. Choose from All logs, Missed calls, Dialed calls, Received calls, Sent msg., Received msg., and Push to talk.
3.Scroll to a number and highlight it to select.
4.Press  Send to call.
Making a Call from the Address Book
You can store phone numbers that you use regularly on the SIM card or in the phone’s memory. These entries are collectively called the Address Book.
Once a number is stored in the Address Book, you can dial it by pressing a few keys using the Speed Dial feature.
For further details about the Address Book feature, see Address Book.
Answering a Call
When you receive a call, the phone rings and displays the caller’s phone number or name, if stored in the Address Book.
1.For any answering mode, press the  Send key to answer an incoming call.
If the Any Key option is activated (Menu >
Settings > Call > All calls > Answering mode), you can press any key to answer a call except for  End and Reject.
If the Active flip option is activated (Menu >
Settings > Calls > General > Call Answer), you can answer the call by opening the phone.
Note: To reject an incoming call, press and hold either Volume key on the left side of the phone before opening the phone. To silence the ringer on an incoming call, press either Volume key once.
2.Press the  End key or close the phone to end the call.
Note: You can answer a call while using the Address Book or menu features. After ending the call, the phone returns to the function screen you were using.
Viewing Missed Calls
The number of missed calls displays on both the Home screen and the front panel LCD. To view the number details:
1.If the phone is closed, open the phone and press Open. The most recently missed call displays.
Note: If there is a voicemail sent by the same number, associated icons are displayed and can then be selected.
2. Scroll through the list of missed calls.
Calling |
21 |
Calling |
|
|
|
Viewing Options for a Missed Call
To view the options for a selected missed call, use the following steps:
1.After opening a missed call, press View.
2.With the missed call selected, press Options.
Saving a Missed Call to Your Address Book
To save a missed call entry to your address book, use the following steps:
1.After missing a call, press Open. The most recently missed call displays.
2.With the missed call selected press Options.
3.Highlight Add to Contacts and press Select or the  Centre key.
4.Highlight either Create contact or Update existing and press Select or the  Centre key.
For further details about the Address Book feature, see Address Book.
Sending a Message to a Missed Call
To send a text message or attachment to a missed call entry:
1.After missing a call, press Open.
2.Press Options.
3.Use the Navigation keys to highlight Send
message, and press Select or the  Centre key.
4.At the Create screen, use the Alphanumeric keys to type in a message. Press Options then Add media to add items such as Image, Video, Sound, Take photo, Record Video, or Record Sound.
5.When you complete your message, press Send to initiate delivery.
Note: When you insert items in your message, the message type automatically changes to Multimedia Message.
Deleting a Missed Call
To delete a missed call entry:
1.After missing a call, press Open.
2.Press Options.
3.Use the Navigation keys to select Delete and press Select or the  Centre key.
4.At the Delete? prompt, press either Yes to confirm the deletion or No to cancel.
5.Press  Exit to exit the Missed Call feature.
Options During a Call
Your phone provides a number of control functions that you can use during a call.
Adjusting the Call Volume
During a call, if you want to adjust the ear piece volume, use the Volume keys on the left side of the phone.
►► Press the Up Volume key to increase the volume level and the Down Volume key to decrease the level.
From a Home screen, you can also use the Volume keys to adjust the ringer volume.
Managing Multiple Calls
You can place the current call on hold whenever you want. You can also make another call while a call is in progress, if your plan supports this service.
To place a call on hold:
1.While on a call, press Hold. This action places the current caller on hold (which displays on the screen under a tab called On hold).
2.You can resume this call by pressing Retrieve.
Calling |
22 |
Calling |
|
|
|
To make a new call while a call is in progress:
1.While on a call, press Hold.
2.Enter the new phone number you want to dial and press  Send to dial the second number.
– or –
Press Options, select New call, and either enter the new number to dial or press Search to select a contact from the Contacts list. Once connected, both calls display on the screen.
Note: The caller currently on hold is put on a window called On hold.
When you are engaged in an active call and also have a call on hold, you may switch between the two calls. Switching calls automatically places the second call on hold.
To switch between calls:
1. Press Swap.
The current call (caller #2) is placed on hold and the previous call on hold (caller #1) is reactivated so you can continue conversing with that person.
2. Press the  End key to end the current call. To end a specific call:
1.Press Options.
2.Use the navigation keys to highlight End call >
Active Call or End call > Held Call and press
Select or the  Centre key. You can press End > All Calls to end all calls.
– or –
Press the  End key.
3. Press  End to end the remaining call.
Using the Speakerphone During an Active Call
While in an active call, you can enable the speakerphone feature.
1.Dial the number and then press  Send.
Send.
2.Press Spkr on to activate the speakerphone. This feature is available both when dialing the number and when the call is answered.
3.Use the Volume keys (located on the left side of your phone) to adjust the volume.
Muting Keypad Tones
You can turn the key tones off or on during a call. If the Mute keytone option is selected, you can press keys without hearing key tones during a call.
Note: To communicate with answering machines or computerized telephone systems, the Keytone option must be set to Unmute (on) in the in-call Options menu.
Switching off the Microphone (Mute)
You can temporarily switch your phone’s microphone off so that the person on the other end of the call cannot hear you.
To switch the microphone off temporarily with a single active call:
1.Press Options > Mute.
2.Press Options > Unmute to switch the microphone back on.
Calling |
23 |
Calling |
|
|
|
Searching for a Number in Address Book
You can search for a number from the Address Book during a call.
1.Press Options.
2.Use the Navigation keys to highlight Contacts and press Select or the  Centre key.
3.Highlight the Address Book entry by pressing the Up or Down Navigation key.
– or –
Enter the first few letters of the contact into the Search field which then highlight the closest match in the Address Book list.
4. Press View.
For further details about the Address Book feature, see Address Book.
Call Waiting
The Call Waiting feature makes it possible to answer an incoming call while a call is in progress, if this service is supported by the network. You are notified of an incoming call with a Call Waiting tone.
Note: To use this feature, Call waiting must be activated. Go to Menu > Settings > Call > Voice call
> Call waiting to activate Call Waiting.
To answer a call while a call is in progress:
►► Press Accept to answer the next incoming call.
The first call is automatically placed on hold.
To switch between two calls:
►► Press Swap.
This places the current call on hold and then activates the previous call.
To end a call:
1.Press Options > End call and press the Right
Navigation key.
2.Highlight Active Call, Held Call, or All Calls and press Select or the  Center key.
3-Way Calling (Multi-Party Calling)
The 3-Way or Multi-Party feature is used to answer a series of incoming calls and place them on hold. If this service is supported by the network, all calls can be joined together. You are notified of an incoming call by a call waiting tone.
Note: The Join option combines all of the established calls (both active and on hold). Swap places the current call on hold and then activates the previous call.
1.Press Accept to answer the first incoming call.
2.Press Accept to answer the next incoming call. The first call is automatically put on hold.
3.To Join the first two callers, press Options > Join and press Select or the  Center key.
Join combines your current set of callers (both active and on hold) into a single multi-party call.
4.Press  End to end the call.
Calling |
24 |
Calling |
|
|
|

Applications
The Apps screen displays all applications installed on your device. Learn how to use and arrange your apps.

Menu
The Menu screen shows all apps on the device.
Accessing Applications
►► From a Home screen, press Menu.
Organize Your Apps
The Apps icons can be organized in your own custom order.
Move Apps
1.On a Menu screen, highlight the App you want to move and press Options.
2.Select Move.
3.Navigate to the position you want to place the App and press OK.
Reset the Original Positions of All Apps
1.On a Menu screen, press Options.
2.Select Reset.
3.At the Reset to default? prompt, select Yes.
Applications |
26 |
Menu |
|
|
|
Loading...