


Contact SAMSUNG WORLDWIDE
If you have any questions or comments relating to Samsung products, please contact the SAMSUNG customer care centre.
Country |
Customer Care Centre |
Web Site |
|
AUSTRALIA |
1300 362 603 |
www.samsung.com |
|
|
|
|
|
Bahrain |
8000-4726 |
- |
|
|
|
|
|
CHINA |
400-810-5858 |
www.samsung.com |
|
010-6475 1880 |
|||
|
|
||
HONG KONG |
(852) 3698-4698 |
www.samsung.com/hk |
|
www.samsung.com/hk_en/ |
|||
|
|
||
|
3030 8282 |
|
|
INDIA |
1800 110011 |
www.samsung.com |
|
1800 3000 8282 |
|||
|
|
||
|
1800 266 8282 |
|
|
|
|
|
|
INDONESIA |
0800-112-8888 |
www.samsung.com |
|
021-5699-7777 |
|||
|
|
||
JAPAN |
0120-327-527 |
www.samsung.com |
|
|
|
|
|
Jordan |
800-22273 |
- |
|
|
|
|
|
MALAYSIA |
1800-88-9999 |
www.samsung.com |
|
|
|
|
|
NEW ZEALAND |
0800 SAMSUNG (0800 726 786) |
www.samsung.com |
|
|
|
|
|
|
1-800-10-SAMSUNG(726-7864) |
|
|
PHILIPPINES |
1-800-3-SAMSUNG(726-7864) |
www.samsung.com |
|
1-800-8-SAMSUNG(726-7864) |
|||
|
|
||
|
02-5805777 |
|
|
|
|
|
|
SINGAPORE |
1800-SAMSUNG(726-7864) |
www.samsung.com |
|
|
|
|
|
SOUTH AFRICA |
0860-SAMSUNG(726-7864 ) |
www.samsung.com |
|
|
|
|
|
TAIWAN |
0800-329-999 |
www.samsung.com |
|
|
|
|
|
THAILAND |
1800-29-3232 |
www.samsung.com |
|
02-689-3232 |
|||
|
|
||
U.A.E |
800-SAMSUNG (726-7864) |
www.samsung.com |
|
|
|
|
|
VIETNAM |
1 800 588 889 |
www.samsung.com |
|
|
|
|
LCD TV
user manual
imagine the possibilities
Thank you for purchasing this Samsung product. To receive more complete service, please register your product at
www.samsung.com/register
Model |
|
Serial No. |
BN68-02739A-00
© 2010 Samsung Electronics Co., Ltd. All rights reserved.

Figures and illustrations in this User Manual are provided for reference only and may differ from actual product appearance. Product design and specifications may be changed without notice.
Still image warning
Avoid displaying still images (like jpeg picture files) or still image element (like TV programme logo, panorama or 4:3 image format, stock or news bar at screen bottom etc.) on the screen. Constant displaying of still picture can cause uneven wear of screen phosphor, which will affect image quality. To reduce risk of this effect, please follow below recommendations:
•Avoid displaying the same TV channel for long periods.
•Always try to display any image on full screen, use TV set picture format menu for best possible match.
•Reduce brightness and contrast values to minimum required to achieve desired picture quality, exceeded values may speed up the burnout process.
•Frequently use all TV features designed to reduce image retention and screen burnout, refer to proper user manual section for details.
Securing the Installation Space
Keep the required distances between the product and other objects (e.g. walls) to ensure proper ventilation.
Failing to do so may result in fire or a problem with the product due to an increase in the internal temperature of the product.
When using a stand or wall-mount, use parts provided by Samsung Electronics only.
xx If you use parts provided by another manufacturer, it may result in a problem with the product or an injury due to the product falling.The appearance may differ depending on the product.
Installation with a stand. |
Installation with a wall-mount. |
 10 cm
10 cm
10 cm |
10 cm |
|
10 cm |
10 cm |
10 cm |
|
10 cm |
Without producing harmful VOC (Volatile Organic Compounds),
Samsung’s Eco-friendly “Crystal Design” expresses colour gradation thanks to our dual injection technology.
2 English

Contents
Getting Started
4
Connections
7
Basic Features
9
Advanced Features
18
Other Information
36
4 Accessories
4Viewing the Control Panel
5Viewing the Remote Control
6Connecting to an Antenna
6Plug & Play (Initial Setup)
7Connecting to an AV Device
8Connecting to an Audio Device
8Changing the Input Source
9How to Navigate Menus
9 Channel Menu
11 Picture Menu
14Sound Menu
15Setup Menu
17Support Menu
18Connecting to a PC
19Network Connection
24Media Play
31AllShare
33Anynet+
36Analogue Channel Teletext Feature
37Installing the Wall Mount
38Assembling the Cables
39Anti-theft Kensington Lock
39Securing the TV to the Wall
40Troubleshooting
43Specifications
44Index
Check the Symbol!
t
TOOLS |
This function can be used by |
Note |
One-touch button |
|
|||
|
pressing the TOOLS button on the |
|
|
|
remote control. |
|
|
English 3
Getting Started
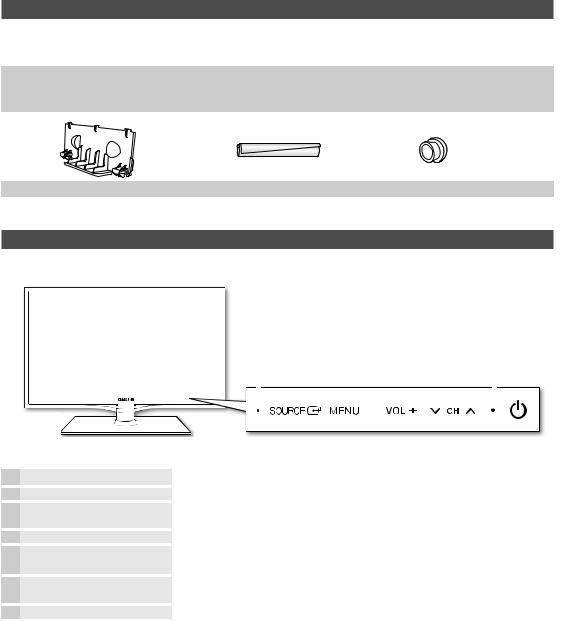
Accessories
Please make sure the following items are included with your LCD TV. If any items are missing, contact your dealer.
The items’ colours and shapes may vary depending on the models.
y Remote Control & Batteries (AAA x 2) |
y |
Cleaning Cloth |
|
y |
Owner’s Instructions |
y |
Power Cord |
y |
Warranty Card / Safety Guide (Not available in some locations) |
|
|
(46 inch TV)
y Blanking Bracket |
y Cable Tie |
y Holder-Ring (4ea) |
Viewing the Control Panel
The product colour and shape may vary depending on the model.
|
|
|
|
|
Remote control sensor |
|
Power Indicator |
||
|
|
|
|
|
|
|
|
|
|
|
|
|
|
|
|
|
|
|
|
|
|
|
|
|
|
|
|
|
|
|
|
|
|
|
|
|
|
|
|
|
|
|
|
|
|
|
|
|
|
|
|
|
|
|
|
|
|
|
|
|
|
|
|
|
|
|
|
|
|
Speakers |
|
P(Power) |
Turns the TV on or off. |
Power Indicator |
Blinks and turns off when the power is on and lights up in standby mode. |
SOURCEE |
Toggles between all the available input sources. In the on-screen menu, use this |
|
button as you would use the ENTEREbutton on the remote control. |
MENU |
Displays an on-screen menu, the OSD (on screen display), of your TV’s features. |
— VOL + |
Adjusts the volume. In the OSD, use the — VOL + buttons as you would use the ◄ |
|
and ► buttons on the remote control. |
z |
Changes the channels. In the OSD, use the zbuttons as you would use the |
|
▼ and ▲ buttons on the remote control. |
Remote control sensor |
Aim the remote control towards this spot on the TV. |
Standby mode
Do not leave your TV in standby mode for long periods of time (when you are away on a holiday, for example). A small amount of electric power is still consumed even when the power button is turned off. It is best to unplug the power code.
4 English
|
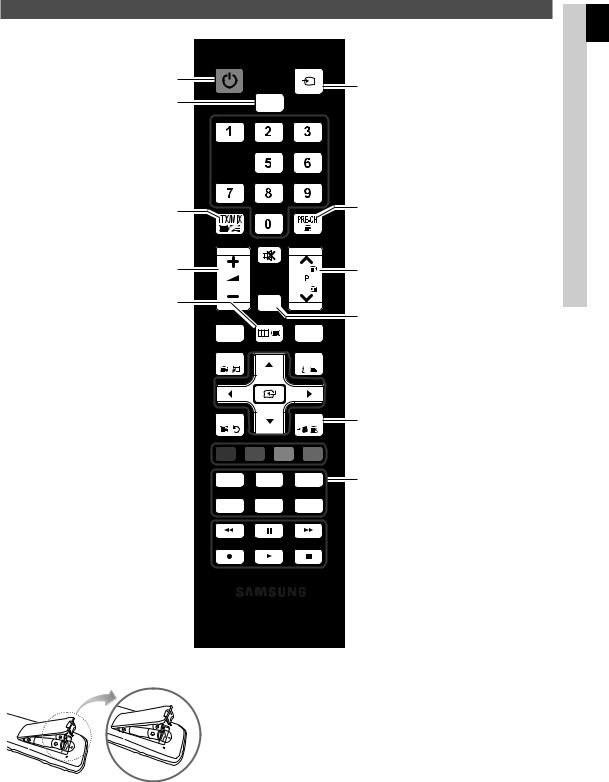
Viewing the Remote Control |
Turns the TV on and off. (P. 6) |
Displays and selects the available video |
|
|
Selects the TV mode directly. |
TV |
Change the channel. 

Alternately select Teletext, Double |
Returns to the previous channel. |
or MiX. |
|

 Cuts off the sound temporarily.
Adjusts the volume. |
Changes channels. |
Displays the main on-screen menu. (P. 9)
Views the Media play. (P. 24)  MEDIA.P
Quickly select frequently used functions.  TOOLS
TOOLS
Selects on-screen menu items and change  menu values.
CH LIST
MENU |
Displays channel list on the screen. (P. 11) |
HDMI  Selects the HDMI mode directly.
INFO  Displays information on the
TV screen. (P. 15)
Returns to the previous menu. (P. 9) 
Buttons in the Channel Manager, 
Media Play menu, etc.
Use these buttons in the Media Play and 
Anynet+ modes. ( : controls recording on Samsung recorders with the Anynet+ feature)
Installing batteries (Battery size: AAA)
RETURN |
|
|
EXIT |
Exit the menu. (P. 9) |
A |
B |
C |
D |
|
S.MODE |
|
SLEEP |
l-ll |
|
|
DUAL |
S.MODE : Selects the sound mode. (P. 14) |
||
|
|
|
|
SLEEP : Settings the Sleep Timer. (P. 15) |
P.MODE |
|
P.SIZE |
E.SAVING |
DUAL l-ll : Selects the dual sound mode. (P. 15) |
P.MODE : Selects the picture mode. (P. 11)
P.SIZE : Choose the picture size. (P. 12)
E.SAVING : Selects the energy saving mode. (P. 11)
NOTE
xUse the remote control within 23 feet from the TV.
xBright light may affect the performance of the remote control. Avoid using nearby special fluorescent light or neon signs.
xThe colour and shape may vary depending on the model.
 Started Getting 01
English 5
Getting Started
Connecting to an Antenna
When the TV is initially powered on, basic settings proceed automatically.Preset: Connecting the mains and antenna.
[TV Rear Panel] |
VHF/UHF Antenna |
|
Cable |
or |
ANT OUT |
 Power Input
Plug & Play (Initial Setup)
When the TV is initially powered on, a sequence of on-screen prompts will assist in confi guring basic settings. Press the POWERPbutton. Available only when Input source is set to TV.
1 |
Selecting a language |
Press the ▲ or ▼ button then press the ENTEREbutton. |
|
|
Select the desired OSD (On Screen Display) language. |
||
|
Selecting Store Demo |
Press the ◄ or ► button then press the ENTEREbutton. |
|
|
or Home Use |
▪ |
Select the Home Use mode. Store Demo Mode is for retail |
2 |
|
||
|
|
environments. |
|
|
▪ |
Returning the unit’s settings from Store Demo to Home Use |
|
|
|
|
(Standard): Press the volume button on the TV. When the volume OSD |
is displayed, press and hold MENU for 5 sec.
POWER
P
3 |
Selecting an area |
Press the ▲ or ▼ button then press the ENTEREbutton. |
|
Select the appropriate area. |
|
4 |
Selecting a channel |
The channel search will start automatically. |
|
For more information, refer to Channel → Auto Store. (p.10) |
|
|
|
|
|
|
Press the ENTEREbutton at any time to interrupt the memorisation process. |
5 |
Setting the clock |
Press the ◄ or ► button to select Day, Month, Year, Hour or Minute. |
|
Set these by pressing the ▲ or ▼ button. |
|
6 |
Viewing the HD |
The connection method for the best HD screen quality is displayed. |
Connection Guide. |
|
|
7 |
Enjoy your TV. |
Press the ENTEREbutton. |
|
If you want to reset this feature...
Select Setup - Plug & Play (Initial setup). Enter your 4 digit PIN number. The default PIN number is ‘0-0-0-0’. If you want to change PIN number, use the Change PIN function.
6 English

Connections
Connecting to an AV Device
Using an HDMI / DVI Cable: HD connection (up to 1080p)
Available devices: DVD, Blu-ray player, HD cable box, HD STB (Set-Top-Box) satellite receiver, cable box, satellite receiver (STB)
DVD |
DVD |
R W
Red White |
HDMI OUT |
 Connections 02
 R W
R W


HDMI IN 1(DVI), 2, 3, 4 / PC/DVI AUDIO IN
AUDIO OUT
R-AUDIO-L
DVI OUT
xWhen using an HDMI/DVI cable connection, you must use the HDMI IN 1(DVI) jack. For the DVI cable connection, use a DVI to HDMI cable or DVI-HDMI (DVI to HDMI) adapter for video connection and the PC/DVI AUDIO IN jacks for audio.
xIf an external device such as a DVD / Blu-ray player / cable box / STB satellite receiver supporting a HDMI versions older than 1.3 is connected, the TV may operate abnormally (e.g. no screen display / no sound / annoying flicker / abnormal colour).
xIf there is no sound after connecting an HDMI cable, check the HDMI version of the external device. If you suspect the version is older than 1.3, contact the provider of the device to confirm the HDMI version and request an upgrade.
xIt is recommended you purchase an HDMI-certified cable. Otherwise, the screen may appear blank or a connection error may occur.
Using a Component (up to 1080p) or Audio/Video (480i only) Cable
Available devices: VCR, DVD, Blu-ray player, cable box, STB satellite receiver
|
R |
W |
Y |
|
R |
W |
BY |
|
|
||
VCR |
AUDIO OUT |
VIDEO OUT |
|
|
R-AUDIO-L |
|
|
|
|
|
|
|
When connecting to AV IN 1, the colour of |
|||||
|
|
|
|
|
the AV IN 1 [Y/VIDEO] jack (Green) does not |
|||||
|
|
|
|
|
match the colour of the video cable (Yellow). |
|||||
R |
W |
R |
B |
G |
To obtain the best picture quality, the |
|||||
|
|
|
|
|
|
|||||
|
|
|
|
|
Component connection is recommended |
|||||
|
|
|
|
|
over the A/V connection. |
|
|
|
||
R |
W |
R |
B |
G |
|
|
|
|
|
|
|
|
|
|
|
Y |
R |
W |
R |
B |
G |
AUDIO OUT |
COMPONENT OUT Blu-ray player |
|
|
|
|
|
||||
R-AUDIO-L |
PR |
PB |
Y |
Yellow |
Red |
White |
Red |
Blue |
Green |
|
|
|
|
|
|
|
|||||
English 7
Connections
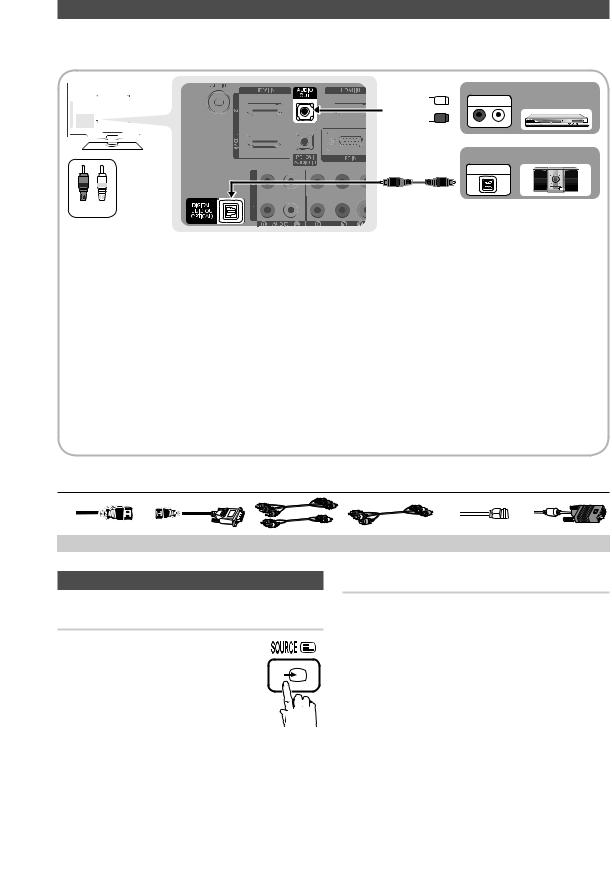
Connecting to an Audio Device
Using an Optical or Audio Cable Connection
Available devices: digital audio system, amplifi er, DVD home theatre
 R W
R W


R W
Red White
DIGITAL AUDIO OUT (OPTICAL)
AUDIO IN
R-AUDIO-L
OPTICAL
DVD
Home Theatre
Amplifi er
xWhen a digital audio system is connected to the DIGITAL AUDIO OUT (OPTICAL) jack, decrease the volume of both the TV and the system.
x5.1 CH (channel) audio is available when the TV is connected to an external device supporting 5.1 CH.
xWhen the receiver (home theatre) is set to on, you can hear sound output from the TV’s optical jack. When the TV is receiving a DTV signal, the TV will send 5.1 CH sound to the home theatre receiver. When the source is a digital component such as a DVD / Blu-ray player / cable box / STB (Set-Top-Box) satellite receiver and is connected to the TV via HDMI, only 2 CH audio will be heard from the home theatre receiver. If you want to hear 5.1 CH audio, connect the digital audio out jack from your DVD / Blu-ray player / cable box / STB satellite receiver directly to an amplifier or home theatre.
AUDIO OUT: Connects to the audio input jacks on your amplifier / DVD home theatre.
xWhen connecting, use the appropriate connector.
xWhen an audio amplifier is connected to the AUDIO OUT jacks: Decrease the volume of the TV and adjust the volume level with the Amplifier’s volume control.
Input Cables (Sold Separately)
|
|
|
|
|
|
|
|
|
|
|
|
|
|
|
|
|
|
|
|
|
|
|
|
|
|
|
|
|
|
|
|
|
|
|
|
|
|
|
|
HDMI |
HDMI-DVI |
Component |
Composite (AV) |
Coaxial (RF) |
VGA |
||||
|
|
|
|
|
|
|
|
|
|
Changing the Input Source
Source List
Use to select TV or other external input sources such as DVD / Blu-ray players / cable box / STB satellite receiver connected to the TV.
■TV / PC / AV1 / AV2 / Component1 / Component2 / HDMI1/DVI / HDMI2 / HDMI3 / HDMI4 / USB
In the Source List, connected inputs will be highlighted.
PC always stay activated.
8 English
Edit Name
■VCR / DVD / Cable STB / Satellite STB / PVR STB / AV Receiver / Game / Camcorder / PC / DVI PC / DVI Devices / TV / IPTV / Blu-ray / HD DVD / DMA: Name the device connected to the input jacks to make your input source selection easier.
When a PC with a resolution of 1920 x 1080 @ 60Hz is connected to the HDMI IN 1(DVI) port, you should set to DVI PC mode under Edit Name.
When connecting an HDMI/DVI cable to the HDMI IN 1(DVI) port, you should set to DVI PC or
DVI Devices mode under Edit Name.
Basic Features
How to Navigate Menus
Before using the TV, follow the steps below to learn how to navigate the menu and select and adjust different functions.
1 |
|
|
|
|
|
|
MENU |
|
|
|
|
|||
|
|
|
|
|
|
|
||||||||
|
|
|
|
|
|
|
|
|||||||
|
|
|
|
|
|
|
|
|
|
|
|
|||
|
|
|
|
|
|
|
|
|
|
|
||||
2 |
|
|
|
|
|
|
|
|
|
|
|
|
|
|
|
|
|
|
|
|
|
|
|
|
|
|
|
|
|
|
|
|
RETURN |
|
|
|
|
|
|
|
||||
|
|
|
|
EXIT |
|
4 |
||||||||
|
|
|
|
|
||||||||||
3 |
|
|
|
|
||||||||||
|
|
|
|
|||||||||||
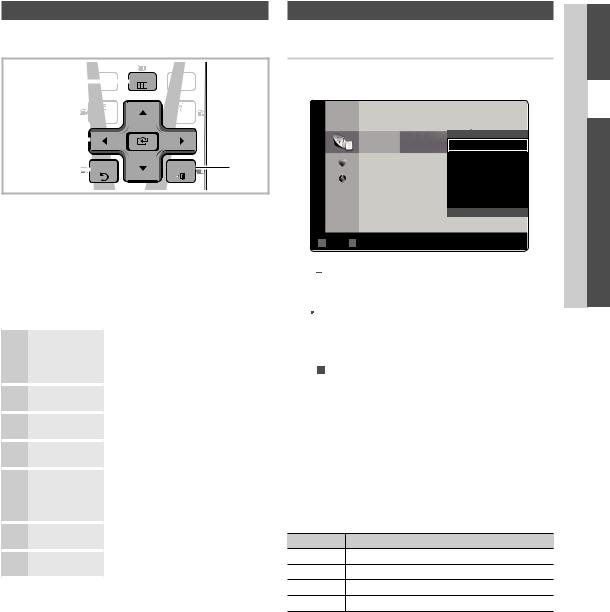
1MENUmbutton: Displays the main on-screen menu.
2ENTERE/ Direction button: Move the cursor and select an item. Confi rm the setting.
3RETURN button: Returns to the previous menu.
4EXIT button: Exits the on-screen menu.
How to Operate the OSD (On Screen Display)
The access step may differ depending on the selected menu.
1 |
MENU m |
2 |
▲ / ▼ |
3 |
ENTERE |
4 |
▲ / ▼ |
5 |
◄ / ► |
6 |
ENTERE |
7 |
EXIT e |
The main menu options appears on the screen:
Picture, Sound, Channel, Setup, Input, Application, Support.
Select an icon with the ▲ or ▼ button.
Press ENTEREto access the sub-menu.
Select the desired submenu with the ▲ or ▼ button.
Adjust the value of an item with the ◄ or ► button. The adjustment in the OSD may differ depending on the selected menu.
Press ENTEREto complete the confi guration.
Press EXIT.
Channel Menu
Channel Manager
Delete or set favourites channels. Select a channel in the
Channels, My Channels or Scheduled.
|
|
6 |
C -- |
|
Channels |
|
7 |
*C -- |
|
|
9 |
C |
Timer Viewing |
|
|
All |
8 |
*C |
Edit My Channels |
|
|
|
|
Lock |
|
|
10 |
C |
Edit Channel Name |
|
|
12 |
C |
Sort |
|
|
13 |
C |
Delete |
|
|
|
|
▼ |
B Zoom C Select  Page TTools
■
 Channels: Shows the channel list according to
channel type.
■*My Channels: Shows the group of the channel.
■ Scheduled: Shows all the currently reserved
programmes.
Using the colour buttons with the Channel Manager
xB Green (Zoom): Enlarges or shrinks a channel
number.
x  Yellow (Select): Select desired channels and press the Yellow button to set all the selected channels at the same time. The cmark appears to the left of the selected channels.
x  (Page): Move to next or previous page.
x T(Tools): Displays the Channel Manager option menu. (The Options menus may differ depending on the situation.)
Channel Status Display Icons
Icons Operations
c A channel selected.
* A channel set as a Favourite.
\A locked channel.
) A reserved programme.
 Features Basic 03
English 9
Basic Features
¦¦ Using Favourite Channels
* My Channels
(in Channel Manager) Shows all favourite channels.
■■ Edit My Channels t: You can set the selected channels to desired my channels group.
The “*” symbol will be displayed and the channel will be set as a my channel.
1.Select a channel and press the TOOLS button.
2.Add or delete a channel in the my channel groups you want among 1, 2, 3 and 4.
xx One or more groups can be selected.
3.After you have changed the settings, the channel list for each group can be viewed in My Channels.
|
|
|
|
|
Air or Cable channel mode |
|
|
|
|
|
|
||
|
|
6 |
|
C -- |
||
|
|
|
||||
My |
|
7 |
*C -- |
|||
My Channel 1 |
8 |
*C -- |
||||
Channels |
||||||
My Channel 4 |
12 |
|
C -- |
|||
|
My Channel 2 |
9 |
|
C -- |
||
|
My Channel 3 |
10 |
|
C -- |
||
|
|
13 |
|
C -- |
||
B Zoom C Select  Page TTools
Programme mode
¦¦ Retuning channels
Area
You can change the desired area.
Auto Store
Scans for a channel automatically and stores in the TV.
Automatically allocated programme numbers may not correspond to actual or desired programme numbers. If a channel is locked using the Child Lock function, the PIN input window appears.
Manual Store
Scans for a channel manually and stores in the TV.
If a channel is locked using the Child Lock function, the PIN input window appears.
■■ Programme (0~99), Colour System, Sound System, Channel, Search: If there is abnormal sound or no sound, reselect the sound standard required.
Channel mode
xx P (programme mode): When tuning is complete, the broadcasting stations in your area have been assigned to position numbers from P0 to P99. You
can select a channel by entering the position number in this mode.
xx C (aerial channel mode) / S (cable channel mode): These two modes allow you to select a channel by entering the assigned number for each aerial broadcasting station or cable channel.
¦¦ Editing channels
Channel Manager Option Menu
(in Channel Manager)
1.Select a channel and press the TOOLS button.
2.Edit the channel name using the Edit Channel Name menu respectively.
■■ Edit Channel Name: Assign your own channel name.
¦¦ Other Features
Channel Manager Option Menu (in Channel Manager)
Set each channel using the Channel Manager menu options (Lock / Unlock, Timer Viewing, Sort, Delete, Select All / Deselect All). Option menu items may differ depending on the channel status.
1.Select a channel and press the TOOLS button.
2.Select a function and change its settings.
■■ Lock / Unlock: Lock a channel so that the channel cannot be selected and viewed.
NOTE
xx This function is available only when the Child Lock is set to On.
xx The PIN input screen appears. Enter your 4-digit PIN, the default of which is “0-0-0-0”. Change the PIN using the Change PIN option.
■■ Timer Viewing: You can set a desired channel to be displayed automatically at the intended time. Set the current time first to use this function.
10 English
■■ Sort: This operation allows you to change the programme numbers of the stored channels. This operation may be necessary after using the auto store.
■■ Delete: You can delete a channel to display the channels you want.
■■ Select All / Deselect All: Select all the channels or deselect all the selected channels in the channel manager.
 Scheduled
(in Channel Manager)
You can view, modify or delete a a show you have reserved to watch.
■■ Change Info: Change a show you have reserved to watch.
■■ Cancel Schedules: Cancel a show you have reserved to watch.
■■ Information: Display a show you have reserved to watch. (You can also change the reservation information.)
■■ Select All / Deselect All: Select or deselect all reserved programmes.
Channel List
You can see all the channels searched.
Fine Tune
If the signal is weak or distorted, fine tune the channel manually.
Fine tuned channels are marked with an asterisk “*”.To reset the fine-tuning, select Reset.
Picture Menu
¦¦ Changing the Preset Picture Mode
Mode
Select your preferred picture type.
■■ Dynamic: Suitable for a bright room.
■■ Standard: Suitable for a normal environment.
■■ Natural: Suitable for an eye comfortable display.
Natural is not available in PC mode.
■■ Movie: Suitable for watching movies in a dark room.
¦¦ Adjusting picture settings
Backlight / Contrast / Brightness / Sharpness / Colour / Tint (G/R)
Your television has several setting options for picture quality control.
NOTE
xx In analogue TV, AV modes of the PAL system, the Tint (G/R) function is not available.
xx In PC mode, you can only make changes to
Backlight, Contrast and Brightness.
xx Settings can be adjusted and stored for each external device connected to the TV.
¦¦ Economical Solutions
ECO Solution
■■ Energy Saving (Off / Low / Medium /
High / Picture Off / Auto) t: Adjust the brightness of the TV in order
to reduce power consumption. If you select Picture Off, the screen is turned off, but the sound remains on. Press any
button except volume button to turn on the screen.
■■ ECO Sensor (Off / On): To enhance your power savings; the picture settings will automatically adapt to the light in the room.
If you adjust the Backlight, the Eco Sensor will be set to Off.
Min Backlight: When ECO sensor is On, the minimum screen brightness can be adjusted manually.
If Eco Sensor is On, the display brightness may change (become slightly darker or brighter) depending on the surrounding light intensity.
■■ No Signal Power Off (Off / 15 min / 30 min / 60 min): Activates the Stand-by mode, in the case of “No Signal” or “Check Signal Cable” status for a certain period of time defined by the user.
Disabled when the PC is in power saving mode.
English 11
 Features Basic 03
Basic Features
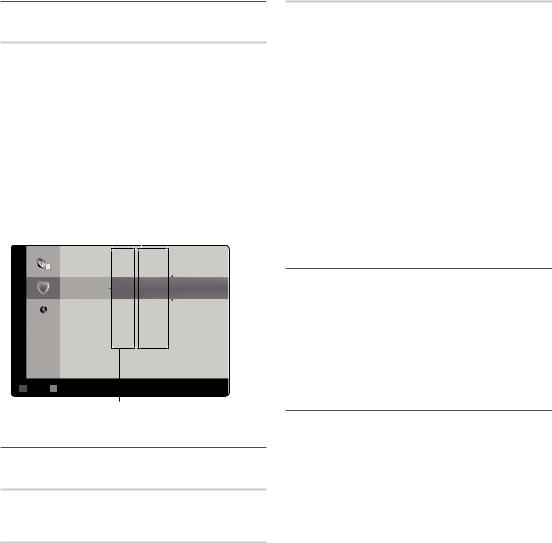
¦¦ Changing the Picture Options
Advanced Settings
(available in Standard / Movie mode)
You can adjust the detailed setting for the screen including colour and contrast.
In PC mode, you can only make changes to Dynamic Contrast, Gamma and White Balance.
Advanced Settings
Black Tone |
: Off |
► |
Dynamic Contrast |
: Medium |
|
Shadow Detail |
: 0 |
|
Gamma |
: 0 |
|
RGB Only Mode |
: Off |
|
Colour Space |
: Native |
|
White Balance |
|
|
|
▼ |
|
|
UMove EEnter |
RReturn |
■■ Black Tone (Off / Dark / Darker / Darkest): Select the black level to adjust the screen depth.
■■ Dynamic Contrast (Off / Low / Medium / High): Adjust the screen contrast.
■■ Shadow Detail (-2~+2): Increase the brightness of dark images.
Disabled under PC mode.
■■ Gamma: Adjust the primary colour intensity.
■■ RGB Only Mode (Off / Red / Green / Blue): You can adjust Colour or Tint of Red, Green or Blue for the picture from an external device (DVD player, home theatre, etc.).
■■ Colour Space (Auto / Native): Adjust the range of colours available to create the image.
■■ White Balance: Adjust the colour temperature for a more natural picture.
R-Offset / G-Offset / B-Offset: Adjust each colour’s (red, green, blue) darkness.
R-Gain / G-Gain / B-Gain: Adjust each colour’s (red, green, blue) brightness.
Reset: Resets the White Balance to it’s default settings. ■■ Flesh Tone: Emphasize pink “Flesh Tone.”
■■ Edge Enhancement (Off / On): Emphasize object boundaries.
Picture Options
In PC mode, you can only make changes to the Colour Tone, Size, Digital Noise Filter and Auto Protection Time.
Picture Options
Colour Tone |
: Normal |
► |
Size |
: 16:9 |
|
Digital Noise Filter |
: Auto |
|
MPEG Noise Filter |
: Auto |
|
HDMI Black Level |
: Normal |
|
Film Mode |
: Off |
|
Auto Protection Time |
: 2hours |
|
|
UMove EEnter |
RReturn |
■■ Colour Tone (Cool / Normal / Warm1 / Warm2)
Warm1 or Warm2 will be deactivated when the picture mode is Dynamic.
Settings can be adjusted and stored for each external device connected to an input on the TV.
■■ Size: Your cable box/satellite receiver may have its own set of screen sizes as
well. However, we highly recommend you use 16:9 mode most of the time.
16:9 : Adjusts the picture size to 16:9 for DVDs or wide broadcasting.
Wide Zoom: Magnifies the picture size more than 4:3.
Adjusts the Position by using ▲, ▼ buttons.
Zoom: Magnifies the 16:9 wide pictures vertically to fit the screen size.
Adjusts the Position or Size by using ▲, ▼ button.
4:3 : The default setting for a movie or normal broadcasting.
Do not watch in 4:3 format for a long time. Traces of borders displayed on the left, right and centre of the screen may cause image retention(screen burn) which are not covered by the warranty.
Screen Fit: Displays the full image without any cut-off when HDMI (720p / 1080i / 1080p) or Component (1080i / 1080p) signals are inputted.
12 English

NOTE
xx After selecting Screen Fit in HDMI (1080i / 1080p) or Component (1080i / 1080p) mode: Adjusts the Position or Size by using ▲, ▼, ◄, ► button.
xx Depending on the input source, the picture size options may vary.
xx The available items may differ depending on the selected mode.
xx In PC mode, only 16:9 and 4:3 modes can be adjusted.
xx Settings can be adjusted and stored for each external device connected to an input of the TV.
xx If you use the Screen Fit function with HDMI 720p input, 1 line will be cut at the top, bottom, left and right as in the overscan function.
■■ Digital Noise Filter (Off / Low / Medium / High / Auto / Auto Visualisation / Demo): When the broadcast signal is weak, some static and ghosting may appear. Select one of the options until the best picture is displayed.
Auto Visualisation: When changing analog channels, displays signal strength.
When bar is green, you are receiving the best possible signal.
■■ MPEG Noise Filter (Off / Low / Medium / High / Auto): Reduces MPEG noise to provide an improved picture quality.
Disabled under PC mode.
■■ HDMI Black Level (Normal / Low): Selects the black level on the screen to adjust the screen depth.
Available only in HDMI mode (RGB signals).
■■ Film Mode (Off / Auto1 / Auto2): Sets the TV to automatically sense and process film signals from all sources and adjust the picture for optimum quality.
Available in TV, AV, COMPONENT (480i / 1080i) and HDMI (480i / 1080i).
■■ Auto Protection Time (2 hours / 4 hours / 8 hours / 10 hours / Off): If the same image remains on the screen, Auto Screen Burn Protector will work.
Picture Reset (OK / Cancel)
Resets your current picture mode to its default settings.
¦¦ Setting up the TV with Your PC
Set the input source to PC.
Auto Adjustment t
Adjust frequency values/positions and fine tune the settings automatically.
Not available when connecting through HDMI/DVI cable.
Screen
■■ Coarse / Fine: Removes or reduces picture noise. If the noise is not removed by Fine-tuning alone, then adjust the frequency as best as possible (Coarse) and Finetune again. After the noise has been reduced, readjust the picture so that it is aligned to the centre of screen.
■■ Position: Adjust the PC screen position with direction button (▲ / ▼ / ◄ / ►).
■■ Image Reset: Resets the image to default settings.
Using Your TV as a Computer (PC) Display
Setting Up Your PC Software (Based on Windows XP)
Depending on the version of Windows and the video card, the actual screens on your PC may differ in which case the same basic set-up information will almost always be applied. (If not, contact your computer manufacturer or Samsung Dealer.)
1.Click on “Control Panel” on the Windows start menu.
2.Click on “Appearance and Themes” in the “Control Panel” window and a display dialog-box will appear.
3.Click on “Display” and a display dialog box will appear.
4.Navigate to the “Settings” tab on the display dialog-box.
yy The correct size setting (resolution) [Optimum: 1920 X 1080 pixels]
yy If a vertical-frequency option exists on your display settings dialog box, the correct value is “60” or “60 Hz”. Otherwise, just click “OK” and exit the dialog box.
 Features Basic 03
English 13

Basic Features
Sound Menu
¦¦ Changing the Preset Sound Mode
Mode t
■■ Standard: Selects the normal sound
mode. ■■ Music: Emphasizes music over voices.
■■ Movie: Provides the best sound for movies.
■■ Clear Voice: Emphasizes voices over other sounds.
■■ Amplify: Increase the intensity of high-frequency sound to allow a better listening experience for the hearing impaired.
¦¦ Adjusting sound settings
Equalizer
Adjusts the sound mode.
■■ Balance L/R: Adjusts the balance between the right and left speaker.
■■ 100Hz / 300Hz / 1kHz / 3kHz / 10kHz (Bandwidth Adjustment): Adjusts the level of specific bandwidth frequencies.
■■ Reset: Resets the equalizer to its default settings.
¦¦ Sound Systems, Etc.
Virtual Surround (Off / On)
This function provides a virtual 5.1 channel surround sound experience through a pair of speakers or headphones using HRTF (Head Related Transfer Function) technology.
If Speaker Select is set to External Speaker, Virtual Surround is disabled.
Dialog Clarity (Off / On)
This function allows you to increase the intensity of a voice over background music or sound effects so that dialog can be heard more clearly when viewing a show.
Auto Volume (Off / Normal / Night)
To equalize the volume level on each channel, set to Normal.
■■ Night: This mode provides an improved sound experience compared to Normal mode, making almost no noise. It is useful at night.
Speaker Select (External speaker / TV speaker)
A sound echo may occur due to a difference in decoding speed between the main speaker and the audio receiver. In this case, set the TV to External Speaker.
When Speaker Select is set to External Speaker, the volume and MUTE buttons will not operate and the sound settings will be limited.
When Speaker Select is set to External Speaker, you should use these settings.
xx TV speaker: Off , External speaker: On
When Speaker Select is set to TV Speaker, you should use these settings.
xx TV speaker: On , External speaker: On
If there is no video signal, both speakers will be mute.
SPDIF Output
SPDIF (Sony Philips Digital Interface) is used to provide digital sound, reducing interference going to speakers and various digital devices such as a DVD player.
■■ Audio Format: During the reception of a digital TV broadcast, you can select the Digital Audio output (SPDIF) format from the options PCM or Dolby Digital.
By connecting to 5.1ch speakers in a dolby digital setup, maximize your interactive 3D sound experience.
■■ Audio Delay: Adjusts SPDIF Audio output delay time.
Sound Reset (OK / Cancel)
Reset all sound settings to the factory defaults.
14 English
 Loading...