


 Loading...
RSView®32
RUNTIME USER’S GUIDE
PUBLICATION VW32RT-UM001F-EN-E–July 2011
Supersedes Publication VW32RT-UM001D-EN-E
Contact Rockwell Customer Support Telephone — 1.440.646.3434
Online Support — http://support.rockwellautomation.com
Copyright Notice © 2011 Rockwell Automation Technologies, Inc. All rights reserved. Printed in USA.
This document and any accompanying Rockwell Software products are copyrighted by Rockwell Automation Technologies, Inc. Any reproduction and/or distribution without prior written consent from Rockwell Automation Technologies, Inc. is strictly prohibited. Please refer to the license agreement for details.
Trademark Notices Allen-Bradley, ControlLogix, FactoryTalk, Rockwell Automation, Rockwell Software, RSLinx, RSView and the Rockwell Software logo are registered trademarks of Rockwell Automation, Inc.
The following logos and products are trademarks of Rockwell Automation, Inc.:
AdvanceDDE, ControlView, Data Highway Plus, DH+, RSView32, RSView32 Resource Kit, and WINtelligent. FactoryTalk Activation, FactoryTalk Live Data, and FactoryTalk Transaction Manager.
RSLinx Classic, SLC 5, SLC 500, and SoftLogix.
Other Trademarks ActiveX, Microsoft, Microsoft Access, SQL Server, Visual Basic, Visual C++, Visual SourceSafe, Windows, Windows ME, Windows NT, Windows 2000, Windows Server 2003, Windows XP, and Windows Vista are either registered trademarks or trademarks of Microsoft Corporation in the United States and/or other countries.
Adobe, Acrobat, and Reader are either registered trademarks or trademarks of Adobe Systems Incorporated in the United States and/or other countries.
ControlNet is a registered trademark of ControlNet International.
DeviceNet is a trademark of the Open DeviceNet Vendor Association, Inc. (ODVA).
Ethernet is a registered trademark of Digital Equipment Corporation, Intel, and Xerox Corporation. OLE for Process Control (OPC) is a registered trademark of the OPC Foundation.
Oracle, SQL*Net, and SQL*Plus are registered trademarks of Oracle Corporation.
All other trademarks are the property of their respective holders and are hereby acknowledged.
Warranty This product is warranted in accordance with the product license. The product’s performance may be affected by system configuration, the application being performed, operator control, maintenance, and other related factors. Rockwell Automation is not responsible for these intervening factors. The instructions in this document do not cover all the details or variations in the equipment, procedure, or process described, nor do they provide directions for meeting every possible contingency during installation, operation, or maintenance. This product’s implementation may vary among users.
This document is current as of the time of release of the product; however, the accompanying software may have changed since the release. Rockwell Automation, Inc. reserves the right to change any information contained in this document or the software at anytime without prior notice. It is your responsibility to obtain the most current information available from Rockwell when installing or using this product.
i
Contents
Chapter P
Preface
About the documentation............................................................................ |
P-1 |
Technical support services........................................................................ |
P-1 |
When you call ............................................................................................................... |
P-2 |
Chapter 1
Installing RSView32 Runtime
Determining system requirements........................................................ |
1-1 |
Step 1 – Total your points ......................................................................................... |
1-2 |
Step 2 – Determine the recommended system configuration ............................. |
1-3 |
Installing RSView32 Runtime ................................................................... |
1-4 |
Installing RSView32 Runtime on Windows Server 2003, Windows XP, |
1-4 |
Windows 2000 and Windows Vista .......................................................................... |
|
Installation summary ................................................................................................... |
1-5 |
Ordering RSView32 Runtime on disks................................................ |
1-5 |
Activating RSView32 Runtime................................................................. |
1-5 |
FactoryTalk® Activation Grace Period ................................................................... |
1-9 |
Uninstalling RSView32 Runtime............................................................. |
1-9 |
Chapter 2
Running a project
Setting up and running your project .................................................... |
2-1 |
|
Summary of steps......................................................................................................... |
2-1 |
|
Step 1 |
– Moving the project........................................................................ |
2-2 |
Step 2 |
– Specifying time, date, and number formats............... |
2-2 |
Step 3 |
– Starting RSView32 Runtime.................................................. |
2-3 |
i
Starting RSView32 Runtime manually....................................................................... |
2-3 |
Starting RSView32 Runtime automatically ............................................................... |
2-3 |
Step 4 – Opening the project...................................................................... |
2-5 |
Using the Runtime Project Manager.......................................................................... |
2-5 |
Step 5 – Setting up the channel, OPC server, or DDE server 2- |
|
6 |
|
Connecting to programmable controllers using direct drivers .............................. |
2-6 |
Connecting to OPC servers and DDE servers........................................................ |
2-7 |
Step 6 – Changing the path to files outside the project |
|
directory.................................................................................................................... |
2-7 |
Step 7 – Running the project...................................................................... |
2-9 |
Running a project manually......................................................................................... |
2-9 |
Running a project automatically ................................................................................. |
2-9 |
Adding files to a project ............................................................................. |
2-10 |
Changing data logging paths .................................................................. |
2-11 |
Stopping a project .......................................................................................... |
2-11 |
When a project stops................................................................................................. |
2-12 |
Chapter 3
Using security
Editing the users for a project .................................................................. |
3-1 |
Logging in at runtime ...................................................................................... |
3-2 |
Using the electronic signature button........................................................................ |
3-3 |
Changing passwords at runtime.............................................................. |
3-3 |
Chapter A
RSView32 commands
Index
ii RSView32 Runtime User’s Guide

P Preface
RSView32™ Runtime is a package for running automation applications developed in RSView32 Works. RSView32 Runtime runs on Microsoft® Windows® Server 2003, Microsoft Windows XP, Windows 2000, Windows Vista, Windows 7, and Windows Server 2008.
About the documentation
The RSView32 Runtime documentation includes:
Help, which contains procedures and reference information.
Readme file, which contains additional information about RSView32. Read this file before you begin working with the software.
Technical support services
If you have questions about RSView32 Runtime, please consult the user’s guide or the Help.
If you cannot find the answer, contact Rockwell Software Technical
Support at:
Telephone: 440–646–3434
Internet Support: www.rockwellsoftware.com or
www..rockwellautomation.com
Support staff are available Monday to Friday from 8 A.M. to 5 P.M.
Eastern Standard Time, except during holidays.
P–1

When you call
When you call, be at your computer and prepared to give the following information:
the product serial number
You’ll find this number on the Activation disk label and in the Help About dialog box that you access from the RSView32 Project Manager.
the product version number
the type of hardware you are using
the exact wording of any messages that appeared on your screen
a description of what happened and what you were doing when the problem occurred
how you tried to solve the problem
P–2 RSView32 Runtime User’s Guide

1Chapter
Installing RSView32 Runtime
This chapter describes:
hardware and software requirements
how to install and activate RSView32™ Runtime
how to uninstall RSView32 Runtime
Determining system requirements
The hardware and software you use with RSView32 Runtime depends on the demands your project places on the system. The greater the demand, the more powerful a system you need.
The recommendations below are based on field experience. It is possible that your application will operate on a platform below these recommendations.
In the following tables, the demands your project places on the system are represented by points. Total your points in step 1, and then use the table in step 2 to determine the hardware and software you need.
1–1
Step 1 – Total your points
For |
If you are |
Add points |
|
|
|
RSView32 project |
running displays, or editing your project using RSView32 |
2 |
|
Works |
|
|
|
|
|
using more than 30,000 tags |
2 |
|
|
|
|
using more than 5,000 tags |
1 |
|
|
|
|
changing displays, on average, more than 5 times per |
1 |
|
minute |
|
|
|
|
|
using more than 200 objects in displays |
2 |
|
|
|
|
using ActiveX® controls in displays |
2 |
Alarms |
monitoring more than 1,500 tags for alarms |
2 |
|
|
|
|
monitoring more than 300 tags for alarms |
1 |
|
|
|
Active Display System, |
using typically more than 5 active clients |
2 |
DDE, or OPC® |
|
|
simultaneously active |
|
|
clients |
|
|
|
|
|
|
using at least 1 client |
1 |
|
|
|
Data log or Historical |
logging less than 100 tags in 1 model |
1 |
trends |
|
|
|
|
|
|
logging between 100 and 1,000 tags in 1 model |
2 |
|
|
|
|
logging to more than 1 model |
2 |
|
|
|
Event detector, derived |
using any |
1 |
tags, or real-time trends |
|
|
|
|
|
VBA |
using any |
2 |
|
|
|
Add-ons |
using any, for each one |
1 |
|
|
|
Total your points here |
|
|
|
|
|
1–2 RSView32 Runtime User’s Guide
Step 2 – Determine the recommended system configuration
For this number |
Minimum hardware you need |
Minimum software you need |
of points |
|
|
|
|
|
8 or more |
Pentium® II 400 MHz |
Windows® XP Professional* or |
|
128 MB RAM |
Windows 2000 Professional** or |
|
|
|
|
|
Windows Server 2003*** or |
|
|
Windows Vista**** or |
|
|
Windows 7 Professional or |
|
|
Windows Server 2008***** |
|
|
|
6 to 7 |
Pentium II 300 MHz |
Windows XP Professional* or |
|
128 MB RAM |
Windows 2000 Professional** or |
|
|
|
|
|
Windows Server 2003*** or |
|
|
Windows Vista**** or |
|
|
Windows 7 Professional or |
|
|
Windows Server 2008***** |
|
|
|
3 to 5 |
Pentium 200 MHz |
Windows XP Professional* or |
|
64 MB RAM |
Windows 2000 Professional** or |
|
|
|
|
|
Windows Server 2003*** |
|
|
|
Important: The hardware should meet or exceed the minimum hardware requirements of the operating system you will run.
*With Service Pack 1 or later.
**With Service Pack 3 or later.
***With Service Pack 1 or later.
****With Service Pack 1 or later.
*****With Service Pack 2.
Installing RSView32 Runtime 1–3
Installing RSView32 Runtime
The steps below explain how to install RSView32 software and user’s guides from a CD–ROM to your computer. If you choose not to install the user’s guides, you can view them from the CD.
Installing RSView32 Runtime on Windows
Server 2003, Windows XP, Windows 2000 and
Windows Vista
As part of the installation process, RSView32 Runtime creates program folders and modifies registry entries. To make these modifications, the currently–logged–in user must have administrative rights on the computer on which RSView32 Runtime is installed.
Installing RSView32 Runtime
Follow these instructions to install RSView32.
To install RSView32 Runtime:
1.Close all open Windows programs.
2.Place the RSView32 CD–ROM into your CD–ROM drive. The CD should start running automatically.
If the CD does not start automatically, run D:\Setup.exe where D is the drive containing the CD.
3.In the RSView32 window, click the button beside Install RSView32 Runtime.
4.Follow the on–screen instructions.
5.During installation, you will be prompted to activate RSView32 Runtime. If activation is present from an earlier version of RSView32 Runtime, click Next.
1–4 RSView32 Runtime User’s Guide
If you removed the activation or if you are installing RSView32 Runtime for the first time, insert the Activation disk in the diskette drive and click Activate. For details about activation, see “Activating RSView32 Runtime” on page 1-5.
6.When installation is complete, restart Windows. If you choose not to restart Windows now, be sure to restart it before running RSView32 Runtime for the first time.
If you plan to use RSView32 as an OPC server, you must configure
Microsoft® Distributed COM (DCOM). For instructions see the
RSView32 Help.
Installation summary
The default installation does the following:
installs RSView32 Runtime in the folder \Program Files\Rockwell Software\RSView
adds a Rockwell Software\RSView32 folder to your list of programs. This folder contains the shortcut for RSView32 Runtime
Ordering RSView32 Runtime on disks
RSView32 Runtime is available on 3.5–inch disks. To order disks, contact your local authorized Allen–Bradley® distributor or your local Allen–Bradley sales office.
Activating RSView32 Runtime
Rockwell Software Inc. uses activation files to activate its Windows– based software packages. You can activate RSView32 Runtime by using FactoryTalk Activation software to download and transfer activation files.
Installing RSView32 Runtime 1–5
FactoryTalk® Activation
FactoryTalk Activation provides a secure, software-based system for activating Rockwell Software products and managing software activation files. With FactoryTalk Activation, there is no need for a physical “master disk” or any physical media; instead, activation files are generated and distributed electronically.
Important: EvRSI activation is replaced by FactoryTalk® Activation in this release. If you are using EvRSI activation, please contact your local Rockwell Automation Sales office or Technical Support for information on migrating your activations to FactoryTalk® Activation. For Rockwell Automation Technical Support in the U.S. call (440 )646-3434. Outside the U.S. see http://www.rockwellautomation.com/locations/.
Finding more information about FactoryTalk Activation
You can find detailed information, instructions, and troubleshooting tips in the FactoryTalk Activation Help.
After installing and launching the FactoryTalk Activation software, click Help or Learn More . . . to open FactoryTalk Activation Help.
Using the FactoryTalk Activation Manager
The FactoryTalk Activation tool is used to obtain the activation files needed to activate your software. It can also be used to borrow activations from servers having available activations, return activations back to servers, re-host activations, etc.
To open the FactoryTalk Activation Manager:
On the Windows Start menu, click Programs > Rockwell Software > FactoryTalk Activation > FactoryTalk Activation Manager.
To use the FactoryTalk Activation Manager:
1.In the FactoryTalk Activation Manager, click the Home tab then click Get New Activations, or you may click Manage Activations tab, then click Get New Activations.
2.Select the Activation Method to be used.
To provide the software’s Serial Number and Product Key, identify the activation server’s Host ID, and download activation files, follow the instructions in the manager.
1–6 RSView32 Runtime User’s Guide
3.Save the activation file or files.
Activation files must have a .lic extension. You can save the files to the default location:
On Windows 2003 and Windows XP the default location for FactoryTalk activation files is:.C:\Documents and Settings\All Users\Shared Documents\Rockwell Automation\Activations
On Windows 7 Professional and Windows Vista the default location for FactoryTalk activation files is:C:\Users\Public\Documents\Rockwell Automation\Activations"
For details, click Help in the top left corner of the page.
Protecting activation files
Activation files are simple text files that must have a .lic extension. The activation key for RSView32 is called RSVMSGR.PRO.
As long as the .lic extension is retained, you can copy or rename an activation file without harming it. However, tampering with text inside the activation file can disable your Rockwell Software products.
If an activation file is damaged or deleted, contact Rockwell Automation Technical Support.
For safekeeping, keep an original set of your activation files on backup media. Use descriptive names for the files, so that you can identify them later, and copy them back to the appropriate computers.
Activation files are locked to the Host IDs of the computers (or dongles) that need them. Activation will fail for Rockwell Software products on a computer where the specified Host ID is not recognized by the activation file.
Installing RSView32 Runtime 1–7
Using borrowed activations
RSView32 supports borrowed activations for development computers. A borrowed activation is retrieved from a pool of available activations on the activation server, and expires after a specified length of time.
Once a borrowed activation is checked out to a particular computer, the computer can disconnect from the network. When the time limit expires, the associated software on the computer is no longer activated, and the activation automatically becomes available again from the server’s activation pool. A borrowed activation can also be returned to the activation server manually before the time limit expires.
To borrow activations from a server:
1.Connect your computer to the network where the activation server is located.
2.Run the FactoryTalk Activation Manager and then click the
Manager Activations tab.
3.Click the Manage Activations tab, and then click Borrow Activations tab.To borrow a single activation, click the checkbox that corresponds to the activation you want to borrow, and then click Set Borrow Term. To borrow more than one activation, click additional checkboxes for the activations you want to borrow and then click Borrow. If you do not see the activations you want to borrow, click I Don’t See My Activation Here. The Activations in gray may not be selected as they are already borrowed by your computer.
4.In the Set Borrow Term window, set the time of the return by entering a calendar date, net number of days, or approximate hours (shift). The default Calendar date is the maximum borrow term for the activation or group of activations.
To return a borrowed activation before it expires:
1.Connect to the network and run the FactoryTalk Activation Manager.
2.On the Manage Activations tab, click Return Activations, select the borrowed activations you want to return.
3.Click the Return Activations button.
1–8 RSView32 Runtime User’s Guide
To open the Activation Help:
To open FactoryTalk Activation Help. Open FactoryTalk Activation Manager, click Help or Learn More . . .
FactoryTalk® Activation Grace Period
FactoryTalk provides customers with access to critical software components for a grace period of 7 days regardless of availability of valid activations. When a product is successfully activated, all grace period records will be cleared and the product will proceed with valid activations.
During the grace period, FactoryTalk Activation will display a warning message and log a diagnostic warning message to FactoryTalk® Diagnostics every four hours if no valid activation key is detected.
Once the grace period expires, RSView32 Runtime will enter demo mode. However, until RSView32 is restarted, it will continue to run as in the grace period.
RSView32 Personalized version can be successfully activated with both RSView32 Personalized activations and RSView32 Protected activations.
Uninstalling RSView32 Runtime
To uninstall RSView32 Runtime, use the Windows Control Panel.
To uninstall RSView32 Runtime:
1.Click the Windows Start button, point to Settings, and then click Control Panel.
2.Double-click Add/Remove Programs, select RSView32 7.60.00, and click Add/Remove.
3.Follow the on–screen instructions.
Installing RSView32 Runtime 1–9
4. When the Uninstall program is finished, restart Windows.
1–10 RSView32 Runtime User’s Guide

2Chapter
Running a project
This chapter outlines:
the steps for setting up and running your project
how to add files to a project
how to stop a project
Setting up and running your project
Once you have installed RSView32™ Runtime on the target computer, you are ready to set up and run the project you have created in RSView32 Works.
Summary of steps
1.Move the project to the target computer.
2.If the target computer is configured for a different locale than the development computer, specify time, date, and number formats.
3.Start RSView32 Runtime.
4.Open the project.
5.Set up the channels, OPC® server, or DDE server.
6.If applicable, change the path for any files that are outside of the project directory.
7.Run the project.
Each of these steps is discussed in detail on the following pages.
2–1
Step 1 – Moving the project
If your project will be running on a different computer than it was developed on, you must move the project using an external tool such as Windows® Explorer, My Computer, or the File Manager. Be sure you move all files referenced in your project, including any files outside of the project directory.
You do not have to move the project to the same directory in which it was created. When you move a project from one computer to another, RSView32 Runtime automatically changes the project directory’s paths to the drive and directory the project has been moved to. If your project references files outside of the project directory, update the path to these files in the Project Paths dialog box. See “Step 6 – Changing the path to files outside the project directory” on page 2-7.
To move your project:
1.In Windows Explorer, My Computer, or File Manager, move or copy the project folder to the target location.
2.Move or copy any folders or files outside the project folder to the target location.
Step 2 – Specifying time, date, and number formats
Skip this step unless the target computer is configured for a different locale than the development computer, and the new locale uses different time, date, or number formats.
Use the Windows Control Panel to specify the formats. You can also change these formats after the project is running, but you must close and restart the project for the changes to take effect.
1.Click the Windows Start button, select Settings, and then click Control Panel.
2.Double-click Regional Settings or Regional Options.
2–2 RSView32 Runtime User’s Guide
3.Select the language or locale whose settings you want to use.
4.Verify or customize the settings on the Number, Time, and Date tabs.
5.Click OK.
For more information, see your Windows documentation.
Step 3 – Starting RSView32 Runtime
You can start RSView32 Runtime manually, or you can set up
RSView32 Runtime to start automatically when Windows starts.
Starting RSView32 Runtime manually
To start RSView32 Runtime in Windows 2000
Click the Windows Start button, select Programs, Rockwell Software, RSView32, and then click RSView32 Runtime.
To start RSView32 Runtime in Windows Server 2003 and
Windows XP
Click the Windows Start button, select All Programs, Rockwell Software, RSView32, and then click RSView32 Runtime.
Starting RSView32 Runtime automatically
To automatically start RSView32 Runtime each time Windows starts, include an RSView32 Runtime shortcut in the Windows Startup folder. You can also open a project when Windows starts.
To add RSView32 to the StartUp folder in Windows 2000
1.Click the Windows Start button, select Settings, and then click “Taskbar & Start Menu.”
2.In the Taskbar and Start Menu Properties dialog box, click the Advanced tab.
3.Click Add. The Create Shortcut wizard opens.
Running a project 2–3
4.To start RSView Works when Windows starts, browse to the location of the RSV32.exe file, and then click the file name.
The path is \Program Files\Rockwell Software\RSView\RSV32.exe.
5.To start RSView Works and open a project when Windows starts, specify the path to RSView32 and to the project. For example, to specify a project called Norm’s Bakery, type:
“C:\Program Files\Rockwell Software\RSView\RSV32.exe” “C:\Program Files\Rockwell Software\Samples\Norm’s Bakery\Norm’s Bakery.rsv”
If the path contains spaces, you must enclose it in double quotes.
6.Click OK, and then click Next.
7.In the Select Program Folder dialog box, select the Startup folder, and then click Next.
8.Specify a name for the shortcut (for example, RSView32).
9.Click Finish, and then click OK.
For more information, see your Windows documentation.
To add RSView32 to the StartUp folder in Windows Server 2003, Windows XP and Windows Vista
1.Click the Windows Start button and select All Programs.
2.Right-click the Startup folder and select Open.
3.Browse to the location of the RSV32.exe file.
The path is \Program Files\Rockwell Software\RSView\RSV32.exe.
4.Right-click the file name and select Create Shortcut. The shortcut will be created in the same location as the RSV32.exe file.
5.Drag the shortcut into the Startup folder.
For more information, see your Windows documentation.
2–4 RSView32 Runtime User’s Guide
Step 4 – Opening the project
To open a project:
1.In the RSView32 Runtime window, click Open on the File menu.
2.In the Open dialog box, locate the project, click the project’s .rsv file (for example, Norm’s Bakery.rsv), and then click Open.
Using the Runtime Project Manager
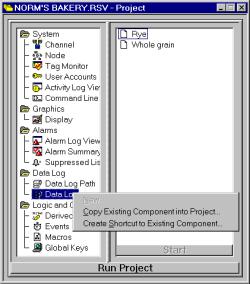
. . . any related components developed in RSView32 Works are listed here. To run a component, double-click it.
When you select an icon here . . .
With the Runtime Project Manager you can:
edit channels, nodes, user accounts, and data log paths—to open an editor, double–click the editor’s icon
view activity and alarm logs—to open the viewers, double–click the Activity Log Viewer and the Alarm Log Viewer icons
Running a project 2–5

open the command line to manually enter RSView32 commands— to open the command line, double–click the Command Line icon
run individual project components—to run a component, select the icon for the editor that created the component, and then double–click the component name
run a project—for details about running a project, see “Step 7 – Running the project” on page 2-9
Step 5 – Setting up the channel, OPC server, or DDE server
Before you can run a project, you must load and configure drivers for the programmable controllers or servers that your project was configured to use.
Connecting to programmable controllers using direct drivers
To connect to most Allen–Bradley® devices, install and load RSLinx® and install the driver required by your RSView32 project.
To communicate with SoftLogix™ 5 programmable controllers, you must use an RSLinx driver.
|
|
You must use the version of RSLinx that came with your RSView32 |
|
IMPORTANT |
|
|
|
software. This version has been tested for compatibility with |
|
|
|
|
|
RSView32. Other versions may not function correctly. |
|
|
|
To select a different RSLinx driver for your project, use the Channel editor.
For details about the RSLinx drivers, see the documentation accompanying RSLinx. For details about the Channel editor, see Chapter 2, Setting up direct driver communications, in the RSView32 User’s Guide.
2–6 RSView32 Runtime User’s Guide
Connecting to OPC servers and DDE servers
To connect to a wide range of local and remote devices, install and configure the appropriate OPC or DDE server. For details about configuring the server, see your server documentation.
To change the OPC node’s server name and access path or the application and topic name for the DDE server your project will use, use the NodeSwitch command or use the Node editor.
For details about the NodeSwitch command, see Appendix A, RSView32 commands, or see Help. For details about the Node editor, see Chapter 3, Setting up OPC and DDE communications, in the RSView32 User’s Guide.
Step 6 – Changing the path to files outside the project directory
If your project references files outside of the project directory and the path to these files has changed (for example, the drive letter has changed), use the Project Paths dialog box to update the path.
For example, imagine your project directory is C:\Norm’s Bakery but you have stored graphic files in C:\Gfx. You move your project from C:\ to D:\. The paths to the files in \Norm’s Bakery are automatically updated, but the path to \Gfx is not—you must update the path in the Project Paths dialog box.
To change the path:
1.With the Project Manager active, click Project on the menu bar, and then click Project Paths.
Running a project 2–7

2.Click the Application Paths tab.
3.In the Name field, select the editor that was used to create the component.
Any components associated with the editor are displayed in the Components field.
4.In the Default Path field, type the new path or click Browse to select the new path.
5.Click Apply Default Path.
The components are updated to the new path.
6.Click OK.
2–8 RSView32 Runtime User’s Guide
Step 7 – Running the project
You can run the project manually or you can set up the project to run automatically when Windows starts.
Running a project manually
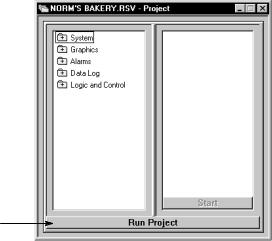
In the Project Manager, click Run Project.
Click this button to run a project.
Running a project automatically
To automatically start RSView32 Runtime and run a project each time
Windows starts, include an RSView32 Runtime shortcut in the
Windows Startup folder, as described on page 2-3.
Running a project 2–9
Adding files to a project
You can add new files to a project any time by copying or moving the physical file to the target computer and then adding the file’s name to the Project Manager.
To add files:
1.In Windows Explorer, My Computer, or File Manager, copy or move the file you want to add into the appropriate folder in the project. For example, add a graphic display file to the Gfx folder.
2.In the RSView32 Project Manager, select the icon for the editor that was used to create the file (for example, select the Data Log icon for a data log model), right–click, and then click Copy Existing Component into Project or click Create Shortcut to Existing Component.
3.In the dialog box, locate the file that you moved, and then click Open. The file name will be added to the right–pane of the Project Manager.
2–10 RSView32 Runtime User’s Guide

Changing data logging paths
You can change the data logging paths at runtime. You can change the primary and secondary paths for dBASE® IV data log models, and the backup path for ODBC data log models. You cannot change the ODBC database using RSView32 Runtime. After you change the logging path you must stop and restart data logging for the changes to take effect.
To edit the logging paths:
1.In the Project Manager, open the Data Log folder.
2.Open the Data Log Path editor.
3.Specify paths as described in “Specifying Logging Paths” in Chapter 7, Configuring data logging, in the RSView32 User’s Guide.
You can also change logging paths at runtime using the DataLogPath command. For details about the DataLogPath command, see Appendix A, RSView32 commands, or see Help.
Stopping a project
To stop a project, do one of the following:
in the Project Manager, click the Stop Project button
on the command line, type ProjectStop
Running a project 2–11
Loading...