


RP-9328

USER‘S
GUIDE
RP-9328
RP-9338
RP-9348
RP-9349
RP-9368
AUDIO SYSTEM

FCC Information
This device complies with Part 15 of the FCC Rules. Operation is subject to the following two conditions: (1) This device may not cause
harmful interference, and (2) this device must accept any interference received, including interference that may cause undesired
operation.
In accordance with FCC requirements, changes or modifications not expressly approved by Thomson Consumer Electronics could void the
user’s authority to operate this product.
This product complies with DHHS Rules 21 CFR Subchapter J. Applicable at the date of manufacture.
This device generates and uses radio frequency (RF) energy, and if not installed and used properly, this equipment may cause interference
to radio and television reception.
This equipment has been type tested and found to comply with the limits for a Class B Computing Device in accordance with the
specifications of FCC Rules. These rules are designed to provide reasonable protection against radio and television interference in a
residential installation. However, there is no guarantee that interference will not occur in a particular installation.
If this equipment does cause interference to radio or television reception (which you can determine by turning the equipment off and on),
try to correct the interference by one or more of the following measures:
• Reorient the receiving antenna (that is, the antenna for the radio or television that is “receiving” the interference).
• Change the position of the unit with respect to the radio or television equipment that is receiving interference.
• Move the unit away from the equipment that is receiving interference.
• Plug the unit into a different wall outlet so that the unit and the equipment receiving interference are on different branch circuits.
If these measures do not eliminate the interference, please consult your dealer or an experienced radio/television technician for additional
suggestions. Also, the Federal Communications Commission has prepared a helpful booklet, “How To Identify and Resolve Radio TV
Interference Problems.” This booklet is available from the U.S. Government Printing Office, Washington, DC 20402. Please specify stock
number 004-000-00345-4 when ordering copies.
Safety Precautions
• Never open the cabinet under any circumstances. Any repairs or internal adjustments should be made only by a
trained technician.
• Warning: Never operate this product with the cabinet removed.
• Do not touch the player with wet hands. If any liquid enters the player cabinet, take the player to a trained
technician for inspection.
• This compact disc player uses a laser to read the music on the disc. The laser mechanism corresponds to the
cartridge and stylus of a record player. Although this product incorporates a laser pick-up lens, it is completely
safe when operated according to directions.
• Discs rotate at high speed inside the player. Do not use damaged, warped, or cracked discs.
For Your Safety
The AC power plug is polarized (one blade is wider than the other) and only fits into AC power outlets one
way. If the plug won’t go into the outlet completely, turn the plug over and try to insert it the other way. If it
still won’t fit, contact a qualified electrician to change the outlet, or use a different one. Do not attempt to
bypass this safety feature.
Service Information
This product should be serviced only by those specially trained in appropriate servicing techniques. For
instructions on how to obtain service, refer to the warranty included in this Guide.
For Your Records
According to some state laws, and in the event that service should be required, you may need both the model
number and the serial number. In the space below, record the date and place of purchase, and the serial
number:
Model No. RP-9328/38/48/68/49
Remote Control No. CRK291B
Date of Purchase ______________
Place of Purchase______________
Serial No. _____________________
WARNING:
OR ELECTRICAL SHOCK HAZARD,
DO NOT EXPOSE THIS PRODUCT
TO RAIN OR MOISTURE.
TO PREVENT FIRE
THE LIGHTNING
FLASH AND ARROWHEAD WITHIN THE
TRIANGLE IS A
WARNING SIGN
ALERTING YOU OF
"DANGEROUS
VOLTAGE" INSIDE
THE PRODUCT.
SEE MARKING ON BOTTOM / BACK OF PRODUCT
CAUTION
RISK OF ELECTRIC SHOCK
DO NOT OPEN
CAUTION: TO REDUCE THE
RISK OF ELECTRIC SHOCK,
DO NOT REMOVE COVER
(OR BACK). NO USERSERVICEABLE PARTS INSIDE. REFER SERVICING
TO QUALIFIED SERVICE
PERSONNEL.
2
THE EXCLAMATION
POINT WITHIN THE
TRIANGLE IS A
WARNING SIGN
ALERTING YOU OF
IMPORTANT
INSTRUCTIONS
ACCOMPANYING
THE PRODUCT.

Table of Contents
FCC Information...................................................... 2
Safety Precautions ................................................ 2
For Your Safety........................................................ 2
Service Information ............................................. 2
For Your Records .................................................... 2
Table of Contents ................................................... 3
Special features ....................................................... 4
First Things First ..................................................... 5
Unpack the system.................................................. 5
Check for moisture................................................ 5
Choose a Location ................................................. 5
SETTING UP THE SYSTEM ............................................ 6
Connecting & placing
the speakers................................................................ 6
Connecting the Antennas ................................... 6
Connecting Components ................................... 7
Connecting for power......................................... 7
Using headphones .................................................. 7
Setting the timer/clock...................................... 7
System Demonstration........................................ 8
General Controls ................................................... 9
1, 2, 3 direct disc access.......................................... 9
Auto track skip (ATS) .............................................. 9
BASS boost .................................................................... 9
timer/clock ................................................................ 9
DEMO ............................................................................... 9
Disc change ................................................................ 9
F.FWD................................................................................ 9
FM STEREO ...................................................................... 9
FUNCTION BUTTONS .................................................. 9
EQ band ......................................................................... 9
custom eq .................................................................... 9
Open/close ..................................................................10
INTRO.............................................................................. 10
power ............................................................................ 10
PAUSE ..............................................................................10
PLAY/PAUSE ...................................................................10
PRESET/TUNE ................................................................ 10
REC ................................................................................... 10
REPEAT ............................................................................ 10
REW .................................................................................. 10
SEEK/SCAN .....................................................................10
SET/demo...................................................................... 10
SHUFFLE .......................................................................... 10
STOP.................................................................................10
STOP/EJECT .................................................................... 10
TRACK/SEARCH ............................................................10
VOLUME..........................................................................10
VFD (Vacuum fluo rescent display)Messages..11
Using the system................................................ 12
Using the tuner ...................................................... 12
Tuning Radio Stations........................................ 12
Storing Stations in Memory ........................... 12
Auto preset programming ............................... 12
Recalling Preset Stations.................................. 12
Using the CD player ............................................... 12
Loading Discs............................................................ 12
Playing Discs.............................................................. 12
CD Playing Time........................................................ 12
Shuffling Play Order ........................................... 13
Repeating Play Order............................................ 13
Pla ying and Loading Discs Simul taneousl y ...13
Programming Play Order.................................. 13
Repeating a Program ........................................... 13
Recalling and Editing the Program .......... 13
Clearing the program ........................................ 13
Using ATS (Auto Track Skip) ............................... 13
Creating an ats program.................................. 13
Recalling and Editing the ATS Program .. 14
Clearing the ATS Program ................................ 14
CD DISPLA Y MESSAGES............................................... 14
Using the cassette deck ...................................... 14
Playing Cassette Tapes ......................................... 14
Continuous Tape play .......................................... 14
Automatic Stop Feature ..................................... 15
Recording from Radio ........................................ 15
Recording from CD................................................ 15
Recording from tape to tape .......................... 15
Recording from components......................... 15
Using the remote control................................. 16
Battery Installation ........................................... 16
General Controls................................................... 16
Troubleshooting tips .......................................... 17
Care and maintenance ....................................... 18
Cleaning the Exterior......................................... 18
Handling Compact Discs.................................... 18
Cleaning Compact Discs...................................... 18
Tape Care...................................................................... 18
Cleaning the Tape Heads.................................... 18
INDEX ............................................................................ 19
canadian warranty ............................................ 20
US warranty ............................................................ 20
3

SPECIAL FEATURES
This user’s guide was written for a series of audio systems that share many of the same features. Please refer to
the chart below as you read through the guide to help you identify exactly which features match the system
you have purchased.
MODEL
RP-9328
RP-9348
RP-9349
RP-9368
SRS ( )*
This feature brings dimensional realism to stereo sound. When the SRS is on, your system electronically
increases the audio separation of the speakers so you can perceive a more spacious stereo sound effect, like
Home Theatre.
SRS allows you to hear multiple sound sources. Audio frequencies are processed to establish directional
cues, which give the impression that sound is coming from all parts of the room. Additional speakers are
not required, but the addition of a subwoofer optimizes the sound performance.
CUSTOM EQ
This feature allows you to custom set your system’s bass, middle range and treble levels.
SURROUND
SPEAKERS
SRS
CUSTOM EQ
VIDEO 1/2
1
1/2
1/2
1/2
* SRS, the SRS symbol (
4
) and Sound Retrieval System are registered trademarks of SRS Labs, Inc.
•
First Things First
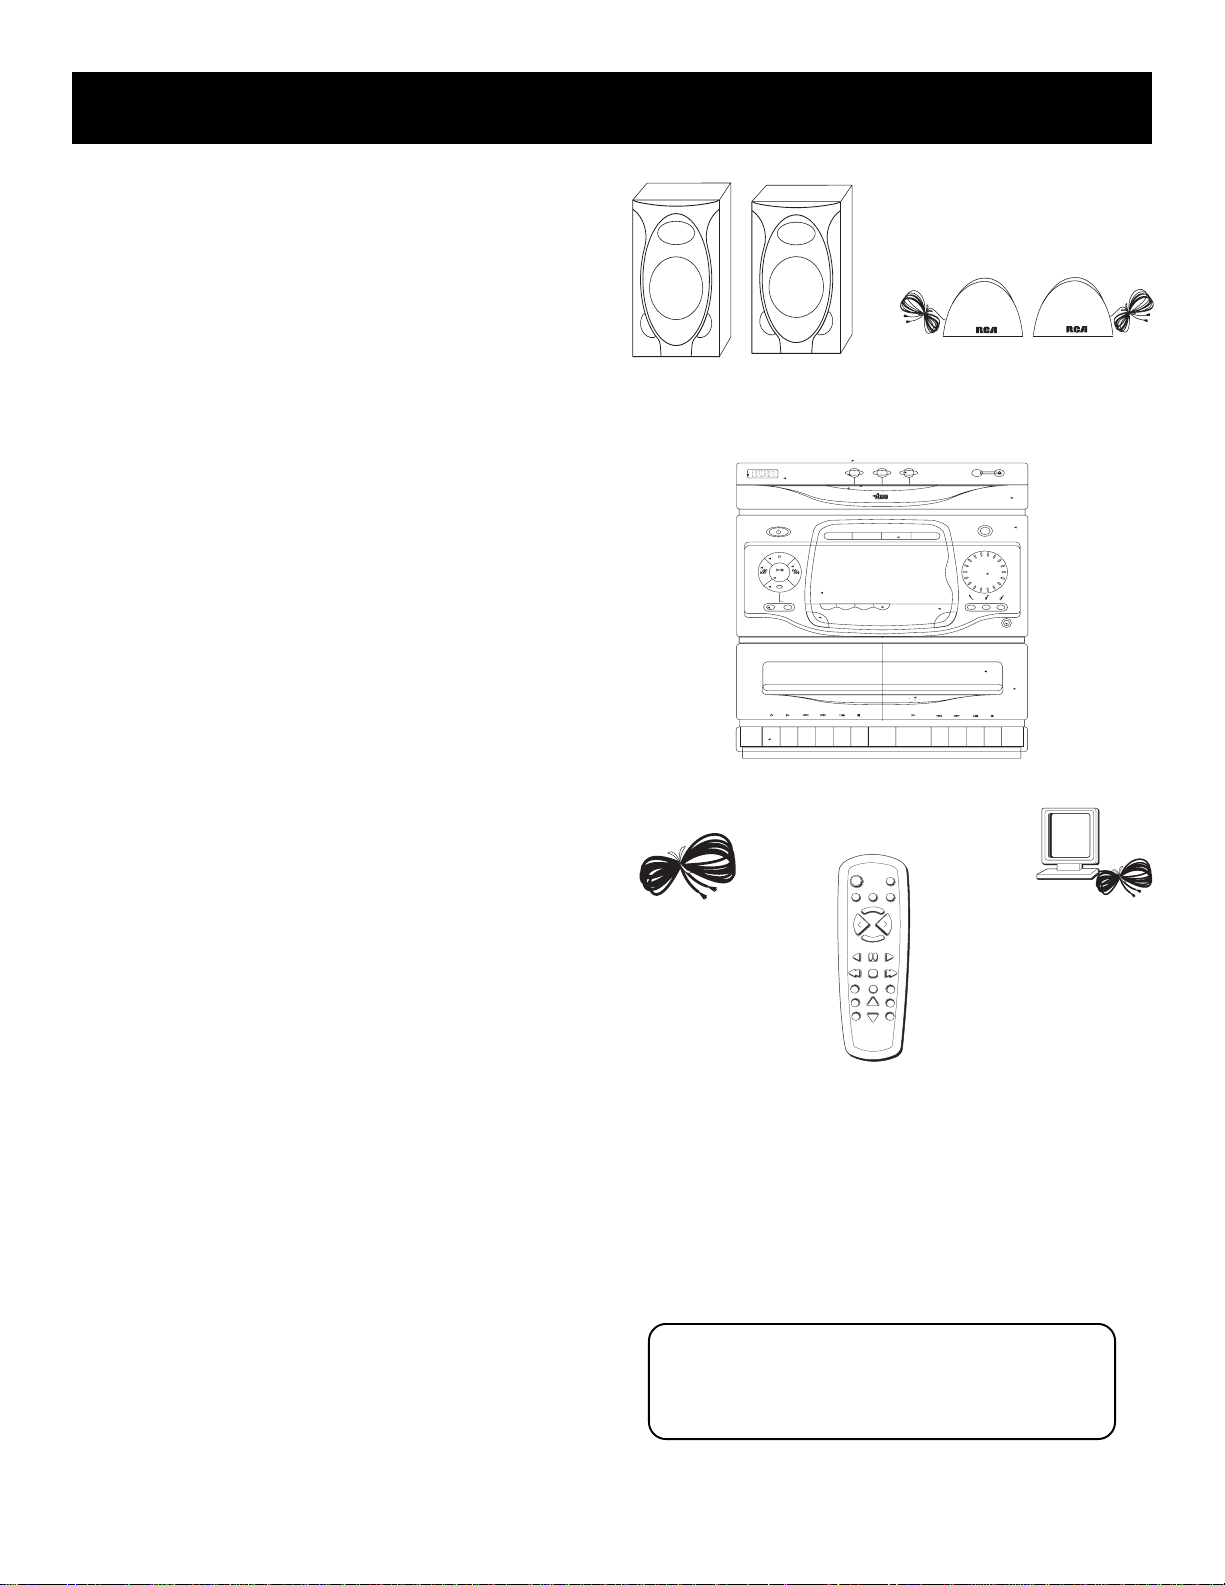
Unpack the system
Unpack the system and its accessories. You should
have:
• main unit;
• two main speakers and two surround speakers;
• the RCA IR remote control;
• an external/detachable FM wire type “T” dipole
antenna;
• and an external AM loop antenna.
Check for moisture
Just as moisture can form on the inside of windows
on a cold day, it can also form on the inside of your
stereo, causing it to malfunction. Some situations in
which condensation might form include the
following:
• Immediately after a heater has been turned on;
• In a steamy or very humid room;
• When the system is suddenly moved from a cold
environment to a warm, moist one; for example, in
moving the stereo from a cool air conditioned
room to an outside porch on a humid, summer day.
If moisture forms inside this player, it may not
operate properly. To correct the problem, turn off
the power and wait about 30 minutes for moisture
to evaporate.
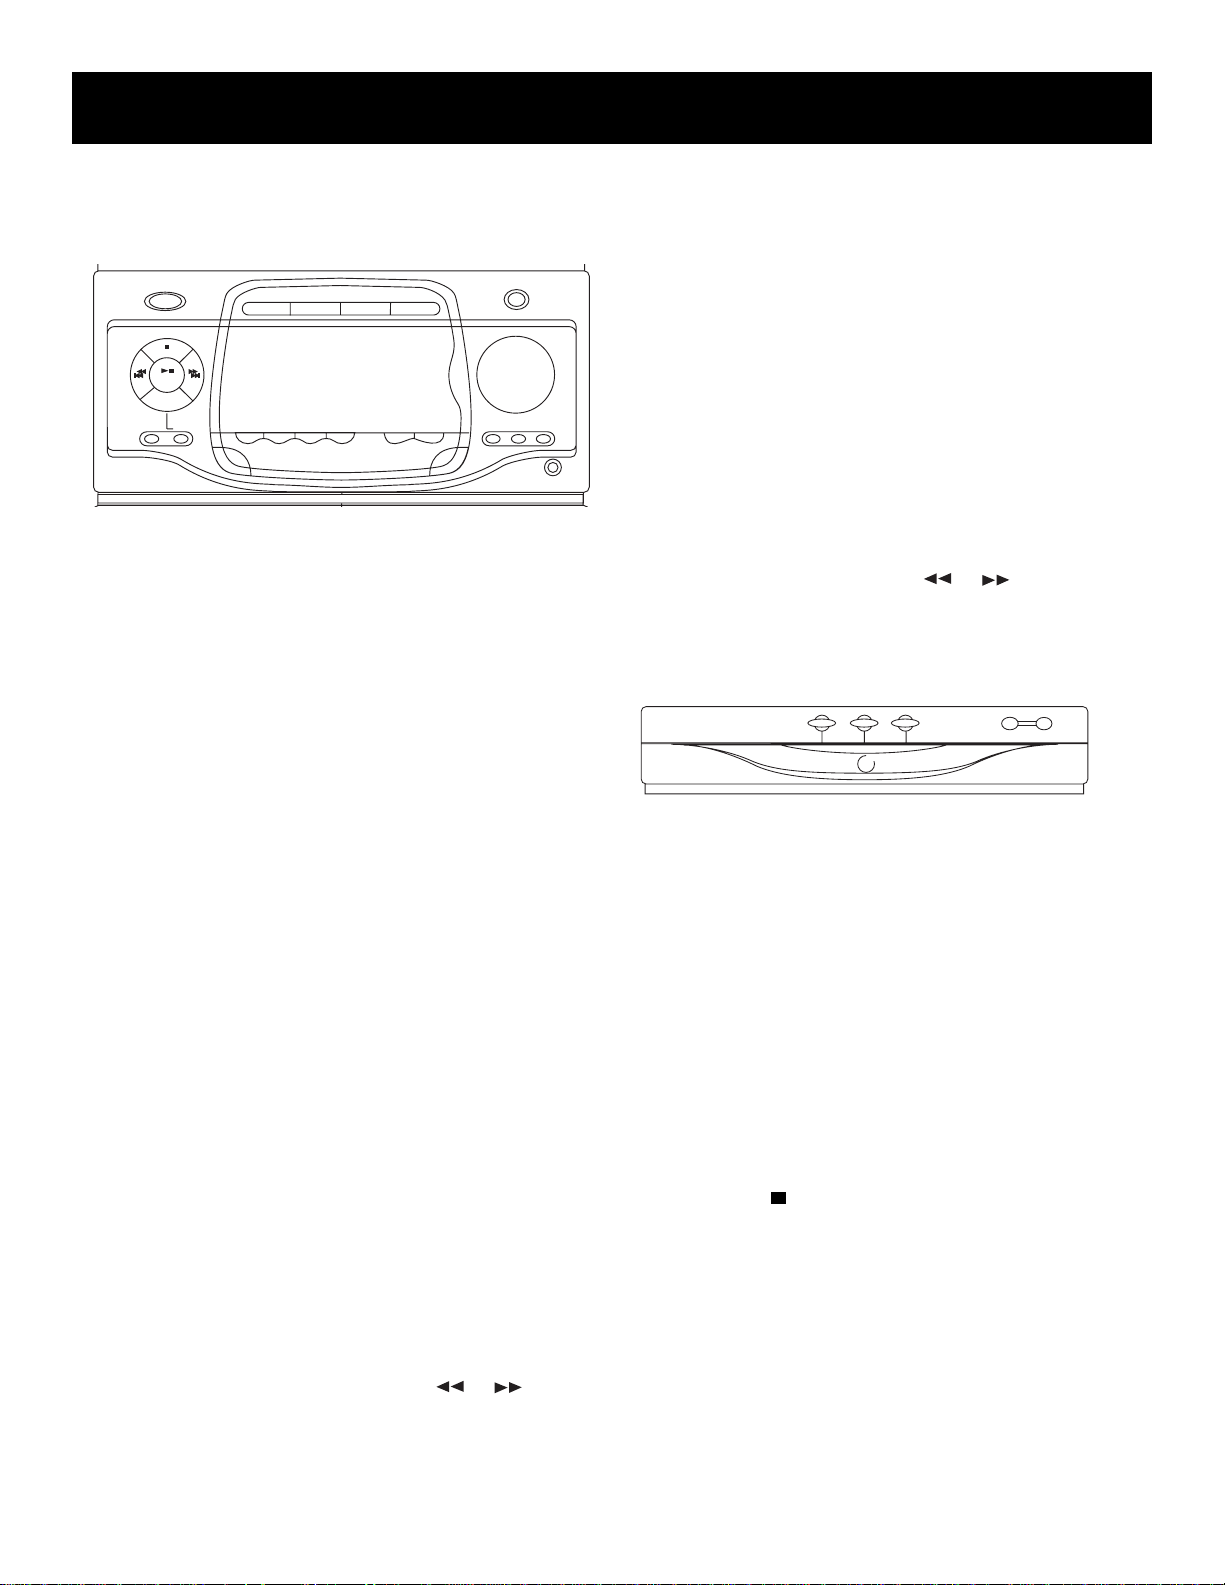
RCA
main speakers
FM antenna
MINI AUDIO SYSTEM CS XXXX CD
STANDBY
A
M
L
TA
I
G
I
D
stop
pause
seek/
scan
PLAY / RECORD
RECORD PLAY
RCA
ON/
R
E
T
C
S
O
N
T
R
O
L
play/
set
preset
tune
CD
SHUFFLE INTRO REPEAT
FM
STEREO
ONE TOUCH RECORDING
AUTO STOP MECHANISM
AUTOMATIC RECORD LEVEL
STOP/EJECT
REW. F. FWD STOP
main unit
123
3 DISCS DIRECT ACCESS
COMPACT
DIGITAL AUDIO
TAPE
RADIO
digital multifunction fluorescent display
ATS
SOFT EJECT SYSTEM
TAPE DUBBING 2>1
CONTINUOUS PLAY 2>1
POWER
VIDEO 1•2
TAPE
TUNER
CD
E
R
S
P
E
T
Q
E
V
O
L
L
O
V
M
U
E
T
PLAY REV PAUSE PLAY FWD
TRACK REV STOP TRACK FWD
SHUFFLE
DISC SKIPREPEAT
SRS
RECORD
PRESET
TUNING
SEEK
surround speakers
(RP-9328, RP-9349, RP-9368)
OPEN/CLOSE
DISC 1 2 3
VIDEO
DEMO
O
C
N
e
T
R
m
u
O
l
o
L
v
bass
clock/
hr/min
REW. F. FWD STOPPLAY
dspeq
phones
PLAYBACK
STOP/EJECT
AM loop
antenna
Choose a Location
These guidelines should be followed when deciding
on a place to put your stereo system:
• Choose a level, solid, surface. Don’t place it on a
soft surface, such as carpeting or foam rubber.
• Choose a location away from direct sunlight,
radiators, air ducts, and other sources of heat.
• Avoid locations that are subject to moisture,
mechanical vibration, shock, or excessive dust.
• Make sure that the location has adequate air
circulation. Good ventilation is essential to protect
the system from internal heat build up.
Remote
Control
Be a Pack Rat
It is a good idea to keep the box and all of the packing
materials your system came with in case you need to store,
move or ship the unit at a later date.
5
SETTING UP THE SYSTEM
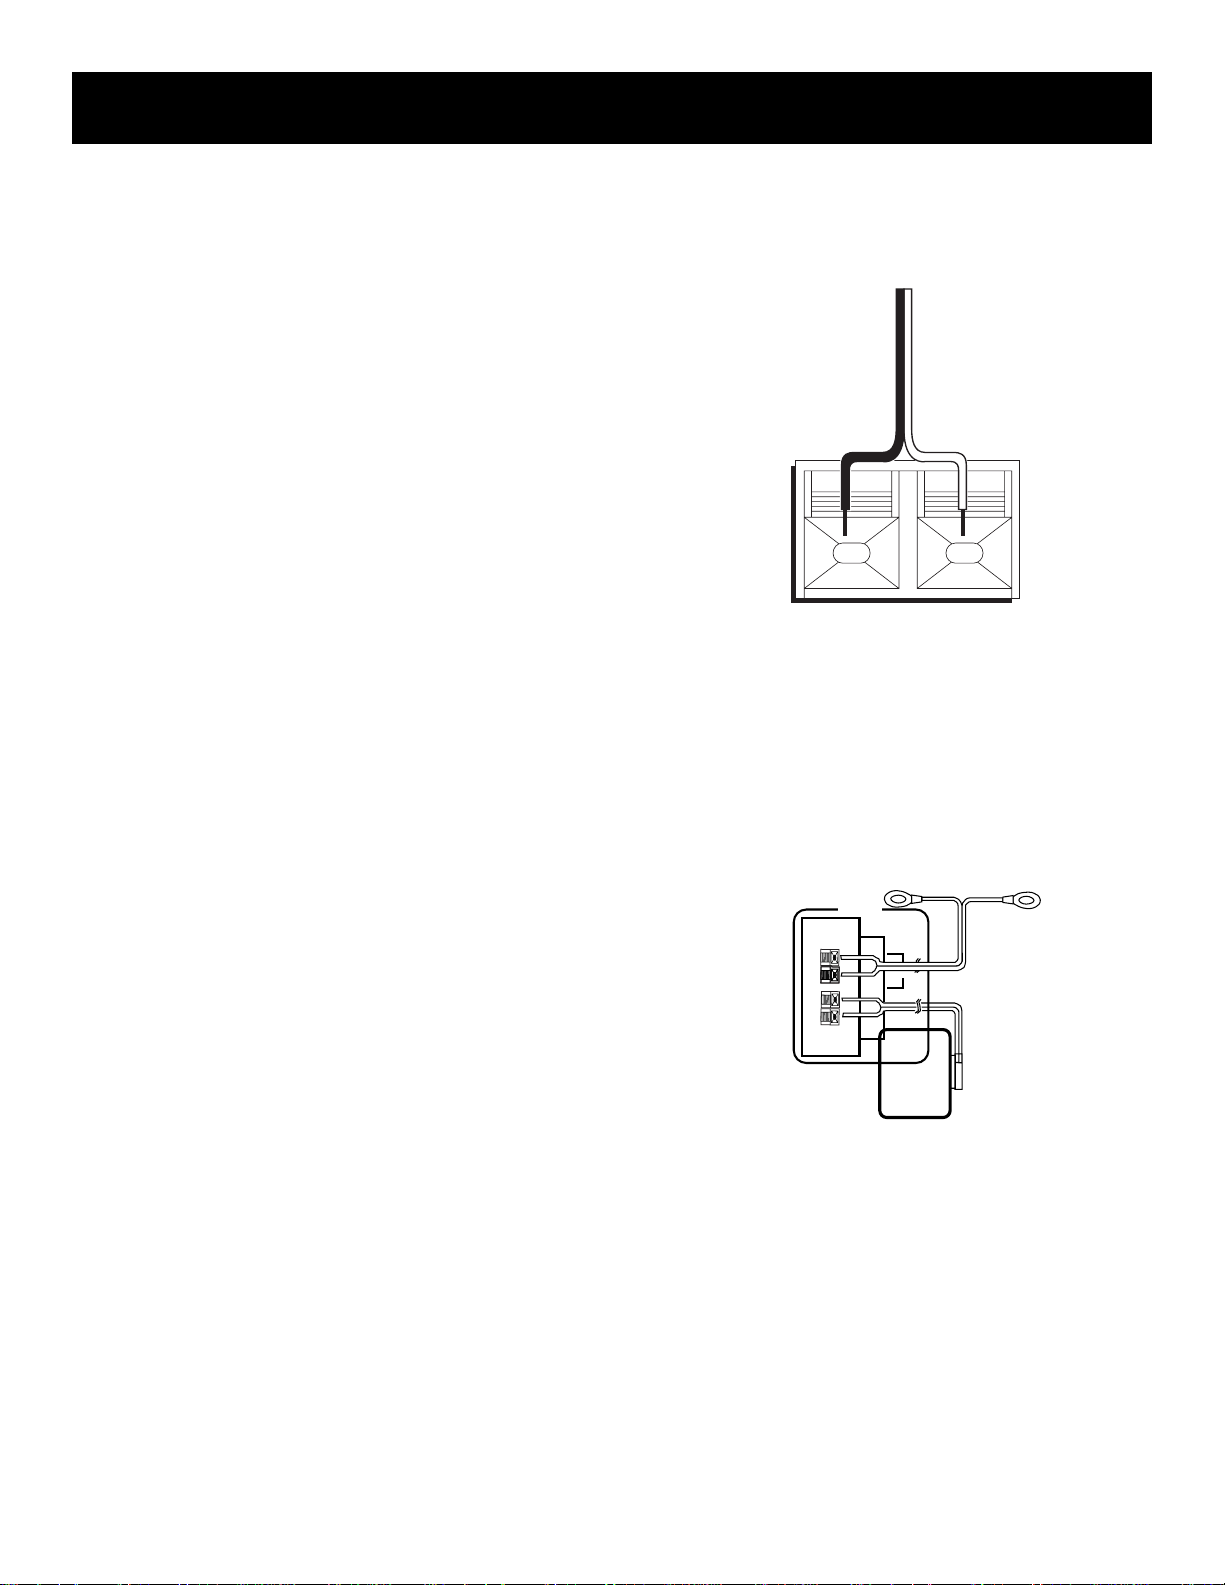
Connecting & placing
the speakers
Each speaker has its own connection terminals on
the back of the system, so connect the wires from
each speaker to one set of terminals. When
connecting the speakers, make sure that the bare
end of each wire makes contact with the metal grips
inside the terminal. There are connections provided
for main and surround speakers.
1. Press down on the tab to open the red terminal
and insert the red wire (+) into the red terminal.
2. Press down on the tab to open the black terminal
and insert the black wire (–) into the black
terminal.
WARNING: Be sure to follow these instructions
carefully. The system can be damaged if speakers
are improperly connected.
The speakers should be set between 6 and 10 feet
apart. Putting the speakers any closer or any farther
apart may result in distorted sound.
The speakers should also form a 45 degree angle to
the central listening point in the room, creating a
triangle of listening enjoyment.
RED
+
BLACK
–
Connecting the
Antennas
The AM and FM wire antennas connect to the FM
ANTENNA terminals and AM terminal on the
system’s back panel, and must be connected for
clear reception. Connect the antenna wires similar
to the way you connected the speakers.
After connecting the antennas, extend them to their
full length; then you can adjust their position for
better reception when you are listening to the
radio.
FM
AM
ANTENNA
AM
LOOP
FM
6
Setting up the system
2 VIDEO 1
R L
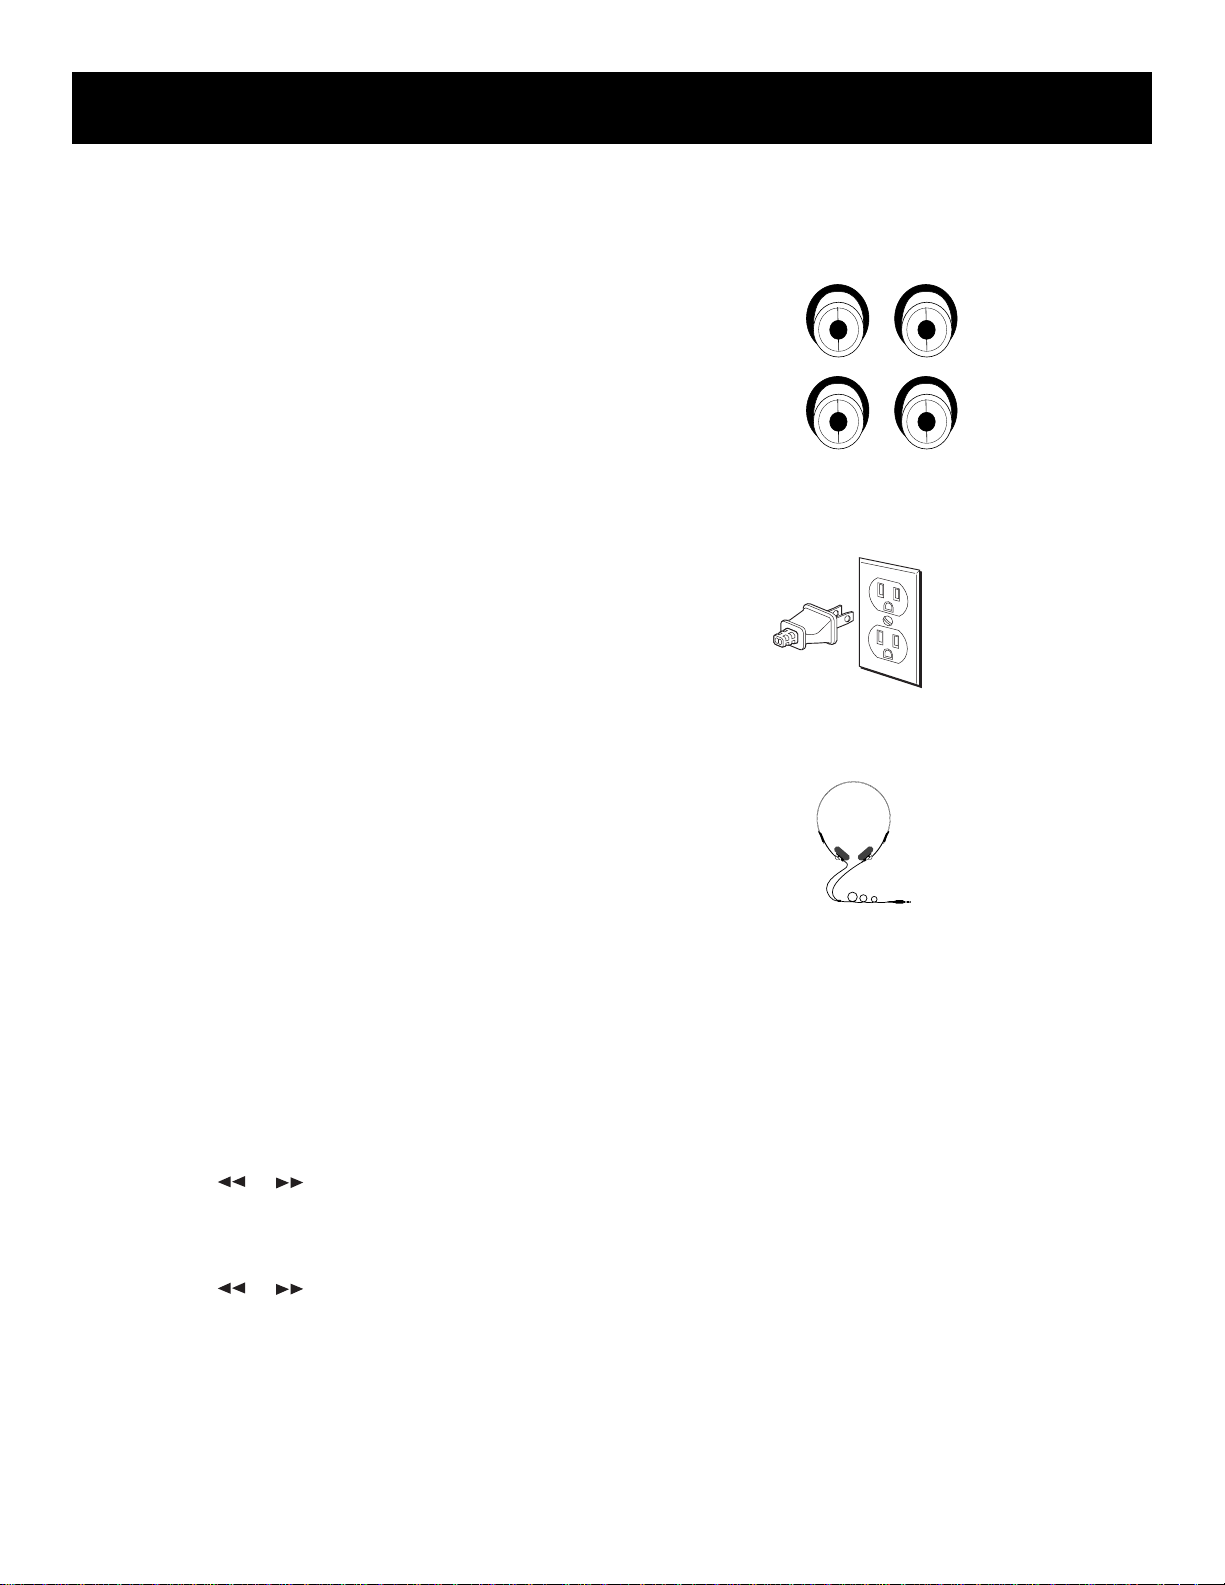
Connecting Components
Use the VIDEO input jacks on the back of the system
to add a component that provides an additional
source of sound into your system (VIDEO 1 or
VIDEO 2) – additional VCRs, camcorders, or other
compatible devices.
To hook up an auxiliary component, match the left
and right audio output plugs from the component
to the left (L) and right (R) VIDEO 1 or VIDEO 2
input jacks on the back panel.
Connecting for power
Plug the power cord into an AC power outlet that
accepts the polarized plug (one blade wider than
the other).
Using headphones
To listen privately to your favorite CDs, tapes and
radio stations, your system has been equipped with
a PHONES jack.
NOTE: Make sure that you turn down the stereo before
you put on headphones, then increase the volume to the
desired level after they are in place.
Setting the timer/clock
Your system is equipped with clock and timer
functions. You can use the timer function to turn
your system on automatically.
To set the clock:
1. Press and hold the TIMER/CLOCK button until
CLOCK appears in the display under the time.
2. Press the SET button once and the hour will flash.
3. Use the
the correct hour.
4. Press the SET button again and the minutes will
flash.
5. Use the
the correct minutes. The time will flash for a few
seconds and be set when it stops.
or buttons to ascend or descend to
or buttons to ascend or descend to
7

Setting up the system
To set the timer:
1. Press the TIMER/CLOCK button. A red clock symbol
should appear beneath the time.
2. Repeat Steps 2-5 from above.
You can set the volume level you want the system
to be at when it turns on. While still in the timer
set mode, simply turn the volume dial to the
desired level. When the timer is set, the volume
level is stored and will not be disturbed during
normal system operation.
NOTE: The timer feature will not activate if the
system is in use.
The system will turn off after one hour if activated
by the timer feature. However, any adjustment
made to the system during the one hour period
will deactivate the automatic turn-off feature.
3. To turn the Timer off manually, press the TIMER/
CLOCK button until the red clock symbol
disappears from the display.
To activate the Timer again, press the TIMER/
CLOCK button once. The red clock symbol will
appear in the display.
System Demonstration
For a simple demonstration of the system’s
capabilities, functions and various display messages,
press the SET/DEMO button located at the bottom
of the Master Controls to the left of the display
while the power is at Standby mode.
8
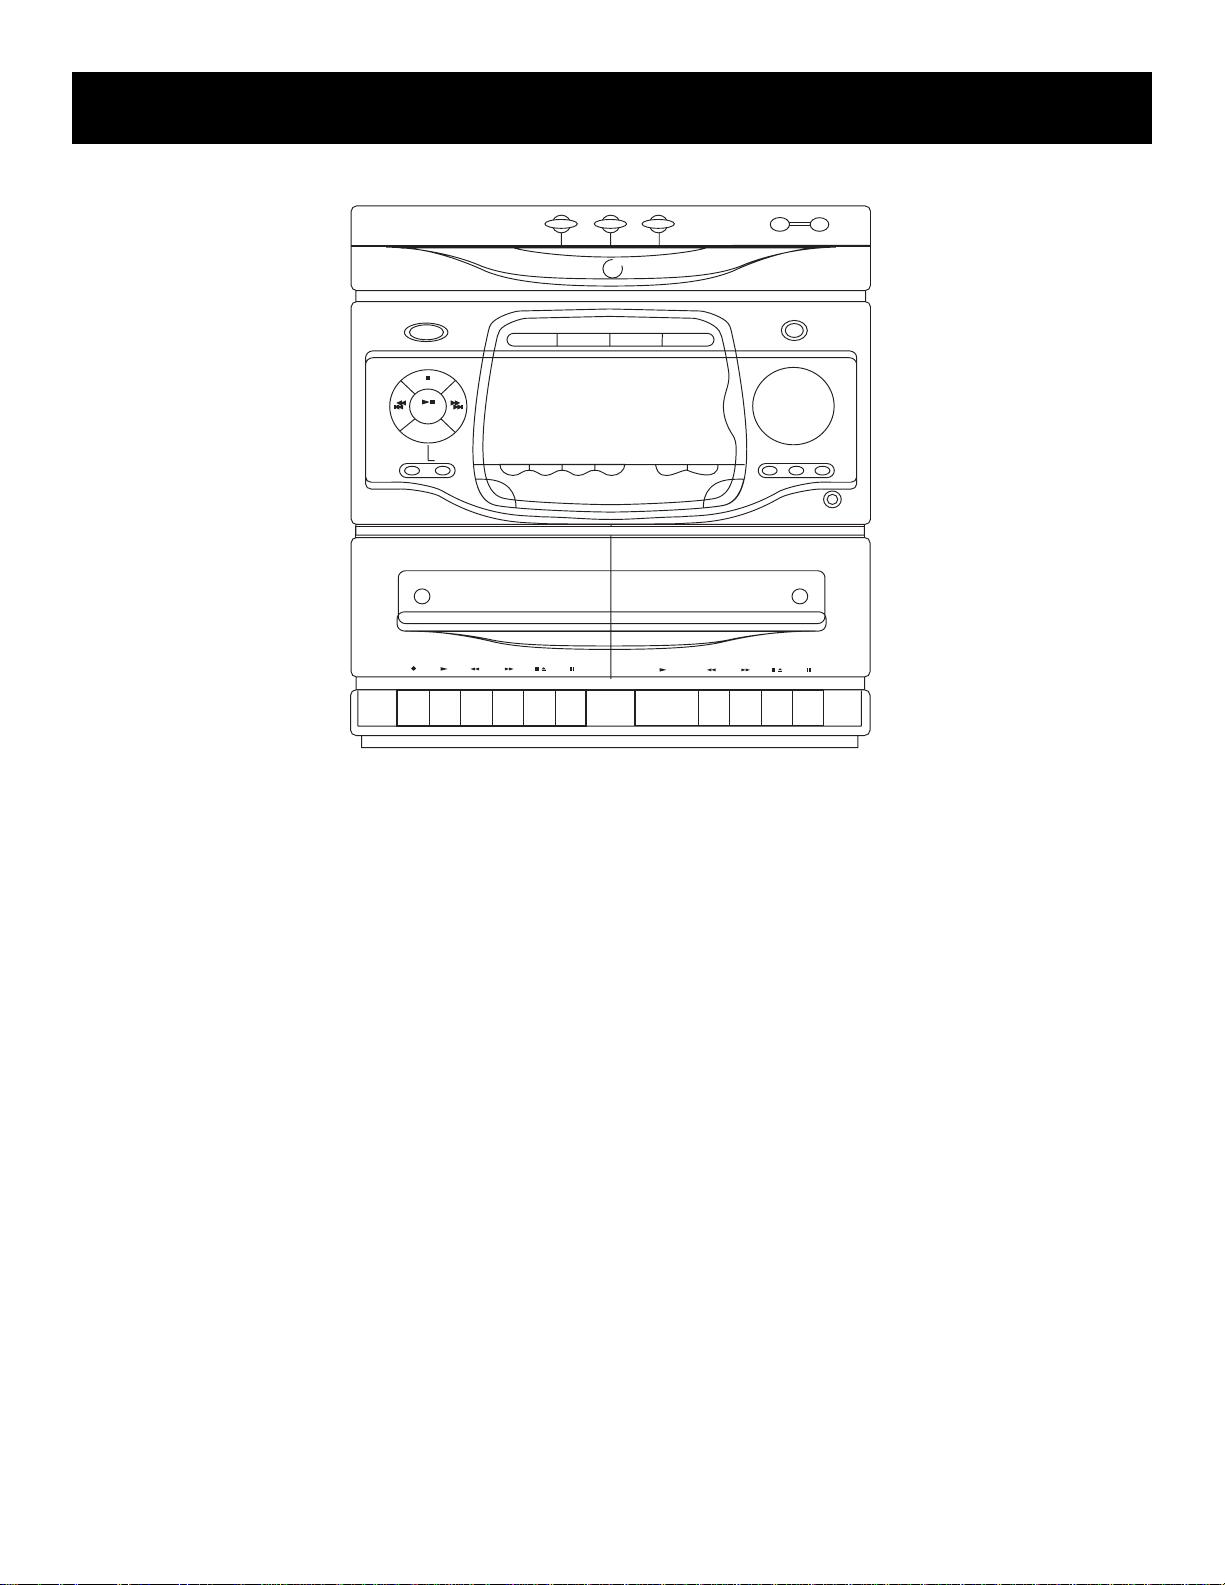
General Controls
H I G H P E R F O R M A N C E A U D I O S Y S T E M
2
1
3 DISCS DIRECT ACCESS
3
3
DISC
DISC CHANGE
OPEN / CLOSE
POWER
STOP
PLAY/
PAUSE
DEMO
PRESET TUNE
SEEK/SCAN
RECORD / PLAYBACK • AUTO STOP
DECK
1
SHUFFLE
FM STEREO
CD
REPEAT
INTRO
1, 2, 3 direct disc access
When in CD mode, these buttons allow you to directly
choose which disc in the tray you want to hear. Upon
pressing, the tray will shift to selected disc and begin play .
Auto track skip (ATS)
This feature is the opposite of programmed play. It
allows you to block up to 32 tracks from playing.
BASS boost
Turn on BASS BOOST (BASS BOOST indicator will light)
to enhance bass frequencies at low volume levels. (It
will cause distortion when used at high volume.)
timer/clock
This button allows you to set the correct time and a
timer to turn the system on automatically.
DEMO
Press SET/DEMO when the set is on “STANDBY” mode.
To access the DEMO mode, all functions will appear on
the display panel.
EQ BAND
This feature allows you to access the preset equalizer
bands - bass, middle range and treble. To adjust the
levels, use the volume dial.
TAPE
ATS
VIDEO 1•2
TUNER
EQ BAND
CUSTOM
TIMER/CLOCK
BASS BOOST
L
U
M
O
V
E
JAZZ
POP
PHONES
PLAYBACK • CONTINUOUS PLAY 2•1
DECK
2
ROCK
Disc CHANGE
When in CD mode, the DISC CHANGE button allows you to
rotate to the next disc in the tray without opening the
disc compartment door. If the button is pushed while the
tray is out and a CD is playing, it will immediately retract,
shift to the next available disc and begin play. If in Stop
mode when pushed, the tray will simply rotate.
F.FWD
This button winds the tape quickly toward the end.
FM STEREO
This feature allows you to improve FM reception by
switching between Stereo to Mono mode. If a
station is being broadcast in stereo, the stereo
indicator ST will show in the display.
CUSTOM EQ
This button allows you to access the custom set bass,
middle range and treble levels.
FUNCTION BUTTONS
Use these buttons - CD, TAPE, TUNER and VIDEO to turn the system on in the function you wish to
operate or to switch between functions while the
system is on.
9

General CoNtrols
Open/close
This button allows you to open and close the CD
compartment door.
INTRO
This feature allows you to listen to the first 10
seconds of each track on the disc in the play
position.
power
This button allows you to turn the system on and
off. When turned on, the system will default to the
last active mode.
NOTE: You can also turn the system on by pressing
any one of the function buttons.
PAUSE
This button, located below each tape deck, allows
you to temporarily suspend tape activity.
PLAY/PAUSE
This button, located to the left of the display,
controls CD activity. Press once to begin CD play,
again to pause play and a third time to resume play.
PRESET/TUNE
This button is active only in the TUNER function.
Press to toggle between Preset and Tune mode.
Using the (>> or <<) buttons, scan through the
preprogrammed frequencies or those on the active
band to select the radio station you want to hear.
REC
This button is located below the left cassette door.
Press to record from CDs, other tapes, the radio or
an auxiliary component.
REPEAT
In the CD mode, you can repeat an entire disc, a
programmed list or a certain track.
REW
This button winds the tape back toward the
beginning.
will stop for approximately five seconds at each of
the FM stations received until the button is pushed
again.
SET/demo
This feature allows you to store preset radio stations
or programmed track lists in the system’s memory.
This works in both the CD and TUNER functions. It
also allows you to set the clock and timer.
SHUFFLE
This feature allows automatic random play of all
discs and all tracks.
STOP
This button, located to the left of the display, ends
CD activity.
STOP/EJECT
On systems with mechanical cassette decks, this
button is located below each cassette door for tape
activity. Press to stop current tape activity, or to
open the cassette compartment door when no
buttons are active. There is also a STOP button
located in the Master Controls to the left of the
display that is active only in the CD function. Press
once to end CD activity.
TRACK/SEARCH
These buttons are active in the TUNER and CD
functions. In the CD function, they allow you to
search through a track while it is playing or skip
through the tracks of the current disc. In the TUNER
function, they allow you to do a fast or slow search
incrementally through the band or presets.
VOLUME
Use this dial to regulate the level of sound output
from the system. Turn the dial to the left to lower
sound output. A message will continually run across
the display when the sound is muted. Turn the dial
to the right to increase sound output. The volume
indicator in the display will show the level of sound
output from minimum to maximum.
SEEK/SCAN
These features are active only in the TUNER function
in the FM band. Press once to activate the Seek
mode. The system will stop tuning on the next
available FM frequency. Press and hold the button
momentarily to activate the Scan mode. The system
10

general controls
VFD (Vacuum fluorescent display) Messages
As you activate different functions, the VFD will indicate which modes are active and what command the
system is currently processing. Below is an example of all the messages you will encounter at one time or
another as you enjoy your system.
AM
PM
AM
PM
kHz
MHz
rp-9328
SHUFFLE
ST
REC
kHz
MHz
STEREO
MIX
REC
MAX
0dB
MIN
VOLUME
VOLUME
MAX
MIN
BASS
SRS
ROCK
JAZZ
POP
CUSTOM
ROCK
JAZZ
POP
CUSTOM
BASS
rp-9338/48/68/49
11
Using the system
Using the tuner
BASS BOOST
L
U
M
O
V
E
JAZZ
ROCK
POP
PHONES
or ) to
SEEK/SCAN
POWER
STOP
PLAY/
PAUSE
DEMO
PRESET TUNE
SHUFFLE
FM STEREO
TAPE
CD
REPEAT
INTRO
ATS
VIDEO 1•2
TUNER
EQ BAND
CUSTOM
TIMER/CLOCK
Tuning Radio Stations
• Press the TUNER function button. Press again to
switch between AM and FM.
• Use the SEEK/SCAN button to find the stronger
radio stations on the FM band in your listening
area.
– Press and release the button to initiate the Seek
mode, which moves through the stations
incrementally. The system will stop tuning on the
next available FM frequency.
– Press and momentarily hold the button to initiate
the Scan mode. The system will automatically stop
and play each radio station it receives strongly for
approximately three seconds. Press the button
again when the system lands on the station you
want to hear.
• Press the FM STEREO button to toggle between
STEREO and MONO modes to help improve
reception.
NOTE: A FM radio station must be transmitting
in stereo for you to receive it in stereo.
• If the STEREO indicator (ST) is fading in and out,
change from FM Stereo to FM Mono to improve
reception.
Storing Stations in Memory
You can preset as many as 32 stations for easy
access.
1. Choose the radio band and station.
2. Press the SET button. The PR on the program
indicator will blink.
3. Press one of the Search buttons (
choose the preset number.
4. Press SET again to store the station in memory.
Auto preset programming
While in the FM band, your system is capable of
automatically programming into its memory any FM
stations broadcasting in stereo in your area. Simply
press and hold the TUNER button for approximately
one second. “AUTO PRESET PROGRAMMING” will
scan across the display while the mode is active.
When finished, the system will tune to the first
preset station.
NOTE: This feature will overwrite any stored
information already stored in the presets.
Recalling Preset Stations
1. Press the PRESET/TUNE button to activate the
Preset mode.
2. Press the SEARCH button
or to move
through the list of preset stations until you find
the one you want.
Using the CD player
3
2
1
3 DISCS DIRECT ACCESS
H I G H P E R F O R M A N C E A U D I O S Y S T E M
DISC
3
Loading Discs
1. Press the OPEN/CLOSE button to open the CD
compartment drawer.
2. Place the CD(s) into the tray.
3. Press the DISC CHANGE button to rotate the
drawer in order to load a third CD.
Playing Discs
After you get the discs loaded, press the DISC
CHANGE button to select a disc and then push PLAY,
or press the Direct Disc Access button of your choice
and the disc will begin playing once it is in the play
position. The display will show which CD you have
chosen to play, the track number and its running
time.
Press STOP (
) to end disc play.
CD Playing Time
The elapsed time for a track appears in the display
while the track is playing.
DISC CHANGE
OPEN / CLOSE
12

Using the system
Shuffling Play Order
Turning on the Shuffle feature causes the tracks to
play in a random order.
• Press the SHUFFLE button to start random track
play. SHUFFLE appears in the display while the
feature is active.
• Press the SHUFFLE button a second time to turn it
off.
Repeating Play Order
You can repeat one track, one disc or all discs.
• Press the REPEAT button once to repeat the current
track.
• Press REPEAT a second time to repeat the whole
disc.
• Press REPEAT a third time to repeat all discs.
will appear in the display.
• Press REPEAT a fourth time to turn the feature off.
appears in the display.
appears in the display.
Playing and Loading Discs
Simultaneously
You can open the disc tray without stopping the disc
currently in play. Simply press the OPEN/CLOSE
button and the tray opens, providing access to the
front disc compartments. Play continues without
interruption while the front two discs can be
changed. If you open the disc tray while a disc is
playing and then press DISC CHANGE, the disc tray
will close, play stops and the disc tray rotates to
begin playing the next available disc.
Programming Play Order
You must be in Stop mode in order to program play
order.
1. Press the SET button.
• ---- appears beside the TRACK indicator and
blinks.
• PR 01 appears in the display indicating that this
is first programmed track.
2. Press the DISC CHANGE button to choose a disc.
3. Press
4. Press SET to save the track in the program memory.
5. Repeat steps 2-4 above to program up to 32 tracks.
• FULL appears in the Front Panel Display when
the program is full.
6. Press PLAY (
Program mode.
or to choose a track.
) to begin programmed play while in
Repeating a Program
When you program tracks into memory, you can
repeat the entire program by pressing the REPEAT
button twice after the program begins playing.
Recalling and Editing the Program
You must be in Stop mode in order to recall and edit
the program.
1. Press the SET button to enter Program mode.
• The display shows first programmed track.
2. Press SET to move to the next program number
until you get to the programmed track you want
to change.
3. Press DISC CHANGE to choose the disc and then
press
4. Press SET to change the current programmed track
to the one you just selected.
or to choose a replacement track.
Clearing the program
You cannot select tracks within a program to clear.
Upon completion of the following steps, the entire
program will be cleared.
1. Press SET to enter Program mode.
2. Press and hold the STOP button until CLEAR shows
in the display. If the program is already empty,
EMPTY will show in the display.
Using ATS (Auto Track Skip)
ATS (Auto Track Skip) is the opposite of
programmed play. Instead of programming the
tracks you want to hear, you indicate which tracks
you do not want to hear.
You can choose as many as 32 tracks to be
automatically skipped.
The process for creating and editing an ATS program
is nearly identical to that of programming disc play.
Creating an ats program
1. Press the ATS button. AUTO TRACK SKIP blinks in
the display.
2. Press the DISC CHANGE button to choose a disc.
3. Press
skipped.
4. Press SET to add the selected track to the ATS
program.
5. Repeat the preceding steps to add more tracks to
the ATS program.
6. Press PLAY (
or to choose the first track to be
) to begin playing the ATS program.
13
 Loading...