

Page 1
20-561 .fm Page 1 Wedne sday, Augus t 4, 1999 3:48 PM
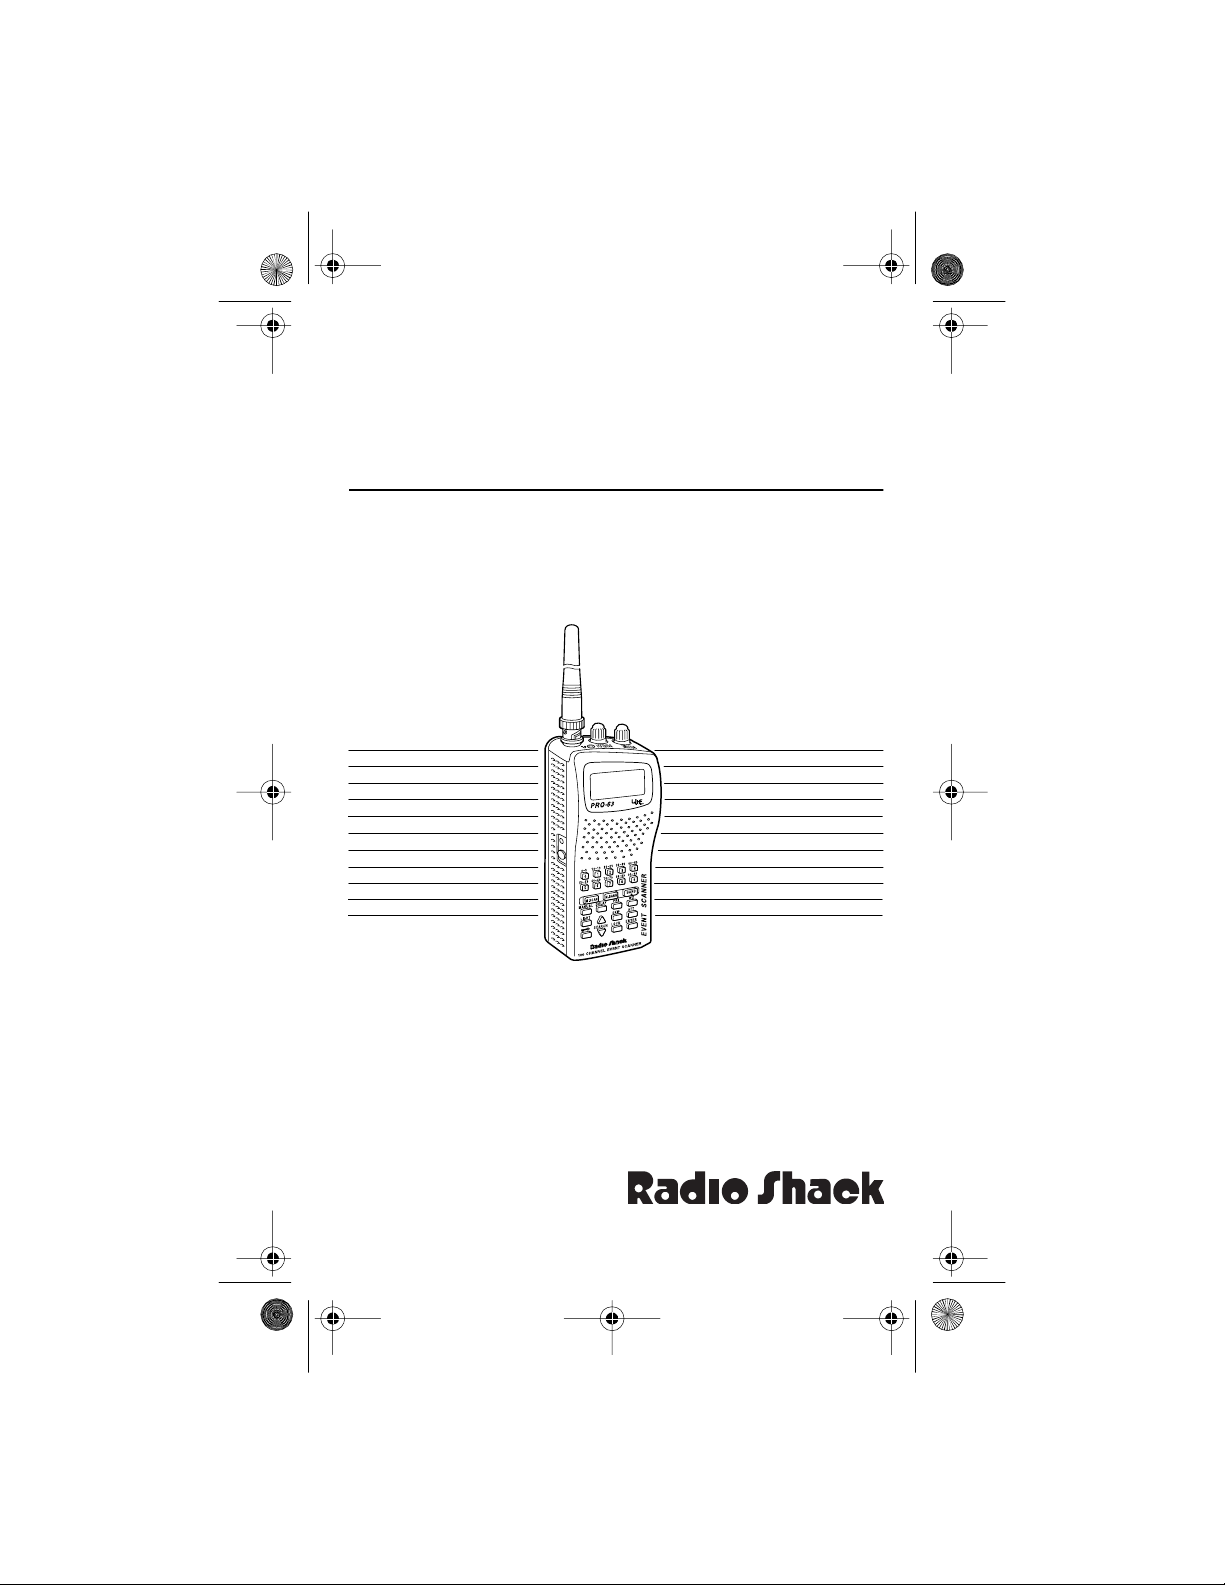
OWNER’S MANUAL
Please read befor e using this equipment.
Cat. No.
20-561
PRO-63 100-Channel
Portable Event Scanner
Page 2

20-561 .fm Page 2 Wedne sday, Augus t 4, 1999 3:48 PM
INTRODUCTION
Your new Radio Shack PRO-63 100-Channel Portable Event
Scanner lets you in on all the action — in the pits at the big race,
on the sidelines at a pro football game, or on the streets of your
home town. This scanner gives you direct access to over 24,000
exciting frequencies, including those used by participants and
staff at s porting event s and air sho ws, polic e and fire d epartments,
ambulance services, and amateur radio services. You can select
up to 100 chan nel s to s can and you c an c hange your s elect ion s at
any time.
The secret to your scanner’s ability to scan so many frequencies
is its cus tom-desi gn ed micr opr ocessor — a t iny, buil t-i n c omput er.
Your scanner has all these special features.
Ten Preprogrammed Sear ch Bands
missions within preset f requency ranges, so you can find interesting frequencies more quickly.
— let you searc h for trans-
Ten Preprogrammed Weather Frequencies
formed about current weather conditions.
Ten Channel-Storage Banks
each bank to group channels so calls are easier to identify.
Two-Second Scan Delay
before moving to anot her channel, so you can hear more replies.
Channe l S k ip
select from being scanned.
Memory Bank Scan
any of the scanner’s channel-storage banks.
Radio Shack is a registered trademark used by Tandy Corporation.
2
— lets you set your scanner to keep channels you
— lets you scan frequencies you stored in
1995 Tandy Corporation.
„
All Rights Reserv ed .
— let you store 10 channels in
— delays scanning f or about 2 s econds
— keep you in-
Page 3

20-561 .fm Page 3 Wedne sday, Augus t 4, 1999 3:48 PM
Direct Channel Access — lets you directly access any stored
channel while you scan the banks.
Button — lets you lock the scanner’s keys to help prevent
accidentally changing the scanner’s programming.
Priority Channel — you can set the scanner to check one chan-
nel every 2 seconds so you do not miss important calls.
Auto Lock — lets you lock the scanner’s programmed channels
to keep you from accidentally erasing frequencies stored in the
channels.
ATT (At tenua te) Butto n — reduces the scanner’s sensitivity to
strong local signals, to reduce interference or noise caused by
these signals.
Liquid Crystal Displ ay — makes i t easy to view and cha nge pr ogramming information.
Display Backlight — makes the display easy to read in dimly-lit
areas.
Three Power Options — let you power the scanne r from alk aline
or rechargeable nickel-cadmium batteries, or external AC or DC
power.
Flexible Antenna with BNC Connect or — provid es exc ellen t r eception and is designed to help prevent antenna breakage.
Memory Backup — keeps ch annel frequen cies stored in memory
for up to 10 years during a power lo ss.
For your records, we urge you to record your scanner’s serial
number in the space below. The serial number is located on the
scanner’s back panel.
Serial Number: _____ ___________
3
Page 4

20-561 .fm Page 4 Wedne sday, Augus t 4, 1999 3:48 PM
Your PRO-63 scanner can receive all of these frequenci es.
• 29-54 MHz (10-Meter Amateur Radio, VHF Lo, 6-Meter
Amateur Radio)
• 108-136.975 MHz (Aircraft/Air Shows)
• 137-174 MHz (Aircraft/Air Shows, Auto Racing, Government,
Motion Picture/Video Industry, Pro Sports Teams, Radio/TV
Remote Broadcast Pickup, Stadiums/Venues, 2-Meter
Amateur Radio, VHF Hi)
• 380-512 MHz (Aircraft/Air Shows, Auto Racing, Government,
Pro Sports Teams, Radio/TV Remote Broadcast Pickup, 70Centimeter Amat eur Radio, Stadiums/Venues, UHF Lo, UHF
“T” Band)
Your PRO-63 scanner contains the following preprogrammed
search bands.
• 29-50 MHz (10-Meter Amat eur Radi o, VHF Lo)
• 50-54 MHz (6-Meter Am ateur Radio)
• 108-136.975 MHz (Aircraft/Air Shows)
• 137-144 MHz (Aircraft/Air Shows, Government)
• 144-148 MHz (2-Meter Amateur Radio)
• 148-174 MHz (Auto Racing, Motion Picture/Video Industry,
Pro Sports Teams, Radio/TV Rem ote Broadcast Pickup, Stadiums/Venues)
• 380-420 MHz (Military Aircraft/Air Shows)
• 420-450 MHz (70-Centim eter Amateur Radio)
• 450-470 MHz (Auto Racing, Pro Sports Teams, Radio/TV
Remote Broadcast Pic kup, Stadiums/V enues)
• 470 - 512 MH z (UHF “ T ” Band)
4
Page 5

20-561 .fm Page 5 Wedne sday, Augus t 4, 1999 3:48 PM
This owner’s manual also includes the section “A General Guide
to Scanning,” which helps you find frequency ranges to scan for a
wide variety of broadcasters.
Note: Mobile use of this scanner is unlawful or requires a permit
in some areas. Check the laws in your area.
FCC NOTICE
Your scanner might cause TV or radio interference even when it
is operating p rop erly. To det er mine whet her or no t your s canner i s
causing the interference, turn off your scanner. If the interference
goes away, your scanner is causing it. Try to eliminate the interference by:
• Moving your scanner away from the receiver.
• Connecting your scanner to an outlet that is on a different
electrical circuit from the receiver.
• Contacting your local Radio Shack store for help.
If you cannot eli minate t he int erfer ence, th e FCC req uires th at you
stop using your scanne r.
5
Page 6

20-561 .fm Page 6 Wedne sday, Augus t 4, 1999 3:48 PM
SCANNING LEGALLY
Your scanner covers frequencies used by many different groups
including police and fire departments, ambulance services, government agencies, private companies, amateur radio services,
military operations, pager services, and wireline (telephone and
telegraph) service providers. It is legal to listen to almost every
transmissi on your scanner can re ceive. However, there are some
transmissions you should never intentionally listen to. These include:
• Telephone conversations (either cellular, cordless, or other
private means of t elephone signal transmiss ion)
• Pager transmissions
• Any scrambled or encrypted transmissions
According to the Electronic Communic ati ons Privacy Act (ECPA),
you are subject to fi nes and pos sible impr isonment for i ntention ally listening to, using, or divulging the contents of such a transmission unless you have th e consent of a party to the communication
(unless such act ivity is otherwise illegal).
Radio Shack encourages responsible, legal scanner use.
6
Page 7

20-561 .fm Page 7 Wedne sday, Augus t 4, 1999 3:48 PM
CONTENTS
PREPARATION........................................................................ 9
Connecting the Flexible Antenna.... ....................................9
Installing Batteries............................................................. 9
Important Information About the PWR and
CHG Jacks...........................................................12
Charging Nic kel-Cad miu m B at te ries..... .. ............... .. .12
Resetting the Scanner.................................................... 13
Using the Belt Clip.......................................................... 14
UNDERST ANDING YOUR SCANNER............. ..................... 15
A Look at the Keypad...................................................... 15
A Look at the Display....................................................... 16
BANDS AND BANKS .............................. .. .. .......................... 18
Search Bands...................................................................18
Channel-Storage Banks ..................................................19
BASIC OPERATION ..............................................................20
Turning On the Scanner and Setting Squelch..................20
Searching For and Storing Active Frequencies............... 21
Limit Search .............................................................22
Manually Storing Frequencies.................................. 23
Scanning the Stored Channels........................................ 25
Scanning All Channels .............................................25
Turning Channel-Storage Banks On and Off............25
Scanning a Channel-Storage Bank ..........................26
Manually Selecting a Channel.......... ........... .. ............ .. .... 26
Listening to the Weather Band ........................................ 27
ADVANCED OPERATION ........................................ .. .. ......... 28
Delay ...............................................................................28
Skipping Channels ................................................ .. ......... 28
Priority ............................................................................. 29
Using Channel Lock................ ............ .. ....................... ... 30
Using the Display Backlight............................................. 30
Using the Attenuator.... .. ........................... ....................... 31
Turning the Key Tone On and Off ....................................31
Using the Keylock............................................................ 32
7
Page 8

20-561 .fm Page 8 Wedne sday, Augus t 4, 1999 3:48 PM
OPTION S ..... ... ............................. .. ... .............. ... .. ....... ... .. ...... 33
Connecting Optional Power Sources..................... .. .. ..... 33
Using AC Power....................................................... 33
Using Vehicle Battery Power ................................... 34
Connecting a Mobile or Base-Station Antenna...............35
Connecting an Earphone/Headphones............ .............. 37
Listening Safely ....................................................... 37
Traffic Safety............................................................ 38
Connecting an Extensi on Speaker.............. .. ................. 38
A GENERAL GUIDE TO SCANNING..................................... 39
United States Broadcast Band.............. .. ........................ 39
Typical Band U sa g e ...... .............................. .. ... ....... .. ... ... 39
VHF Band (30.00-300. 0 MHz) .......... ............ ...........39
UHF Band (300.00 MHz-3.0 GHz)........................... 40
Primary Usage ................................................................ 41
VHF Band .......... ........................... ...........................41
UHF Band................................................................ 41
Specified Intervals........................................................... 42
Band Allo c a tio n ............... .. ... ....... .. ... ............... .. .. ........ .. .. 42
Ham Radio Frequencies................. ........... .. ....................47
National Weather Frequencies........................................ 47
Birdie Frequencies ..........................................................48
Frequency Conversion ......................... .. .........................49
TROUB L E S HO O T IN G...................... .. .. ........ .. ... .............. ... .. . 50
CARE AND MAINTENANCE .......................... ...................... .52
SPECIFICATIONS ................................................................. 53
8
Page 9
20-561 .fm Page 9 Wedne sday, Augus t 4, 1999 3:48 PM
PREPARATION
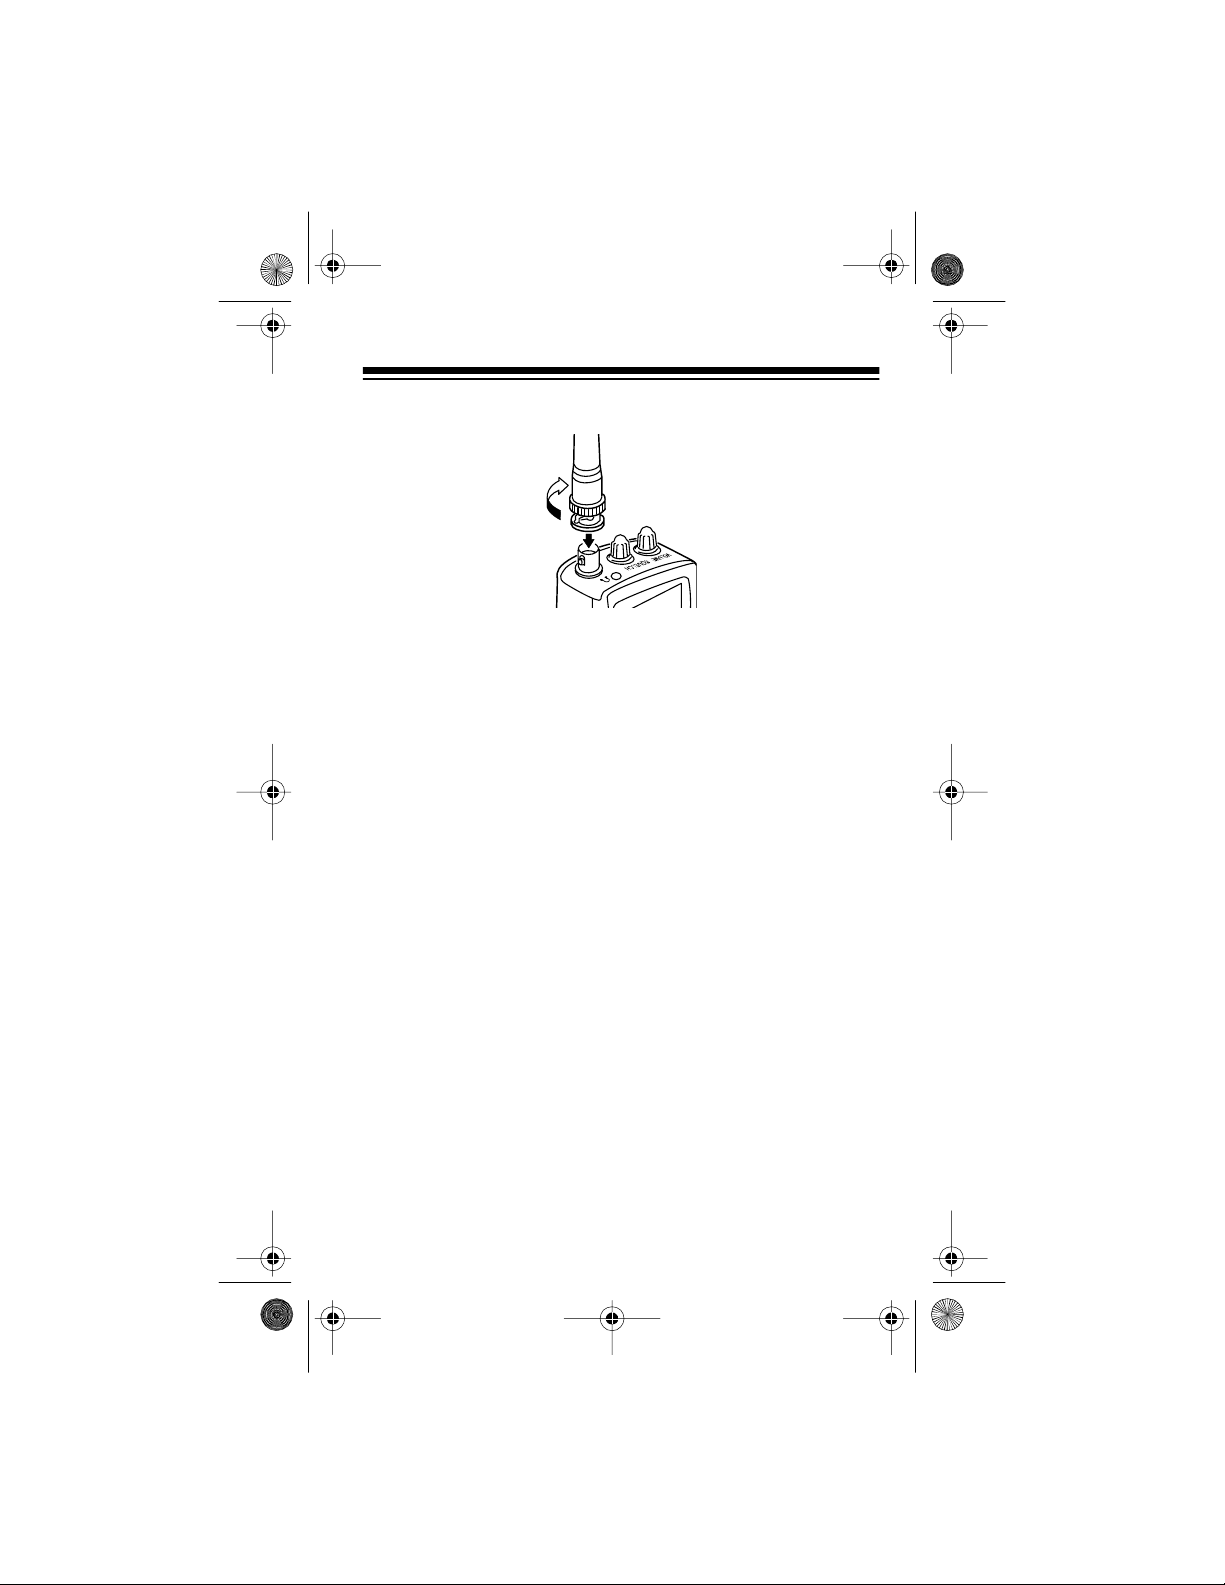
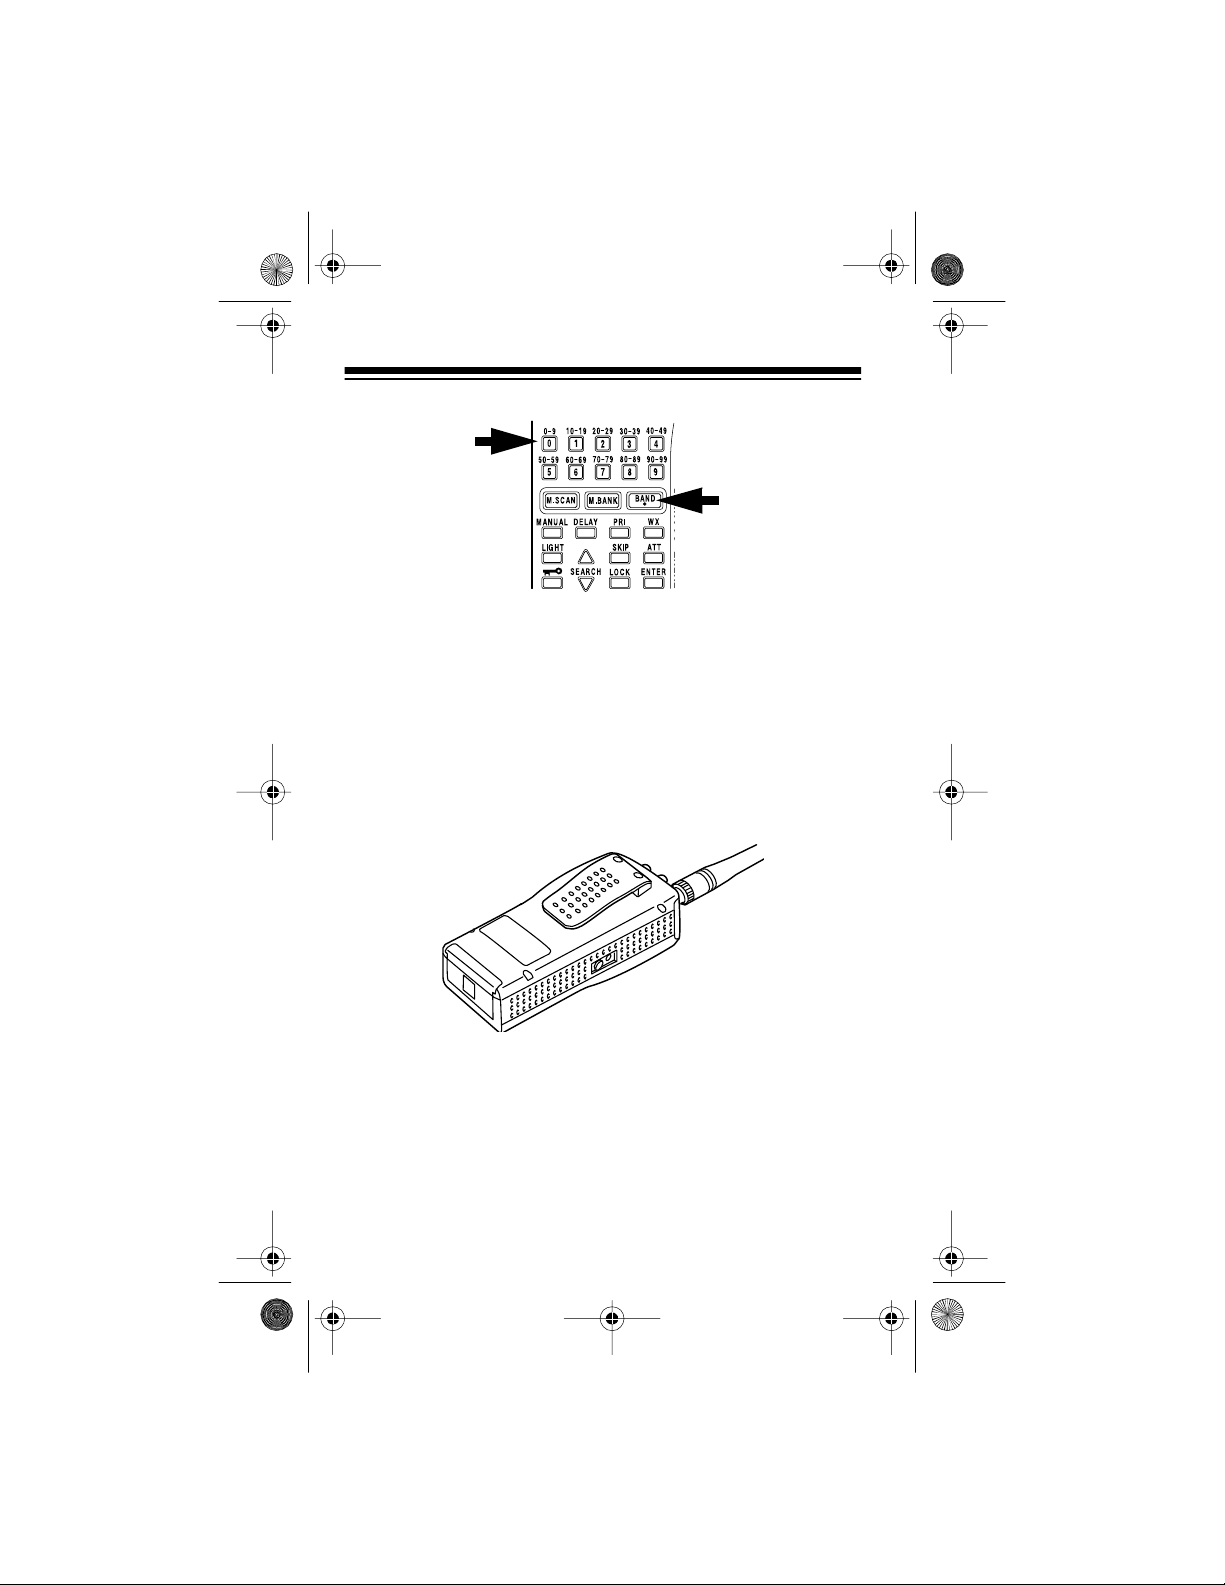
CONNECTING THE FLEXIBLE ANTENNA
1. Hold the antenna so it stands straight up.
2. Slip the slots in t he antenna’s connect or over the tabs on the
ANT
jack on top of the scanner.
3. Press down and turn the antenna’s base clockwise until it
locks into place.
Note:
Instead of t he supplied flexibl e antenna, you can connec t a
mobile or base-s tation antenna ( not supp lied) to your s canner. For
more information, see “Connecting a Mobile or Base-Station Antenna” on Page35.
INSTALLING BATTERIES
You can power your sc anner wi th si x AA batter ies. For t he longe st
operation and best performance, we recommend alkaline batteries, such as Cat. No. 23-552. Or, you can use rechargeable nickel-cadmium batte ries (Cat. No. 23-125).
Note:
You can also power your scanner from either standard AC
power (using an optional AC adapter) or vehicle battery power
(using an optional DC cigarette lighter adapter). See “Connecting
Optional Power Sources” on Page33 for more information.
9
Page 10
OFF
MAX
MIN MAX
VOLUME
SQUELCH
20-561 .fm Page 10 Wednesday, August 4, 1999 3: 48 PM
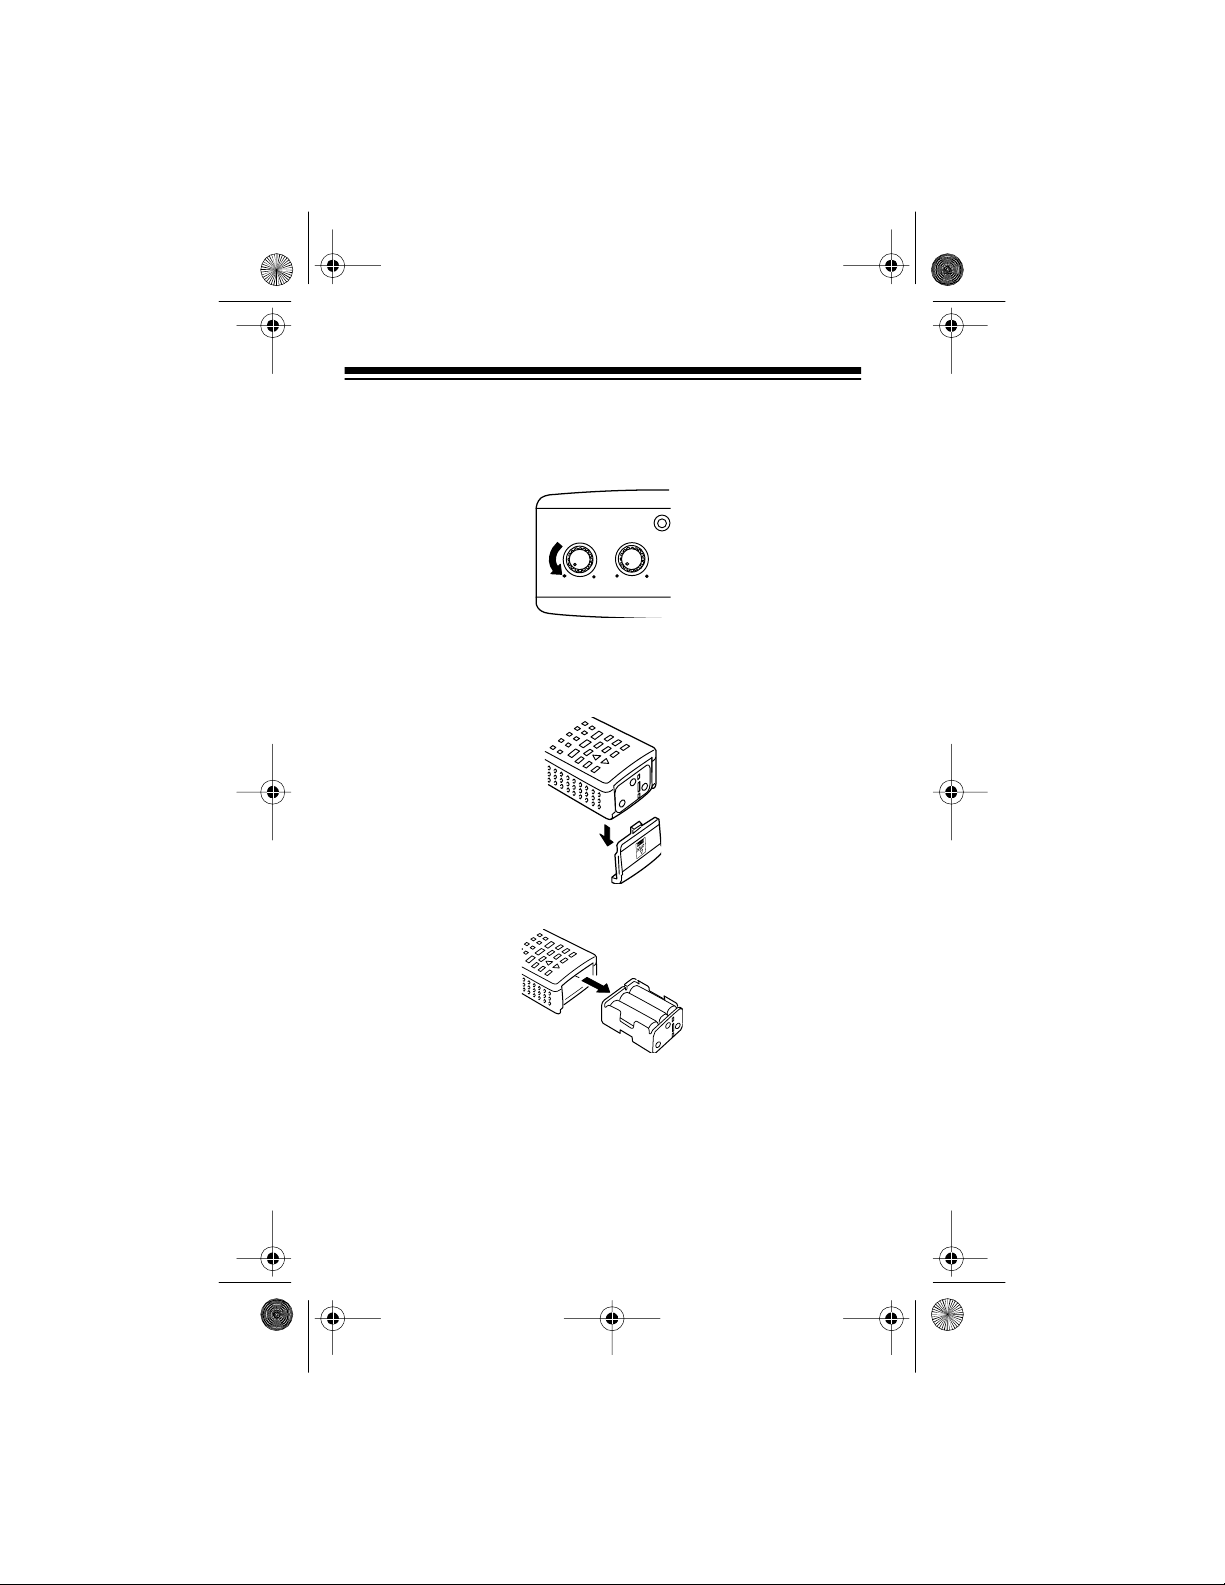
Follow these steps to install or replace batt eries.
1. If the scanner is on, turn
VOLUME OF F/MAX
fully counter-
clockwise until it clicks to turn it off.
2. While pressing and holding down the battery compartment
cover on the bottom of the scanner, slide the cover in the
direction of the arrow to remove it.
3. Remove the battery holder from the battery compartment.
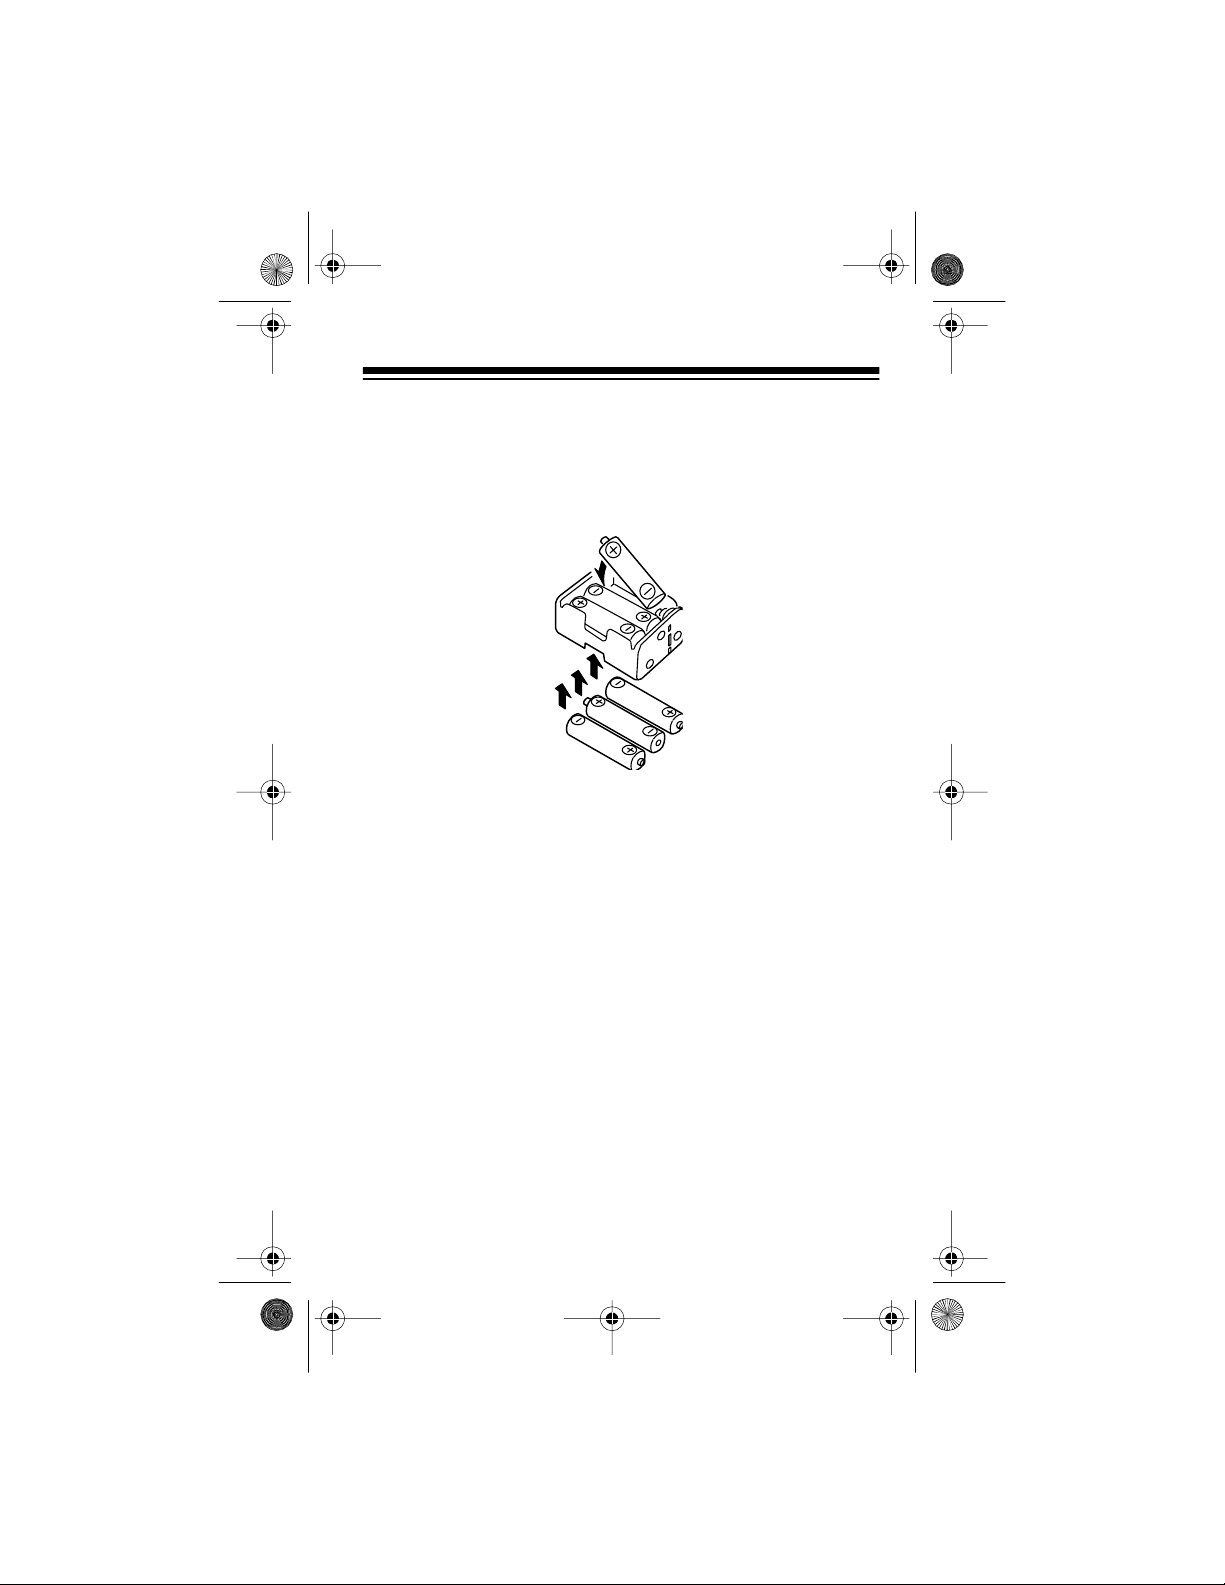
4. Remove any old batteries from the battery holder.
Cautions:
• Always dispose of old non-rechargeable batteries
promptly and properly. Do not bury or burn them.
• Never leave dead or weak bat teries in the battery holder.
10
Page 11
20-561 .fm Page 11 Wednesday, August 4, 1999 3: 48 PM
• Never mix rechargeable and non-rechargeable batteries,
or rechargeable batteries of different capacities.
5. Insert six batteries in the battery holder as indicated by the
polarity symbols (+ and
–
) marked on the battery holder and
inside the battery compartment.
6. Replace the battery holder in the battery compartm ent.
Caution: The battery holder fits only one way inside the bat-
tery compartment. Do not force it.
7. Replace the battery com partment cover .
If
flashes on the display and the scanner beeps, immedi-
BA T T
ately replace al l si x n on-rech arge able bat teri es, or rechar ge a ll six
rechargeable batteries. See “Important Information About the
PWR and CHG Jacks” and “Charging Nickel-Cadmium Batteries”
on Page 12.
Important: This product is capable of using rechargeable nickelcadmium batteries. At the end of the batteries’ useful life, they
must be recycled or disposed of properly. Contact your local,
county, or state hazardous waste management authorities for information on recycling or disposal programs in your area. Some
options that might be avail able a re: m unici pal curb-s ide coll ectio n,
drop-off boxes at retailers, recycling collection centers, and mailback programs.
11
Page 12
20-561 .fm Page 12 Wednesday, August 4, 1999 3: 48 PM
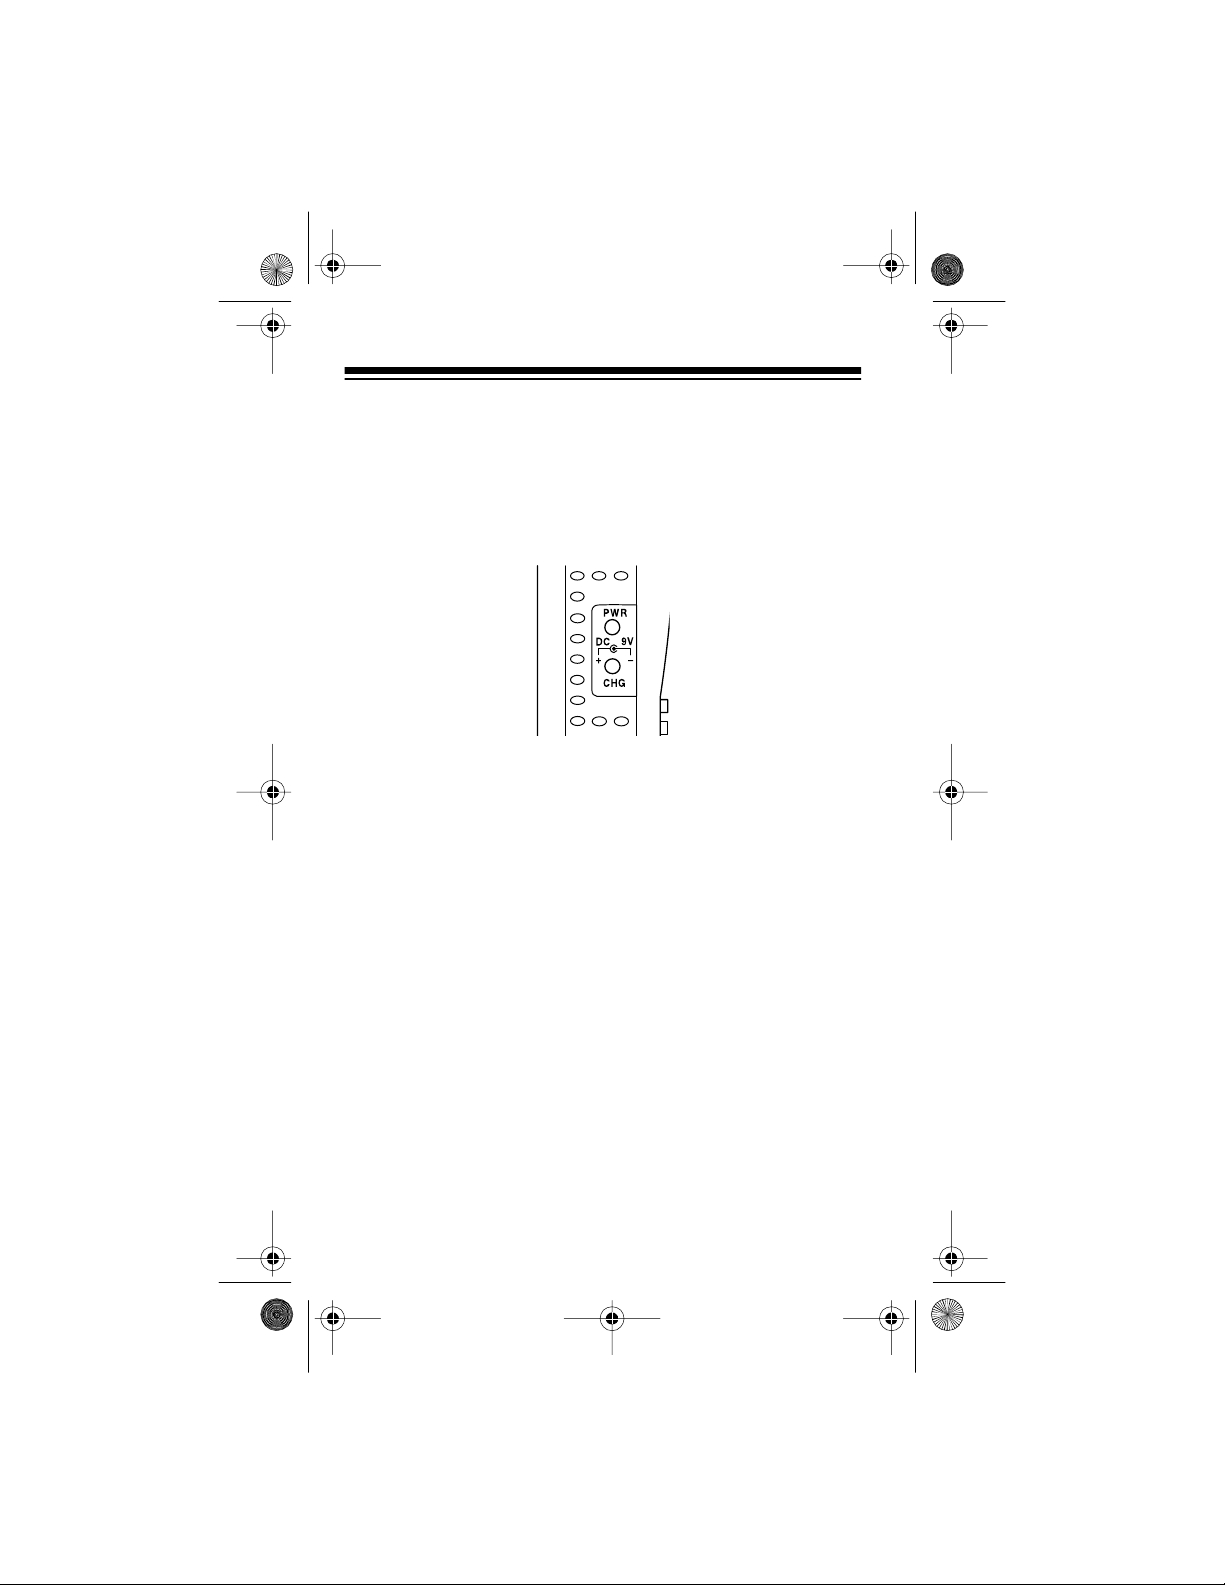
Important Information About the PWR and CHG
Jacks
There are two ex ternal j acks on the l eft side o f the scanne r —
CHG
and
. It is important that you understand the purpose of each
PWR
jack before you connect any adapter to the scanner.
PWR
The
jack powers the scanner and disconnects the internal
batteries. You can use this jack with either an AC adapter or DC
cigarette ligh ter ada pter, regar dless o f t he typ e of bat t eries you installed.
CHG
The
batteries . The
jack powers the scanner and also charges the internal
CHG
jack is c overed by a plast ic plug. Use the
CHG
jack only when rechargeable nickel-cadmium batteries are installed.
Warning:
Never use the
CHG
jack with non-rechargeable batteries installed. If you try to recharge non-rechargeable batteries,
they become very hot and could explode.
Charging Nickel-Cadmium Batteries
The scanner has a built-in charging circuit that lets you recharge
nickel-ca dmium b atter ies while th ey are i n the s canne r. To c harge
the batteries, simply connect an AC or DC adapter to the scan-
CHG
ner’s
Page 33).
12
jack (see “Connecting Optional Power Sources” on
Page 13

20-561 .fm Page 13 Wednesday, August 4, 1999 3: 48 PM
Warning: Do not connect either adapter to the scanner ’s
if you installed non-rec har geable bat teri es (standa rd, extra- lif e, or
alkaline). Non-rechargeable batteries become hot and can explode if you try to rechar ge them.
It takes about 10 to 18 hours to recharge batteries that are fully
discharged. You c an operat e the scann er whil e rec hargin g nickel cadmium batteries, but the charging time is leng thened.
Cautions:
• Do not overcharge nickel-cadmium batteries.
• To prevent damaging nickel-cadmium batteries, never
charge them in an area where the temperature is above
°
90
F or below 40°F.
Note: Nick el-cad mium b atter ies l ast l onger and d elive r mo re power if you occasionally let them fully discharge. To do this, simply
use the scanner until
the scanner beeps. Then fully charge the batteries.
flashes on the scanner’s display and
BA T T
CHG
jack
RESETTING THE SCANNER
If the scanner’s display locks up or does not work properly after
you connect a power s ource, you m ight need t o r eset the scanner .
Caution: This procedure clears all the information you programmed into the scanner. Use this procedure only when you are
sure your scanner is not working properly.
1. If the scanner is on, turn
until it clicks to turn it off.
2. While you press and hold down the
on the scanner.
VOLUME O F F/M AX
counterclockwi se
•
and 0 keys, turn
BAND/
13
Page 14
20-561 .fm Page 14 Wednesday, August 4, 1999 3: 48 PM
•
3. After 2 seconds, release
BAND/
and 0.
USING THE BELT CLIP
You can use the belt clip attached to the back of the scanner for
hands-free car rying when you are on the go. Simply slide the belt
clip over your belt or waistband.
14
Page 15
20-561 .fm Page 15 Wednesday, August 4, 1999 3: 48 PM
UNDERST ANDING YOUR SCANNER
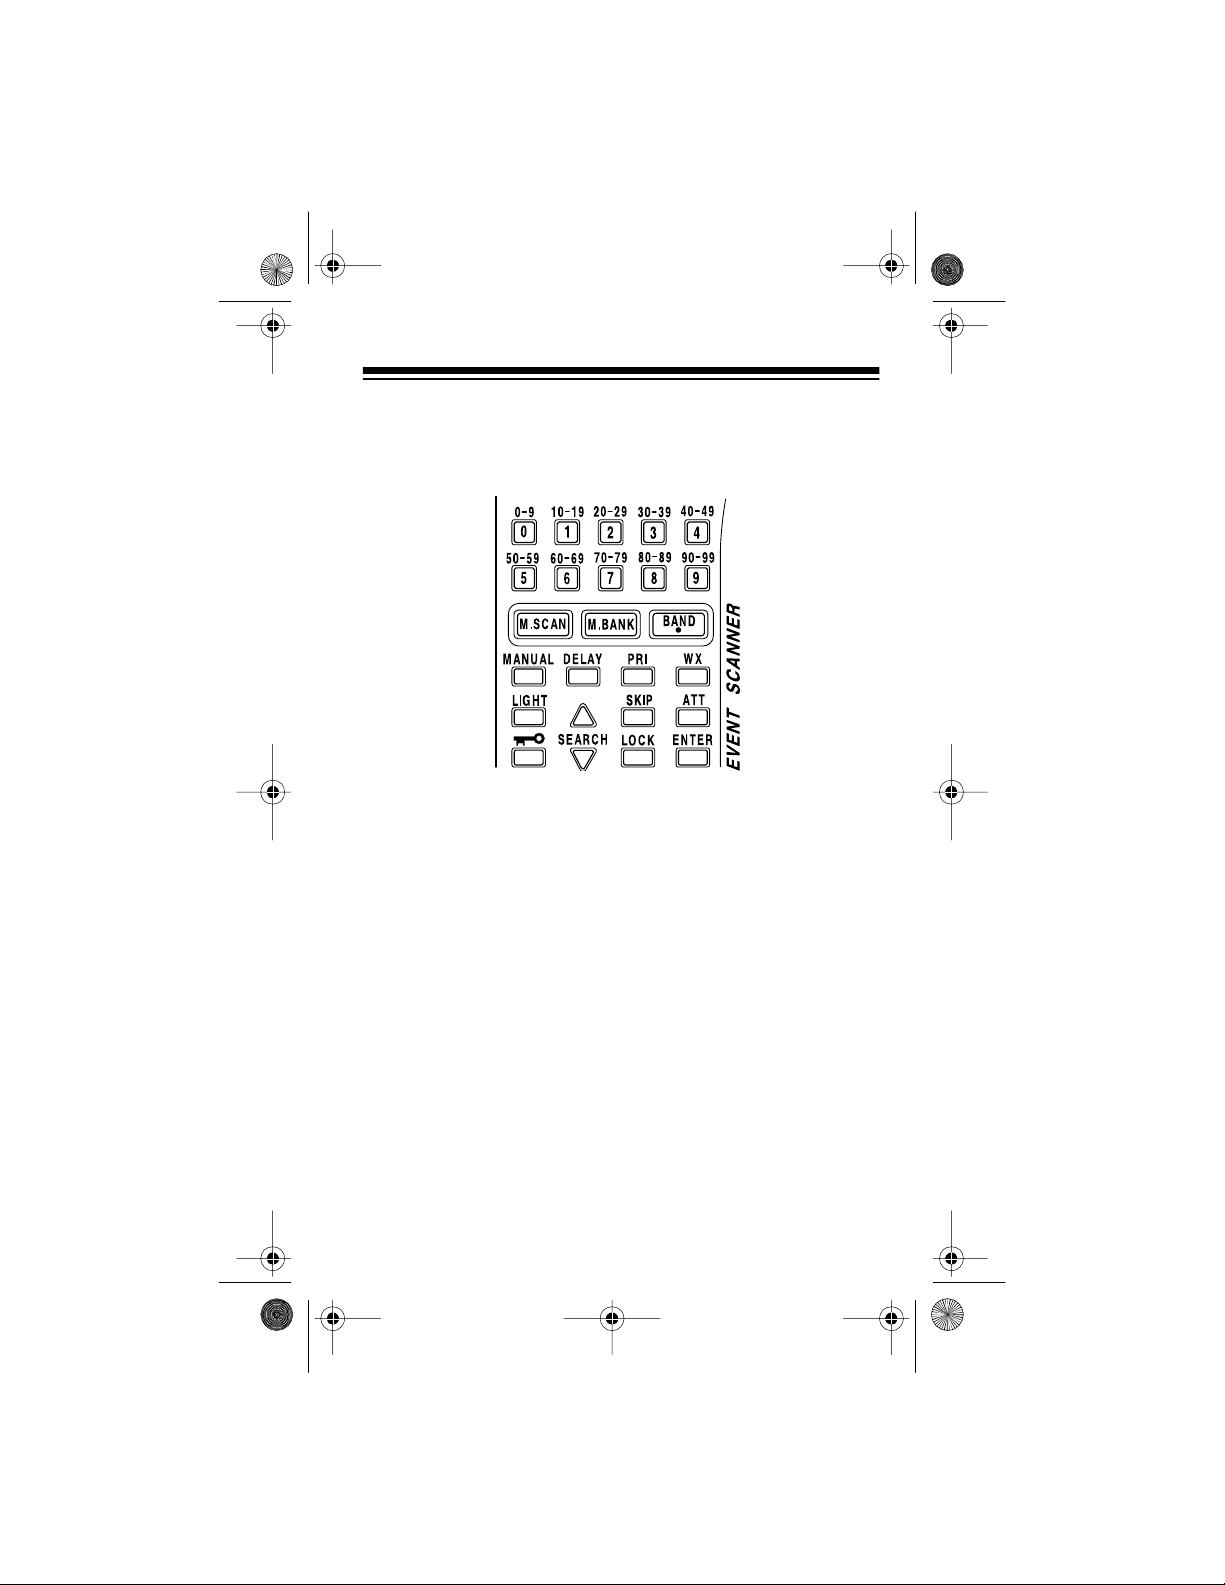
A LOOK AT THE KEYPAD
A quick look at the scanner’s keys will help you understand the
scanner’s functions.
Number Keys
numbers printed above it. The single digits refer to the number of
a channel or a frequenc y. The range of number s (80-89, for example) shows the cha nnels that make up a channel storage bank. In
addition, the keypad has different functions in the manual and
scan modes.
M.SCAN
M.BANK
BAND/
•
decimal point when programming frequencies.
MANUAL
number or frequency.
DELAY
PRI
— turns the priority channel function on or off.
— each key has a single digit on it and a range of
— scans through the chann els you have stored.
— scans a channel storag e bank you select.
— selects a preprogrammed search band or enters the
— stops scann ing and lets you direct ly enter a channel
— turns the delay function on or off.
15
Page 16
20-561 .fm Page 16 Wednesday, August 4, 1999 3: 48 PM
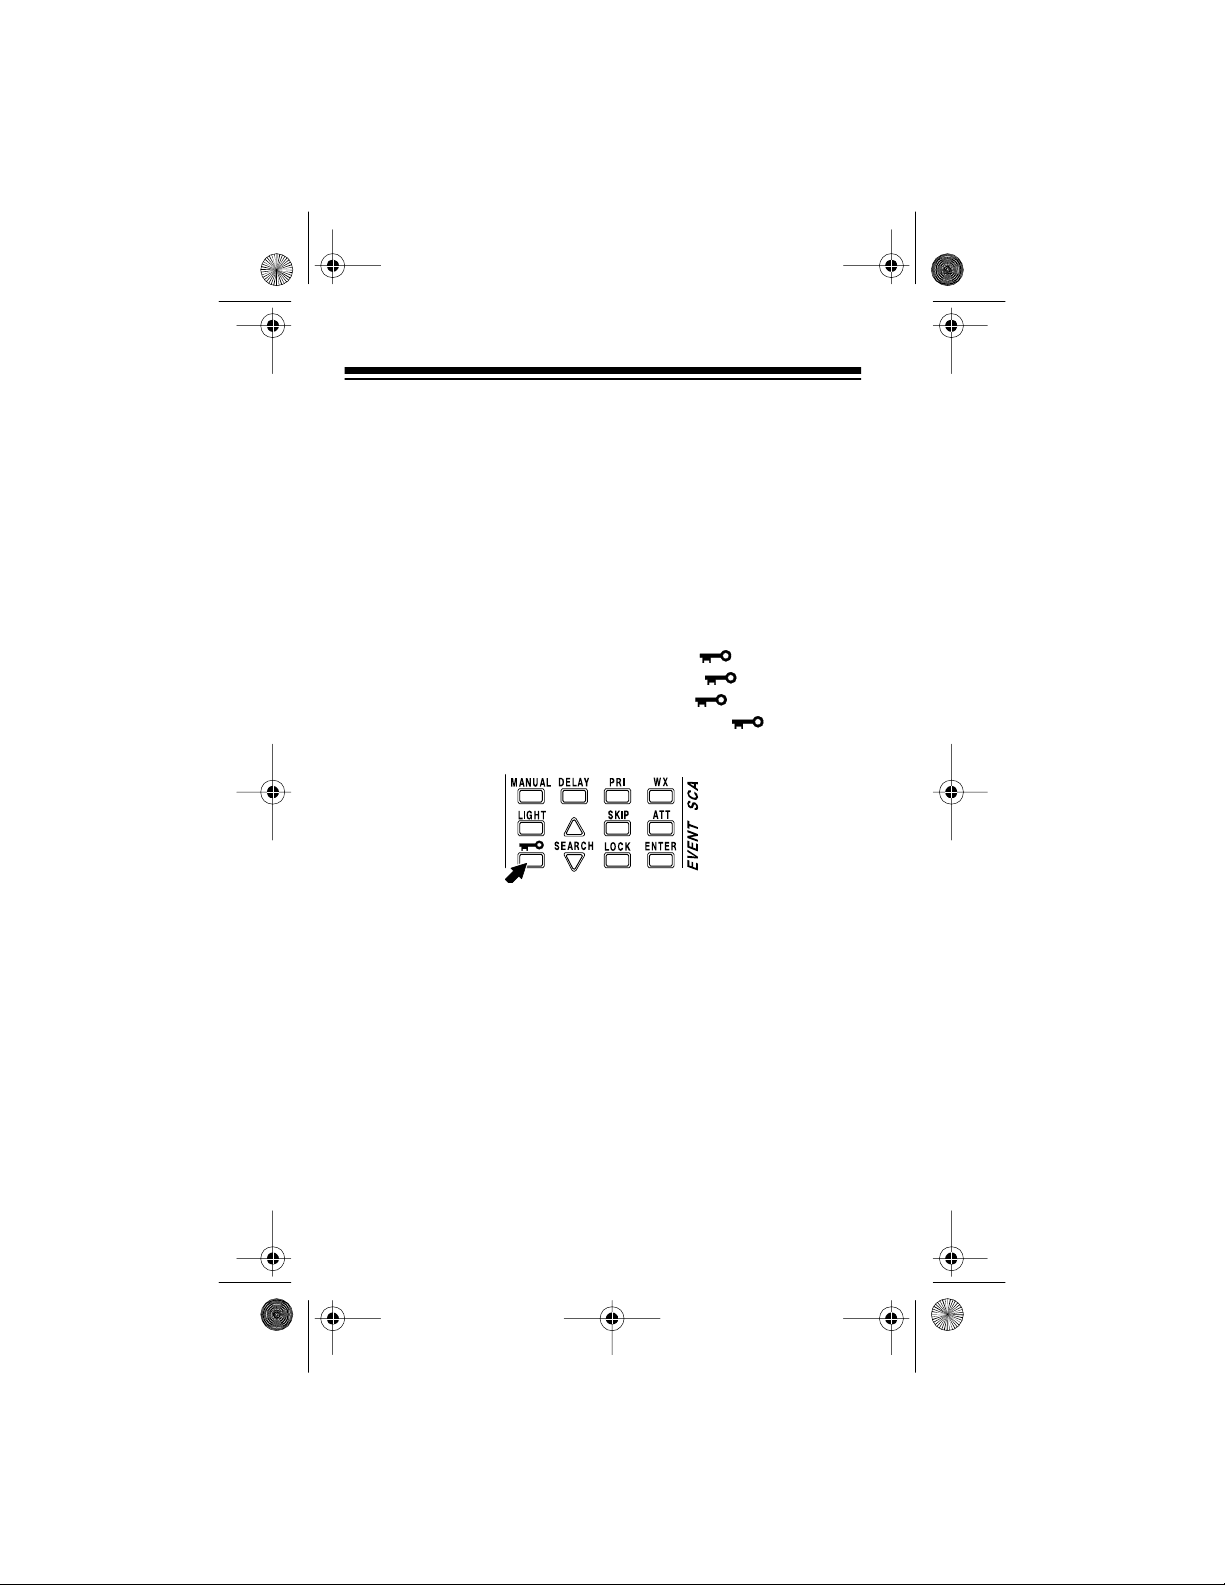
WX — scans through the 10 preprogrammed weather channels.
LIGHT — a quick press turns on t he display’s backlight for 5 sec-
onds, or turns off the backlight if it is on.
SEARCH
can find ones you want to store, or selects the search direction
when you scan channels or manually step through them.
SKIP — selects channels to skip during scanning.
A TT — turns attenuat ion on to redu ce the scanner’ s sensitivity, or
turns it off to increase it.
— locks/unlocks the keypad (ex cept LIGHT) to prevent acci-
dental entries.
LOCK — locks the stored channels to prevent accidental chang-
es.
ENTER —enters frequencies into channels.
/ —
starts searc hing for acti ve freque nci es so yo u
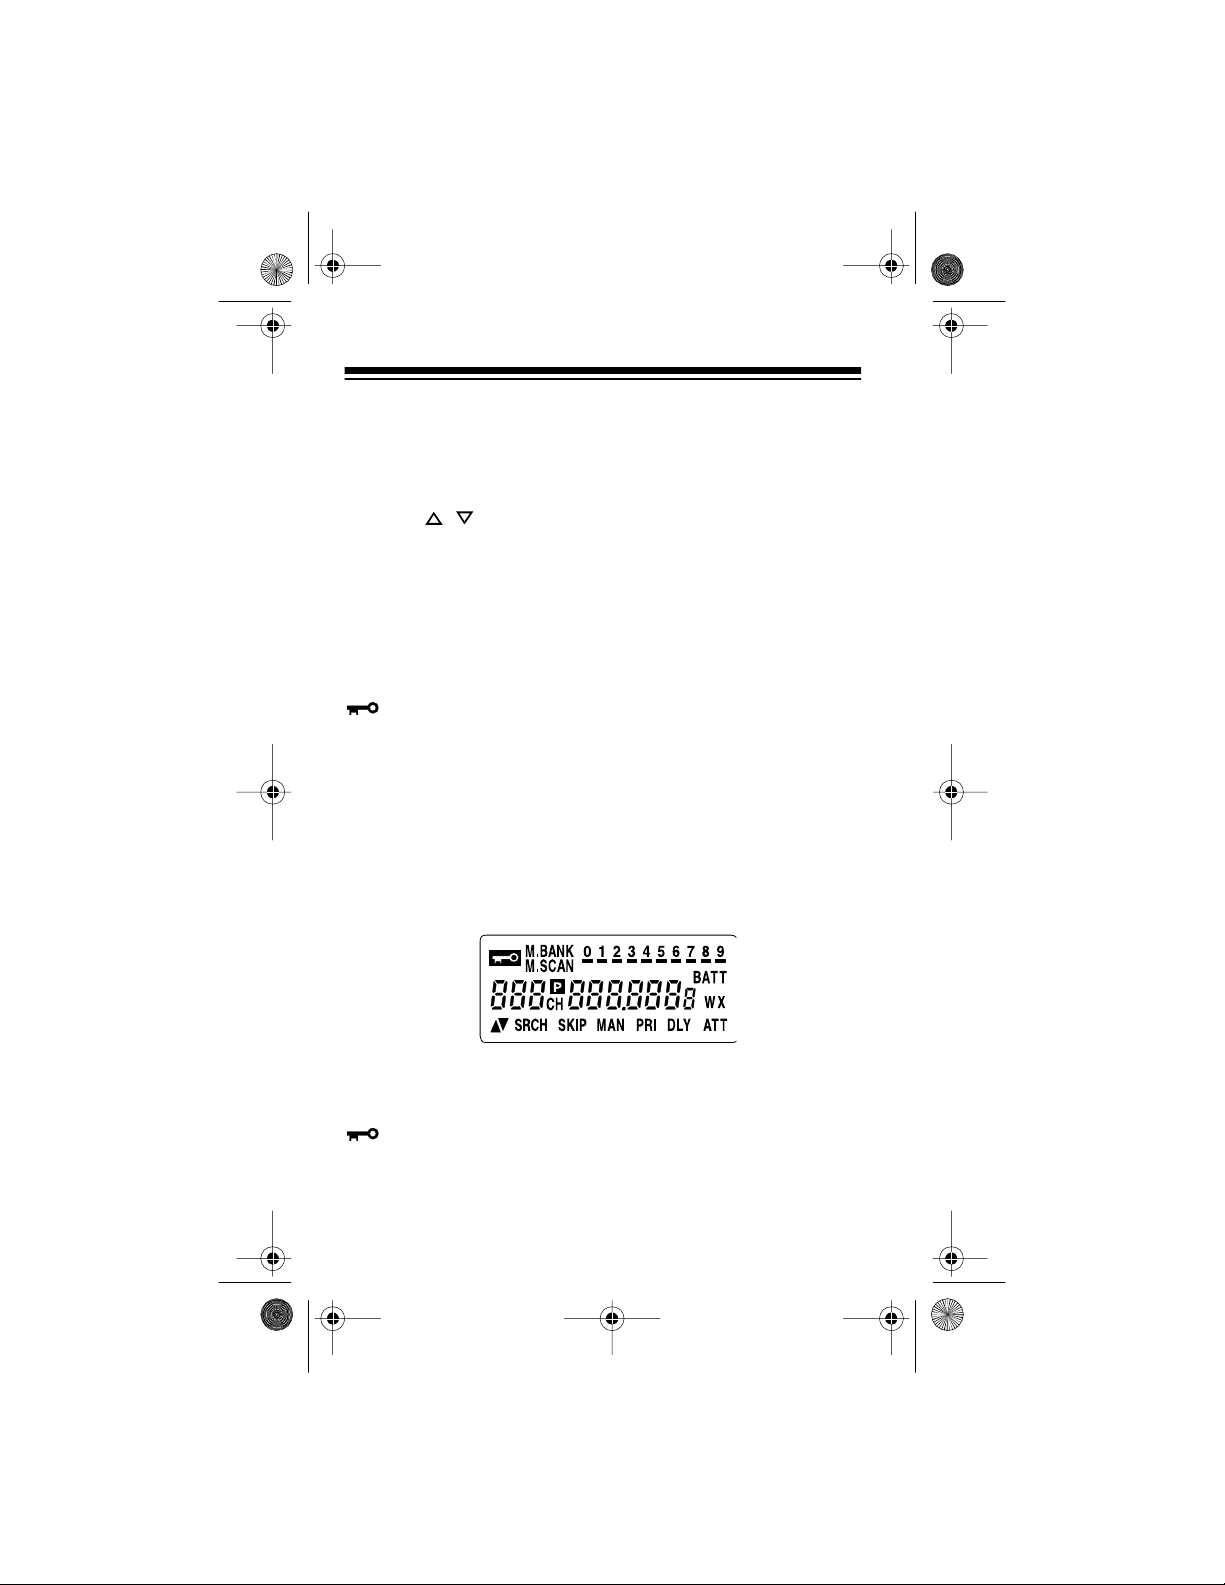
A LOOK AT THE DISPLAY
A quick look at the display should help you understand what the
scanner can do.
— appears when you lock the keypad.
M.BANK
ner scans through a selected channel storage bank. A bar under
the number shows that t he bank is selected.
16
— appears with numbers (0-9) to show when the scan-
Page 17

20-561 .fm Page 17 Wednesday, August 4, 1999 3: 48 PM
M.SCAN
storage banks ar e tu rned on f or s canni ng. A b ar unde r the n umber
shows that the cha nnel-s torage b ank i s selec ted. See “Band s and
Banks” on Page 18.
BA TT
CH
channels the scanner is tuned to.
— appears when the scanner is tune d to the priority channel.
P
888.8888
quency the scanner is tuned to.
WX
weather channels.
and — indicate the search or scan direction.
SRCH
SKIP
skipped while scann ing.
MAN
— appears with numbers (0-9) to sh ow which channel-
— flashes when the batt eries are low.
— appears with a number (00-99) to show which of the 100
— digits in the middle of the display show which fre-
— appears when you scan or search the 10 preprogrammed
— appears during a frequency search.
— appears when you manually select a channel you
— appears when you manually select a channel.
— appears when the priority feature is selected.
PRI
— appears when you turn on the scanner’s 2-second delay
DLY
feature.
— appears when you turn on the scanner’s attenuate fea-
ATT
ture.
— appears beside the channel number whe n you l ock the ch an-
L
nel.
17
Page 18

20-561 .fm Page 18 Wednesday, August 4, 1999 3: 48 PM
BANDS AND BANKS
SEARCH BANDS
Your scanner can tune over 24 ,000 different f requencies. Each of
these frequencies is contained within a group of frequencies
called a band. The scanner uses permanent memory locations
called search bands (0-9) to group these bands. You can search
these bands to quickly find active frequencies you might want to
store into the scanner’s channels (see “Channel-Storage Banks”
on Pa ge 19).
The scanner has the following search bands.
Search Band
029
150
2 108
3 137
4 144
5 148
6 380
7 420
8 450
9 470
For example, if you wanted to search for transmissions between
pilots and the control tower at an air show, you could search only
the search bands where you are most likely to hear the transmissions (2, 3, and 6).
18
Search Range
(MHz)
–
50
–
54
–
137
–
144
–
148
–
174
–
420
–
450
–
470
–
512
Page 19

20-561 .fm Page 19 Wednesday, August 4, 1999 3: 48 PM
Notes:
• The frequencies in the scanner’s search bands are preset.
You cannot change them.
• “Band Allocation” on Page 42 lists frequency ranges and the
broadcasters you are likely to hear on those frequencies.
• Although the scanner displays
search band 2, it receives frequencies of 108 to 136.975
MHz in the search band.
108-137
when you select
CHANNEL-STORAGE BANKS
You can store up to 100 frequencies into memory lo cations within
the scanner c alled cha nnels. You can st or e one f requenc y i n each
of the 100 channels.
To make it easier to identify and select the frequencies you want
to listen to, the scanner’s channels are divided into 10 channelstorage banks (0
channels.
–
9). Each channel-storage bank contains ten
You can use each channel-storage bank to group frequencies of
the same type, such as those used by racing teams, aircraft and
the control tower, the polic e department, and ambulance services
(see “A General Guide to Sca nning” on Page 39).
For example, you might want to listen to communi cations bet ween
the driver of Car 26 and his pit crew at a stock car race. Additionally, there might be other broadcasters a t the race you want to listen to, such as the medical center, pace car, and crowd security.
To make it easier to remember where you stored the driver’s frequency, you could program the frequency into Channel 26 (the
same number as his car), then program frequencies for the other
broadcasters i n the same bank (starting with Channel 20) .
19
Page 20

OFF
MAX
MIN MA X
VOLUME
SQUELCH
OFF
MAX
MIN MA X
VOLUME
SQUELCH
20-561 .fm Page 20 Wednesday, August 4, 1999 3: 48 PM
BASIC OPERATION
TURNING ON THE SCANNER AND
SETTING SQUELCH
Note:
Make sure the scanner’s antenna is connected before you
turn it on.
1. Turn
2. Turn
SQUELCH MIN/MAX
VOLUME OFF/MAX
fully counterclockwise.
clockwise until it clicks and you hear
a hissing sound.
3. Turn
SQUELCH MIN/MAX
clockwise, then leave it set to a
point just af ter the hissing sound stops.
The scanner automatically starts scanning channels. Press
UAL
to stop scanning.
Note:
If you have not stored frequencies into any channels (see
MAN-
“Searching For and Storing Active Frequencies” on Page 21), the
scanner does not scan.
20
Page 21

20-561 .fm Page 21 Wednesday, August 4, 1999 3: 48 PM
Notes:
• If the scanner picks up unwanted, partial, or very weak t ransmissions, turn
scanner’s sensitivity to these signals. If you want to listen to
a weak or distant station, turn
clockwise.
SQUELCH MIN/MAX
clockwise to decrease the
SQUELCH MIN/MAX
counter-
•If
SQUELCH MIN/MAX
ing sound, the scanner does not scan properly.
is adjusted so you always hear a hiss-
SEARCHING FOR AND STORING ACTIVE
FREQUENCIES
You can store up to 100 frequenci es i nto your sca nner’s channels
using either of the following methods.
• Limit search within a range of preprogrammed frequencies
• Manual storage
Good references for active frequencies are Radio Shack’s “Beyond Police Call,” “Police Call Radio Guide Including Fire and
Emergency Services,” “Aeronautical Frequency Directory,” and
“Radio!” magazi ne. We upda te these r eferen ces ofte n, so be sure
to get a curre nt copy. See also “A Ge neral Guide to Scanning” on
Page 39.
If you do not have a reference to frequencies in your area, follow
the steps in “Limit Search” on Page 22 to search for transmissions.
21
Page 22

20-561 .fm Page 22 Wednesday, August 4, 1999 3: 48 PM
Limit Sear ch
If you do not know a frequency to store, you can select a search
band containing a preprogrammed frequency range and search
that range f or active frequencies. Then you can store frequencies
you find ther e into channels.
a search.
•
1. Press
BAND/
.
2. Within about 2 seconds, enter the search band number. The
band’s number appears next to
play and the fr equency range of the search band appears on
the right. Then the next available channel flashes.
appears on the displ ay during
SRCH
on the left side of the dis-
b
Notes:
• If you do not press a number key within 2 seconds after you
press
, the number for the previously selected search
•
BAND/
band is displayed, then the scanner displays the next available channel number (or 00 if you have not stored frequencies into any channels). If this happens, simply press the
search band’s number key again to select the band you
want.
•
• You can also repeatedly press
BAND/
in Step 2 instead of
entering a number t o select a search band.
After you sele ct a search band, the sc anner aut omatical ly sear ches from the lower limit to the upper limit through all frequencies in
the search band.
22
Page 23

20-561 .fm Page 23 Wednesday, August 4, 1999 3: 48 PM
ENTER
or .
to
When the scanner stops on an active frequency, press
store it in t he fl ashi ng chann el or pres s and hol d or for abo ut
a second to continue th e search.
Notes:
• To search the frequency band upward or downward step by
step (5, 12.5, or 25 kHz), quickly press and release or .
or disappears from the display. See “Specified Inter-
vals”on Page 42.
• To quickly move upward or downward through the range of
frequencies, press and hold down or . The scanner
tunes through the frequencies until you rele ase
• If you try to store a frequency you already stored in another
channel,
and the channel number where the freque ncy was previ ously
stored appears for about 3 seconds. Select another frequency or press
channel.
• After you store a frequency into the last available channel,
the scanner displays
you press or again, the scanner continues the search
but
flashes on the display. To store more frequencies, you
--
must unlock some channels. See “Using Channel Lock” on
Page 30.
flashes on the display for about 3 seconds,
dUPL
ENTER
again to store the frequency into the
Ch FULL
when yo u pre s s or . If
Manually Storing Frequencies
If you know a frequency you want to store, follow these steps to
store it manually.
1. Press
2. Use the number keys to enter the channel number (00 t o 99)
MANUAL
where you want to store the fre quency, then press or .
.
MAN
appears.
23
Page 24

20-561 .fm Page 24 Wednesday, August 4, 1999 3: 48 PM
Hint: If you are storing a f requency used by a specific broadcaster (such as a racing team), you can remember where
you stored the frequency by storing it in the same channel
number as the team’s car number.
Note: If you enter an invalid channel number, the scanner
beeps three times and
flashes on the display for about
Error
4 seconds. Simply r epeat this step.
3. Using the number keys, enter the frequency you want to
store into that channel. Use
•
to enter the decimal
BAND/
point.
4. Press
to store the frequency.
ENTER
Notes:
• If you entered an invalid frequency in Step 3, the scanner
beeps three times and
flashes on the display for
Error
about 4 seconds. Simpl y repeat Steps 3 and 4.
• Your scanner automatically rounds the entered frequency
down to the closest valid frequency. For example, if you try
to enter a frequency of 151.4730, your scanner accepts it as
151.4700.
• If you entered a frequency that is already stored in another
channel, the scanner beeps and
flashes on the dis-
dUPL
play for about 5 seconds, then the channel number where
you tried to store the duplicate frequency appears (next to
the flashing frequency).
• To store the frequency, press
ENTER
again.
• To store a different frequency, repeat Steps 3 and 4 to
enter another frequency and store it.
24
Page 25

20-561 .fm Page 25 Wednesday, August 4, 1999 3: 48 PM
• If you tried to store a frequency in a locked channel, the
scanner beeps once and
flash on the display, then the frequency flashes. To
LOC
store the frequency, either unlock the channel (see “Using
Channel Lock” on Page30) and repeat Steps 1-4, or repeat
Steps 2-4 to select another channel and store the frequency.
Repeat Steps 2-4 to store more frequencies into channels. Or, if
you want to program the next channel in sequence, press or ,
then repeat Steps 3-4.
Note:
When you store a frequency in a channel, the scanner auto-
matically locks that channel (see “Using Channel Lock” on Page 30).
(next to the channel number) and
L
SCANNING THE STORED CHANNELS
Scanning All Channels
To begin scanning all the stored channels in your scanner, press
M.SCAN
banks which are not skipped (see “Skipping Channels” on
Page 28).
. The scanner scans through all channels in the activated
Note:
Press or to change the scan direction.
Turning Channel-Storage Banks On and Off
You can turn each channel-storage bank on and off. When you
turn off a bank, the scanner does not scan any of the 10 c hannels
in that bank.
While scanning, press th e number ke y of the ban k you want t o turn
on or off. If the m emory bank indi cator bar is on, t he bank i s turned
on and the scanner scans a ll channels within t hat bank that are not
skipped. If the indicator is off, the scanner does not scan any of
the channels within that bank.
25
Page 26

20-561 .fm Page 26 Wednesday, August 4, 1999 3: 48 PM
Notes:
• You can manually select any channel in a bank, even if the
bank is turned of f.
• You cannot turn off all banks. There must be at least one
active bank.
• You cannot turn on a bank where all the chann els in the bank
are skipped (see “Skipping Channels” on Page 28).
Scanning a Channel-Storage Bank
You can scan a single channel-storage bank. Select the channelstorage bank you want to scan, then press
starts scanning channels in the selected bank that are not
skipped.
M.BANK
. The scanner
To select and scan another bank, repeatedly press
move the bar on the top of the display under the bank you want.
To select a channel within the bank, enter the channel number.
M.BANK
to
MANUALLY SELECTING A CHANNEL
You can continuously monitor a specific channel without scanning. This is useful if you want to hear a broadcast on a channel
and do not want to miss any details (even though there might be
periods of silence) or if you want to monitor a locked-out channel
(see “Skipping Channels” on Page 28).
26
Page 27

20-561 .fm Page 27 Wednesday, August 4, 1999 3: 48 PM
Follow these steps to manually select a channel.
1. Press
2. Enter the channel number.
3. Press
4. To select another channel within the bank, repeatedly press
Or, if your scanner is scanning and stops at the desired channel,
press
MANUAL
MANUAL
to select higher channels or to select lower channels.
MANUAL
.
.
once before the scanne r continues to scan.
appears on the display.
MAN
LISTENING TO THE WEATHER BAND
The FCC (Federal Communications Commission) has allocated
11 channels f or use by th e Nati onal Oce ani c and At mosph eric Administration ( NOAA). NOAA br oadcasts yo ur local forecast and regional weather information on one or more of these channels. We
have preprogrammed your scanner with 10 of the U.S. frequencies available to NOAA.
To scan the preprogrammed weather channels, press
To manually tune th rough the preprogrammed weat her channels,
repeatedly press
peatedly press to select higher channels or to select lower
channels.
Note:
For a list of all 11 national weather frequencies, see “Na-
tional Weather Frequencies” on Page 47.
WX
until
appears on the display. Then re-
MAN
WX
.
27
Page 28

20-561 .fm Page 28 Wednesday, August 4, 1999 3: 48 PM
ADVANCE D OPERATION
DELAY
Many agencies use a two-way radio system that might have a
pause of several seconds between a query and a reply. Your
scanner’s del ay feature lets it wait for 2 seconds after each transmission on a channel or frequency while scanning or sear ching.
To program a 2-second delay, press
frequency i s selec te d.
the channel or frequency while scanning or searching, it waits for
2 seconds after each transmission on that channel or frequency
before it res ume s scanning or searching.
DL Y
appears. When your sca nner stops on
DELAY
while the channel or
SKIPPING CHANNELS
You can increase the scan ner’s ef fec tive sca nning speed by skipping those c hannels tha t have a cont inuous trans mission , such a s
a weather channel.
To skip a channel while scanning, pr ess
selected.
SKIP
appears on the display.
SKIP
while the channel is
28
Page 29

20-561 .fm Page 29 Wednesday, August 4, 1999 3: 48 PM
To remove the skip from a channel, manually select the channel,
then press
Notes:
• The scanner automatically skips empty channels.
• You cannot remove the skip from an empty channel.
SKIP
.
disappears from the display.
SKIP
PRIORITY
You can scan through channels and still not miss an impo rt an t or
interesting cal l on a specif ic channel . Channel 00 (the f irst chann el
in Bank 0) is preset as the priority channel.
When the priority feature is turned on, the scanner checks Channel 00 every 2 seconds, and stays on the channel if there is activity. If ther e is no acti vity,
To turn on the pr iority feature, press
play. To turn off the priority feature, press
pears from the displ ay.
flashes on t he dis pla y ever y 2 second s.
P
PRI
.
appears on the dis-
PRI
PRI
again.
PRI
disap-
Notes:
• Channel 00 is preset as the priority channel. You cannot
change it.
• The scanner automatically skips the priority channel when
there is no transmission on the channel. If there is a transmission on the channel, you must turn off the priority feature
to skip the priority channel.
29
Page 30

20-561 .fm Page 30 Wednesday, August 4, 1999 3: 48 PM
USING CHANNEL LOCK
When you enter a freq uency into a cha nnel, t he scanner autom atically locks the channel to prevent it from being overwrit ten by another frequency.
To unlock a channel, press
Follow these steps to unlock all channels.
1. Press
2. While pressing and holding down
down
L
appears to the left of the ch annel number.
LOCK
. L disappears fr om the di splay.
MANUAL
LOCK
.
until the scanner beeps three times.
ENTER
, press and hold
To manually lock a cha nnel, se lect t he channel , then pres s
L
appears to the left of the channel number.
LOCK
USING THE DISPLAY BACKLIGHT
You can turn on the display’s backlight for easy viewing in dimlylit areas. Pr ess
turn off the light before it automatically turns off, press
again.
30
LIGHT
to turn on the displ ay light f or 5 s econds. To
LIGHT
.
Page 31

20-561 .fm Page 31 Wednesday, August 4, 1999 3: 48 PM
USING THE ATTENUATOR
To reduce int erfer enc e or no ise c aused by stron g sign als, you can
reduce the scanner’s sensitivity to these signals. Press
ATT
appears on the display to reduce the scanner’s sensitivity.
Note:
If you turn on this feature, the scanner might not receive
weak signals.
ATT
until
To turn off the attenuat or, press
the display.
ATT
again.
ATT
disappears fro m
TURNING THE KEY TONE ON AND OFF
Each time you press any of the scanner’s keys (except and
LIGHT
), the scanner sounds a tone.
Follow these steps to turn the scanner’s key to ne on or off.
1. If the scanner is on, turn
until it clicks to turn it off.
2. While you press and hold down the
on the scanner.
VOLUM E OF F/ MA X
counterclockwi se
2
ENTER
and
keys, turn
31
Page 32
20-561 .fm Page 32 Wednesday, August 4, 1999 3: 48 PM
3. After a second, release 2 and
ENTER
.
USING THE KEYLOCK
Once you program your scanner, you can protect it from acci dental program changes by turning on the keylock feature. When the
keypad is locked, the only controls that operate are
UME OFF/MAX
SQUELCH MIN/MAX
, and
. (However, the scanner
continues to scan channels).
To turn on the keyl ock, pres s and hold down for about 3 seconds until the scan ner beeps thr ee ti mes and appears on the
display. To turn it off, press and hold down for about 3 seconds until the scanner beeps three times and disappears
from the display.
LIGHT, VOL-
32
Page 33

20-561 .fm Page 33 Wednesday, August 4, 1999 3: 48 PM
OPTIONS
CONNECTING OPTIONAL POWER
SOURCES
Using AC Power
To operate the scanner from AC power, you need an AC adapter
such as Radio Shack Cat. No. 273-1665.
Cautions:
• To prevent electric shock, the plug’s blades are polarized
and fit only one way. If the plug does not fit easily, turn it over
and try again. Do not force t he plug into the AC outlet.
• You must use an AC adapter that supplies 9 volts and delivers at least 300 milliamps . Its center tip must be set to negative, and its plug must correctly fit the scanner’s
CHG
jacks. The recommended adapter meets these specifications. Using an adapter that does not meet these specifications could ser iously damage the scanner or the adapt er.
• Always plug the AC adapter’s barrel plug into the scanner
before you plug the ada pter’s power module into the AC outlet. Always unplug the adapter’s power module from the AC
outlet before you unplug the adapter’s barrel plug from the
scanner.
PWR
and
Plug the adapter’s barrel plug into the scanner’s
plug the adapter’s power module into a standard AC outlet.
PWR
jack. Then
33
Page 34

20-561 .fm Page 34 Wednesday, August 4, 1999 3: 48 PM
Note: If you installed rechargeable nickel-cadmium batteries in
the scanner, you can connect the AC adapter to the
CHG
jack.
Simply remove the rubber cap from t he CHG jack, conne ct the AC
adapter’s barrel plug to the jack, then plug the adapter’s power
module into a s tandard AC out let. This power s the s canner and recharges the batteries at the same time. See “Charging NickelCadmium Batteries” on Page 12.
Using Vehicle Battery Power
To operate the scanner from your vehicle’s battery, you need a
DC cigarette lighter adapter such as Cat. No. 270-1560.
Cautions:
• You must use a DC adapter that supplies (regulated) 9-volt
power and deliver s at l east 300 milliamps. Its center tip must
be set to negative, and its plug must correctly fit the scanner’s
these specifications. Using an adapter that does not meet
these specifications could seriously damage the scanner or
the adapter.
• To protect your vehicle’s electrical system, always plug the
adapter int o the scanner bef ore you plug it into your vehicle’s
cigarette-lighter socket. Always unplug the adapter from the
vehicle’s cigarette-lighter socket before you unplug it from
the scanner.
PWR
and
jacks. The recommended adapt er meet s
CHG
Follow these steps to connect the DC adapter.
1. Connect the DC adapter’s orange barrel plug to the
adapter’s cable, wit h the tip set to
2. Set the adapter’s volt age switch to
3. Plug the adapter’s barrel plug into the scanner’s
–
(negative).
.
9V
PWR
jack.
Then plug the other end of the adapter into your vehicle’s
cigarette li ghter socket.
34
Page 35

20-561 .fm Page 35 Wednesday, August 4, 1999 3: 48 PM
Notes:
• If you installed rechargeable nickel-cadmium batteries in the
scanner, you can connect the DC cigarette lighter adapter to
the
jack, connect the adapter’s barrel plug to the jack, then plug
the other end of the adapter into your vehicle’s cigarette
lighter socket. This powers the scanner and recharges the
batteries at the same time. See “Charging Nickel-Cadmium
Batteries” on Page 12.
jack. Simply remove the rubber cap from the
CHG
CHG
• If the scanner does not operate properly when you use a DC
cigarette lighter adapter, unplug the adapter from the lighter
socket and clean the socket to remove ashes and other
debris.
CONNECTING A MOBILE OR BASESTATION ANTENNA
Instead of the supplied flexible antenna , you can connect a mobile
or base-station ant enna (not suppl ied) to your scan ner. Your local
Radio Shack store sells a wide variety of antennas. Choose the
one that best meets your needs.
35
Page 36

20-561 .fm Page 36 Wednesday, August 4, 1999 3: 48 PM
When deciding on a mobile or base-station antenna and its location, consi der the following:
• The antenna should be mounted as high as possible.
• The antenna and antenna cable should be as far as possible
from sources of electrical noise (appliances, ignition systems, gauges, and so on).
• The antenna should be vertical for the best perfo rmance.
When connecting an optional antenna, always use 50-ohm coaxial cable, s uch as RG-58 ( Cat . No. 2 78-1314) or RG -8/M ( Cat. No.
278-1313). For lengths over 50 feet, use RG-8 low-loss dielectric
coaxial cab le (Cat . No. 278- 1312). If t he co axial cable’ s connec tor
does not fit in the scanner’s
ANT
jack, you might also need a PL259-to-BNC antenna plug adapter, such as Cat. No. 278-120.
Your local Radio Shack store carries a wide var iety of coaxial antenna cable and connectors.
Follow the mounting instructions suppli ed with the antenna. Then
route the anten na cable to the scanner, and connect it to the
ANT
jack on the top of the scanner.
Cautions:
• Do not route the cable over sharp edges or moving parts.
• Do not run the cable next to power cables.
• Do not run the cable through a vehicle’s engine compart-
ment or other areas t hat produce extreme heat.
36
Page 37

20-561 .fm Page 37 Wednesday, August 4, 1999 3: 48 PM
Warning: Us e extreme caution whe n you inst all or remove an out door antenna. If the antenna st arts to fall , let it go! It coul d contact
overhead power li nes. If the antenna touc hes a power line, co ntact
with the antenna, mast, cable, or guy wires can cause electrocution and death. Call the power company to remove the antenna.
DO NOT attempt to do so yourself.
CONNECTING AN EARPHONE/
HEADPHONES
For private listening, you can plug an optional earphone or monaural headphones (such as Cat. No. 33-175 or Cat. No. 20-210,
not supplied) into the jack on top of your scanner. This automatically disconnects the internal speaker. Your local Radio
Shack store has a wide selection of earphones.
Note: In a noisy area, monaural headphones might provide more
comfortable listening.
Listening Safely
To protect your hea ring, follow these guidel ines when you use an
earphone or headphones.
• Set the volume to the lowest setting before you begin listening. After you begin listening, adjust the volume to a comfortable level.
37
Page 38

20-561 .fm Page 38 Wednesday, August 4, 1999 3: 48 PM
• Do not listen at extremely high volume levels. Extended
high-volume listening can lead to permanent hearing loss.
• Once you set the volume, do not increase it. Over time, your
ears adapt to the volume level, so a volume level that does
not cause discomfort might still damage your hearing.
Traffic Safety
Do not wear an earphone or headphones while operati ng a motor
vehicle or riding a bicycle. This can create a traffic hazard and is
illegal in some areas.
Even though some earphones and headphones are designed to
let you hear some outside sounds when listening at normal volume levels, they sti ll present a traffic hazar d.
CONNECTING AN EXTENSION SPEAKER
In a noisy area, an extension speaker (such as Cat. No. 21-549)
or an amplified speaker (such as Cat. No. 21-541), positioned in
the right plac e, mi ght pro vide more comfor tabl e listeni ng. Plug t he
speaker cable’s
38
1
/8-inch mini- plug into your scanner’s jack.
Page 39

20-561 .fm Page 39 Wednesday, August 4, 1999 3: 48 PM
A GENERAL GUIDE TO SCANNING
Reception of the frequencies covered by your scanner is mainly
“line-of-sight.” This means you cannot usually hear stations that
are beyond the horizo n.
UNITED STATES BROADCAST BAND
In the United States, there are sever al broadcast bands. The standard AM and FM bands are probably the most well known. There
are also four television audio broadcast bands — the lower three
transmit on the VHF band and the fourth transmits on the UHF
band. You can use your sc anner to mon itor the 470
tion of the UHF band.
TYPICAL BAND USAGE
The following ch art s show t he typ es of broad cast s you c an he ar in
each band, the number of the sear ch band where you can search
for them, and the frequency range of the broadcasts.
–
512 MHz por-
VHF Band (30.00-300.0 MHz)
Broadcast Type
10-Meter Amateur, VHF
Lo
6-Meter Amateur 1 50.00 54.00
Aircraft/Air Shows 2 108.00 136.975
Aircraft/Air Shows/G ov-
ernmen t
Search
Band
0 29.00 50.00
3 137.00 144.00
Frequency Ran ge (MHz)
39
Page 40

20-561 .fm Page 40 Wednesday, August 4, 1999 3: 48 PM
Broadcast Type
2-Meter Amateur 4 144.00 148.00
Auto Racing, Motion Pic-
ture/Video Industry, Pro
Sports T eams, Radio/TV
Remote Broadcast Pick-
up, Stadiums/Venues
Search
Band
5 148.00 174.00
Frequency Ran ge (MHz)
UHF Band (300.00 MHz — 3.0 GHz)
Broadcast Type
Military Aircraft/Air
Shows
US Government 6,7 406.00 450.00
70-Centimeter Amateur 7 420.00 450.00
Auto Racing, Pro Sports
Teams, Radio/TV Re-
mote Broadcast Pickup,
Stadiums/Venues
FM-TV Audio Broad-
cast, Wideband
Search
Band
6 380.00 384.00
8 450.00 470.00
9 470.00 512.00
Frequency Range (MHz)
40
Page 41

20-561 .fm Page 41 Wednesday, August 4, 1999 3: 48 PM
PRIMARY USAGE
As a general rule, m ost radio acti vity is concen trated on th e following frequencies:
VHF Band
Broadcast Type
Governme nt, P olic e, and
Fire
Emergency Services 5 158.730 159.460
Railroad 5 160.000 161.900
Search
Band
5 153.785 155.980
Frequency Ran ge (MHz)
UHF Band
Broadcast Type
Land-Mobile Paired Fre-
quenci es
Base Stations 8 451.025 454.950
Mobil e Units 8 45 6. 02 5 459.950
Relay Repeater Units 8 460.025 464.975
Remote Control Stations 8 465.025 469.975
Note:
Remote control stations and mobile units operate at 5 MHz
Search
Band
8 450.000 470.000
higher than their associated base stations and relay repeater
units.
Frequency Ran ge (MHz)
41
Page 42

20-561 .fm Page 42 Wednesday, August 4, 1999 3: 48 PM
SPECIFIED INTERVALS
All the frequencies in the scanner’s search bands are accessible
only at specific intervals. For example:
Search Band Interval (kHz)
0, 1, 3, 4, 5 5.0
6, 7, 8, 9 12.5
225.0
Note:
Your scanner automatically rounds the entered frequency
down to the clos est valid frequency. For example, if you t ry t o enter a frequency of 151.473, your scanner accepts it as 151.470.
BAND ALLOCATION
To help decide which frequency ranges to scan, use the following
listing of t he typica l services t hat use the f requenc ies your sc anner
receives. These frequencies are subject to change, and might
vary from area to area. For a more complete listing, refer to “Beyond Police Call,” “Police Call Radio Guide Including Fire and
Emergency Services,” and “Radio!” magazine, available at your
local Radio Shack store.
Abbreviations
AIR .....................................................................Aircraft/Air Show
AUTO .... ....... ... .. ....... ... .. ............... .. ... ....... .. ... ............Auto Rac in g
CAP........................................................................Civil Air Patrol
FIRE ....................................................................Fire Department
HAM ...........................................................Amateur (Ham) Radio
GOVT ...........................................................Federal Government
42
Page 43

20-561 .fm Page 43 Wednesday, August 4, 1999 3: 48 PM
MARI............ .. .. ........ .. ... .............. ... .. ....... . Ma ritime Lim ited Coas t
(Coast Guard, Marine
telephone, Shipboard
Radio, Private stations)
MED.............................................. ..Emergency/Medical Services
MIL.............................................................................U.S. Military
MOV .............................................. Motion Picture/Video Industry
NET ............................................Notification Nets (Public Safety)
NEWS......... ............ .. ............Relay Press (Newspaper reporters)
POL ........... ............. .. .......................................Poli ce Department
PUB ..............................................Public Services (Public Safety,
Local Government,
Forestry Conservation)
PSB ......................................................................... Public Safety
RTV......................................Radio/TV Remote Broadcast Pickup
SPORT .............................................................Pro Sports Teams
STAD ................................................................Stadiums/Venues
TELB............................................. .. ... Mobile Telephone (Air craft,
Radio Common Carrier,
Landline companies)
TVn.......................................................FM/TV (Audio Broadcast)
WTHR..............................................................................Weather
High Frequency (HF) — (29 MHz–30 MHz)
10-Meter Amateur Band — (28.0–29.7 MHz)
29.000-29.700 . . . . . . . . . . . . . . . . . . . . . . . . . . . . . . . . . . . HAM
Very High Frequency (VHF) — (30 MHz–300 MHz)
Low Band — (30–50 MHz in 5 kHz steps)
29.900-30.550 . . . . . . . . . . . . . . . . . . . . . . . . . . . . . GOVT, MIL
30.580-31.980 . . . . . . . . . . . . . . . . . . . . . . . . . . . . . . . . . . . PUB
32.000-32.990 . . . . . . . . . . . . . . . . . . . . . . . . . . . . . . GOVT, MIL
33.020-33.980 . . . . . . . . . . . . . . . . . . . . . . . . . . . . . . . . IND,PUB
34.010-34.990 . . . . . . . . . . . . . . . . . . . . . . . . . . . GOVT, MIL
35.020-35.980 . . . . . . . . . . . . . . . . . . . . . . . . . . . . . . . . . . . PUB
36.000-36.230 . . . . . . . . . . . . . . . . . . . . . . . . . . . . . . GOVT, MIL
36.270-36.990 . . . . . . . . . . . . . . . . . . . . . . . . . . . . . . GOVT, MIL
43
Page 44

20-561 .fm Page 44 Wednesday, August 4, 1999 3: 48 PM
37.020-37.980 . . . . . . . . . . . . . . . . . . . . . . . . . . . . . . . . . . . PUB
38.000-39.000 . . . . . . . . . . . . . . . . . . . . . . . . . . . . . . GOVT, MIL
39.020-39.980 . . . . . . . . . . . . . . . . . . . . . . . . . . . . . . . . . . . PUB
40.000-42.000 . . . . . . . . . . . . . . . . . . . . . . . . . . . . . . GOVT, MIL
42.020-42.940 . . . . . . . . . . . . . . . . . . . . . . . . . . . . . . . . . . . POL
43.220-43.680 . . . . . . . . . . . . . . . . . . . . . . . . . . . . . . . . . . . PUB
44.620-46.580 . . . . . . . . . . . . . . . . . . . . . . . . . . . . . . . POL, PUB
46.600-46.990 . . . . . . . . . . . . . . . . . . . . . . . . . . . . . . . . . . GOVT
47.020-47.400 . . . . . . . . . . . . . . . . . . . . . . . . . . . . . . . . . . . PUB
47.440-49.580 . . . . . . . . . . . . . . . . . . . . . . . . . . . . . . . IND, PUB
49.610-49.990 . . . . . . . . . . . . . . . . . . . . . . . . . . . . . . . . . . . . MIL
6-Meter Amateur Band — (50–54 MHz)
50.00-54.00 . . . . . . . . . . . . . . . . . . . . . . . . . . . . . . . . . . . . . HAM
Aircraft Band — (108–136 MHz)
108.000-121. 490 . . . . . . . . . . . . . . . . . . . . . . . . . . . . . . . . . . AIR
121.500 . . . . . . . . . . . . . . . . . . . . . . . . . . . . . . . AIR Emergency
121.510-136.975 . . . . . . . . . . . . . . . . . . . . . . . . . . . . . . . . . . AIR
U.S. Government Band — (137–144 MHz)
137.000-144.000 . . . . . . . . . . . . . . . . . . . . . . . . AIR, GOVT, MIL
2-Meter Amateur Band — (144–1 48 MHz )
144.000-148.000 . . . . . . . . . . . . . . . . . . . . . . . . . . . . . . . . . HAM
VHF Hi Band — (148–174 MHz)
148.050-150.345 . . . . . . . . . . . . . . . . . . . . . . . . . . . . . CAP, MIL
150.775-150.790 . . . . . . . . . . . . . . . . . . . . . . . . . . . . . . . . . MED
151.145-151.475 . . . . . . . . . . . . . . . . . . . . . . . . . . . . . . . . . POL
151.625-151.955 . . . . . . . . . . . . . . . . . . . AUTO, SPORT, STAD
152.0075 . . . . . . . . . . . . . . . . . . . . . . . . . . . . . . . . . . . . . . . MED
152.030-152.240 . . . . . . . . . . . . . . . . . . . . . . . . . . . . . . . . TELB
152.510-152.840 . . . . . . . . . . . . . . . . . . . . . . . . . . . . . . . . TELB
152.870-153.020 . . . . . . . . . . . . . . . . . . . . . . . . . . . . . . . . . MOV
153.740-154.445 . . . . . . . . . . . . . . . . . . . . . . PUB, FIRE, STAD
44
Page 45

20-561 .fm Page 45 Wednesday, August 4, 1999 3: 48 PM
154.540-154.570 . . . . . . . . . . . . . . . . . . . AUTO, SPORT, STAD
154.600. . . . . . . . . . . . . . . . . . . . . . . . . . . . . . . . . SPORT, STAD
154.655-156.240 . . . . . . . . . . . . AUTO, MED, POL, PUB, STAD
156.275-157.425 . . . . . . . . . . . . . . . . . . . . . . . . . . . . . . . . MARI
157.450. . . . . . . . . . . . . . . . . . . . . . . . . . . . . . . . . . . . . . . . . MED
157.710. . . . . . . . . . . . . . . . . . . . . . . . . . . . . . . . . . . . . . . . AUTO
157.770-158.100 . . . . . . . . . . . . . . . . . . . . . . . . . . . . . . . . TELB
158.490-158.700 . . . . . . . . . . . . . . . . . . . . . . . . . . . . . . . . TELB
158.730-159.465 . . . . . . . . . . . . . . . . . . . . . . . . . . . . POL, PUB
161.640 . . . . . . . . . . . . . . . . . . . . . . . . . . . . . . . . . . . . . . . AUTO
161.600-162.000 . . . . . . . . . . . . . . . . . . . . . . . . . . . . MARI, RTV
162.0125-162.35 . . . . . . . . . . . . . . . . . . . . . . . . . . . GOVT, MIL
162.400-162.550 . . . . . . . . . . . . . . . . . . . . . . . . . . . . . . . WTHR
162.5625-162.6375 . . . . . . . . . . . . . . . . . . . . . . . . . . GOVT, MIL
162.6625. . . . . . . . . . . . . . . . . . . . . . . . . . . . . . . . . . . . . . . . MED
162.6875-163.225 . . . . . . . . . . . . . . . . . . . . . . . . . . . GOVT, MIL
163.250. . . . . . . . . . . . . . . . . . . . . . . . . . . . . . . . . . . . . . . . . MED
163.275-166.225 . . . . . . . . . . . . . . . . . . . . . . . . . . . . GOVT, MIL
166.250. . . . . . . . . . . . . . . . . . . . . . . . . . . . . . .FIRE, GOVT, RTV
166.275-169.400 . . . . . . . . . . . . . . . . . . . . . . . . . . . . . . . . GOVT
169.445. . . . . . . . . . . . . . . . . . . . . . . . . . . . . . . . . Wireless Mikes
169.500. . . . . . . . . . . . . . . . . . . . . . . . . . . . . . . . . . . . . . . . GOVT
169.505. . . . . . . . . . . . . . . . . . . . . . . . . . . . . . . . . Wireless Mikes
169.55-169.9875 . . . . . . . . . . . . . . . . . . . . . . . . . . . . GOVT, MIL
170.025-170.150 . . . . . . . . . . . . . . . . . . . . . . .FIRE, GOVT, RTV
170.175-170.225 . . . . . . . . . . . . . . . . . . . . . . . . . . . . . . . . GOVT
170.245-170.305 . . . . . . . . . . . . . . . . . . . . . . . . . Wireless Mikes
170.350-170.400 . . . . . . . . . . . . . . . . . . . . . . . . . . . . GOVT, MIL
170.475. . . . . . . . . . . . . . . . . . . . . . . . . . . . . . . . . . . . . . . . . PUB
170.4875-173.175 . . . . . . . . . . . . . GOVT, PUB, Wireless Mikes
173.225-173.375 . . . . . . . . . . . . . . . . . . . . . . . . . . .MOV, NEWS
173.3875-173.5375 . . . . . . . . . . . . . . . . . . . . . . . . . . . . . . . . MIL
173.5625-173.5875 . . . . . . . . . . . . . . MIL, Medical/Crash Crews
173.60-173.9875 . . . . . . . . . . . . . . . . . . . . . . . . . . . . . . . . GOVT
45
Page 46

20-561 .fm Page 46 Wednesday, August 4, 1999 3: 48 PM
Ultra High Frequency (UHF) — (300 MHz–3 GHz)
Military Aircraft Band — (319.1–406 MHz)
380.000-383.900 . . . . . . . . . . . . . . . . . . . . . . . AIR, Coast Guard
384.000-406.000 . . . . . . . . . . . . . . . . . . . . . . . . . . . . AIR, GOVT
U.S. Government Band — (406–450 MHz)
406.125-419.975 . . . . . . . . . . . . . . . . . . . . . . . . . . . . . . . . GOVT
70-cm Amateur Band — (420–450 MHz)
420.000-450.000 . . . . . . . . . . . . . . . . . . . . . . . . . . . . . . . . . HAM
Low Band — (450–470 MHz)
450.050-450.925 . . . . . . . . . . . . . . . . . . . . . . . . . . . . . . . . . .RTV
452.0375-453.00 . . . . . . . . . . . . . . . . . . . . . . . . . . . . . . . . NEWS
453.0125-453.9875 . . . . . . . . . . . . . . . . . . . . . . . . . . PUB, STAD
454.025-454.975 . . . . . . . . . . . . . . . . . . . . . . . . . . . . . . . . . TELB
455.050-455.925 . . . . . . . . . . . . . . . . . . . . . . . . . . . . . . . . . .RTV
457.550-457.600 . . . . . . . . . . . . . . . . . . . . . . . . . . . . . . . . AUTO
458.025-458.175 . . . . . . . . . . . . . . . . . . . . . . . . . . . . . . . . . MED
460.0125-460. 6375 . . . . . . . . . . . . . . . . . . . . . . FIRE, POL, PUB
460.6400-462. 9350 . . . . . . . . . . . . . . . . . . . . . . . . .AUTO, STAD
462.9375-463.1875 . . . . . . . . . . . . . . . . . . . . . . . . . . . . . . . MED
463.2000-470. 00 . . . . . . . . . . . . . . . AUTO, NET, SPORT, STAD
FM-TV Audio Broadcast, UHF Wide Band — (470–512 MHz)
(Channel 14 throu gh 69 in 6 MHz steps)
475.750 . . . . . . . . . . . . . . . . . . . . . . . . . . . . . . . . . . . Channel 14
481.750 . . . . . . . . . . . . . . . . . . . . . . . . . . . . . . . . . . . Channel 15
487.750 . . . . . . . . . . . . . . . . . . . . . . . . . . . . . . . . . . . Channel 16
493.750 . . . . . . . . . . . . . . . . . . . . . . . . . . . . . . . . . . . Channel 17
499.750 . . . . . . . . . . . . . . . . . . . . . . . . . . . . . . . . . . . Channel 18
505.750 . . . . . . . . . . . . . . . . . . . . . . . . . . . . . . . . . . . Channel 19
51 1.750. . . . . . . . . . . . . . . . . . . . . . . . . . . . . . . . . . . . Channel 20
46
Page 47

y
20-561 .fm Page 47 Wednesday, August 4, 1999 3: 48 PM
Note: Some cities use the 470-512 MHz band for land/mobile services.
HAM RADIO FREQUENCIES
Ham radio operators often broadcast emergency information
when other means of communications break down.
The following chart shows the v oice frequencies you can monitor.
Wavelength
(meters)
10 meters 0 29.000 29.700
6 meters 1 50.100 54.000
2 meters 4 144.100 148.000
70 centimeters 7 420.000 450.000
Search Band Frequenc
Range (MHz)
NATIONAL WEATHER FREQUENCIES
All of the following frequencies except 162.440 are programmed
into your scanner ’s weat her band.
161.650 MHz 162.425 MHz 162.475 MHz 162.550 MHz
161.775 MHz 162.440 MHz 162.500 MHz 163.275 MHz
162.400 MHz 162.450 MHz 162.525 MH z
Note: You can st ill manually tune t o 162.440 (see “Search ing For
and Storing Active Frequencies” on Page 21).
47
Page 48

20-561 .fm Page 48 Wednesday, August 4, 1999 3: 48 PM
BIRDIE FREQUENCIES
Birdies are frequencies your scanner uses when it operates.
These operating frequencies might interfere with broadcasts on
the same frequencies. If you program one of these frequencies,
you might hear only noise on that frequency.
If the interference is not severe, you might be able to turn
SQUELCH MIN/MAX
most common birdies to watch for:
clockwise to cut out the birdie. These are the
29.800 MHz
32.000 MHz
38.400 MHz
46.370 MHz
51.200 MHz
112.375 MHz
115.200 MHz
121.600 MHz
128.000 MHz
131.025 MHz
134.400 MHz
136.675 MHz
140.175 MHz
140.800 MHz
144.625 MHz
148.525 MHz
152.750 MHz
153.600 MHz
156.540 MHz
157.050 MHz
160.555 MHz
162.200 MHz
166.400 MHz
173.925 MHz
381.6625 MHz
388.3875 MHz
396.800 MHz
419.3625 MHz
422.400 MHz
426.025 MHz
427.325 MHz
435.200 MHz
438.5375 MHz
442.100 MHz
443.400 MHz
447.500 MHz
451.4375 MHz
454.5875 MHz
455.450 MHz
458.2625 MHz
459.475 MHz
462.600 MHz
463.4875 MHz
467.5125 MHz
471.525 MHz
479.6625 MHz
487.700 MHz
512.000 MHz
To find your sp eci fic s canner’ s bird ies , begin by disco nnect ing t he
antenna and moving it away from the scanner. Make sure that no
other nearby radio or TV sets are turned on. Search each search
band from its lowest frequency to its highest. Occasionally, the
scanner will stop as if it had found a signal, often without any
sound. That is a birdie. Make a note of that frequency, then continue. Make a l ist of all the birdies in your scanner for future reference.
48
Page 49

20-561 .fm Page 49 Wednesday, August 4, 1999 3: 48 PM
FREQUENCY CONVERSION
The tuning location of a station can be expressed in frequency
(kHz or MHz) or i n wa velengt h (meter s). The f ollowing in formati on
can help you make the necessary conversions.
1 MHz (m illi on)=1,0 00 kHz (tho u s a nd )
To convert MHz to kHz, mul ti ply by 1,000.
30.62 MHz x 1000=30620 kHz
To convert from kHz to MHz, divide by 1,000.
1000
MHz
=
KHz
1.75 meters
127 800,
=127.8 MHz
-----------------------
To convert MHz to meters, divide 300 by the number of megahertz.
300
--------- 171
49
Page 50

20-561 .fm Page 50 Wednesday, August 4, 1999 3: 48 PM
TROUBLESHOOTING
If your scanner is not working as it should, these suggestions
might help you el iminate the problem. If the scanner still does not
operate normal ly, t ake it to your l ocal Radi o Shack st ore for assistance.
Problem Suggestion
Scanner is on but will not scan. • If SQUELCH MIN/MAX is
adjusted so you always
hear a hissing sound, the
scanner will not scan properly. Be sure SQUELCH
MIN/MAX is adju sted properly. See “Turning On the
Scanner and Setting
Squelc h” on Page 20.
• Be sure scanner is set to
the scan mode (
is not displayed). See
UAL
“Scanning th e Stored Channels” on Page 25.
• Be sure you have stored
frequencies into the scanner’s channels. See
“Searc hing For an d Storing
Active Frequencies” on
Page 21.
MAN-
Scanner does not work at all. • Replace the batteries with
fresh ones or recharge
them.
• Be sure the AC adapter or
DC cigarette lighter adapter
is connected properly.
appears on the display. You progr ammed a frequency in-
Error
correctly. Try again.
50
Page 51

20-561 .fm Page 51 Wednesday, August 4, 1999 3: 48 PM
Problem Suggestion
Scanner receives stations poorly
or not a t all.
Scanner’s keys or disp lay work
poorly or not at a ll.
Scanner locks on frequencies
that have an unclea r transmission.
• Check the antenna (indoor
or outdoor). See “Connecting the Flexible Antenna” on
Page 9 and “Connecting a
Mobile or Base-Station
Antenna” on Page 35.
• Signals may be blocked
from be ing received b y the
scanner due to metal
frames or material in the
building. Change the scanner ’s locatio n an d t ry ag ain.
• The scanner’s keys are
locked. Unlock the scanner’s keys. See “Using the
Keylock” on Page 32.
• Reset the scanner. See
“Resetting the Scanner” on
Page 13.
You might have tuned to a birdie
frequency. Avoid programming
frequencies listed under “Birdie
Frequencies” on Page 48, or only
select them manually.
51
Page 52

20-561 .fm Page 52 Wednesday, August 4, 1999 3: 48 PM
CARE AND MAINTENANCE
Your Radio Shack PRO-63 100-Channel Portable Event Scanner
is an example of s uperior des ign and craftsmans hip. The fol lowing
suggestions will help you care for your scanner so you can enjoy
it for yea rs.
Keep the sca nner dry. I f i t get s wet, wipe i t d ry immediately. Liquids can contain minerals that can
corrode the elec tr onic circuits.
Handle the scanner gently and carefully. Dropping it can damage cir cuit boar ds and cases, and
can cause the scanner to work improperly.
Use and s tore the sc anner onl y in nor mal temperature environments. Temperature extremes can
shorten the l ife of electr onic devices and distort or
melt plasti c parts.
Keep the scanner away from dust and di rt , which
can cause premature wear of parts.
Wipe the scanner wi th a damp cloth occasionally
CLEANER
to keep it looking new. Do not use harsh chemicals, cleaning solvents, or strong detergents to
clean it.
Modifying or tampering with the scanner’s internal components
can cause a malf unction and might inval idate i ts warrant y and void
your FCC authori zatio n to opera te it . If yo ur scanner is not operating as it should, take it to your local Radio Shack store for assistance.
52
Page 53

20-561 .fm Page 53 Wednesday, August 4, 1999 3: 48 PM
SPECIFICATIONS
Frequency Coverage
VHF Lo . . . . . . . . . . . . . . . . . . . . 29.7–50 MHz (in 5 kHz steps)
Amateur Radio . . . . . . . . . . . . . . . 29–29.7 MHz (in 5 kHz steps)
50–54 MHz (in 5 kHz step s)
144–148 MHz (in 5 kHz step s)
420–450 MHz (in 12. 5 kHz steps)
Amateur Radio/Government . 450–470 MHz (in 12.5 kHz steps)
Aircraft . . . . . . . . . . . . . . . . 108–136.975 MHz (in 25 kHz steps)
Government . . . . . . . . . . . . . . . . . 137–144 MHz (in 5 kHz steps)
380–420 MHz (in 12. 5 kHz steps)
VHF Hi . . . . . . . . . . . . . . . . . . . . . 148–174 MHz (in 5 kHz steps)
UHF “T” . . . . . . . . . . . . . . . . . 470–512 MHz (in 12.5 kHz steps)
Channels of Operation . . . . . . . . . . . . . . . . .100 Channels in Any
Band Combinations
(10 channels per bank x 10 banks)
Sensitivity (20 dB S/N) . . . . . . . . . . . . . . . . . . . . . . . . . . . .0.7
Selectivity:
±
10 kHz . . . . . . . . . . . . . . . . . . . . . . . . . . . . . . . . . . . . –6 dB
±
18 kHz . . . . . . . . . . . . . . . . . . . . . . . . . . . . . . . . . . . . –50 dB
Spurious Rejection:
30-54 MHz . . . . . . . . . . . . . . . . . . . . . . . . . . 50 dB at 40 MHz
108-136.975 MHz . . . . . . . . . . . . . . . . . . . . 50 dB at 124 MHz
137-174 MHz . . . . . . . . . . . . . . . . . . . . . . . 50 dB at 154 MHz
380-512 MHz . . . . . . . . . . . . . . . . . . . . . . . 40 dB at 450 MHz
Scanning Rate . . . . . . . . . . . . . . . . . . Up to 25 channels/second
Search Rate . . . . . . . . . . . . . . . . . . . . . . . Up to 50 steps/second
Delay Time . . . . . . . . . . . . . . . . . . . . . . . . . . . . . . . . . 2 seconds
Priority Sampling . . . . . . . . . . . . . . . . . . . . . . . . . . . . 2 seconds
m
V
53
Page 54

20-561 .fm Page 54 Wednesday, August 4, 1999 3: 48 PM
Intermediat e Frequencies (IF):
1st . . . . . . . . . . . . . . . . . . . . . . . . . . . . . . . . . . . . . . 10.7 MHz
2nd . . . . . . . . . . . . . . . . . . . . . . . . . . . . . . . . . . . . . . . 455 kHz
IF Rejection (10.7 MHz) . . . . . . . . . . . . . . . . 70 dB at 154 MHz
Squelch Sensitivity:
Threshold . . . . . . . . . . . . . . . . . . . . . . . . . . . Less than 0.5
m
V
Tight (VHF Lo, Hi, UHF) . . . . . . . . . . . . . . . . . . .(S+N)/N 25 dB
Tight (Aircraft) . . . . . . . . . . . . . . . . . . . . . . . . . . .(S+N)/N 20 dB
Antenna Impedance . . . . . . . . . . . . . . . . . . . . . . . . . . 50 Ohms
Built-in Speaker . . . .1
3
/8 Inches (36 mm), 8 Ohms, dynamic type
Audio Output Power (10% THD) . . . . . . . . . . . .240 mW Nominal
Power Requirements . . . . . . . . . . . . . . . . . . . . . . . . . . . . +9 VDC
(6 AA alkaline batteries,
6 AA rechargeable nickel-cadmium batteries,
AC adapter (Cat. No. 273-1665),
or DC cigarette-li ghter adapter (Cat. No. 270-1560) )
Current Drain (Squel ched) . . . . . . . . . . . . . . . . . . . . . . . . 65 mA
Dimensions . . . . . . . . . . . . . . . . . . 5
7
/8 ¥ 21/2 ¥ 13/4 Inches HWD
(149 ¥ 64 ¥ 45 mm)
Weight . . . . . . . . . . . . . . . . . . . . . . . . . . . . . . . . . 8.8 Oz (250 g)
Specifications are typical; individual units might vary. Specifications are subject to change and improvement without notice.
54
Page 55

20-561 .fm Page 55 Wednesday, August 4, 1999 3: 48 PM
NOTES
U.S. PATENT NOS.
3,794,925
3,801,914
3,961,261
3,962,644
4,027,251
4,092,594
4,123,715
4,245,348
55
Page 56

20-561 .fm Page 56 Wednesday, August 4, 1999 3: 48 PM
RADIO SHACK LIMITED WARRANTY
This product is warranted against defects for 1 year from date of
purchase from Radio Shack company-owned stores and authorized R adi o S hack fran ch isee s an d dea ler s. Wi th in thi s pe rio d, w e
will repair it without charge for parts and labor. Simply
Radio Shack sales slip
Shack store. Warranty does not cover transportation costs. Nor
does it cover a product subject ed to misuse or accidental damage.
EXCEPT AS PROVIDED HEREIN, RADIO SHACK MAKES NO
EXPRESS WARRANTIES AND ANY IMPLIED WARRANTIES
ARE LIMITED IN DURATION TO THE DURATION OF THE WRITTEN LIMITED WARRANTIES CONTAINED HEREIN. Some states
do not permit limitation or exclusion of implied warranties; therefore, the aforesaid limitation(s) or exclusion(s) may not apply to the
purchaser.
This warranty gives you specific legal rights and you may also have other
rights which vary from state to state.
as proof of purchase date to any Radio
bring yo ur
We Service What We Sell
9/94
RADIO SHACK
A Division of Tandy Corporation
Fort Worth, Texas 76102
11A5 Printed in Hong Kong
GE-95D-1500
 Loading...