

Page 1
20-418 .fm Page 1 Wednesday, Au gust 4, 1999 12 :42 PM
Cat. No.
OWNER’S MANUAL
20-418
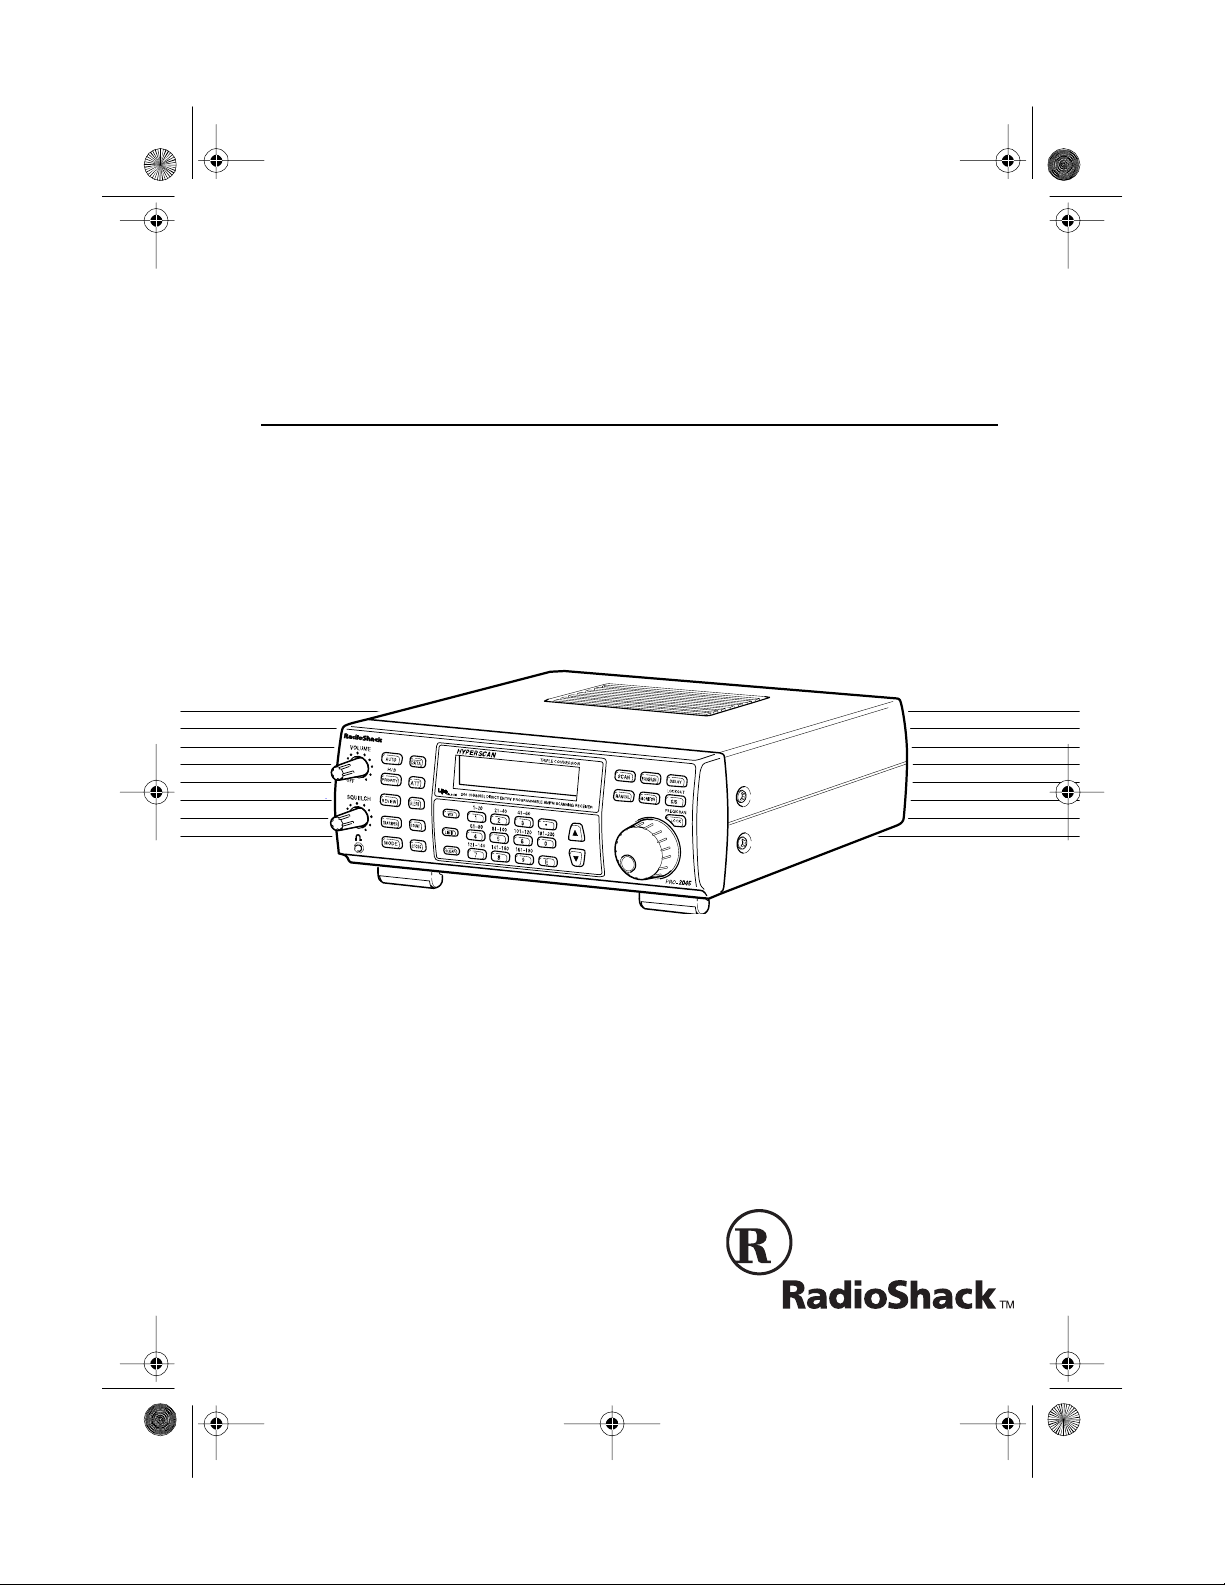
PRO-2045
200-Channel Weather Alert Home Scanner
Please read before using this equipment.
Page 2

y
y
y
g
y
20-418 .fm Page 2 Wednesday, Au gust 4, 1999 12 :42 PM
FEATURES
Your RadioShack PRO-2045 200Channel Weather Alert Home Scanner lets you in on all the action! This
scanner gives you direct access to
over 49,500 exciting f requen cies used
by police and fire departments, amb ulance and transportation services, amateur radio, as well as aircraft
communications, Citizen’s Band, and
commercial FM and t elevision broadcasts.
You can select up to 200 channels for
your scanner to scan, and you can
change your selections at any time. Its
rotary tuning control lets you easily select frequencies and channels. Plus,
when you turn on the weather alert
function, the scanner sounds an alarm
if the weather service transmits a
weather alert tone.
The secret to your scan ner’s ability to
scan so many frequencies is its custom-designed microprocessor — a
tiny, built-in computer.
H
perscan
— scans programmed
channels at up to 50 channels per
second.
H
persearch
— lets you set the scanner to search at up to 300 steps per
second.
Rotar
Tuner
— lets you easily tu ne
and select frequencies or channels.
Auto Sort
— lets you scan the channels stored in a bank, in order from
lowest to highest frequency, to increase scanning speed.
Auto Store
— quickly finds and automatically stores active frequencies
into the selected banks (but does not
store the frequency if it is already
stored in another channel).
Ten Channel-Stora
e Banks
— let
you store 20 channels in each of 10
banks to group frequencies so you
can easily identify calls.
Your scanner has these features:
Frequenc
Transfer
ly organize your frequencies by trans-
WX Alert
— warns you of serious
weather conditions by sounding an
ferring them from one channel to
another.
alarm if the weather service transmits
a weather alert tone.
Monit or Memori e s
— let you store up
to 10 frequencies you locate during a
Weather Band Auto Scan
— scans
frequency search.
the preprogrammed weather freque ncies so you can stay informed about
current weather conditions.
© 1996 Tandy Corporation.
All Rights Reserv ed .
RadioShack is a trademark used by Tandy Corporation.
Hyperscan and Hypersearch are registered trademarks used by Tandy Corporation.
Limit Search
transmissions within a set range.
— lets you search for
2
— lets you e as i-
Page 3

20-418 .fm Page 3 Wednesday, Au gust 4, 1999 12 :42 PM
Direct Search — lets you search f or
transmissions starting from a f requency you specify.
Count Feature — lets you keep track
of how many times your sc anner has
stopped on a channel.
Search Skip — lets you select up to
50 frequencies for the scanner t o skip
during a search, so you can avoid frequencies you have already discovered
or that have a continuous transmission.
Two-Second Scan Delay — delays
scanning for 2 seconds before mov ing
to another channel, so you can hear
more replies.
Data Skip — skips data signal s (nonmodulated signals such as preamble
signals for pagers) during scan, limit
search, and direct search.
Attenuat or — reduces the scanner’s
sensitivity to help limit reception to
strong, nearby transmitters.
Memory Backup — keeps stored
channel frequencies in memory for up
to 3 days during a power loss.
CTCSS Option — with an optional
CTCSS tone circuit board, you can
use the Continuous Tone Coded
Squelch System (CTCSS) to selectively listen to some business band
and amateur radio transmissions.
Backlit Display — lets you easily see
the indicators on the scanner’s display, even at night.
We recommend you record your scanner’s serial number here. The number
is on the scanner’s back panel.
Serial Number: _________________
Lock-Out Function — prevents
channels you select from being
scanned.
Priority Channels — checks 10 specified channels every 2 seconds so you
do not miss important calls.
Automatic Modulation Mode — selects the modulation method — narrow-band frequency modulation
(NFM) or amplitude modulation (AM)
— most often used for each band, and
lets you manual ly override the preset
mode.
Your scanner has the following preprogrammed weather channels:
• 162.4000 MHz (NFM)
• 162.4250 MHz (NFM)
• 162.4500 MHz (NFM)
• 162.4750 MHz (NFM)
• 162.5000 MHz (NFM)
• 162.5250 MHz (NFM)
• 162.5500 MHz (NFM)
3
Page 4
20-418 .fm Page 4 Wednesday, Au gust 4, 1999 12 :42 PM
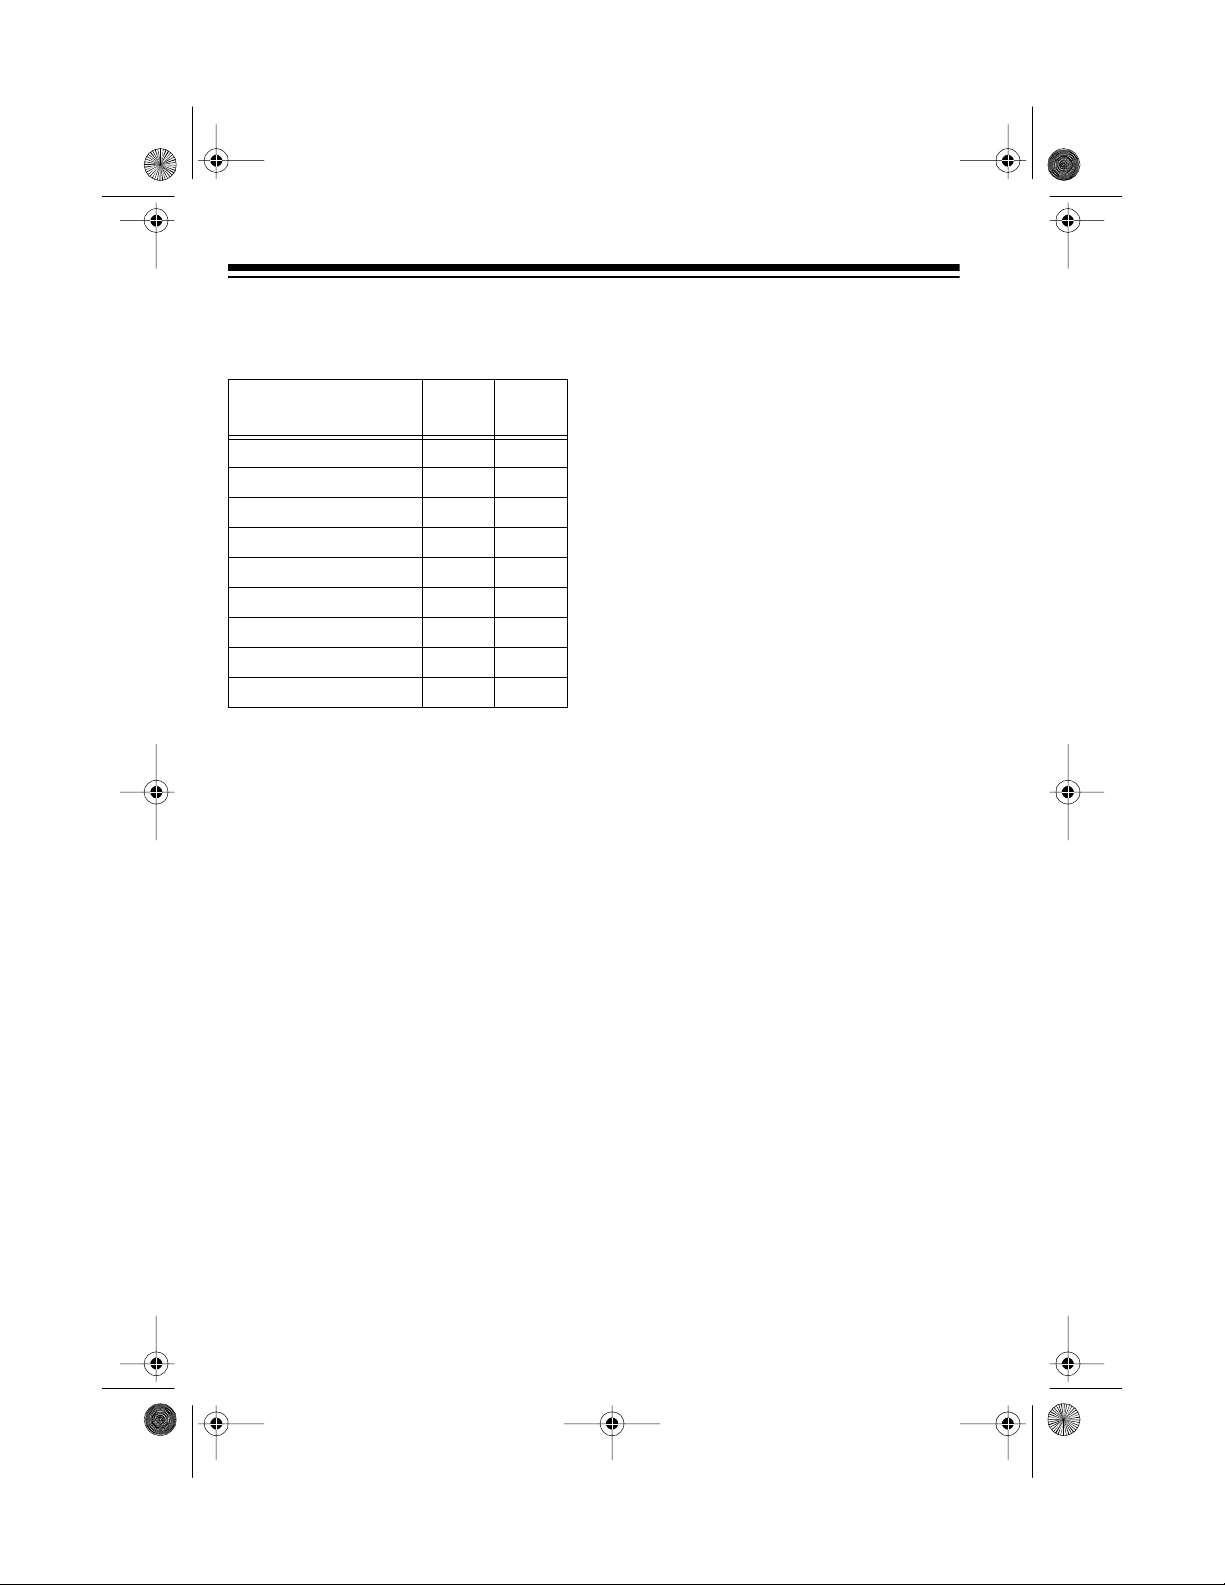
Your scanner can receive all of these
bands:
Range
(MHz)
29–54 5 NFM
108–136.975 12.5 AM
137–174 5 NFM
216–224.9875 12.5 NFM
225–399.9875 12.5 AM
400–512 12.5 NFM
806–823.9375 12.5 NFM
851–868.9375 12.5 NFM
896.1125–1,000 12.5 NFM
Step
(kHz)
Mode
FCC NOTICE
Your scanner might caus e radio or T V
interference even when it is operat ing
properly. To determine if your scanner
is causing the interference, turn off
your scanner. If the interference goes
away, your scanner was causing it.
Try to eliminate the interference by:
• Moving your scanner away from
the receiver
• Connecting your scanner to an
outlet that is on a different electrical circuit from the receiver
• Contacting a RadioShack store for
help
SCANNING LEGALLY
Your scanner covers frequencies
used by many different groups including police and fire departments, ambulance services, government agencies,
private companies, amateur radio services, military operations, pager services, and wireline (telephone and
telegraph) service providers. It is lega l
to listen to almost every t ransmission
your scanner can receive. However,
there are some transmissions you
should never intentionally listen to.
These include:
• Telephone conversations (either
cellular, cordless, or other private
means of telephone signal transmission)
• Pager transmissions
• Any scrambled or encrypted
transmissions
According to the Electronic Communications Privacy Act (ECPA), you are
subject to fines and possible imprisonment for intentionally listening to, using, or divulging the contents of such a
transmission unless you have the consent of a party to the conversation (unless such activity is otherwise illegal).
RadioShack encourages responsible,
legal scanner use.
If you cannot eliminate the interference, the FCC requires that you stop
using your scanner.
4
Page 5

g
20-418 .fm Page 5 Wednesday, Au gust 4, 1999 12 :42 PM
CONTENTS
Preparation . . . . . . . . . . . . . . . . . . . . . . . . . . . . . . . . . . . . . . . . . . . . . . . . . . . . . . 7
Connecting Power . . . . . . . . . . . . . . . . . . . . . . . . . . . . . . . . . . . . . . . . . . . . . . 7
Using Standard AC Power . . . . . . . . . . . . . . . . . . . . . . . . . . . . . . . . . . . . 7
Using Vehicle Battery Power . . . . . . . . . . . . . . . . . . . . . . . . . . . . . . . . . . 7
Connecting an Antenna . . . . . . . . . . . . . . . . . . . . . . . . . . . . . . . . . . . . . . . . . 8
Telescoping Antenna . . . . . . . . . . . . . . . . . . . . . . . . . . . . . . . . . . . . . . . . 8
Optional Outdoor Antenna . . . . . . . . . . . . . . . . . . . . . . . . . . . . . . . . . . . . 8
Resetting the Scanner . . . . . . . . . . . . . . . . . . . . . . . . . . . . . . . . . . . . . . . . . . 9
Using the Feet . . . . . . . . . . . . . . . . . . . . . . . . . . . . . . . . . . . . . . . . . . . . . . . . . 9
Testing Alert Operation . . . . . . . . . . . . . . . . . . . . . . . . . . . . . . . . . . . . . . . . . 10
Testing Alert Reception . . . . . . . . . . . . . . . . . . . . . . . . . . . . . . . . . . . . . . 10
Testing the Weather Alert . . . . . . . . . . . . . . . . . . . . . . . . . . . . . . . . . . . . 11
Connecting an Earphone . . . . . . . . . . . . . . . . . . . . . . . . . . . . . . . . . . . . . . . 11
Listening Safely . . . . . . . . . . . . . . . . . . . . . . . . . . . . . . . . . . . . . . . . . . . 11
Traffic Safety . . . . . . . . . . . . . . . . . . . . . . . . . . . . . . . . . . . . . . . . . . . . . . 12
Connecting an Amplified Extension Speaker . . . . . . . . . . . . . . . . . . . . . . . . 12
Installing an Optional CTCSS Tone Board . . . . . . . . . . . . . . . . . . . . . . . . . . 12
Understandin
A Look at the Keyboard . . . . . . . . . . . . . . . . . . . . . . . . . . . . . . . . . . . . . . . . 14
A Look at the Display . . . . . . . . . . . . . . . . . . . . . . . . . . . . . . . . . . . . . . . . . . 16
Understanding Channel-Storage Banks . . . . . . . . . . . . . . . . . . . . . . . . . . . . 18
Channel-Storage Banks . . . . . . . . . . . . . . . . . . . . . . . . . . . . . . . . . . . . . 18
Monitor Memories . . . . . . . . . . . . . . . . . . . . . . . . . . . . . . . . . . . . . . . . . . 18
Operation . . . . . . . . . . . . . . . . . . . . . . . . . . . . . . . . . . . . . . . . . . . . . . . . . . . . . . 19
Turning On the Scanner/Setting Volume and Squelch . . . . . . . . . . . . . . . . . 19
Using the Rotary Control . . . . . . . . . . . . . . . . . . . . . . . . . . . . . . . . . . . . . . . . 19
Storing Frequencies . . . . . . . . . . . . . . . . . . . . . . . . . . . . . . . . . . . . . . . . . . . 19
Searching For and Temporarily Storing Active Frequencies . . . . . . . . . . . . . 20
Limit Search . . . . . . . . . . . . . . . . . . . . . . . . . . . . . . . . . . . . . . . . . . . . . . 20
Direct Search . . . . . . . . . . . . . . . . . . . . . . . . . . . . . . . . . . . . . . . . . . . . . 21
Search Skip . . . . . . . . . . . . . . . . . . . . . . . . . . . . . . . . . . . . . . . . . . . . . . 22
Automatically Storing Frequencies . . . . . . . . . . . . . . . . . . . . . . . . . . . . . . . . 23
Listening to Monitor Memories . . . . . . . . . . . . . . . . . . . . . . . . . . . . . . . . . . . 24
Moving a Frequency from a Monitor Memory to a C hannel . . . . . . . . . . . . . 24
Scanning Channels . . . . . . . . . . . . . . . . . . . . . . . . . . . . . . . . . . . . . . . . . . . . 24
Turning Channel-Storage Banks On and Off . . . . . . . . . . . . . . . . . . . . . 24
Locking Out Channels . . . . . . . . . . . . . . . . . . . . . . . . . . . . . . . . . . . . . . 25
Manually Selecting a Channel . . . . . . . . . . . . . . . . . . . . . . . . . . . . . . . . . . . 25
Scanning the Weather Band . . . . . . . . . . . . . . . . . . . . . . . . . . . . . . . . . . . . . 26
Weather Alert . . . . . . . . . . . . . . . . . . . . . . . . . . . . . . . . . . . . . . . . . . . . . 26
Using the Weather Alert Standby Mode . . . . . . . . . . . . . . . . . . . . . . . . . 26
Your Scanner . . . . . . . . . . . . . . . . . . . . . . . . . . . . . . . . . . . . . . 14
5
Page 6

20-418 .fm Page 6 Wednesday, Au gust 4, 1999 12 :42 PM
Special Features . . . . . . . . . . . . . . . . . . . . . . . . . . . . . . . . . . . . . . . . . . . . . . . . 27
Delay . . . . . . . . . . . . . . . . . . . . . . . . . . . . . . . . . . . . . . . . . . . . . . . . . . . . . . . 27
Priority . . . . . . . . . . . . . . . . . . . . . . . . . . . . . . . . . . . . . . . . . . . . . . . . . . . . . . 27
Changing Search Speeds . . . . . . . . . . . . . . . . . . . . . . . . . . . . . . . . . . . . . . . 28
Using the Programmable Attenuator . . . . . . . . . . . . . . . . . . . . . . . . . . . . . . . 28
Using Auto Sort . . . . . . . . . . . . . . . . . . . . . . . . . . . . . . . . . . . . . . . . . . . . . . . 29
Skipping Data Signals . . . . . . . . . . . . . . . . . . . . . . . . . . . . . . . . . . . . . . . . . . 29
Turning On or Off the Key Tone . . . . . . . . . . . . . . . . . . . . . . . . . . . . . . . . . . . 29
Changing the Modulation Mode . . . . . . . . . . . . . . . . . . . . . . . . . . . . . . . . . . . 29
Transferring a Frequency to Another Channel . . . . . . . . . . . . . . . . . . . . . . . 30
Transferring to an Empty Channel . . . . . . . . . . . . . . . . . . . . . . . . . . . . . 30
Transferring to a Channel that has a Stored Frequency . . . . . . . . . . . . . 30
Exchanging Frequencies Betwee n Two Programmed Channels . . . . . . 30
Using the Count Feature . . . . . . . . . . . . . . . . . . . . . . . . . . . . . . . . . . . . . . . . 31
Using CTCSS . . . . . . . . . . . . . . . . . . . . . . . . . . . . . . . . . . . . . . . . . . . . . . . . 31
CTCSS Tone Frequencies . . . . . . . . . . . . . . . . . . . . . . . . . . . . . . . . . . . 31
Assigning a CTCSS Tone Frequency to a Channel . . . . . . . . . . . . . . . . 32
Changing or Deleting a CTCSS Tone Frequency for a Channel . . . . . . . 32
A General Guide to Scanning . . . . . . . . . . . . . . . . . . . . . . . . . . . . . . . . . . . . . . 33
Guide to Frequencies . . . . . . . . . . . . . . . . . . . . . . . . . . . . . . . . . . . . . . . . . . 33
National Weather Service Frequencies . . . . . . . . . . . . . . . . . . . . . . . . . . 33
Ham Radio Frequencies . . . . . . . . . . . . . . . . . . . . . . . . . . . . . . . . . . . . . 33
Birdie Frequencies . . . . . . . . . . . . . . . . . . . . . . . . . . . . . . . . . . . . . . . . . 34
Guide to the Action Bands . . . . . . . . . . . . . . . . . . . . . . . . . . . . . . . . . . . . . . . 35
Typical Band Usage . . . . . . . . . . . . . . . . . . . . . . . . . . . . . . . . . . . . . . . . 35
Primary Usage . . . . . . . . . . . . . . . . . . . . . . . . . . . . . . . . . . . . . . . . . . . . 36
Specified Intervals . . . . . . . . . . . . . . . . . . . . . . . . . . . . . . . . . . . . . . . . . . 37
Band Allocation . . . . . . . . . . . . . . . . . . . . . . . . . . . . . . . . . . . . . . . . . . . . . . . 38
Frequency Conversion . . . . . . . . . . . . . . . . . . . . . . . . . . . . . . . . . . . . . . . . . 41
Troubleshooting . . . . . . . . . . . . . . . . . . . . . . . . . . . . . . . . . . . . . . . . . . . . . . . . . 42
Care and Maintenance . . . . . . . . . . . . . . . . . . . . . . . . . . . . . . . . . . . . . . . . . . . . 43
Specifications . . . . . . . . . . . . . . . . . . . . . . . . . . . . . . . . . . . . . . . . . . . . . . . . . . . 44
6
Page 7

20-418 .fm Page 7 Wednesday, Au gust 4, 1999 12 :42 PM
PREPARATION
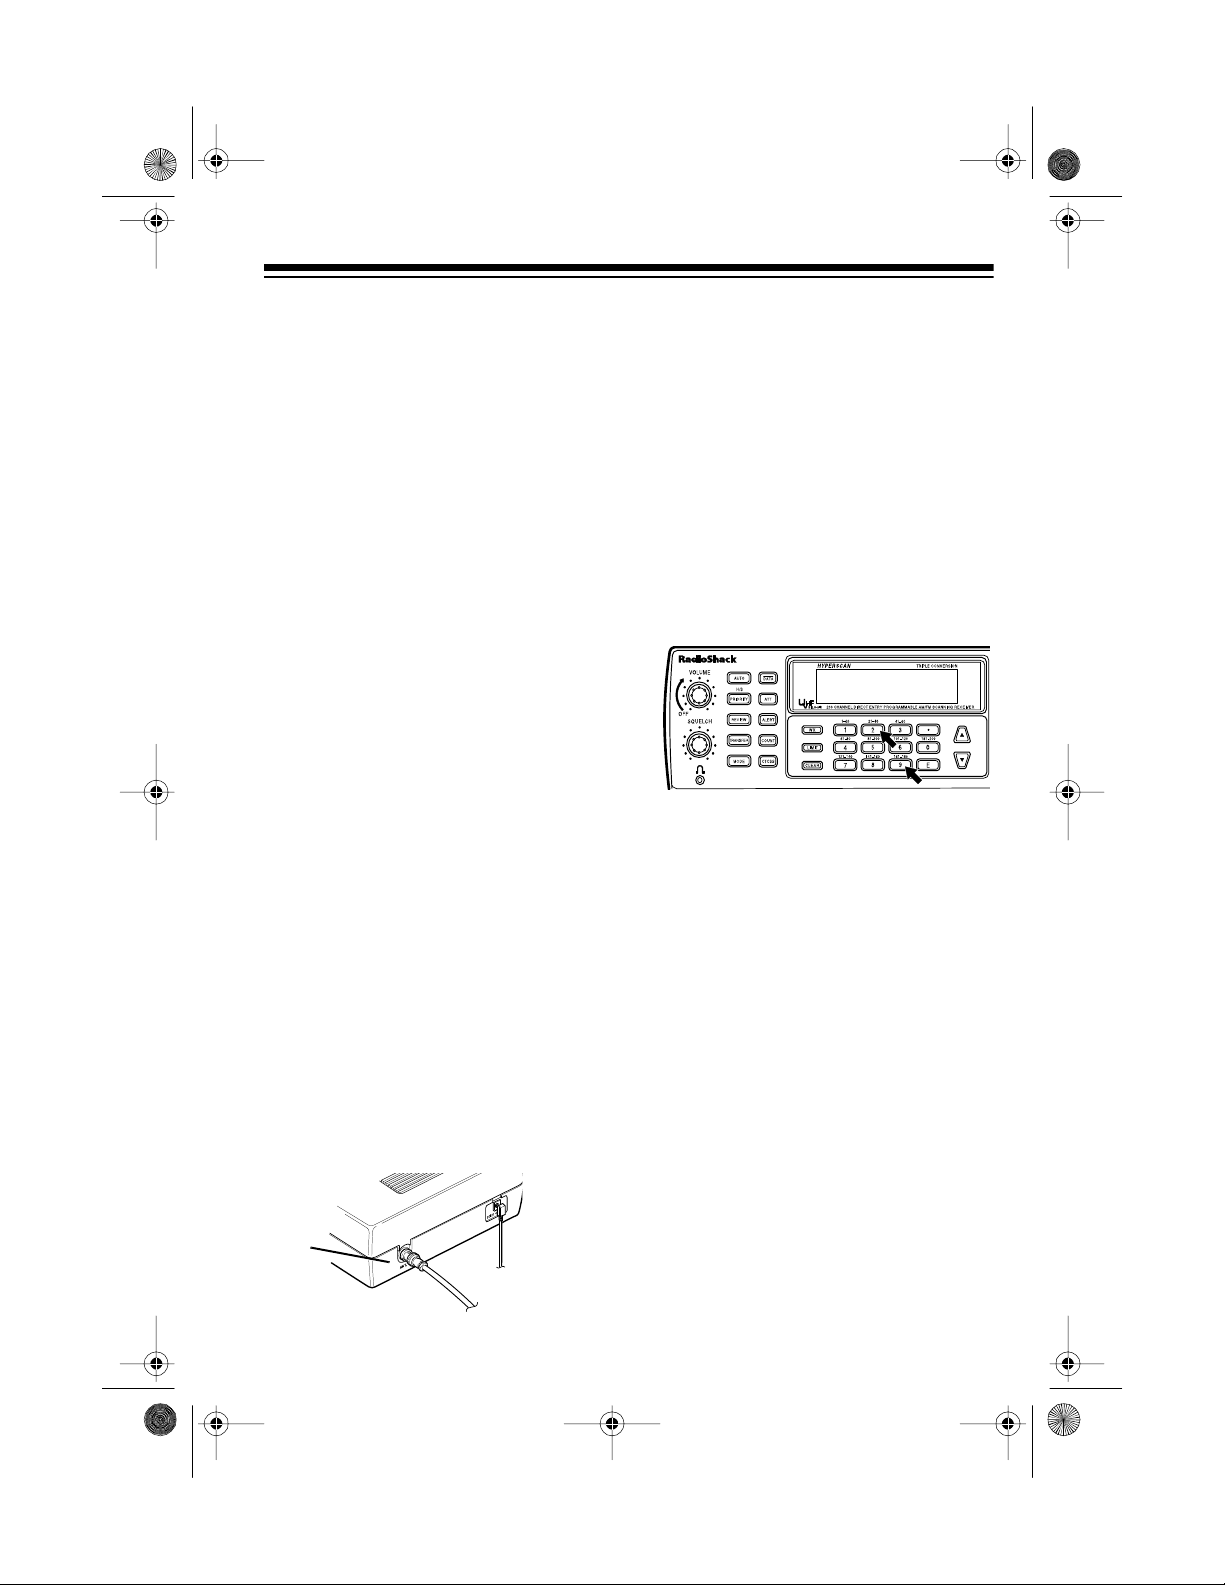
CONNECTING POWER
You can power your scanner from a
standard AC outlet using t he supplied
AC adapter or from your vehicle’s battery using an optional DC power cord.
If a power failure occurs or if the power cord is disconnected, the scanner’s
memory backup circuit keeps inform ation in memory for up to 3 days.
The memory backup circuit be-
Note:
gins to protect memory within a few
minutes after you plug in the scanner.
Using Standard AC Power
Warning:
with an extension cord unless the
blades can be fully inserted.
Cautions:
• The supplied AC adapter supplies
• Connect the adapter to the scan-
• If you have difficulty inserting the
Do not use the AC adapt er
12 volts and delivers 500 milliamps. Its center tip is set to positive, and its plug properly fits the
scanner’s
AC adapter that does not meet
these specifications could damage the scanner or the adapter.
ner before you connect it to an AC
outlet. Disconnect the adapter
from the AC outlet before you disconnect it from the scanner.
AC adapter’s plug, do not force it.
Turn it over and reinsert it.
DC 12V
jack. Using an
Follow these steps to use AC power.
DC 12V
1. Insert the supplied AC adapter’s
barrel plug into the scanner’s
12V
jack.
2. Plug the adapter ’s power module
into a standard AC outlet.
DC
Using Vehicle Battery Power
Use a DC power cord (not supplied),
such as RadioShack Cat. No. 2701533, to power your scanner in your
vehicle.
Cautions:
• The DC power cord you select
must supply 12 volts and deliver
at least 500 mA. Its center tip
must be positive, and its plug
must fit the scanner’s
The recommended power cord
meets these specifications. Using
a power cord that does not m eet
these specifications could damage the scanner or power cord.
• Connect the power cord to the
scanner before you plug it into
your vehicle. Disconnect the
power cord from the vehicle
before you disconnect it from the
scanner.
DC 12V
jack.
7
Page 8

20-418 .fm Page 8 Wednesday, Au gust 4, 1999 12 :42 PM
• If you use your scanner in your
vehicle with the engine running,
you might hear electrical noise
from the scanner. This is normal.
Note: Mobile use of this scanner is
unlawful or requires a perm it in some
areas. Check the laws in your area.
Follow these steps to use vehicle battery power.
DC 12V
1. Insert the DC power cord’s barrel
plug into the scanner’s
jack.
2. Plug the DC power cord’s cigarette-lighter plug into your vehicle’s cigarette-lighter socket.
DC 12V
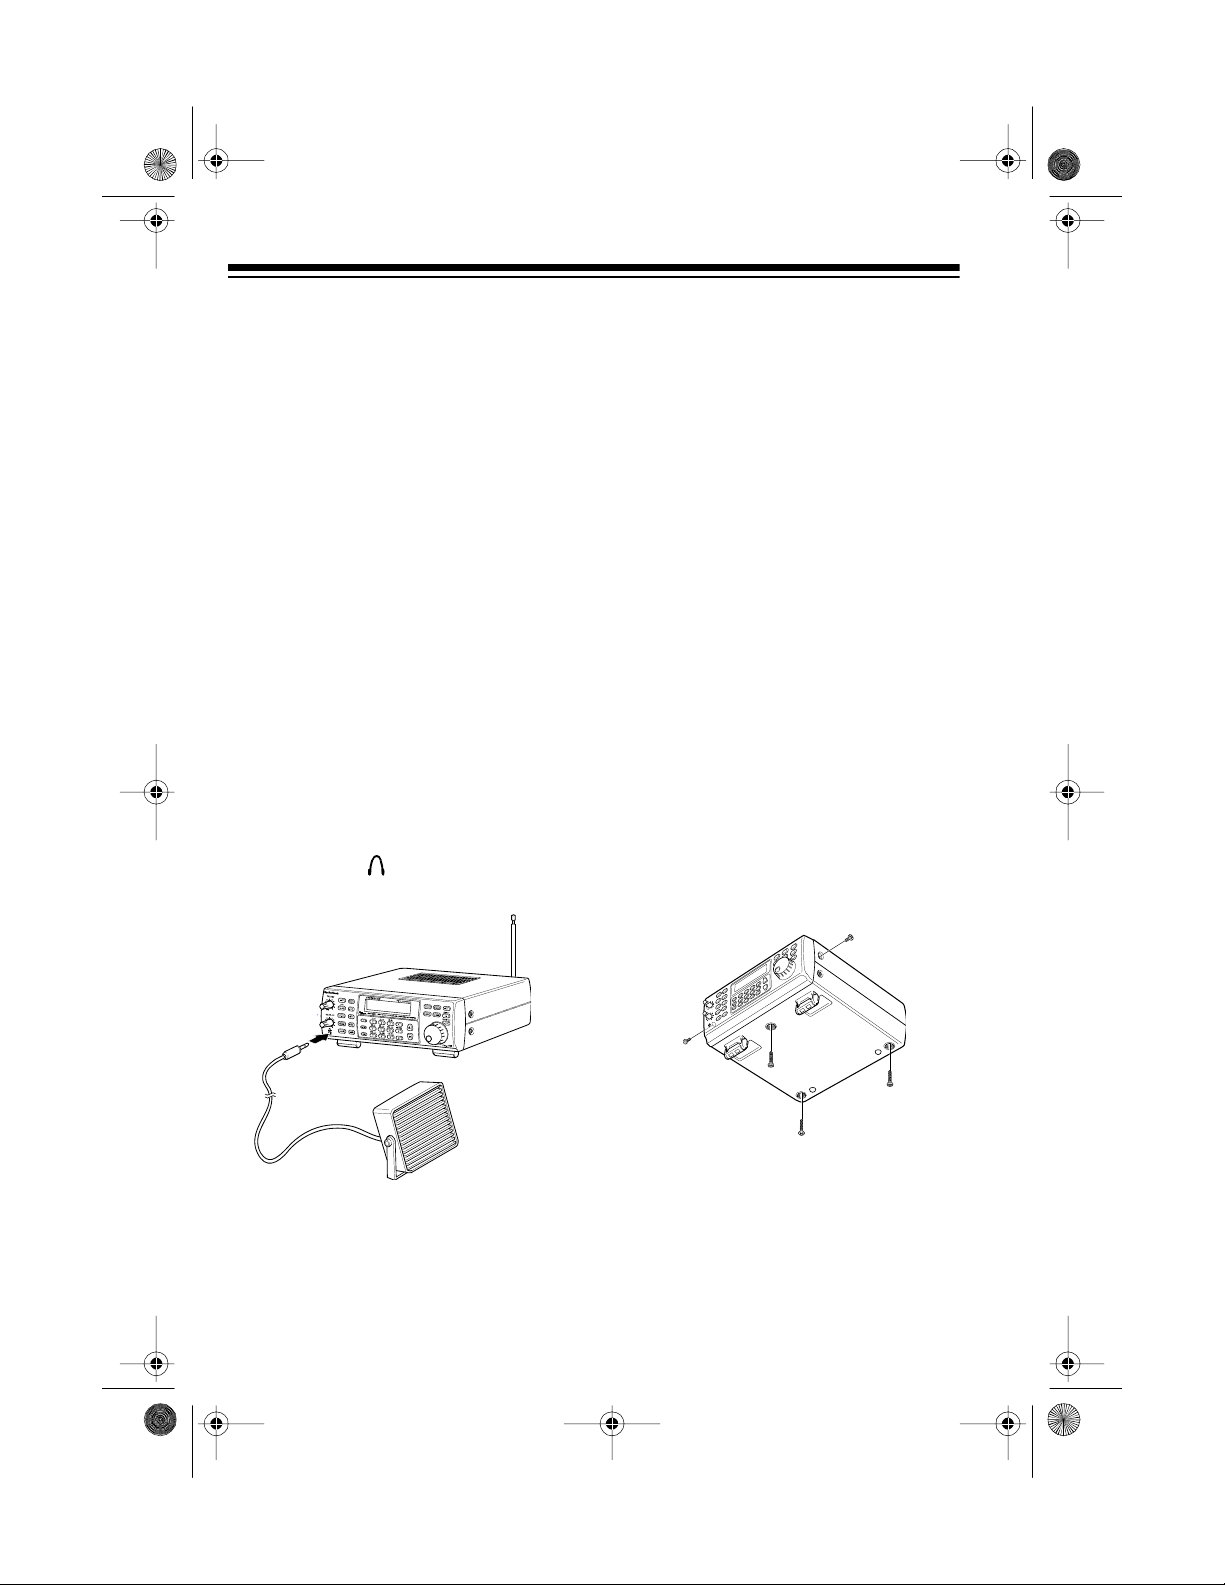
CONNECTING AN
ANTENNA
You can connect either the supplied
telescoping antenna or an optional antenna to your scanner.
Telescoping Antenna
ANT
1. Hold the antenna so it stands
straight up.
2. Gently push the antenna’s plug
ANT
onto the
ner’s back panel.
The antenna’s length affects reception. Adjust the antenna’s length as
follows for the best results.
29–150 MHz Extend fully
150–174 MHz Extend only 3 seg-
216–406 MHz Extend only 2 seg-
406–1000 MHz Collapse Fully (only
jack on the scan-
ments
ments
1 segment extended)
Optional Outdoor Antenna
The supplied anten na is usually good
for strong, local signals. However, for
the best results in receiving weaker,
more distant signals on all bands, you
can attach an optional outdoor antenna (not supplied), such as a mobile,
telescoping, multi-band, or outdoor
base antenna.
The supplied telescoping antenna
helps your scanner receive st rong local signals. Follow these steps to install the supplied antenna.
8
Warning: When installing or removing
an outdoor antenna, follow all cautions
and warnings included with the antenna.
Page 9
20-418 .fm Page 9 Wednesday, Au gust 4, 1999 12 :42 PM
Note: Always use 50-ohm coaxial cable to connect an outdoor ant enna to
your scanner. For lengths under 50
feet, use RG-58 or RG-8/M coaxial cable. For lengths over 50 feet, use RG8, low-loss coaxial cable. If the coaxial
cable’s connector does not fit the
jack, you might also need an adapter.
Your local RadioShack store sells a
complete line of outdoor antennas,
adapters, BNC connectors, and
mounting hardware.
For the best performance, consider
the following when deciding on an outdoor antenna and its location:
• The location of the external
antenna should be as high as possible.
• The external antenna and
antenna cable should be as far
away as possible from sources of
electrical noise (appliances, other
radios, and so on).
ANT
RESETTING THE
SCANNER
If the scanner’s display locks up or
does not work properly after you connect power or after a power surge, you
might need to reset the scanner.
Caution: This procedure clears all the
information you have programmed
into the scanner. Use this procedure
only when you are sure your scanner
is not working properly.
1. Turn off the scanner.
2. While you press and hold down
and 9, turn on the scanner.
2
• The external antenna should be
vertical.
Mount the antenna following the instructions supplied with the antenna
and its mounting hardware, then route
the antenna cable t o the scanne r and
connect it to the
of the scanner.
ANT
ANT
jack on the back
USING THE FEET
To tilt the display for the best viewing
angle and to provide the best traction,
pull down on the scanner’s feet so
they lock into place.
9
Page 10

20-418 .fm Page 10 Wednesday, A ugust 4, 1999 12:42 PM
TESTING ALERT
OPERATION
For your scanner’s weather alert function to be effective, you must place the
scanner:
• Where it can receive an emergency alert broadcast (see “Testing Alert Reception” on this page)
• Where you can hear its alert tone
(See “Testing the Weather Alert”
on Page 11).
Once you determine a location that
meets these two conditions, leave the
scanner there for the best protection.
Testing Alert Reception
The fact that you get clear voice reception or that the t one sounds when
you test the weather alert does not
guarantee that an emergency alert
broadcast will trigger your scanner’s
alert tone. Also, if you are in a
area, your scanner might be triggered
by a broadcast in one area , but no t be
triggered if you place it somewhere
else (even close by).
To test for actual reception, yo ur radio
must receive a test or emergency alert
broadcast. The National Weather Service (NWS) broadcasts a te st a lert every week on Wednesday between 11
AM and 12 Noon. To find out the specific test schedule in your area, contact your local National Oceanic and
Atmospheric Administration (NOAA)
or National Weather Service office.
fringe
These offices are usually listed in the
telephone book under “US Government, Department of Commerce.”
To verify that your scanner receives
the test alert properly, set the scanner
to the weather alert standby mode
(see “Using the Weather Alert Sta ndby Mode” o n Page 25) duri ng the time
when the test alert is broadcast in your
area.
If the test alert broadcast does not trigger your scanner’s tone, you are out of
range of the broadcast.
Note:
weather alert feature when you travel,
you cannot guarantee that an emergency alert broadcast will trigger the
scanner in all areas.
Notes for Weather Alerts:
If you use your scanner’s
• To ensure your scanner will sound
the alert tone when it receives an
emergency signal, keep the
antenna fully extended at all
times.
• If severe weather threatens, do
not wait for an alert tone; turn on
your scanner and monitor the latest weather information.
10
Page 11
20-418 .fm Page 11 Wednesday, A ugust 4, 1999 12:42 PM
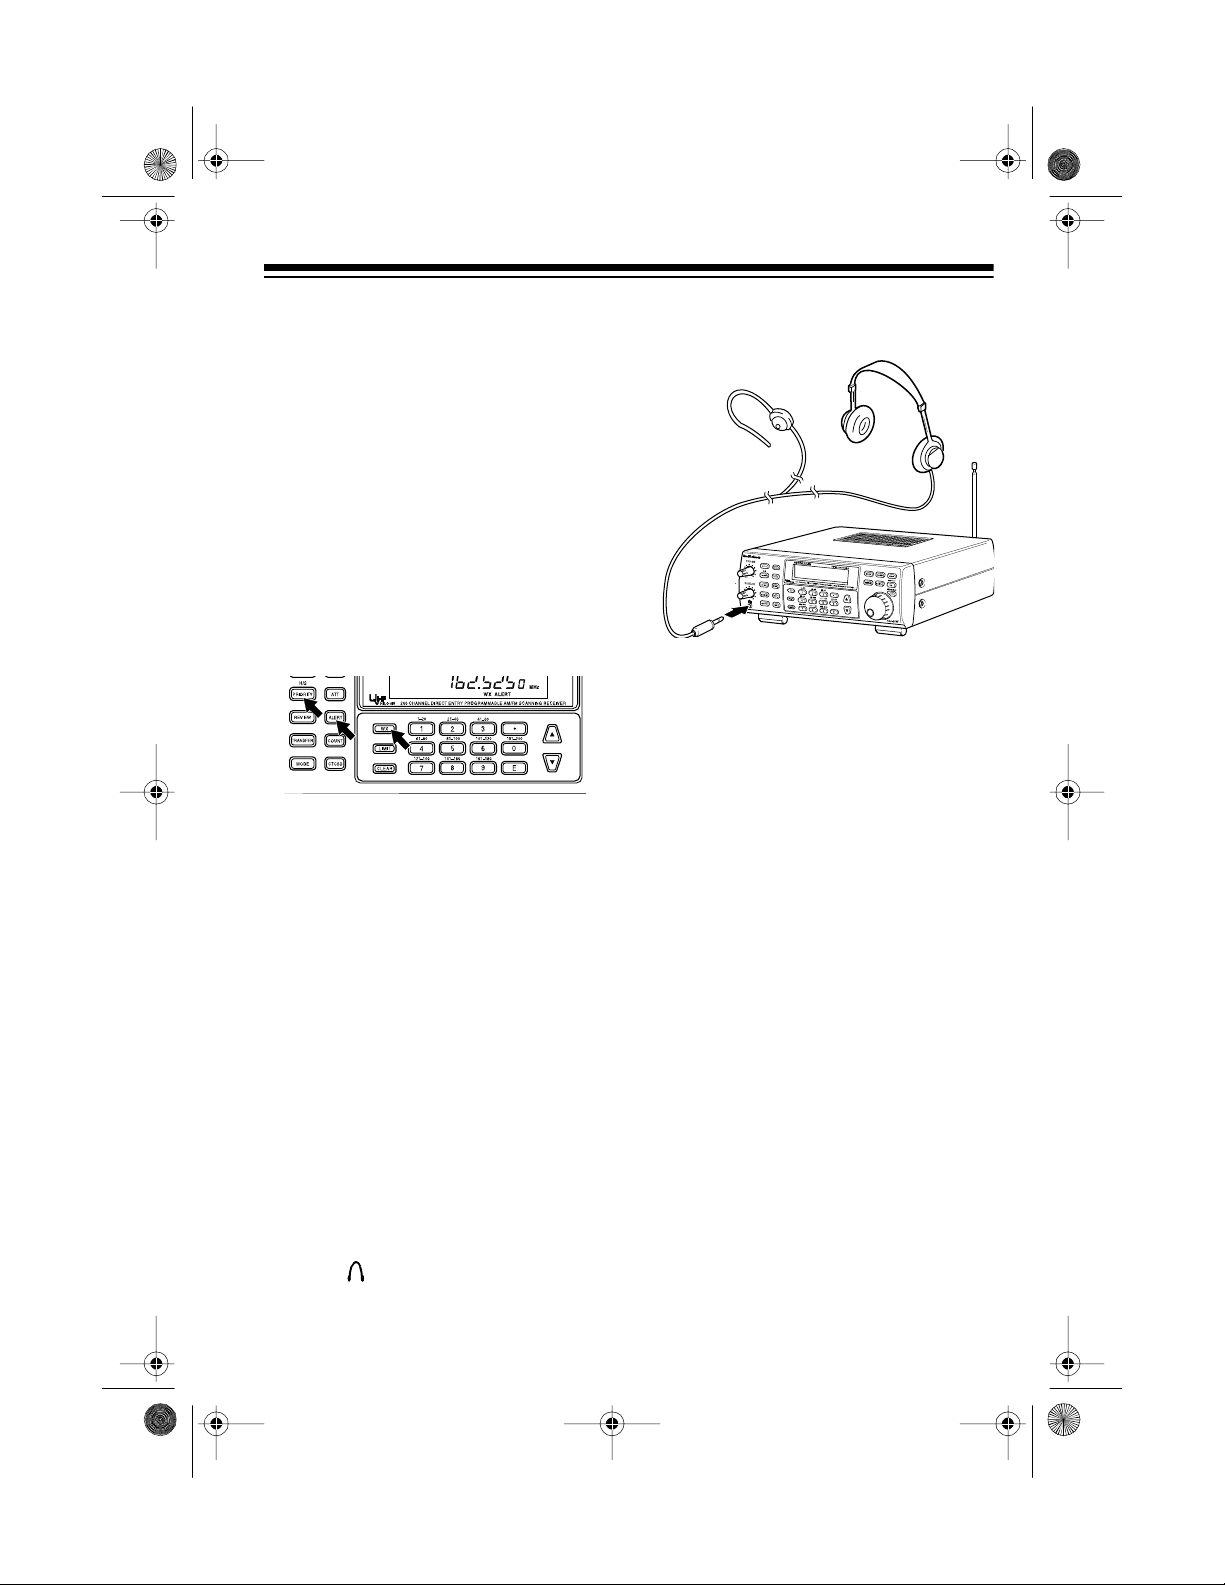
Testing the Weather Alert
Follow these steps to test the weather
alert — to hear how it sounds and e nsure that the circuitry is working.
Note:
your scanner will sound an alert when
the weather service transmits an
emergency signal (see “Weather
Alert” on Page 25). Proper operation
is affected by the strength of the
weather service’s signal.
This test does not ensure that
1. Press
2. When the scanner stops on a
3. Press and hold
WX
.
weather channel, press
ALERT
than 2 seconds until the scanner
sounds a loud alarm.
appears on the display.
PRIORITY
ALERT
for more
scanner. This disconne cts the interna l
speaker.
Your local RadioShack store
Note:
has a wide selection of earphones and
headphones.
Listening Safely
To protect your hearing, follow these
guidelines when you use an earpho ne
or headphone.
.
• Do not listen at extremely high
volume levels. Extended high-volume listening can lead to permanent hearing loss.
To turn off the alarm, press
WX
.
ALERT
or
CONNECTING AN
EARPHONE
For private listening, plug an earphone
or mono headphones’
into the jack on the front of the
1
/8-inch plug
• Set the volume to the lowest setting before you begin listening.
After you begin listening, adjust
the volume to a comfortable level.
• Once you set the volume, do not
increase it. Over time, your ears
adapt to the volume level, so a
volume level that does not cause
discomfort might still damage your
hearing.
11
Page 12
20-418 .fm Page 12 Wednesday, A ugust 4, 1999 12:42 PM
Traffic Safety
Do not wear an earphone or headphones while operating a mo tor vehicle. This can create a traffic hazard
and can be illegal in some areas.
Even though some earphones and
headphones let you hear some outside sounds when listening a t normal
volume levels, they still c an present a
traffic hazard.
CONNECTING AN
AMPLIFIED EXTENSION
SPEAKER
In a noisy area, an amplified extension
speaker might provide more comfortable listening. Plug the speaker ca-
1
ble’s
/8-inch (3.5 mm) mini plug into
the scanner’s jack. This disconnects the internal speaker.
INSTALLING AN
OPTIONAL CTCSS
TONE BOARD
The scanner’s CTCSS (Continuous
Tone Control Squelch System) feature
lets you choose to listen only to transmissions that transmit one of 38 standard CTCSS tones. To use CTCSS,
you must install an optional CTCSS
tone board (Cat. No. 20-0031).
Cautions:
• Make sure the scanner i s off and
disconnect the power before you
install a CTCSS tone board.
• Discharge static electricity buildup
by touching a metal object before
you open the scanner.
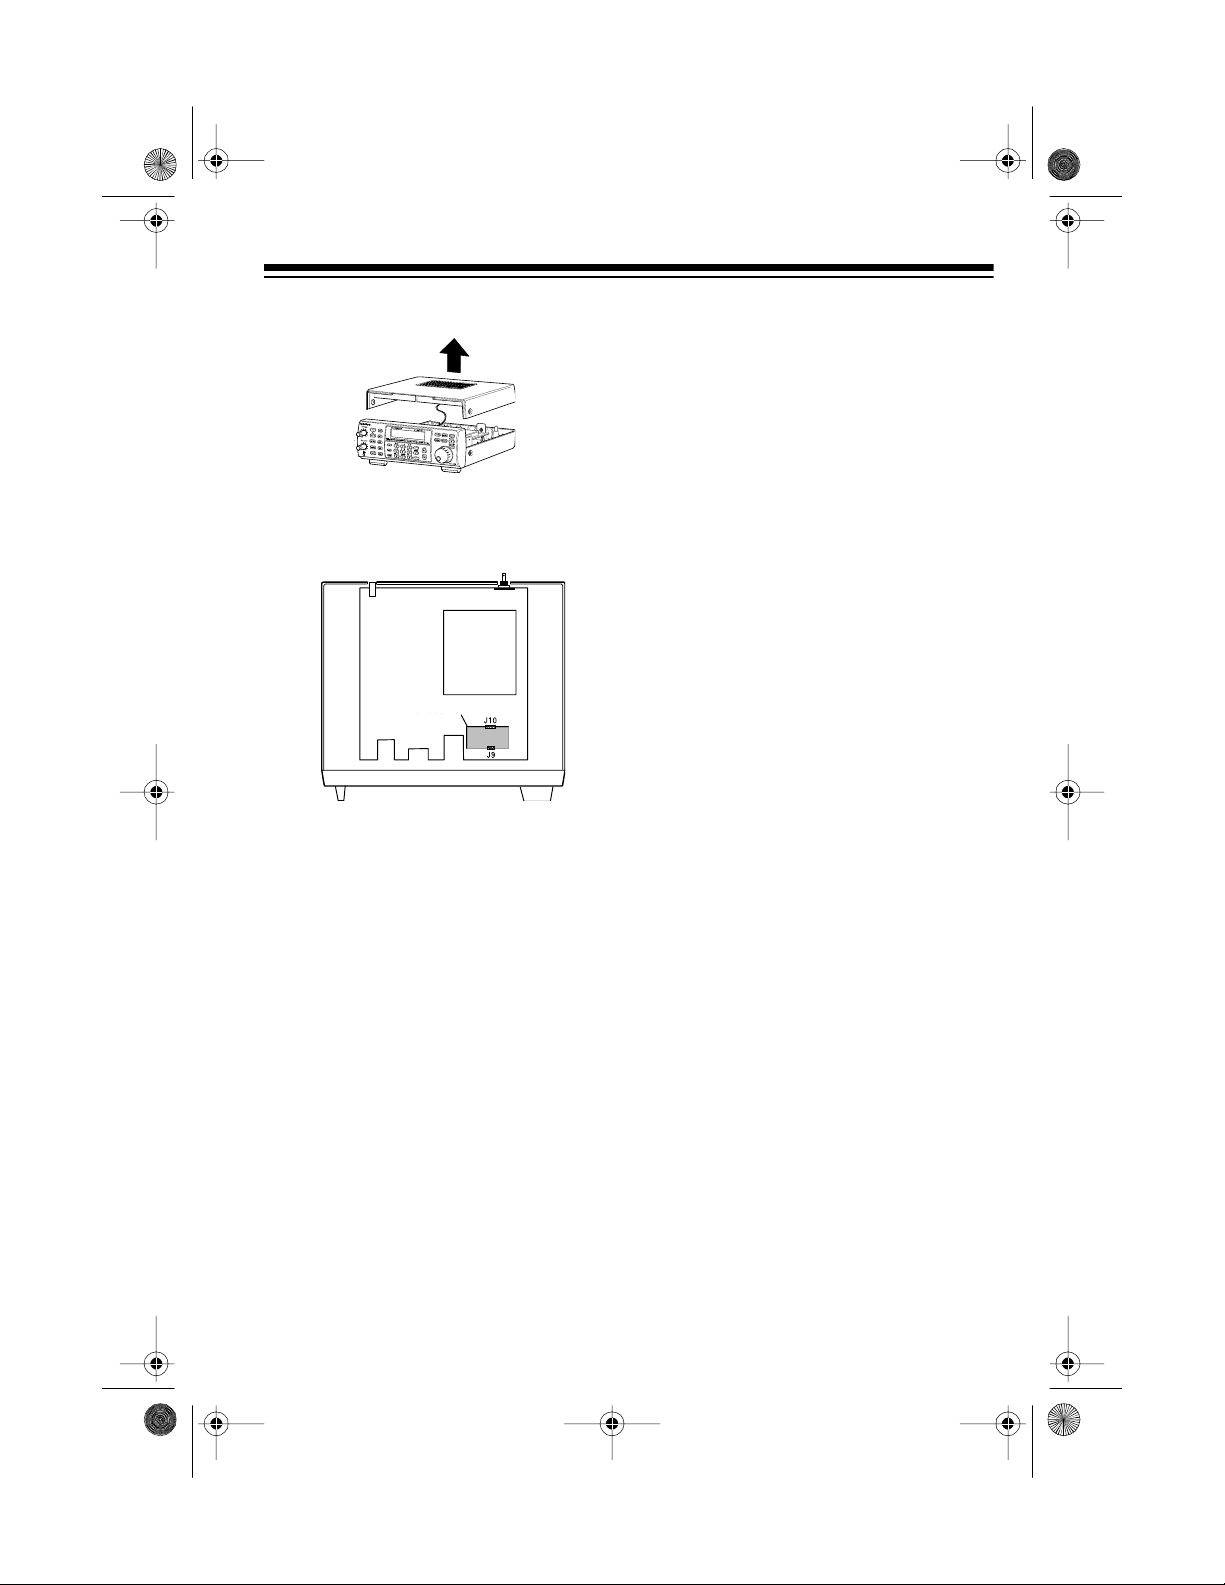
1. Use a Phillips screwdriver to
remove the two side screws on
the scanner ’s top cover and three
screws on the bottom.
RadioShack stores sell an am-
Note:
plified communications extension
speaker.
12
Caution:
is attached to the top cover and
the circuit board. Use care when
you remove the top cover to not
damage the speaker or its connector.
The scanner’s speaker
Page 13
20-418 .fm Page 13 Wednesday, A ugust 4, 1999 12:42 PM
2. Remove the scanner’s top cover .
3. Gently plug the CTCSS board into
sockets
J9
and
J10
on the top of
the scanner’s circuit board.
CTCSS Board
CTCSS BORD
4. Replace the scanner’s top cover,
then replace the two side screws
and three bottom screws.
For information about using
Note:
CTCSS, see “Using CTCSS” on
Page 30.
13
Page 14
20-418 .fm Page 14 Wednesday, A ugust 4, 1999 12:42 PM
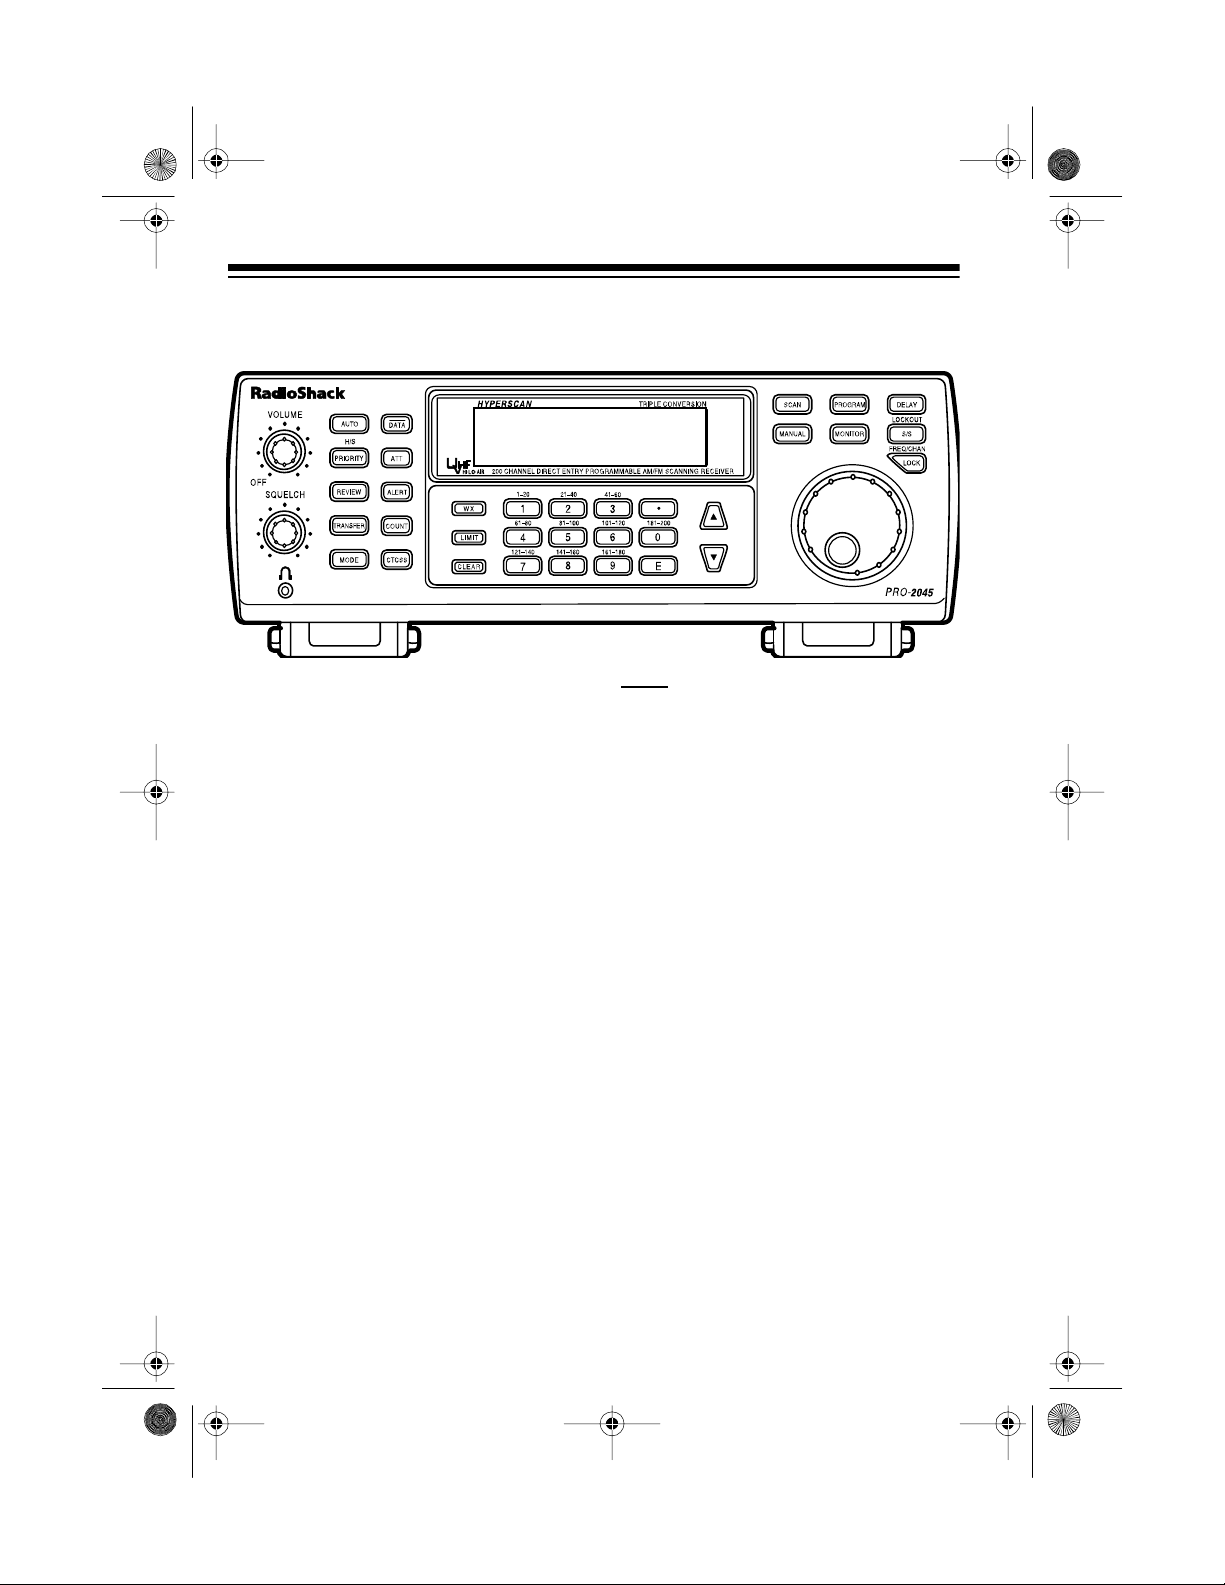
UNDERSTANDING YOUR SCANNER
A LOOK AT THE KEYBOARD
A quick glance at this section should help you understand each key’s function(s).
VOLUME
— rotate to turn the scann er
on or off and adjust the volume.
SQUELCH
— rotate to adjust the
squelch.
AUTO
— lets you automatically program frequencies into bank s; sets the
the scanner to scan banks from the
lowest to the highest frequency.
H/S-PRIORITY
— sets and turns on
and off priority for a particular channel;
turns on and off Hypersearch.
REVIEW
— lets you review locked-out
channels or search skip memory.
TRANSFER
— transfers the contents
of a channel to an empty or desired
channel, or exchanges the con tents of
two channels.
MODE
— selects the modulation mode
(AM and FM) function.
DATA
— turns on or off data skip.
ATT
— turns on or off the attenuator to
let you limit reception to strong, local
transmitters.
ALERT
— sets the scanner to the
weather alert mode.
COUNT
— sets the scanner to di splay
the number of times the scanner detected a transmission on a channel
since you turned the scanner on.
CTCSS
— lets you use the optional
CTCSS mode if you installed a
CTCSS tone board.
WX
— starts scanning the weather fre-
quencies.
LIMIT
— starts a limit search.
CLEAR
— clears an incorrect entry.
14
Page 15

20-418 .fm Page 15 Wednesday, A ugust 4, 1999 12:42 PM
Number Keys — each key has a single digit with a range of numbers printed above it. The single d igits are us ed
to enter the number of a channel or
frequency. The range of numbers (21–
40, for example) indicates the channels that make up a memory bank.
See “Understanding Channel-Storage
Banks” on Page 17.
• — enters a decimal point when you
set a frequency.
E —
enters the frequency when you
program channels.
and
s
SCAN
— select the search directi on.
t
— scans through programmed
channels.
MANUAL
— stops scanning and lets
you directly enter a channel number.
PROGRAM
— programs frequencies
into channels.
DELAY
— programs a 2-second de lay
for the selected channel and turns on
or off the delay during a limit or direct
search or weather scan.
LOCKOUT-S/S
— lets you lock out a
selected channel, or skip a specified
frequency during a limit or direct
search.
FREQ/CHAN-LOCK
— selects the rotary tuner’s mode — frequency tuning,
channel tuning, or locked.
Rotary Tuner — turn to t une through
channels or frequencie s. Turn the rotary tuner faster to increase the t uni ng
speed.
MONITOR —
accesses the 10 monitor
memories. See “Moving a Frequency
from a Monitor Mem ory to a C hannel”
on Page 23.
15
Page 16

20-418 .fm Page 16 Wednesday, A ugust 4, 1999 12:42 PM
A LOOK AT THE DISPLAY
The display has several indicators that show the scanner’s current operating mode.
A good look at the display will help you understand how your scanner operates.
MON
— appears during a search or
when you listen to a monitor memory.
The number to the right of this shows
the current monitor memory number.
See “Listening to Monitor Memories”
on Page 23.
FREQ, CH AN, LOCK
rotary tuner’s current setting.
BANK
— shows which channelstorage banks are turned on. See “Understanding Channel-Storage Banks”
on Page 17.
HYPER
channels or when the scanner is in the
Hypersearch mode during limit
search, direct search, and auto store.
AUTO
in the auto store mode or when the
auto sort function is turned on.
COUNT
scanner’s count feature.
CTCSS
feature is turned on.
DATA
the data skip feature.
— appears when you scan
— appears when the scanner is
— appears when you u se the
— appears when the CTCSS
— appears when you turn on
— shows the
FM/AM
tion mode; flashes when you override
the default mode.
P
ority channel.
CH
show which of the 200 channels the
scanner is tuned to.
ATT
is turned on.
MHz
this indicator show which frequency
the scanner is tuned to.
SCAN
channels.
MAN
select a channel.
PGM
frequencies into the scanner’s channels.
PRI
scanner to scan the selected priority
channels every 2 seconds.
— shows the current modula-
— appears when you listen to a pri-
— digits that precede this indicator
— appears wh en the attenuator
— the large digits that precede
— appears when you scan
— appears when you manually
— appears while you program
— appears when you set the
16
Page 17

20-418 .fm Page 17 Wednesday, A ugust 4, 1999 12:42 PM
L/O
— appears when you manually
select a locked channe l or a skipped
frequency.
DLY
— appears w hen you program a
channel for a 2-second delay or when
you listen to a c hannel that has been
programmed with the delay feature.
Also, the indicator appears when you
turn on the delay feat ure during a limit
or direct search or weather scan.
WX
— appears when the scanner is
searching the weather band frequencies.
ALERT
is set to respond to a weather alert
tone.
s and t — indicate the search direction.
— appears when the sc anner
Channel-Storage Banks
To make it easier to identify and select
the channels you want to listen to,
channels are divided into 10 channelstorage banks of 20 channels each.
Use each channel-storage bank to
group frequencies, such as the police
department, the fire department, ambulance services, or aircraft (see
“Guide to the Action Bands” on
Page 34).
For example, the police department
might use four frequencies, one for
each side of town. You could program
the police frequencies starting with
Channel 1 (the first channel in Bank 1)
and then program fire department frequencies starting with Channel 21 (the
first channel in Bank 2).
SEARCH
search (
quency search (
weather frequency search, auto sto re
mode, hold direct search (
appears), and hold limit s earch (
also appears).
— appears during a limit
-L-
also appears), direct fre-
-d-
also appears),
-h-
also
-H-
UNDERSTANDING
CHANNEL-STORAGE
BANKS
You can store up to 210 frequencies
into your scanner’s memory. You
store each frequency into either a
memory called a channel, or a temporary memory called a monitor. This
scanner has 200 channel memories
and 10 monitor memories.
MONITOR MEMORIES
The scanner also has 10 monitor
memories. You can use these mem ories to temporarily store frequencies
while you decide whether or not to
save them into channels. This is
handy for quickly storing an active frequency when you search through an
entire band. See “Searching For and
Temporarily Storing Active Frequencies” on Page 19.
17
Page 18

20-418 .fm Page 18 Wednesday, A ugust 4, 1999 12:42 PM
OPERATION
TURNING ON THE
SCANNER/SETTING
VOLUME AND SQUELCH
1. Rotate
to turn on the scanner.
2. Rotate
clockwise.
3. Slowly turn
until the hissing stops.
Note:
tion, turn
You might hear hissing, but you will
not miss any transmissions. If you turn
SQUELCH
the scanner does not search or scan.
VOLUME
SQUELCH
To hear a weak or distant sta-
SQUELCH
too far counterclockwise,
1/4 turn clockwise
fully counter-
SQUELCH
counterclockwise.
clockwise
USING THE ROTARY
CONTROL
The rotary control has three modes
that you select using the
LOCK
button. To select the control’s
mode, repeatedly press
LOCK
until the scanner displays the
desired mode.
FREQ
— the rotary control steps
through frequencies during a search.
CHAN
— the rotary control steps
through the programmed channels.
LOCK
— the rotary control does not
operate. Use this setting to h elp prevent accidentally changing the channel or frequency.
FREQ/CHAN-
FREQ/CHAN-
STORING FREQUENCIES
You can store up to 200 frequencies
into your scanner’s channels. Good
frequency references are RadioShack’s “Police Call Guide including Fire and Emergency Services,”
“Official Aeronautical Frequency Directory,” and “Maritime Frequency Directory.” These directories are
updated every year, so be sure to get
a current copy.
If you do not have a frequency reference for your area, you can use a limit
or direct search to find transmissions.
See “Searching For and Temporarily
Storing Active Frequencies” on
Page 19 or “Guide to the Action
Bands” on Page 34.
Follow these steps to manually store
frequencies.
1. Press
on the display.
2. Enter the number for the channel
where you want to store a frequency.
Note:
number using any of the following
methods:
• Use the number keys to enter
•Press
PROGRAM
You can enter the channel
the channel number, then press
PROGRAM
the channel number one step at
a time.
.
PROGRAM
PGM
.
appears
to increment
18
Page 19

20-418 .fm Page 19 Wednesday, A ugust 4, 1999 12:42 PM
•Press
the
Turn the rotary tuner to select
the desired channel.
3. Enter a frequency (including the
decimal point).
4. Press
Notes:
• If you made a mistake in Step
3, the scanner displays
and beeps three times. Press
CLEAR
from Step 3.
• Your scanner rounds frequen-
cies down to the next valid frequency. For example, if you
enter 151.473, the scanner
accepts this as 151.470.
5. Repeat Steps 2-4 to program
more channels.
FREQ/CHAN-LOCK
CHAN
indicator appears.
E
to store the frequency.
, then proceed again
until
Error
SEARCHING FOR AND
T EMPORARILY STORING
ACTIVE FREQUENCIES
You can search for freque ncies using
a limit or direct search, then temporarily store frequencies into monitor
memories.
Limit Search
A limit search lets you search for active transmissions within a specified
range of frequencies.
You can use the scanner’s de-
Note:
lay feature during a limit search (see
“Delay” on Page 26).
Follow these steps to search for active
frequencies.
1. Press
2. Using the number keys, enter the
3. Press
4. Using the number keys or the
5. Press
PROGRAM
and a frequency appear on the
display.
lowest frequency (including the
decimal point) you want to search,
then press
Notes:
• To use the rotary tuner to enter
the frequency, turn it clockwise
or counterclockwise until the
desired frequency appears,
then press
• If you enter an invalid frequency, the scanner displays
Error
repeat the step.
appear on the display.
rotary tuner, enter the highest frequency you want to search, then
press
lower to the upper limit, or press
to search down from the upper to
the lower limit.
and s or t appear, and the next
available monitor memory flashes
on the display.
. To correct this, simply
LIMIT
E
.
to search up from the
s
, then
E
.
E
.
. Hi and a frequency
–L–, SEARCH
LIMIT
Lo
.
t
,
19
Page 20

20-418 .fm Page 20 Wednesday, A ugust 4, 1999 12:42 PM
6. When the scanner finds a transmission, you can:
• Store the displayed frequency
into the current monitor memory
— quickly press
MONITOR
.
• Lock out the frequency so the
scanner does not stop on it
S/S
again — press
. The scan-
ner resumes searching.
• Continue the search without
storing it or locking it out —
s
or t.
press
• Hold the scanner on the fre-
LIMIT
quency — press
or turn
the rotary tuner either way one
-H-
click.
appears.
Notes:
or
• You can press
scanner displays
s
t
-H-
while the
to step
through the frequencies toward
the upper or lower limits.
Direct Search
A direct search lets you specify a
starting frequency, t hen search for active transmissions above or below the
specified frequency.
Note:
during a direct search (see “Delay”).
You can use the de lay feature
1. Press
MANUAL
.
2. Using the number keys, enter the
frequency (including the decimal
point) you want to start the search
from; or, enter the channel number containing the starting frequency and press
PROGRAM
3. Press
to select the channel.
to search up or
s
MANUAL
to search
t
or
down starting from the specified
frequency.
-d-, SEARCH
, and s
or t appear, and the next available
monitor memory flashes.
• If you tune to a searc h skip f requency, the scanner displays
L/O
(see “Search Skip” on
Page 21).
• If you program all frequencies
within a limit search range as
search skip frequencies, the
scanner goes to the hold mo de.
-H-
appears on the display.
• During the limit search, you can
change the modulation (NFM or
AM). See “Changing the Modulation Mode” on Page 28.
LIMIT
Press
hold
s
again or press and
or
for more than 1 second
t
to resume the lim it search.
20
If you enter an invalid fre-
Note:
quency,
Error
appears on the
display. To correct this, repeat
Steps 2 and 3.
4. When the scanner finds an active
frequency, you can do one of the
followin g:
• Store the frequency into the
current monitor memory —
quickly press
MONITOR
.
• Lock out the frequency so the
scanner does not stop on it
S/S
again — press
. The scan-
ner resumes searching.
Page 21

20-418 .fm Page 21 Wednesday, A ugust 4, 1999 12:42 PM
• Continue the search — press
or t.
• Hold the scanner on the frequency — press
LIMIT
the rotary tuner either way one
-h-
click.
appears.
Notes:
or
• You can press
s
during the
t
hold to step through the frequencies toward the upper or
lower limit s .
• If you tune to a searc h skip f requency, the scanner displays
L/O
(see “Search Skip” on
Page 21).
• During the direct search, you
can change the modulation
mode (NFM or AM). See
“Changing the Modulation
Mode” on Page 28.
LIMIT
Press
hold
s
again or press and
or
for more than 1 second
t
to resume the direct search.
Search Skip
or turn
s
• You can select the skipped frequency when the scanner is in the
hold mode. The scanner displays
L/O
when you select a skipped
frequency.
To skip a frequency, press
S/S
when
the scanner stops on the frequency
during a limit or direct search.
Follow these steps to see which skip
frequencies you have stored.
1. During a limit or direct search,
REVIEW
press
. The first skip fre-
quency appears on the display.
2. Use
s, t
, or
to review the
REVIEW
other skip frequencies.
To remove a skip frequency, select
the skip frequency you want to clear
by using
S
.
s, t
, or
REVIEW
, then press
S/
To clear all the skip frequencies at
once, while searching for fre quencies,
press and hold
S/S
until the scanner
beeps twice.
You can skip specified frequencies
during a limit or direct search. This lets
you avoid frequencies that have data
tones or are already st ored in a channel. You can program up to 50 frequencies for the scanner to skip.
Notes:
• If you program more than 50 skip
frequencies, each new frequency
replaces one you already stored.
21
Page 22

20-418 .fm Page 22 Wednesday, A ugust 4, 1999 12:42 PM
AUTOMATICALLY
STORING FREQUENCIES
You can have your scanner automatically store active frequencies into
empty channels within the banks you
specify.
1. Press
PROGRAM
then
and the lower limit frequency
appears.
2. Enter the lower limit using the
number keys or use the rotary
tuner to enter the lower limit of the
frequency range you want to
search, then press
Note:
If you enter an invalid frequency in Step 2 or 4, the scanner
displays
Error
. Simply repeat
the step.
LIMIT
3. Press
. Hi appears.
4. Enter the upper limit using the
number keys or use the rotary
tuner to enter the upper limit of the
frequency range you want to
search, then press
5. Press
AUTO
AUTO
.
the numbers 1–10 flash on the
display.
LIMIT
.
E
.
E
;.
appears and
Lo
Notes:
0
• To se lect bank 10, press
.
• If you select a bank that does
not contain an empty channel,
the scanner beeps and
FULL
appears.
• To d eselect t he bank, press the
bank number again.
7. Press
to the upper limit, or
to search from the lower
s
to search
t
from the upper to lower limi t. The
current bank’s indicator starts
blinking. The current channel also
appears.
When the scanner finds a transmission, it checks to see if the f requency is stored in any other
channel. If not, the sc anner st ores
the frequency, then continues
searching for more transmissions.
8. To stop sto ring frequencies, press
MANUAL
.
When all channels fill, the scanner
beeps twice and
MANUAL
to display the channel where
End
appears. Press
the last frequency was stored.
6. Using the number keys, enter the
numbers of the banks where you
want to store frequencies. The
selected banks’ indicators appear
steadily in the display. All other
banks’ indicators flash.
22
Page 23

20-418 .fm Page 23 Wednesday, A ugust 4, 1999 12:42 PM
LISTENING TO MONITOR
MEMORIES
Once you store frequencies i nto moni tor memories using a direct or limit
search or weather scan, you can listen
to a monitor memory by pressing
MANUAL, MONITOR
number for the monitor memory you
want to listen to.
Note:
To listen to the mo nitor memories, the priority channel feature must
be turned off.
, and then the
MOVING A FREQUENCY
FROM A MONITOR
MEMORY TO
A CHANNEL
1. Press
2. Enter the channel number where
3. Press
4. Press
PROGRAM
you want to store the frequency,
then press
appears on the display.
MONITOR
keys or turn the rotary tuner to
select the monitor m em ory’s num ber. The channel number flashes
and the frequency appears.
E
. The scanner stores the
frequency into the selected channel.
.
PROGRAM
. Use the number
.
PGM
SCANNING CHANNELS
To begin scanning channels, press
SCAN
. The scanner scans through all
non-locked channels in the activated
banks. (See “Turning Channel-Storage Banks On and Off” below and
“Locking Out Channels” on Page 25.)
Note:
If the scanner does not scan, be
sure you have set
Turning Channel-Storage
Banks On and Off
You can turn each channel-storage
bank on and off. When you turn off a
bank, the scanner does not scan any
of the 20 channels in that bank.
While scanning, press the number key
corresponding to the bank you want to
turn on or off. If the memory bank
number at the top of the display is on,
the bank is tu rned on and the s canner
scans all channels within that bank
that are not locked out . If the number
is off, the scann er does not scan any
of the channels within that bank.
Notes:
• You can manually select any
channel in a bank, even if the
bank is turned off.
• There must be at least o ne active
bank. You cannot turn off all
banks.
SQUELCH
correctly.
23
Page 24

20-418 .fm Page 24 Wednesday, A ugust 4, 1999 12:42 PM
Locking Out Channels
You can increase the effective scanning speed by locking out channels
that have a continuous transmission,
such as a weather channel.
You can manually select the
Note:
channels you have locked out.
To lock out a channel, manually select
REVIEW
L/O
LOCKOUT
when there
disappears
so
the channel, then press
L/O
appears on the display.
To review the locked-out channels,
manually select the first channel you
want to review. Then repeatedly press
REVIEW
to see the locked-out chan-
nels in sequence.
If you press
Note:
is no locked-out channel, the scanner
sounds an error tone.
To remove the lock-out from a channel, manually select the channel , then
LOCKOUT
press
so
from the display.
Follow these steps to unlock all chan-
nels in the selected banks.
MANUALLY SELECTING
A CHANNEL
You can continuously monitor a specific channel without scanning. This is
useful if you hear an emergency
broadcast on a channel and do not
want to miss any details (even t hough
there might be periods of silence) or if
you want to monitor a specific channel.
If your scanner is scanning an d stops
at the desired channel, press
one time. Pressing
MANUAL
times causes your scanner to step
through the channels.
To manually select a channel, press
MANUAL
or turn the rotary tuner either
way one click. Then enter the channel
number using either of the following
methods:
• Enter the channel number, then
MANUAL
press
•Press
FREQ/CHAN-LOCK
scanner displays
again.
CHAN
the rotary tuner until the desired
channel number appears.
MANUAL
additional
until the
, then turn
1. Select the banks while the scanner is scanning.
2. Press
MANUAL
3. Press and hold
to stop scanning.
LOCKOUT
until the
scanner beeps twice.
24
Page 25

20-418 .fm Page 25 Wednesday, A ugust 4, 1999 12:42 PM
SCANNING THE
WEATHER BAND
The FCC (Federal Communications
Commission) has allocated 11 channels for use by the National Oceanic
and Atmospheric Administration
(NOAA).
Your scanner is preprogramm ed with
the following seven frequencies avail able to NOAA.
• 162.400 MHz • 162.450 MHz
• 162.500 MHz • 162.475 MHz
• 162.425 MHz • 162.550 MHz
• 162 .525 M H z
To hear your local forecast and regional weather information, simply
WX
press
Your scanner scans t he we athe r band
and stops on an active broadcast. If a
broadcast is weak, press
continue to scan through the weather
band. To store the current weather
channel in a monitor memory, press
MONITOR
Weather Alert
Your scanner’s weather alert feature
can warn you when your local NOAA
weather station broadcasts a severe
weather emergency signal. (See
“Testing Alert Operation” on Page 10.)
. WX appears on the display.
WX
again to
.
1. Press
2. Press
When NOAA broadcasts a severe
weather emergency signal, the scanner sounds a loud alarm (regardless
of the volume control setting). The
alarm continues until the emergency
signal stops transmitting.
To manually turn off the siren and exit
the weather alert mode, pres s
or WX.
WX
to find the clearest local
weather broadcasting station.
ALERT
ALERT
.
appears.
ALERT
Using the Weather Alert
Standby Mode
When you set the scanner to the
weather alert standby mode, the scanner’s display and speaker turn off until
the scanner receives the severe
weather emergency signal. Whe n the
scanner receives the signal, it sounds
a loud alarm. To set the scanner to the
weather alert standby mode, follow
these steps.
1. Press
2. When the scanner stops on a
To exit the weather alert standby
mode, press
WX
.
ALERT
weather channel, press
2 seconds. The scanner displays
on ALErt
the display turns off and your
scanner is in the weather alert
standby mode.
for 10 seconds, then
ALERT
or WX.
for
25
Page 26

20-418 .fm Page 26 Wednesday, A ugust 4, 1999 12:42 PM
SPECIAL FEATURES
DELAY
Many agencies use a two-way radio
system that might h ave a period of 2
or more seconds between a query and
a reply. To keep from missing a reply
on a specific channel, you can program a 2-second delay into any c hannel, or on frequencies during a
frequency search. The scanner continues to monitor the frequency for 2
seconds after the transmission stops
before resuming scanning.
To program a 2-second delay:
• If the scanner is scanning and
stops on an active channel,
quickly press
tinues scanning again.
• If the desired channel is not
selected, manually select the
channel, then press
• If the scanner is searching, pres s
DELAY
while the scanner is
searching.
display and the scanner autom atically adds a 2-second delay to
every transmission it stops on.
To turn off the 2-second delay, pres s
DELAY
while the scanner is monitoring
the channel or while the scanner is
searching.
display.
DELAY
before it con-
DELAY
DLY
appears on the
DLY
disappears from the
.
PRIORITY
The priority feature lets you scan
through channels and still not miss important or interesting calls on specific
channels. You can program one
stored channel in each bank as a priority channel (up to 10 stored channels). As the scanner scans the
banks, it checks the priority channels
every 2 seconds for activity.
Notes:
• You cannot use the priority and
data skip features at the same
time.
• You cannot use the priority and
count features at the same time.
• You can lock out priority channels.
If you lock out all priority channels,
the display shows
you turn on the priority feature.
• The priority feature must be
turned off to listen to monitor
memories.
• The scanner checks the lowestnumbered priority channels first. If
it detects a transmission on a priority channel, it stays on that
channel and does not check the
other priority channels until the
transmissi on ends.
LOC OUt
when
26
Page 27

20-418 .fm Page 27 Wednesday, A ugust 4, 1999 12:42 PM
The scanner automatically designates each bank’s first channel as that
bank’s priority channel. Follow these
steps to program a different channel
as the priority channel for a bank.
1. Press
2. Use the number keys to enter the
3. Repeat Steps 1-2 fo r each chan-
4. To confirm all priority channel
PROGRAM
channel number you want to pr ogram as the priority channel, then
PRIORITY
press
display to the right of the channel
number.
nel you want to program as a priority channel.
numbers for banks, press
GRAM
then repeatedly press
ORITY
to see the priority channels.
.
. P appears on the
PRO-
PRI-
CHANGING SEARCH
SPEEDS
The PRO-2045 has two search
speeds.
Normal
Search
Speed
To switch between the normal and Hypersearch speeds, during a search or
auto store, press
on the display during a HyperSearch.
Note:
in the 5 kHz-step bands . See “Specified Intervals” on Page 35.
100 steps/
second
H/S
You can use Hypersearch only
Hypersearch
300 steps/
second
HYPER
.
appears
USING THE
PROGRAMMABLE
ATTENUATOR
To turn on the priority feature, press
PRIORITY
pears on the display, and t he scann er
checks the priority channel in all selected banks every 2 seconds, from
the lowest-numbered priority channel
to the highest-numbered priority channel. It stays on the c hannel if there is
activity, and
To turn off the priority feature, press
PRIORITY
during scanning.
P
appears on the display.
PRI
.
disappears.
PRI
ap-
To limit reception to strong local
broadcasts, you can reduce the scanner’s sensitivity by turning on the attenuator.
You can turn the attenuator on or off
for individual channels, or use this
function during a limit, direct, or
weather search.
ATT
AT T
until
27
To turn on the attenuator, press
ATT
until
turn off the attenuator, press
ATT
appears on the display. To
disappears.
Page 28

20-418 .fm Page 28 Wednesday, A ugust 4, 1999 12:42 PM
USING AUTO SORT
You can set the scanner to scan within
each bank from the channel with the
lowest frequency to the channel with
the highest frequency, instead of in
channel number order. This makes
the scanner scan faster.
Follow these steps to turn on auto
sort.
1. Turn off the scanner.
2. Press and hold
on the scanner.
for 3 seconds. During scanning,
AUTO
appears.
To turn off auto sort, repeat these
OFF Sort
steps.
onds.
AUTO
, then turn
on Sort
appears for 3 sec-
appears
SKIPPING DATA
SIGNALS
You can set the scanner to skip nonmodulated or data signals (such as
control signals for pagers or trunked
systems) when searching or scanning.
This feature does not work in
Note:
the AM mode (see “Changing the
Modulation Mode” on Page 28). Also,
the scanner might not skip data signals that have varied patterns of pauses and frequencies.
To skip data signals, press
DATA
appears. To turn off data skip,
press
DATA
until
DATA
DATA
disappears.
until
TURNING ON OR OFF
THE KEY TONE
Your scanner beeps each time you
press a key. Follow these steps to tu rn
off the key tone beep.
1. Turn off the scanner.
2. Press and hold
turn on the scann er.
appears.
To turn on the beep, repeat these
on bEEP
steps.
LOCKOUT
appears.
, then
OFF bEEP
CHANGING THE
MODULATION MODE
Your scanner receives amplitude
modulated (AM) or narrow-band frequency modulated (NFM) transmissions and selects the mode most
commonly used in each frequency
range. However, you can manually
change the mode while the scanner is
searching for frequencies or scanning
channels. The selected mode flashes
if it is not the default.
To change the modulation mode,
MODE
press
tion mode (
display.
To return to the default modulation
mode, press
longer flashes.
until the desired modu la-
AM
or FM) flashes on the
MODE
until the mode no
28
Page 29

20-418 .fm Page 29 Wednesday, A ugust 4, 1999 12:42 PM
TRANSFERRING A
FREQUENCY TO
ANOTHER CHANNEL
Transferring to an Empty
Channel
This feature lets you reassign a stored
frequency to another bank’s vacant
channel.
Note:
You cannot transfer a frequency
into or out of a priority channel.
1. Press
2. Using the number keys or the
3. Press
4. Use the number keys to select the
Note:
already used,
case, you can select another bank.
MANUAL
rotary tuner, select the channel
that has the frequency you want to
transfer.
TRANSFER
tors flash on the display.
desired bank number. The frequency is automatically transferred to the selected bank’s
lowest empty channel.
If all that bank’s channels are
to stop scanning.
. All bank indi ca-
FULL
appears. In that
3. Using the number keys or the
rotary tuner, select the channel
that has the frequency you want to
transfer.
4. Press
flashes on the display.
5. Using the number keys or the
rotary tuner, select the desired
channel.
6. Press
TRANSFER
to transfer the frequency.
s
twice.
Exchanging Frequencies
Between Two Programme d
Channe ls
1. Press
2. Press
3. Using the number keys or the
4. Press
5. Using the number keys or the
6. Press
MANUAL
CHAN
appears.
rotary tuner, select the channel
that has the frequency you want to
transfer.
flashes on the display.
rotary tuner, select the desired
channel.
to exchange the frequen-
t
cies.
to stop scanning.
FREQ/CHAN-LOCK
TRANSFER
twice.
until
CH
CH
T ransferring to a C hannel that
has a Stored Frequency
1. Press
2. Press
MANUAL
CHAN
appears on the display.
to stop scanning.
FREQ/CHAN-LOCK
until
29
Page 30

20-418 .fm Page 30 Wednesday, A ugust 4, 1999 12:42 PM
USING THE COUNT
FEATURE
The scanner can count the number of
times it has detected a transmission
on each channel since you turned on
the scanner or cleared the count.
1. While the scanner is scanning,
MANUAL
press
2. Press
plays
number, and the count number.
3. Repeatedly press
play each channel and the number of times the scanner det ected
a transmission on that channel.
Note:
you can use the rotary tuner
instead of pressing
display the channel count.
While you view the count for a channel, you can zero the count by press-
CLEAR
ing
To turn off the count display, press
COUNT
COUNT
COUNT
If
.
until
.
. The scanner dis-
, the current channel
MANUAL
CHAN
is on the display,
MANUAL
COUNT
disappears.
to dis-
to
USING CTCSS
CTCSS is frequently used when two
different services or groups use the
same frequencies, but are relatively
close together. Each group set s their
transmitters to different CTCSS frequencies, and sets their receivers to
only let them hear transmiss ions that
include the correct CTCSS frequenc y.
This helps to avoid radio interferenc e
between the groups.
You can use the CTCSS feature to
lock out undesired transmissions and
monitor only those which transmit a
specific CTCSS tone.
Note:
You must install a CTCSS tone
board before you can use t his feature.
“Installing an Optional CTCSS
Tone Board” on Page 12.
CTCSS Tone Frequencies
The following table shows the available CTCSS tone f requen cies and t he
letter codes commonly us ed in the industry to refer to the frequencies:
XZ 67.0 1B 107.2 6Z 167.9
XA 71.9 2E 110.9 6A 173.8
WA 74.4 2A 114.8 6B 179.9
XB 77.0 2B 118.8 7Z 186.2
WB 79.7 3Z 123.0 7A 192.8
YZ 82.5 3A 127.3 M1 203.5
YA 85.4 3B 131.8 M2 210.7
YB 88.5 4Z 136.5 M3 218.1
ZZ 91.5 4A 141.3 M4 225.7
ZA 94.8 4B 146.2 M5 233.6
ZB 97.4 5Z 151.4 M6 241.8
1Z 100.0 5A 156.7 M7 250.3
1A 103.5 5B 162.2
30
Page 31

20-418 .fm Page 31 Wednesday, A ugust 4, 1999 12:42 PM
Assigning a CTCSS Tone
Frequency to a Channe l
You can specify the CT CSS tone frequency you want the scanner to detect on a specific preprogrammed
channel.
1. Select the channel number that
has the frequency you want to
assign a CTCSS tone frequency
to.
2. Press
on the display.
3. Press
appear on the display.
4. Press
FREQ
5. Using
choose the CTCSS frequency.
The channel number flashes on
the display.
Note:
wise to step up the displayed tone
frequency. Turn the rotary tuner
counterclockwise to step down the
displayed tone frequency.
PROGRAM
CTCSS
FREQ/CHAN-LOCK
appears on the display.
, or the rotary tuner,
s, t
Turn the rotary tuner clock-
CTCSS
.
.
PGM
and
appears
00.0
until
Changing or Deleting a
CTCSS Tone Frequency for a
Channel
CTCSS
1. If
CTCSS
CTCSS
2. Select the channel number that
contains the CTCSS tone frequency you want to change or
delete.
3. Press
4. Using
select
tone frequency or select another
CTCSS tone frequency to replace
the current one.
5. Press
is not displayed, press
. The scanner displays
.
PROGRAM
, or the rotary tuner,
s, t
00.0
to de let e th e CTC SS
E
.
, then
CTCSS
.
6. Press
stops flashing.
7. Press
plays the channel and frequency.
8. To t urn on C TCSS for that cha nnel, press
display alternates between the
frequency and the CTCSS tone
frequency.
E
. The channel number
MANUAL
. The scann er dis-
CTCSS
. The scanner’s
31
Page 32

20-418 .fm Page 32 Wednesday, A ugust 4, 1999 12:42 PM
A GENERAL GUIDE TO SCANNING
Reception of the frequencies covered
by your scanner is mainly “line-ofsight.” That means you usually cannot
hear stations that are beyond the horizon.
During the summer months, you might
be able to hear stations in the 30–50
MHz range located several hundred or
even thousands of m iles away. This is
because of summer atmospheric con-
161.650 MHz 162.425 MHz 162.475 MHz 162.550 MHz
161.775 MHz 162.440 MHz 162.500 MHz 163.275 MHz
162.400 MHz 162.450 MHz 162.525 MHz
Ham Radio Frequencies
Ham radio operators often broadcast
emergency information when other
means of communication break down.
ditions. This type of reception is unpredictable but often very interesting!
GUIDE TO
FREQUENCIES
National Weather Service
Frequencies
The following chart shows the voice
frequencies that you can monitor.
Wavelength Voice Frequency (MHz)
10-meter 29.000 29.700
6-meter 50.100 54.000
2-meter 144.100 148.000
1
1
/4-meter 222.000 225.000
70-centimeter 420.000 450.000
33-centimeter 902.000 928.000
32
Page 33

20-418 .fm Page 33 Wednesday, A ugust 4, 1999 12:42 PM
Birdie Frequencies
Birdies are frequencies your scanner uses when it operates. T hese operating frequencies might interfere with broadcasts on the same frequencies. If you tune one
of these frequencies, you hear only noise on that frequency.
If the interference is not severe, you might be able to turn
SQUELCH
clockwise to
cut out the birdie. Here are this scanner’s birdie frequencies that you migh t wan t to
watch for:
29.4900 114.6875 147.4550 405.6000
29.4950 117.9625 147.4600 416.0000
31.2000 124.5250 150.9100 417.1000
36.0450 127.8000 155.1050 456.9260
52.0000 131.0750 156.0000 469.5000
52.4300 134.3500 228.4625 813.4000
108.1375 135.2000 230.5625 820.1125
108.8125 137.6250 232.1000 940.9000
1 11.4125 140.9050 398.2375 993.5000
114.4000 144.1800
To find the birdies in any receiver, begin by disc onnecting the antenna and movi ng
it away from the receiver. Make sure that no other nearby radio or TV sets are
turned on near the receiver. Use the search function and search every frequency
range from its lowest frequency to the highest. Occasionally, the searching will stop
as if it had found a signal, often without any sound. That is a birdie. Make a list of all
the birdies in your scanner for future reference.
33
Page 34

20-418 .fm Page 34 Wednesday, A ugust 4, 1999 12:42 PM
GUIDE TO THE ACTION BANDS
Typical Band Usage
HF Band (29.00–30.0 MHz)
10-Meter Amateur .................................................................29.00–29.70 MHz
VHF Band (30.00–300.0 MHz)
Low Range............................................................................29.70–50.00 MHz
6-Meter Amateur ...................................................................50.00–54.00 MHz
Aircraft................................................ .......... ....... ....... .......108.00–136.98 MHz
U.S. Government ............................... .......... .. ....... ....... .....137.00–144.00 MHz
2-Meter Amateur ...............................................................144.00–148.00 MHz
High Range . ......................................................................148.00–174.00 MHz
New Mobile Narrow Band ................................................. 220.00–22 2.00 MHz
1
/4 -Meter Amateur........................................................... 222.00–225.00 MHz
1
Military Aircraft ..................................................................225.00–287.80 MHz
UHF Band (300.00 MHz–3.0 GHz)
Military Aircraft .................................................................. 311.00–384.00 MHz
U.S. Government ............................... .......... .. ....... ....... .....406.00–450.00 MHz
70-Centimeter Amateur.....................................................420.00–450.00 MHz
Low Range........................................................................450.00–470.00 MHz
Public Service ................................................................... 806. 00–82 3.9 8 MHz
Conventional Systems ...................................................... 851.00–856.00 MHz
Conventional/Trunked Systems ........................................856.00–861.00 MHz
Trunked Systems ..............................................................861.00–866.00 MHz
Public Safety ..................................................................... 866.00–869.00 MHz
High Range . ......................................................................894.01–902.00 MHz
33-Centimeter Amateur.....................................................902.00–928.00 MHz
Private Trunked................................................................. 935. 00–94 0.0 0 MHz
General Trunked ............................................................... 940.00–941.00 MHz
Fixed Services...................................................................941.00–944.00 MHz
Studio-to-Transmitter Broadcast Links..............................944.00–952.00 MHz
Private Fixed Services, Paging .........................................952.00–960.00 MHz
Aeronautical Navigation ..................................................960.00–1000.00 MHz
34
Page 35

20-418 .fm Page 35 Wednesday, A ugust 4, 1999 12:42 PM
Primary Usage
As a general rule, most radio activity is concentrated on the following frequencies:
VHF Band
Activities Frequencies (MHz)
Government, Police, and Fire
Emergency Services
Railroad 160.000–161.900
UHF Band
Activities Frequencies (MHz)
Land-Mobile Paired Frequencies 450.000–470.000
Base Stations 451.025–454.950
Mobile Units 456.025–459.950
Relay Repeater Units 460.025–464.975
Remote Control Stations 465.025–469.975
Remote control stations and mobile units operate at 5 MHz higher than their
Note:
associated base stations and relay repeater units.
153.785–155.980
158.730–159.460
SPECIFIED INTERVALS
:Frequencies in different bands are accessible only at specific intervals. For example
Band T ype Specified Interval (kHz)
VHF, HAM, and Government 5.0
Aircraft 25.0
All Others 12.5
Your scanner automatically rounds th e entere d frequenc y down to the closes t
Note:
valid frequency. For example, if you try to enter a frequency of 151.473, your scanner
accepts it as 151.470.
35
Page 36

g
g
g
ging
20-418 .fm Page 36 Wednesday, A ugust 4, 1999 12:42 PM
BAND ALLOCATION
To help decide which frequency ranges to scan, use the following listing of the typical services that use the frequencies your scanner receives. These frequencies are
subject to change, and might vary from area to area. For a more complete listing,
refer to the “Police Call Radio Guide including Fire and Emergency Services,” available at your local RadioShack store.
Abbreviations
AIR ................................................. Aircraft
BIFC.....Boise (ID)Inte ra
BUS.............................................Business
CAP............................... ......C i vil Air Patro l
CB ....................................... Citizens Band
CCA.................................Common Carrier
CSB........................Conventional Systems
CTSB........Conventional/Trunked Systems
FIRE . .. ... ................. ..........Fire De p ar tm e n t
HAM ........................Amateur (Ham) Radio
GOVT ........................Federal Government
GMR........................General Mobile Radio
GTR.................................General Trunked
IND ...............................Industrial Services
MAR ............. ......... M il i ta r y A ma te u r R a di o
MARI ............... ......Maritime Lim ited Coas t
MARS.........Military Affiliate Radio System
MED ............ Emer
MIL .........................................U.S. Military
MOV............Motion Picture/Video Industry
NEW........................... New Mobile Narrow
NEWS ......... ........................ ....Relay Pre s s
OIL .........................Oil/Petroleum Industry
PFSP..........Private Fixed Services/Pa
POL .......................... ....Pol ic e De partmen t
PUB...................................Public Services
PSB .......................................Public Safety
PTR .. .. ... ................. .......... Private Trun k e d
ency Fire Cache
(Manufacturin
(Coast Guard, Marine telephone, Shipboard Radio, Private stations)
ency/Medical Ser vices
(Public Safety, Local Government, Forestry Conservation)
, Construction, Farming, Forest Products)
(Newspaper reporters)
36
Page 37

20-418 .fm Page 37 Wednesday, A ugust 4, 1999 12:42 PM
ROAD........ Road & Highway Maintenance
RTV..Radio/TV Remote Broadcast Pickup
TAXI ......................................Taxi Services
TELB..............................Mobile Telephone
TELC..............................Cordless Phones
TELM .......... .. .......Telephone Maintenance
TOW........... ................. .............Tow Trucks
TRAN ...................Transportation Services
TSB ................................Trunked Systems
TVn .................. FM-TV (Audio Broadcast)
USXX .................... Government Classified
UTIL ......................Power & Water Utilities
WTHR .......................................... Weather
High Frequency (HF) (29 MHz-30 MHz)
10-Meter Amateur Band (29.0-29.7 MHz)
28.000-29.700....................................HAM
Very High Frequency (VHF)
(30 MHz– 300 MHz)
(Aircraf t, Radio Common Carrier, Landline companies)
(Trucks, Tow Trucks, Buses,
Railroad, Other)
Low Band (29.7–50 MHz–in 5 kHz steps)
29.700- 29.790 ..... ......... ............. .......... IND
29.900-30.550......................... GOVT, MIL
30.580-31.9 80 .......... ................. IND, P U B
32.000-32.990 .........................GOVT, MIL
33.020-33.980 ....................US, IND, PUB
34.010-34.990 .........................GOVT, MIL
35.020-35.980BUS, PUB, IND, TELM 36.000-36.230 GOVT, MIL
36.250 ......... ..................Oil Spill C le a n u p
36.270-36.990 .........................GOVT, MIL
37.020-37.980 ........................... PUB, IND
38.000-39.000......................... GOVT, MIL
39.020-39.9 80...... ................. ............ P U B
40.000-42.000...............GOVT, MIL, MARI
42.020- 42.940 ..... ......... ............. .........P OL
42.960- 43.180 ..... ......... ............. .......... IND
43.220-43.680 ................TELM, IND, PUB
43.700- 44.600 ..... ......... ............. ...... TRAN
44.620-46.5 80 .......... ................ P O L , PU B
46.600-46.9 90 .......... ............GOV T, TELC
47.020- 47.400 ..... ......... ............. ........ PUB
47.420 ......... ............Amer ic an R ed Cro ss
47.440-49.5 80 .......... ................. IND, P U B
49.610-49.9 90 .......... ............... M IL , T E LC
6-Meter Amateur Band (50-54 MHz)
50.00-54.00........................................HAM
37
Page 38

g
g
g
g
20-418 .fm Page 38 Wednesday, A ugust 4, 1999 12:42 PM
Aircraft Band (108–136 MHz)
108.000-121.490 .................................AIR
121.500 ............................ AIR Emer
ency
121.510-136.000 .................................AIR
U.S. Government Band (13 8-144 MHz)
137.000-144.000 .....................GOVT, MIL
2-Meter Amateur Band (144-148 MHz)
144.000-148.000 ............................... HAM
VHF-Hi BAND (148-174 MHz)
148.050-150.345 ..............CAP, MAR, MIL
150.775-150.790 .............................. MED
150.815-150.965 .............................. TOW
150.980 .........................Oil Spill Clean up
150.995-151.130 ............................ ROAD
151.145-151.475 ............................... POL
151.490-151.955 ........................ IND,BUS
151.985 ...........................................TELM
152.0075 .......................................... MED
152.030-152.240 .............................. TELB
152.270-152.465 ........................IND,TAXI
152.480 .............................................BUS
152.510-152.840 ............................. TELB
152.870-153.020 ....................... IND,MOV
153.035-153.725 ................IND, OIL, UTIL
153.740-154.445 .....................PUB, FIRE
154.490-154.570 .......................IND, BUS
154.585 ......................... Oil Spill Clean up
154.600-154.625 ............................... BUS
154.655-156.240 MED, ROAD, POL, PUB
156.255 ...............................................OIL
156.275-157.425 ..............................MARI
157.450 .............................................MED
157.470-157.515 ............................... TOW
157.530-157.725 ....................... IND, TAXI
157.740 .............................................BUS
157.770-158.100 ...............................TELB
158.130-158.460 ........................BUS, IND
OIL, TELM, UTIL
158.490 -158.70 0 ...... ... ..................... TELB
158.730-159.465 ..........POL, PUB, ROAD
159.480 ...............................................OIL
159.495-161.565 ..............................TRAN
161.580 ...............................................OIL
161.600-162.000 .................... MARI, RTV
162.0125-162.35 .........GOVT, MIL, USXX
162.400-162.550 ............................WTHR
162.5625-162.6375 .....GOVT, MIL, USXX
162.6625 ...........................................MED
162.6875-163.225 .......GOVT, MIL, USXX
163.250 .............................................MED
163.275-166.225 .........GOVT, MIL, USXX
166.250 ........................GOVT, RTV, FI RE
166.275-169.400 ...................GOVT, BIFC
169.445 .............................Wireless Mikes
169.500 ...........................................GOVT
169.505 .............................Wireless Mikes
169.55-169. 9875 .........GOVT, MIL, USXX
170.000 .............................................BIFC
170.025-170.150 ..........GOVT, RTV, FIRE
170.175-170.225 .............................GOVT
170.245-170.305 ...............Wireless Mikes
170.350-170.400 ..................... GOVT, MIL
170.425-170.450............... ............ .... BIFC
170.475 ............................................. PUB
170.4875-173.175..................GOVT, PUB,
Wireless Mik es
173.225-173.375 ........MOV , NEWS, UTIL
173.3875-173.5375 .............................MIL
173.5625-173.5875........................ .... MIL,
Medical/Crash Crews
173.60-173.9875 .............................GOVT
New Mobile Narrow Band (220-222 MHz)
220.000-222.000 .............................. NEW
1
1
/4-Meter Amateur Band (222-225 MHz)
222.000-225.000 ...............................HAM
Military Aircraft Band (237.9-287.8 MHz)
237.900 ...Coast Guard Sea rch & Resc ue
239.800 ................................ FAA Weather
241.000 ............................................. Army
243.000 ...................................Emer
255.400 ....................... FAA Fli
ency
ht Service
257.800 .............................Civilian Towers
287.800 ...... Coast Guard Air/Sea Rescue
Ultra Hi
h Frequency (UHF) - (300 MHz- 3
GHz)
Military Aircraft Band (319.1-383.9 MHz)
319.100 ................. FAA Air Traffic Control
321.000-336.600 ........................ Air Force
342.500-344.600 ................. FAA Weather
346.400-364.200 ........................ Air Force
Air Traffic Control
381.800-383.900............... .... Coast Guard
38
Page 39

g
g
g
g
g
ging
g
20-418 .fm Page 39 Wednesday, A ugust 4, 1999 12:42 PM
U.S. Government Band (406-450 MHz)
406.125-419.975 ................. GOVT, USXX
70-Centimeter Amateur Band (420-450
MHz)
420.000-450.000 ...............................HAM
33-Centimeter Amateur Band
(902-928 MHz)
902.000-928.000 .............................. HAM
Low Band (450-470 MHz)
450.050-450.925 ................................RTV
451.025-452. 025... IND, OIL, TELM, UTIL
452.0375-453.00 ..........IND, TAXI, TRAN,
TOW, NEW S
453.0125-453.9875 ........................... PUB
454.000 ............................................... OIL
454.025-454.975 ............................... TELB
455.050-455.925 .................................RTV
457.525-457.600 ............................... BUS
458.025-458.175 ...............................MED
460.0125-460.6375 ........ FIRE, POL, PUB
460.650 -462.17 5 .... ... ........................ BUS
462.1875-462.450 ..................... BUS, IND
462.4625-462. 525 . IND, OIL, TELM, UTIL
462.550-462.725 .............................. GMR
462.750-462.925 ............................... BUS
462.9375-463.1875 ...........................MED
463.200-467.925 ............................... BUS
FM-TV Audio Broadcast, UHF Wide Band
(470-806 MHz) (Channel 14 throu
MHz steps)
475.750 .................................. Channel 14
481.750 .................................. Channel 15
487.750 .................................. Channel 16
.
.
805.750 .................................. Channel 69
Note:
Some cities use the 470-512 MHz
band for land/mobile services.
h 69 in 6
Private Tr unked
935.0125-939.9875 ...........................PTR
General Trunked
940.0125-940.9875 ............... ............ GTR
Fixed Services
941.000-944.000 ............................GOVT
Studio-to-Transmitter Bro adcast Links
944.000-952.000 ................................TVn
Private Fixed Services, Pa
952.000-960.000 .............................PFSP
Aeronautical Navi
960.000-1000.000 .............................. AIR
ation
FREQUENCY
CONVERSION
The tuning location of a station can beexpressed in frequency (kHz or MHz) or
in wavelength (meters). The following
information can help you make the necessary conversions.
Conventional Systems Band
Locally Assi
851.0125-855.9875 ........................... CSB
ned
1 MHz (million)=1,000 kHz (thousand)
To convert MHz to kHz, multiply by
1,000.
Conventional /Trunked Systems Band
Locally Assi
856.0125-860.9875 .........................CTSB
Trun ked Systems Band
Locally Assi
861.0125-865.9875 ............................TSB
Public Safety Band
Locally Assi
866.0125-868.9875 ........................... PSB
ned
ned
ned
30.62 MHz x 1000=30620 kHz
To convert from kHz to MHz, divide by
1,000.
127 800,
=127.8 MHz
-----------------------
kHz
1000
To convert MHz to meters, divide 300
by the number of megahertz.
300
=
--------- 171
1.75 meters
MHz
39
Page 40

20-418 .fm Page 40 Wednesday, A ugust 4, 1999 12:42 PM
TROUBLESHOOTING
If you have problems, here a re some
suggestions that might help. If none of
these suggestions help, take your
PROBLEM POSSIBLE CAUSE REMEDY
Scanner is totally inoperative.
Scanner is on but will
not scan.
While scanning, the
scanner locks on frequencies that have an
unclear transmission.
Rotary tuner does not
work.
No power. Make sure you plugged
SQUELCH
•
rectly adjusted.
• A channel has been
manually selected.
“Birdies.” Avoid programming fre-
Rotary lock is turned on. Press
scanner to your local RadioShack
store for assistan ce.
the scanner into a working AC or DC outlet.
is not cor-
• Adjust
clockwise.
• Press
quencies listed under
“Birdie Frequencies” on
Page 33 or only listen to
them manually.
CHAN
or
display.
SQUELCH
SCAN
.
LOCK
appears on the
until
FREQ
40
Page 41

20-418 .fm Page 41 Wednesday, A ugust 4, 1999 12:42 PM
CARE AND MAINTENANCE
Your PRO-2045 200-Channel Direct
Entry Programmable Scanner is an
CLEANER
example of superior design and craftsmanship. The following suggestions
will help you care for the PRO-2045 so
you can enjoy it for years.
Keep the scanner dry. If
it gets wet, wipe it dry
immediately. Liquids
can contain minerals
that can corrode the
electronic circuits.
Handle the scanner
gently and carefully.
Dropping it can damage
circuit boards and cases and can cause the
scanner to work improperly.
Wipe the scanner with a
damp cloth occasionally to keep it looking
new. Do not use harsh
chemicals, cleaning
solvents, or strong detergents to clean the
scanner.
Modifying or tampering with your
scanner’s internal components can
cause a malfunction and might invalidate the scanner’ s warranty and void
your FCC authorization to operate it. If
your scanner is not operating as it
should, take it to your local RadioShack store for assistance.
Use and store the scanner only in normal temperature environments.
Temperature extremes
can shorten the life of
electronic devices and
distort or melt plastic
parts.
Keep the scanner away
from dust and dirt,
which can cause premature wear of parts.
41
Page 42

20-418 .fm Page 42 Wednesday, A ugust 4, 1999 12:42 PM
SPECIFICATIONS
Frequency Coverage, Step, and Default Modulation Mode s:
Range
(MHz)
Step
(kHz)
Mode
29–54 5 NFM
108–136.975 12.5 AM
137–174 5 NFM
216–224.9875 12.5 NFM
225–399.9875 12.5 AM
400–512 12.5 NFM
806–823.9375 12.5 NFM
851–868.9375 12.5 NFM
896.1125–1,000 12.5 NFM
Channels . . . . . . . . . . . . . 210 (20 Channels × 10 Banks + 10 Monitor Mem ories)
Sensitivity (20 dB S/N with 60% modulation for AM; 3 kHz deviation for NFM):
NFM 40.84 MHz . . . . . . . . . . . . . . . . . . . . 0.5 µV
S+N/N=20 dB 162.4 MHz . . . . . . . . . . . . . . . . . . . . 0.6 µV
453.25 MHz . . . . . . . . . . . . . . . . . . . . 0.6 µV
954.9125 MHz . . . . . . . . . . . . . . . . . . . . 0.8 µV
AM 127.175 MHz . . . . . . . . . . . . . . . . . . . . 1.5 µV
S+N/N=20 dB 230.05 MHz . . . . . . . . . . . . . . . . . . . . 1.5 µV
325.05 MHz . . . . . . . . . . . . . . . . . . . . 1.5 µV
Direct/Limit Search Speed:
Normal Speed . . . . . . . . . . . . . . . . . . . . . . . . . . . . . . . . . . . 100 Steps/Second
Hypersearch . . . . . . . . . . . . . . . . . . . . . . . . . . . . . . . . . . . . 300 Steps/Second
Scanning Speed . . . . . . . . . . . . . . . . . . . . . . . . . . . . . . . . . . . 50 Channels/ Seco nd
Priority Channel Sampling Interval . . . . . . . . . . . . . . . . . . . . . . . . . . . . . 2 Seconds
Programmable Delay . . . . . . . . . . . . . . . . . . . . . . . . . . . . . . . . . . . . . . . 2 Seconds
42
Page 43

20-418 .fm Page 43 Wednesday, A ugust 4, 1999 12:42 PM
IF Frequencies . . . . . . . . . . . . . . . . . . . . . . . . . . . . . . . . . . . . . . . 1st IF: 370.7 MHz
2nd IF: 10.85 MHz
3rd IF: 450 kHz (NFM)
Audio Power . . . . . . . . . . . . . . . . . . . . . . . . . . . . . . . . . . . . . . . . 1 Watt Maximum
7
Built-In Speaker . . . . . . . . . . . . . . . . . . 2
/16-Inch (57 mm), 8-Ohm, Dynamic Type
Maximum Current Drain . . . . . . . . . . . . . . . . . . . . . . . . . . . . . . . . . . . . . . . 500 mA
Power Requirement . . . . . . . . . . . . . . . . . . . . . . . . . . . . . . . . . . . . . . . . . . 12 Volts
AC Adapter . . . . . . . . . . . . . . . . . . . . . . . . . . . . . . . . . . . . . . . . . . . . . . . . S upplied
DC Adapter . . . . . . . . . . . . . . . . . . . . . . . . . . . . . . RadioShack Cat. No. 270-1533
1
Dimensions . . . . . . . . . . . . . . . . . . . . . . . . . . . . . . 3
/4 × 91/4 × 81/16 Inches (HWD)
(82 × 235 × 205mm)
Weight . . . . . . . . . . . . . . . . . . . . . . . . . . . . . . . . . . . . . . . . . . . . . . . . . . . 1 lb, 17 oz
(960 g)
Specifications are typical; individual units m ight vary. Specifications are subj ect to
change and improvement without notice.
43
Page 44

20-418 .fm Page 44 Wednesday, A ugust 4, 1999 12:42 PM
RadioShack Limited Warranty
This product is warranted against defects for 1 year from date of purchase from
RadioShack company-owned stores and authorized RadioShack franchisees and dealers. Wit h in this per io d, w e w i ll repair it withou t c ha r ge fo r pa r ts an d l abor. Simply
your RadioShack sales slip
ranty does not cover transportation costs. Nor does it cover a product subjected to misuse or acci de ntal damag e.
EXCEPT AS PROVIDED HEREIN, RadioShack MAKES NO EXPRESS WARRANTIES
AND ANY IMPLIED WARRANTIES ARE L IMITED IN DURATION TO THE DURATION
OF THE WRITTEN LIMITED WARRANTIES CONTAINED HEREIN. Some states do
not permit limitation or exclusion of implied warranties; therefore, the aforesaid limitation(s) or exclusion(s) may not apply to the purchaser.
This warranty gi ves you specific legal rights and you may also have other rights which vary from
state to state.
as proof of purchase date to any RadioShack store. War-
We Service What We Sell
bring
10/95
RadioShack
A Division of Tan dy Corpor ation
Fort Worth, Texas 76102
UBZZ01262ZZ
5A6 Printed in the Philippines
 Loading...