


XN-P02DAB-S
Table of contents
 Loading...
Operating Instructions
Discover the benefits of registering your product online at http://www.pioneer.co.uk (or http://www.pioneer.eu).
NETWORK RECEIVER
XN-P02-S/-K
N-P01-S/-K
XN-P02DAB-S/-K
NETWORK AUDIO PLAYER
2
CAUTION
TO PREVENT THE RISK OF ELECTRIC SHOCK, DO NOT
REMOVE COVER (OR BACK). NO USER-SERVICEABLE PARTS
INSIDE. REFER SERVICING TO QUALIFIED SERVICE
PERSONNEL.
D3-4-2-1-1_B1_En
WARNING
This equipment is not waterproof. To prevent a fire or shock
hazard, do not place any container filled with liquid near this
equipment (such as a vase or flower pot) or expose it to
dripping, splashing, rain or moisture.
D3-4-2-1-3_A1_En
WARNING
To prevent a fire hazard, do not place any naked flame sources
(such as a lighted candle) on the equipment.
D3-4-2-1-7a_A1_En
VENTILATION CAUTION
(XN-P02, XN-P02DAB only)
When installing this unit, make sure to leave space around
the unit for ventilation to improve heat radiation (at least 10
cm at top, 10 cm at rear, and 10 cm at each side).
Operating Environment
Operating environment temperature and humidity:
+5 °C to +35 °C (+41 °F to +95 °F); less than 85 %RH (cooling
vents not blocked)
Do not install this unit in a poorly ventilated area, or in
locations exposed to high humidity or direct sunlight (or
strong artificial light).
D3-4-2-1-7c*_A2_En
CAUTION
The I STANDBY/ON switch on this unit will not
completely shut off all power from the AC outlet. Since the
power cord serves as the main disconnect device for the
unit, you will need to unplug it from the AC outlet to shut
down all power. Therefore, make sure the unit has been
installed so that the power cord can be easily unplugged
from the AC outlet in case of an accident. To avoid fire
hazard, the power cord should also be unplugged from the
AC outlet when left unused for a long period of time (for
example, when on vacation).
D3-4-2-2-2a*_A1_En
WARNING
Store small parts out of the reach of children and infants. If
accidentally swallowed, contact a doctor immediately.
D41-6-4_A1_En
This product is for general household purposes. Any failure
due to use for other than household purposes (such as
long-term use for business purposes in a restaurant or use
in a car or ship) and which requires repair will be charged
for even during the warranty period.
K041_A1_En
POWER-CORD CAUTION
Handle the power cord by the plug. Do not pull out the plug by
tugging the cord and never touch the power cord when your
hands are wet as this could cause a short circuit or electric
shock. Do not place the unit, a piece of furniture, etc., on the
power cord, or pinch the cord. Never make a knot in the cord
or tie it with other cords. The power cords should be routed
such that they are not likely to be stepped on. A damaged
power cord can cause a fire or give you an electrical shock.
Check the power cord once in a while. When you find it
damaged, ask your nearest PIONEER authorized service
center or your dealer for a replacement.
S002*_A1_En
10 cm 10 cm
10 cm
10 cm
NETWORK AUDIO PLAYER
SOURCE
N-P01
5 V2.1 A
STANDBY/ON
l
D3-11-15-5-2_A1_En
For Norway customers
Utstyr som er koplet til beskyttelsesjord via nettplugg
og/eller via annet jordtilkoplet utstyr – og er tilkoplet et
kabel-TV nett, kan forårsake brannfare. For å unngå dette
skal det ved tilkopling av utstyret til kabel-TV nettet
installeres en galvanisk isolator mellom utstyret og
kabel-TV nettet.
XN-P02, XN-P02DAB only
For Sweden customers
Utrustning som är kopplad till skyddsjord via jordat
vägguttag och/eller via annan utrustning och samtidigt är
kopplad till kabel-TV nät kan i vissa fall medföra risk för
brand.
För att undvika detta skall vid anslutning av utrustningen
till kabel-TV nät galvanisk isolator finnas mellan
utrustningen och kabel-TV nätet.
(N-P01 only)
When installing this unit, make sure to leave space around
the unit for ventilation to improve heat radiation (side 10 cm,
rear 10 cm, top 5 mm).
WARNING
Slots and openings in the cabinet are provided for ventilation
to ensure reliable operation of the product, and to protect it
from overheating. To prevent fire hazard, the openings should
never be blocked or covered with items (such as newspapers,
table-cloths, curtains) or by operating the equipment on thick
carpet or a bed.
D3-4-2-1-7b*_A1_En
3
Information for users on collection and disposal of old equipment and used batteries
These symbols on the products, packaging, and/or accompanying documents mean
that used electrical and electronic products and batteries should not be mixed with
general household waste.
For proper treatment, recovery and recycling of old products and used batteries,
please take them to applicable collection points in accordance with your national
legislation.
By disposing of these products and batteries correctly, you will help to save valuable
resources and prevent any potential negative effects on human health and the
environment which could otherwise arise from inappropriate waste handling.
For more information about collection and recycling of old products and batteries,
please contact your local municipality, your waste disposal service or the point of sale
where you purchased the items.
These symbols are only valid in the European Union.
For countries outside the European Union:
If you wish to discard these items, please contact your local authorities or dealer and
ask for the correct method of disposal.
K058a_A1_En
Symbol examples
for batteries
Symbol for
equipment
Pb
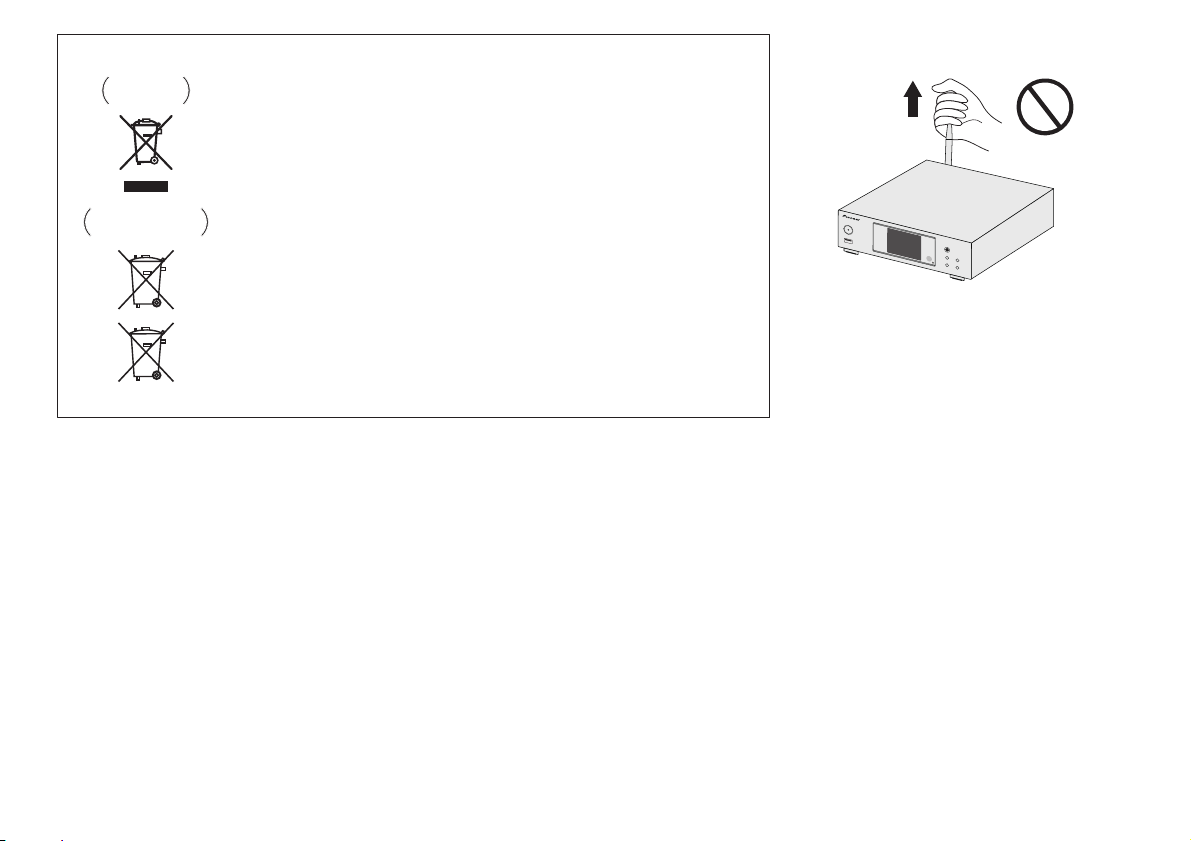
Do not lift this device by holding the wireless LAN antenna,
since damage or personal injury may result.
Radio wave caution
This unit uses a 2.4 GHz radio wave frequency, which is a
band used by other wireless systems (Microwave ovens and
Cordless phones, etc.). In this event noise appears in your
television image, there is the possibility this unit (including
products supported by this unit) is causing signal interference
with the antenna input connector of your television, video,
satellite tuner, etc. In this event, increase the distance
between the antenna input connector and this unit (including
products supported by this unit).
• Pioneer is not responsible for any malfunction of the
compatible Pioneer product due to communication
error/malfunctions associated with your network
connection and/or your connected equipment. Please
contact your Internet service provider or network device
manufacturer.
• A separate contract with/payment to an Internet service
provider is required to use the Internet.

4
Thank you for buying this Pioneer product. Please read through these operating instructions so you will know how to operate your model properly.
About this product . . . . . . . . . . . . . . . . . . . . . . . . . . . . . . . 5
Checking what’s in the box. . . . . . . . . . . . . . . . . . . . . . . . . 5
Loading the batteries . . . . . . . . . . . . . . . . . . . . . . . . . . . . . 5
Operating range of remote control . . . . . . . . . . . . . . . . . . . 5
Remote control. . . . . . . . . . . . . . . . . . . . . . . . . . . . . . . . . . 6
01 Controls and displays
(Network audio player: N-P01)
Front panel . . . . . . . . . . . . . . . . . . . . . . . . . . . . . . . . . . . . 10
02 Connecting your equipment
(Network audio player: N-P01)
WLAN antenna connection . . . . . . . . . . . . . . . . . . . . . . . 11
Analog audio output connections. . . . . . . . . . . . . . . . . . . 11
Digital audio output connections . . . . . . . . . . . . . . . . . . . 11
Connecting USB storage devices . . . . . . . . . . . . . . . . . . . 12
Connecting to the network through the LAN interface or
WLAN antenna. . . . . . . . . . . . . . . . . . . . . . . . . . . . . . . . . 12
Using centralized control with other Pioneer
components . . . . . . . . . . . . . . . . . . . . . . . . . . . . . . . . . . . 12
Using combined with the XC-P01 or XC-P01DAB . . . . . . . 13
Plugging in. . . . . . . . . . . . . . . . . . . . . . . . . . . . . . . . . . . . 13
03 Getting started
(Network audio player: N-P01)
Setting the player . . . . . . . . . . . . . . . . . . . . . . . . . . . . . . . 14
General control. . . . . . . . . . . . . . . . . . . . . . . . . . . . . . . . . 14
04 iPod/iPhone/iPad playback
(Network audio player: N-P01)
Confirming what iPod/iPhone/iPad models are
supported. . . . . . . . . . . . . . . . . . . . . . . . . . . . . . . . . . . . . 15
Playing your iPod/iPhone/iPad . . . . . . . . . . . . . . . . . . . . . 16
05 Music playback using
Bluetooth
® wireless
technology (Network audio player: N-P01)
Remote control operation. . . . . . . . . . . . . . . . . . . . . . . . . 17
Pairing with the unit (Initial registration) . . . . . . . . . . . . . 17
Listen to music on the unit from a Bluetooth
capable device . . . . . . . . . . . . . . . . . . . . . . . . . . . . . . . . . 18
Radio wave caution . . . . . . . . . . . . . . . . . . . . . . . . . . . . . 18
06 USB playback (Network audio player: N-P01)
Playing files stored on USB storage devices. . . . . . . . . . . 20
07 Playback with NETWORK features
(Network audio player: N-P01)
Network setting . . . . . . . . . . . . . . . . . . . . . . . . . . . . . . . . 21
A: Wired setting . . . . . . . . . . . . . . . . . . . . . . . . . . . . . . . . 22
B: Connection settings using an iOS device
(with iOS 5.0 or later) . . . . . . . . . . . . . . . . . . . . . . . . . . . . 22
C: Connection settings using an iOS device
(with iOS 7.1 or later) . . . . . . . . . . . . . . . . . . . . . . . . . . . . 23
D: WPS connection setting. . . . . . . . . . . . . . . . . . . . . . . . 24
E: Wireless Setting . . . . . . . . . . . . . . . . . . . . . . . . . . . . . . 25
F: Connecting to a router without WPS-PBC function . . . . 26
Friendly Name . . . . . . . . . . . . . . . . . . . . . . . . . . . . . . . . . 27
Listening to the Internet radio. . . . . . . . . . . . . . . . . . . . . . 27
Advanced operations for the Internet radio . . . . . . . . . . . . 27
About the Spotify audio stream playback function . . . . . . 28
Introduction . . . . . . . . . . . . . . . . . . . . . . . . . . . . . . . . . . . 29
Playing audio files stored on computers or other
components . . . . . . . . . . . . . . . . . . . . . . . . . . . . . . . . . . . 29
Using AirPlay to enjoy music . . . . . . . . . . . . . . . . . . . . . . 30
AirPlay Password . . . . . . . . . . . . . . . . . . . . . . . . . . . . . . . 30
Installing Pioneer ControlApp. . . . . . . . . . . . . . . . . . . . . . 31
Using Pioneer ControlApp . . . . . . . . . . . . . . . . . . . . . . . . 31
08 Additional information
(Network audio player: N-P01)
Troubleshooting . . . . . . . . . . . . . . . . . . . . . . . . . . . . . . . . 32
Setting quick start mode. . . . . . . . . . . . . . . . . . . . . . . . . . 34
Firmware Update . . . . . . . . . . . . . . . . . . . . . . . . . . . . . . . 35
Resetting this player . . . . . . . . . . . . . . . . . . . . . . . . . . . . . 36
Cautions on use . . . . . . . . . . . . . . . . . . . . . . . . . . . . . . . . 36
About network playback . . . . . . . . . . . . . . . . . . . . . . . . . . 37
About playable music file formats. . . . . . . . . . . . . . . . . . . 38
About iPod/iPhone/iPad . . . . . . . . . . . . . . . . . . . . . . . . . . 39
About aptX . . . . . . . . . . . . . . . . . . . . . . . . . . . . . . . . . . . . 40
About Wi-Fi® . . . . . . . . . . . . . . . . . . . . . . . . . . . . . . . . . . 40
About Spotify . . . . . . . . . . . . . . . . . . . . . . . . . . . . . . . . . . 40
09 Control and display
(Stereo receiver: SX-P01, SX-P01DAB)
Front panel . . . . . . . . . . . . . . . . . . . . . . . . . . . . . . . . . . . . 41
10 Connecting your equipment
(Stereo receiver: SX-P01, SX-P01DAB)
Connecting your equipments
(XN-P02, XN-P02DAB only) . . . . . . . . . . . . . . . . . . . . . . . . 42
11 Getting started
(Stereo receiver: SX-P01, SX-P01DAB)
To turn the power on . . . . . . . . . . . . . . . . . . . . . . . . . . . . . 44
Setting the clock . . . . . . . . . . . . . . . . . . . . . . . . . . . . . . . . 44
General functions . . . . . . . . . . . . . . . . . . . . . . . . . . . . . . . 44
Timer and sleep operation. . . . . . . . . . . . . . . . . . . . . . . . . 46
Setting the wake-up timer . . . . . . . . . . . . . . . . . . . . . . . . . 46
Sleep operation. . . . . . . . . . . . . . . . . . . . . . . . . . . . . . . . . 46
12 Using the tuner
(Stereo receiver: SX-P01, SX-P01DAB)
Tuning to a FM radio station . . . . . . . . . . . . . . . . . . . . . . . 47
Introduction to RDS . . . . . . . . . . . . . . . . . . . . . . . . . . . . . 48
Listening to the DAB (XN-P02DAB only) . . . . . . . . . . . . . . 49
Selecting DAB . . . . . . . . . . . . . . . . . . . . . . . . . . . . . . . . . 49
13 Additional information
(Stereo receiver: SX-P01, SX-P01DAB)
Troubleshooting chart . . . . . . . . . . . . . . . . . . . . . . . . . . . . 51
Condensation . . . . . . . . . . . . . . . . . . . . . . . . . . . . . . . . . . 51
If problem occurs . . . . . . . . . . . . . . . . . . . . . . . . . . . . . . . 51
Factory reset, clearing all memory . . . . . . . . . . . . . . . . . . 51
Cleaning the cabinet. . . . . . . . . . . . . . . . . . . . . . . . . . . . . 51
Specifications (Network audio player: N-P01) . . . . . . . . . . 52
Specifications (Stereo receiver: SX-P01, SX-P01DAB) . . . . 52
Contents
5
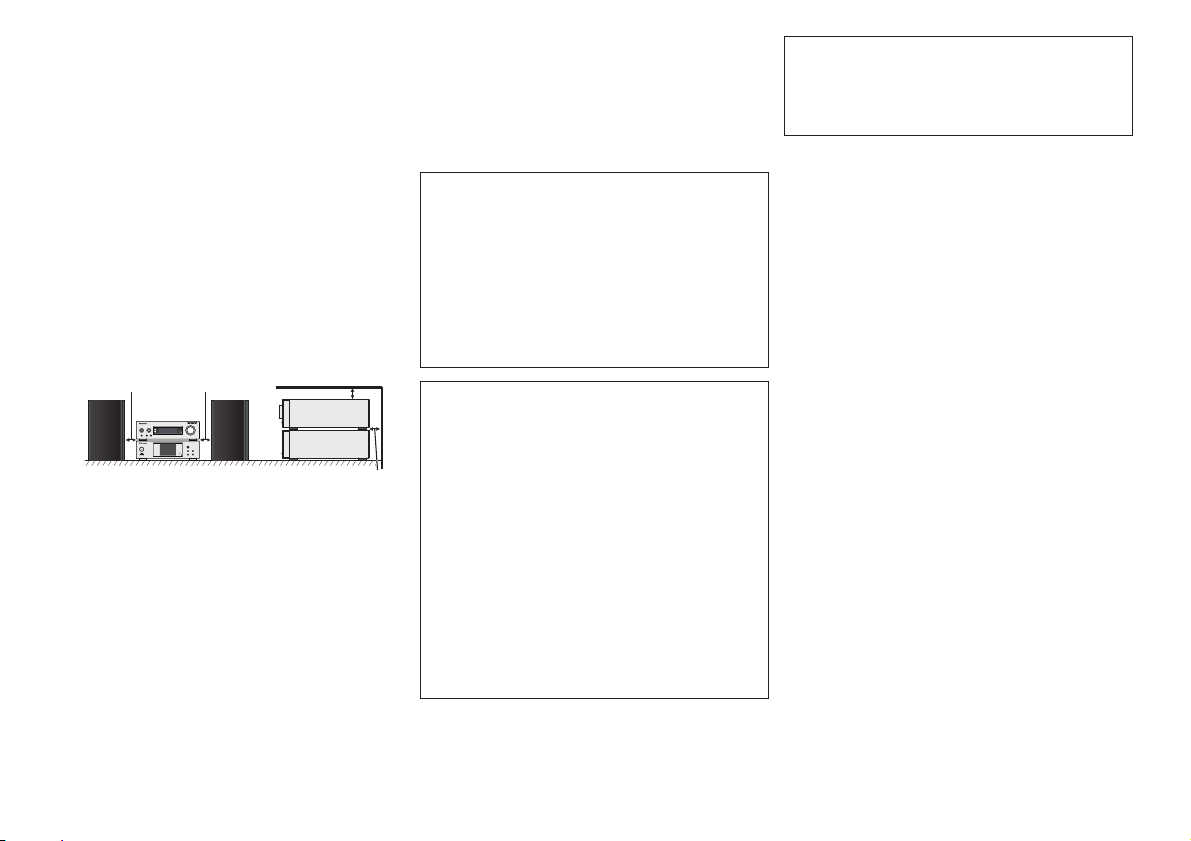
Before you start
About this product
XN-P02 or XN-P02DAB
XN-P02 or XN-P02DAB Network Receiver System consists of
Stereo receiver and Network audio player.
N-P01
N-P01 Network Audio Player consists of the main unit.
Note
•
The product may be used in conjunction with the following,
separately retailed system products. (N-P01 only)
CD RECEIVER SYSTEM XC-P01
•
Stereo receiver: SX-P01
•
CD Player: PD-P01
CD RECEIVER SYSTEM XC-P01DAB
•
Stereo receiver: SX-P01DAB
•
CD Player: PD-P01
Checking what’s in the box
Please check that you’ve received the following supplied
accessories:
•
Remote control
•
Power cord
•
AAA size IEC R03 dry cell batteries (to confirm system
operation) x 2
•
RCA audio cable
•
WLAN antenna x 2
•
Remote control cable
•
Warranty card
•
Quick Start Guide
•
These operating instructions (CD-ROM)
•
FM wire antenna (XN-P02 only)
•
DAB/FM wire antenna (XN-P02DAB only)
NETWORK AUDIO PLAYER
SOURCE
N-P01
5 V 2.1 A
STANDBY/ON
l
NETWORK AUDIO PLAYER
SOURCE
N-P01
5 V 2.1 A
STANDBY/ON
l
Loading the batteries
The batteries included with the player have been provided to
allow you check product operation and may not last long. We
recommend using alkaline batteries that have a longer life.
WARNING
•
Do not use or store batteries in direct sunlight or other
excessively hot place, such as inside a car or near a heater.
This can cause batteries to leak, overheat, explode or catch
fire. It can also reduce the life or performance of batteries.
CAUTION
•
Incorrect use of batteries may result in such hazards as
leakage and bursting. Observe the following precautions:
-
Never use new and old batteries together.
-
Insert the plus and minus sides of the batteries properly
according to the marks in the battery case.
-
Batteries with the same shape may have different
voltages. Do not use different batteries together.
-
When disposing of used batteries, please comply with
governmental regulations or environmental public
institution’s rules that apply in your country/area.
-
When inserting the batteries, make sure not to damage
the springs on the battery’s terminals. This can cause
batteries to leak or over heat.
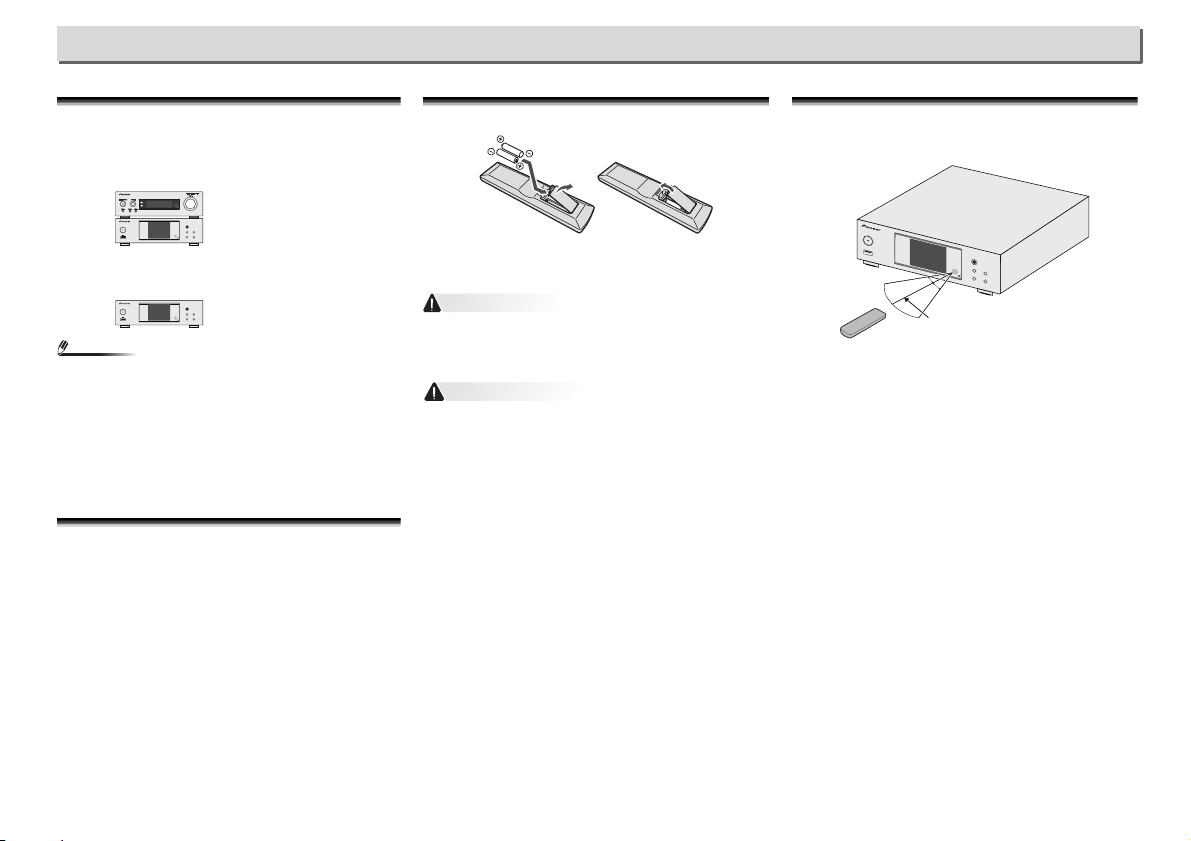
Operating range of remote control
The remote has a range of about 7 m at an angle of about 30°
from the remote sensor.
Keep in mind the following when using the remote control:
•
Make sure that there are no obstacles between the remote
and the remote sensor on the player.
•
Remote operation may become unreliable if strong sunlight
or fluorescent light is shining on the player’s remote sensor.
•
Remote controllers for different devices can interfere with
each other. Avoid using remotes for other equipment
located close to this player.
•
Replace the batteries when you notice a fall off in the
operating range of the remote.
7 m
30°
30°
Stereo receiver:
SX-P01/SX-P01DAB
Network audio player:
N-P01
6
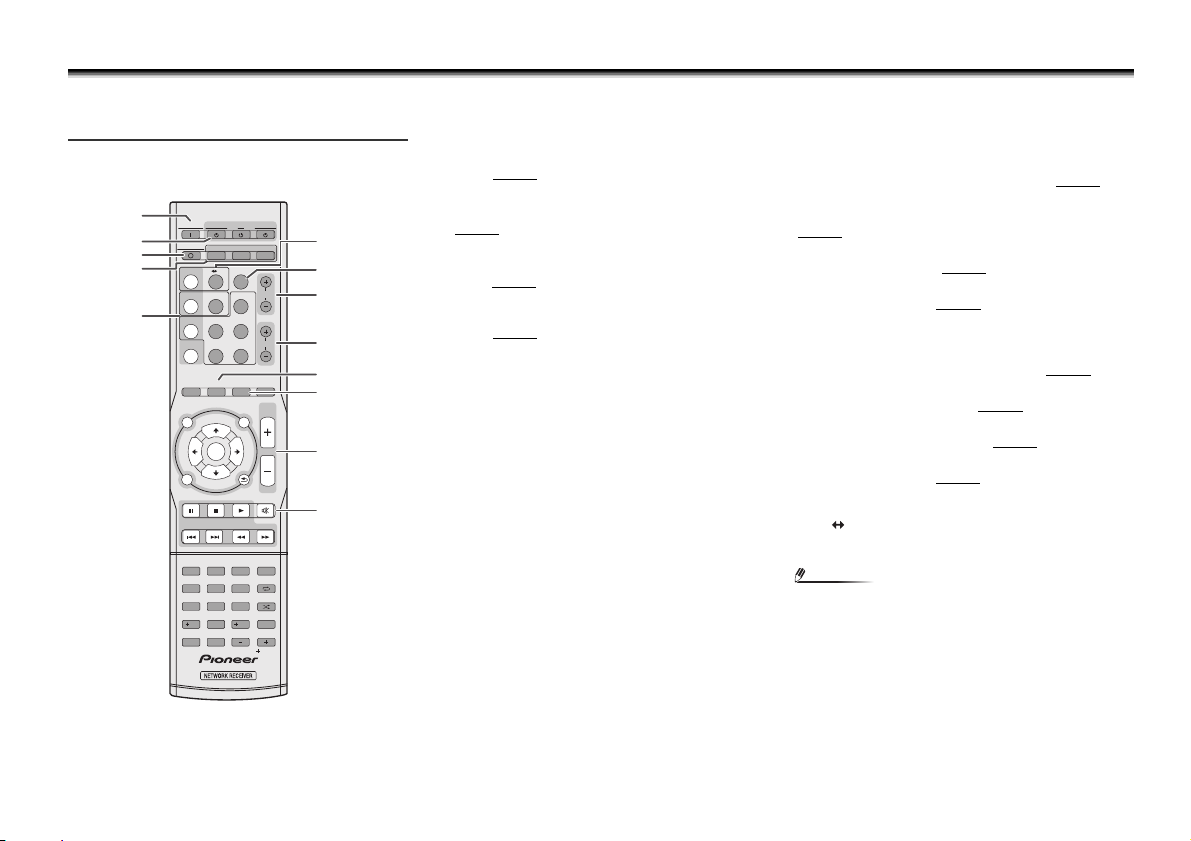
Remote control
There are functions which can be operated only when the remote control is set in either of the network audio player control mode, stereo receiver control mode or CD player control mode, and
functions which can be operated regardless of the mode of the remote control.
Buttons for general operations
The following functions are available regardless of the mode
of the remote control.
1
SYSTEM ON
Press to turn on the stereo receiver, network audio player and
CD player (page 44
).
2
STANDBY/ON
RECEIVER – Press to turn on and off the stereo receiver
(page 44
).
CD – Press to turn on and off the CD player.
NETWORK – Press to turn on and off the network audio
player (page 21
).
3
SYSTEM OFF
Press to turn off the stereo receiver, network audio player and
CD player (page 44
).
4
Remote control mode selection buttons
CONTROL RCV – Press to operate the functions available
only in the stereo receiver control mode.
CONTROL CD – Press to operate the functions available
only in the CD player control mode.
CONTROL NET – Press to operate the functions available
only in the network audio player control mode.
<Stereo receiver SX-P01, SX-P01DAB only>
5
Input function buttons
Use to select the input source to this receiver (page 45).
6
DIRECT
Use to listen to the sound source in the original sound quality
(page 45
).
7
TREBLE +/–
Press to adjust the treble (page 45).
8
BASS +/–
Press to adjust the bass (page 45).
9
SLEEP
Press to select the amount of time before the stereo receiver
turn off (Off – 30 min. – 60 min. – 90 min.). You can check
the remaining time by pressing SLEEP once (page 46
).
10
CLOCK
Press to check the current time (page 44).
11
Volume control buttons
Use to adjust the listening volume (page 44).
12
MUTE
Use to Mute the volume (page 45).
<CD player PD-P01 only>
13
CD USB
Press to select the CD or iPod/USB function for the CD
player.
Note
•
The supplied remote control can be used to control the
network audio player (N-P01), stereo receiver (SX-P01,
SX-P01DAB), and CD player (PD-P01).
SYSTEM ON RECEIVER CD NETWORK
CONTROL
CLOCKTIMER SLEEP DIMMER
NETCDRCV
SYSTEM OFF
TREBLE
BASS
BT AUDIO
iPod/USB
DIG IN 1/2
M.SERVER
CD/USB
CD USB
BAND
FAVORITES
TUNER
DIRECT
NETWORK
NET SERVICE
VOLUME
RETURN
MUTE
PTYAUTO TUNE
SETUP
TUNER EDIT
REPEAT
SHUFFLE
PLAY MODE
FOLDER
CLEAR
DISPLAY
iPod CONTROL
TOP
MENU
1 2 3 PGM
456
789
0
10
100
T
U
N
E
P
R
E
S
E
T
T
U
N
E
ENTER
RDS DISP
ENTER
Favorite
P
R
E
S
E
T
SORT
3
1
8
10
11
12
9
7
6
13
4
5
2

7
Buttons available for the network audio player
control mode
The following functions are available only when the remote
control is in the network control mode.
Important
•
Press the CONTROL NET button before pressing the
following buttons.
1
Input function buttons
Use to select the input source to this player.
2
TOP MENU
Displays the top menu of each input source.
3
///
Use to select/switch system settings and modes, and to
confirm actions.
4
ENTER
Press to confirm actions.
5
SETUP
Press to access the player setup menu (page 21).
6
Playback control buttons
The main buttons (, , etc.) are used to control each
function after you have selected it using the input function
buttons.
7
Numeric buttons
Use to enter the number.
8
CLEAR
Use to select/switch system settings.
9
DIMMER
Make the display brighter, darker, or turn it off altogether. The
brightness can be controlled in four steps (page 14
).
10
iPod CONTROL
Switches between the iPod controls and the player controls
(page 16
).
11
RETURN
Exit the current menu screen.
12
Playback mode buttons
REPEAT – Press to change repeat play setting from a
iPod, USB, Internet Radio, Music Server or Favorites.
SHUFFLE – Press to change shuffle play setting from a
iPod, USB, Internet Radio, Music Server or Favorites.
13
+Favorite
When using the Internet Radio or Music Server functions,
use to add an audio file or a station to Favorites function
(page 27
, 29).
14
SORT
When using the Music Server function, allows tracks to be
sorted if the DLNA server supports the sort function.
SYSTEM ON RECEIVER CD NETWORK
CONTROL
CLOCKTIMER SLEEP DIMMER
NETCDRCV
SYSTEM OFF
TREBLE
BASS
BT AUDIO
iPod/USB
DIG IN 1/2
M.SERVER
CD/USB
CD USB
BAND
FAVORITES
TUNER
DIRECT
NETWORK
NET SERVICE
VOLUME
RETURN
MUTE
PTYAUTO TUNE
SETUP
TUNER EDIT
REPEAT
SHUFFLE
PLAY MODE
FOLDER
CLEAR
DISPLAY
iPod CONTROL
TOP
MENU
PGM
100
T
U
N
E
P
R
E
S
E
T
T
U
N
E
ENTER
RDS DISP
ENTER
Favorite
123
456
789
0
10
P
R
E
S
E
T
SORT
4
4
3
2
1
5
6
9
10
11
12
13
14
8
7
8
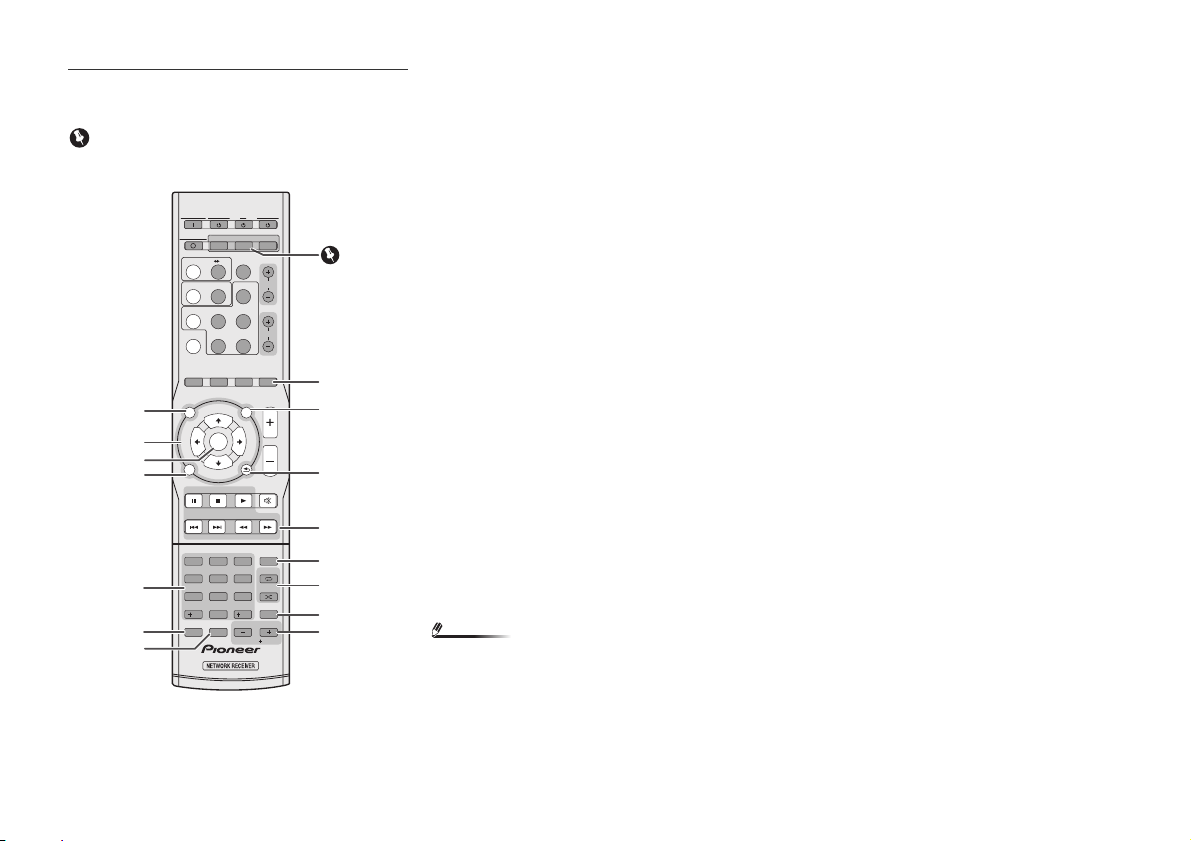
Buttons available for the stereo receiver control
mode
The following functions are available only when the remote
control is in the stereo receiver control mode.
Important
•
Press the CONTROL RCV button before pressing the
following buttons.
1
BAND
N-P01:Switches between FM ST (stereo) and FM MONO radio
bands (page 47
, 48).
XN-P02, XN-P02DAB: Switches between FM ST (stereo) and
FM MONO, and DAB radio bands (page 49
).
2
TIMER
Press to set the wake-up timer or check the current setting
(page 46
).
3
TOP MENU
Press to display the DAB setting menu (XN-P02DAB only)
(page 50
).
4
///
Use to select system setting and switch modes.
TUNE / – Use to find radio frequencies (page 47
, 49).
PRESET / – Use to select preset radio stations
(page 47
).
5
ENTER
Press to confirm actions.
6
SETUP
Press to access the setup menu (page 45, 51).
7
AUTO TUNE
Press to start the DAB auto scan (XN-P02DAB only)
(page 49
).
8
RDS function buttons
PTY – Use to search for RDS program types (page 48).
RDS DISP – Press to display the different types of RDS
information available (page 48
).
9
Numeric buttons
Use to enter the number.
10
CLOCK
Press to set the clock (page 44).
11
DIMMER
Press to adjust the brightness of the display (page 44).
12
DISPLAY
Press to display information of the current mode (page 48,
49
).
13
RETURN
Press to exit the current menu screen.
14
TUNER EDIT
Use to memorize/name stations for recall (page 47).
15
CLEAR
Press to clear the specified settings.
Note
•
Stereo receiver control mode can only be used by
customers using the stereo receiver (SX-P01, SX-P01DAB).
SYSTEM ON RECEIVER CD NETWORK
CONTROL
CLOCKTIMER SLEEP DIMMER
NETCDRCV
SYSTEM OFF
TREBLE
BASS
BT AUDIO
iPod/USB
DIG IN 1/2
M.SERVER
CD/USB
CD USB
BAND
FAVORITES
TUNER
DIRECT
NETWORK
NET SERVICE
VOLUME
RETURN
MUTE
PTYAUTO TUNE
SETUP
TUNER EDIT
REPEAT
SHUFFLE
PLAY MODE
FOLDER
CLEAR
DISPLAY
iPod CONTROL
TOP
MENU
PGM
100
T
U
N
E
P
R
E
S
E
T
T
U
N
E
ENTER
RDS DISP
ENTER
Favorite
123
456
789
0
10
P
R
E
S
E
T
SORT
6
5
8
4
3
2
1
6
7
10
11
12
13
14
15
9
9
Buttons available for the CD player control mode
The following functions are available only when the remote
control is in the CD player control mode.
Important
•
Press the CONTROL CD button before pressing the
following buttons.
1
TOP MENU
Press to display the iPod/iPhone/iPad mini top menu.
2
///
Use to select system setting and switch modes.
3
ENTER
Press to confirm actions.
4
SETUP
Press to access the setup menu.
5
Numeric buttons
Use to enter the number.
6
CLEAR
Press to clear a programmed track.
7
DIMMER
Press to adjust the brightness of the display.
8
DISPLAY
Press to display information of the current mode.
9
RETURN
Press to exit the current menu screen.
10
Playback control buttons
Use buttons to control playback.
11
PGM
Press to set programmed playback.
12
Playback mode buttons
REPEAT – Press to repeat the playback of track/file.
SHUFFLE – Press to shuffle the playback order of tracks/
files.
13
PLAY MODE
Press to enter the folder playback mode.
14
FOLDER +/–
Use to select a folder of a MP3/WMA disc or of a USB mass
storage device.
Note
•
CD player control mode can only be used by customers
using the CD player (PD-P01).
SYSTEM ON RECEIVER CD NETWORK
CONTROL
CLOCKTIMER SLEEP DIMMER
NETCDRCV
SYSTEM OFF
TREBLE
BASS
BT AUDIO
iPod/USB
DIG IN 1/2
M.SERVER
CD/USB
CD USB
BAND
FAVORITES
TUNER
DIRECT
NETWORK
NET SERVICE
VOLUME
RETURN
MUTE
PTYAUTO TUNE
SETUP
TUNER EDIT
REPEAT
SHUFFLE
PLAY MODE
FOLDER
CLEAR
DISPLAY
iPod CONTROL
TOP
MENU
PGM
100
T
U
N
E
P
R
E
S
E
T
T
U
N
E
ENTER
RDS DISP
ENTER
Favorite
123
456
789
0
10
P
R
E
S
E
T
SORT
3
3
6
2
1
4
7
11
13
12
14
8
10
9
5

10
1
1
Controls and displays (Network audio player: N-P01)
Front panel
1
STANDBY/ON button
Switches the player between standby and on (page 14).
2
USB terminal
Use to connect your USB mass storage device or iPod/
iPhone/iPad as an audio source (page 12
, 20).
3
Display
See Display below.
4
Remote sensor
Receives the signals from the remote control (page 5).
5
SOURCE
Select the input source (page 14).
6
Playback control button
Select the desired track or folder to be played back. Use to
stop the playback. Use / to stop playback or resume
playback from the pause point.
Display
1
Input source
2
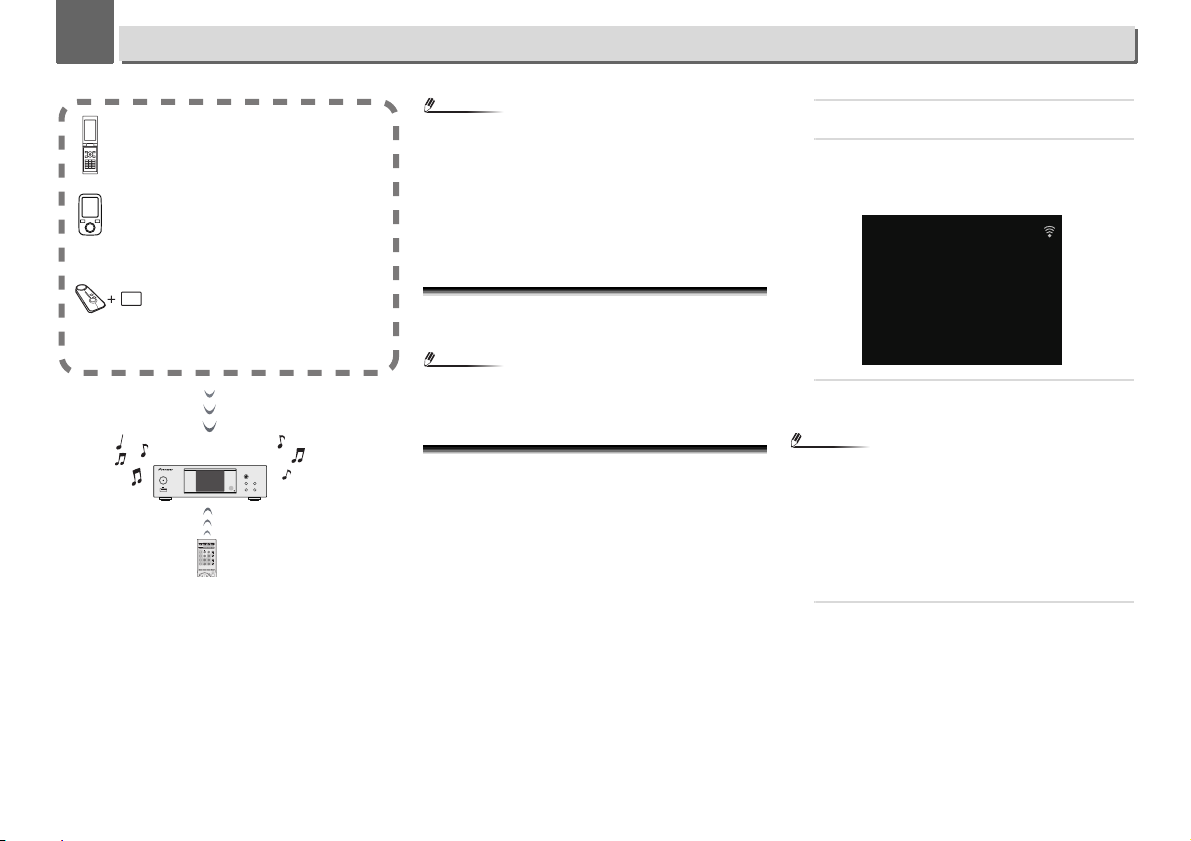
Network connection status
When the player is connected to the wired network,
this indicator lights (page 12
).
When the player that is connected to the LAN cable is
not connected to the network, this indicator lights. When
the LAN cable is not connected to this player, this
indicator does not light (page 12
).
When the player is connected to the wireless network,
this indicator lights. Depending on the strength of
wireless signal, the icon changes in five steps (page 12
).
When the player is not connected to the wireless
network, this indicator lights (page 12
).
Displayed when the wireless network settings for the
player are still set to their initial settings. See (page 21
) for
details on performing wireless settings.
3
Name of file/track/artist/album/station, etc.
4
Artwork
Displayed when the currently playing file includes an album
jacket image, etc.
5
Repeat and Shuffle
Repeat all files.
Repeat a file.
Shuffle
6
Play status
Displays the play status. The play status differs depending on
the input source.
NETWORK AUDIO PLAYER
SOURCE
N-P01
5 V 2.1 A
STANDBY/ON
l
21 3 4 65
iPod/USB
Song 1
Artist
Album
44:38 - 44:02
7
7
1 2
3
6
4
5
1

2
2
11
Connecting your equipment (Network audio player: N-P01)
CAUTION
•
Be sure to turn off the power and unplug the power cord
from the power outlet whenever making or changing
connections.
•
Connect the power cord after all the connections between
devices have been completed.
WLAN antenna connection
Connect the WLAN antenna to the WLAN ANTENNA
terminal.
Please always use the supplied WLAN antenna.
Analog audio output connections
By connecting this unit’s analog audio output to the analog
audio input of an amplifier, you can use the amplifier to enjoy
analog audio produced from this unit.
Note
•
If you are using the XN-P02 or XN-P02DAB, please refer to
the connection method shown on page 43
.
•
If you are using in combination with the XC-P01 or XC-
P01DAB, please refer to the connection method shown on
page 13
.
Digital audio output connections
By connecting this unit’s digital audio output to the digital
audio input of an AV receiver or D/A converter, etc, you can
use the amplifier to enjoy digital audio produced from this
unit.
Note
•
Digital signal formats that can be output from this unit
include linear PCM signals with sampling rate and
quantitative bits up to 192 kHz/24 bits (depending on the
connected device and environment, operation may not be
successful).
•
Digital audio signals that can be output from this unit’s
DIGITAL OUT connectors include the following inputs:
iPod/USB (*1), Internet Radio, Spotify and Music Server
(*1).
*1: Not including DSD file playback
•
When you select BT audio, USB or Music Server and
playback a DSD file, no signal will be output from the unit’s
DIGITAL OUT (OPTICAL) connector. Please use the AUDIO
OUT connector.
L
R
DIGITAL
OUT
CONTROL
OPTICAL
WLAN ANTENNA
AC IN
WLAN ANTENNA
LAN (10/100)
AUDIO
OUT
OUT
WLAN ANTENNA
WLAN ANTENNA
WLAN ANTENNA
WLAN ANTENNA
1
2
3
1
2
3
Supplied WLAN
antenna
Supplied WLAN
antenna
Power cord
To AC outlet
L
R
DIGITAL
OUT
CONTROL
OPTICAL
WLAN ANTENNA
LAN (10/100)
AUDIO
OUT
OUT
ANALOG
RL
AUDIO INPUT
Amplifier
L
R
DIGITAL
OUT
CONTROL
OPTICAL
WLAN ANTENNA
LAN (10/100)
AUDIO
OUT
OUT
DIGITAL IN
OPTICAL
AV receiver, D/A
converter, etc.
12
2
2
Connecting your equipment (Network audio player: N-P01)
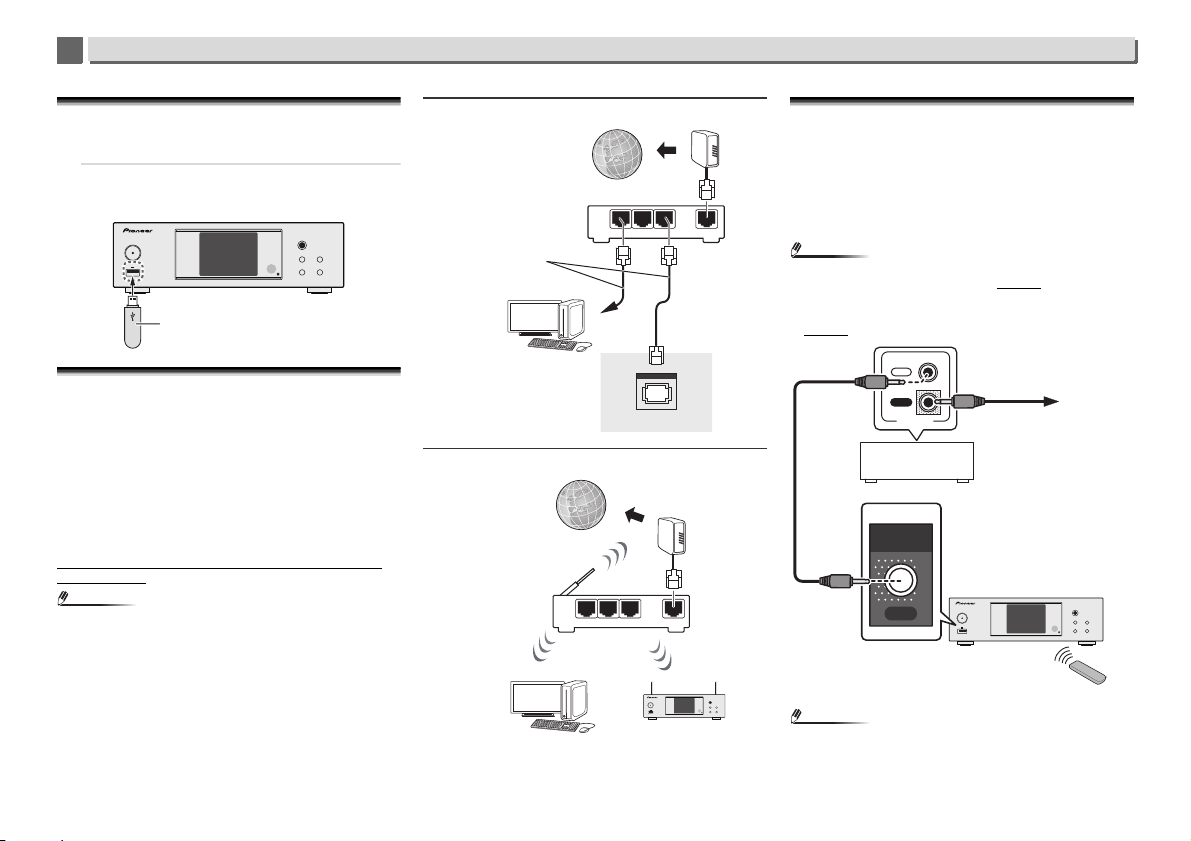
Connecting USB storage devices
It is possible to listen to two-channel audio using the USB
terminal on the front of this player.
1
Connect your USB device to the USB terminal on the
front panel of this player.
•
This player does not support a USB hub.
Connecting to the network through the LAN
interface or WLAN antenna
By connecting this player to the network via the LAN interface
or WLAN antenna, you can play back audio files stored on
components on the network, including your PC, and listen to
Internet radio stations.
Connect the LAN terminal on this player to the LAN terminal
on your router (with or without the built-in DHCP server
function) with a straight LAN cable (CAT 5 or higher). Also
wireless connection to the network is possible.
Requires network settings to be performed. For details, See
Playback with NETWORK features (Network audio player: N-
P01) on page 21
Note
•
If you are not using network functions then it is
recommended that you set Network Type to Wired under
Network Setting.
•
To use services such as Internet radio, you must conclude
a contract with an Internet service provider.
•
Photo or video files cannot be played back.
•
With Windows Media Player 12, you can even play back
copyrighted audio files on this player.
Connecting using LAN cable
Connecting using wireless LAN
Using centralized control with other Pioneer
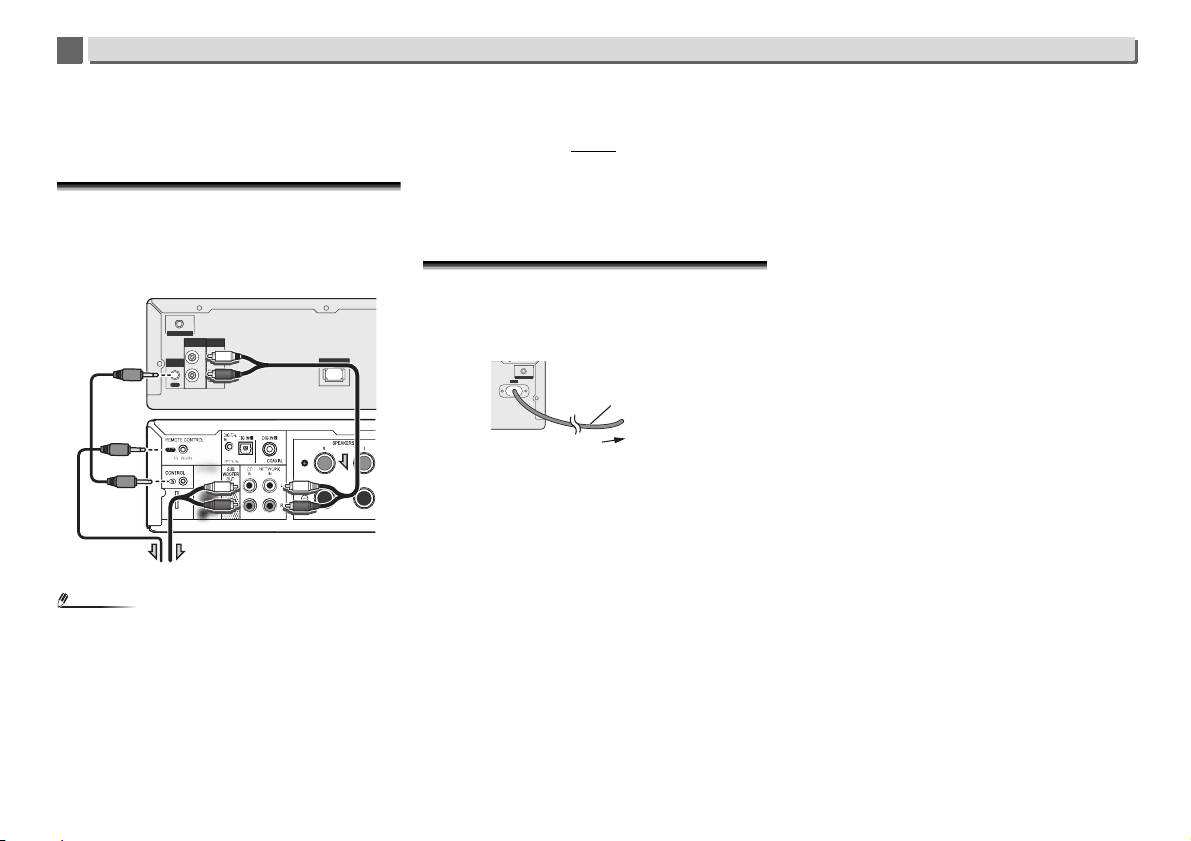
components
Multiple Pioneer components equipped with CONTROL IN/
OUT jacks can be connected to the unit, allowing centralized
control of the components via the remote sensor on the unit.
This also allows remote control of components not equipped
with a remote sensor, or installed in places where the
component’s remote sensor cannot be accessed.
Note
•
If you are using the XN-P02 or XN-P02DAB, please refer to
the connection method shown on page 43
.
•
If you are using in combination with the XC-P01 or XC-
P01DAB, please refer to the connection method shown on
page 13
.
Note
•
For connections use a supplied monaural miniplug cord
(without resistor).
NETWORK AUDIO PLAYER
SOURCE
N-P01
5 V 2.1 A
STANDBY/ON
l
USB storage device
(commercially available)
LAN (10/100)
WAN
321
LAN
Internet
Router
Computer
This player’s rear
panel
LAN cable
(commercially
available)
NETWORK AUDIO PLAYER
SOURCE
N-P01
5 V2.1 A
STANDBY/ON
l
WAN
321
LAN
Internet
Wireless LAN
router
Computer
Modem
IN
OUT
CONTROL
NETWORK AUDIO PLAYER
SOURCE
N-P01
5 V 2.1 A
STANDBY/ON
l
CONTROL
OUT
Other Pioneer component
equipped with CONTROL
IN/OUT jacks
To other Pioneer component
equipped with CONTROL IN
jack
N-P01
Aim remote control at
the sensor on the unit.
Remote
control
Modem
13
2
2
Connecting your equipment (Network audio player: N-P01)
•
When connecting the CONTROL IN/OUT jacks,
commercially available audio cords must also be used to
make analog connections. Merely connecting the
CONTROL IN/OUT jacks alone will not allow proper system
control.
Using combined with the XC-P01 or
XC-P01DAB
•
Connect the stereo receiver (SX-P01, SX-P01DAB) and
network audio player (N-P01) using the supplied remote
control cable and RCA audio cable.
Note
•
When the stereo receiver (SX-P01, SX-P01DAB) and
network audio player (N-P01) are connected using the
remote control cable, the stereo receiver remote control
signal receiver will not function. Point the remote control at
the remote control signal receiver on the network audio
player.
•
When connecting to the control connector, you must also
connect the audio cable (analog connection). Only
connecting to the control connector will not allow for
correct system control.
•
Connecting the remote control cable will allow the Pioneer
ControlApp to be used, providing simple control over the
stereo receiver (SX-P01, SX-P01DAB) via the network audio
player (N-P01). Refer to page 31
for details of the Pioneer
ControlApp.
•
If the network audio player’s quick start setting is Off then
you will be unable to control the stereo receiver or CD
player.
Turn the network audio player’s quick start setting On and
you will be able to control them.
Plugging in
Before making or changing the connections, switch off the
power and disconnect the power cord from the AC outlet.
After you’ve finished making all connections, plug the player
into an AC outlet.
L
R
DIGITAL
OUT
CONTROL
OPTICAL
WLAN ANTENNA
LAN (10/100)
AUDIO
OUT
OUT
N-P01
SX-P01 or SX-P01DAB
CD Player (PD-P01)
WLAN ANTENNA
AC IN
To AC outlet
This player’s rear
panel
Power cord

3
3
14
Getting started (Network audio player: N-P01)
Setting the player
When you use the player for the first time, the following
screens will be displayed.
Set up the following items to customize the player.
1
Press
NETWORK.
The power indicator flashes slowly. About twenty seconds
after turning on the power, the following screen appears.
About thirty seconds are required between turning the
power on and completion of startup.
When powering up for the first time
When you turn on the power to the player for the first time,
initial settings will be automatically performed, thus startup
will take about 1 minute.
•
After the Pioneer logo is displayed, the screen will go dark.
The start up process is complete once the Pioneer logo is
displayed a second time.
Auto Power Off setup
Set to automatically turn off the player after a specified time
has passed (when the power has been on with no operation
for the set period of time).
•
Default setting: 15 min
1
Press NET SERVICE, then press SETUP on the remote
control.
The Initial Setup menu is shown on the display.
2
Select ‘Option Setting’ from Initial Setup menu.
3
Select ‘Power Off Setting’ from Option Setting menu.
4
Select ‘Auto Power Off’ from Power Off Setting menu.
5
Use
/
to specify the amount of time to allow before
the power is turned off (when there has been no
operation), then press ENTER.
Select 15 minutes (default setting) or 30 minutes, 60
minutes or OFF.
6
When you’re finished, press RETURN.
General control
Input function
When pressing SOURCE button on the player, the current
function will change to different mode. Press SOURCE button
repeatedly to select desired function. The selected input is
displayed on the front panel display.
Note
•
The backup function will protect the memorised function
mode should there be a power failure or the AC power cord
becomes disconnected.
Display brightness control
Press the CONTROL NET button on the remote control. Press
DIMMER button to dims the display brightness. The
brightness can be controlled in four steps.
BT Audio
iPod/USB
Music
Server
Internet
Radio
Favorites Spotify

4
4
15
iPod/iPhone/iPad playback (Network audio player: N-P01)
Merely by connecting your iPod/iPhone/iPad to this player,
you can enjoy high-quality sound from your iPod/iPhone/iPad.
Confirming what iPod/iPhone/iPad models are
supported
The iPod/iPhone/iPad playable on this player are shown
below.
Note
•
USB works with iPhone 5s, iPhone 5c, iPhone 5, iPhone 4s,
iPhone 4, iPhone 3GS, iPad Air, iPad (3rd and 4th
generation), iPad 2, iPad mini with Retina Display, iPad
mini, iPod touch (1st through 5th generation) and iPod
nano (3rd through 7th generation). However, some of the
functions may be restricted for some models. The player is
not compatible with the iPod shuffle.
•
This player has been developed and tested for the software
version of iPod/iPhone/iPad indicated on the website of
Pioneer (http://pioneer.jp/homeav/support/ios/eu/).
•
Installing software versions other than indicated on the
website of Pioneer to your iPod/iPhone/iPad may result in
incompatibility with this player.
•
iPod, iPhone and iPad are licensed for reproduction of
noncopyrighted materials or materials the user is legally
permitted to reproduce.
•
Features such as the equalizer of iPod/iPhone/iPad cannot
be controlled using this player, and we recommend
switching the equalizer off before connecting.
1
Select “Settings” from the top menu.
You can confirm your software version by operating your
iPod/iPhone/iPad. When using iPod touch, iPhone or
iPad, select “General” after selecting “Settings”.
2
Select “About”.
The software version will be displayed.
Connect iPod/iPhone/iPad to the USB terminal
Connect your iPod/iPhone/iPad to the USB terminal on the
player’s front panel. Use the iPod cable supplied with your
iPod/iPhone/iPad for the connection.
•
For the cable connection, also refer to the operating
instructions for your iPod/iPhone/iPad.
iPod/iPhone/iPad Audio Control
iPod nano 3G/4G/5G/6G/7G
iPod touch 1G/2G/3G/4G/5G
iPhone 3GS
iPhone 4
iPhone 4s
iPhone 5
iPhone 5c
iPhone 5s
iPad mini
iPad mini with Retina Display
iPad 2
iPad (3rd generation)
iPad (4th generation)
iPad Air
NETWORK AUDIO PLAYER
SOURCE
N-P01
5 V 2.1 A
STANDBY/ON
l
4
4
16
iPod/iPhone/iPad playback (Network audio player: N-P01)
Playing your iPod/iPhone/iPad
CAUTION
•
When your iPod/iPhone/iPad is connected to this player
and you wish to operate the iPod/iPhone/iPad directly, be
sure to hold the iPod/iPhone/iPad steady with the other
hand to prevent malfunctions due to faulty contacts.
1
Connect your iPod/iPhone/iPad.
To connect your iPod/iPhone/iPad, see Connect iPod/
iPhone/iPad to the USB terminal on page 15.
2
Press iPod/USB to select iPod/USB as the input source.
iPod/USB is shown on the display and starts playback.
Note
•
When the iPod/iPhone/iPad is connected to this player, the
playback information for the songs are displayed on the
iPod/iPhone/iPad display. Pressing iPod CONTROL
button on the remote will switch the display and display the
information on the front panel of the player.
Important
•
If this player cannot play your iPod/iPhone/iPad, perform
the following troubleshooting checks:
-
Check whether the iPod/iPhone/iPad is supported by this
player (page 15
).
-
Reconnect the iPod/iPhone/iPad to the player. If this
doesn’t seem to work, try resetting your iPod/iPhone/
iPad.
-
Check the iPod/iPhone/iPad software is supported by this
player.
•
If the iPod/iPhone/iPad cannot be operated, check the
following items:
-
Is the iPod/iPhone/iPad connected correctly? Reconnect
the iPod/iPhone/iPad to the player.
-
Is the iPod/iPhone/iPad experiencing a hangup? Try
resetting the iPod/iPhone/iPad, and reconnect it to the
player.
-
When connecting the iPad, use only an iPad dedicated
cable.
Tip
•
iPod/iPhone/iPad recharging occurs whenever an iPod/
iPhone/iPad is connected to this player. (This function is
only supported when the power is initially turned on or
during Network Standby).
•
When input is switched from iPod/USB to another
function, iPod/iPhone/iPad playback is temporarily
stopped.
5
5
17
Music playback using
Bluetooth
® wireless technology (Network audio player: N-P01)
The unit is capable of playing back music stored on Bluetooth
capable devices (cell phones, digital music players etc.)
wirelessly. You can also use a Bluetooth audio transmitter
(sold separately) to enjoy music from devices that do not have
Bluetooth functionality. Please refer to the user’s manual for
your Bluetooth capable device for more details.
Note
•
The Bluetooth
®
word mark and logos are registered
trademarks owned by Bluetooth SIG, Inc. and any use of
such marks by PIONEER CORPORATION is under license.
Other trademarks and trade names are those of their
respective owners.
•
The Bluetooth wireless technology enabled device must
support A2DP profiles.
•
Pioneer does not guarantee proper connection and
operation of this unit with all Bluetooth wireless technology
enabled devices.
Remote control operation
The remote control supplied with this unit allows you to play
and stop media, and perform other operations.
Note
•
The Bluetooth wireless technology enabled device must
support AVRCP profiles.
•
Remote control operations cannot be guaranteed for all
Bluetooth wireless technology enabled devices.
Pairing with the unit (Initial registration)
In order for the unit to playback music stored on a Bluetooth
capable device, pairing must first be performed. Pairing
should be performed when first using the unit with the
Bluetooth capable device, or when the pairing data on the
device has been erased for any reason.
Pairing is a step required to allow communication using
Bluetooth wireless technology to be carried out.
•
Pairing is only performed the first time that you use the unit
and the Bluetooth capable device together.
•
In order to allow communication using Bluetooth wireless
technology to take place, pairing must be performed on
both the unit and the Bluetooth capable device.
•
After pressing the
BT AUDIO
and switching to
BT Audio
function, perform the pairing procedure on the Bluetooth
capable device. If pairing has been performed correctly,
you will not need to perform the pairing procedures for the
unit as shown below.
Please refer to the user’s manual for your Bluetooth capable
device for more details.
1
Press the STANDBY/ON and turn the power to the unit
on.
2
Press the BT AUDIO.
The unit switches to
BT Audio
and “Waiting device” will be
displayed.
•
Waiting device
3
Turn on the power to the
Bluetooth
capable device that
you wish to pair with, and perform pairing procedure on
it.
Note
•
This unit will be displayed as “N-P01” on all Bluetooth
capable devices that you have.
Pairing will start.
•
Place the Bluetooth capable device close to the unit.
•
Please refer to the user’s manual for your Bluetooth
capable device for details on when pairing can be
performed and the procedures required for pairing.
•
When PIN code entry is requested, enter “0000.” (This unit
does not accept any PIN code setting other than “0000.”)
4
Confirm on the
Bluetooth
capable device that pairing
has been completed.
If pairing with the Bluetooth capable device has been
completed correctly “Connected“ will be displayed.
NETWORK AUDIO PLAYER
SOURCE
N-P01
5 V 2.1 A
STANDBY/ON
l
SYSTEM ONRECEIVER CD NETWORK
CONTROL
CLOCKTIMER SLEEP DIMMER
NETCDRCV
SYSTEM OFF
TREBLE
BASS
BT AUDIO
iPod/USB
DIG IN 1/2
M.SERVER
CD/USB
CDUSB
BAND
FAVORITES
TUNER
DIRECT
NETWORK
NET SERVICE
VOLUME
DISPLAY
iPod CONTROL
TOP
MENU
T
U
N
E
Remote control operation
Device not equipped with Bluetooth
wireless technology: Digital music
player
+
Bluetooth
®
wireless technology audio
transmitter (commercially available)
Bluetooth wireless technology enabled device:
Digital music player
Bluetooth wireless technology enabled device:
Cell phone
BT Audio
Waiting Device
Loading...