


Model No.
TX-L42U5E
TX-L32C5E
Operating Instructions
LCD Television
Thank you for purchasing this Panasonic product.
Please read these instructions carefully before operating this product and retain them for future reference.
The images shown in this manual are for illustrative purposes only.
Please refer to Pan European Guarantee Card if you need to contact your local Panasonic dealer for assistance.
English

Contents |
|
SAFETY PRECAUTIONS..................................................................................................... |
3 |
Warning ................................................................................................................................................................................................... |
3 |
Caution.............................................................................................................................. |
4 |
Maintenance..................................................................................................................... |
4 |
Display panel, Cabinet, Pedestal..................................................................................................................................................... |
4 |
Mains plug .............................................................................................................................................................................................. |
4 |
Notice for DVB functions................................................................................................. |
5 |
Standard Accessories....................................................................................................... |
6 |
Attaching the Pedestal.................................................................................................... |
6 |
Installing Pedestal (TX-L42U5E) ...................................................................................................................................................... |
7 |
Uninstalling Pedestal (TX-L42U5E) ................................................................................................................................................ |
7 |
Installing Pedestal (TX-L32C5E) ...................................................................................................................................................... |
7 |
Uninstalling Pedestal (TX-L32C5E)................................................................................................................................................. |
7 |
Wall-hanging (Not supplied)............................................................................................................................................................ |
8 |
PART NAMES AND FUNCTIONS....................................................................................... |
9 |
TV Controls/ Indicators....................................................................................................................................................................... |
9 |
TV (Side / Back)...................................................................................................................................................................................... |
9 |
Connections.................................................................................................................... |
10 |
Computer Connection..................................................................................................................................................................... |
10 |
Video Equipment Connection ...................................................................................................................................................... |
10 |
AC Power Cord Connection........................................................................................................................................................... |
11 |
Aerial or Cable Connection............................................................................................................................................................ |
11 |
Remote Control Batteries Installation.......................................................................... |
11 |
Remote Control.............................................................................................................. |
12 |
Turning On/Off LCD TV.................................................................................................. |
13 |
Selecting Input Source................................................................................................... |
13 |
ASPECT............................................................................................................................ |
13 |
Initial Setup.................................................................................................................... |
14 |
On-Screen Display.......................................................................................................... |
18 |
Picture ................................................................................................................................................................................................... |
18 |
Sound .................................................................................................................................................................................................... |
19 |
Timer...................................................................................................................................................................................................... |
20 |
Setup...................................................................................................................................................................................................... |
20 |
Media Player........................................................................................................................................................................................ |
22 |
TROUBLESHOOTING....................................................................................................... |
24 |
SPECIFICATIONS............................................................................................................. |
25 |
Input Signal Compatibility Chart.................................................................................. |
26 |
COMPONENT (Y, PB, PR), HDMI..................................................................................................................................................... |
26 |
PC (from D-sub terminal/ HDMI terminal)................................................................................................................................ |
26 |
Multi-media Supported Specification.......................................................................... |
27 |
Photo ..................................................................................................................................................................................................... |
27 |
Music...................................................................................................................................................................................................... |
27 |
Movie ..................................................................................................................................................................................................... |
27 |
LICENSE........................................................................................................................... |
28 |
2
SAFETY PRECAUTIONS
Warning
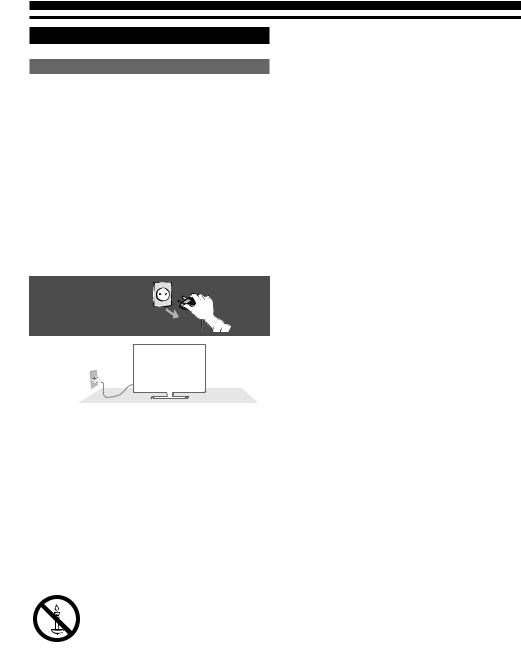
Handling the mains plug and lead
•Insert the mains plug fully in to the socket outlet. (If the mains plug is loose, it could generate heat and cause fire.)
•Ensure that the mains plug is easily accessible.
•Do not touch the mains plug with a wet hand. This may cause an electrical shock.
•Do not damage the mains lead, damaged lead may cause fire or electrical shock.
−−Do not move the TV with the lead plugged in to a socket outlet.
−−Do not place a heavy object on the lead or place the lead near a high temperature object.
−−Do not twist the lead, bend it excessively or stretch it.
−−Do not pull on the lead. Hold onto the mains plug body when disconnecting the plug.
−−Do not use a damaged mains plug or socket outlet.
−−Ensure TV does not crush the mains lead.
If you find any abnormality, remove the mains plug immediately!
AC 220-240 V
50 Hz
Do not expose to rain or excessive moisture
•To prevent damage which might result in electric shock or fire, do not expose this TV to rain or excessive moisture.
•This TV must not be exposed to dripping or splashing water and objects filled with liquid, such as vases, must not be placed on top of or above the TV.
Do not place foreign objects inside the TV
•Do not allow any objects to drop into the TV through the air vents as fire or electrical shock may result.
Do not place the TV on unstable surfaces
•The TV may fall or tip over.
Use only original dedicated pedestal / mounting equipment
•Using an unapproved pedestal or other fixtures may make the TV unstable, risking injury. Be sure to ask your local Panasonic dealer to perform the set up or installation.
•Use approved pedestals / wall-hanging brackets.
Power source
•This TV is designed to operate on AC 220-240 V, 50 Hz.
Do not remove covers and NEVER modify the TV yourself
•High voltage components may cause serious electrical shock, do not remove the rear cover as live parts are accessible when it is removed.
•There are no user serviceable parts inside.
•Have the TV checked, adjusted or repaired at your local Panasonic dealer.
Do not expose the TV set to direct sunlight and other sources of heat
•Avoid exposing the TV to direct sunlight and other sources
To prevent the spread of fire, keep candles or other open flames away from this product at all times
3

Caution
When cleaning the TV remove the mains plug
•Cleaning an energised TV may cause electrical shock.
Remove the mains plug from the wall socket when TV is not in use for a prolonged period of time
•The TV will still consume some power even in the off mode, as long as the mains plug is still connected.
•Remove the mains plug from the wall socket before connecting or disconnecting leads.
Do not expose your ears to excessive volume from the headphones
•Irreversible damage can be caused.
Do not apply strong force or impact to the display panel
•This may cause damage resulting in injury.
Transport TV set in upright position Do not block the rear air vents
•Adequate ventilation is essential to prevent failure of electronic components.
•Ventilation should not be impeded by covering the ventilation openings with items such as newspapers, table cloths and curtains.
•We recommend that a gap of at least 10 cm is left all around this television receiver even when placed inside a cabinet or between shelves.
•When using the pedestal, keep the space between the bottom of the TV and the surface where the TV is set. If pedestal is not used, ensure the vents in the bottom of the TV set are not blocked.
Minimum distance
10 cm
10 cm |
10 cm |
10 cm |
Maintenance
First, remove the mains plug from the socket outlet.
Display panel, Cabinet, Pedestal
Regular care :
Gently wipe the surface of the display panel, cabinet, or pedestal by using a soft cloth to clean the dirt or fingerprints.
For stubborn dirt :
Dampen a soft cloth with clean water or diluted neutral detergent (1 part detergent to 100 parts water). Then wring the cloth and wipe the surface. Finally, wipe away all the moisture.
Caution
•Do not use a hard cloth or rub the surface too hard. This may cause scratches on the surface.
•Take care not to subject the TV’s surfaces to water or detergent. Liquid inside the TV could lead to product failure.
•Take care not to subject the surfaces to insect repellent, solvent, thinner or other volatile substances. This may degrade surface quality or cause peeling of the paint.
•The surface of the display panel is specially treated and may be easily damaged. Take care not to tap or scratch the surface with your fingernail or other hard objects.
•Do not allow the cabinet and pedestal to make contact with a rubber or PVC substance for a long time. This may degrade surface quality.
Mains plug
Wipe the mains plug with a dry cloth at regular intervals. Moisture and dust may lead to fire or electrical shock.
4
Notice for DVB functions
This TV is designed to meet the standards (as of August, 2010) of DVB-T (MPEG2 and MPEG4 AVC(H.264)) digital terrestrial services and DVB-C (MPEG2 and MPEG4-AVC(H.264)) digital cable services.
Consult your local dealer for availability of DVB-T services in your area.
•This TV may not work correctly with the signal which does not meet the standards of DVB-T or DVB-C.
•Not all the features are available depending on the country, area, broadcaster and service provider.
•Not all CI modules work properly with this TV. Consult your service provider about the available CI module.
•This TV may not work correctly with CI module that is not approved by the service provider.
•Additional fees may be charged depending on the service provider.
•The compatibility with future DVB services is not guaranteed.
•Check the latest information on the available services at the following website. (English only) http://panasonic.jp/support/global/cs/tv/Consult your cable service provider for availability of DVB-C services with this TV.
Panasonic does not guarantee operation and performance of peripheral devices made by other manufacturers; and we disclaim any liability or damage arising from operation and/or performance from usage of such other maker’s peripheral devices.
5
Standard Accessories
 Check you have all the items shown.
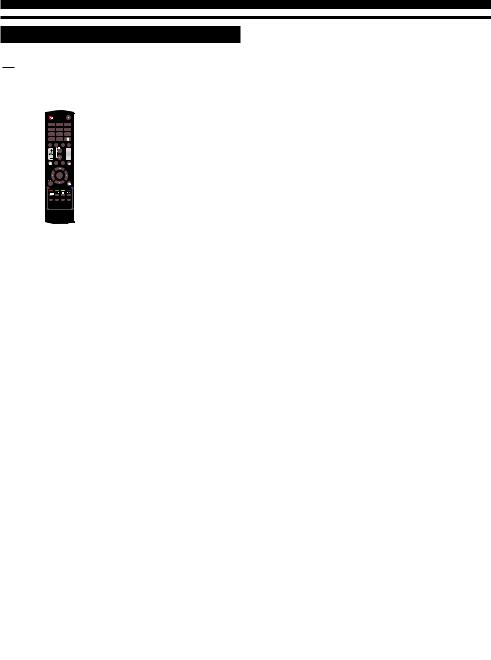
Remote Control |
|
Batteries (R03 AAA) |
||||||
(TZZ00000007A) |
|
|
x 2 |
|||||
|
|
|
|
|
|
|
|
|
|
|
|
|
|
|
|
|
|
|
|
|
|
|
|
|
|
|
|
|
|
|
|
|
|
|
|
|
|
|
|
|
|
|
|
|
TX-L42U5E
Neck and Base |
Screws |
|
Screws x 4 |
|
(Assembly screws for Base) |
|
Screws x 4 |
|
(Assembly screws for Pedestal) |
TX-L32C5E
Neck and Base |
Screws |
|
Screws x 4 |
|
(Assembly screws for Base) |
|
Screws x 2 |
|
(Assembly screws for Pedestal) |
Power Cord
Attaching the Pedestal
Warning
Do not disassemble or modify the pedestal.
•Otherwise the TV may fall over and become damaged, and personal injury may result.
Caution
Do not use any pedestal other than that provided with this TV.
•Otherwise the TV may fall over and become damaged, and personal injury may result.
Do not use the pedestal if it becomes warped or physically
•If you use the pedestal while it is physically damaged, personal injury may result. Contact your nearest Panasonic dealer immediately.damaged.
During assembly, use only screws supplied and make sure
•If sufficient care is not taken to ensure screws are properly tightened during assembly, the pedestal will not be strong
enough to support the TV. It might fall over and become damaged and personal injury may result.that all screws are securely tightened.
•If the TV is knocked or children climb onto the pedestal with the TV installed, the TV may fall over and personal injury may result.Ensure that the TV does not fall over.
Two or more people are required to install and remove
•If two or more people are not present, the TV may be dropped, and personal injury may result.the TV.
Caution
Small object
This product contains possibly dangerous parts that can be breathed in or swallowed by young children accidentally
•Keep the dangerous parts out of reach of young children.
The metal part of stand neck has sharp edges. Please use caution when handling the pedestal.
6

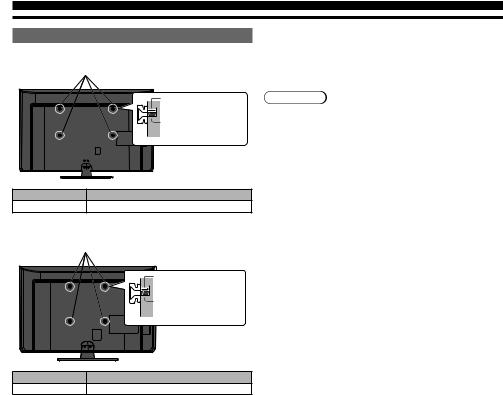
Installing Pedestal (TX-L42U5E)
1.Place the LCD TV screen facing down on a flat surface place where maintained with soft materials (such as a blanket) for protecting the display screen.
2.Use four assembly screws to fasten the neck to the base securely.
3. Adjusts the pedestal to the bottom of the TV.
4.Use only the supplied assembly screws to fasten the pedestal securely to the TV.
Installing Pedestal (TX-L32C5E)
1.Place the LCD TV screen facing down on a flat surface place where maintained with soft materials (such as a blanket) for protecting the display screen.
2.Use four assembly screws to fasten the neck to the base securely.
3. Adjusts the pedestal to the bottom of the TV.
4.Use only the supplied assembly screws to fasten the pedestal securely to the TV.
Uninstalling Pedestal (TX-L42U5E)
1.Place the LCD TV screen facing down on a flat surface place where maintained with soft materials (such as a blanket) for protecting the display screen.
2.Remove screws in four holes with screw driver.
Uninstalling Pedestal (TX-L32C5E)
1.Place the LCD TV screen facing down on a flat surface place where maintained with soft materials (such as a blanket) for protecting the display screen.
2.Remove screws in two holes with screw driver.
7
Wall-hanging (Not supplied)
TX-L42U5E
Wall-hanging Insets
|
Depth of screw : minmum 8 mm |
|
maximum 11 mm |
|
Diameter : M6 |
|
Screw for xing the TV onto the |
|
wall-hanging bracket |
|
(not supplied with the TV) |
|
(View from the side) |
TV Size |
VESA standard interface |
42 inch |
200 x 400 mm |
TX-L32C5E
Wall-hanging Insets
|
Depth of screw : minmum 8 mm |
|
maximum 11 mm |
|
Diameter : M6 |
|
Screw for xing the TV onto the |
|
wall-hanging bracket |
|
(not supplied with the TV) |
|
(View from the side) |
TV Size |
VESA standard interface |
32 inch |
200 x 200 mm |
Wall-hanging bracket (Optional)
Please contact your nearest Panasonic dealer to purchase the recommended optional accessories.
For additional details, please refer to the manual of the optional accessories.
Warning
•Using other wall-hanging brackets, or installing a wall hanging bracket by yourself have the risk of personal injury and product damage. In order to maintain the unit’s performance and safety, be absolutely sure to ask your dealer or a licensed contractor to secure the wall-hanging brackets. Any damage caused by installing without a qualified installer will void your warranty.
•Do not mount the unit directly below ceiling lights (such as spotlights, floodlights or halogen lights) which typically give off high heat. Doing so may warp or damage plastic cabinet parts.
•Take care when fixing wall brackets to the wall. Always ensure that there are no electrical cables or pipes in the wall before hanging bracket.
•To prevent fall and injury, remove the TV from its fixed wall position when it is no longer in use.
8
PART NAMES AND FUNCTIONS
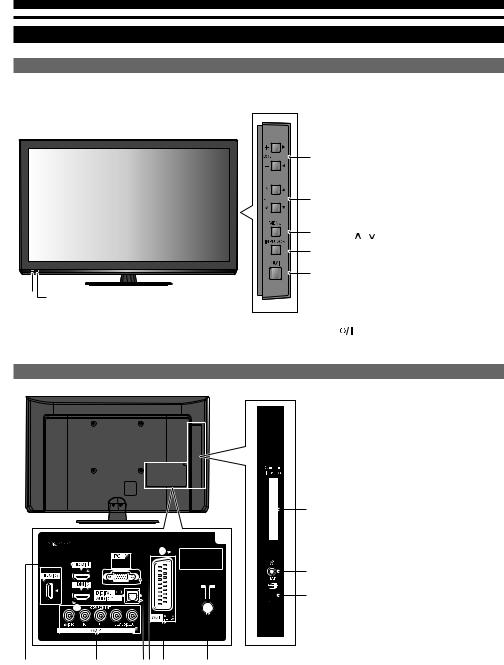
TV Controls/ Indicators
1 Remote Control Signal Receiver
•Do not place any objects between the TV remote control signal receiver and remote control.
2 |
Power Indicator |
|
Red: Standby |
3 |
Green: On |
|
Green blink: Receiving a command from |
the remote control.
|
4 |
3 |
VOL +/- |
|
|
•Used to change volume. |
|||
|
|
•Used to adjust the value of the selected item |
||
|
5 |
on On-Screen Menu. |
||
|
4 |
CH |
/ |
|
|
|
Used to change channels. |
||
|
6 |
••Used to select item on On-Screen Menu. |
||
|
7 |
5 |
MENU |
|
1 |
2 |
•Open or close the On-Screen Menu. |
||
6 |
INPUT/OK |
|||
|
|
•Use to select an input source. |
||
|
|
•Confirm and enter a selection. |
||
|
|
7 |
|
(POWER) |
|
|
•Use to turn the TV On or Off. |
||
TV (Side / Back)
|
AV IN |
|
ST3 |
Manufactured under license |
|
|
|
|
from Dolby Laboratories. |
|
PC AUDIO |
|
|
Dolby and the double-D |
|
|
|
symbol are trademarks of |
|
|
via AV 2 |
|
|
Dolby Laboratories. |
|
*1 |
|
|
|
|
ST3 |
|
|
|
|
|
|
|
>PC< |
|
>PC< |
|
|
|
1 |
2 |
34 |
5 |
6 |
*1: HDMI 3 is only for TX-L42U5E model.
Note:
The examples used throughout this manual are based on the TX-L32C5E model.
1 HDMI 1/HDMI 2/HDMI 3*1
•Connect all kinds of HDMI output equipment.
•When connecting a DVI device using an HDMI-DVI adapter, connect the device to the HDMI1 jack.
2 AV 2
•Connect video and audio output from video equipment.
3 DIGITAL AUDIO OUT
•Connect an audio amplifier to this jack.
7 4 PC
•Connect computer outputs to this terminal.
•Connect an audio cable to L/R jacks of AV2 and audio out jack on the computer.
5 AV 1
8 •Full SCART, which transmits RGB, S-Video and CVBS in, and audio/video out (Analogue only).
6 Aerial Jack
9 •Connects to TV RF signals (Aerial/CATV).
7Common Interface
•The Common Interface Module menu provides access to software contained on Common Interface (CI) Modules.
8Headphone
•Connect a headphone (stereo) to this jack and the TV speaker out will be muted.
9USB
•Connect USB memory stick to this terminal to play Multimedia.
9
 Loading...