


N
1 2 3
4 5 6
7 8 9
C0
Operating Instructions
Progressive Plasma Television
Model No. TH-37PA30
TH-42PA30
Pedestal stand shown above is optional extra.
Please read these instruction before operating your set and retain them for future reference.
English
TQBC0711

Welcome
Dear Panasonic Customer,
We hope that you have many years of enjoyment from your new TV. The Quick Start Guide section at the beginning of this instruction book will allow you to use the TV as quickly as possible. We recommend that you then read the complete instruction book, and keep it to refer to as you explore the range of advanced features that this Plasma TV offers.
Contents
Important Safety Notice .............................................. |
3 |
Safety Precautions ..................................................... |
4 |
Maintenance ............................................................... |
5 |
Accessories ................................................................ |
6 |
Fitting remote control batteries ................................... |
6 |
How to open the front cover ....................................... |
7 |
Terminal cover open and close .................................. |
7 |
Fastening method ...................................................... |
7 |
Quick Start Guide ....................................................... |
8 |
Basic controls: front panel and remote control ......... |
10 |
Using the On Screen Displays ................................. |
11 |
Picture menu ............................................................ |
12 |
Sound menu ............................................................. |
13 |
Setup menu .............................................................. |
14 |
Tuning menu – overview .......................................... |
15 |
Tuning menu – Programme edit ............................... |
16 |
Adding / deleting a programme channel ............... |
16 |
Moving a programme channel .............................. |
16 |
Tuning a programme channel ............................... |
16 |
Renaming a programme channel .......................... |
17 |
Locking a programme channel .............................. |
17 |
Changing the sound system for a channel ............ |
17 |
Copying programme information to |
|
a recording device ............................................ |
17 |
Tuning menu – Auto setup ....................................... |
18 |
Tuning menu – Manual tuning .................................. |
19 |
Manual tuning (via front panel)................................ |
19 |
Q-Link ....................................................................... |
20 |
Aspect Controls ........................................................ |
21 |
Multi window............................................................. |
24 |
Still ........................................................................... |
25 |
Channel search ........................................................ |
25 |
Picture and text ........................................................ |
25 |
PC mode .................................................................. |
26 |
Photo View mode ..................................................... |
28 |
VCR / DVD operation ............................................... |
32 |
Teletext operation ..................................................... |
33 |
Connections ............................................................. |
36 |
How to connect the Headphones / AV3 terminals . 36 |
|
How to connect the Audio Output terminals .......... |
37 |
How to connect the AV1 / 2 / 4 Scart terminals ..... |
37 |
How to connect the Component Input terminals ... |
37 |
How to connect the PC Input terminals ................. |
38 |
Troubleshooting ....................................................... |
39 |
Scart and S-video terminal information .................... |
40 |
Input signal can be displayed ................................... |
41 |
Specifications ........................................................... |
42 |
2
Important Safety Notice
WARNING
1)To prevent damage which may result in fire or shock hazard, do not expose this appliance to rain or moisture.
Do not place containers with water (flower vase, cups, cosmetics, etc.) above the set. (including on shelves above, etc.)
2)To prevent electric shock, do not remove cover. No user serviceable parts inside. Refer servicing to qualified service personnel.
3)Do not remove the earthing pin on the power plug. This apparatus is equipped with a three pin earthing-type power plug. This plug will only fit an earthing-type power outlet. This is a safety feature. If you are unable to insert the plug into the outlet, contact an electrician.
Do not defeat the purpose of the earthing plug.
CAUTION
1)This appliance is intended for use in environments which are relatively free of electromagnetic fields.
Using this appliance near sources of strong electromagnetic fields or where electrical noise may overlap with the input signals could cause the picture and sound to wobble or cause interference such as noise to appear. To avoid the possibility of harm to this appliance, keep it away from sources of strong electromagnetic fields.
2)If a static electricity discharge occurs inside the front cover, the screen may momentarily flicker. This is not a malfunction.
The screen will return to normality in a short while.
To prevent electric shock, ensure the grounding pin on the AC cord power plug is securely connected.
Trademark Credits
•VGA is a trademark of International Business Machines Corporation.
•Macintosh is a registered trademark of Apple Computer, USA.
•S-VGA is a registered trademark of the Video Electronics Standard Association.
Even if no special notation has been made of company or product trademarks, these trademarks have been fully respected.
•SD Logo is a trademark.
CAUTION:
Symptoms |
Check |
Do not allow a still picture to be displayed for an extended period, as this can
After-images appear
cause a permanent after-image to remain on the Plasma TV.
Examples of still pictures include logos, video games, computer images, teletext and images displayed in 4:3 mode.
Without signals and operations for 2 minutes, the level of the contrast decreases automatically to prevent image retention.
Note:
The permanent after-image on the Plasma TV resulting from fixed image use is not an operating defect and as such is not covered by the Warranty.
This product is not designed to display fixed images for extended periods of time.
3

Safety Precautions
 WARNING
 Setup
Setup
This Plasma TV is for use only with the following optional accessories. Use with any other type of optional accessories may cause instability which could result in the possibility of injury.
(All of the following accessories are manufactured by Matsushita Electric Industrial Co., Ltd.)
•Pedestal ....................................... TY-ST42PX20
•Display stand ................................ TY-DP4201W, TY-S42PX20W (TH-42PA30), TY-S37PX20W (TH-37PA30)
•Wall-hanging bracket (vertical) .... TY-WK42PV3W
•Wall-hanging bracket (angle) ....... TY-WK42PR2W
Always be sure to ask a qualified technician to carry out set-up.
Do not place the Plasma TV on sloped or unstable surfaces.
• The Plasma TV may fall off or tip over.
Do not place any objects on top of the Plasma TV.
•If water is spilt onto the Plasma TV or foreign objects get inside it, a short-circuit may occur which could result in fire or electric shock. If any foreign objects get inside the Plasma TV, please consult your local Panasonic dealer.
If using the pedestal (optional accessory), leave a space of at least 10 cm at the top, left and right, at least 6 cm at the bottom, and at least 7 cm at the rear. If using some other setting-up method, leave a space of at least 10 cm at the top, bottom, left and right, and at least 1.9 cm at the rear.
Avoid installing this product near electronic equipment that is easy to receive electromagnetic waves.
• It will cause interference in image, sound, etc. In particular, keep video equipment away from this product.
 When using the Plasma TV
The Plasma TV is designed to operate on 220 - 240 V AC, 50/60 Hz. Do not cover the ventilation holes.
• Doing so may cause the Plasma TV to overheat, which can cause fire or damage to the Plasma TV.
Do not stick any foreign objects into the Plasma TV.
•Do not insert any metal or flammable objects into the ventilations holes or drop them onto the Plasma TV, as doing so can cause fire or electric shock.
Do not remove the cover or modify it in any way.
•High voltages which can cause severe electric shocks are present inside the Plasma TV. For any inspection, adjustment and repair work, please contact your local Panasonic dealer.
Securely insert the power cord plug as far as it will go.
•If the plug is not fully inserted, heat may be generated which could cause fire. If the plug is damaged or the wall socket plate is loose, they shall not be used.
Do not handle the power cord plug with wet hands.
• Doing so may cause electric shocks.
Do not do anything that may damage the power cable. When disconnecting the power cable, pull on the plug body, not the cable.
•Do not damage the cable, make any modifications to it, place heavy objects on top of it, heat it, place it near any hot objects, twist it, bend it excessively or pull it. To do so may cause fire and electric shock. If the power cable is damaged, have it repaired at your local Panasonic dealer.
If the Plasma TV is not going to be used for any prolonged length of time, unplug the power cord plug from the wall outlet.
4

Safety Precautions
 If problems occur during use
If a problem occurs (such as no picture or no sound), or if smoke or an abnormal odour starts to come out from the Plasma TV, immediately unplug the power cord plug from the wall outlet.
•If you continue to use the Plasma TV in this condition, fire or electric shock could result. After checking that the smoke has stopped, contact your local Panasonic dealer so that the necessary repairs can be made. Repairing the Plasma TV yourself is extremely dangerous, and should never be attempted.
If water or foreign objects get inside the Plasma TV, if the Plasma TV is dropped, or if the cabinet becomes damages, disconnect the power cord plug immediately.
•A short circuit may occur, which could cause fire. Contact your local Panasonic dealer for any repairs that need to be made.

 CAUTION
 When using the Plasma TV
Do not bring your hands, face or objects close to the ventilation holes of the Plasma TV.
•Heated air comes out from the ventilation holes at the top of Plasma TV will be hot. Do not bring your hands or face, or objects which cannot withstand heat, close to this port, otherwise burns or deformation could result.
Be sure to disconnect all cables before moving the Plasma TV.
•If the Plasma TV is moved while some of the cables are still connected, the cables may become damaged, and fire or electric shock could result.
Disconnect the power cord plug from the wall socket as a safety precaution before carrying out any cleaning.
• Electric shocks can result if this is not done.
Clean the power cable regularly to prevent it becoming dusty.
•If dust built up on the power cord plug, the resultant humidity can damage the insulation, which could result in fire. Pull the power cord plug out from the wall outlet and wipe the mains lead with a dry cloth.
This Plasma TV radiates infrared rays, therefore it may affect other infrared communication equipment.
Install your infrared sensor in a place away from direct or reflected light from your Plasma TV.
Maintenance
The front of the display panel has been specially treated. Wipe the panel surface gently using only a cleaning cloth or a soft, lint-free cloth.
•If the surface is particularly dirty, wipe with a soft, lint-free cloth which has been soaked in pure water or water to which a small amount of neutral detergent has been added, and then wipe it evenly with a dry cloth of the same type until the surface is dry.
•Do not scratch or hit the surface of the panel with fingernails or other hard objects, otherwise the surface may become damaged. Furthermore, avoid contact with volatile substances such as insect sprays, solvents and thinner, otherwise the quality of the surface may be adversely affected.
If the cabinet becomes dirty, wipe it with a soft, dry cloth.
•If the cabinet is particularly dirty, soak the cloth in water to which a small amount of neutral detergent has been added and then wring the cloth dry. Use this cloth to wipe the cabinet, and then wipe it dry with a dry cloth.
•Do not allow any detergent to come into direct contact with the surface of the Plasma TV.
If water droplets get inside the unit, operating problems may result.
•Avoid contact with volatile substances such as insect sprays, solvents and thinner, otherwise the quality of the cabinet surface may be adversely affected or the coating may peel off. Furthermore, do not leave it for long periods in contact with articles made from rubber or PVC.
5
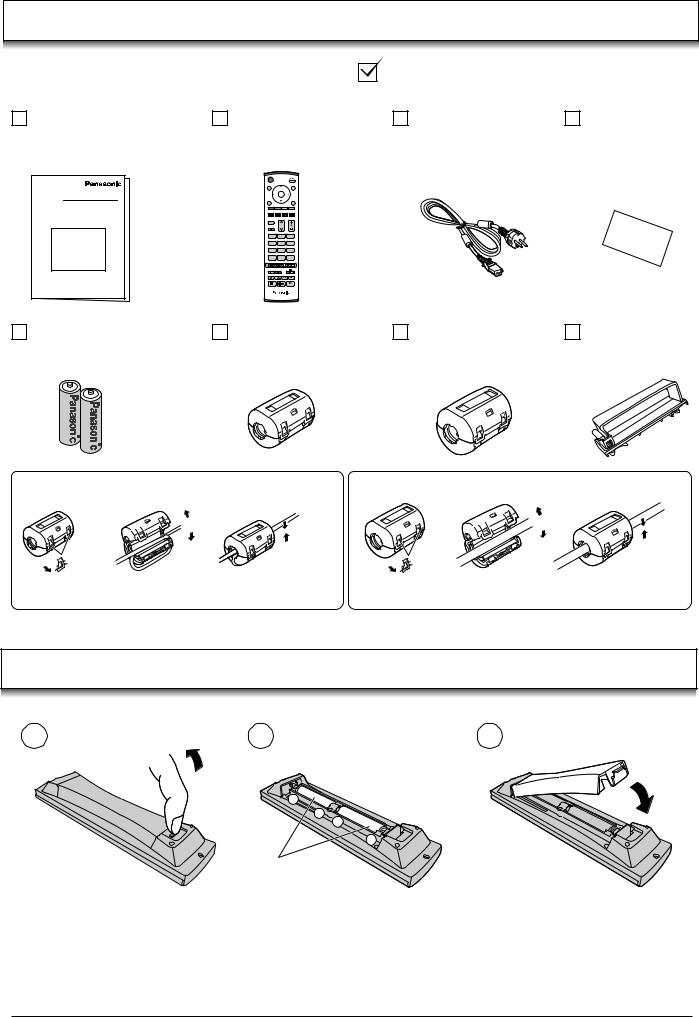
Accessories
Check that you have the accessories and items shown
Operating Instruction book |
Remote Control |
Mains Lead |
TV Guarantee |
(TQBC0711) |
Transmitter |
|
|
|
(EUR7635020) |
|
|
N
1 2 3
4 5 6
7 8 9
C0
Batteries for the Remote |
Ferrite core |
Ferrite core |
Clamper × 2 |
||||||
Control Transmitter |
(Small size) × 5 |
(Large size) |
× 2 |
||||||
(2 × R6 (UM3) size) |
|
|
|
||||||
|
|
|
|
|
|
|
|
|
|
|
|
|
|
|
|
|
|
|
|
|
|
|
|
|
|
|
|
|
|
|
|
|
|
|
|
|
|
|
|
|
|
|
|
|
|
|
|
|
|
|
|
|
|
|
|
|
|
|
|
Installing the ferrite core (Small size) Installing the ferrite core (Large size)
1 |
2 |
3 |
|
1 |
2 |
3 |
|
|
Open |
|
|
|
Open |
|
|
|
|
|
|
|
|
Pull back the tabs. |
|
Press the cable |
Pull back the tabs. |
|
Press the cable |
|
(in two places) |
|
through and close. |
(in two places) |
|
through and close. |
Fitting remote control batteries
1 |
2 |
3 |
|
+ |
|
|
- |
|
|
+ |
|
|
- |
|
|
“R6 (UM3)” size |
|
Pull and hold the hook, then |
Insert batteries - note correct |
Replace the cover. |
open the battery cover. |
polarity ( + and -). |
|
•Make sure that the batteries are fitted the correct way round.
•Do not mix old batteries with new batteries. Remove old, exhausted batteries immediately.
•Do not mix different battery types, i.e. Alkaline and Manganese or use rechargeable (Ni - Cad) batteries.
6

How to open the front cover
SD CARDT
PUSH-EJEC
Push “ ”.
”.
Terminal cover open and close
Open
1. Push down hooks and pull the
2 1
cover slightly towards yourself to disengage the claws (at 4 points).
2. Slowly pull out in the downward direction.
Close
1
|
1. |
Insert the claws (at 4 points) |
2 |
|
at the bottom end. |
|
|
|
1 |
2. |
Push until it clicks. |
|
When connecting the Scart cable to the TV’s Scart terminals, connect through this window. (This window cannot close completely when connecting the Scart cable.)
Other cables should be connected before closing the terminal cover.
Fastening method
Clamper |
Open |
Close |
Fastening of Mains Lead and other cables
11  2
2
2
Fastening method of Mains Lead
1.Insert the power plug into the main body.
2.Fasten with the mains lead fastening band.
Fastening method of other cables
Attach the clamper on the installation hole, and fasten them. Bundle the cable with the cable fastening clamper.
Fastening band |
|
Fastening |
Loosening |
|
Pull off. |
|
Keep the knob |
To tighten. |
pressed. |
7

Quick Start Guide
1
SET TOP BOX |
RF cable |
|
|
|
(Not supplied) |
Scart cables |
OR |
|
|
(Not supplied) |
|
|
|
AV4 |
|
AV2 |
AV1 |
RGB |
S VIDEO |
VIDEO |
RGB |
VIDEO |
S VIDEO |
|
VIDEO |
VCR / DVD recorder
Plug in aerial and connect ancillary equipment.
2
2 


 1
1
3
 Remote control
  signal sensor
1Connect the mains lead to the Plasma TV.
2Connect the mains plug to the wall socket.
Press the  switch on the TV set to turn the set on.
OK
To switch the TV set to Standby mode, press |
|
|
|
||
the |
button on the remote control. |
|
|
|
|
The TV set can be switched on by pressing |
N |
|
|
||
the |
button again if it was switched to |
|
|
||
|
|
|
|||
Standby mode. |
1 |
2 |
3 |
||
4 |
5 |
6 |
|||
Note: |
|
||||
|
7 |
8 |
9 |
||
|
|
||||
|
|
C |
0 |
|
|
This TV will still consume some power as long as the mains plug is still inserted into the wall socket.
Power Indicator |
|
LED Indicator |
|
Standby |
: Red |
On |
: No Light |
C.A.T.S sensor
Plasma C.A.T.S (Contrast Automatic Tracking System)
Plasma C.A.T.S automatically senses the ambient light conditions and adjusts the brightness and gradation accordingly, to optimise contrast. (Effective when Viewing mode is set to Auto.)
TV
8

Quick Start Guide
4
Land |
Start ATP 
 Suchlauf


 Abbruch
CH12
AUTO SETUP IN PROGRESS
SEARCHING : PLEASE WAIT
|
|
|
|
|
|
|
02 |
78:01 |
41 |
|
|||
|
|
|
|
|
|
|
EXIT |
: To exit |
|
|
|||
Select your country.
For Belgium, Switzerland and E.Eu, select the desired language.
If you wish to perform manual tuning, press the Green button.
See page 19.
Press the Red button to start Auto Setup.
Auto setup will begin, your stations will be located and stored.
If a compatible recording device is connected to the correct Scart terminal, programme data will be downloaded to the device via Q-Link.
See page 20.
OK
Green |
N |
|
|
|
1 |
2 |
3 |
|
4 |
5 |
6 |
Red |
7 |
8 |
9 |
|
C |
0 |
|
TV
5 |
Once Auto setup is complete, if you are installing a new Q-Link compatible recording device, you can now |
|
switch it On. Downloaded tuning data will match the television’s. Not all devices support this download of |
|
programme information, some may require to be started manually. See the device’s instruction book for details. |
|
• If the recording device has not accepted download data from the TV, you may need to select the download |
option from the device’s menu.
• If Q-Link is not operating correctly, check it is connected to the TV’s correct Scart terminal, the Scart cable is a “full function” type, and the device is compatible with Q-Link, NEXTVIEWLINK or similar technologies. Ask your dealer for further details.
• For further information on Q-Link and connecting equipment. See page 20, 37.
6 |
We recommend that as soon as the Auto setup feature is completed, the picture |
|
controls are reset to normal viewing levels. To do this, press the N button. |
N
OK
N
1 2 3
4 5 6
7 8 9
C0
TV
9

Basic controls: front panel and remote control
SD Card slot |
|
PC Card slot |
|||||
(see page 29) |
|
(see page 29) |
|||||
|
|
|
|
|
|
|
PC CARD EJECT |
|
|
|
|
SD CARD |
|
|
|
|
|
|
|
PUSH-EJECT |
|
|
|
STR F |
/ |
/ |
TV/AV |
S VIDEO VIDEO |
L |
R |
PC |
AV3 |
|
|
|
||||
|
|
|
|
|
|
|
|
MAINS Power |
STR (Normalization store) |
|
TV/AV button |
AV3 terminals |
PC input terminal |
|
(see page 36) |
(see page 36) |
(see page 38) |
||
On / Off switch |
Used to store tuning and other |
|
|
|
|
|
function settings. |
|
Headphones jack (see page 36) |
|
|
|
|
|
|
||
F (Function select) |
|
|
|
|
|
Displays the On Screen Display functions, use repeatedly to |
Increases or decreases the programme position by one. When |
||||
select from the available functions - Volume, Contrast, |
a function is already displayed, press to increase or decrease |
||||
Brightness, Colour, Sharpness, Tint (in NTSC mode), |
the selected function. When in Standby mode, switches TV |
||||
Bass, Treble, Balance and Tuning mode. |
|
On. |
|
|
|
Standby On / Off button |
|
|
Photo View mode button |
||
Switches TV On or Off (Standby mode). |
|
|
(see page 28-31) |
|
|
Status button |
|
|
|
Switch between viewing TV or AV input. |
|
|
|
|
(see page 36) |
|
|
Press to display programme position, |
|
TV/AV |
Press to store settings in Sound menu, |
||
programme name, channel number, |
|
||||
|
|
Tuning menu and Teletext, or to change |
|||
time, MPX mode, Receiving system, |
|
|
|||
|
|
between Multi and Single mode during |
|||
Aspect mode and programme table. |
|
|
|||
|
OK |
Photo View mode. |
|
||
|
|
|
|
||
Menu button |
|
MENU |
EXIT |
Cursor buttons to make selections and |
|
Press to access the Picture, Sound |
|
|
|||
and Setup menus. (see page 11-14) |
|
|
adjustments. |
|
|
|
|
TV/TEXT F.P. |
INDEX HOLD |
Exit the mode. |
|
Teletext buttons (see page 33-35) |
|
|
|||
|
|
Coloured buttons used for |
|||
|
|
|
|
||
|
|
|
|
Aspect functions (see page 21-23) |
|
N (Normalize) button |
N |
|
Programme edit functions |
||
|
(see page 16, 17) |
|
|||
Resets all settings to their default levels. |
|
|
|
||
|
|
Teletext functions (see page 33-35) |
|||
|
|
|
|
||
AV selection (see page 36)
Channel up / down button
Sound mute On / Off
Direct channel access
During normal TV viewing or when in the Tuning, Programme edit or
Manual tuning menus, press and then enter channel number using the numeric buttons.
1 |
2 |
3 |
4 |
5 |
6 |
7 |
8 |
9 |
|
VCR |
|
C |
0 |
|
ASPECT |
MULTI WINDOW |
DIRECT TV REC |
REC |
VCR |
DVD |
Volume up / down button
Programme / channel change buttons (0- 9) and Teletext page buttons.
(see page 33, 34)
When in Standby mode, switches TV On.
Programme position for selection of two digit programmes (10-99) using numeric buttons.
ASPECT control button |
|
DIRECT TV RECord button |
|
PROGRAMME |
(see page 20) |
||
(see page 21-23) |
|||
|
|
||
|
|
MULTI WINDOW button |
|
|
|
(see page 24, 25) |
|
Ambience On / Off (see page 13) |
|
VCR / DVD buttons |
|
|
|
(see page 32) |
|
|
|
TV |
10
Using the On Screen Displays
Many features available on this TV can be accessed via the On Screen Display menu system. Use the remote control as shown below to access and adjust features as desired.
The MENU button is used to open the main menus and also to return to the previous menu.
The up and down cursor buttons are used to move the cursor and select menus.
The left and right cursor buttons are used to access menus, adjust levels or to select from a range of options.
The OK button is used with a number of features to store settings after adjustments have been made or options have been set.
The EXIT button is used to exit the menu system and return to the normal viewing screen.
MENU
OK
N
1 2 3
4 5 6
7 8 9
C 0
OK
EXIT |
TV |
An On Screen Help box is displayed whenever a menu is displayed on the TV. This Help box indicates which buttons on the remote control are used to navigate the menu shown, see above for descriptions of button functions.
Note:
The Help box is not shown in the menu pictures in this instruction book due to space limitations.
ON SCREEN HELP ‘Instructions’ box
Select |
|
Adjust |
|
Return |
Exit |
Sound menu
Bass
Treble |
|
|
|
|
|
|
|
|
|
|
|
Balance |
|
|
|
|
|
|
|
|
|
|
|
|
|
|
|
|
|
Headphone volume |
|
|
|
|
|
|
|
|
|
|
|
MPX |
No service |
||||
Mode |
Music |
||||
Ambience |
Off |
||||
11

Picture menu
Press the MENU button.
Move to choose Picture menu.
Access Picture menu.
Move to choose menu option.
Adjust chosen option or access chosen menu.
Press the EXIT button at any time to go back to watching TV.
Viewing mode The Viewing mode menu allows you to select three different screen settings - Dynamic, Normal, Cinema and Auto.
In each Viewing mode setting, Contrast, Brightness, Colour, Sharpness, Tint (in NTSC only), Colour balance, P-NR, MPEG NR and 3D-COMB can be adjusted and stored to suit your particular viewing requirement. (e.g., you may require different settings for viewing sports, films, news etc.)
Viewing mode offers you up to a maximum of three separate settings for each signal source: RF, AV1, AV2, AV3 and AV4. Changes will be stored automatically.
By analysing and processing the incoming picture, all three modes feature automatic enhancement.
Contrast, Brightness, Colour, Sharpness
|
Increase or decrease the levels of these options |
|
according to your personal preference. |
Tint |
The picture hue can be adjusted to suit your taste. |
|
Note: |
|
When the TV is receiving NTSC, YUV(60Hz) signals, |
|
Tint is displayed. |
Colour balance |
Allows you to set the overall colour tone of the picture. |
|
Choose from Cool, Normal and Warm. |
P-NR |
Automatically reduces unwanted picture noise. |
MPEG NR |
Reduces MPEG noise. |
|
Allows you to choose from Off, Min, Mid and Max. |
|
This function is effective in reducing the digital block |
|
noise when viewing DVD, VCD or digital broadcasting. |
|
The effect will be changed based on the scene and image. |
|
Note: |
|
MPEG Compression technology of the image signal |
|
adopted by DVD, VCD or digital broadcasting. |
3D-COMB |
Occasionally, whilst viewing still or slow moving pictures, |
|
colour patterning may be seen. Set 3D-COMB to On to |
|
display sharper and more accurate colours. |
|
Displayed only when receiving PAL or NTSC signals. |
|
Not displayed during RGB Video, S-Video input and |
|
AV4C input mode. |
MENU
OK
N
1 2 3
4 5 6
7 8 9
C 0
EXIT
TV
Main menu |
Picture menu |
Sound menu |
Setup menu |
Picture menu
Viewing mode |
Dynamic |
||||||
Contrast |
|
|
|
|
|
|
|
|
|
|
|
|
|
|
|
|
|
|
|
|
|
|
|
Brightness |
|
|
|
|
|
|
|
Colour |
|
|
|
|
|
|
|
|
|
|
|
|
|
|
|
|
|
|
|
|
|
|
|
Sharpness |
|
|
|
|
|
|
|
Tint |
|
|
|
|
|
|
|
|
|
|
|
|
|
|
|
Colour balance |
Normal |
||||||
P-NR |
Auto |
||||||
MPEG NR |
Off |
||||||
3D-COMB |
On |
||||||
Picture menu
Viewing mode |
Dynamic |
||||||
Contrast |
|
|
|
|
|
|
|
|
|
|
|
|
|
|
|
Brightness |
|
|
|
|
|
|
|
Colour |
|
|
|
|
|
|
|
|
|
|
|
|
|
|
|
|
|
|
|
|
|
|
|
|
|
|
|
|
|
|
|
Sharpness |
|
|
|
|
|
|
|
Tint |
|
|
|
|
|
|
|
|
|
|
|
|
|
|
|
Colour balance |
Normal |
||||||
P-NR |
Auto |
||||||
MPEG NR |
Off |
||||||
3D-COMB |
On |
||||||
Picture menu
Viewing mode |
Dynamic |
||||||||||
Contrast |
|
|
|
|
|
|
|
|
|
|
|
|
|
|
|
|
|
|
|
|
|
|
|
Brightness |
|
|
|
|
|
|
|
|
|
|
|
Colour |
|
|
|
|
|
|
|
|
|
|
|
|
|
|
|
|
|
|
|
|
|
|
|
Sharpness |
|
|
|
|
|
|
|
|
|
|
|
Tint |
|
|
|
|
|
|
|
|
|
|
|
|
|
|
|
|
|
|
|
|
|
|
|
Colour balance |
Normal |
||||||||||
P-NR |
Auto |
||||||||||
MPEG NR |
Off |
||||||||||
3D-COMB |
On |
||||||||||
12

Sound menu
Press the MENU button.
Move to choose Sound menu.
Access Sound menu.
Move to choose menu option.
Adjust chosen option or access chosen menu.
Press the EXIT button at any time to go back to watching TV.
Pressing the OK button after having adjusted some features will store the setting as the default (replacing the factory setting).
MENU
OK
N
1 2 3
4 5 6
7 8 9
C 0
EXIT
OK |
TV |
Bass |
Increase or decrease level to enhance or minimise |
|
lower, deeper sound output. |
Treble |
Increase or decrease level to enhance or minimise |
|
sharper, higher sound output. |
Balance |
The levels of sound between the left and right speakers |
|
can be adjusted to suit your listening position. |
Headphone |
Can be adjusted independently of the TV speakers so |
volume |
that everyone can enjoy listening at a level comfortable |
|
for them. |
MPX |
Usually set to Stereo to provide the best reproduction, |
|
but if reception deteriorates or if the service is not |
|
available then switch to Mono. Mono (M1) and (M2) |
|
can also be selected if a mono signal is being |
|
transmitted. |
Mode |
Sound quality can be improved when watching music |
|
scene or drama by selecting the appropriate Music or |
|
Speech mode. |
Ambience |
To enjoy a concert hall effect, turn Ambience On. |
|
Switching is also possible by pressing the Ambience |
|
button. |
|
The benefits of Ambience sound are enormous. You |
|
can be completely enveloped in sound; just as if you |
|
were at a concert hall or cinema. |
|
The Ambience effect can be obtained without the use |
|
of external Ambience speakers. |
Main menu |
Picture menu |
Sound menu |
Setup menu |
Sound menu
Bass |
|
|
|
|
|
|
|
|
|
|
|
|
|
|
|
Treble |
|
|
|
|
|
|
|
|
|
|
|
|
|
|
|
Balance |
|
|
|
|
|
|
|
|
|
|
|
|
|
|
|
Headphone volume |
|
|
|
|
|
|
|
MPX |
No service |
||||||
Mode |
Music |
||||||
Ambience |
Off |
||||||
Sound menu
Bass |
|
|
|
|
|
|
|
Treble |
|
|
|
|
|
|
|
Balance |
|
|
|
|
|
|
|
Headphone volume |
|
|
|
|
|
|
|
MPX |
No service |
||||||
Mode |
Music |
||||||
Ambience |
Off |
||||||
Sound menu
Bass |
|
|
|
|
|
|
|
|
|
|
|
|
|
|
|
Treble |
|
|
|
|
|
|
|
|
|
|
|
|
|
|
|
Balance |
|
|
|
|
|
|
|
|
|
|
|
|
|
|
|
Headphone volume |
|
|
|
|
|
|
|
MPX |
No service |
||||||
Mode |
Music |
||||||
Ambience |
Off |
||||||
Sound menu
Bass |
|
|
|
|
|
|
|
Treble |
|
|
|
|
|
|
|
Balance |
|
|
|
|
|
|
|
Headphone volume |
|
|
|
|
|
|
|
MPX |
No service |
||||||
Mode |
Music |
||||||
Ambience |
Off |
||||||
13

Setup menu
Press the MENU button.
Move to choose Setup menu.
Access Setup menu.
Move to choose menu option.
Adjust chosen option or access chosen menu.
Press the EXIT button at any time to go back to watching TV.
Q-Link |
Allows you to select which AV terminal is to be used for data |
||||
|
communication between this TV and a compatible recording |
||||
|
device. Choose from Off, AV2 and AV4. See page 20. |
||||
AV2 / AV4 out |
Offers a choice of signals to send to the Scart terminal |
||||
|
selected in the Q-Link option. You can choose from the current |
||||
|
TV programme position, the signal entering AV1 / AV2 / AV3 |
||||
|
/ AV4 or Monitor - the picture displayed on screen. |
||||
Teletext |
Allows you to choose between TOP or List mode. |
||||
|
See page 33-35. |
|
|
|
|
Off timer |
Switches the TV off within a preset time which you can choose |
||||
|
from between 0 to 90 minutes in 15 minute intervals. |
||||
Text language |
Select character set, so that all characters needed are availabe |
||||
|
for text on teletext pages (e.g., cyrillic characters, etc.). |
||||
|
Mode Languages |
|
|
|
|
|
West: English, French, German, Greek, Italian, Spanish, |
||||
|
Swedish, Turkish |
|
|
|
|
|
East1: Czech, English, Estonian, Lettish, Rumanian, |
||||
|
Russian, Ukrainian |
|
|
|
|
|
East2: Czech, English, German, Hungarian, Lettish, Polish, |
||||
|
Rumanian |
|
|
|
|
Side panel |
Allows you to choose from Off, Low, Mid and High. |
||||
|
Do not display a picture in 4:3, 14:9, Picture out of picture, |
||||
|
Picture and picture, Picture and text modes for an extended |
||||
|
period, as this can cause an after-image to |
|
Side panel |
||
|
remain on the side panels either side of the |
|
|||
|
|
|
|
|
|
|
display field. |
|
4 : 3 |
|
|
|
To prevent the appearance of such an after- |
|
|
|
|
|
|
|
|
|
|
Power save |
image, illuminate the side panels. |
|
|
|
|
|
|
|
|
||
By reducing the brighness of picture, power consumption |
|||||
|
can be lowered. |
|
|
|
|
Tuning menu |
Provides access to many other features including |
||||
|
Programme edit and Auto setup. See page 16-18. |
||||
OSD language When you first install the TV, the On Screen Display language is set according to your choice of country. OSD language lets you change the language used for On Screen Displays.
Colour system During AV mode, Colour system is displayed. See page 15.
Volume During AV mode, Volume correction is displayed. correction You can adjust volume level of AV mode. Volume level is
memorised.
MENU
OK
N
1 2 3
4 5 6
7 8 9
C 0
EXIT
TV |
Main menu |
Picture menu |
Sound menu |
Setup menu |
Setup menu
Q-Link |
AV2 |
AV2 out |
TV |
Teletext |
TOP |
Off timer |
Off |
Text language |
West |
Side panel |
Off |
Power save |
Off |
Tuning menu |
|
OSD language |
|
|
Setup menu |
|
|
|
|
|
|
Q-Link |
AV2 |
||||
|
AV2 out |
TV |
||||
|
Teletext |
TOP |
||||
|
Off timer |
Off |
||||
|
Text language |
West |
||||
|
Side panel |
Off |
||||
|
Power save |
Off |
||||
|
Tuning menu |
Access |
||||
|
OSD language |
|
|
|
|
|
|
|
|
|
|
|
|
|
|
|
|
|
|
|
|
Setup menu |
|
|
|
|
|
|
Q-Link |
AV2 |
||||
|
AV2 out |
TV |
||||
|
Teletext |
TOP |
||||
|
Off timer |
Off |
||||
|
Text language |
West |
||||
|
Side panel |
Off |
||||
|
Power save |
Off |
||||
|
Tuning menu |
|
|
|
|
|
|
OSD language |
Access |
||||
AV mode |
|
|
|
|
|
|
|
|
|
|
|
|
|
|
Setup menu |
|
|
|
|
|
|
Q-Link |
AV2 |
||||
|
AV2 out |
TV |
||||
|
Teletext |
TOP |
||||
|
Off timer |
Off |
||||
|
Colour system |
Auto |
||||
|
Volume correction |
|
|
|
|
|
|
Text language |
West |
||||
|
Side panel |
Off |
||||
|
Power save |
Off |
||||
|
OSD language |
|
|
|
|
|
|
|
|
|
|
|
|
14
 Loading...