


SD Video Camera
Operating Instructions
Model No. SV-AV50
Before use, please read these instructions completely.
For USA assistance. please call:1-800-211-PANA(7262) or, contact us via the web at: http://www.panasonic.com/contactinfo
For Canadian assistance. please call:1-800-561-5505 or visit us at www.panasonic.ca
|
VQT0G69 |
|
PP |
||
|
Before opening the CD-ROM package, please read the following.
End User License Agreement
You (“Licensee”) are granted a license for the Software defined in this End User License Agreement (“Agreement”) on condition that you agree to the terms and conditions of this Agreement. If Licensee does not agree to the terms and conditions of this Agreement, promptly return the Software to Matsushita Electric Industrial Co., Ltd. (“Matsushita”), its distributors or dealers from which you made the purchase.
Article 1 License
Licensee is granted the right to use the Software, including the information recorded or described on the CD-ROM, instruction manuals, and any other media provided to Licensee (collectively “Software”), but all applicable rights to patents, copyrights, trademarks and trade secrets in the Software are not transferred to Licensee.
Article 2 Use by a Third Party
Licensee may not use, copy, modify, transfer or allow any third party, whether free of charge or not, to use, copy or modify the Software, except as expressly provided for in this Agreement.
Article 3 Restrictions on Copying the Software
Licensee may make a single copy of the Software in whole or in part solely for back-up purpose.
Article 4 Computer
Licensee may use the Software only on one computer, and may not use it on more than one computer.
Article 5 Reverse Engineering, Decompiling or Disassembly
Licensee may not reverse engineer, decompile, or disassemble the Software, except to the extent either of them is permitted under law or regulation of the country where Licensee resides. Matsushita, or its distributors will not be responsible for any defects in the Software or damage to Licensee caused by Licensee’s reverse engineering, decompiling, or disassembly of the Software.
Article 6 Indemnification
The Software is provided “AS-IS” without warranty of any kind, either expressed or implied, including, but not limited to, warranties of non-infringement, merchantability and/or fitness for a particular purpose. Further, Matsushita does not warrant that the operation of the Software will be uninterrupted or error free. Matsushita or any of its distributors will not be liable for any damage suffered by Licensee arising from or in connection with Licensee’s use of the Software.
Article 7 Export Control
Licensee agrees not to export or re-export to any country the Software in any form without the appropriate export licenses under regulations of the country where Licensee resides, if necessary.
Article 8 Termination of License
The right granted to Licensee hereunder will be automatically terminated if Licensee contravenes any of the terms and conditions of this Agreement. Upon termination hereof, Licensee must destroy the Software and related documentation together with all the copies thereof at Licensee’s own expense.
2

Contents |
|
End User License Agreement ................... |
2 |
Information for Your Safety ....................... |
4 |
Introduction ............................................... |
7 |
Preparation |
|
Standard Accessories ............................... |
8 |
Optional Accessory ................................... |
8 |
Controls and Components ........................ |
9 |
Using the USB Cradle ............................. |
10 |
Power Supply .......................................... |
10 |
Charging the Battery ................................ |
11 |
Inserting a Memory Card......................... |
12 |
Using the LCD Monitor............................ |
13 |
Turning the Power On ............................. |
15 |
Selecting Operation Modes..................... |
16 |
Using the Menu Screen........................... |
17 |
List of Menus........................................... |
18 |
Setting Date and Time ............................ |
20 |
Adjusting Brightness and |
|
Color Level on the LCD Monitor ............ |
21 |
Basic Functions |
|
Recording Still Pictures ........................... |
22 |
Playing Back Still Pictures....................... |
23 |
Recording Moving Pictures |
|
(MPEG4)................................................ |
24 |
Playing Back Moving Pictures |
|
(MPEG4)................................................ |
25 |
Voice Recording |
|
(Voice Recording Function) ................... |
26 |
Listening to Voice Recordings |
|
(Voice Playback) .................................... |
27 |
Listening to Music (Audio Playback) ....... |
28 |
Adjusting the Volume .............................. |
29 |
Using the Remote Controller/ |
|
Earphones ............................................. |
30 |
Advanced Functions |
|
Digital Zoom Function ............................. |
31 |
Night View Function ................................ |
31 |
Backlight Compensation Function........... |
32 |
Adjusting White Balance ......................... |
33 |
Erasing the Files Recorded on |
|
a Memory Card ...................................... |
34 |
Protecting Files (File Protection) ............. |
35 |
Writing Printing Data on a Memory Card |
|
(DPOF Setting) ...................................... |
36 |
Playing Back Still Pictures One by One |
|
(P. Slide Show)....................................... |
37 |
Formatting the Memory Card .................. |
38 |
Playing Back on an external device ........ |
39 |
Recording Pictures supplied from an |
|
external device....................................... |
40 |
Using Auto Recording Function .............. |
41 |
On a Personal Computer |
|
About the supplied software.................... |
42 |
USB Driver .............................................. |
44 |
SD-MovieStage ....................................... |
44 |
SD-Jukebox............................................. |
45 |
Installing USB Driver ............................... |
46 |
Installing SD-MovieStage Ver.2.5............ |
46 |
Installing SD-Jukebox Ver.4 .................... |
47 |
Connecting to the PC .............................. |
48 |
Starting the Software............................... |
49 |
Disconnecting the USB Cable Safely...... |
49 |
If you no longer need software |
|
(Uninstall)............................................... |
49 |
Constructing a Folder when |
|
the Memory Card is used with a PC ...... |
50 |
3

Others |
|
Charge the Built-in Battery for |
|
Maintaining the Date Information........... |
51 |
After Use ................................................. |
51 |
Indications............................................... |
52 |
Cautions for Use ..................................... |
54 |
Notes and Hints ...................................... |
57 |
Before Requesting Service ..................... |
66 |
Specifications .......................................... |
69 |
Limited Warranty |
|
(For U.S.A. Only) ................................... |
70 |
Customer Services Directory |
|
(For U.S.A Only) .................................... |
72 |
Index ....................................................... |
73 |
Spanish Quick Use Guide/ Guía española para el uso rápido
Colocación en el Soporte USB ............... |
74 |
Alimentación eléctrica ............................. |
74 |
Carga de la batería ................................. |
75 |
Inserción de la Tarjeta de memoria......... |
76 |
Selección de los modos |
|
de funcionamiento ................................. |
76 |
Grabación de Imágenes Fijas/ |
|
Imágenes en Movimiento/Voz................ |
77 |
Reproducción de Imágenes Fijas/ |
|
Imágenes en Movimiento/Voz/Audio ..... |
77 |
Dear Customer,
We would like to take this opportunity to thank you for purchasing this Panasonic SD Video Camera. Please read these Operating Instructions carefully and keep them handy for future reference.
Information for Your Safety
WARNING
TO REDUCE THE RISK OF FIRE OR SHOCK HAZARD AND ANNOYING INTERFERENCE, USE ONLY THE RECOMMENDED ACCESSORIES AND DO NOT EXPOSE THIS EQUIPMENT TO RAIN OR MOISTURE. DO NOT REMOVE THE COVER (OR BACK); THERE ARE NOT USER SERVICEABLE PARTS INSIDE. REFER SERVICING TO QUALIFIED SERVICE PERSONNEL.
Notice:
This product has parts that contain a small amount of mercury. It also contains lead in some components. Disposal of these materials may be regulated in your community due to environmental considerations. For disposal or recycling information please contact your local authorities, or the Electronics Industries Alliance: <http://www.eiae.org.>
IMPORTANT
Please respect all copyrights. Whatever you have recorded and created can be used for your personal entertainment only. Under copyright laws, other materials cannot be used without obtaining permission from the holders of the copyrights.
4

≥Injury or material damage resulting from any kind of use that is not in accordance with the operating Instructions are the sole responsibility of the user.
Extremely high precision technology is employed to produce the LCD Monitor screen featuring a total of approximately 117,600 pixels. The result is more than 99.99% effective pixels with a mere 0.01% of the pixels inactive or always lit. However, this is not a malfunction and does not affect the recorded picture.
≥If the SD Video Camera is used continuously for a long time or used at a high ambient temperature, red, blue, green or white dots may appear on the screen and be recorded on a still picture. This is due to the rise of the temperature
inside the body. This is not a malfunction. Under this condition, turn the SD Video Camera off and leave it for a while.
≥The manufacturer shall in no event be liable for the loss of recordings due to malfunction or defect of this SD Video Camera, its accessories or Memory Card.
≥Please note that the actual controls and components, menu items, etc. of your SD Video Camera may look somewhat different from those shown in the illustrations in these Operating Instructions.
≥SD logo is a trademark.
≥In this Operating Instructions, “Memory Card” and “Card” mean “SD Memory Card”.
≥The SD Video Camera uses copyrightprotected technologies and is protected by the patented technologies and intellectual properties of Japan and the U.S. To use these copyright-protected technologies, authorization of the Macrovision Company is required. It is prohibited to disassemble or modify the SD Video Camera.
≥(l 00) indicates the page to be referred to.
≥Note that the SD Video Camera may not play back the data recorded or created on another product and another product may not play back the data recorded on the SD Video Camera.
≥The nameplate of the SD Video Camera is fixed on the bottom of the battery compartment.
≥MPEG Layer-3 audio decoding technology licensed from Fraunhofer IIS and Thomson multimedia.
THE SOCKET OUTLET SHALL BE INSTALLED NEAR THE EQUIPMENT AND SHALL BE EASILY ACCESSIBLE.
CAUTION
Danger of explosion if battery is incorrectly replaced.
Replace only with the same or equivalent type recommended by the manufacturer.
Dispose of used batteries according to the manufacturer’s instructions.
U.S. Patent Nos. 4,631,603, 4,577,216, 4,819,098, and 4,907,093.
This product incorporates copyright protection technology that is protected by U.S. patents and other intellectual property rights. Use of this copyright protection technology must be authorized by Macrovision, and is intended for home and other limited consumer uses only unless otherwise authorized by Macrovision. Reverse engineering or disassembly is prohibited.
A lithium ion/polymer battery that is recyclable powers the product you have purchased. Please call 1-800-8-BATTERY for information on how to recycle this battery.
5

FCC Note: (U.S. only)
This equipment has been tested and found to comply with the limits for a Class B digital device, pursuant to Part 15 of the FCC Rules. These limits are designed to provide reasonable protection against harmful interference in a residential installation. This equipment generates, uses, and can radiate radio frequency energy and, if not installed and used in accordance with the instructions, may cause harmful interference to radio communications. However, there is no guarantee that interference will not occur in a particular installation. If this equipment does cause harmful interference to radio or television reception, which can be determined by turning the equipment off and on, the user is encouraged to try to correct the interference by one or more of the following measures:
≥Reorient or relocate the receiving antenna.
≥Increase the separation between the equipment and receiver.
≥Connect the equipment into an outlet on a circuit different from that to which the receiver is connected.
≥Consult the dealer or an experienced radio/TV technician for help.
FCC Caution: |
To assure continued compliance, follow the attached installation |
|
instructions and use only shielded interface cables with ferrite |
|
core when connecting to computer or peripheral devices. |
|
Any changes or modifications not expressly approved by the |
|
party responsible for compliance could void the user’s authority |
|
to operate this equipment. |
Trade Name: |
Panasonic |
Model No.: |
SV-AV50 |
Responsible party: |
Matsushita Electric Corporation of America One Panasonic |
|
Way, Secaucus, NJ 07094 |
Support Contact: |
Panasonic Consumer Electronics Company |
|
1-800-211-PANA(7262) |
This device complies with Part 15 of the FCC Rules. Operation is subject to the following two conditions: (1) This device may not cause harmful interference, and (2) this device must accept any interference received, including interference that may cause undesired operation.
This Class B digital apparatus complies with Canadian ICES-003.
SV-AV50
6

Introduction
This SD Video Camera can record MPEG4 moving pictures, still picture and voice data. Additionally, it can play back a high quality music file of the MPEG2-AAC and MP3 format (Records files with the supplied SD-Jukebox Ver.4). And using the viewer software, SD-MovieStage Ver.2.5 (supplied accessory), the MPEG4 moving picture data can be edited on the personal computer.
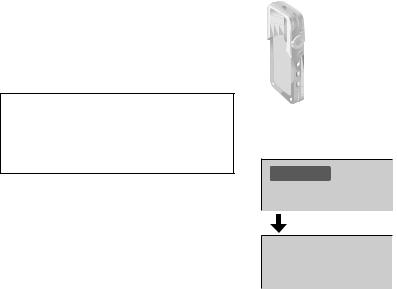
ª Clock setting
When you purchase the SD Video Camera, the clock setting has not been performed. To start, please set the year, month, date and time. (l 20)
PRESS MENUTO SET CLOCK
7

Preparation
Standard Accessories
1AC Adaptor (VSK0647) (l 10)
≥Supplies power to the SD Video Camera.
2Battery Pack (l 11)
≥Supplies power to the SD Video Camera.
3SD Memory Card (8 MB) (RP-SD008BVE0) (l 12)
≥Useable capacity will be less.
4USB Cable (K1HA09BD0001) (l 48)
5Stereo earphones (LOBAB0000173) (l 30)
6Remote Controller (N2QCAD000005) (l 30)
8USB Cradle (VSK0664) (l 10)
9Lens Protection Sticker (VGQ8054) (l 14)
10CD-ROM (l 42)
USB Driver, SD-MovieStage Ver.2.5, SD-Jukebox Ver.4, Adobe Acrobat Reader
≥For using the SD-MovieStage Ver.2.5 and SD-Jukebox Ver.4, refer to the PDF manual. This manual describes installation only.
11Neck Lanyard (VFC4056)
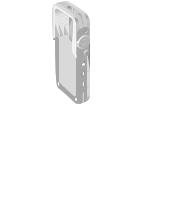
12Carrying Case (VFC4030)
≥Put the SD Video Camera in the Carrying Case supplied after use or when carrying it.
13Cleaning Cloth (VFC3778)
Optional Accessory
7 AV Cable (K2KC4CB00005) (l 39, 40) |
1 Battery Pack (CGA-S003A/1B) (l 11) |
|
≥Supplies power to the SD Video |
||
|
||
|
Camera. |
8

Controls and Components
1 LCD Monitor (l 13)
2 Neck Lanyard Holder
3Power/Card Access Lamp (l 11, 56)
4Record/Play mode Switch (l 16)
5Mode Button [MODE] (l 16)
6Power Button [Í] (l 15)
7Zoom/Volume Lever [T/W] (l 29, 31)
8Menu Button [MENU] (l 17)
9Jog Ball
10Recording Start/Stop Button (l 22, 24, 26)
11Release Button [RELEASE] (l 13)
12Night View Button [NIGHT VIEW] (l 31)
13Speaker
14Neck Lanyard fixation hole
15Lens (l 56)
16Microphone (built-in, monaural) (l 26)
17Flash (l 22)
18Grip (l 13)
19Remote Controller/Earphone Terminal Socket [  ] (l 30)
20Card/Battery Door (l 11)
21USB Cradle Connector (l 10)
22Battery Lock (l 11)
23Memory Card Slot (l 12)
24Battery Slot (l 11)
25AV Input/Output Terminal Socket [AV IN/OUT] (l 39)
26USB Terminal Port [USB] (l 48)
27DC Input Socket [DC IN 4.8V] (l 10)
28Device Connector (l 10)
AV IN/OUT |
USB |
|
|
|
DC IN 4.8V |
25 |
26 |
27 |
28
1 2
3
|
|
4 |
MENU |
8 |
5 |
|
6 |
|
Ô |
|
9
×
7
10
 ТЕМЕБУЕ
  11
11
12
ОЙЗИФ ЦЙЕЧ
13


 16
16
14 
 17
17
15
14


 18
18

 19
19
 21
21
MULTI
20
22

 24
24 

 23 20
23 20
9

Using the USB Cradle |
1 |
|
Inserting the camera into the USB cradle allows the |
||
battery to be charged. The USB cradle also allows the |
|
|
camera to be connected to external devices such as |
|
|
your TV for viewing images or to record from external |
|
|
video sources. The USB Cradle also allows the |
|
|
pictures on an external device to be recorded on a |
|
|
Card using the timer function. (l 39, 40) |
|
|
1 Place the SD Video Camera on the USB |
1 |
|
Cradle. |
|
|
≥The grooves A of the SD Video Camera fit in the |
|
|
leading protrusions B. |
|
|
≥Place the SD Video Camera on the USB Cradle |
|
|
so that the mating connectors 1 are in |
A |
|
alignment. |
||
|
||
≥Before fitting the SD Video Camera on the USB |
B |
|
Cradle, turn the SD Video Camera off. |
|
Power Supply
ªUsing AC Adaptor
1 |
Place the SD Video Camera on the USB |
|
2 |
Cradle. |
|
Connect the DC Input Lead to the |
3 |
|
|
[DC IN 4.8V] socket on the USB Cradle. |
|
3 |
2 |
|
Connect the AC Adaptor to AC Main |
DC IN 4.8V |
socket.
10
Charging the Battery
Be sure to turn the power switch on the camera off when charging the battery.
1Slide and open the Card/Battery Door.
2Insert the battery all the way.
3 Close and lock the Card/Battery Door while sliding it.
4 Place the SD Video Camera on the USB Cradle.
5 Connect the DC Input Lead to the [DC IN 4.8V] socket on the USB Cradle.
6 Connect the AC Adaptor to AC Main socket.
≥Power/Card Access Lamp 1 flashes, and Charging starts.
7 Wait until Power/Card Access Lamp 1 goes off.
≥When recharging is completed, Power/Card Access Lamp goes off.
≥Under normal operation the charging light stays on during charging. If it blinks a charging problem may be occurring. Please see page 56 for more details.
ªRemoving the Battery
1Slide and open the Card/Battery Door.
2Release the Battery Lock A and incline this unit to remove the Battery.
≥When you cannot remove the battery, pull out the projection part B to remove it.
3Close and lock the Card/Battery Door while sliding it.
1
2
3
15 |
6 |
DC IN 4.8V |
|
2
B A
11
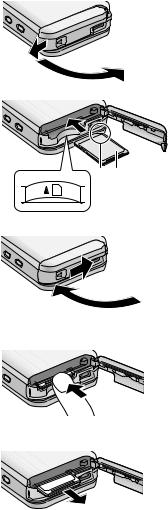
Inserting a Memory Card
Be sure to turn the power off when inserting the card.
1Slide and open the Card/Battery Door.
2Hold the Memory Card placing the cut off corner 1 at the front with the label 2 facing up, and then insert it all the way until it clicks.
≥Turn off the SD Video Camera before inserting/ removing a Card.
≥Confirm the direction of the battery.
3Close and lock the Card/Battery Door while sliding it.
ªRemoving the Memory Card
1Slide and open the Card/Battery Door.
2Press the Card until it clicks to release.
3Pull out the Card.
4Close and lock the Card/Battery Door while sliding it.
≥Keep the SD Memory Card out of the reach of children to prevent swallowing.
1
2
1 2
3
2
3
12

Using the LCD Monitor |
1,2 |
During live recording the image can be viewed on the LCD monitor. The monitor also allows you to review previously recorded material.
1 Open the LCD Monitor.
2 Adjust the LCD Monitor angle according
to the desired recording/playing angle. |
1 |
1 |
|
1 : Use mainly when recording. |
|||
|
|||
≥Position your finger on Grip A. When you |
|
|
|
put your finger on the upper position of the |
|
|
|
Grip, there are times when your finger may |
|
|
|
touch the lens |
|
|
|
|
2 |
3 |
|
A |
|
|
|
|
2 |
|
2 : Use mainly when playing back.
≥In this case, lean the LCD Monitor while pressing the [RELEASE] Button.
≥The LCD Monitor can rotate up to the angles illustrated. |
ТЕМЕБУЕ |
1 : Up to 90° maximum |
|
2 : Up to 90° maximum |
|
3: Up to 180° maximum
≥If the position of the LCD Monitor is set to 2, when
you set the Record/Play mode switch to [ ] mode only the indication which is limited appears on screen display.
≥Close the LCD Monitor while pressing the [RELEASE] Button. (Take care not to get your finger caught between the LCD Monitor and the body of the SD Video Camera.)
13

ªAttaching the Lens Protection Sticker |
1 |
1 Attach the Lens Protection Sticker 1 to |
the front of this unit. (Attach the Lens Protection Sticker to the position of the line 2.)
≥Put the finger under the Lens Protection Sticker
1.
ªUsing the Jog Ball
As the angle of the LCD monitor is changed, so too will the direction of movement using the Jog Ball. A
A : Recording angle B : Playing back angle
A : UP |
B : RIGHT |
|
|
D : LEFT |
C : DOWN |
|
|
≥When you keep pressing the [MENU] Button for |
B |
|
2 seconds or more in playback mode, the Jog Ball |
||
|
||
and the Zoom Lever cannot be activated to prevent |
|
|
wrong operations. The MENU screen also does not |
|
|
appear. (The [¥ HOLD] indication appears.) |
|
|
The Jog Ball and the Zoom Lever are activated |
|
|
when you keep pressing the [MENU] Button for |
|
2seconds or more.
ªRecording Still Pictures skillfully
The SD Video Camera automatically adjusts the shutter speed of the camera to the subject’s brightness.
When recording pictures in dark places*, the shutter speed becomes slower. Be careful not to shake the camera.
* e.g., Indoor, Shade.
≥When recording still pictures, hold the SD Video Camera firmly with both hands, and take a stance.
≥When recording still pictures using the Remote Controller (supplied), camera shake will be reduced.
≥Press the Recording Start/Stop Button ([1/_]/[¥]) 1 on the Remote Controller
≥When recording pictures of subjects in quick motion, the picture or image may be blurred.
1
2
|
A |
|
Ô |
D |
B |
|
× |
|
C |
|
A |
× |
Ô |

 D
D

 B
B
C
1
14
Turning the Power On
Select a desired mode from the mode selection screen
on the LCD Monitor. |
1 |
|
|
1 Press the [Í] Button for 1 second or |
A |
more. |
|
≥The SD Video Camera is turned on and the |
|
Power/Card Access Lamp A is lit in red. |
|
ªAuto power on mode
If you set the [Auto power on] to [On] in [Setup] on [MENU], the SD Video Camera is automatically turned on when LCD Monitor is opened.
≥When the battery is removed, the setting on the [Auto power on] is turned to [Off]. (The setting on the [Auto power on] may be turned to [Off] when the battery power is drained. Please recharge the battery for this feature to function.)
ªTurning the power off
1Press the [Í] Button for 2 seconds or more.
≥The SD Video Camera is turned off and the
Power/Card Access Lamp A is goes off. ≥When the LCD monitor is closed, the picture on
the LCD monitor disappears. However, the SD Video Camera is not turned off.
≥When you do not operate the SD Video Camera for about 5 or more minutes, the SD Video Camera is automatically turned off. (Using the AC Adaptor, when both the card and the battery are not inserted, the SD Video Camera is not turned off automatically.)
15
Selecting Operation Modes
1Set to [  ] 1 to select Record Mode. Set to [
  ] 2 to select Play Mode.
2Press the [MODE] Button to select a Operation Mode.
≥Every time the [MODE] Button is pressed, the Operation Mode changes as follows.
≥After several seconds, only icons are displayed. 3
[  ]: Record mode
[PICTURE]l[MPEG4]l[VOICE]l[PICTURE]
[  ]: Play mode
[PICTURE]l[MPEG4]l[VOICE]l[AUDIO]l [PICTURE]
ªAbout the Operation Modes
Seven operation modes are provided as follows.
≥Still picture (JPEG format still picture) record mode
(l 22)
≥Still picture (JPEG format still picture) play mode
(l 23)
≥Moving picture (MPEG4 format) record mode (l 24) ≥Moving picture (MPEG4 format) play mode (l 25) ≥Voice (VOICE format) record mode (l 26)
≥Voice (VOICE format) play mode (l 27)
≥Audio (MPEG2-AAC/MP3 format) play mode (l 28)
1 1 2
MODE
 2
2
 PICTURE
3

16

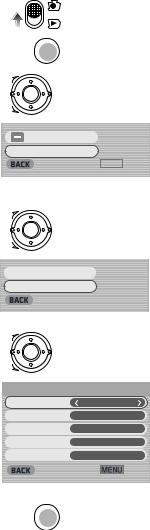
Using the Menu Screen
Allows the functions usable in the selected mode to be set from the menu.
1Select a desired mode. (l 16)
2Press the [MENU] Button.
≥The menu in the selected mode is displayed.
3Roll the Jog Ball UP or DOWN to select a desired item.
4Press the Jog Ball.
5For selecting an item, roll the Jog Ball UP or DOWN to select a desired item and then LEFT or RIGHT to set the item. 1
For conducting an item, roll the Jog Ball UP or DOWN to select a desired item and then press the Jog Ball. 2
6Press the [MENU] Button.
≥Menu screen disappears, and the selected item is now being set.
≥Press the [MENU] Button when playing back the moving picture, still picture or sound so you can edit the file being played back.
≥When you keep pressing the [MENU] Button for 2 seconds or more in playback mode, the Jog Ball
and the Zoom Lever cannot be activated to prevent wrong operations. The MENU screen also does not appear. (The [¥ HOLD] indication appears.)
The Jog Ball and the Zoom Lever are activated when you keep pressing the [MENU] Button for 2 seconds or more.
1
 MODE
MODE
2 MENU 
 4'% /'07
 /2') OQFG
  'ZVTC HKPG

 #WVQ TGEQTFKPI UGVWR

 &KURNC[ UGVWR
 5GVWR
5GVWR
 ':+6
':+6
3,4 Ô |
Ô |
××
 4'% /'07
 /2') OQFG
  'ZVTC HKPG

 #WVQ TGEQTFKPI UGVWR

 &KURNC[ UGVWR
 5GVWR
5GVWR
 ':+6
':+6
5 |
Ô |
Ô |
|
|
|
|
× |
× |
|
|
1 |
|
5'672 |
|
|
$GGR |
1HH |
|
+PRWV UGNGEV |
%COGTC |
 (QTOCV ECTF
 %NQEM UGV
 ':+6
':+6
2
6 MENU 
17
List of Menus
The menu screens used differ slightly from the actual menus. These are offered for simplified illustration purposes.
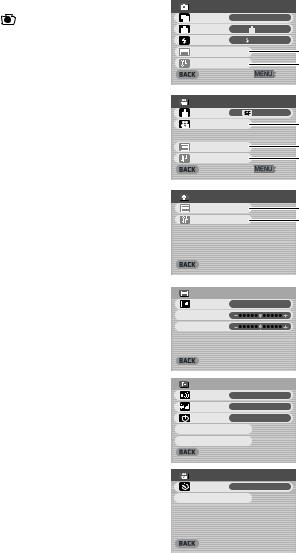
ªRecord Mode [ ]
1Still Picture Record Menu
Picture size [Picture size] (l 22) Picture quality [Quality] (l 22) Flash setting [Flash] (l 22) Display setup [Display setup] 1 Initial setup [Setup] 2
Return to the previous screen [BACK]
2MPEG4 Moving Picture Record Menu
Moving picture quality [MPEG4 mode] (l 24) Auto recording setup [Auto recording setup] 3
(l 41)
Display setup [Display setup] 1 Initial setup [Setup] 2
Return to the previous screen [BACK]
3Voice Record Menu
Display setup [Display setup] 1 Initial setup [Setup] 2
Return to the previous screen [BACK]
1 |
4'% /'07 |
|
|
|
2KEVWTG UK\G |
|
|||
|
||||
|
3WCNKV[ |
|
(KPG |
|
|
(NCUJ |
|
(NCUJ QP |
|
|
&KURNC[ UGVWR |
|
1 |
|
|
5GVWR |
|
2 |
|
|
|
|
':+6 |
|
2 |
4'% /'07 |
|
|
|
/2') OQFG |
|
5WRGT HKPG |
||
|
|
|||
|
#WVQ TGEQTFKPI UGVWR |
3 |
||
|
&KURNC[ UGVWR |
|
1 |
|
|
5GVWR |
|
2 |
|
|
|
|
':+6 |
|
3 |
4'% /'07 |
|
|
|
|
&KURNC[ UGVWR |
|
1 |
|
|
5GVWR |
|
2 |
|
 ':+6
':+6
Sub-Menu for Record Mode
1Display setup [Display setup]
Display [Icon display]
≥When it is set to [On], superimposed indications such as playback status and picture quality will be displayed.
Brightness [Brightness] (l 21) Color level [Color] (l 21)
Return to the previous screen [BACK]
2Initial setup [Setup]
Beep sound setting [Beep]
≥When it is set to [On], beeps for confirmation or alarm.
AV input selection [Input select]* (l 40)
* This menu is not in Voice Record Menu. Auto power on [Auto power on] (l 15) Card format [Format card] (l 38)
Clock setting [Clock set] (l 20) Return to the previous screen [BACK]
3Auto recording setup [Auto recording setup]
Rec timer [REC Timer] (l 41)
Auto record standby [Auto record standby] (l 41)
Return to the previous screen [BACK]
1 |
&+52.#; 5'672 |
|
|
+EQP FKURNC[ |
1P |
 $TKIJVPGUU
 %QNQT
%QNQT
 ':+6
':+6
2 |
5'672 |
|
|
$GGR |
1P |
|
+PRWV UGNGEV |
%COGTC |
|
#WVQ RQYGT QP |
1HH |
 (QTOCV ECTF
 %NQEM UGV
 ':+6
':+6
3 |
#761 4'%14&+0) 5'672 |
|
|
|
|
|
4'% 6KOGT |
1HH |
|
|
|
 #WVQ TGEQTF UVCPFD[
 ':+6
':+6
18

ªPlay Mode [ |
] |
|
1 Still Picture Playback Menu |
1 |
|
Card editing [Card editing] 1 |
|
|
P. Slide show [P. Slide show] (l 37) |
|
|
Display setup [Display setup] (l 18) |
|
|
Initial setup [Setup] 2 |
|
|
Return to the previous screen [BACK] |
|
|
2 MPEG4 Moving Picture Playback Menu |
|
|
Playback size [Screen] (l 25) |
2 |
|
MPEG4 repeat [Repeat] (l 25) |
|
|
Card editing [Card editing] 1 Display setup [Display setup] (l 18) Initial setup [Setup] 2
Return to the previous screen [BACK]
3 Voice Playback Menu
Card editing [Card editing] 1 |
3 |
|
Display setup [Display setup] (l 18) |
||
|
||
Initial setup [Setup] 2 |
|
|
Return to the previous screen [BACK] |
|
4Audio Playback Menu
Audio repeat [Repeat] (l 28) Power save [Power save]
≥When it is set to [On], the LCD Monitor is turned
off in approx. 5 seconds after playing a music file. 4 Select playlist [Playlist] 3 (l 29)
Display setup [Display setup] (l 18) Initial setup [Setup] 2
Return to the previous screen [BACK]
Sub-Menu for Play Mode
1 Card editing [Card editing]
Erase all files [Erase all files] (l 34) |
1 |
File protection [Lock/Unlock] (l 35) |
|
DPOF check [DPOF checking] (l 36) |
|
DPOF reset [DPOF resetting] (l 36) |
|
Return to the previous screen [BACK] |
|
2 Initial setup [Setup] |
|
Beep sound setting [Beep] (l 18) |
|
AV output selection [Output select] (l 39) |
2 |
Auto power on [Auto power on] (l 15) |
|
Return to the previous screen [BACK] |
|
3 Select Playlist [Playlist] |
|
Default playlist [DefaultPlaylist] (l 29) |
3 |
Playlist [Playlist] (l 29) |
|
2.#; /'07 |
|
%CTF GFKVKPI |
1 |
2 5NKFG UJQY |
|
&KURNC[ UGVWR |
|
5GVWR |
2 |
|
':+6 |
2.#; /'07 |
|
5ETGGP |
(WNN |
4GRGCV |
#NN |
%CTF GFKVKPI |
1 |
&KURNC[ UGVWR |
2 |
5GVWR |
|
|
':+6 |
2.#; /'07 |
|
%CTF GFKVKPI |
1 |
&KURNC[ UGVWR |
|
5GVWR |
2 |
|
':+6 |
2.#; /'07 |
|
4GRGCV |
#NN |
2QYGT UCXG |
1P |
2NC[NKUV |
3 |
&KURNC[ UGVWR |
|
5GVWR |
2 |
|
':+6 |
%#4& '&+6+0) |
|
'TCUG CNN HKNGU |
|
.QEM 7PNQEM |
|
&21( EJGEMKPI |
|
&21( TGUGVVKPI |
|
|
':+6 |
5'672 |
|
$GGR |
1P |
1WVRWV UGNGEV |
|
#WVQ RQYGT QP |
1HH |
2.#;.+56 |
|
&GHCWNV2NC[NKUV
2NC[NKUV
2NC[NKUV
19
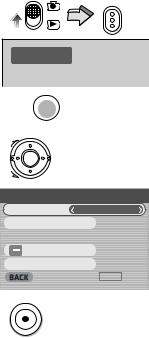
Setting Date and Time
At the time of purchase of the SD Video Camera, the date and time are not set ([PRESS MENU TO SET CLOCK] is displayed). First, set the date and time, then use the SD Video Camera.
1Set the Record/Play mode Switch to [  ].
].
2Press the [MENU] Button.
3Select [Setup] and press the Jog Ball.
4Select [Clock set] and press the Jog Ball.
5Select [Year] and roll the Jog Ball LEFT or RIGHT to set a desired value.
6In the same way, set [Month], [Day], [Hour], [Minute] to a desired value.
7Press the [MENU] Button.
1
2
3
4
MENU 
Ô
×

 &KURNC[ UGVWR
 5GVWR
5GVWR
 ':+6
':+6
Ô
×
≥When the built-in battery has been exhausted, set the date and time after the battery has charged.
(l 51)
 (QTOCV ECTF
 %NQEM UGV
 ':+6
':+6
5,6 Ô
×
 %.1%- 5'6
;GCT
/QPVJ &'%
&C[
*QWT #/
/KPWVG
 ':+6
':+6
7 MENU 
20
Adjusting Brightness and |
1 |
||
Color Level on the LCD |
|||
|
|||
Monitor |
2 |
||
LCD Brightness [Brightness] |
|||
|
|||
It adjusts the brightness of the image on the LCD |
3 |
||
screen. |
|||
LCD Color Level [Color] |
|
||
It adjusts the color saturation of the image on the LCD |
|||
screen. |
|
||
1 |
Set the Record/Play mode Switch to [ |
] |
|
|
and set the operation mode to [PICTURE] |
||
2 |
or [MPEG4]. |
|
|
Press the [MENU] Button. |
|
||
3 |
Select [Display setup] and press the Jog |
|
|
4 |
Ball. |
4 |
|
Select [Brightness] or [Color]. |
|||
5 |
Roll the Jog Ball LEFT or RIGHT for |
|
|
|
adjustment. |
|
|
|
≥If [Brightness] is selected, the brightness can be |
||
|
increased by moving the [ ] to the right. |
|
|
|
≥If [Color] is selected, the color can become |
|
|
6 |
darker by moving the [ ] to the right. |
|
|
Press the [MENU] Button. |
|
||
|
≥The [MENU] screen disappears. (If left unused |
|
|
|
for approx. 5 seconds, the display will |
|
|
|
automatically revert to the [Display setup] |
5 |
|
|
screen.) |
||
≥These adjustments do not affect the recorded images.
MODE
MENU 
Ô
×
 4'% /'07
 /2') OQFG
  5WRGT HKPG

 #WVQ TGEQTFKPI UGVWR

 &KURNC[ UGVWR
 5GVWR
5GVWR

 ':+6
':+6
Ô
×
 &+52.#; 5'672

 +EQP FKURNC[ 10
 $TKIJVPGUU
 %QNQT
%QNQT
 ':+6
':+6
Ô
×
 $TKIJVPGUU
6 MENU 
21

Basic Functions
Recording Still Pictures
Records still pictures.
1Set the Record/Play mode Switch to [  ] and set the operation mode to [PICTURE].
2Press the [MENU] Button.
3Set [Picture size] to desired picture size.
≥Select one of [1600a1200], [1280a960], or [640a480].
4Set [Quality] to desired picture quality.
≥Select one of [Fine] or [Normal].
5To use the flash, Set [Flash] to [Flash on] or [Auto].
≥When [Flash] is set to [Auto],  will be displayed in a dark place and the Flash will be available.
≥Set [Flash] to [Off] to inactivate the Flash.
6Press the [MENU] Button.
7Press the Recording Start/Stop Button.
≥The still image is recorded on the Memory Card.
1 |
|
MODE |
|
PICTURE |
|
2 |
MENU |
|
3,4,5 |
|
|
|
Ô |
|
|
× |
|
|
4'% /'07 |
|
|
2KEVWTG UK\G |
|
|
3WCNKV[ |
(KPG |
|
(NCUJ |
(NCUJ QP |
|
&KURNC[ UGVWR |
|

 5GVWR
5GVWR
 ':+6
':+6
6 MENU 
ªTo Check the Recorded Image |
7 |
immediately |
|
Press the Jog Ball 1 or set the LCD Monitor to the |
|
Viewer position 2. |
1 |
1 The recorded image displays for approx. |
|
5 seconds. |
|
2The still images are displayed until the LCD Monitor is set up as 1.
≥The [REVIEW] Indication is displayed. ≥Press the [MENU] Button when the checking
display appears to show [Erase card file] display. 2 Select [Yes] and press the Jog Ball to delete the image.
Ô
×
REVIEW
22
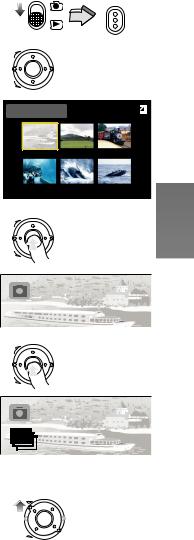
Playing Back Still Pictures
This mode plays back still pictures recorded on the |
1 |
MODE |
|
Memory Card.
1Set the Record/Play mode Switch to [  ] and set the operation mode to [PICTURE].
≥Still picture files recorded on the Memory Card are displayed in the index picture screen.
2Roll the Jog Ball to select a desired file.
3Press the Jog Ball.
≥A still picture file is played back on the LCD Monitor.
ªOperation during Playback
Stop (Reverts to the |
Press the Jog Ball |
|
index picture screen.) |
||
|
||
|
|
|
Displays the next |
Roll the Jog Ball RIGHT |
|
(previous) screen |
(LEFT) |
|
|
|
|
Slide show |
Press the Jog Ball for |
|
1 second or more |
||
|
||
|
|
2
3
Ô
×
 PICTURE
Ô
×
ªTo Play Back All of the Still Pictures
One by One
While playing back, Press the Jog Ball for |
1 |
1 second or more 1.
≥The image is played back for approx. 3 seconds. ≥Press the Jog Ball to stop.
≥Roll the Jog Ball DOWN to pause, and roll the Jog Ball UP to resume playback.
ªTo Double the Image Size
While playing back, rotate the Zoom/Volume Lever |
|
toward [T] 2. |
|
≥Rotate the Zoom/Volume Lever toward [W] to |
|
resume normal playback. |
2 |
≥Roll the Jog Ball to change the enlarging area of the |
image. Cannot select files unless you restore the size of a picture.
≥Depending on the image, you cannot enlarge it.
≥Only JPEG images that were created by this product will be displayed correctly. Files that are copied to the SD card may not be displayed properly, or not at all.
Ô
×
Ô
×
23
Recording Moving Pictures (MPEG4)
You can record moving pictures on the Memory Card.
1Set the Record/Play mode Switch to [  ] and set the operation mode to [MPEG4].
2Press the [MENU] Button.
3Set the [MPEG4 mode] to desired picture quality.
≥Select one of [Extra fine], [Super fine], [Fine] or [Economy].
≥Press the [MENU] Button after completing the setting.
4Press the Recording Start/Stop Button.
≥Recording starts.
≥While recording the moving picture, press the Recording Start/Stop Button to stop recording.
≥If you select [Economy] on [MPEG4 mode], the quality of image will deteriorate.
≥If the moving picture is recorded again after stopping recording, it will be saved as another file.
≥Digital Zoom Function, Night View Function, Backlight Compensation Function and White Balance adjustment cannot be selected during recording of MPEG4 moving pictures.
1
2
3
4
MODE
 MPEG4
MPEG4
MENU 
Ô
×
 4'% /'07
 /2') OQFG
  'ZVTC HKPG

 #WVQ TGEQTFKPI UGVWR

 &KURNC[ UGVWR
 5GVWR
5GVWR
 ':+6
':+6
24
 Loading...