

SD-Jukebox Ver. 3.0
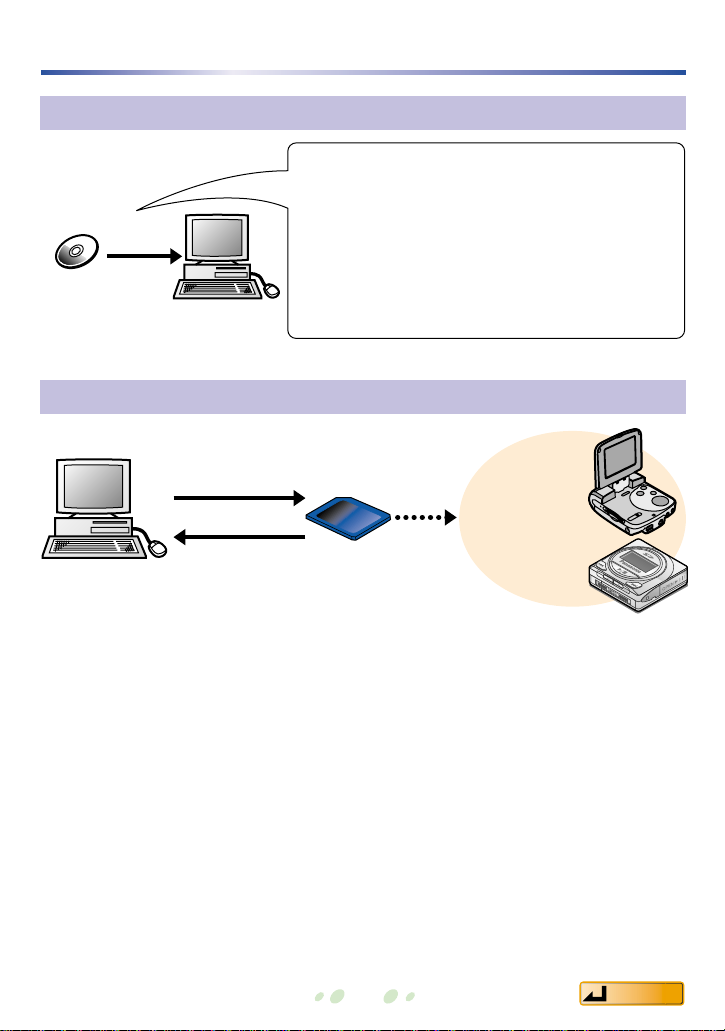
For information on the basic operations in
Windows and how to use your computer and
peripheral devices, see the Operating
Instructions included with your system.
Operating Instructions
Thank you for purchasing SD-Jukebox.
To ensure proper use, carefully read these Operating Instructions and the Operating
Instructions included with your SD Multi AV Device.
Before listening to music with
the SD Multi AV Device
Be sure to follow the instructions in
these Operating Instructions to transfer
music to an SD Memory Card.
MSC0031CD_E_ZA MS1202SF0
English
© 2003 Matsushita Electric Industrial Co., Ltd.
Contents
2
Important SD-Jukebox usage information
SD-Jukebox incorporates copyright protection technology using
encryption technology in order to protect copyrights, to ensure the healthy
development of music culture, and to protect the rights of valid
purchasers.
• SD-Jukebox records music data in encrypted form onto your hard disk drive.
Encrypted music cannot be moved/copied to other folders, drives, and other PCs for
use.
• Unique information pertaining to your PC's processor and hard disk drive is used in
the encryption process. Therefore, if either the processor or hard disk drive is
replaced, previously created music data will no longer be available for use.
• Depending on your computer system, you may experience problems such as being
unable to record or use recorded music data. Please note that Matsushita is in no way
liable for any music data you lose, or for any other direct or indirect damages.
• SD-Jukebox cannot work with MMC (MultiMediaCard).
• SD-Jukebox cannot play and record music CDs that does not have a mark on
the disc label.
3
Contents
Preparations
System Requirements......................4
Before you start................................5
• SD-Jukebox Features........................5
• Recorded tracks are stored in
compressed form on your PC............6
• Transferring data between
a PC and SD Memory Card...............6
Connecting an SD Memory Card......7
• Protecting data on
an SD Memory Card..........................7
Checking out tracks to
an SD Memory Card ......................23
Checking in tracks from
an SD Memory Card to the PC.......25
Editing.............................................26
Listening to music on the PC..........28
Images............................................30
• Attaching images.............................31
Modifying the sound
with the equalizer............................32
Using SD-Jukebox
Reference information
Names and functions of
the screen elements.......................35
Formatting an SD Memory Card.....46
Supported formats..........................47
• Conversion table .............................47
Uninstalling SD-Jukebox ................48
Troubleshooting..............................49
Removing the SD Memory Card.....52
Limits related to
copyright protection........................52
Limitations related to
Windows Explorer...........................52
Index and glossary .........................53
Starting SD-Jukebox.........................8
Playlists ............................................9
• Selecting a playlist...........................10
Recording CDs to your PC.............11
Importing audio data to
SD-Jukebox....................................14
Creating a playlist...........................17
•
You can use Music Sommelier to
create a playlist
..................................18
•
Music Sommelier:
Selecting impressions to group tracks
....19
•
Music Sommelier:
Grouping tracks of similar impression
....20
•
Music Sommelier:
Auto track selection .........................21
• Searching by track title,
artist name, and more......................22

Contents
4
System Requirements
• CPU: Windows 98 SE, Windows Me: Intel Pentium
®
II
333 MHz or higher
Windows 2000, Windows XP: Intel Pentium
®
III
500 MHz or higher
• RAM: Windows 98 SE, Windows Me: 64 MB or more
Windows 2000, Windows XP: 128 MB or more
• Hard disk drive: At least 60MB free disk space (more space may be required for music
data and depending on your version of Windows)
• Display: 800×600 or better resolution (1024×768 or better recommended)
Set to High Color (16-bit) or higher
• Sound device: Creative Labs Sound Blaster 16 or compatible device
• CD-ROM drive (required for installation and for CD recording):
A CD-ROM drive capable of digital recording is required. Four-speed or
higher is recommended. (Recording may not work properly with CDROM drives connected through an IEEE1394 or USB connection.)
• USB port (required for connecting an SD Memory Card)
(SD-Jukebox may not run properly if the SD Memory Card is connected through a USB
hub or USB extension cable.)
• DirectX 8.1 or higher installed on your computer.
• If you are using the CDDB function, then an Internet connection is also required.
(1) SD-Jukebox may not run properly on all computers meeting the recommended system
specifications.
(2) SD-Jukebox may not run properly on user-built computers.
SD-Jukebox does not run on Macintosh systems.
In order to use SD-Jukebox, you need an IBM PC/AT-compatible personal
computer satisfying the system requirements shown below.
SD-Jukebox does not run on Microsoft Windows 3.1/ Windows 95/ Windows 98, or
Windows NT. SD-Jukebox may not run properly if your computer has been upgraded from
Windows 3.1/ 95 to Windows 98 SE, Windows 2000, Windows Me, or Windows XP.
Not compatible with dual-CPU models or multi-boot environments. Only available when
the user is logged in as the system administrator.
If you are upgrading from Windows 98/98 SE or Windows Me to Windows XP
Select "Upgrade installation (recommended)". If you select "New installation", music data
created with SD-Jukebox prior to upgrading to Windows XP will no longer be available for use.
OS:
Microsoft®Windows®98 SE, Windows®2000(Professional SP2/SP3) , Windows®Me,
Windows®XP(Home Edition or Professional, as well as each version after updating with SP1)
Hardware requirements
Compatible PC: IBM PC/AT-compatible personal computers with one
of the following operating systems preinstalled
Contents
5
Before you start
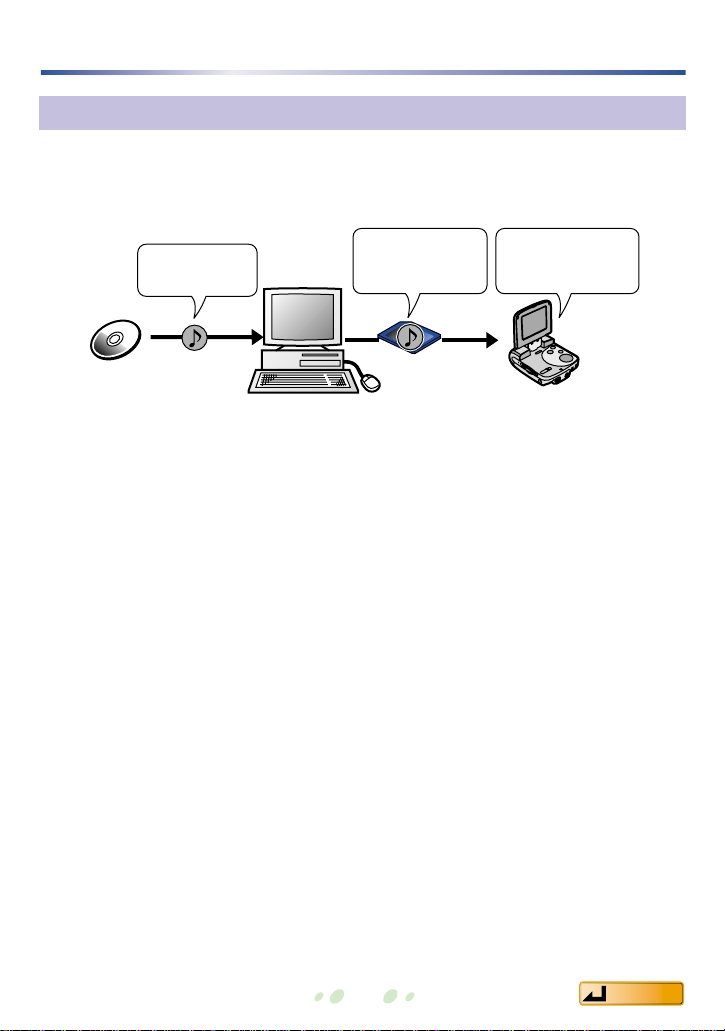
SD-Jukebox Features
SD-Jukebox is a software program for recording and managing music CDs on
your PC and transferring recorded tracks to an SD Memory Card so you can
enjoy the music on an SD Multi AV Device or an SD Audio Player.
Other features:
• Edit titles, track order, and other information on your PC, and play tracks on
your PC.
• You can choose the impression that fits your mood and Music Sommelier will
automatically select tracks that match the impression.
• Display album artwork or your preferred still images while listening to a track.
• In cases where music information is registered at the CDDB site, information
such as album titles can be downloaded just by playing a music CD.
(In order to use CDDB function, you must set up an Internet connection for
your PC and establish separate contracts with individual service providers.)
Record tracks
from music CDs
Music CD
PC
Write tracks
(music data) to an
SD Memory Card
Enjoying the music
on an SD Multi
AV Device, etc.
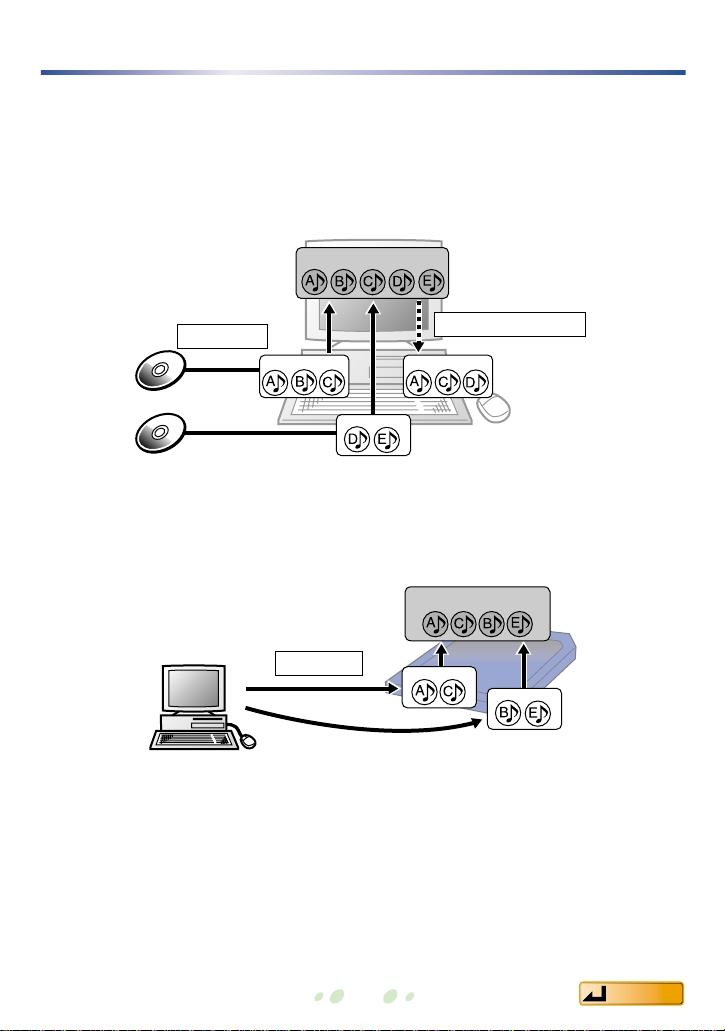
Recorded tracks are stored in compressed form on your PC
Transferring data between a PC and SD Memory Card
Transferring a track (audio data) recorded on your PC to an SD Memory Card is
called "Checking out" the track. After checking out the track to your SD Memory
Card, you can listen to it on a device such as an SD Multi AV Device.
You can check out the audio data for a track up to three times. This limitation
was established to protect copyright.
Returning a track to your PC from an SD Memory Card is called "Checking in"
the track. After checking in the track, your PC increases the remaining check-out
count by one. You can also check out a returned track to other SD Memory
Cards.
Checkout
(write)
Checkin
(return)
Before you start
6
Music data compression
↓
Save the compressed music data to your hard disk.
↓
Check it out to an SD Memory Card.
To play music on an SD Multi AV Device or SD
Audio Player, you must use the compression
format compatible with your SD Multi AV Device
or SD Audio Player.
SD Multi AV
Device
Play music and
images
SD Audio Player
Play music
()
Music CD
Recording
Contents
Connecting an SD Memory Card
7
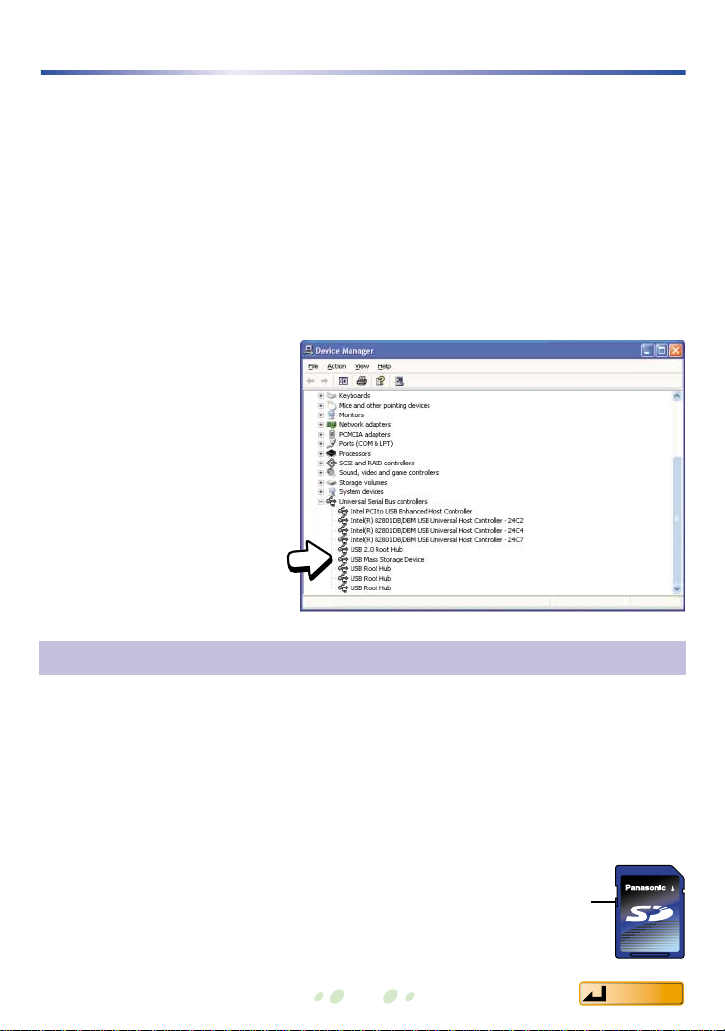
Protecting data on an SD Memory Card
To prevent the risk of damaging the inside of an SD Memory Card or corrupting
the audio data so that it is unusable, wait until SD-Jukebox has completely
stopped processing or the Card Access lamp of SD Multi AV Device turns off
before you do any of these things:
• Attach or remove the SD Memory Card or the SD Multi AV Device
• Intentionally close SD-Jukebox or Windows
• Intentionally turn off the PC (e.g., pull the power cord out of the power
outlet)
After check out, we recommend moving the writeprotect switch on the SD Memory Card to the LOCK
position. Unlock the switch when you want to do a
new check out or check in tracks.
Write-protect
switch
Attach the SD Memory Card to your SD Multi AV Device and then connect it to the PC
.
For connection details, consult your SD Multi AV Device user’s guide. See page
52 for instructions on removing the SD Memory Card.
You can also access the SD Memory Card through a connection with an optional
USB Reader/Writer for the SD Memory Card.
After you have correctly connected the SD Multi AV Device or USB
Reader/Writer, it will be identified as "USB Mass Storage Device" (in Windows
2000/XP) or "Panasonic Multi AV Device" (in Windows 98SE/Me) in the Device
Manager list.
For instructions on opening the Device Manager, refer to the Windows
documentation.
(Example)
Contents
Contents
8
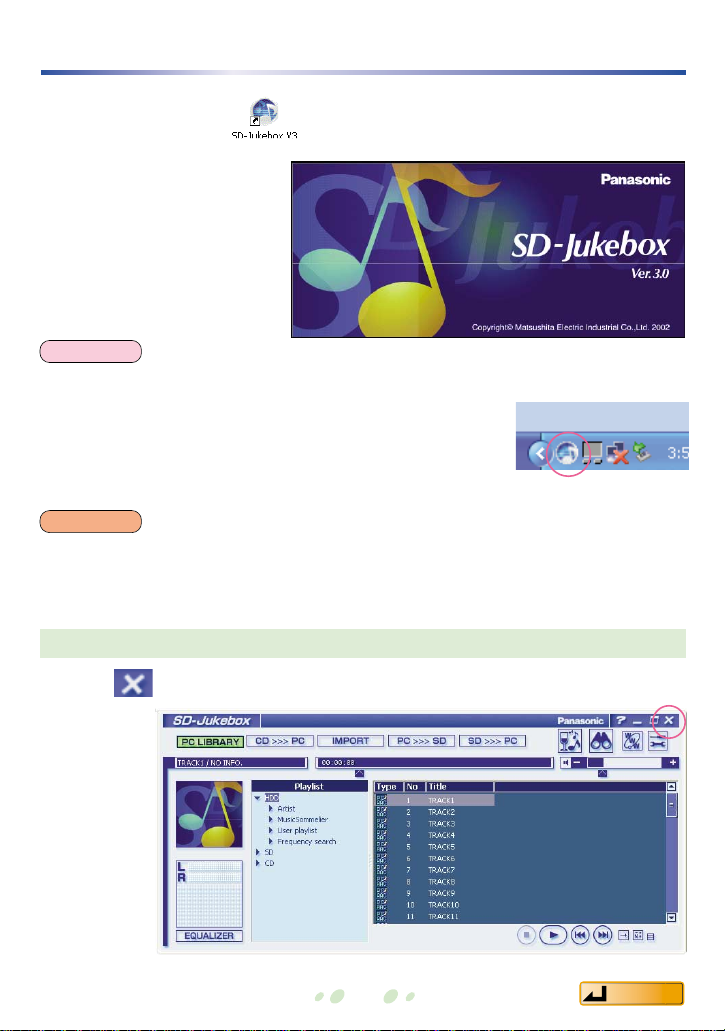
Starting SD-Jukebox
• Double-click the icon on the desktop.
The <Library Screen>
appears after the <Title
Screen>.
• Click .
<Title Screen>
Exiting SD-Jukebox
• If the icon does not appear on the desktop, then from the Start menu, select [All Programs]
→
[Panasonic] →[SD-JukeboxV3] →[SD-JukeboxV3].
• SD-Jukebox version information
To check which version you have, start SD-Jukebox and
right-click the SD-Jukebox icon on the task tray. Next, select
"About SD-Jukebox".
NOTE
While SD-Jukebox is running, we recommend disabling any power-saving functions on
your equipment (e.g., the PC).
CAUTION
SD-Jukebox icon
Contents
Playlists
9
A playlist is a collection of tracks like an album. By selecting and playing a
playlist, you can listen to the tracks in the playlist.
When you record tracks on your PC, a playlist is automatically created. You can
also make new playlists collecting your favorite recorded tracks.
When you check out tracks to your SD Memory Card, a playlist is also created
automatically on the SD Memory Card.
PC
Recording
Library of all tracks(HDD)
Playlist
Playlist Playlist
Creating a playlist
SD Memory Card
Checkout
Library of all tracks(SD)
Playlist
Playlist

Playlists
10
Selecting a playlist
When selecting a track to listen to with SD-Jukebox
or to check out, choose the playlist from the right
window.
• Click [ ] to display the nested playlist below. (Click
[ ] to restore the previous display.)
• Click on a playlist name to display the tracks it
includes.
[HDD] When you record a track on your hard
disk, the track is added to the [HDD]
library. Click [HDD] to display all the tracks
recorded on your PC.
Playlists are automatically created below the heading [Artist].
• Artist: A playlist with tracks organized by each artist
• Music Sommelier : A playlist created by Music Sommelier
• User playlist: Playlists that users create by grouping tracks
after recording them
• Frequency search: A playlist created automatically based on the
tracks most frequently played over the past
month or week
[SD] Click [SD] to display all the tracks recorded on your SD Memory Card.
Click [ ] to display the playlist of the SD Memory Card.
[CD] Displays the tracks of the CD.
Deleting a track from the [HDD] library will delete the audio data for that track.
NOTE
Contents
Contents
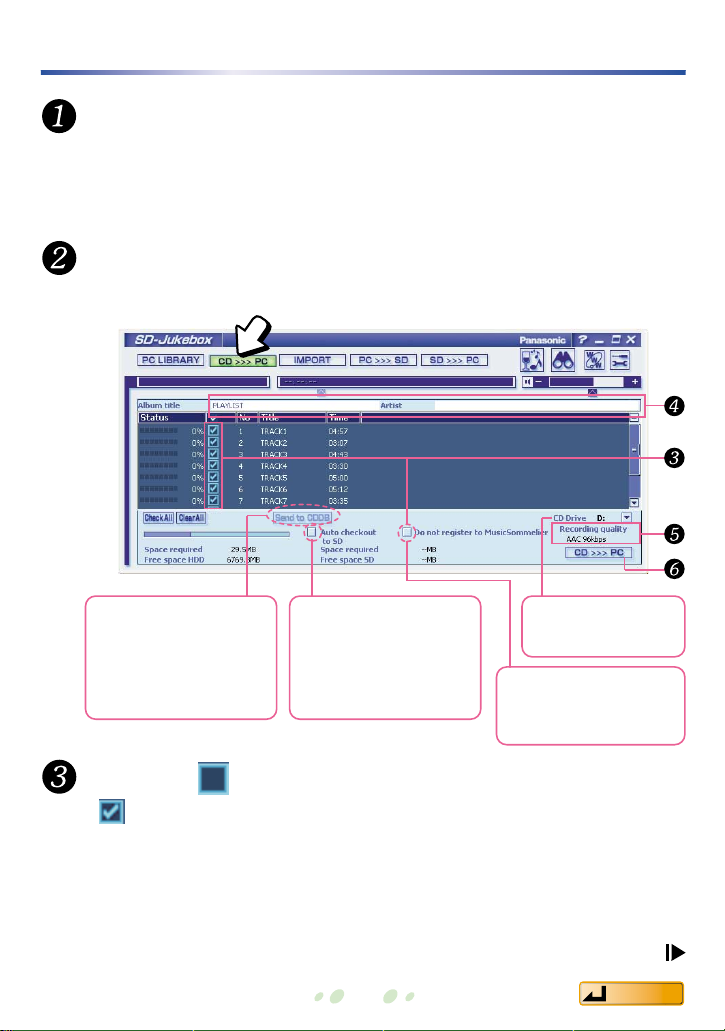
Select the (checkbox) next to the track to be recorded.
• appears next to the selected track.(Click again to remove the check
mark.)
• To record all tracks, click [Check All].
• When recording audio files other than music (for example, recordings of
speeches, dramatic performances, or sound effects), click the checkbox
[Do not register to Music Sommelier].
11
If the CD starts playing automatically as soon as you insert it in the CDROM drive (CD-EXTRA or an application with an auto-play function), close
the auto-playing program. You will not be able to use SD-Jukebox until the
auto-playing program is closed.
Click [CD>>>PC].
Recording CDs to your PC
Insert a CD in your PC's CD-ROM drive.
The <CD Recording Screen> appears.
<CD Recording Screen>
To record music to your
PC and simultaneously
check out the music to an
SD Memory Card, click
"Auto checkout to SD".
Select your CDROM drive.
Deactivates track
assignment by Music
Sommelier.
After you enter or revise
CD track information,
you can send the
information to CDDB to
register it on their server.
Continued on next page
Contents
12
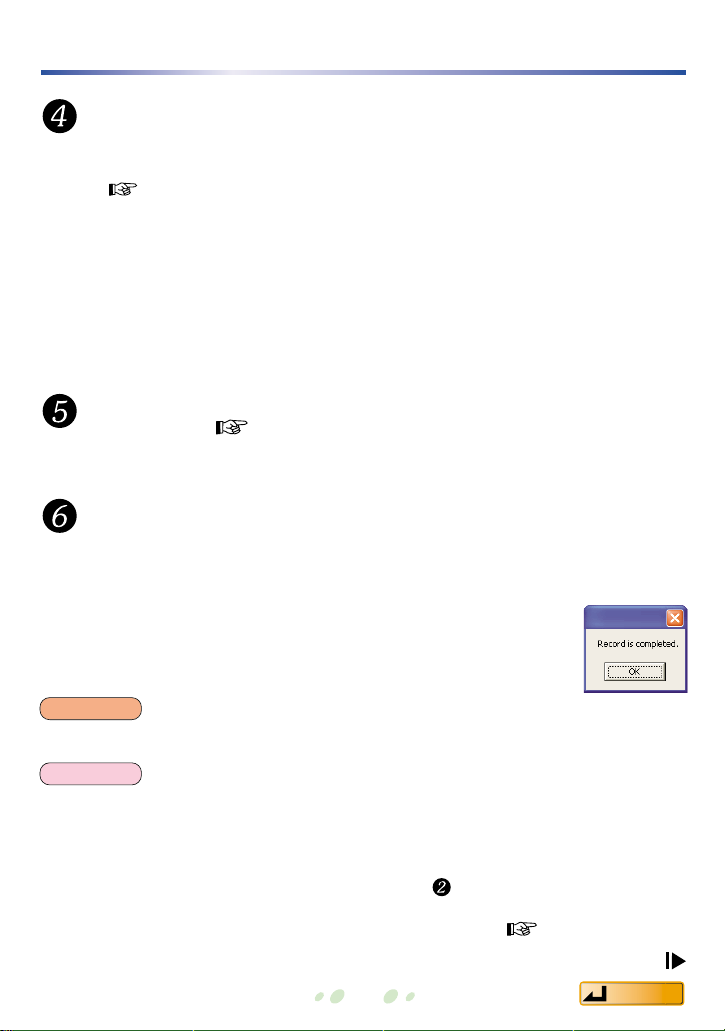
Enter names for [Album title] and [Artist].
• In cases where music information is registered at the CDDB, the album
title, the artist name and title information will be downloaded automatically.
( page 53)
(In order to use CDDB function, you must set up an Internet connection for your
PC and establish separate contracts with individual service providers.)
• When no information is available, the creation date and track number are
assigned. (Artist information is not entered automatically.)
In such a case, we recommend changing the album title to your preferred
name so that you can recognize the contents.
You can edit the track title after recording.
Recording CDs to your PC
The default setting is AAC and 96 kbps.
Modify the recording method and audio quality as
necessary.
(
page
13)
Click [CD>>>PC].
• Recording starts.
• Click [Cancel] to cancel a recording in progress. (If you cancel partway
through a track, recording will stop at the next track.)
• When all the tracks have been recorded, the <Record
is completed Screen> is displayed. Click [OK].
During recording, do not remove the CD or remove or insert an SD Memory Card.
• Recordings from CD-R and CD-RW discs may not work properly.
• When you record a CD compatible with the CD TEXT standard, the album title, artist
name, and title information recorded on the CD are acquired automatically. However,
your PC's CD-ROM drive must also support CD TEXT in order for this to work.
• When you must switch the CD-ROM drive, after step select the drive where you have
inserted the CD.
• If you cannot access the CDDB, complete the CDDB settings. (
page
45)
NOTE
CAUTION
Continued on next page
Before clicking [CD>>>PC], you can choose the format of data compression for
recording and the level of audio quality.
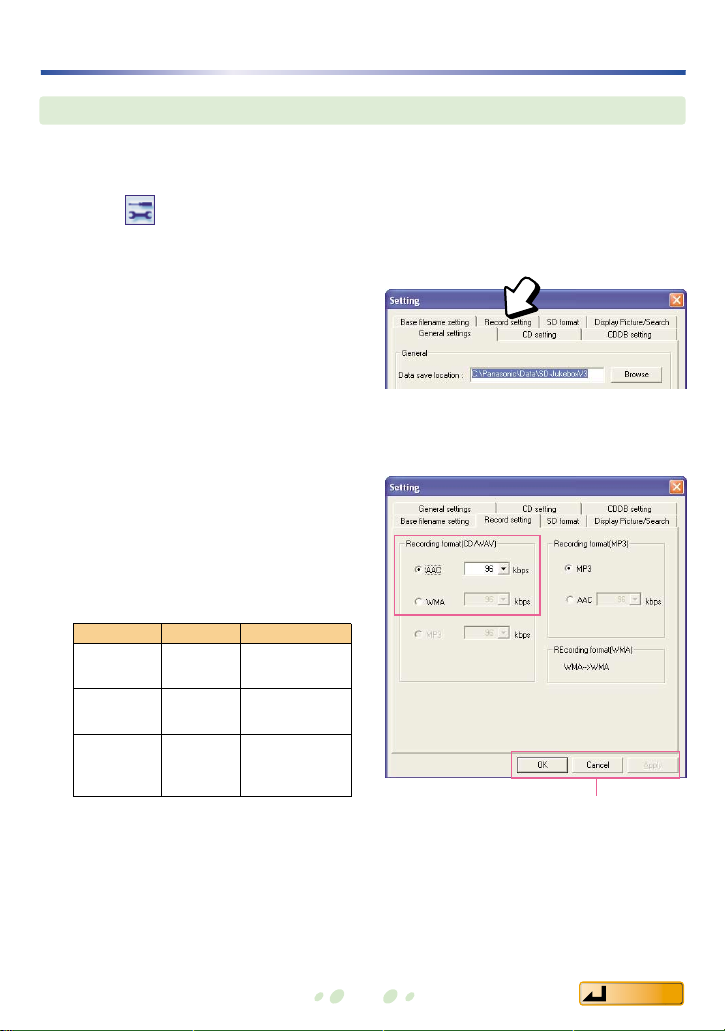
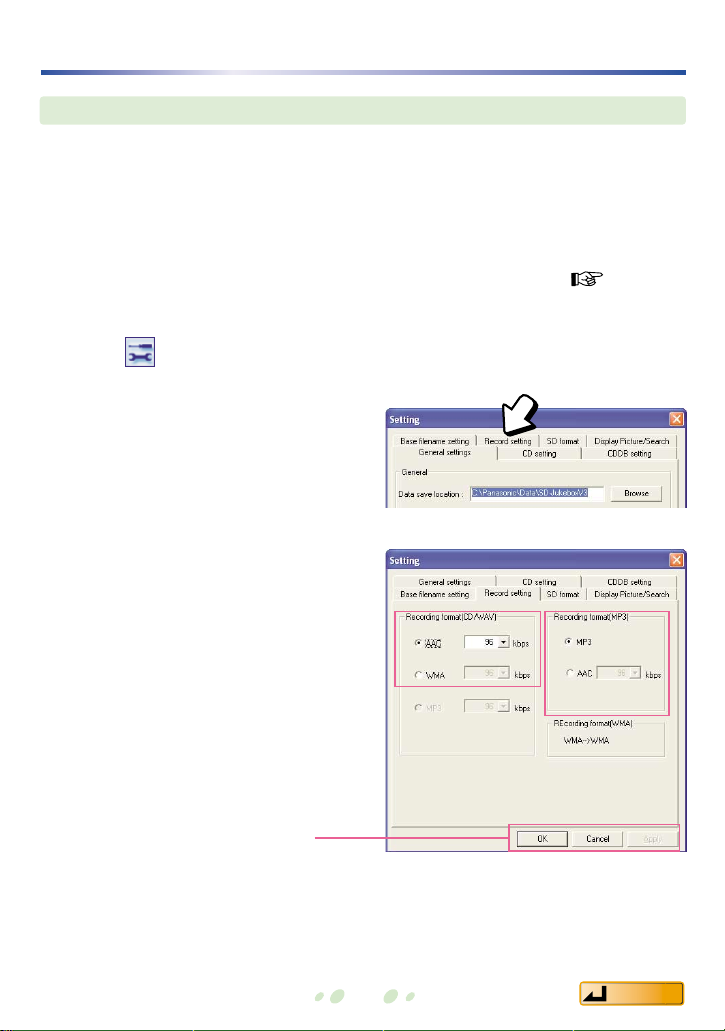
13
Recording CDs to your PC
Selecting the recording method and audio quality
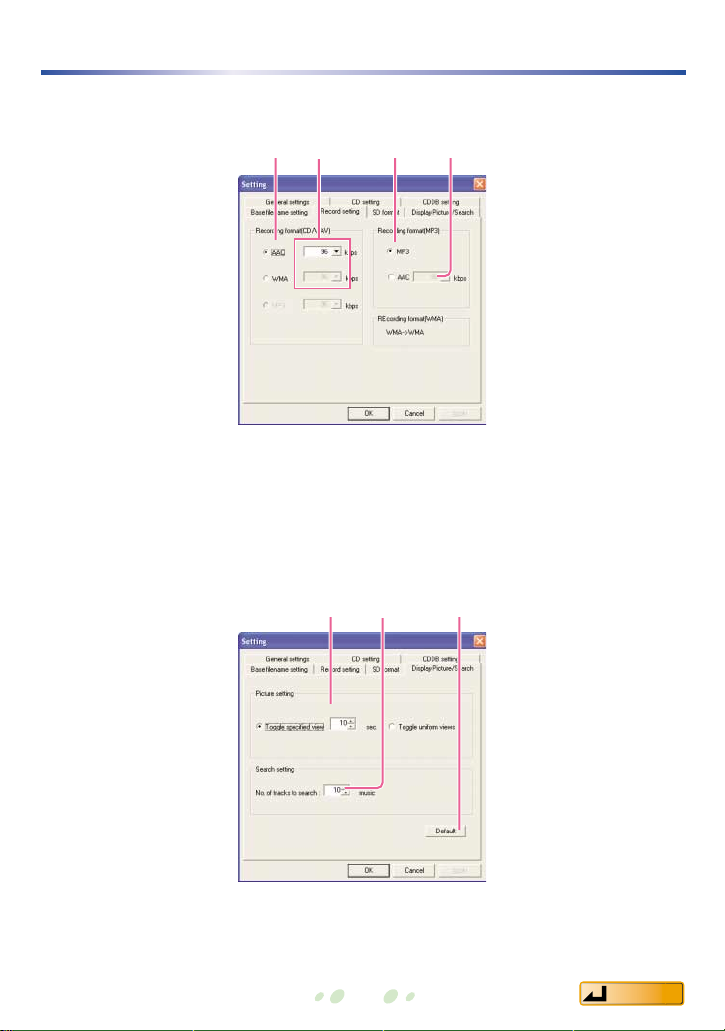
1. Click to display <Setting Screen>.
2. Click on the [Record setting] tab.
3. In [Recording format (CD/WAV)], select AAC or Secure WMA.
Next, select the audio quality level from the pulldown menu.
4. Click [Apply], then [OK].
The higher the number, the better
the quality. However, better
quality requires more memory.
The table below shows the
recordable time on a 64MB SD
Memory Card.
Secure MP3 cannot be selected.
Bit rate
Recordable time
High
128 kbps
About 64
quality minutes
Standard
96 kbps
About 86
minutes
For long-
About 129
time 64 kbps
minutes
recording
4
Contents
Contents
14
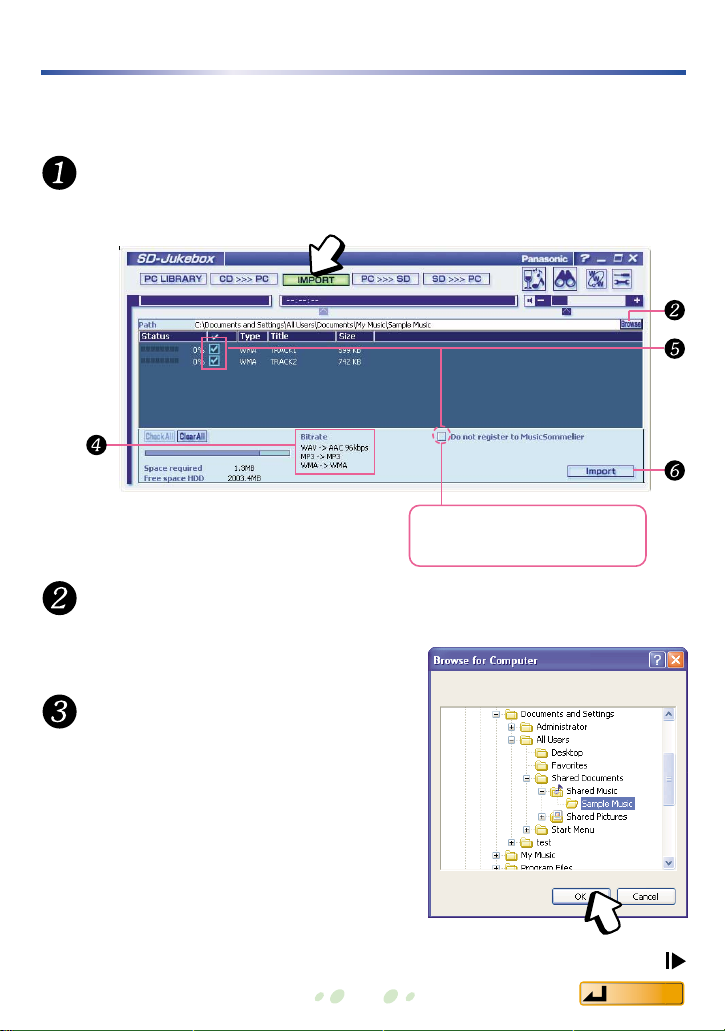
Importing audio data to SD-Jukebox
Follow these steps to import the MP3, WMA, and WAV music data files saved
on your hard disk to SD-Jukebox.
Click [Browse].
Click [IMPORT].
The <File Import Screen> appears.
The <Browse for Computer Screen>
appears.
<File Import Screen>
Select the folder containing
the MP3, WAV, or WMA files
and click [OK].
File names are displayed on the <File
Import Screen>.
<
Browse for Computer Screen
>
Continued on next page
Deactivates track assignment
by Music Sommelier.
Contents
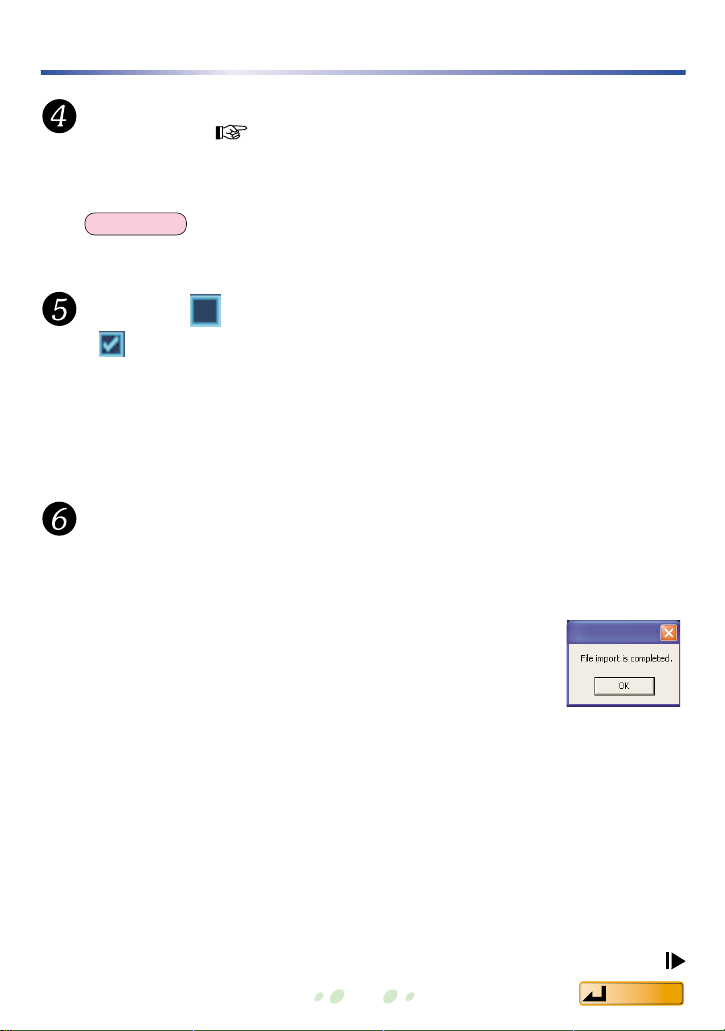
• Importing starts.
• Click [Cancel] to quit importing in progress. (If you cancel partway
through a track, importing will stop at the next track.)
• When all tracks have been imported, the <File import is
completed> is displayed. Click [OK].
• We recommend changing the playlist name to your preferred name after
importing.
Click [Import].
The default settings are as follows:
WAV→AAC, MP3→Secure MP3, and WMA→Secure WMA.
Modify the file import method and audio quality as
necessary.
(
page
16)
Copyright-protected WMA files cannot be imported.
15
Importing audio data to SD-Jukebox
Select the (checkbox) next to the track you want to import.
• appears next to the selected track.(Click again to remove the check
mark.)
• Click [Check All] to import all of the tracks.
• When importing audio files other than music (for example, recordings of
speeches, dramatic performances, or sound effects), click the checkbox
[Do not register to Music Sommelier].
NOTE
Continued on next page
Contents
Importing audio data to SD-Jukebox
16
Before clicking [Import], you can select the import method (the compression
format) and the level of audio quality.
• For WAV files, you can choose between AAC and Secure WMA.
• For MP3 files, you can choose between Secure MP3 and AAC.
Normally, Secure MP3 is selected. Select AAC if necessary for the SD Multi
AV Device or the SD Audio Player you are using.
• Compression format and bit rate are not changed for WMA files. (
page
47)
Selecting the importing method and audio quality
3.
In the source file data format
field, select the recording
method and choose the
audio quality from the
pulldown menu.
4. Click [Apply], then [OK].
4
1. Click to display <Setting Screen>.
2. Click on the [Record setting]
tab.
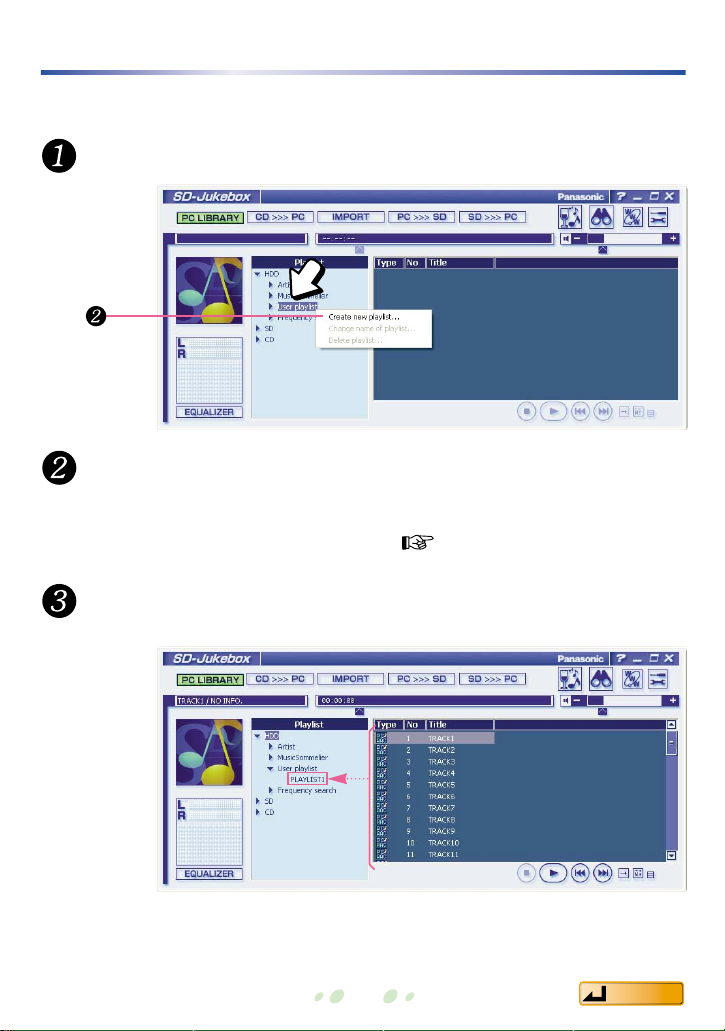
Creating a playlist
17
You can make a playlist for groups of your favorite tracks.
In the <Library Screen>, right-click on [User playlist].
Click "Create new playlist…".
• A new playlist is created.
• We recommend changing the playlist name to your preferred name so
that you can recognize the contents.
(
page
27)
Select tracks from the list and drag them to your new
playlist folder.
Contents
Contents
18
Creating a playlist
You can use Music Sommelier to create a playlist
When you use SD-Jukebox to record tracks on your PC, Music Sommelier
automatically forms an impression of the track. The impressions can be
used as the basis for creating a playlist. You can create groups of tracks
for playlists that tend to give a certain impression by selecting the
impression instead of selecting the tracks individually.
You can also create random track groups by simply selecting patterns for track progression
.
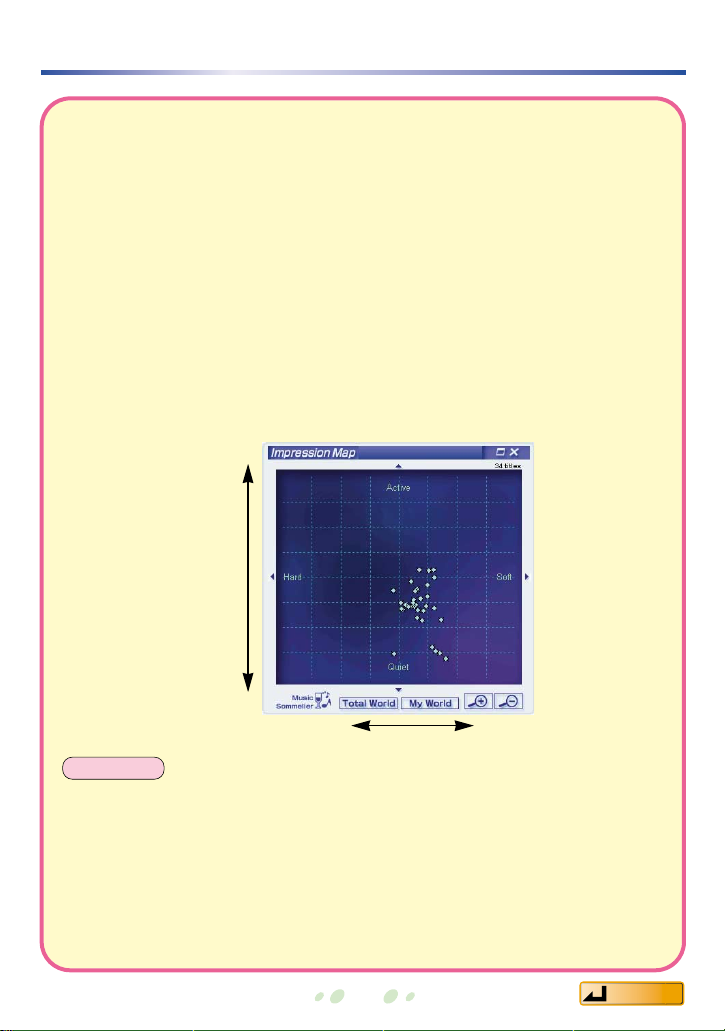
Music Sommelier forms impressions about tracks based on their tempo,
beat, and other characteristics. The impression results are displayed in the
impression map organized by two axes. The activity axis ranges from quiet
to Active, and the emotive axis ranges from Mechanical to human. The
impression map shows various tracks as dots, and the positions of the
dots indicate the track impression.
The emotive axis
Mechanical Human
Active
The
activity axis
Quiet
• People form various impressions of tracks. It is conceivable that Music Sommelier
track selections will not necessarily suit your tastes.
• It is possible to apply Music Sommelier to audio data besides tracks, for example,
to speech recordings. However, they might be registered beyond the range of the
impression map, which would prevent display.
• Static and other recording elements can influence the impression formed by Music
Sommelier. Thus, if the same track is recorded twice, it may be shown in different
positions on the impression map.
NOTE

Contents
19
Creating a playlist
Click .
Select the impression and click it.
The items with tracks that tend to match the impression are marked with a
.
• A list of tracks that tend to match is displayed.
The range of the selected tracks is displayed
on the impression map.
• For tracks that you will not add to the
playlist, click the check box to remove the
check mark.
After the confirmation message is displayed, click [OK].
The <Music Sommelier Screen> is
displayed.
Click [Select].
Music Sommelier: Selecting impressions to group tracks
When you select an impression to match your mood, such as "POP" or "Healing"
music, the tracks on your PC that match the impression are automatically selected.
<Music Sommelier Screen>
Name the playlist.
Click [Add to Playlist].
You can change the search range for selection by feeling by clicking [Edit] after selecting
the impression.
NOTE

Contents
20
Creating a playlist
Music Sommelier: Grouping tracks of similar impression
After you select one track from a list, you can group others that resemble it.
In the <Music Sommelier Screen>,
click [(New Keyword)], and then [Edit].
The <Edit Screen> is displayed.
From the list, choose a
representative track as the basis for
the impression and double-click it.
• The representative track title appears
in the <Edit Screen>.
• You can also enter a track from the
impression map by double-clicking on
the track’s dot.
<Edit Screen>
You can specify the search
range. Choosing "Minimum"
will yield fewer matches.
• Your keyword will become the name of the impression after registering.
• Click [Preview] to check the search parameters on the image map.
The keyword (impression name) you entered in step is registered at
the field for "Select by feeling".
Enter a keyword.
Click [Register].
Create a playlist by following the steps on page 19.
• Right-click on a track in the <Library Screen> and then click "Select similar track" to
create a playlist of tracks that resemble it. (The playlist is created below [Music
Sommelier].)
• You can save up to 20 new keywords.
NOTE

Contents
21
Creating a playlist
Music Sommelier: Auto track selection
For the overall progression (track pattern) of all tracks on your playlist, when you
make a selection like "Easygoing tracks to energetic tracks" or "Energetic tracks
to easygoing tracks to energetic tracks", the designated number of tracks will be
selected in an order matching the progression.
Track selection is random, so different tracks are chosen each time even if you
use the same pattern.
In the <Music Sommelier Screen>, choose a track
selection pattern.
Click [Select].
•
The selection results that match your chosen pattern are displayed in the list.
• For tracks that you will not add to the playlist, click the checkbox to
remove the check mark.
When the confirmation message is displayed, click [OK].
Examples
: From easygoing to
energetic tracks
: From easygoing to
energetic to
easygoing tracks
: All energetic tracks
• Click to display the
nested patterns.
You can designate
number of songs.
(Between 4 and 99
tracks.)
Name the playlist.
Click [Add to Playlist].
You can exclude the tracks from track selection assignment. Follow these steps to
deregister them.
1. From the <Music Sommelier Screen>, select [(New Keyword)]. Click [Edit].
2. Right-click on the track title in the list.
3. Click "Activate Auto-Select function", and remove the check.
NOTE
Contents
22
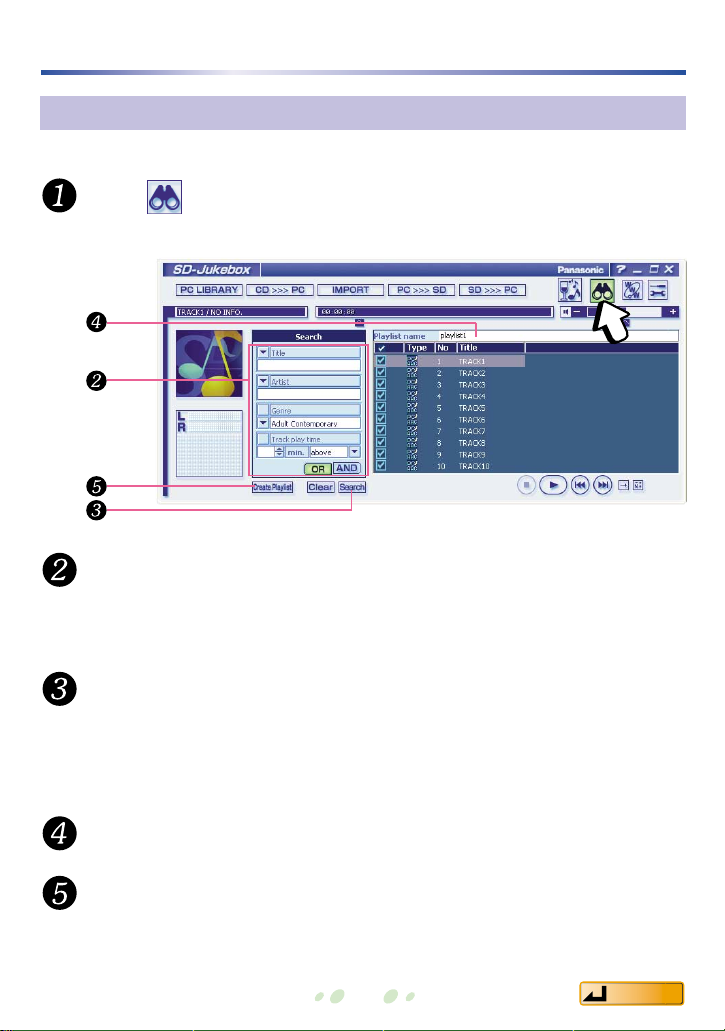
Creating a playlist
Enter your requirements.
• Enter your search criteria for title, artist, album, genre, and track play time.
• Select [OR] to search for tracks that fulfill any individual requirement.
Select [AND] to search for tracks that fulfill all requirements.
Name the playlist.
<Search Screen>
Searching by track title, artist name, and more
You can create a playlist of tracks that fulfill the criteria you set.
Click
.
The <Search Screen> is displayed.
• A list of tracks that fulfills your requirements is displayed.
• For tracks that you will not add to the playlist, click the checkbox to
remove the check mark.
• Click [Clear] to delete the search results.
Click [Search].
Click [Create Playlist].
• After the confirmation message is displayed, click [OK].
•
The playlist you created is added under [User playlist] on the Library Screen
.

Contents
23
Checking out tracks to an SD Memory Card
Select the desired track from the PC's library and use SD-Jukebox to check out
the track to an SD Memory Card.
If an image is attached to the track you are checking out, the image will be
recorded on the SD Memory Card at the same time.
Click [PC>>>SD].
Connect an SD Memory Card.
Select the playlist name containing the track you want to
check out.
<From PC to SD Screen>
The <From PC to SD Screen> is displayed.
Select the (checkbox) next to the track being checked out.
• appears next to the selected track.(Click again to remove the check
mark.)
• To check out all tracks, click [Check All].
Continued on next page
Select the player you will use.

Contents
24
Checking out tracks to an SD Memory Card
Enter a name in [List to be created].
We recommend changing the name in [List to be created] to your preferred
name so that you can recognize the contents.
After the <Checkout is completed Screen> is displayed, click [OK], then remove the SD
Memory Card.
Click [PC>>>SD].
• The check out process starts.
• After all the tracks have been checked out, the
<Checkout is completed Screen> is displayed. Click
[OK].
• Click [Cancel] to cancel check out. (If you cancel
partway through a track, check out will stop at the next
track.)
• If you check out a WMA file to an SD Memory Card, it cannot be played on an SD Multi
AV Device.
• There are limits on the number of playlists and tracks that can be written to an SD
Memory Card.
– Maximum number of playlists: 99
– Maximum number of tracks per playlist: 99
– Maximum number of tracks per SD Memory card: 999
• Only tracks with one or more check-out remaining are displayed on the <From PC to SD
Screen>.
CAUTION
NOTE

Contents
25
The <From SD to PC Screen> is displayed.
•
appears next to the selected track.(Click again to remove the check mark.)
• To check in all tracks, click [Check All].
Do not remove the SD Memory Card until the <Processing complete Screen> is displayed.
When you check in a track from an SD Memory Card, the track is returned to the
PC and its check out count is increased.
Use the same PC as you used for checking out the track.
• If you check in a track that is on multiple playlists, it will be deleted from all of the playlists
on the SD Memory Card.
• If the track has been deleted from the PC's [HDD] library, you will not be able to check it
in. In this case, the music data itself will be deleted.
• When a track is deleted from the SD Memory Card's playlist, it is simply deleted from the
playlist; it is not checked in.
Click [SD>>>PC].
Select the (checkbox) next to the track being checked in.
Click [SD].
Click [SD>>>PC].
• The selected tracks are checked in to your PC.
• After all tracks have been checked in, the <Processing
complete Screen> is displayed. Click [OK].
<From SD to PC Screen>
CAUTION
NOTE
Checking in tracks from an SD Memory Card to the PC
Contents
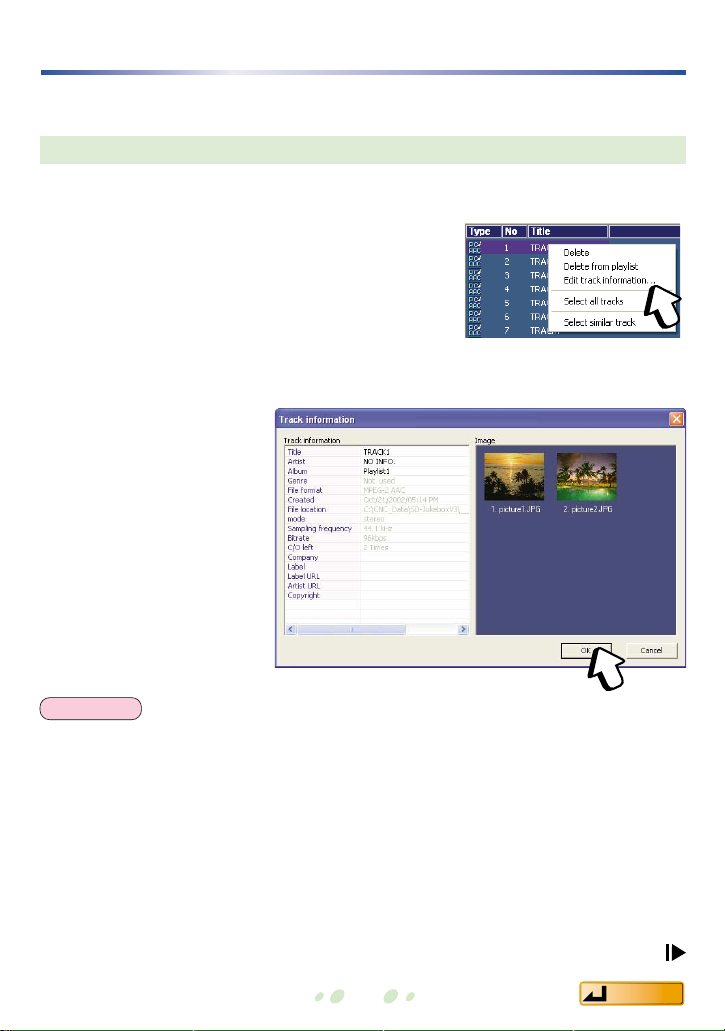
Editing
• Only the items listed under [User playlist] can be edited.
• Track titles cannot be changed on the SD Memory Card. To change them, check in the
tracks that you want to change to your PC, change the track titles on your PC, and then
check them out again. (They cannot be changed if the tracks have been deleted from
your PC’s [HDD] library.)
• A maximum of 60 characters can be entered.
26
You can edit with the <Library Screen>.
1. Right-click the track to be changed.
2. Click "Edit track information…".
3. Enter a name and click [OK].
The <Track Information Screen> is
displayed.
Changing title, artist names and album title
<Track Information Screen>
NOTE
Continued on next page

Contents
27
Changing the track order
1. Select the playlist to be edited.
2. Drag and drop tracks to change the track order.
Deleting playlists
1. Right-click the playlist to be deleted.
2. Click "Delete playlist...".
Editing
1. Right-click the playlist name to be changed.
3. Change the name.
2. Click "Change name of playlist...".
You can edit with the <Library Screen>.
Changing the name of playlists
1. Right-click the track to be deleted.
2. Click "Delete" or "Delete from playlist".
Deleting tracks
• If you select [Delete], the audio data itself will be deleted.
• If you select [Delete from playlist], the track is removed from the playlist,
but the audio data itself is not deleted.
• When a track is deleted from the [HDD] library, its music data is deleted
and the track can no longer be checked in.
• After the confirmation message is displayed, click [Yes].
After the confirmation message is displayed, click [Yes].

Contents
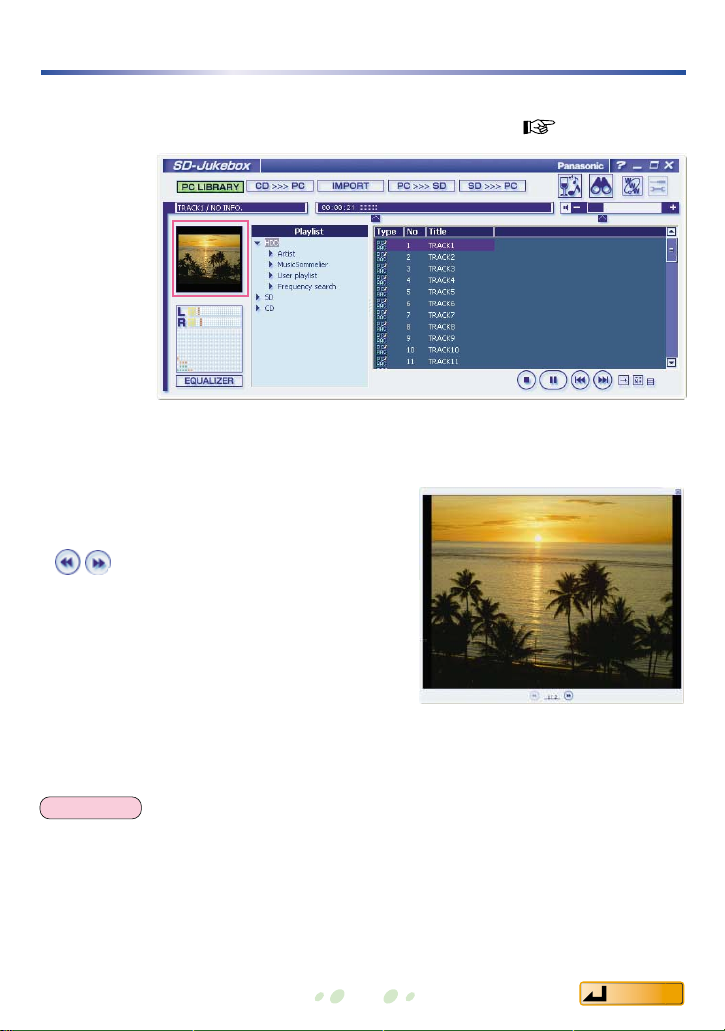
28
Listening to music on the PC
You can use this software to listen to CD tracks, tracks stored on the PC, and
tracks on an SD Memory Card.
Click [PC LIBRARY].
Click .
• Playing starts from the first track. When all the tracks on the playlist (or
CD) have been played, playing stops automatically.
• You can start the play from a particular track by double-clicking the track.
Select the playlist you want to play.
The <Library Screen> is displayed.
<Library Screen>
Continued on next page
While a CD or an SD Memory Card is being played, do not remove the CD or SD Memory
Card and do not open the CD-ROM drive tray.
CAUTION
• WMA data on SD Memory Cards cannot be played on the PC.
• Tracks of Music Sommelier selection are marked with a musical note in the Type
column.
NOTE
Contents
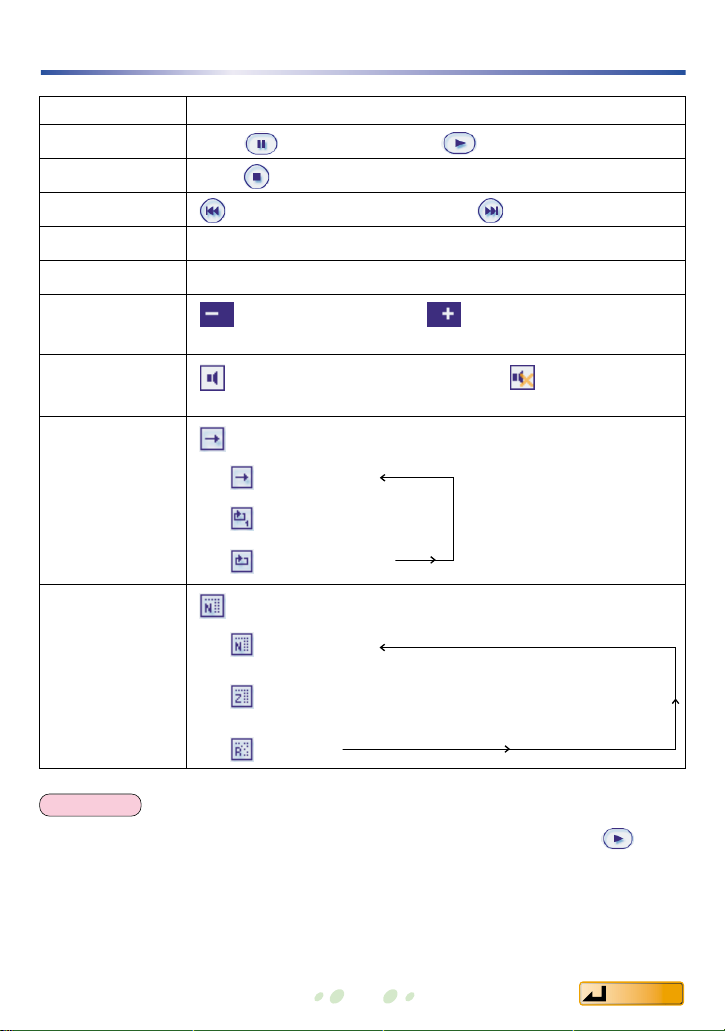
Button(s) to click
Click while playing (click to start playing)
Click while playing
: Queue previous song : Queue next song
Drag the slider to the right
Drag the slider to the left
:Decrease volume :Increase volume
(
Volume can also be adjusted using the volume adjustment slider
)
(Activating Mute displays this icon: )
Click it again to restore sound.
(each time this button is clicked, the display changes
as shown below)
Regular Play
↓
One-track repeat
↓
All-track repeat
(each time this button is clicked, the display changes
as shown below)
Regular Play
↓
ZAPPING Play:
Several seconds of a characteristic
part of each track is played.
↓
Random
29
Listening to music on the PC
Function
Pause
Stop
Queue song
Fast forward
Rewind
Volume
adjustment
Mute
Change repeat
modes
Change play
modes
• Playing may stop when you switch modes while playing. If that happens, click
.
• In zapping play mode, a few seconds of a characteristic part of the track is selected and
played automatically.
• Zapping play is unavailable for tracks on a music CD or an SD Memory Card.
NOTE
Contents
30
Images
During play, image files that are attached to the track are displayed. You can
attach your own favorite still image files saved on your PC. ( page 31)
• If there are multiple images, they are switched at set intervals just like a slide
show. (You can change the interval time by accessing <Display Picture/Search
Screen>.)
• Double-click on the image to display it in
another window.
You can switch between images using
.
When during check out tracks to your SD Memory Card, the images attached to tracks are
checked out simultaneously. The images are displayed when you play the tracks on a
player that supports images (such as an SD Multi AV Device).
NOTE

Contents
Images
31
In the <Library Screen>, click [HDD].
Right-click on the track for the image, and then click
"Edit track information…".
These image file formats are supported: bmp, jpg, png, tif (Uncompressed), pct, and pcx.
Attaching images
You can attach up to 20 images to a single track.
The <Track Information Screen> is displayed.
Drag and drop images to the "Image" window.
• Drag and drop attached images to change their order.
• Delete attached images by right-clicking on them, and then clicking
[Delete].
Click [OK].
<Track Information Screen>
NOTE

2.
Click the non-indented
[ON] button to activate
the equalizer functions.
3. Click [AUTO].
4. Click .
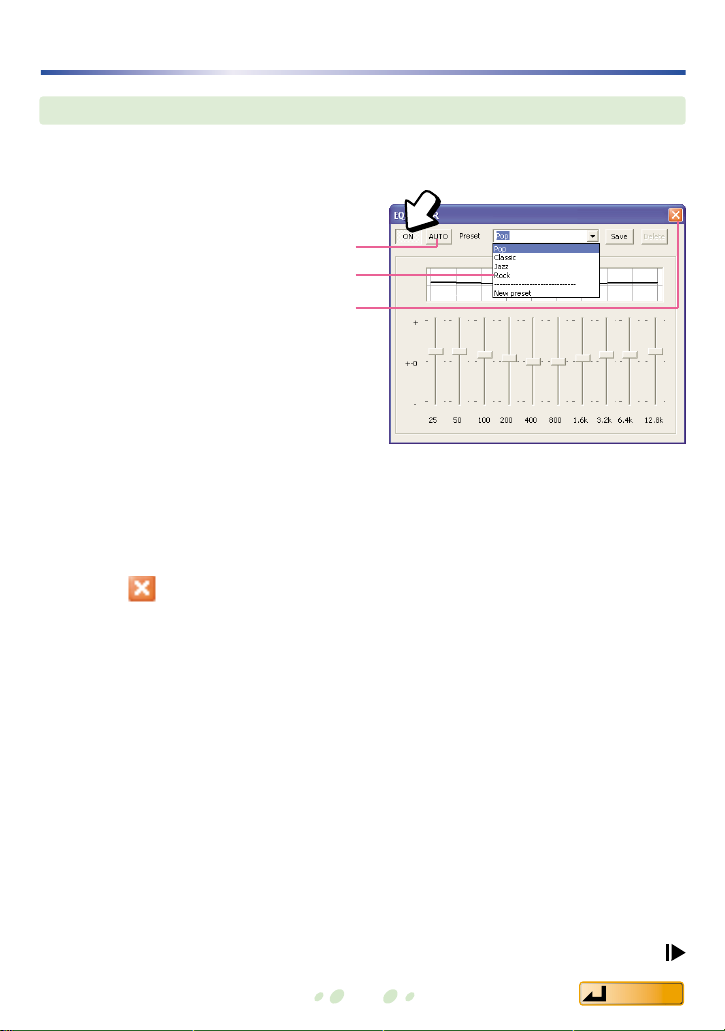
Modifying the sound with the equalizer
32
You can easily modify the sound to match the type of music. Even more detailed
adjustments are possible to suit your tastes.
<Equalizer Screen>
For automatic selection of the preset equalizer that best matches the track.
Automatic selection to match tracks
1. Click [EQUALIZER].
The <Equalizer Screen> is displayed.
3
4
Continued on next page
Contents
Modifying the sound with the equalizer
33
Selecting the equalizer that suits your tastes
1. Click [EQUALIZER].
4. From the "Preset"
pulldown menu,
select your preferred
preset equalizer.
3. Make sure that
[AUTO] is OFF (so
that the button is not
shown pressed).
3
4
5
Continued on next page
2.
Click the non-indented
[ON] button to activate
the equalizer functions.
5. Click .
If it is ON, click [AUTO] to
switch it OFF.
Contents

Modifying the sound with the equalizer
34
By saving your preferred equalizer settings, you can select them from the
"Preset" pulldown menu.
Low High
For more detailed adjustment
1. Click [EQUALIZER].
4. In the "Preset" pulldown menu, select "New preset".
2.
Click the non-indented
[ON] button to activate
the equalizer functions
.
5. Name your preset.
6. Use the sliders to adjust the level of each sound frequency .
7. Click [Save].
• You can save up to 10 sets of equalizer settings.
•
To delete the new presets that you have saved, select the preset for deletion and click [Delete]
.
• You can correct it by selecting the saved preset, readjusting the frequency ranges, and
clicking [Save].
By changing the preset name before clicking [Save], you can save it as a new preset.
54,
3
6
7
8
3. Make sure that
[AUTO] is OFF (so
that the button is not
shown pressed).
If it is ON, click [AUTO] to
switch it OFF.
8. Click .
NOTE
Contents
Contents
35
2
Names and functions of the screen elements
These buttons are always displayed.
35 86 74 9
11
1
Displays the <Library Screen>.
Displays the <CD Recording Screen>.
Displays the <File Import Screen>.
Displays the <From PC to SD Screen>.
Displays the <From SD to PC Screen>.
Displays the <Music Sommelier Screen>.
Displays the <Search Screen>.
Establishes an Internet connection.
Displays the <Setting Screen>.
For setting the recording method and audio quality, as well as for formatting
SD Memory Cards and other functions.
Adjusts the volume.
Mute.
1
2
3
4
5
6
7
8
9
10
11
10

Contents
36
Names and functions of the screen elements
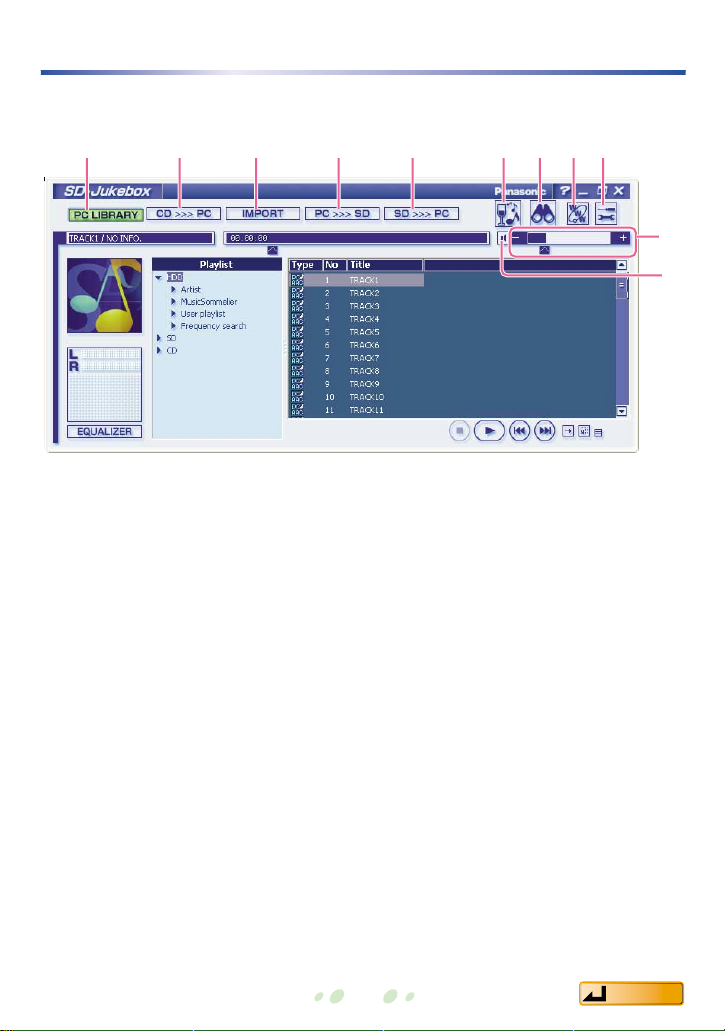
<Library Screen>
7
2
4
3
6
1
14
5
1110
8
12913
Fast-forwards and rewinds.
Click a column to sort the list according to that column.
Right-click to select items for display.
Displays the title, and so on.
Double-click a track to start playback.
Displays the audio input level during play.
Displays the <Equalizer Screen>.
Displays the images attached to the track that is playing.
Double-click it to view the image in another window.
For selection of playlists.
When you click a playlist, the tracks on the playlist are displayed in 3.
Displays the data format.
Stops playback.
Starts playback.
Changes to display during play. Click it to pause play.
Queues the previous track or the next track.
Changes the repeat mode.
→
(Regular Play)
→
(One-track repeat)
→
(All-track repeat)
Changes the play mode.
→
(Regular Play)
→
(ZAPPING Play)
→
(Random)
Switches to display the small player.
1
2
3
4
5
6
7
8
9
10
11
12
13
14

Contents
13
37
Names and functions of the screen elements
<CD Recording Screen>
45 7698
11 131210
2
Displays the recording status.
For input of the album title and artist name.
Right-click to select items for display.
Selects all tracks.
Displays the memory required to record the selected track, as well as the
available memory on your PC.
Deselects all selected tracks.
Allows CD track information entered or corrected by the user to be sent to
CDDB and registered on the server.
Automatically checks out a track to SD Memory Card after recording to the PC.
Removes the recorded tracks from track assignment by Music Sommelier.
Displays the recording method and audio quality they are set.
To change them, access the <Record Setting Screen>.
Starts recording.
Used to select the CD-ROM drive containing the CD to be recorded.
Displays the tracks on the CD in a list.
1
2
3
4
5
6
7
8
9
10
11
12
13

Names and functions of the screen elements
38
<File Import Screen>
12
74
65 98
10
3
Displays the file import status.
Used to select the folder containing the music data (file) to be imported.
Click a column to sort the list according to that column.
Right-click to select items for display.
Selects all files.
Displays the memory required to import the selected files, as well as the
available memory on your PC.
Deselects all selected files.
Displays the recording method and audio quality they are set.
To change them, access the <Record Setting Screen>.
Removes the imported tracks from track assignment by Music Sommelier.
Starts file importing.
Displays just the MP3, WAV, and WMA files that can be imported, along with
their file sizes.
1
2
3
4
5
6
7
8
9
10
Contents
Contents
39
Names and functions of the screen elements
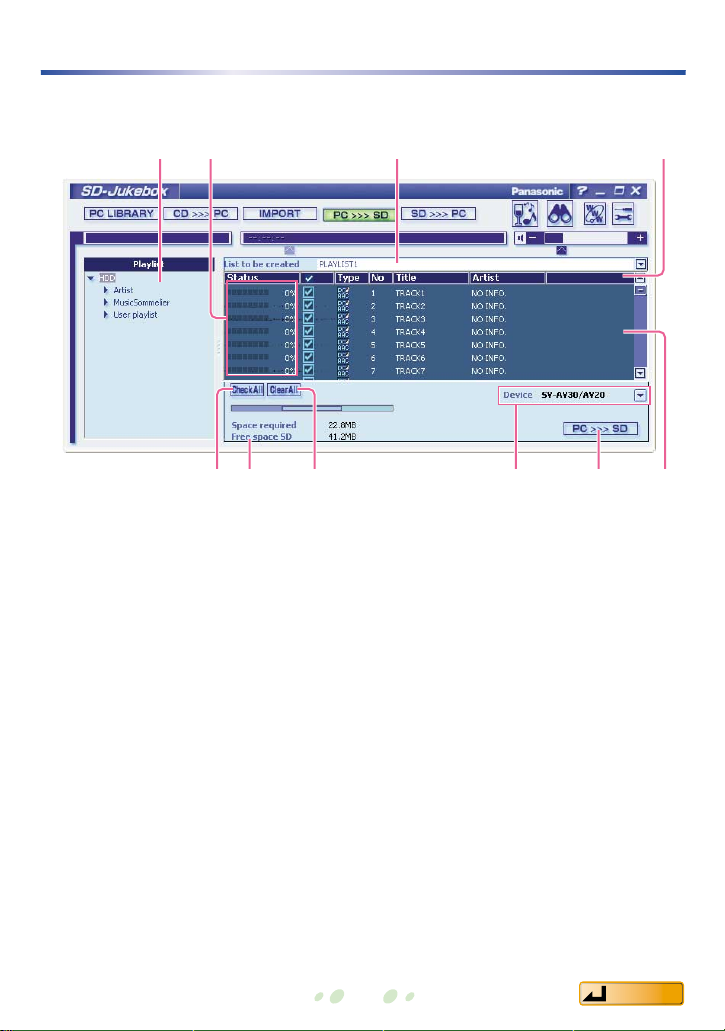
<From PC to SD Screen>
21
59
3
4
76 8
10
Used to select the PC playlist to be checked out to SD Memory Card.
Displays the check out status.
A new playlist name to be created on SD Memory Card is entered here.
Click a column to sort the list according to that column.
Right-click to select items for display.
Selects all tracks.
Displays the memory required to check out the selected track, as well as the
available memory on your SD Memory Card.
Deselects all selected tracks.
Selects the player you will use.
Starts check out.
Displays the PC playlist tracks and the remaining check out count to SD
Memory Card.
1
2
3
4
5
6
7
8
9
10

Contents
Names and functions of the screen elements
40
<From SD to PC Screen>
2
6
1
5
743
Displays the check in status.
Click a column to sort the list according to that column.
Right-click to select items for display.
Selects all tracks.
Displays the memory that would become available on your SD Memory Card
when you check in the selected track.
Deselects all selected tracks.
Starts check in.
Displays the tracks on the SD Memory Card.
1
2
3
4
5
6
7
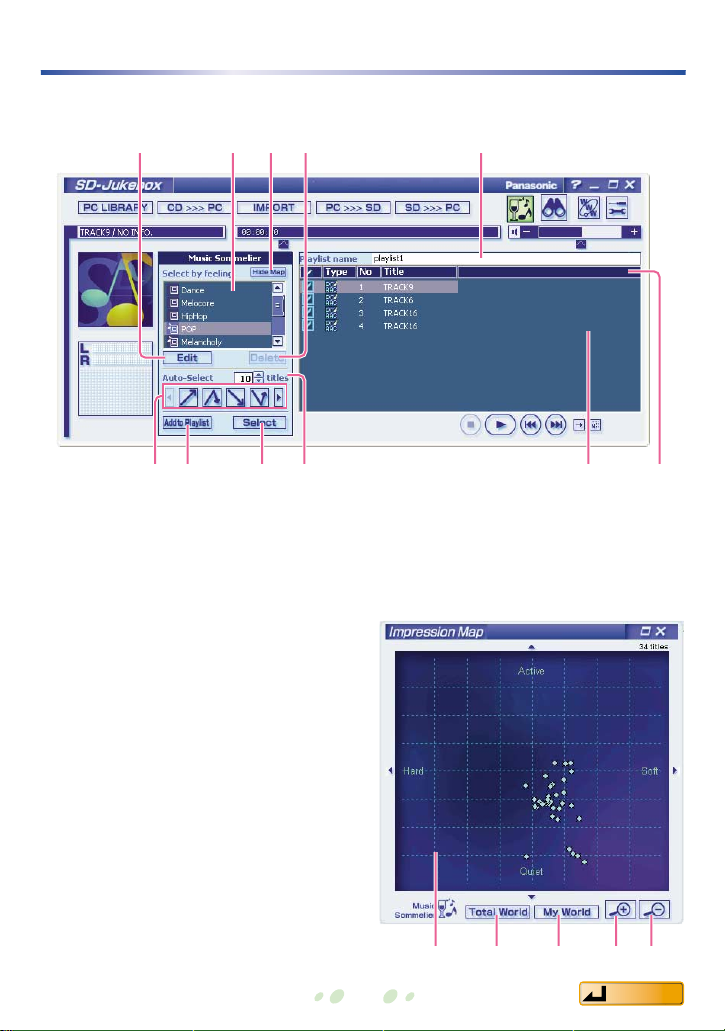
Edits a new impression.
Also used to change existing impressions.
For selection of impressions.
Clears the impression map.
Deletes the impression.
For input of the playlist name.
For auto track selection.
Adds to the playlist.
Selects the track.
For setting the number of tracks in
auto track selection.
Lists the track selection results.
Click a column to sort the list
according to that column.
Right-click to select items for display
.
Displays the various tracks as dots
on the impression map.
Displays the entire map.
Enlarges the display of the portion
where tracks are plotted.
Zoom in.
Zoom out.
1
2
3
4
5
6
7
8
9
10
11
12
13
14
15
16
Contents
41
Names and functions of the screen elements
<Music Sommelier Screen>
21
610789
3 5
11
12 13 14 15 16
4

Contents
42
Names and functions of the screen elements
<Search Screen>
21
67 98
10
3 4
11
5
Sets the track play time.
Sets the genre.
Sets the title, artist, and album.
For input of the playlist name.
Adds to the playlist.
For searching tracks matching any search requirement.
Clears search results.
Starts search.
For searching tracks matching all search requirements.
Lists the search results.
Click a column to sort the list according to that column.
Right-click to select items for display.
1
2
3
4
5
6
7
8
9
10
11

Names and functions of the screen elements
43
<Setting Screen>
2345
9
10 11
6781
1
2
3
4
5
6
7
8
9
10
11
<General Settings Screen>
Displays the <General Settings Screen>.
Sets the base file name which is to be set by default. (Up to 200 single-byte
characters)
Displays the <Record Setting Screen> for the recording method and audio
quality settings.
Formats the SD Memory Card.
Sets CD-related functions.
Displays the <Display Picture/Search Screen> for switching the image
during play and for setting the number of tracks to be found when searching.
Sets the CDDB function.
Sets the default folder for saving audio data.
Sets various functions.
Sets the browser and URL.
Sets the mute time between tracks.
Contents
<Record Setting Screen>
<Display Picture/Search Screen>
234
1
1 32
Sets the recording method for CD recording and WAV file importing.
Sets the audio quality level for CD recording and WAV file importing.
Sets the recording method for MP3 file importing.
Sets the audio quality level for converting MP3 to AAC.
1
2
3
4
Sets the image display during play.
Sets the number of tracks to be found when searching in the <Search Screen>
.
Restores the default SD-Jukebox settings.
1
2
3
Names and functions of the screen elements
44
Contents
Names and functions of the screen elements
45
<Equalizer Screen>
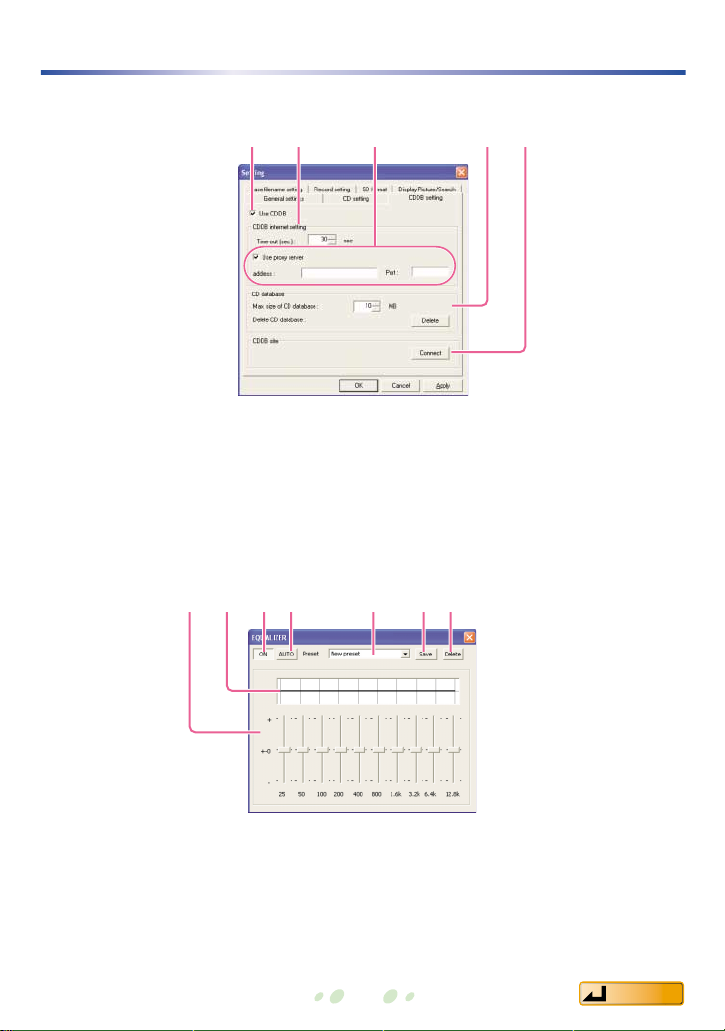
Adjusts the level of each frequency range.
Adjustment results are displayed in the wave line.
Toggles the equalizer ON and OFF.
Sets automatic selection mode.
For selecting the equalizer type.
Saves the equalizer with your adjustments.
Deletes the equalizer.
1
2
3
4
5
6
7
<CDDB Setting Screen>
162 7543
54321
Specifies whether or not CDDB is used.
Specifies the Internet connection settings.
If you plan to use CDDB, be sure to complete the proxy settings correctly.
If you use proxy server, enter the IP address and the port number.
Specifies the settings for the database of track names to be stored on the computer
.
Establishes a connection to the CDDB website.
1
2
3
4
5
Contents

Contents
46
Formatting an SD Memory Card
When an SD Memory Card is formatted, all data on the card is erased.
• When an SD Memory Card is formatted, tracks checked out using SD-Jukebox as well as
all other data are erased. Before formatting an SD Memory Card, be sure to check its
contents.
• Only use the procedure shown below to format an SD Memory Card. Check out and
playback may not work properly if other formatting procedures are used.
• After formatting, remove and reinsert your SD Memory Card before checking out tracks
to it.
Click .
Click the [SD format] tab.
Click [Start formatting].
When the confirmation screen appears, click [Yes].
• Formatting starts.
• When formatting is finished, the <Format Finished Screen> is displayed.
Click [OK].
<Setting Screen> is displayed.
CAUTION
Contents
47
Supported formats
64 kbps
32 kHz
• Music CDs : CD-DA, CD-EXTRA, CD TEXT
• MP3 : MPEG-1 layer3, MPEG2 layer3 low sampling frequency
• WMA : Windows Media Audio 32 /44.1 /48 kHz, 64–160 kbps
• WAV : PCM 44.1 kHz 16 bits (2-channel stereo)
Sampling frequency and bit rate are not converted during conversion from MP3 to secure
MP3 or conversion from WMA to secure WMA.
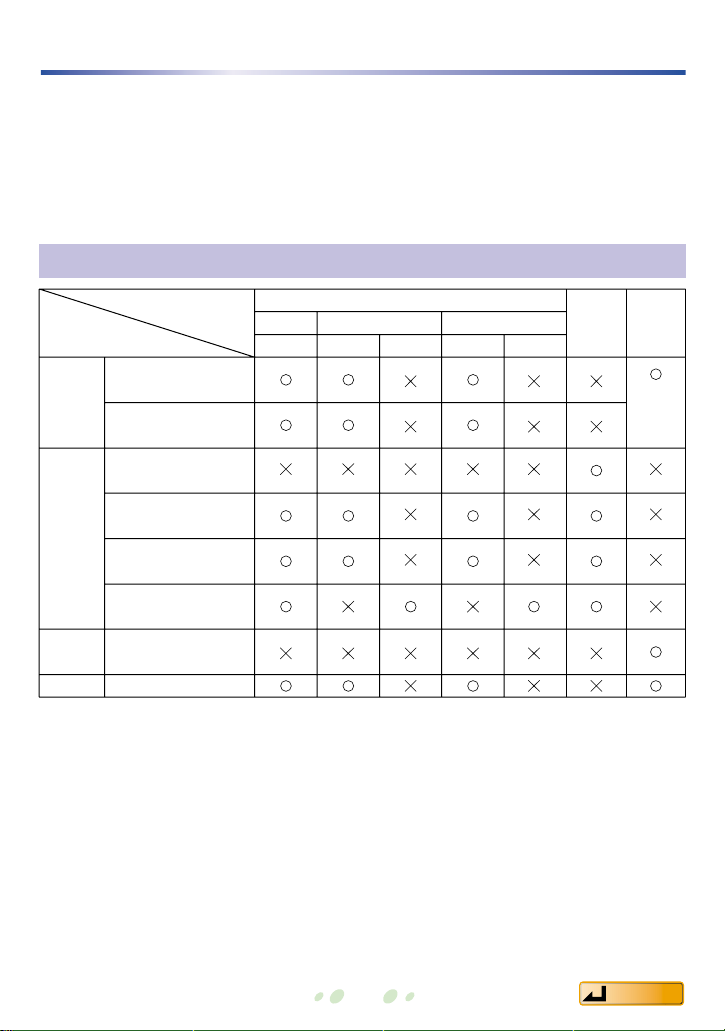
Conversion table
Music
CD
MP3
(2-channel
Stereo)
WMA
WAV
Output format
CD-DA
CD-EXTRA
16/22.05/24 kHz
32 kbps–192 kbps
32 kHz
32 kbps–192 kbps
44.1 kHz
32 kbps–192 kbps
48 kHz
32 kbps–192 kbps
32 / 44.1/ 48 kHz
64 kbps–160 kbps
44.1 kHz / 172 KB / second
AAC (2-channel stereo)
96 kbps 128 kbps
44.1 kHz 48 kHz 44.1 kHz 48 kHz
mono32
/64/96
/128
/160
()
Secure
WMA
Secure
MP3
(2-channel
stereo)
Input format

Contents
48
Uninstalling SD-Jukebox
Removing the SD-Jukebox application from your PC to discontinue use is called
"uninstalling" it.
Before uninstalling it, disconnect the SD Multi AV Device.
From the Windows [Start] menu, select [Control Panel].
Select [Add or Remove Programs].
The <Add or Remove Programs Screen> is displayed.
Click [SD-JukeboxV3], and then click [Change/Remove].
Click [OK].
Click [Finish].
SD-JukeboxV3 is deleted, and a confirmation screen is displayed.

Contents
49
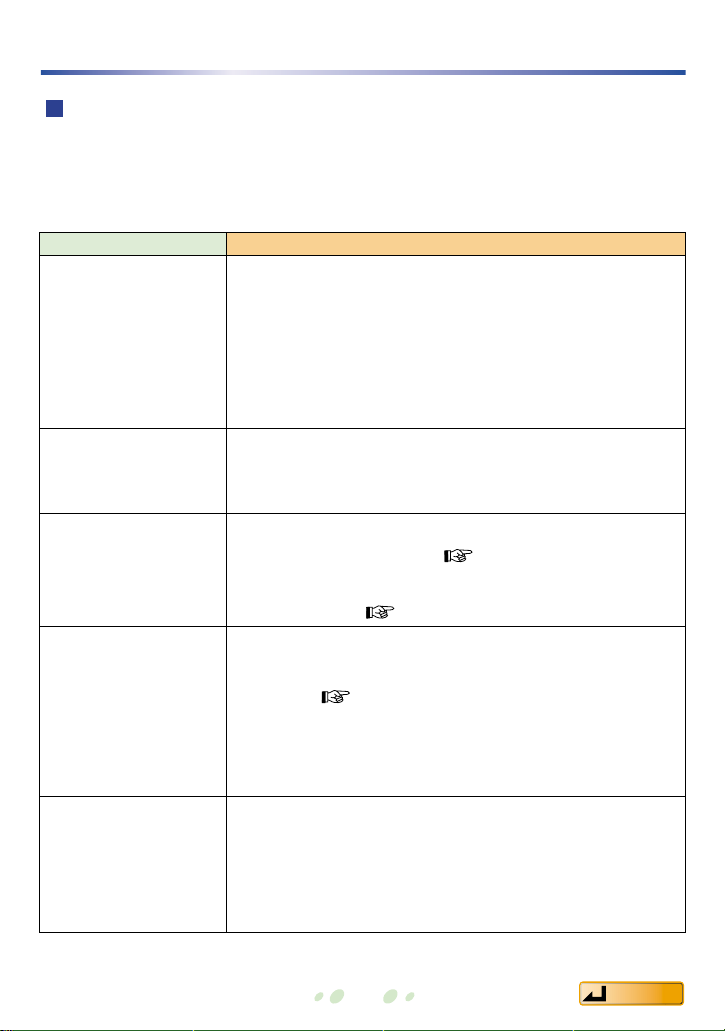
Troubleshooting
Problems during installation and startup
Problems during recording to PC
Before requesting service, make the below checks.
(If the steps presented here do not solve your difficulty, check your PC's
operating manual as well.)
At these times
Unable to start SDJukebox
Check here for problem
• Did you install SD-Jukebox onto the hard disk drive?
SD-Jukebox cannot be started directly from the
installation CD-ROM.
• Does your PC have at least 64MB (Windows 2000,
XP: 128MB) of RAM? (
page
4)
At these times
Unable to record
CD is not recognized
No tracks on the <CD
Recording Screen>
Check here for problem
• Is the CD damaged?
• On the <CD Recording Screen>, check whether the
correct CD-ROM drive (playback drive) has been
selected.
• Does the CD-ROM drive support digital playback and
recording?
The CD-ROM drive must support digital playback
and recording.
• Is there enough free space on the PC's hard disk
drive? (
page
4)
Check whether a CD has been properly inserted in the
PC.

Contents
50
Problems during playback operations
See the SD Multi AV Device's Operating Instructions for information on playback
using the SD Multi AV Device.
At these times
Unable to play
One track (or all tracks)
is played repeatedly
Unable to start playback
from the first track
Only a portion of
the tracks is played
Unable to play
back from the
desired playlist
There is no
sound or the
volume is too
low
Sound quality is
poor
Buzzing sound
CD TEXT
information not
displayed
Check here for problem
• CD: Has a CD been inserted? If a CD has been properly
inserted, click [CD] on the <Library Screen>.
• PC: Is there music data on the PC?
•
Does the CD-ROM drive support digital playback and recording?
The CD-ROM drive must support digital playback and recording.
Is the repeat mode set to one-track repeat (or all-track
repeat)? (
page
29)
Is the playback mode set to random?
(
page
29)
Is the play mode set to ZAPPING Play?(
page
29)
Click [PC LIBRARY] to display the <Library Screen>,
where you can select the desired playlist. (
page
10)
•
Use the volume slider or volume button to increase the volume.
• Check the volume setting on the PC. Even if the volume
setting in SD-Jukebox is high, if the PC's volume is set to
zero or mute, you won't hear any sound.
The music may have been recorded at a low sound quality
setting. Change the sound quality in the <Record Setting
Screen> and redo the recording. (
page
13)
Depending on the characteristics of your CD-ROM drive,
you may hear a buzzing type of sound when you play a
CD or recorded music data.
The CD-ROM drive in your PC must support CD TEXT.
Troubleshooting
Contents
51
Troubleshooting
Problem related to SD Memory Card
Check whether the SD Memory Card can be played on the SD Multi AV Device.
The SD Memory Card may have been damaged if it cannot be played on the SD
Multi AV Device.You may be able to use the SD Memory Card if you reformat it,
but all of the data on the card will be erased.
At these times
SD Memory Card is not
recognized.
[SD] is not displayed on
the <Library Screen>.
Unable to select [Auto
checkout to SD] on the
<CD Recording Screen>
Unable to check out
Unable to check out
even though there is free
space on the SD
Memory Card
Problems after
formatting an SD
Memory Card
(Error messages are
displayed, etc.)
Check here for problem
• Check whether the SD Memory Card has been properly
inserted in the SD Multi AV Device.
• Check whether the SD Multi AV Device has been properly
connected to the PC.
If the SD Memory Card is still not recognized after the above
procedures, try restarting your PC.
The SD Memory Card may not have been recognized. Check
Whether the SD Memory Card has been properly connected to
the PC.
• Check out to an SD Memory Card is limited to three times in
order to protect copyrights.(
page
6)
• Is the write-protect switch on the SD Memory Card set to the
LOCK position?(
page
7)
The data may have been altered through Explore or another
program.When an SD Memory Card is formatted through SDJukebox (
page
46), it can be used to check out
tracks.However, formatting an SD Memory Card erases all of
the data on the card, so be sure to check in the card data you
need before formatting.
The card may have been formatted by a program other than
SD-Jukebox. Exit SD-Jukebox. On the [Removable Disk] icon
depicting the SD Memory Card, right-click and select [Eject] to
remove the card.
Contents
52
Limits related to copyright protection
• SD-Jukebox incorporates software usage limits related to copyright protection.
- Limitations related to SD Memory Cards (
Page
6)
- SD-Jukebox may not work with SD Memory Cards containing copy limitation
information, and music data recorded using DVD audio equipment.
- In cases where the copyright holder or service provider has added music
data use method conditions to the music data, the music data must be used
in accordance with those conditions.
• Pursuant to copyright law, recordings you make may not be used for purposes
other than individual enjoyment without the consent of the copyright holder.
Limitations related to Windows Explorer
• When an SD Memory Card is connected to your PC, it is displayed as an
external drive (e.g., "D drive") in Windows Explorer. Do not use Explore to
move, rename, delete, compress, or otherwise alter music data and folders on
an SD Memory Card. Music data altered through Explorer cannot be played.
Always edit music data through SD-Jukebox.
• Likewise, do not use Windows Explorer to delete, move, rename, or otherwise
alter music data and folders on your PC.
Removing the SD Memory Card
When using Windows 98 SE/Me
1 Close the software program that is using the SD Multi AV Device.
2 Check to see the access lamp on the SD Multi AV Device is off, and then
remove the SD Memory Card.
When using Windows 2000/XP
1 Close the software program that is using the SD Multi AV Device.
2 Click the card icon displayed in the system tray on the lower right of the
screen.
3 Select "Stop USB Mass Storage Device" and click it.
4 Check to see the access lamp on the SD Multi AV Device is off, and then
remove the SD Memory Card.

Contents
53
Index and glossary
AAC..........................................................6
AAC, which stands for Advanced Audio
Coding, is an audio compression system
used with MPEG-2 and MPEG-4. This
system enables high-quality audio
playback with a high compression rate.
Artist name.......................................12,26
Auto track selection .............................21
CDDB ..................................................5,12
A database service provided by Gracenote
(a US company) for finding CDs around
the world. When you play a CD in an
application supporting CDDB, the
application automatically references data
from CDDB and downloads information
such as the artist name and titles.
CD Recording Screen......................11,37
CD TEXT ................................................12
A standard for recording text information
such as titles onto music CDs. In addition
to voice data, up to 6000 characters of 1-
byte code can be recorded onto a CD.
Check in..............................................6,25
Check in refers to the process of moving
tracks, which have been checked out to
an SD Memory Card, back to the PC.
Check out ...........................................6,23
Check out refers to the process of writing
tracks recorded on a PC to an SD
Memory Card.
Deleting .................................................27
Equalizer ...............................................32
File Import Screen ..........................14,38
Formatting ............................................46
From PC to SD Screen ...................23,39
From SD to PC Screen ...................25,40
[HDD] library..........................................10
The collection of all recorded music data.
Image .....................................................30
Library Screen..................................26,36
MP3 ...................................................14,47
MP3, which stands for MPEG1 AUDIO
Layer3, is an audio compression system
used with MPEG1. Three layers (Layer1,
Layer2, and Layer3) have been
standardized for MPEG1 AUDIO. Layer3
has the highest compression rate, so
MP3 is used on the Internet and in other
applications.
MPEG, which stands for Moving Picture
Experts Group, is a standard created by
an organization for compressing
multimedia data.
Music Sommelier..................................18
Playing...................................................28
Playlist................................................9,10
Recording..............................................11
SD Memory Card.....................................5
A memory card containing copyright
protection information. Features include a
fast data transfer rate, and a thinner,
lighter, and more compact form factor
than CompactFlash.
Search....................................................22
Select similar tracks.............................20
Song order: how to change.................27
Starting the program..............................8
Title ...................................................12,26
Uninstalling the program.....................48
User playlist .....................................10,17
Version information ...............................8
WMA....................................................6,47
WMA, which stands for Windows Media
™
Audio, is a compression format
developed by Microsoft Corporation. It
achieves the same sound quality as MP3
with a file size that is smaller than that of
MP3.

· SD logo is a trademark.
· Portions of this product are protected under copyright law and are provided under license
by ARIS / SOLANA /4C.
· Microsoft and the Microsoft logo, Windows, Windows NT and DirectX are registered
trademarks or trademarks of Microsoft Corporation in the US and
other countries.
· Windows Media, and the Windows logo are trademarks, or
registered trademarks of Microsoft Corporation in the United
States and/or other countries.
· Pentium and MMX are registered trademarks or trademarks of
Intel Corporation of the US.
· Sound Blaster 16 is a trademark of Creative Technology, Ltd. of the US.
· IBM and PC/AT are registered trademarks of International Business Machines
Corporation of the US.
·
Macintosh is a trademark of Apple Computer, Inc., registered in the US and other countries
.
· CDDB is a registered trademark of © Gracenote.
· Music recognition technology and related data are provided by Gracenote and the
Gracenote CDDB®Music Recognition ServiceSM.
Gracenote is the industry standard in music recognition technology and related content
delivery. For more information go to www.gracenote.com.
Gracenote is CDDB, Inc. d/b/a “Gracenote.” CD and music related data from Gracenote
CDDB
®
Music Recognition ServiceSM© 2000, 2001 Gracenote. Gracenote CDDB Client
Software © 2000, 2001 Gracenote. U.S. Patents Numbers #5,987,525; #6,061,680;
#6,154,773, and other patents issued or pending.
CDDB is a registered trademark of Gracenote. CDDB-Enabled, the Gracenote
logo, the CDDB Logo, and the “Powered by Gracenote CDDB” logo are
trademarks of Gracenote. Music Recognition Service and MRS are service
marks of Gracenote.
· Other system names and product names appearing in this document are in general the
registered trademarks or trademarks of the respective developer companies. Note that
the ™ mark and ® mark do not appear in this document.
· Licensed AAC Patents(U.S. patent numbers);
MSC0031CD_E_ZA MS1202SF0
· Panasonic assumes no liability for damaged music data or cases where music cannot
be recorded due to problems with this product or your PC.
·
This product and the contents of this document are subject to change without prior notice
.
· This document presents examples of the operating screens that appear on a system
running Windows XP.
The illustrations and screens in this document may be somewhat different from those
on an actual screen.
08/937,950
5848391
5,291,557
5,451,954
5 400 433
5,222,189
5,357,594
5 752 225
5,394,473
5,583,962
5,274,740
5,633,981
5 297 236
4,914,701
5,235,671
07/640,550
5,579,430
08/678,666
98/03037
97/02875
97/02874
98/03036
5,227,788
5,285,498
5,481,614
5,592,584
5,781,888
08/039,478
08/211,547
5,703,999
08/557,046
08/894,844
5,299,238
5,299,239
5,299,240
5,197,087
5,490,170
5,264,846
5,268,685
5,375,189
5,581,654
05-183,988
5,548,574
08/506,729
08/576,495
5,717,821
08/392,756
 Loading...