

SD Multi AV Device
Operating Instructions
Model No.
SV-AV10E/B/EN
Before use, please read these instructions completely.
VQT9775

Contents
Information for Your Safety ................................. 3
Caution for AC mains lead
(SV-AV10B only) ................................................. 3
Introduction.......................................................... 4
Power supply frequency.......................................4
Preparation
Standard Accessories .........................................4
Optional Accessories........................................... 4
Controls and Components................................... 5
Attaching the Neck Strap.....................................5
Power Supply ...................................................... 6
Using AC Adaptor ................................................... 6
Using the Battery ....................................................6
Inserting a Card...................................................7
Removing the Card................................................. 7
Using the LCD Monitor........................................ 7
Turning the Power ON......................................... 8
Turning the Power OFF ..........................................8
Selecting Operation Modes .................................8
About the Operation Mode...................................... 8
Using the Menu Screen....................................... 9
List of Menus ....................................................... 9
REC MODE.............................................................9
PLAYBACK MODE ............................................... 10
Setting the power supply frequency .................. 12
To reduce the appearance of horizontal stripes con-
sisting of light and dark patterns ...........................12
Adjusting Brightness and Colour Level..............13
To Adjust...............................................................13
Setting Date and Time....................................... 13
Basic Functions
Recording the Moving Picture (MPEG4) ...........14
To stop recording..................................................14
Display in the moving picture (MPEG4) mode ...... 14
Playing the Moving Picture (MPEG4) ................ 15
To stop playback...................................................15
To find the beginning of a moving picture file .......15
To Change the Display Size .................................15
Recording Still Pictures .....................................16
Display in the Still picture mode............................ 16
Playing back Still Pictures ................................. 17
To stop playback...................................................17
To play the next (previous) file.............................. 17
Recording Voice (Voice Recording Function).... 18
To stop recording..................................................18
Display in the Voice Mode ....................................18
Hearing the Voice Recorded (Playback Sound) 19
To stop playback...................................................19
Fast forward (fast backward) playback .................19
To find the beginning of a voice file: .....................19
Listening to Music (Music Play) .........................20
To stop playback...................................................20
To find the beginning of a music file: ....................20
Using the Earphone...........................................21
Adjusting the Volume.........................................21
Advanced Functions
Backlight Compensation Function .....................22
Adjusting White Balance ....................................22
Erasing the Files Recorded on a Card...............23
To erase All Files ..................................................23
Protecting the file (Lock Setting)........................24
To release the lock setting:...................................24
To lock all files: ..................................................... 24
Writing Printing Data on a Card (DPOF Setting)25
To release all the DPOF settings:......................... 25
Playing back still pictures one by one (Slide Show)
26
To cancel the Slide Show: ....................................26
Formatting the Card...........................................26
For using SD-MovieStage
Operating environment......................................27
Installing SD-MovieStage ..................................28
Cautions for Windows XP/2000 Professional .......28
Starting SD-MovieStage ....................................28
Others
Notes & Precautions..........................................29
Charge the built-in battery for maintaining the date in-
formation...............................................................29
After Use............................................................... 29
Using a Card in a Personal Computer .................. 30
Indications..........................................................31
Cautions for Use ...................................................32
About the Lens...................................................... 33
About the AC Adaptor ...........................................33
About the LCD Monitor .........................................33
Optimal Use of the Battery.................................... 33
Notes on the SD Memory Card Write-Protect Switch
34
Cautions for Storage .............................................34
Fogging of lens ..................................................... 34
State of Power Lamp while charging ....................34
Before Requesting Service................................35
Specifications.....................................................36
Dear Customer,
We would like to take this opportunity to thank you for
purchasing this Panasonic SD Multi AV Device. Please
read these Operating Instructions carefully and keep them
handy for future reference.
Information for Your Safety
WARNING
TO REDUCE THE RISK OF FIRE OR SHOCK
HAZARD AND ANNOYING INTERFERENCE, USE
ONLY THE RECOMMENDED ACCESSORIES AND
DO NOT EXPOSE THIS EQUIPMENT TO RAIN OR
MOISTURE. DO NOT REMOVE THE COVER (OR
BACK); THERE ARE NOT USER SERVICEABLE
PARTS INSIDE. REFER SERVICING TO QUALIFIED
SERVICE PERSONNEL.
Carefully observe copyright laws.
Recording of pre-recorded tapes or discs or other
published or broadcast material for purposes other
than your own private use may infringe copyright
laws. Even for the purpose of private use, recording
of certain material may be restricted.
≥Please note that the actual controls and components,
menu items, etc. of your SD Multi AV Device may look
somewhat different from those shown in the illustrations
in these Operating Instructions.
SD Logo is a trademark.
:
≥
≥Other names, company names, and product names
printed in these instructions are trademarks or
registered trademarks of the companies concerned.
≥The SD Multi AV Device uses copyright-protected
technologies and is protected by the patented
technologies and intellectual properties of Japan and
the U.S. To use these copyright-protected technologies,
authorization of the Macrovision Company is required. It
is prohibited to disassemble or modify the SD Multi AV
Device.
≥(l 00) indicates the page to be referred to.
≥Note that the SD Multi AV Device may not play back the
data recorded or created on another product and
another product may not play back the data recorded on
the SD Multi AV Device.
≥The nameplate of the SD Multi AV Device is fixed on the
bottom of the battery holder.
Caution for AC mains lead
(SV-AV10B only)
Message to User who has Power Cable B as an
accessory. (l 4)
For your safety, please read the following text carefully.
This appliance is supplied with a moulded three-pin mains
plug for your safety and convenience. A 5-ampere fuse is
fitted in this plug.
Should the fuse need to be replaced, please ensure that
the replacement fuse has a rating of 5-amperes and it is
approved by ASTA or BSI to BS1362.
Check for the ASTA mark Ï or the BSI mark Ì on the
body of the fuse.
If the plug contains a removable fuse cover you must
ensure that it is refitted when the fuse is replaced. If you
lose the fuse cover, the plug must not be used until a
replacement cover is obtained. A replacement fuse cover
can be purchased from your local Panasonic Dealer.
IF THE FITTED MOULDED PLUG IS UNSUITABLE FOR
THE SOCKET OUTLET IN YOUR HOME THEN THE
FUSE SHOULD BE REMOVED AND THE PLUG CUT
OFF AND DISPOSED OF SAFELY.
THERE IS A DANGER OF SEVERE ELECTRICAL
SHOCK IF THE CUT OFF PLUG IS INSERTED INTO
ANY 13-AMPERE SOCKET.
As the colours of the wires in the mains lead of this
appliance may not correspond with the coloured markings
identifying the terminals in your plug, proceed as follows:
The wire which is coloured BLUE must be connected to
the terminal in the plug which is marked with the letter N
or coloured BLACK.
The wire which is coloured BROWN must be connected to
the terminal in the plug which is marked with the letter L
or coloured RED.
Under no circumstances should either of these wires be
connected to the earth terminal of the three-pin plug,
marked with the letter E or the Earth Symbol Ó.
ªBefore Use
Remove the Connector Cover as follows.
Connector
Cover
ªHow to replace the Fuse
1) Remove the Fuse Cover with a screwdriver.
Fuse
Cover
If a new plug is to be fitted, please observe the wiring
code as shown below.
If in any doubt, please consult a qualified electrician.
ªIMPORTANT
The wires in this mains lead are coloured in accordance
with the following code:
Blue: Neutral
Brown: Live
2) Replace the fuse and attach the Fuse Cover.
Fuse
1)
2)
3)
Introduction
This SD Multi AV Device can record both still picture data and MPEG4
moving picture. Additionally, it can play back a high quality music file of
the MPEG2-AAC and MP3 format (Record files with the supplied real
®
jukebox
MovieStage (supplied accessory), this SD Multi AV Device can display
the pictures recorded with it as thumbnails and edit the MPEG4 moving
picture data.
and USB Reader/Writer). And using the viewer software SD-
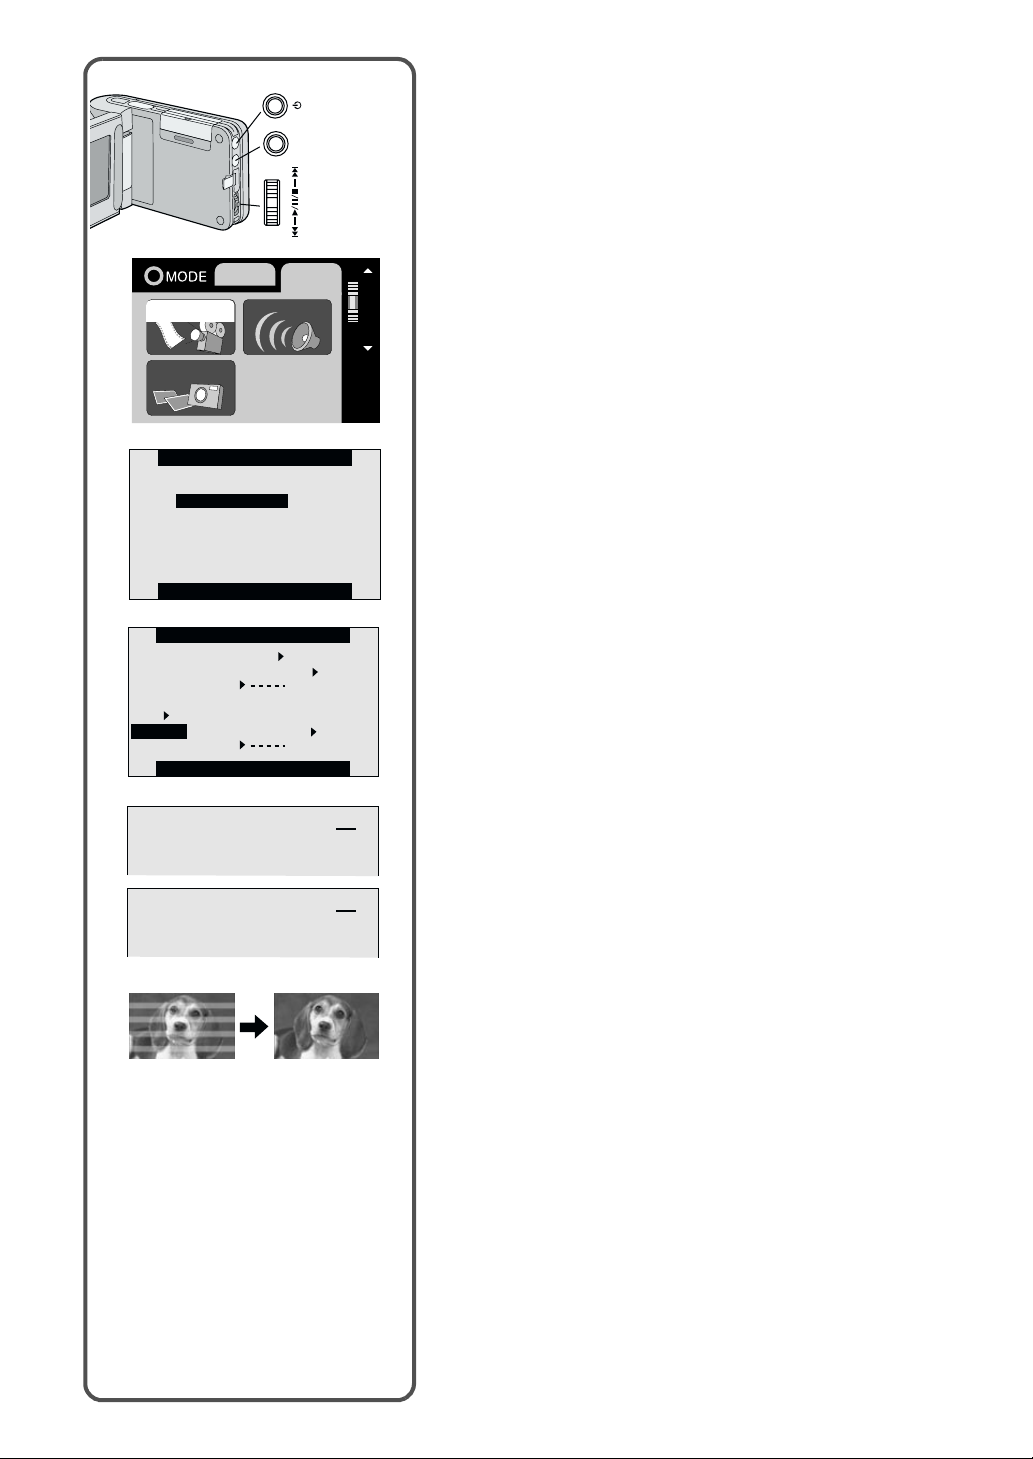
ª Power supply frequency
Under fluorescent lighting, horizontal stripes
consisting of light and dark patterns may
appear on the screen as illustrated below.
To reduce the affect of the horizontal stripes,
switch the power supply frequency to 50 Hz
or 60 Hz.(l 12)
Preparation
4)
ABC
5)
6)
7)
8)
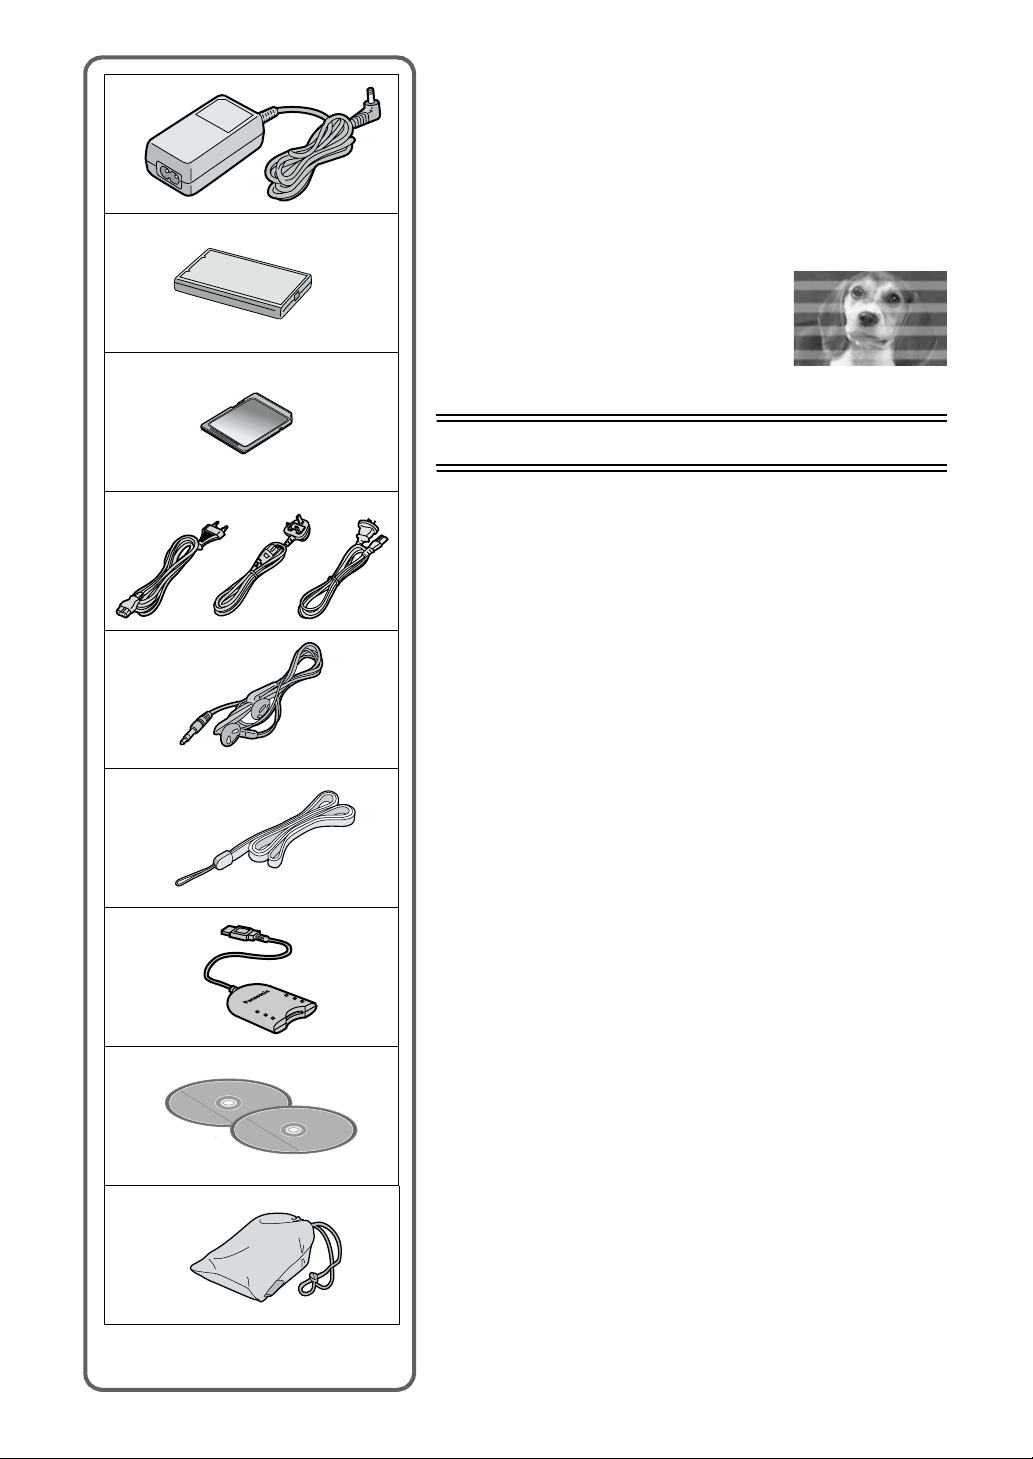
Standard Accessories
Illustrated on the left are accessories packaged with the SD Multi AV
Device (Panasonic SV-AV10E).
1) AC Adaptor (VSK0621) (l 6)
≥Supplies power to the SD Multi AV Device.
2) Battery Pack (CGA-S301E) (l 6)
≥Supplies power to the SD Multi AV Device.
3) SD Memory Card (8 MB) (RPSD008BVE0) (l 7)
4) Power Cable (l 6)
::::SV-AV10E/EN (VJA0664)
A
:SV-AV10B only (VJA0940)
B
:SV-AV10EN only (VJA0754)
C
5) Earphone (LOBAB0000172) (l 19, 20, 21)
6) Neck Strap (VFC3838) (l 5)
7) USB Reader/Writer (BN-SDCBAE)
≥For the operation of the USB ReaderWriter, refer to the additional
instruction supplied in the same package.
8) CD-ROM (l 27)
SD-MovieStage (For Windows
Home Edition/XP Professional) (VFF0143)
Panasonic Media Manager (real jukebox
(VFF0148)
≥For the installation and the operation of the Panasonic Media
Manager, refer to the additional instructions supplied in the same
package.
≥For using the SD-MovieStage software, refer to the PDF manual.
This manual describes installation only.
9) Carrying Case (RFC0069-H)
≥Put the SD Multi AV Device in the Carrying Case supplied after use
or when carrying it.
®
98SE/Me/2000 Professional/XP
®
,realplayer etc.)
9)
Optional Accessories
10) Battery Pack (CGA-S301E) (l 6)
≥Same product as that mentioned in 2).

11)
12)
13)
1)
15) 16)
2) 3)
6)
7)
8)
9)
14)
4)
/
MENU
VOL
MODE/
VOL
5)
10)
Controls and Components
1) LCD Monitor (l 7)
2) Recording Start/Stop Button (l 14, 16, 18)
3) Card Slot Cover (l 7)
4) Card Slot (l7)
5) Card Access Lamp (l 7)
6) Power ON/OFF Button [
Menu Button [MENU] (l 9)
7) Power Lamp (l 8)
8) Mode Selector Button [MODE] (l 8)
Volume Adjustment Button [VOL] (l 21)
9) Jog Lever [:s1/;/
10) Strap Holder (l5)
11) Lens
12) Microphone (built-in, monaural) (l 18)
13) Flash (l 16)
14) Card View Window
15) Battery Compartment (l 6)
16) Battery Compartment Cover (l 6)
17) Terminal Cover
18) Earphone Socket [
19) DC Input Socket [DC IN 4.8V] (l 6)
] (l 8)
_
s9/_] (l 8,22)
] (l 15, 19, 20, 21)
Attaching the Neck Strap
18)
1
Pass the shorter loop of the Neck Strap through the
17)
Ë
DC IN 4.8V
Strap Holder
2
Pass the big loop of the Strap through the small loop.
≥When using the Strap to carry the SD Multi AV Device, loop the
Strap around your neck and be careful not to accidentally hit the
SD Multi AV Device against hard objects.
.
1
19)
1
1
2
Power Supply
1
1
Using the Battery
1
2
DC IN 4.8V
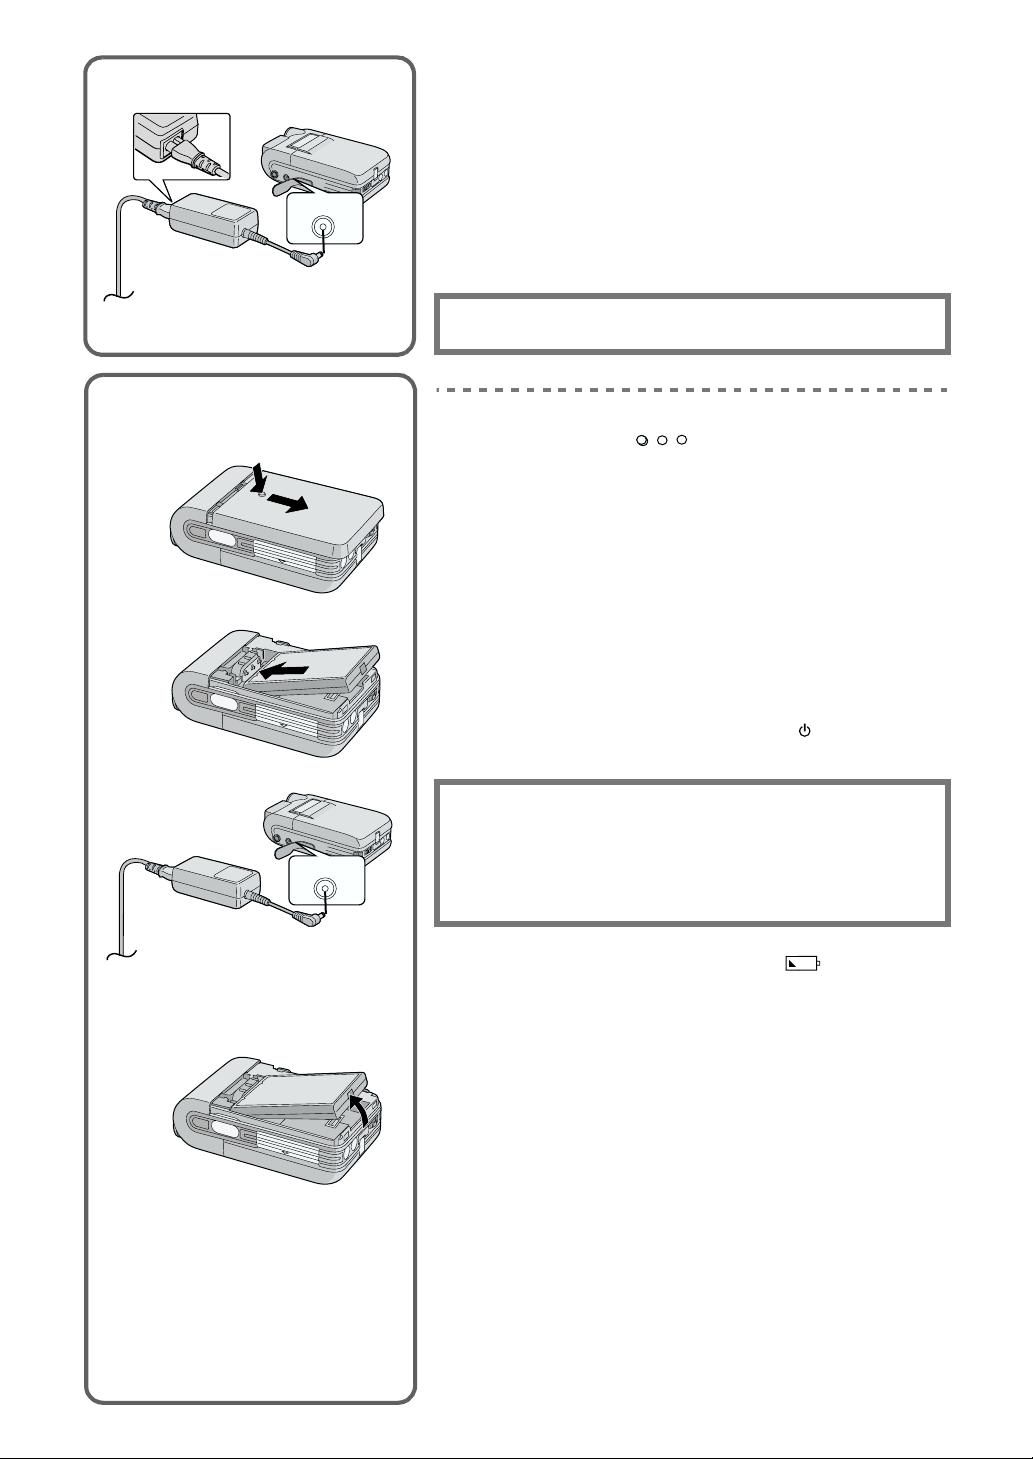
ª Using AC Adaptor
1
Connect the AC Mains Lead to the AC Adaptor and the
AC mains socket.
≥The AC Mains Lead does not fit entirely into the AC Adaptor
socket. A gap will remain as shown 1.
Connect the DC Input Lead to the [DC IN 4.8V] socket on
2
2
the SD Multi AV Device.
The SOCKET OUTLET SHALL BE INSTALLED NEAR THE
EQUIPMENT AND SHALL BE EASILY ACCESSIBLE
.
ª Using the Battery
1
While holding the [
Battery Compartment Cover.
Press the terminals of the battery onto the terminals of
2
the Battery Compartment and set the battery.
≥Fit the battery with its label facing upward.
≥After the battery is set, close the cover.
Connect the AC Mains Lead to the AC Adaptor and the
3
AC Mains socket.
Connect the DC Input Lead to the [DC IN 4.8V] socket on
4
the SD Multi AV Device.
≥ Power Lamp flashes, and Charging starts.
Wait until Power Lamp goes off.
5
≥When recharging is completed, Power Lamp goes off.
≥Disconnect the DC cord and hold down the [ ] button for two
seconds or more, and the SD Multi AV Device is turned ON.
] part, slide it to remove the
DC IN 4.8V
3
Removing the Battery
CAUTION
Danger of explosion if battery is incorrectly replaced.
Replace only with the same or equivalent type recommended by
the manufacturer.
Dispose of used batteries according to the manufacturer’s
instructions.
4
≥When the Battery Level Indicator indicates [ ], the battery
will run out in a few minutes. Recharge the battery.
≥It takes about 120 minutes, maximum for full-charging. (The charging
times are for normal ambient temperature (20° C/60%). If the Battery is
charged at a higher or lower temperature, the charging time may be
longer)
≥When recharging, turn the power of the SD Multi AV Device OFF.
≥If the Power Lamp flashes quickly (or slowly) when recharging,
recharging is not normal. (l 34)
≥When the battery is running out while the SD Multi AV Device is being
used, the Power Lamp starts to flash. Recharge the battery or use the
SD Multi AV Device with the DC cord connected.
≥If you disconnect the DC Input Lead or the AC Mains Lead while
charging the Battery, Power Lamp flashes several times and goes off.
For continuing Battery charge, wait for about 1 minutes, and then
connect the AC Mains Lead and the DC Cord.
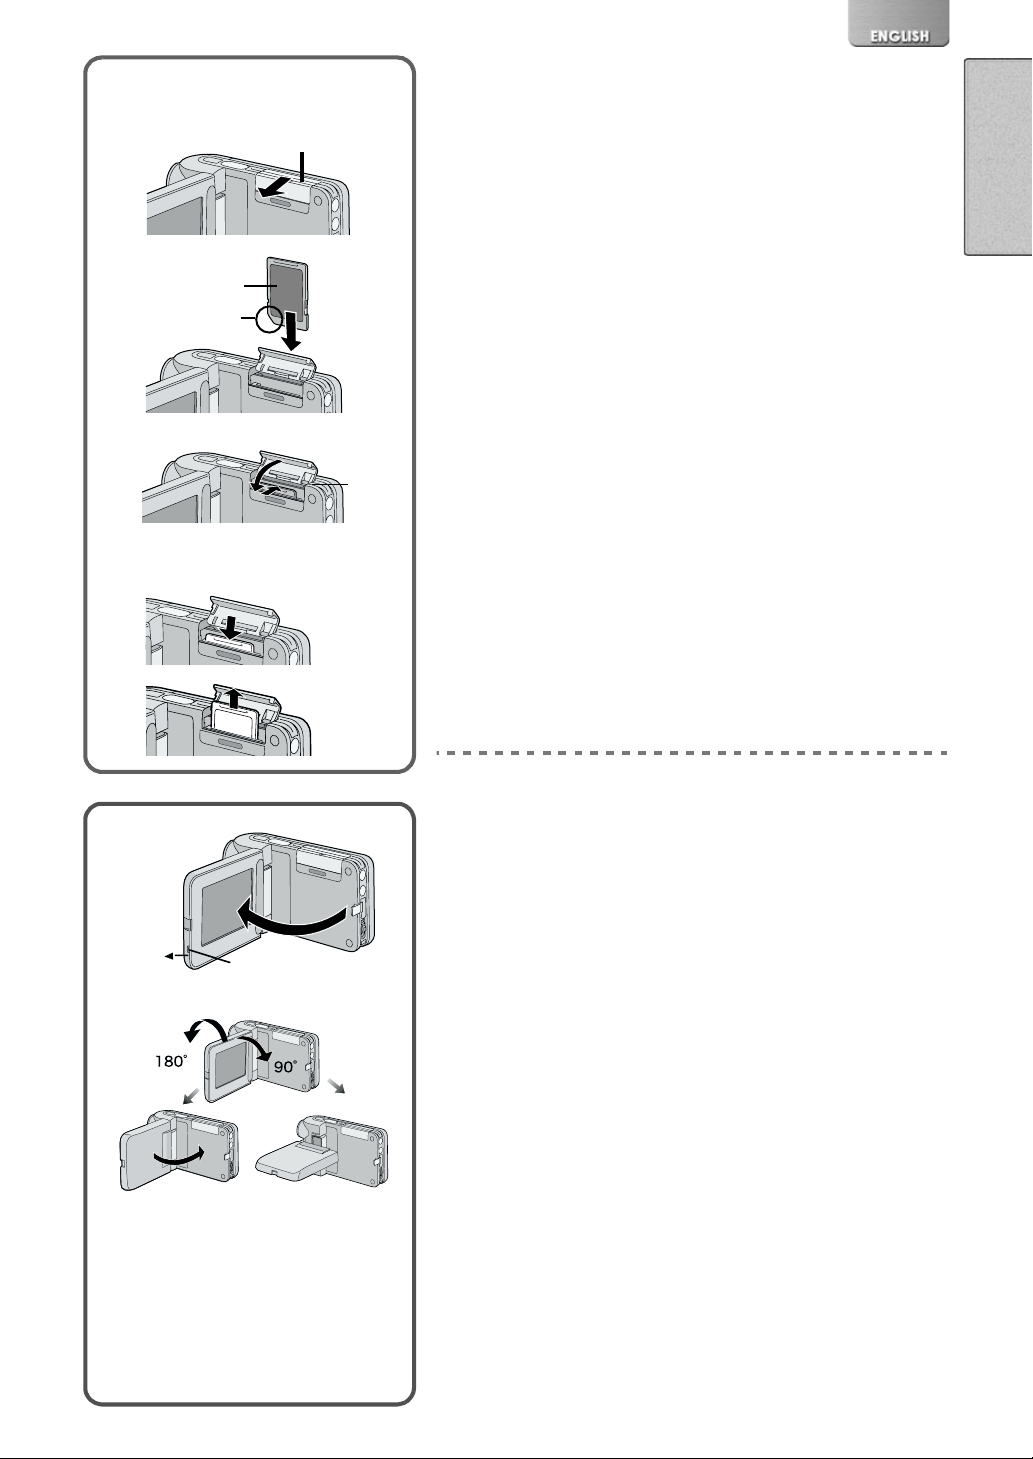
Inserting a Card
2
3
2
Removing the Card
Inserting a Card
Slide the Card Slot Cover 1, and flip it to open.
1
1
3
4
4
≥Turn off the SD Multi AV Device, when inserting a Card.
Hold the Memory Card placing the cut off corner 2 at the
2
frontward, and then insert it
left and showing the label
3
fully until it clicks.
After the Memory Card is set, close the Card Slot Cover
3
.
1
ª Removing the Card
Open the Card Slot Cover and push the top of the Card. The Card
will pop up a little and allow you to pick it up with your fingers to
remove.
≥While the Card Access Lamp 4 is on, the following operations should
not be attempted: (Such action will damage the Card, cause loss of
recorded data and cause the SD Multi AV Device to malfunction.)
-Open the Card Slot Cover.
-Remove or insert the Card.
-Operate your SD Multi AV Device.
Remove the battery or unplug the power cable.
-
-Apply vibration or shock.
≥Only an SD Memory card or MultiMediaCard can be used for this SD
Multi AV Device.
≥Do not touch the terminals on the back of the Card with your fingers.
≥If the Card Slot Cover is not closed completely, remove the Memory
Card and re-insert it.
≥Electrical noise, static electricity or failure of the SD Multi AV Device or
the card may damage the card or erase the data stored on the card. It
is recommended to save important data onto a personal computer.
Using the LCD Monitor
Record and play the video image while viewing the LCD Monitor.
Put your finger on the protrusion 1 to open the LCD
1
Monitor.
Adjust the LCD Monitor angle according to the desired
2
recording/playing angle.
OPEN
1
1
2
2
3
≥The LCD Monitor can rotate a maximum of 180
vertical position to the upward direction and a maximum of 90
to the downward direction. Forcefully rotating the LCD Monitor
beyond these ranges will damage the SD Multi AV Device.
≥The picture will be displayed upside down at some playing angles. If
[UPSIDE-DOWN] is selected for [LCD MONITOR] under the [OTHER
FUNCTIONS] menu the picture will be displayed upside down.
°
2 from the
°
3
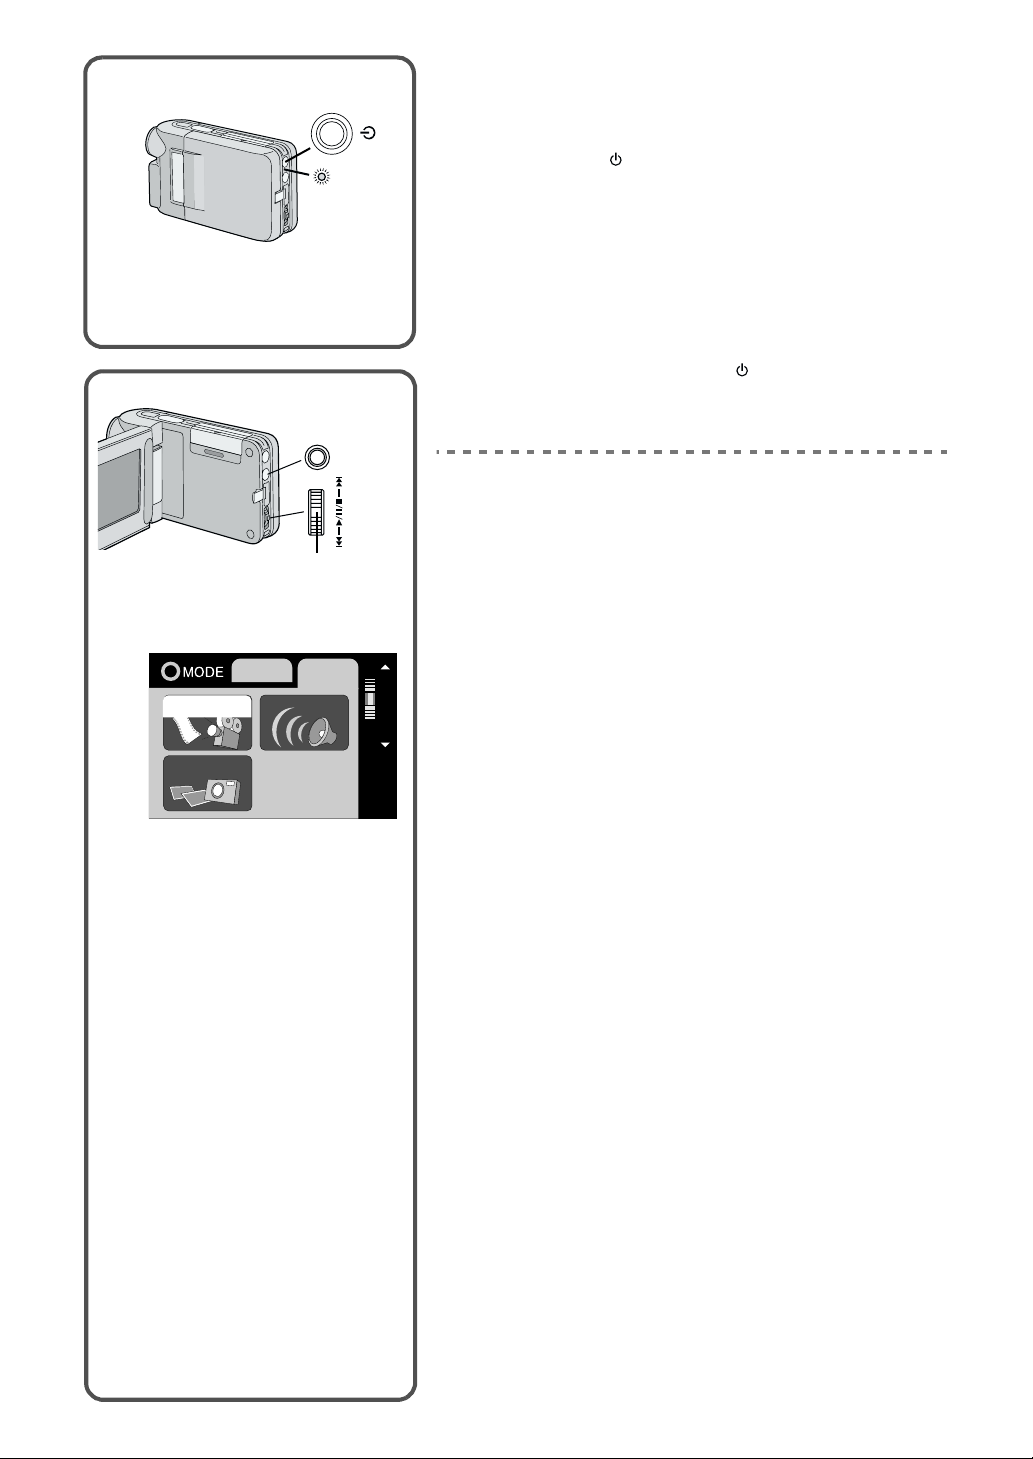
Turning the Power ON
Install the battery or plug in the AC adaptor. (l 6)
/
2
1,2
VOL
MODE/
+
3,4
VOL
-
2
1
MPEG4
PICTURE
RECPLAY
VOICE
1
MENU
Hold down the [ ] button for two seconds or more.
2
≥The SD Multi AV Device is turned on.
≥The message [PLEASE WAIT] is displayed for a while and then the
mode selection screen will be displayed.
≥
≥If the device is not used for 10 minutes or longer , the power is
automatically turned off. Press the power button again to turn it
back on.
ª Turning the Power OFF
While the Power is on, hold down the [ ] button for two seconds
or more.
Selecting Operation Modes
Select a desired mode on the mode selection screen.
Press the [MODE] Button.
1
≥The mode selection screen 1 appears.
≥The mode selection screen also appears when the power is
turned on.
Press the [MODE] Button to select [REC] or [PLAY].
2
≥Alternates between [REC] and [PLAY] by a push.
Move the Jog Lever up or down to select a desired
3
mode.
Press down the centre of the Jog Lever 2.
4
SELECT
≥The mode selection screen disappears, and the selected mode is
now set.
PUSH/SET
ª About the Operation Mode
Seven operation modes are provided as follows.
≥Moving picture (MPEG4 format) record mode [REC>>MPEG4]
≥Moving picture (MPEG4 format) play mode [PLAY>>MPEG4]
≥Still picture (JPEG format still picture) record mode [REC>>PICTURE]
≥Still picture (JPEG format still picture) play mode [PLAY>>PICTURE]
≥Sound (VOICE format) record mode [REC>>VOICE]
≥Sound (VOICE format) play mode [PLAY>>VOICE]
≥Music (MPEG2-AAC music/ MP3 format) play mode [PLAY>>MUSIC]
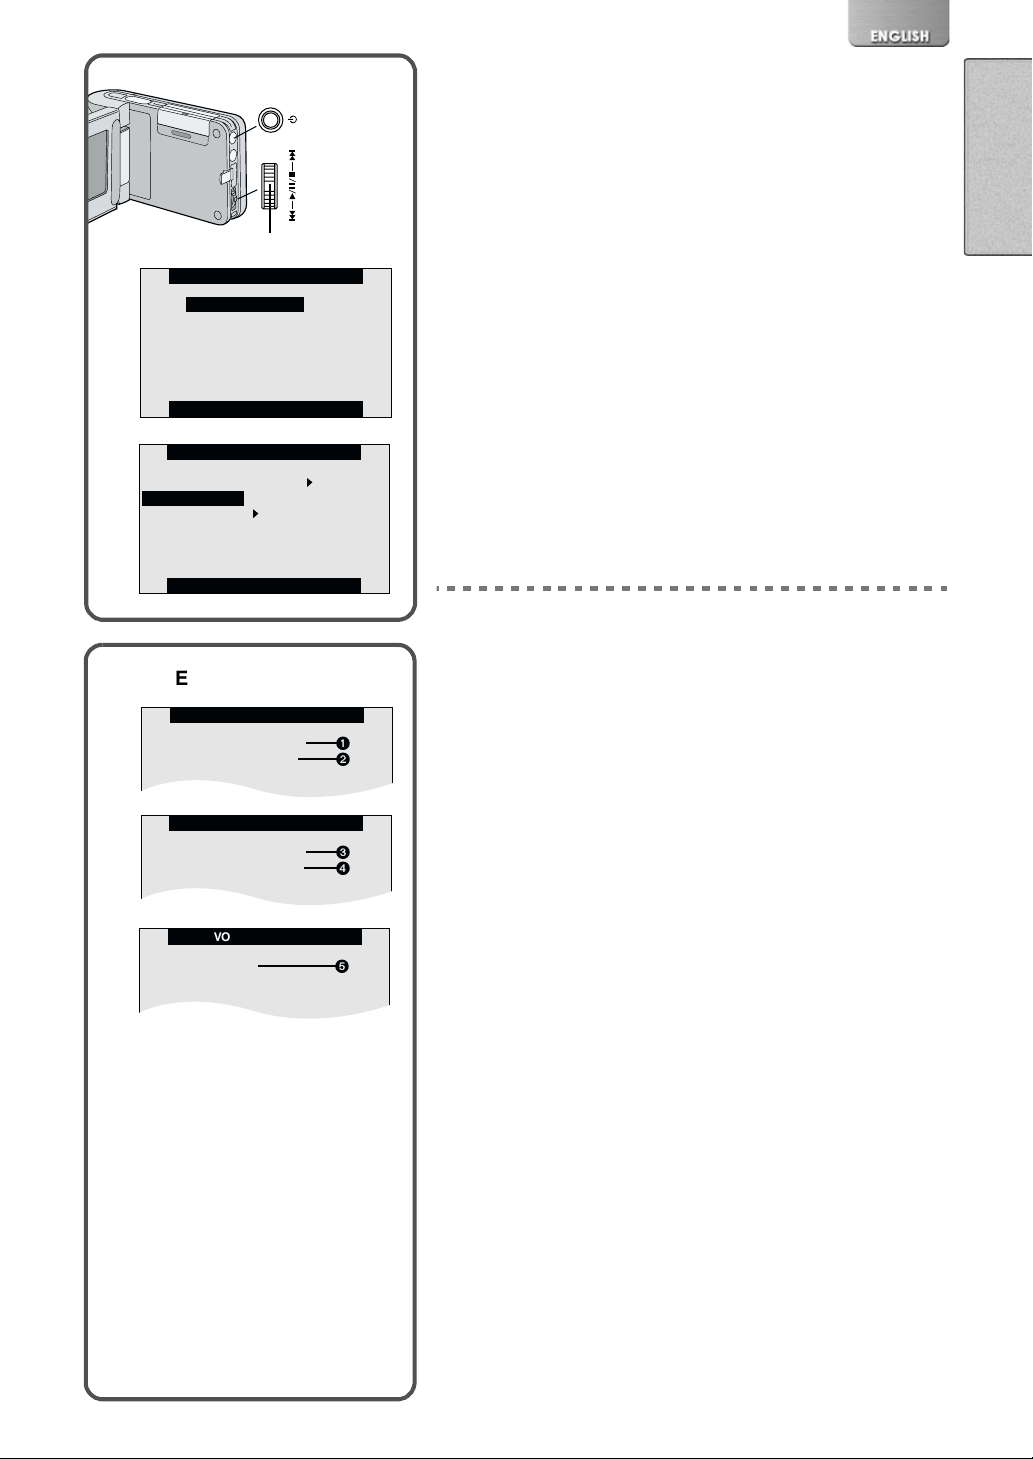
Using the Menu Screen
MPEG4 RECORD
RECORDING SETUP
OTHER FUNCTION
1
2
VOICE RECORD
FUNCTIONS
PICTURE RECORD
RECORDING SETUP
OTHER FUNCTIONS
3
4
/
2,6
MENU
+
3,4,5
VOL
-
2
3
PICTURE RECORD
RECORDING SETUP
OTHER FUNCTIONS
PRESS MENU TO RETURN
Allows the functions useable in the selected mode to be set from the
menu.
Select a desire mode. (l 8)
1
Press the [MENU] Button.
2
≥A list of menus useable in the selected mode is displayed 3.
Move the Jog Lever up or down to select a desired
3
menu.
Press down the centre of the Jog Lever 2.
4
≥Menu screen appears.4
Move the Jog Lever up or down to select a desired item
5
.
and press down the centre of the Jog Lever
≥With each press of 2, the cursor [1] moves to the next mode.
Press the [MENU] Button.
6
≥Menu screen disappears, and the selected item is now being set.
2
4
FLASH OFF ON
PICTURE QUALITY
RECORDING SETUP
FINE NORMAL ECONOMY
PRESS MENU TO RETURN
ªREC MODE
≥To abort the setting, press the [MENU] Button.
≥While a Menu is displayed, you cannot record or play back.
≥Menu operation flow is indicated in these Operating Instructions by >>.
≥Set the power supply frequency before use.
≥Press the [MENU] button when playing back the moving picture, still
picture or sound to edit the file being played back.
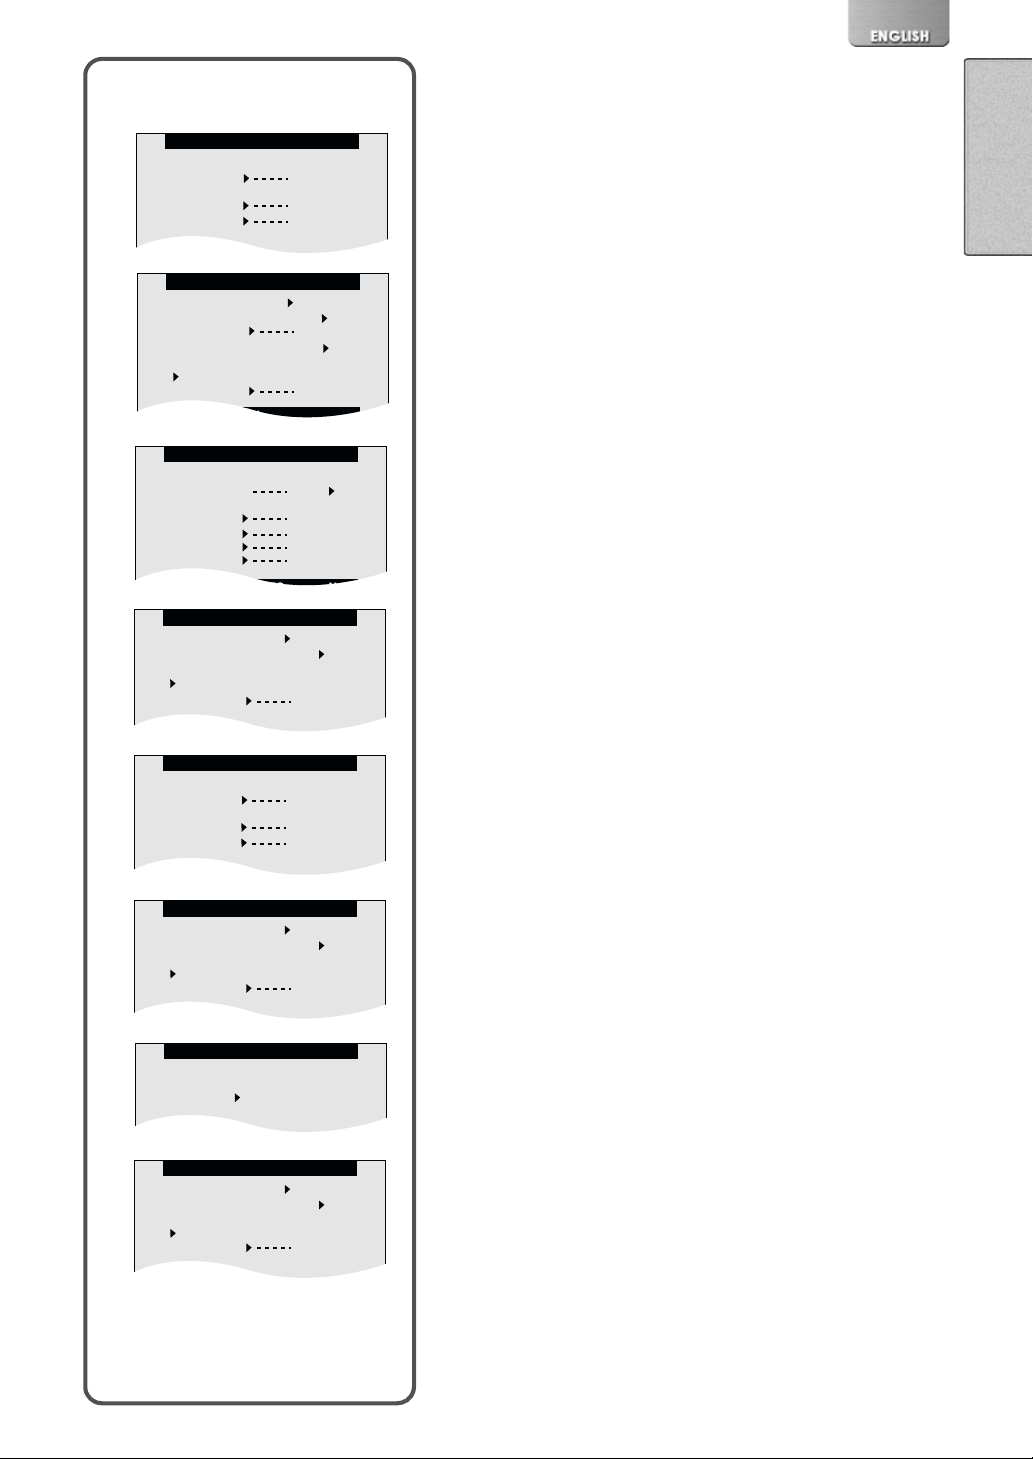
List of Menus
The figures of the Menus are for explanation purposes only, and they are
different from the actual Menus.
ª REC MODE
[MPEG4 RECORD] Menu
Recording Setup [RECORDING SETUP]
Other Functions [OTHER FUNCTIONS]
[PICTURE RECORD] Menu
Recording Setup [RECORDING SETUP]
Other Functions [OTHER FUNCTIONS]
[VOICE RECORD] Menu
Functions [OTHER FUNCTIONS]
5

RECORDING SETUP
FLASH OFF ON
PICTURE QUALITY
FINE NORMAL ECONOMY
FUNCTIONS
DATE/TIME OFF D/T TIME
DISPLAY OFF ON
LCD MONITOR
NORMAL UPSIDE-DOWN
CLOCK SET YES
Sub-Menu for REC MODE
OTHER FUNCTIONS
DATE/TIME OFF D/T TIME
DISPLAY OFF ON
LCD SET YES
LCD MONITOR
NORMAL UPSIDE-DOWN
AC MAINS 50HZ 60HZ
CLOCK SET YES
MPEG4 PLAYBACK
CARD EDITING
OTHER FUNCTIONS
1
2
PICTURE PLAYBACK
CARD EDITING
OTHER FUNCTIONS
3
4
VOICE PLAYBACK
CARD EDITING
OTHER FUNCTIONS
5
6
MUSIC PLAYBACK
REPEAT SETUP
OTHER FUNCTIONS
7
8
RECORDING SETUP
MPEG4 MODE
FINE NORMAL
ECONOMY1 ECONOMY2
OTHER FUNCTIONS
DATE/TIME OFF D/T TIME
DISPLAY OFF ON
LCD SET YES
LCD MONITOR
NORMAL UPSIDE-DOWN
AC MAINS 50HZ 60HZ
CLOCK SET YES
1
2
3
4
List of Menus (Cont.)
Sub-Menu for REC MODE
1 MPEG4 Mode [MPEG4 MODE] (llll 14)
2 Date/Time [DATE/TIME] (llll 13)
Display [DISPLAY]
LCD Set [LCD SET] (llll 13)
LCD Monitor [LCD MONITOR] (llll 9)
AC Mains [AC MAINS] (llll 12)
Clock set [CLOCK SET] (llll 13)
3 Flash [FLASH] (llll 16)
Picture Quality [PICTURE QUALITY] (llll 16)
4 Date/Time [DATE/TIME] (llll 13)
Display [DISPLAY]
LCD Set [LCD SET] (llll 13)
LCD Monitor [LCD MONITOR] (llll 9)
AC Mains [AC MAINS] (llll 12)
Clock set [CLOCK SET] (llll 13)
5 Date/Time [DATE/TIME] (llll 13)
Display [DISPLAY]
LCD Monitor [LCD MONITOR] (llll 9)
Clock set [CLOCK SET] (llll 13)
ª PLAYBACK MODE
[MPEG4 PLAYBACK] Menu
Card Editing [CARD EDITING]
Other Functions [OTHER FUNCTIONS]
5
ªPLAYBACK MODE
[PICTURE PLAYBACK] Menu
Card Editing [CARD EDITING]
Other Functions [OTHER FUNCTIONS]
[VOICE PLAYBACK] Menu
Card Editing [CARD EDITING]
Other Functions [OTHER FUNCTIONS]
[MUSIC PLAYBACK] Menu
Repeat Setup [REPEAT SETUP]
Other Functions [OTHER FUNCTIONS]
CARD EDITING
ERASE ALL FILES
YES
FILE PROTECTION
YES
DPOF SETTING YES
SLIDE SHOW YES
CARD FORMAT YES
FUNCTIONS
DATE/TIME OFF D/T TIME
DISPLAY OFF ON
LCD MONITOR
NORMAL UPSIDE-DOWN
CLOCK SET YES
OTHER FUNCTIONS
DATE/TIME OFF D/T TIME
DISPLAY OFF ON
LCD MONITOR
NORMAL UPSIDE-DOWN
CLOCK SET YES
REPEAT SETUP
REPEAT SETUP
OFF 1MUSIC ALL
Sub-Menu for PLAYBACK
CARD EDITING
ERASE ALL FILES
YES
FILE PROTECTION
YES
CARD FORMAT YES
OTHER FUNCTIONS
DATE/TIME OFF D/T TIME
DISPLAY OFF ON
LCD MONITOR
NORMAL UPSIDE-DOWN
CLOCK SET YES
CARD EDITING
ERASE ALL FILES
YES
FILE PROTECTION
YES
CARD FORMAT YES
OTHER FUNCTIONS
DATE/TIME OFF D/T TIME
DISPLAY OFF ON
LCD SET YES
DISPLAY SIZE FULL NORMAL
LCD MONITOR
NORMAL UPSIDE-DOWN
CLOCK SET YES
List of Menus (Cont.)
1
Sub-Menu for PLAYBACK MODE
1 Erase All Files [ERASE ALL FILES] (llll 23)
File Protection [FILE PROTECTIONS] (llll 24)
Card Format [CARD FORMAT] (llll 26)
2 Date/Time [DATE/TIME] (llll 13)
Display [DISPLAY]
LCD Set [LCD SET] (llll 13)
2
Display Size [DISPLAY SIZE] (llll 15)
LCD Monitor [LCD MONITOR] (llll 9)
Clock set [CLOCK SET] (llll 13)
3 Erase All Files [ERASE ALL FILES] (llll 23)
File Protection [FILE PROTECTIONS] (llll 24)
DPOF Setting [DPOF SETTING] (llll 25)
Slide Show [SLIDE SHOW] (llll 26)
Card Format [CARD FORMAT] (llll 26)
4 Date/Time [DATE/TIME] (llll 13)
3
Display [DISPLAY] (llll 10)
Display Size [DISPLAY SIZE] (llll 15)
LCD Monitor [LCD MONITOR] (llll 9)
Clock set [CLOCK SET] (llll 13)
5 Erase All Files [ERASE ALL FILES] (llll 23)
File Protection [FILE PROTECTIONS] (llll 24)
Card Format [CARD FORMAT] (llll 26)
6 Date/Time [DATE/TIME] (llll 13)
4
Display [DISPLAY] (llll 10)
LCD Monitor [LCD MONITOR] (llll 9)
Clock set [CLOCK SET] (llll 13)
7 Repeat Setup [REPEAT SETUP] (llll 20)
8 Date/Time [DATE/TIME] (llll 13)
Display [DISPLAY] (llll 10)
LCD Monitor [LCD MONITOR] (llll 9)
Clock set [CLOCK SET] (llll 13)
5
6
7
8
1
MPEG4
PICTURE
2
3
DATE/TIME OFF D/T TIME
DISPLAY OFF ON
LCD SET YES
LCD MONITOR
NORMAL UPSIDE-DOWN
AC MAINS 50HZ 60HZ
CLOCK SET YES
MPEG4 RECORD
RECORDING SETUP
OTHER FUNCTIONS
PRESS MENU TO RETURN
OTHER FUNCTIONS
PRESS MENU TO RETURN
/
RECPLAY
VOICE
2,3
MENU
1
VOL
MODE/
+
1,2,3
VOL
-
1/100
SELECT
PUSH/SET
4
Setting the power supply frequency
Set the power supply frequency before using the SD Multi AV Device.
The power supply frequency is different depending on the country or
region.
Adjustment of the frequency will help reduce the appearance of
horizontal stripes consisting of light and dark patterns under fluorescent
lighting.
Set the Operation Mode to [REC>> MPEG4] or [REC>>
1
. (l 8)
PICTURE]
Select the [OTHER FUNCTIONS] 2.
2
Set the [AC MAINS] 3 to [50 HZ] or [60 HZ].
3
≥This setting may not completely suppress the horizontal stripes
≥Irrespective of the setting, the horizontal stripes may still be presented
in the following cases.
-When using the SD Multi AV Device to record pictures under a
lighting instrument such as a high-frequency fluorescent lamp:
-When using the SD Multi AV Device to record a lighting instrument
such as a fluorescent lamp:
ª To reduce the appearance of horizontal stripes
consisting of light and dark patterns
If adjustment of the frequency does not have much effect on reducing
horizontal stripes, operate the SD Multi AV Device as follow.
Set the Operation Mode to [REC>> MPEG4] or [REC>>
1
PICTURE]
Move the Jog Lever down for about 1 second.
2
≥The [1/100] Indication 4 appears when the power supply
frequency is set to [50 Hz].
≥The [1/120] Indication 5 appears when the power supply
frequency is set to [60 Hz].
To Release this mode
Move the Jog Lever down for about 1 second.
≥Turning the power OFF will release this mode.
1
.(l 8)
1
1/120
≥It is not possible to use Backlight Compensation Mode when this mode
5
is set to ON.
≥If this mode is used for outdoor recording, the entire image on the
screen (or recording images) may be tinged with white.
≥This mode cannot be set or released while recording.
≥The SD Multi AV Device adjusts the brightness by varying the shutter
speed. However, the shutter speed is fixed in this mode and the
brightness cannot be adjusted.

Adjusting Brightness and Colour Level
1
2
DATE/TIME OFF D/T TIME
DISPLAY OFF ON
LCD SET YES
LCD MONITOR
NORMAL UPSIDE-DOWN
AC MAINS 50HZ 60HZ
CLOCK SET YES
6
DATE/TIME OFF D/T TIME
DISPLAY OFF ON
LCD SET YES
LCD MONITOR
NORMAL UPSIDE-DOWN
AC MAINS 50HZ 60HZ
CLOCK SET YES
MPEG4 RECORD
RECORDING SETUP
OTHER FUNCTIONS
PRESS MENU TO RETURN
OTHER FUNCTIONS
PRESS MENU TO RETURN
LCD SET
BRIGHTNESS
COLOUR LEVEL
PRESS MENU TO RETURN
OTHER FUNCTION
PRESS MENU TO RETURN
3
3
/
1,5
MENU
+
1,2,3,4
VOL
-
/
1,4
MENU
+
1,2,3
VOL
-
LCD Brightness [BRIGHTNESS] 4
It adjusts the brightness of the image on the LCD screen.
LCD Colour Level [COLOUR LEVEL] 5
It adjusts the colour saturation of the image on the LCD screen.
ª To Adjust
1
Select the [OTHER FUNCTIONS] 1.
2
Set the [LCD SET] to [Yes] 2.
3
Press down the centre of the Jog Lever 3 to select the
item to be adjusted.
4
Move the Jog Lever up or down to raise or lower the
number of vertical bars in the Bar Indication.
≥A larger number of vertical bars indicates stronger brightness or
colour saturation.
5
Press the [MENU] Button twice.
≥The [LCD SET] screen disappears.
≥These adjustments do not affect the recorded images.
≥Do adjustment in the moving picture record mode or still picture record
mode.
Setting Date and Time.
Set the date and time from the [MENU] screen.
1
4
5
Select the [OTHER FUNCTIONS] to set [Yes] on the
[CLOCK SET].
2
Move the Jog Lever up or down to set [YEAR] to a
6
desired value, and press down the centre of the Jog
Lever to move to [MONTH].
3
In the same way, set [MONTH], [DAY], [HOUR], [MINUTE]
to a desired value.
4
Press the [MENU] Button to exit the date setting.
≥The second display starts from 0 (zero).
≥Press the [MENU] Button again to terminate the menu screen.
≥The built-in battery sustains the operation of the clock.
≥The time format is a 24 hour clock.
≥The clock might cause a deviation from the correct date and/or time, so
that check the current date and/or time before filming a movie or taking
a photo.
≥If the [0] indicator is displayed, set the date and time after the battery
has charged. (llll 29)
7
7
CLOCK SET
YEAR 2002
MONTH MAR.
DAY 20
HOUR AM10
MIN 35
PRESS MENU TO RETURN

1
2
3
MPEG4 MODE
MPEG4
PICTURE
MPEG4 RECORD
RECORDING SETUP
OTHER FUNCTION
PRESS MENU TO RETURN
RECORDING SETUP
FINE NORMAL
ECONOMY1 ECONOMY2
PRESS MENU TO RETURN
MPEG4
4
RECPLAY
VOICE
/
MENU
VOL
MODE/
+
VOL
-
4
2,3
1
1,2,3
PUSH/SET
SELECT
Basic Functions
Recording the Moving Picture (MPEG4)
You can record moving pictures on the Card.
Set the Operation Mode to [REC>> MPEG4]
1
Select the [RECORDING SETUP]2.
2
Set the [MPEG4 MODE] 3 to desired picture quality.
3
≥Select one of the options of [FINE], [NORMAL], [ECONOMY1], or
[ECONOMY2].
≥Press the [MENU] Button twice to exit menu.
Press the Recording Start/Stop Button.
4
≥Recording starts.
ª To stop recording
While recording the moving picture, press the Recording Start/Stop
Button 4.
≥If the moving picture is recorded again after stopping recording, it will
be saved as another file.
ª Display in the moving picture (MPEG4) mode
: Moving picture mode.
R:0h00m: Remaining Time Indication
F/N/E1/E2: Shows the picture quality. [F]: Fine, [N]: Normal , [E1]:
≥The MPEG4 moving pictures can be recorded in any mode, but moving
pictures recorded in the [FINE], [NORMAL] or [ECONOMY 1] mode
may not be played on other Panasonic digital video cameras. The
message [Press RESET button.] may be displayed in such case. This
is not a fault of the camera.
≥The MPEG4 moving pictures recorded in the [ECONOMY 2] mode may
not be played, if it was a short recording (4 seconds or shorter).
≥The picture quality level deteriorates, if the [ECONOMY 1/2] in the
[RECORDING SET UP] MENU is selected.
≥The recorded data can be also played back on Windows
Player.(l 30)
Record the su bject a pp rox.50 cm away fro m it.
≥
≥The capacities of the recording time for MPEG4 files are as follows:
Economy1 and [E2] :Economy2.
(The picture quality in E2 is lower than E1).
1
®
Media
0h10m14s N
R0h10m
Fine Normal Economy1 Economy2
8MB 2 min 3 min 6 min 8 min
16MB 4 min 7 min 14 min 19 min
32MB 10 min 15 min 30 min 40 min
64MB 20 min 32 min 60 min 80 min
The times listed in the above table are approximate.

Playing the Moving Picture (MPEG4)
Plays back moving pictures recorded on the card.
1
MPEG4
PICTURE
2
MOL
MOL
MOL
MOL
MOL
MOL
4
DATE/TIME OFF D/T TIME
DISPLAY OFF ON
LCD SET YES
DISPLAY SIZE FULL NORMAL
LCD MONITOR
NORMAL UPSIDE-DOWN
CLOCK SET YES
MPEG4
001
. ASF
002
. ASF
003
. ASF
004
. ASF
005
. ASF
006
. ASF
OTHER FUNCTIONS
PRESS MENU TO RETURN
3
RECPLAY
VOICE
MUSIC
VOL
MODE/
+
VOL
-
1
1,2,3
PUSH/SET
SELECT
Set the Operation Mode to [PLAY>>MPEG4]
1
1
≥Moving picture files recorded on the card are displayed in the form
of a list (six files per page) 2.
Move the Jog Lever up or down to select a desired file.
2
Press down the centre of the Jog Lever 3.
3
≥A moving picture file is played back.
≥After playing back the files with the number selected and after, the
file list reverts.
≥Wear the Earphone (supplied) to listen to the sound.
ª To stop playback
While playing back, hold down the centre of the Jog Lever 3 for
about two seconds.
≥Playback is stopped and moving picture files are displayed in the form
of a list.
≥Press once, and the play back will pause.
ª To find the beginning of a moving picture file
While playing back, move the Jog Lever up or down.
ª To Change the Display Size
Select [FULL] or [NORMAL] from the [DISPLAY SIZE] option under
the [OTHER FUNCTIONS] Menu 4.
≥If the [FULL] is selected, the quality of picture will degrade slightly.
≥If the picture recorded on another machine is played back in the [FULL]
mode, a part of the picture will be clipped.
≥To hear the sound, the earphone must be plugged into the jack of the
SD Multi Audio Device.
≥Files are numbered hexadecimally.
≥The file format supported by this SD Multi AV Device is ASF. (Some
ASF formatted files may not be played back.)
≥When a moving picture is played back, a mosaic may appear or some
frames may be missing; but this is normal.
≥MPEG4 files recorded by another device may not be played back.
≥Fast forward or slow playback is not available.
≥When playing back a picture recorded by other equipment, picture size
may differ.
≥
≥Refer to Page 21 for volume adjustment.
≥Refer to Page 30 for viewing pictures on a personal computer.

1
MPEG4
PICTURE
2
3
FLASH OFF ON
PICTURE QUALITY
4
FLASH OFF ON
PICTURE QUALITY
PICTURE RECORD
RECORDING SETUP
OTHER FUNCTION
PRESS MENU TO RETURN
RECORDING SETUP
FINE NORMAL ECONOMY
PRESS MENU TO RETURN
RECORDING SETUP
FINE NORMAL ECONOMY
/
MODE/
RECPLAY
VOICE
6
2,5
MENU
VOL
1
+
1,2,3,4
VOL
-
SELECT
PUSH/SET
Recording Still Pictures
Records still pictures.
Set the Operation Mode to [REC>>PICTURE]
1
Select [RECORDING SETUP] 2.
2
Set the [PICTURE QUALITY] 3 to desired picture quality.
3
≥Select one of [FINE], [NORMAL], or [ECONOMY].
To use the flash, Set the [FLASH] on the [RECORDING
4
SETUP]
Menu to [ON].
4
≥At a dark place, will be displayed and the Flash will be
available. (The display disappears at a bright place.)
Press the [MENU] Button twice to exit menu.
5
Press the Recording Start/Stop Button.
6
≥The still image is recorded on the Card.
ª Display in the Still picture mode
R 0000: Number of remaining recordable pictures
F/N/E: Select a picture quality. ( [F]: Fine, [N]: Normal and [E]:
≥The image size is 640 x 480 (VGA).
≥If [NORMAL] or [ECONOMY] is selected for recording, mosaic-pattern
noise may appear on a playback image depending on the image
content.
≥The available range of the Flash is approximately 60 to 100 cm in a
dark place.
≥Record the subject approx.
≥If the number of remaining recordable pictures is 10,000 or more, the
indication will be “9999”.
≥ flashes immediately after the Flash is used to indicate that pictures
cannot be recorded. Wait until it turns on.
≥The following table shows still image storage capacity for each image
quality settings:
8MB 45 95 190
16MB 100 200 400
32MB 220 440 880
64MB 440 880 1760
The numbers shown in the above table are approximate and may vary
depending on picture content.
: Still picture mode
Economy)
50 cm
away from it.
Fine Normal Economy
1
PRESS MENU TO RETURN
PICTURE
R 15
N

Playing back Still Pictures
Plays back still pictures recorded on the card.
1
2
MPEG4
PICTURE
100 - 0001
100 - 0002
100 - 0003
100 - 0004
100 - 0005
100 - 0006
3
VOICE
MUSIC
PICTURE
RECPLAY
VOL
MODE/
+
VOL
-
1
1,2,3
PUSH/SET
SELECT
Set the Operation Mode to [PLAY>>PICTURE]
1
≥Still picture files recorded on the card are displayed in the form of a
list (six files per page) 2.
Move the Jog Lever up or down to select a desired file.
2
Press down the centre of the Jog Lever 3.
3
≥A still picture file is played back.
1
ª To stop playback
While playing back, press down the centre of the Jog Lever.
≥Playback is stopped and still picture files are displayed in the form of a
list.
ª To play the next (previous) file
While playing back, Move the Jog Lever up or down.
≥If there is no file to be played, [NO FILE] is displayed.
≥Only JPEG formatted files are able to play on your SD Multi AV Device.
(In some cases, even such a file may not be played back).

Recording Voice (Voice Recording Function)
You can record voice data on the card.
2
3
1
VOL
MODE/
1
Set the Operation Mode to [RECORD>>VOICE] 2.
+
1
VOL
-
1
Press the Recording Start/Stop Button.
2
≥Recording starts.
Speak into the built-in microphone 1 of this SD Multi AV
3
Device.
ª To stop recording
While recording Voice, press the Recording Start/Stop Button.
2
MPEG4
PICTURE
VOICE
RECPLAY
VOICE
0h10m14s
R0h10m
SELECT
PUSH/SET
ª Display in the Voice Mode
: Voice Mode
R:0h00m: Remaining Time Indication
≥The LCD Monitor will shut off about 5 seconds after starting to record.
This is not a malfunction but a normal sequence in recording. When
voice recording stops, the LCD Monitor turns on again.
≥To check the voice while recording, use the earphone.
≥The recorded file is automatically locked (to prevent accidental
erasure).
≥The screen shows a simple blue background.
≥If the [MODE/VOL] button is pressed while recording, the LCD Monitor
turns on and will turn off again in approx. five seconds.
≥To check the sound which is being recorded, the Earphone supplied
needs to be connected. (Volume adjustment is not available.)
≥The indexes of the recording time for Voice files are as follows:
8MB 25 min.
16MB 58 min.
32MB 120 min.
64MB 240 min.
≥The times listed in the above table are approximations.

Hearing the Voice Recorded (Playback
Ë
1
VOL
MODE/
+
2,3,4
VOL
-
3
Plays back the voice files recorded by this SD Multi AV Device. Plays
back the voice files recorded by this SD Multi AV Device. Wear the
Earphone (supplied) to listen to the sound.
Plug the earphone into the [ ] jack. (l 21)
1
Set the Operation Mode to [PLAY>>VOICE] 1.
2
≥Voice files recorded on the card are displayed in the form of a list
(six files per page) 2.
Move the Jog Lever up or down to select a desired file.
3
Press down the centre of the Jog Lever 3.
4
≥A voice file is played back.
≥In approx. five seconds after playing back, the Monitor will turn off.
≥After playing back, the file list reverts and the LCD monitor turns on
again.
ª To stop playback
While playing back, hold down the centre of the Jog Lever for about
two seconds.
≥Playback is stopped and voice files are displayed in the form of a list.
≥Press once, and the playback will pause.
Sound)
1
2
MPEG4
PICTURE
MOB
001
. VM1
MOB
002
. VM1
MOB
003
. VM1
MOB
004
. VM1
MOB
005
. VM1
MOB
006
. VM1
VOICE
RECPLAY
VOICE
MUSIC
SELECT
PUSH/SET
ª Fast forward (fast backward) playback
While playing back, hold down the Jog Lever upwards
(downwards).
≥Hold down the Jog lever upwards for fast forward playback or
downwards for fast backward playback. (Hold down the Jog Lever for
about one second or more for 10 times the normal speed or for about
seven seconds or more for 60 times.)
≥Release the Jog Lever to return to the normal playback.
ª To find the beginning of a voice file:
While playing back, move the Jog Lever up or down.
≥When playback begins, the LCD Monitor turns off about 5 seconds
later.
≥The screen shows a simple blue background.
≥If a file is not available, [NO FILE] will be displayed.
≥If the [MODE/VOL] button or the Jog Lever is pressed after the LCD
Monitor turns off, the Monitor turns on and will turn off again in approx.
five seconds.
≥The L/R indication on the Earphone represents Left/Right.
≥The recorded voice files cannot be played back on PC.

1
MPEG4
PICTURE
Ë
/
5
RECPLAY
VOICE
MUSIC
1
3
MENU
2
VOL
MODE/
+
2,3,4,
VOL
-
5,6
SELECT
PUSH/SET
Listening to Music (Music Play)
You can play MPEG-2 AAC format and MP3 data. Music files must be
written on the SD Memory Card using a USB Reader/Writer for SD
Memory Card (supplied accessory) and the Panasonic Media Manager
(supplied accessory) special software programme in order for the SD
Multi AV Device to play music. For more detailed information, please
refer to the supplied Panasonic Media Manager Basic Operating
Instructions. The SD memory card must be formatted using the supplied
USB Reader/Writer before using the “ Listening to Music (Music Play)”.
For more specific information regarding formatting the SD memory card ,
please refer to the supplied Panasonic Media Manager Basic Operating
instructions.
Plug the earphone terminal into the [ ] jack. (l 21)
1
Set the Operation Mode to [PLAY>>MUSIC] 1.
2
≥Music files recorded on the card are displayed in the form of a list
(six files per page).
Select the [REPEAT SETUP]
3
Set the [REPEAT SETTING] to desired settings.
4
≥Select either [1MUSIC] or [ALL]. Select [OFF] when playback is not
desired to be repeated.
Move the Jog Lever up or down to select a desired file 4.
5
Press down the centre of the Jog Lever 5.
6
≥A music file is played back.
≥In approx. five seconds after playing back, the Monitor will turn off.
≥After playing back, the file list reverts and the LCD monitor turns on
again.
ª To stop playback
While playing back, hold down the centre of the Jog Lever for about
two seconds.
≥Playback is stopped and music files are displayed in the form of a list.
≥Press once, and the playback will pause.
2
3
2
3
REPEAT SETUP
4
TITL1 / ARTIST
TITL2 / ARTIST
TITL3 / ARTIST
TITL4 / ARTIST
TITL5 / ARTIST
TITL6 / ARTIST
MUSIC PLAYBACK
1 REPEAT SETUP
2 OTHER FUNCTION
PRESS MENU TO RETURN
REPEAT SETUP
OFF 1MUSIC ALL
PRESS MENU TO RETURN
MUSIC
1
2
3
4
5
6
ª To find the beginning of a music file:
While playing back, move the Jog Lever up or down.
≥Only the MPEG2-AAC formatted file and MP3 (data recorded using
Panasonic Media Manager) is applicable to play on your SD Multi AV
Device.
≥Music playback is not possible with a MultiMediaCard.
≥A title or artist name may not be displayed in some cases.
≥When playback begins, the LCD Monitor turns off about 5 seconds
later.
≥Music cannot be heard without connecting the earphone.
≥All music files are locked.
≥The SD Multi AV Device can be used as a player only. It cannot record
or erase tracks. However, using its Formatting Function, all the data on
an SD Memory Card can be erased.
≥Only the first 17 characters are displayed for the title/artist name.
≥If a file is not available, [NO FILE] will be displayed.

Listening to Music (Music Play) (Cont.)
≥During playback, the date is not displayed.
Ë
1
≥MP3 is the abbreviation for MPEG1 Audio Layer3.
≥Normal MP3 files cannot be played back. Use the data created with
Panasonic Media Manager.
≥Some MP3 or MPEG2-AAC files which were written with Panasonic
Media Manager may not be played back.
≥The bit rates (recommended) supported are 64 kbps, 96 kpbs or 128
kbps for both the MPEG2-AAC and MP3 files.
≥The WMA data cannot be played back.
≥
Using the Earphone
Since there is no internal speaker, the supplied earphone must be used
when hearing the sound or making volume adjustment.
Plug the earphone terminal into the [ ] jack.
1
≥If the voice sound is checked with the Earphone on while recording, the
volume adjustment function is invalid.
1
VOL
MODE/
+
2,3
VOL
-
1
Adjusting the Volume
Adjusts the playback audio level for moving picture files, music files, and
voice files.
While playing back, press the [MODE/VOL] Button.
1
≥The [Volume] indication appears 1.
Move the Jog Lever up to increase the audio level or
2
down to decrease it.
Press the [MODE/VOL] Button.
3
≥The [Volume] indication disappears.
≥If the [MODE/VOL] Button or the Jog Lever is left unoperated for
five seconds, the [Volume] indication will automatically disappear.

1
2
MPEG4
PICTURE
1
VOL
MODE/
+
VOL
-
RECPLAY
VOICE
1,2
SELECT
PUSH/SET
Advanced Functions
Backlight Compensation Function
This prevents a recording subject from being recorded darker in
backlight. (Backlight is the light that shines from behind a recording
subject.)
Set the Operation Mode to [REC>>MPEG4] or
1
[REC>>PICTURE]
Move the Jog Lever up for about 1 second.
2
≥The [ª] Indication 2 is displayed.
To Resume Normal Recording
Move the Jog Lever up for about 1 seconds.
≥When the Backlight Compensation Function is activated, the entire
screen becomes brighter.
≥Turning the power OFF will release this function.
≥It is not possible to use Horizontal Stripes Reduction Mode when this
mode is set to ON.
≥The backlight may not be sufficiently compensated in dark places.
≥The Backlight Compensation Function cannot be set or released while
recording.
Adjusting White Balance
The SD Multi AV Device adjusts White Balance automatically. However,
depending on the scene or light condition, the Automatic White Balance
may not be able to bring out natural colours. In such case, the white
balance can be adjusted manually.
.
1
1
2
MPEG4
PICTURE
RECPLAY
VOICE
1
VOL
MODE/
+
VOL
1,3
-
PUSH/SET
1
SELECT
Set the Operation Mode to [REC>>MPEG4] or
1
[REC>>PICTURE]
Point the SD Multi AV Device at a full-screen white
2
.
1
subject (e.g. white paper).
Keep pressing the centre of the Jog Lever until the [1]
3
Indication
is displayed.
2
To Resume Automatic Adjustment
Press down the centre of the Jog Lever until the [1] Indication 2
disappears.
≥You may not be able to achieve correct White Balance adjustment
manually under weak illumination. (In this case, the [1] Indication
flashes.)
≥Turning the power OFF will release the adjusted White Balance setting.
≥This mode cannot be set or released while recording.
≥Adjustment of White Balance is effective under the following
conditions.
-When recording under reddish lighting (halogen light bulb,
incandescent light bulb, etc.).
-When recording a picture of mono-tone colour.
-When recording under multiple lightings

1
ERASE CARD FILE
FILE PROTECTION
DPOF SETTING
CHECK
EXIT
2
ERASE FILE
NO RETURN
YES
4
ERASE ALL FILES
FILE PROTECTION
DPOF SETTING YES
SLIDE SHOW YES
CARD FORMAT YES
CARD EDITING
PRESS MENU TO RETURN
Erasing the Files Recorded on a Card
Using SD Multi AV Device, you can erase the files recorded on a Card.
After the file is erased, it cannot be restored.
2
/
MENU
+
3,4
VOL
-
3
YES
YES
Play back the file to be erased or let it pause.
1
(l 15, 17 ,19)
Press the [MENU] Button.
2
≥The [CARD EDITING] screen appears 1.
≥Except for the still picture mode, [DPOF SETTING] and [SLIDE
SHOW] is not displayed.
Press the Jog Lever downwards/upwards to select
3
and press down the centre of the
[ERASE CARD FILE]
Jog Lever
3
≥A verification message appears 2.
Move the Jog Lever up or down to select [YES] and
4
press down the centre of the Jog Lever
3
≥The selected file is erased from the Card.
≥If [NO] is selected, the file selection is cancelled.
≥To abort the [CARD EDITING] screen, select [RETURN].
ª To erase All Files
1
Set [ERASE ALL FILES] on the [CARD EDITING] 4 Menu
to [YES].
≥A verification message appears.
Select [YES].
2
Press the [MENU] Button twice.
3
≥Erased files cannot be restored.
≥This SD Multi AV Device cannot erase any music files (MPEG2-AAC
and MP3) (l 20).
≥Music files (in MPEG2-AAC or MP3 format) cannot be erased on the
SD Multi AV Device.
≥The files recorded in the Voice Record mode (see page 18) are
automatically locked. Release the lock to erase them.
≥Do not erase the Voice Files recorded with this SD Multi AV Device
using other devices.
≥A locked file cannot be erased. Release the lock to erase them.
≥Any file cannot be erased if the write protect switch on the SD Memory
Card is set to [LOCK].
≥If a file is erased on the SD Multi AV Device, the DPOF information set
on another camera may also be erased.
≥A still picture file (other than JPEG) that cannot be played back on the
SD Multi AV Device may be erased.
≥Erasing many files may take a little time. Wait until the ACCESS Lamp
goes out.

1
2
ERASE CARD FILE
FILE PROTECTION
DPOF SETTING
CHECK
EXIT
100-0011
100-0012
100-0013
Protecting the file (Lock Setting)
Precious files recorded on a Card can be locked (to prevent accidental
erasure).
2,
/
MENU
1,2
+
3,4
VOL
-
1,2
3
Play back the file to be locked or let it pause. (l 15, 17
1
,19)
Press the [MENU] Button
2
≥The [CARD EDITING] screen appears 1.
≥Except for the still picture mode, [DPOF SETTING] and [SLIDE
SHOW] is not displayed.
Move the Jog Lever up or down to select the [FILE
3
PROTECTION], and press down the centre of the Jog
.
3
Lever
≥The selected file is locked and the [ ] Indication 2 is attached
to the selected files.
≥Repeat steps 1 through 3 to lock multiple files.
ª To release the lock setting:
Select [UNLOCK] in Step 3.
≥the [ ] Indication disappears.
ª To lock all files:
1
Set the [FILE PROTECTION] on the [CARD EDITING]
Menu
Select [LOCK ALL FILES] 5 .
2
≥To unlock all the files, select [UNLOCK ALL FILES].
to [YES].
4
4
ERASE ALL FILES
FILE PROTECTION
DPOF SETTING YES
SLIDE SHOW YES
CARD FORMAT YES
5
LOCK ALL FILES
UNLOCK ALL FILES
CARD EDITING
PRESS MENU TO RETURN
FILE PROTECTION
PRESS MENU TO RETURN
YES
YES
≥Even if files are locked, the files will be deleted when the Card is
formatted.
≥Any music files (MPEG2-AAC and MP3) cannot be unlocked.
≥Files recorded by Voice Recording Functions are automatically locked
(to prevent accidental erasure).
≥The Lock Setting carried out by this SD Multi AV Device is only
effective for this SD Multi AV Device.
≥The SD Memory Card has a write protection switch on it. If the switch is
moved to the [LOCK] side, you cannot write to or format the Card. If it
is moved back, you can.
≥If there are many files to be locked (or unlocked), the operation takes a
longer time.

1
ERASE CARD FILE
FILE PROTECTION
DPOF SETTING
CHECK
EXIT
2
DPOF SETTING
1
4
100-0011
100-0012
100-0013
Writing Printing Data on a Card (DPOF
Setting)
/
MENU
2,
DPOF Setting Printing data (DPOF Setting), such as the number of
images to be printed, can be written to the Card.
1,2
+
3,4
VOL
-
1,2
3
Play back a still picture to be DPOF-set.(l 17)
1
Press the [MENU] Button.
2
≥The [CARD EDITING] screen appears 1.
Move the Jog Lever up or down to select [DPOF
3
SETTING] and press down the centre of the Jog Lever
Move the Jog Lever up or down to select the number of
4
to be printed and press down the centre of
pictures
2
3
the Jog Lever.
≥When DPOF setting is set to 1 or more files, the [ ] indication
4 appears.
ª To release all the DPOF settings:
1
Set the [DPOF SETTING] on the [CARD EDITING] Menu
to [YES].
5
Select [SET ALL TO 0] 6.
2
≥If the [ALL 1] is selected, all the still pictures are set for one DPOF.
≥If the [CHECK] is selected, still pictures that DPOF setting are set
can be played back like a Slide Show.
≥DPOF is the abbreviation of Digital Print Order Format. DPOF is used
to select images you want to print. DPOF can only used with products
that support this feature.
≥The number of prints can be set from 0 to 99.
≥This SD Multi AV Device may not recognize the DPOF set by the other
type of device.
≥Verifying the DPOF Setting may take a little time. Wait until the
ACCESS Lamp goes out.
5
ERASE ALL FILES
FILE PROTECTION
DPOF SETTING YES
SLIDE SHOW YES
CARD FORMAT YES
6
CARD EDITING
PRESS MENU TO RETURN
DPOF SETUP
ALL 1
ALL 0
CHECK
PRESS MENU TO RETURN
YES
YES

1
MPEG4
PICTURE
2
FILE PROTECTION YES
DPOF SETTING YES
CARD FORMAT YES
SLIDE SHOW YES
CARD EDITTING
PRESS MENU TO RETURN
3
RECPLAY
VOICE
MUSIC
/
MENU
VOL
MODE/
+
VOL
-
2
1
1,2
SELECT
PUSH/SET
Playing back still pictures one by one (Slide
Show)
The recorded still picture in the Card can be played back like a Slide
Show.
Set the Operation Mode to [PLAY>>PICTURE] 1.
1
Set the [SLIDE SHOW] on the [CARD EDITING] 2 Menu
2
to [YES].
≥Slide show starts from the selected still picture.
≥All pictures are sequentially displayed, each for about 5 seconds,
and the show stops at the last picture.
ª To cancel the Slide Show:
press down the centre of the Jog Lever 3 for about 2
seconds or more.
≥Press down the centre of the Jog Lever once, and the playback will
pause.
≥Playback time may take longer than usual depending on the picture.
≥The order and playback time of a slide show set on another device is
not applicable to this SD Multi AV Device (all pictures are played back).
Formatting the Card
If a Card becomes unreadable by the SD Multi AV Device, formatting it
may make it reusable. Formatting erases all the data recorded on a
Card. If additional cards are purchased it is advisable to format the card
before it is used the first time.
1
FILE PROTECTION YES
DPOF SETTING YES
CARD FORMAT YES
SLIDE SHOW YES
2
CARD EDITTING
PRESS MENU TO RETURN
FORMAT WILL ERASE
ALL FILES
No RETURN
YES
Set the Operation Mode to [PLAY>>MPEG4],
1
[PLAY>>PICTURE], or [PLAY>>VOICE].
Set the [CARD FORMAT] on the [CARD EDITING] Menu
2
to [YES].
1
/
2
MENU
1
VOL
MODE/
+
1,2,3
VOL
-
3
≥A verification message appears 2.
Move the Jog Lever up or down to select [YES] and
3
press down the centre of the Jog Lever
3
≥Formatting is carried out.
≥By formatting, all data stored in the Card (e.g., still pictures, MPEG4
moving pictures, voice data, music data) is erased.
≥Format the Card on the SD Multi AV Device or on Panasonic Media
Manager (supplied). A Card formatted on a machine other than the SD
Multi AV Device may not be used. A Card formatted on the SD Multi AV
Device may not be used on other machines. Format a Card on the
machine on which it is used.
≥If the write protection switch of the SD Memory Card is set on [LOCK],
data cannot be erased.
≥When the Card is formatted, the files will be deleted, even if files are
locked.
≥As formatting erases all the data, save the necessary data on a
personal computer, etc. beforehand.
≥Format may take a little time. Wait until the ACCESS Lamp goes out.

For using SD-MovieStage
•
For using the SD-MovieStage software, refer to the PDF manual. This
manual describes installation only.
Operating environment
SD-MovieStage can be installed in a PC/AT compatible personal
computer which can run Microsoft
Professional/XP.
®
Windows® 98SE/Me/2000
Compatible machines:
®
PC/AT compatible PC with Microsoft Windows
XP/2000 Professional pre-installed.(Intel
98 Second Edition/Me/
®
Pentium® Ⅱ 333MHz or
higher CPU recommended)
Graphic display:
High Colour (16 bit) or more.
Desktop resolution of 800X600 dots or higher.
Installed memory:
®
128 MB or more (for Windows
256 MB or more (for Windows
98SE/Me)
®
2000/XP)
Free hard disk space:
400 MB or more
Disk drive:
CD-ROM drive
Port s:
USB Terminal
Other requirements:
Mouse
≥Microsoft and Windows are registered trademarks of Microsoft in the
United States and other countries.
≥Intel Pentium is a registered trademark.
≥Other names, company names, and product names printed in these
instructions are trademarks or registered trademarks of the companies
concerned.
≥The contents or complete reproduction or copy of these Operating
Instructions could be changed without notice.
≥

Installing SD-MovieStage
Insert the supplied CD-ROM into the personal
2
3
1
computer’s CD-ROM drive.
Double-click [My Computer], double-click CD-ROM icon,
2
double-click [SD-MovieStage Ver.1.0E], and double-click
[SETUP.EXE].
Select the Language to be installed and click the [OK]
3
Button.
Click the [Next] Button.
4
≥The next screen will be displayed.
Read License Agreement carefully, and click [Yes]
5
Button, if you accept the terms of the agreement.
≥If [No] Button is selected, you cannot proceed to install.
Click the [Next] Button.
6
Click the [Next] Button.
7
≥Check that the [PAL] system is selected.
4
5
6
7

Installing SD-MovieStage (Cont.)
Click the [YES] Button.
8
8
≥The necessary software for the SD-MovieStage is installed.
Click [Yes] Button to create the short-cut icon on the
9
desktop.
At the end of the Setup, click on the [Finish] Button.
10
≥After rebooting the computer, the SD MovieStage is enabled.
≥For the information of the operation of SD-MovieStage, refer to the
instruction in the PDF file that was installed together with this
software. Adobe
www.adobe.com/) is required to read PDF files.
≥The screen image inserted into this manual is captured from
English version.
®
Acrobat® Reader® (refer to http://
9
10
DC IN 4.8V
ª Cautions for Windows XP/2000 Professional
When installing or using this software, specify the user name to
[Administrator (computer administrator)] or any other user name having
the equivalent right. Then log on with that user name to install this
software.
(If you don't have such a right, consult with your system administrator).
Starting SD-MovieStage
The step below starts the SD-MovieStage. Please read the PDF-based
Instructions for using the SD-MovieStage.
Select [Programs] >> [Panasonic] >> [SD-MovieStage]
1
>> [SD-MovieStage] from the Windows start menu.
≥SD-MovieStage will start.
≥If you use Windows 98SE, install Panasonic Media Manager (supplied
accessory) before using the SD-MovieStage.
Others
Notes & Precautions
ª Charge the built-in battery for maintaining the date
information.
This built-in battery is used for the memory of date and time. If [0] is
displayed when the power is on, the built-in battery may be exhausted.
Charge using the following procedure:
Take the battery out and plug in the AC adapter (l 6).
1
Turn the power off and leave this SD Multi AV Device as
2
it is for about 12 hours.
ª After Use.
1
Turn off the SD Multi AV Device.
Take out the Card.
2
Detach the power supply and retract the LCD Monitor
3
Put the SD Multi AV Device into the Carrying Case.
4
.

ªUsing a Card in a Personal Computer
≥To erase pictures that you recorded on the Card by
using the SD Multi AV Device, be sure to erase them on
the SD Multi AV Device, not on the computer.
≥You may not be able to properly play back on the SD
Multi AV Device after editing the recorded data or
changing the image data on a personal computer.
≥The image data files recorded on the Card with this SD
Multi AV Device conform to the DCF (Design Rules for
Camera Files Systems) universal standard stipulated by
JEITA (Japan Electronics and Information Technology
Industries Association).
≥Moving Picture format (MPEG4) that can be played back
on this device is ASF. (Depending on the file, it may not
be able to be played back even if it is in ASF format.)
Constructing a Folder when the Card is used
with a PC
≥When a Card with data recorded on it is inserted into a
personal computer, folders will be displayed as in the
figure.
≥The “SD_VOICE” folder and the Voice files in the folder
are set as hidden. Depending on the settings of your
personal computer, this hidden folder and these hidden
files might not appear in Windows Explorer or the “My
Computer” screen.
≥The memory capacity indicated on the SD Card label
corresponds to the total amount of the capacity to
protect and manage the copyright and of the capacity
available as a conventional memory for a SD Multi AV
Device, Personal Computer or others. Capacity that can
be used as conventional memory:
8MB Card: about 6,800,000 bytes
≥The [SD_VOICE] folder, the voice files contained in it,
and [SD_AUDIO] folder are specified to the hidden files.
Those folders and files may not be displayed on the
Explore and My Computer screen depending on the
setting of your PC.
≥Do not delete any folders located on the Card. If this is
done, the Card may not be recognized on your SD Multi
AV Device.
≥The MPEG 4 moving picture file (ASF format) can be
played on the Windows Media Player (Ver. 6.4 or later).
If it cannot be played back, download the appropriate
software (G.726). The Windows Media Player contains
the auto-downloading feature of this software. Log on
the Internet and double-click the MPEG 4 moving picture
file. The software will be downloaded automatically.(To
play back a file on MacOS, Windows Media Player for
Macintosh is required.)
≥When formatting a Card, format it on the SD Multi AV
Device or on Panasonic Media Manager.
≥When a moving picture is played back on a personal
computer, a black belt may be present along the top and
bottom of the picture.
≥If data not supported by the SD Multi AV Device is
recorded on a personal computer, it cannot be
recognized by the SD Multi AV Device.
[100cdpfp]: The images (imga0001.jpg etc.) in this
folder are recorded in the JPEG
format.([100-0001] or similar indication is
displayed on the SD Multi AV Device.)
[Misc]: Files in which DPOF Data has been set to
[SD_VC100] Folder in which the voice data (e.g.,
[SD_AUDIO] Folder in which the music data (e.g.,
≥[PRL001]:MPEG4 moving picture is recorded in ASF
format (MOL00001.ASF etc.). It can be played back with
Windows Media Player (ver.6.4 and later). Because of
small size, this File is well suited for transmitting data
through a telephone line etc.
≥[DCIM], [IM01CDPF], [PRIVATE], [VTF], [SD_VIDEO],
[SD_VOICE] etc. are necessary items in the folder
structure. They have nothing to do with actual
operations.
≥The SD Multi AV Device automatically saves file
numbers (imga0001.jpg, etc.) along with the images.
The file numbers are recorded with each image as a
consecutive number.
the image are in this.
MOB0001.VM1) files are stored.
A0B001.SA1) files recorded by the
Panasonic Media Manager (supplied
accessory) are stored.

2
1
MPEG4
ß
6
7
100-0001
PICTURE
2
1
PLEASE WAIT
APR 10 2002
5
Indications
1) Remaining Battery Power [ ]
When the battery power becomes low, the indication
changes. When the battery level indicator indicates
[ ], the battery will run out in a few minutes.
Recharge the battery. may be displayed when
the AC Adaptor is used. This is not abnormal.
≥
2) Status Indications
Playback Mode
≥:1: Playback (l 15,19,20,26)
≥:;: Still Playback (l 15,19,20,26)
≥5/6: Cue Playback/Review Playback (Only for
(10 times speed with 10 6 / 5 and 60 times
speed with 60 6 / 5)
≥ : Repeat Playback (l 20)
≥SLIDE1: Slide play back
Recording Mode
≥ : Flash (l 16)
1/100,1/120
≥
ª
≥:
≥:1 White Balance setting Mode (l 22)
3) Card Indication 1
MPEG4
R:0h00m: Remaining Time Indication
F/N/E1/E2: Shows the picture quality. [F]: Fine, [N]:
PICTURE
0000: Number of remaining recordable pictures
F/N/E: Select a picture quality. [F]: Fine, [N]:
sound play back) (l 19,20)
Horizontal Stripes Reduction Mode
(l 12)
Backlight Compensation Mode (l 22)
: During recording, this indication is lit in
red, and the [ACCESS] Lamp lights.
When it is lit in green, recording is not
possible. When Remaining Time
Indication is [R:0h00m], it flashes in red.
When no card is inserted, the
indication flashes in red.
Normal, [E1]: Economy and [E2]:
Economy 2.
: During recording, this indication is lit in
red, and the [ACCESS] Lamp lights.
When it is lit in green, recording is not
possible. When Remaining Time
Indication is [R:0h00m], it flashes in red.
When no card is inserted, the
indication flashes in red.
Normal and [E]: Economy
0h10m14s
R 0h10m
8
VOLUME +
6
N
3
VOICE
: During recording, this indication is lit in
red, and the [ACCESS] Lamp lights.
When it is lit in green, recording is not
possible. When Remaining Time
Indication is [R:0h00m], it flashes in red.
When no card is inserted, the
R:0h00m: Remaining Time Indication
4) Card Indication 2
≥ : DPOF setting (setting for more than 1
≥[00]: Number set DPOF (l 25)
≥ [ ] : LOCK setting (l 24)
≥ [640] : Picture size
When you play back a scene recorded on the SD
Multi AV Device with a picture size specification
different from the one stated above, the following
indications should be displayed. If the size of the
picture is from 640 pixels to 800 pixels, the [[640]]
indication will be displayed;
if picture size is 640 pixels or lower, the scene
should be displayed without any indication of picture
size.
≥[SVGA]: From 800 to 1024
≥[XGA]: From 1024 to 1280
≥[SXGA]: From 1280 to 1600
≥[UXGA]: Above 1600 pixels
5) Date/Time Indication (l 10)
6) Volume (l 21)
≥Use this indication to adjust the volume of playback
sound from the earphone.
7) File Name Display (l 15, 17, 19, 20)
indication flashes in red.
print) (l 25)
4

8) Displayed by the text
[LOW BATTERY]:
The battery may be exhausted. Replace it with fully
charged battery.
[NO CARD]:
The Memory Card is not inserted. Otherwise, the Card
may not be inserted correctly.
[CARD FULL]:
The memory capacity is fully utilized. Erase any
unneccessaly files or replace it with a new card.
[CARD LOCKED]:
The write enable switch of the SD Memory Card is set to
[LOCK] (see page 24).
[CHECK CARD]:
Re-insert the Card. If [CHECK CARD] is still displayed,
the Card is not compatible or applicable. This SD Multi AV
Device cannot recognize it. Format it (l 26).
[FILE LOCKED]
You attempt to execute the erase operation on a locked
Card.
[UNPLAYABLE CARD]
This data is not valid for playback.
[PLEASE RE-OPERATE]:
Press the power button for 5 seconds or longer if playback
or recording cannot be controlled or the screen freezes. If
the power remains, remove the battery off or unplug the
power cord.
ª Cautions for Use
When you use your SD Multi AV Device on a rainy or
snowy day or on a beach, make sure that no water or
moisture enters the SD Multi AV Device.
≥Water may cause the SD Multi AV Device or card to
malfunction. (Irreparable damage may occur.)
≥If sea water splashes onto the SD Multi AV Device, wet a
soft cloth with tap water, wring it well, and use it to wipe
the camera body carefully. Then, wipe it again
thoroughly with a soft dry cloth.
Keep the SD Multi AV Device away from magnetized
equipment (such as a microwave oven, TV, video
game equipment, etc.).
≥If you use the SD Multi AV Device on or near a TV,
images or sounds may be disturbed due to
electromagnetic wave radiation.
≥Do not use near a cell phone because doing so may
cause noise to adversely affect the picture and sound.
≥Recording on the card may be damaged, or images may
be distorted by strong magnetic fields created by
speakers or large motors.
≥Electromagnetic wave radiation generated by a
microprocessor may adversely affect the SD Multi AV
Device, causing the disturbance of images and sounds.
≥If the SD Multi AV Device is affected by magnetically
charged equipment and does not function properly, turn
off the SD Multi AV Device power and detach the Battery
or AC Adaptor and then connect the Battery or AC
Adaptor again. Thereafter, turn on the SD Multi AV
Device power.
Do not use your SD Multi AV Device near radio
transmitters or high-voltage lines.
≥If you record pictures near radio transmitters or
high-voltage lines, recorded images or sounds may be
adversely affected.
Do not use this SD Multi AV Device for surveillance
purposes or other business use.
≥If you use the SD Multi AV Device for a long period of
time, the internal temperature increases and,
consequently, this may cause malfunction.
≥This SD Multi AV Device is not intended for business
use.
When you use your SD Multi AV Device on a beach or
similar place, do not let sand or fine dust get into the
SD Multi AV Device.
≥Sand or dust may damage the SD Multi AV Device.
(Extra care should be taken when inserting and
removing the Card.)
Do not spray insecticides or volatile chemicals onto
the SD Multi AV Device.
≥If the SD Multi AV Device is sprayed with such
chemicals, the camera body may be deformed and the
surface finish may peel off.
≥Do not keep rubber or plastic product in contact with the
SD Multi AV Device for a long period of time.

Do not use benzine, thinner or alcohol for cleaning
the SD Multi AV Device.
≥The camera body may be deformed and the surface
finish may peel off.
≥Before cleaning, detach the Battery or pull out the AC
Mains Lead from the AC Mains socket.
≥Wipe the SD Multi AV Device with a soft dry cloth. To
remove stubborn stains, wipe with a cloth that is soaked
in a detergent diluted with water, and afterward, finish
wiping with a dry cloth.
≥For storing or transporting the SD Multi AV Device, place
it in a bag or case lined with soft pads to prevent the
coating on the camera body from being worn.
After use, be sure to take the Card out and detach the
Battery from the SD Multi AV Device or pull out the AC
Mains Lead from AC Mains socket.
≥If the Battery is left on the SD Multi AV Device for a long
time, the voltage drops excessively, and the Battery may
not function even after it is recharged.
ªAbout the Lens
When the Lens is Fogged up:
Turn off the SD Multi AV Device and leave the SD Multi AV
Device in this condition for about 1 hour. When the lens
temperature becomes close to the ambient temperature,
the fog disappears naturally.
ªAbout the AC Adaptor
≥If the Battery is warm, charging takes longer time than
usual.
≥If you use the AC Adaptor near a radio, radio reception
may be disturbed. Keep the AC Adaptor 1 metre or more
away from radio.
≥After use, be sure to pull out the AC Mains Lead from
the AC Mains socket. (The SD Multi AV Device
consumes approx. 0.5 W of power when it is turned off
simply by the [ ] Button.)
≥Keep the electrodes of the AC Adaptor and Battery
clean at all times.
≥Remove the battery if the device is left unused for a long
time.
≥The temperature of the SD Multi AV Device and the
battery may rise while charging the battery. Such rise of
temperature does not indicate a fault.
≥Do not install, remove, plug or unplug the battery or
power cord while the power is on.
ª About the LCD Monitor
≥In a place with drastic temperature changes,
condensation may form on the LCD Monitor. Wipe it with
soft dry cloth.
≥If your SD Multi AV Device is extremely cold when you
turn its power on, the image on the LCD Monitor will be
slightly darker than usual at first. However, as the
internal temperature increases, it goes back to the
normal brightness.
Extremely high precision technology is employed to
produce the LCD Monitor screen featuring a total of
approximately 110,000 pixels. The result is more than
99.99% effective pixels with a mere 0.01% of the pixels
inactive or always lit. However, this is not a malfunction
and does not affect the recorded picture.
ª Optimal Use of the Battery
Battery Characteristics
This Battery is a rechargeable lithium ion battery. Its
ability to generate power is based upon the chemical
reaction that takes place inside it. This reaction is
susceptible to the surrounding temperature and humidity,
and, if the temperature is too high or too low, the operating
time of the Battery becomes shorter. If the Battery is used
in an extremely cold environment, the Battery may
operate only for about 5 minutes. If the Battery becomes
extremely hot, a protective function may operate, and the
Battery may become unusable for a while.
Be Sure to Detach the Battery after Use
Be sure to detach the Battery from the SD Multi AV
Device. (If it is left attached to the SD Multi AV Device, a
minute amount of current is consumed even when the SD
Multi AV Device power is off.) If the Battery is left attached
to the SD Multi AV Device for a long time, over discharge
takes place. The Battery may become unusable after it is
charged.
Disposing of an Unusable Battery
≥The Battery has a limited life.
≥Do not throw the Battery into fire because it may cause
an explosion.
Always Keep the Terminals of the Battery Clean
Prevent the terminals from getting clogged with dirt, dust,
or other substances.
If you drop the Battery accidentally, check to see if the
Battery body and terminals are deformed.
Attaching a deformed Battery to the SD Multi AV Device
may damage the SD Multi AV Device.

ªNotes on the SD Memory Card Write-
Protect Switch
≥The SD Memory Card has a write-protect switch. Sliding
the switch to [LOCK] prevents the recording of data to
the card as well as the deletion of data from the card.
Sliding back the switch permits such operations.
ªCautions for Storage
Before storing the SD Multi AV Device, take the Card
out and detach the Battery.
Store all the components in a dry place with a relatively
stable temperature.
(Recommended Temperature:15 to 25oC, Recommended
Humidity:40 to 60%)
SD Multi AV Device
≥Wrap it with a soft cloth to prevent dust from getting into
the SD Multi AV Device.
≥Do not leave the SD Multi AV Device in places that
expose it to high temperature.
The Power Lamp flashes while charging. (Flashes approx.
every two seconds when charging is normal.)
When the Power Lamps flashes more quickly or slowly (or
tuns off), some abnormality may have happened.
The flashing speed suggests the following states.
Flashing approx. every 0.5 seconds:
≥The SD Multi AV Device, battery or AC adaptor may be
defective. Contact your nearest Panasonic dealer.
Flashing approx. every six seconds:
≥The ambient temperature or that of the battery itself is
too high or too low. Charging proceeds, but will take a
longer time.
Turning off:
Charging is completed.
If the Power Lamp turns off when charging is not
completed, the following reasons are probable.
≥The ambient temperature or that of the battery itself is
too high or too low. Wait until the proper temperature is
reached and charge the Battery again.
≥The AC Adaptor is probably defective. Contact your
nearest Panasonic dealer.
Battery
≥Extremely high temperatures or low temperatures will
shorten the life of the Battery.
≥If the Battery is kept in smoky or dusty places, the
terminals may rust and cause malfunctions.
≥Do not allow the Battery terminals to come in
contact with metal objects (such as necklaces,
hairpins, etc.) This can result in a short circuit or
heat generation and, if you touch the Battery in this
condition, you may be badly burned.
≥Store the Battery in a completely discharged state. To
store the Battery for a long period of time, we
recommend you charge it once every year and store it
again after you completely use up the charged capacity.
Card
≥When the Card is being read, do not remove the Card,
turn off the power, or subject it to vibration or impact.
≥Do not leave the Card in places where there is high
temperature or direct sunlight, or where electromagnetic
waves or static electricity are easily generated.
≥Do not bend or drop the Card. The Card or the recorded
content may be damaged.
≥After use, be sure to remove the Card from the SD Multi
AV Device.
≥After usage, store the supplied SD Memory Card in the
enclosed bag.
≥Do not touch the terminals on the back of the Card with
your fingers. Do not allow dirt, dust or water to enter it.
ªFogging of lens
Turn off the power and leave the SD Multi AV Device as it
is for an hour or so. When a temperature equilibrium is
reached, the fogging will naturally disappear.
ªState of Power Lamp while charging

Before Requesting Service
If the trouble persists even when the action suggested
below has been taken, press the the [ ] Button to turn
off the power and disconnect and re-connect the Power
Cable. Consult your dealer.
Power
1: The SD Multi AV Device power cannot be turned
on.
1: Is the power source connected correctly?
2: The SD Multi AV Device power shuts off
automatically.
2: If you do not use the SD Multi AV Device for more
than 10 minutes, the power shuts off automatically to
save the Battery power.
3: The SD Multi AV Device power does not stay on
long enough.
3-1: Is the Battery low? Charge the Battery or attach a
fully charged Battery.
Battery
1: Battery runs down quickly.
1-1: Is the Battery fully charged? Charge it with the AC
Adaptor.
1-2: Are you using the Battery in an extremely cold place?
In cold places, the operating time of the Battery
becomes shorter.
1-3: Has the Battery worn out? If the operating time is still
short even after the Battery is fully charged, the
Battery has worn out.
2:
Recording
1: Recording does not start although power is
supplied to the SD Multi AV Device and the Card
is correctly inserted.
1: Is the SD Multi AV Device power turned on?
1-1: Is the [ ] Lamp on? If the [ ] Lamp is not on, no
recording function can be operated.
1-2:
Playback
1: Sound is not played back from the earphones.
1: Is the volume too low? During playback, keep
pressing the [MODE] Button until the [VOLUME]
Indication appears. Then, press the [MODE] Button
to adjust the volume.
2: Recorded images are not clear.
2: Is [PICTURE QUALITY] on the [CARD SETUP]
Sub-Menu set to [NORMAL] or [ECONOMY]? If
recording is done with it set to [NORMAL] or
[ECONOMY], images with fine details may include a
mosaic-like pattern. Set [PICTURE QUALITY] to
[FINE].
3: Playback images do not look normal.
3: The picture may be damaged. In order to prevent the
loss of image data, backing up on a personal
computer is recommended.
4: During Playback an [k] Indication is displayed.
4: The data was either recorded in a different format, or
data is damaged.
5: Even if a Card is formatted, it cannot be used.
5: Either the SD Multi AV Device or the Card may be
damaged. Please consult a dealer.
6: Playing back or recording do not function and
the screen has frozen.
6: Press and hold the power button until the power is
turned off. If the power still remains after 5 seconds
passed, remove the battery or unplug the AC
adapter.
7: Sound is not heard with the Earphone connected
while a still picture is played back.
7: Sound is not presented in the Still Picture mode
(recording or playing back of still pictures).
8: How do I send an MPEG4 moving picture
recorded as e-mail?
8: Capture the moving picture data recorded on the SD
Multi AV Device onto a personal computer and
attach it to an e-mail to send it. In this case, it is
recommended to make a file size 1 MB or less. The
recording time of 1 MB MPEG4 moving picture is
approx. 15 seconds (Fine), 20 seconds (Normal), 45
seconds (Economy 1) or 60 seconds (Economy 2).
(The capacity limit of the file which is attachable to an
e-mail differs depending on the environment used.) If
the file is played back on Macintosh
Windows Media Player for Macintosh
or later) The Windows
®
Media Player for Macintosh®
®
, use the
®
. (MacOS® 8.0
can be downloaded from Microsoft's home page.
9: Red, blue, green or white dots appear on the
screen.
9-1: 0.01% or less of the pixels of some LCD monitors
may remain turned on or off.
9-2: If the SD Multi AV Device is used continuously for a
long time or used at a high ambient temperature, red,
blue, green or white dots may appear on the screen
and be recorded on a still picture. This is due to the
rise of the temperature inside the body. This is
caused by a characteristic of the C-MOS sensor and
is not a failure. Under this condition, turn the SD Multi
AV Device off and leave it for a while.
≥C-MOS sensors are said to be a next-
generation image pick-up device succeeding
CCDs as they are small and consume low
power.

Specifications
SD Multi AV Device Information for your safety
Power Source: DC 4.8 V (AC Adaptor)
Power Source: DC 3.7 V (Battery)
Power Consumption: Recording
Image Sensor: 1/4-inch C-MOS Image Sensor
Lens: F3.6, Focal Length; 3.88 mm
Monitor: 2.0-inch LCD
Microphone: Mono
Standard Illumination: 1400 lx
Minimum Required Illumination: 120 lx
Recording Media: MultiMediaCard, SD Memory Card
Image Compression: JPEG (VGA)
Video Compression: MPEG4
Voice Compression: G.726
Music Expansion MPEG2-AAC, MP3
Dimensions: Approx. 28 (W)k 50 (H)k 87 (D) mm
Weight: Approx. 98 g(without Battery and Memory Card)
Operating Temperature: 0 oCj40 oC
Operating Humidity: 10%j80%
AC Adapto r Information for your safety
Power Source: AC 110–240 V, 50/60 Hz
Power Consumption: 7.0 W
DC Output: DC 4.8 V, 1 A
3.1W (When using the AC Adaptor)
2.8 W (When using the battery)
Shortest Image Distance; Approx. 50 cm from Lens
Fine; 320k240 dot
Normal; 176k144 dot
Economy1; 176k144 dot
Economy2; 176k144 dot
Approx. 125 g(with Battery and SD Memory Card)
Dimensions: Approx. 40 (W)k 26 (H)k 75 (D) mm
Weight: Approx.75 g
Battery Pack Information for your safety
Nominal Voltage: 3.7V
Nominal Capacity: 900 mAh
Dimensions Approx. 36(W)k7(H)k53(D) mm
Weight Approx. 27
g


/
ИНФОРМАЦИЯ
О СЕРТИФИКАЦИИ ПРОДУКЦИИ
БЛОК ПИТАНИЯ
BZ02
(Регистрационный номер в Госреестре—РОСС SG.0001.11BZ02)
ДЛЯ ИНФОРМАЦИОННОЙ ТЕХНИКИ
МОДЕЛЬ VSK0621 Panasonic
сертифицирован ОС ГОСТ-АЗИЯ,
Сертификат соответствия:
Сертификат соответствия выдан:
Сертификат соответствия действителен
до:
Модель VSK0621 Panasonic
соответствует требованиям нормативных
документов:
Информация для покупателя
Название продукции:
Название страны производителя:
Название производителя:
Юридический адрес:
№ РОСС СN. BZ02.B03196
10 января, 2002 года
10 января, 2005 года
ГОСТ Р50377-92 (МЭК 950-86)
ГОСТ Р 51318.22-99,
ГОСТ Р 50839-2000,
7(семь) летСрок службы
Аудио-Видео SD-устройство
Япония
Мацушита Электрик Индастриал Ко., Лтд.
1006 Кадома, Осака, Япония
Дата производства: Вы можете уточнить год и месяц по серийному номеру на табличке.
Пример маркировки—Серийный номер № G2XXXXXXX (X-любая цифра или буква)
Месяц: Первая цифра серийного номера (А—Январь, В—Февраль, ...L—Декабрь)
Год: Вторая цифра серийного номера (2—2002, 3—2003, ...)
Дополнительная информация: Пожалуйста внимательно прочитайте
инструкцию по эксплуатации.
E
VQT9775
F0202Mk0( 0000 A)
C
Matsushita Electric Industrial Co., Ltd.
Web site: http://www.panasonic.co.jp/global
 Loading...