


Operating Instructions
Portable Hard Disk Unit
Model No. AJ-

 G
G
DEUTSCH Fur Erlauterungen in Deutsch, konsultieren Sie bitte die mitgelieferte CD-ROM.
FRANÇAIS Pour des explications en français, veuillez vous reporter au CD-ROM fourni.
ITALIANO Per le istruzioni in italiano, vedere il CD-ROM in dotazione.
ESPAÑOL Para la explicación en español, consulte el CD-ROM suministrado.
Before operating this product, please read the instructions carefully and save this manual for future use.
とは、保証書と一緒に大切に保管し、必要なときにお読みください。
S0705K5116 -M |
|
Printed in Japan |
VQT0T80-2W |
ENGLISH

Read this first!
For U.S.A. and Canada
IMPORTANT
“Unauthorized recording of copyrighted television programmes, video tapes and other materials may infringe the rights of copyright holders and contravene copyright laws.”
Operating precaution
Operation near any appliance which generates strong magnetic fields may give rise to noise in the video and audio signals. If this should be the case, deal with the situation by, for instance, moving the source of the magnetic fields away from the unit before operation.
CAUTION:
Danger of explosion or fire if battery is mistreated.
•Replace only with same or specified type.
•Do not disassemble or dispose of in fire.
•Do not store in temperatures over 60 °C.
•Use specified charger for rechargeable batteries.
•Do not recharge the battery if it is not a rechargeable type.
For memory back up battery
•Danger of explosion if battery is incorrectly replaced.
Replace only with the same or equivalent type.
•Refer replacement back-up battery to qualified service personnel.
WARNING:
•TO REDUCE THE RISK OF FIRE OR SHOCK HAZARD, DO NOT EXPOSE THIS EQUIPMENT TO RAIN OR MOISTURE.
•TO REDUCE THE RISK OF FIRE OR SHOCK HAZARD, KEEP THIS EQUIPMENT AWAY FROM ALL LIQUIDS. USE AND STORE ONLY IN LOCATIONS WHICH ARE NOT EXPOSED TO THE RISK OF DRIPPING OR SPLASHING LIQUIDS, AND DO NOT PLACE ANY LIQUID CONTAINERS ON TOP OF THE EQUIPMENT.
CAUTION:
In order to maintain adequate ventilation, do not install or place this unit in a bookcase, built-in cabinet or any other confined space. To prevent risk of electric shock or fire hazard due to overheating, ensure that curtains and any other materials do not obstruct the ventilation.
CAUTION:
TO REDUCE THE RISK OF FIRE OR SHOCK HAZARD AND ANNOYING INTERFERENCE, USE THE RECOMMENDED ACCESSORIES ONLY.


 indicates safety information.
A rechargeable battery that is recyclable powers the product you have purchased.
For U.S.A. - California Only
This product contains a CR Coin Cell Lithium Battery which contains Perchlorate Material–special handling may apply.
See www.dtsc.ca.gov/hazardouswaste/perchlorate
E-1
Read this first! (continued)
For U.S.A. and Canada
FCC NOTICE (USA)
Declaration of Conformity
Model Number: |
AJ-PCS060G |
Trade Name: |
PANASONIC |
Responsible Party: Panasonic Corporation of North America |
|
|
One Panasonic Way, Secaucus, NJ 07094 |
Support contact: |
Panasonic Broadcast & Television Systems Company |
1-800-524-1448
This device complies with Part 15 of FCC Rules. Operation is subject to the following two conditions:
(1) This device may not cause harmful interference, and (2) this device must accept any interference received, including interference that may cause undesired operation.
To assure continued compliance, follow the attached installation instructions and do not make any unauthorized modifications.
CAUTION:
This equipment has been tested and found to comply with the limits for a Class B digital device, pursuant to Part 15 of the FCC Rules. These limits are designed to provide reasonable protection against harmful interference in a residential installation. This equipment generates, uses and can radiate radio frequency energy and, if not installed and used in accordance with the instructions, may cause harmful interference to radio communications. However, there is no guarantee that interference will not occur in a particular installation. If this equipment does cause harmful interference to radio or television reception, which can be determined by turning the equipment off and on, the user is encouraged to try to correct the interference by one of the following measures:
•Reorient or relocate the receiving antenna.
•Increase the separation between the equipment and receiver.
•Connect the equipment into an outlet on a circuit different from that to which the receiver is connected.
•Consult the dealer or an experienced radio/TV technician for help.
The user may find the booklet “Something About Interference” available from FCC local regional offices helpful.
FCC Warning:
To assure continued FCC emission limit compliance, the user must use only shielded interface cables when connecting to host computer or peripheral devices. Also, any unauthorized changes or modifications to this equipment could void the user’s authority to operate this device.
IMPORTANT SAFEGUARDS
1.Read Instructions — All the safety and operating instructions should be read before the unit is operated.
2.Retain Instructions — The safety and operating instructions should be retained for future reference.
3.Heed Warnings — All warnings on the unit and in the operating instructions should be adhered to.
4.Follow Instructions — All operating and maintenance instructions should be followed.
5.Cleaning — Unplug this video unit from the wall outlet before cleaning. Do not use liquid or aerosol cleaners. Use a dry cloth for cleaning.
6.Attachments — Do not use attachments not recommended by the video product manufacturer as they may be hazardous.
7.Water and Moisture — Do not use this video unit near water — for example near a bath tub, wash bowl, kitchen sink, or laundry tub, in a wet basement, or near a swimming pool, and the like.
8.Accessories — Do not place this video unit on an unstable cart, stand, tripod, bracket, or table. The video unit may fall, causing serious injury to a child or adult, and serious damage to the unit. Use only with a cart, stand, tripod, bracket, or table recommended by the manufacturer, or sold with the video unit. Any mounting
of the unit should follow the manufacturer’s instructions and should use a mounting
accessory recommended by the manufacturer.
An appliance and cart
combination should be moved 

 with care. Quick stops, S3125A
excessive force, and uneven surfaces may cause the appliance and cart combination to overturn.
9.Ventilation — Slots and openings in the cabinet are provided for ventilation and to ensure reliable operation of the video unit and to protect it from overheating. These openings must not be blocked or covered.
Never place the video unit on a bed, sofa, rug, or other similar surface, or near or over a radiator or heat register. This video unit should not be placed in a builtin installation such as a bookcase or rack unless proper ventilation is provided or the manufacturer's instructions have been adhered to.
10.Power Sources — This video unit should be operated only from the type of power source indicated on the marking label. If you are not sure of the type of power supply to your home, consult your appliance dealer or local power company. For video units intended to be operated from battery power, or other sources, refer to the operating instructions.
(Continued on next page)
ENGLISH
E-2
Read this first! (continued)
11.Grounding or Polarization — This video unit may be equipped with either a polarized 2- wire AC (Alternating Current) line plug (a plug having one blade wider than the other) or 3-wire grounding type plug, a plug having a third (grounding) pin.
The 2-wire polarized plug will fit into the power outlet only one way. This is a safety feature. If you are unable to insert the plug fully into the outlet, try reversing the plug. If the plug still fails to fit, contact your electrician to replace your obsolete outlet. Do not defeat the safety purpose of the polarized plug.
The 3-wire grounding type plug will fit into a grounding type power outlet. This is a safety feature. If you are unable to insert the plug into the outlet, contact your electrician to replace your obsolete outlet. Do not defeat the safety purpose of the grounding type plug.
12.Power-Cord Protection — Power-supply cords should be routed so that they are not likely to be walked on or pinched by items placed upon or against them, paying particular attention to cords of plugs, convenience receptacles, and the point where they exit from the unit.
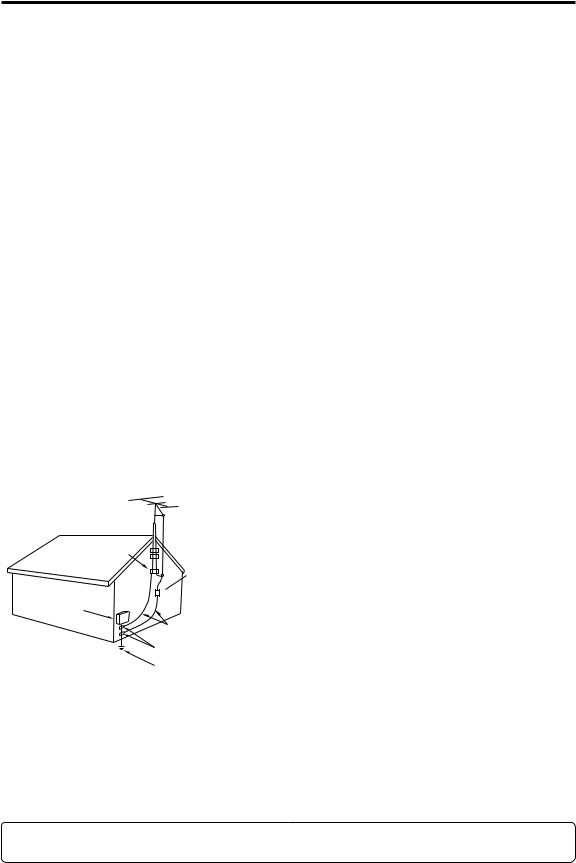
13.Outdoor Antenna Grounding — If an outside antenna or cable system is connected to the video unit, be sure the antenna or cable system is grounded so as to provide some protection against voltage surges and built-up static charges. Part 1 of the Canadian Electrical Code, in USA Section 810 of the National Electrical Code, provides information with respect to proper grounding of the mast and supporting structure, grounding of the lead-in wire to an antenna discharge unit, size of grounding conductors, location of antenna discharge unit, connection to grounding electrodes, and requirements for the grounding electrode.
 ANTENNA LEAD IN WIRE
GROUND CLAMP
ANTENNA DISCHARGE UNIT
ELECTRIC  (NEC SECTION 810-20) SERVICE
EQUIPMENT
|
GROUNDING CONDUCTORS |
|
(NEC SECTION 810-21) |
NEC – NATIONAL |
GROUND CLAMPS |
ELECTRICAL CODE |
|
|
POWER SERVICE GROUNDING |
|
ELECTRODE SYSTEM |
|
(NEC ART 250, PART H) |
14.Lightning — For added protection of this video unit receiver during a lightning storm, or when it is left unattended and unused for long periods of time, unplug it from the wall outlet and disconnect the antenna or cable system. This will prevent damage to the video unit due to lightning and power-line surges.
15.Power Lines — An outside antenna system should not be located in the vicinity of overhead power lines or other electric light or power circuits, or where it can fall into such power lines or circuits. When installing an outside antenna system, extreme care should be taken to keep from touching such power lines or circuits as contact with them might be fatal.
16.Overloading — Do not overload wall outlets and extension cords as this can result in a risk of fire or electric shock.
17.Objects and Liquids — Never push objects of any kind into this video unit through openings as they may touch dangerous voltage points or short out parts that could result in a fire or electric shock. Never spill liquid of any kind onto the video unit.
18.Servicing — Do not attempt to service this video unit yourself as opening or removing covers may expose you to dangerous voltage or other hazards. Refer all servicing to qualified service personnel.
19.Damage Requiring Service — Unplug this video unit from the wall outlet and refer servicing to qualified service personnel under the following conditions:
a.When the power-supply cord or plug is damaged.
b.If any liquid has been spilled onto, or objects have fallen into the video unit.
c.If the video unit has been exposed to rain or water.
d.If the video unit does not operate normally by following the operating instructions.
Adjust only those controls that are covered by the operating instructions, as an improper adjustment of other controls may result in damage and will often require extensive work by a qualified technician to restore the video unit to its normal operation.
e.If the video unit has been dropped or the cabinet has been damaged.
f.When the video unit exhibits a distinct change in performance – this indicates a need for service.
20.Replacement Parts — When replacement parts are required, be sure the service technician has used replacement parts specified by the manufacturer or have the same characteristics as the original part.
Unauthorized substitutions may result in fire, electric shock or other hazards.
21.Safety Check — Upon completion of any service or repairs to this video unit, ask the service technician to perform safety checks to determine that the video unit is in safe operating order.
FCC Warning: Any unauthorized changes or modifications to this equipment would void the user’s authority to operate.
E-3

Read this first! (continued)
For Europe
IMPORTANT
“Unauthorized recording of copyrighted television programmes, video tapes and other materials may infringe the rights of copyright holders and contravene copyright laws.”
Operating precaution
Operation near any appliance which generates strong magnetic fields may give rise to noise in the video and audio signals. If this should be the case, deal with the situation by, for instance, moving the source of the magnetic fields away from the unit before operation.
WARNING: |
|
CAUTION: |
• TO REDUCE THE RISK OF FIRE OR SHOCK |
|
Danger of explosion or fire if battery is mistreated. |
HAZARD, DO NOT EXPOSE THIS EQUIPMENT |
|
• Replace only with same or specified type. |
TO RAIN OR MOISTURE. |
|
• Do not disassemble or dispose of in fire. |
• TO REDUCE THE RISK OF FIRE OR SHOCK |
|
• Do not store in temperatures over 60 °C. |
HAZARD, KEEP THIS EQUIPMENT AWAY |
|
• Use specified charger for rechargeable batteries. |
FROM ALL LIQUIDS. USE AND STORE ONLY |
|
• Do not recharge the battery if it is not a |
IN LOCATIONS WHICH ARE NOT EXPOSED |
|
rechargeable type. |
TO THE RISK OF DRIPPING OR SPLASHING |
|
For memory back up battery |
LIQUIDS, AND DO NOT PLACE ANY LIQUID |
|
• Danger of explosion if battery is incorrectly replaced. |
CONTAINERS ON TOP OF THE EQUIPMENT. |
|
Replace only with the same or equivalent type. |
|
|
• Refer replacement back-up battery to qualified |
|
|
|
|
|
service personnel. |
|
|
|
CAUTION: |
|
CAUTION: |
In order to maintain adequate ventilation, do not |
|
TO REDUCE THE RISK OF FIRE OR SHOCK |
install or place this unit in a bookcase, built-in |
|
HAZARD AND ANNOYING INTERFERENCE, |
cabinet or any other confined space. To prevent |
|
USE THE RECOMMENDED ACCESSORIES |
risk of electric shock or fire hazard due to |
|
ONLY. |
overheating, ensure that curtains and any other |
|
|
|
|
|
materials do not obstruct the ventilation. |
|
|
|
|
|
 DO NOT REMOVE PANEL COVERS BY UNSCREWING THEM.
To reduce the risk of electric shock, do not remove the covers. No user serviceable parts inside. Refer servicing to qualified service personnel.


 indicates safety information.
Attention/Attentie
•Batteries are used for the main power source and memory back-up in the product. At the end of their useful life, you should not throw them away.
Instead, hand them in as small chemical waste.
•Voor de primaire voeding en het reservegeheugen van het apparaat wordt gebruikgemaakt van een batterij.
Wanneer de batterij is uitgeput, mag u deze niet gewoon weggooien, maar dient u deze als klein chemisch afval weg te doen.
ENGLISH
E-4
Read this first! (continued)
Information on Disposal for Users of Waste Electrical & Electronic Equipment (private households)
This symbol on the products and/or accompanying documents means that used electrical and electronic products should not be mixed with general household waste.
For proper treatment, recovery and recycling, please take these products to designated collection points, where they will be accepted on a free of charge basis. Alternatively, in some countries you may be able to return your products to your local retailer upon the purchase of an equivalent
new product.
Disposing of this product correctly will help to save valuable resources and prevent any potential negative effects on human health and the environment which could otherwise arise from inappropriate waste handling. Please contact your local authority for further details of your
nearest designated collection point.
Penalties may be applicable for incorrect disposal of this waste, in accordance with national legislation.
For business users in the European Union
If you wish to discard electrical and electronic equipment, please contact your dealer or supplier for further information.
Information on Disposal in other Countries outside the European Union
This symbol is only valid in the European Union.
If you wish to discard this product, please contact your local authorities or dealer and ask for the correct method of disposal.
E-5

Contents
Getting Started
Read this first! E-1
IMPORTANT SAFEGUARDS E-2
Overview E-7 Features E-7 Included accessories E-7 Options E-7
For better performance E-8
AJ-PCS060G E-8 Hard disk E-8 Cleaning E-9 Maintenance E-9 AC adapter E-9 Battery pack E-9
Using the AJ-PCS060G
Control reference guide E-10
Front E-10 Top E-11 Right side E-11 Left side E-12 Back E-12
Copying E-13
Turning the unit ON and OFF E-13 Inserting P2 cards E-13 Ejecting P2 cards E-13
Write-protection on P2 cards E-14 HDD capacity indicator E-14 Battery level indicator E-15 Copying from P2 cards to the HDD E-15 Canceling copy operations E-17
Formatting E-17
Formatting P2 cards E-17 Formatting the HDD E-18
Auto power OFF during use E-18
Connecting to a Computer
Connecting to a computer E-19 |
HDD page E-23 |
|
Overview of dedicated software E-21 |
S.M.A.R.T page E-25 |
|
Setup page E-26 |
||
Starting and closing P2Store Manager E-22 |
||
Upgrade page E-27 |
||
P2Store Manager screens E-23 |
Updating procedure E-28 |
|
|
Troubleshooting and Reference
ERROR LED display E-29 |
Specifications E-32 |
Troubleshooting E-31 |
|
•Microsoft and the Microsoft logo, Windows are registered trademarks or trademarks of Microsoft Corporation in the United States and other countries.
•Apple, Macintosh, and the respective logos are registered trademarks or trademarks of Apple Computer, Inc. in the United States and other countries.
•Intel and Pentium are registered trademarks or trademarks of Intel Corporation in the United States and other countries.
•Other product names or corporate names in this manual are either trademarks or registered trademarks of their respective owners. In this manual, the trademark symbol ™ and registered symbol ® are omitted.
ENGLISH
E-6

Overview
The AJ-PCS060G is a dedicated portable hard disk unit for AJ-P2C series P2 memory cards. It features a USB 2.0 (Type B) interface for data transfer with a computer.
Data from P2 camera-recorders can easily be copied to the 60 GB internal hard disk.
Features
•P2 card slot
•Internal 2.5 60 GB hard disk
•Improved shock resistance from an acceleration sensor and protective materials around the hard disk 1)
•High-speed copying of P2 card data directly to the hard disk
•Fast data transfer to a computer via the USB 2.0 cable
1)Shock Resistance
•If a disk operation (such as copying) is in progress when the sensor detects that the unit is hit or dropped, the hard drive head is automatically parked to protect the disk and data.
•The hard disk is also protected by impact-absorbing materials. However, no guarantee against damage or data loss is implied.
Included accessories
• Install Manual |
..............................................................................................................................1 |
• Ferrite core .................................................................................................................................. |
1 |
•CD-ROM
[Includes P2 Driver, P2 Card Manager,
Install Manual and Operating Instructions (this manual)]...................................................... |
1 |
|
Options |
|
|
• Battery pack |
CGR-D16 (1,600 mAh) |
|
|
CGA-D54 (5,400 mAh) |
|
• AC adapter |
AG-B15 |
|
E-7
For better performance
AJ-PCS060G
The unit’s internal hard disk is protected by materials to withstand impact or drops better. However, please understand that no guarantee against damage or data loss is implied.
As optional accessories, use a recommended battery pack and AC adapter.
Hard disk
The unit houses a hard disk drive (“HDD”).
Take the following precautions during setup and use to protect the HDD and data stored on it from data loss or interrupted operation.
•Do not subject the unit to vibration or impact during use. (Otherwise, the HDD may be damaged.)
•Do not use the unit where vibration occurs or put it on unstable surfaces.
•Do not use it in enclosed areas without air circulation, where operating heat cannot be dissipated.
•Do not subject it to extreme changes in temperature.
→Using the unit where the temperature changes suddenly poses a risk of condensation. Using the unit with internal condensation may damage the HDD. Ensure a fairly constant room temperature, where any temperature changes occur at less than 20 °C (68 °F) per hour.
•Do not use the unit in extremely humid places.
•Do not remove the battery pack or unplug the AC adapter when the power is on.
•Before transferring the unit elsewhere, always turn the unit OFF by holding the [POWER] button for at least 2 seconds and waiting for it to finish shutting down.
Wait until it has stopped moving completely (about 2 minutes), and protect it from vibration and impact in transit. (After turned OFF, the HDD will continue spinning from inertia for a while.)
•Do not use the unit at altitudes lower than –90 m (–300 feet or lower), or higher than 3,000 m (10,000 feet or higher) above sea level.
The HDD is a high-precision device. Operating conditions may pose a risk of partial damage, and in a worst-case scenario, there is a serious risk that data cannot be read or recorded. Thus, please do not consider the internal HDD a permanent storage place for data. Use it as a temporary storage device until you can back up data on other storage media.
 Recorded data
If the HDD is damaged, data recorded on it will be lost. Always keep an extra copy of important data on separate storage media. See page E-21 for instructions on backing up data.
Note that Panasonic cannot be liable for data lost from HDD failure or other problems, or for other direct or indirect loss.
 Erasure of HDD data before disposal or transference of the unit
When you dispose of the unit or transfer it, we urge you to take responsibility for erasing any important data on the HDD. This will avoid any problems from leaked information.
Dispose of the HDD after bringing it near a strong magnetic field and breaking it with a hammer or other means to make it unreadable.
ENGLISH
E-8
For better performance (continued)
Cleaning
Never clean the unit with solvents such as benzene, thinner, or alcohol
•Before cleaning, remove the battery pack or unplug the AC adapter.
•Cleaning the unit with solvents may damage the outer case or cause the paint to peel.
•Use a clean, soft dry cloth to wipe away dust or dirt. If the unit becomes quite dirty, wipe it with a cloth dampened in diluted neutral detergent after wringing the cloth well. Use a dry cloth to wipe it dry.
•If you use a chemically treated dust cloth, follow the precautions for use.
Maintenance
The unit’s internal hard disk drive (HDD) is a high-performance part that is subject to maintenance.
To keep the unit in optimal condition, we recommend that you inspect it regularly and bring it to the place of purchase for periodic maintenance.
Ask your dealer for further details about periodic maintenance.
Request periodic maintenance under this guideline. See page E-24 for instructions on checking the operating time.
Every 2,000 hours of use
Tips:
•In some cases, the content of the HDD is cleared during maintenance, so any data will be lost. Before maintenance, always back up needed data on separate storage media.
Please understand that you will not be compensated for lost data.
•You will not be compensated for data stored on the HDD in the case of HDD failure. Lost data cannot be recovered.
The HDD is for temporary storage of data, and we recommend backing up needed data promptly.
AC adapter
Use the optional AC adapter (AG-B15).
Read the user’s manuals of all accessories carefully before use.
Note:
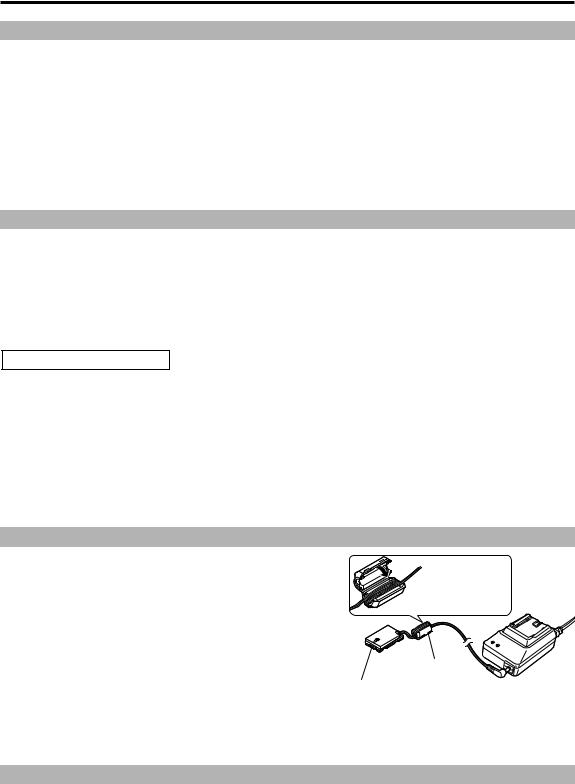
When using an AC adapter, attach the included ferrite core near the base of the battery-type connector on the DC cable connected to the unit. Be sure to wind the cable around the ferrite core twice, as shown, at time of attachment.
If you do not use the ferrite core, other devices may be affected by the unit.
Wind twice

 around and

 close it
Ferrite core
Battery-type connector on the DC cable
Battery pack
Use the optional Battery pack.
Read the user's manuals of all accessories carefully before use.
E-9
Control reference guide
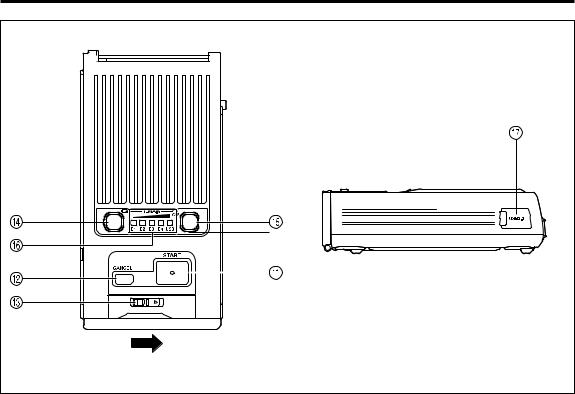
Front
ENGLISH
POWER button |
P2C LED |
Use this button to turn the unit ON and OFF. When the unit is OFF, simply press the [POWER] button to turn it ON. When ON, hold the [POWER] button for at least two seconds to turn it OFF.
 POWER LED
Lights when the unit is ON.
The POWER LED flashes during startup or shutdown.
 P2C button
Press to format P2 cards. After copying data to the HDD, you can format the P2 card as needed. (See page E-17)
Note:
Data cannot be recovered after formatting. Before formatting cards, make sure all the data may safely be deleted.
 HDD button
Press to format the internal HDD. All unneeded data on the HDD can be deleted at once.
(See page E-18)
Note:
Data cannot be recovered after formatting. Before formatting the HDD, make sure all the data may safely be deleted.
Lights or flashes when the unit is accessing a P2 card.
(See pages E-16, E-17 and E-28)
 HDD LED
Lights or flashes when the unit is accessing the internal HDD.
(See pages E-16, E-18 and E-28)
 ERROR LED
Lights or flashes if errors occur.
Errors are identified by the combination of [COPY STATUS] LEDs on the front and [E1 to E4], [P2C], and [HDD] LEDs on the top.
(See pages E-15 and E-29 to E-31)
 P2 card slot
A dedicated slot for P2 cards. Before inserting a P2 card, make sure the EJECT button  is in. Hold the card level as you insert it.
Never insert anything in the slot except P2 cards.
 EJECT button
Press to eject P2 cards from the slot. (See page E-13)
 COPY STATUS LEDs
Indicates the progress of copying or formatting. (See pages E-16, E-17, E-18, E-28 and E-31)
E-10
Control reference guide (continued)
Top |
Right side |
 START button
Press to start copying or formatting.
Hold the [START] button for at least 2 seconds to start either process.
 CANCEL button
Press to cancel copying.
During copying, hold the [CANCEL] button for at least 2 seconds to cancel copying.
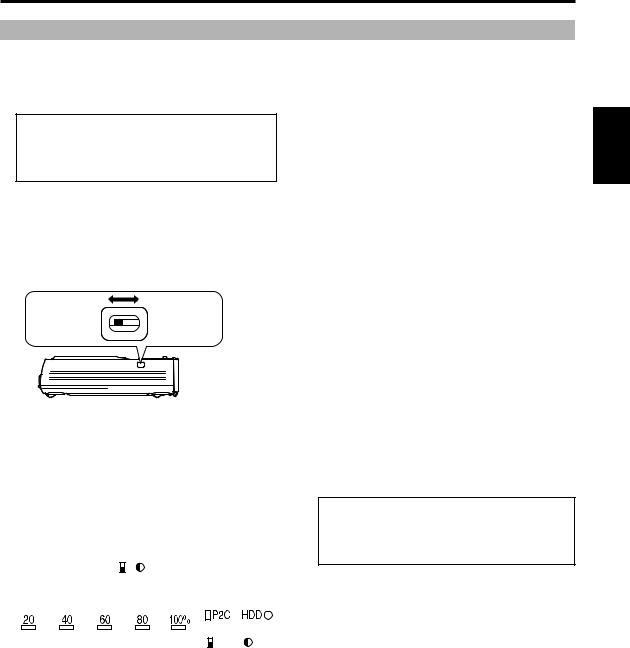
 Sliding knob
To open the front panel cover, slide the knob in the direction of the arrow.
 Battery level indicator button [
 ]
]
After this button is pressed, the remaining power level of the battery pack will be displayed for about 2 seconds in  , the [REMAIN] indicator.
(See page E-15)
The [USB] indicator remains lit (green) as long as a USB 2.0 cable is connected.
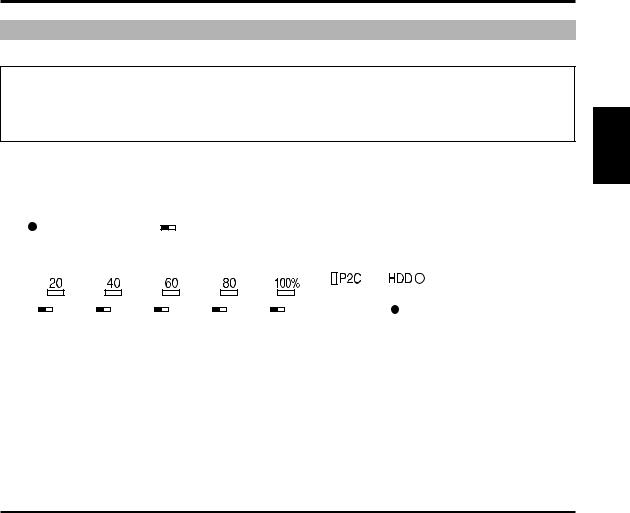
 HDD capacity indicator button [HDD CAP]
After this button is pressed, the available HDD capacity will be displayed for about 2 seconds in  , the [REMAIN] indicator.
The number in [REMAIN] represents how many cards can be copied to the HDD.
(See page E-14)
The [USB] indicator remains lit (green) as long as a USB 2.0 cable is connected.
 Battery/HDD indicator and error LEDs [REMAIN]
Indicates the remaining battery level, available HDD capacity, and, if errors occur, error identification.
(See pages E-14, E-15, E-29 to E-31)
 USB 2.0 connector (Type B)
When connecting the unit to a computer, plug the USB 2.0 cable into this connector.
Note:
Computers used with the unit must support USB 2.0.
E-11
Control reference guide (continued)
Left side
Rear panel |
Front panel |
side |
side |
ENGLISH
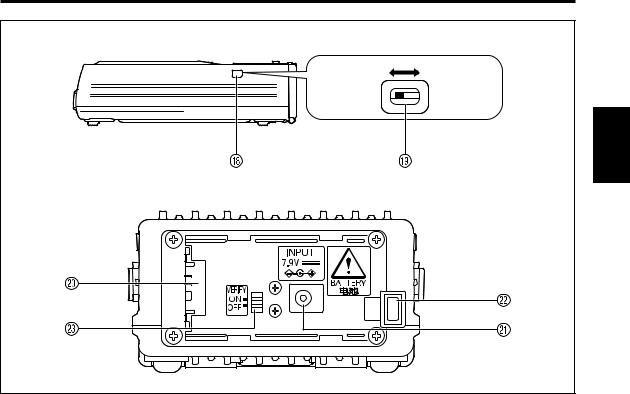
Back
 Sliding switch cover
 Sliding switch
Slide toward the front to enable software updates.
Normally, keep the switch toward the back. (See page E-28)
 Power inlet
Insert an optional battery pack or AC adapter here.
 DC IN socket (7.9 V)
 Battery lock release button
When removing optional battery packs or AC adapters, hold down the button as you slide it toward the button side.
 VERIFY switch
Use this switch to verify data after it has been copied from P2 cards onto the internal HDD. (See page E-16)
ON : Verify
OFF: Do not verify
Note:
To ensure accurate copying, slide the VERIFY switch to ON. If it is set to OFF, the unit may not be able to copy correctly in some cases. However, note that copying will take twice as long with verification (when ON) than without (when OFF).
E-12

Copying
Turning the unit ON and OFF
Use an optional battery pack or AC adapter as the power source. (See page E-7) In either case, make sure the power source is firmly connected to the unit.
For connection instructions, refer to the user's manual of the accessory. Turn the unit ON before all operations. When finished (and when the unit is not in use), turn the unit OFF.
Power ON
To turn the unit ON, press the [POWER] button. The POWER LED flashes during startup. When the unit is ready for use, it remains lit (green).
Note:
•When a low voltage error occurs (when [ERROR] LED lights in red and [E2] in [REMAIN] flashes in red), either replace the battery pack with a recharged one or switch to the AC adapter and restart the unit.
•When the temperature of the built-in HDD falls below the specified temperature (when [ERROR] LED lights in red, and [E1] lights and [E2] flashes in red in [REMAIN]), the unit warms up to the specified temperature. During warm-up, the [START] button and other controls are temporarily disabled.
•More power is consumed during warm-up. In some cases a low-voltage error may occur afterwards, depending on the remaining level of the battery pack. If this occurs, turn the power OFF and then ON again.
Power OFF
To turn the unit OFF, hold the [POWER] button for at least 2 seconds. The POWER LED goes out. Note that during shutdown, this LED flashes.
Inserting P2 cards
When inserting a P2 card in the card slot, always hold the card level and insert it carefully.
Forcing cards in the slot at an angle may damage them or the unit.
Ejecting P2 cards
To eject a card, press the EJECT button once, and after the button comes out, press it again.
Do not eject P2 cards during access by the unit (when the [P2C] LED is lit). The data may be lost or the P2 card damaged.
Note:
If the unit is connected to a computer, wait until shutdown processing for the card is complete before pressing the EJECT button.
•For Windows:
1.Go to [Start] → [My Computer]
2.Right-click on the P2 card drive (displayed as a removable disk) and select “Eject”
3.Press the EJECT button and remove the P2 card
•For Macintosh:
Select the P2 card volume displayed on the desktop. From the menu bar at the top of the screen, select [File] → [Eject], or otherwise drag the volume to the trash.
E-13
Copying (continued)
Write-protection on P2 cards
When P2 cards are inserted, the following operations will be prevented to protect the data, even if you adjust the write-protect switch. Thus, check the write-protect switch before inserting P2 cards.
Write-protect switch settings
PROTECT |
|
|
Data cannot be written to or deleted from |
|
|
|
the card. |
PROTECT |
|
|
Data may be written to or deleted from |
|
|
||
|
|
|
the card. |
ENGLISH
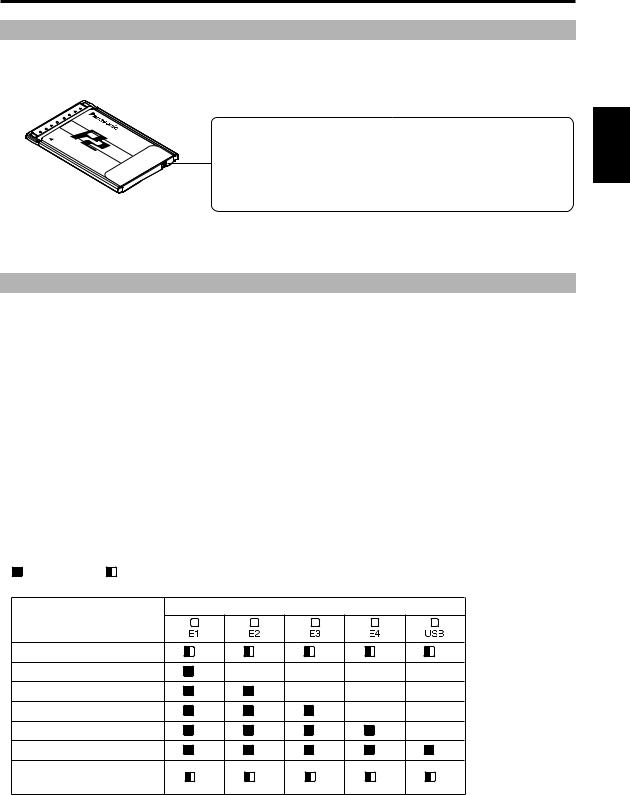
HDD capacity indicator
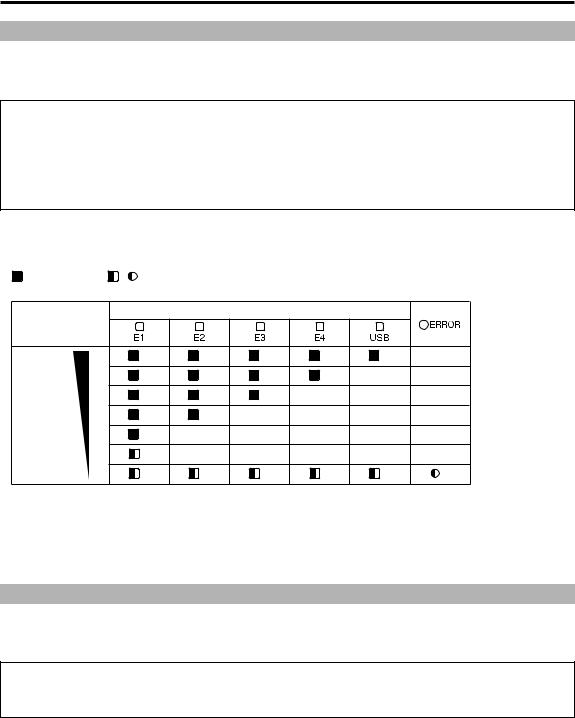
Up to 15 P2 cards worth of data can be copied to the unit's internal HDD. (However, in the case of 8 GB P2 cards, the data on only 7 P2 cards can be copied.) To see how much space is available on the HDD (how many cards can be copied), press the [HDD CAP] button and check the [REMAIN] indicator.
See HDD Capacity (in Number of Cards) .
With the unit ON, check how many P2 cards can be copied
•When using 2 GB or 4 GB P2 cards:
Press the [HDD CAP] button once. In [REMAIN], [E1] lights in orange for a second. After this, the display corresponds to information given in HDD Capacity (in Number of Cards) , below.
•When using 8 GB P2 cards:
Press the [HDD CAP] button twice. In [REMAIN], [E1] and [E2] light in orange for a second. After this, the display corresponds to information given in HDD Capacity (in Number of Cards) , below.
HDD Capacity (in Number of Cards) |
|
|
|
|
||||
: LED lit |
: LED flashing |
|
|
|
|
|||
R : red |
G : green |
|
|
|
|
|
||
|
Capacity |
|
|
|
REMAIN |
|
|
|
(No. of cards that |
|
|
|
|
|
|||
can be copied) |
|
|
|
|
|
|||
|
0 |
|
R |
R |
R |
R |
R |
|
|
1 |
|
G |
|
|
|
|
|
|
2 |
|
G |
G |
|
|
|
|
|
3 |
|
G |
G |
G |
|
|
|
|
4 |
|
G |
G |
G |
G |
|
|
|
5 or more |
|
G |
G |
G |
G |
G |
|
|
Full useable |
|
G |
G |
G |
G |
G |
|
(when the cards are not in use) |
||||||||
|
|
|
|
|
||||
The [REMAIN] indicator goes out after about 2 seconds.
E-14
Copying (continued)
Battery level indicator
When using an optional battery pack, you can check the remaining level. You can see how much power is left by pressing the [ 

 ] button and checking the [REMAIN] indicator. See Battery level , below.
Copy operations are not allowed when a low-voltage error occurs (when the [ERROR] LED lights in red and [E2] in [REMAIN] flashes in red). Use the battery pack only if [E1] in [REMAIN] is lit in green.
Once the level reaches 0 (zero), an error is displayed as described in Battery level and the unit goes OFF immediately. Switch to another optional battery pack that is fully charged or use an optional AC adapter.
With the unit ON, press the [ 

 ] button
The display will correspond to Battery level , below.
Battery level |
|
|
: LED lit |
, |
: LED flashing |
R : red |
G |
: green |
Battery pack |
|
|
REMAIN |
|
|
|
|
|
|
|
|
|
|
level |
|
|
|
|
|
|
100 |
G |
G |
G |
G |
G |
|
|
G |
G |
G |
G |
|
|
|
G |
G |
G |
|
|
|
|
G |
G |
|
|
|
|
|
G |
|
|
|
|
|
|
R |
|
|
|
|
|
0 |
R |
R |
R |
R |
R |
R |
|
||||||
The [REMAIN] indicator goes out after about 2 seconds. |
|
|
||||
Note:
With an AC adapter, in some cases the LED display may not indicate 100. This is not a problem.
Copying from P2 cards to the HDD
High-speed copying from P2 cards to the HDD is possible because data is transferred directly to the HDD.
Do not turn the unit OFF or eject P2 cards when the [P2C] or [HDD] LEDs are lit.
When using an optional battery pack, check the remaining level before copying data.
If [E1] in [REMAIN] flashes in red, switch to a fully charged optional battery or use an optional AC adapter.
1.With the unit ON, insert a P2 card in the slot
2.Press the [HDD CAP] button and make sure there is enough space to copy at least one card
If the capacity (in number of cards) is 0, copy needed data to other storage media and format the HDD. (See page E-14 and E-18)
E-15

Copying (continued)
3.Hold the [START] button for at least 2 seconds
Copying begins, and the verification 1) is conducted (when the [VERIFY] switch is set to ON). The copying progress is indicated by the LEDs, as follows.
|
: LED lit |
, , |
: LED flashing |
|
|||
|
|||
G : green |
OR |
: orange |
|
|
|
|
COPY STATUS |
|
|
|
Progress (%) |
|
|
|
|
|
|
00-19 |
G |
|
|
|
|
|
20-39 |
G |
G |
|
|
During |
During |
40-59 |
G |
G |
G |
|
access |
access |
60-79 |
G |
G |
G |
G |
OR |
OR |
80-99 |
G |
G |
G |
G |
G |
|
100 |
G |
G |
G |
G |
G |
|
4.Make sure all the [COPY STATUS] LEDs are lit in green
5.Press the [POWER] button
Copying is complete and the [COPY STATUS] LEDs go out.
Note:
•Once the data on a P2 card has been copied to the HDD, it cannot be copied to the HDD again. If this is the case, one of the following operations will be performed depending on the [VERIFY] switch setting.
[VERIFY] switch is OFF: Even when step 3 is taken, 100% is immediately displayed as the copying progress status.
[VERIFY] switch is ON: When step 3 has been taken, the data is not copied, 40-59% is displayed as the copying progress status, and the verification is conducted.
•Even after data on a P2 card has been edited, added or deleted by a computer or other device, it may be recognized as the same data. If this is the case, one of the following operations will be performed
depending on the [VERIFY] switch setting.
[VERIFY] switch is OFF: Even when step 3 is taken, 100% is immediately displayed as the copying progress status.
[VERIFY] switch is ON: When step 3 has been taken, the data is not copied, 40-59% is displayed as the copying progress status, the verification is conducted, the data is recognized as different, and operation ends with the Verify NG error 2). (See page E-31)
•If the unit heats up during copying, it will automatically copy at a slower rate. The [P2C] and [HDD] LEDs also flash slowly at this time.
•If copying is not completed normally (if the unit is turned OFF or the P2 card is pulled out during copying), the HDD capacity (number of cards that can be copied) is decreased by as many P2 cards that could not be copied.
•All [COPY STATUS] LEDs flash in green if a blank P2 card is inserted and step 3 above is finished.
•In the case of P2 cards that include a Bad clip 3), be sure to first restore any lost data using a P2 camerarecorder or other device before copying using this unit. When a defective clip is copied without correcting its defects, it may not be possible to repair the copied defective clip.
1)This function conducts the verify whether the data on P2 cards and the data recorded on the internal HDD are the same.
2)When the Verify NG error has occurred, “ERROR” appears in the status column of the HDD partition information section (see page E-23). If this is the case, the data on the P2 card concerned can be copied again, but the partition with the “ERROR” status will remain unchanged.
3)Improperly recorded clip due to accidental removal of the P2 card or sudden power loss during recording.
Clips with a yellow X marker displayed on the thumbnail screen when using a P2 camera-recorder or similar device.
ENGLISH
E-16

Copying (continued)
Canceling copy operations
You can cancel copying in progress as follows.
1.Hold the [CANCEL] button for at least 2 seconds
The [COPY STATUS], [P2C], and [HDD] LEDs change as follows.
: LED lit
OR : orange
COPY STATUS
|
|
|
|
|
|
|
|
|
|
|
|
|
|
|
|
|
|
|
OR |
|
|
OR |
|
|
OR |
|
|
OR |
|
|
OR |
|
|
|
|
|
|
|
|
|||||||||||
|
|
|
|
|
|
|||||||||||
|
|
|
|
|
|
|
|
|
|
|
|
|
|
|
|
|
2.Press the [POWER] button
Copying is canceled and the [COPY STATUS] LEDs go out.
Note:
Canceling copy automatically deletes copied data.
Formatting
Formatting P2 cards
You can delete all data on P2 cards.
Data cannot be recovered after formatting. Before formatting cards, make sure all the data may safely be deleted.
Do not turn the unit OFF or eject P2 cards when the [P2C] LED is flashing. This may damage the P2 card.
P2 cards cannot be formatted if the write-protect switch is set to PROTECT. Additionally, when P2 cards are inserted in the slot, you cannot adjust the write-protect switch to prepare them for formatting.
1.With the unit ON, insert a P2 card in the slot
2.Hold the [P2C] button for at least 2 seconds
The [COPY STATUS], [P2C], and [HDD] LEDs change as follows.
|
|
|
: LED lit |
: |
LED flashing |
|
|
|
|
|
||||
OR : orange |
|
|
|
|
|
|
|
|
|
|
||||
|
|
|
|
|
|
|
|
|
|
|
|
|
|
|
|
|
|
|
|
COPY STATUS |
|
|
|
|
|
|
|||
|
|
|
|
|
|
|
|
|
|
|
|
|
|
|
|
|
|
|
|
|
|
|
|
|
|
|
|
|
|
|
|
|
OR |
|
OR |
|
OR |
|
OR |
OR |
|
|
OR |
|
|
|
|
|
|||||||||||
|
|
|
|
|||||||||||
3. Within 2 seconds, press the [START] button
The [COPY STATUS], [P2C], and [HDD] LEDs go out, and P2 card formatting begins. Formatting is complete when the [P2C] LED flashes in orange.
Note:
While the [COPY STATUS], [P2C], and [HDD] LEDs are on in step 2, if you do not press the [START] button within 2 seconds (step 3), the P2 card will not be formatted. To format the card, repeat the process from step 2.
E-17
Formatting (continued)
Formatting the HDD
You can delete all data copied onto the internal HDD.
Put the unit on a solid surface before formatting the HDD. Vibration or impact may damage the unit during formatting.
Data cannot be recovered after formatting. Before formatting the HDD, make sure all the data may safely be deleted.
Do not turn the unit OFF when the [HDD] LED is lit.
1.With the unit ON, hold the [HDD] button for at least 2 seconds
The [COPY STATUS] LED, [P2C] LED, and [HDD] LED change as follows.
: LED lit |
|
: LED flashing |
|
|
|
||||
OR : orange |
|
|
|
|
|
|
|
|
|
|
|
|
|
|
|
|
|
|
|
|
|
COPY STATUS |
|
|
|
|
|
||
|
|
|
|
|
|
|
|
|
|
|
|
|
|
|
|
|
|
|
|
OR |
|
OR |
OR |
|
OR |
|
OR |
|
OR |
2.Within 2 seconds, press the [START] button
The [COPY STATUS], [P2C], and [HDD] LEDs go out, and HDD formatting begins. Formatting is complete when the [HDD] LED flashes in orange.
Note:
•While the [COPY STATUS], [P2C], and [HDD] LEDs are on in step 1, if you do not press the [START] button within 2 seconds (step 2), the internal HDD will not be formatted.
To format the HDD, repeat the process from step 1.
•15 partitions are created automatically on the internal HDD.
Auto power OFF during use
 If left unused, the unit will automatically turn OFF after ten minutes if no copying or formatting operations are in progress. To use the unit, turn it ON again.
 If the unit is left unused while connected to a computer via the USB 2.0 cable, auto power OFF is deactivated, even if no copying or formatting is in progress. To turn the unit OFF, hold the [POWER] button for at least 2 seconds.
 Note that auto power OFF is disabled while waiting for an error check after an error has occurred or when copying has ended.
Note:
You can set the time until auto power OFF on the P2Store Manager Setup page, in “Auto power off mode.”
Options: [Never], [5 min], [10 min], [15 min], [20 min], [25 min], and [30 min]. Default: [10 min]. (See page E-26)
ENGLISH
E-18

Connecting to a computer
Connect the unit to a computer with the USB 2.0 cable to back up data from P2 cards and the internal HDD on the computer.
 System requirements
Your computer must meet these requirements for the P2 driver, the dedicated driver for this unit, and the dedicated software.
Operating system: Windows XP Professional SP2 or later Windows 2000 SP4 or later
Macintosh OS X (10.4.2 or 10.4.6), running on a PowerPC-based computer
Interface: |
Equipped with a USB 2.0 port |
Note:
This unit and the dedicated driver and software are not compatible with Intel-based Macintosh computers running Mac OS X.
 Installation
•For Windows:
Install the P2 driver on your computer from the included CD-ROM. The dedicated software is installed at the same time.
For installation instructions, refer to the provided installation manual.
Note:
The P2 driver is software enabling high-speed access of the P2 card via a USB 2.0 cable.
•For Macintosh:
Follow these steps to install the dedicated driver and software applications.
1.Insert the included CD-ROM in your computer
2.Double-click the Macintosh folder in the CD-ROM
3.Copy the AJ-PCS060G folder to a location such as the desktop using drag and drop
4.Double-click the “P2StoreDriver.dmg” disk image module in the AJ-PCS060G folder
5.Double-click “P2StoreDriver.pkg”
The installation screen will now appear. Follow the instructions on the screen to complete
the installation.
Note:
If the dedicated driver is not installed, you cannot access the internal HDD from your computer.
 Uninstallation
• For Windows:
For uninstallation instructions, refer to the provided installation manual.
• For Macintosh:
To uninstall the P2 driver and dedicated software, drag the AJ-PCS060G folder from where it is installed on the computer directly to the trash and empty the trash.
E-19
Connecting to a computer (continued)
 Connection
1.Start the computer
2.Use the USB 2.0 cable to connect the unit to the computer
3.Turn the unit ON by pressing the [POWER] button
On the unit, the POWER LED lights in green. The connection is automatically detected.
Note:
•Use a commercially available USB 2.0 cable. Use a cable shorter than 3 m (9.8 feet). The connection will not work correctly if the cable is longer than 3 m (9.8 feet).
•Do not connect more than one unit to the computer at once.
•Data cannot be written to the unit from a computer.
•Do not eject the P2 card or unplug the USB 2.0 cable during access of the P2 card or internal HDD. This may cause problems on the computer.
•Before ejecting P2 cards while the unit is connected to a computer, refer to the notes in “Ejecting P2 cards” on page E-13.
For Windows:
•When you connect the unit to a computer with the USB 2.0 cable, up to 16 partitions are added to the computer (15 partitions for the internal HDD and 1 partition for the P2 card). (This applies when mounting on drive letters.)
•In some cases, these partitions may be the same as for existing drives on the network. When partitions cannot be seen due to duplication with existing drives, use the P2Store Manager to mount
these partitions on folders. Refer to  Drive mount setting button of page E-24.
•Partitions not used in the operation described in “Copying from P2 cards to the HDD” on page E-15 cannot be accessed from the computer. Refer to the HDD page (described on page E-23) to confirm which drive letters or specified folders have been assigned.
For Macintosh:
•Each partition is displayed as a folder on the desktop.
•If the number of copied partitions does not match the number of folders on the desktop, a connection error has occurred. Restart the computer and check again.
 Removal
1.Disconnect the USB connection as follows
•For Windows XP Professional:
Double-click on the “Safely Remove Hardware” icon in the task tray. Follow the instructions on screen to stop the “Panasonic P2 series USB Devices.”
•For Windows 2000:
Double-click on the “Unplug or Eject Hardware” icon in the task tray. Follow the instructions on screen to stop the “Panasonic P2 series USB Devices.”
•For Macintosh:
Select all folders displayed when the unit is connected. From the menu bar at the top of the screen, select [File] → [Eject], or otherwise drag them to the trash.
2.Turn the unit OFF by holding the [POWER] button for at least 2 seconds
The POWER LED goes out.
3.Unplug the USB 2.0 cable
ENGLISH
E-20

Connecting to a computer (continued)
 Backing up data
To protect valuable data stored on the internal HDD, we recommend making a backup copy on your computer or another storage device.
Always check the free space on your computer’s hard disk before backing up data.
For Windows:
• Using Windows Explorer:
Select top-level folders and files of each partition on the unit and copy them to your preferred folders on the computer. Execute the same procedure on all partitions of the unit.
• Using the “P2 Viewer”:
Select needed clips and copy them to your preferred target folder on the computer, where you have set up the virtual drive. See the software manual for further instructions.
For Macintosh:
• Using Finder:
Double-click folders displayed on the desktop (which represent each of the partitions on the unit) to open them. Select top-level folders and files and copy them to your preferred folders on the computer. Copy all the contents of other partitions on the unit the same way.
Overview of dedicated software
Using the dedicated software applications, you can display the status of the AJ-PCS060G, operate it, and perform routine inspection of the internal HDD.
 Features
1.P2Store Manager
•HDD status display
You can check the unit’s HDD partition information, self-diagnostic information, and more.
•AJ-PCS060G setup
You can customize operating parameters for the unit, including enabling or disabling auto power OFF.
•AJ-PCS060G software updates
You can download software from the Panasonic website to keep the unit up to date.
2.HDD Maintenance
•Routine inspection of the internal HDD
The software gives you full access to the internal HDD of the AJ-PCS060G, enabling you to check the status of the unit.
Refer to “Recommended daily checks and regular maintenance” (included).
E-21

Starting and closing P2Store Manager
1.Use the USB 2.0 cable to connect the unit to the computer
2.Turn the unit ON by pressing the [POWER] button
On the unit, the POWER LED lights in green, and the connection is automatically detected.
3.Start P2Store Manager
Windows XP Professional:
Go to [Start] → [All Programs] → [Panasonic P2] → [P2 Store Manager]. Windows 2000:
Go to [Start] → [Programs] → [Panasonic P2] → [P2 Store Manager]. For Macintosh:
Double-click the icon for this application in the AJ-PCS060G folder.
4.Make sure the indicator in the lower-left corner of the P2Store Manager screen displays “State: Connecting.”
You can now display the unit’s status and manage it. (See page E-23)
5.Exit P2Store Manager For Windows:
Click the Close box ( button) in the upper-right corner.
For Macintosh:
In the menu bar at the top of the screen, click [P2StoreManager] → [Quit P2StoreManager].
ENGLISH
E-22
P2Store Manager screens
Overview of screens
 Page tabs
Click the tabs to access different pages.
 Page display area
Displays sections with various information about the unit and buttons for operations.
 State display area
Displays “State: Connecting” when the unit is connected to the computer, otherwise, “State: Disconnected.”
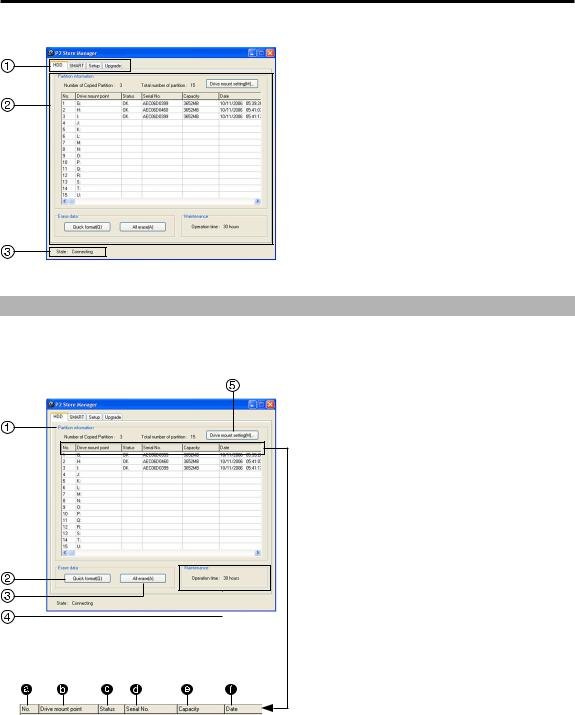
HDD page
This page allows confirmation of the partition information of the internal HDD of the unit and the setting of the format and mounting method.
(The mounting method setting is a function only for Windows.)
 Partition information section
Displays partition information for data copied from P2 cards.
 No.
No.
Displays the partition number.  Drive mount point
Displays the assigned drive letter or specified folder name.
 Status
Displays the partition status. “OK”: Normal
“ERROR”: Trouble occurred at some point during the copying or verification process.
 Serial No.
Displays the source P2 card serial number.  Capacity
Displays the source P2 card capacity (in MB).
 Date
Date
Displays the date of copying.
 Quick format button
For quick formatting of the internal HDD, do the following.
1. Click the [Quick format] button
A confirmation dialog is displayed, prompting you for approval for formatting.
2. Click [Yes] to execute quick formatting 1), 2)
 All erase button
For writing zeros to all sectors of the internal HDD.
If you are using a battery to power the unit, switch to an AC adapter before this procedure. 1. Click the [All erase] button
A confirmation dialog is displayed, prompting you for approval for erasing, after which another dialog confirms the AC adapter connection.
2. Click [Yes]
Zeros are written to all sectors. 1) – 3)
E-23

P2Store Manager screens (continued)
 Maintenance section
Displays the total time that the internal HDD has been in use.
 Drive mount setting button
(only for Windows)
You can select mounting on a drive letter or specified folder.
When the [Drive mount setting] button is clicked, the following screen is displayed.
•When mounting on a drive letter:
1.Select [Mount on drive letter].
2.Click the [OK] button.
3.Restart the unit according to the instructions on
the screen.
•When mounting on a specified folder 4) – 12):
1.Select [Mount on NTFS folder].
When modifying the drive mount point folder, click the [Browse] button and specify the mount point.
2.Click the [OK] button.
3.Restart the unit according to the instructions on the screen.
Note:
1)If you format the HDD using Macintosh software, always confirm that all data has been erased after formatting by unplugging and plugging in the USB 2.0 cable and checking.
2)Before using [Quick format] and [All erase], put the unit on a stable surface.
Vibration or impact may damage the unit during formatting.
Using [Quick format] or [All erase] will delete all data on the internal HDD.
If data you need is stored on it, back up the data to separate storage media before formatting.
3)It takes about 45 minutes to write zeros to all sectors. Always do this with an AC adapter connected.
4)When [Mount on NTFS folder] is selected, each partition of the internal HDD of the unit is sequentially mounted on the subfolders “pa01” through “pa15.” If the subfolders “pa01” through “pa15” don’t exist under the specified folder, these subfolders are automatically created.
5)The specified NTFS folder cannot be mounted for the following cases.
•When the subfolders “pa01” through “pa15” are not empty.
•When the file system is not NTFS.
6)After executing [Mount on NTFS folder], the partitions of the internal HDD of the unit are sometimes not sequentially mounted on the subfolders “pa01” through “pa15” when the internal HDD of the unit is formatted or when a P2 card that is 8 GB or more is copied to the unit. When the unit and the computer are going to be connected, we recommend that you perform mounting.
7)If the number of the partitions is less than 15, when the internal HDD of the unit is formatted and reconnected after mounting is performed, a confirmation dialog is displayed. Follow the instructions on the screen.
8)When the input folder name does not exist, a confirmation dialog is displayed. Click [Yes] after confirming this input folder name.
9)If the subfolders “pa01” through “pa15” are accessed after mounting when the unit and the computer are not connected, a confirmation dialog may be displayed.
10)When disconnecting the unit from the computer after executing [Mount on NTFS folder], only one drive letter that was assigned on the P2 card is displayed.
11)The icon display for subfolders “pa01” through “pa15” may be different after executing [Mount on NTFS folder]. However, data accesses will be performed without problems.
12)When copying the data in subfolders “pa01” through “pa15” after executing [Mount on NTFS folder], perform a “copy” rather than a “move.”
ENGLISH
E-24
P2Store Manager screens (continued)
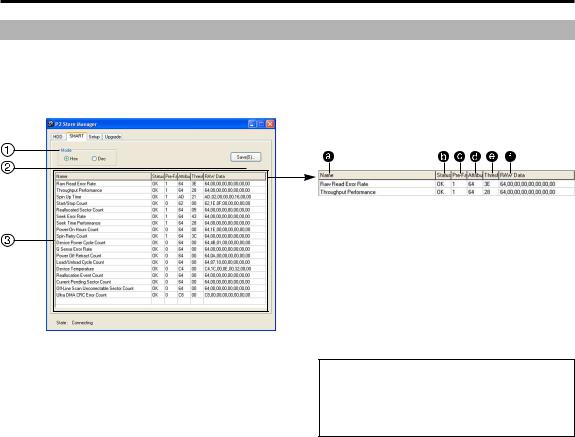
S.M.A.R.T page
Hard disks are relatively fragile devices. Before using the unit's HDD, check the S.M.A.R.T information. (S.M.A.R.T: Self-Monitoring, Analysis and Reporting Technology) If an error is displayed, contact the place of purchase.
Check self-diagnostic information for the unit's internal HDD on this page.
 Mode section
Self-diagnostic information includes a list of numbers. Choose the format from these options.
For hexadecimal display: Choose [Hex] For decimal display: Choose [Dec]
 Save button
Self-diagnostic information can be saved as follows.
1. Click the [Save] button
The [Save As] dialog is displayed.
2.Enter a file name and click the [Save] button The self-diagnostic information is saved as a text file.
 Self-diagnostic information section
Displays self-diagnostic information as follows.
 Name
Name
Identifies the displayed item.  Status
Gives diagnostic results. OK: No errors
NG: Errors
 Pre-Failure / Advisory
Rates the severity of internal HDD errors as “1” or “0.”
“1”: Serious “0”: Not serious
If the diagnostic results  are “NG” for a serious error (“1” in [Pre-Failure / Advisory]), a critical error has occurred on the internal HDD. Contact the place of purchase as soon as possible.
 Attribute
Displays a value representing the item status.
 Threshold
Displays a reference value used in determining if the item is “OK” or “NG.”
If the status value of  is lower than the value in this section, an “NG” judgment is made.
 RAW Data
Displays status details for the item.
E-25

P2Store Manager screens (continued)
Setup page
For checking and changing the unit's operating parameters.
 High temperature mode section
You can specify whether HDD operation is suspended or remains active if the internal HDD temperature exceeds a prescribed level.
Options: [Suspend] and [Active]. Default: [Suspend].
The unit’s current setting is displayed in the “Current Setting” section.
If you change it, afterward click the [Apply] button  .
.
Note:
Setting to [Active] may result in failure of the HDD.
Use this setting at your own risk.
 Under Limit of HDD access section
You can specify the minimum ambient temperature at which HDD operation is permitted.
Options: [5 deg / 41 F] and [-5 deg / 23 F]. Default: [5 deg / 41 F].
The unit’s current setting is displayed in the “Current Setting” section. If you change it, afterward click the [Apply] button  .
.
Note:
Setting to [-5 deg / 23 F] may result in failure of the HDD.
Use this setting at your own risk.
 Shock detection in USB mode section
Use [ON] and [OFF] to enable or disable impact detection when the unit is connected to a computer via the USB 2.0 cable.
[ON] (default):
Data transfer with the computer is suspended if the unit is hit.
[OFF]:
Data transfer is maintained even if the unit is hit.
The unit’s current setting is displayed in the “Current Setting” section.
If you change it, afterward click the [Apply] button  .
.
Note:
The possibility of HDD failure is higher with the [OFF] setting than with the [ON] setting. Use this setting at your own risk.
 Auto power off mode section
You can specify the time until the unit switches OFF automatically if left unused (when no copying or formatting is in progress).
Options: [Never], [5 min], [10 min], [15 min], [20 min], [25 min], and [30 min].
Default: [10 min].
The unit’s current setting is displayed in the “Current Setting” section.
If you change it, afterward click the [Apply] button  . Note that auto power OFF is disabled when the unit is connected to a computer.
 Initialize button
You can restore the default settings in sections
 ,
,  ,
,  and
and  . However, note that the setup details are not applied automatically.
If you change them, click the [Apply] button  .
.
 Apply button
You can save the setup details in sections  ,
,
 ,
,  and
and  on the unit as follows. 1. Click the [Apply] button
A confirmation dialog is displayed. 2. Click [Yes]
The setup details are saved on the unit. 3. Restart the unit.
Note:
The new setup takes effect after the unit is restarted.
ENGLISH
E-26

P2Store Manager screens (continued)
Upgrade page
For keeping the unit's software updated.
 Current Status section
Displays the current mode (Normal mode or Software upgrade mode) and the version and checksum of the software used.
 Upgrade section
You can keep the unit up to date by downloading and installing the latest software for it.
 Browse button
Click the [Browse] button to select the downloaded software for the unit.
The “Version/Checksum” section displays the version and checksum of the software after updating.
 Execute button
For executing the command to update the software.
Note that it takes several minutes to complete this process.
Note:
During this process, never turn the unit OFF or unplug the USB 2.0 cable.
This may damage the unit.
Additionally, put the unit on a stable surface beforehand.
E-27
P2Store Manager screens (continued)
Updating procedure
1.Follow the on-screen instructions on the support site given below to download the unit's software data and expand the file data to a folder of your choice.
For Japanese http://panasonic.biz/sav/
For English https://eww.pavc.panasonic.co.jp/pro-av/
2. Turn the unit OFF
In the State display area, “State: Disconnected” is displayed.
3.Remove the sliding switch cover on the side of the unit and slide the switch toward the front, as shown below.
Rear panel |
Front panel |
side |
side |
4. Turn the unit ON
In the State display area, “State: Connecting” is displayed.
5.In the “Current Status” section, make sure “Mode: Software upgrade mode” is displayed
If “Mode: Normal Mode” is displayed, reconfirm that the sliding switch is toward the front, as directed in step 3.
During updating, the LED display is as follows.
|
|
|
|
|
|
: LED lit |
|
|
|
, : LED flashing |
|||||||||||||||||||||||
|
|
|
|
|
|
|
|
|
|||||||||||||||||||||||||
|
|
|
|
|
|
|
|
|
|||||||||||||||||||||||||
|
|
G : Green |
|
|
|
OR : Orange |
|||||||||||||||||||||||||||
|
|
|
|
|
|
|
|
|
|
|
|
|
|
|
|
|
|
|
|
|
|
|
|
|
|
|
|
|
|
|
|
|
|
|
|
|
|
|
|
|
|
|
COPY STATUS |
|
|
|
|
|
|
|
|
|
|
|
|
||||||||||||
|
|
|
|
|
|
|
|
|
|
|
|
|
|
|
|
|
|
|
|
|
|
|
|
|
|
|
|
|
|
|
|
|
|
|
|
|
|
|
|
|
|
|
|
|
|
|
|
|
|
|
|
|
|
|
|
|
|
|
|
|
|
|
|
|
|
|
|
|
|
|
|
|
|
|
|
|
|
|
|
|
|
|
|
|
|
|
|
|
|
|
|
|
|
|
|
|
|
|
|
|
|
|
|
|
|
|
|
|
|
|
|
|
|
|
|
|
|
|
|
|
|
|
|
|
|
|
|
|
|
|
|
|
|
||
|
|
|
G |
|
|
|
|
G |
|
|
|
G |
|
|
|
G |
|
|
|
|
G |
|
|
|
|
OR |
OR |
||||||
|
|
|
|
|
|
|
|
|
|
|
|
|
|
|
|
|
|
|
|
|
|||||||||||||
|
|
|
|
|
|
|
|
|
|
|
|||||||||||||||||||||||
|
|
|
|
|
|
|
|
|
|
|
|||||||||||||||||||||||
|
|
|
|
|
|
|
|
|
|
|
|
|
|
|
|
|
|
|
|
|
|
|
|
|
|
|
|
|
|
|
|
|
|
6.Click the [Browse] button
The [Open] dialog is displayed.
7.Select the software data for the unit as downloaded in step 1
The “Version/Checksum” section displays the version and checksum of the software after updating.
If the information in both “Version/Checksum” sections matches, there is no need to update. Go to step 11.
8.Click the [Execute] button
A confirmation dialog is displayed.
9.Click the [Yes] button
The latest software will be installed, which takes several minutes.
During this process, never unplug the USB 2.0 cable or turn the unit or computer OFF.
10.After checking the update message, click the [OK] button.
The unit will be automatically deactivated. In Windows 2000, a warning is displayed regarding ejection, but there is no problem. Click the [OK] button.
11.On the side of the unit, set the sliding switch toward the back and attaching the sliding switch cover.
12.Turn the unit ON
In the State display area, “State: Connecting” is displayed.
13.Confirm that the “Current Status” section displays “Mode: Normal Mode”
14.Confirm that the information in both “Version/Checksum” sections matches
If they do not, repeat this process from step 2.
Note:
Visit the following website for the latest news regarding operational verification of the AJPCS060G, including verified P2 cards.
For Japanese http://panasonic.biz/sav/
For English https://eww.pavc.panasonic.co.jp/pro-av/
ENGLISH
E-28
 Loading...