


 Loading...
User Manual
Insight Managed Smart Cloud
Wireless Access Point
AC3000 802.11ac Wave 2 Tri Radio
Model WAC540
|
NETGEAR, Inc. |
March 2019 |
350 E. Plumeria Drive |
202-11795-01 |
San Jose, CA 95134, USA |

Insight Managed Smart Cloud Wireless Access Point AC3000 WAC540 User Manual
Support
Thank you for purchasing this NETGEAR product. You can visit https://www.netgear.com/support/toregisteryourproduct,gethelp,accessthelatest downloads and user manuals, and join our community. We recommend that you use only official NETGEAR support resources.
Compliance and Conformity
ForregulatorycomplianceinformationincludingtheEUDeclarationofConformity,visit https://www.netgear.com/about/regulatory/.
See the regulatory compliance document before connecting the power supply.
Do not use this device outdoors. If you connect cables or devices that are outdoors to thisdevice,see http://kb.netgear.com/000057103 forsafetyandwarrantyinformation.
Trademarks
©NETGEAR,Inc.,NETGEAR,andtheNETGEARLogoaretrademarksofNETGEAR,Inc. Any non-NETGEAR trademarks are used for reference purposes only.
Revision History
Publication Part |
Publish Date |
Comments |
Number |
|
|
202-11795-01 |
March 2019 |
First publication. |
2

Contents
Chapter 1 Hardware Overview |
|
About NETGEAR Insight...................................................................... |
8 |
Related documentation....................................................................... |
8 |
Unpack the access point...................................................................... |
8 |
Top panel with LEDs............................................................................. |
9 |
Back panel........................................................................................... |
11 |
Product label....................................................................................... |
12 |
Safety instructions and warnings...................................................... |
13 |
Chapter 2 Install the Access Point in Your Network and Access It for Initial Configuration
Position your access point................................................................. |
17 |
Set up and connect the access point to your network................... |
18 |
Set up the access point with a PoE network connection.......... |
18 |
Set up the access point with a non-PoE network connection... |
19 |
Connect to the access point for initial configuration..................... |
20 |
Connect over WiFi using the NETGEAR Insight Mobile App on |
|
an iOS or Android mobile device................................................ |
21 |
Connect over the Internet using the NETGEAR Insight Cloud |
|
Portal................................................................................................ |
21 |
Connect over WiFi using a WiFi-enabled computer or mobile |
|
device.............................................................................................. |
22 |
ConnectoverEthernetusingacomputerconnectedtothesame |
|
network............................................................................................ |
26 |
Connect over Ethernet using a directly connected computer..29 |
|
Log in to the access point after initial setup to view or change |
|
settings................................................................................................. |
33 |
Chapter 3 Manage the Basic WiFi and Radio Features |
|
Set up and manage WiFi networks.................................................. |
36 |
Set up an open or secure WiFi network...................................... |
36 |
View or change the settings of a WiFi network.......................... |
42 |
Disable or enable a WiFi network or set up a WiFi activity |
|
schedule.......................................................................................... |
43 |
Remove a WiFi network................................................................. |
44 |
Enable or disable client isolation for a WiFi network................ |
45 |
3

Insight Managed Smart Cloud Wireless Access Point AC3000 WAC540 User Manual
Hide or broadcast the SSID for a WiFi network.......................... |
46 |
Enable or disable band steering with 802.11k RRM and 802.11v |
|
WiFi network management.......................................................... |
47 |
Change the VLAN ID for a WiFi network..................................... |
48 |
Enable or disable PMF for a WiFi network.................................. |
49 |
Enable or disable URL tracking for a WiFi network................... |
49 |
Select a MAC ACL for a WiFi network......................................... |
50 |
Set bandwidth rate limits for a WiFi network.............................. |
52 |
Register and configure Facebook Wi-Fi for the access point... |
53 |
Set up a captive portal for a WiFi network.................................. |
55 |
Unregister the access point from Facebook Wi-Fi.................... |
58 |
Manage the basic radio features...................................................... |
59 |
Manage the basic settings for the radios.................................... |
59 |
Turn a radio on or off..................................................................... |
63 |
Change the WiFi mode for a radio.............................................. |
63 |
Change the MCS index and data rate for a radio...................... |
65 |
Change the channel width for a radio......................................... |
66 |
Change the output power for a radio......................................... |
67 |
Change the guard interval for a radio......................................... |
68 |
Change the channel for a radio................................................... |
69 |
Manage Quality of Service for a WiFi radio................................ |
69 |
Chapter 4 Manage the Advanced WiFi and Radio Features |
|
Manage the advanced radio features.............................................. |
73 |
Manage the advanced WiFi settings for the radios................... |
73 |
Manage the maximum number of clients for a radio................ |
76 |
Manage the broadcast and multicast settings for a radio........ |
77 |
Manage load balancing for the radios........................................ |
78 |
Manage Airtime Fairness for the radios...................................... |
80 |
Set a data volume limit for the access point.................................... |
81 |
Set up a WiFi bridge between access points.................................. |
84 |
Chapter 5 Manage Access and Security |
|
Block specific URLs and keywords for Internet access.................. |
90 |
Manage local MAC access control lists............................................ |
91 |
Manually set up a MAC access control List................................. |
92 |
Import an existing MAC access control list................................. |
95 |
Manage user accounts....................................................................... |
98 |
Add a user account........................................................................ |
98 |
Change the settings for a user account...................................... |
99 |
Remove a user account............................................................... |
100 |
Manage neighbor AP detection..................................................... |
101 |
Enableneighboraccesspointdetectionandmoveaccesspoints |
|
to the Known AP List.................................................................... |
101 |
4

Insight Managed Smart Cloud Wireless Access Point AC3000 WAC540 User Manual
Import an existing neighbor access point list in the Known AP |
|
List.................................................................................................. |
104 |
Set up RADIUS servers..................................................................... |
106 |
Chapter 6 Manage the Local Area Network and IP Settings |
|
Disable the DHCP client and specify a fixed IP address.............. |
109 |
Enable the DHCP client................................................................... |
110 |
Set the 802.1Q VLAN and management VLAN............................ |
111 |
Enable or disable Spanning Tree Protocol................................... |
113 |
Enable or disable the network integrity check function.............. |
114 |
Enable or disable IGMP snooping................................................. |
114 |
Enable or disable Ethernet LLDP.................................................... |
115 |
Enable or disable UPnP................................................................... |
116 |
Manage the link aggregation capability........................................ |
117 |
Chapter 7 Manage and Maintain the Access Point |
|
Change the management mode to NETGEAR Insight or |
|
Web-browser.................................................................................... |
120 |
Change the country or region of operation.................................. |
121 |
Change the admin user account password.................................. |
122 |
Change the system name................................................................ |
123 |
Specify a custom NTP server........................................................... |
124 |
Set the time zone.............................................................................. |
125 |
Manage the syslog settings............................................................. |
126 |
Manage the firmware of the access point..................................... |
127 |
Check for new firmware and upgrade the access point......... |
127 |
Manuallydownloadfirmwareandupgradetheaccesspoint.128 |
|
Revert to the backup firmware................................................... |
130 |
Use an SFTP server to upgrade the access point.................... |
131 |
Manage the configuration file of the access point....................... |
132 |
Back up the access point configuration.................................... |
132 |
Restore the access point configuration..................................... |
133 |
Reboot the access point from the local browser interface......... |
134 |
Schedule the access point to reboot............................................. |
135 |
Return the access point to its factory default settings................. |
135 |
Use the Reset button................................................................... |
136 |
Use the local browser interface.................................................. |
137 |
Enable or disable Telnet.................................................................. |
138 |
Enable or disable Secure Shell....................................................... |
139 |
Enable SNMP and manage the SNMP settings............................ |
139 |
Manage the LEDs............................................................................. |
141 |
Chapter 8 Monitor the Access Point and the Network |
|
View the access point Internet, IP, and system settings.............. |
143 |
5

Insight Managed Smart Cloud Wireless Access Point AC3000 WAC540 User Manual
View the WiFi radio settings............................................................ |
146 |
View unknown and known neighbor access points..................... |
149 |
View client distribution, connected clients, and client trends.... |
150 |
View WiFi and Ethernet traffic, traffic statistics, and channel |
|
utilization........................................................................................... |
154 |
View or download tracked URLs..................................................... |
156 |
View, save, download, or clear the logs........................................ |
158 |
View a WiFi bridge connection....................................................... |
159 |
View the data volume consumption.............................................. |
160 |
View Air Time Fairness client distribution..................................... |
161 |
View alarms and notifications......................................................... |
163 |
Chapter 9 Diagnostics and Troubleshooting |
|
Capture WiFi and Ethernet packets............................................... |
165 |
Perform a ping test........................................................................... |
167 |
Check the Internet speed................................................................ |
168 |
Quick tips for troubleshooting....................................................... |
169 |
Troubleshoot with the LEDs............................................................ |
170 |
Power/Cloud LED is off............................................................... |
171 |
Power/Cloud LED remains solid amber................................... |
171 |
Power/Cloud LED is blinking amber slowly, continuously..... |
172 |
The access point functions as a PoE PD and the Power/Cloud |
|
LED remains solid amber............................................................ |
172 |
Power/Cloud LED does not light blue in the NETGEAR Insight |
|
management mode..................................................................... |
173 |
2.4, 5H, or 5L WLAN LED Is Off.................................................. |
173 |
A LAN LED is off while a switch or LAN device is connected..174 |
|
Troubleshoot the WiFi connectivity............................................... |
174 |
Troubleshoot Internet browsing..................................................... |
175 |
You cannot log in to the access point over a LAN connection.... |
176 |
Changes are not saved.................................................................... |
176 |
Troubleshoot your network using the ping utility........................ |
177 |
Test the LAN path to your access point.................................... |
177 |
Test the path from your computer to a remote device........... |
178 |
AppendixAFactoryDefaultSettingsandTechnicalSpecifications |
|
Factory settings................................................................................. |
180 |
Technical specifications................................................................... |
183 |
6

1
Hardware Overview
TheNETGEARInsightManagedSmartCloudWirelessAccessPoint(WAC540)AC3000
802.11acWave2TriRadio,inthismanualreferredtoastheaccesspoint,supportsthree radios with tri-band concurrent operation at 2.4 GHz, 5 GHz low band, and 5 GHz high band.
The access point can provide a combined throughput of 3000 Mbps (400 Mbps at 2.4GHz,867Mbpsat5GHzlowband,and1733Mbpsat5GHzhighband). Theaccess point can function as a Power over Ethernet plus (PoE+) powered device (PD) so that you can connect it to a PoE+ switch in an existing network and let it operate without a power adapter. With a power adapter, you can connect the access point to a regular switch. A second Ethernet LAN port supports a link aggregation (LAG) connection.
This chapter contains the following sections:
•About NETGEAR Insight
•Related documentation
•Unpack the access point
•Top panel with LEDs
•Back panel
•Product label
•Safety instructions and warnings
Note: For more information about the topics that are covered in this manual, visit the support website at netgear.com/support/.
Note: Firmwareupdateswithnewfeaturesandbugfixesaremadeavailablefromtime to time at netgear.com/support/download/. You can check for and download new firmware manually. If the features or behavior of your product does not match what is described in this manual, you might need to update the firmware.
Note: In this user manual, WiFi network means the same as SSID (service set identifier or WiFi network name) or VAP (virtual access point). That is, in this user manual, when we refer to a WiFi network we mean an individual SSID or VAP.
7

Insight Managed Smart Cloud Wireless Access Point AC3000 WAC540 User Manual
About NETGEAR Insight
The access point supports the NETGEAR Insight mobile app, which lets you set up and manage the access point from your iOS or Android mobile device and connects to the Insight cloud-based management platform. For Insight Premium or Insight Pro subscribers,theaccesspointalsosupportstheInsightCloudPortal,whichisthewebsite that provides access to the Insight cloud-based management platform. However, this user manual describes the local browser–based management interface, in this manual referredtoasthelocalbrowserinterface.FormoreinformationaboutNETGEARInsight, visit insight.netgear.com and see the NETGEAR knowledge base at netgear.com/support/product/insight.aspx.
If you install the access point as a NETGEAR Insight managed device, the settings for features that you can manage through the Insight mobile app and Insight Cloud Portal aremaskedoutinthelocalbrowserinterface.However,usingthelocalbrowserinterface, youcanstillmanagethesettingsforcertainfeaturesthatarenotyetsupportedinInsight. For more information, visit the NETGEAR knowledge base at netgear.com/support/product/insight.aspxandsearchforWhatisHybridManagement Mode.
Related documentation
The following related documentation is available at netgear.com/support/download/:
•Installation guide
•Ceiling and wall-mount guide
•Data sheet
For information about the NETGEAR Insight mobile app and the Insight Cloud Portal, visit insight.netgear.com and see the NETGEAR knowledge base at netgear.com/support/product/insight.aspx.
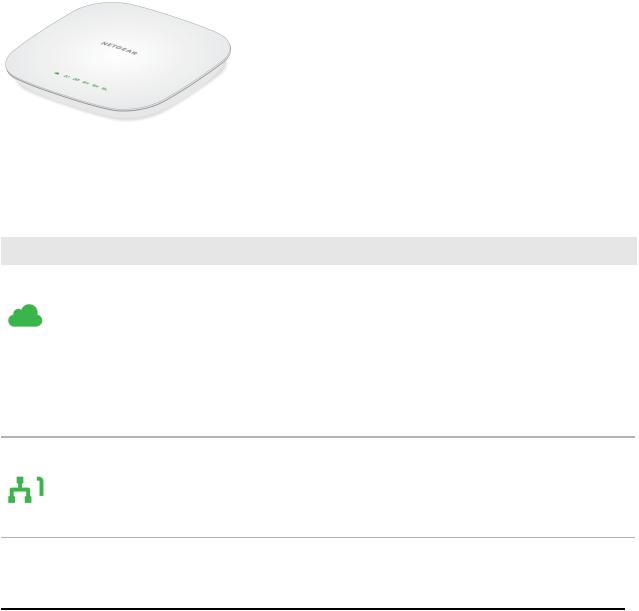
Unpack the access point
The package includes the following items:
•Access point model WAC540 or WAC540PA
•Ceiling and wall-mount kit
•Installation guide
Hardware Overview |
8 |
User Manual |
Insight Managed Smart Cloud Wireless Access Point AC3000 WAC540 User Manual
•Ceiling and wall-mount guide
•DC power adapter (model WAC540PA only, sold separately for model WAC540)
Otherthanapoweradapter,modelWAC540andmodelWAC540PAareidentical.Each model can function as a PoE+ PD connected to a PoE+ switch so that you can use the access point without a power adapter.
Top panel with LEDs
TheLEDsthatprovidethestatusoftheaccesspointarelocatedonthetoppanelofthe access point.
Figure 1. Top panel with LEDs
Table 1. LED descriptions
LED Description
Power/Cloud LED Off. No power is supplied to the access point.
Solid green. The access point functions either as a standalone access point or as an Insight discoveredaccesspointthatisnotconnectedtotheInsightcloud-basedmanagementplatform. Solid blue. The access point functions in Insight mode and is connected to the Insight cloud-based management platform.
Solidamber. Duringstartup,thePower/CloudLEDlightssolidamber. Ifafterfiveminutesthe amber light remains, either a boot error occurred, or, if the access point functions as a PoE+ PD device, it might not be receiving power at the required 802.3at (PoE+) level.
Blinking amber quickly, temporarily. The access point is upgrading firmware.
Blinking amber slowly, continuously. The access point did not receive an IP address from a DHCP server.
LAN 1 LED |
Off. Either no powered-on Ethernet device is connected to the LAN port, or, if a powered-on |
|
Ethernet device is connected, no Ethernet link is detected. |
|
Solid green. A 1000 Mbps Ethernet link is detected on the LAN port. |
|
Blinking green. 1000 Mbps traffic activity is detected on the LAN port. |
|
Solid amber. A 10 or 100 Mbps Ethernet link is detected on the LAN port. |
|
Blinking amber. 10 or 100 Mbps traffic activity is detected on the LAN port. |
Hardware Overview |
9 |
User Manual |

Insight Managed Smart Cloud Wireless Access Point AC3000 WAC540 User Manual
Table 1. LED descriptions (Continued)
LED |
Description |
LAN 2 LED |
Off. Either no powered-on Ethernet device is connected to the LAN port, or, if a powered-on |
|
Ethernet device is connected, no Ethernet link is detected. |
|
Solid green. A 1000 Mbps Ethernet link is detected on the LAN port. |
|
Blinking green. 1000 Mbps traffic activity is detected on the LAN port. |
|
Solid amber. A 10 or 100 Mbps Ethernet link is detected on the LAN port. |
|
Blinking amber. 10 or 100 Mbps traffic activity is detected on the LAN port. |
2.4G WLAN LED |
Off. The 2.4 GHz WiFi radio is off. |
|
Solid green. The 2.4 GHz WiFi radio is on. |
|
Solid blue. One or more WLAN clients are connected to the 2.4 GHz WiFi radio. |
|
Blinking blue. Traffic is detected on the 2.4 GHz WiFi radio. |
5H WLAN LED |
Off. The 5 GHz high band WiFi radio is off. |
|
Solid green. The 5 GHz high band WiFi radio is on. |
|
Solid blue. One or more WLAN clients are connected to the 5 GHz high band WiFi radio. |
|
Blinking blue. Traffic is detected on the 5 GHz high band WiFi radio. |
5L WLAN LED |
Off. The 5 GHz low band WiFi radio is off. |
|
Solid green. The 5 GHz low band WiFi radio is on. |
|
Solid blue. One or more WLAN clients are connected to the 5 GHz low band WiFi radio. |
|
Blinking blue. Traffic is detected on the 5 GHz low band WiFi radio. |
Note: ForinformationabouttroubleshootingwiththeLEDs,see Troubleshootwiththe LEDs on page 170.
Hardware Overview |
10 |
User Manual |
Insight Managed Smart Cloud Wireless Access Point AC3000 WAC540 User Manual
Back panel
ThebackpaneloftheaccesspointprovidesaDCpowerconnector,twoLANports,and a Reset button.
Figure 2. Access point back panel
Viewed from left to right, the back panel contains the following components:
1.Resetbutton.PresstheResetbuttonforabout2secondstoreboottheaccesspoint or for more than 10 seconds to reset the access point to factory default settings. If you added the access point to a NETGEAR Insight network location, you must first use the Insight mobile app or Insight Cloud Portal to remove the access point from yourInsightnetworklocationbeforethefactorydefaultsettingsfunctionoftheReset button is available. For more information, see Use the Reset button on page 136.
2.LAN 2 port. One Gigabit Ethernet RJ-45 LAN port. Use the LAN 2 port to connect the access point to the same switch as the LAN 1 port for a link aggregation (LAG) connection.TheswitchmustbecapableofsupportingaLAGconnection,whichyou must configure on the switch. By default, LAG capability is supported on the access point. If you manually disable LAG capability, the LAN 2 port is also disabled. For more information, see Manage the link aggregation capability on page 117.
Note: If you want to connect a switch to the LAN 2 port instead of the LAN 1 port, use a power adapter, do not use a LAG connection, and do not manually disable the LAG capability. However, if you connect a switch to the LAN 1 port, you can use the LAN 2 port only for a LAG connection, not for any other type of connection.
Hardware Overview |
11 |
User Manual |
Insight Managed Smart Cloud Wireless Access Point AC3000 WAC540 User Manual
3.LAN1port. OneGigabitEthernetRJ-45LANportthatcanacceptPoE+power. Use the LAN 1 port to connect the access point to a switch or PoE+ switch that is connected to a network router with an Internet connection. You can also use the LAN 1 port to connect the access point to a computer for initial configuration. If you use PoE power, the access point requires 802.3at (PoE+) input. For optimal functioning, make sure that you use an 802.3at (PoE+) switch and not an 802.3af (PoE) switch.
Note: The LAN 1 port is a PoE+ PD port that you can connect to a PoE+ switch or non-PoEswitch. TheLAN2portisanon-PoEportthatyoucanconnecttoanon-PoE switch. You must connect either the LAN 1 port or, if you use a power adapter, the LAN 2 port to a switch for a network connection.
4.DCpowerconnector.IfyoudonotuseaPoEconnection,connectapoweradapter to the DC power connector. The access point requires 12V, 2.5A input. ModelWAC540comeswithoutapoweradapterbutyoucanorderapoweradapter as an option.
Model WAC540PA comes with a power adapter.
FormoreinformationabouttheLANportconnection,seeSetupandconnecttheaccess point to your network on page 18.
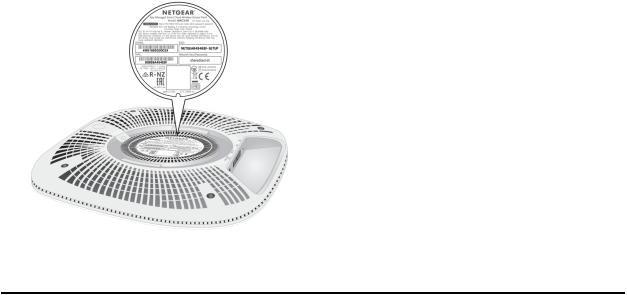
Product label
The product label on the bottom panel of the access point shows the serial number, MAC address, default WiFi network name (SSID), network key (password), and default login information of the access point.
Figure 3. Product label
Hardware Overview |
12 |
User Manual |

Insight Managed Smart Cloud Wireless Access Point AC3000 WAC540 User Manual
Safety instructions and warnings
Use the following safety guidelines to ensure your own personal safety and to help protect your system from potential damage.
Toreducetheriskofbodilyinjury,electricalshock,fire,anddamagetotheequipment, observe the following precautions:
•This product is designed for indoor use only in a temperature-controlled and humidity-controlled environment. For more information, see the environmental specifications in the appendix or the data sheet. Anydevicethatislocatedoutdoorsandconnectedtothisproductmustbeproperly grounded and surge protected.
Failure to follow these guidelines can result in damage to your NETGEAR product, which might not be covered by NETGEAR’s warranty, to the extent permissible by applicable law.
•Observe and follow service markings:
-Do not service any product except as explained in your system documentation. Some devices should never be opened.
-If applicable to your device, opening or removing covers that are marked with the triangular symbol with a lightning bolt can expose you to electrical shock. Werecommendthatonlyatrainedtechnicianservicescomponentsinsidethese compartments.
•Ifanyofthefollowingconditionsoccur,unplugtheproductfromtheelectricaloutlet and replace the part or contact your trained service provider:
-Depending on your device, the power adapter, power adapter cable, power cable, extension cable, or plug is damaged.
-An object fell into the product.
-The product was exposed to water.
-The product was dropped or damaged.
-The product does not operate correctly when you follow the operating instructions.
•Keep your system away from radiators and heat sources. Also, do not block cooling vents.
•Do not spill food or liquids on your system components, and never operate the product in a wet environment. If the system gets wet, see the appropriate section in your troubleshooting guide, or contact your trained service provider.
Hardware Overview |
13 |
User Manual |

Insight Managed Smart Cloud Wireless Access Point AC3000 WAC540 User Manual
•Do not push any objects into the openings of your system. Doing so can cause fire or electric shock by shorting out interior components.
•Use the product only with approved equipment.
•If applicable to your device, allow the product to cool before removing covers or touching internal components.
•Operate the product only from the type of external power source indicated on the electrical ratings label. If you are not sure of the type of power source required, consult your service provider or local power company.
•To avoid damaging your system, if your device uses a power supply with a voltage selector, be sure that the selector is set to match the power at your location:
-115V,60HzinmostofNorthandSouthAmericaandsomeFarEasterncountries such as South Korea and Taiwan
-100V, 50 Hz in eastern Japan and 100V, 60 Hz in western Japan
-230V, 50 Hz in most of Europe, the Middle East, and the Far East
•Besurethatattacheddevicesareelectricallyratedtooperatewiththepoweravailable in your location.
•Depending on your device, use only a supplied power adapter or approved power cable:
If your device uses a power adapter:
-If you were not provided with a power adapter, contact your local NETGEAR reseller.
-Thepoweradaptermustberatedfortheproductandforthevoltageandcurrent marked on the product electrical ratings label.
If your device uses a power cable:
-If you were not provided with a power cable for your system or for any AC-poweredoptionintendedforyoursystem,purchaseapowercableapproved for your country.
-The power cable must be rated for the product and for the voltage and current marked on the product electrical ratings label. The voltage and current rating of the cable must be greater than the ratings marked on the product.
•To help prevent electric shock, plug the system and peripheral power cables into properly grounded electrical outlets.
•If applicable to your device, the peripheral power cables are equipped with three-prong plugs to help ensure proper grounding. Do not use adapter plugs or remove the grounding prong from a cable. If you must use an extension cable, use a three-wire cable with properly grounded plugs.
Hardware Overview |
14 |
User Manual |

Insight Managed Smart Cloud Wireless Access Point AC3000 WAC540 User Manual
•Observe extension cable and power strip ratings. Make sure that the total ampere rating of all products plugged into the extension cable or power strip does not exceed80percentoftheampereratingslimitfortheextensioncableorpowerstrip.
•To help protect your system from sudden, transient increases and decreases in electricalpower,useasurgesuppressor,lineconditioner,oruninterruptiblepower supply (UPS).
•Position system cables, power adapter cables, or power cables carefully. Route cablessothattheycannotbesteppedonortrippedover. Besurethatnothingrests on any cables.
•Donotmodifypoweradapters,poweradaptercables,powercablesorplugs.Consult a licensed electrician or your power company for site modifications.
•Always follow your local and national wiring rules.
Hardware Overview |
15 |
User Manual |

2
Install the Access Point in Your Network and Access It for Initial Configuration
Thischapterdescribeshowyoucaninstallandaccesstheaccesspointinyournetwork.
The chapter contains the following sections:
•Position your access point
•Set up and connect the access point to your network
•Connect to the access point for initial configuration
•Log in to the access point after initial setup to view or change settings
16

Insight Managed Smart Cloud Wireless Access Point AC3000 WAC540 User Manual
Position your access point
Before you install your access point as described in the mounting installation guide, consider how you will position the access point.
The access point lets you access your network anywhere within the operating range of your WiFi network. However, the operating distance or range of your WiFi connection can vary significantly depending on the physical placement of your access point. For example, the thickness and number of walls the WiFi signal passes through can limit the range.
Additionally,otherWiFiaccesspointsinandaroundyourhomemightaffectyouraccess point’s signal. WiFi access points can be routers, repeaters, WiFi range extenders, and any other devices that emit WiFi signals for network access.
Position your access point according to the following guidelines:
•Placeyouraccesspointnearthecenteroftheareawhereyourcomputersandother devices operate and within line of sight to your WiFi devices.
•If you use a power adapter, make sure that the access point is within reach of an AC power outlet.
•Place the access point in an elevated location, minimizing the number walls and ceilings between the access point and your other devices.
•Place the access point away from electrical devices such as these:
-Ceiling fans
-Home security systems
-Microwaves
-Computers
-Base of a cordless phone
-2.4 GHz and 5.8 GHz cordless phones
•Placetheaccesspointawayfromlargemetalsurfaces,largeglasssurfaces,insulated walls, and items such as these:
-Solid metal door
-Aluminum studs
-Fish tanks
-Mirrors
-Brick
-Concrete
Install the Access Point in Your 17 User Manual Network and Access It for Initial
Configuration
Insight Managed Smart Cloud Wireless Access Point AC3000 WAC540 User Manual
Ifyouareusingadjacentaccesspoints,usedifferentradiofrequencychannelstoreduce
interference.
Set up and connect the access point to your network
TheaccesspointisintendedtofunctionasaWiFiaccesspointinyourexistingnetwork.
Thefollowingsectionsdescribehowyoucanconnecttheaccesspointtoyournetwork:
•Set up the access point with a PoE network connection on page 18
•Set up the access point with a non-PoE network connection on page 19
To set up your access point, follow the procedure in one of these sections.
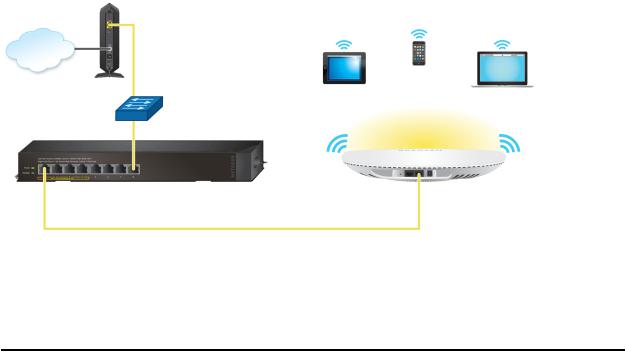
Set up the access point with a PoE network connection
You can connect the access point to a Power over Ethernet plus (PoE+) switch in your network. The switch must be connected to a network router that is connected to the Internet. If you use a PoE+ connection, the access point does not require a power adapter.
WiFi clients can connect to the access point and access your network and the Internet.
Figure 4. Set up the access point with a PoE+ connection to your network
Install the Access Point in Your 18 User Manual Network and Access It for Initial
Configuration
Insight Managed Smart Cloud Wireless Access Point AC3000 WAC540 User Manual
To set up the access point with a PoE connection to your network:
1.Connect an Ethernet cable to the LAN 1 port on the access point. This is the LAN port next to the DC power connector.
2.Connect the other end of the Ethernet cable to a PoE+ port on a PoE+ switch that is connected to your network and to the Internet.
The access point requires 802.3at (PoE+) input. For optimal functioning, make sure that you use an 802.3at (PoE+) switch and not an 802.3af (PoE) switch.
ThePower/CloudLEDlightssolidamber.Afteraboutoneminute,iftheaccesspoint is connected to a DHCP server, the Power/Cloud LED turns solid green and the access point is ready for you to perform the initial configuration.
For information about accessing the access point for initial configuration, see Connect to the access point for initial configuration on page 20.
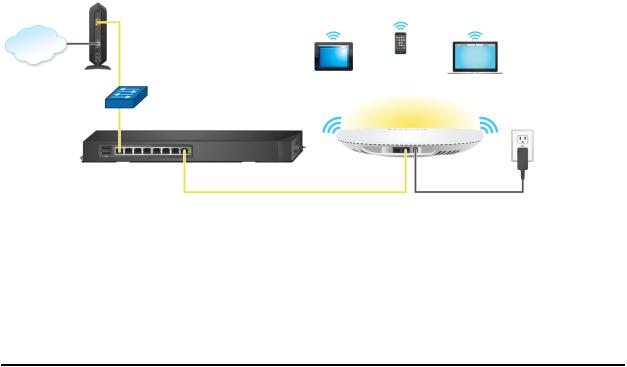
Setuptheaccesspointwithanon-PoEnetworkconnection
Youcanconnecttheaccesspointtoaregularswitch,thatis,anon–PoweroverEthernet switch in your network. The switch must be connected to a network router that is connectedtotheInternet. Ifyouusearegularswitch,theaccesspointrequiresapower adapter, which is an option that you can purchase for model WAC540. (Model WAC540PA comes with a A DC power adapter.)
WiFi clients can connect to the access point and access your network and the Internet.
Figure 5. Set up the access point with a connection to your network
To set up the access point with a non-PoE connection to your network:
1.Connect an Ethernet cable to the LAN 1 port on the access point.
2.Connect the other end of the Ethernet cable to a switch that is connected to your network and to the Internet.
Install the Access Point in Your 19 User Manual Network and Access It for Initial
Configuration

Insight Managed Smart Cloud Wireless Access Point AC3000 WAC540 User Manual
3.Connect the power adapter to the access point and plug it into an electrical outlet.
ThePower/CloudLEDlightssolidamber.Afteraboutoneminute,iftheaccesspoint is connected to a DHCP server, the Power/Cloud LED turns solid green and the access point is ready for you to perform the initial configuration.
For information about accessing the access point for initial configuration, see Connect to the access point for initial configuration on page 20.
Connect to the access point for initial configuration
Afteryousetuptheaccesspoint,youcanuseseveralmethodstoconnecttoitforinitial
configuration.
You can connect to the access point by using the NETGEAR Insight mobile app on an iOS or Android mobile device, by accessing the Insight Cloud Portal, or by using the local browser interface. You cannot use Insight access with the local browser interface. These types of access are mutually exclusive.
TheInsightmobileappandtheInsightCloudPortalprovideeaseofaccessandletyou configuremostfeaturesthatareavailableontheaccesspoint.Thelocalbrowserinterface lets you configure all features that are available on the access point.
If you use the Insight mobile app or the Insight Cloud Portal to connect to the access point, see one of the following sections:
•Connect over WiFi using the NETGEAR Insight Mobile App on an iOS or Android mobile device on page 21
•Connect over the Internet using the NETGEAR Insight Cloud Portal on page 21
Ifyouusethelocalbrowserinterfacetoconnecttotheaccesspoint,followtheprocedure in one of these sections:
•Connect over WiFi using a WiFi-enabled computer or mobile device on page 22
•Connect over Ethernet using a computer connected to the same network on page 26
•Connect over Ethernet using a directly connected computer on page 29
Note: If your network does not include a DHCP server (or a router that functions as a DHCP server) and you do not perform the initial configuration of the access point as describedinoneofthesesections,youcanconnectonlytwoclientstotheaccesspoint and the access point can provide an IP address to only two clients. To prevent this situation, make sure that you perform the initial configuration of the access point.
Install the Access Point in Your 20 User Manual Network and Access It for Initial
Configuration
Insight Managed Smart Cloud Wireless Access Point AC3000 WAC540 User Manual
Connect over WiFi using the NETGEAR Insight Mobile App on an iOS or Android mobile device
You can install the NETGEAR Insight mobile app on an iOS or Android mobile device and set up the access point (and perform many other tasks as well).
For more information about the Insight mobile app, visit insight.netgear.com and see the NETGEAR knowledge base at netgear.com/support/product/insight.aspx.
To connect to the access point over WiFi using an iOS or Android mobile device:
1.On your mobile device, go to the app store, search for NETGEAR Insight, and download the app.
2.Open the Insight mobile app and log in to your NETGEAR account or create a new account to log in with.
3.Follow the prompts in the Insight mobile app to discover and register the access point on the network so that you can configure and manage the access point.
Note: IftheaccesspointisconnectedtotheInternet,youcanusetheInsightmobile apptoconfiguretheaccesspointbyconnectingtoitsdefaultSSID.ThedefaultSSID is on the access point label on the bottom of the access point and is shown in the formatNETGEARxxxxxx-SETUP,wherexxxxxxisthelastsixhexadecimaldigitsofthe access point’s MAC address. The default password is sharedsecret.
ConnectovertheInternetusingtheNETGEARInsightCloud
Portal
The Insight Cloud Portal is available for Insight Premium or Insight Pro subscribers. To use the NETGEAR Insight Cloud Portal to configure and manage the access point, the access point must already be connected to the Internet.
For more information about the Insight Cloud Portal and the configuration and management options that are available through the Insight Cloud Portal, visit insight.netgear.com and see the NETGEAR knowledge base at netgear.com/support/product/insight.aspx.
Install the Access Point in Your 21 User Manual Network and Access It for Initial
Configuration
Insight Managed Smart Cloud Wireless Access Point AC3000 WAC540 User Manual
To connect to the access point over the Internet through the Insight Cloud Portal:
1.Visit insight.netgear.com.
The NETGEAR Account Login page displays.
2.Enter your Insight email address and password.
If you do not own an Insight account, you can create one.
3.Click the NETGEAR LOG IN button.
YoucannowaddtheaccesspointtoanInsightnetworklocationsothatyouconfigure and manage the access point.
Connect over WiFi using a WiFi-enabled computer or mobile device
This section describes how to connect to the access point for the first time over WiFi using a WiFi-enabled computer or mobile device (without using the NETGEAR Insight mobile app).
ToconnecttotheaccesspointoverWiFiusingaWiFi-enabledcomputerormobile device:
1.Fromyourcomputerormobiledevice,connectoverWiFitotheaccesspoint’sdefault WiFi network.
The default SSID is on the access point label on the bottom of the access point and is shown in the format NETGEARxxxxxx-SETUP, where xxxxxx is the last six hexadecimal digits of the access point’s MAC address. The default password is sharedsecret.
2.On the computer or mobile device, open a web browser and, in the address bar, enter www.routerlogin.net (or www.aplogin.net).
Note: You can use www.routerlogin.net (and www.aplogin.net) only during initial setup of the access point.
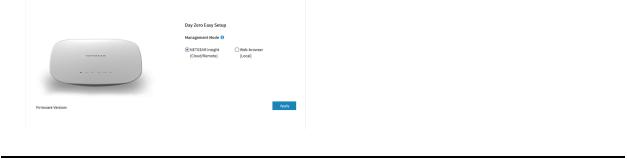
The Day Zero Easy Setup page displays.
Install the Access Point in Your 22 User Manual Network and Access It for Initial
Configuration
Insight Managed Smart Cloud Wireless Access Point AC3000 WAC540 User Manual
In the address bar, www.routerlogin.net (or www.aplogin.net) is replaced by the IP address that is assigned to the access point by the DHCP server in your network.
3.Write down the IP address of the access point.
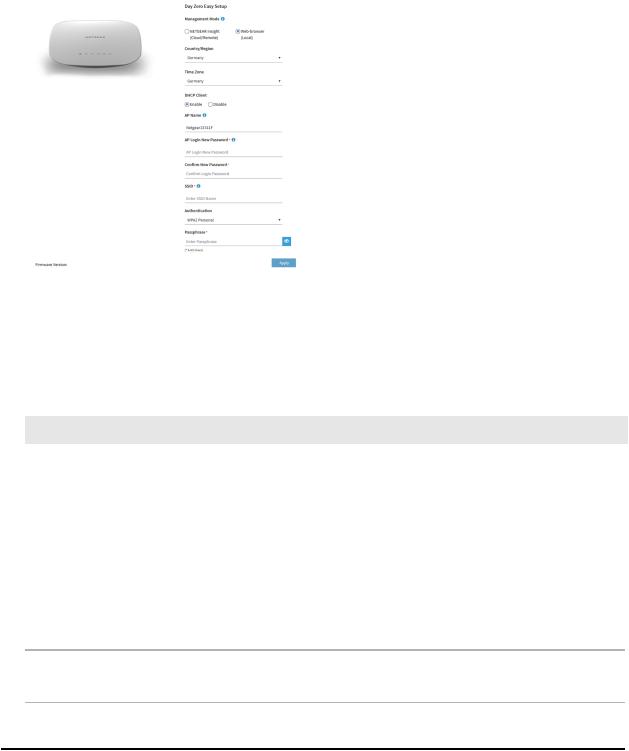
4.Select the Web-browser radio button.
Note: After you save the basic settings that are shown on the page, the Day Zero EasySetuppagenolongerdisplayswhenyoulogin.Instead,aloginwindowopens. After you log in, the Dashboard page displays.
5. Enter the settings that are described in the following table.
Setting Description
Country/Region From the menu, select the country and region in which the access point is operating.
Note: Makesurethatthecountryissettothelocationwherethedeviceisoperating. You are responsible for complying with the local, regional, and national regulations that are set for channels, power levels, and frequency ranges.
Note: Itmightnotbelegaltooperatetheaccesspointinaregionotherthantheregions listedinthemenu.Ifyourcountryorregionisnotlisted,checkwithyourlocalgovernment agency.
Time Zone |
From the menu, select the time zone for the country and region in which the access point |
|
is operating. |
Install the Access Point in Your 23 User Manual Network and Access It for Initial
Configuration

Insight Managed Smart Cloud Wireless Access Point AC3000 WAC540 User Manual
(Continued)
Setting |
Description |
DHCP Client |
By default, the DHCP client of the access point allows the access point to receive an IP |
|
address from a DHCP server (or router that functions as a DHCP server) in your network. |
|
To set up the access point with a static (fixed) IP address, do the following: |
|
a. Select the Disable radio button. |
|
Additional fields display. |
|
b. SpecifytheIPaddress,IPsubnetmask,IPaddressofthedefaultgateway,andIPaddress |
|
of the DNS server. |
AP Name |
As an option, enter a new system name for the access point. The name must contain |
|
alphanumeric characters, must contain at least one alphabetical character, cannot be |
|
longerthan15characters,andcancontainhyphensbutcannotstartorendwithahyphen. |
|
By default, the system name is Netgearxxxxxx, in which xxxxxx represents the last six |
|
hexadecimal digits of the access point’s MAC address. |
AP Login New |
The admin password is the password that you use to log in to the access point’s local |
Password |
browserinterface. (Itis not thepasswordthatyouuseforWiFiaccess.)Enteranewadmin |
|
password with a minimum of 6 characters and a maximum of 32 characters. |
|
The ideal password contains no English dictionary words and contains uppercase and |
|
lowercase letters, numbers, and symbols. However, do not include quotation marks (") in |
|
the password. |
|
Write down and save the password for future use. |
Confirm New |
Enter exactly the same password that you entered in the AP Login New Password field. |
Password |
|
SSID |
You cannot use the default SSID for regular operation (the default SSID is for setup only). |
|
Enter a new name with a maximum of 32 characters. You can use a combination of |
|
alphanumeric and special characters, except for quotation marks (") and a backslash (\). |
Install the Access Point in Your 24 User Manual Network and Access It for Initial
Configuration

Insight Managed Smart Cloud Wireless Access Point AC3000 WAC540 User Manual
(Continued)
Setting |
Description |
|
Authentication |
From the menu, select one of the following authentication types for the WiFi network: |
|
Type |
• |
Open.Authenticationisnotrequiredanddataencryptionisnotsupported.Thissetting |
|
|
does not provide any security and is not appropriate for most situations. |
|
• |
WPA2 Personal. This option allows only WiFi clients that support WPA2 to connect to |
|
|
the SSID. Select this option if all WiFi clients are capable of supporting WPA2. This |
|
|
option uses AES encryption. |
|
• |
WPA2PersonalMixed.ThisoptionallowsbothWPAandWPA2WiFiclientstoconnect |
|
|
totheSSID. ThisoptionusesTKIPandAESencryption. BroadcastpacketsuseTKIP. For |
|
|
unicast (that is, point-to-point) transmissions, WPA clients use TKIP and WPA2 clients |
|
|
use AES. |
|
After you complete the setup process, you can set up WPA2 Enterprise security with |
|
|
RADIUS servers. For more information, see Set up an open or secure WiFi network on |
|
|
page 36. |
|
Passphrase |
Unless you select Open from the Authentication Type menu, enter a new passphrase |
|
|
(network key or WiFi password) for the WiFi network. |
|
6.Click the Apply button.
Your settings are saved and you are disconnected from the access point. If you changed the default country, the access point restarts.
7.Reconnect over WiFi to the access point’s WiFi network using the new SSID and passphrase that you just defined on the Day Zero Easy Setup page.
8.In the web browser, enter the access point IP address that you wrote down in Step 3.
If you assigned a static IP address to the access point, enter that IP address. A login window opens.
9.Enter the access point user name and password.
The default user name is admin. The password is the one that you just defined on the Day Zero Easy Setup page. The user name and password are case-sensitive.
The Dashboard page displays. You can now customize the access point settings for your network environment.
Install the Access Point in Your 25 User Manual Network and Access It for Initial
Configuration
Insight Managed Smart Cloud Wireless Access Point AC3000 WAC540 User Manual
Connect over Ethernet using a computer connected to the same network
The following procedure assumes that your network includes a DHCP server (or router thatfunctionsasaDHCPserver)andthattheaccesspointandthecomputerareonthe same network. By default, the access point functions as a DHCP client. If you want to set up the access point with a static (fixed) IP address, see Connect over Ethernet using a directly connected computer on page 29.
To connect to the access point using a computer that is connected to the same network as the access point:
1.To determine the IP address that the DHCP server assigned to the access point, access the DHCP server or use an IP network scanner.
2.Onthecomputer,openawebbrowserand,intheaddressbar,entertheIPaddress that is assigned to the access point.
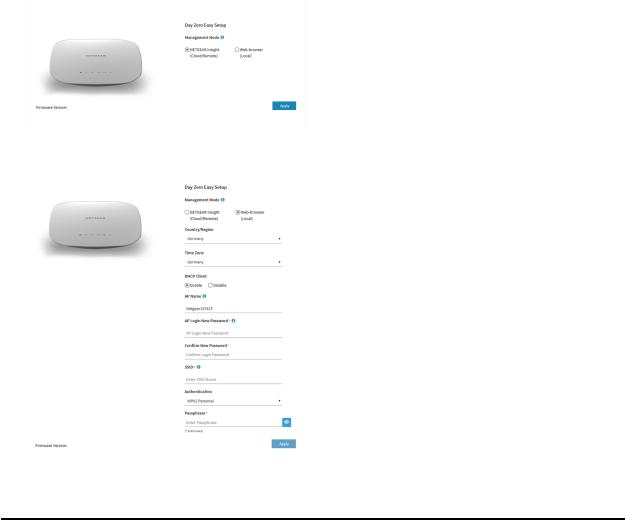
The Day Zero Easy Setup page displays.
3. Select the Web-browser radio button.
Install the Access Point in Your 26 User Manual Network and Access It for Initial
Configuration

Insight Managed Smart Cloud Wireless Access Point AC3000 WAC540 User Manual
Note: After you save the basic settings that are shown on the page, the Day Zero EasySetuppagenolongerdisplayswhenyoulogin.Instead,aloginwindowopens. After you log in, the Dashboard page displays.
4. Enter the settings that are described in the following table.
Setting |
Description |
Country/Region |
From the menu, select the country and region in which the access point is operating. |
|
Note: Makesurethatthecountryissettothelocationwherethedeviceisoperating. You |
|
are responsible for complying with the local, regional, and national regulations that are |
|
set for channels, power levels, and frequency ranges. |
|
Note: Itmightnotbelegaltooperatetheaccesspointinaregionotherthantheregions |
|
listedinthemenu.Ifyourcountryorregionisnotlisted,checkwithyourlocalgovernment |
|
agency. |
Time Zone |
From the menu, select the time zone for the country and region in which the access point |
|
is operating. |
DHCP Client |
By default, the DHCP client of the access point allows the access point to receive an IP |
|
address from a DHCP server (or router that functions as a DHCP server) in your network. |
|
To set up the access point with a static (fixed) IP address, do the following: |
|
a. Select the Disable radio button. |
|
Additional fields display. |
|
b. SpecifytheIPaddress,IPsubnetmask,IPaddressofthedefaultgateway,andIPaddress |
|
of the DNS server. |
AP Name |
As an option, enter a new system name for the access point. The name must contain |
|
alphanumeric characters, must contain at least one alphabetical character, cannot be |
|
longerthan15characters,andcancontainhyphensbutcannotstartorendwithahyphen. |
|
By default, the system name is Netgearxxxxxx, in which xxxxxx represents the last six |
|
hexadecimal digits of the access point’s MAC address. |
AP Login New |
The admin password is the password that you use to log in to the access point’s local |
Password |
browserinterface. (Itis not thepasswordthatyouuseforWiFiaccess.)Enteranewadmin |
|
password with a minimum of 6 characters and a maximum of 32 characters. |
|
The ideal password contains no English dictionary words and contains uppercase and |
|
lowercase letters, numbers, and symbols. However, do not include quotation marks (") in |
|
the password. |
|
Write down and save the password for future use. |
Install the Access Point in Your 27 User Manual Network and Access It for Initial
Configuration

Insight Managed Smart Cloud Wireless Access Point AC3000 WAC540 User Manual
(Continued)
Setting |
Description |
|
Confirm New |
Enter exactly the same password that you entered in the AP Login New Password field. |
|
Password |
|
|
SSID |
You cannot use the default SSID for regular operation (the default SSID is for setup only). |
|
|
Enter a new name with a maximum of 32 characters. You can use a combination of |
|
|
alphanumeric and special characters, except for quotation marks (") and a backslash (\). |
|
Authentication |
From the menu, select one of the following authentication types for the WiFi network: |
|
Type |
• |
Open.Authenticationisnotrequiredanddataencryptionisnotsupported.Thissetting |
|
|
does not provide any security and is not appropriate for most situations. |
|
• |
WPA2 Personal. This option allows only WiFi clients that support WPA2 to connect to |
|
|
the SSID. Select this option if all WiFi clients are capable of supporting WPA2. This |
|
|
option uses AES encryption. |
|
• |
WPA2PersonalMixed.ThisoptionallowsbothWPAandWPA2WiFiclientstoconnect |
|
|
totheSSID. ThisoptionusesTKIPandAESencryption. BroadcastpacketsuseTKIP. For |
|
|
unicast (that is, point-to-point) transmissions, WPA clients use TKIP and WPA2 clients |
|
|
use AES. |
|
After you complete the setup process, you can set up WPA2 Enterprise security with |
|
|
RADIUS servers. For more information, see Set up an open or secure WiFi network on |
|
|
page 36. |
|
Passphrase |
Unless you select Open from the Authentication Type menu, enter a new passphrase |
|
|
(network key or WiFi password) for the WiFi network. |
|
5.Click the Apply button. Your settings are saved.
If you changed the default country, the access point restarts.
Note: Do not close the page!
After a short period, the Dashboard page displays automatically. If the Dashboard page does not display, for example, because you assigned a static IP address, see the next step.
You can now customize the access point settings for your network environment.
Install the Access Point in Your 28 User Manual Network and Access It for Initial
Configuration

Insight Managed Smart Cloud Wireless Access Point AC3000 WAC540 User Manual
6.If the Dashboard does not display automatically, do the following: a. Take one of the following actions:
•If you assigned a static IP address to the access point, enter that IP address in the address bar of the web browser.
•IfyoudidnotassignastaticIPaddress,reentertheIPaddressthatisdisplayed in the address bar of the web browser. If that does not work, write down the IPaddress,closethewebbrowser,reopenthewebbrowser,andthenreenter the IP address in the address bar of the web browser.
•If you did not assign a static IP address and you closed the page so that you cannot see the IP address of the access point, use an IP scanner tool, use a networkdiscoverytool,oraccesstheDHCPservertodiscovertheIPaddress of the access point in your network. Then, open a browser and enter the IP address in the address bar of the web browser.
A login window opens.
b.Enter the access point user name and password.
The default user name is admin. The password is the one that you just defined ontheDayZeroEasySetuppage.Theusernameandpasswordarecase-sensitive. The Dashboard page displays. You can now customize the access point settings for your network environment.
ConnectoverEthernetusingadirectlyconnectedcomputer
If your network does not include a DHCP server (or router that functions as a DHCP server),youcanuseacomputerthatisconnectedthroughanEthernetcabletotheLAN port of the access point.
ToconnecttotheaccesspointusingacomputerthatisconnectedtotheLANport of the access point:
1.Record the IP address and subnet mask of your computer so that you can reinstate these IP address settings later.
2.Temporarily change the IP address on your computer to 192.168.0.210 with 255.255.255.0 as the subnet mask.
(You can actually use any IP address in the 192.168.0.2–192.168.0.254 range, with the exception of IP address 192.168.0.100, which is the default IP address of the access point.)
FormoreinformationaboutchangingtheIPaddressonyourcomputer,seethehelp or documentation for your computer.
3.UseanEthernetcabletoconnectyourcomputertotheLANportontheaccesspoint.
Install the Access Point in Your 29 User Manual Network and Access It for Initial
Configuration
Insight Managed Smart Cloud Wireless Access Point AC3000 WAC540 User Manual
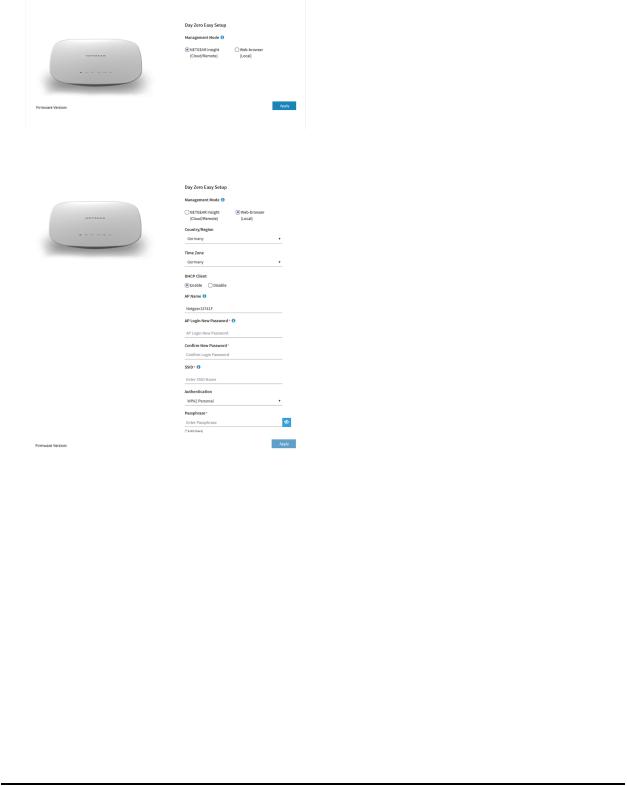
4.On the computer, open a web browser and enter 192.168.0.100 in the address bar.
The Day Zero Easy Setup page displays.
5. Select the Web-browser radio button.
Note: After you save the basic settings that are shown on the page, the Day Zero EasySetuppagenolongerdisplayswhenyoulogin.Instead,aloginwindowopens. After you log in, the Dashboard page displays.
6. Enter the settings that are described in the following table.
Install the Access Point in Your 30 User Manual Network and Access It for Initial
Configuration
Loading...