


 Loading...
RangeMax™ Wireless-N Gigabit Router with USB WNR3500L User Manual
NETGEAR, Inc.
350 E. Plumeria Drive
San Jose, CA 95134 USA
202-10545-01 November 2009 v1.0

© 2009 by NETGEAR, Inc. All rights reserved.
Product Registration, Support, and Documentation
Register your product at http://www.netgear.com/register. Registration is required before you can use our telephone support service. Product updates and Web support are always available at http://www.netgear.com/support.
Setup documentation is available on the CD, on the support website, and on the documentation website. When the wireless router is connected to the Internet, click the Knowledge Base or the Documentation link under Web Support on the main menu to view support information.
Trademarks
NETGEAR and the NETGEAR logo are registered trademarks, and RangeMax and Smart Wizard are trademarks of NETGEAR. Inc. in the United States and/or other countries. Microsoft, Windows, and Windows NT are registered trademarks and Windows Vista is a trademark of Microsoft Corporation. Other brand and product names are registered trademarks or trademarks of their respective holders.
Statement of Conditions
In the interest of improving internal design, operational function, and/or reliability, NETGEAR reserves the right to make changes to the products described in this document without notice.
NETGEAR does not assume any liability that may occur due to the use or application of the product(s) or circuit layout(s) described herein.
Certificate of the Manufacturer/Importer
It is hereby certified that the RangeMax Wireless-N Gigabit Router with USB WNR3500L has been suppressed
in accordance with the conditions set out in the BMPT-AmtsblVfg 243/1991 and Vfg 46/1992. The operation of some equipment (for example, test transmitters) in accordance with the regulations may, however, be subject to certain restrictions. Please refer to the notes in the operating instructions.
Federal Office for Telecommunications Approvals has been notified of the placing of this equipment on the market and has been granted the right to test the series for compliance with the regulations.
Bestätigung des Herstellers/Importeurs
Es wird hiermit bestätigt, daß das RangeMax Wireless-N Gigabit Router with USB WNR3500L gemäß der im BMPTAmtsblVfg 243/1991 und Vfg 46/1992 aufgeführten Bestimmungen entstört ist. Das vorschriftsmäßige Betreiben einiger Geräte (z.B. Testsender) kann jedoch gewissen Beschränkungen unterliegen. Lesen Sie dazu bitte die Anmerkungen in der Betriebsanleitung.
Das Bundesamt für Zulassungen in der Telekommunikation wurde davon unterrichtet, daß dieses Gerät auf den Markt gebracht wurde und es ist berechtigt, die Serie auf die Erfüllung der Vorschriften hin zu überprüfen.
Regulatory Compliance Information
This section includes user requirements for operating this product in accordance with National laws for usage of radio spectrum and operation of radio devices. Failure of the end-user to comply with the applicable requirements may result in unlawful operation and adverse action against the end-user by the applicable National regulatory authority.
ii
v1.0, November 2009

NOTE: This product's firmware limits operation to only the channels allowed in a particular Region or Country. Therefore, all options described in this user's guide may not be available in your version of the product.
Europe – EU Declaration of Conformity
Marking by the above symbol indicates compliance with the Essential Requirements of the R&TTE Directive of the European Union (1999/5/EC). This equipment meets the following conformance standards:
EN300 328, EN301 489-17, EN60950
A printed copy of the EU Declaration of Conformity certificate for this product is provided in the WNR3500L product package.
Europe – Declaration of Conformity in Languages of the European Community
Cesky [Czech] |
NETGEAR Inc. tímto prohlašuje, že tento Radiolan je ve shode se základními |
|
|
požadavky a dalšími príslušnými ustanoveními smernice 1999/5/ES. |
|
|
|
|
Dansk |
Undertegnede NETGEAR Inc. erklærer herved, at følgende udstyr Radiolan overholder |
|
[Danish] |
de væsentlige krav og øvrige relevante krav i direktiv 1999/5/EF. |
|
|
|
|
Deutsch |
Hiermit erklärt NETGEAR Inc., dass sich das Gerät Radiolan in Übereinstimmung mit |
|
[German] |
den grundlegenden Anforderungen und den übrigen einschlägigen Bestimmungen der |
|
|
Richtlinie 1999/5/EG befindet. |
|
|
|
|
Eesti |
Käesolevaga kinnitab NETGEAR Inc. seadme Radiolan vastavust direktiivi 1999/5/EÜ |
|
[Estonian] |
põhinõuetele ja nimetatud direktiivist tulenevatele teistele asjakohastele sätetele. |
|
|
|
|
English |
Hereby, NETGEAR Inc., declares that this Radiolan is in compliance with the essential |
|
|
requirements and other relevant provisions of Directive 1999/5/EC. |
|
|
|
|
Español |
Por medio de la presente NETGEAR Inc. declara que el Radiolan cumple con los |
|
[Spanish] |
requisitos esenciales y cualesquiera otras disposiciones aplicables o exigibles de la |
|
|
Directiva 1999/5/CE. |
|
|
|
|
Ελληνική |
ΜΕ ΤΗΝ ΠΑΡΟΥΣΑ NETGEAR Inc. ΔΗΛΩΝΕΙ ΟΤΙ Radiolan ΣΥΜΜΟΡΦΩΝΕΤΑΙ |
|
[Greek] |
ΠΡΟΣ ΤΙΣ ΟΥΣΙΩΔΕΙΣ ΑΠΑΙΤΗΣΕΙΣ ΚΑΙ ΤΙΣ ΛΟΙΠΕΣ ΣΧΕΤΙΚΕΣ ΔΙΑΤΑΞΕΙΣ ΤΗΣ |
|
|
ΟΔΗΓΙΑΣ 1999/5/ΕΚ. |
|
|
|
|
Français |
Par la présente NETGEAR Inc. déclare que l'appareil Radiolan est conforme aux |
|
[French] |
exigences essentielles et aux autres dispositions pertinentes de la directive 1999/5/CE. |
|
|
|
|
Italiano [Italian] |
Con la presente NETGEAR Inc. dichiara che questo Radiolan è conforme ai requisiti |
|
|
essenziali ed alle altre disposizioni pertinenti stabilite dalla direttiva 1999/5/CE. |
|
|
|
|
Latviski |
Ar šo NETGEAR Inc. deklarē, ka Radiolan atbilst Direktīvas 1999/5/EK būtiskajām |
|
[Latvian] |
prasībām un citiem ar to saistītajiem noteikumiem. |
|
|
|
|
Lietuvių |
Šiuo NETGEAR Inc. deklaruoja, kad šis Radiolan atitinka esminius reikalavimus ir kitas |
|
[Lithuanian] |
1999/5/EB Direktyvos nuostatas. |
|
|
|
|
|
|
|
|
iii |
|
v1.0, November 2009

Nederlands |
Hierbij verklaart NETGEAR Inc. dat het toestel Radiolan in overeenstemming is met de |
[Dutch] |
essentiële eisen en de andere relevante bepalingen van richtlijn 1999/5/EG. |
|
|
Malti [Maltese] |
Hawnhekk, NETGEAR Inc., jiddikjara li dan Radiolan jikkonforma mal-htigijiet |
|
essenzjali u ma provvedimenti ohrajn relevanti li hemm fid-Dirrettiva 1999/5/EC. |
|
|
Magyar |
Alulírott, NETGEAR Inc. nyilatkozom, hogy a Radiolan megfelel a vonatkozó alapvetõ |
[Hungarian] |
követelményeknek és az 1999/5/EC irányelv egyéb elõírásainak. |
|
|
Polski [Polish] |
Niniejszym NETGEAR Inc. oświadcza, że Radiolan jest zgodny z zasadniczymi |
|
wymogami oraz pozostałymi stosownymi postanowieniami Dyrektywy 1999/5/EC. |
|
|
Português |
NETGEAR Inc. declara que este Radiolan está conforme com os requisitos essenciais |
[Portuguese] |
e outras disposições da Directiva 1999/5/CE. |
|
|
Slovensko |
NETGEAR Inc. izjavlja, da je ta Radiolan v skladu z bistvenimi zahtevami in ostalimi |
[Slovenian] |
relevantnimi določili direktive 1999/5/ES. |
|
|
Slovensky |
NETGEAR Inc. týmto vyhlasuje, _e Radiolan spĺňa základné po_iadavky a všetky |
[Slovak] |
príslušné ustanovenia Smernice 1999/5/ES. |
|
|
Suomi |
NETGEAR Inc. vakuuttaa täten että Radiolan tyyppinen laite on direktiivin 1999/5/EY |
[Finnish] |
oleellisten vaatimusten ja sitä koskevien direktiivin muiden ehtojen mukainen. |
|
|
Svenska |
Härmed intygar NETGEAR Inc. att denna Radiolan står I överensstämmelse med de |
[Swedish] |
väsentliga egenskapskrav och övriga relevanta bestämmelser som framgår av direktiv |
|
1999/5/EG. |
|
|
Íslenska |
Hér með lýsir NETGEAR Inc. yfir því að Radiolan er í samræmi við grunnkröfur og aðrar |
[Icelandic] |
kröfur, sem gerðar eru í tilskipun 1999/5/EC. |
|
|
Norsk |
NETGEAR Inc. erklærer herved at utstyret Radiolan er i samsvar med de |
[Norwegian] |
grunnleggende krav og øvrige relevante krav i direktiv 1999/5/EF. |
|
|
FCC Requirements for Operation in the United States
FCC Information to User
This product does not contain any user serviceable components and is to be used with approved antennas only. Any product changes or modifications will invalidate all applicable regulatory certifications and approvals.
FCC Guidelines for Human Exposure
This equipment complies with FCC radiation exposure limits set forth for an uncontrolled environment. This equipment should be installed and operated with minimum distance of 20 cm between the radiator and your body.
This transmitter must not be co-located or operating in conjunction with any other antenna or transmitter.
iv
v1.0, November 2009

FCC Declaration Of Conformity
We NETGEAR, Inc., 350 E. Plumeria Drive, San Jose, CA 95134, declare under our sole responsibility that the model WNR3500L RangeMax Wireless-N Gigabit Router with USB WNR3500L complies with Part 15 of FCC Rules. Operation is subject to the following two conditions:
•This device may not cause harmful interference, and
•This device must accept any interference received, including interference that may cause undesired operation.
FCC Radio Frequency Interference Warnings & Instructions
This equipment has been tested and found to comply with the limits for a Class B digital device, pursuant to Part 15 of the FCC Rules. These limits are designed to provide reasonable protection against harmful interference in a residential installation. This equipment uses and can radiate radio frequency energy and, if not installed and used in accordance with the instructions, may cause harmful interference to radio communications. However, there is no guarantee that interference will not occur in a particular installation. If this equipment does cause harmful interference to radio or television reception, which can be determined by turning the equipment off and on, the user is encouraged to try to correct the interference by one or more of the following methods:
•Reorient or relocate the receiving antenna.
•Increase the separation between the equipment and the receiver.
•Connect the equipment into an electrical outlet on a circuit different from that which the radio receiver is connected.
•Consult the dealer or an experienced radio/TV technician for help.
RangeMax Wireless-N Gigabit Router with USB
Tested to Comply with FCC Standards
FOR HOME OR OFFICE USE
Modifications made to the product, unless expressly approved by NETGEAR, Inc., could void the user's right to operate the equipment.
Maximum Wireless Signal Rate Derived from IEEE Standard 802.11 Specifications
Actual data throughput will vary. Network conditions and environmental factors, including volume of network traffic, building materials and construction, and network overhead, lower actual data throughput rate.
v
v1.0, November 2009

Product and Publication Details
Model Number: |
WNR3500L |
Publication Date: |
November 2009 |
Product Family: |
Wireless Router |
Product Name: |
RangeMax Wireless-N Gigabit Router with USB WNR3500L |
Home or Business Product: |
Home |
Language: |
English |
Publication Part Number: |
202-10545-01 |
vi
v1.0, November 2009

RangeMax™ Wireless-N Gigabit Router with USB WNR3500L User Manual
Contents
NETGEAR RangeMax™ Wireless-N Gigabit Router with USB WNR3500L User Manual
About This Manual
Chapter 1
Configuring Your Internet Connection
Using the Setup Manual ................................................................................................. |
1-1 |
Logging In to Your Wireless Router ................................................................................ |
1-2 |
Selecting a Language for Your Screen Display .............................................................. |
1-5 |
Using the Setup Wizard .................................................................................................. |
1-6 |
Viewing or Manually Configuring Your ISP Settings ....................................................... |
1-6 |
Chapter 2 |
|
Safeguarding Your Network |
|
Planning Your Wireless Network .................................................................................... |
2-1 |
Wireless Placement and Range Guidelines ............................................................. |
2-2 |
Wireless Security Options ........................................................................................ |
2-3 |
Manually Configuring Your Wireless Settings ................................................................. |
2-4 |
Configuring WEP Wireless Security ......................................................................... |
2-6 |
Configuring WPA, WPA2, or WPA/WPA2 Wireless Security .................................... |
2-8 |
Using Push ‘N’ Connect to Configure Your Wireless Network ........................................ |
2-9 |
Using the WPS Button to Configure Your Network and Add a Client ..................... |
2-10 |
Using a PIN to Configure Your Network and Add a Client ..................................... |
2-11 |
Configuring Advanced WPS Settings ..................................................................... |
2-13 |
Adding Both WPS-Capable Clients and Non-WPS-Capable Clients ............................ |
2-14 |
Restricting Access to Your Router ................................................................................ |
2-15 |
Contents |
vii |
v1.0, November 2009

RangeMax™ Wireless-N Gigabit Router with USB WNR3500L User Manual
Chapter 3
Protecting Your Network
Protecting Access to Your WNR3500v2 Router ............................................................. |
3-1 |
Changing the Built-In Password ............................................................................... |
3-2 |
Restricting Access by MAC Address .............................................................................. |
3-3 |
Blocking Access to Internet Sites ................................................................................... |
3-4 |
Blocking Access to Internet Services ............................................................................. |
3-6 |
Configuring a User-Defined Service ......................................................................... |
3-7 |
Scheduling Blocking ....................................................................................................... |
3-8 |
Viewing Logs of Web Access or Attempted Web Access ............................................... |
3-9 |
Configuring E-mail Alert and Web Access Log Notifications ........................................ |
3-10 |
Setting the Time ............................................................................................................ |
3-11 |
Chapter 4 |
|
Using Network Monitoring Tools |
|
Upgrading the Router Firmware ..................................................................................... |
4-1 |
Upgrading Automatically to New Router Software ................................................... |
4-3 |
Upgrading Manually to New Router Software .......................................................... |
4-3 |
Viewing Wireless Router Status Information ................................................................... |
4-4 |
Viewing a List of Attached Devices ................................................................................. |
4-9 |
Managing the Configuration File ..................................................................................... |
4-9 |
Backing Up and Restoring the Configuration ......................................................... |
4-10 |
Erasing the Configuration ....................................................................................... |
4-11 |
Enabling Remote Management Access ....................................................................... |
4-11 |
Chapter 5 |
|
Customizing Your Network Settings |
|
Using the LAN IP Setup Options .................................................................................... |
5-1 |
Using the Router as a DHCP Server ........................................................................ |
5-4 |
Using Address Reservation ...................................................................................... |
5-4 |
Using a Dynamic DNS Service ....................................................................................... |
5-5 |
Configuring the WAN Setup Options .............................................................................. |
5-7 |
Setting Up a Default DMZ Server ............................................................................. |
5-8 |
Configuring Static Routes ............................................................................................... |
5-9 |
Allowing Inbound Connections to Your Network ........................................................... |
5-11 |
How Your Computer Accesses a Remote Computer through Your Router ............ |
5-11 |
How Port Triggering Changes the Communication Process .................................. |
5-13 |
|
|
Contents |
viii |
v1.0, November 2009

RangeMax™ Wireless-N Gigabit Router with USB WNR3500L User Manual
How Port Forwarding Changes the Communication Process ................................ |
5-14 |
How Port Forwarding Differs from Port Triggering ................................................. |
5-15 |
Configuring Port Forwarding to Local Servers .............................................................. |
5-16 |
Adding a Custom Service ....................................................................................... |
5-17 |
Editing or Deleting a Port Forwarding Entry ........................................................... |
5-18 |
Configuring Port Triggering ........................................................................................... |
5-18 |
Wireless Repeating (Also Called WDS) ....................................................................... |
5-21 |
Wireless Repeating Function ................................................................................. |
5-22 |
Setting Up the Base Station ................................................................................... |
5-23 |
Setting Up a Repeater Unit .................................................................................... |
5-24 |
Chapter 6 |
|
Fine-Tuning Your Network |
|
Assessing Your Speed Requirements ............................................................................ |
6-2 |
Optimizing Your Network Bandwidth .............................................................................. |
6-3 |
Optimizing Wireless Performance .................................................................................. |
6-5 |
Changing the MTU Size ................................................................................................. |
6-6 |
Quality of Service ........................................................................................................... |
6-7 |
Using WMM QoS for Wireless Multimedia Applications ........................................... |
6-8 |
Configuring QoS for Internet Access ........................................................................ |
6-8 |
Using Universal Plug and Play ..................................................................................... |
6-13 |
Chapter 7 |
|
USB Storage |
|
USB Drive Requirements ............................................................................................... |
7-1 |
File Sharing Scenarios ................................................................................................... |
7-2 |
USB Storage Basic Settings ........................................................................................... |
7-4 |
Editing a Network Folder .......................................................................................... |
7-6 |
Configuring USB Storage Advanced Settings ................................................................ |
7-7 |
Creating a Network Folder ....................................................................................... |
7-9 |
ReadyShare Access ..................................................................................................... |
7-10 |
Unmounting a USB Drive ............................................................................................. |
7-10 |
Specifying Approved USB Devices ............................................................................... |
7-11 |
Connecting to the USB Drive from a Remote Computer .............................................. |
7-12 |
Locating the Internet Port IP Address .................................................................... |
7-12 |
Accessing the Router’s USB Drive Remotely Using FTP ...................................... |
7-12 |
|
|
Contents |
ix |
v1.0, November 2009

RangeMax™ Wireless-N Gigabit Router with USB WNR3500L User Manual
Connecting to the USB Drive with Microsoft Network Settings .................................... |
7-12 |
Enabling File and Printer Sharing .......................................................................... |
7-13 |
Chapter 8 |
|
Troubleshooting |
|
Quick Tips ....................................................................................................................... |
8-1 |
Troubleshooting Basic Functions .................................................................................... |
8-3 |
Cannot Access the Router Main Menu ........................................................................... |
8-5 |
Cannot Access the Internet ............................................................................................ |
8-6 |
Troubleshooting a Network Using the Ping Utility ........................................................... |
8-8 |
Testing the LAN Path to Your Router ....................................................................... |
8-8 |
Testing the Path from Your Computer to a Remote Device ..................................... |
8-9 |
Problems with Date and Time ....................................................................................... |
8-10 |
Wireless Connectivity ................................................................................................... |
8-10 |
Using Your Wireless Card Setup Program ............................................................. |
8-11 |
Setting Up and Testing Basic Wireless Connectivity .............................................. |
8-11 |
Restoring the Default Configuration and Password ...................................................... |
8-14 |
Appendix A |
|
Default Configuration and Technical Specifications |
|
Technical Specifications ................................................................................................. |
A-3 |
Appendix B |
|
Related Documents |
|
Index
Contents |
x |
v1.0, November 2009
About This Manual
This user manual provides information for configuring the features of the NETGEAR® RangeMax Wireless-N Gigabit Router with USB WNR3500L beyond initial configuration settings. Initial configuration instructions can be found in the NETGEAR Wireless Router Setup Manual. The information in this manual is intended for readers with intermediate computer and Internet skills.
Conventions, Formats, and Scope
The conventions, formats, and scope of this manual are described in the following paragraphs:
•Typographical conventions. This manual uses the following typographical conventions:
Italic |
Emphasis, books, CDs |
|
|
Bold |
User input, GUI screen text |
|
|
Fixed |
Command prompt, CLI text, code |
Italic |
URL links |
|
|
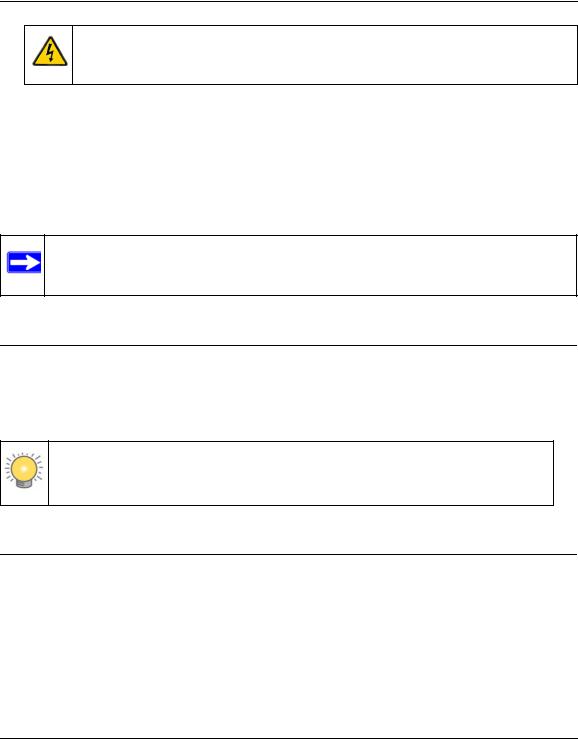
•Formats. This manual uses the following formats to highlight special messages:
 Note: This format is used to highlight information of importance or special interest.
 Tip: This format is used to highlight a procedure that will save time or resources.
Warning: Ignoring this type of note might result in a malfunction or damage to the equipment, a breach of security, or a loss of data.
xi
v1.0, November 2009
RangeMax™ Wireless-N Gigabit Router with USB WNR3500L User Manual
Danger: This is a safety warning. Failure to take heed of this notice might result in personal injury or death.
•Scope. This manual is written for the WNR3500L router according to these specifications:
Product Version |
RangeMax Wireless-N Gigabit Router with USB WNR3500L |
|
|
Manual Publication Date |
November 2009 |
|
|
For more information about network, Internet, firewall, and VPN technologies, click the links to the NETGEAR website in Appendix B, “Related Documents.”
Note: Product updates are available on the NETGEAR, Inc. website at
http://www.netgear.com/products/WNR3500L.
How to Print This Manual
To print this manual, your computer must have the free Adobe Acrobat reader installed in order to view and print PDF files. The Acrobat reader is available on the Adobe Web site at http://www.adobe.com.
Tip: If your printer supports printing two pages on a single sheet of paper, you can save paper and printer ink by selecting this feature.
Revision History
Part Number |
Version |
Date |
Description |
|
Number |
||||
|
|
|
||
|
|
|
|
|
202-10433-01 |
1.0 |
May 2009 |
First publication. |
|
|
|
|
|
|
202-10545-01 |
1.0 |
November 2009 |
New features. |
|
|
|
|
|
xii
v1.0, November 2009
Chapter 1
Configuring Your Internet Connection
This chapter describes how to configure your WNR3500L router Internet connection. When you install your wireless router using the Resource CD as described in the NETGEAR Router Setup Manual, these settings are configured automatically for you. This chapter provides instructions on how to log in to the wireless router for further configuration.
Note: NETGEAR recommends using the Smart Wizard™ on the Resource CD for initial configuration, as described in the NETGEAR Wireless Router Setup Manual.
This chapter includes the following sections:
•“Using the Setup Manual”
•“Logging In to Your Wireless Router” on page 1-2
•“Using the Setup Wizard” on page 1-5
•“Using the Setup Wizard” on page 1-5
•“Viewing or Manually Configuring Your ISP Settings” on page 1-5
Using the Setup Manual
For first-time installation of your wireless router, refer to the NETGEAR Wireless Router Setup Manual. The Setup Manual explains how to launch the NETGEAR Smart Wizard on the Resource CD to step you through the procedure to connect your router, modem, and computers. The Smart Wizard will assist you in configuring your wireless settings and enabling wireless security for your network. After initial configuration using the Setup Manual, you can use the information in this User Manual to configure additional features of your wireless router.
For installation instructions in a language other than English, refer to the language options on the
Resource CD.
1-1
v1.0, November 2009
RangeMax™ Wireless-N Gigabit Router with USB WNR3500L User Manual
Logging In to Your Wireless Router
You can log in to the wireless router to view or change its settings.
Note: Your computer must be configured for DHCP. For help with configuring DHCP, see the documentation that came with your computer or see the link to the online document in “Preparing Your Network” in Appendix B.
To log in to the wireless router:
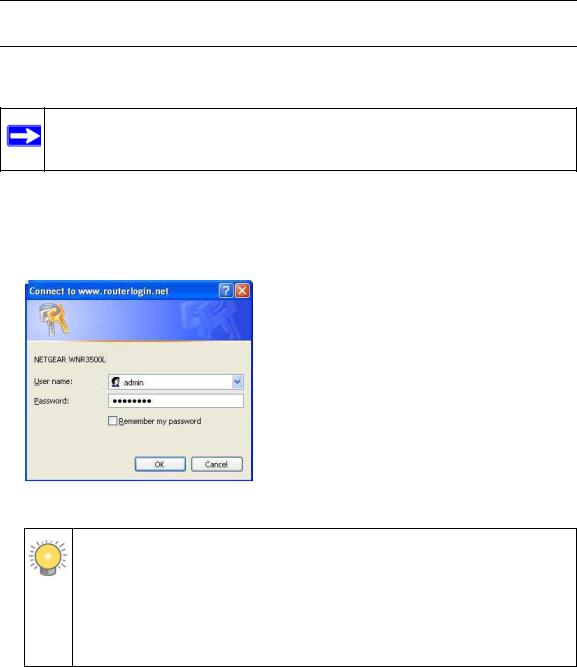
1.Connect to the wireless router by typing http://www.routerlogin.net or the router’s LAN IP address (the default is 192.168.1.1) in the address field of your browser, and then press Enter. A login window opens:
Figure 1-1
Tip: You can connect to the wireless router by typing either of these URLs in the address field of your browser, and then pressing Enter:
•http://www.routerlogin.net
•http://www.routerlogin.com
If these URLs do not work, you must type the IP address of the router, for example, http://www.192.168.1.1.
Configuring Your Internet Connection |
1-2 |
v1.0, November 2009
RangeMax™ Wireless-N Gigabit Router with USB WNR3500L User Manual
2.Enter admin for the router user name and your password (or the default, password). For information about how to change the password, see “Changing the Built-In Password” on page 3-2.
Note: The router user name and password are not the same as any other user name or password you might use to log in to your Internet connection.
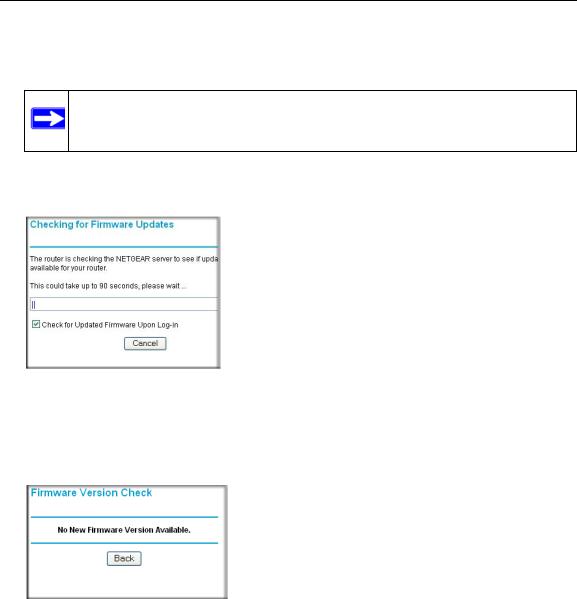
The Checking for Firmware Updates screen displays unless you previously cleared the Check for Updated Firmware Upon Log-in check box.
Figure 1-2
If the router discovers a newer version of software, you are asked if you want to upgrade to the new software (see “Upgrading the Router Firmware” on page 4-1 for details). If no new firmware is available, the following message displays.
Figure 1-3
3. The Basic Settings screen displays showing the wireless router’s settings.
Configuring Your Internet Connection |
1-3 |
v1.0, November 2009

RangeMax™ Wireless-N Gigabit Router with USB WNR3500L User Manual
Figure 1-4
Note: If the Check for New Version Upon Log-in check box is selected, the home page is the Router Upgrade screen. Otherwise, it is the Basic Settings screen.
If the wireless router is connected to the Internet, you can select Knowledge Base or Documentation under Web Support in the main menu to view support information or the documentation for the wireless router.
If you do not click Logout, the wireless router will wait for 5 minutes after no activity before it automatically logs you out.
Configuring Your Internet Connection |
1-4 |
v1.0, November 2009

RangeMax™ Wireless-N Gigabit Router with USB WNR3500L User Manual
Using the Setup Wizard
You can manually configure your Internet connection using the Basic Settings screen, or you can allow the Setup Wizard to determine your Internet Service Provider (ISP) configuration.
The Setup Wizard searches your Internet connection for servers and protocols to determine your ISP configuration. This feature is not the same as the Smart Wizard on the Resource CD. To use the Setup Wizard to assist with configuration or to verify the Internet connection settings:
1.From the main menu, select Setup Wizard.
2.Click Next to proceed. Enter your ISP settings, as needed.
3.At the end of the Setup Wizard, click Test to verify your Internet connection. If you have trouble connecting to the Internet, see Chapter 8, “Troubleshooting.”
Viewing or Manually Configuring Your ISP Settings
To view or configure the basic settings:
1.Log in to the wireless router as described in “Logging In to Your Wireless Router” on page 1-2.
The Basic Settings screen displays (described in Table 1-1 on page 1-7).
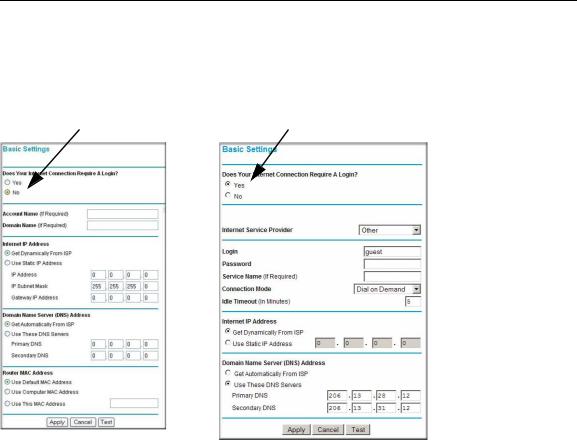
2.Select Yes or No depending on whether your ISP requires a login. This selection changes the fields available on the Basic Settings screen.
•Yes. If your ISP requires a login, select the encapsulation method. Enter the login name. If you want to change the login time-out, enter a new value in minutes.
•No. If your ISP does not require a login, enter the account name, if required, and the domain name, if required.
3.Enter the settings for the IP address and DNS server. If you enter or change a DNS address, restart the computers on your network so that these settings take effect.
4.If no login is required, you can specify the MAC Address setting.
5.Click Apply to save your settings.
6.Click Test to test your Internet connection. If the NETGEAR website does not appear within one minute, refer to Chapter 8, “Troubleshooting.
Configuring Your Internet Connection |
1-5 |
v1.0, November 2009
RangeMax™ Wireless-N Gigabit Router with USB WNR3500L User Manual
When your Internet connection is working you do not need to launch the ISP’s login program on your computer to access the Internet. When you start an Internet application, your wireless router automatically logs you in
The fields that are displayed depend on whether or not your Internet connection requires a login.
ISP does not require login |
ISP does require login |
Figure 1-5
The following table explains the fields in the Basic Settings screen.
Configuring Your Internet Connection |
1-6 |
v1.0, November 2009

RangeMax™ Wireless-N Gigabit Router with USB WNR3500L User Manual
Table 1-1. Basic Settings screen fields
Settings |
|
Description |
|
|
|
Does Your ISP Require a Login? |
• Yes |
|
|
|
• No |
|
|
|
These fields |
Account Name |
Enter the account name provided by your ISP. This might also |
appear only if no |
(If required) |
be called the host name. |
login is required. |
|
|
Domain Name |
Enter the domain name provided by your ISP. |
|
|
(If required) |
|
|
|
|
These fields |
Internet Service Provider |
• PPTP (Point to Point Tunneling Protocol). This is used |
appear only if |
|
primarily in Austrian DSL services. |
your ISP |
|
• Telstra Bigpond. This setting is only for older cable modem |
requires a login. |
|
service accounts that still require a Bigpond Login utility. |
|
|
Telstra has discontinued this type of account. Those with |
|
|
Telstra DSL accounts and newer cable modem accounts |
|
|
should select No for Does Your Internet Connection |
|
|
Require A Login?. |
|
|
• Other. This is the default setting. It is for PPPoE (Point to |
|
|
Point Protocol over Ethernet), the protocol used by most |
|
|
DSL services worldwide. |
|
|
|
|
Login |
The login name provided by your ISP. This is often an e-mail |
|
|
address. |
|
|
|
|
Password |
The password that you use to log ISP. |
|
|
|
|
Service Name |
If your ISP provided a Service Name, enter it here. This field |
|
|
appears if the Internet Service Provider is defined as “Other” |
|
|
(PPPoE) |
|
|
|
|
Connection Mode |
Specify when the router will connect to and disconnect from |
|
|
the Internet. |
|
|
• Always On. The router logs in to the Internet immediately |
|
|
after booting and never disconnects. |
|
|
• Dial on Demand. The router logs in only when outgoing |
|
|
traffic is present and logs out after the idle time-out. |
|
|
• Manually Connect. The router logs in or logs out only when |
|
|
you click Connect or Disconnect in the Router Status |
|
|
screen. |
|
|
|
|
Idle Timeout (In minutes) |
If you want to change the Internet login time-out, enter a new |
|
|
value in minutes. This determines how long the wireless router |
|
|
keeps the Internet connection active after there is no Internet |
|
|
activity from the LAN. Entering an Idle Timeout value of 0 |
|
|
(zero) means never log out. |
|
|
|
Configuring Your Internet Connection |
1-7 |
v1.0, November 2009

RangeMax™ Wireless-N Gigabit Router with USB WNR3500L User Manual
Table 1-1. Basic Settings screen fields (continued)
Settings |
|
Description |
|
|
|
Internet IP Address |
• Get Dynamically from ISP. Your ISP automatically assigns |
|
|
|
these addresses. |
|
|
• Use Static IP Address. Enter the IP address that your ISP |
|
|
assigned. Also enter the IP subnet mask and the gateway IP |
|
|
address. The gateway is the ISP’s gateway to which your |
|
|
wireless router will connect. |
|
|
|
Domain Name Server (DNS) Address |
The DNS server is used to look up site addresses based on |
|
|
|
their names. |
|
|
• Get Automatically from ISP. Your ISP automatically |
|
|
assigns this address. |
|
|
• Use These DNS Servers. If you know that your ISP does |
|
|
not automatically transmit DNS addresses to the wireless |
|
|
router during login, select this option, and enter the IP |
|
|
address of your ISP’s primary DNS server. If a secondary |
|
|
DNS server address is available, enter it also. |
|
|
|
This field |
Router MAC Address |
The Ethernet MAC address that will be used by the wireless |
appears if no |
|
router on the Internet port. Some ISPs register the Ethernet |
login is required |
|
MAC address of the network interface card in your computer |
or the Internet |
|
when your account is first opened. They will then accept traffic |
Service Provider |
|
only from the MAC address of that computer. This feature |
is not defined as |
|
allows your wireless router to masquerade as that computer |
“Other.” |
|
by “cloning” its MAC address. |
|
|
• Use Default Address. Use the default MAC address. |
|
|
• Use Computer MAC Address. The wireless router will |
|
|
capture and use the MAC address of the computer that you |
|
|
are now using. You must be using the one computer that is |
|
|
allowed by the ISP. |
|
|
• Use This MAC Address. Enter the MAC address that you |
|
|
want to use. |
|
|
|
Configuring Your Internet Connection |
1-8 |
v1.0, November 2009
Chapter 2
Safeguarding Your Network
For a wireless connection, the SSID, also called the wireless network name, and the wireless security setting must be the same for the wireless router and wireless computers or wireless
adapters. NETGEAR strongly recommends that you use wireless security.
Warning: Computers can connect wirelessly at a range of several hundred feet. This can allow others outside of your immediate area to access your network.
This chapter includes:
•“Planning Your Wireless Network”
•“Manually Configuring Your Wireless Settings” on page 2-4
•“Using Push ‘N’ Connect to Configure Your Wireless Network” on page 2-9
•“Adding Both WPS-Capable Clients and Non-WPS-Capable Clients” on page 2-14
•“Restricting Access to Your Router” on page 2-15
Planning Your Wireless Network
For compliance and compatibility between similar products in your area, the operating channel and region must be set correctly.
To configure the wireless network, you can either specify the wireless settings, or you can use WiFi Protected Setup (WPS) to automatically set the SSID and implement WPA/WPA2 security.
•To manually configure the wireless settings, you must know the following:
–SSID. The default SSID for the wireless router is NETGEAR.
–The wireless mode (802.11n, 802.11g, or 802.11b) that each wireless adapter supports.
–Wireless security option. To successfully implement wireless security, check each wireless adapter to determine which wireless security option it supports.
See “Manually Configuring Your Wireless Settings” on page 2-4.
2-1
v1.0, November 2009

RangeMax™ Wireless-N Gigabit Router with USB WNR3500L User Manual
•Push 'N' Connect (WPS) automatically implements wireless security on the wireless router while, at the same time, allowing you to automatically implement wireless security on any WPS-enabled devices (such as wireless computers and wireless adapter cards). You activate WPS by pressing a WPS button on the wireless router, clicking an onscreen WPS button, or entering a PIN number. This generates a new SSID and implements WPA/WPA2 security.
Note: NETGEAR’s Push 'N' Connect feature is based on the Wi-Fi Protected Setup  (WPS) standard (for more information, see http://www.wi-fi.org). All other Wi-
Fi-certified and WPS-capable products should be compatible with NETGEAR products that implement Push 'N' Connect.
To set up your wireless network using the WPS feature:
–Use the WPS button on the side of the wireless router (there is also an onscreen WPS button), or enter the PIN of the wireless device.
–Make sure that all wireless computers and wireless adapters on the network are Wi-Fi certified and WPA or WPA 2 capable, and that they support WPS configuration.
See “Using Push ‘N’ Connect to Configure Your Wireless Network” on page 2-9.
Wireless Placement and Range Guidelines
The range of your wireless connection can vary significantly based on the physical placement of the wireless router. The latency, data throughput performance, and notebook power consumption of wireless adapters also vary depending on your configuration choices.
For best results, place your wireless router according to the following guidelines:
•Near the center of the area in which your PCs will operate.
•In an elevated location such as a high shelf where the wirelessly connected PCs have line-of- sight access (even if through walls).
•Away from sources of interference, such as PCs, microwave ovens, and 2.4 GHz cordless phones.
•Away from large metal surfaces.
•If using multiple access points, it is better if adjacent access points use different radio frequency channels to reduce interference. The recommended channel spacing between adjacent access points is 5 channels (for example, use Channels 1 and 6, or 6 and 11).
The time it takes to establish a wireless connection can vary depending on both your security settings and placement.
Safeguarding Your Network |
2-2 |
v1.0, November 2009
RangeMax™ Wireless-N Gigabit Router with USB WNR3500L User Manual
Wireless Security Options
Computers can connect over a 802.11g or 802.11n network at a range of up to 300 feet. Such distances can allow for others outside your immediate area to access your network.
Unlike wired network data, your wireless data transmissions can extend beyond your walls and can be received by anyone with a compatible adapter. For this reason, use the security features of your wireless equipment. The WNR3500L router provides highly effective security features which are covered in detail in this chapter. Deploy the security features appropriate to your needs.
There are several ways you can enhance the security of your wireless network:
1.Open system: Easy, but no security
2.WEP: Security, but some performance impact
3.WPA-PSK: Strong security
4.WPA-2-PSK: Very strong security
Figure 2-1
•WEP. Wired Equivalent Privacy (WEP) data encryption provides data security. WEP Shared Key authentication and WEP data encryption block all but the most determined eavesdropper. This data encryption mode has been superseded by WPA-PSK and WPA2-PSK.
•WPA-PSK (TKIP), WPA2-PSK (AES). Wi-Fi Protected Access (WPA) using a pre-shared key to perform authentication and generate the initial data encryption keys. The very strong authentication along with dynamic per frame re-keying of WPA makes it virtually impossible to compromise.
For more information about wireless technology, see the link to the online document in “Wireless Networking Basics” in Appendix B.
Safeguarding Your Network |
2-3 |
v1.0, November 2009
RangeMax™ Wireless-N Gigabit Router with USB WNR3500L User Manual
Manually Configuring Your Wireless Settings
You can view or manually configure the wireless settings for the wireless router in the Wireless Settings screen. If you want to make changes, make sure to note the current settings first.
Note: If you use a wireless computer to change the wireless network name (SSID) or  wireless security settings, you will be disconnected when you click Apply. To
avoid this problem, use a computer with a wired connection to access the wireless router.
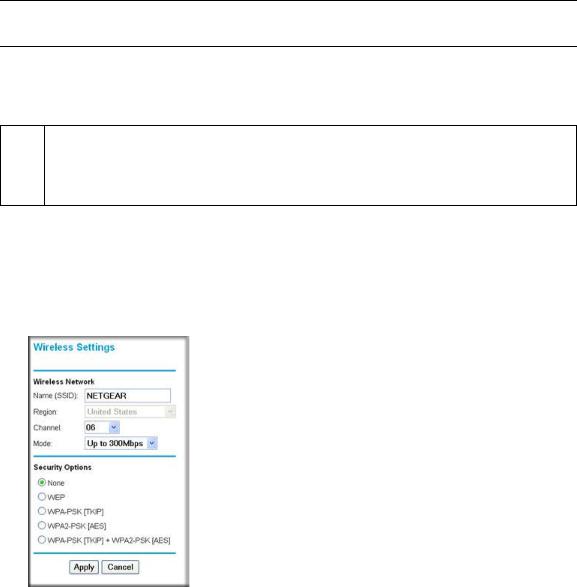
To view or manually configure the wireless settings:
1.Log in to the wireless router at its default LAN address of http://www.routerlogin.net with its default user name of admin, and default password of password, or using whatever user name, password, and LAN address you have chosen for the wireless router.
2.Select Wireless Settings from the main menu to display the Wireless Settings screen:
Figure 2-2
The settings for this screen are explained in Table 2-1.
3.Select the region in which the wireless router will operate.
4.For initial configuration and test, leave the other settings unchanged.
5.To save your changes, click Apply.
Safeguarding Your Network |
2-4 |
v1.0, November 2009

RangeMax™ Wireless-N Gigabit Router with USB WNR3500L User Manual
6.Configure and test your computers for wireless connectivity.
Program the wireless adapter of your computers to have the same SSID and wireless security settings as your wireless router. Check that they have a wireless link and are able to obtain an IP address by DHCP from the wireless router. If there is interference, adjust the channel.
Table 2-1. Wireless Settings
Settings |
Description |
|
|
Wireless |
Name (SSID): The SSID is also known as the wireless network name. Enter a 32- |
Network |
character (maximum) name in this field. This field is case-sensitive. |
|
In a setting where there is more than one wireless network, different wireless network |
|
names provide a means for separating the traffic. Any device you want to participate |
|
in a wireless network must use the SSID. |
|
|
|
Region: The location where the router is used. |
|
|
|
Channel: The wireless channel used by the gateway. The default is Auto. |
|
Do not change the wireless channel unless you experience interference (shown by |
|
lost connections or slow data transfers). If this happens, you might need to |
|
experiment with different channels to see which is the best. |
|
|
|
Mode: The default is up to 145 Mbps, which allows 802.11n, 802.11g, and 802.11b |
|
wireless stations access. |
Security Options • None. You can use this setting to establish wireless connectivity before implementing wireless security. NETGEAR strongly recommends that you implement wireless security.
•WEP (Wired Equivalent Privacy). Use encryption keys and data encryption for data security. You can select 64-bit or 128-bit encryption.
See “Configuring WEP Wireless Security”.
•WPA-PSK [TKIP] (WiFi Protected Access Pre-Shared Key). Allow only computers configured with WPA to connect to the wireless router.
See “Configuring WPA, WPA2, or WPA/WPA2 Wireless Security”.
•WPA2-PSK [AES] (Wi-Fi Protected Access with 2 Pre-Shared Keys). Allow only computers configured with WPA2 to connect to the wireless router.
See “Configuring WPA, WPA2, or WPA/WPA2 Wireless Security”.
•WPA-PSK [TKIP] + WPA2-PSK [AES]. Allow computers configured with either WPA-PSK or WPA2-PSK security to connect to the wireless router.
See “Configuring WPA, WPA2, or WPA/WPA2 Wireless Security”.
Safeguarding Your Network |
2-5 |
v1.0, November 2009

RangeMax™ Wireless-N Gigabit Router with USB WNR3500L User Manual
Configuring WEP Wireless Security
Note: If you use a wireless computer to configure wireless security settings, you will be  disconnected when you click Apply. Reconfigure your wireless computer to match
the new settings, or access the wireless router from a wired computer to make further changes.
To configure WEP data encryption:
1.Log in to the wireless router at its default LAN address of http://www.routerlogin.net with its default user name of admin, and default password of password, or using whatever user name, password, and LAN address you have chosen for the wireless router.
2.From the main menu, select Wireless Settings to display the Wireless Settings screen.
3.In the Security Options section, select the WEP (Wired Equivalent Privacy) radio button:
Figure 2-3
4. Select the Authentication Type: Automatic or Shared Key. The default is Automatic.
Note: The authentication scheme is separate from the data encryption. If you require strong security, use both the Shared Key and WEP encryption settings.
Safeguarding Your Network |
2-6 |
v1.0, November 2009

RangeMax™ Wireless-N Gigabit Router with USB WNR3500L User Manual
5.Select the Encryption Strength setting:
•WEP (Wired Equivalent Privacy) 64-bit encryption. Enter 10 hexadecimal digits (any combination of 0–9, a–f, or A–F).
•WEP (Wired Equivalent Privacy) 128-bit encryption. Enter 26 hexadecimal digits (any combination of 0–9, a–f, or A–F).
6.Enter the encryption keys. You can manually or automatically program the four data encryption keys. These values must be identical on all computers and Access Points in your network:
•Passphrase. To use a passphrase to generate the keys, enter a passphrase, and click Generate. This automatically creates the keys. Wireless stations must use the passphrase or keys to access the wireless router.
 Note: Not all wireless adapters support passphrase key generation.
•Key 1 – Key 4. These values are not case-sensitive. You can manually enter the four data encryption keys. These values must be identical on all computers and access points in your network. Enter 10 hexadecimal digits (any combination of 0–9, a–f, or A–F) for WEP-64 and 26 hexadecimal digits for WEP-128.
7.Select which of the four keys will be the default.
Data transmissions are always encrypted using the default key. The other keys can be used only to decrypt received data. The four entries are disabled if WPA-PSK or WPA authentication is selected.
8.Click Apply to save your settings.
Safeguarding Your Network |
2-7 |
v1.0, November 2009
RangeMax™ Wireless-N Gigabit Router with USB WNR3500L User Manual
Configuring WPA, WPA2, or WPA/WPA2 Wireless Security
To set up wireless security, you can either manually configure it in the Wireless Settings screen, or you can use Wi-Fi Protected Setup (WPS) to automatically set the SSID and implement WPA/ WPA2 security (see “Using Push ‘N’ Connect to Configure Your Wireless Network” on page 2-9.
Both WPA and WPA2 provide strong data security. WPA with TKIP is a software implementation that can be used on Windows systems with Service Pack 2 or later; WPA2 with AES is a hardware implementation; see your device documentation before implementing it. Consult the product documentation for your wireless adapter for instructions for configuring WPA settings.
Note: If you use a wireless computer to configure wireless security settings, you will be  disconnected when you click Apply. If this happens, reconfigure your wireless
computer to match the new settings, or access the wireless router from a wired computer to make further changes.
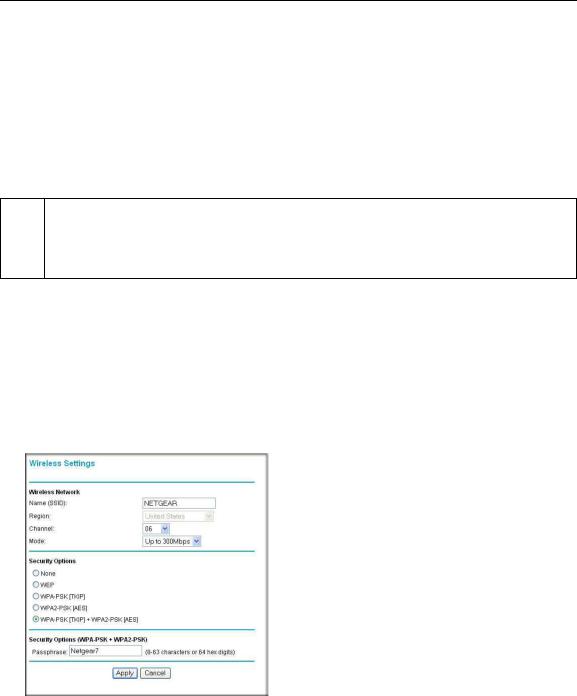
To configure WPA or WPA2 in the wireless router:
1.Log in to the wireless router at its default LAN address of http://www.routerlogin.net with its default user name of admin and default password of password, or using whatever user name, password, and LAN address you have chosen for the wireless router.
2.Select Wireless Settings from the main menu.
3.On the Wireless Settings screen, select the radio button for the WPA or WPA2 option of your choice.
Figure 2-4
Safeguarding Your Network |
2-8 |
v1.0, November 2009

RangeMax™ Wireless-N Gigabit Router with USB WNR3500L User Manual
4.The settings displayed on the screen depend on which security option you select.
5.For WPA-PSK or WPA2-PSK, enter the passphrase.
6.To save your settings, click Apply.
Using Push ‘N’ Connect to Configure Your Wireless Network
If your wireless clients support Wi-Fi Protected Setup (WPS), you can use this feature to configure the wireless router’s SSID and security settings and, at the same time, connect the wireless client securely and easily to the wireless router. Look for the symbol on your client device (computers that will connect wirelessly to the wireless router are clients). WPS automatically configures the network name (SSID) and wireless security settings for the wireless router (if the wireless router is in its default state) and transmits these settings to the wireless client.
Note: NETGEAR’s Push 'N' Connect feature is based on the Wi-Fi Protected Setup  (WPS) standard (for more information, see http://www.wi-fi.org). All other Wi-Fi-
certified and WPS-capable products should be compatible with NETGEAR products that implement Push 'N' Connect.
Some considerations regarding WPS are:
•WPS supports non-security, WPA-PSK, WPA2-PSK, and WEP with auto or open authentication. WEP with Shared Key authentication is not supported.
•If your wireless network will include a combination of WPS capable devices and non-WPS capable devices, NETGEAR suggests that you set up your wireless network and security settings manually first, and use WPS only for adding additional WPS capable devices. See “Adding Both WPS-Capable Clients and Non-WPS-Capable Clients” on page 2-14.
A WPS client can be added using the Push Button method or the PIN method.
•Using the Push Button. This is the preferred method. See the following section, “Using the WPS Button to Configure Your Network and Add a Client”.
•Entering a PIN. For information about using the PIN method, see “Using a PIN to Configure Your Network and Add a Client” on page 2-11.
Safeguarding Your Network |
2-9 |
v1.0, November 2009
RangeMax™ Wireless-N Gigabit Router with USB WNR3500L User Manual
Using the WPS Button to Configure Your Network and Add a Client
Any wireless computer or wireless adapter that will connect to the wireless router wirelessly is a client. The client must support a WPS button, and must have a WPS configuration utility, such as the NETGEAR Smart Wizard or Atheros Jumpstart.
To use the wireless router WPS button to add a WPS client:
1.Log in to the wireless router at its default LAN address of http://www.routerlogin.net with its default user name of admin and default password of password, or using whatever LAN address and password you have set up.
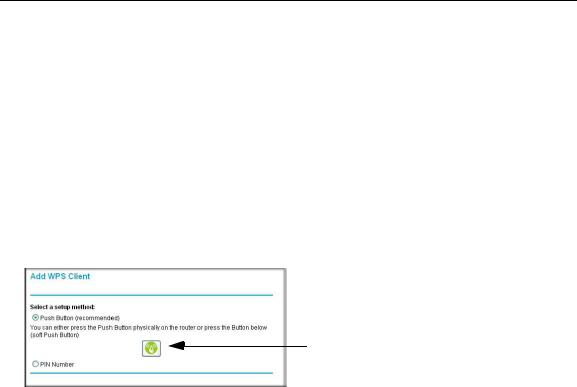
2.On the wireless router main menu, select Add a WPS Client, and then click Next. The following screen displays:
WPS button
Figure 2-5
By default, the Push Button (recommended) radio button is selected.
3.Either press the WPS button on the side of the wireless router, or click the onscreen button. The wireless router tries to communicate with the client for 2 minutes.
4.Go to the client wireless computer, and run a WPS configuration utility. Follow the utility’s instructions to click a WPS button.
5.Go back to the wireless router screen to check for a message.
Safeguarding Your Network |
2-10 |
v1.0, November 2009
Loading...