


)NSTALLATION 'UIDE
N600 Wireless Dual Band USB Adapter WNDA3100
Contents
English 1
Deutsch 7
Français 13
NETGEAR, Inc.
350 East Plumeria Drive
San Jose, CA 95135
version 1.0
English
)NSTALLATION 'UIDE
N600 Wireless Dual Band USB Adapter WNDA3100
This guide explains Express installation with the NETGEAR Smart Wizard. For help with custom installation, see the User Manual on the Resource CD.
Estimated completion time: 10 minutes.
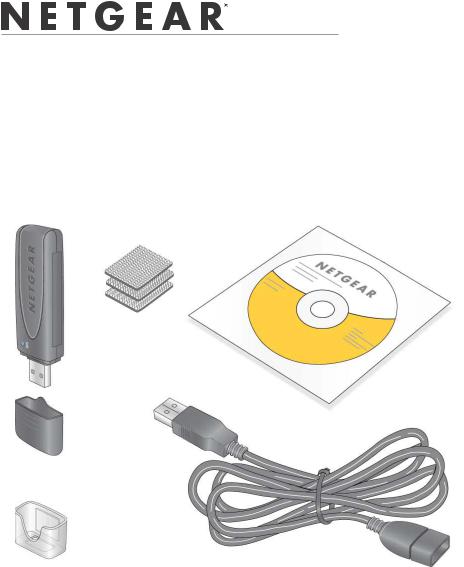
Package Contents
Loop and hook fasteners
Resource CD
USB Wireless Adapter
Plastic cradle |
USB cable |
1

English
Install the Software
1.Insert the Resource CD in your computer’s CD drive. If the CD main page does not display, browse the files on the CD and double-click Autorun.exe.
2.Click Install the Software. The Software Update Check screen displays.
3.If you are connected to the Internet, click Check for Updates. If not, then click Install from CD.
4.Accept the license agreement.
5.On the Setup Type screen, for Express (recommended) setup, click Next.
Insert Your Adapter
You are prompted to insert your adapter.
1.Insert the adapter into a USB port on your computer, or connect it with the USB cable (see “USB Cable and Cradle” on the other side of this guide).
Note: For best results, put the wireless adapter at least 4 feet (1 meter) away from your router.
2.Click Next. The WNDA3100v2 software detects the adapter.
3.Follow the onscreen prompts for the NETGEAR wizard.
2

English
Connect to a Network
You are prompted to connect to a wireless network with one of these screens:
WPS network |
No WPS |
•WPS network: This network supports Push 'N' Connect (also called WPS). You can follow the steps to push the WPS button and connect without entering a password.
•No WPS: Select your wireless network from the list and click Next. To connect to a secure network, you must enter its passphrase or network key.
The adapter connects to the network, which can take a minute or two. The Smart Wizard Settings screen displays. Your settings are saved in a profile, which you can name.
Profile name
The  icon appears in the system tray and on the desktop. You can use it to open the Smart Wizard to make changes or connect to a different wireless network.
3
English
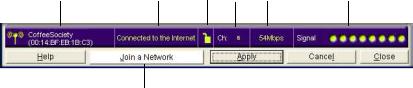
Status Bar
The status bar at the bottom of the Smart Wizard screen shows details about your wireless connection.
1 |
3 |
4 |
5 |
6 |
7 |
|
|
2 |
|
|
|
Understanding the Status Bar |
||
|
|
|
1. Wireless network |
|
Identifies which wireless network you have joined. |
|
|
|
2. Join a Network |
|
Join a different wireless network or rejoin your current network, if you |
|
|
were disconnected. |
|
|
|
3. Connection |
• |
Connected to Internet. |
status |
• |
Connected to Router. The adapter is connected to a router, but the |
|
|
router is not connected to the Internet. |
|
• 169.254.x.x or ___.___.___.___. You are connected to a router, but |
|
|
|
the router has a problem. See the User Manual on the Resource CD. |
|
|
|
4. Security |
• |
A closed lock indicates a network with wireless security. |
|
• |
An open lock indicates an open network without wireless security. |
|
|
|
5. Channel |
|
The wireless channel used by the network. |
|
|
|
6. Data rate |
|
Wireless data rate measured in megabits per second. To optimize this, |
|
|
connect to a network with a high-speed router or access point and a |
|
|
high-speed Internet connection. |
|
|
|
7. Signal strength |
|
More dots indicates a stronger signal. Usually, your connection works |
|
|
best when the signal is strongest. |
|
|
|
4
English
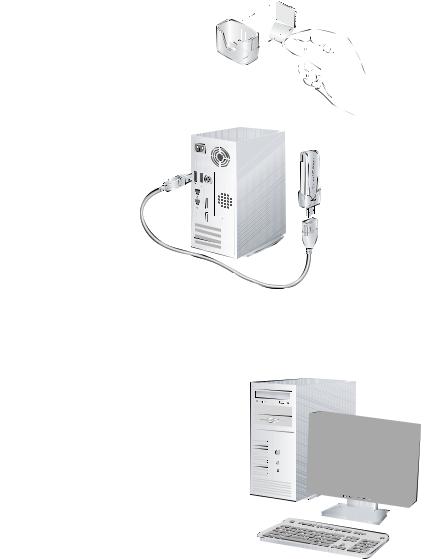
USB Cable and Cradle
You can use the USB cable and plastic cradle to place the adapter in a location that will extend its range and obtain better wireless reception.
1. Three fasteners come in the package. Locate the one with a prickly side, peel off the plastic film, and stick it on the back of the plastic cradle.
2. Insert the adapter in the plastic cradle.
3. Connect the USB
cable.
4.Place one of the other fasteners on the side or back of your monitor near the top for better reception.
5.Then join the fasteners.
5
 Loading...