


WiFi Cable Modem Router C3700
User Manual
Note: This document is for certification purposes only. Images are for position only and might differ from the actual product.
October 2013
350 East Plumeria Drive
San Jose, CA 95134
USA

WiFi Cable Modem Router C3700
Support
Thank you for selecting NETGEAR products.
After installing your device, locate the serial number on the label of your product and use it to register your product at https://my.netgear.com. You must register your product before you can use NETGEAR telephone support. NETGEAR recommends registering your product through the NETGEAR website. For product updates and web support, visit http://support.netgear.com.
Phone (US & Canada only): 1-888-NETGEAR.
Phone (Other Countries): Check the list of phone numbers at http://support.netgear.com/general/contact/default.aspx.
Trademarks
NETGEAR, the NETGEAR logo, and Connect with Innovation are trademarks and/or registered trademarks of NETGEAR, Inc. and/or its subsidiaries in the United States and/or other countries. Information is subject to change without notice. © NETGEAR, Inc. All rights reserved.
2

Contents
Chapter 1 Connect to the Modem Router
Gateway Front Panel . . . . . . . . . . . . . . . . . . . . . . . . . . . . . . . . . . . . . . . . . . 7 Gateway Rear Panel . . . . . . . . . . . . . . . . . . . . . . . . . . . . . . . . . . . . . . . . . . 9 Power Supply Manufacturers and Models . . . . . . . . . . . . . . . . . . . . . . . . 9 Gateway Label . . . . . . . . . . . . . . . . . . . . . . . . . . . . . . . . . . . . . . . . . . . . . . 10 Position Your Gateway . . . . . . . . . . . . . . . . . . . . . . . . . . . . . . . . . . . . . . . . 10 Log In to Your Gateway . . . . . . . . . . . . . . . . . . . . . . . . . . . . . . . . . . . . . . . 11 View the Modem Router Home Screens . . . . . . . . . . . . . . . . . . . . . . . . . . 11 Basic Home Screen . . . . . . . . . . . . . . . . . . . . . . . . . . . . . . . . . . . . . . . . 12 Advanced Home Screen. . . . . . . . . . . . . . . . . . . . . . . . . . . . . . . . . . . . . 13 Join the Wireless Network . . . . . . . . . . . . . . . . . . . . . . . . . . . . . . . . . . . . . 14
Chapter 2 NETGEAR genie Basic Settings
Cable Connection. . . . . . . . . . . . . . . . . . . . . . . . . . . . . . . . . . . . . . . . . . . . 16 View or Configure Your Wireless Network . . . . . . . . . . . . . . . . . . . . . . . . . 16 Wireless Screen Fields. . . . . . . . . . . . . . . . . . . . . . . . . . . . . . . . . . . . . . 18 Network Map . . . . . . . . . . . . . . . . . . . . . . . . . . . . . . . . . . . . . . . . . . . . . . . 19 Voice Status . . . . . . . . . . . . . . . . . . . . . . . . . . . . . . . . . . . . . . . . . . . . . . . . 19
Chapter 3 NETGEAR genie Advanced Home
Internet Setup. . . . . . . . . . . . . . . . . . . . . . . . . . . . . . . . . . . . . . . . . . . . . . . 22
Wireless Setup . . . . . . . . . . . . . . . . . . . . . . . . . . . . . . . . . . . . . . . . . . . . . . 23
WAN Setup. . . . . . . . . . . . . . . . . . . . . . . . . . . . . . . . . . . . . . . . . . . . . . . . . 23
LAN Setup . . . . . . . . . . . . . . . . . . . . . . . . . . . . . . . . . . . . . . . . . . . . . . . . . 25
LAN Setup Screen Fields . . . . . . . . . . . . . . . . . . . . . . . . . . . . . . . . . . . . 26
Use the Router as a DHCP Server. . . . . . . . . . . . . . . . . . . . . . . . . . . . . 26
Address Reservation . . . . . . . . . . . . . . . . . . . . . . . . . . . . . . . . . . . . . . . 27
Chapter 4 Security
Keyword Blocking of HTTP Traffic . . . . . . . . . . . . . . . . . . . . . . . . . . . . . . . 30
Block Services (Port Filtering) . . . . . . . . . . . . . . . . . . . . . . . . . . . . . . . . . . 31
Schedule Blocking . . . . . . . . . . . . . . . . . . . . . . . . . . . . . . . . . . . . . . . . . . . 32
Chapter 5 Administration
View Modem Router Status . . . . . . . . . . . . . . . . . . . . . . . . . . . . . . . . . . . . 35
Cable Information . . . . . . . . . . . . . . . . . . . . . . . . . . . . . . . . . . . . . . . . . . 35
Internet Port . . . . . . . . . . . . . . . . . . . . . . . . . . . . . . . . . . . . . . . . . . . . . . 36
3

WiFi Cable Modem Router C3700
Wireless Settings (2.4 GHZ and 5 GHz). . . . . . . . . . . . . . . . . . . . . . . . . 36
Router Mode. . . . . . . . . . . . . . . . . . . . . . . . . . . . . . . . . . . . . . . . . . . . . . . . 36
Logs . . . . . . . . . . . . . . . . . . . . . . . . . . . . . . . . . . . . . . . . . . . . . . . . . . . . 37
Network Map . . . . . . . . . . . . . . . . . . . . . . . . . . . . . . . . . . . . . . . . . . . . . . . 38
Back Up Settings . . . . . . . . . . . . . . . . . . . . . . . . . . . . . . . . . . . . . . . . . . . . 39
Restore Configuration Settings. . . . . . . . . . . . . . . . . . . . . . . . . . . . . . . . 40
Erase . . . . . . . . . . . . . . . . . . . . . . . . . . . . . . . . . . . . . . . . . . . . . . . . . . . 40
Set Password . . . . . . . . . . . . . . . . . . . . . . . . . . . . . . . . . . . . . . . . . . . . . . . 41
View Event Logs. . . . . . . . . . . . . . . . . . . . . . . . . . . . . . . . . . . . . . . . . . . . . 41
Diagnostics. . . . . . . . . . . . . . . . . . . . . . . . . . . . . . . . . . . . . . . . . . . . . . . . . 42
Ping Utility. . . . . . . . . . . . . . . . . . . . . . . . . . . . . . . . . . . . . . . . . . . . . . . . 42
Traceroute Utility . . . . . . . . . . . . . . . . . . . . . . . . . . . . . . . . . . . . . . . . . . 43
DS Throughput Utility . . . . . . . . . . . . . . . . . . . . . . . . . . . . . . . . . . . . . . . 44
US Throughput Utility . . . . . . . . . . . . . . . . . . . . . . . . . . . . . . . . . . . . . . . 45
Wireless Channel . . . . . . . . . . . . . . . . . . . . . . . . . . . . . . . . . . . . . . . . . . . . 46
Chapter 6 Advanced Settings
Advanced Wireless Settings. . . . . . . . . . . . . . . . . . . . . . . . . . . . . . . . . . . . 49 Wireless Card Access List . . . . . . . . . . . . . . . . . . . . . . . . . . . . . . . . . . . 49 Port Forwarding and Port Triggering . . . . . . . . . . . . . . . . . . . . . . . . . . . . . 51 Remote Computer Access Basics . . . . . . . . . . . . . . . . . . . . . . . . . . . . . 51 Port Triggering to Open Incoming Ports . . . . . . . . . . . . . . . . . . . . . . . . . 52 Port Forwarding to Permit External Host Communications . . . . . . . . . . 54 How Port Forwarding Differs from Port Triggering . . . . . . . . . . . . . . . . . 55 Set Up Port Forwarding to Local Servers. . . . . . . . . . . . . . . . . . . . . . . . . . 55 Add a Custom Service . . . . . . . . . . . . . . . . . . . . . . . . . . . . . . . . . . . . . . 56 Edit or Delete a Port Forwarding Entry. . . . . . . . . . . . . . . . . . . . . . . . . . 57 Set Up Port Triggering . . . . . . . . . . . . . . . . . . . . . . . . . . . . . . . . . . . . . . . . 58 Dynamic DNS. . . . . . . . . . . . . . . . . . . . . . . . . . . . . . . . . . . . . . . . . . . . . . . 60 Remote Management. . . . . . . . . . . . . . . . . . . . . . . . . . . . . . . . . . . . . . . . . 61 Universal Plug and Play . . . . . . . . . . . . . . . . . . . . . . . . . . . . . . . . . . . . . . . 63
Chapter 7 Troubleshooting
Basic Functions . . . . . . . . . . . . . . . . . . . . . . . . . . . . . . . . . . . . . . . . . . . . . 65 Using LEDs to Troubleshoot. . . . . . . . . . . . . . . . . . . . . . . . . . . . . . . . . . 66 Cannot Log In to the Modem Router . . . . . . . . . . . . . . . . . . . . . . . . . . . . . 66 Troubleshoot the ISP Connection . . . . . . . . . . . . . . . . . . . . . . . . . . . . . . . 67 Troubleshoot a TCP/IP Network Using a Ping Utility . . . . . . . . . . . . . . . . . 67 Test the LAN Path to Your Gateway . . . . . . . . . . . . . . . . . . . . . . . . . . . 68 Test the Path from Your Computer to a Remote Device . . . . . . . . . . . . 68 Wireless Performance and Modem Router Location . . . . . . . . . . . . . . . . . 69
Appendix A Supplemental Information
Factory Default Settings . . . . . . . . . . . . . . . . . . . . . . . . . . . . . . . . . . . . . . . 71
Technical Specifications. . . . . . . . . . . . . . . . . . . . . . . . . . . . . . . . . . . . . . . 72
4

WiFi Cable Modem Router C3700
Appendix B Notification of Compliance
5

1. Connect to the Modem Router |
1 |
Getting to know your modem router |
This chapter describes how to configure the Internet connection of your gateway and includes these sections:
•Gateway Front Panel
•Gateway Rear Panel
•Gateway Label
•Position Your Gateway
•Log In to Your Gateway
•View the Modem Router Home Screens
•Join the Wireless Network
6

WiFi Cable Modem Router C3700
Gateway Front Panel
WPS Button / LED
Wireless Button
Power LED
Downstream LED
Upstream LED
Internet LED
2.4 GHz LED
5 GHz LED
Ethernet LED
USB LED
You can use the LEDs to verify status and connections. The following table lists and describes each LED and button on the front panel of the modem router.
Table 1. LEDs
LED Description
WPS
• Green. Wireless security is enabled.
• Off. No WPS connection exists.
WiFi
• Green. The wireless radio is operating.
• Off. The wireless radio is off.
Power
• Green. Power is supplied to the modem router.
• Off. No power is supplied to the modem router.
Connect to the Modem Router
7

WiFi Cable Modem Router C3700
Table 1. LEDs (continued)
LED |
Description |
|
|
Downstream |
• Solid green. One or more downstream channels are locked. |
|
• Blinking green. The unit is scanning for a downstream channel. |
|
• Off. No downstream channel is locked. |
Upstream |
• Solid green. One or more upstream channels are locked. |
|
• Blinking green. The unit is scanning for an upstream channel. |
|
• Off. No upstream channel is locked. |
Internet |
• Solid green. The modem router is online. |
|
• Blinking green. The modem router is synchronizing with the cable provider’s cable |
|
modem termination system (CMTS). |
|
• Off. The modem router is offline. |
2.4 GHz radio |
• Green. The 2.4 GHz radio is on. |
|
|
|
• Off. The 2.4 GHz radio is off. |
|
|
5 GHz radio |
• Green. The 5 GHz radio is on. |
|
|
|
• Off. The 5 GHz radio is off. |
|
|
Ethernet |
• Green. A device is connected to an Ethernet port and powered on. |
|
|
|
• Off. No device is detected to an Ethernet port. |
|
|
USB |
• Green. A USB device is connected to the port on the back panel. |
|
|
|
• Off. No USB device is connected to the port on the back panel. |
|
|
Connect to the Modem Router
8

WiFi Cable Modem Router C3700
Gateway Rear Panel
Reset button |
USB port (optional) |
Ethernet LAN ports |
Coaxial cable connector |
Power adapter input |
Power On/Off button |
The rear panel includes the following connections when viewed from top to bottom:
•Reset button. You can return the modem router to its factory settings. Press and hold the Reset button for over 7 seconds. The modem router resets and returns to its factory settings. See Factory Default Settings on page 71.
•Phone port. A telephone connection for an analog phone line.
•Two Gigabit Ethernet LAN ports. Use these ports to connect local computers.
•Coaxial cable connector. Attach a coaxial cable to the cable service provider connection.
•Power adapter input. Connect the power adapter unit here.
•Power On/Off button. Press to turn on power. Press again to turn off power.
Power Supply Manufacturers and Models
Use only power supplies listed here:
Connect to the Modem Router
9

WiFi Cable Modem Router C3700
•Adaptor of CWT
Manufacturer: Channel Well Technology Co Ltd Model: SAL018F2
•Adaptor of PI
Manufacturer: PI Electronics (H.K.) Ltd. Model: AD817000
Gateway Label
The label on the bottom of the modem router shows the WPS PIN, login information, MAC address, and serial number.
Figure 1. The label shows unique information about your modem router
Position Your Gateway
The operating distance or range of your wireless connection can vary based on the physical placement of the gateway. For best results, place your gateway:
•Near the center of the area in which your computers operate.
•In an elevated location such as a high shelf.
•Away from potential sources of interference, such as computers, microwave ovens, and cordless phones.
•Away from large metal surfaces.
Note: Failure to follow these guidelines can result in significant performance degradation or inability to connect wirelessly to the modem router.
Connect to the Modem Router
10
WiFi Cable Modem Router C3700
Log In to Your Gateway
You can log in to the modem router to view or change its settings.
Note: To connect to the modem router, use a computer that is configured for DHCP (most computers are). For help with configuring DHCP, see the instructions that came with your computer.
The modem router automatically logs you out after 5 minutes of no activity.
To log in to the modem router:
1.On the computer that is connected to the modem router with an Ethernet cable, type http://192.168.0.1 in the address field of your Internet browser.
A login window opens.
2.Log in with the user name admin and its default password of password.
The modem router Basic Home screen displays when you log in (see Basic Home Screen on page 12).
View the Modem Router Home Screens
The modem router home screens include a Basic Home screen and an Advanced Home screen.
Connect to the Modem Router
11

WiFi Cable Modem Router C3700
Basic Home Screen
When you connect to the modem router, the gateway dashboard (Basic Home screen) displays.
Menus (Click the Advanced tab to view more)
 Dashboard (Click to view details)
The Basic Home screen has a dashboard that shows the status of your Internet connection and network. You can click the sections of the dashboard to view more detailed information. The left column has menus and an Advanced tab appears at the top that is used to access more menus and screens.
•Home. This dashboard screen displays when you log in to the modem router or select the Home tab.
•Cable Connection. This option displays the cable signal quality, the upstream power, the downstream power, and the connection status.
•Wireless. Select this option to view or change the wireless settings for your modem router.
•Network Map. Select this option to view the devices that are connected to your network.
•Voice. This option displays the voice status.
•Advanced tab. Select the Advanced tab to set up the modem router for unique situations such as when remote access by IP or by domain name from the Internet is needed. See Advanced Home Screen on page 13. Using this tab requires a solid understanding of networking concepts.
For more information about the Basic settings, see Chapter 2, NETGEAR genie Basic Settings.
Connect to the Modem Router
12

WiFi Cable Modem Router C3700
Advanced Home Screen
Note: Using the Advanced Home screen requires a solid understanding of networking concepts.
To view the Advance Home screen, select the Advanced tab from the top menu.
The modem router Advanced Home screen has a dashboard that lets you see the configuration of your modem router and network at a glance. You can click any of the sections of the dashboard to view more detailed information. The left column has the menus, and at the top there is a Basic tab that is used to the basic menus and screens.
•Advanced Home. This dashboard screen displays when you select the Advanced tab.
•Setup. Set up the Internet connection, wireless, WAN, and LAN.
•Security. Block sites, block services, and set up email notifications.
•Administration. View gateway status, logs, and event logs, back up and restore the configuration file, and change the gateway password.
•Advanced Setup. Configure advanced network features such as port forwarding, port triggering, Dynamic DNS, and UPnP.
•Home tab. Return to the Basic Home screen. See Basic Home Screen on page 12.
For more information about the Advanced settings, see Chapter 3, NETGEAR genie Advanced Home.
Connect to the Modem Router
13

WiFi Cable Modem Router C3700
Join the Wireless Network
To join the wireless network:
1.Open the software that manages your wireless connections on the wireless device (laptop computer, gaming device, iPhone) that you want to connect to your modem router.
This software scans for all wireless networks in your area.
2.Look for your network and select it.
If you did not change the name of your network during the setup process, look for the default WiFi network name (SSID) and select it. The default SSID is on the label on the bottom of the modem router.
3.Enter the modem router password and click Connect.
The default password is on the label on the bottom of the modem router.
Connect to the Modem Router
14

2. NETGEAR genie Basic Settings |
2 |
Your Internet connection and network |
This chapter explains the features available from the genie Basic Home screen. This chapter contains the following sections:
•Cable Connection
•View or Configure Your Wireless Network
•Network Map
•Voice Status
15

WiFi Cable Modem Router C3700
Cable Connection
To change the starting frequency:
From the Basic tab, select Cable Connection.
The Starting Frequency is automatically generated. Most of the time, you do not need to enter a value in this field. If you need to enter a starting frequency, contact your Internet service provider.
Use the Cable Connection screen to track the initialization procedure of the modem router, and to get details about the downstream and upstream cable channel. The time is displayed after the modem router is initialized.
The modem router automatically goes through the following steps in the provisioning process:
•Scans and locks the downstream frequency and then ranges the upstream channels.
•Obtains a WAN address for the modem router.
•Connects to the Internet.
View or Configure Your Wireless Network
The Wireless screen lets you view or configure the wireless network set-up.
The wireless cable gateway comes with preset security. This feature means that the WiFi network name (SSID), network key (password), and security option (encryption protocol) are preset in the factory. You can find the preset SSID and password on the bottom of the unit.
NETGEAR genie Basic Settings
16

WiFi Cable Modem Router C3700
Note: The preset SSID and password are uniquely generated for every device to protect and maximize your wireless security.
NETGEAR recommends that you do not change your preset security settings. If you do decide to change your preset security settings, make a note of the new settings and store it in a safe place.
If you use a wireless computer to change the wireless network name (SSID) or other wireless security settings, you are disconnected when you click the Apply button. To avoid this problem, use a computer with a wired connection to access the modem router.
To view or change basic wireless settings: 1. From the Basic tab, select Wireless.
The screen sections, settings, and procedures are explained in the following sections.
2.Make the appropriate changes.
3.Click the Apply button. Your settings are saved.
4.Set up and test your wireless devices and computers to make sure that they can connect wirelessly. If they do not, check the following:
•Is your wireless device or computer connected to your network or another wireless network in your area? Some wireless devices automatically connect to the first open network (without wireless security) that they discover.
•Does your wireless device or computer appear on the Network Map screen? If it does, it is connected to the network.
•If you are not sure what the network name (SSID) or password is, look on the label on your modem router.
NETGEAR genie Basic Settings
17
WiFi Cable Modem Router C3700
Wireless Screen Fields
The Fragmentation Length, CTS/RTS Threshold, and Preamble Mode options in this screen are reserved for wireless testing and advanced configuration only. Do not change these settings unless you have a specific reason to do so.
•Region Selection. Select the location where the modem router is used.
•Enable Wireless Gateway Radio. This setting allows the modem router to broadcast its SSID so wireless stations can see this wireless name (SSID) in their scanned network lists. This check box is selected by default. To turn off the SSID broadcast, clear the Enable SSID Broadcast check box, and click the Apply button.
•Enable SSID Broadcast. This feature allows the modem router to broadcast its SSID so wireless stations can see this wireless name (SSID) in their scanned network lists. This check box is selected by default. To turn off the SSID broadcast, clear this check box, and click the Apply button.
•Name (SSID). The SSID is also known as the wireless network name. Enter a 32-character (maximum) name in this field. This field is case-sensitive. The default SSID is randomly generated, and NETGEAR strongly recommends that you do not change the SSID.
•Channel. This setting is the wireless channel that the modem router uses. Choose a value from 1 through 13. (For products in the North America market, only Channels 1 through 11 can be operated.) Do not change the channel unless you experience interference (such as lost connections or slow data transfers). If any interference happens, experiment with different channels to see which is the best.
•Mode. Up to 145 Mbps is the default and allows 802.11n and 802.11g wireless devices to join the network. g & b supports up to 54 Mbps. The 300-Mbps setting allows 802.11n devices to connect at this speed.
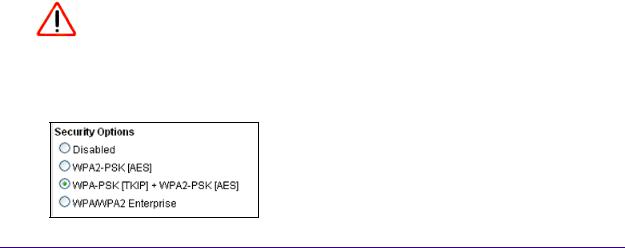
Security Options Settings
The Security Options section of the Wireless screen lets you change the security option and password. NETGEAR recommends that you do not change the security option or password, but if you want to change these settings, this section explains how.
CAUTION:
Do not disable security.
To change the WPA security option and password:
1. Under Security Options, select the WPA option that you want.
NETGEAR genie Basic Settings
18

WiFi Cable Modem Router C3700
2.In the password field that displays when you select a WPA security option, enter the network key (password) that you want to use. It is a text string from 8 to 63 characters.
Network Map
You can view all computers or devices that are currently connected to your network here.
To view a map of attached devices:
From the Basic tab, select Network Map.
Wired devices are connected to the modem router with Ethernet cables. Wireless devices have joined the wireless network.
•IP Address. The IP address that the modem router assigned to this device when it joined the network. This number can change when a device disconnects and then rejoins the network.
•Device Name. If the device name is known, it is shown here.
You can click Refresh to update this screen.
Voice Status
You can review specific details about the voice connection.
NETGEAR genie Basic Settings
19

WiFi Cable Modem Router C3700
To view the status of the voice connection:
From the Basic tab, select Voice.
The following fields display:
•MTA Provision Status. The gateway status. The values can be Operational, On hook, or Off hook. This status applies to line 1.
•MTA MAC Address. The telephony MAC address.
•MTA IP Address. The telephony IP address.
•MTA FQDN. The Fully Qualified Domain Name (FQDN). The Internet service provider assigns this name.
•MTA Telephony Signaling. This value is set to Media Gateway Control Protocol (MGCP), a way of to set up voice calls.
NETGEAR genie Basic Settings
20
3. NETGEAR genie Advanced Home |
3 |
Specifying custom settings |
This chapter explains the features available from the genie Advanced Home screen. This chapter contains the following sections:
•Internet Setup
•Wireless Setup
•WAN Setup
•LAN Setup
Some selections on the Advanced Home screen are described in separate chapters:
•Security. See Chapter 4, Security.
•Administration. See Chapter 5, Administration.
•Advanced Setup. See Chapter 6, Advanced Settings.
21

WiFi Cable Modem Router C3700
Internet Setup
The Internet Setup screen is where you view or change ISP information.
To change the Internet settings:
1. From the Advanced tab, select Setup > Internet Setup.
2.Enter the settings for the IP address and DNS server. The default settings usually work fine. If you have problems with your connection, check the ISP settings.
3.Click the Apply button. Your settings are saved.
Internet Setup Screen Fields
The following descriptions explain all of the possible fields in the Internet Setup screen.
Internet IP Address.
•If you log in to your service or your ISP did not provide you with a fixed IP address, the gateway finds an IP address for you automatically when you connect. Select Get Dynamically from ISP.
•If you have a fixed (or static) IP address, your ISP has provided you with the required information. Select Use Static IP Address and type the IP address, IP subnet mask, and gateway IP address in the correct fields.
For example:
-IP Address. 24.218.156.183
-Subnet Mask. 255.255.255.0
-Gateway IP Address. 24.218.156.1
Domain Name Server (DNS) Address. The DNS server is used to look up site addresses that are based on their names.
NETGEAR genie Advanced Home
22
WiFi Cable Modem Router C3700
•If your ISP gave you one or two DNS addresses, select Use These DNS Servers and type the primary and secondary addresses.
•Otherwise, select Get Automatically from ISP.
Note: If you get address not found errors when you go to a website, it is likely that your DNS servers are not set up correctly. Contact your ISP to get the DNS server addresses.
Wireless Setup
For information about the fields on this screen, see View or Configure Your Wireless Network on page 16.
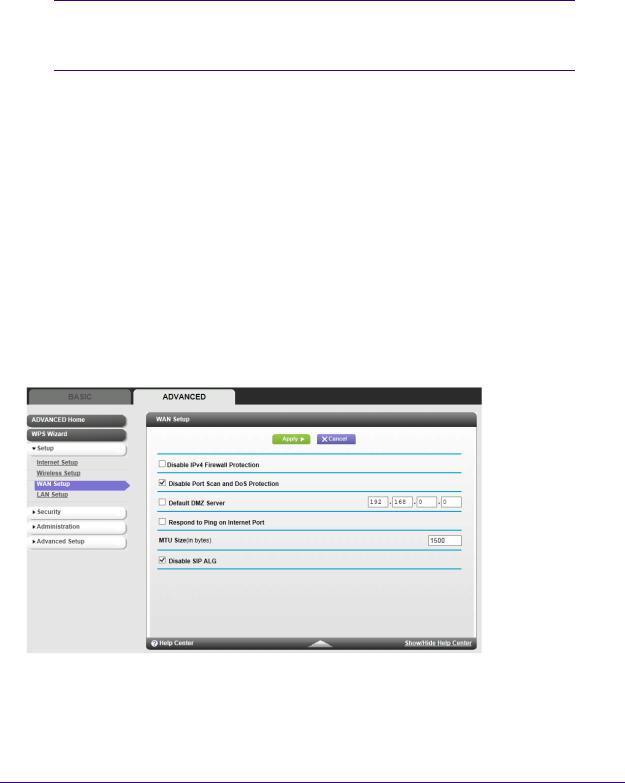
WAN Setup
The WAN Setup screen lets you configure a DMZ (demilitarized zone) server and enable the modem router to respond to a ping on the WAN (Internet) port.
To change the WAN settings:
From the Advanced tab, select Setup > WAN Setup. The following screen displays:
•Disable IPv4 Firewall Protection. Firewalls protect your gateway and connected devices from external attacks. The firewall is enabled by default.
•Disable Port Scan and DoS Protection. DoS protection protects your LAN against denial of service attacks such as Syn flood, Smurf Attack, Ping of Death, Teardrop
NETGEAR genie Advanced Home
23
 Loading...