


DM200

Broadband High-Speed
DSL Modem
User Manual
Model DM200
September 2017
202-11621-03
350 E. Plumeria Drive
San Jose, CA 95134
USA

Broadband High-Speed DSL Modem Model DM200
Support
Thank you for purchasing this NETGEAR product.You can visit www.netgear.com/support to register your
product, get help, access the latest downloads and user manuals , and join our comm unity.We recommend that
you use only official NETGEAR support resources.
Conformity
For the current EU Declaration of Conformity, visit http://kb.netgear.com/app/answers/detail/a_id/11621.
Compliance
For regulatory compliance information, visit http://www.netgear.com/about/regulatory.
See the regulatory compliance document before connecting the power supply.
Trademarks
© NETGEAR, Inc., NETGEAR and the NETGEAR Logo are trademarks of NETGEAR, Inc. An y non-NETGEAR
trademarks are used for reference purposes only.
2

Contents
Chapter 1 Hardware Overview of the Modem
Unpack Your Modem..............................................................................................7
Front Panel With LEDs...........................................................................................7
Back Panel With Ports, Buttons, and a DC Connector...........................................9
Product Label.......................................................................................................10
Chapter 2 Install and Access the Modem
Connect to the Modem With an Ethernet Cable...................................................12
Types of Logins....................................................................................................12
DSL Service.........................................................................................................12
Automatic Internet Setup.....................................................................................13
Set Up the Modem for DSL Service and Access the Modem..............................13
Log In to the Modem After Setup to View or Change Settings.............................20
Change the Language.........................................................................................21
Let the Modem Automatically Update Its Firmware.............................................21
Access the Modem With the NETGEAR genie App.............................................22
Chapter 3 Manage the Internet Settings Manually
Use the Internet Setup Wizard After Initial Setup................................................25
Manually Set Up an ADSL Internet Connection...................................................29
Specify an ADSL Connection Without a Login................................................30
Specify an ADSL Connection With a Login and PPPoA or PPPoE Service....34
Manually Set Up a VDSL Internet Connection.....................................................38
Specify a VDSL Connection Without a Login..................................................38
Specify a VDSL Connection With a Login and PPPoE Service.......................42
Specify an IPv6 Internet Connection....................................................................47
IPv6 Internet Connections and IPv6 Addresses..............................................47
Set Up an IPv6 6to4 Tunnel Internet Connection............................................47
Set Up an IPv6 Pass Through Internet Connection.........................................49
Set Up an IPv6 Fixed Internet Connection......................................................49
Use Auto Config for an IPv6 Internet Connection...........................................51
Manage the MTU Size.........................................................................................52
MTU Concepts................................................................................................52
Change the MTU Size.....................................................................................54
Chapter 4 Manage the WAN and LAN Network Settings
Manage the WAN Security Settings.....................................................................56
Manage NAT Filtering..........................................................................................56
Manage the SIP Application-Level Gateway........................................................57
Manage IGMP Proxying.......................................................................................57
Manage the Modem’s LAN IP Address Settings..................................................58
Manage the Router Information Protocol Settings...............................................59
3

Broadband High-Speed DSL Modem Model DM200
Manage Reserved LAN IP Addresses.................................................................60
Reserve a LAN IP Address.............................................................................60
Change a Reserved IP Address......................................................................61
Remove a Reserved IP Address Entry............................................................61
Manage the DHCP Server Address Pool.............................................................62
Disable the Built-In DHCP Server........................................................................63
Change the Modem’s Device Name.....................................................................64
Set Up and Manage Custom Static Routes.........................................................65
Set Up a Static Route......................................................................................65
Change a Static Route....................................................................................66
Remove a Static Route...................................................................................67
Chapter 5 Manage the Modem and Monitor the Traffic
Disable the Modem’s Routing Features and Use the Modem as a DSL Modem
Only......................................................................................................................69
Reenable the Modem’s Routing Features............................................................70
Update the Firmware of the Modem....................................................................71
Check for New Fir mware and Update the Modem..........................................71
Manually Upload New Firmware and Update the Modem...............................72
Manage the Configuration File of the Modem......................................................73
Back Up the Settings.......................................................................................73
Restore the Settings........................................................................................74
Change the admin Password...............................................................................74
Set Up Password Recovery.................................................................................75
Recover the admin Password..............................................................................76
Return the Modem to Its Factory Default Settings...............................................76
Use the Reset Button......................................................................................77
Erase the Settings...........................................................................................78
View the Status and Statistics of the Modem.......................................................78
View Information About the Modem and the Internet Port Settings................78
View the Por t Traffic Statistics.........................................................................81
Change the Traffic Statistics Polling Frequency...............................................82
View, Renew, or Release the TCP/IP Internet Connection..............................83
View, Establish, or Terminate the PPPoE or PPPoA Inter net Connection.......84
View Devices Currently on the Network...............................................................85
Set the Time Zone................................................................................................85
Manage the Activity Log.......................................................................................86
View or Clear the Logs....................................................................................86
Specify Which Activities Are Logged...............................................................87
Manage the Modem Remotely.............................................................................87
Chapter 6 Manage Port Forwarding
Forward Incoming Traffic for a Default Service or Application..............................90
Add a Port Forwarding Rule With a Custom Ser vice or Application....................91
Change a Port Forwarding Rule...........................................................................92
Remove a Por t Forwarding Rule..........................................................................93
Application Example: Make a Local Web Server Public.......................................94
How the Modem Implements the Port Forwarding Rule......................................94
4

Broadband High-Speed DSL Modem Model DM200
Chapter 7 Troubleshooting
Quick Tips for Troubleshooting.............................................................................96
Troubleshoot With the LEDs.................................................................................96
Power LED Is Off.............................................................................................96
Power LED Remains Solid Amber...................................................................97
You Cannot Log In to the Modem.........................................................................97
Troubleshoot the Internet Connection..................................................................97
Troubleshoot the DSL Link..............................................................................98
DSL LED Is Solid Green.............................................................................98
DSL LED Is Blinking Amber........................................................................98
DSL LED Is Off...........................................................................................98
Obtain an Internet IP Address.........................................................................98
Ver ify the PPPoE or PPPoA Connection.........................................................99
Reestablish the PPPoE or PPPoA Connection.............................................100
Troubleshoot Internet Browsing.....................................................................101
Changes Are Not Saved....................................................................................101
Troubleshoot Your Network Using the Ping Utility..............................................101
Test the LAN Path to Your Modem.................................................................101
Test the Path From Your Computer to a Remote Device...............................102
Appendix A Supplemental Information
Factory Settings.................................................................................................105
Technical Specifications.....................................................................................106
5

Hardware Overview of the Modem
The NETGEAR® Broadband High-Speed DSL Modem Model DM200, in this manual referred to as the modem,
supports autodetection for universal DSL support.The modem is compatible with most major broadband DSL
Internet service providers and supports VDSL2 and ADSL2+.Y ou can connect the modem directly to a computer ,
router, or WiFi router.
The chapter contains the following sections:
• Unpack Your Modem on page 7
• Front Panel With LEDs on page 7
• Back Panel With Ports, Buttons, and a DC Connector on page 9
• Product Label on page 10
The modem does not support a connection to a cable Internet service provider .The modem
Note
supports only a connection to a DSL (ADSL or VDSL) Internet service provider. However,
the modem does not support a bonded VDSL connection.
1
For more information about the topics that are cov ered in this manual, visit the support website
Note
at support.netgear.com.
Firmware updates with new features and bug fixes are made available from time to time at
Note
downloadcenter.netgear.com.You can check for and download new firmware manually. If
the features or behavior of y our product does not match what is described in this guide, you
might need to update your firmware.
6
Broadband High-Speed DSL Modem Model DM200
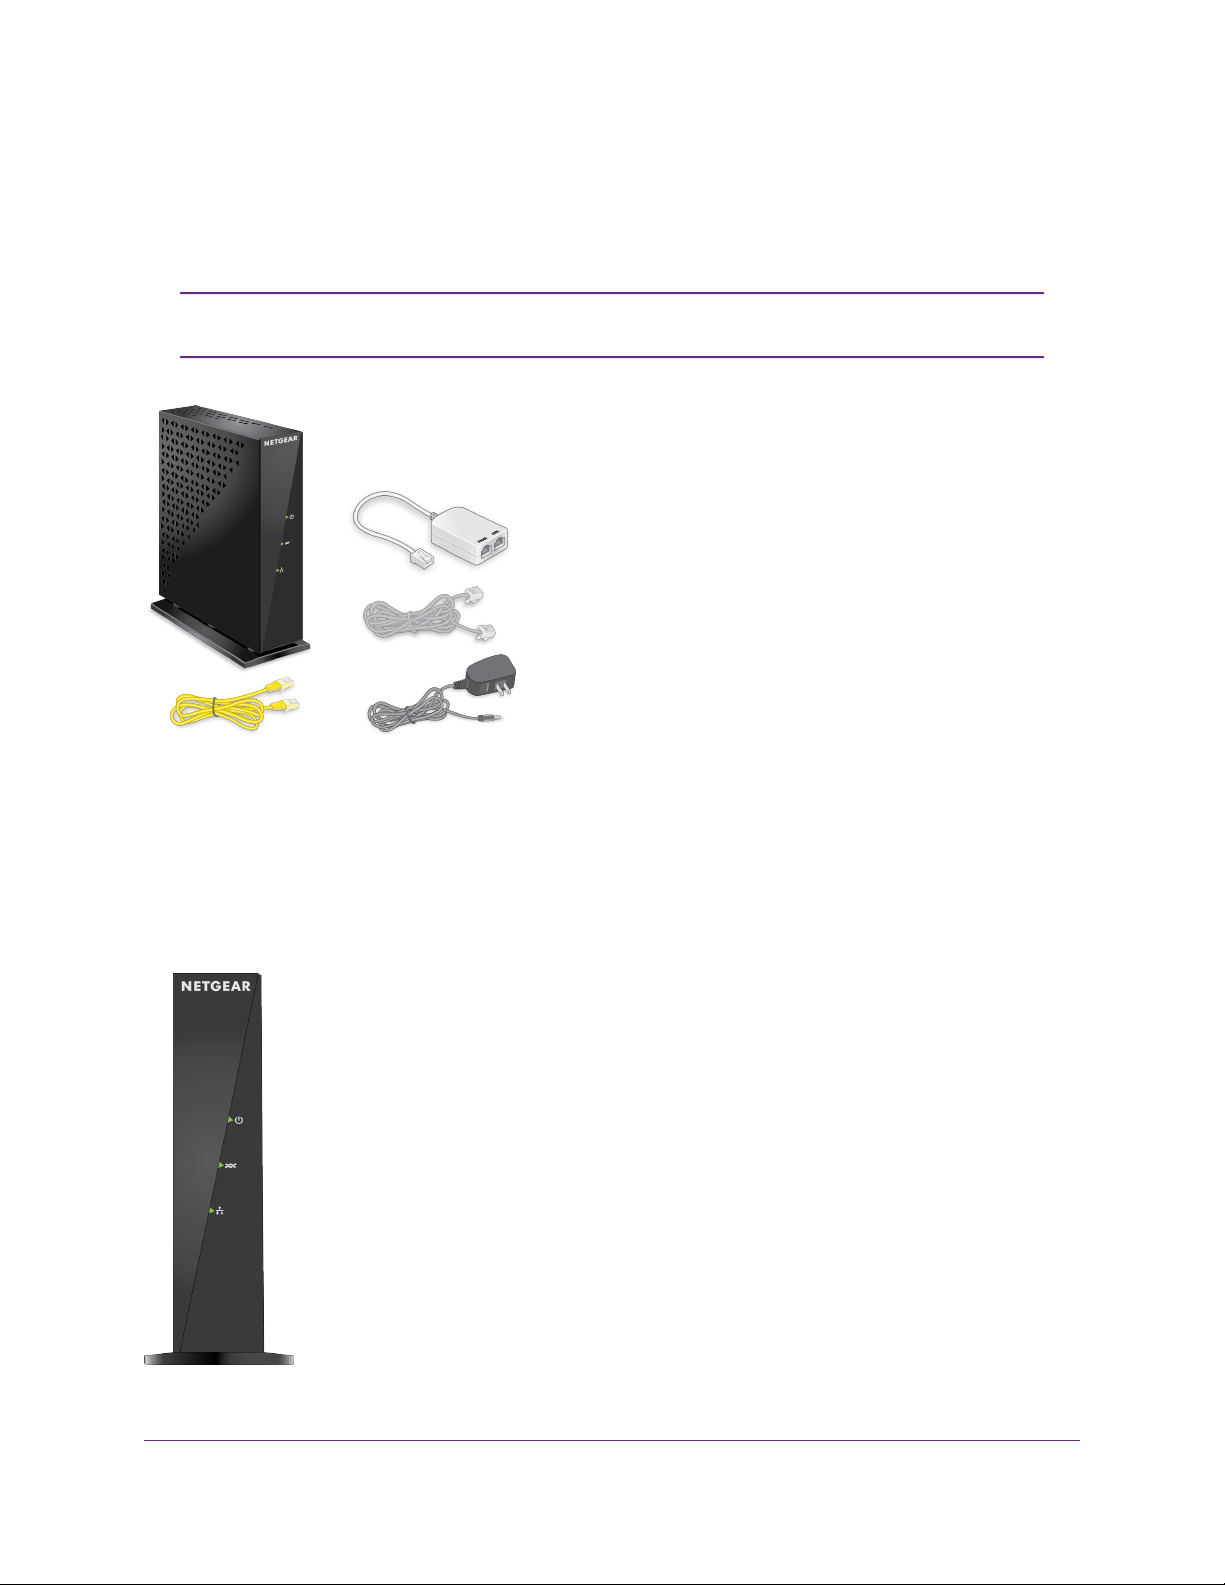
Unpack Your Modem
Your package contains the modem, DSL microfilter, Ethernet cable, phone cable, and power adapter
(localized to the country of sale).
Your package might contain more items.The filter or phone cable provided depends
Note
on the region. In some regions, a CD is included in the package.
Figure 1. DM200 package content
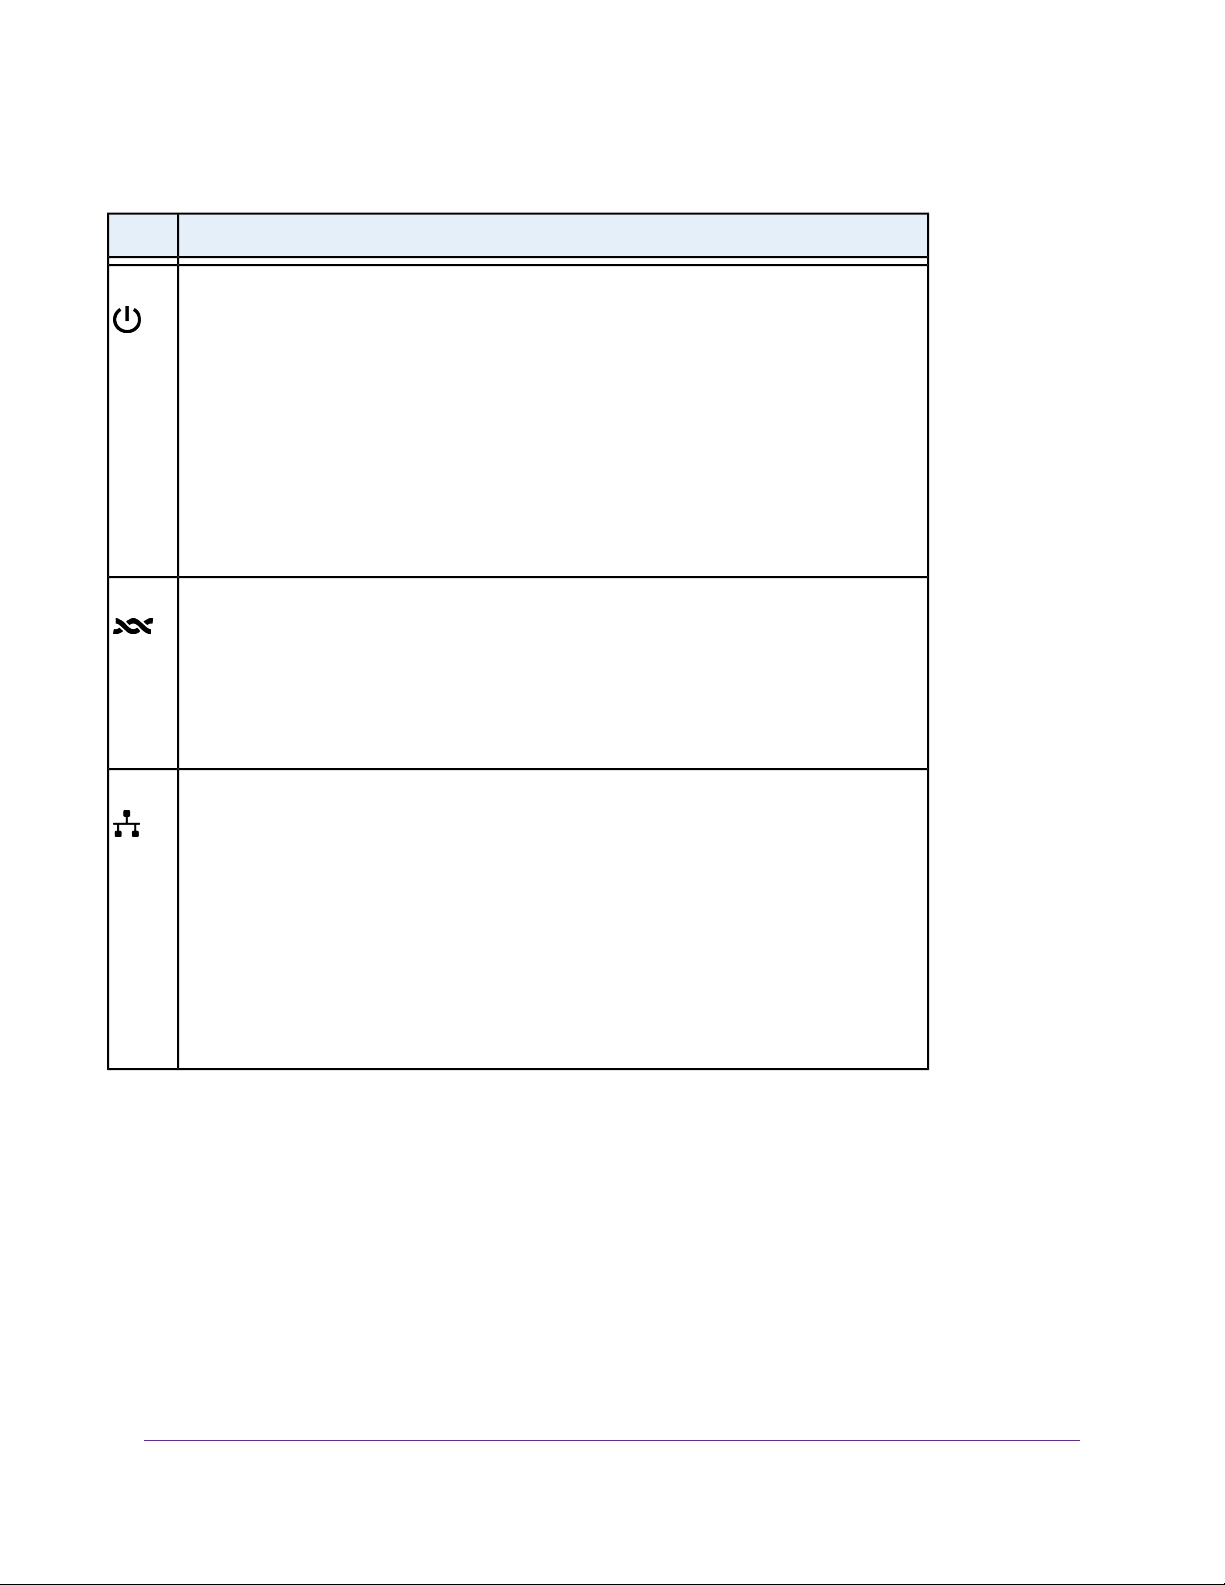
Front Panel With LEDs
The status LEDs are located on the front panel of the modem.
Figure 2. LEDs of the modem
Hardware Overview of the Modem
7
Broadband High-Speed DSL Modem Model DM200
Table 1. LED and button descriptions
DescriptionLED
Power
• Solid green.The modem is ready.
• Solid amber.The modem is starting.
If the Power LED lights solid amber during any other time, a power-on self-test (POST)
failure or device malfunction occurred.
For more information, see Power LED Remains Solid Amber on page 97.
• Blinking amber.The modem is in the process of upgrading firmware or was reset to
factory default settings and is restarting.
For more information, see Use the Reset Button on page 77.
• Off. Power is not supplied to the modem.
For more information, see Power LED Is Off on page 96.
DSL
• Solid green.The modem is connected to a DSL service and the DSL connection is ready.
• Amber blinking.The modem is trying to connect to a DSL service and the DSL connection
is not yet established.
• Off.The modem is not connected to a DSL service or a DSL connection is not established.
For more information, see Troubleshoot the DSL Link on page 98.
LAN
The LED color indicates the speed of the Ethernet connection: green for 100 Mbps and amber
for 10 Mbps.
• Solid green or solid amber. A powered-on device is connected to the Ethernet port.
When you apply power to the modem, the LAN LED lights solid green f or about 12 seconds
and then turns off even if a powered-on device is connected to the Ethernet port. When
the startup procedure is complete and a powered-on device is connected to the Ethernet
port, the LAN LED lights solid green or solid amber.
• Blinking green or blinking amber. Data is being transmitted over the Ethernet port.
• Off. No powered-on device is connected to the Ethernet port or the startup procedure is
not yet complete.
Hardware Overview of the Modem
8
Broadband High-Speed DSL Modem Model DM200
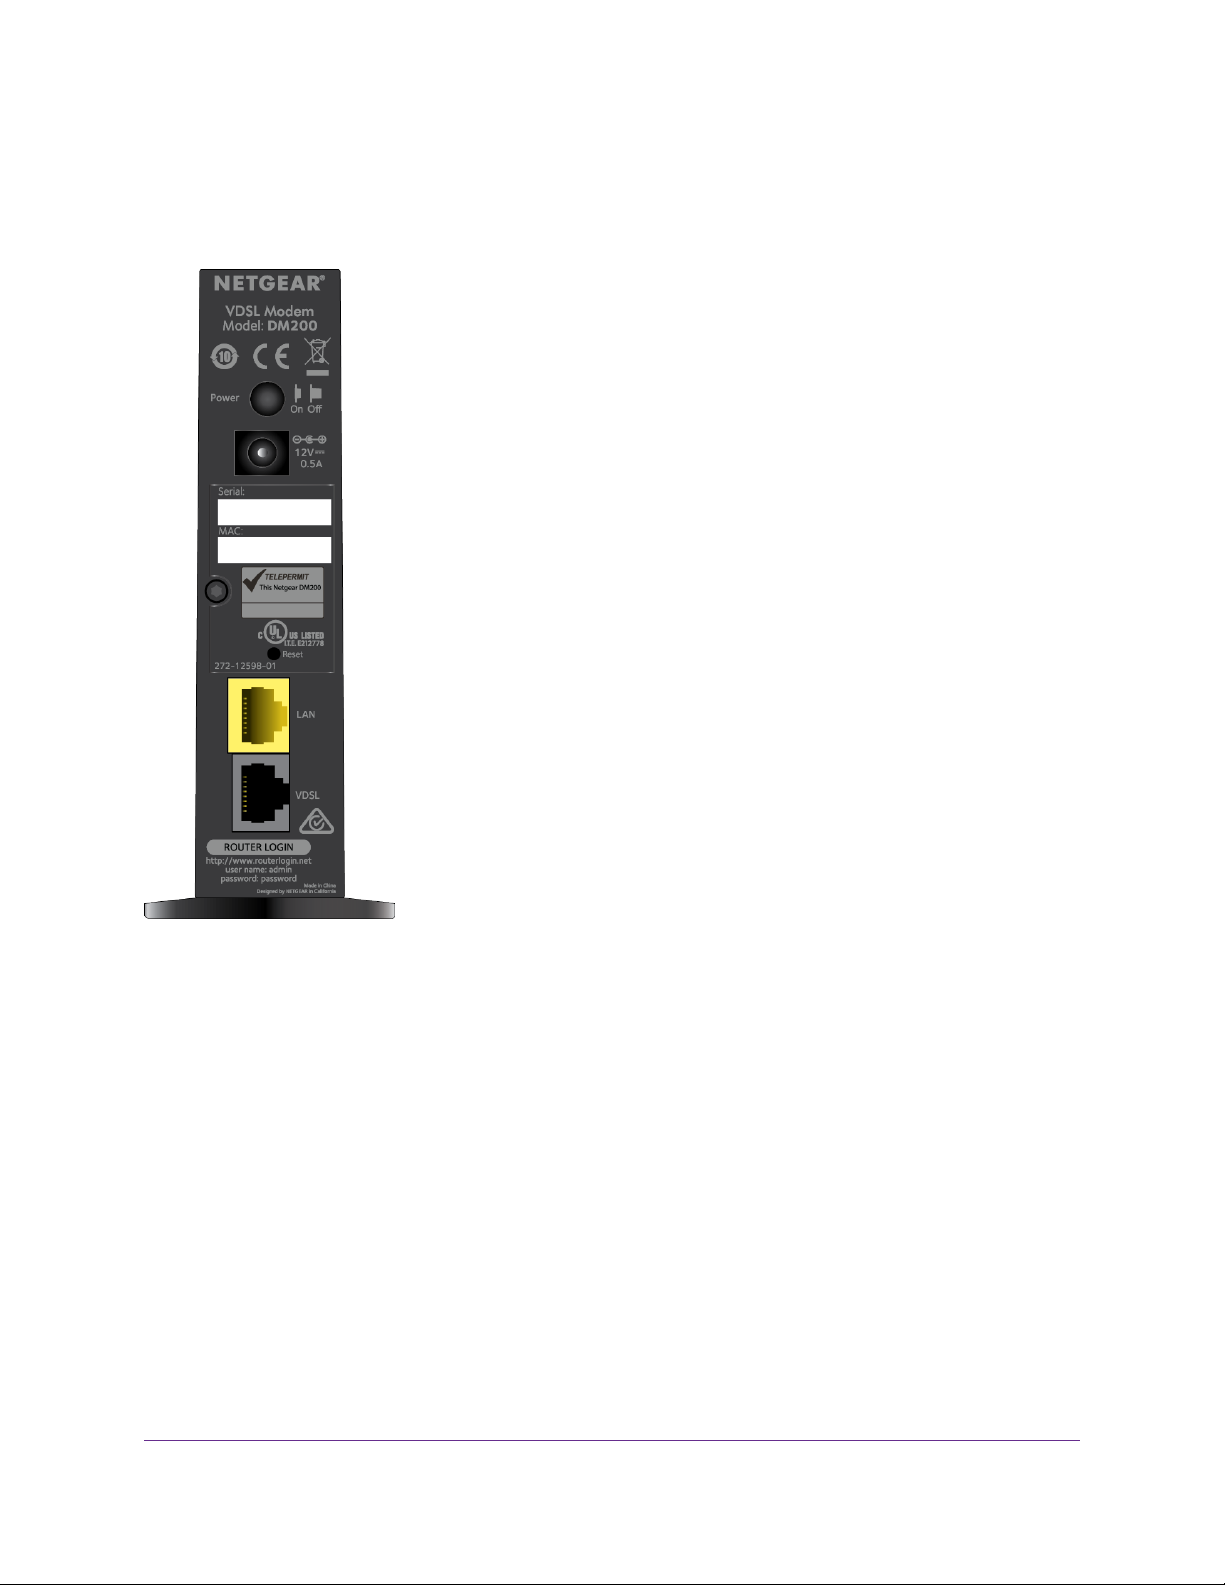
Back Panel With Ports, Buttons, and a DC Connector
The back panel of the modem provides ports, buttons, and a DC power connector.
Figure 3. Modem back panel
Viewed from top to bottom, the back panel contains the following components:
• Power On/Off button. Press the Power On/Off button to provide power to the modem.
• DC power connector. Connect the power adapter that came in the product package to the DC power
connector.
• Reset button. For information about using the Reset button, see Return the Modem to Its Factory
Default Settings on page 76.
• LAN port. One Fast Ethernet RJ-45 LAN ports to connect the modem to a LAN device such as a
computer, router, WiFi router, or Ethernet switch.This port is colored yellow.
• VDSL port. One RJ-11 DSL port for connecting the modem to an ADSL or VDSL line.This port is colored
gray.
Because the VDLS port supports both ADSL and VDSL services, the VDSL port is in this manual referred
to as the DSL port.
Hardware Overview of the Modem
9
Broadband High-Speed DSL Modem Model DM200
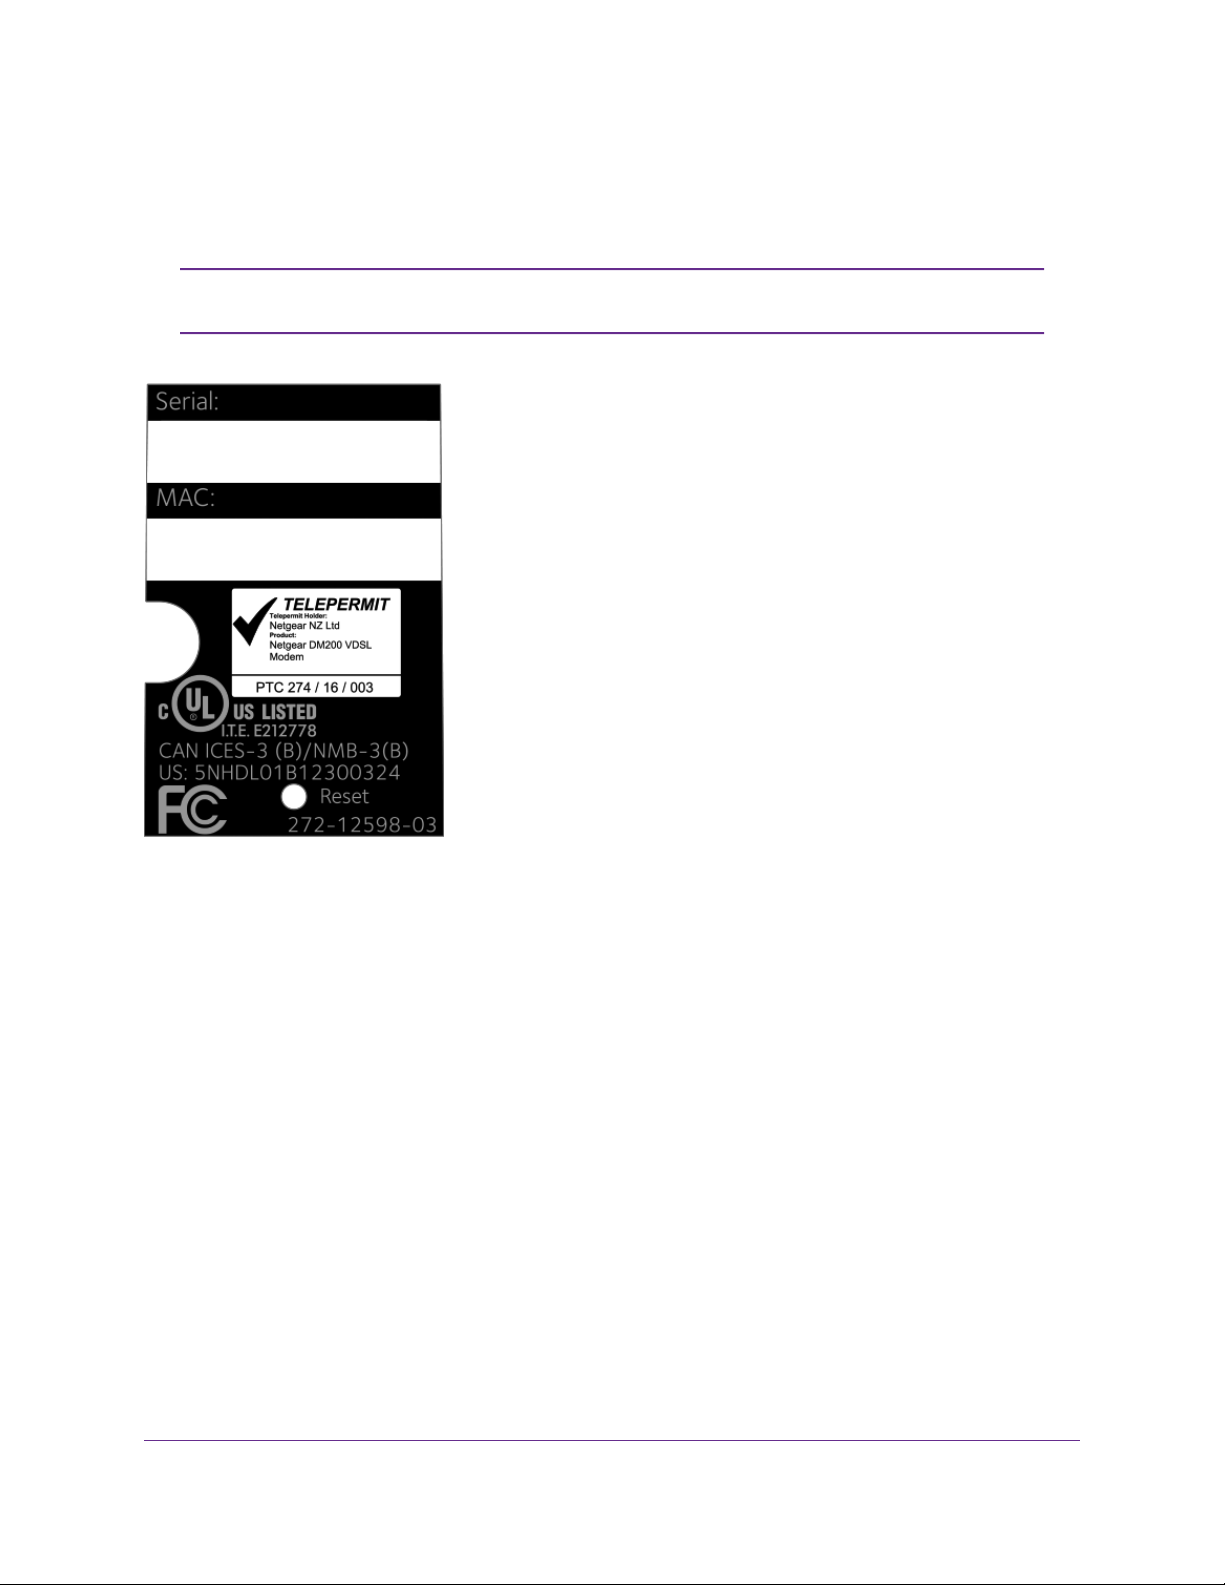
Product Label
The product label on the rear panel of the modem lists the serial number and MAC address of the modem.
The modem login information is not on the product label but stated below the VDSL
Note
port on the back panel.
Figure 4. Modem product label
Hardware Overview of the Modem
10

Install and Access the Modem
This chapter describes how you can install and access the modem and its network.
The chapter contains the following sections:
• Connect to the Modem With an Ethernet Cable on page 12
• Types of Logins on page 12
• DSL Service on page 12
• Automatic Internet Setup on page 13
• Set Up the Modem for DSL Service and Access the Modem on page 13
• Log In to the Modem After Setup to View or Change Settings on page 20
• Change the Language on page 21
• Let the Modem Automatically Update Its Firmware on page 21
2
11

Broadband High-Speed DSL Modem Model DM200
Connect to the Modem With an Ethernet Cable
During and after installation, you can connect your computer to the modem using an Ethernet cable and
join the modem’s local area network (LAN).
If you set up your computer to use a static IP address, change the settings of y our computer so that it uses
Dynamic Host Configuration Protocol (DHCP).
To connect your computer to the modem with an Ethernet cable:
1. Make sure that the modem is receiving power (its Power LED is lit).
2. Connect an Ethernet cable to an Ethernet port on your computer.
3. Connect the other end of the Ethernet cable to the LAN port on the modem.
Your computer connects to the modem’s LAN. A message might display on your computer screen to
notify you that an Ethernet cable is connected.
Types of Logins
Separate types of logins serve different purposes.This section describes the differences so that you know
which login to use when.
Types of logins:
• ISP login.The login that your Internet service provider (ISP) gave you logs you in to your Internet
service.Your ISP gave you this login information in a letter or some other way. If you cannot find this
login information, contact your ISP.
• Modem login.This logs you in to the modem’s web pages from a web browser as admin.
DSL Service
Make sure that your ADSL or VDSL service is active before you install the modem.When your Internet
service starts, your Internet service provider (ISP) typically gives you all the information that you need to
connect to the Internet.Y ou need the f ollowing inf ormation to install your modem and connect to the Internet:
• DSL user name and password.This information is included in the welcome letter that your DSL ISP
sent you when you signed up for your service. Record your DSL Internet service account user name
and password.
• Your telephone number or DSL account number. If you do not use voice service, you can use your
DSL account number in place of a phone number.
• Fixed or static IP address settings.These settings are rare and required only for a special deployment
by the ISP. Most ISPs assign IP address settings dynamically.
If you do not know or cannot locate your DSL user name and password, call your DSL Internet service
provider (ISP). Be specific when speaking with your DSL Internet service provider. For example, you could
say, “I need my DSL service user name and password. Can you help me?”
Install and Access the Modem
12
Broadband High-Speed DSL Modem Model DM200
If your provider says that the y do not support NETGEAR services, tell them that you need
Note
only your DSL user name and password.You do not need support.
Automatic Internet Setup
You can use the NETGEAR installation assistant to set up the modem automatically, or you can use the
modem’s web pages to set up the modem manually.
The NETGEAR installation assistant runs on any device with a web browser and launches the first time that
you set up the Internet connection for your modem. For more information, see Set Up the Modem for DSL
Service and Access the Modem on page 13.
After initial installation and setup, the NETGEAR Setup Wizard is always accessible to
Note
assist you with setting up an installation with DSL service. F or more inf ormation, see Use
the Internet Setup Wizard After Initial Setup on page 25.
Set Up the Modem for DSL Service and Access the Modem
The NETGEAR installation assistant can detect the type of ISP connection and presents pages on which
you can you enter the required inf ormation.The following procedure describes common steps that you must
follow for most ISPs, but also includes some uncommon steps that you might need to follow only for some
ISPs. Other uncommon steps such as configuring IPTV options and configuring DHCP Option 61 that are
required only for some ISPs are not included in the following procedure.
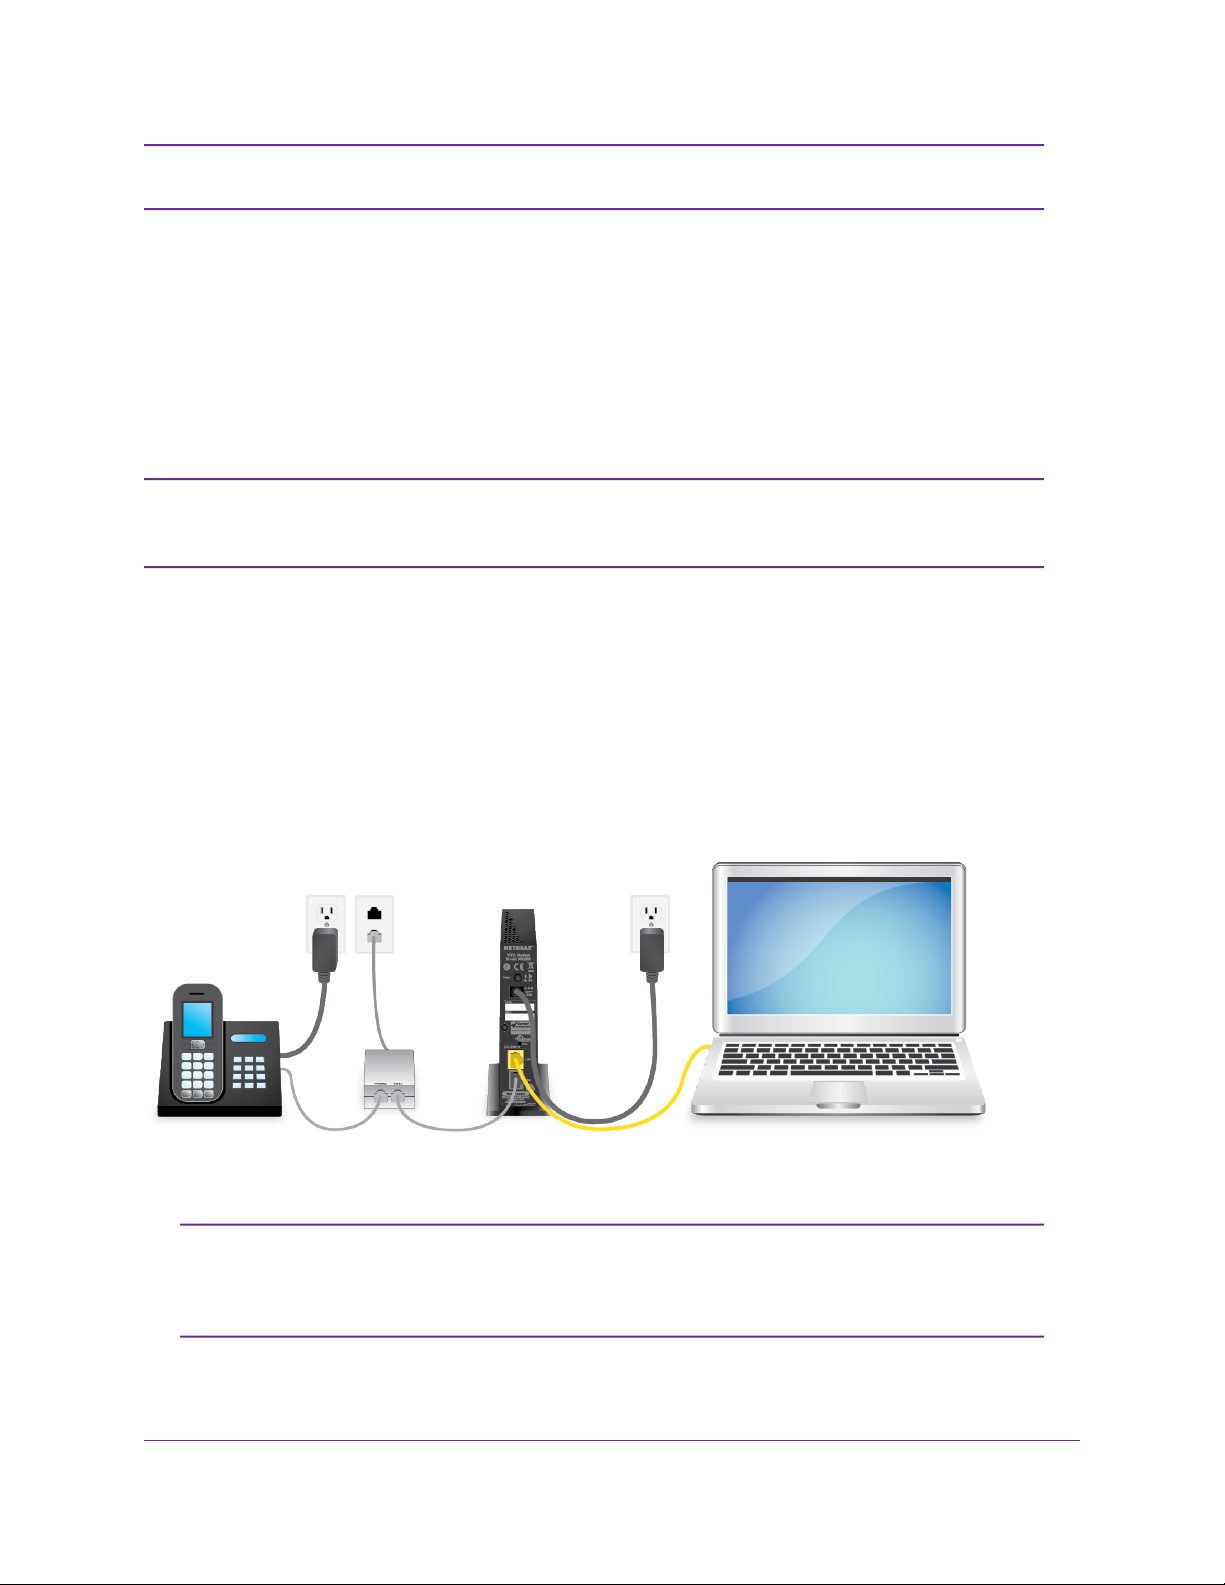
The following figure shows the cabling of your modem for DSL service:
Figure 5. Modem cabling for DSL service and a computer
If you connect the modem to a router or WiFi router instead of directly to a computer,
Note
you can change the device mode of the modem. For more information, see Disable
the Modem’s Routing Features and Use the Modem as a DSL Modem Only on page
69.
Install and Access the Modem
13

Broadband High-Speed DSL Modem Model DM200
To connect your modem to a DSL service:
1. Install an ADSL or DSL microfilter between the phone line and the phone.
The product package contains either an ADSL or DSL microfilter.
2. Use a phone cable to connect the microfilter to the gray DSL port on the modem.
The product package contains a phone cable.
3. Connect the power adapter to the modem and plug it into an electrical outlet.
Wait for the Power LED to light solid green, which takes about one minute.
4. If the Power LED does not light, press the Power On/Off button.
5. Check the DSL LED .
If the modem is connected to a DSL service, the DSL LED lights green.
6. Use an Ethernet cable to connect your computer to the yellow Ethernet LAN port on the modem.
The product package contains a yellow Ethernet cable.
Your computer connects to the modem’s LAN.
If the computer is set to a static (fixed) IP address (this setting is uncommon), either
Note
change the computer to obtain an IP address automatically from the modem through
DHCP, or change the IP address of the computer to a static IP address in the
192.168.5.2–192.168.5.254 range.
7. Launch a web browser.
Install and Access the Modem
14
Broadband High-Speed DSL Modem Model DM200
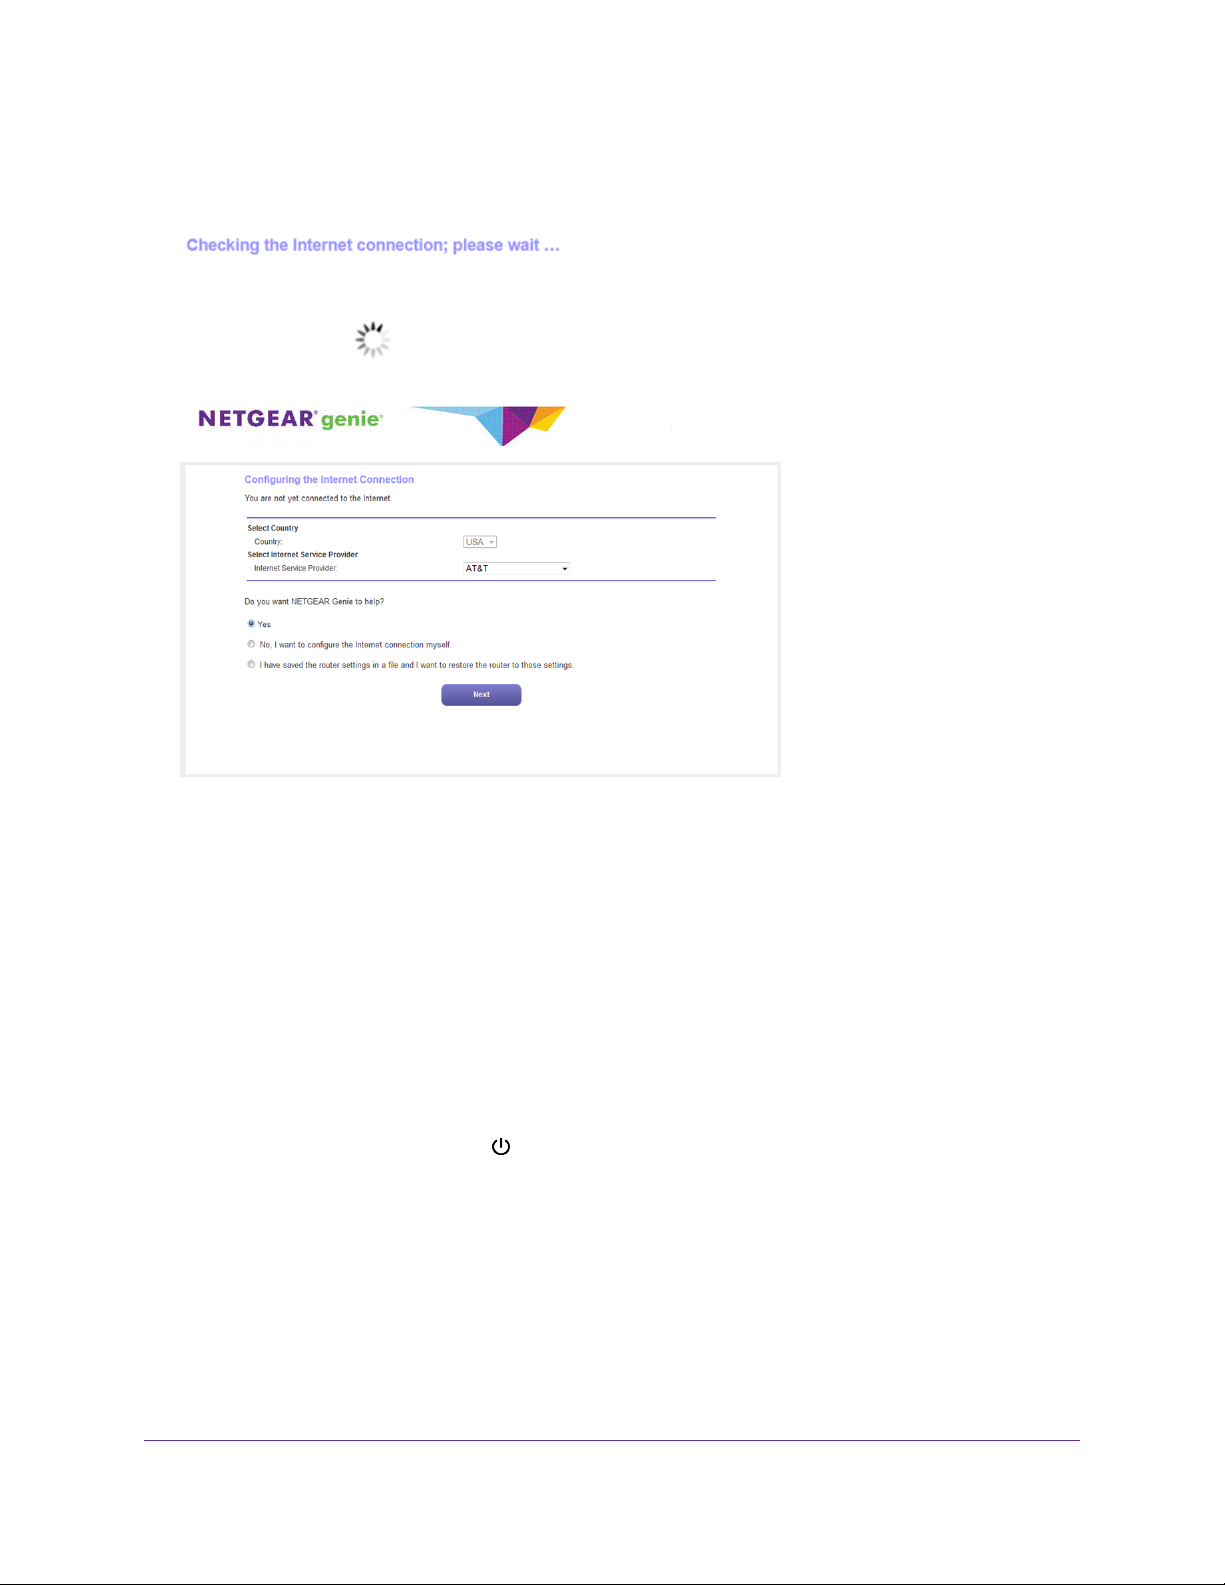
The modem checks the Internet connection.
If the Configuring the Internet Connection page displays, skip to Step 10. If the page does not display,
see Step 8.
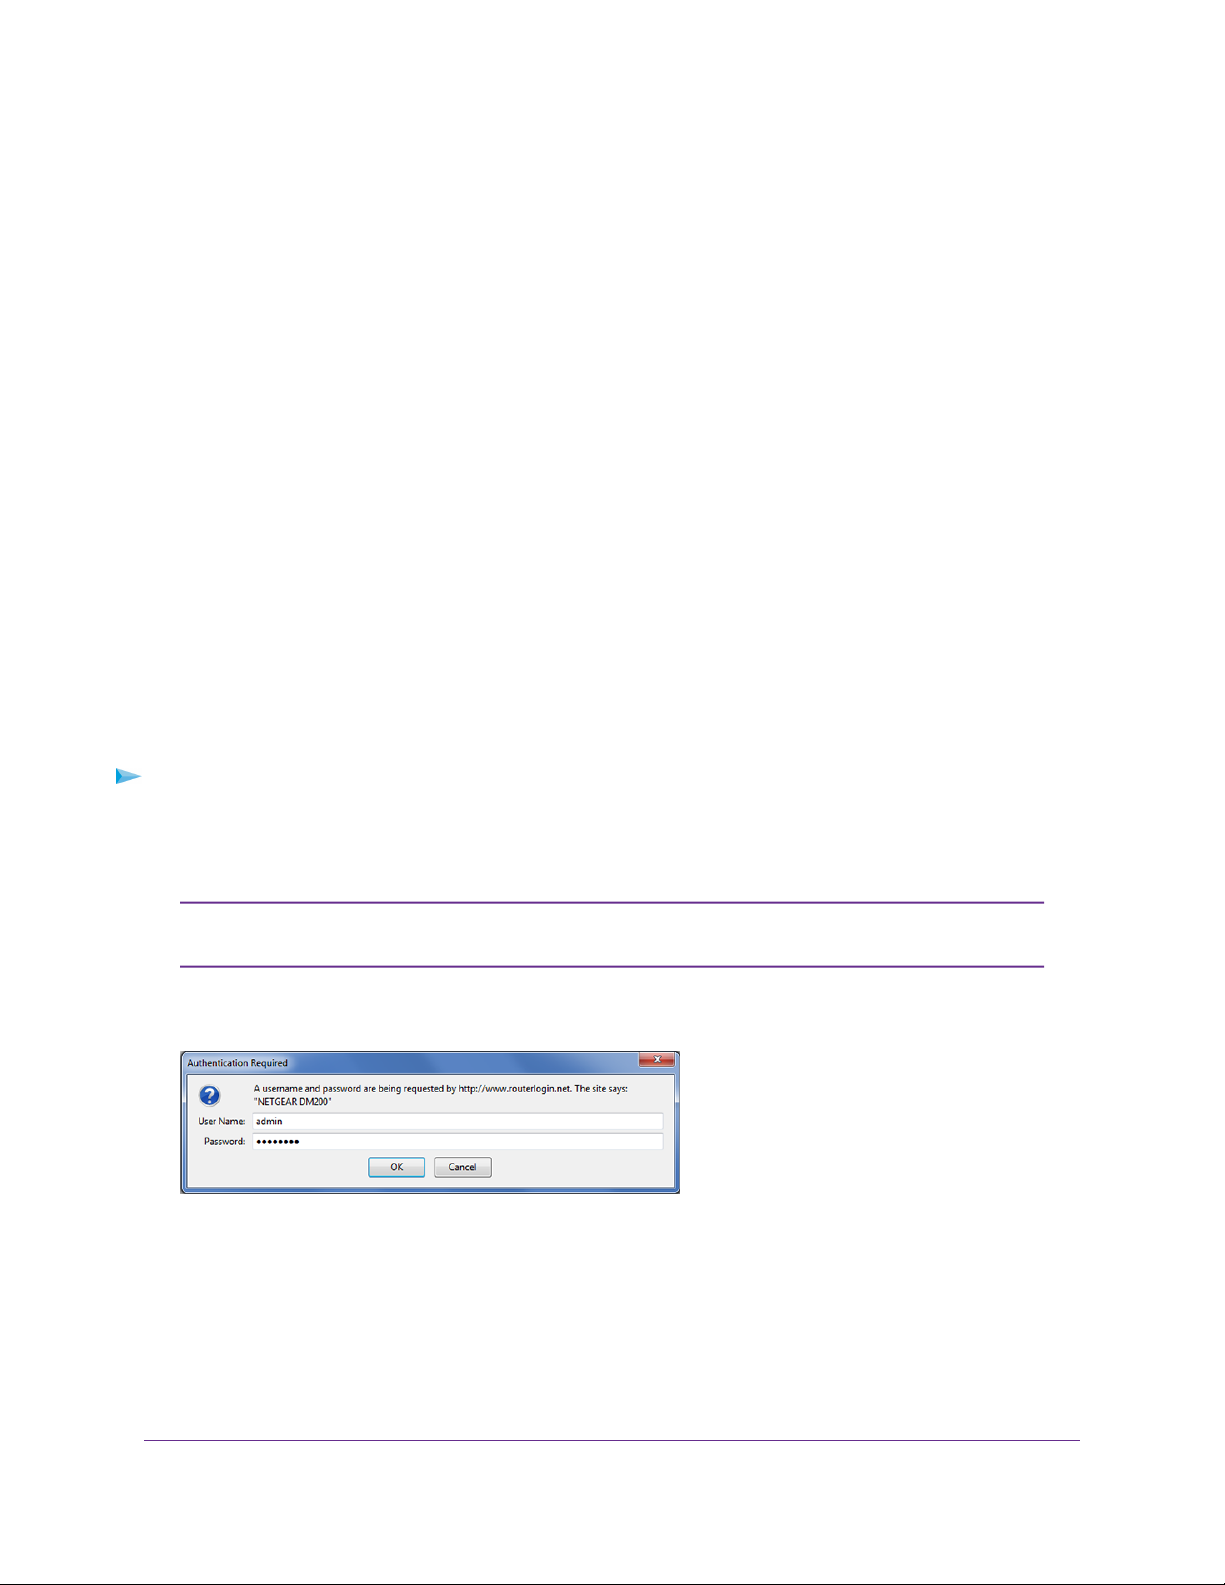
8. If the Configuring the Internet Connection page does not display, do the following:
a. In the address field of the web browser, enter www.routerlogin.net.
b. When prompted, enter admin for the user name and password for the password.
If the Configuring the Internet Connection page displays, skip to Step 10. If the page still does not displa y,
see Step 9.
9. If the browser cannot display the web page, do the following:
a. Make sure that the computer is connected to the Ethernet LAN port of the modem.
b.
Make sure that the Power LED of the modem is lit solid green.
c. Make sure that your browser does not cache the previous page by closing and reopening the
browser.
d. Clear the browser cache.
e. If the computer is set to a static (fixed) IP address (this setting is uncommon), either change the
computer to obtain an IP address automatically from the modem through DHCP, or change the IP
address of the computer to a static IP address in the 192.168.5.2–192.168.5.254 range.
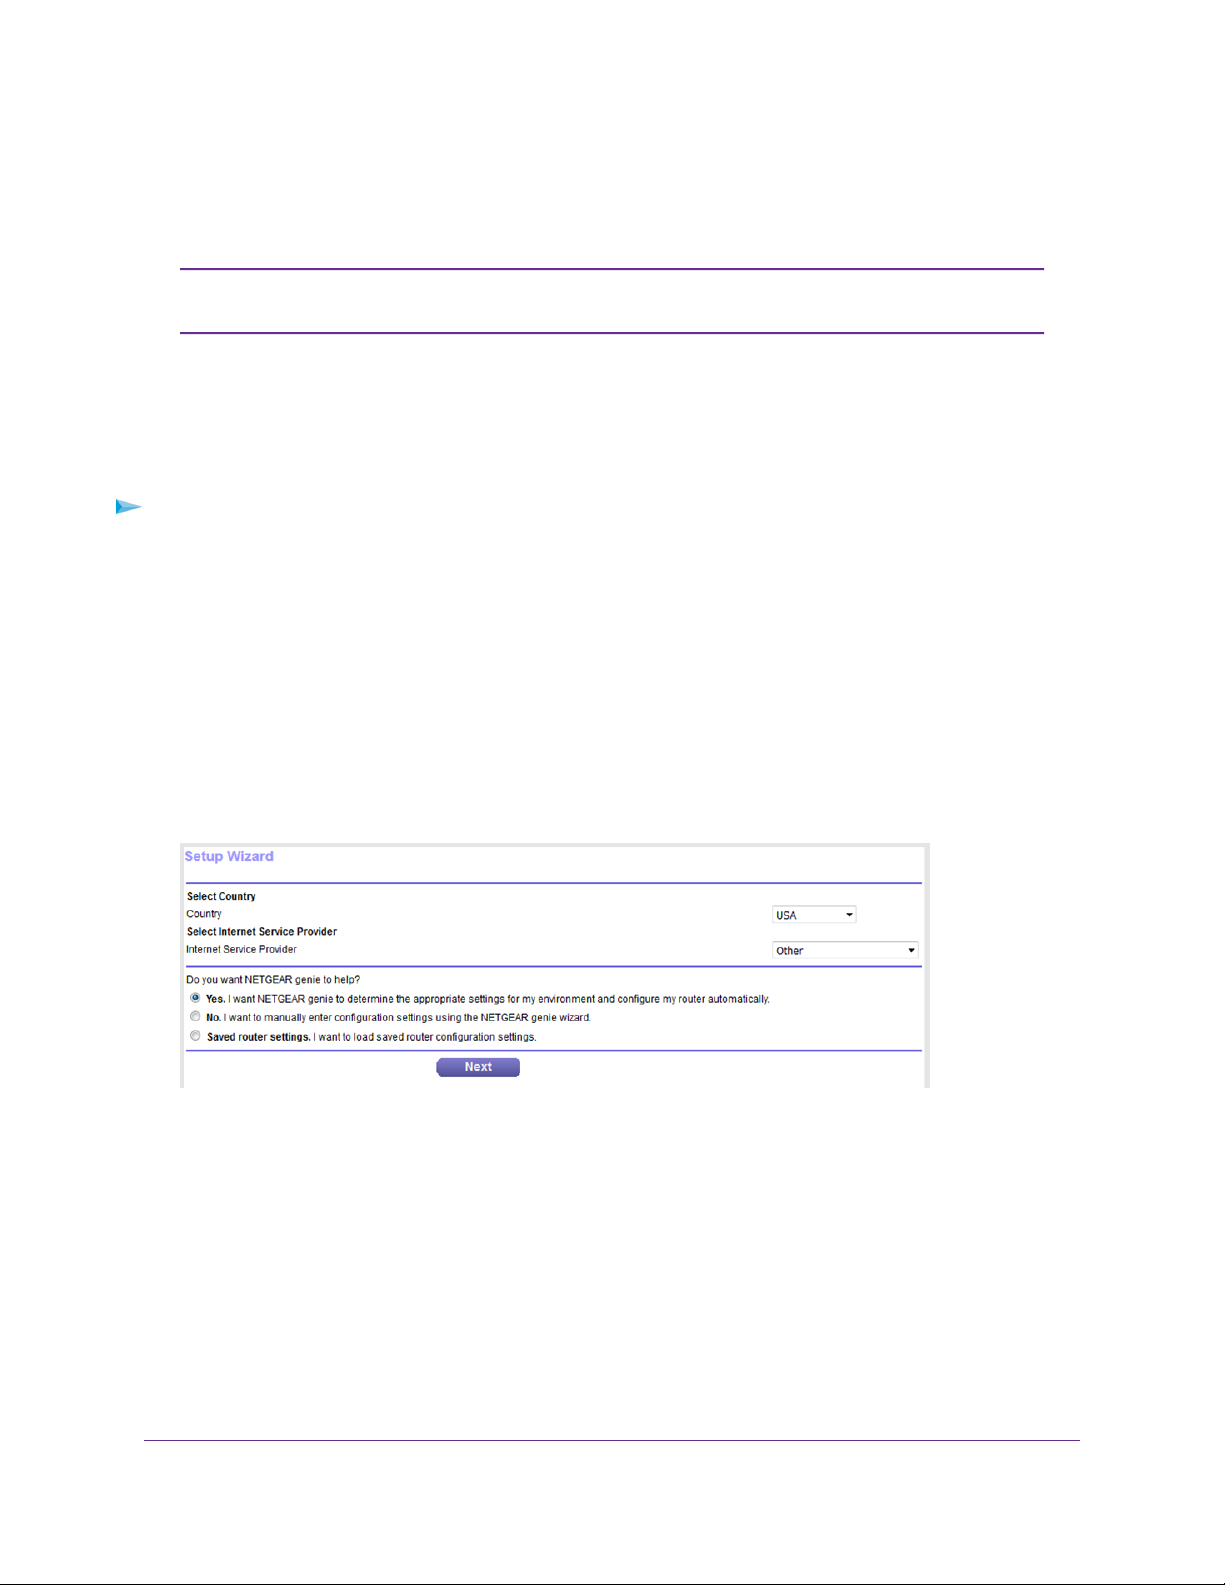
10. From the Country menu, select the country in which you use the modem.
11. From the Internet Service Pro vider menu, select the Internet service provider (ISP) that you are using.
Install and Access the Modem
15

Broadband High-Speed DSL Modem Model DM200
If your ISP is not in the menu, select Other.
12. Select the Yes radio button.
13. Click the Next button.
14. During the detection and setup process, you must change the password for the modem and enable
password recovery by selecting two questions and providing answers.
If the Admin Accounting Settings page does not yet display, other pages might display and you might
need to provide more information, in which case you must continue with Step 16.The pages that display
depend on your type of ISP connection and configuration.
To change the password and enable password recovery, do the following:
a. In the New Password field, enter a new password.
The ideal password contains no dictionary words from any language and contains uppercase and
lowercase letters, numbers, and symbols. It can be up to 30 characters.
b. In the Confirm New Password field, repeat the password.
We recommend that you write down your new password or save it in some other way so you don’t
forget it.
c. From the Security Question #1 menu, select a question.
d. In the first Answer field, enter an answer that makes sense to you.
e. From the Security Question #2 menu, select a question that is different from the first one that you
selected.
f. In the second Answer field, enter an answer that makes sense to you.
g. Click the Next button.
Install and Access the Modem
16
Broadband High-Speed DSL Modem Model DM200
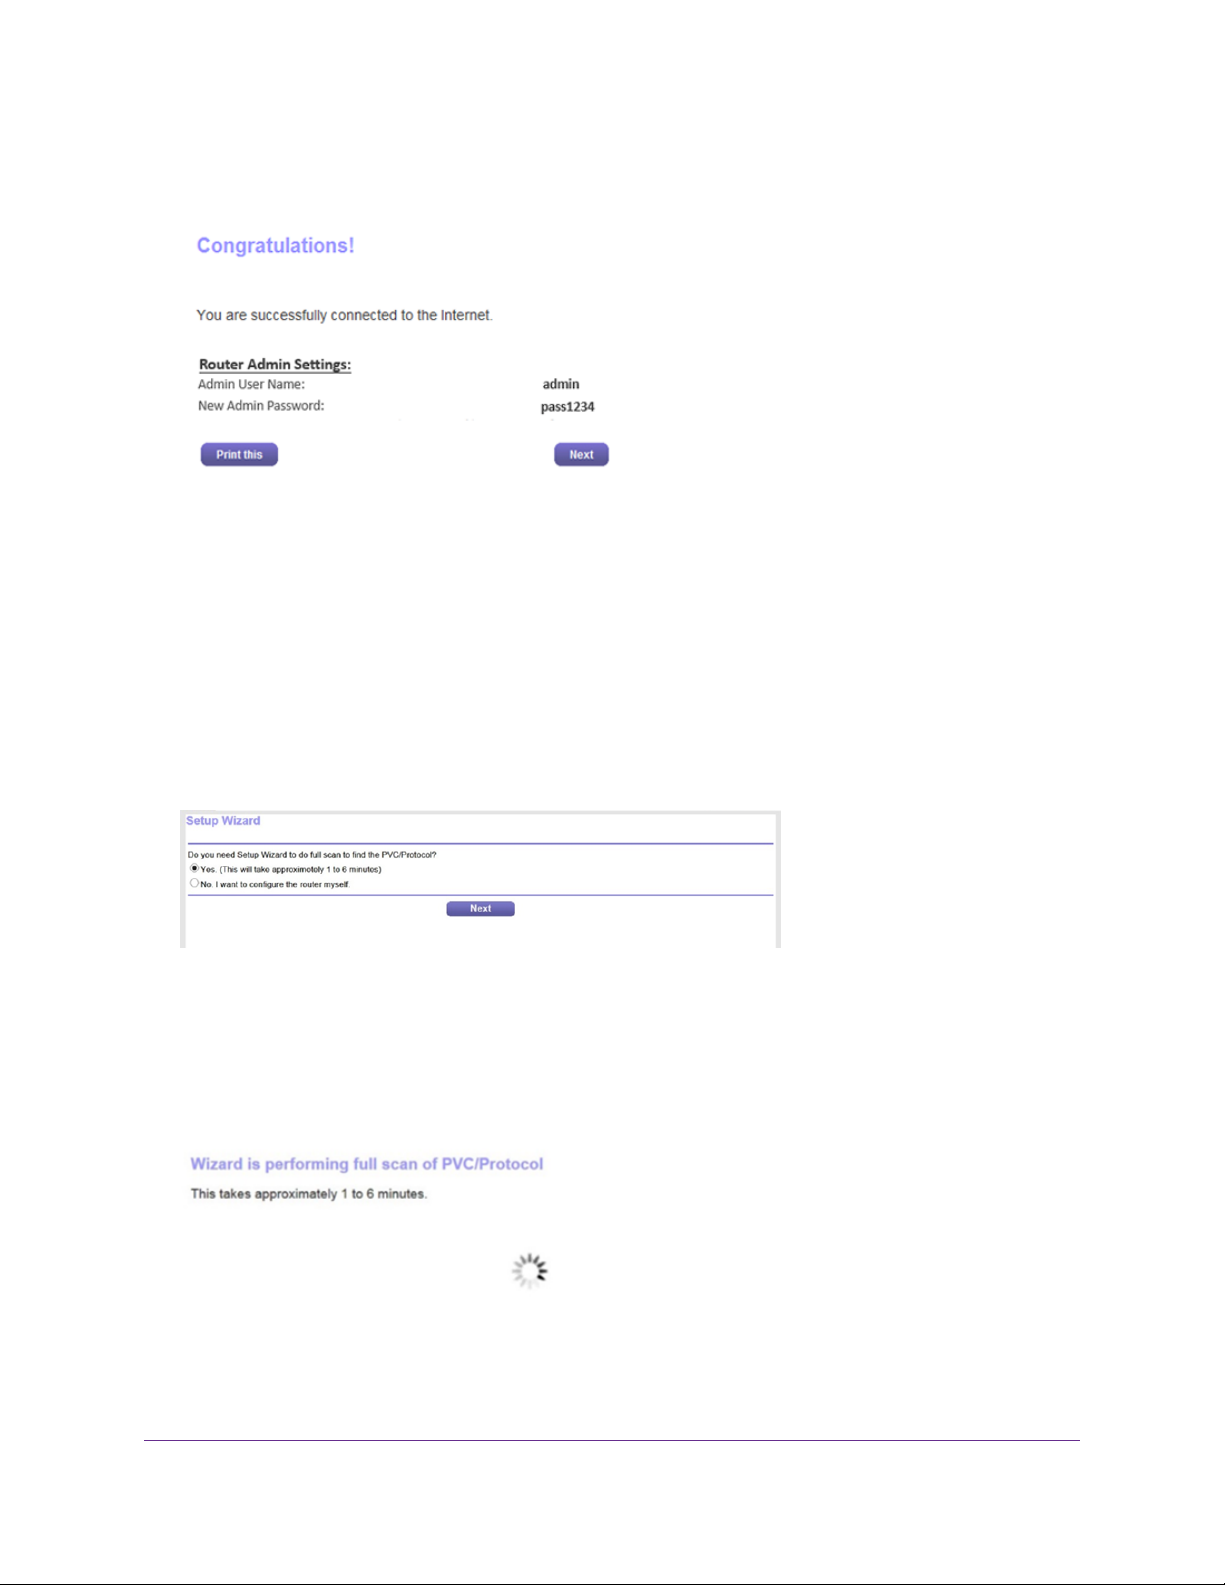
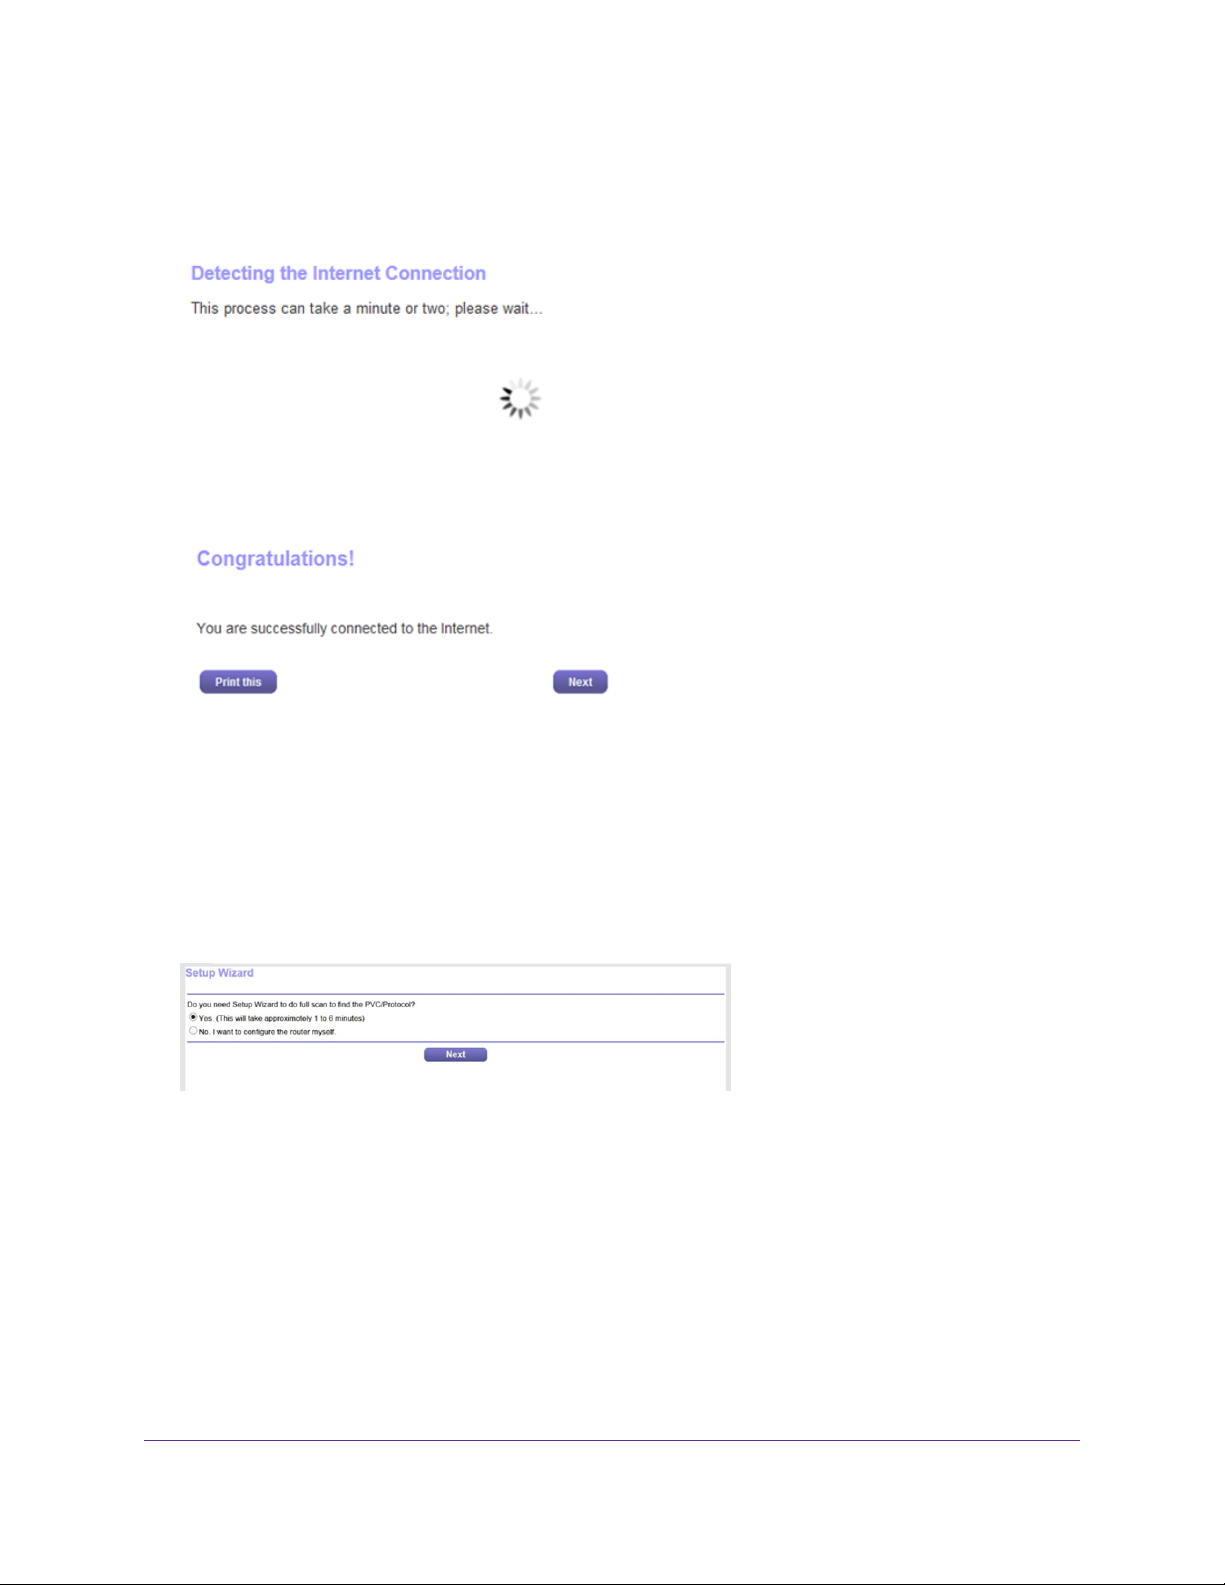
When the modem is connected to the Internet, the Congratulations! page displays, and you successfully
completed the setup process.
15. Click the Next button.
You are prompted to download and install the free NETGEAR Desktop genie app.
This step concludes a successful setup process. If you are connected to the Internet, you can ignore
Step 16 through Step 19.
16. (Only if page in the following figure displa ys) Specify a full scan to let the NETGEAR installation assistant
find the PVC protocol.
The page that might display asks you if y ou need the Setup Wizard (which is the same as the NETGEAR
installation assistant) to do a full scan to find the PVC protocol. If this page does not display, continue
with Step 17.
Do the following:
a. Select the Yes radio button.
b. Click the Next button.
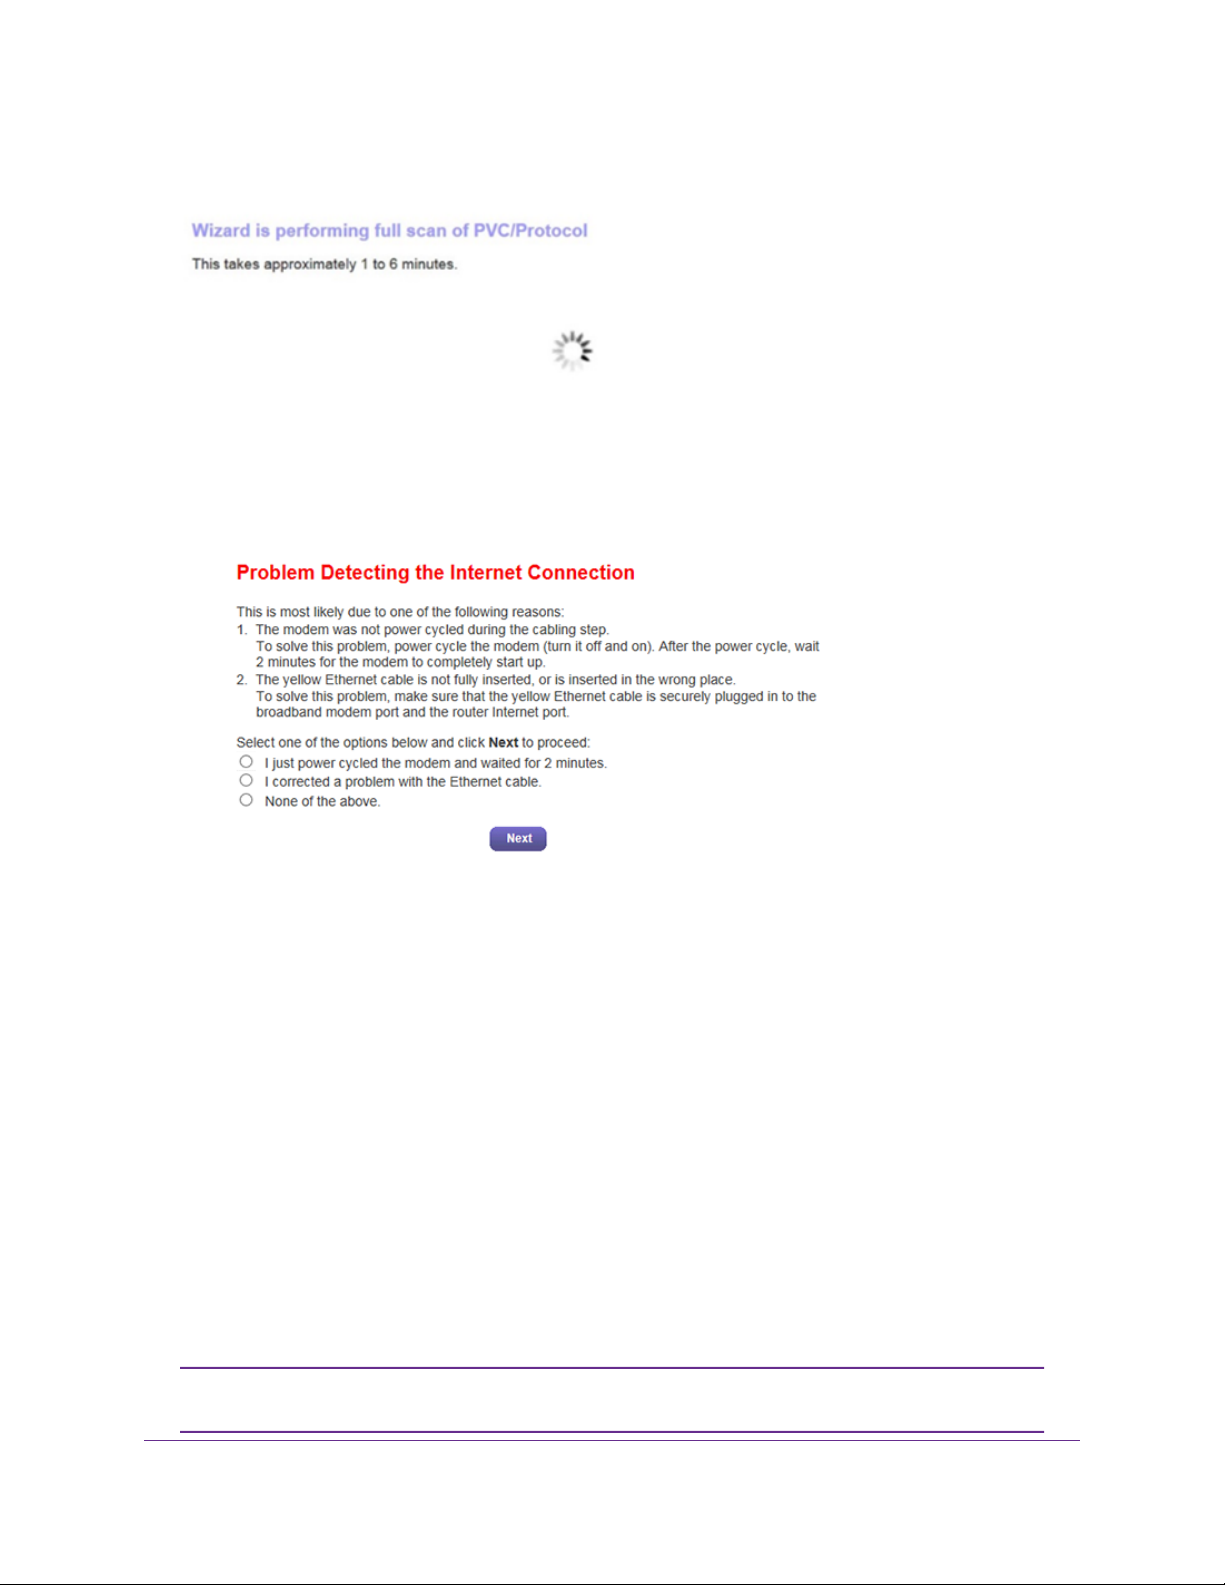
The NETGEAR installation assistant performs a full scan, which might take up to six minutes.
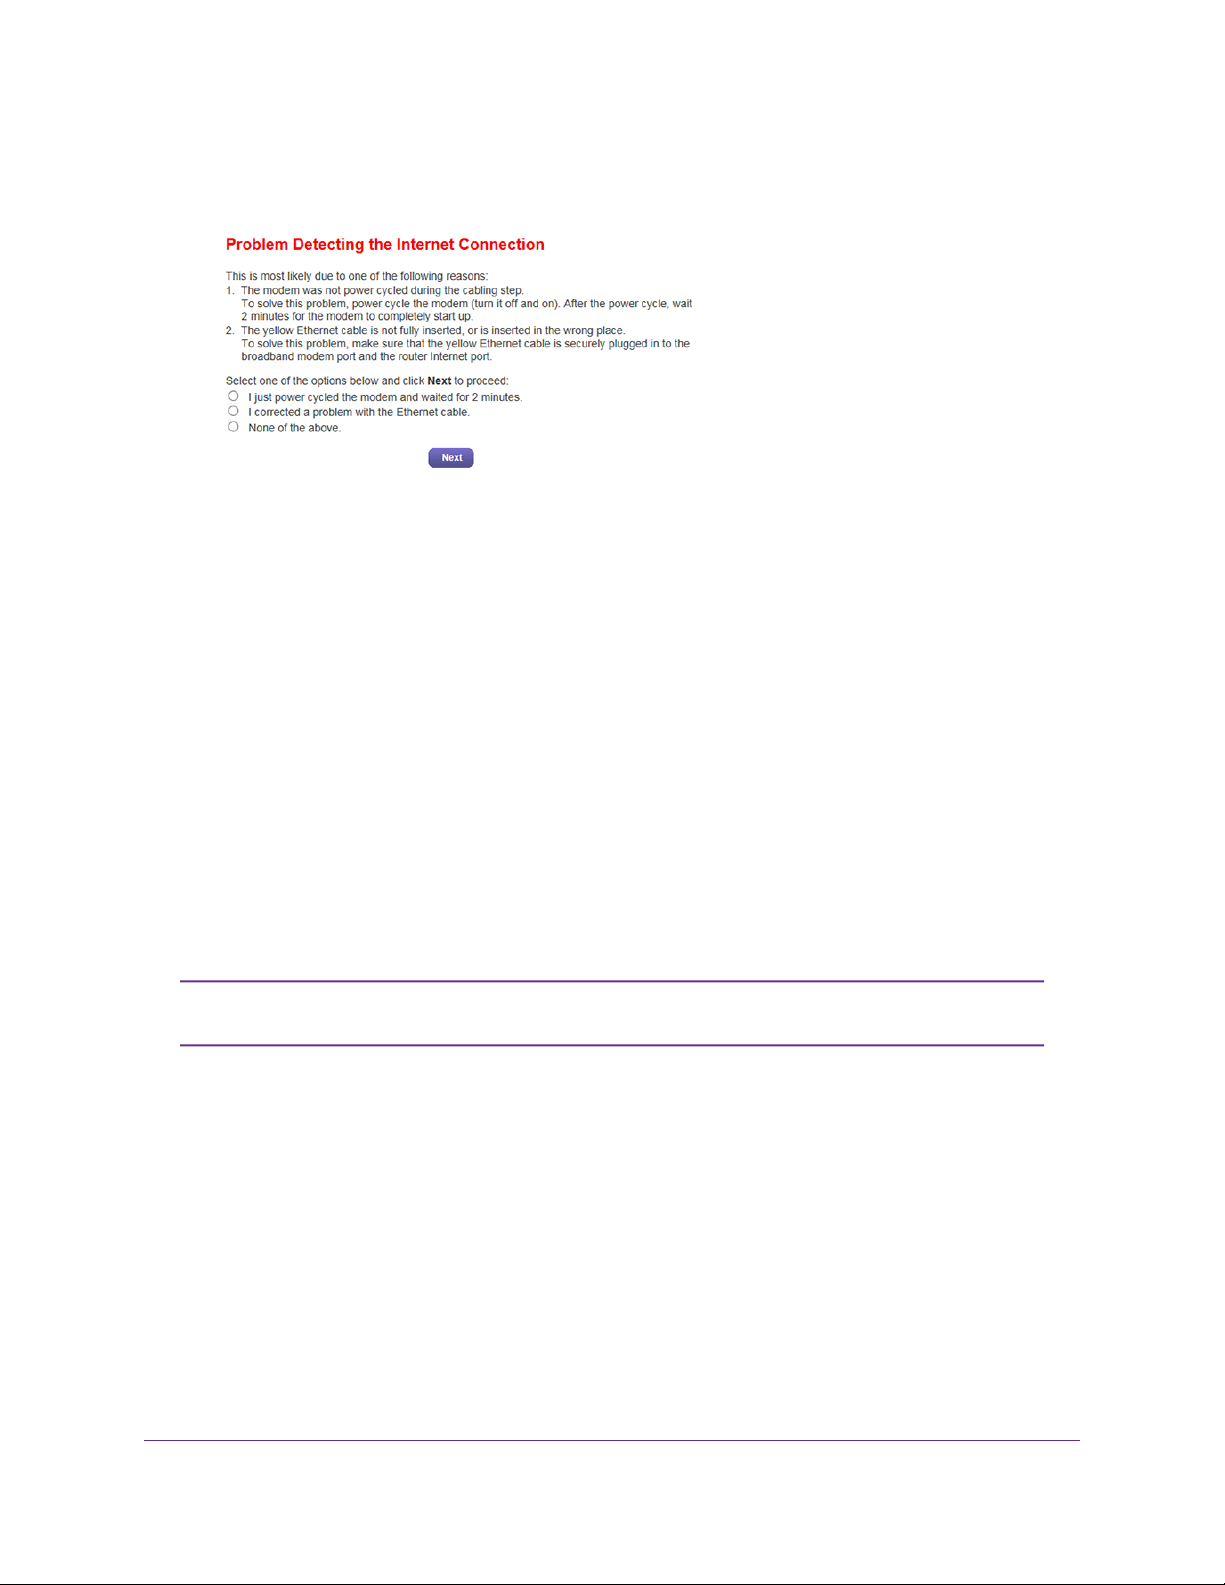
17. (Only if page in the following figure displa ys) Specify ho w to manage prob lems with the detection of the
Internet connection.
Install and Access the Modem
17
Broadband High-Speed DSL Modem Model DM200
The page that might display states that a problem occurred while the wizard was detecting the Internet
connection. If this page does not display, continue with Step 18.
Take one of the following actions:
• If you did not yet power cycle the modem, do so now:
a. Unplug your modem’s power, leaving the modem connected to the wall jack for your Internet
service.
b. Wait 10 seconds.
c. Plug in your modem’s power and turn on your modem.
d. Wait two minutes.
e. Select the I just power cycled the modem and waited for 2 minutes radio button.
f. Click the Next button.
• If you do not need to power cycle the modem, do the following:
a. Select the None of the above radio button.
b. Click the Next button.
The Ethernet cable information that is shown in the previous figure does not apply to
Note
the modem.
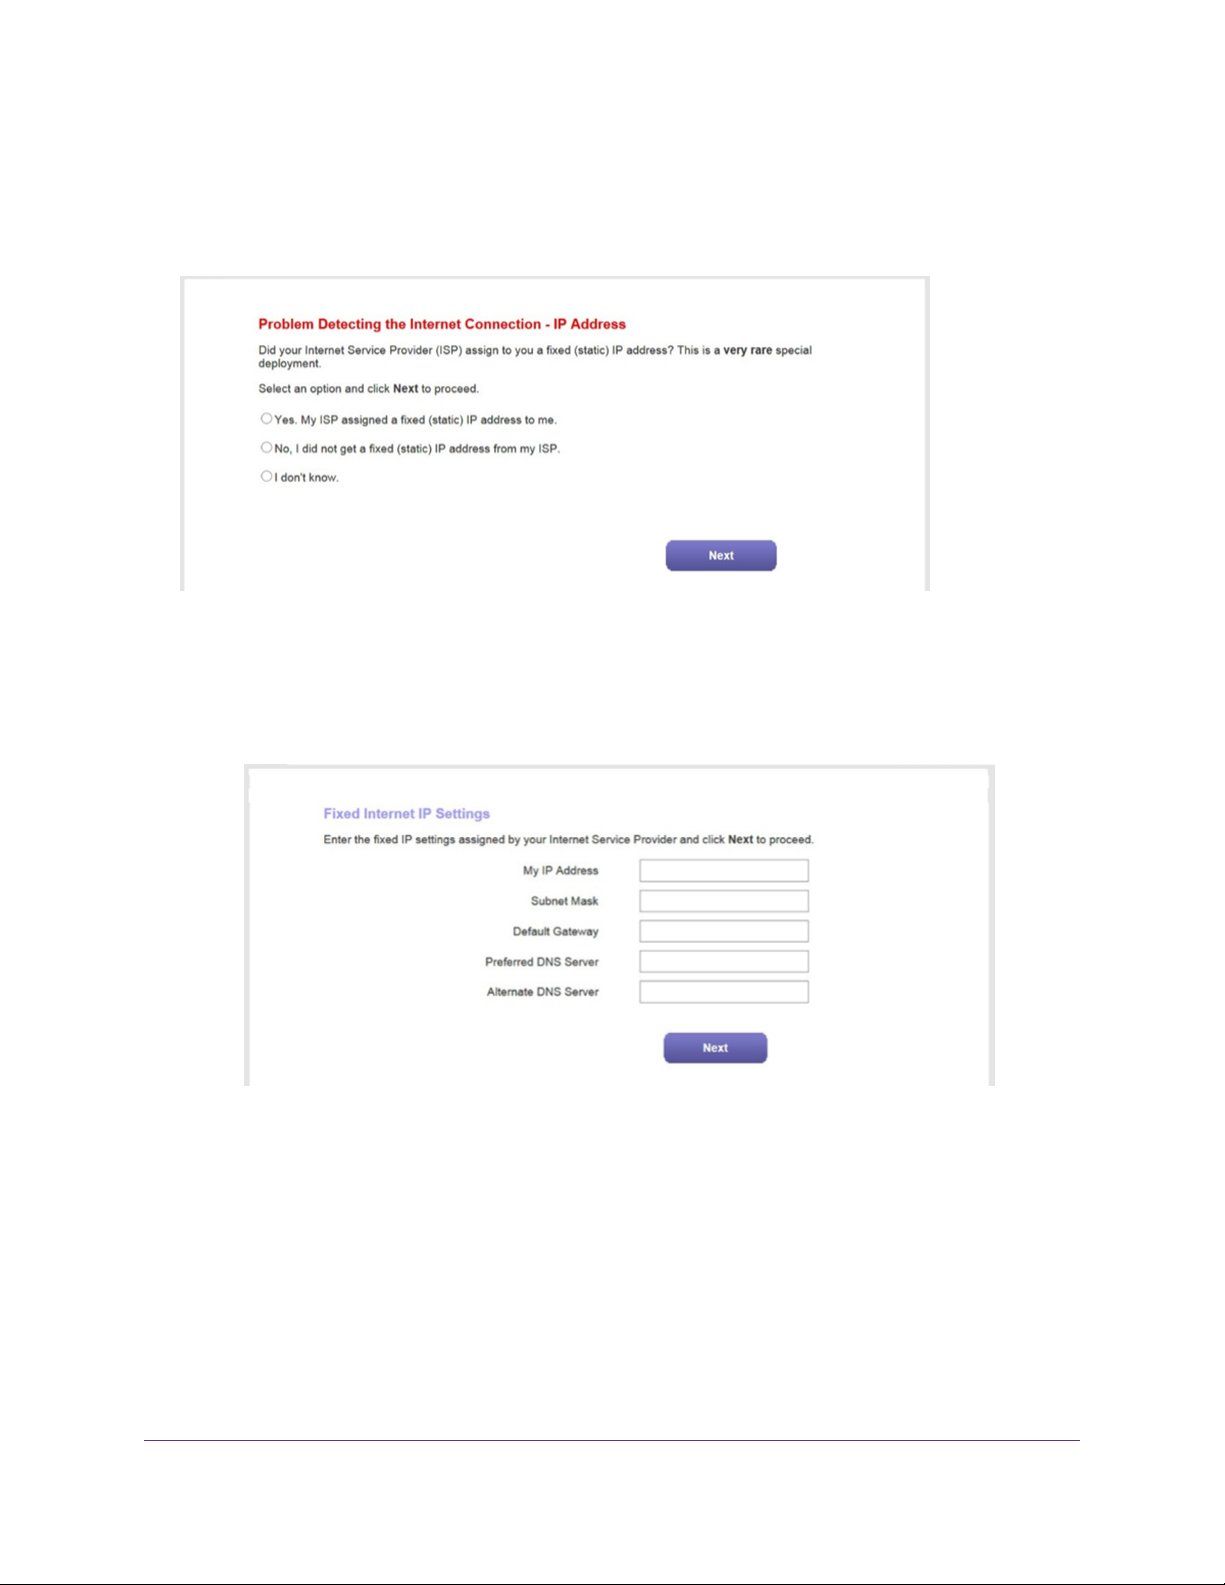
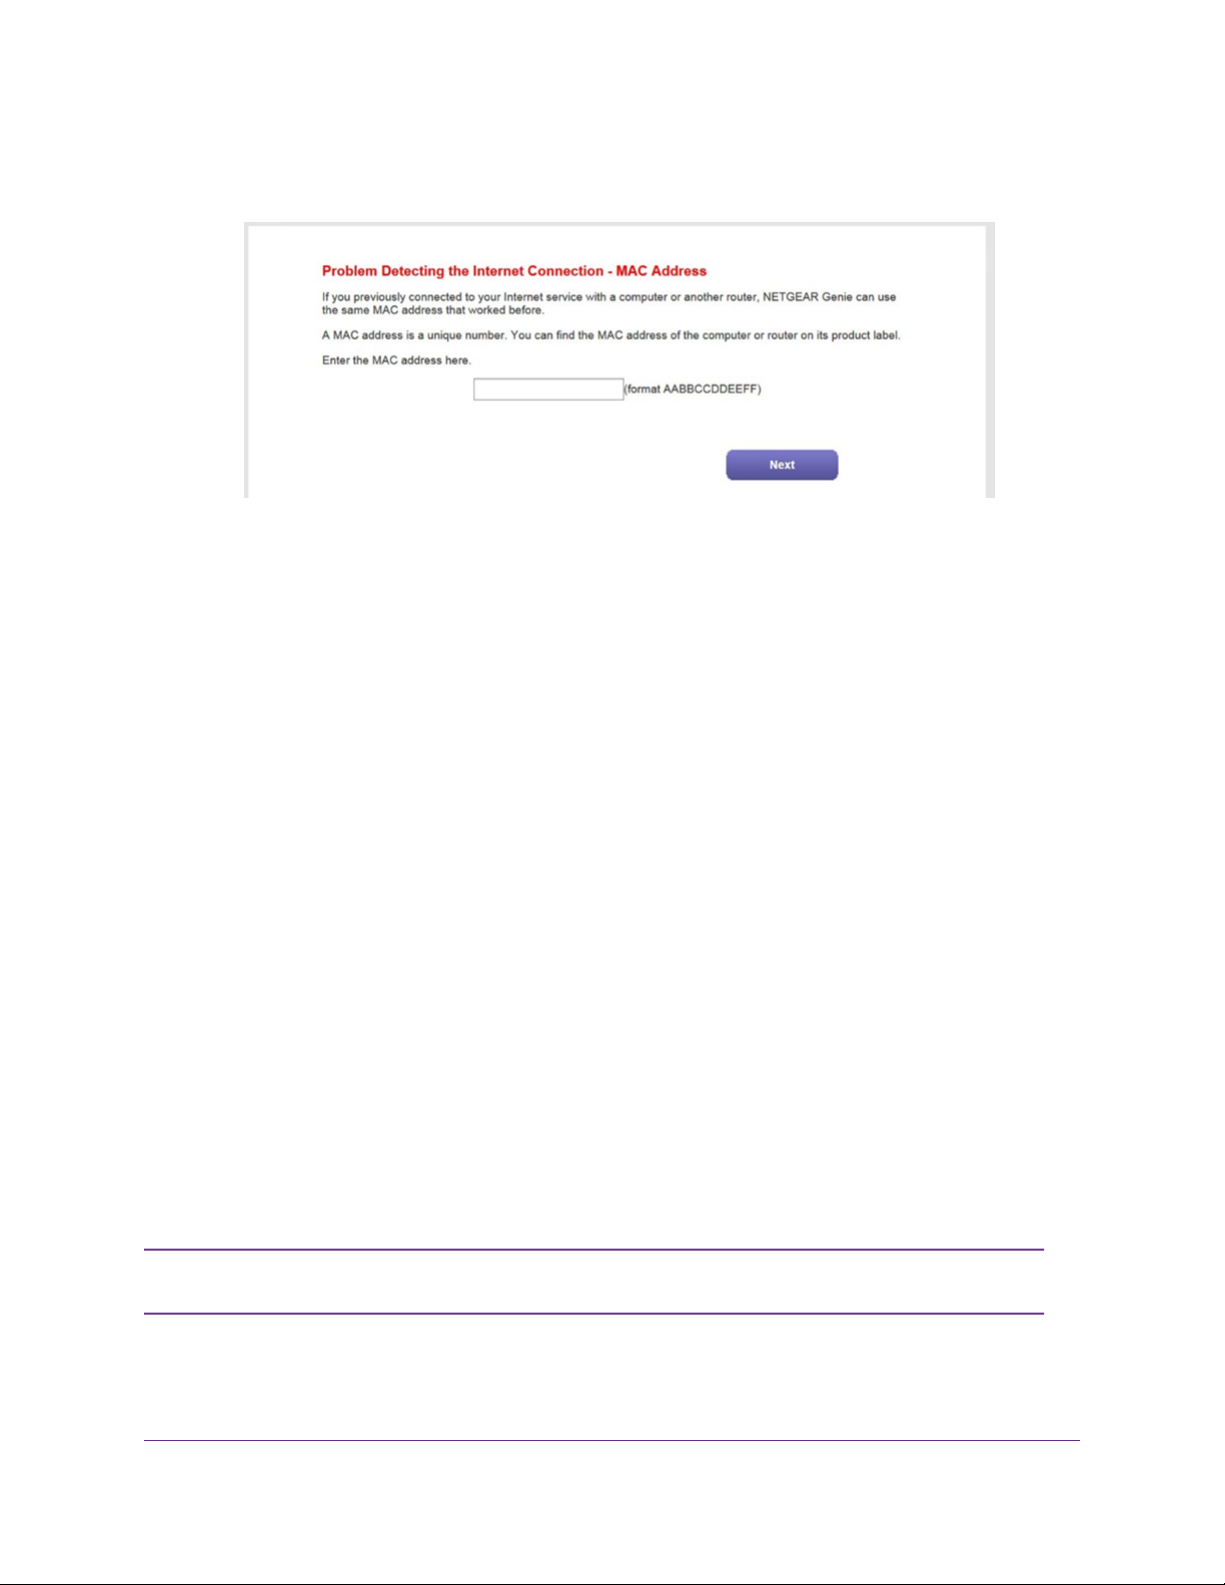
18. (Only if page in the following figure displa ys) Specify ho w to manage prob lems with the detection of the
IP address for the Internet connection.
Install and Access the Modem
18
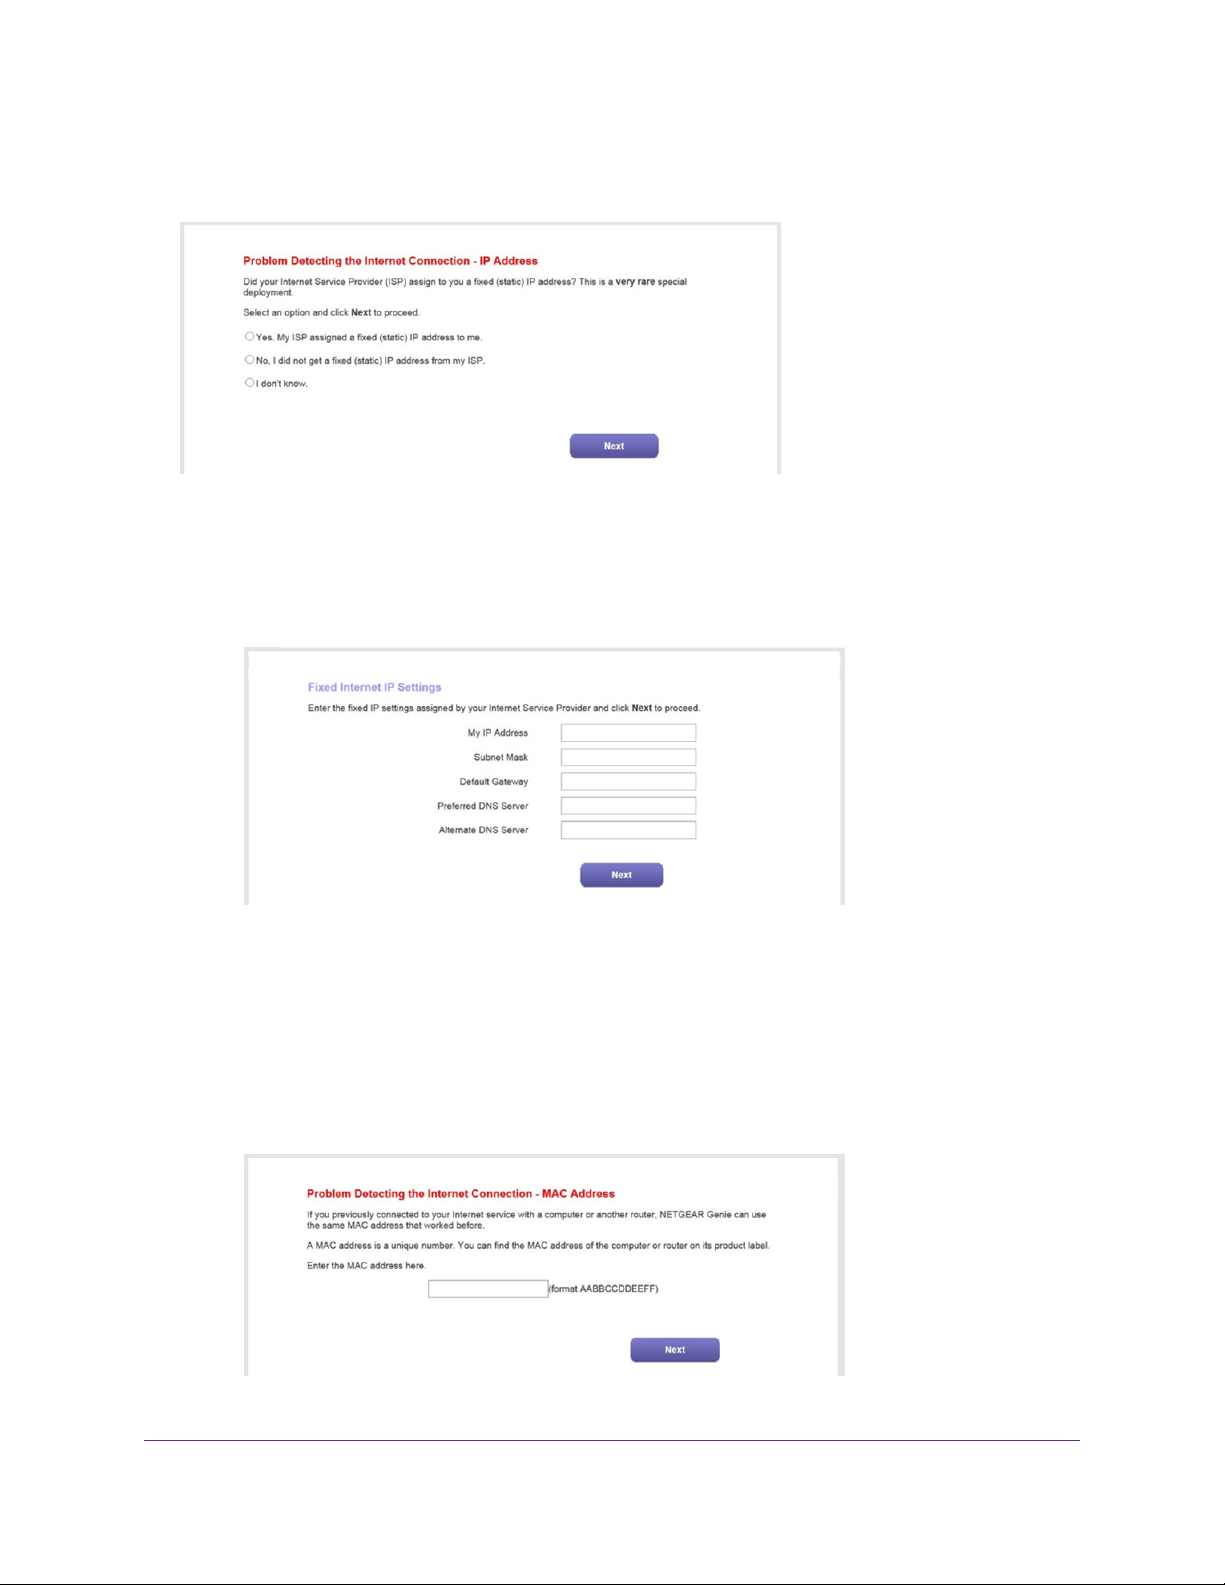
Broadband High-Speed DSL Modem Model DM200
The page that might display states that a problem occurred while the wizard was detecting the Internet
connection IP address. If this page does not display, continue with Step 19.
Take one of the following actions:
• If your ISP assigned you a fixed (static) IP address, do the following:
a. Select the Yes radio button.
b. Click the Next button.
c. Enter the address information that your ISP gave you for your fixed IP address configuration.
d. Click the Next button.
• If your ISP did not assign you a fix ed IP address or you do not kno w if y our ISP assigned y ou a fix ed
IP address, do the following:
a. Select either the No or the I don’t know radio button.
b. Click the Next button.
Install and Access the Modem
19
Broadband High-Speed DSL Modem Model DM200
c. Enter the MAC address of the computer or router with which you pre viously were able to connect
to the Internet.You might find the MAC address on the product label of your device. Enter the
MAC address in the AABBCCDDEEFF format, not in the AA:BB:CC:DD:EE:FF format.
d. Click the Next button.
19. If the Congratulations! page still does not display and the modem still does not connect to the Internet,
do the following:
a. Review all y our settings and make sure that you selected the correct options and entered e verything
correctly.
b. Run the NETGEAR installation assistant one more time.
c. Contact your ISP to verify that you are using the correct configuration information.
d. Read Troubleshoot the Internet Connection on page 97.
e. If problems persist, register your NETGEAR product and contact NETGEAR technical support.
Log In to the Modem After Setup to View or Change Settings
After you set up the modem for DSL service, you can view or change the settings for the modem.
To log in to the modem:
1. Launch a web browser from a computer that is connected to the network.
2. Enter http://www.routerlogin.net.
You can also type http://www.routerlogin.com or http://192.168.5.1.The procedures
Note
in this manual use http://www.routerlogin.net.
The nature of the login window that opens depends on your web browser.
3. Enter the modem user name and password.
Install and Access the Modem
20
Broadband High-Speed DSL Modem Model DM200
The user name is admin.The default password is password.The user name and password are
case-sensitive.
4. Click the OK button.
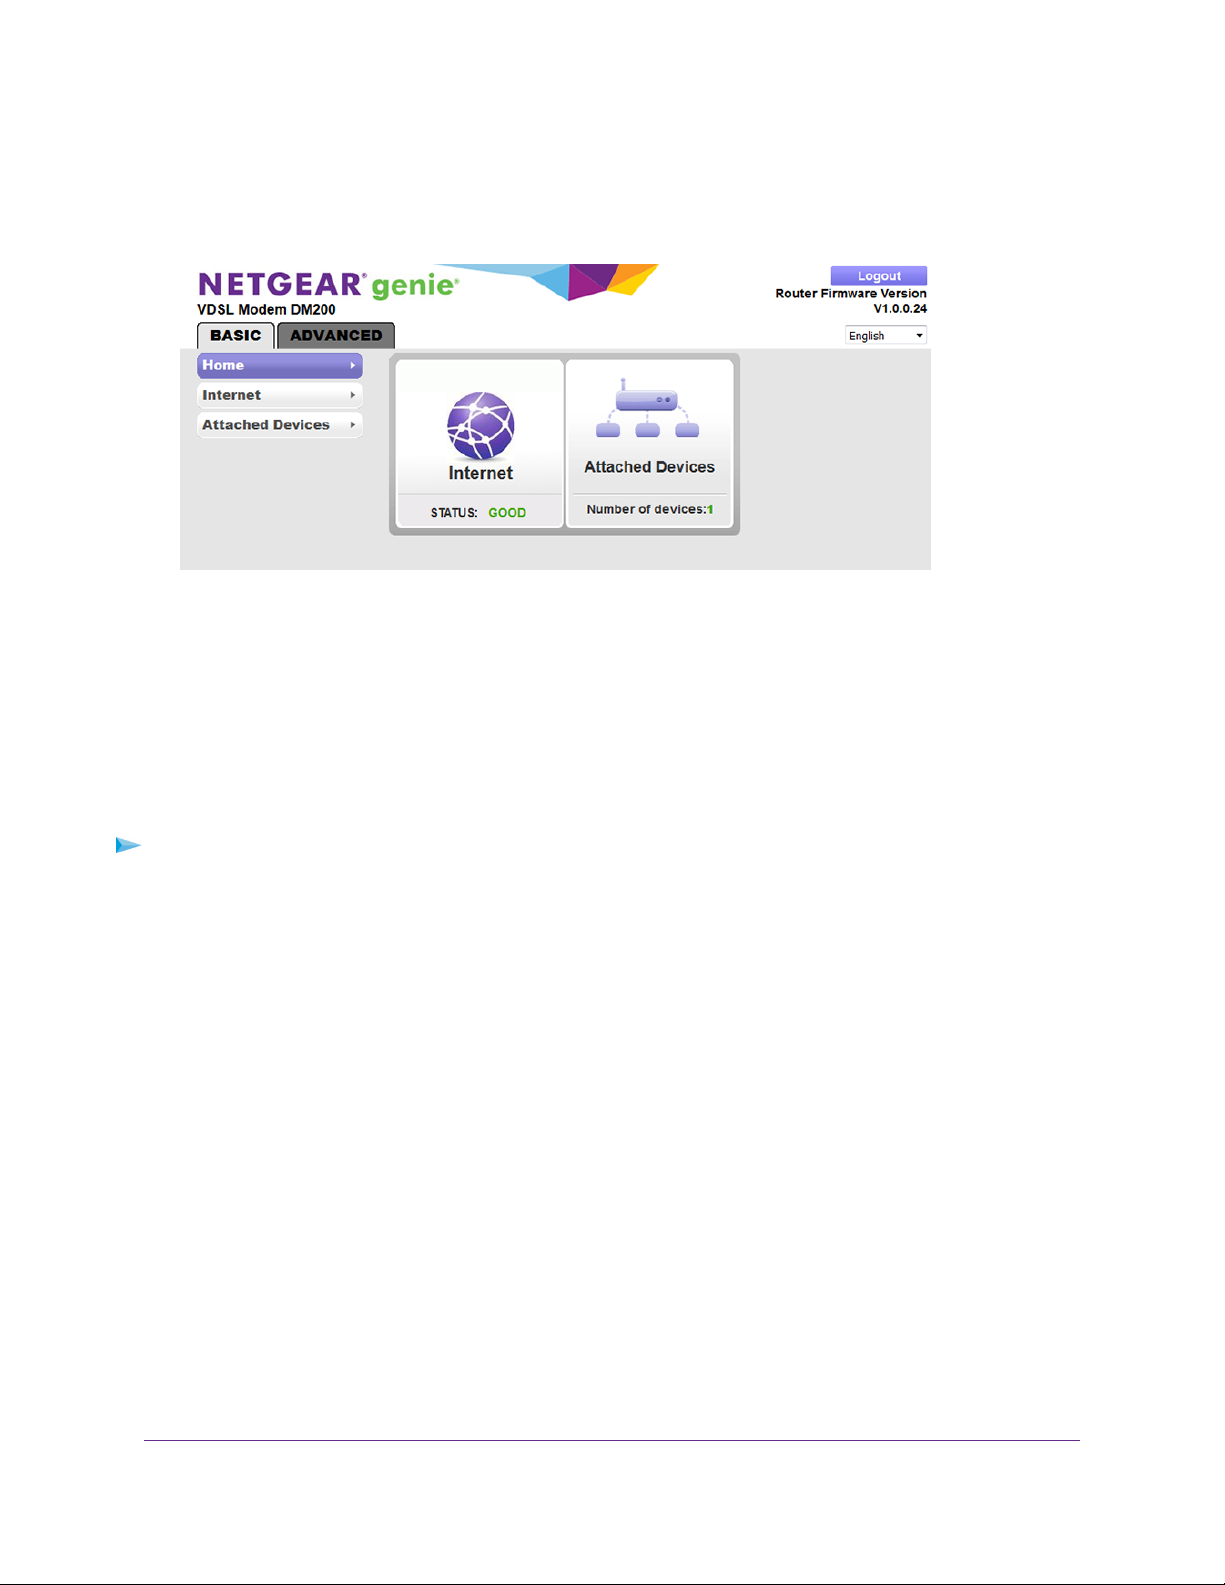
The BASIC Home page displays a dashboard that lets you see the status of your Internet connection
and network at a glance.You can click any of the sections of the dashboard to view more detailed
information.The left column displays the menus, and at the top is an ADVANCED tab that you can use
to access more menus and pages.
Change the Language
By default, the language is set as Auto.You can change the language.
To change the language:
1. Launch a web browser from a computer that is connected to the network.
2. Enter http://www.routerlogin.net.
A login window opens.
3. Enter the user name and password.
The user name is admin.The default password is password.The user name and password are
case-sensitive.
The BASIC Home page displays.
4. In the upper right corner, select a language from the menu.
5. When prompted, click the OK button to confirm this change.
The page refreshes with the language that you selected.
Let the Modem Automatically Update Its Firmware
When you set up your modem and are connected to the Internet, the modem automatically checks for you
to see if newer firmware is available. If it is, a message is displayed at the top of the page. For information
about manually updating firmware, see Update the Firmware of the Modem on page 71.
Install and Access the Modem
21

Broadband High-Speed DSL Modem Model DM200
To let the modem automatically update its firmware:
1. Launch a web browser from a computer that is connected to the network.
2. Enter http://www.routerlogin.net.
A login window opens.
3. Enter the modem user name and password.
The user name is admin.The default password is password.The user name and password are
case-sensitive.
The BASIC Home page displays.
4. Wait for the modem to determine if newer firmware is available.
This process might take a few minutes. If the modem detects new firmware, the modem displays a
message at the top of the page.
5. Click the message.
6. To update the modem with the latest firmware, click the Yes button.
After the update, the modem restarts.
WARNING:
To avoid the risk of corrupting the firmware, do not interrupt the update. For
example, do not close the browser, click a link, or load a new page. Do not
turn off the modem.Wait until the modem finishes restarting and the Power
LED turns solid green.
Access the Modem With the NETGEAR genie App
The genie app is the easy dashboard for managing, monitoring, and repairing your home network from
a smartphone, tablet, or WiFi-enabled computer. Howe v er, because the modem does not support WiFi, you
can connect to the modem only over its LAN port.You can install the genie app on your computer, connect
the computer to the modem with an Ethernet cable, and access the modem with the genie app.
The genie app lets you verify the Internet status of the modem, view the attached device (that is , the computer
that is connected to modem), and change the password of the modem.
To use the genie app to access the modem:
1. Visit the NETGEAR genie web page at netgear.com/genie.
2. Click the appropriate Download button.
3. Follow the onscreen instructions to install the app on your computer.
4. Connect the computer to the modem with an Ethernet cable.
5. Launch the genie app.
The genie app dashboard displays.
Install and Access the Modem
22
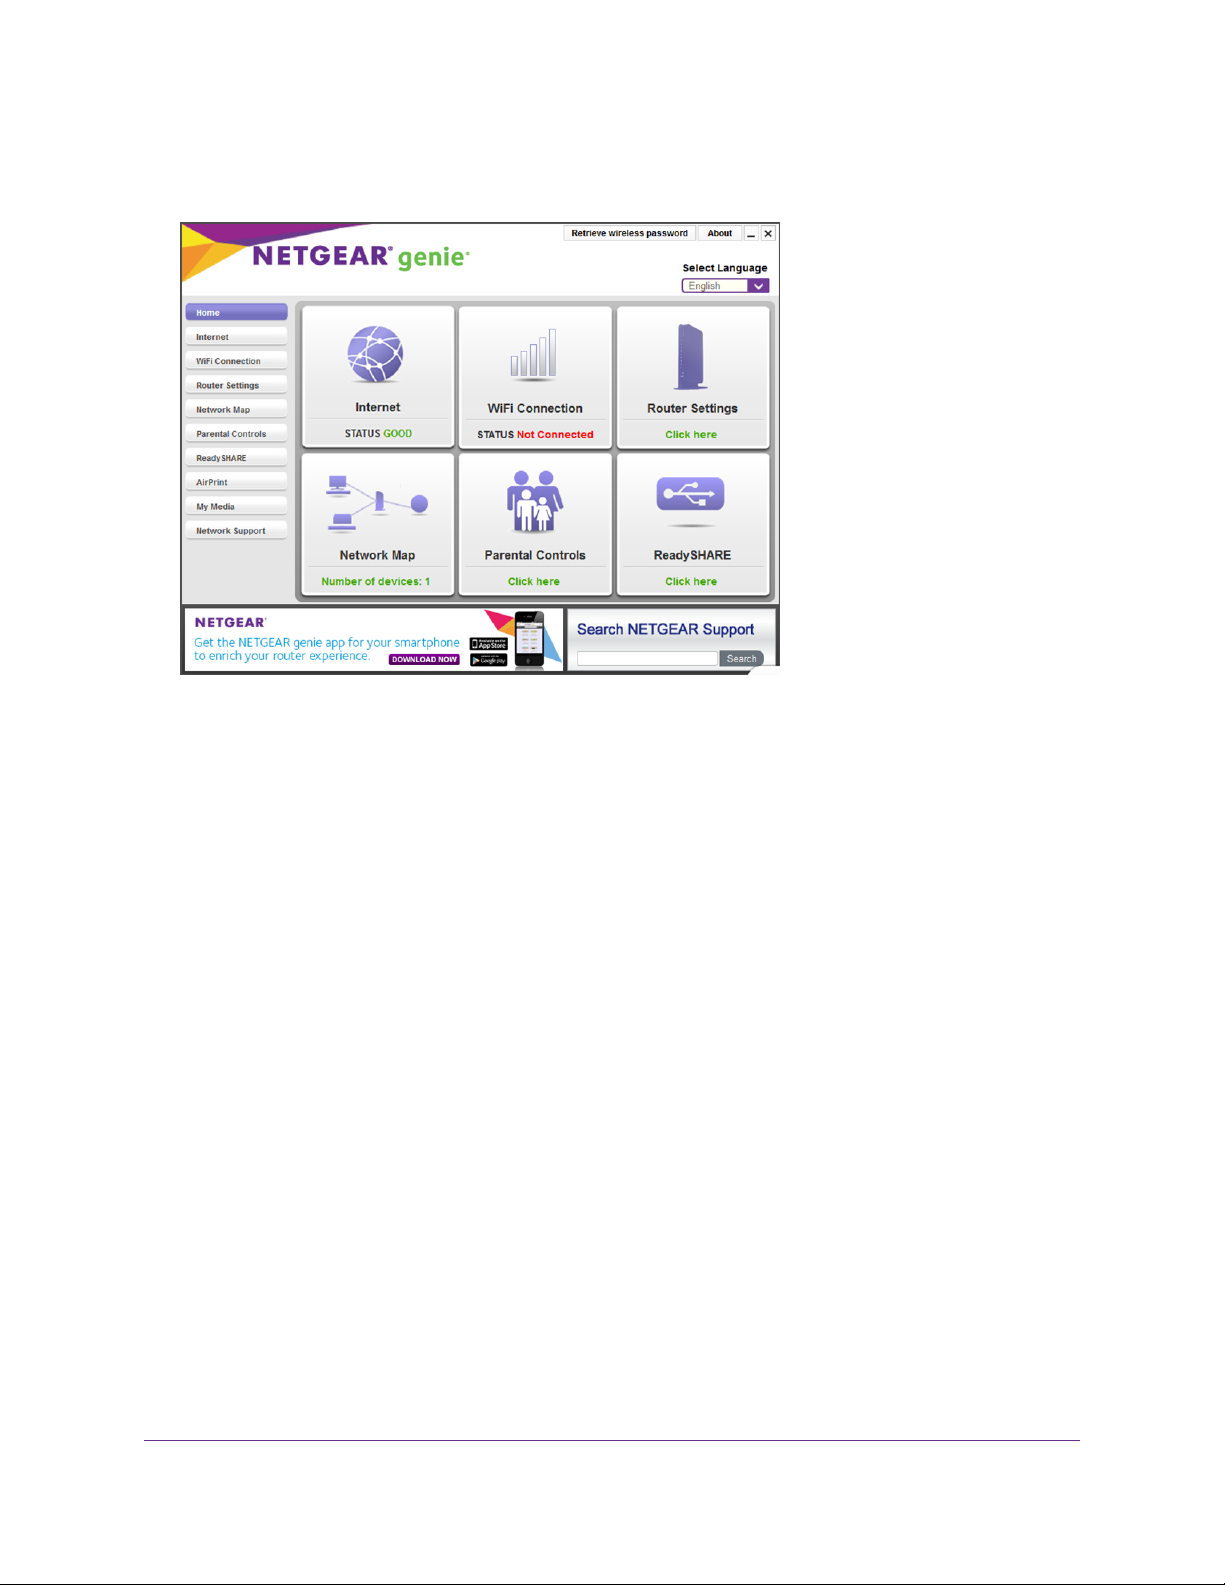
Broadband High-Speed DSL Modem Model DM200
The following figure shows an e xample of a genie app dashboard f or a Windows computer.The modem
does not support WiFi or any WiFi f eatures, the P arental Controls feature, and the ReadySHARE f eature.
Install and Access the Modem
23

Manage the Internet Settings Manually
This chapter describes how you can manage the Internet settings of the modem manually.
Usually, the quickest way to set up the modem is to allow the NETGEAR installation assistant to detect the
Internet connection when you first access the modem with a web browser .This option is described in Install and
Access the Modem on page 11.You can also customize or specify your Internet settings manually.
The chapter contains the following sections:
• Use the Internet Setup Wizard After Initial Setup on page 25
• Manually Set Up an ADSL Internet Connection on page 29
• Manually Set Up a VDSL Internet Connection on page 38
• Specify an IPv6 Internet Connection on page 47
• Manage the MTU Size on page 52
3
24
Broadband High-Speed DSL Modem Model DM200
Use the Internet Setup Wizard After Initial Setup
You can use the Setup Wizard to detect your Internet settings and automatically set up your modem.
The Setup Wizard is the same as the NETGEAR installation assistant, which launches
Note
the first time you connect to your modem.
The Setup Wizard can detect the type of ISP connection and presents pages on which you can you enter
the required information.The following procedure describes common steps that you must follow for most
ISPs, but also includes some uncommon steps that you might need to follow only for some ISPs. Other
uncommon steps such as configuring IPTV options and configuring DHCP Option 61 that are required only
for some ISPs are not included in the following procedure.
To use the Setup Wizard:
1. Launch a web browser from a computer that is connected to the network.
2. Enter http://www.routerlogin.net.
A login window opens.
3. Enter the modem user name and password.
The user name is admin.The default password is password.The user name and password are
case-sensitive.
The BASIC Home page displays.
4. Select ADVANCED > Setup Wizard.
5. From the Country menu, select the country in which you use the modem.
6. From the Internet Service Pro vider menu, select the Internet service provider (ISP) that you are using.
If your ISP is not in the menu, select Other.
7. Select the Yes radio button.
If you select the No radio button, y ou are taken to the Internet Setup page after you click the Next b utton.
For more information, see one of the following sections:
• Manually Set Up an ADSL Internet Connection on page 29
• Manually Set Up a VDSL Internet Connection on page 38
Manage the Internet Settings Manually
25
Broadband High-Speed DSL Modem Model DM200
8. Click the Next button.
The Setup Wizard searches your Internet connection for servers and protocols to determine your ISP
configuration.
When the modem is connected to the Internet, the Congratulations! page displays, and you successfully
completed the setup process.
If the Congratulations! page does not display, other pages might display and you might need to pro vide
more information, in which case you must continue with Step 9.The pages that display depend on your
type of ISP connection and configuration.
9. (Only if the page in the following figure displa ys) Specify a full scan to let the Setup Wizard find the PVC
protocol.
The page that might display asks you if you need the Setup Wizard to do a full scan to find the PVC
protocol. If this page does not display, continue with Step 10.
Do the following:
a. Select the Yes radio button.
b. Click the Next button.
Manage the Internet Settings Manually
26
Broadband High-Speed DSL Modem Model DM200
The Setup Wizard performs a full scan, which might take up to six minutes.
10. (Only if the page in the following figure displays) Specify how to manage problems with the detection
of the Internet connection.
The page that might display states that a problem occurred while the wizard was detecting the Internet
connection. If this page does not display, continue with Step 11.
Take one of the following actions:
• If you need to power cycle the modem, do so now:
a. Unplug your modem’s power, leaving the modem connected to the wall jack for your Internet
service.
b. Wait 10 seconds.
c. Plug in your modem’s power and turn on your modem.
d. Wait two minutes.
e. Select the I just power cycled the modem and waited for 2 minutes radio button.
f. Click the Next button.
• If you do not need to power cycle the modem, do the following:
a. Select the None of the above radio button.
b. Click the Next button.
The Ethernet cable information that is shown in the previous figure does not apply to
Note
the modem.
Manage the Internet Settings Manually
27
Broadband High-Speed DSL Modem Model DM200
11. (Only if the page in the following figure displays) Specify how to manage problems with the detection
of the IP address for the Internet connection.
The page that might display states that a problem occurred while the wizard was detecting the Internet
connection IP address. If this page does not display, continue with Step 12.
Take one of the following actions:
• If your ISP assigned you a fixed (static) IP address, do the following:
a. Select the Yes radio button.
b. Click the Next button.
c. Enter the address information that your ISP gave you for your fixed IP address configuration.
d. Click the Next button.
• If your ISP did not assign you a fix ed IP address or you do not kno w if y our ISP assigned y ou a fix ed
IP address, do the following:
Manage the Internet Settings Manually
28
Broadband High-Speed DSL Modem Model DM200
a. Select either the No or the I don’t know radio button.
b. Click the Next button.
c. Enter the MAC address of the computer or router with which you pre viously were able to connect
to the Internet.
You might find the MAC address on the product label of your device. Enter the MAC address in
the AABBCCDDEEFF format, not in the AA:BB:CC:DD:EE:FF format.
d. Click the Next button.
12. If the Congratulations! page still does not display and the modem still does not connect to the Internet,
do the following:
a. Review all y our settings and make sure that you selected the correct options and entered e verything
correctly.
b. Run the Setup Wizard one more time.
c. Contact your ISP to verify that you are using the correct configuration information.
d. Read Troubleshoot the Internet Connection on page 97.
e. If problems persist, register your NETGEAR product and contact NETGEAR technical support.
Manually Set Up an ADSL Internet Connection
You can view or change the modem’s ADSL Internet connection settings manually. The following sections
describe the options that are available to you to manually set up the ADSL Internet connection:
• Specify an ADSL Connection Without a Login on page 30
• Specify an ADSL Connection With a Login and PPPoA or PPPoE Service on page 34
Some ISPs require that you register on their website before you can obtain Internet
Note
service. Follow the directions that your ISP gave you.
Manage the Internet Settings Manually
29

Broadband High-Speed DSL Modem Model DM200
Specify an ADSL Connection Without a Login
If you want to manually configure the ADSL connection settings, use the inf ormation that your Internet service
provider (ISP) gave you to connect to your Internet service. If you cannot find this information, contact your
ISP. Entering incorrect information might prevent the modem from connecting to the Internet.
If your ISP supports two virtual interfaces (one Internet virtual interface and one IPTV
Note
virtual interface), either you can connect a computer or router to the modem or you
can connect an IPTV device to the modem. Because the modem provides a single
LAN port, you can connect only one type of device and you cannot use both virtual
interfaces simultaneously.
To view or specify the settings for an ADSL Internet connection that does not require a
login:
1. Launch a web browser from a computer that is connected to the network.
2. Enter http://www.routerlogin.net.
A login window opens.
3. Enter the modem user name and password.
The user name is admin.The default password is password.The user name and password are
case-sensitive.
The BASIC Home page displays.
4. Select Internet.
The Internet Setup page displays.
5. From the Select Country menu, select the country in which you use the modem.
The Select Country menu is not available in all countries and might be masked out.
6. From the Select Internet Service Provider menu, select the Internet service provider (ISP) that you
are using.
If your ISP is not in the menu, select Other.
7. From the Transfer Mode menu, select ADSL(ATM).
8. From the DSL Mode menu, select the ADSL mode that your ISP provided you:
• Auto.The modem detects the DSL mode automatically. (This is the default setting.)
• ADSL. Legacy version of ADSL.
• ADSL2. Legacy version of ADSL2.
• ADSL2+. ADSL2+ provides the fastest downstream rates and can interoperate with ADSL2 and
ADSL.
9. From the menu above the Enable This Interface check box, select the virtual interface that you are
configuring.
• Internet. If you connect the modem to a computer or router, select the Internet virtual interface. In
most situations you can ignore the IPTV virtual interface.
Manage the Internet Settings Manually
30
 Loading...