


 Loading...
ReadyNAS OS 6.0
Software Manual
Models:
104
312
314
350 East Plumeria Drive
San Jose, CA 95134
USA
March 2013 202-11207-01

ReadyNAS OS 6.0
Support
Thank you for selecting NETGEAR products.
After installing your device, locate the serial number on the label of your product and use it to register your product at https://my.netgear.com. You must register your product before you can use NETGEAR telephone support. NETGEAR recommends registering your product through the NETGEAR website. For product updates and web support, visit http://support.netgear.com.
Phone (US & Canada only): 1-888-NETGEAR.
Phone (Other Countries): Check the list of phone numbers at http://support.netgear.com/general/contact/default.aspx.
Trademarks
NETGEAR, the NETGEAR logo, and Connect with Innovation are trademarks and/or registered trademarks of NETGEAR, Inc. and/or its subsidiaries in the United States and/or other countries. Information is subject to change without notice. © NETGEAR, Inc. All rights reserved.
Revision History
Publication Part Number |
Publish Date |
Comments |
|
|
|
202-11207-01 |
March 2013 |
First publication |
|
|
|
2

Table of Contents
Chapter 1 Getting Started
Quick-start Guide . . . . . . . . . . . . . . . . . . . . . . . . . . . . . . . . . . . . . . . . . . . . . 8
Additional Documentation. . . . . . . . . . . . . . . . . . . . . . . . . . . . . . . . . . . . . . . 8
Supported Operating Systems . . . . . . . . . . . . . . . . . . . . . . . . . . . . . . . . . . . 9
Supported Browsers. . . . . . . . . . . . . . . . . . . . . . . . . . . . . . . . . . . . . . . . . . . 9
Diskless Systems . . . . . . . . . . . . . . . . . . . . . . . . . . . . . . . . . . . . . . . . . . . . . 9
ReadyCLOUD. . . . . . . . . . . . . . . . . . . . . . . . . . . . . . . . . . . . . . . . . . . . . . . 10
Setup Modes . . . . . . . . . . . . . . . . . . . . . . . . . . . . . . . . . . . . . . . . . . . . . 10
Discover and Set Up Your ReadyNAS . . . . . . . . . . . . . . . . . . . . . . . . . . 10
Local Setup Wizard . . . . . . . . . . . . . . . . . . . . . . . . . . . . . . . . . . . . . . . . . . 12
The Local Admin Page . . . . . . . . . . . . . . . . . . . . . . . . . . . . . . . . . . . . . . . . 13
Access the Local Admin Page . . . . . . . . . . . . . . . . . . . . . . . . . . . . . . . . 14
Register Your System. . . . . . . . . . . . . . . . . . . . . . . . . . . . . . . . . . . . . . . . . 15
Chapter 2 Volume Configuration
Basic Volume and RAID Concepts. . . . . . . . . . . . . . . . . . . . . . . . . . . . . . . 17 Volumes . . . . . . . . . . . . . . . . . . . . . . . . . . . . . . . . . . . . . . . . . . . . . . . . . 17 RAID . . . . . . . . . . . . . . . . . . . . . . . . . . . . . . . . . . . . . . . . . . . . . . . . . . . . 17 Manage Volumes . . . . . . . . . . . . . . . . . . . . . . . . . . . . . . . . . . . . . . . . . . . . 21 Change RAID Mode . . . . . . . . . . . . . . . . . . . . . . . . . . . . . . . . . . . . . . . . 21 View the Status of a Volume . . . . . . . . . . . . . . . . . . . . . . . . . . . . . . . . . 23 Configure the Checksum Function . . . . . . . . . . . . . . . . . . . . . . . . . . . . . 26 Create a Volume. . . . . . . . . . . . . . . . . . . . . . . . . . . . . . . . . . . . . . . . . . . 27 Delete a Volume . . . . . . . . . . . . . . . . . . . . . . . . . . . . . . . . . . . . . . . . . . . 28 Expand Storage Capacity. . . . . . . . . . . . . . . . . . . . . . . . . . . . . . . . . . . . 29 Add Protection to a Volume . . . . . . . . . . . . . . . . . . . . . . . . . . . . . . . . . . 32 Maintain Volumes . . . . . . . . . . . . . . . . . . . . . . . . . . . . . . . . . . . . . . . . . . 34
Chapter 3 Shared Folders
Basic Shared Folder Concepts. . . . . . . . . . . . . . . . . . . . . . . . . . . . . . . . . . 37
Data Organization. . . . . . . . . . . . . . . . . . . . . . . . . . . . . . . . . . . . . . . . . . 37
Shared Folder Defaults. . . . . . . . . . . . . . . . . . . . . . . . . . . . . . . . . . . . . . 38
File and Folder Names . . . . . . . . . . . . . . . . . . . . . . . . . . . . . . . . . . . . . . 38
File-Sharing Protocols . . . . . . . . . . . . . . . . . . . . . . . . . . . . . . . . . . . . . . 38
Access Rights. . . . . . . . . . . . . . . . . . . . . . . . . . . . . . . . . . . . . . . . . . . . . 40
Manage Shared Folders. . . . . . . . . . . . . . . . . . . . . . . . . . . . . . . . . . . . . . . 41
Create a Shared Folder . . . . . . . . . . . . . . . . . . . . . . . . . . . . . . . . . . . . . 41
View and Change the Properties of a Shared Folder . . . . . . . . . . . . . . . 43
Delete a Shared Folder . . . . . . . . . . . . . . . . . . . . . . . . . . . . . . . . . . . . . 45
3

ReadyNAS OS 6.0
Browse a Shared Folder. . . . . . . . . . . . . . . . . . . . . . . . . . . . . . . . . . . . . 46 Shared Folder Access Rights . . . . . . . . . . . . . . . . . . . . . . . . . . . . . . . . . . .47 Access Rights to Shared Folders . . . . . . . . . . . . . . . . . . . . . . . . . . . . . .47 User and Group Authentication . . . . . . . . . . . . . . . . . . . . . . . . . . . . . . .47 Set Network Access Rights to Shared Folders. . . . . . . . . . . . . . . . . . . .48 Set Up Access Rights to Files and Folders . . . . . . . . . . . . . . . . . . . . . . 57 Access Shared Folders from a Network-Attached Device . . . . . . . . . . . . .60 Use a Web Browser . . . . . . . . . . . . . . . . . . . . . . . . . . . . . . . . . . . . . . . .60 Use a Windows Device. . . . . . . . . . . . . . . . . . . . . . . . . . . . . . . . . . . . . .61 Use a Mac OS X Device. . . . . . . . . . . . . . . . . . . . . . . . . . . . . . . . . . . . .62 Use a Linux or Unix Device . . . . . . . . . . . . . . . . . . . . . . . . . . . . . . . . . .64 Use FTP and FTPS . . . . . . . . . . . . . . . . . . . . . . . . . . . . . . . . . . . . . . . .65 Use Rsync . . . . . . . . . . . . . . . . . . . . . . . . . . . . . . . . . . . . . . . . . . . . . . .65 Access Shared Folders Using Cloud Services . . . . . . . . . . . . . . . . . . . . . . 66 Use ReadyCLOUD . . . . . . . . . . . . . . . . . . . . . . . . . . . . . . . . . . . . . . . . .66 Use ReadyNAS Remote. . . . . . . . . . . . . . . . . . . . . . . . . . . . . . . . . . . . .69 Use ReadyDROP . . . . . . . . . . . . . . . . . . . . . . . . . . . . . . . . . . . . . . . . . . 74
Chapter 4 LUNs
Basic LUN Concepts . . . . . . . . . . . . . . . . . . . . . . . . . . . . . . . . . . . . . . . . .82 Thin vs. Thick Provisioning. . . . . . . . . . . . . . . . . . . . . . . . . . . . . . . . . . .82 Default LUN Settings . . . . . . . . . . . . . . . . . . . . . . . . . . . . . . . . . . . . . . . 83 Manage LUNs. . . . . . . . . . . . . . . . . . . . . . . . . . . . . . . . . . . . . . . . . . . . . . . 84 Create a LUN . . . . . . . . . . . . . . . . . . . . . . . . . . . . . . . . . . . . . . . . . . . . .84 View and Change the Properties of a LUN. . . . . . . . . . . . . . . . . . . . . . .86 Delete a LUN . . . . . . . . . . . . . . . . . . . . . . . . . . . . . . . . . . . . . . . . . . . . .90 LUN Groups and Access Rights. . . . . . . . . . . . . . . . . . . . . . . . . . . . . . . . . 91 Create a LUN Group. . . . . . . . . . . . . . . . . . . . . . . . . . . . . . . . . . . . . . . .91 Assign a LUN to a LUN Group . . . . . . . . . . . . . . . . . . . . . . . . . . . . . . . .92 Remove a LUN from a LUN Group. . . . . . . . . . . . . . . . . . . . . . . . . . . . . 94 Delete a LUN Group . . . . . . . . . . . . . . . . . . . . . . . . . . . . . . . . . . . . . . . . 95 Manage Access Rights for LUN Groups. . . . . . . . . . . . . . . . . . . . . . . . . 96 Access LUN Groups from an iSCSI-Attached Device . . . . . . . . . . . . . . .103 Access LUN Groups Using Microsoft iSCSI Software Initiator . . . . . . .104
Chapter 5 Snapshots
Basic Snapshot Concepts . . . . . . . . . . . . . . . . . . . . . . . . . . . . . . . . . . . .112 Rolling back . . . . . . . . . . . . . . . . . . . . . . . . . . . . . . . . . . . . . . . . . . . . .113 Clones. . . . . . . . . . . . . . . . . . . . . . . . . . . . . . . . . . . . . . . . . . . . . . . . . .113 Manually Take a Snapshot . . . . . . . . . . . . . . . . . . . . . . . . . . . . . . . . . . . .114 Browse Snapshots Using Recovery Mode . . . . . . . . . . . . . . . . . . . . . . . .115 Roll Back to a Snapshot . . . . . . . . . . . . . . . . . . . . . . . . . . . . . . . . . . . . . .118 Roll Back to a Snapshot Using Recovery Mode. . . . . . . . . . . . . . . . . .118 Roll Back to a Snapshot Using the Timeline. . . . . . . . . . . . . . . . . . . . .121 Clone Snapshots . . . . . . . . . . . . . . . . . . . . . . . . . . . . . . . . . . . . . . . . . . .125 Delete Snapshots . . . . . . . . . . . . . . . . . . . . . . . . . . . . . . . . . . . . . . . . . . .129 Delete Snapshots Using Recovery Mode. . . . . . . . . . . . . . . . . . . . . . .129
4

ReadyNAS OS 6.0
Delete Snapshots Using the Timeline. . . . . . . . . . . . . . . . . . . . . . . . . .131 Recover Data from a Snapshot . . . . . . . . . . . . . . . . . . . . . . . . . . . . . . . .134 Recover Data from a Snapshot to a Network-Attached Device . . . . . .134 Recover Data from a Snapshot to an iSCSI-Attached Device . . . . . . .134
Chapter 6 Users and Groups
Basic User and Group Concepts . . . . . . . . . . . . . . . . . . . . . . . . . . . . . . .137
User and Group Account Limitations . . . . . . . . . . . . . . . . . . . . . . . . . . . .137
User and Group Management Modes . . . . . . . . . . . . . . . . . . . . . . . . . . .137
User Accounts . . . . . . . . . . . . . . . . . . . . . . . . . . . . . . . . . . . . . . . . . . . . .140
Create User Accounts. . . . . . . . . . . . . . . . . . . . . . . . . . . . . . . . . . . . . .140
Edit User Accounts . . . . . . . . . . . . . . . . . . . . . . . . . . . . . . . . . . . . . . . .142
Delete User Accounts . . . . . . . . . . . . . . . . . . . . . . . . . . . . . . . . . . . . . .143
Group Accounts . . . . . . . . . . . . . . . . . . . . . . . . . . . . . . . . . . . . . . . . . . . .144
Create Groups . . . . . . . . . . . . . . . . . . . . . . . . . . . . . . . . . . . . . . . . . . .144
Edit Groups. . . . . . . . . . . . . . . . . . . . . . . . . . . . . . . . . . . . . . . . . . . . . .145
Delete Groups. . . . . . . . . . . . . . . . . . . . . . . . . . . . . . . . . . . . . . . . . . . .147
Cloud Users . . . . . . . . . . . . . . . . . . . . . . . . . . . . . . . . . . . . . . . . . . . . . . .148
Add Cloud Users. . . . . . . . . . . . . . . . . . . . . . . . . . . . . . . . . . . . . . . . . .148
Remove Cloud Users . . . . . . . . . . . . . . . . . . . . . . . . . . . . . . . . . . . . . .150
Chapter 7 System Settings
Customize the Basic System Settings . . . . . . . . . . . . . . . . . . . . . . . . . . .152 Set the Clock . . . . . . . . . . . . . . . . . . . . . . . . . . . . . . . . . . . . . . . . . . . .152 Select the Language. . . . . . . . . . . . . . . . . . . . . . . . . . . . . . . . . . . . . . .153 Set the Administrator Password . . . . . . . . . . . . . . . . . . . . . . . . . . . . . .154 Configure System Alerts . . . . . . . . . . . . . . . . . . . . . . . . . . . . . . . . . . . .155 Configure the Hostname. . . . . . . . . . . . . . . . . . . . . . . . . . . . . . . . . . . .158 Enable Antivirus . . . . . . . . . . . . . . . . . . . . . . . . . . . . . . . . . . . . . . . . . .159
Configure the Network Settings . . . . . . . . . . . . . . . . . . . . . . . . . . . . . . . .160 Network Basic Concepts. . . . . . . . . . . . . . . . . . . . . . . . . . . . . . . . . . . .160 Configure the Ethernet Interfaces. . . . . . . . . . . . . . . . . . . . . . . . . . . . .162 Configure Bonded Adapters . . . . . . . . . . . . . . . . . . . . . . . . . . . . . . . . .168 Configure Global Settings for File-Sharing Protocols . . . . . . . . . . . . . . . .179 Basic File-Sharing Concepts . . . . . . . . . . . . . . . . . . . . . . . . . . . . . . . .179 Supported File-Sharing Protocols. . . . . . . . . . . . . . . . . . . . . . . . . . . . .180 Configure File-Sharing Protocols . . . . . . . . . . . . . . . . . . . . . . . . . . . . .181 Configure Media Services . . . . . . . . . . . . . . . . . . . . . . . . . . . . . . . . . . . .186 ReadyDLNA . . . . . . . . . . . . . . . . . . . . . . . . . . . . . . . . . . . . . . . . . . . . .186 iTunes Streaming Server . . . . . . . . . . . . . . . . . . . . . . . . . . . . . . . . . . .189 Manage genie Apps . . . . . . . . . . . . . . . . . . . . . . . . . . . . . . . . . . . . . . . . .191 Enable the NETGEAR genie Service . . . . . . . . . . . . . . . . . . . . . . . . . .191 Create a NETGEAR genie+ Marketplace Account . . . . . . . . . . . . . . . .192 Manage genie Apps . . . . . . . . . . . . . . . . . . . . . . . . . . . . . . . . . . . . . . .193 Discovery Services . . . . . . . . . . . . . . . . . . . . . . . . . . . . . . . . . . . . . . . . . .195
Chapter 8 System Maintenance
5

ReadyNAS OS 6.0
System Monitoring . . . . . . . . . . . . . . . . . . . . . . . . . . . . . . . . . . . . . . . . . .197 System and Disk Health Information . . . . . . . . . . . . . . . . . . . . . . . . . .197 System Real-Time and Historical Monitoring . . . . . . . . . . . . . . . . . . . .198 System Logs. . . . . . . . . . . . . . . . . . . . . . . . . . . . . . . . . . . . . . . . . . . . .201 SNMP Monitoring . . . . . . . . . . . . . . . . . . . . . . . . . . . . . . . . . . . . . . . . .203
System Maintenance . . . . . . . . . . . . . . . . . . . . . . . . . . . . . . . . . . . . . . . .205 Update Firmware . . . . . . . . . . . . . . . . . . . . . . . . . . . . . . . . . . . . . . . . .205 Reset the Firmware to Factory Defaults . . . . . . . . . . . . . . . . . . . . . . . .208 Recover the Administrator Password . . . . . . . . . . . . . . . . . . . . . . . . . .209 Shut Down or Restart the System . . . . . . . . . . . . . . . . . . . . . . . . . . . .210 Manage Power Usage . . . . . . . . . . . . . . . . . . . . . . . . . . . . . . . . . . . . .210
Optional Uninterruptible Power Supplies . . . . . . . . . . . . . . . . . . . . . . . . .213 Uninterruptible Power Supplies . . . . . . . . . . . . . . . . . . . . . . . . . . . . . .213 UPS Configurations . . . . . . . . . . . . . . . . . . . . . . . . . . . . . . . . . . . . . . .213 Manage UPS Devices. . . . . . . . . . . . . . . . . . . . . . . . . . . . . . . . . . . . . .214
Chapter 9 Backup and Recovery
Back Up or Restore System Configuration. . . . . . . . . . . . . . . . . . . . . . . .220 Basic Data Backup and Recovery Concepts . . . . . . . . . . . . . . . . . . . . . .221 Backup Concepts . . . . . . . . . . . . . . . . . . . . . . . . . . . . . . . . . . . . . . . . .221 Recovery Concepts . . . . . . . . . . . . . . . . . . . . . . . . . . . . . . . . . . . . . . .223 Secure Cloud Backups . . . . . . . . . . . . . . . . . . . . . . . . . . . . . . . . . . . . .224 Backup Protocols . . . . . . . . . . . . . . . . . . . . . . . . . . . . . . . . . . . . . . . . .224 Backup Job Recommendations . . . . . . . . . . . . . . . . . . . . . . . . . . . . . .225 Manage Backup and Recovery Jobs . . . . . . . . . . . . . . . . . . . . . . . . . . . .226 Create a Backup Job . . . . . . . . . . . . . . . . . . . . . . . . . . . . . . . . . . . . . .226 Create a Recovery Job. . . . . . . . . . . . . . . . . . . . . . . . . . . . . . . . . . . . .227 Configure a Backup or Recovery Job. . . . . . . . . . . . . . . . . . . . . . . . . .230 Manually Start a Backup or Recovery Job . . . . . . . . . . . . . . . . . . . . . .239 Delete a Backup or Recovery Job . . . . . . . . . . . . . . . . . . . . . . . . . . . .239 View or Clear a Job Log . . . . . . . . . . . . . . . . . . . . . . . . . . . . . . . . . . . .240 Configure the Backup Button . . . . . . . . . . . . . . . . . . . . . . . . . . . . . . . . . .241 Time Machine . . . . . . . . . . . . . . . . . . . . . . . . . . . . . . . . . . . . . . . . . . . . . .243 ReadyNAS Vault. . . . . . . . . . . . . . . . . . . . . . . . . . . . . . . . . . . . . . . . . . . .245 Dropbox . . . . . . . . . . . . . . . . . . . . . . . . . . . . . . . . . . . . . . . . . . . . . . . . . .247
Appendix A Notification of Compliance
6

1. Getting Started |
1 |
|
|
||
|
|
|
This manual describes how to configure and manage your ReadyNAS® storage system. Your ReadyNAS storage system relies on the following applications:
•ReadyCLOUD. Use this online service to discover your ReadyNAS system on your local area network and access the local admin page.
•Local admin page. Use this browser-based interface to configure and manage your ReadyNAS system.
This chapter includes the following sections:
•Quick-start Guide
•Additional Documentation
•Supported Operating Systems
•Supported Browsers
•Diskless Systems
•ReadyCLOUD
•Local Setup Wizard
•The Local Admin Page
•Register Your System
7

ReadyNAS OS 6.0
Quick-start Guide
This manual provides conceptual information about storage systems, detailed instructions about using your system, and NETGEAR’s recommendations about configuring, managing, and backing up your system. NETGEAR recommends that you read this manual to make the best use of your storage system.
To quickly start using your system, review the following sections in this order:
1.Discover and Set Up Your ReadyNAS on page 10. You use ReadyCLOUD to discover your storage system on your network.
2.Create a Shared Folder on page 41. Shared folders are the way you organize the data you store on your ReadyNAS system.
3.Create a LUN on page 84. LUNs are SAN data sets that allow data transfer and storage over iSCSI.
4.Basic Snapshot Concepts on page 112. Protect the data that is stored in folders and LUNs by creating snapshots.
5.Create User Accounts on page 140. You create a user account for each person that you want to allow to access your ReadyNAS system.
6.Configure Global Settings for File-Sharing Protocols on page 179. File-sharing protocols enable you to transfer files across a network.
7.Basic Data Backup and Recovery Concepts on page 221. You can back up the data that you store on your ReadyNAS system and you can use your ReadyNAS system to back up data that you store on other devices.
Additional Documentation
NETGEAR maintains a community website that supports ReadyNAS products. Visit http://www.netgear.com/readynas for reviews, tutorials, comparison charts, software updates, documentation, an active user forum, and much more.
For information about your system’s hardware, see the hardware manual for your system, which is available at http://support.netgear.com/product/ReadyNAS-OS6.
8

ReadyNAS OS 6.0
Supported Operating Systems
The ReadyNAS supports the following operating systems:
•Microsoft Windows 8
•Microsoft Windows 7
•Microsoft Windows Vista
•Apple Macintosh OS X
•Linux, Unix, Solaris
•Apple iOS
•Google Android
Supported Browsers
The ReadyNAS local admin page supports the following browsers:
•Microsoft Internet Explorer 9.0+
•Apple Safari 5.0+
•Google Chrome 20+
•Mozilla Firefox 14+
If you have difficulty accessing the local admin page or if you notice unexpected behavior, try using another browser.
Diskless Systems
If you have a diskless ReadyNAS storage system, you must first install and format at least one disk before you can use ReadyCLOUD or the local admin page. For more information, see the hardware manual for your system, which is available at http://support.netgear.com/product/ReadyNAS-OS6.
You must use supported disks in your ReadyNAS system. For a list of supported disks, visit http://www.netgear.com/readynas-hcl.
9
ReadyNAS OS 6.0
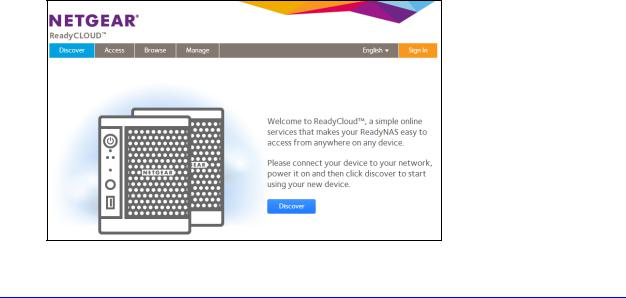
ReadyCLOUD
ReadyCLOUD is an online service that you use to discover and set up ReadyNAS storage systems on your network. You can also use ReadyCLOUD to access and manage data on your ReadyNAS systems. In order to use ReadyCLOUD, your computer and storage system must have Internet access.
Note: If your computer and storage system do not have Internet access, install and run the RAIDar utility instead. RAIDar is on the resource CD that came with your system. It includes versions for Windows, Mac, and Linux operating systems. It is also available at http://www.netgear.com/raidar.
Setup Modes
After you discover your device using ReadyCLOUD, you can choose between two setup modes: ReadyCLOUD Mode and Offline Mode.
•ReadyCLOUD Mode. This setup mode allows you to securely access and manage your ReadyNAS system from anywhere that has an Internet connection. If you select ReadyCLOUD mode, you must create a free ReadyCLOUD account or sign in using your existing ReadyCLOUD account.
•Offline Mode. This setup mode makes your ReadyNAS data available only inside your home or office network. Selecting this setup mode takes you directly to the local admin page for your ReadyNAS system.
Discover and Set Up Your ReadyNAS
To discover and set up your ReadyNAS system:
1.Visit http://readycloud.netgear.com on a computer that uses the same LAN and Internet connection as your ReadyNAS system.
2. Click the Discover button to automatically detect your ReadyNAS system on the network.
10
ReadyNAS OS 6.0
Your new ReadyNAS system is marked with a NEW label.
3.Click the Setup button.
4.Select the mode that you want to use to set up your system.
•Option 1. Select ReadyCLOUD Mode.
a. Sign in to ReadyCLOUD or create a user account.
Tip: If you have a ReadyNAS Remote account, you can sign in to
ReadyCLOUD using your ReadyNAS Remote credentials.
b.Follow the prompts to set up your ReadyNAS system.
The ReadyCLOUD login page displays when setup is complete. You can access the local admin page for your system by signing in to ReadyCLOUD.
For more information about ReadyCLOUD, see Use ReadyCLOUD on page 66.
•Option 2. Select Offline Mode.
An SSL certificate security warning displays. This warning ensures an encrypted authentication and secure access to the ReadyNAS local admin page for your storage system.
a.Accept the certificate. A login prompt displays.
b.Enter admin for the user name, enter password for the password, and click the OK button.
Both user name and password are case-sensitive.
You can change these credentials when you configure your system. NETGEAR recommends that you change your password as soon as possible.
11

ReadyNAS OS 6.0
c.Follow the prompts of the setup wizard that launches in your browser. When you complete the setup wizard, the local admin page displays.
Local Setup Wizard
The first time you access the local admin page, a setup wizard prompts you to configure the basic settings of your ReadyNAS storage system.
Note: The local setup wizard is for users who choose to set up their ReadyNAS system using Offline mode. If you set up your system using ReadyCLOUD mode and the ReadyCLOUD setup wizard, the local setup wizard does not display.
Figure 1. Setup wizard (Welcome screen)
You can change the language setting for the setup wizard by clicking Language at the top left corner of the screen and selecting a language from the drop-down list.
The setup wizard guides you through the initial configuration process to help you quickly integrate your ReadyNAS storage system into your network. Follow the setup wizard’s prompts to configure the following settings:
•Time and date. For more information, see Set the Clock on page 152.
•Alert Contact. For more information, see Configure System Alerts on page 155.
•Host name. For more information, see Configure the Hostname on page 158.
•Administrator password and password recovery. For more information, see Set the Administrator Password on page 154.
When you complete the setup wizard, the local admin page displays.
12
ReadyNAS OS 6.0
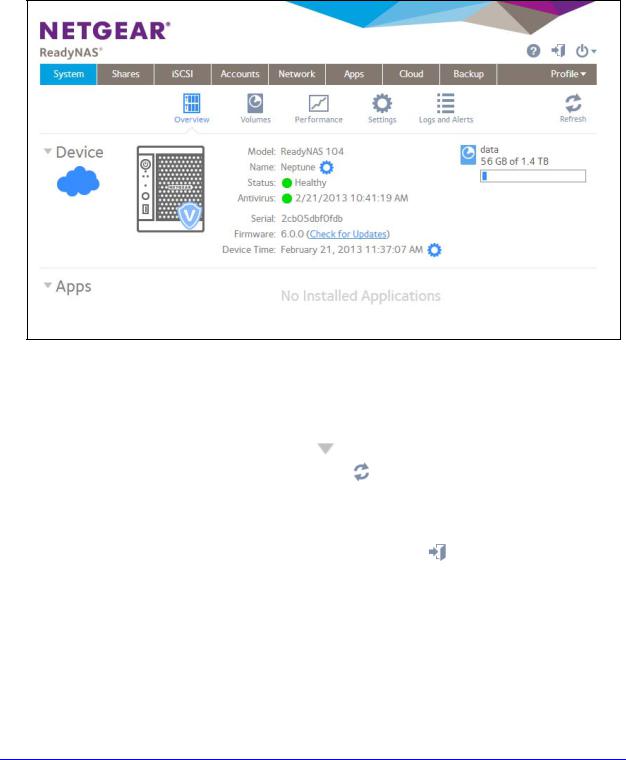
The Local Admin Page
The local admin page is a browser-based interface that you use to configure and manage your ReadyNAS system. When you visit the local admin page, the Overview screen displays, as shown in the following figure.
Figure 2. Local admin page (Overview screen)
•To navigate through the local admin page, use the navigation bar across the top of the screen and the navigation icons below it.
•Some screens are divided into multiple sections. You can collapse or expand sections of
the screen by clicking the triangle icons ( |
) next to each section heading. |
|
• To refresh the screen, click the Refresh icon ( |
) in the top right corner below the |
|
navigation bar. |
|
|
• Fore more information about your product, visit an official NETGEAR support page by clicking the Support icon ( ) in the top right corner of the screen.
• To log out of the local admin page, click the Logout icon ( |
) in the top right corner of |
the screen. |
|
Other features of the local admin page are described in the following chapters.
In this manual, instructions for navigating through the local admin page begin by specifying the selection from the navigation bar and then, if necessary, specifying the selections from the row of navigation icons and section headings. For example, to configure the global file-sharing protocols, select System > Settings > Services. System is the selection from the navigation bar. Settings is the selection from the row of navigation icons. Services is the selection from the section headings on the Settings screen.
13

ReadyNAS OS 6.0
Access the Local Admin Page
You can access the local admin page at any time by launching a web browser and visiting https://<hostname>. <hostname> is the name that you assigned to your ReadyNAS system or the default hostname if you did not change it. You can also access the local admin page from ReadyCLOUD (see Discover and Set Up Your ReadyNAS on page 10 and Use ReadyCLOUD on page 66).
The default credentials to log in to the local admin page are:
•User name: admin
•Password: password
Both user name and password are case-sensitive.
Note: If you cannot access the local admin page using its hostname, try entering https://<ReadyNAS IP address> instead, where <ReadyNAS IP address> is the IP address of the ReadyNAS.
14
ReadyNAS OS 6.0
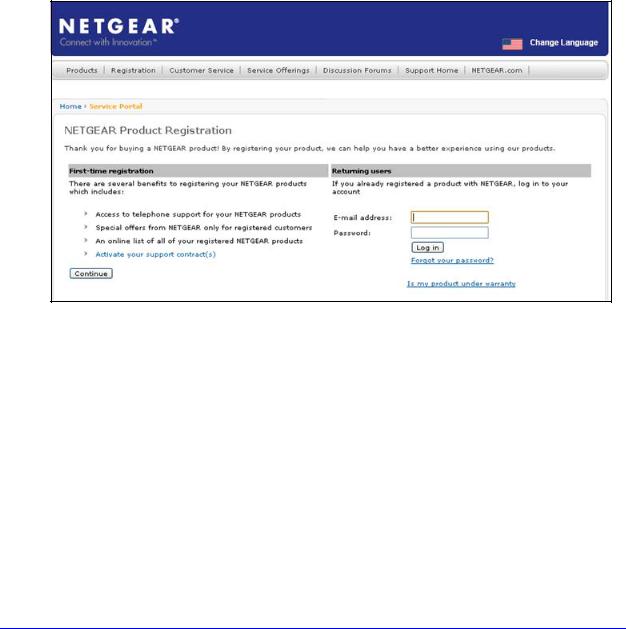
Register Your System
You must register your product before you can use NETGEAR telephone support. Register your ReadyNAS system at the NETGEAR Product Registration website.
To register your ReadyNAS system:
1.Locate the serial number of the system.
You can find the serial number on the Overview screen of local admin page or on the chassis label of your product.
2.Open a web browser and visit http://www.netgear.com/register.
The product registration web page displays.
3.Take one of the following actions:
•If you have never registered a NETGEAR product, click the Continue button.
•If you have registered a NETGEAR product in the past, enter your email address and password and click the Log in button.
4.Follow the prompts.
The ReadyNAS is registered.
15

2. Volume Configuration |
2 |
|
|
||
|
|
|
This chapter describes how to configure and manage the volumes in your ReadyNAS storage system. It includes the following sections:
•Basic Volume and RAID Concepts
•Manage Volumes
16

ReadyNAS OS 6.0
Basic Volume and RAID Concepts
To get the most out of your ReadyNAS storage system, it is helpful to understand the basics of volumes and RAID. Understanding these concepts is the first step to making good decisions about how to configure, manage, and use your ReadyNAS storage system.
Volumes
In the most general sense, volumes are data storage devices. Your computer treats an internal hard drive as a volume. It also treats a portable USB thumb drive as a volume.
Volumes can be either physical or logical. Usually, the term physical volume refers to a hard disk drive. When this term is used in this way, a two-bay storage system can have up to two physical volumes (hard disk drives). A four-bay storage system can have up to four physical volumes (hard disk drives). A six-bay storage system can have up to six physical volumes.
The term logical volume refers to the way that you divide, or partition, your storage space. For example:
•Each logical volume can correspond to a hard disk drive.
•A logical volume can be made up of more than one hard disk drive.
In this manual, the term volume refers to a logical volume. The terms hard disk drive and disk refer to a physical volume.
RAID
Your ReadyNAS storage system allows you to configure your hard disks using one of the many RAID technologies.
RAID is short for redundant array of independent disks. RAID is a storage technology that balances data protection, system performance, and storage space by determining how the storage system distributes data. Many different ways of distributing data have been standardized into various RAID levels. Each RAID level offers a tradeoff of data protection, system performance, and storage space. For example, one RAID level might improve data protection but reduce storage space. Another RAID level might increase storage space but also reduce system performance.
Your ReadyNAS storage system supports X-RAID2TM mode, a proprietary single-volume RAID architecture that is easy to administer, and Flex-RAID mode, which allows you to format your disks in a variety of industry-standard RAID levels. Both RAID modes allow you to hot-swap disks without powering down and automatically expand your volumes to accommodate larger-capacity disks when you replace smaller-capacity disks.
When you power on your system for the first time or if you reset your system to its factory default settings, the optimal RAID mode and level are automatically selected for you based on the number of disks that are installed. You can also configure the RAID settings manually (see Change RAID Mode on page 21).
17

ReadyNAS OS 6.0
X-RAID2
X-RAID2 is an auto-expandable RAID technology that is available only on ReadyNAS systems. With X-RAID2, you do not need to know intricate details about RAID to administer your system. X-RAID2 allows you to add storage space without reformatting your drives or moving your data to another location. Because the expansion happens online, you can continue to use your ReadyNAS system while the volume capacity increases.
Because X-RAID2 is a single-volume architecture, if you configure your hard disk drives to use X-RAID2, your storage system has only one volume that is made up of all installed hard disk drives. X-RAID2’s single-volume architecture has two major advantages:
•Easy system management
•Auto-expansion
With Flex-RAID formatting, if you want to add disks to expand your storage capacity, you must back up the data to another system, add a disk, reformat the RAID volume, and restore the data to the new RAID volume. With X-RAID2, none of those administrative tasks are required. Instead, with X-RAID2, your volume automatically expands to accommodate additional disks or larger-capacity disks.
With X-RAID2, you can start out with one hard disk, add a second disk for data protection, and add more disks for additional storage capacity. X-RAID2 accommodates the new disks automatically. You can replace existing disks with larger-capacity disks and X-RAID2 automatically accommodates the new disks.
X-RAID2 requires a minimum of two hard disks to provide protection against disk failure. If you have a one-disk ReadyNAS storage system and want protection from disk failure, you need to add a second disk that is at least as large as the first. It can be added while the system is running.
X-RAID2 uses the capacity of one disk for data storage and reserves the capacity of a second disk for data protection, which allows the volume to recreate data if a disk fails. In a two-disk system, the usable storage space is one disk. In a three-disk system, the usable storage space is two disks. In general, the total capacity of your storage system equals the capacity of all your disks minus the capacity of one disk.
18
ReadyNAS OS 6.0
The following figure illustrates how X-RAID2 uses new disks.


 c b
c b 


a
Figure 3. X-RAID2 disk usage
a.The first disk that you install is used for initial (unprotected) storage space.
b.The second disk that you install is reserved for data protection (parity information).
c.Installing additional disks increases your storage space.
Note: X-RAID2 reserves the capacity of one disk for data protection. The actual space reserved for data protection is distributed across all disks.
Flex-RAID
NETGEAR’s Flex-RAID technology allows you to choose from among several industry-standard RAID levels:
•RAID 0. This most basic RAID level does not protect your data from loss in the event that one of your drives fails. RAID 0 distributes data across multiple disks, resulting in improved disk performance compared to systems that do not use RAID formatting. The total capacity of your storage system equals the capacity of all of your disk drives.
Note: After you create a RAID 0 volume, you cannot expand the volume, change the RAID level, or switch RAID modes.
• RAID 1. This RAID level provides full redundancy of your data, because it duplicates data across multiple disks. Exactly the same data is stored on two or more disks at all times. RAID 1 protects your data from loss if one disk fails. The total capacity of your storage system equals the capacity of your smallest disk.
19

ReadyNAS OS 6.0
•RAID 5. This RAID level also provides data redundancy, but it requires at least three disks. RAID 5 uses the capacity of one disk to protect you from data loss if one disk fails. Your data is distributed across multiple disks to improve disk performance. The total capacity of your storage system equals the capacity of all your disks minus the capacity of one disk. It is supported on systems with at least four drive bays.
•RAID 6. This RAID level can recover from the loss of two disks. Your data is distributed across multiple disks to improve disk performance. The total capacity of your storage system equals the capacity of all your disks minus the capacity of two disks. It is supported on systems with at least four drive bays.
•RAID 10 (or 1+0). This RAID level uses both RAID 1 and RAID 0 technology. First, your data is duplicated so that exactly the same data is stored on two or more disks. Then, the data is distributed across additional disks to improve disk performance. It is supported on systems with at least four drive bays.
The Flex-RAID levels that you can select depend on the number of disks included in the volume. The following table describes the Flex-RAID levels that are available for a given number of disks. It also indicates whether adding a disk for data protection is possible for each configuration.
Table 1. Flex-RAID levels and data protection
Number of Disks |
RAID Level |
Can I add a disk to for data protection? |
per Volume |
|
|
|
|
|
1 |
RAID 1 |
Yes. (Additional disk provides redundancy.) |
|
|
|
2 |
RAID 1 |
No. (Volume protection is already redundant.) |
|
|
|
2 or more |
RAID 0 |
No. (RAID 0 does not offer protection.) |
|
|
|
3 or more |
RAID 5 |
Yes. (Additional disk provides dual redundancy and converts the volume to |
|
|
RAID 6.) |
|
|
|
4 |
RAID 10 |
No. (Volume protection is already redundant.) |
|
|
|
4 or more |
RAID 6 |
No. (Volume is already protected with dual redundancy.) |
|
|
|
20
ReadyNAS OS 6.0
Manage Volumes
Change RAID Mode
You can change the RAID mode that your ReadyNAS storage system uses. By default, your system’s hard disks are configured into a single X-RAID2 volume.
Change from X-RAID2 to Flex-RAID
Your ReadyNAS system can easily change a volume from X-RAID2 to Flex-RAID mode. Data on the X-RAID2 volume is preserved when you switch to Flex-RAID. The RAID level of the resulting Flex-RAID volume is automatically assigned based on the number of disks that are installed.
To change from X-RAID2 to Flex-RAID:
1.Select System > Volumes.
2.Click the X-RAID button at the right side of the screen.
3.Confirm that you want to switch from X-RAID2 to Flex-RAID.
The volume switches from X-RAID2 mode to Flex-RAID mode and the indicator on the X-RAID button turns gray.
The RAID level is automatically assigned based on the number of disks that are installed.
21

ReadyNAS OS 6.0
Change from Flex-RAID to X-RAID2
If your system contains only one volume, you can easily switch from Flex-RAID to X-RAID2. Data on the Flex-RAID volume is preserved when you switch to X-RAID2.
If your system contains multiple volumes, you must first reconfigure your disks into a single volume.
Note: When you switch to X-RAID2 mode, any extra disks installed in your system are automatically reformatted and used for storage expansion.
You cannot change the RAID mode of a RAID 0 or RAID 10 volume.
To change from Flex-RAID to X-RAID2 on a single-volume system:
1.Select System > Volumes.
2.Click the X-RAID button at the right side of the screen.
3.Confirm that you want to switch from X-RAID2 to Flex-RAID.
The volume switches from Flex-RAID mode to X-RAID2 mode and the indicator on the X-RAID button turns green.
Any available drives are automatically used for storage expansion.
22
ReadyNAS OS 6.0
Change to a Different RAID Level
In Flex-RAID mode, you assign one of several RAID levels to your volume. Available RAID levels depend on the number of disks that you want the volume to include. For more information, see Flex-RAID on page 19. You can reconfigure your volumes to use a different RAID level.
Note: Changing the RAID level of a volume erases all data. If data is stored on your system, you must back up the data to another storage device before changing the RAID level.
You cannot change the RAID level of a RAID 0 volume.
To change to RAID levels:
1.If any data is stored on the volumes that you want to reconfigure, back up your data.
2.Delete the volumes that you want to reconfigure (see Delete a Volume on page 28).
The disks that were part of the volumes become available again for other purposes (the color of the disks turns black).
3.Create a new volume from the available disks and select the RAID level (see Create a Volume on page 27).
The volume is formatted according to your specifications. Formatting can take quite a while, depending on the size of your hard disk drives.
View the Status of a Volume
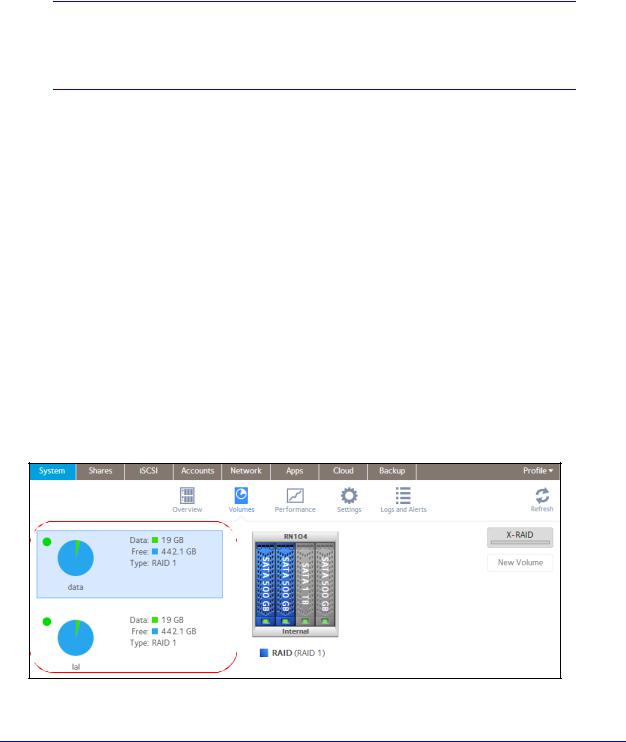
To view a summary of the volume status: Select System > Volumes.
The volumes are listed at the left side of the screen.
23

ReadyNAS OS 6.0
The following summary information is displayed next to each volume.
Item |
Description |
|
|
Data |
The storage space that is consumed by data in MB, GB, or TB. |
|
|
Free |
The storage space that is available in MB, GB, or TB. |
|
|
Type |
The configured RAID level. |
|
|
Health indicator |
The color of the indicator to the right of the volume icon indicates the health of the volume. |
|
• Green. The volume is healthy. |
|
• Yellow. The volume is degraded. |
|
• Red. The volume is bad or faulty. |
|
|
To view the I/O stats and disk status:
1.Select System > Volumes.
2.Select the volume from the list on the left.
3.From the pop-up menu that displays, select Settings.
24
ReadyNAS OS 6.0
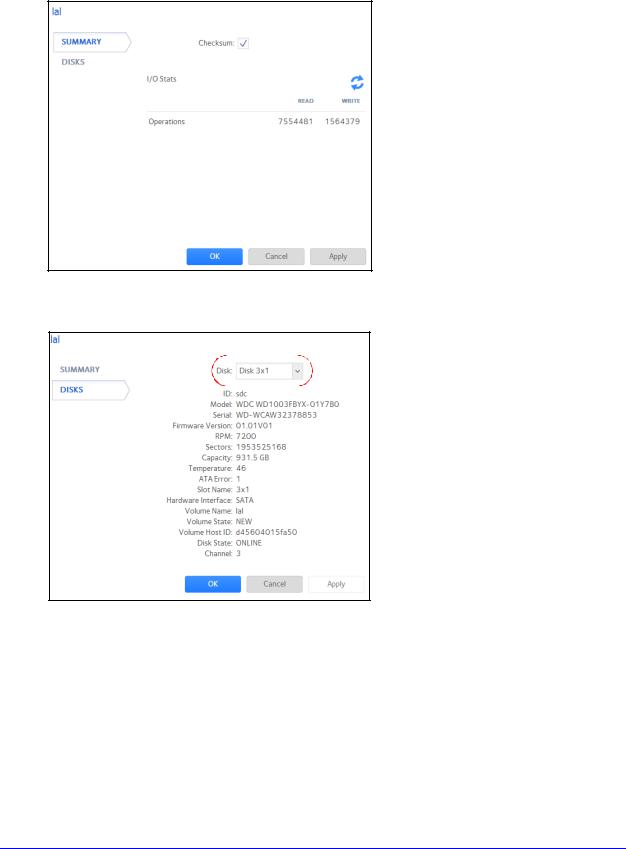
A pop-up screen displays the I/O stats in the Summary tab.
4.Select the Disks tab.
5.From the Disk drop-down list, select one of the disks in the volume to view its status.
Note: The disks are listed by their position in the enclosure: <column>x<row>. For example, Disk 3X1 is the third disk from the left in the top row of the enclosure.
25
ReadyNAS OS 6.0
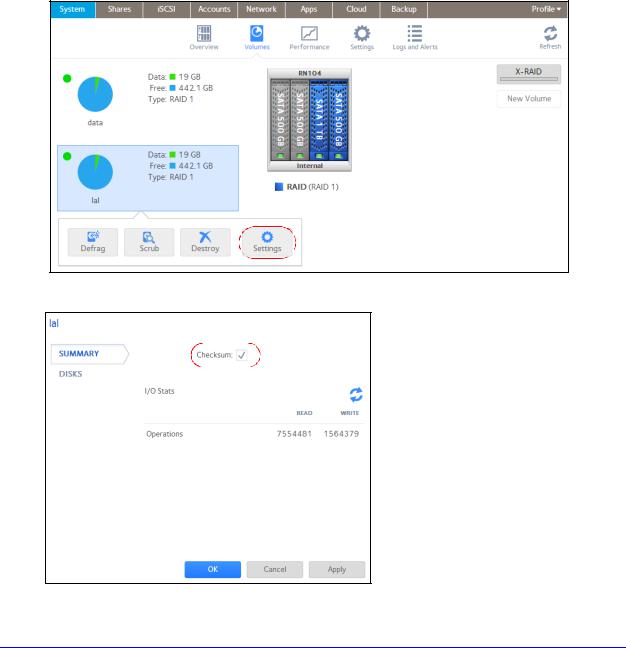
Configure the Checksum Function
Checksum functions help detect data transmission errors. The ReadyNAS uses a checksum function to improve accuracy and consistency when writing data to a volume. You can enable or disable the checksum function on each volume. Enabling the checksum function improves the integrity of your data but reduces performance speeds.
Enable or disable the checksum function:
1.Select System > Volumes.
2.Select one of the volumes listed on the left side of the screen.
3.From the pop-up menu that displays, select Settings.
A pop-up screen displays.
4. In the Summary tab, select or clear the Checksum check box.
26
ReadyNAS OS 6.0
5.Click Apply.
6.Click OK.
Your changes are saved.
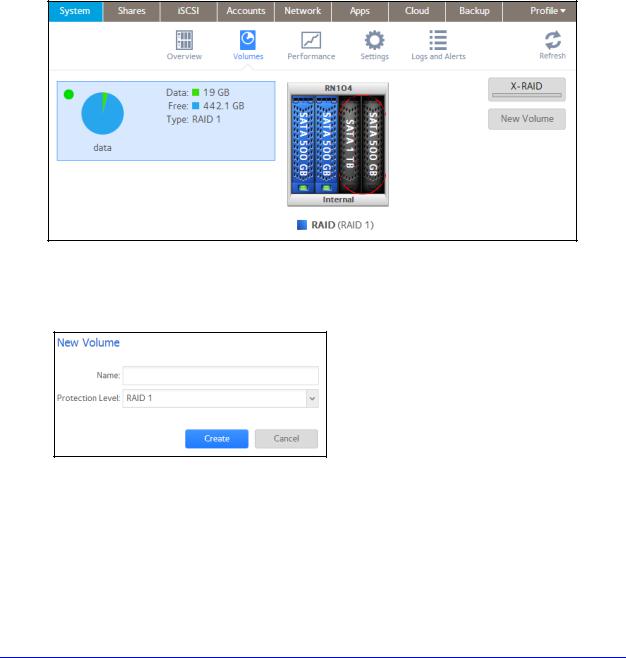
Create a Volume
To create a volume and select the RAID level:
1.Select System > Volumes.
2.From the enclosure graphic, select the disks that you want to include in the new volume.
Available disks are colored black.
3.Click the New Volume button at the right of the screen. The New Volume pop-up screen displays.
4.Configure the following settings:
•Name. Enter a name for the volume. The volume must not have the same name as a folder in the root folder system. The volume names home, apps, and job_ are reserved and cannot be used.
•Protection Level. From the drop-down list, select the RAID mode or RAID level. The available options depend on the number of disks that you selected in step 2.
5.Click Create.
The new volume is created and appears in the list of volumes at the left of the screen.
27
ReadyNAS OS 6.0
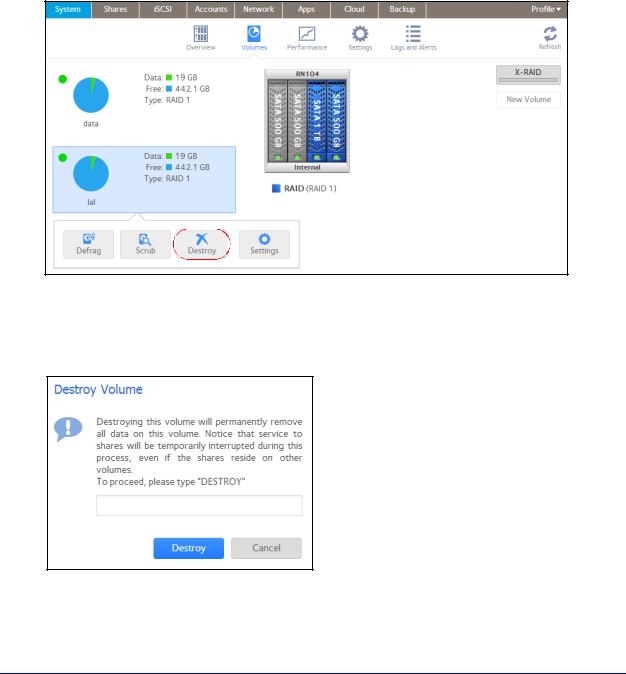
Delete a Volume
Before you delete a volume, make sure that you back up any data (folders and LUNs) that you want to save to another volume or another storage device.
To delete a volume:
1.Select System > Volumes.
2.Select the volume that you want to delete.
3.From the pop-up menu that displays, select Destroy.
Note: The Destroy option is not available when the ReadyNAS has a single volume only. The Destroy option is available if you have at least two volumes.
A pop-up screen displays.
4.Type DESTROY to confirm your decision.
5.Click Destroy.
28

ReadyNAS OS 6.0
The volume is deleted. The disks that were part of the volume become available again for other purposes (the color of the disks turns black).
Expand Storage Capacity
You can expand the storage capacity of an existing volume in two ways:
•Horizontal expansion. Expand the volume by adding more disks to the volume.
•Vertical expansion. Expand the volume by replacing disks in the volume with larger-capacity disks.
X-RAID2 makes horizontal volume expansion easy. If your X-RAID2 volume includes two or more disks, the volume expands automatically when you add disks.
If you want to horizontally expand a Flex-RAID volume, you must switch to X-RAID2 mode or manually reformat the volume. Switching to X-RAID2 mode is only possible on single-volume systems.
Vertical expansion is available for X-RAID2 and Flex-RAID volumes.
You can continue to use your ReadyNAS system while the new disks are incorporated in the background. The process of volume expansion can take several hours. If you set up email notifications for your system, you receive an email message when the process finishes. For more information about alert notifications, see Configure System Alerts on page 155.
Horizontally Expand an X-RAID2 Volume
Horizontal expansion is available for X-RAID2 volumes only.
To horizontally expand an X-RAID2 volume:
Add a disk to an X-RAID2 volume that includes two or more disks.
For more information about how to add a disk to your ReadyNAS system, see the hardware manual for your system, which is available at http://support.netgear.com/product/ReadyNAS-OS6.
The system automatically determines whether the new disk is used for protection or storage. When you add a second disk, the new disk is used for data protection. When you add a third or fourth disk, the new disk is used to increase your storage capacity. For more information, see X-RAID2 on page 18. New disks are incorporated in the background while you continue to use your storage system.
29
ReadyNAS OS 6.0
Vertically Expand a Volume
Both X-RAID2 and Flex-RAID volumes support vertical expansion.
When you vertically expand a Flex-RAID volume, you must replace all disks in the volume with larger-capacity disks.
Note: Vertical expansion is not available for RAID 0 volumes.
When you vertically expand an X-RAID2 volume, you must replace disks in the volume according to the following table.
Table 2. X-RAID2 vertical expansion requirements
RAID Level |
Disk Replacements Required for Vertical Expansion |
|
|
RAID 1 |
Replace 2 or more disks with larger-capacity disks. |
|
|
RAID 5 |
Replace 2 or more disks with larger-capacity disks. |
|
|
RAID 6 |
Replace 4 or more disks with larger-capacity disks. |
|
|
If you replace fewer disks than required for vertical expansion, the disks are reserved for data protection. Your available storage capacity does not increase to accommodate the reserved disks until you replace the required number of disks.
IMPORTANT:
To reduce the risk of data loss, NETGEAR recommends that you back up your data before vertically expanding a volume.
To vertically expand an X-RAID2 volume:
1.Replace one disk in the volume with a larger-capacity disk.
For more information about how to add a disk to your system, see the hardware manual for your system, which is available at http://support.netgear.com/product/ReadyNAS-OS6.
Note: You must use supported disks in your ReadyNAS system. For a list of supported disks, visit http://www.netgear.com/readynas-hcl.
2. Wait for the volume to resync your data.
30
Loading...