


Quick Start
AirCard 810
Mobile Hotspot
Contents / Inhalt / Table des matières /
Sommario / Contenido / Содержание /
Sisältö / Innehåll
English . . . . . . . . . . . . . . . . . . . . . . . . . . . . . . . . . |
. . .1. . . |
Deutsch . . . . . . . . . . . . . . . . . . . . . . . . . |
. 18.. . . . . |
Français . . . . . . . . . . . . . . . . . . . . . . . . . . . . . . . . . |
.34. . . |
Italiano . . . . . . . . . . . . . . . . . . . . . . . . . . . . . . . |
.50. . . . . |
Español . . . . . . . . . . . . . . . . . . . . . . . . . . . . . . . . . . . . . |
.66 |
Svenska . . . . . . . . . . . . . . . . . . . . . . . . . . . . . . . . . |
.82. . . |
Русский . . . . . . . . . . . . . . . . . . . . . . . . . . . |
.98. . . . . . |
Suomi . . . . . . . . . . . . . . . . . . . . . . . . . . . . . . . . . . . . . . |
114 |
2

Meet Your Hotspot
Before you connect your mobile hotspot, familarize yourself with its LCD screen, icons, buttons, and connectors.
Buttons and Connectors
Power button
Status LED
Micro USB port
Primary antenna connector
English
Status LED
The status LED indicates data connection status:
•Blue, slow blink. The hotspot is ready.
•Blue, double blink. The hotspot is transferring data.
•Amber, slow blink. The hotspot is not connected to the network.
3

Power Button
Press and hold the Power button for two seconds to power the hotspot on, five seconds to turn the hotspot off.
Press and release the Power button to cycle through LCD screens.
Power button
LCD Screen
You can use the touch screen icons and other screen elements to view the mobile hotspot’s status, configure WiFi band settings, view data usage details, and view system alerts.
4

|
|
|
Icon |
Description |
|
|
|
|
|
|
|
|
Signal |
5 bars. Excellent. |
|
|
|
strength |
1 bar. Low level. |
|
|
|
||
|
|
|
||
|
|
|
|
|
|
|
|
Network |
4G+. An LTE Advanced network with |
|
|
|
carrier aggregation is available. |
|
|
|
|
type |
|
|
|
|
||
|
|
|
4G. An LTE network is available. |
|
|
|
|
|
|
|
|
|
|
|
|
|
|
|
H+. DC-HSPA+ HSPA+/DC HSPA. |
|
|
|
|
H. HSPA. |
|
|
|
|
|
|
|
|
|
3G. UMTS. |
|
|
|
|
|
|
|
|
|
|
|
|
|
Traffic |
Outline. Connected. |
|
|
|
||
|
|
|
|
|
|
|
|
|
Solid. Sending or receiving. |
|
|
|
|
|
|
|
|
|
None. Not connected. |
|
|
|
|
|
|
|
|
Battery |
The percentage of the remaining |
|
|
|
battery charge. |
|
|
|
|
level |
|
|
|
|
|
|
|
|
|
|
|
Set Up Your Hotspot |
||||
Before you connect to your mobile hotspot, you must insert a micro SIM card (3FF), install the battery, power on the mobile hotspot, and charge your battery.
Note: To obtain a micro SIM card, contact your Internet service provider.
5

¾¾ To insert the micro SIM card:
1.Remove the back cover using the thumb catch on the corner of the mobile hotspot.
2.Remove the battery.
3.Slide the micro SIM card into the slot with the gold colored contacts facing down.
4.Ensure that the micro SIM card is seated securely.
5.Reinsert the battery.
6.Replace the cover.
6

¾¾ To power on your hotspot:
Press and hold the Power button until the LCD screen lights.
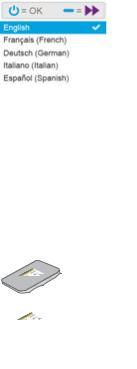
A language selection screen displays.
¾¾ To select a language:
1.Press the Navigation button to cycle through the language options until your language is highlighted.
2.Press the Power button to select the language.
You can change the language again later from the hotspot web page.
¾¾ To recharge your battery:
1.Connect the micro USB cable to your hotspot.
2.Connect the other end of the cable to the USB port on your computer or to the USB charger.
Note: Your battery comes partially charged.
7

Create a Mobile Connection
Your hotspot comes preconfigured with the access point name (APN) for your network service provider. Your hotspot checks the APN to determine the type of network connection to establish.
You are now ready to surf the web!
You must configure an APN for your hotspot if you are setting up your hotspot for the first time or if you see a message indicating that APN setup is required.
¾¾ To configure an APN:
1.On the home screen, tap the Settings icon.
2.Tap the Network icon.
Operator 
3.Tap the APN > button.
A list of preprogrammed APNs that might work with your current SIM displays.
4.Select the appropriate APN.
8
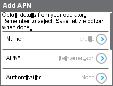
5.If none of the preprogrammed APNs are appropriate, set up an APN.
a. Tap the +Add button.
b.Enter the APN details.
Contact your network service provider for information about these specific details.
c.Tap the Save button.
A message indicating that an APN was created displays.
¾¾ To connect to your hotspot:
1.Ensure that WiFi is enabled on your computer or other device.
2.On your computer or other device, search for WiFi networks:
•For Windows devices, click the Internet Access icon.
•For Mac devices, from the WiFi menu, select the network.
•For tablets, look for a settings option.
3.Select the WiFi name displayed on your LCD screen.
4.Enter the WiFi password exactly as it appears on the LCD screen.
9

Passwords are case-sensitive.
When a computer or mobile device connects to the hotspot, a 1 displays beside the WiFi icon on the LCD screen.
Note: For you to connect to the mobile broadband network, your SIM account must be active. If you use a prepaid or pay-as-you-go micro SIM, the account must show a positive balance.
5.Launch your browser and, if desired, visit the hotspot web page netgear.aircard to personalize your settings.
Your mobile hotspot is ready to use out of the box. You probably don’t need to personalize any settings.
The mobile hotspot is completely secure using its default security settings.
NETGEAR AirCard App
Download the complimentary mobile app from netgear.com/AirCardApps. Use this app to view your settings and connection and data usage information from your smartphone or tablet. To manage all hotspot settings, visit netgear.aircard.
Manage WiFi Settings
You can manage your WiFi settings by tapping the WiFi icon on the hotspot touch screen.
10

You can also manage your WiFi settings from your hotspot web page.
Note: The hotspot resets when you change WiFi settings. Connected devices are disconnected.
View or Compose SMS Messages
Tap the Messages icon to view or compose SMS messages.
¾¾ To read messages:
1.On the home screen, tap the Messages icon.
2.Tap a message line.
11

¾¾ To compose a message:
1.On the home screen, tap the Messages icon.
2.Tap the Compose button in the upper right corner.
If a valid SIM card is not inserted in your hotspot, the Compose button appears grey.
3.Enter a telephone number.
4.Tap the Next button.
5.Compose the message.
6.Press the Send button.
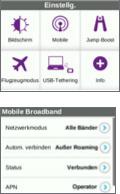
Customise Hotspot Settings
You can customise other settings as well.
¾¾ To customise your hotspot’s settings:
1.On the home screen, tap the Settings icon.
2.Tap any one of the icons to adjust a setting.
12
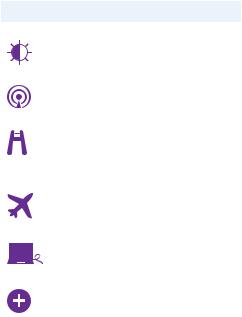
The following table describes the icons that display on the Settings screen.
|
Icon |
Description |
|||||||
|
|
|
|
|
|
|
|
|
|
|
Display |
Configure the touch screen display |
|||||||
|
|
|
|
|
|
|
|
|
(brightness, time-out, display of WiFi |
|
|
|
|
|
|
|
|
|
credentials, status LED display). |
|
|
|
|
|
|
|
|
|
|
|
Network |
Choose the network types to use, set |
|||||||
|
|
|
|
|
|
|
|
|
roaming rules, display network connection |
|
|
|
|
|
|
|
|
|
details. |
|
|
|
|
|
|
|
|
|
|
|
Jump Boost |
Use your mobile hotspot to give a boost |
|||||||
|
|
|
|
|
|
|
|
|
to another device’s battery using the jump |
|
|
|
|
|
|
|
|
|
boost cable provided with your device. |
|
|
|
|
|
|
|
|
|
|
|
Airplane |
Disable the mobile hotspot’s WiFi and |
|||||||
|
Mode |
cellular radios while on an airplane or in |
|||||||
|
|
|
|
|
|
|
|
|
areas where WiFi is restricted. The jump |
|
|
|
|
|
|
|
|
|
boost feature can still be used in this |
|
|
|
|
|
|
|
|
|
mode. |
|
|
|
|
|
|
|
|
|
|
|
USB Tether |
Connect to the Internet from supported |
|||||||
|
|
|
|
|
|
|
|
|
computers with a USB cable, and charge |
|
|
|
|
|
|
|
|
|
your device at the same time. |
|
|
|
|
|
|
|
|
|
|
|
More |
See information about the device including |
|||||||
|
|
|
|
|
|
|
|
|
software updates, factory reset, and |
|
|
|
|
|
|
|
|
|
tutorial. |
|
|
|
|
|
|
|
|
|
|
View Alerts
You can view alerts and notifications by swiping downward from the ALERTS icon at the top of the screen. Scroll across to view multiple alerts.
13
Hotspot Web Page
On the hotspot web page, you can do the following:
•Change the WiFi SSID, WiFi password, admin password, and WiFi encryption
•Set autoconnect options
•View data usage
•Read SMS messages
•View alerts
•View and change other settings
•Check device status
¾¾ To access your hotspot web page:
1.Launch an Internet browser from a computer or WiFi device that is connected to the network.
2.Enter http://netgear.aircard.
3.Enter the administrator login password. The default password is password. The hotspot web page displays.
Change Security Settings
The WiFi network name and admin password provide security. Your mobile hotspot comes with a randomly generated and secured WiFi network name (SSID) and password that you can continue to use as is. Read this section if you want to change your security settings.
¾¾ To change the WiFi network name:
1.Launch an Internet browser from a computer or WiFi device that is connected to the hotspot.
2.Enter http://netgear.aircard.
14
3.Enter the administrator login password. The default password is password. The hotspot web page displays.
4.Select WiFi > Options.
5.Enter a new WiFi network name.
6.Click the Submit button.
¾¾ To change the WiFi password:
1.Launch an Internet browser from a computer or WiFi device that is connected to the hotspot.
2.Enter http://netgear.aircard. The hotspot web page displays.
3.Enter the administrator login password. The default password is password. The hotspot web page displays.
4.Select WiFi > Options.
The WiFi options page displays.
5.Enter a new WiFi password.
If you change your password, be sure to keep a record of it and store it in a safe place.
6.Click the Submit button.
Connect Devices
You can add devices to your network using a WiFi network manager or WPS if the device can use WPS.
Note: WPS enables you to connect WPS-enabled devices to a WiFi network without entering a WiFi password using a keyboard.
15
¾¾ To connect additional WiFi-capable devices:
1.Open the WiFi network manager on your computer or other WiFi device (such as a smartphone, tablet, media player, or camera).
2.Select the WiFi network name displayed on the LCD screen.
3.Enter the WiFi password displayed on the LCD screen.
4.Launch your browser.
¾¾ To connect devices using WPS:
1.Press the Power button to awaken the LCD screen.
2.Tap the WiFi icon.
The WiFi screen displays.
3.Tap the WPS icon.
The WPS screen displays.
4.Tap the Pair with Main Wi-Fi button.
5.Within two minutes, press the WPS button on the device that you want to connect to your WiFi network.
The hotspot and the WiFi device automatically communicate and establish a secure connection.
16
Support
Thank you for purchasing this NETGEAR product.
After installing your device, locate the serial number on the label of your product and use it to register your product at https://my.netgear.com.
You must register your product before you can use NETGEAR telephone support. NETGEAR recommends registering your product through the NETGEAR website.
For product updates and web support, visit http://support.netgear.com.
NETGEAR recommends that you use only the official NETGEAR support resources.
You can get the user manual online at http://downloadcenter.netgear.com or through a link in the product’s user interface.
Trademarks
© NETGEAR, Inc., NETGEAR and the NETGEAR Logo are trademarks of NETGEAR, Inc. Any non NETGEAR trademarks are used for reference purposes only.
Compliance
For the current EU Declaration of Conformity, visit http://support.netgear.com/app/answers/detail/a_ id/11621/.
For regulatory compliance information, visit http://www.netgear.com/about/regulatory/.
See the regulatory compliance document before connecting the power supply.

Kurzanleitung
AirCard 810
Mobiler Hotspot

Ihr Hotspot
Machen Sie sich vor dem Verwenden des mobilen Hotspots mit dem LCD-Bildschirm, den Symbolen, Tasten und Anschlüssen vertraut.
Tasten und Anschlüsse
Ein-/Ausschalter
Status-LED
Micro-USB-Anschluss
Primärer Antennenanschluss
Deutsch
Status-LED
Die Status-LED zeigt den Status der Datenverbindung an:
•Blau, langsames Blinken: Der Hotspot ist bereit.
•Blau, doppeltes Blinken: Der Hotspot überträgt Daten.
•Gelb, langsames Blinken: Der Hotspot ist nicht mit dem Netzwerk verbunden.
19

Ein-/Ausschalter
Halten Sie den Ein-/Ausschalter zwei Sekunden lang gedrückt, um den Hotspot einzuschalten, und fünf Sekunden lang gedrückt, um den Hotspot auszuschalten.
Halten Sie den Ein-/Ausschalter gedrückt, und lassen Sie ihn wieder los, um zwischen den LCD-Bildschirmen zu wechseln.
Ein-/Ausschalter
LCD-Bildschirm
Sie können die Symbole und anderen Elemente auf dem Touchscreen zum Anzeigen des Status des mobilen Hotspots, Konfigurieren der WLAN-Bandeinstellungen und Anzeigen von Details zur Datennutzung und Systemmeldungen verwenden.
20
|
|
|
Symbol |
Beschreibung |
|
|
|
|
|
|
|
|
Signalstärke |
5 Balken: Ausgezeichnet. |
|
|
|
|
1 Balken: Niedrig. |
|
|
|
|
|
|
|
|
|
|
|
|
|
|
|
|
|
|
Netzwerktyp |
4G+. Ein LTE-Advanced-Netzwerk mit |
|
|
|
||
|
|
|
|
Carrier Aggregation ist verfügbar. |
|
|
|
|
4G. Das LTE-Netzwerk ist verfügbar. |
|
|
|
|
H+. DC-HSPA+ HSPA+/DC-HSPA. |
|
|
|
|
|
|
|
|
|
H: HSPA. |
|
|
|
|
|
|
|
|
|
|
|
|
|
|
3G: UMTS |
|
|
|
|
|
|
|
|
|
|
|
|
|
|
|
|
|
|
|
|
|
|
|
Datenverkehr |
Umriss. Verbunden. |
|
|
|
||
|
|
|
|
Leuchtet: Beim Senden oder |
|
|
|
|
|
|
|
|
|
Empfangen. |
|
|
|
|
Keine. Nicht verbunden. |
|
|
|
|
|
|
|
|
Akkuanzeige |
Anzeige der Restakkuladung in Prozent. |
|
|
|
|
|
Einrichten des Hotspots
Bevor Sie eine Verbindung zu Ihrem mobilen Hotspot herstellen, müssen Sie eine Micro-SIM-Karte (3FF) sowie den Akku einsetzen, den mobilen Hotspot einschalten und den Akku laden.
Hinweis: Um eine Mikro-SIM-Karte zu erhalten, wenden Sie sich an den Mobilfunk-/Netzanbieter.
21

¾¾ So setzen Sie die Mikro-SIM-Karte ein:
1.Entfernen Sie die rückseitige Abdeckung am dafür vorgesehenen Verschluss an der äußeren Kante des mobilen Hotspots.
2.Entfernen Sie den Akku.
3.Schieben Sie die Micro-SIM-Karte in den Steckplatz ein. Die goldfarbenen Kontakte müssen dabei nach unten zeigen.
4.Stellen Sie sicher, dass die Micro-SIM-Karte sicher eingesetzt ist.
5.Setzen Sie den Akku wieder ein.
6.Bringen Sie die Abdeckung wieder an.
22
¾¾ So schalten Sie den Hotspot ein:
Halten Sie den Ein-/Ausschalter gedrückt, bis der LCD-Bildschirm leuchtet.
Der Bildschirm zur Sprachauswahl wird angezeigt.
¾¾ So wählen Sie eine Sprache aus:
1.Drücken Sie die Navigationstaste, um zwischen den Sprachoptionen zu wechseln, bis Ihre Sprache markiert ist.
2.Drücken Sie den Ein-/Ausschalter, um die Sprache auszuwählen.
Sie können die Sprache später erneut von der Website des Hotspots aus ändern.
¾¾ So laden Sie den Akku:
1.Schließen Sie das Micro-USB-Kabel an Ihren Hotspot an.
2.Schließen Sie das andere Ende des Kabels an den USBAnschluss des Computers oder an das USB-Ladegerät an.
Hinweis: Der mitgelieferte Akku ist teilweise aufgeladen.
23
Herstellen einer mobilen Verbindung
In Ihrem Hotspot ist der Access Point Name (APN) für Ihren Netzwerkdienstanbieter bereits vorkonfiguriert. Der Hotspot prüft den APN, um die Art der herzustellenden Netzwerkverbindung zu bestimmen.
Sie können nun im Internet surfen!
Sie müssen einen APN für Ihren Hotspot konfigurieren, wenn Sie diesen zum ersten Mal einrichten oder eine Meldung angezeigt wird, dass die Einrichtung eines APN erforderlich ist.
¾¾ So konfigurieren Sie einen APN:
1.Tippen Sie auf der Startseite auf das Symbol Settings (Einstellungen).
2.Tippen Sie auf das Symbol Network (Netzwerk).
3.Tippen Sie unter APN auf das Symbol >.
Eine Liste vorprogrammierter APN, die möglicherweise zusammen mit Ihrer aktuellen SIM funktionieren, wird angezeigt.
4.Wählen Sie den entsprechenden APN aus.
24
5.Wenn keiner der vorprogrammierten APN passend ist, richten Sie einen APN ein.
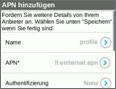
a.Tippen Sie auf die Schaltfläche +Add (+Hinzufügen).
b.Geben Sie die Details des APN ein.
Wenden Sie sich an Ihren Netzwerkdienstanbieter, wenn Sie mehr über die genannten Details erfahren möchten.
c.Tippen Sie auf die Schaltfläche Save (Speichern).
Eine Meldung wird angezeigt, dass ein APN erstellt wurde.
¾¾ So stellen Sie eine Verbindung zu Ihrem Hotspot her:
1.Stellen Sie sicher, dass WLAN auf Ihrem Computer oder auf einem anderen Gerät aktiviert ist.
2.Suchen Sie auf Ihrem Computer oder auf einem anderen Gerät nach WLAN-Netzwerken:
•Klicken Sie bei Windows-Geräten auf das Symbol für Internet Access (Internetzugriff).
•Wählen Sie bei MAC-Geräten das Netzwerk im Menü WiFi (WLAN) aus.
•Suchen Sie auf Tablets nach den Einstellungsoptionen.
3.Wählen Sie den auf Ihrem LCD-Bildschirm angezeigten WLAN-Namen.
4.Geben Sie das WLAN-Passwort genau so ein, wie es auf dem LCD-Bildschirm erscheint.
25

Bei Passwörtern wird zwischen Großund Kleinschreibung unterschieden.
Wenn ein Computer oder ein Mobilgerät eine Verbindung zum Hotspot herstellt, wird eine 1 neben dem Symbol WiFi (WLAN) auf dem LCD-Bildschirm angezeigt.
Hinweis: Damit Sie eine Verbindung zum mobilen Breitband-Netzwerk herstellen können, muss Ihre SIM-Karte aktiv sein. Bei Verwendung einer PrepaidKarte oder einer Pay-as-you-Go-SIM-Karte muss der Kontostand positiv sein.
5.Starten Sie den Browser, und besuchen Sie, falls gewünscht, die Webseite des Hotspots
netgear.aircard, um Ihre Einstellungen anzupassen.
Ihr mobiler Hotspot ist bereit für die direkte Verwendung. Sie brauchen wahrscheinlich keine Einstellungen anzupassen.
Der mobile Hotspot ist über die Standardsicherheitseinstellungen bereits im Auslieferungszustand sicher.
NETGEAR AirCard-App
Laden Sie die kostenlose mobile App auf netgear.com/AirCardApps herunter. Mit dieser App können Sie Ihre Einstellungen sowie Informationen zur Verbindung und Datennutzung auf Ihrem Smartphone oder Tablet abrufen. Besuchen Sie zur Verwaltung aller HotspotEinstellungen netgear.aircard.
Verwalten der WLANEinstellungen
Sie können die WLAN-Einstellungen verwalten, indem Sie auf das Symbol WiFi (WLAN) auf dem Touchscreen des Hotspots tippen.
26
Darüber hinaus können Sie Ihre WLAN-Einstellungen von der Webseite Ihres Hotspots aus verwalten.
Hinweis: Der Hotspot wird zurückgesetzt, wenn Sie die WLAN-Einstellungen ändern. Verbundene Geräte werden getrennt.
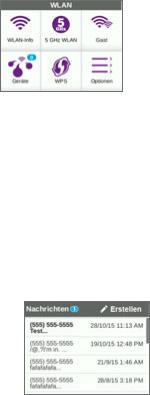
Anzeigen oder Erstellen von SMS-Nachrichten
Tippen Sie auf das Symbol Messages (Nachrichten), um SMS-Nachrichten anzuzeigen oder zu verfassen.
¾¾ So lesen Sie Nachrichten:
1.Tippen Sie auf der Startseite auf das Symbol Messages (Nachrichten).
2.Tippen Sie auf eine Zeile in der Nachricht.
27

¾¾ So verfassen Sie eine Nachricht:
1.Tippen Sie auf der Startseite auf das Symbol Messages (Nachrichten).
2.Tippen Sie in der oberen rechten Ecke auf die Schaltfläche Compose (Verfassen).
Wenn keine gültige SIM-Karte in Ihrem Hotspot eingesetzt ist, wird die Schaltfläche Compose (Verfassen) grau dargestellt.
3.Geben Sie eine Telefonnummer ein.
4.Tippen Sie auf die Schaltfläche Next (Weiter).
5.Verfassen Sie die Nachricht.
6.Drücken Sie die Schaltfläche Send (Senden).
Anpassen der HotspotEinstellungen
Sie können andere Einstellungen ebenso anpassen.
¾¾ So passen Sie Ihre Hotspot-Einstellungen an:
1.Tippen Sie auf der Startseite auf das Symbol Settings (Einstellungen).
2.Tippen Sie auf eines der Symbole, um eine Einstellung anzupassen.
28

Die folgende Tabelle beschreibt die Symbole, die auf dem Einstellungsfenster angezeigt werden.
|
Symbol |
Beschreibung |
|||||
|
|
|
|
|
|
|
|
|
Anzeige |
Konfigurieren Sie den Touchscreen |
|||||
|
|
|
|
|
|
|
(Helligkeit, Timeout, Anzeige von WLAN- |
|
|
|
|
|
|
|
Anmeldeinformationen, LED-Anzeige). |
|
|
|
|
|
|
|
|
|
Netzwerk |
Wählen Sie die zu verwendenden |
|||||
|
|
|
|
|
|
|
Netzwerktypen aus, legen Sie Roaming- |
|
|
|
|
|
|
|
Regeln fest, und zeigen Sie Details zur |
|
|
|
|
|
|
|
Netzwerkverbindung an. |
|
|
|
|
|
|
|
|
|
Jump-Boost |
Verwenden Sie Ihren mobilen Hotspot, damit |
|||||
|
|
|
|
|
|
|
der Akku eines anderen Geräts mithilfe eines |
|
|
|
|
|
|
|
Jump-Boost-Kabels, das im Lieferumfang |
|
|
|
|
|
|
|
Ihres Geräts enthalten ist, leistungsfähiger |
|
|
|
|
|
|
|
wird. |
|
|
|
|
|
|
|
|
|
Flugzeugmodus |
Schalten Sie das WLAN des mobilen Hotspots |
|||||
|
|
|
|
|
|
|
und Mobiltelefone aus, wenn Sie sich im |
|
|
|
|
|
|
|
Flugzeug oder in Bereichen befinden, wo |
|
|
|
|
|
|
|
WLAN verboten ist. Die Jump-Boost- |
|
|
|
|
|
|
|
Funktion kann in diesem Modus immer noch |
|
|
|
|
|
|
|
verwendet werden. |
|
|
|
|
|
|
|
|
|
USB-Tethering |
Stellen Sie mit einem USB-Kabel von |
|||||
|
|
|
|
|
|
|
unterstützten Computern aus eine |
|
|
|
|
|
|
|
|
|
|
|
|
|
|
|
Verbindung mit dem Internet her, und laden |
|
|
|
|
|
|
|
|
|
|
|
|
|
|
|
Sie gleichzeitig Ihr Gerät auf. |
|
|
|
|
|
|
|
|
|
|
|
|
|
|
|
|
|
Mehr |
Erhalten Sie weitere Informationen zum Gerät, |
|||||
|
|
|
|
|
|
|
u. a. zu Software-Updates, zum Zurücksetzen |
|
|
|
|
|
|
|
auf Werkseinstellungen und Tutorial. |
|
|
|
|
|
|
|
|
Warnungen anzeigen
Sie können Warnungen und Benachrichtigungen anzeigen, indem Sie vom Symbol ALERTS (Warnungen) oben auf dem Bildschirm nach unten wischen. Scrollen Sie darüber, um mehrere Warnungen anzuzeigen.
29
Hotspot-Website
Auf der Hotspot-Website können Sie Folgendes tun:
•WLAN-SSID, WLAN-Passwort, AdministratorPasswort sowie WLAN-Verschlüsselung ändern
•AutoConnect-Optionen einstellen
•Datennutzung anzeigen
•SMS-Nachrichten lesen
•Anzeigen von Warnungen
•Weitere Einstellungen anzeigen und ändern
•Gerätestatus überprüfen
¾¾ So greifen Sie auf Ihre Hotspot-Website zu:
1.Starten Sie den Internet-Browser auf einem Computer oder WLAN-Gerät mit Verbindung zum Netzwerk.
2.Geben Sie http://netgear.aircard ein.
3.Geben Sie das Administratorpasswort ein. Das Standardpasswort lautet password. Die Hotspot-Website wird angezeigt.
Ändern der Sicherheitseinstellungen
Der WLAN-Netzwerkname und das Administratorpasswort sorgen für Sicherheit. Ihr mobiler Hotspot verfügt über einen zufällig erzeugten und geschützten WLANNetzwerknamen (SSID) sowie ein Passwort, die Sie genauso weiter verwenden können. Lesen Sie diesen Abschnitt, wenn Sie Ihre Sicherheitseinstellungen ändern möchten.
¾¾ So ändern Sie den WLAN-Netzwerknamen:
1.Starten Sie den Internet-Browser auf einem Computer oder WLAN-Gerät mit Verbindung zum Hotspot.
2.Geben Sie http://netgear.aircard ein.
30
 Loading...