


 Loading...
NETGEAR Fuse
Mobile Hotspot
User Guide
[UG template version 15a_mbb]
boost AC779SB_ug_en_21aug2015_d6

Table of Contents |
|
Introduction.................................................................................................................................................... |
1 |
Before You Begin .................................................................................................................................. |
1 |
Operating Environment (Compatible OSs) ........................................................................................... |
1 |
Package Contents................................................................................................................................. |
2 |
SSID and Security Key ......................................................................................................................... |
2 |
Additional Information ........................................................................................................................... |
3 |
Contacting Customer Service ............................................................................................................... |
3 |
Get Started.................................................................................................................................................... |
4 |
Parts and Function................................................................................................................................ |
4 |
SIM Card ............................................................................................................................................... |
5 |
Handling a SIM Card..................................................................................................................... |
5 |
Insert the SIM Card....................................................................................................................... |
6 |
Remove the SIM Card .................................................................................................................. |
7 |
Battery Use ........................................................................................................................................... |
8 |
Insert the Battery........................................................................................................................... |
8 |
Remove the Battery ...................................................................................................................... |
9 |
Charge the Battery...................................................................................................................... |
10 |
Turn Your Device On and Off ............................................................................................................. |
11 |
Control Your Device Using the Power Button............................................................................. |
12 |
Sleep Mode................................................................................................................................. |
12 |
Activation and Service ........................................................................................................................ |
13 |
Connect with WiFi (WLAN) ......................................................................................................................... |
14 |
Connect to the Mobile Hotspot WiFi Network ..................................................................................... |
14 |
Find and Select the Mobile Hotspot WiFi Network ..................................................................... |
14 |
Connect Through WPS ............................................................................................................... |
14 |
Guest WiFi Network ............................................................................................................................ |
16 |
Turn the Guest WiFi Network On and Off................................................................................... |
16 |
Guest WiFi Password ................................................................................................................. |
17 |
Connect with the Micro-USB Cable ............................................................................................................ |
18 |
Making a Tethered Connection........................................................................................................... |
18 |
TRU-Install .......................................................................................................................................... |
19 |
LCD Interface .............................................................................................................................................. |
21 |
TOC |
i |
LCD Home Screen .............................................................................................................................. |
21 |
Signal Strength Icon.................................................................................................................... |
22 |
Battery Icon................................................................................................................................. |
22 |
Alerts ........................................................................................................................................... |
22 |
LCD Information Screens.................................................................................................................... |
23 |
Alerts Screen............................................................................................................................... |
23 |
Device Info Screen...................................................................................................................... |
24 |
Settings ....................................................................................................................................................... |
25 |
Mobile Hotspot Manager Overview..................................................................................................... |
25 |
Log In to the Mobile Hotspot Manager........................................................................................ |
25 |
Mobile Hotspot Manager Home Page................................................................................................. |
26 |
Data Usage ................................................................................................................................. |
27 |
My Account ................................................................................................................................. |
28 |
Alerts ........................................................................................................................................... |
28 |
Status (Connection Details) ........................................................................................................ |
29 |
WiFi Page............................................................................................................................................ |
29 |
Connect Tab................................................................................................................................ |
30 |
WiFi Options Tab ........................................................................................................................ |
31 |
Show or Hide the Main WiFi Network Name and Password on LCD Home Screen .................. |
34 |
Change the WiFi Network Name ................................................................................................ |
34 |
Set the Maximum Number of WiFi Devices ................................................................................ |
35 |
Change the WiFi Security ........................................................................................................... |
35 |
Turn WiFi On or Off When Tethered........................................................................................... |
36 |
Change the WiFi Channel........................................................................................................... |
36 |
MAC Filter Tab............................................................................................................................ |
37 |
Manage the Block List (MAC Filtering) ....................................................................................... |
38 |
Settings Page...................................................................................................................................... |
39 |
General Device Settings ............................................................................................................. |
39 |
Change the Mobile Hotspot Manager Password ........................................................................ |
42 |
Set the Sleep (Inactivity) Timer................................................................................................... |
42 |
Set the Language........................................................................................................................ |
42 |
Set the LCD Timeout .................................................................................................................. |
43 |
Set the LCD Brightness .............................................................................................................. |
43 |
Software and Reset Tab ............................................................................................................. |
43 |
Export Settings............................................................................................................................ |
45 |
TOC |
ii |
Import Settings............................................................................................................................ |
45 |
Update the Mobile Hotspot Software and Firmware................................................................... |
46 |
Download Software Updates ...................................................................................................... |
46 |
Reset Your Device ...................................................................................................................... |
47 |
System Logs ............................................................................................................................... |
48 |
Network Preferences .................................................................................................................. |
49 |
Access Point Name (APN).......................................................................................................... |
50 |
SIM Security................................................................................................................................ |
51 |
Network Status Details................................................................................................................ |
51 |
Router Basic Settings ................................................................................................................. |
52 |
DMZ ............................................................................................................................................ |
54 |
Enable VPN Passthrough ........................................................................................................... |
55 |
Enable UPnP (Universal Plug and Play)..................................................................................... |
55 |
DHCP .......................................................................................................................................... |
56 |
Port Forwarding .......................................................................................................................... |
57 |
Port Filtering................................................................................................................................ |
59 |
About Page ......................................................................................................................................... |
61 |
View Network Activation Information .......................................................................................... |
64 |
Appendix ..................................................................................................................................................... |
65 |
Frequently Asked Questions............................................................................................................... |
65 |
Tips...................................................................................................................................................... |
66 |
Extending Battery Life................................................................................................................. |
66 |
Mobile Hotspot Location ............................................................................................................. |
67 |
Improving Signal Strength........................................................................................................... |
67 |
Improving WiFi Performance ...................................................................................................... |
67 |
Security Tips ............................................................................................................................... |
68 |
Find the MAC Address................................................................................................................ |
69 |
Find the IP Address .................................................................................................................... |
70 |
Troubleshooting .................................................................................................................................. |
70 |
General Tips................................................................................................................................ |
70 |
LCD Is Dark................................................................................................................................. |
70 |
Insufficient Signal Strength ......................................................................................................... |
71 |
Cannot Connect to WiFi.............................................................................................................. |
71 |
Cannot Connect Through USB ................................................................................................... |
72 |
Cannot Display the Home Page ................................................................................................. |
72 |
TOC |
iii |
Cannot Connect to the Mobile Broadband Network |
................................................................... 73 |
Cannot Check for Updates.......................................................................................................... |
73 |
Technical Specifications ..................................................................................................................... |
74 |
Radio Frequency and Electrical Specifications........................................................................... |
74 |
Software Specifications............................................................................................................... |
75 |
Environmental Specifications...................................................................................................... |
76 |
Mechanical Specifications........................................................................................................... |
76 |
Legal ................................................................................................................................................... |
76 |
Trademarks and Copyright ................................................................................................................. |
76 |
Patents ........................................................................................................................................ |
77 |
Licenses ...................................................................................................................................... |
77 |
GNU General Public License (Version 2) ................................................................................... |
77 |
GNU General Public License (Version 3) ................................................................................... |
82 |
GNU Lesser General Public License (Version 2.1) .................................................................... |
93 |
GNU Lesser General Public License (Version 3) ....................................................................... |
99 |
Fontconfig License.................................................................................................................... |
102 |
Libxml2 License ........................................................................................................................ |
103 |
Locapi License .......................................................................................................................... |
104 |
Pimd License............................................................................................................................. |
105 |
Shadow License........................................................................................................................ |
105 |
ISC License............................................................................................................................... |
106 |
OpenSSL License ..................................................................................................................... |
106 |
Original SSLeay License........................................................................................................... |
107 |
Copyright................................................................................................................................... |
108 |
Limitation of Liability.................................................................................................................. |
108 |
Additional Information and Updates.......................................................................................... |
109 |
Safety Information ..................................................................................................................................... |
110 |
Important Notice................................................................................................................................ |
110 |
Safety and Hazards........................................................................................................................... |
110 |
Proper Battery Use and Disposal...................................................................................................... |
110 |
Regulatory Notices............................................................................................................................ |
112 |
Index.......................................................................................................................................................... |
114 |
TOC |
iv |

Introduction
The following topics describe the basics of using this guide and your new mobile broadband device.
Before You Begin
Thank you for purchasing your new NETGEAR Fuse Mobile Hotspot. The following topics explain how best to use this guide to get the most out of your mobile broadband device.
Before Using Your Device
Read Safety Information thoroughly for proper usage.
Accessible services may be limited by subscription contract conditions.
Guide Usage Notes
Note that most descriptions in this guide are based on your device's default settings at the time of purchase.
Screenshots and Key Labels
Screenshots and Key labels are provided for reference only. Actual windows, menus, etc., may differ in appearance.
Other Notations
In the user guide, the NETGEAR Fuse Mobile Hotspot may be referred to either as "mobile broadband device," "hotspot," "device," or "WiFi router."
Operating Environment (Compatible OSs)
The table below outlines the compatible operating environments for your device. Use outside of these environments may affect performance. Additional factors (hardware, connected peripherals, installed applications, etc.) may also affect performance.
●For computer support, OS version upgrade information, etc., see the corresponding manufacturer's product support documentation.
●The information for the operating environments (compatible OSs) listed below is the current information for your device sold as of May 2015.
Introduction |
1 |

|
Item |
|
Description |
|
|
|
|
|
|
|
Windows® 8 (x86), Windows 7, Windows Vista®, Windows |
|
Compatible Operating Systems (OSs) |
|
XP® SP3, or Mac OS® X (version 10.5 or later) |
|
|
|
|
|
|
|
Mac OS 10.6–10.8, iOS4, Android 2.1, Blackberry 5.0 |
|
|
|
|
|
|
|
One or more computers that support WiFi (802.11b/g/n) |
|
Additional Requirements |
|
If you’ll be connecting your device through USB, a USB 2.0 |
|
|
|
|
|
|
|
slot |
|
|
|
|
|
Available Hard Disk Capacity |
|
N/A |
|
|
|
|
|
|
|
Internet Explorer® (version 8.0 or later) |
|
|
|
Mozilla Firefox® (version 4.0 or later) |
|
Compatible Browsers |
|
Google Chrome™ (version 17 or later) |
|
|
Apple Safari® (version 5.0 or later) |
|
|
|
|
|
|
|
Apple Safari® Mobile (version iOS 4.0) |
|
|
|
Android Browser (Android OS 2.2 or later) |
|
|
|
|
|
Package Contents
See below for details on everything you will find in the box for your NETGEAR Fuse Mobile Hotspot.
●NETGEAR Fuse Mobile Hotspot
●Battery cover
●Rechargeable battery
●AC charger with Type A USB port
●Micro-USB cable
●Micro-SIM (preinstalled)
●Get Started Guide
●Important Information Booklet
SSID and Security Key
Before connecting WiFi devices to your NETGEAR Fuse Mobile Hotspot, you will need to confirm the SSID (network name) and security key (WiFi password).
Introduction |
2 |
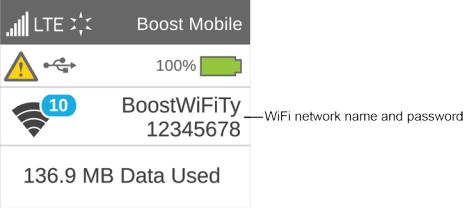
■The WiFi network name and security key (password) are displayed on the LCD home screen when you power on your device.
Additional Information
The following list describes additional information useful to know before you begin using your NETGEAR Fuse Mobile Hotspot.
●Your mobile broadband device accommodates software updates. Always use the latest software.
●Note that connection speeds may drop or connections may be disabled depending on line traffic or connection environments.
●When using WLAN overseas, change the settings according to the laws of those countries.
Contacting Customer Service
You can reach Customer Service online.
●Visit boostmobile.com.
●If your device is ever lost or stolen, call Boost immediately at 1-888-BOOST-4U (1-888-266-7848). We will secure your account balance and your account information.
Introduction |
3 |

Get Started
The following topics give you all the information you need to set up your mobile device the first time.
Parts and Function
Learn your device's primary external features and buttons.
Front View
Back View (Battery Cover Removed)
Get Started |
4 |
Interior (Battery Removed)
|
Part |
|
|
Description |
|
|
|
|
|
|
|
|
LCD screen |
|
View device status. (See LCD Interface.) |
||
|
|
|
|
||
|
Power button |
|
Toggle power on or off. |
||
|
|
|
|
||
|
External antenna ports (2) |
|
RF antenna connectors for advanced users (slide open to access). |
||
|
|
|
|
|
|
|
Micro-USB port |
|
Connect the micro-USB cable for charging or creating a tethered |
||
|
|
connection. |
|||
|
|
|
|
||
|
|
|
|
|
|
|
Battery cover |
|
Remove the battery cover to remove or insert the battery or SIM |
||
|
|
card. |
|||
|
|
|
|
||
|
|
|
|
||
|
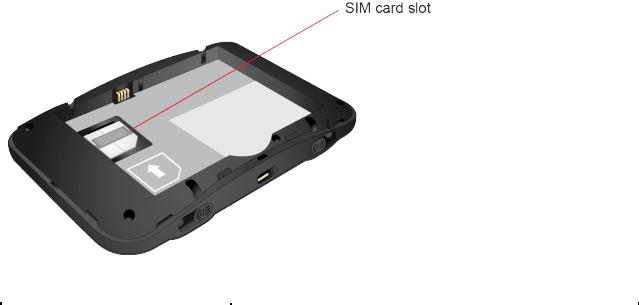
SIM card slot |
|
The SIM card is preinstalled. |
||
|
|
|
|
|
|
SIM Card
The SIM card is an IC card containing your device's phone number and other customer information.
Note: Your SIM card is preinstalled.
Handling a SIM Card
Keep the following in mind when handling a SIM card.
●The customer is responsible for any damage caused by inserting the SIM card in another brand of IC card reader, etc.
Get Started |
5 |
●Always keep the IC chip clean.
●Wipe clean with a dry, soft cloth.
●Avoid applying labels. May damage the SIM card.
●See instructions included with the SIM card for handling.
●The SIM card is the property of the company.
●The SIM card is replaceable (at cost) in case of loss/damage.
●Return the SIM card to the company when cancelling a subscription.
●Returned SIM cards are recycled for environmental purposes.
●Note that SIM card specifications and performance may change without notice.
●NETGEAR recommends that you keep a separate copy of information that is stored on the SIM card. NETGEAR is not responsible for damages from stored information that is lost.
●Always follow emergency procedures to suspend service if your SIM card or device (SIM card inserted) is lost or stolen. For details, contact Customer Service.
●Always power off the mobile broadband device before inserting or removing the SIM card.
Insert the SIM Card
Follow these instructions to insert a SIM card. Remember to power off your device before inserting a SIM card.
Note: Your device's SIM card is preinstalled. These instructions are for reference only.
1.Remove the battery cover.
2.Remove the battery. (See Remove the Battery.)
Get Started |
6 |
3.Open the SIM card cover.
4.Insert the SIM card.
Insert gently with the gold IC chip facing downward.
5.Close the SIM card cover.
6.Insert the battery. (See Insert the Battery.)
Make sure that the battery contact points align with those inside the battery compartment.
7. Attach the battery cover.
Remove the SIM Card
Follow these instructions to remove the device's SIM card.
Note: Remove the SIM card only if instructed by your Internet service provider.
1.Press and hold the Power button to turn off the device before removing the SIM card.
2.Remove the battery cover.
3.Remove the battery. (See Remove the Battery.)
4.Open the SIM card cover.
5.Remove the SIM card.
6.Close the SIM card cover.
7.Insert the battery. (See Insert the Battery.)
Make sure that the battery contact points align with those inside the battery compartment.
Get Started |
7 |
8. Attach the battery cover.
Battery Use
The following topics explain how to insert and remove your device's battery.
Battery Cautions
Storage: Avoid storing or leaving the battery with no charge remaining. Saved information and settings may become lost or changed, or the battery may become unusable. Charge once every six months before storing or leaving unused for a long period.
Bulges: Depending on use, bulges may appear near end of battery life. This does not affect safety.
Replacing Battery: The battery is a consumable item. It needs to be replaced if operating time shortens noticeably. Purchase a new battery.
Cleaning: Clean soiled terminals between the battery and the device with a clean, dry cotton swab. Soiled terminals can result in a poor connection and prevent charging, etc.
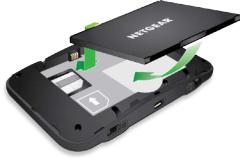
Insert the Battery
Before you use your device, install the battery.
1. At the antenna connector shown below, lift the raised edge of the battery cover to remove it.
2. Insert the battery into your device, contacts end first.
Get Started |
8 |

Make sure that the battery contact points align with those inside the battery compartment.
3. Replace the battery cover.
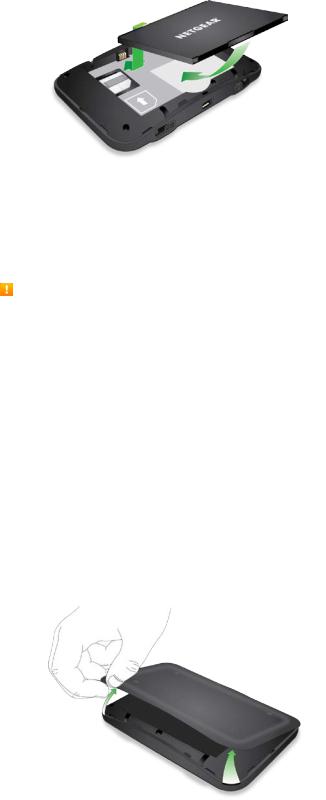
Remove the Battery
Follow these instructions to remove your device's battery. Always power the device off before removing the battery.
1. At the antenna connector shown below, lift the raised edge of the battery cover to remove it.
2. Remove the battery.
3. Replace the battery cover.
Get Started |
9 |

Charge the Battery
You need to recharge your device’s battery periodically. You can continue using your device while it is charging.
The faster method is to connect your device to the AC charger. Alternatively, you can connect your device to your computer, although this charges more slowly.
Charge Using the AC Adapter
1. Insert the larger (Type A) end of the micro-USB cable into the AC charger.
2. Insert the other end of the cable into the micro-USB port on the side of your device.
3.Insert the AC charger into an electrical outlet. (If the battery is already partially charged when the charger is plugged into the outlet, your device will power on automatically.)
While your device is charging, the percentage of charge that the battery has displays on the LCD (and the Mobile Hotspot Manager home page, if your device is on).
When your device is fully charged, the full battery icon and message display on the LCD (and the Mobile Hotspot Manager home page, if your device is on).
Charge Using a USB-to-Computer Connection
Note: If you will be using the USB connection to connect to the Internet (and not just for charging your device), you must install the device driver. (See TRU-Install.)
Note: If you are using Mac OS X 10.4.x, after you connect your device, you may see a warning message that your computer is running on the UPS backup battery and that you should prevent a computer
Get Started |
10 |
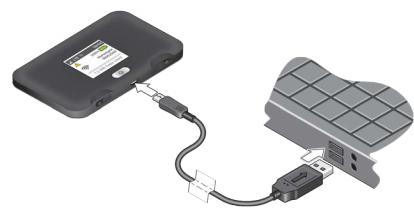
shutdown. You can continue with your work. To prevent this message from being displayed, install the device driver.
1.Make sure that your computer is turned on.
2.Insert the larger (Type A) end of the micro-USB cable into your computer.
3.Insert the other end of the cable into the micro-USB port on the side of your device.
●While your device is charging, the percentage of charge that the battery has displays on the LCD (and the Mobile Hotspot Manager home page, if your device is on).
●When your device is fully charged, the full battery icon and message display on the LCD (and the Mobile Hotspot Manager home page, if your device is on).
Turn Your Device On and Off
Use the Power button to turn your device on and off.
Turning Your Device On
1.Make sure that:
Your device has a charged battery inserted.
– or –
Your device is connected to the AC charger or a computer (through the micro-USB cable).
2.If the LCD is blank, press and hold the Power button until the screen lights up.
Get Started |
11 |

Turning Your Device Off
■Press and hold the Power button until the "Shut Down" message appears.
Control Your Device Using the Power Button
The Power button is used to turn the NETGEAR Fuse Mobile Hotspot on or off and to choose which information screen to display on the LCD.
|
Desired result |
|
Action |
|
|
|
|
|
Turn mobile |
|
Press and hold the Power button for 3-4 seconds. |
|
hotspot on |
|
|
|
|
|
|
|
|
|
|
|
Turn mobile |
|
Press and hold the Power button for 3-4 seconds. |
|
hotspot off |
|
|
|
|
|
|
|
|
|
|
|
Wake up WiFi |
|
|
|
signal and device |
|
Press and release the Power button. |
|
screen |
|
|
|
|
|
|
|
Cycle through |
|
Press and release the Power button. |
|
screens |
|
|
|
|
|
|
|
|
|
|
Sleep Mode
If you are not using your device, or if the battery has not been charged, your device automatically enters sleep mode to save power.
In sleep mode, WLAN is disabled.
■To wake your hotspot from sleep mode, press the Power button and the LCD wakes up.
WLAN function is enabled and WiFi devices can reconnect to the hotspot.
Get Started |
12 |
The time required to recover the network connection varies by environment, settings, etc.
Activation and Service
Before using your device, you must set up your service with Boost Mobile. Locate the MEID (DEC) number on the packaging. You will need this 18-digit number to activate your Mobile Hotspot.
For more information about your Boost Mobile account, see My Account.
Create Your Account and Pick Your Plan
Set up your Boost Mobile account.
1.From your computer, visit boostmobile.com/activate.
2.Enter your device's MEID and click start activation process.
Your Mobile Hotspot’s MEID (serial number) can be found on the packaging.
3.Follow the remaining instructions to choose your plan and select a payment method.
4.Follow the activation instructions.
Note: You can also activate by phone by calling 1-888-BOOST-4U (1-888-266-7848).
Get Started |
13 |

Connect with WiFi (WLAN)
You can connect to your Fuse Mobile Hotspot WiFi networks from computers and WiFi devices.
Connect to the Mobile Hotspot WiFi Network
You can find and select the WiFi network or you can use WiFi Protected Setup (WPS) to connect to the WiFi network.
Find and Select the Mobile Hotspot WiFi Network
The following procedure explains how to connect to the hotspot's WiFi network.
To connect to WiFi:
1.Do one of the following, depending on your operating system.
Windows 7: Click the WiFi icon  in the system tray.
Windows Vista: Click Control Panel > Network and Internet > Network and Sharing Center > Connect to a network.
Windows XP: Click Control Panel > Network Connections > Wireless Network Connections > View available wireless networks.
Mac: Click the AirPort icon  (in the upper right corner of your screen).
Linux: See the user documentation of the Linux distribution.
Other operating systems: See the user documentation for your operating system or computer.
2.Select the WiFi network provided by the NETGEAR Fuse Mobile Hotspot and connect to it. (If prompted for a network key/security key/password, enter the WiFi password.)
Tip: The WiFi network name and password are displayed on the LCD home screen of the NETGEAR Fuse Mobile Hotspot. (See LCD Home Screen.)
Connect Through WPS
WiFi Protected Setup (WPS) provides a fast, simple, and secure way to connect WPS-enabled devices to your WiFi network. You don’t have to give the name (SSID) and WiFi password of your Main or Guest network to other users.
Connect with WiFi (WLAN) |
14 |
The WPS feature is available on certain cameras, printers, smartphones, and laptops. These devices have either a hardware button or a WPS-related option in the software. Please consult the user documentation for your device.
WPS is always available for the Main and Guest WiFi networks as long as the WiFi radio is on (the device is not asleep due to the sleep [standby] option, or off while the device is tethered).
WPS is not available in any of these situations:
●WiFi radio is off while your device is sleeping due to inactivity.
●WiFi radio is off while your device is tethered. (See Turn WiFi On or Off When Tethered.)
●The WiFi security option is WPA Personal, WEP, or WEP-related, for example, WEP 64 Bit Open. (To change security to WPA/WPA2 Personal, see Change the WiFi Security.)
●The broadcast network name is not enabled. (See WiFi Options Tab.)
●MAC Filter Mode is "White list (Allow only those in list)", but no computers have been added to the list. (See Manage the Block List (MAC Filtering).)
If the maximum number of connected devices on the chosen network (Main or Guest) has already been met, an error message indicating that the maximum number of devices has been reached is displayed when you attempt WPS. Disconnect one of the connected devices and then retry.
Use the LCD to Connect with WPS
1.Press the Power button on the Mobile Hotspot.
The LCD displays.
2.Press the Power button again to cycle through the LCD screens and display the WiFi Protected Setup screen.
3.Press and hold the Power button until the activation bar fills up on the WiFi Protected Setup screen.
For 2 minutes the Mobile Hotspot scans for computers or WiFi devices that are using WPS to establish a WiFi connection.
4.Within 2 minutes, press the WPS button on the computer or WiFi device you want to connect or select the WPS-related option in your device’s software.
The computer or WiFi device connects to the Mobile Hotspot WiFi network.
Use the Mobile Hotspot Manager (http://MyHotSpot) to Connect with WPS
1.Log in to the home page. (See Log In to the Mobile Hotspot Manager.)
2.Click WiFi.
3.Below the Main WiFi or Guest WiFi section, click WPS.
Connect with WiFi (WLAN) |
15 |
4.Perform one of the following procedures, depending on whether the WiFi device you are adding to your WiFi network supports the PBC (Push Button Configuration) method or the PIN (Personal Information Number) method.
If the WiFi device supports the PBC (Push Button Configuration) method:
1.Click WPS button pairing.
2.Within 2 minutes, press the WPS button on the wireless device you want to connect or select the WPS-related option in your device’s software.
–or –
If the WiFi device has a PIN associated with it:
1.Find out the PIN for the WiFi device you are adding. To do this, use the PIN option in your device’s software. Alternatively, use the WiFi Protected Setup Wizard that may be available, depending on the manufacturer of your device.
2.In the Web page, click Enter WPS PIN.
3.Enter your device’s PIN.
4.Click Submit.
Your NETGEAR Fuse Mobile Hotspot and the wireless device will communicate and establish the connection. If no problems are encountered, the message “The device can now access your hotspot” displays. If your device does not connect, the message “No devices were connected …” displays. Try to connect it manually. (See Find and Select the Mobile Hotspot WiFi Network.)
Note: If you want to stop the pairing process, click Cancel.
Guest WiFi Network
Your NETGEAR Fuse Mobile Hotspot lets you create a separate Guest WiFi network that you can share with temporary users.
Devices on the Guest WiFi network:
●Cannot access devices that are on the Main WiFi network (such as printers or other computers).
●Cannot use the Mobile Hotspot Manager to change any device settings.
Turn the Guest WiFi Network On and Off
You can turn on the Guest WiFi network from the Mobile Hotspot Manager’s WiFi page.
1.Log in to the home page. (See Log In to the Mobile Hotspot Manager.)
2.Click WiFi.
3.In the Guest WiFi area, click Turn On or Turn Off.
Connect with WiFi (WLAN) |
16 |
Guest WiFi Password
You can set the hotspot to use the same Guest WiFi password all the time, or for greater security, you can have it generate a random password each time the Guest WiFi network is turned on.
Change the Guest WiFi Password
You can change the Guest WiFi password manually.
Note: The password changes only when Guest WiFi is turned on—for example, if Guest WiFi was on when your device was restarted, the password doesn’t change because the Guest WiFi is still on.
1.Log in to the home page. (See Log In to the Mobile Hotspot Manager.)
2.Click WiFi > Options.
3.In the Guest WiFi section, enter a new WiFi password.
4.Click Submit.
Tip: To generate a new random password manually, with the above settings active, turn the Guest WiFi off and then back on again. (See Turn the Guest WiFi Network On and Off.)
Randomize the Guest WiFi Password
You can randomize the guest WiFi password.
1.Log in to the home page. (See Log In to the Mobile Hotspot Manager.)
2.Click WiFi > Options.
3.In the Guest WiFi section, select Generate a new password each time I turn on the Guest WiFi.
4.Click Submit.
Connect with WiFi (WLAN) |
17 |
Connect with the Micro-USB Cable
The following topics describe how to share your device's Internet connection with a computer using a direct USB connection.
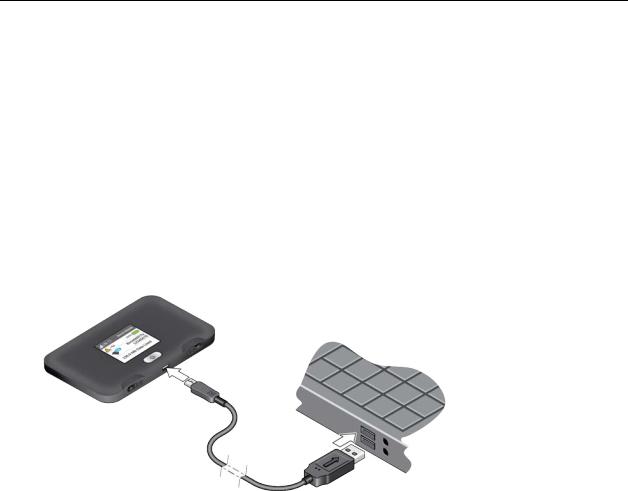
Making a Tethered Connection
Your device supports a direct connection through a USB cable to a Windows or Mac computer. (This is commonly referred to as a “tethered” connection.)
To connect your device to your computer:
1.Insert the larger (Type A) end of the micro-USB cable into your computer.
2.Insert the other end of the cable into the micro-USB port on the side of your device.
Note: If you’ll be using USB to connect to the Internet (and not just for charging your device), you must install the device driver.
Use the micro-USB cable when:
●You want to charge your device, but you don’t want to use the AC charger, or the AC charger is not available.
●Your computer does not have WiFi.
●You want to prevent any other devices from using the hotspot. (See Turn WiFi On or Off When Tethered.)
Note: You can also block individual devices. See Manage the Block List (MAC Filtering).
Note: If you’re having problems, see Cannot Connect Through USB.
Connect with the Micro-USB Cable |
18 |
Note: If you’ll be using USB for data transfer (and not just for charging your device), you must install the device driver. (See “Windows” or “Mac” below.) No Installation CD is required—your device supports the TRU-Install feature.
Note: If you’re using Mac OS X 10.4.x, after you connect your device, you may see a warning message that your computer is running on the UPS backup battery and that you should perform a computer shutdown. You can continue with your work. To prevent this message from being displayed, install the device driver (see “Mac” below).
Windows Device Driver
To install the device driver on Windows:
1.Make sure that your device is turned on.
2.Connect your device to your computer through the micro-USB cable.
3.If the TRU-Install window is not displayed, in Windows Explorer, browse to the TRU-Install entry
 (under My Computer), and then browse to the Win folder and run Setup.exe.
– or –
If the AutoPlay window opens, click Run setup.exe.
4.In the TRU-Install window, click OK.
5.Follow the onscreen instructions.
Mac Device Driver
To install the device driver on Mac:
1.Make sure that your device is turned on.
2.Connect your device to your computer through the micro-USB cable.
3.In the window that appears, double-click the .pkg file.
4.Follow the onscreen instructions.
5.When prompted for your password, enter your Mac password.
TRU-Install
TRU-Install is a feature that installs the necessary drivers the first time you connect your device to your Windows or Mac computer through the micro-USB cable. (For details, see Making a Tethered Connection.) An installation CD is not required.
TRU-Install is enabled by default.
To change the setting:
Connect with the Micro-USB Cable |
19 |
1.In the address bar of your Web browser, type one of the following:
http://MyHotSpot
http://192.168.1.1
2.In the Sign In field, enter the Mobile Hotspot Manager administrator password (1-31 letters, numbers, and symbols). (The default password is "password.")
3.Click Settings > General > Software and Reset.
4.Select (to enable TRU-Install) or clear (to disable TRU-Install) the check box labeled Install driver when connecting to Windows or MAC computers with a USB cable.
Connect with the Micro-USB Cable |
20 |

LCD Interface
Access your device and connection information, and configure device settings from the LCD interface.
If the LCD is not lit, see Turn Your Device On and Off.
LCD Home Screen
The LCD home screen displays icons and text that reflect the status of your device and your connection, and screen elements that link to other configuration screens.
Item |
|
|
Description |
|
|
|
|
1 |
|
|
Signal strength |
|
|
|
|
2 |
|
|
Network type (LTE) |
|
|
|
|
3 |
|
|
Network carrier name |
|
|
|
|
4 |
|
|
Alerts – Indicates number of alerts to be read. Appears only when at least one alert is |
|
|
active. (See Alerts Screen.) |
|
|
|
|
|
|
|
|
|
5 |
|
|
Battery status. (See Battery Icon.) |
|
|
|
|
6 |
|
|
Share icon. |
|
|
|
|
7 |
|
|
Main WiFi network name and password. |
|
|
|
|
8 |
|
|
WiFi Status – Indicates whether WiFi is active (solid) or sleeping (outlined) and the |
|
|
number of WiFi connections. |
|
|
|
|
|
|
|
|
|
9 |
|
|
Data usage – Indicates the amount of data remaining. |
|
|
|
|
LCD Interface |
21 |

Tip: Information on the LCD can also be viewed and configured in the Mobile Hotspot Manager interface. See Mobile Hotspot Manager Home Page and General Device Settings.
Signal Strength Icon
The signal strength icon appears on your device’s home screen and in the Mobile Hotspot Manager
Status panel.
If your device is not connected (dropped signal, outside of service area, etc.) the alerts icon ( ) appears on the LCD.
Signal |
|
Strength |
Status |
Icon |
|
No signal
Very weak signal
Excellent signal
Battery Icon
The battery icon indicates the state of the battery of your device.
The text next to the icon indicates the remaining charge. The battery icon displays on your device’s home screen and in the Mobile Hotspot Manager Status panel.
The battery’s life is affected by the following conditions, some of which can be adjusted from your device and from the Mobile Hotspot Manager:
●Standby time (See Set the Sleep (Inactivity) Timer.)
●Data throughput
●Network signal strength (the better the signal, the longer the battery life)
Alerts
Alerts notify you about situations that require your attention and suggest the actions you need to take to resolve them.
Some of the alerts you may encounter include:
●Software Update Available
LCD Interface |
22 |

●Max WiFi devices reached
●Mobile Broadband disconnected
●WiFi is off
●Hotspot is not activated
●SIM errors
LCD Information Screens
The LCD home screen links to several screens used to configure your device.
●Alerts – Show network and device messages. See Alerts Screen for details.
●WPS – Use WiFi Protected Setup to connect to the WiFi network.
●Device Info – View information about the mobile hotspot.
●About – View device details.
Tip: Information on the LCD can also be viewed and configured in the Mobile Hotspot Manager interface. See Mobile Hotspot Manager Home Page and General Device Settings.
To move between these screens:
●Press the Power button once to move between screens.
●On the Alerts and About screens, press and hold the Power button to see additional pages.
Alerts Screen
The Alerts screen shows network or device alerts for situations that require your attention.
To read more alerts:
■If there is more than one alert to read, press and hold the Power button to view the next alert. To exit the Alerts screen:
■Press the Power button once.
LCD Interface |
23 |

Device Info Screen
The Device Info screen shows detailed information about your mobile hotspot and account. To exit the Device Info screen:
■Press the Power button once.
The Device Info screen shows the following information.
Item |
Description |
|
|
MEID |
The MEID of your hotspot (displayed on the packaging and inside the battery |
|
compartment). |
|
|
My # |
The hotspot’s telephone number. |
|
|
ICCID |
The serial number of the SIM. |
|
|
FW |
The hotspot’s firmware version. |
|
|
FW Build Date |
The date the firmware version was created. |
|
|
Activation |
The hotspot’s activation status (Activated / Deactivated) and the date and time |
status |
the status changed. |
|
|
Admin |
The URL to access the Mobile Hotspot Manager. |
|
|
Password |
The password to log in to the Mobile Hotspot Manager. |
|
|
LCD Interface |
24 |
Settings
The following topics provide an overview of device settings, accessed through the Mobile Hotspot Manager.
Mobile Hotspot Manager Overview
Use a Web browser to access your device and connection information, and configure device settings from the Mobile Hotspot Manager.
Log In to the Mobile Hotspot Manager
Logging in to the home page allows you to view more detailed information about your device, and to manage its settings, broadband network connection, and WiFi networks.
Note: To log in to the home page, your computer must be tethered to your device, or connected to your device’s Main WiFi network. You cannot log in over the Guest WiFi network.
Note: If you access the Mobile Hotspot Manager but you don’t log in, you can only view the current network connection status and a list of devices connected to the Main and Guest WiFi networks.
To log in:
1.In the address bar of your Web browser, type one of the following:
http://MyHotSpot
http://192.168.1.1
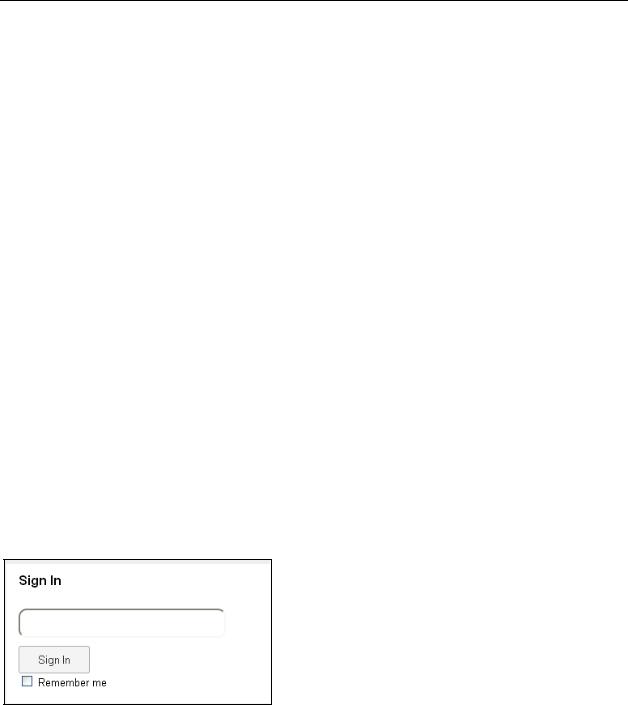
2.In the Sign In field on the home screen, enter the password (1–31 letters, numbers, and symbols).
Note: The default password is “password.” NETGEAR recommends that you change the password, if you haven’t already. (See Change the Mobile Hotspot Manager Password.)
3. Click Sign In.
After a period of inactivity, you will be automatically logged off (timeout security feature).
Settings |
25 |
Loading...