


 Loading...
AirCard 779S Mobile Hotspot
User Manual
March 2015 201-11510-01
350 East Plumeria Drive
San Jose, CA 95134
USA

AirCard 779S Mobile Hotspot
Support
Contact AT&T Customer Care at (800) 331-0500 for assistance.
Compliance
For regulatory compliance information, visit http://www.netgear.com/about/regulatory.
See the regulatory compliance document before connecting the power supply.
Trademarks
Trademarks
© NETGEAR, Inc. NETGEAR and the NETGEAR Logo are trademarks of NETGEAR, Inc. Any non-NETGEAR trademarks are used for reference purposes only.
2

Contents
Chapter 1 Get Started
Get to Know Your Hotspot . . . . . . . . . . . . . . . . . . . . . . . . . . . . . . . . . . . . . . . . . . . . . 7 Power the Hotspot On and Off. . . . . . . . . . . . . . . . . . . . . . . . . . . . . . . . . . . . . . . 7 LCD Screen Elements . . . . . . . . . . . . . . . . . . . . . . . . . . . . . . . . . . . . . . . . . . . . . . . 8 Charge Your Hotspot . . . . . . . . . . . . . . . . . . . . . . . . . . . . . . . . . . . . . . . . . . . . . . . 9 Set Up Your Hotspot . . . . . . . . . . . . . . . . . . . . . . . . . . . . . . . . . . . . . . . . . . . . . . . . . . 9 Install the Micro-SIM Card . . . . . . . . . . . . . . . . . . . . . . . . . . . . . . . . . . . . . . . . . 10 Install the Battery . . . . . . . . . . . . . . . . . . . . . . . . . . . . . . . . . . . . . . . . . . . . . . . . . 11 Connect to the Internet . . . . . . . . . . . . . . . . . . . . . . . . . . . . . . . . . . . . . . . . . . . . . . 12 View the Hotspot Web Page . . . . . . . . . . . . . . . . . . . . . . . . . . . . . . . . . . . . . . . . . . 12 NETGEAR AirCard App for Smartphones and Tablets. . . . . . . . . . . . . . . . . . . . . . 13 Accessories. . . . . . . . . . . . . . . . . . . . . . . . . . . . . . . . . . . . . . . . . . . . . . . . . . . . . . . . . 13
Chapter 2 Use Your Hotspot
Monitor Data Usage . . . . . . . . . . . . . . . . . . . . . . . . . . . . . . . . . . . . . . . . . . . . . . . . . 15 Manage Wi-Fi. . . . . . . . . . . . . . . . . . . . . . . . . . . . . . . . . . . . . . . . . . . . . . . . . . . . . . . 15 Enable Guest Wi-Fi . . . . . . . . . . . . . . . . . . . . . . . . . . . . . . . . . . . . . . . . . . . . . . . . 16 Add a Wireless Device to Your Wi-Fi Network . . . . . . . . . . . . . . . . . . . . . . . . . 17 Set the Maximum Number of Connected Devices. . . . . . . . . . . . . . . . . . . . . . 19 View or Block Connected Users . . . . . . . . . . . . . . . . . . . . . . . . . . . . . . . . . . . . . 20 Set Mobile Broadband Autoconnect Options . . . . . . . . . . . . . . . . . . . . . . . . . . . . 23 View and Delete SMS Messages . . . . . . . . . . . . . . . . . . . . . . . . . . . . . . . . . . . . . . . 24 View Alerts . . . . . . . . . . . . . . . . . . . . . . . . . . . . . . . . . . . . . . . . . . . . . . . . . . . . . . . . . 25 Extend Battery Life . . . . . . . . . . . . . . . . . . . . . . . . . . . . . . . . . . . . . . . . . . . . . . . . . . 26 Adjust Wi-Fi Settings to Optimize Battery Life . . . . . . . . . . . . . . . . . . . . . . . . 26 Adjust Display Settings to Increase Battery Life . . . . . . . . . . . . . . . . . . . . . . . 27 Recharge the Battery . . . . . . . . . . . . . . . . . . . . . . . . . . . . . . . . . . . . . . . . . . . . . . 29 Establish Security . . . . . . . . . . . . . . . . . . . . . . . . . . . . . . . . . . . . . . . . . . . . . . . . . . . 30 Change Hotspot Web Page Login Settings . . . . . . . . . . . . . . . . . . . . . . . . . . . . 30 Change Device Encryption Security Settings . . . . . . . . . . . . . . . . . . . . . . . . . . 31 View Details About Your Hotspot . . . . . . . . . . . . . . . . . . . . . . . . . . . . . . . . . . . . . . 33 Update Your Hotspot Software and Firmware . . . . . . . . . . . . . . . . . . . . . . . . . . . 34 What Alerts Mean . . . . . . . . . . . . . . . . . . . . . . . . . . . . . . . . . . . . . . . . . . . . . . . . . . . 35 SIM Not Installed. . . . . . . . . . . . . . . . . . . . . . . . . . . . . . . . . . . . . . . . . . . . . . . . . . 35 SIM Error—Check SIM . . . . . . . . . . . . . . . . . . . . . . . . . . . . . . . . . . . . . . . . . . . . 35 SIM Locked . . . . . . . . . . . . . . . . . . . . . . . . . . . . . . . . . . . . . . . . . . . . . . . . . . . . . . 36 SIM MEP Locked . . . . . . . . . . . . . . . . . . . . . . . . . . . . . . . . . . . . . . . . . . . . . . . . . . 36 Temperature-Related Alerts . . . . . . . . . . . . . . . . . . . . . . . . . . . . . . . . . . . . . . . . 36 Security Credentials . . . . . . . . . . . . . . . . . . . . . . . . . . . . . . . . . . . . . . . . . . . . . . . . . 37
3

AirCard 779S Mobile Hotspot
Chapter 3 Advanced Settings
Tethered Mode. . . . . . . . . . . . . . . . . . . . . . . . . . . . . . . . . . . . . . . . . . . . . . . . . . . . . . 39 Back Up and Restore Hotspot Settings. . . . . . . . . . . . . . . . . . . . . . . . . . . . . . . . . . 40 Manage Wi-Fi Network Options . . . . . . . . . . . . . . . . . . . . . . . . . . . . . . . . . . . . . . . 42 Enable SIM Security . . . . . . . . . . . . . . . . . . . . . . . . . . . . . . . . . . . . . . . . . . . . . . . . . 44 Configure Mobile Broadband. . . . . . . . . . . . . . . . . . . . . . . . . . . . . . . . . . . . . . . . . . 44
View WAN Information. . . . . . . . . . . . . . . . . . . . . . . . . . . . . . . . . . . . . . . . . . . . . 45 Enable Port Forwarding . . . . . . . . . . . . . . . . . . . . . . . . . . . . . . . . . . . . . . . . . . . . 45 Enable Port Filtering . . . . . . . . . . . . . . . . . . . . . . . . . . . . . . . . . . . . . . . . . . . . . . . 46 Enable VPN Pass-Through . . . . . . . . . . . . . . . . . . . . . . . . . . . . . . . . . . . . . . . . . . 47 Enable DMZ . . . . . . . . . . . . . . . . . . . . . . . . . . . . . . . . . . . . . . . . . . . . . . . . . . . . . . 48 Set LAN Options . . . . . . . . . . . . . . . . . . . . . . . . . . . . . . . . . . . . . . . . . . . . . . . . . . 49
Configure Your Hotspot’s Access Point Name . . . . . . . . . . . . . . . . . . . . . . . . . . . . 50 Add a New APN . . . . . . . . . . . . . . . . . . . . . . . . . . . . . . . . . . . . . . . . . . . . . . . . . . . 51 Select Which APN to Use . . . . . . . . . . . . . . . . . . . . . . . . . . . . . . . . . . . . . . . . . . . 52 Remove an APN. . . . . . . . . . . . . . . . . . . . . . . . . . . . . . . . . . . . . . . . . . . . . . . . . . . 53
Chapter 4 Frequently Asked Questions
Questions About Connecting and Disconnecting
Devices and Accessing the Internet . . . . . . . . . . . . . . . . . . . . . . . . . . . . . . . . . . . . 55 What do I do if I can’t connect a device to the hotspot? . . . . . . . . . . . . . . . . 55 What do I do if I can’t access the Internet?. . . . . . . . . . . . . . . . . . . . . . . . . . . . 55 How do I find out how many users are connected to my
hotspot’s Wi-Fi networks? . . . . . . . . . . . . . . . . . . . . . . . . . . . . . . . . . . . . . . . . . 55 Why does the No Signal icon display? . . . . . . . . . . . . . . . . . . . . . . . . . . . . . . . . 56 Why can’t my device access the hotspot web page when
connected to a VPN? . . . . . . . . . . . . . . . . . . . . . . . . . . . . . . . . . . . . . . . . . . . . . . 56 Why can’t my hotspot connect to a computer running Windows Vista? . . . 56 What do I do if my hotspot doesn’t connect to my
service provider’s network? . . . . . . . . . . . . . . . . . . . . . . . . . . . . . . . . . . . . . . . . 56 Questions About the Hotspot Battery . . . . . . . . . . . . . . . . . . . . . . . . . . . . . . . . . . 57 Why isn’t my battery charging? . . . . . . . . . . . . . . . . . . . . . . . . . . . . . . . . . . . . . 57 How can I extend the life of the battery? . . . . . . . . . . . . . . . . . . . . . . . . . . . . . 57 Questions About the Hotspot Web Page . . . . . . . . . . . . . . . . . . . . . . . . . . . . . . . . 57 How do I go back to the hotspot web page? . . . . . . . . . . . . . . . . . . . . . . . . . . 57 What do I do if I forget my admin login password? . . . . . . . . . . . . . . . . . . . . . 58 General Questions . . . . . . . . . . . . . . . . . . . . . . . . . . . . . . . . . . . . . . . . . . . . . . . . . . . 58 Why is the signal indicator always low? . . . . . . . . . . . . . . . . . . . . . . . . . . . . . . 58 Why is the download or upload speed slow? . . . . . . . . . . . . . . . . . . . . . . . . . . 58 How do I turn the hotspot off? . . . . . . . . . . . . . . . . . . . . . . . . . . . . . . . . . . . . . 58
The LCD is not lit. How do I know if the hotspot is still
powered on? . . . . . . . . . . . . . . . . . . . . . . . . . . . . . . . . . . . . . . . . . . . . . . . . . . . . . 58 How do I find my computer’s IP address? . . . . . . . . . . . . . . . . . . . . . . . . . . . . . 59 How do I find a device’s MAC address? . . . . . . . . . . . . . . . . . . . . . . . . . . . . . . . 59 What do I do if the Wi-Fi network name doesn’t appear in
the list of networks? . . . . . . . . . . . . . . . . . . . . . . . . . . . . . . . . . . . . . . . . . . . . . . 60
4

AirCard 779S Mobile Hotspot
How can I reset the hotspot? . . . . . . . . . . . . . . . . . . . . . . . . . . . . . . . . . . . . . . . 61 Where can I find more information? . . . . . . . . . . . . . . . . . . . . . . . . . . . . . . . . . 61
Chapter 5 Specifications
Mechanical Specifications . . . . . . . . . . . . . . . . . . . . . . . . . . . . . . . . . . . . . . . . . . . . 63
Environmental Specifications. . . . . . . . . . . . . . . . . . . . . . . . . . . . . . . . . . . . . . . . . . 63
Supported RF Bands . . . . . . . . . . . . . . . . . . . . . . . . . . . . . . . . . . . . . . . . . . . . . . . . . 63
5

1. Get Started |
1 |
|
|
||
|
|
|
This chapter provides an overview of AirCard 779S Mobile Hotspot features, and instructions for how to set up your hotspot and connect to the Internet. The chapter covers the following topics:
•Get to Know Your Hotspot
•Set Up Your Hotspot
•Connect to the Internet
•View the Hotspot Web Page
•NETGEAR AirCard App for Smartphones and Tablets
•Accessories
6
AirCard 779S Mobile Hotspot
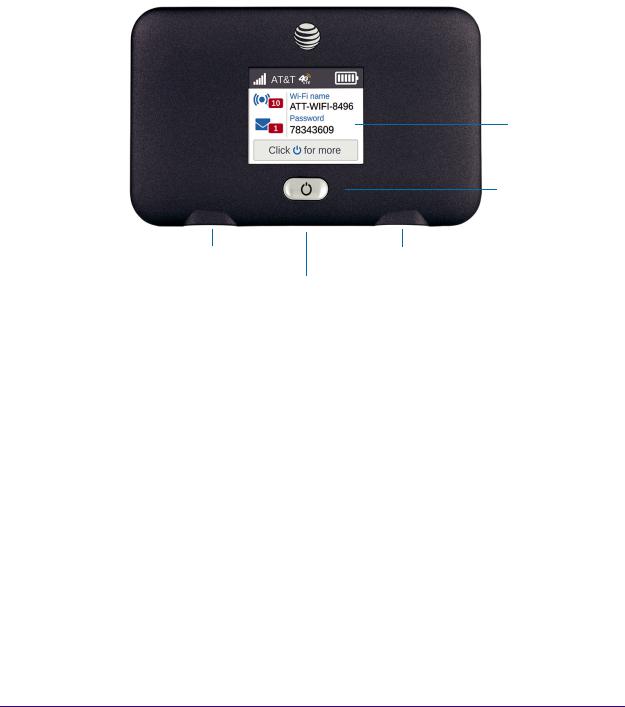
Get to Know Your Hotspot
Your hotspot enables you to create a Wi-Fi access point in any location with cellular network coverage. Use a Wi-Fi access point to connect your laptop and other Wi-Fi-capable devices to your service provider’s mobile broadband network and connect to the Internet.
LCD screen
Power/navigation button
External antenna port |
External antenna port |
Micro-USB charging port
Figure 1. Hotspot button and features
Power the Hotspot On and Off
Press the Power button to wake the LCD screen and to power the hotspot on and off.
Table 1. Power button usage
Desired Result |
Action |
|
|
Turn on hotspot. |
Press and hold the Power button for two seconds. |
Turn off hotspot. |
Press and hold the Power button for five seconds. |
|
|
Wake up Wi-Fi signal and |
Press and quickly release the Power button. |
screen. |
|
View a different screen |
Press and release the Power button repeated until the |
|
desired screen displays. |
|
|
Get Started
7
AirCard 779S Mobile Hotspot
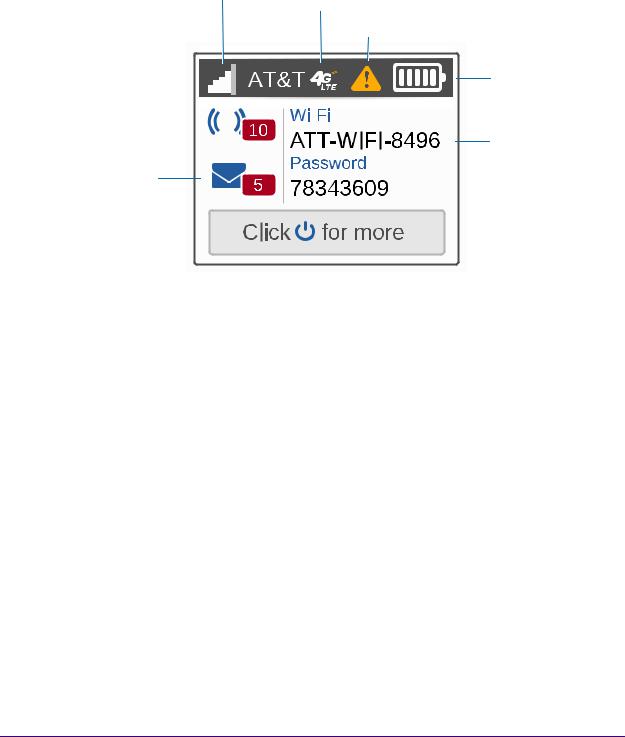
LCD Screen Elements
You can use the LCD screen icons and other screen elements to view the hotspot’s status, configure Wi-Fi band settings, and view system alerts and carrier messages.
Signal strength
Network indicator
Alert indicator
Battery
Number of
connected devices 


 Wi-Fi network name and password
Number of unread messages
Figure 2. LCD screen
Get Started
8
AirCard 779S Mobile Hotspot
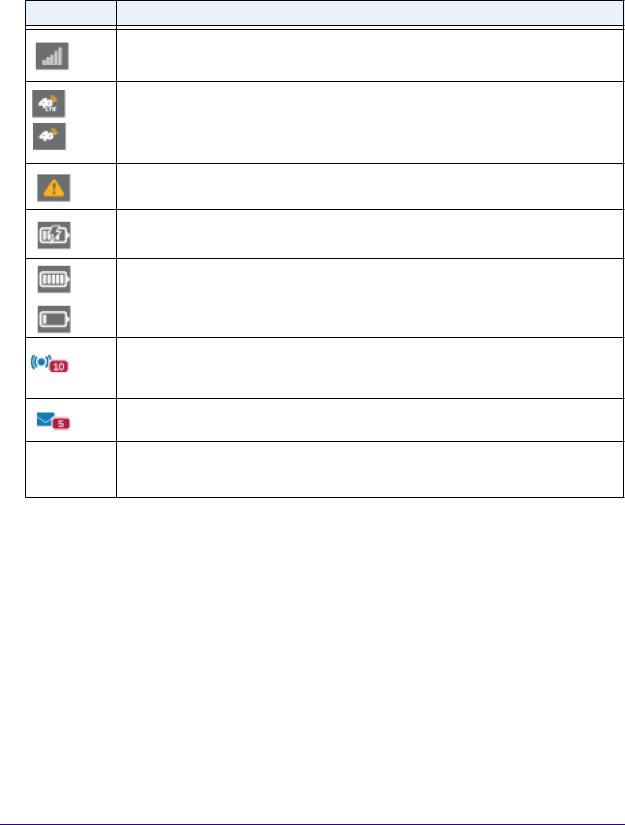
Table 2. LCD screen elements
Element Indicates
1 bar. The hotspot signal is weak.
5 bars. The hotspot signal is strong.
4G/LTE. The LTE network is available.
4G. The HSPA and HSPA+ networks are available.
Note: The orange bars indicate network activity by radiating in and out when data is being received or transmitted.
System alerts require attention.
The battery is charging.
5 bars. The battery is fully charged.
1 bar. The battery charge is low.
Blue. Wi-Fi is active.
Gray. Wi-Fi is inactive.
A number, if displayed, indicates the number of connected devices.
A number, if displayed, indicates the number of unread messages.
Default main The Wi-Fi name and password used by Wi-Fi-enabled devices to connect to the hotspot.
Wi-Fi name and password
Charge Your Hotspot
Your hotspot can receive power from any of the following sources:
•Rechargeable battery included with the hotspot
•Wall socket using the AC adapter and USB cable
•USB port on your computer
Set Up Your Hotspot
Before you can set up your hotspot, you need to get a micro-SIM card and an access point name (APN):
•Make sure that you get a micro-SIM card (also called 3FF) rather than a nano-SIM or standard size SIM.
Get Started
9

AirCard 779S Mobile Hotspot
•Make sure that you get a data-enabled SIM:
•Some phone SIMs work, but not all. Best practice is to use a hotspot or tablet SIM. Phone SIMs and hotspot and tablet SIMs look the same but work differently on the network.
•If you want to use 4G LTE data, make sure that the service provides 4G capability.
•Get the APN from the service provider:
•The APN is often listed in the literature that came with the SIM.
•The service provider website might also list the APN information.
•As a last resort, most service provider APN information is available through a web search. For example, search for <service provider name> APN.
•For information about adding, selecting, or removing APNs, see Configure Your Hotspot’s Access Point Name on page 50.
Install the Micro-SIM Card
To connect to the Internet, you need a micro-SIM card. To obtain a micro-SIM card, contact your Internet service provider.
To install the micro-SIM card:
1. Remove the back cover by lifting at the notch on either corner of the hotspot.
2. Insert the micro-SIM card.
Get Started
10
AirCard 779S Mobile Hotspot
Install the Battery
A rechargeable battery was included with your hotspot.
To install the battery:
1. Remove the back cover by lifting at the notch on either corner of the hotspot.
2.Insert the battery as shown, ensuring that the gold contacts on the battery line up with the gold contacts on the hotspot.
Gold contacts
Battery
3. Replace the back cover.
Note: The battery comes partially charged and ready to use. When the battery needs recharging, follow the instructions in Recharge the Battery on page 29.
Get Started
11

AirCard 779S Mobile Hotspot
Connect to the Internet
You can connect up to 10 wireless devices such as smart phones, laptops, and tablets to your mobile hotspot’s Wi-Fi network.
To connect to the Internet:
1.Press and hold the Power button for two seconds.
Once powered up, the mobile hotspot automatically searches for and connects to your network provider’s mobile broadband network.
2.Connect your computer or other device to your Wi-Fi network:
a.Check to see that Wi-Fi is enabled on your device and search for available Wi-Fi networks.
b.Select the Wi-Fi name displayed on the hotspot LCD screen and connect to it.
c.When prompted, enter your Wi-Fi password as it displays on the hotspot LCD screen.
3.Launch your browser to surf the Internet.
View the Hotspot Web Page
Your hotspot comes configured and ready to use. Use the hotspot web page to manage advanced settings.
Log in as an administrator to change settings and view detailed information. (The default administrator login password is attadmin.)
To log in as an administrator:
1.Launch a web browser from a computer or Wi-Fi device that is connected to the network.
2.Enter http://attwifimanager or http://192.168.1.1. A login screen displays.
3.Enter the password in the Sign In field.
The default password is attadmin. The password is case-sensitive.
After you log in, you can access all of the features available on the LCD screen plus advanced features. For example, you can do the following:
•Change the SSID, Wi-Fi passwords, admin login, and Wi-Fi encryption settings
•Enable a guest Wi-Fi
•Set auto-connect options
•View data usage
•Change security settings and router options
Get Started
12

AirCard 779S Mobile Hotspot
NETGEAR AirCard App for Smartphones and Tablets
Download and use the free NETGEAR AirCard app to view your connection and settings from your smartphone or tablet. Search the app store for NETGEAR AirCard.
To manage all hotspot settings, visit the hotspot web page at
http://attwifimanager or http://192.168.1.1.
Accessories
You hotspot ships with the following accessories:
•Micro-USB cable. Use this cable to recharge the battery or tether the hotspot to your computer.
•Wall charger. Use a wall charger with the USB cable to recharge the battery or to power the hotspot from a wall socket.
You can purchase an AirCard Signal Boosting Cradle (DC113A) separately. The boosting cradle boosts the signal, extends coverage indoors and in areas with low signal strength, and adds Ethernet connectivity.
Accessory availability varies by region. For more information, visit
http://www.netgear.com/ATTUniteExpress.
Get Started
13

2. Use Your Hotspot |
2 |
|
|
||
|
|
|
This chapter explains how to use your hotspot. The chapter covers the following topics:
•Monitor Data Usage
•Manage Wi-Fi
•Set Mobile Broadband Autoconnect Options
•View and Delete SMS Messages
•View Alerts
•Extend Battery Life
•Establish Security
•View Details About Your Hotspot
•Update Your Hotspot Software and Firmware
•What Alerts Mean
•Security Credentials
Note: To change settings, log in as an administrator. See View the Hotspot Web Page on page 12.
14

AirCard 779S Mobile Hotspot
Monitor Data Usage
You can monitor or configure your data usage using the hotspot web page.
To configure your monthly data usage:
1.Launch a web browser from a computer or wireless device that is connected to the network.
2.Enter http://attwifimanager or http://192.168.1.1. A login screen displays.
3.Enter the password in the Sign In field.
The default password is attadmin. The password is case-sensitive.
If you are using a post-paid SIM card, select the Data Alert check box and adjust the slide bar to set a data usage alert.
Note: If you have a GoPhone plan, go to att.com/mygophone to check your data usage.
Data Usage Disclaimer
Actual billed usage can be higher than estimated data usage displayed on the usage meter. For example, actual billed usage might be higher when: a part of a shared data plan such as Mobile Share; multiple users with different log in credentials using the same device; traveling internationally or outside AT&Ts network; using the SIM card with another device; or, using a tethered handset.
Manage Wi-Fi
The mobile hotspot gives you the option to share the Wi-Fi radio between two Wi-Fi networks, a main Wi-Fi network for devices you trust, and a guest Wi-Fi network that allows you to share your Wi-Fi with temporary visitors without exposing them to your devices on the main Wi-Fi network.
By default, main Wi-Fi is enabled and guest Wi-Fi is disabled. If your place of business does not allow Wi-Fi or for any other reason you want to disable Wi-Fi and use the hotspot only in tethered mode, the hotspot gives you that option.
Note: Whenever you change Wi-Fi settings, the hotspot resets to activate the new settings. Any devices connected to the hotspot are disconnected when the hotspot resets.
Use Your Hotspot
15
AirCard 779S Mobile Hotspot
Enable Guest Wi-Fi
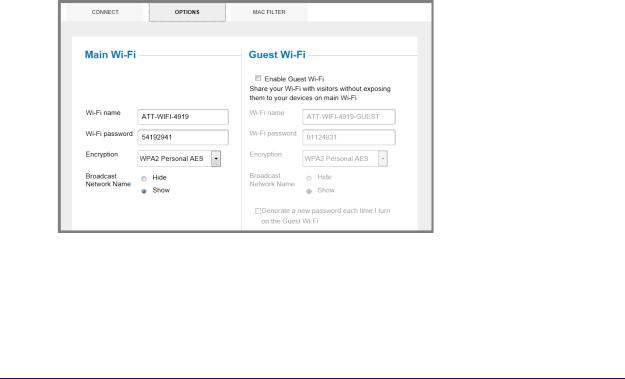
You can enable guest Wi-Fi from the hotspot web page or set advanced Wi-Fi options on the Wi-Fi Options screen.
Enable guest Wi-Fi on the hotspot web page:
1.Launch a web browser from a computer or wireless device that is connected to the network.
2.Enter http://attwifimanager or http://192.168.1.1. A login screen displays.
3.Enter the password in the Sign In field.
The default password is attadmin. The password is case-sensitive.
4.Click the box next to Enable Guest Wi-Fi.
Select advanced guest Wi-Fi options (optional):
1.Launch a web browser from a computer or wireless device that is connected to the network.
2.Enter http://attwifimanager or http://192.168.1.1. A login screen displays.
3.Enter the password in the Sign In field.
The default password is attadmin. The password is case-sensitive.
4.Select Wi-Fi > OPTIONS.
5.Select the Enable Guest Wi-Fi check box.
6.Enter a Wi-Fi name.
7.Enter a Wi-Fi password.
8.Select an encryption mode:
Use Your Hotspot
16

AirCard 779S Mobile Hotspot
•WPA2 Personal AES. Strong security supported by newer Wi-Fi devices (default).
•WPA/WPA2 Personal. Strong security supported by most Wi-Fi devices. Use WPA2 Personal AES whenever possible.
9.Select one of the radio buttons next to Broadcast Network Name:
•Show displays the Wi-Fi network name and password on the LCD screen.
•Hide does not display the Wi-Fi network name and password on the LCD screen.
10.To change the guest Wi-Fi password automatically, select the Generate a new password each time I turn on the Guest Wi-Fi check box.
The Submit button displays after you make a selection.
11.Click the Submit button. Your changes are saved.
If you change the frequency, or change the guest Wi-Fi options, the Wi-Fi type changes automatically to Custom Setup.
Note: When you change your Wi-Fi settings (including disabling or enabling either Wi-Fi network), the hotspot resets. Any devices connected to the hotspot are disconnected when the hotspot resets.
Add a Wireless Device to Your Wi-Fi Network
You can connect up to 10 wireless devices (such as smartphones, laptops, tablets, digital cameras, printers, gaming consoles, and digital picture frames) to your hotspot network. For information about setting connections for main Wi-Fi and guest Wi-Fi networks, see Set the Maximum Number of Connected Devices on page 19.
You can add a wireless device to your Wi-Fi network manually. If the device you are adding is WPS enabled, you can use the WPS method to connect the device without using the Wi-Fi password.
Add a Wireless Device Manually
To add a wireless device manually:
1.On the wireless device that you want to add to your network, view the list of available Wi-Fi networks.
2.Connect to the network that corresponds to your hotspot network as displayed on the LCD screen.
3.When prompted, enter the Wi-Fi password for your hotspot network.
The Wi-Fi password displays on the hotspot LCD screen. If the screen is turned off, press and quickly release the Power button to wake the LCD screen.
Use Your Hotspot
17

AirCard 779S Mobile Hotspot
Add a WPS-Enabled Device
You can add a WPS-enabled Wi-Fi device to your Wi-Fi network without a Wi-Fi password, using the hotspot web page.
To add a WPS-enabled Wi-Fi device from the hotspot web page:
1.Launch a web browser from a computer or wireless device that is connected to the network.
2.Enter http://attwifimanager or http://192.168.1.1. A login screen displays.
3.Enter the password in the Sign In field.
The default password is attadmin. The password is case-sensitive.
Use Your Hotspot
18
AirCard 779S Mobile Hotspot
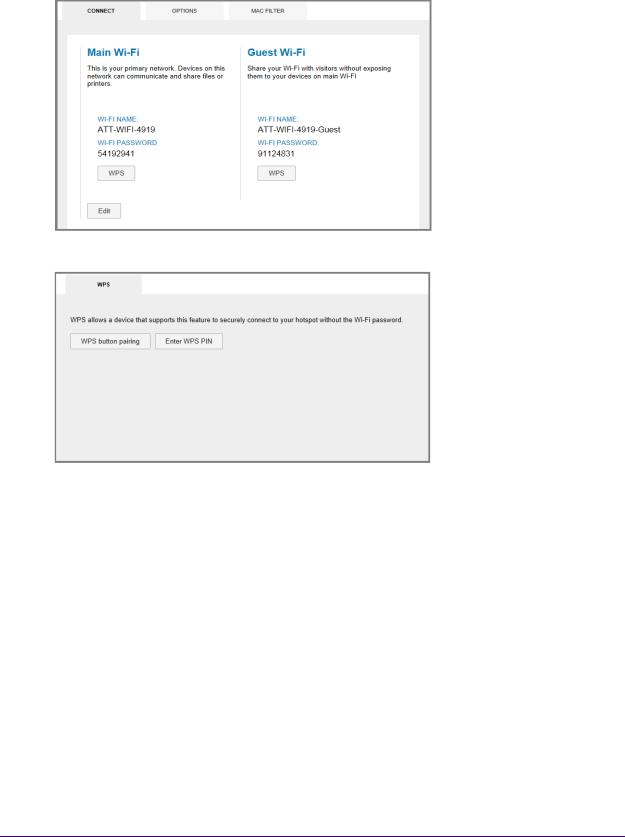
4. Select Wi-Fi > CONNECT.
5. Click the WPS button for either the main Wi-Fi or the guest Wi-Fi network (if available).
6.Choose the WPS method you want to use:
•WPS button pairing. If the device you want to connect includes a WPS button, click the WPS button pairing button and, within two minutes (120 seconds), press the device’s WPS button.
•Enter WPS PIN. If a WPS PIN is associated with the device you want to connect, click the Enter WPS PIN button and enter the device’s WPS PIN.
Your hotspot and the wireless device communicate and establish the connection.
Set the Maximum Number of Connected Devices
You can connect up to 10 wireless devices to the hotspot. These connections are shared between the hotspot’s main and secondary Wi-Fi networks.
To set the number of devices that can connect to each Wi-Fi network:
1.Launch a web browser from a computer or wireless device that is connected to the network.
Use Your Hotspot
19
Loading...