


DOCSIS 3.0 N450 Wi-Fi Data
Gateway CG3000D User Manual
April 2013 202-11278-01
350 East Plumeria Drive
San Jose, CA 95134
USA

NETGEAR DOCSIS 3.0 N450 Wi-Fi Data Gateway
Support
Thank you for selecting NETGEAR products.
After installing your device, locate the serial number on the label of your product and use it to register your product at https://my.netgear.com. You must register your product before you can use NETGEAR telephone support. NETGEAR recommends registering your product through the NETGEAR website. For product updates and web support, visit http://support.netgear.com.
Phone (US & Canada only): 1-888-NETGEAR.
Phone (Other Countries): Check the list of phone numbers at http://support.netgear.com/general/contact/default.aspx.
Trademarks
NETGEAR, the NETGEAR logo, and Connect with Innovation are trademarks and/or registered trademarks of NETGEAR, Inc. and/or its subsidiaries in the United States and/or other countries. Information is subject to change without notice. © NETGEAR, Inc. All rights reserved.
Revision History
Publication Part Number |
Version |
Publish Date |
Comments |
|
|
|
|
202-11278-01 |
v1.0 |
APRIL 2013 |
First publication |
|
|
|
|
2

Contents
Chapter 1 Connecting to the Internet
Gateway Front Panel. . . . . . . . . . . . . . . . . . . . . . . . . . . . . . . . . . . . . . . . . . 6 Gateway Rear Panel . . . . . . . . . . . . . . . . . . . . . . . . . . . . . . . . . . . . . . . . . . 8 Wireless Performance and Gateway Location . . . . . . . . . . . . . . . . . . . . . . 8 Log In to Your Gateway. . . . . . . . . . . . . . . . . . . . . . . . . . . . . . . . . . . . . . . . 9 View Basic Settings . . . . . . . . . . . . . . . . . . . . . . . . . . . . . . . . . . . . . . . . . . 10
Chapter 2 Configuring Your Wireless Network
Set Up Your Wireless Network . . . . . . . . . . . . . . . . . . . . . . . . . . . . . . . . . 12 Configure Wireless Settings Manually. . . . . . . . . . . . . . . . . . . . . . . . . . . . 12 Use Push 'N' Connect (WPS) Wireless Setup. . . . . . . . . . . . . . . . . . . . . . 14 Add a Client Using the WPS Button . . . . . . . . . . . . . . . . . . . . . . . . . . . . . 14 Add a Client Using a PIN. . . . . . . . . . . . . . . . . . . . . . . . . . . . . . . . . . . . . . 16 Set Up Wi-Fi Multimedia . . . . . . . . . . . . . . . . . . . . . . . . . . . . . . . . . . . . . . 17 Change the Password . . . . . . . . . . . . . . . . . . . . . . . . . . . . . . . . . . . . . . . . 18
Chapter 3 Filtering Content
View Denial of Service (DoS) Attack Logs . . . . . . . . . . . . . . . . . . . . . . . . 20
Limit Internet Site Access . . . . . . . . . . . . . . . . . . . . . . . . . . . . . . . . . . . . . 21
Allow Unrestricted Access . . . . . . . . . . . . . . . . . . . . . . . . . . . . . . . . . . . . . 22
Disable Gateway Features . . . . . . . . . . . . . . . . . . . . . . . . . . . . . . . . . . . . 22
Chapter 4 Maintaining Your Network
View the Gateway Status . . . . . . . . . . . . . . . . . . . . . . . . . . . . . . . . . . . . . 26
View the Connection Status . . . . . . . . . . . . . . . . . . . . . . . . . . . . . . . . . . . 27
Back Up and Restore Your Settings . . . . . . . . . . . . . . . . . . . . . . . . . . . . . 27
View the Event Log . . . . . . . . . . . . . . . . . . . . . . . . . . . . . . . . . . . . . . . . . . 28
Run the Diagnostic Utilities . . . . . . . . . . . . . . . . . . . . . . . . . . . . . . . . . . . . 29
Ping Utility . . . . . . . . . . . . . . . . . . . . . . . . . . . . . . . . . . . . . . . . . . . . . . . 29
Traceroute Utility . . . . . . . . . . . . . . . . . . . . . . . . . . . . . . . . . . . . . . . . . . 31
Chapter 5 Advanced Settings
Advanced Wireless Settings . . . . . . . . . . . . . . . . . . . . . . . . . . . . . . . . . . . 33
MAC Filtering. . . . . . . . . . . . . . . . . . . . . . . . . . . . . . . . . . . . . . . . . . . . . . . 34
IP Filtering . . . . . . . . . . . . . . . . . . . . . . . . . . . . . . . . . . . . . . . . . . . . . . . . . 36
Port Blocking . . . . . . . . . . . . . . . . . . . . . . . . . . . . . . . . . . . . . . . . . . . . . . . 37
Table of Contents | 3

NETGEAR DOCSIS 3.0 N450 Wi-Fi Data Gateway
Port Forwarding . . . . . . . . . . . . . . . . . . . . . . . . . . . . . . . . . . . . . . . . . . . . . 37 Port Triggering . . . . . . . . . . . . . . . . . . . . . . . . . . . . . . . . . . . . . . . . . . . . . . 39 DMZ Host . . . . . . . . . . . . . . . . . . . . . . . . . . . . . . . . . . . . . . . . . . . . . . . . . . 40 LAN IP Setup . . . . . . . . . . . . . . . . . . . . . . . . . . . . . . . . . . . . . . . . . . . . . . . 41 Reserve an IP Address for DHCP Use. . . . . . . . . . . . . . . . . . . . . . . . . . . . 42 Lan Switch . . . . . . . . . . . . . . . . . . . . . . . . . . . . . . . . . . . . . . . . . . . . . . . . . 42 Configure Universal Plug and Play (UPnP) . . . . . . . . . . . . . . . . . . . . . . . . 43 Set Networking Protocols . . . . . . . . . . . . . . . . . . . . . . . . . . . . . . . . . . . . . . 44 Enable Network Address Translation . . . . . . . . . . . . . . . . . . . . . . . . . . . . . 45 Remove USB Devices . . . . . . . . . . . . . . . . . . . . . . . . . . . . . . . . . . . . . . . . 45
Chapter 6 Troubleshooting
Basic Functions . . . . . . . . . . . . . . . . . . . . . . . . . . . . . . . . . . . . . . . . . . . . . 47 Connect to the Gateway’s Main Menu . . . . . . . . . . . . . . . . . . . . . . . . . . . . 47 Troubleshoot the ISP Connection . . . . . . . . . . . . . . . . . . . . . . . . . . . . . . . 48 Troubleshoot a TCP/IP Network Using a Ping Utility . . . . . . . . . . . . . . . . . 48 Test the LAN Path to Your Gateway . . . . . . . . . . . . . . . . . . . . . . . . . . . 49 Test the Path from Your Computer to a Remote Device . . . . . . . . . . . . 49
Appendix A Supplemental Information
Factory Default Settings . . . . . . . . . . . . . . . . . . . . . . . . . . . . . . . . . . . . . . . 52
Technical Specifications. . . . . . . . . . . . . . . . . . . . . . . . . . . . . . . . . . . . . . . 53
Appendix B Notification of Compliance
4

1. Connecting to the Internet |
1 |
|
|
||
|
|
|
For help installing the gateway, see the DOCSIS 3.0 N450 Wi-Fi Data Gateway CG3000D Installation Guide.
This chapter describes how to log in and monitor your gateway and includes these sections:
•Gateway Front Panel
•Gateway Rear Panel
•Wireless Performance and Gateway Location
•Log In to Your Gateway
•View Basic Settings
For information about product features and compatible NETGEAR products, visit the NETGEAR website at http://www.netgear.com.
5

NETGEAR DOCSIS 3.0 N450 Wi-Fi Data Gateway
Gateway Front Panel
Figure 1. Gateway front view
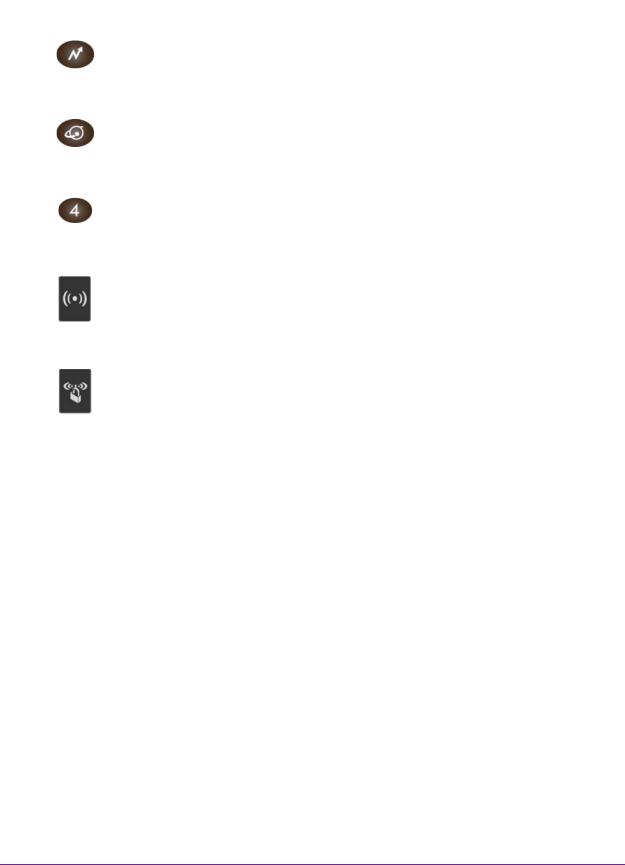
You can use the LEDs to verify status and connections. The following table lists and describes each LED and button on the front panel of the gateway.
Table 1. LEDs and buttons
LED |
Description |
|
• Solid green. Power is supplied to the cable modem. |
|
• Blinking. The modem is performing a power-on self-test. |
Power |
• Red. The unit is performing a self-test, or the thermal cutoff circuit has been triggered. |
|
• Off. The modem is not receiving power. |
|
• Blue. More than one downstream channel is locked. |
|
• Green. One downstream channel is locked. |
Downstream |
• Blinking green. The unit is scanning for a downstream channel. |
|
• Off. No downstream channel is locked. |
|
|
Connecting to the Internet
6
NETGEAR DOCSIS 3.0 N450 Wi-Fi Data Gateway
LED |
Description |
|
|
• Blue. More than one upstream channel is locked. |
|
|
• Solid. One upstream channel is locked. |
|
Upstream |
• Blinking green. The unit is ranging on the upstream. |
|
|
• Off. No downstream channel is locked. |
|
|
• Solid green. The cable modem is online. |
|
|
• Slow blink. The cable modem is receiving DHCP information. |
|
Internet |
• Fast blink. The cable modem is downloading configuration file. |
|
|
• Off. The cable modem is offline. |
|
|
|
|
|
Green indicates 1,000 Mbps. Amber indicates 100/10 Mbps. |
|
LAN (Ethernet) |
• Solid. An Ethernet device is connected and powered on. |
|
• Blinking. Data is being transmitted or received on the Ethernet port. |
||
|
• Off. No Ethernet device is detected on the Ethernet port. |
|
|
|
|
|
• Solid green. The wireless card is plugged in and enabled. |
|
|
• Blinking. There is traffic on the wireless card. |
|
Wireless |
• Off. The wireless card is either disabled or not plugged in. |
|
• To enable or disable the card, press this button for 3 seconds. |
||
On/Off |
||
|
||
|
|
|
|
Pressing this button opens a 2-minute window for the gateway to connect with other |
|
|
WPS-enabled devices. For more information, about using the WPS method to implement |
|
|
security, see the Use Push 'N' Connect (WPS) Wireless Setup on page 14. |
|
WPS |
|
|
|
|
Connecting to the Internet
7
NETGEAR DOCSIS 3.0 N450 Wi-Fi Data Gateway
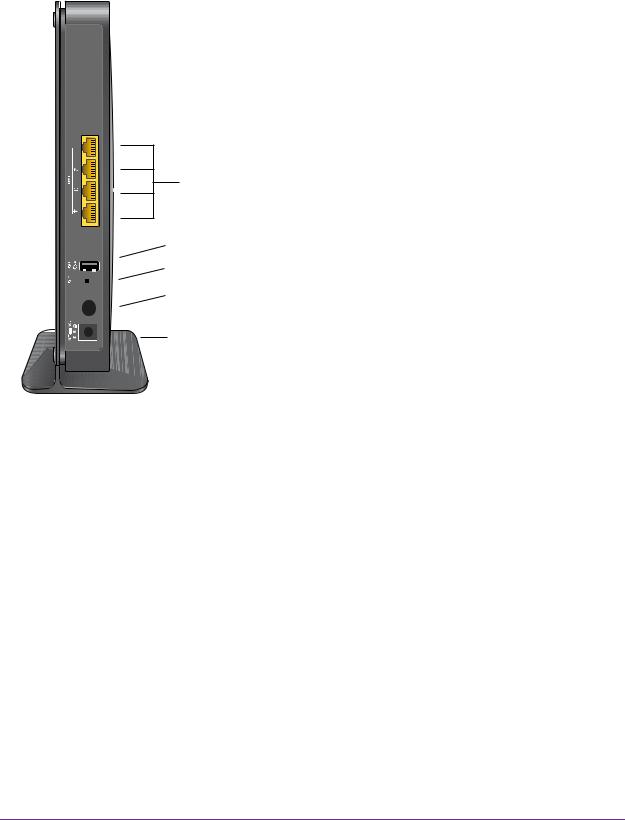
Gateway Rear Panel
Ethernet LAN ports
USB port
Reset button
Coaxial cable connector
Power adapter input
Figure 2. Gateway rear panel
The rear panel includes the following connectors, viewed from left to right:
•Four Gigabit Ethernet LAN ports. To connect local computers, use these ports.
•USB port. The USB port is a USB host and can be used for connecting a USB hard drive, flash drive, or printer.
•Reset. To set the gateway to the original factory settings, press and hold the Reset button for over 7 seconds. See Factory Default Settings on page 52.
•Coaxial cable connector. Attach a coaxial cable to the cable service provider’s connection.
•Power. Power adapter input.
Wireless Performance and Gateway Location
The range of your wireless connection can vary based on the physical placement of the gateway. The latency, data throughput performance, and notebook power consumption of wireless adapters also vary depending on your configuration choices.
For best results, place your gateway according to the following guidelines:
Connecting to the Internet
8
NETGEAR DOCSIS 3.0 N450 Wi-Fi Data Gateway
•Near the center of the area in which your computers operate.
•In an elevated location such as a high shelf where the wirelessly connected computers have line-of-sight access (even if through walls).
•Away from sources of interference, such as computers, microwave ovens, and 2.4 GHz cordless phones.
•Away from large metal surfaces.
•To provide the best side-to-side coverage, put the gateway in a vertical position.
The time it takes to establish a wireless connection can vary depending on both your security settings and the gateway location. WEP connections can take slightly longer to establish. Also, WEP encryption can consume more battery power on a notebook computer.
Log In to Your Gateway
Log in to the gateway to view or change its settings.
Note: To connect to the gateway, use a computer configured for DHCP (most computers are). For help with configuring DHCP, see the instructions that came with your computer.
When you have logged in, if you do not click Logout, the gateway waits for activity for 5 minutes before it automatically logs you out.
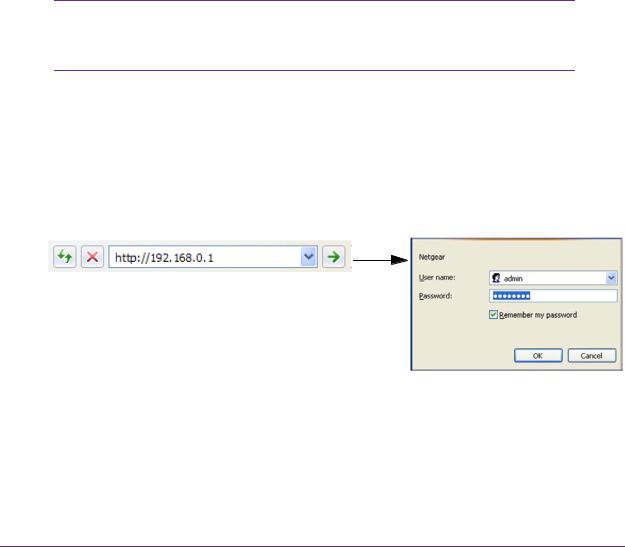
To log in to the gateway:
1.On the computer that is connected to the gateway with an Ethernet cable, type http://192.168.0.1 in the address field of your Internet browser.
A login window displays.
2. Log in with the user name admin and the default password, password.
Connecting to the Internet
9
NETGEAR DOCSIS 3.0 N450 Wi-Fi Data Gateway
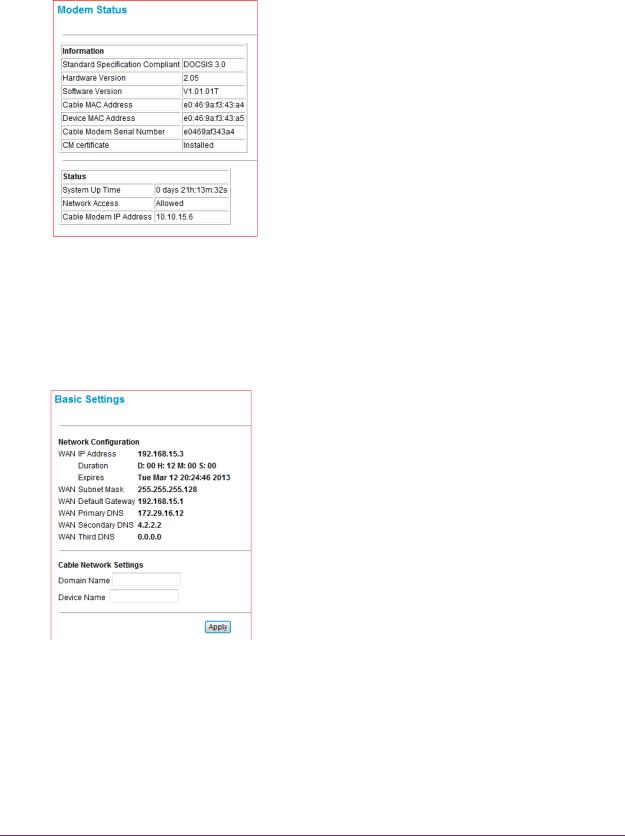
When you connect to the gateway, the Modem Status screen displays.
View Basic Settings
The Basic Settings screen displays the Internet settings for the gateway.
To view or configure basic settings:
1. From the main menu, select Basic Settings.
2.Enter the Domain Name.
If your Internet service provider requires a Domain Name, type that name here.
3.Enter the Device Name.
This name is a friendly name representing the gateway in the network computers running Windows Vista and the Network Explorer on all other Windows computers.
4.Click Apply.
Connecting to the Internet
10
2. Configuring Your Wireless Network 2
This chapter describes now to configure your gateway’s Internet connection and add devices to your network. It includes the following sections:
•Set Up Your Wireless Network
•Configure Wireless Settings Manually
•Use Push 'N' Connect (WPS) Wireless Setup
•Add a Client Using a PIN
•Set Up Wi-Fi Multimedia
•Change the Password
Note: Before changing wireless settings, connect the gateway and set up its Internet connection as described in the DOCSIS3.0 N450 Wi-Fi Data Gateway CG3000D Quick Installation Guide.
11
NETGEAR DOCSIS 3.0 N450 Wi-Fi Data Gateway
Set Up Your Wireless Network
To set up the wireless network, you can enter wireless settings, or you can use Wi-Fi Protected Setup (WPS). To wirelessly connect to the gateway, a computer or wireless device must be configured with the same wireless settings as the gateway.
Configure Wireless Settings Manually
You can manually configure the wireless settings and security in the Wireless Settings screen.
To view or configure the wireless settings:
1.If you are located near the gateway, use an Ethernet cable to connect your computer to the gateway while you are changing the wireless settings.
Note: If you connect wirelessly to the gateway and then change its wireless network name (SSID) or wireless security, you will be disconnected after you click Apply.
2.Log in to the gateway.
For more information, see Log In to Your Gateway on page 9.
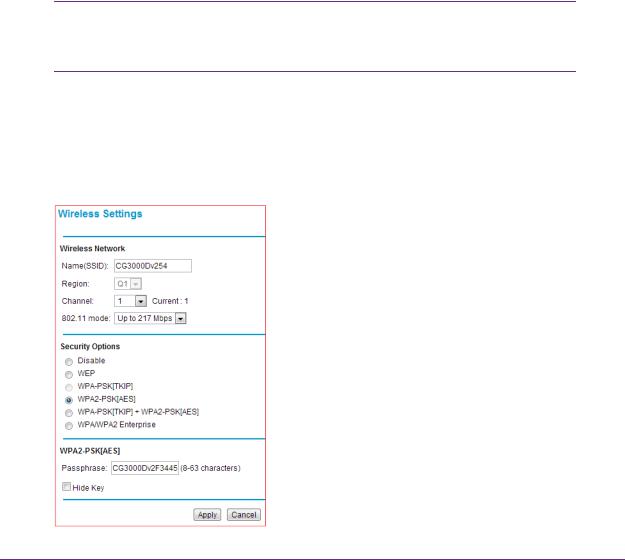
3.In the main menu, under Setup, select Wireless Settings. The following screen displays.
Configuring Your Wireless Network
12

NETGEAR DOCSIS 3.0 N450 Wi-Fi Data Gateway
4.Specify the Wireless Network settings for your network:
•Name (SSID). The name of the wireless network.
The default wireless network name (SSID) for the gateway appears on the label of the gateway. You can enter a different name here for better wireless security and to make it easier to recognize your network when you want to connect to it wirelessly.
•Region. The location where the gateway operates.
•Channel. The available channels depend on the region. Some countries have laws specifying which channels should be used. To reduce interference when using more than one access point, NETGEAR recommends using 5-channel spacing between adjacent access points (for example, use Channels 1 and 6, or 6 and 11).
•802.11 Mode. This value is set to Up to 217 Mbps by default. You can specify the mode to support faster equipment or legacy equipment.
5.Specify the security options:
•By default the gateway works with WPA and WPA 2 wireless security. You can specify the network key, which works like a password to access the wireless network.
a. Set up WPA or WPA2 wireless security.
•WPA-PSK. This setting provides the TKIP encryption type and a pre-shared key password.
•WPA2-PSK. This setting provides the AES encryption type and a pre-shared key password.
Note: Configure your wireless computers with the same WPA2 or WPA settings as your gateway so that you can connect.
b.Depending on the WPA settings that you select, enter the required information.
For WPA-PSK or WPA2-PSK, enter the pre-shared key, which is a password between 8 and 63 characters. The default WPA password appears on the label of your gateway.
Note: By default, the gateway is set up to work with WPA and WPA2 wireless security, both of which are newer than WEP. Typically, the only reason you might need to set up WEP would be to allow access to older wireless computers or devices that cannot support WPA.
6. Click Apply.
Configuring Your Wireless Network
13

NETGEAR DOCSIS 3.0 N450 Wi-Fi Data Gateway
Note: If you plan to use WPS, and you want to keep your wireless settings the same, go to the Advance Wireless Settings screen and make sure that the Keep Existing Settings check box is selected. See
Advanced Wireless Settings on page 33.
Use Push 'N' Connect (WPS) Wireless Setup
Push 'N' Connect (WPS) can be a quick way to automatically set up your gateway’s wireless network and set up your wireless computer to connect to it at the same time. WPS, also called Wi-Fi Protected Setup, is relatively new technology, so before you decide to use it, check to make sure your wireless computers and devices support WPS. Look for the
 symbol on all the computers that connect wirelessly to the gateway.
If you do not see the  symbol on all the computers that connect to the wireless network, then you should manually set up your network first (see Configure Wireless Settings Manually on page 12). After that, you can still use WPS to set up the wireless connection for the computers that support WPS.
Note: All WPS-capable products should be compatible with the gateway. For more information about the WPS standard, visit http://www.wi-fi.org).
Two Push 'N' Connect methods are available, WPS button and PIN (personal identification number).
Add a Client Using the WPS Button
Note: The first time you use WPS, it assigns a random network name (SSID) and a random password to your wireless network. If you want to keep the network name and password you specified in the Wireless Settings screen, you must select the Keep Existing Settings check box in the Advanced Wireless Settings screen. See
Advanced Wireless Settings on page 33.
Any computer or wireless device that connects wirelessly to the gateway is a client. After a device is added as a client, it can automatically connect to the gateway.
Configuring Your Wireless Network
14
NETGEAR DOCSIS 3.0 N450 Wi-Fi Data Gateway
To add a wireless device to your gateway using the WPS button:
1.Make sure that you know how WPS works on your computer or wireless device.
If it works with WPS, it has a WPS utility and might also have a WPS button that you can press.
2.Log in to the gateway.
For more information, see Log In to Your Gateway on page 9.
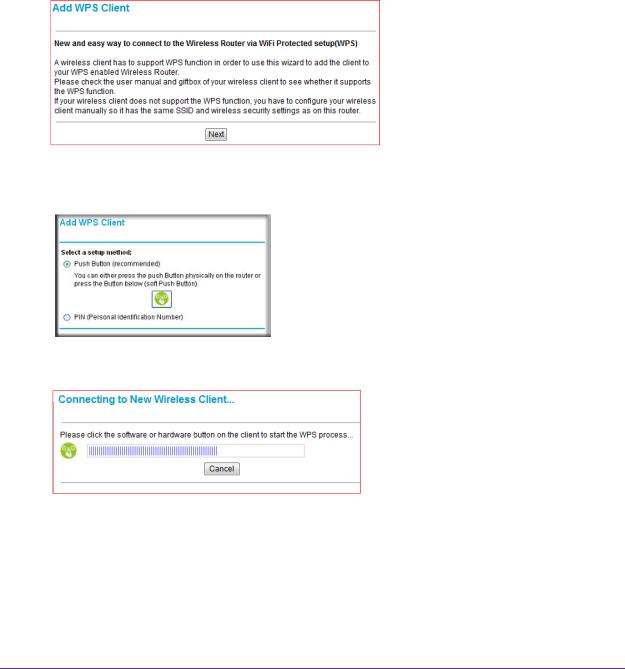
3.In the main menu, select Add WPS Client. The following screen displays.
4.Click Next.
The Add WPS Client screen displays:
5. Either click the  WPS button, or press the
  button on the front of the gateway.
•The WPS LED on the front of the gateway begins to blink.
•The gateway tries to communicate with the wireless computer or device for 2 minutes.
•If the security option in the Wireless Settings screen was set to Disable, it is automatically changed to WPA-PSK [TKIP] + WPA2-PSK [AES], including a random wireless security password.
6.Go to the wireless computer, and run its WPS configuration utility.
Configuring Your Wireless Network
15
NETGEAR DOCSIS 3.0 N450 Wi-Fi Data Gateway
7.To click the WPS button, follow the utility’s instructions.
When the computer connects to the wireless network, the gateway sends its SSID and WPA-PSK or WPA2-PSK configuration to that computer.
8.On the computer that just joined the wireless network, make sure you can connect to the Internet.
You should see the gateway’s Internet LED blink, showing that the Internet connection is in use.
Add a Client Using a PIN
Any computer or wireless device that connect wirelessly to the gateway is a client. After a device is added as a client, it can automatically connect to the gateway.
To add a wireless device to your gateway using a PIN:
1.Make sure that you know how WPS works on your computer or wireless device.
If it works with WPS, it has a WPS utility. To determine the PIN for your wireless computer or device, use this utility.
2.Log in to the gateway.
For more information, see Log In to Your Gateway on page 9.
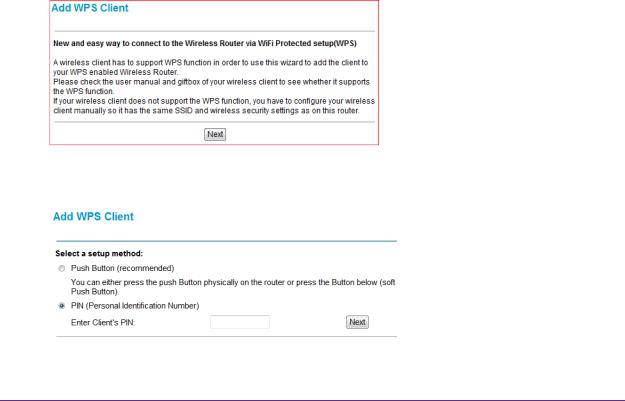
3.In the main menu, select Add WPS Client. The following screen displays.
4.Click Next.
The Add WPS Client screen displays.
5. Select the PIN radio button.
Configuring Your Wireless Network
16
NETGEAR DOCSIS 3.0 N450 Wi-Fi Data Gateway
6.In the Enter Client’s PIN field, type the PIN that you located in Step 1.
7.Click Next.
•The WPS LED on the front of the gateway begins to blink.
•The gateway tries to communicate with the wireless computer or device for 4 minutes.
•If the security option in the Wireless Settings screen was set to Disable, it is automatically changed to WPA-PSK (including a PSK security password).
When the computer connects to the wireless network, the gateway sends its SSID and WPA-PSK or WPA2-PSK configuration to that computer.
8.On the computer that just joined the wireless network, make sure you can connect to the Internet.
You should see the gateway’s Internet LED blink, showing that the Internet connection is in use.
Set Up Wi-Fi Multimedia
Wi-Fi Multimedia (WMM) provides basic Quality of Service (QoS) features to IEEE 802.11 networks. WMM prioritizes traffic according to four access categories, voice, video, best effort, and background. It does not, however, provide guaranteed throughput. You can use the Wi-Fi Multimedia screen to set up wireless multimedia Quality of Service (QoS).
To set up Wi-Fi Multimedia:
1.Log in to the gateway.
For more information, see Log In to Your Gateway on page 9.
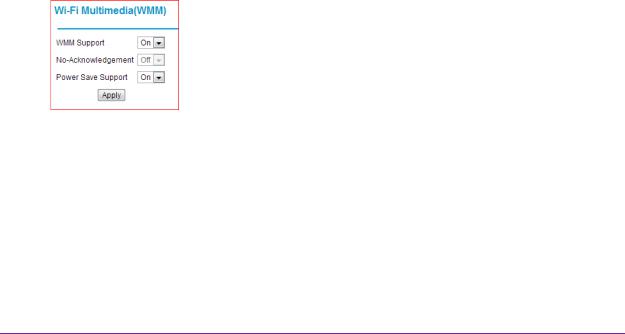
2.In the main menu, under Setup, select Wi-Fi Multimedia. The following screen displays.
3.Specify the Wi-Fi Multimedia setting for the network:
•WMM Support. Select On to enable WMM.
•No-Acknowledgement. Select Off if you want to use Acknowledgement (ACK) messages. Select On if you do now want to use acknowledgement messages.
Usually, Off is selected which might improve the efficiency of packet transmission. If wireless communication quality is poor at your location, select On so that you are notified when a package is lost. High interference levels can cause poor communication.
Configuring Your Wireless Network
17
NETGEAR DOCSIS 3.0 N450 Wi-Fi Data Gateway
•Power Save Support. To conserve battery power in smaller devices that are connected to the gateway, select On.
4.Click Apply.
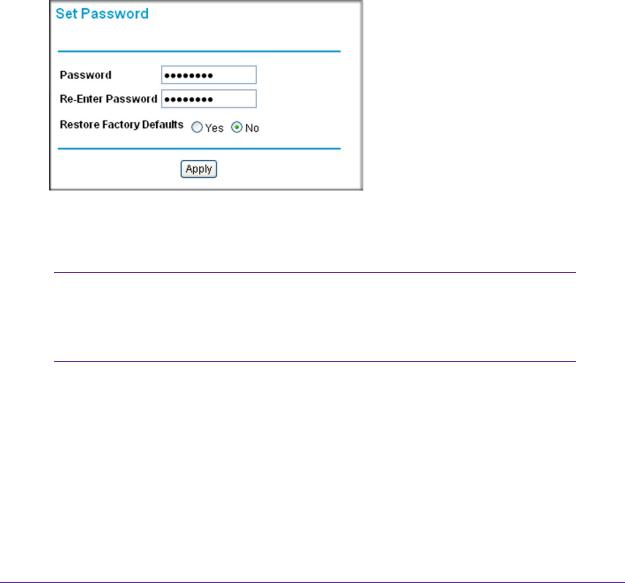
Change the Password
For security reasons, the gateway has its own user name and password. NETGEAR recommends that you change the default password to a more secure password. The ideal password should contain no dictionary words from any language, and should be a mixture of both uppercase and lowercase letters, numbers, and symbols. Passwords can contain up to
30characters.
To change the password:
1.In the main menu, under Maintenance, select Set Password.
2.Enter the new password twice.
3.Click Apply.
Note: After changing the password, you will be required to log in again to continue the configuration. If you have backed up the gateway settings previously, create a new backup so that the saved settings file includes the updated password.
Configuring Your Wireless Network
18
 Loading...